1
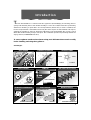
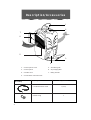
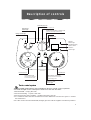
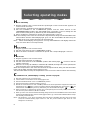
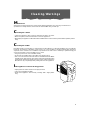
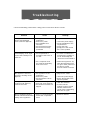
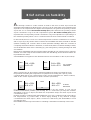
Brief notes on humidity A ir naturally contains a certain amount of water in the form of water vapour and this determines its humidity level. However, the capacity of air to retain water vapour is limited and depends on the temperature. The higher the temperature, the greater the quantity of water vapour the air can retain. The absolute humidity (A.H.) value indicates the quantity of water vapour contained in 1 kg of air and is expressed in grams. The relative humidity (R.H.) value represents the actual quantity of water contained in 1 kg of air expressed as a percentage of the maximum quantity which can be contained under the same environmental conditions. In other words, the air in a room at a certain temperature could be considered as a container with a capacity of, say, 10 litres. If this container were half filled with water, it would be 50% full (relative humidity) and contain 5 litres of water (absolute humidity). When the container is completely full, it is described as “saturated”, in other words, there is a relative humidity of 100%, and in this situation water start condensing (e.g. becoming water), creating damages to walls and furniture. Experts have established that the optimum relative humidity for our organism and to preserve furniture and other objects varies between 45% and 60%. Ideally, rooms should therefore be kept within these values. A dehumidifier is an appliance that eliminates the excess of moisture on the air (see below). 20°C 20°C R.H. = 50% A.H. = 5 l 5l R.H. = 25% A.H. = 2.5 l 2.5 l of water eliminated 2,5 l There is another way to decrease the relative humidity level. It is by increasing the room temperature. Increasing the temperature is equivalent to increasing the capacity of the container. When the air is at a temperature of 20˚C, it is the equivalent of a 10 litre container, while at 30˚C it is the equivalent of a 20 litre container. (see below). 20°C 30°C R.H. = 50% A.H. = 5 l R.H. = 25% A.H. = 5 l no water eliminated 5l 5l Of course, just increasing the room temperature is not the solution to your excess moisture/condensation problem. Just warming the air means that you keep the moisture suspended in the air as vapour, but when the temperature drops, the water vapour forms condensation again. However, heating combined with dehumidification (as in the combined mode) especially at low temperatures- e.g. below 100C, or when drying washing is very useful. It changes condensation into water vapour , which can then be collected by the dehumidifier, in a fast and effective way. Dehumidifiers are the only real answer to controlling condensation and damp in the home. 2 Introduction T his new dehumidifier is a combined function appliance (dehumidifying and heating) able to quickly and efficiently reduce the relative humidity in a room. Its combined function is particularly suitable for obtaining a rapid effect at low temperatures (below 10˚C). In these conditions, the heater evaporates the condensation formed by the water vapour on walls, furniture and objects, allowing the humidity to then be eliminated efficiently by the dehumidifier. The compact unit is fitted with handles making it easy to transport. The combined operation is particularly suitable for drying clothes (COMBI DRYER function). To ensure optimum results and maximum safety, read this instruction manual carefully before installing and using the appliance. yyyyy @@@@@ ÀÀÀÀÀ ,,,,, ,,,, @@@@@ ÀÀÀÀÀ ,,,,, yyyyy ,,,, @@@@@ ÀÀÀÀÀ ,,,,, yyyyy ,,,, @@@@@ ÀÀÀÀÀ ,,,,, yyyyy ,,,, @@@@@ ÀÀÀÀÀ ,,,,, ,,,, @@@@@ yyyyy ÀÀÀÀÀ ,,,,, yyyyy @@@@@ ÀÀÀÀÀ ,,,,, yyyyy @@@@@ ÀÀÀÀÀ ,,,,, yyyyy @@@@@ ÀÀÀÀÀ ,,,,, yyyyy @@@@@ ÀÀÀÀÀ ,,,,, yyyyy Advantages: HIGH SPEED TOTAL CONTROL COMBINED OPERATION COMFORT HEATING POWER ECON MAX 800W 1.600W AIR PURIFICATION FILTER HUMIDISTAT 2 SPEEDS QUIET OPERATION THERMOSTAT ELIMINATES CONDENSATE CANISTER EXTERNAL DRAIN HOSE @,ÀÀ@,À@,À@,À@,À@,À@,À@,À@,À@,À@,À@,À@,À@,À@,À@, À@,À@, À@,À@, À@, À@, EASY TO MOVE ERGONOMIC HANDLES CASTORS MAXIMUM SAFETY OVERHEAT PROTECTION FUNCTIONAL PROTECTION 3 De s c r i p t i o n / A c c e s s o r i e s 1 2 7 Air outlet 6 Air intake 5 3 4 1. Control panel cover 5. Air intake grille 2. Control panel 6. Air purifying filter 3. Canister door 7. Lifting handle 4. Condensate collection tank Accessory Description condensate drain hose rubber bung 4 No. provided 1 (2 m) 1 Important I mportant • This appliance is designed to dehumidify and heat domestic rooms and must not be used for other purposes. • It is dangerous to modify or alter the characteristics of the appliance in any way. • If the appliance requires repair, always contact a Technical Service Centre authorised by the manufacturer. Always insist on original spare parts. Repairs carried out by unauthorised personnel may be dangerous and invalidate the guarantee. • This appliance must be used exclusively by adults. Young children should be supervised to ensure that they do not play with the appliance. • The appliance is not intended for use by young children or the infirm without supervision. • The appliance must be connected to an efficient earth installation. Have your electrical circuit checked by a qualified electrician. • Do not use extension power cables. • Before cleaning or maintenance operations, always unplug the appliance from the mains. • Do not move the appliance by pulling the power cable. • Do not install the appliance in rooms containing gas, oil or sulphur. Do not install near sources of heat. • Keep the unit at least 50 cm away from inflammable substances (alcohol etc) or pressurised containers (eg. aerosol cans). • Do not rest heavy or hot objects on top of the appliance. • Clean the air filter regularly. • Always transport the appliance upright. Remember to drain the tank before moving the appliance. • The refrigerant used in this appliance would cause damage to the ozone layer if relased into the atmosphere. Therefore at the end of the working life of the appliance the unit should be taken to a recycling centre for disposal of the refrigerant. • The materials used for packaging can be recycled. You are therefore recommended to dispose of them in special differentiated waste collection containers. The dehumidifier must be used only as indicated in this manual. These instructions are not intended to cover as many as possible conditions and situations which may arise. As with all household appliances installation, operation and conservation should be carried out prudently and following common sense. T echnical assistance Keep the list of Technical Service Centres and identify the Centre nearest you. E lectrical connections After moving the appliance, wait at least an hour before turning it on again. Before plugging the appliance into the power socket, check that: • The mains power supply corresponds to the power supply indicated on the rating plate. • The power socket and electrical circuit are adequate for the appliance. • The power socket matches the plug. If this is not the case, have the plug replaced by a qualified electrician; • The power socket must be adequately earthed; Failure to respect this safety rule absolves the manufacturer from all liability. This appliance is manufactured in compliance with EEC standard EN 55014 on the suppression of radio interference. • If the supply cord is damaged, it must be replaced by the manufacturer or it's service agent or a similarly qualified person in order to avoid a hazard. 5 Installation P lace the dehumidifier in a suitable position, a hallway or landing are generally good sites. The appliance must be positioned so that the air intake and air outlet grills are at least 50 cm away from any wall or obstacle to ensure adequate ventilation. Condensate can be drained in one of two ways: A) Draining into the tank The condensate can be drained directly into the tank located inside the appliance (fig.1). The tank can be easily removed and has a handle making it simple to carry and empty. fig.1 B) Continuous external draining If the appliance is to be operated for long periods of time but you are unable to empty the tank, you are recommended to use the continuous drain facility. 1) Remove the rubber bung from the spout (Fig. 2). 2) Make a hole in the tank inside the spout using a fine drill bit (8mm) (Fig. 2). 3) To fit the rubber hose to the spout, open the door, remove the tank, pass the drain hose provided through the space between the door (at a slight angle) and the bottom of the appliance, reposition the tank and fit the hose onto the spout (Fig. 3). 4) Close the door. 5) Make sure the hose is on the level otherwise the water will remain in the tank. Check there are no kinks in the hose. N.B.: Keep the rubber bung.You will need it to plug the hose or close the spout if you revert to draining into the tank (see point A). fig.2 6 fig.3 De s c r i p t i o n o f c o n t r o l s Dehumidifying mode OFF position: appliance off Dehumidifying indicator light Combined dehumidifying / heating mode to heat and dehumidify simultaneously Heating indicator light Air circulation Heating mode Minimum indicator light Speed/Heat setting selection button Maximum indicator light Thermostat knob Humidistat knob Power indicator light Dehumidifying standby light indicates that the appliance is connected to the mains lights up for the first three minutes in dehumidifying mode “Tank full / no tank” indicator light Tank control system This dehumidifier is fitted with a special intelligent device to ensure correct operation. A red indicator light on the control panel comes on to warn the user when: 1. the tank is full ➛ empty the tank 2. the tank is missing ➛ replace the tank 3. the tank is in the wrong position ➛ position the tank correctly 4. in continuous drain: the hose is obstructed or the difference in level is too great ➛ remove the obstruction. Once the cause has been eliminated, the light goes out and the appliance resumes operation. 7 S e l e c t i n g o p e ra t i n g m o d e s H ow to dehumidify 1) Plug the appliance into a mains socket. The power light comes on to show the appliance is connected to the mains. 2) Check that the “tank full/no tank” indicator light is off. 3) Turn the humidistat to the “CONTINUOUS” position and the mode selector to the “DEHUMIDIFICATION” position. The dehumidification pause light comes on during the first three minutes (safety device), followed by the dehumidification light. 4) Select maximum or minimum fan speed (the relevant light comes on). When the humidity in the room has reached the required level, slowly turn the humidistat knob anticlockwise until the dehumidifying light goes out. The dehumidifier will then keep the humidity in the room at the selected level automatically. Note: When dehumidifying, the appliance not only dehumidifies but also slightly warms the air (1-2°C hotter than room temperature) H ow to ventilate 1) Plug the appliance into a mains socket. 2) Turn the mode selector to the “VENTILATION” position. 3) Select the Select maximum or minimum fan speed. The corresponding light comes on. H ow to heat 1) Plug the appliance into a mains socket. 2) Turn the thermostat knob to position 5. 3) Turn the mode selector to the “HEATING” position. The heating light comes on and the appliance starts up. 4) Select the economy (1 = 800 W) or maximum (2 = 1600 W) heating level on the speed/heat selection button (the corresponding light comes on). When the temperature in the room has reached the required level, slowly turn the thermostat knob anticlockwise until the heating light goes out. The thermostat will then keep the temperature in the room at the selected level automatically. C ombined mode, (dehumidifying + heating) (see info on pag.18) 1) 2) 3) 4) 5) Plug the appliance into a mains socket. Check that the “tank full/no tank” warning light is off. Turn the humidistat knob to the “CONTINUOUS” position. Turn the thermostat to desired position (pos.1-5). Rotate the mode selector to the “COMBI” position. If the set temperature is higher than the room temperature, the ( )light comes on together with the dehumidification pause light ( ) for the first three minutes (safety device), followed by the dehumidification light ( ). 6) Select maximum or minimum fan speed (and consequently the electrical power). In this mode, the electrical power will be 1,990 W or 1.190 W. 7) When you have reached the desired humidity, slowly turn back the humidistat knob anticlockwise until the dehumidifying light and the heating light if still on, go out. The dehumidifier will then keep the humidity at the set level. Note: The appliance only stops completely when the level of humidity set is reached. If the tank is full, the tankfull warning light comes on and the power indicator light turns off . The refrigerant circuit stops. 8 Cleaning/Warnings M aintenance Always remove the plug from the power socket before performing any cleaning or maintenance operations. For safety reasons, never wash the dehumidifier using a water jet. C leaning the cabinet • Clean the appliance using a damp cloth then dry with a dry cloth. • Never use petrol, alcohol or solvents to clean the appliance. • Never spray the appliance with insecticides or similar. These could cause the paint to flake or plastic parts to warp. C leaning the air filter If the filter is dirty, air circulation is compromised and the efficiency of the dehumidifying and air purifying functions decreases. It is therefore good practice to clean the filter at regular intervals. The frequency depends on the duration and conditions of operation. If the unit is used constantly or systematically, you are recommended to clean the filter once a week. • It is good practice to clean the filter weekly. • To remove the air filter, extract by pulling it as shown in fig. 4. • Use a vacuum cleaner to remove dust accumulations from the filter. If the filter is very dirty, wash in warm water and rinse several times. The temperature of the water should not exceed 40˚C. After washing the filter, allow to dry completely before putting it back in the appliance. I f the appliance is not used for long periods • Unplug from the mains socket and empty the tank. • Clean and reposition the filter. • Protect the appliance from dust by covering with a large plastic bag. fig.4 9 Tr o u b l e s h o o t i n g Check the following points before calling your local Technical Service Centre. Problem Cause Remedy The appliance does not work in dehumidifying mode (indicator light off) •the appliance is not plugged in •there is no power •the humidistat is on minimum •the tank is full of water •the tank is incorrectly positioned •plug into the mains The appliance operates in dehumidifying mode (light on) but the humidity is not reduced •filter clogged •the temperature or humidity of the home is too low •clean the filter •in certain conditions, it is normal for the appliance not to dehumidify (see “Technical characteristics” •the compressor is off because the defrosting device has cut in •switch the appliance off, wait 30 minutes then turn on again. If the problem is no solved, call the Technical Service Centre. •the appliance is not plugged in •there is no power •the thermostat is set to minimum •the area is too big •there are open windows •the thermal overload has tripped •plug into the mains •there is a 3 minute delay before the compressor starts •wait for 3 minutes The appliance does not operate in heating mode (light off) The appliance operates in heating mode (light on), but does not heat The air conditioner doesn’t work for about 3 minutes from turning on the appliance •check the power supply •set the humidistat to the required level •empty the tank •gently place the tank in the correct position •check the power supply •set the thermostat to the required position •close the windows •to reset, turn the appliance off for several minutes, eliminate the cause of the overheating then turn on again Te c h n i c a l C h a ra c t e r i s t i c s Power supply voltage See rating label Absorbed power dehumidifying only “ Absorbed power heating ECON: “ MAX: “ Maximum absorbed power “ Maximum absorbed current “ Refrigerant R-22 Air treated (min/max) 210/300 Defrosting device yes Thermostat yes Humidistat yes Fan speeds 2 Thermal overload yes Compressor protection device yes Canister control yes Air purification filter yes Dimensions LxHxD m3/h 365x610x375 Weight (net) mm 23 Kg. Canister capacity 5.5 litres Operating limits: Heating Dehumidifying • temperature Max. 27°C 5° - 32° • relative humidity Max. 95% 30 - 95% Note: The quantity of water dissolved in the air drops as the temperature is reduced. For example, at 5˚C and with 80% relative humidity, there are less than 5 grams of water vapour in every cubic metre of air. In the event of humidity problems at low temperatures, you are therefore recommended to select the COMBI function. 11