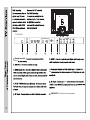
1
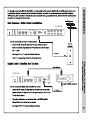
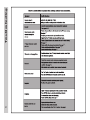
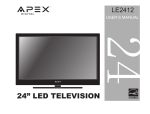
LD3288M Safety Instructions CAUTION RISK OF ELECTRIC SHOCK DO NOT OPEN Safety: TO REDUCE THE RISK OF ELECTRICAL SHOCK DO NOT REMOVE COVER (OR BACK). NO USER SERVICEABLE PARTS ARE INSIDE. REFER TO QUALIFIED PERSONNEL ONLY. The lightning flash with arrowhead symbol, within an equilateral triangle, is intended to alert the user to the presence of uninsulated “dangerous voltage” within the product’s enclosure that may be of sufficient magnitude to constitute a risk of electric shock to persons. The exclamation point within an equilateral triangle is intended to alert the user to the presence of important operating and maintenance (servicing) instructions in the literature accompanying the television. WARNING: TO PREVENT FIRE OR SHOCK HAZARDS, DO NOT EXPOSE THIS PRODUCT TO RAIN OR MOISTURE. NOTE TO CABLE/TV INSTALLER: This reminder is provided to call the CATV system installer’s attention to Article 820-40 of the National Electric Code (U.S.A.). The code provides guidelines for proper grounding and, in particular, specifies that the cable ground shall be connected to the grounding system of the building, as close to the point of the cable entry as practical. FCC REGULATORY INFORMATION: This television has been tested and found to comply with the limits for a Class B digital device, pursuant to Part 15 of the FCC Rules. These limits are designed to provide reasonable protection against harmful interference in a residential installation. This television generates, uses and can radiate radio frequency energy and, if not installed and used in accordance with the instructions, may cause harmful interference to radio communications. However, there is no guarantee that interference will not occur in a particular installation. If this television does cause interference to other electronic equipment, which can be determined by turning the television off and on, then the user is encouraged to try to correct the interference by one or more of the following measures: - Reorient or relocate the receiving antenna. - Increase the separation between the equipment and television. - Connect the equipment into an outlet on a circuit different from that to which the television is connected. - Consult your dealer or an experienced radio/TV technician for assistance. 1 Any changes or modifications not expressly approved by the party responsible for compliance may void the user’s authority to operate the equipment. Bass / Treble / Balance ......................................................................................... 21 Table of Contents ................................................................................................... 4 Surround................................................................................................................ 21 Introduction / What’s In the Box ............................................................................. 5 Audio Language .................................................................................................... 21 Remote Control Remote Control Battery Install ............................................................................... 6 Date & Time Settings ....................................................................................... 22 Remote Control Overview ...................................................................................... 7 TV Overview Setup Settings Front & Side Panel ................................................................................................. 8 Menu Language .................................................................................................... 23 Rear Panel ............................................................................................................. 9 Transparency.... .................................................................................................... 23 Pedestal Removal / Wall Mounting ........................................................................ 9 Zoom Mode .......................................................................................................... 23 Noise Reduction ................................................................................................... 23 XVS ...................................................................................................................... 23 Table of Contents Audio Settings Safety Instructions ..................................................................................................1-3 Restore Default .................................................................................................... 23 Installation Connection to Antenna & Cable / Satellite Box ..................................................... 10 Connection to HDMI Inputs ................................................................................... 11 Connection to Component (YPbPr) Inputs ........................................................... 12 Connection to AV Composite Inputs........................................................................ 13 Connection to a Personal Computer ..................................................................... 14 Connection to a Receiver / Amp ........................................................................... 15 Initial TV Setup Initial Setup Wizard ............................................................................................... 16 TV Channel Setup & Channel Auto Scan ............................................................. 17 Closed Caption Settings .................................................................................... 24 Advanced Setting for PC ....................................................................................... 25 Parental Control - US ............................................................................................ 26 Parental Control - Canada .................................................................................... 27 TV Settings Favorite ................................................................................................................. 28 Add/Delete ............................................................................................................ 28 Channel Label ...................................................................................................... 28 DTV Signal ........................................................................................................... 28 Zoom Modes ........................................................................................................ 29 Picture Settings Contrast ................................................................................................................ 20 Brightness ............................................................................................................. 20 Color ..................................................................................................................... 20 Tint ........................................................................................................................ 20 Sharpness ............................................................................................................. 20 6SHFL¿FDWLRQV ..................................................................................................... 30 Troubleshooting .................................................................................................. 31 Index .................................................................................................................... 32 Warranty .............................................................................................................. 33 Color Temperature ................................................................................................ 20 Power Saving Mode .............................................................................................. 20 4 LD3288M LD3288M LD3288M Remote Control Functions Using the Remote Control Handset 1. Power – Turn the LCD display ON or OFF (Standby). 2. Display – Provides program information currently viewed. 1 3. TV – Direct access to the television tuner. 3 4 5 4. HDMI – Press repeatedly to select HDMI 1, HDMI 2, HDMI 3. 6 7 8 5. COMP – Press repeatedly to select Component . 6. AV – Press repeatly to select AV . 9 10 7. VGA – Direct access to the VGA (PC) input;; press again to return to the previously viewed input. 8. CH LIST – Press to display a list of channels saved in the TV tuner memory. 9. Guide – Press to review scheduled programming for the current channel viewed. FREEZE 12 11 13 14 10. FAV – Press to display a list of favorite TV channels you have added. (pg. 26) 11. Freeze – Pause and still-frame the current image on the display. Press again for live TV. 12. Picture – Select preset picture modes: Dynamic > Standard > Movie > Power Saving > Personal. (pg. 18) 13. Temp – Select the Color Temperature COOL > NORMAL > WARM. (pg. 18) 15 16. Return – Press to return to the previous menu displayed. 16 19 21 15. Exit – Press to exit a menu that is displayed. 18 17 14. TSW XArrows/ Enter – 1DYLJDWHPHQXVWRPDNHVHOHFWLRQV3UHVV(17(5WRFRQ¿UP Overview 2 20 22 23 17. Sleep – Press to activate the Sleep function to turn off the TV automatically;; 5 Min > 10 Min > 15 Min > 30 Min > 45 Min > 60 Min > 90 Min > 120 Min > 180 Min > 240 Min > OFF. 23 18. Menu – Press to display the Main menu. 19. Zoom – Select viewable display options: Normal > Wide > Zoom > Cinema. (pg. 27) 20. Volume (+/-) – Adjust volume up (+) or volume down (-). 21. Last – Press to select between the current and previously viewed TV channel. 22. Mute – Press to temporarily turn sound off. Press again to resume. 23. Channel – S / T scan channels up (S) or channels down (T). 24. Numbers / Dash – Select desired TV channel directly. For example: to select digital channel four, 24 25 26 28 27 press “4” “-” “1” (4-1). 25. Input – Press to display all input sources on screen. (pgs. 9-14) 26. Audio – Select preset sound modes: PERSONAL > STANDARD > MUSIC > MOVIE (pg. 19) 27. MTS – Press to select a program’s second audio channel (if available). (pg. 19) 7 28. CCD – Select closed caption subtitles (if available) OFF > ON. (pg. 22) NOTE: When using the remote control, point it directly at the TV. I INPUT SOURCE SOURCE INPUT TV AV Component HDMI 1 HDMI 2 HDMI 3 VGA TV SIDE PANEL AUDIO OUT Headphone Jack included) one one AUDIO OUT- Connect to the audio equipment. TV SIDE PANEL AUDIO OUT side TV SIDE PANEL TV SIDE PANEL INPUT SOURCE SOURCE INPUT side or TV AV Component HDMI 1 HDMI 2 HDMI 3 VGA TV SIDE PANEL AUDIO OUT one(1) side side or TV AV Component HDMI 1 HDMI 2 HDMI 3 VGA Inputs INPUT SOURCE SOURCE INPUT TV SIDE PANEL AUDIO OUT side side INPUT SOURCE SOURCE INPUT TV AV Component HDMI 1 HDMI 2 HDMI 3 VGA TV SIDE PANEL AUDIO OUT 768 side side INPUT SOURCE SOURCE INPUT TV AV Component HDMI 1 HDMI 2 HDMI 3 VGA TV SIDE PANEL TV SIDE PANEL AUDIO OUT EaTKiTw EaTKiTw side Surround EaTKiTw EaTKiTw TV Setup Initial Setup Wizard Select Language Time Zone Set Wizard . Initial Setup Wizard 16 16 TV Setup Set Wizard TV AV Component HDMI 1 HDMI 2 HDMI 3 VGA Initial Setup Wizard . 17 INPUT SOURCE SOURCE INPUT Channel Scan E rr or Cable Service TV Setup Initial Setup Wizard To receive the Channel Access Code: Go to Web: www.tmaxdigital.com/activation Text your 18-digit S/N to: 1-909-939-2336 Call: 1-877-833-1888 rr E How to Navigate: • Press the arrow button to highlight the item you want. Initial Setup Wizard or Antenna ATSC NOTE: 1. TV reception when using an indoor/outdoor antenna is dependent on local terrain, tall buildings and distance from local area TV transmission towers. 2. The Channel Access Codes are different for ATSC and cable . 18 16 TV Setup Select antenna options and perform Channel Auto Scan to receive television channels that will be stored into the TV tuner memory. To • • • enter TV Mode: Press the MENU button Using the arrow buttons; scroll to highlight TV mode Press the down arrow button to highlight CABLE or AIR Cable Mode Select CABLE if you subscribe to a pay television service without a set top box. TV Channel Setup & Channel Auto Scan • Using the arrow button to highlight CABLE. 19 Air Mode Select AIR when connected to an indoor/outdoor antenna. • Press the arrow button to highlight AIR. • Press the arrow button to select AUTO SCAN. Press ENTER and the cursor will move up and CABLE SYSTEM will be displayed next. • Press the down arrow button to select Auto Scan then press the right arrow button twice to start Channel Auto Scan. • Press the arrow button to select STD > IRC > HRC > Auto (Auto is recommended). • Channel Auto Scan may take several minutes to complete. • Press the down arrow button to select Auto Scan and press ENTER. • Channel Auto Scan may take several minutes to complete. NOTE: For cable or satellite users without an indoor/ outdoor TV antenna, there is no need to run Channel Auto Scan. Connect your cable or satellite set top box to one of the available inputs on the TV for viewing. See pages 11-13 for connection details. - How to Navigate: Press the MENU button on the remote control. Navigate using arrow buttons to select PICTURE. Press the down arrow button to highlight PICTURE MODE, then press the arrow button to select your viewing preference from 4 factory options: STANDARD > DYNAMIC > MOVIE >POWER SAVING * > PERSONAL . The STANDARD setting is recommended for most viewing environments. er options more pleasing. Depending on To make more critical adjustments based on your own preferences in PERSONAL: • Press down arrow button to highlight Contrast. Navigate using the arrow buttons to increase or decrease contrast intensity. Menu Adjustments The PICTURE ences. Adjustment options include contrast, brightness, color, sharpness and color temperature. • Press down arrow button to highlight Brightness. Navigate using the arrow buttons to increase or decrease overall brightness. • Press down arrow button to highlight Tint. Navigate using the arrow buttons to adjust colors toward green or reddish tint. • Press down arrow button to highlight Sharpness. Navigate using the arrow buttons to soften or view crisper edges in the picture. • Press down arrow button to highlight your Color Mode preference. Navigate using the arrow buttons to select COOL (more bluish tone), NORMAL or WARM setting. Note: When adjustments are complete, you may select another menu by pressing the Menu button. Picture Settings • Press down arrow button to highlight Color. Navigate using the arrow buttons to increase or decrease color intensity. 20 Menu Adjustments Audio Settings The AUDIO menu offers options to make sound enhancements while listening through the built-in speakers or to select digital audio options when connected to a Dolby Digital receiver though a (SPDIF) coaxial digital output. How to Navigate: Press the MENU button on the remote control. Navigate using arrow buttons to select AUDIO. Press the arrow button to highlight SOUND MODE, then press the arrow button to select your sound preference from 4 factory options: PERSONAL > STANDARD > MUSIC > MOVIE. To make more critical sound adjustments based on your own preferences in PERSONAL: • Press down arrow button to highlight Bass. Navigate using the arrow buttons to increase or decrease low frequency intensity. • Press down arrow button to highlight Treble. Navigate using the arrow buttons to increase or decrease high frequency intensity. • Press down arrow button to highlight Balance. Navigate using the arrow buttons to adjust sound towards the left or right speaker. Surround • Press down arrow button to highlight Surround . Press the arrow button to turn the dimensional surround effect ON or OFF (for built-in speakers only). • Press down arrow button to highlight SPDIF type. Navigate using the arrow buttons to select between PCM (Analog Audio) > RAW (Digital Audio). See page 15. • Press down arrow button to highlight Audio Language. Navigate using the arrow buttons to select to listen to an alternative language broadcast (if available) English > Spanish > French. Note: This feature is not available when text is grayed out. (You may select an alternative language using the remote control by pressing MTS) 21 Note: When adjustments are complete, you may select another menu by pressing the Menu button. How to Navigate: Press the MENU button on the remote control. Navigate using arrow t u buttons to select TIME. • Press down q arrow button to highlight Sleep Timer. Then press the u arrow button to select time to view before television timer turns off: 5 Min > 10 Min > 15 Min > 30 Min > 45 Min > 60 Min > 90 Min > 120 Min > 180 Min > 240 Min > OFF. • Press down q arrow button to highlight Time Zone. Then press the u arrow button to select between: EASTERN > CENTRAL > MOUNTAIN > PACIFIC > ALASKA > HAWAII. Note: This feature is not available when text is grayed out. Note: When adjustments are complete, you may select another menu by pressing the Menu button. Date & Time Settings • Press down q arrow button to highlight Daylight Savings Time. Navigate using the t u arrow buttons to turn this feature on or off. Menu Adjustments The TIME menu includes adjustment of settings for your local time zone and daylight savings time. The clock will adjust automatically after you perform Channel Auto Scan of available broadcast channels broadcasting in your area. (See page 17 for TV Setup) 22 Menu Adjustments Setup Settings In the SETUP menu you may change the initial set up of preferences that include settings for language, menu display, computer monitoring, closed captions, enhancement of black detail in the picture and resetting your TV back to its factory default status. How to Navigate: Press the MENU button on the remote control. Navigate using arrow t u buttons to select SETUP. Gain access to display options by pressing the down q arrow button to highlight Menu Language or other options, then press u arrow button on your remote to select. • Other languages include Spanish and French. • Highlight Noise Reduction. Navigate using the t u arrow buttons to reduce video noise: Off > Low > Medium > High (Default setting: Low) • Highlight Transparency. Navigate using the t u arrow buttons to turn Off u On the translucent effect of the User menu. • Highlight XVS. Navigate using the t u arrow buttons to select: Off > On. XVS provides noticeable black detail enhancement that may be preferred. • Highlight Zoom Mode. Navigate using the t u arrow buttons to select the viewing mode displayed: Normal > Wide > Zoom > Cinema. • Highlight Restore Default. Press the u arrow button to automatically set all adjustments back to their original settings. (This feature is also available on the remote control. See page 27) 23 When prompted, Select “Yes” to confirm. NOTE: Closed Caption and Advanced are features described on the following pages. How to Navigate: Press the MENU button on the remote control. Navigate using arrow t u buttons to select SETUP. Press the down q arrow button to highlight Closed Caption. • Press down q arrow button to highlight Advanced Selection. Navigate using the t u arrow buttons to select Service 1-6. • Press down q arrow button to highlight Option. Press the u arrow button to enter a menu with options to customize text fonts, colors and opacities. • Press down q arrow button to highlight Basic Selection. Navigate using the t u arrow buttons select CC 1-4, Text 1-4. Note: When adjustments are complete, you may select another menu by pressing the Menu button. Features are not available when text is grayed out. Closed Captions • Press down q arrow button to highlight CC Mode. Navigate using the t u arrow buttons select Off > On > CC on Mute. Menu Adjustments The SETUP menu includes adjustments for activating the Closed Caption feature for display on the television and customizing CC display types and font styles. 24 PC Menu Adjustments Advanced Settings 25 In the SETUP menu you may adjust the position of images displayed on screen once you connect an input signal from your PC. Recommended resolution is 1,366 x 768. For use with a laptop computer, refer to your computer’s owner manual on instruction for proper display output. If your PC system uses a standard signal mode, the screen will adjust automatically. Connect an optional 3.5mm audio cable for stereo sound. See page 14 for details. How to Navigate: After connecting to a PC, press the VGA button on your remote control. Press the MENU button on the remote control and navigate using arrow buttons to select SETUP. Gain access to position adjustment options by pressing the down arrow button to highlight Advanced, then press arrow button to select from the following options. • Highlight Clock. Navigate using the arrow buttons to control the width of the image. • Highlight H-Pos. Navigate using the arrow buttons to adjust the position of images displayed from side to side. • Highlight Phase. Navigate using the arrow buttons to improve focus and image stability. • Highlight V-Pos. Navigate using the arrow buttons to adjust the position of images displayed up and down. • Highlight Auto. Press the arrow button to automatically adjust the display to the best setting. When prompted, How to Navigate: Press the MENU button on the remote control. Navigate using arrow buttons to select PARENTAL. Gain access to parental rating options by pressing the down arrow button to highlight ENTER PASSWORD. Enter your 4 digit code (factory default code is “0000”) unless previously changed. • To set parental controls for television programming or DVD movies, press the down/up arrow buttons to highlight US. Navigate using the buttons to highlight TV/MPAA menu. again. (not illustrated) • To make changes to PARENTAL controls, highlight SYSTEM LOCK then press the arrow button to ON. NOTE: Features are not available when text is grayed out. • Highlight TV, then press the arrow button to enter the TV Ratings menu to select your preference. TV-Y TV-Y7 TV-G TV - PG TV - 14 TV - MA Appropriate for all children Appropriate for all children over 7 General Audience Parental Guidance Suggested Parents Strongly Cautioned Mature Audience Only • Highlight MPAA then press the arrow button repeatedly to select your movie rating preference. G General Audience PG Parental Guidance Suggested PG13 Parents Strongly Cautioned R Restricted NC17 No One Under 17 Permitted X Adults Only Parental Control - US • To change the password, press arrow button to display a screen to enter your Menu Adjustments In the PARENTAL menu, you may block television and movie programming based on TV ratings and Motion Picture Association guidelines. To gain access and select your preferences within the Parental menu make certain your input is set to TV. 26 Menu Adjustments Parental Control - Canada 27 In the PARENTAL menu, you may block television and movie programming based on Canadian TV and movie rating guidelines. To gain access and select your preferences within the Parental menu make certain your input is set to TV. How to Navigate: Press the MENU button on the remote control. Navigate using arrow buttons to select PARENTAL. Gain access to rating options by pressing the down arrow button to highlight ENTER PASSWORD. Enter your 4 digit code (factory default code is “0000”) unless previously changed. See page 24 for information on how to change your password. • Navigate using down arrow button to highlight CANADA ENGLISH then press the arrow button repeatedly to select your ratings preference. • Navigate using down arrow button to highlight CANADA FRENCH then press the arrow button repeatedly to select your ratings preference. E C C8+ G PG 14+ 18+ Appropriate for everyone Appropriate for all children Appropriate for everyone 8 years old and up General Audience Parental Guidance Appropriate for Children over 14 years old Mature Audience Only E G 8 ans+ 13 ans+ 16 ans+ 18 ans+ Appropriate for everyone General Audience Appropriate for Children 8 years old and up Appropriate for Children 13 years old and up Appropriate for Children 16 years old and up Mature Audience Only Note: When adjustments are complete, you may select another menu by pressing the Menu button. How to Navigate: Press the MENU button on the remote control. Navigate using arrow t u buttons to select TV. Press the down q button to highlight your preferences. • Highlight FAVORITE to add channels to your Favorites List. Navigate using the t u qp arrow buttons to select channels to be added or deleted from your list. Press ENTER to add or delete a channel. A checkmark indicates a channel has been added. You may also display your FAVORITE list from the remote control by pressing FAV. Menu Adjustments The TV menu provides for the setup of your television to receive TV channels, store your favorites, add or skip channels and label them by their call letters. (For antenna and Channel Auto Scan setup, please refer to page 17.) Press ‘ENTER’ To Change Press ‘ENTER’ To Change TV Settings • Highlight ADD/DELETE to select or skip channels already in memory. Navigate using the t u qp arrow buttons to access the list of available channels. Press ENTER to change the channels status. A checkmark indicates a channel has been added. • Highlight CHANNEL LABEL to name or rename a broadcast channel. Navigate using the u arrow button to enter the screen menu to re-label a channel. Use the qp arrow buttons to spell out each letter, number or character. Use t u arrow buttons to advance to the next space. NOTE: The DTV SIGNAL is a measurement of signal strength for the current channel viewed. 28 Zoom Modes The ZOOM function offers several viewing display options on the 16:9 screen. Press ZOOM to cycle through the following widescreen settings. Press ZOOM to cycle through the following widescreen settings. 1. NORMAL Recommended for viewing native widescreen content and undistorted 4:3 images (with black bars). 2. WIDE Stretches certain 4:3 content and may reduce visible black bars. 3. ZOOM 6WUHWFKHVWKHLPDJHERWKYHUWLFDOO\DQGKRUL]RQWDOO\WR¿OOWKH screen when viewing widescreen content. The Zoom effect will crop images somewhat. 4. CINEMA :KHQYLHZLQJFRQWHQW&LQHPDPRGHZLOO¿OOWKHHQWLUH screen eliminating visible side black bars. It may also eliminate or reduce black bars on certain widescreen movies. 29 Resolution 30.8 21.1 9.5 30 Troubleshooting 18 18 23 23 31 26 27 28 20 26 27 18 28 21 21 23 26 21 21 31 20 22 20 21 24 18 27 18 28 21 21 23 22 25 29 28 21 20 20 22 20 21 23 26 27 20 25 25 20 22 23 29 23 29 26 27 26 27 23 23 29 25 25 32 Warranty Limited North American Warranty LD3288M For peace of mind and valuable services, please take a moment to register your product at www.tmaxdigital.com. Tmax Digital, Inc. expresses the following non-transferable and limited warranty on a new Apex Digital LD3288M purchased from an authorized Apex Digital® U.S. retailer. Retain the original bill of sale for proof of purchase. Limited One (1) Year Warranty We warrant the parts in this product against defects in material or workmanship for a period of one (1) year from the date of original purchase from an Apex Digital® authorized retailer. We also warrant labor charges for a period of one (1) year from the date of original purchase. During the limited warranty period, we will provide a technician to service repairs in your home for a TV that is 32" and above, or you may bring it in to an Apex Digital authorized service center. For a list of Apex Digital authorized service centers, please call the Apex Digital customer support line. Service repairs may be made with new or recertified parts. Service that is provided is warranted for the duration of the original warranty or 45 days. If it is determined to have the unit to be sent in for service/replacement, it is customer’s responsibility to retain the original packaging or provide secure packaging in order to facilitate any warranty service. Your Responsibility The above warranty is subject to the following conditions: You must retain the original bill of sales to provide proof of purchase then call Customer Service for an assessment of the problem. Labor service charges for set installation, setup, adjustment of consumer controls and installation or repair of any type of antenna or cable systems are not covered by this warranty. Reception problems caused by inadequate antenna or cable systems are your responsibility. The warranty extends only to defects in materials or workmanship as limited above and does not extend to any other products or parts, accessories that have been lost, discarded, damaged by misuse, accident, neglect, acts of God such as lightning, voltage surges in the home, improper installation, rendered illegible. Warranty does not cover cosmetic damage. How to Obtain Warranty Service If after following the operating instructions and reviewing the FAQ pages for televisions at www.tmaxdigital.com, contact Customer Service directly at (877) 833-1888, Mon. - Fri. from 7 am to 9 pm (CST), Sat. - Sun. 7 am to 6 pm (CST). You will be instructed on how your claim will be processed. Have information available including date of purchase, serial number and the problem with the product. Should a problem be determined to be within the limits of the warranty you will be provided with an on-site authorization number and instructions. Proof of purchase must be confirmed before any warranty service can be provided. Should a claim not be covered by the limited warranty, you will be asked whether you wish to have service provided for a fee. We may charge the customer for any service call made for anything not covered by the limited warranty. Limitations Your LCD panel is an innovative device that is manufactured to precise tolerances with active performing pixels of at least 99.9%. As such, it is NOT a malfunction to view multiple nonperforming pixels on your screen. All warranties implied by state law are expressly limited to the duration of the limited warranty set forth above with the exception of warranties implied by state law. The foregoing warranty is exclusive and in lieu of all other warranties, guarantees, agreements etc., with respect to repair or replacement of any parts. We shall not be liable for consequential or incidental damage or exclusions and imitations of incidental or consequential damages, so the above may not apply to you. For our Pixel Policy, please refer to our website www.tmaxdigital.com. This warranty gives you specific rights though these rights may vary from state to state. Some states do not allow limitations on the duration of the warranty or exclusions and limitations of incidental or consequential damages, so the above may not apply to you. 33