1
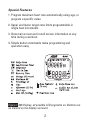
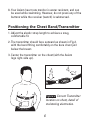
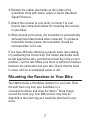
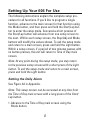
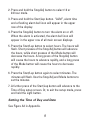
606 Heart Rate Monitor Owner’s Manual 606 Heart Rate Monitor Owner’s Manual Table of Contents Introduction . . . . . . . . . . . . . . . . . . . . . . . . . . . . . . . . . . . . . . . . . .1 Functions and Features . . . . . . . . . . . . . . . . . . . . . . . . . . . . . . . 2 Button Commands and Important Tips . . . . . . . . . . . . . . . . . . . 4 Positioning the Chest Strap/Transmitter . . . . . . . . . . . . . . . . . 6 Mounting the Receiver to Your Bike . . . . . . . . . . . . . . . . . . . . . 7 Setting Up Your 606 for Use . . . . . . . . . . . . . . . . . . . . . . . . . . . . 8 Setting the Daily Alarm . . . . . . . . . . . . . . . . . . . . . . . . . . . . 8 Setting the Time of Day and Date . . . . . . . . . . . . . . . . . . . 9 Activating/Deactivating Heart Rate Recovery Alarm . . 11 Setting Maximum Heart Rate . . . . . . . . . . . . . . . . . . . . . . 11 Setting Heart Rate Target Zones . . . . . . . . . . . . . . . . . . . 13 Setting Recovery Timer Limits . . . . . . . . . . . . . . . . . . . . . 14 Setting Lap/Interval Timers . . . . . . . . . . . . . . . . . . . . . . . . 16 Using Your Axiom 606 . . . . . . . . . . . . . . . . . . . . . . . . . . . . . . . . 21 Viewing Current Heart Rate . . . . . . . . . . . . . . . . . . . . . . 21 Time of Day and Date . . . . . . . . . . . . . . . . . . . . . . . . . . . . . 22 Alarms . . . . . . . . . . . . . . . . . . . . . . . . . . . . . . . . . . . . . . . . . . 23 Stopwatch . . . . . . . . . . . . . . . . . . . . . . . . . . . . . . . . . . . . . . 26 Lap Timer . . . . . . . . . . . . . . . . . . . . . . . . . . . . . . . . . . . . . . . 27 Interval Timer . . . . . . . . . . . . . . . . . . . . . . . . . . . . . . . . . . . .29 Table of Contents (cont.) Time in Zone . . . . . . . . . . . . . . . . . . . . . . . . . . . . . . . . . . . . 32 Selecting a Target Zone . . . . . . . . . . . . . . . . . . . . . . . . . . 32 Heart Rate Recovery Timing . . . . . . . . . . . . . . . . . . . . . . . 34 Viewing Memory Recall Screens . . . . . . . . . . . . . . . . . . 35 Clearing Memory Recall Screens . . . . . . . . . . . . . . . . . . 42 Backlight . . . . . . . . . . . . . . . . . . . . . . . . . . . . . . . . . . . . . . . . . . . 43 Replacing Batteries . . . . . . . . . . . . . . . . . . . . . . . . . . . . . . . . . . 44 Troubleshooting . . . . . . . . . . . . . . . . . . . . . . . . . . . . . . . . . . . . . 45 Appendix Fig. A1, Function Overview - Setup . . . . . . . . . . . . . . . . . 48 Fig. A2, Function Overview - Use . . . . . . . . . . . . . . . . . . . 50 Fig. A3, Time of Day/Date Main Screen and Setup Screens . . . . . . . . . . . . . . . . . . . . . . . . . 52 Fig. A4, Stopwatch Main Screen and Setup Screens . 52 Fig. A5, Timer Main Screen and Setup Screens . . . . . . 54 Fig. A6, Time in Zone Main Screen and Recall Screens56 Fig. A7, Lap Recall Screens . . . . . . . . . . . . . . . . . . . . . . . 56 Fig. A8, Interval Recall Screens with Timed Recovery 58 Fig. A9, Interval Recall Screens with Heart Rate Recovery . . . . . . . . . . . . . . . . . . . . . . . 58 Introduction The Axiom 606 heart rate monitor calculates and displays heart rate information using a radio frequency signal transmitted from the chest transmitter to the watch receiver. The Axiom 606 provides the feedback you need to monitor your training, and the functions you need to increase your fitness and performance. Combined with an appropriate exercise program, the Axiom 606 will help you: • Monitor your training • Reduce your heart rate recovery time • Increase your aerobic capacity • Improve your overall fitness • Improve your exercise performance The clear display and simple operation make the Axiom 606 very user-friendly. WARNING: Before you begin any exercise program you should consult a physician. If you use a pacemaker or other implanted electronic device, consult your physician prior to using a heart rate monitor. Functions and Features 1. Current heart rate 2. Current heart rate expressed as a percentage of maximum heart rate 3. Out of Zone alarm (visible and optional audible) 4. Time spent in, above and below two target zones, expressed as time and as a percentage of total workout time 5. Average heart rate for entire workout 6. Maximum heart rate attained during workout 7. Stopwatch 8. Lap timer (records 20 lap times, with average and maximum heart rate per lap) or, Interval timer (coordinates up to 20 intervals, and records average and maximum heart rate per exercise session. Recovery sessions governed by time or recovery heart rate.) 9. Automatic heart rate recovery timing 10. Time of day (12 or 24 hour mode) 11. Daily alarm 12. Month and day calendar 13. Electroluminescent backlight 2 Special Features 1. Program maximum heart rate automatically using age, or program a specific value 2. Upper and lower target zone limits programmable in single beat increments 3. View main screen and recall screen information at any time during a workout 4. Simple button commands make programming and operation easy Figure 1. 606 Display, all possible LCD segments on. Buttons are as marked on the display surround. 3 Button Commands and Important Tips Button Commands The Axiom 606 is a full-featured heart rate monitor, but remains simple to use. You need to remember only a few basic button commands to set or change values and to scroll through the four main screens (please refer to Figure A1 and A2 in the Appendix for an overview of screen selection). Please note that all button presses should be a short press and release unless otherwise noted. To advance from one main screen to the next, press the Mode button. The Mode button will cycle through the four main screens in the following order: Time of Day, Stopwatch, Timer, Time in Zone, and back to Time of Day. To enter Setup mode: Press and hold the Start/Lap button in any main screen except Time in Zone. To advance from one setup screen to the next, press the Start/Lap button. To change the values within each setup screen, press the Stop/ Adj button. At any point in the setup mode, you may return to the previous setup screen with a short press of the Light button. The backlight will not illuminate in any setup screen. To exit the setup mode and return to one of the four main screens, press and hold the Light button. If you accidentally find yourself in a setup screen but don’t wish to modify the values, simply press and hold the Light button to exit the setup mode and return to a main screen. Important Tips 1. To activate the Heart Rate function (to display heart rate), press and hold the Mode button in any main screen. 2. To exit any setup screen and return to a main screen, press and hold the Light button. 3. To advance from one main screen to the next, press the Mode button. 4. To start the Stopwatch in any main screen, press the Start Lap button. To stop the Stopwatch in any main screen, press the Stop/Adj button. 5. Time in zone data accumulates only while the stopwatch is running. Activate the stopwatch at the beginning of your workout if you wish to record time in, above and below zone, and average and maximum heart rate for entire workout. 6. For heart rate readings to register properly, it is critical that there be sufficient moisture (water, saliva or Axiom Heartbeat Signal Enhancer) between the electrodes on the transmitter (chest strap) and your skin. Insufficient moisture may cause no reading, a frozen reading or an erratic reading. 7. Using a wireless heart rate monitor near computers, motorized gym equipment, electric motors, high voltage power lines, automobiles, televisions or fluorescent lights may cause erratic readings. 8.Your Axiom heart rate monitor is water resistant, and can be used while swimming. However, do not press any of the buttons while the receiver (watch) is submersed. Positioning the Chest Band/Transmitter 1. Adjust the elastic strap length to achieve a snug, comfortable fit. 2.The transmitter should face outward as shown in Fig.2, with the band fitting comfortably on the bare chest just below the breast. 3.Center the transmitter on the chest (with the Axiom logo right-side up). Figure 2. Correct Transmitter location on chest, detail of moistening electrodes. 4. Moisten the rubber electrodes on the inside of the transmitter strap with water, saliva or Axiom Heartbeat Signal Enhancer. 5. Attach the receiver to your wrist, or mount it to your bicycle (see instructions below for mounting the receiver to your bike). 6. When placed on the body, the transmitter is automatically activated (and deactivated when removed). To conserve transmitter battery power, the transmitter should be removed when not in use. If you have difficulty obtaining a regular heart rate reading, try readjusting the chest strap. The rubber electrodes must be flat against the skin, and the band must be in the correct position—not too low. Make sure there is sufficient moisture between the electrodes and your skin. Check that the band is clean, with no accumulated sweat or dirt. Mounting the Receiver to Your Bike Your 606 includes a Handlebar Adapter for your bike. Slide the split foam ring over your handlebar in a convenient location and wrap the Velcro® Strap snugly around the foam ring. Your 606 receiver may now be attached to the foam ring as it would be attached to your wrist. Setting Up Your 606 For Use The following instructions explain the complete setup procedure for all functions. If you’d like to program a single function, advance to the main screen for that function using the Mode button, and then press and hold the Start/Lap button to enter the setup mode. Successive short presses of the Start/Lap button will advance from one setup screen to the next. Within each setup screen, the Stop/Adj and Mode buttons will modify the values shown. To exit the setup mode and return to a main screen, press and hold the Light button. Within a setup screen, if a period of two minutes passes with no button presses, the unit will return to Time of Day main screen. Note: At any point during the setup mode, you may return to the previous setup screen with a short press of the Light button. To exit the setup mode and return to a main screen, press and hold the Light button. Setting the Daily Alarm See Figure A3 in Appendix. Note: This setup screen can be accessed at any time from the Time of Day main screen with a long press of the Start/ Lap button. 1. Advance to the Time of Day main screen using the Mode button. 2. Press and hold the Stop/Adj button to select 12 or 24 hour mode. 3.Press and hold the Start/Lap button. “ALM”, alarm time and a flashing alarm bell icon will appear in the upper row of the display. 4. Press the Stop/Adj button to turn the alarm on or off. When the alarm is activated, the alarm bell icon will appear in the upper row of all main screen displays. 5. Press the Start/Lap button to select hours. The hours will flash. Short presses of the Stop/Adj button will advance the hours, while short presses of the Mode button will decrease the hours. A long press of the Stop/Adj button will cause the hours to advance rapidly, and a long press of the Mode button will cause the hours to decrease rapidly. 6. Press the Start/Lap button again to select minutes. The minutes will flash. Use the Stop/Adj and Mode buttons to set the minutes. 7. A further press of the Start/Lap button will advance to the Time of Day setup screen. Or, to exit the setup mode, press and hold the Light button. Setting the Time of Day and Date See Figure A3 in Appendix. Note: This setup screen can be accessed at any time from the Time of Day main screen with a long press of the Start/ Lap button, and then three successive short presses of the Start/Lap button. Note: To select 12 or 24 hour mode, press and hold the Stop/ Adj button in the Time of Day main screen 1. The seconds will flash. Press the Stop/Adj button to zero the seconds. 2. Press the Start/Lap button to select hours. The hours will flash. Short presses of the Stop/Adj button will advance the hours, while short presses of the Mode button will decrease the hours. A long press of the Stop/Adj button will cause the hours to advance rapidly, and a long press of the Mode button will cause the hours to decrease rapidly. 3. Press the Start/Lap button again to select minutes. The minutes will flash. Use the Stop/Adj and Mode buttons to set the minutes. 4. Press the Start/Lap button again to select month. The month will flash. Use the Stop/Adj and Mode buttons to set the month. 5. Press the Start/Lap button again to select day. The day will flash. Use the Stop/Adj and Mode buttons to set the day. 10 6. A further press of the Start/Lap button will advance to the Recovery Alarm setup screen. Or, to exit the setup mode, press and hold the Light button. Note: 12 or 24 hour mode is selected from the Time of Day main screen with a long press of the Stop/Adj button. Activating/Deactivating the Heart Rate Recovery Alarm See Figure A4 in Appendix. Note: This setup screen can be accessed at any time from the Stopwatch (STW) main screen with a long press of the Start/Lap button. 1. “RCY” will appear at the top of the display. “AL” will appear in the upper row of the display, and the word “On” or “OFF” will flash in the lower row of the display. 2. Press the Stop/Adj button to turn the Heart Rate Recovery alarm on or off. A further press of the Start/Lap button will advance to the Maximum Heart Rate setup screen. Or, to exit the setup mode, press and hold the Light button. Setting Maximum Heart Rate See Figure A4 in Appendix. Note: This setup screen can be accessed at any time from the Stopwatch (STW) main screen with a long press of the Start/Lap button, and then one short press of the Start/Lap button. 11 A maximum heart rate (MHR) value must be entered in order for the 606 to calculate and display current heart rate as a percentage of maximum heart rate. In the Maximum Heart Rate setup screen, you may enter either your age or your maximum heart rate (if known). Values between 10 and 99 will be interpreted as age values, and “AGE” will appear next to the value. The HR600 will calculate an approximate maximum heart rate value based on your age according to the following formula: MHR = 220 – AGE Values between 121 and 220 will be interpreted as maximum heart rate values, and “MHR” will appear next to the value. Values between 100 and 120 will not be displayed. 1. “AGE” or “MHR” and a flashing age or MHR value will appear in the lower row of the display. 2. Short presses of the Stop/Adj button will increase the value, while short presses of the Mode button will decrease the value. A long press of the Stop/Adj button will cause the value to increase rapidly, and a long press of the Mode button will cause the value to decrease rapidly. 3. A further press of the Start/Lap button will advance to the Target Zone setup screen. Or, to exit the setup mode, press and hold the Light button. 12 Setting Heart Rate Target Zones See Figure A4 in Appendix. Note: This setup screen can be accessed at any time from the Stopwatch (STW) main screen with a long press of the Start/Lap button, and then two successive short presses of the Start/Lap button. Caution: The default target zone settings are not intended as suggested or recommended upper and lower limit values. These values should be carefully adjusted according to each user’s fitness level. 1. The number “1” and a flashing upper limit value for Target Zone 1 will appear in the upper row of the display. Short presses of the Stop/Adj button will increase the upper limit value in single beat increments (from 35bpm to 240bpm), while short presses of the Mode button will decrease the value. A long press of the Stop/Adj button will cause the upper limit value to increase rapidly, and a long press of the Mode button will cause the value to decrease rapidly. In the lower right corner of the display, the upper limit value is displayed as a percentage of maximum heart rate. 2. Press the Start/Lap button to select the lower limit value for Zone 1. The lower limit value will flash. Use the Stop/ Adj and Mode buttons to set the lower limit value in single beat increments (from 30bpm to the upper limit value 13 minus 5bpm). In the lower right corner of the display, the lower limit value is displayed as a percentage of maximum heart rate. Note: The 606 will automatically compensate to preserve a 5 bpm difference between the upper and lower limits. 3. Press the Start/Lap button again to select the upper limit value for Target Zone 2. The number “2” and a flashing upper limit value for Zone 2 will appear in the upper row of the display. Use the Stop/Adj and Mode buttons to set the upper limit value. 4. Press the Start/Lap button again to select the lower limit value for Zone 2. The lower limit value will flash. Use the Stop/Adj and Mode buttons to set the lower limit value. 5. A further press of the Start/Lap button will advance to the Recovery Timer Upper and Lower Limits setup screen. Or, to exit the setup mode, press and hold the Light button. Note: To activate the Out of Zone Audible Alarm, see “Alarms,” page 23. Setting Recovery Timer Limits See Figure A4 in Appendix. Note: This setup screen can be accessed at any time from the Stopwatch (STW) main screen with a long press of the Start/Lap button, and then six successive short presses of the Start/Lap button. 14 The 606 automatically records the amount of time it takes your heart rate to descend from a preset upper limit to a preset lower limit. Timing begins automatically when your heart rate falls below the upper limit, and continues until your heart rate falls below the lower limit. During recovery timing “RCY” will flash in the upper row of the display screen. When timing stops, the Heart Rate Recovery alarm will sound (if activated—see “Alarms” p.23), and recovery time will appear in the upper row of the display for 5 seconds. While the recovery timer is running, accumulating recovery time can be viewed in the Recovery Timer recall screen. (See “Viewing Memory Recall screens”, page 34). Note: Recovery timing is automatically disabled when the Interval Timer is in use. 1. “RCY” will appear at the top of the display, and the upper limit value will flash in the upper row of the display. 2. Short presses of the Stop/Adj button will increase the value (from 35bpm to 200bpm), while short presses of the Mode button will decrease the value. A long press of the Stop/Adj button will cause the value to increase rapidly, and a long press of the Mode button will cause the value to decrease rapidly. In the lower right corner of the dis play, the upper limit value is displayed as a percentage of maximum heart rate. 3.Press the Start/Lap button to select the lower limit value. The lower limit value will flash in the lower row of the display. 15 4. Use the Stop/Adj and Mode buttons to set the lower limit value (from 30bpm to the upper limit minus 5bpm). In the lower right corner of the display, the lower limit value is displayed as a percentage of maximum heart rate. Note: The 606 will automatically compensate to preserve a 5bpm difference between the upper and lower limits. 5. A further press of the Start/Lap button will advance to the Timer setup screen. Or, to exit the setup mode, press and hold the Light button. Setting Stopwatch/Lap/Interval Timers See Figure A5 in Appendix. Note: This setup screen can be accessed at any time from the Timer (TMR) main screen with a long press of the Start/ Lap button. The 606 allows you to select one of three timer options, a Stopwatch Timer, Lap Timer or Interval Timer. During exercise, one of the three timer options must be activated in order for heart rate data to accumulate in memory. The Stopwatch Timer (StP) operates as a standard stopwatch, allowing you to time any event, or a portion of any event. The Lap Timer (LAP) is used to time as many as 20 laps (portions of a workout) and to record the average and maximum heart rate for each lap. 16 The Interval Timer (Int) is used to control interval training, by coordinating a sequence of up to 20 alternating exercise and recovery phases. Each exercise phase lasts for a preset duration, and is governed by a countdown timer. Each recovery phase lasts either for a preset duration, or until a preset recovery heart rate is attained. Note: Timer mode cannot be changed while the stopwatch is running. To Select Stopwatch (StP) 1."TMR" will appear at the top of the display. "StP," "LAP" or "Int" will flash in the lower row of the display. 2. Use the Stop/Adj button to select "StP". 3. A further press of the Start/Lap button will exit the setup screen and return to the Time of Day main screen. The setup procedure is complete. To Select Lap Timer (LAP) 1. "TMR" will appear at the top of the display. "StP," "LAP" or "Int" will flash in the lower row of the display. 2. Use the Stop/Adj button to select "LAP". 3. A further press of the Start/Lap button will exit the setup screen and return to the Time of Day main screen. The setup procedure is complete. 17 To Select Interval Timer (Int) 1. "TMR" will appear at the top of the display. "StP," "LAP" or "Int" will flash in the lower row of the display. 2.Use the Stop/Adj button to select "Int". 3.Press the Start/Lap button to advance to the Interval Alarm screen. Note: If activated, the Interval Alarm will sound at the beginning of each exercise and recovery phase, and at the end of the programmed interval session to indicate the session is over. 4. “On” or “OFF” will flash in the lower row of the display. 5.Press the Stop/Adj button to activate or deactivate the alarm. 6.Press the Start/Lap button to select the number of intervals you wish to program. “Int” and the flashing interval number will appear in the lower row of the display. 7.Use the Stop/Adj and Mode buttons to select the desired number of intervals. 8.Press the Start/Lap button again to select the exercise minutes for all intervals. “E” will appear in the lower row of the display to denote the Exercise portion of the intervals, and the minutes will flash. Press the Stop/Adj button to advance the minutes, or the Mode button to decrease the minutes. 18 9. Press the Start/Lap button to select the exercise seconds. The seconds will flash. Set the seconds using the Stop/Adj and Mode buttons. 10. Press the Start/Lap button to select whether the recovery portion of each interval is governed by time (t) or by recovery heart rate ( ). To Select Time-governed Recovery If time-governed recovery is chosen, the duration of each recovery phase will be governed by a preset time. During the workout, a countdown timer will indicate time remaining in each recovery phase. When the countdown timer reaches zero, the next interval will begin. 1.A flashing "t" or flashing " " will appear in the lower row of the display. Press the Stop/Adj button to select recovery phases governed by time (t). 2.Press the Start/Lap button to select recovery minutes for all intervals. The minutes will flash. Set the minutes using the Stop/Adj and Mode buttons. 3.Press the Start/Lap button again to select recovery seconds. The seconds will flash. Set the seconds using the Stop/Adj and Mode buttons. 4. A further press of the Start/Lap button will exit the setup screen and return to the Time of Day main screen. The setup procedure is complete. 19 To Select Heart Rate-governed Recovery If heart rate-governed recovery is chosen, the duration of each recovery phase will be governed by the amount of time required for your heart rate to reach a preset recovery heart rate value. During the workout, a timer will indicate time accumulated within each recovery phase. When your heart rate reaches the preset recovery heart rate value, the next interval will begin. 1.A flashing "t" or flashing " " will appear in the lower row of the display. Press the Stop/Adj button to select recovery phases governed by heart rate ( ). 2. Press the Start/Lap button to set the recovery heart rate value for each recovery phase. 3. The heart rate value will flash. Use the Stop/Adj or Mode buttons to adjust the heart rate value (from 30bpm to 200bpm). The value will also be displayed as a percentage of maximum heart rate. 4. A further press of the Start/Lap button will exit the setup screen and return to the Time of Day main screen. The setup procedure is complete. 20 Using Your 606 Viewing Current Heart Rate To activate the heart rate function, press and hold the Mode button in any main screen. Each time the heart rate function is activated, the current Target Zone (“ZonE 1” or “ZonE 2”) and Timer mode selections (“Stp”, “LAP” or “Int” ) will be displayed briefly on the screen before automatically moving to the Timer main screen. The heart icon and a zero heart rate value will appear in the lower row of the display. After a few seconds (provided you are wearing the chest transmitter strap) the heart icon will begin to flash, and the heart rate value will indicate your current heart rate. Current heart rate as a percentage of maximum heart rate will be displayed in the lower right corner of the display. An up arrow to the left of the heart icon indicates you are exercising above your preset target zone upper limit. A down arrow indicates you are exercising below your preset target zone lower limit. An arrow pointing in both directions indicates you are exercising within the upper and lower limits of your preset target zone. (To adjust target zone upper and lower limits, see “Setting Your Heart Rate Target Zones”, Page 13.) 21 To turn off the heart rate function, press and hold the Mode button in any main screen. The 606 also offers an AutoOff feature. The heart rate function will automatically turn off after a period of two minutes with no heart rate signal received. Note: As long as the transmitter is worn, it will continue to send a signal to the receiver, even if the heart rate function has been turned off. To conserve transmitter battery power, the transmitter should be removed when not in use. Time of Day and Date/Heart Rate Mode See Figure A3 in Appendix. Press the Mode button to advance to the Time of Day main screen. The time is displayed in the upper row of the display. Provided that the heart rate function has not been activated, the date is displayed in the lower row of the display. Once the heart rate function is activated, the heart icon and a heart rate value will replace the date information in the lower row of the display. Date information is not accessible while the heart rate function is activated. To select 12 or 24 hour time format, or to view the current alarm time setting (from the Time of Day main screen), press and hold the Stop/Adj button. Continue holding the Stop/Adj button to toggle between 12 and 24 hour mode. If the 12 hour time format is selected, “PM” will appear for all times between noon and midnight. 22 Alarms Daily Alarm Advance to the Time of Day main screen using the Mode button. 1. To view the current alarm time setting, press and hold the Stop/Adj button. Current alarm time will be displayed in the upper row of the display. 2.To activate the Daily Alarm, press and hold the Start/Lap button. “ALM”, alarm time and the flashing alarm bell icon will appear in the upper row of the display. 3. Press the Stop/Adj button to turn the alarm on or off. When the alarm is activated, the alarm bell icon will appear in the upper row of all main screen displays. 4. Press the Light button to return to the Time of Day main screen. The alarm sounds for sixty seconds. To silence the alarm, press any button. A button pressed to silence the alarm will not perform its normal function. Out of Target Zone Alarm When activated, the audible Out of Zone Alarm will sound in rhythm with your heart beat when your heart rate rises 23 above your selected target zone upper limit, or falls below your selected target zone lower limit. 1.To activate the audible Out of Zone Alarm, advance to any main screen, and activate the heart rate function (if it is not already activated) with a long press of the Mode button. 2.Press and hold the Light button to turn the alarm on or off. An alarm icon will appear above the heart icon to indicate the alarm is activated. Heart Rate Recovery Alarm For an explanation of the Heart Rate Recovery function, see “Setting Recovery Timer Limits,”p.14. When activated, the Heart Rate Recovery alarm will sound for four seconds to indicate that your heart rate has fallen below the recovery heart rate lower limit, and recovery heart rate timing has stopped. Recovery time is displayed for five seconds (to view this time after your workout, see “Viewing Memory Recall Screens,” Page 35). To silence the alarm, press any button. A button pressed to silence the alarm will not perform its normal function. 1.To activate the Heart Rate Recovery Alarm, advance to the Stopwatch main screen (STW) using the Mode button. 2.Press and hold the Start/Lap button. “On” or “OFF” will flash in the lower row of the display. 24 3.Press the Stop/Adj button to turn the Heart Rate Recovery alarm on or off. 4.Press the Light button to return to the Stopwatch main screen. Interval Alarm The interval alarm is only available if the interval timer is selected as the timer mode. When activated, the interval alarm will sound at the beginning of each exercise and recovery phase, and at the end of the programmed interval session to indicate the session is over. 1.To activate the Interval Alarm, advance to the Timer main screen (TMR) using the Mode button. 2.Press and hold the Start/Lap button to enter setup mode. Press the Start/Lap button again to select the interval alarm setup screen. 3.“On” or “OFF” will flash in the lower row of the display. 4.Press the Stop/Adj button to activate or deactivate the alarm. 5.Press and hold the Light button to return to the Timer main screen. Note: This alarm cannot be activated or deactivated while the stopwatch is running. 25 Operating the Timer (Stopwatch/Lap/Interval Timers) In Stopwatch Mode If Stopwatch was selected as the timer mode in the setup procedure (see “Setting Stopwatch/Lap/Interval Timers”, page 16), elapsed stopwatch time will be displayed in both the Stopwatch and Timer main screens. 1.Advance to any main screen using the Mode button. 2.Start the stopwatch with a short press of the Start/Lap button. 3.Running stopwatch time will be displayed in the upper row of the display in both the Stopwatch and Timer main screens. If the heart rate function is activated, the heart icon, current heart rate and current heart rate as a percentage of maximum heart rate will be displayed in the lower row of the display. While the stopwatch is running, “STW” will flash in all main screens except the Stopwatch main screen, where it will remain steady. 4.Stop the stopwatch with a press of the Stop/Adj button in any main screen. Reset 1.To reset the stopwatch, advance to the Timer main screen (TMR) using the Mode button. 26 2.Stop the stopwatch (if it is running) with a short press of the Stop/Adj button. 3.Press and hold the Stop/Adj button. Maximum stopwatch time is 9 hr, 59 min, 59.9 sec. In Lap Mode To use the Lap Timer, Lap mode must have been selected in the setup procedure (see “Setting Stopwatch/Lap/Interval Timers”, page 16). Note: Lap Timer and stopwatch operation are linked. The lap timer is used to record times for as many as 20 laps (portions of a workout). Also recorded are average heart rate and maximum heart rate for each lap, and total elapsed stopwatch time. 1. Advance to the Timer main screen (TMR) using the Mode button. “TMR” and current lap time will be displayed in the upper row of the display. If the heart rate function is activated, the lower row of the display will show the number of the current lap for three seconds, before reverting to current heart rate information. If the heart rate function is not activated, the number of the current lap will remain displayed. 2.To begin the first lap, press the Start/Lap button. (Note: This press can be made from any main screen.) This press will activate the stopwatch, and “STW” will flash in all 27 main screens (except the Stopwatch main screen, where it will remain steady). 3.To record the first lap, press the Start/Lap button again. (Note: this press can be made from any main screen.) One alarm beep will sound, and the lap time, average heart rate and maximum heart rate for lap 1 will be recorded in memory. 4.To record successive laps, press the Start/Lap button. (Note: These presses can be made from any main screen.) Each press of the Start/Lap button records the previous lap in memory and begins a new lap. 5.Each time the Start/Lap button is pressed, the time of the lap just measured will be displayed in the upper row of the display, and the number of the lap just measured will be displayed in the lower row of the display. After three seconds, the display will revert to main screen data. 6.After the 20th lap has been recorded, “End” will appear in the lower row of the display, and further presses of the Start/Lap button will emit no alarm beep. This indicates that memory is full. The stopwatch will continue to run, but no additional lap data will be recorded in memory. Each lap time will be recorded in memory (up to a total of 20 laps), along with average and maximum heart rate values for each lap (provided the heart rate function is activated), and total elapsed stopwatch time. To view this data, see “Viewing Memory Recall Screens,” page 34. 28 Reset 1. To reset the Lap Timer and Stopwatch, advance to the Timer main screen (TMR) using the Mode button. 2. Press and hold the Stop/Adj button. Note: Resetting the Lap Timer will clear all accumulated lap recall data from memory and will reset the stopwatch time. In Interval Mode To use the Interval Timer, Interval mode must have been selected in the setup procedure (see “Setting Stopwatch/ Lap/Interval Timers,” page 16). Note: To operate the Interval Timer, the heart rate function must be activated (with a long press of the Mode button in any main screen). Interval Timer and stopwatch operation are linked. The interval timer is used to control interval training, by coordinating a sequence of up to 20 alternating exercise and recovery phases. Each exercise phase lasts for a preset duration, and is governed by a countdown timer. Each recovery phase lasts either for a preset duration, or until a preset recovery heart rate is attained. (To program the exercise and recovery sessions, see “Setting Stopwatch/Lap/Interval Timers,” page 16). 29 1. Advance to the Timer main screen (TMR) using the Mode button, and activate the heart rate function with a long press of the Mode button. Time remaining in the first exercise phase of the first interval will be displayed in the upper row of the display. 2. Beginning the first interval session requires two presses of the Start/Lap button. (Note: These presses can be made from any main screen.) The first press will activate the stopwatch. “STW” will flash in all main screens except the Stopwatch main screen, where it will remain steady. 3.The second press of the Start/Lap button will begin the exercise phase of the first interval. This press can be made from any main screen. If this press is made from any screen other than the Timer main screen, the 606 will automatically advance to the Timer main screen, and the running countdown timer will appear in the upper row of the display. Exercise Phase 4.If the Interval Alarm is activated (see “Interval Alarm,” page 25) the beginning of each exercise phase is signaled with one alarm beep. As each exercise phase begins, the time remaining for that phase will begin to count down in the upper row of the display, and the number of the cur rent interval will be displayed briefly in the lower row of the display. 30 Recovery Phase Note: To select timed or heart rate-governed recovery, see page 19). 5.Timed Recovery: If the Interval Alarm is activated, the beginning of each recovery phase is signaled with two alarm beeps, and “RCY” will flash at the top of the display. As each recovery phase begins, the upper row of the display will show a countdown timer that indicates time remaining in the current recovery phase. Heart Rate-governed Recovery: If the Interval alarm is activated, the beginning of each recovery phase is signaled with two alarm beeps, and “RCY” will flash at the top of the display. As each recovery phase begins, the upper row of the display will show a standard timer, which indicates time accumulated in the current recovery phase. 6.If the Interval Alarm is activated, the end of the interval session (the end of the last recovery phase) is signaled with three alarm beeps. 7.To stop the timer during any exercise or recovery phase, press the Stop/Adj button. This will also stop the stopwatch. A press of the Start/Lap button will restart the timer and the stopwatch from the point at which they were stopped. 31 8.After the final recovery phase, "END" will appear in the lower row of the display. This indicates the interval session is complete. Data for each exercise and recovery phase will be recorded in memory. To view this data, see "Viewing Memory Recall Screens," page 35. Reset 1. To reset the Interval Timer and Stopwatch, advance to the Timer main screen (TMR) using the Mode button. 2. Press and hold the Stop/Adj button. Note: Resetting the Interval Timer will clear all accumulated interval recall data from memory. Operating Time in Zone See Figure A6 in Appendix. Selecting Target Zone 1 or Zone 2 The 606 offers two programmable target zones, making it easier to control the intensity of your workouts. Either zone can be selected at any time before or during a workout. During a workout, Above, In and Below Zone data will be recorded only for the selected target zone. It is not possible to record data in both zones simultaneously. 1. To select Zone 1 or Zone 2 as the active target zone, advance to the Time in Zone main screen (TiZ) using the Mode button. 32 2.Press and hold the Start/Lap button. “ZonE” will appear at the top of the screen, and “1” or “2” will flash in the lower row of the display. 3.Toggle between Zone 1 and Zone 2 with short presses of the Stop/Adj button. 4. Once you have made your selection, press the Light button to return to the main screen. Time in Zone From the Time in Zone main screen, you can view average and maximum heart rate for the entire workout, and the amount of time spent above, in and below the preset target zones. Time is expressed in hours, minutes and seconds, and also as a percentage of total workout time. Timing and heart rate calculation begin automatically provided that the heart rate function and stopwatch have been activated, and that the receiver is receiving a signal from the chest transmitter belt. Time accumulated in the currently selected Target Zone is displayed in the upper row of the Time In Zone main screen. To view time above and below zone, see "Viewing Memory Recall Screens", page 35. Note: Time in Zone and heart rate data accumulate only while the stopwatch is running. If the stopwatch is not started at the beginning of a workout, no data will be recorded in the Time in Zone recall screens. 33 Note: The maximum data accumulation time for all Time in Zone recall screens combined (in, above and below Zone 1 plus in, above and below Zone 2) is 9 hours, 59 minutes, 59 seconds. At that point, no further data will be recorded until the recall screens are reset. (See “Clearing Memory Recall Screens,” p.42) Heart Rate Recovery Timing The 606 automatically records the amount of time it takes your heart rate to descend from a preset upper limit to a preset lower limit. Timing begins automatically when your heart rate falls below the upper limit, and continues until your heart rate falls below the lower limit. When timing stops, the Heart Rate Recovery alarm will sound (if activated—see “Heart Rate Recovery Alarm,” page 24), and recovery time will appear in the upper row of the display for five seconds. As your heart rate rises above the upper limit again, the timer is automatically reset so that timing can begin again. In other words, the 606 always records your most recent recovery time. Note: Recovery timing is automatically disabled when the Interval Timer is in use. To view your most recent recovery time, see "Viewing Memory Recall Screens", p.35. 34 Viewing Memory Recall Screens See Figure A6 in Appendix. Note: While viewing recall screens, press the Light button at any time to return to the previous screen. 1. Advance to the Time in Zone main screen (TiZ) using the Mode button. Press and hold the Start/Lap button to access the recall screens. “ZonE 1” or “Zone 2” will appear to indicate current target zone selection. Average Heart Rate 2.Press the Start/Lap button to view Average Heart Rate. The heart icon and “AVG” will appear in the lower row of the display. Average heart rate for the entire workout (expressed as beats per minute and as a percentage of maximum heart rate) will be displayed in the lower row of the display. Maximum Heart Rate 3.Press the Start/Lap button again to view Maximum Heart Rate. The maximum heart rate attained during the workout (expressed as bpm and as a percentage of MHR) will be displayed in the lower row of the display. Time Above Zone 1 4. Note: If Zone 1 was not selected during the workout, only Zone 2 data will be displayed. Proceed to step 7. Press the Start/Lap button again to view Time Above Zone 1. 35 “TiZ” and time accumulated above Zone 1 will be dis played in the upper row of the display. Time above zone as a percentage of total workout time will be displayed in the lower row of the display. Time In Zone 1 5. Press the Start/Lap button again to view Time In Zone 1. Time accumulated in Zone 1 will be displayed in the upper row of the display. Time in zone as a percentage of total workout time will be displayed in the lower row of the display. Time Below Zone 1 6.Press the Start/Lap button again to view Time Below Zone 1. Time accumulated below Zone 1 will be displayed in the upper row of the display. Time below zone as a percentage of total workout time will be displayed in the lower row of the display. Time Above Zone 2 7.Note: If Zone 2 was not selected during the workout, Zone 2 data will not be displayed. Proceed to step 10. Press the Start/Lap button again to view Time Above Zone 2. “TiZ” and time accumulated above Zone 2 will be displayed in the upper row of the display. Time above zone as a per centage of total workout time will be displayed in the lower row of the display. Time In Zone 2 8.Press the Start/Lap button again to view Time In 36 Zone 2. Time accumulated in Zone 2 will be displayed in the upper row of the display. Time in zone as a percentage of total workout time will be displayed in the lower row of the display. Time Below Zone 2 9.Press the Start/Lap button again to view Time Below Zone 2. Time accumulated below Zone 2 will be displayed in the upper row of the display. Time below zone as a percentage of total workout time will be displayed in the lower row of the display. Heart Rate Recovery Time 10. Press the Start/Lap button again to view Heart Rate Recovery Time. “RCY” and the most recently measured heart rate recovery time will be displayed in the upper row of the display. 11. Press the Start/Lap button again to view Lap recal or Interval recall screens. If neither Lap Timer nor Interval Timer were used during the workout, this button press will return to Time in Zone main screen. Lap Recall Data See Figure A7 in Appendix 1.From the Heart Rate Recovery Time recall screen, press the Start/Lap button to view Lap recall data screens. "LAP Info" will appear in the display. 37 2.Press the Start/Lap button again to view total elapsed stopwatch time in the upper row of the display, and the total number of laps recorded in the lower row of the display. Note: If recall data is accessed while the stopwatch is running, stopwatch time will continue to accumulate although it will not be shown to advance in the recall screen. 3.Press the Start/Lap button to view a scrolling sequence of three recall screens for Lap 1. Each screen appears for three seconds. The upper row of each screen displays lap time. The lower row of each screen displays: Screen A: Lap number Screen B: Average heart rate for the lap (as bpm and %MHR) Screen C: Maximum heart rate for the lap (as bpm and %MHR) 4. Press the Start/Lap button at any point during the scrolling sequence to advance to the scrolling sequence for Lap 2, and so on until the recall screens for all laps have been viewed. 5. Press the Light button at any point during the scrolling sequence to return to the scrolling sequence for the previous lap. 38 6.At the end of the last scrolling sequence, a further press of the Start/Lap button will display “End” to indicate there is no further data to display. A short press of the Light button will return to the scrolling sequence for the previous lap. Press the Start/Lap button or press and hold the Light button to return to the Time in Zone main screen. Interval Recall Data See Figure A8 in Appendix Time-governed Recovery 1.From the Heart Rate Recovery Time recall screen, press the Start/Lap button to view Interval recall data screens. "Int InFo" will appear in the display. 2.Press the Start/Lap button again to view total elapsed stopwatch time in the upper row of the display, and the total number of intervals completed in the lower row of the display. Note: If recall data is accessed while the stopwatch is running, stopwatch time will continue to accumulate although it will not be shown to advance in the recall screen. 3.Press the Start/Lap button to view a scrolling sequence of three recall screens for Interval 1. Each screen appears for three seconds. The upper row of each screen displays interval number. The lower row of each screen displays: 39 Screen A: Heart rate at the end of the recovery phase (as bpm and %MHR) Screen B: Average heart rate during the exercise phase (as bpm and %MHR) Screen C: Maximum heart rate during the exercise phase (as bpm and %MHR) 4. Press the Start/Lap button at any point during the scrolling sequence to advance to the scrolling sequence for Interval 2, and so on until the recall screens for all intervals have been viewed. 5.Press the Light button at any point during the scrolling sequence to return to the scrolling sequence for the previous interval. 6. At the end of the last scrolling sequence, a further press of the Start/Lap button will display “End” to indicate there is no further data to display. A short press of the Start/Lap button or a long press of the Light button will return to the Time in Zone main screen. A short press of the Light button will return to the scrolling sequence for the previous interval. Heart Rate-governed Recovery See Figure A9 in Appendix 1.From the Heart Rate Recovery Time recall screen, press the Start/Lap button to view Interval recall data screens. 40 "Int Info" will appear in the display. 2.Press the Start/Lap button again to view total elapsed stopwatch time in the upper row of the display, and the total number of intervals completed in the lower row of the display. Note: If recall data is accessed while the stopwatch is running, stopwatch time will continue to accumulate although it will not be shown to advance in the recall screen. 3.Press the Start/Lap button to view a scrolling sequence of three recall screens for Interval 1. Each screen appears for three seconds. Screen A: Displays the timed length of the recovery phase in the upper row of the display, and the interval number in the lower row. Screen B: Displays interval number in the upper row of the display, and the average heart rate for the exercise phase (as bpm and %MHR) in the lower row. Screen C: Displays interval number in the upper row of the display, and maximum heart rate during the exercise phase (as bpm and %MHR) in the lower row. 4.Press the Start/Lap button at any point during the scrolling sequence to advance to the scrolling sequence for Interval 2, and so on until the recall screens for all intervals have been viewed. 41 5. Press the Light button at any point during the scrolling sequence to return to the scrolling sequence for the previous interval. 6.At the end of the last scrolling sequence, a further press of the Start/Lap button will display “End” to indicate there is no further data to display. A short press of the Start/Lap button or a long press of the Light button will return to the Time in Zone main screen. A short press of the Light button will return to the scrolling sequence for the previous interval. Clearing Memory Recall Screens Global Reset To perform a global reset which clears all data from Time in Zone, Lap and Interval recall screens, and resets the Stopwatch and Timer: 1. Stop the stopwatch (if it is running) with a short press of the Stop/Adj button. 2. Advance to the Time in Zone main screen (TiZ) using the Mode button. 3. Press and hold the Stop/Adj button. After two seconds, “HOLd to CLEAr” will appear in the display. Continue holding the Stop/Adj button. After two more seconds, “donE” will appear in the display. Release the Stop/Adj 42 button to return to the Time in Zone main screen. All data has been cleared from memory. Partial Reset To perform a partial reset (which clears all data from Lap and Interval recall screens, and resets the Stopwatch and Timer, but does not clear the Time in Zone recall screens): 1. Stop the stopwatch (if it is running) with a short press of the Stop/Adj button. 2. Advance to the Timer main screen (TMR). 3. Press and hold the Stop/Adj button. The Timer and Stopwatch will be reset, and all data in Lap or Interval recall screens will be cleared. However, Time in Zone data (time in, above and below zone, average and maximum heart rate, and recovery time) will remain in memory. Backlight In any main screen, a short press of the Light button will illuminate the backlight for four seconds.The backlight will not illuminate when the Light button is pressed in a setup screen or to silence an alarm. 43 Replacing Batteries Transmitter Battery (Battery type: 3V Lithium 2032) To open the battery compartment cover, remove the four screws from the corner of the cover (see figure 3). Before removing the battery, note its orientation. The positive pole should face the compartment cover, and the negative pole should contact the metal prongs inside the battery compartment. Orient the replacement battery in the same manner. To ensure continued water resistance, make sure the rubber O-ring is still in place around the inside edge of the compartment before replacing the cover. Figure 3 When changing the transmitter battery, remember to replace O-ring correctly. Watch Receiver Battery (Battery type: 3V Lithium 2025) To prevent damage to the receiver’s water-tight seal, we recommend taking your receiver to a jeweler or watch repair shop for battery replacement. 44 Troubleshooting What if the heart rate reading is erratic or totally absent? 1. Make sure the chest strap is sufficiently tight. The strap should be positioned and tightened so that the electrodes are flat against your skin. Adjust the strap side to side or slightly up or down until the strap is positioned properly, and the electrodes make solid contact with your skin. 2. Make sure the electrode strips are sufficiently moist. Moisture enables the electrodes to make proper electrical contact. Moisten the electrode strips with water, saliva or Axiom Heartbeat Signal Enhancer (item # 40-0579). If you are wearing the transmitter strap over a shirt, make sure the shirt is moistened to provide adequate electrical contact for the electrodes. Accumulated sweat or dirt on the electrode strips may impair electrical contact. Make sure the electrode strips are clean. 3. Make sure you have activated the heart rate function with a long press (press and hold) of the Mode button in any main screen. 4. Make sure the transmitter battery is installed properly and fully charged. What if the heart rate reading becomes extremely high? Electromagnetic signals from outside sources may cause 45 abnormally high heart rate readings. Common sources of electromagnetic signals are high voltage power lines, motor driven equipment, and other heart rate monitor users. Check your surroundings for possible sources of electromagnetic signals, and move away from the source. Note: The 606 automatically records the highest maximum heart rate attained during a workout. It cannot, however, distinguish between genuine heart rate signals, and artificially high heart rate signals caused by electrical interference. For this reason, the 606 may occasionally record an artificially high maximum heart rate caused by electrical interference encountered during a workout. 46 47 48 Figure A1 Function Overview - Setup. 49 50 Figure A2 Function Overview - Usage. 51 52 Figure A3 Time of Day/Date Main Screen and Setup Screens Figure A4 Stopwatch Main Screen and Setup Screens 53 54 Figure A5 Timer Main Screen and Setup Screens 55 56 Figure A6 Figure A7 Lap Recall Screens Time in Zone Main Screen and Recall Screens 57 58 Figure A8 Interval Recall Screens with Timed Recovery Figure A9 Interval Recall Screens with Heart Rate Recovery 59 Notes: 60 Tech Support 1-800-553-8324 40-3652 0806-1 Made in Taiwan