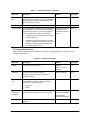
1
Chapter 8
Configuring IP
Overview of Configuring IP
The Internet Protocol (IP) is enabled by default. This chapter describes how to configure IP parameters on the
BigIron RX.
The IP Packet Flow
Figure 8.1 on page 8-1 Shows how an IP packet moves through a BigIron RX.
Figure 8.1
IP Packet flow through a BigIron RX
ARP
Table
(software)
Incoming
Port
IP ACLs
(hardware)
Static ARP
Table
Deny
Drop
Permit
RIP
Yes
Lowest
Metric
PBR
(hardware)
IP Route
Table
(software)
Lowest
Admin.
Distance
OSPF
BGP4
Next Hop
Table
(hardware)
Match
No
IP Routing
(hardware)
No Match
Forward to CPU
Directly
connected
host
forwarding
cache
(software)
ECMP and
Trunk Load
Balancing
(hardware)
Outgoing
Port
Figure 8.1 on page 8-1 Shows the following packet flow:
August 2009
© 2009 Brocade Communications Systems, Inc.
1
1.
When the BigIron RX receives an IP packet, the BigIron RX checks for IP ACL filters on the receiving
interface. If a deny filter on the interface denies the packet, the BigIron RX discards the packet and performs
no further processing. If logging is enabled for the filter, then the BigIron RX generates a Syslog entry and
SNMP trap message.
2.
If the packet is not denied, the BigIron RX checks for Policy Based Routing (PBR). If the packet matches a
PBR policy applied on the incoming port, the PBR processing is performed and either drops the packet or
forwards it to a port, based on the route map rules.
3.
If the incoming packet does not match PBR rules, the BigIron RX looks in the hardware IP routing table to
perform IP routing. The hardware routing table is pre-loaded with the complete routing table, except for the
directly connected host entries. Default and statically defined routes are also pre-loaded in the hardware
routing table. If the incoming packet matches a route entry, the packet is routed according to the information
provided in the route entry. The ECMP and trunk load balancing is done by the hardware, if needed, to select
the outgoing port.
4.
If there is no match in the IP routing table and a default route is not configured, the packet is dropped. For an
IP packet whose destination IP address is to a directly connected host, the first packet is forwarded to the
CPU. If the ARP is resolved and the host is reachable, the CPU creates a route entry in the hardware to route
subsequent packets in hardware.
The software enables you to display the ARP cache and static ARP table, the IP route table, the IP forwarding
cache.
ARP Cache Table
The Address Resolution Protocol (ARP) is supported on the BigIron RX. See “IP Fragmentation Protection” on
page 8-30.
The ARP cache contains entries that map IP addresses to MAC addresses. Generally, the entries are for devices
that are directly attached to the BigIron RX.
An exception is an ARP entry for an interface-based static IP route that goes to a destination that is one or more
router hops away. For this type of entry, the MAC address is either the destination device’s MAC address or the
MAC address of the router interface that answered an ARP request on behalf of the device, using proxy ARP.
The ARP cache can contain dynamic (learned) entries and static (user-configured) entries. The software places a
dynamic entry in the ARP cache when the BigIron RX learns a device’s MAC address from an ARP request or
ARP reply from the device.
The software can learn an entry when the BigIron RX receives an ARP request from another IP forwarding device
or an ARP reply. Here is an example of a dynamic entry:
1
IP Address
MAC Address
Type
Age
207.95.6.102
0800.5afc.ea21
Dynamic
0
Port
6
Each entry contains the destination device’s IP address and MAC address.
Static ARP Table
In addition to the ARP cache, the BigIron RX has a static ARP table.
Entries in the static ARP table are user-configured. You can add entries to the static ARP table regardless of
whether the device the entry is for is connected to the BigIron RX.
The software places an entry from the static ARP table into the ARP cache when the entry’s interface comes up.
Here is an example of a static ARP entry:
Index
1
IP Address
207.95.6.111
MAC Address
0800.093b.d210
Port
1/1
Each entry lists the information you specified when you created the entry.
2
© 2009 Brocade Communications Systems, Inc.
August 2009
To display ARP entries, see the following:
•
“Displaying the ARP Cache” on page 8-64
•
“Displaying the Static ARP Table” on page 8-65
To configure other ARP parameters, see “IP Fragmentation Protection” on page 8-30.
To increase the size of the ARP cache and static ARP table, see the following:
•
For dynamic entries, see the “Displaying and Modifying System Parameter Default Settings” on page 6-13.
The ip-arp parameter controls the ARP cache size.
•
For static entries, see “Changing the Maximum Number of Entries the Static ARP Table Can Hold” on page 835. The ip-static-arp parameter controls the static ARP table size.
IP Route Table
The IP route table contains paths to IP destinations.
The IP route table can receive the paths from the following sources:
•
A directly-connected destination, which means there are no router hops to the destination
•
A static IP route, which is a user-configured route
•
A route learned through RIP
•
A route learned through OSPF
•
A route learned through BGP4
The IP route table contains the best path to a destination.
•
When the software receives paths from more than one of the sources listed above, the software compares the
administrative distance of each path and selects the path with the lowest administrative distance. The
administrative distance is a protocol-independent value from 1 – 255.
•
When the software receives two or more best paths from the same source and the paths have the same
metric (cost), the software can load share traffic among the paths based on Layer 2, Layer 3 and TCP/UDP
information.
Here is an example of an entry in the IP route table:
Destination
NetMask
Gateway
Port
Cost
Type
1.1.0.0
255.255.0.0
99.1.1.2
1/1
2
R
Each IP route table entry contains the destination’s IP address and subnet mask and the IP address of the nexthop router interface to the destination. Each entry also indicates the port attached to the destination or the nexthop to the destination, the route’s IP metric (cost), and the type. The type indicates how the IP route table
received the route.
To display the IP route table, see “Displaying the IP Route Table” on page 8-68.
To configure a static IP route, see “Configuring Static Routes” on page 8-41.
To clear a route from the IP route table, see “Clearing IP Routes” on page 8-70.
To increase the size of the IP route table for learned and static routes, see “Displaying and Modifying System
Parameter Default Settings” on page 6-13.
•
For learned routes, modify the ip-route parameter.
•
For static routes, modify the ip-static-route parameter.
August 2009
© 2009 Brocade Communications Systems, Inc.
3
IP Forwarding Cache
The BigIron RX maintains a software cache table for fast processing of IP packets that are forwarded or generated
by the CPU. The cache also contains forwarding information that is normally contained in the IP routing table. For
example, the cache contains information on the physical outgoing port, priority, VLAN, and the type of cache entry.
Also, cache entries have hardware information, which is useful for debugging and aging.
There are two types of IP cache entries:
1.
Directly connected host entries – These entries are created when the CPU receives the first packet destined
to a directly connected host. Host entries are set to age out after a certain period if no traffic is seen for that
entry.
2.
Network entries – These entries are created when a route table entry is created in software. These entries are
not subjected to aging. A route table entry is created when routes are learned by routing protocols such as
OSPF or when routes are statically configured.
Here is an example of an entry in the IP forwarding cache:
1
IP Address
192.168.1.11
Next Hop
DIRECT
MAC
0000.0000.0000
Type
PU
Port
n/a
Vlan
Pri
0
Each IP forwarding cache entry contains the IP address of the destination, and the IP address and MAC address
of the next-hop router interface to the destination. If the destination is actually an interface configured on the
BigIron RX itself, as shown here, then next-hop information indicates this. The port through which the destination
is reached is also listed, as well as the VLAN and Layer 4 QoS priority associated with the destination if applicable.
To display the IP forwarding cache, see “Displaying the Forwarding Cache” on page 8-66.
Basic IP Parameters and Defaults
IP is enabled by default. The following protocols are disabled by default:
•
Route exchange protocols (RIP, OSPF, BGP4)
•
Multicast protocols (IGMP, PIM-DM, PIM-SM, DVMRP)
•
Router redundancy protocols (VRRPE, VRRP, FSRP)
When Parameter Changes Take Effect
Most IP parameters described in this chapter are dynamic. They take effect immediately, as soon as you enter the
CLI command. You can verify that a dynamic change has taken effect by displaying the running configuration. To
display the running configuration, enter the show running-config or write terminal command at any CLI prompt.
To save a configuration change permanently so that the change remains in effect following a system reset or
software reload, save the change to the startup configuration file. Enter the write memory command from the
Privileged EXEC level of any configuration level of the CLI.
Changes to memory allocation require you to reload the software after you save the changes to the startup
configuration file. When reloading the software is required to complete a configuration change, the procedure that
describes the configuration change includes a step for reloading the software.
4
© 2009 Brocade Communications Systems, Inc.
August 2009
IP Global Parameters
Table 8.1 lists the IP global parameters for the BigIron RX, their default values, and where to find configuration
information.
Table 8.1: IP Global Parameters
Parameter
Description
Default
See page...
IP state
The Internet Protocol, version 4
Enabled
n/a
Note: You cannot
disable IP.
IP address and
mask notation
Router ID
Format for displaying an IP address and its network
mask information. You can enable one of the
following:
•
Class-based format; example: 192.168.1.1
255.255.255.0
•
Classless Interdomain Routing (CIDR) format;
example: 192.168.1.1/24
The value that routers use to identify themselves to
other routers when exchanging route information.
OSPF and BGP4 use router IDs to identify routers.
RIP does not use the router ID.
Class-based
8-10
Note: Changing this
parameter affects the
display of IP
addresses, but you
can enter addresses in
either format
regardless of the
display setting.
The IP address
configured on the
lowest-numbered
loopback interface.
8-28
If no loopback
interface is configured,
then the lowestnumbered IP address
configured on the
device.
IP Maximum
Transmission
Unit (MTU)
The maximum length an Ethernet packet can be
without being fragmented.
1500 bytes for
Ethernet II
encapsulation
8-27
1492 bytes for SNAP
encapsulation
Address
Resolution
Protocol (ARP)
A standard IP mechanism that routers use to learn
the Media Access Control (MAC) address of a device
on the network. The router sends the IP address of a
device in the ARP request and receives the device’s
MAC address in an ARP reply.
Enabled
8-31
ARP rate
limiting
Lets you specify a maximum number of ARP packets
the device will accept each second. If the device
receives more ARP packets than you specify, the
device drops additional ARP packets for the
remainder of the one-second interval.
Disabled
8-32
August 2009
© 2009 Brocade Communications Systems, Inc.
5
Table 8.1: IP Global Parameters (Continued)
Parameter
Description
Default
See page...
ARP age
The amount of time the device keeps a MAC address
learned through ARP in the device’s ARP cache. The
device resets the timer to zero each time the ARP
entry is refreshed and removes the entry if the timer
reaches the ARP age.
Ten minutes
8-34
Note: You also can change the ARP age on an
individual interface basis. See Table 8.2 on page 8-8.
Proxy ARP
An IP mechanism a router can use to answer an ARP
request on behalf of a host, by replying with the
router’s own MAC address instead of the host’s.
Disabled
8-34
Static ARP
entries
An ARP entry you place in the static ARP table.
Static entries do not age out.
2048
8-35
Time to Live
(TTL)
The maximum number of routers (hops) through
which a packet can pass before being discarded.
Each router decreases a packet’s TTL by 1 before
forwarding the packet. If decreasing the TTL causes
the TTL to be 0, the router drops the packet instead of
forwarding it.
64 hops
8-37
Directed
broadcast
forwarding
A directed broadcast is a packet containing all ones
(or in some cases, all zeros) in the host portion of the
destination IP address. When a router forwards such
a broadcast, it sends a copy of the packet out each of
its enabled IP interfaces.
Disabled
8-38
All ones
8-39
Note: You also can enable or disable this parameter
on an individual interface basis. See Table 8.2 on
page 8-8.
Directed
broadcast mode
The packet format the router treats as a directed
broadcast. The following formats can be directed
broadcast:
•
All ones in the host portion of the packet’s
destination address.
•
All zeroes in the host portion of the packet’s
destination address.
NOTE: If you enable
all-zeroes directed
broadcasts, all-ones
directed broadcasts
remain enabled.
Source-routed
packet
forwarding
A source-routed packet contains a list of IP addresses
through which the packet must pass to reach its
destination.
Enabled
8-38
Internet Control
Message
Protocol (ICMP)
messages
The BigIron RX can send the following types of ICMP
messages:
Enabled
8-39
•
Echo messages (ping messages)
•
Destination Unreachable messages
•
Redirect messages
8-40
Note: You also can enable or disable ICMP Redirect
messages on an individual interface basis. See Table
8.2 on page 8-8.
6
© 2009 Brocade Communications Systems, Inc.
August 2009
Table 8.1: IP Global Parameters (Continued)
Parameter
Description
Default
See page...
ICMP Router
Discovery
Protocol (IRDP)
An IP protocol a router can use to advertise the IP
addresses of its router interfaces to directly attached
hosts. You can enable or disable the protocol, and
change the following protocol parameters:
Disabled
8-54
Four
8-59
•
Forwarding method (broadcast or multicast)
•
Hold time
•
Maximum advertisement interval
•
Minimum advertisement interval
•
Router preference level
Note: You also can enable or disable IRDP and
configure the parameters on an individual interface
basis. See Table 8.2 on page 8-8.
Maximum
BootP relay
hops
The maximum number of hops away a BootP server
can be located from a router and still be used by the
router’s clients for network booting.
Maximum
Frame Size
You can set a maximum frame size of IP packets that
are forwarded on all ports of a PPCR.
Domain name
for Domain
Name Server
(DNS) resolver
A domain name (example: foundry.router.com) you
can use in place of an IP address for certain
operations such as IP pings, trace routes, and Telnet
management connections to the router.
None configured
8-20
DNS default
gateway
addresses
A list of gateways attached to the router through
which clients attached to the router can reach DNSs.
None configured
8-20
IP load sharing
A Brocade feature that enables the router to balance
traffic to a specific destination across multiple equalcost paths.
Enabled
8-50
8-26
Load sharing is based on a combination of
destination MAC address, source MAC address,
destination IP address, source IP address, and IP
protocol.
Note: Load sharing is sometimes called Equal Cost
Multi Path (ECMP).
Maximum IP
load sharing
paths
The maximum number of equal-cost paths across
which the BigIron RX is allowed to distribute traffic.
Four
8-50
Origination of
default routes
You can enable a router to originate default routes for
the following route exchange protocols, on an
individual protocol basis:
Disabled
25-4
August 2009
•
RIP
•
OSPF
•
BGP4
26-29
27-23
© 2009 Brocade Communications Systems, Inc.
7
Table 8.1: IP Global Parameters (Continued)
Parameter
Description
Default
See page...
Default network
route
The router uses the default network route if the IP
route table does not contain a route to the destination
and also does not contain an explicit default route
(0.0.0.0 0.0.0.0 or 0.0.0.0/0).
None configured
8-48
Static route
An IP route you place in the IP route table.
No entries
8-41
Source interface
The IP address the router uses as the source address
for Telnet, RADIUS, or TACACS/TACACS+ packets
originated by the router. The router can select the
source address based on either of the following:
The lowest-numbered
IP address on the
interface the packet is
sent on.
8-28
•
The lowest-numbered IP address on the interface
the packet is sent on.
•
The lowest-numbered IP address on a specific
interface. The address is used as the source for
all packets of the specified type regardless of
interface the packet is sent on.
IP Interface Parameters
Table 8.2 lists the interface-level IP parameters for the BigIron RX, their default values, and where to find
configuration information.
Table 8.2: IP Interface Parameters
Parameter
Description
Default
See page...
IP state
The Internet Protocol, version 4
Enabled
n/a
Note: You cannot
disable IP.
IP address
A Layer 3 network interface address
None configureda
8-10
Ethernet II
8-25
1500 for Ethernet II
encapsulated packets
8-27
The BigIron RX has separate IP addresses on
individual interfaces.
Encapsulation
type
8
The format of the packets in which the router
encapsulates IP datagrams. The encapsulation
format can be one of the following:
•
Ethernet II
•
SNAP
IP Maximum
Transmission
Unit (MTU)
The maximum length (number of bytes) of an
encapsulated IP datagram the router can forward.
ARP age
Locally overrides the global setting. See Table 8.1 on
page 8-5.
1492 for SNAP
encapsulated packets
Ten minutes
© 2009 Brocade Communications Systems, Inc.
8-34
August 2009
Table 8.2: IP Interface Parameters (Continued)
Parameter
Description
Default
See page...
Metric
A numeric cost the router adds to RIP routes learned
on the interface. This parameter applies only to RIP
routes.
1 (one)
25-2
Directed
broadcast
forwarding
Locally overrides the global setting. See Table 8.1 on
page 8-5.
Disabled
8-38
ICMP Router
Discovery
Protocol (IRDP)
Locally overrides the global IRDP settings. See Table
8.1 on page 8-5.
Disabled
8-55
ICMP Redirect
messages
Locally overrides the global setting. See Table 8.1 on
page 8-5.
Enabled
8-40
DHCP gateway
stamp
The router can assist DHCP/BootP Discovery packets
from one subnet to reach DHCP/BootP servers on a
different subnet by placing the IP address of the
router interface that receives the request in the
request packet’s Gateway field.
The lowest-numbered
IP address on the
interface that receives
the request
8-59
The router can forward UDP broadcast packets for
UDP applications such as BootP. By forwarding the
UDP broadcasts, the router enables clients on one
subnet to find servers attached to other subnets.
The router helps
forward broadcasts for
the following UDP
application protocols:
8-57
Note: To completely enable a client’s UDP
application request to find a server on another subnet,
you must configure an IP helper address consisting of
the server’s IP address or the directed broadcast
address for the subnet that contains the server. See
the next row.
•
bootps
•
dns
•
netbios-dgm
•
netbios-ns
•
tacacs
•
tftp
•
time
You can override the default and specify the IP
address to use for the Gateway field in the packets.
Note: UDP broadcast forwarding for client DHCP/
BootP requests (bootpc) must be enabled and you
must configure an IP helper address (the server’s IP
address or a directed broadcast to the server’s
subnet) on the port connected to the client.
UDP broadcast
forwarding
IP helper
address
The IP address of a UDP application server (such as
a BootP or DHCP server) or a directed broadcast
address. IP helper addresses allow the router to
forward requests for certain UDP applications from a
client on one subnet to a server on another subnet.
None configured
8-58
a. Some devices have a factory default, such as 209.157.22.154, used for troubleshooting during installation. For the BigIron RX,
the address is on module 1 port 1 (or 1/1).
August 2009
© 2009 Brocade Communications Systems, Inc.
9
Configuring IP Parameters
Some parameters can be configured globally while others can be configured on individual interfaces. Some
parameters can be configured globally and overridden for individual interfaces.
Configuring IP Addresses
You can configure an IP address on the following types of the BigIron RX interfaces:
•
Ethernet port
•
Virtual routing interface (also called a Virtual Ethernet or “VE”)
•
Loopback interface
By default, you can configure up to 24 IP addresses on each interface.
Also, the CAM can hold up to 256,000 IP address entries.
NOTE: Once you configure a virtual routing interface on a VLAN, you cannot configure Layer 3 interface
parameters on individual ports in the VLAN. Instead, you must configure the parameters on the virtual routing
interface itself.
Also, once an IP address is configured on an interface, the hardware is programmed to route all IP packets that
are received on the interface. Consequently, all IP packets not destined for this device’s MAC address will not be
bridged but dropped.
The BigIron RX supports both classical IP network masks (Class A, B, and C subnet masks, and so on) and
Classless Interdomain Routing (CIDR) network prefix masks.
•
To enter a classical network mask, enter the mask in IP address format. For example, enter
“209.157.22.99 255.255.255.0” for an IP address with a Class-C subnet mask.
•
To enter a prefix network mask, enter a forward slash (/) and the number of bits in the mask immediately after
the IP address. For example, enter “209.157.22.99/24” for an IP address that has a network mask with 24
significant bits (ones).
By default, the CLI displays network masks in classical IP address format (example: 255.255.255.0). You can
change the display to prefix format. See “Configuring the Default Gateway” on page 8-12.
Assigning an IP Address to an Ethernet Port
To assign an IP address to port 1/1, enter the following commands:
BigIron RX(config)# interface ethernet 1/1
BigIron RX(config-if-e1000-1/1)# ip address 192.45.6.1 255.255.255.0
NOTE: You also can enter the IP address and mask in CIDR format, as follows:
BigIron RX(config-if-e10000-1/1)# ip address 192.45.6.1/24
Syntax: interface ethernet <slot/port>
Syntax: [no] ip address <ip-addr> <ip-mask> | <ip-addr>/<mask-bits> [ospf-ignore | ospf-passive | secondary]
The ospf-ignore | ospf-passive parameters modify the BigIron RX defaults for adjacency formation and interface
advertisement. Use one of these parameters if you are configuring multiple IP subnet addresses on the interface
but you want to prevent OSPF from running on some of the subnets.
10
•
ospf-passive – Disables adjacency formation with OSPF neighbors (but does not disable advertisement of
the interface into OSPF). By default, when OSPF is enabled on an interface, the software forms OSPF router
adjacencies between each primary IP address on the interface and the OSPF neighbor attached to the
interface.
•
ospf-ignore – Disables OSPF adjacency formation and advertisement of the interface into OSPF. The
subnet is completely ignored by OSPF.
© 2009 Brocade Communications Systems, Inc.
August 2009
Use the secondary parameter if you have already configured an IP address within the same subnet on the
interface.
NOTE: When you configure more than one address in the same subnet, all but the first address are secondary
addresses and do not form OSPF adjacencies.
Assigning an IP Address to a Loopback Interface
Loopback interfaces are always up, regardless of the states of physical interfaces. They can add stability to the
network because they are not subject to route flap problems that can occur due to unstable links between a
BigIron RX and other devices.
You can configure up to eight loopback interfaces on a BigIron RX.
You can add up to 24 IP addresses to each loopback interface.
NOTE: If you configure the BigIron RX to use a loopback interface to communicate with a BGP4 neighbor, you
also must configure a loopback interface on the neighbor and configure the neighbor to use that loopback interface
to communicate with the BigIron RX. See “Adding a Loopback Interface” on page 27-44 in the BGP4 chapter.
To add a loopback interface, enter commands such as those shown in the following example:
BigIron RX(config-bgp-router)# exit
BigIron RX(config)# int loopback 1
BigIron RX(config-lbif-1)# ip address 10.0.0.1/24
Syntax: interface loopback <num>
For the syntax of the IP address, see “Assigning an IP Address to an Ethernet Port” on page 8-10.
Assigning an IP Address to a Virtual Interface
A virtual interface is a logical port associated with a Layer 3 Virtual LAN (VLAN) configured on a BigIron RX.
NOTE: Other sections in this chapter that describe how to configure interface parameters also apply to virtual
interfaces.
NOTE: The BigIron RX uses the lowest MAC address on the device (the MAC address of port 1 or 1/1) as the
MAC address for all ports within all virtual interfaces you configure on the device.
To add a virtual interface to a VLAN and configure an IP address on the interface, enter commands such as the
following:
BigIron
BigIron
BigIron
BigIron
BigIron
RX(config)# vlan 2 name IP-Subnet_1.1.2.0/24
RX(config-vlan-2)# untag e1/1 to 1/4
RX(config-vlan-2)# router-interface ve1
RX(config-vlan-2)# interface ve1
RX(config-vif-1)# ip address 1.1.2.1/24
The first two commands create a Layer 3 protocol-based VLAN named “IP-Subnet_1.1.2.0/24” and add a range of
untagged ports to the VLAN. The router-interface command creates virtual interface 1 as the routing interface for
the VLAN. The last two commands change to the interface configuration level for the virtual interface and assign
an IP address to the interface.
Syntax: router-interface ve <num>
Syntax: interface ve <num>
The <num> parameter specifies the virtual interface number. You can specify from 1 to the maximum number of
virtual interfaces supported on the device. To display the maximum number of virtual interfaces supported on the
device, enter the show default values command. The maximum is listed in the System Parameters section, in
the Current column of the virtual-interface row.
August 2009
© 2009 Brocade Communications Systems, Inc.
11
For the syntax of the IP address, see “Assigning an IP Address to an Ethernet Port” on page 8-10.
Deleting an IP Address
To delete an IP address, enter a command such as the following:
BigIron RX(config-if-e1000-1/1)# no ip address 1.1.2.1
This command deletes IP address 1.1.2.1. You do not need to enter the subnet mask.
To delete all IP addresses from an interface, enter the following command:
BigIron RX(config-if-e1000-1/1)# no ip address *
Syntax: no ip address <ip-addr>
Configuring the Default Gateway
To manage a BigIron RX using Telnet or Secure Shell (SSH) CLI connections or the Web management interface,
you must configure an IP address for the BigIron RX.
To configure a default gateway, first define an IP address using the following CLI command.
BigIron RX(config)# ip address 192.45.6.110 255.255.255.0
Syntax: ip address <ip-addr> <ip-mask>
or
Syntax: ip address <ip-addr>/<mask-bits>
GRE IP Tunnel
The BigIron RX allows the tunneling of packets of the following protocols over an IP network using the Generic
Router Encapsulation (GRE) mechanism as described in RFC 2784:
•
OSPF
•
BGP
•
IS-IS point-to-point
Using this feature, packets of these protocols can be encapsulated inside a transport protocol packet at a tunnel
source and delivered to a tunnel destination where it is unpacked and made available for delivery. Figure 8.2 on
page 8-12 describes the GRE header format.
Figure 8.2
GRE Header format
1 bit
Checksum
12 bits
3 bits
Reserved0
Ver
16 bits
16 bits
16 bits
Protocol Type Checksum Reserved
(optional) (optional)
Checksum – This field is assumed to be zero in this version. If set to 1 means that the Checksum (optional) and
Reserved (optional) fields are present and the Checksum (optional) field contains valid information.
Reserved0 – Bits 6:0 of the field are reserved for future use and must be set to zero in transmitted packets. If bits
11:7 of the field are non-zero, then a receiver must discard the packet unless RFC 1701 is implemented. This field
is assumed to be zero in this version.
Ver – This field must be set to zero. This field is assumed to be zero in this version.
GRE MTU Configuration Considerations
The default value of IP GRE tunnel MTU is 1476 bytes. The MTU of the GRE tunnel is compared with the outgoing
packet before the encapsulation is done. After the encapsulation, the packet size increases by 24 bytes. If a user
wants to change the GRE tunnel MTU, the MTU should be at least 24 bytes less than the IP MTU of the outgoing
interface. Otherwise, the size of the encapsulated packet will exceed the IP MTU of the outgoing interface. In that
12
© 2009 Brocade Communications Systems, Inc.
August 2009
case, the packet is dropped if the DF (Do-Not-Fragment) bit is set in the original IP packet, otherwise, the packet is
sent to CPU for fragmentation.
NOTE: The encapsulated packets sent on a GRE tunnel have the DF bit set. Setting a GRE tunnel MTU to be
greater than 1476 will cause the encapsulated packet to be greater than 1500 bytes. This may cause the transit
routers to drop the encapsulated packet if that transit router's IP MTU is 1500 bytes (a typical default MTU value)
since transit routers can not fragment a GRE packet.
Configuring a GRE IP Tunnel
To configure a GRE IP Tunnel, the following parameters must be configured:
•
Tunnel interface
•
Source Address for the Tunnel
•
Destination address for the Tunnel
•
GRE Encapsulation
•
Loopback address for the Tunnel (required for de-encapsulation)
•
IP address for the Tunnel
NOTE: Sustained rates of small packet sizes may affect the ability of a 10 gigabit Ethernet port to maintain line
rate GRE encapsulation and de-encapsulation performance.
NOTE: ISIS is supported only in point-to-point mode on GRE tunnel.
Configuring a Tunnel Interface
To configure a tunnel interface, use a the following command:
BigIron RX(config)# interface tunnel 1
BigIron RX(config-tnif-1)
Syntax: interface tunnel <tunnel-number>
The <tunnel-number> variable is numerical value that identifies the tunnel being configured.
Configuring a Source Address for a Tunnel Interface
To configure a source address for a specific tunnel interface, enter the following command:
BigIron RX(config)# interface tunnel 1
BigIron RX(config-tnif-1)tunnel source 35.0.8.108
Syntax: tunnel source <ip-address>
The <ip-address> variable is source IP address being configured for the specified tunnel.
Configuring a Destination Address for a Tunnel Interface
To configure a destination address for a specific tunnel interface, enter the following command:
BigIron RX(config)# interface tunnel 1
BigIron RX(config-tnif-1)tunnel destination 131.108.5.2
Syntax: tunnel destination <ip-address>
The <ip-address> variable is destination IP address being configured for the specified tunnel.
NOTE: Ensure a route to the tunnel destination exist on the tunnel source device. Create a static route if needed.
Configuring a Tunnel Interface for GRE Encapsulation
To configure a specified tunnel interface for GRE encapsulation, enter the following command:
August 2009
© 2009 Brocade Communications Systems, Inc.
13
BigIron RX(config)# interface tunnel 1
BigIron RX(config-tnif-1)tunnel mode gre ip
Syntax: tunnel mode gre ip
The gre parameter specifies that the tunnel will use GRE encapsulation
The Ip parameter specifies that the tunnel protocol is IP.
Configuring a Loopback Port for a Tunnel Interface
On the BigIron RX, a loopback port is required for de-encapsulating a packet exiting the tunnel.
Fiber-optic components must be present on the interface module for the loopback port to work. Therefore,
consider the following configuration rules for a loopback port:
•
1-gigabit copper ports should not be configured as loopback ports.
•
1-gigabit and 10-gigabit fiber ports can be configured as loopback port.
•
1-gigabit fiber ports require a fiber cable to be connected to itself for loopback to work.
•
10-gigabit fiber ports do not require a cable.
To configure a loopback port for a specified tunnel interface, enter the following commands:
BigIron RX(config)# interface tunnel 1
BigIron RX(config-tnif-1)tunnel loopback 3/1
Syntax: tunnel loopback <port-number>
The <port-number> variable is the port number assigned to be the loopback port for the specified tunnel interface.
A loopback port is required to perform termination and forwarding in hardware. If a loopback port is not configured,
tunnel termination is performed by the CPU. When a port is used as a loopback port for a tunnel, it should not be
used for any other purpose.
NOTE: The tunnel loopback port is one of the router’s physical ports. It’s defined so the GRE packet processing
Is done on by the port’s LP CPU instead of the MP’s CPU. You can use a 10 GBE port without a loopback
connector but the optical transceiver module MUST be installed. You can use a 1 GBE fiber port, but a physical
loopback connector is required. Copper ports are not supported.
Configuring an IP Address for a Tunnel Interface
To configure an IP address for a specified tunnel interface, enter the following command:
BigIron RX(config)# interface tunnel 1
BigIron RX(config-tnif-1)ip address 10.10.3.1/24
Syntax: ip address <ip-address>
The <ip-address> variable is the IP address being configured for the specified tunnel interface.
Example of a GRE IP Tunnel Configuration
In this example, a GRE IP Tunnel is configured between the BigIron RX A switch and the BigIron RX B switch.
Traffic between networks 10.10.1.0/24 and 10.10.2.0/24 is encapsulated in a GRE IP packet sent through the
tunnel on the 10.10.3.0 network. and unpacked and sent the destination network. A static route is configured at
each router to go through the tunnel interface to the target network.
14
© 2009 Brocade Communications Systems, Inc.
August 2009
Figure 8.3
GRE IP Tunnel Configuration Example
P
B
i
g
I
r
o
n
R
X
o
3
/
3
1
0
.
1
0
.
1
.
0
/
2
r
t
A
1
6
.
0
.
8
.
1
0
8
4
1
1
0
.
1
0
.
3
.
1
I
1
0
1
1
0
.
1
0
.
2
.
0
/
2
.
0
1
0
.
1
.
0
3
.
.
3
n
t
e
r
n
e
t
0
.
2
4
P
o
1
B
i
g
I
r
o
n
R
X
r
/
5
3
t
1
1
.
1
0
8
.
5
.
2
B
Configuration Example for BigIron RX A
BigIron RX (config)# interface ethernet 3/1
BigIron Rx (config-if-e1000-3/1)# ip address 36.0.8.108/24
BigIron RX (config)# exit
BigIron RX (config)# interface tunnel 1
BigIron RX(config-tnif-1)# tunnel loopback 4/1
BigIron RX(config-tnif-1)# tunnel source 36.0.8.108
BigIron RX(config-tnif-1)# tunnel destination 131.108.5.2
BigIron RX(config-tnif-1)# tunnel mode gre ip
BigIron RX(config-tnif-1)# ip address 10.10.3.1/24
BigIron RX(config-tnif-1)# exit
BigIron RX (config)# ip route 131.108.5.0/24 36.0.8.1
BigIron RX(config)# ip route 10.10.2.0/24 tunnel 1
Configuration Example for BigIron RX B
BigIron RX(config)# interface ethernet 5/1
BigIron RX(config--if-e1000-5/1)# ip address 131.108.5.2/24
BigIron RX (config)# exit
BigIron RX (config)# interface tunnel 1
BigIron RX(config-tnif-1)# tunnel loopback 1/1
BigIron RX(config-tnif-1)# tunnel source 131.108.5.2
BigIron RX(config-tnif-1)# tunnel destination 36.0.8.108
BigIron RX(config-tnif-1)# tunnel mode gre ip
BigIron RX(config-tnif-1)# ip address 10.10.3.2/24
BigIron RX(config-tnif-1)# exit
BigIron RX(config)# ip route 36.0.8.0/24 131.108.5.1
BigIron RX(config)# ip route 10.10.1.0/24 tunnel 1
Displaying GRE Tunneling Information
You can display GRE Tunneling Information using the show ip interface, show ip route and show interface
tunnel commands as shown in the following:
BigIron RX# show ip interface tunnel 1
Interface
Tunnel 1
IP-Address
10.10.3.1
OK? Method
YES NVRAM
Status
up
Protocol VRF
up
default
Syntax: show ip interface tunnel <tunnel-no>
August 2009
© 2009 Brocade Communications Systems, Inc.
15
This display shows the following information.
Table 8.3: CLI Display of Interface IP Configuration Information
This Field...
Displays...
Interface
The tunnel and tunnel number.
IP-Address
The IP address of the tunnel interface.
OK?
Whether the IP address has been configured on the tunnel interface.
Method
Whether the IP address has been saved in NVRAM. If you have set
the IP address for the interface in the CLI, but have not saved the
configuration, the entry for the interface in the Method field is
“manual”.
Status
The link status of the interface. If you have disabled the interface with
the disable command, the entry in the Status field will be
“administratively down”. Otherwise, the entry in the Status field will be
either “up” or “down”.
Protocol
Whether the interface can provide two-way communication. If the IP
address is configured, and the link status of the interface is up, the
entry in the protocol field will be “up”. Otherwise the entry in the
protocol field will be “down”.
VRF
The name of the Virtual Routing instance that the tunnel is configured
in.
The show ip route command displays routes that are pointing to a GRE tunnel as shown in the following:
BigIron RX# show ip route
Total number of IP routes: 9
Type Codes - B:BGP D:Connected I:ISIS S:Static R:RIP O:OSPF; Cost - Dist/Metric
1
2
3
4
5
6
7
8
9
Destination
2.2.2.1/32
10.10.1.0/24
20.2.1.0/24
45.4.1.0/24
63.148.1.0/24
70.7.1.0/24
80.8.1.0/24
110.110.2.0/24
189.100.1.0/24
Gateway
DIRECT
110.110.2.12
DIRECT
80.8.1.2
DIRECT
DIRECT
70.7.1.1
63.148.1.1
110.110.2.12
Port
Cost
loopback1 0/0
tunnel 1
1/1
eth5/11
0/0
tunnel 2
0/0
eth 2/11
0/0
eth 2/14
0/0
eth 2/14
1/1
eth 2/11
1/1
tunnel 1
0/0
Type
D
S
D
D
D
D
S
S
D
The show interface tunnel command displays the status and configuration information for a tunnel interface as
shown in the following:
BigIron RX# show interface tunnel 1
Tunnel1 is up, line protocol is up
Hardware is Tunnel
Tunnel source 63.148.1.2
Tunnel destination is 110.110.2.12
Tunnel mode gre ip
Tunnel loopback is 1/3
16
© 2009 Brocade Communications Systems, Inc.
August 2009
No port name
MTU 1476 Bytes
Syntax: show interface tunnel <number>
The <number> parameter indicates the tunnel interface number for which you want to display information.
IPv6 Over IPv4 Tunnels in Hardware
To enable communication between the isolated IPv6 domains using the IPv4 infrastructure, you can configure
IPv6 over IPv4 tunnels.
Brocade supports the following IPv6 over IPv4 tunneling in hardware mechanisms:
•
Manually configured tunnels
In general, a manually configured tunnel establishes a permanent link between routers in IPv6 domains. A
manually configured tunnel has explicitly configured IPv4 addresses for the tunnel source and destination.
This tunneling mechanism requires that the router at each end of the tunnel run both IPv4 and IPv6 protocol
stacks. The routers running both protocol stacks, or dual-stack routers, can interoperate directly with both IPv4
and IPv6 end systems and routers.
Configuring a Manual IPv6 Tunnel
You can use a manually configured tunnel to connect two isolated IPv6 domains. You should deploy this point-topoint tunnel mechanism if you need a permanent and stable connection.
Configuration Notes
•
The tunnel mode should be ipv6ip indicating that this is ipv6 manual tunnel
•
Both source and destination addresses needs to be configured on the tunnel.
•
On the remote side we need to have exactly opposite source/destination pair.
•
The tunnel destination should be reachable through the ipv4 backbone.
•
The ipv6 address on the tunnel needs to be configured for the tunnel to come up
•
Both static and dynamic IPv6 routing protocols on top of the tunnel are supported
•
The tunnel source can be ip address or interface name
•
Manual tunnels provide static point-point connectivty
NOTE: IPV6 over IPV4 tunnel will not work when used with transperant VLAN flooding mode .
Figure 8.4
Manually Configured Tunnel
Dual-Stack
Dual-Stack
IPv4
Network
IPv6
Network
Tunnel
Source
IPv6
Network
Tunnel
Destination
To configure a manual IPv6 tunnel, enter commands such as the following on a Layer 3 Switch running both IPv4
and IPv6 protocol stacks on each end of the tunnel:
BigIron RX(config)# interface tunnel 1
BigIron RX(config-tnif-1)#tunnel source ethernet 3/1
August 2009
© 2009 Brocade Communications Systems, Inc.
17
BigIron RX(config-tnif-1)#tunnel destination 198.162.100.1
BigIron RX(config-tnif-1)#tunnel mode ipv6ip
BigIron RX(config-tnif-1)#ipv6 address 2001:b78:384d:34::/64 eui-64
This example creates tunnel interface 1 and assigns a global IPv6 address with an automatically computed EUI64 interface ID to it. The IPv4 address assigned to Ethernet interface 3/1 is used as the tunnel source, while the
IPv4 address 192.168.100.1 is configured as the tunnel destination. Finally, the tunnel mode is specified as a
manual IPv6 tunnel.
Syntax: interface tunnel <number>
For the <number> parameter, specify a value between 1 – 32.
Syntax: ipv6 address <ipv6-prefix>/<prefix-length> [eui-64]
You must specify the <ipv6-prefix> parameter in hexadecimal using 16-bit values between colons as documented
in RFC 2373.
You must specify the <prefix-length> parameter as a decimal value. A slash mark (/) must follow the <ipv6-prefix>
parameter and keyword configures the global or site-local address with an EUI-64 interface ID in the low-order 64
bits. The interface ID is automatically constructed in IEEE EUI-64 format using the interface’s MAC address.
Syntax: tunnel source <ipv4-address> | ethernet <port> | loopback <number> | ve <number>
You must specify the <ipv4-address> parameter using 8-bit values in dotted decimal notation.
The ethernet | loopback | ve parameter specifies an interface as the tunnel source. If you specify an Ethernet
interface, also specify the port number associated with the interface. If you specify a loopback, VE, or interface,
also specify the loopback, VE, or number, respectively.
Syntax: tunnel destination <ipv4-address>
You must specify the <ipv4-address> parameter using 8-bit values in dotted decimal notation.
Syntax: tunnel mode ipv6ip
Clearing IPv6 Tunnel Statistics
You can clear all IPv6 tunnel statistics (reset all fields to zero) or statistics for a specified tunnel interface.
For example, to clear statistics for tunnel 1, enter the following command at the Privileged EXEC level or any of the
Config levels of the CLI:
BigIron RX# clear ipv6 tunnel 1
Syntax: clear ipv6 tunnel <number>
The <number> parameter specifies the tunnel number.
Displaying IPv6 Tunnel Information
To display a summary of tunnel information, enter the following command at any level of the CLI:
BigIron RX# show ipv6 tunnel
IP6 Tunnels
Tunnel Mode
Packet Received
1
configured
0
2
configured
0
Packet Sent
0
22419
Syntax: show ipv6 tunnel
18
© 2009 Brocade Communications Systems, Inc.
August 2009
This display shows the following information.
Table 8.4: IPv6 tunnel information
This Field...
Displays...
Tunnel
The tunnel interface number.
Mode
The tunnel mode. Possible modes include the following:
•
configured – Indicates a manually configured tunnel.
•
6to4 – Indicates an automatic 6to4 tunnel.
•
auto – Indicates an automatic IPv4-compatible tunnel.
Packet Received
The number of packets received by a tunnel interface.
Packet Sent
The number of packets sent by a tunnel interface.
Displaying Tunnel Interface Information
For example, to display status and configuration information for tunnel interface 1, enter the following command at
any level of the CLI:
BigIron RX# show interfaces tunnel 1
Tunnel1 is up, line protocol is up
Hardware is Tunnel
Tunnel source ethernet 3/5
Tunnel destination is not configured
Tunnel mode ipv6ip auto-tunnel
No port name
MTU 1500 bytes
Syntax: show interfaces tunnel <number>
The <number> parameter indicates the tunnel interface number for which you want to display information.
This display shows the following information.
Table 8.5: IPv6 tunnel interface information
This Field...
Displays...
Tunnel interface status
The status of the tunnel interface can be one of the following:
Line protocol status
Hardware is tunnel
August 2009
•
up – The tunnel interface is functioning properly.
•
down – The tunnel interface is not functioning and is down.
The status of the line protocol can be one of the following:
•
up – The line protocol is functioning properly.
•
down – The line protocol is not functioning and is down.
The interface is a tunnel interface.
© 2009 Brocade Communications Systems, Inc.
19
Table 8.5: IPv6 tunnel interface information (Continued)
This Field...
Displays...
Tunnel source
The tunnel source can be one of the following:
•
An IPv4 address
•
The IPv4 address associated with an interface/port.
Tunnel destination
The tunnel destination can an IPv4 address.
Tunnel mode
The tunnel mode can be one the following:
•
ipv6ip auto-tunnel – Indicates an automatic IPv4-compatible
tunnel.
•
ipv6ip 6to4 – Indicates an automatic 6to4 tunnel.
Port name
The port name configured for the tunnel interface.
MTU
The setting of the IPv6 maximum transmission unit (MTU).
Displaying Interface Level IPv6 Settings
To display Interface level IPv6 settings for tunnel interface 1, enter the following command at any level of the CLI:
BigIron RX#show ipv6 inter tunnel 1
Interface Tunnel 1 is up, line protocol is up
IPv6 is enabled, link-local address is fe80::3:4:2 [Preferred]
Global unicast address(es):
1001::1 [Preferred], subnet is 1001::/64
1011::1 [Preferred], subnet is 1011::/64
Joined group address(es):
ff02::1:ff04:2
ff02::5
ff02::1:ff00:1
ff02::2
ff02::1
MTU is 1480 bytes
ICMP redirects are enabled
No Inbound Access List Set
No Outbound Access List Set
OSPF enabled
The display command above reflects the following configuration:
BigIron RX#show running-config interface tunnel 1
!
interface tunnel 1
port-name ManualTunnel1
tunnel mode ipv6ip
tunnel source loopback 1
tunnel destination 2.1.1.1
ipv6 address fe80::3:4:2 link-local
ipv6 address 1011::1/64
ipv6 address 1001::1/64
ipv6 ospf area 0
Configuring Domain Name Server (DNS) Resolver
The DNS resolver lets you use a host name to perform Telnet, ping, and traceroute commands. You can also
define a DNS domain on a BigIron RX and thereby recognize all hosts within that domain. After you define a
20
© 2009 Brocade Communications Systems, Inc.
August 2009
domain name, the BigIron RX automatically appends the appropriate domain to the host and forwards it to the
domain name server.
For example, if the domain “newyork.com” is defined on a BigIron RX and you want to initiate a ping to host
“NYC01” on that domain, you need to reference only the host name in the command instead of the host name and
its domain name. For example, you could enter either of the following commands to initiate the ping:
BigIron RX# ping nyc01
BigIron RX# ping nyc01.newyork.com
Defining a DNS Entry
You can define up to four DNS servers for each DNS entry. The first entry serves as the primary default address.
If a query to the primary address fails to be resolved after three attempts, the next gateway address is queried
(also up to three times). This process continues for each defined gateway address until the query is resolved.
The order in which the default gateway addresses are polled is the same as the order in which you enter them.
Suppose you want to define the domain name of newyork.com on a BigIron RX and then define four possible
default DNS gateway addresses. To do so, enter the following commands:
BigIron RX(config)# ip dns domain-name newyork.com
BigIron RX(config)# ip dns server-address 209.157.22.199 205.96.7.15 208.95.7.25
201.98.7.15
Syntax: ip dns domain-name <name>
Syntax: ip dns server-address <ip-addr> [<ip-addr>] [<ip-addr>] [<ip-addr>]
The first IP address in the ip dns server-address... command becomes the primary gateway address and all
others are secondary addresses. Because IP address 201.98.7.15 is the last address listed, it is also the last
address consulted to resolve a query.
Defining a Domain List
If you want to use more than one domain name to resolve host names, you can create a list of domain names. For
example, enter the commands such as the following:
BigIron
BigIron
BigIron
BigIron
BigIron
RX(config)#
RX(config)#
RX(config)#
RX(config)#
RX(config)#
ip
ip
ip
ip
dns
dns
dns
dns
domain-list
domain-list
domain-list
domain-list
company.com
ds.company.com
hw_company.com
qa_company.com
The domain names are tried in the order you enter them
Syntax: [no] ip dns domain-list <domain-name> sequence-number <sequence-number>
The <domain-name> parameter specifies the domain name to be added to the list.
The <sequence-number> parameter specifies a sequence number that is generated internally in steps of 10
starting with sequence number 5. The entries are tried in order of sequence number of entries.
Use the no form of the command to remove a domain name from the domain-list.
Displaying the Domain Name List
To determine what domain names have been configured in the domain list, enter the following command:
BigIron RX(config)#show ip dns domain-list
Total number of entries : 3
Primary Domain Name:
Domain Name List:
seq:4 eng.company.co
seq:5 facilities.company.com
seq:12.
support.company.com
Syntax: show ip dns domain-list
August 2009
© 2009 Brocade Communications Systems, Inc.
21
Verifying Domain Name or IP Address
You can use the ip domain-lookup command to verify the host name for an IP address or the IP address for a
host name. For example, if you have an IP address and you want to find out what host name it resolves to, enter
the following command:
BigIron RX#ip domain-lookup 66.151.144.5
Host Flag TTL/min Type Address
border2.pc0-0-bbnet1.sje.pnap.net (TMP,OK) 720 IP 66.151.144.5
You can also enter the following:
BigIron RX#ip domain-lookup border2
Host Flag TTL/min Type Address
border2.pc0-0-bbnet1.sje.pnap.net (TMP,OK) 720 IP 66.151.144.5
Syntax: ip domain-loopkup <ip-address> | <host-name>
<ip-address> Enter an IP address to obtain the host name.
<host-name> Enter the host name to obtain the IP address.
The complete, qualified host name, along with its IP address and TTL value are displayed.
Adding Host Names to the DNS Cache Table
Dynamic Cache entries
The entries in a DNS cache table are used to resolve host names to IP addresses. When a client initiates a DNS
query, the Brocade device checks the DNS cache table to see if the host name can be resolved to any of the
entries. If it a match is found, the query is resolved. If a match is not found, the DNS resolver sends the query to
the DNS servers. If the name is resolved, the complete, qualified host name and its IP address is added to the
DNS cache table and the hosts’ IP address is returned to the client.
Static Cache entries
You can manually add entries to the DNS cache table if you know a host’s complete, qualified name and its IP
address. To add host names and their IP addresses to the DNS cache table, enter commands such as the
following:
BigIron RX(config)#ip dns cache-entry www.foundrynet.com 63.236.63.244 720
Syntax: [no] ip dns cache-entry <host-name> <ip-address>
<host-name> Complete, qualified name . For example, enter www.company.com or host.company.com.
<ip-address> Enter the IP address of the host. This must be the correct IP address for the host.
Use the no form of the command to manually remove an entry from the DNS cache table; however, you must enter
the entire entry to delete the entry. For example, you must enter:
BigIron RX(config)#no ip dns cache-entry www.foundrynet.com 63.236.63.244
Clearing the DNS Cache Table
To clear the entire DNS cache table, enter the following command:
BigIron RX#clear ip dns cache-table
To clear a specific entry in DNS cache table, enter the following command:
BigIron RX# clear ip dns cache-table www.foundrynet.com
OR
BigIron RX# clear ip dns cache-table 63.236.63.244
Syntax: clear ip dns cache-table [ip-address | host-name]
<host-name> Complete, qualified name . For example, enter www.company.com or host.company.com.
22
© 2009 Brocade Communications Systems, Inc.
August 2009
<ip-address> Enter the IP address of the host. This must be the correct IP address for the host.
Displaying the DNS Cache Table
To display what hosts are currently in the DNS cache table, enter the following command:
BigIron RX(config)#show ip dns cache-table
Host
Flag
border2.pc0-0-bbnet1.sje.pnap.net (TMP,OK)
sl-internap-109-0.sprintlink.net (TMP,OK)
sl-st21-sj-13-0.sprintlink.net
(TMP,OK)
mail.company.com
(STA,OK)
Address
66.151.144.5
144.223.242.86
144.232.20.59
64.236.22.148
To display the individual entries in the cache-table, enter a command such as the following:
BigIron RX(config)#show ip dns cache-table border2
Host Flag TTL/min Address
border2.pc0-0-bbnet1.sje.pnap.net (TMP,OK) 720 66.151.144.5
OR
BigIron RX(config)#show ip dns cache-table 66.151.144.5
Host Flag TTL/min Address
border2.pc0-0-bbnet1.sje.pnap.net (TMP,OK) 720 66.151.144.5
Table 8.6: The show ip dns cache-table output
This Field...
Displays...
Host
The complete, qualified domain name of the host.
Flag
Indicates if the entry is dynamic or static and if the information for the
domain is up to date:
•
TMP – Entry is dynamic
•
STA – Entry is static
•
OK – Information for the entry is up to date
•
EX – The entry is expired and would not be used. Such an entry
would be deleted from the cache table at next cache poll refresh.
TTL/min
If the entry is dynamic (TMP) this value shows how long the entry
remains in the DNS cache table. If the entry is static (STA), it remains
in the DNS cache table and never changes until it is manually
removed or the DNS cache table is cleared.
Address
The IP address of the entry.
Syntax: show ip dns cache-table [host-name | ip-address]
<host-name> Complete, qualified name . For example, enter www.company.com or host.company.com.
<ip-address> Enter the IP address of the host. This must be the correct IP address for the host.
Defining the Polling Interval
The polling interval determines how often the Brocade device checks the status of the entries in the DNS cache
table to determine if the information for that host has changed. If the TTL value of the cache entry is expired the
entry is removed from the cache-table.
To define a polling interval, enter the following command:
BigIron RX(config)#ip dns poll-interval 7
August 2009
© 2009 Brocade Communications Systems, Inc.
23
Syntax: ip dns poll-interval <minutes>
Enter the polling interval in minutes. The default is 1 minutes.
Displaying the Polling Interval
To display the current polling interval configured for the device, enter the following command:
BigIron RX(config)#show ip dns poll-time-interval
Current DNS polling interval is 7 minutes
Syntax: show ip dns poll-time-interval
Displaying the Server List
To display the current DNS server list configured for the device, enter the following command:
BigIron RX#show ip dns server-list
Total number of DNS Servers configured: 2
Server List:
10.51.17.30
10.51.17.29
Syntax: show ip dns server-list
Debugging the DNS feature
To debug the DNS feature enter the following command:
BigIron RX#debug ip dns
IP: dns debugging is on
Syntax: debug ip dns
Using a DNS Name To Initiate a Trace Route
Suppose you want to trace the route from a BigIron RX to a remote server identified as NYC02 on domain
newyork.com.
Figure 8.5
Querying a host on the newyork.com domain
Domain Name Server
newyork.com
[
nyc01
nyc02
207.95.6.199
BigIron RX
nyc01
nyc02
...
...
Because the newyork.com domain is already defined on the BigIron RX, you need to enter only the host name,
NYC02, as noted below.
BigIron RX# traceroute nyc02
Syntax: traceroute <host-ip-addr> [maxttl <value>] [minttl <value>] [numeric] [timeout <value>]
[source-ip <ip addr>]
The only required parameter is the IP address of the host at the other end of the route.
24
© 2009 Brocade Communications Systems, Inc.
August 2009
After you enter the command, a message indicating that the DNS query is in process and the current gateway
address (IP address of the domain name server) being queried appear on the screen:
Type Control-c to abort
Sending DNS Query to 209.157.22.199
Tracing Route to IP node 209.157.22.80
To ABORT Trace Route, Please use stop-traceroute command.
Traced route to target IP node 209.157.22.80:
IP Address
Round Trip Time1
Round Trip Time2
207.95.6.30
93 msec
121 msec
NOTE: In the above example, 209.157.22.199 is the IP address of the domain name server (default DNS
gateway address), and 209.157.22.80 represents the IP address of the NYC02 host.
Configuring Packet Parameters
You can configure the following packet parameters to control how the BigIron RX sends IP packets to other
devices on an Ethernet network. The BigIron RX always places IP packets into Ethernet packets to forward them
on an Ethernet port.
•
Encapsulation type – The format for the Layer 2 packets within which the BigIron RX sends IP packets.
•
Maximum Frame Size – The maximum frame size that applies to all ports on a packet processor (PPCR).
•
IP Maximum Transmission Unit (MTU) – The maximum length of IP packet that a Layer 2 packet can contain.
IP packets that are longer than the IP MTU are fragmented and sent in multiple Layer 2 packets. You can
change the IP MTU globally or on a port.
•
Global IP MTU – The default IP MTU value depends on the encapsulation type on a port and is 1500
bytes for Ethernet II encapsulation and 1492 bytes for SNAP encapsulation.
•
Port IP MTU – A port’s default IP MTU depends on the encapsulation type enabled on the port.
Changing the Encapsulation Type
The BigIron RX encapsulates IP packets into Layer 2 packets, to send the IP packets on the network. A Layer 2
packet is also called a MAC layer packet or an Ethernet frame. The MAC address of the BigIron RX interface
sending the packet is the source address of the Layer 2 packet. The Layer 2 packet’s destination address can be
one of the following:
•
The MAC address of the IP packet’s destination. In this case, the destination device is directly connected to
the BigIron RX.
•
The MAC address of the next-hop gateway toward the packet’s destination.
•
An Ethernet broadcast address.
The entire IP packet, including the source address, destination address, other control information, and the data, is
placed in the data portion of the Layer 2 packet. Typically, an Ethernet network uses one of two different formats of
Layer 2 packet:
•
Ethernet II
•
Ethernet SNAP (also called IEEE 802.3)
The control portions of these packets differ slightly. All IP devices on an Ethernet network must use the same
format. The BigIron RX uses Ethernet II by default. You can change the IP encapsulation to Ethernet SNAP on
individual ports if needed.
NOTE: All devices connected to the BigIron RX port must use the same encapsulation type.
August 2009
© 2009 Brocade Communications Systems, Inc.
25
To change the IP encapsulation type on interface 1/5 to Ethernet SNAP, enter the following commands:
BigIron RX(config)# int e 1/5
BigIron RX(config-if-e1000-1/5)# ip encapsulation snap
Syntax: ip encapsulation snap | ethernet-2
Setting Maximum Frame Size Per PPCR
You can set a maximum frame size of IP packets that are forwarded on all ports of a PPCR. You can set a
maximum frame size globally and per interface.
Globally setting the maximum frame size
To set a maximum frame size that applies to the device, enter a command such as the following:
BigIron RX(config)# default-max-frame-size 2000
BigIron RX(config)# write memory
BigIron RX(config)# reload
Syntax: default-max-frame-size <bytes>
Enter 64 – 9212 for <bytes>. The default is 1518 bytes.
Setting a maximum frame size per interface
When you set a maximum frame size on an interface, that size applies to all ports in a PPCR. Table 8.7 shows the
ports of each Interface module.
Table 8.7: Available Ports per PPCR
Module
type
24 x 1G
Number of
Packet
Processors
(PPCR)
Ports in a PPCR
PPC1
PPCR2
PPCR3
PPCR4
2
1 - 12
13 - 24
N/A
N/A
To set a maximum frame size for all the ports attached to a PPCR, enter a command such as the following at the
Interface Configuration level:
BigIron
BigIron
BigIron
BigIron
BigIron
RX(config)#interface ethernet 6/4
RX(config-if-e1000-6/4)#max-frame-size 1500 bytes
RX(config-if-e1000-6/4)#write memory
RX(config-if-e1000-6/4)#exit
RX(config)#reload
In this example the maximum frame size is applied to port 4 of a 24 x 1G Ethernet Interface module. That means
that this maximum will apply to ports 1 to 10 on the interface module.
To configure the untagged max-frame-size on a VLAN, enter a command such as the following at he Interface
Configuration level.
BigIron RX(config-vlan-20)#
BigIron RX(config-vlan-20)#max-frame-size 5000
Please reload system!
BigIron RX(config-vlan-20)#
Syntax: max-frame-size <bytes>
The <frame-size> variable specifies the maximum frame size for each port that is connected the same PPCR as
described in Table 8.7. Values can be from 64 to 9212 bytes. The default is 1518 bytes.
26
© 2009 Brocade Communications Systems, Inc.
August 2009
Changing the MTU
The IP MTU is the maximum length of an IP packet that a Layer 2 packet can contain. If an IP packet is larger than
the IP MTU allowed by the Layer 2 packet, the BigIron RX fragments the IP packet into multiple parts that will fit
into Layer 2 packets, and sends the parts of the fragmented IP packet separately, in different Layer 2 packets. The
device that receives the multiple fragments of the IP packet reassembles the fragments into the original packet.
The default IP MTU is 1500 bytes for Ethernet II packets and 1492 for Ethernet SNAP packets. You can change
the IP MTU globally or an individual ports. You can increase the IP MTU size to accommodate large packet sizes,
such as jumbo packets, globally or on individual physical ports. However, IP MTU cannot be set higher than the
maximum frame size, minus 18.
For jumbo packet, the BigIron RX supports hardware forwarding of Layer 3 jumbo packets. Layer 3 IP unicast
jumbo packets received on a port that supports the frame's IP MTU size and forwarded to another port that also
supports the frame's IP MTU size are forwarded in hardware.
Configuration Considerations for Increasing the IP MTU
•
The maximum value of an IP MTU cannot exceed the configured maximum frame size, minus 18. For
example, global IP MTU cannot exceed the value of default-max-frame-size, minus 18 bytes. IP MTU for an
interface cannot exceed the value of the maximum frame size configured on a port, minus 18 bytes. The 18
bytes is used for IP overhead, VLAN tagging, etc.
•
When you increase the IP MTU size of a port, the increase uses system resources. Increase the IP MTU size
only on the ports that need it. For example, if you have one port connected to a server that uses jumbo
frames and two other ports connected to clients that can support the jumbo frames, increase the IP MTU only
on those three ports. Leave the IP MTU size on the other ports at the default value (1500 bytes). Globally
increase the IP MTU size only if needed.
•
Use the same IP MTU size on all ports that will be supporting jumbo frames. If the device needs to fragment
a jumbo frame (and the frame does not have the DF bit set), the device fragments the frame into 1500-byte
fragments, even if the outbound port has a larger IP MTU. For example, if a port has an IP MTU setting of
8000 and receives an 8000-byte frame, then must forward the frame onto a port with an IP MTU of 4000, the
device does not fragment the 8000-byte frame into two 4000-byte frames. Instead, the device fragments the
8000-byte frame into six fragments (five 1500-byte fragments and a final, smaller fragment.)
Globally Changing the IP MTU
To globally enable jumbo support on all ports, enter commands such as the following:
BigIron RX(config)# ip mtu 5000
BigIron RX(config)# write memory
Syntax: [no] ip mtu <bytes>
The <bytes> parameter specifies the maximum number of bytes an Ethernet frame can have in order to be
forwarded on a port. Enter 64 – 9212, but this value must be 18 bytes less than the value of the global maximum
frame size.
NOTE: The BigIron RX will always use 22 Bytes less than the configured MTU in order to compensate for the
4Bytes required for VLAN tags. This is so if a packet is forwarded on both a tagged and untagged link within a
VLAN, it will get through.
Changing the Maximum Transmission Unit on an Individual Interface
By default, the maximum IP MTU sizes are as follows:
•
1500 bytes – The maximum for Ethernet II encapsulation
•
1492 bytes – The maximum for SNAP encapsulation
NOTE: The IP MTU configured at the physical interface level takes precedence over the IP MTU configured at
the global level for that physical interface.
To change the IP MTU for interface 1/5 to 1000, enter the following commands:
August 2009
© 2009 Brocade Communications Systems, Inc.
27
BigIron RX(config)# int e 1/5
BigIron RX(config-if-e10000-5)# ip mtu 1000
Syntax: [no] ip mtu <bytes>
The <bytes> parameter specifies the IP MTU. Ethernet II packets can hold IP packets from 572 – 1500 bytes long.
Ethernet SNAP packets can hold IP packets from 572 – 1492 bytes long. However, the value of IP MTU on an
interface cannot exceed the configured value of IP MTU for an interface, minus 18 bytes. The default IP MTU for
Ethernet II packets is 1500. The default IP MTU for SNAP packets is 1492.
Changing the Router ID
In most configurations, a BigIron RX has multiple IP addresses, usually configured on different interfaces. As a
result, a BigIron RX’s identity to other devices varies depending on the interface to which the other device is
attached. Some routing protocols, including OSPF and BGP4, identify a BigIron RX by just one of the IP
addresses configured on the BigIron RX, regardless of the interfaces that connect the BigIron RX devices. This IP
address is the router ID.
NOTE: RIP does not use the router ID.
NOTE: If you change the router ID, all current BGP4 sessions are cleared.
By default, the router ID on a BigIron RX is one of the following:
•
•
If the router has loopback interfaces, the default router ID is the IP address configured on the lowest
numbered loopback interface configured on the BigIron RX. For example, if you configure loopback interfaces
1, 2, and 3 as follows, the default router ID is 9.9.9.9/24:
•
Loopback interface 1, 9.9.9.9/24
•
Loopback interface 2, 4.4.4.4/24
•
Loopback interface 3, 1.1.1.1/24
If the device does not have any loopback interfaces, the default router ID is the lowest numbered IP interface
configured on the device.
If you prefer, you can explicitly set the router ID to any valid IP address. The IP address cannot be in use on
another device in the network.
NOTE: The BigIron RX uses the same router ID for both OSPF and BGP4. If the router is already configured for
OSPF, you may want to use the router ID that is already in use on the router rather than set a new one. To display
the router ID, enter the show ip CLI command at any CLI level.
To change the router ID, enter a command such as the following:
BigIron RX(config)# ip router-id 209.157.22.26
Syntax: ip router-id <ip-addr>
The <ip-addr> can be any valid, unique IP address.
NOTE: You can specify an IP address used for an interface, but do not specify an IP address in use by another
device.
Specifying a Single Source Interface for Telnet, TACACS/TACACS+,
or RADIUS Packets
When the BigIron RX originates a Telnet, TACACS/TACACS+, or RADIUS packet, the source address of the
packet is the lowest-numbered IP address on the interface that sends the packet. You can configure the BigIron
28
© 2009 Brocade Communications Systems, Inc.
August 2009
RX to always use the lowest-numbered IP address on a specific interface as the source addresses for these types
of packets. When you configure the BigIron RX to use a single source interface for all Telnet, TACACS/TACACS+,
or RADIUS packets, the BigIron RX uses the same IP address as the source for all packets of the specified type,
regardless of the port(s) that actually sends the packets.
Identifying a single source IP address for Telnet, TACACS/TACACS+, or RADIUS packets provides the following
benefits:
•
If your Telnet, TACACS/TACACS+, or RADIUS server is configured to accept packets only from specific IP
addresses, you can use this feature to simplify configuration of the server by configuring the Brocade device
to always send the packets from the same link or source address.
•
If you specify a loopback interface as the single source for Telnet, TACACS/TACACS+, or RADIUS packets,
servers can receive the packets regardless of the states of individual links. Thus, if a link to the server
becomes unavailable but the client or server can be reached through another link, the client or server still
receives the packets, and the packets still have the source IP address of the loopback interface.
The software contains separate CLI commands for specifying the source interface for Telnet, TACACS/TACACS+,
or RADIUS packets. You can configure a source interface for one or more of these types of packets separately.
To specify an Ethernet or a loopback or virtual interface as the source for all TACACS/TACACS+ packets from the
device, use the following CLI method. The software uses the lowest-numbered IP address configured on the port
or interface as the source IP address for TACACS/TACACS+ packets originated by the device.
The following sections show the syntax for specifying a single source IP address for Telnet, TACACS/TACACS+,
and RADIUS packets.
Telnet Packets
To specify the lowest-numbered IP address configured on a virtual interface as the device’s source for all Telnet
packets, enter commands such as the following:
BigIron
BigIron
BigIron
BigIron
RX(config)# int loopback 2
RX(config-lbif-2)# ip address 10.0.0.2/24
RX(config-lbif-2)# exit
RX(config)# ip telnet source-interface loopback 2
The commands configure loopback interface 2, assign IP address 10.0.0.2/24 to the interface, then designate the
interface as the source for all Telnet packets from the BigIron RX.
Syntax: ip telnet source-interface ethernet <slot/port> | loopback <num> | ve <num>
The <num> parameter is a loopback interface or virtual interface number.
The following commands configure an IP interface on an Ethernet port and designate the address port as the
source for all Telnet packets from the BigIron RX.
BigIron
BigIron
BigIron
BigIron
RX(config)# interface ethernet 1/4
RX(config-if-e10000-1/4)# ip address 209.157.22.110/24
RX(config-if-e10000-1/4)# exit
RX(config)# ip telnet source-interface ethernet 1/4
TACACS/TACACS+ Packets
To specify the lowest-numbered IP address configured on a virtual interface as the device’s source for all TACACS/
TACACS+ packets, enter commands such as the following:
BigIron
BigIron
BigIron
BigIron
RX(config)# int ve 1
RX(config-vif-1)# ip address 10.0.0.3/24
RX(config-vif-1)# exit
RX(config)# ip tacacs source-interface ve 1
The commands configure virtual interface 1, assign IP address 10.0.0.3/24 to the interface, then designate the
interface as the source for all TACACS/TACACS+ packets from the BigIron RX.
Syntax: ip tacacs source-interface ethernet <slot/port> | loopback <num> | ve <num>
The <num> parameter is a loopback interface or virtual interface number.
August 2009
© 2009 Brocade Communications Systems, Inc.
29
RADIUS Packets
To specify the lowest-numbered IP address configured on a virtual interface as the device’s source for all RADIUS
packets, enter commands such as the following:
BigIron
BigIron
BigIron
BigIron
RX(config)# int ve 1
RX(config-vif-1)# ip address 10.0.0.3/24
RX(config-vif-1)# exit
RX(config)# ip radius source-interface ve 1
The commands configure virtual interface 1, assign IP address 10.0.0.3/24 to the interface, then designate the
interface as the source for all RADIUS packets from the BigIron RX.
Syntax: ip radius source-interface ethernet <slot/port> | loopback <num> | ve <num>
The <num> parameter is a loopback interface or virtual interface number.
Configuring an Interface as the Source for Syslog Packets
You can configure the device to use the lowest-numbered IPv4 or IPv6 address configured on a loopback
interface, virtual interface, or Ethernet port as the source for all Syslog packets from the device. The software uses
the lowest-numbered IP or IPv6 address configured on the interface as the source IP address for the packets.
For example, to specify the lowest-numbered IP address configured on a virtual interface as the device's source
for all Syslog packets, enter commands such as the following:
BigIron
BigIron
BigIron
BigIron
RX(config)# int ve 1
RX(config-vif-1)# ip address 10.0.0.4/24
RX(config-vif-1)# exit
RX(config)# ip syslog source-interface ve 1
The commands in this example configure virtual interface 1, assign IP address 10.0.0.4/24 to the interface, then
designate the interface's address as the source address for all Syslog packets.
Syntax: [no] ip syslog source-interface ethernet [<slotnum>/]<portnum> | loopback <num> | ve <num>
The <num> parameter is a loopback interface or virtual interface number. If you specify an Ethernet, the
<slotnum>/]<portnum> is the port’s number including the slot number, if you are configuring a device.
The default is the lowest-numbered IP or IPv6 address configured on the port through which the packet is sent.
The address therefore changes, by default, depending on the port.
NOTE: With this new command, the source ip of syslog is no longer controlled by the snmp-server trap-source
command. In releases before 02.4.00, the snmp-server trap-source command controlled both SNMP and Syslog
source IP.
IP Fragmentation Protection
Beginning with this release, IP packet filters on the BigIron RX switches will drop undersized fragments and
overlapping packet fragments to prevent tiny fragment attacks as explained in RFC 1858. When packets are
fragmented on the network, the first fragment of a packet must be large enough to contain all the necessary
header information. Fragments, once reassembled, must meet certain criteria before they are allowed to pass
through the network. There are no CLI commands for this new security feature.
IP Option Attack Protection
An attack on the network could be accomplished using the options field of an IP packet header. For example, the
source routing option makes it possible for the sender to specify a route to follow.
To protect against attacks contained in the option field, BigIron RX devices drop any IP packet that contains an
option in its header, except for packets. IGMP packets are processes even if they contain IP options. If you want
other packets that contain options in their headers to be processed, enter a command such as the following:
BigIron RX(config)#ip ip-option-process
30
© 2009 Brocade Communications Systems, Inc.
August 2009
Syntax: [no] ip ip-option-process
IP Receive Access List
The IP receive access list feature uses IPv4 ACLs to filter the packets intended for the management process to
protect the management module from being overloaded with heavy traffic that was sent to one of the Layer 3
Switch IP interfaces. The feature applies to IPv4 unicast and multicast packets.
Configuring IP Receive Access List
IP receive access list is a global configuration command. Once it is applied, the command will be effective on all
the management modules on the device. To configure the feature, do the following:
1.
Create a numbered ACL that will be used as the IP receive ACL. This ACL can be a standard (1– 99) or
extended (100–199) ACL. Named ACLs are not supported.
For example,
BigIron
BigIron
BigIron
BigIron
BigIron
2.
RX(config)#
RX(config)#
RX(config)#
RX(config)#
RX(config)#
access-list 10
access-list 10
access-list 10
access-list 10
write memory
deny host 209.157.22.26 log
deny 209.157.29.12 log
deny host IPHost1 log
permit any
Configure ACL 10 as the IP receive access list by entering the following command:
BigIron RX(config)# ip receive access-list 10
Syntax: [no] ip receive access-list <num>
Specify an access list number for <num>.
The IP receive ACL is applied globally to all interfaces on the device.
Displaying IP Receive Access List
To determine if IP receive access list has been configured on the device, enter the following command:
BigIron RX# show access-list bindings
L4 configuration:
ip receive access-list 101
Configuring ARP Parameters
Address Resolution Protocol (ARP) is a standard IP protocol that enables the BigIron RX to obtain the MAC
address of another device’s interface when the BigIron RX knows the IP address of the interface. ARP is enabled
by default and cannot be disabled.
How ARP Works
The BigIron RX needs to know a destination’s MAC address when forwarding traffic, because the BigIron RX
encapsulates the IP packet in a Layer 2 packet (MAC layer packet) and sends the Layer 2 packet to a MAC
interface on a device directly attached to the BigIron RX. The device can be the packet’s final destination or the
next-hop router toward the destination.
The BigIron RX encapsulates IP packets in Layer 2 packets regardless of whether the ultimate destination is
locally attached or is multiple router hops away. Since the BigIron RX’s IP route table and IP forwarding cache
contain IP address information but not MAC address information, the BigIron RX cannot forward IP packets based
solely on the information in the route table or forwarding cache. The BigIron RX needs to know the MAC address
that corresponds with the IP address of either the packet’s locally attached destination or the next-hop router that
leads to the destination.
For example, to forward a packet whose destination is multiple router hops away, the BigIron RX must send the
packet to the next-hop router toward its destination, or to a default route or default network route if the IP route
August 2009
© 2009 Brocade Communications Systems, Inc.
31
table does not contain a route to the packet’s destination. In each case, the BigIron RX must encapsulate the
packet and address it to the MAC address of a locally attached device, the next-hop router toward the IP packet’s
destination.
To obtain the MAC address required for forwarding a datagram, the BigIron RX does the following:
•
First, the BigIron RX looks in the ARP cache (not the static ARP table) for an entry that lists the MAC address
for the IP address. The ARP cache maps IP addresses to MAC addresses. The cache also lists the port
attached to the device and, if the entry is dynamic, the age of the entry. A dynamic ARP entry enters the
cache when the BigIron RX receives an ARP reply or receives an ARP request (which contains the sender’s
IP address and MAC address). A static entry enters the ARP cache from the static ARP table (which is a
separate table) when the interface for the entry comes up.
To ensure the accuracy of the ARP cache, each dynamic entry has its own age timer. The timer is reset to
zero each time the BigIron RX receives an ARP reply or ARP request containing the IP address and MAC
address of the entry. If a dynamic entry reaches its maximum allowable age, the entry times out and the
software removes the entry from the table. Static entries do not age out and can be removed only by you.
•
If the ARP cache does not contain an entry for the destination IP address, the BigIron RX broadcasts an ARP
request out all its IP interfaces. The ARP request contains the IP address of the destination. If the device with
the IP address is directly attached to the BigIron RX, the device sends an ARP response containing its MAC
address. The response is a unicast packet addressed directly to the BigIron RX. The BigIron RXplaces the
information from the ARP response into the ARP cache.
ARP requests contain the IP address and MAC address of the sender, so all devices that receive the request
learn the MAC address and IP address of the sender and can update their own ARP caches accordingly.
NOTE: The ARP request broadcast is a MAC broadcast, which means the broadcast goes only to devices that
are directly attached to the BigIron RX. A MAC broadcast is not routed to other networks. However, some routers,
including the BigIron RX, can be configured to reply to ARP requests from one network on behalf of devices on
another network. See “Enabling Proxy ARP” on page 8-34.
NOTE: If the router receives an ARP request packet that it is unable to deliver to the final destination because of
the ARP timeout and no ARP response is received (the BigIron RX knows of no route to the destination address),
the router sends an ICMP Host Unreachable message to the source.
Rate Limiting ARP Packets
You can limit the number of ARP packets the BigIron RX accepts during each second. By default, the software
does not limit the number of ARP packets the device can receive. Since the device sends ARP packets to the CPU
for processing, if a device in a busy network receives a high number of ARP packets in a short period of time,
some CPU processing might be deferred while the CPU processes the ARP packets.
To prevent the CPU from becoming flooded by ARP packets in a busy network, you can restrict the number of ARP
packets the device will accept each second. When you configure an ARP rate limit, the device accepts up to the
maximum number of packets you specify, but drops additional ARP packets received during the one-second
interval. When a new one-second interval starts, the counter restarts at zero, so the device again accepts up to
the maximum number of ARP packets you specified, but drops additional packets received within the interval.
To limit the number of ARP packets the device will accept each second, enter a command such as the following at
the global CONFIG level of the CLI:
BigIron RX(config)# arp-port-rate-limit 100
This command configures the device to accept up to 100 ARP packets each second. If the device receives more
than 100 ARP packets during a one-second interval, the device drops the additional ARP packets during the
remainder of that one-second interval.
Syntax: [no] arp-port- rate-limit <num>
32
© 2009 Brocade Communications Systems, Inc.
August 2009
The <num> parameter specifies the number of ARP packets and can be from 0 – 30,000. If you specify 0, the
device will not accept any ARP packets.
Applying a Rate Limit to ARP Packets on an Interface
To prevent the CPU from becoming flooded by ARP packets in a busy network, you can restrict the number of ARP
packets an interface will accept each second. When ARP rate limit is configured on an interface, the interface will
accept up to the maximum number of packets you specify, but drops additional ARP packets received during the
one-second interval. When a new one-second interval starts, the counter restarts at zero, so the interface again
accepts up to the maximum number of ARP packets you specified, but drops additional packets received within
the interval. This feature is disabled by default.
Configuration Notes
•
When configuring ARP rate limiting globally, interface level ARP rate-limiting gets removed.
•
The interface level configuration overrides the global configuration for a specific port.
•
The command is supported on Layer 3 Switches only.
•
There is no default value for <rate>. Enter 0–30,000.
•
If the value of <rate> is entered as 0, the interface will stop processing ARP packets immediately.
•
You can go to interface trunk mode to configure the ARP port rate limit. When configured over trunk interface
(i.e. on the lead port) the same limit will be configured on each and every port in the trunk.
•
ARP rate limiting is only supported on physical interfaces (virtual interfaces (ve) are not supported).
Setting the Rate Limit to ARP Packets on an Interface
You can limit the number of ARP packets the device will accept each second by entering the arp-port-rate-limit
command. However, if you want to apply a limit on the rate that ARP packets flow on an interface of a Layer 3
Switch, enter a command such as the following:
BigIron RX(config)#interface ethernet 1/4
BigIron RX(config-vif-10)#arp-port-rate-limit 2000
Syntax: [no] arp-port-rate-limit <rate>
There is no default value for <rate>. Enter 0–30,000.
Displaying the Rate Limit for ARP Packets
To determine how many ARP packets were dropped by an interface due to the configured rate limit for ARP
packets, enter a command such as the following:
LP-1#show ip traffic arp
ARP Statistics
1400 total recv, 1400 req recv, 0 req sent
0 pending drop, 0 invalid source, 0 invalid dest
ARP Rate Limiting Statistics
Interface
Received
ethernet1/1
184200
ethernet1/2
0
ethernet1/3
0
ethernet1/4
184200
Processed
700
0
0
700
Dropped(Rate-limted)
183500
0
0
183500
The example above displays the LP processed 50 packets every second and dropped any addtional packets.
August 2009
© 2009 Brocade Communications Systems, Inc.
33
Syntax: show ip traffic arp
This Column...
Displays...
Interface
The interface on the device.
Received
Number of ARP packets received by the interface.
Processed
Number of ARP packets processed by the interface.
Dropped (Rate-limited)
Number of ARP packets dropped by the interface.
Clearing the Rate Limit for ARP Packets
To clear the ARP port rate limit data on every port of the LP, enter a command such as the following:
LP-1# clear ip traffic arp
Changing the ARP Aging Period
When the BigIron RX places an entry in the ARP cache, the BigIron RX also starts an aging timer for the entry.
The aging timer ensures that the ARP cache does not retain learned entries that are no longer valid. An entry can
become invalid when the device with the MAC address of the entry is no longer on the network.
The ARP age affects dynamic (learned) entries only, not static entries. The default ARP age is ten minutes. On the
BigIron RX, you can change the ARP age to a value from 0 – 240 minutes. If you set the ARP age to zero, aging is
disabled and entries do not age out.
To globally change the ARP aging parameter to 20 minutes, enter the following command:
BigIron RX(config)# ip arp-age 20
Syntax: ip arp-age <num>
The <num> parameter specifies the number of minutes and can be from 0 – 240. The default is 10. If you specify
0, aging is disabled.
To override the globally configured IP ARP age on an individual interface, enter a command such as the following
at the interface configuration level:
BigIron RX(config-if-e1000-1/1)# ip arp-age 30
Enabling Proxy ARP
Proxy ARP allows the BigIron RX to answer ARP requests from devices on one network on behalf of devices in
another network. Since ARP requests are MAC-layer broadcasts, they reach only the devices that are directly
connected to the sender of the ARP request. Thus, ARP requests do not cross routers.
For example, if Proxy ARP is enabled on the BigIron RX connected to two subnets, 10.10.10.0/24 and 20.20.20.0/
24, the BigIron RX can respond to an ARP request from 10.10.10.69 for the MAC address of the device with IP
address 20.20.20.69. In standard ARP, a request from a device in the 10.10.10.0/24 subnet cannot reach a device
in the 20.20.20.0 subnet if the subnets are on different network cables, and thus is not answered.
NOTE: An ARP request from one subnet can reach another subnet when both subnets are on the same physical
segment (Ethernet cable), since MAC-layer broadcasts reach all the devices on the segment.
Proxy ARP is disabled by default.
To enable IP proxy ARP, enter the following command:
BigIron RX(config)# ip proxy-arp
To again disable IP proxy ARP, enter the following command:
34
© 2009 Brocade Communications Systems, Inc.
August 2009
BigIron RX(config)# no ip proxy-arp
Syntax: [no] ip proxy-arp
Creating Static ARP Entries
The BigIron RX has a static ARP table, in addition to the regular ARP cache. The static ARP table contains entries
that you configure.
Static entries are useful in cases where you want to pre-configure an entry for a device that is not connected to the
BigIron RX, or you want to prevent a particular entry from aging out. The software removes a dynamic entry from
the ARP cache if the ARP aging interval expires before the entry is refreshed. Static entries do not age out,
regardless of whether the Brocade device receives an ARP request from the device that has the entry’s address.
You can increase the number of configurable static ARP entries. See “Changing the Maximum Number of Entries
the Static ARP Table Can Hold” on page 8-35.
To display the ARP cache and static ARP table, see the following:
•
To display the ARP table, see “Displaying the ARP Cache” on page 8-64.
•
To display the static ARP table, see “Displaying the Static ARP Table” on page 8-65.
To create a static ARP entry for a static MAC entry, enter a command such as the following:
BigIron RX(config)# arp 1 192.53.4.2 1245.7654.2348 e 1/2
The command adds a static ARP entry that maps IP address 192.53.4.2 to MAC address 1245.7654.2348. The
entry is for a MAC address connected to port 1/2 of the BigIron RX.
Syntax: arp <ip-addr> <mac-addr> ethernet <slot/port>
The <ip-addr> command specifies the IP address of the device that has the MAC address of the entry.
The <mac-addr> parameter specifies the MAC address of the entry.
The ethernet <slot/port> command specifies the port number attached to the device that has the MAC address of
the entry.
The arp command allows you to specify only one port number. To create a static ARP entry for a static MAC entry
that is associated with multiple ports, specify the first (lowest-numbered) port associated with the static MAC entry.
Changing the Maximum Number of Entries the Static ARP Table Can Hold
The default number of entries in the static ARP table on the BigIron RX are as follows:
•
Default maximum: 8192
•
Configurable maximum: 65536
NOTE: You must save the configuration to the startup configuration file and reload the software after changing
the static ARP table size to place the change into effect.
NOTE: The basic procedure for changing the static ARP table size is the same as the procedure for changing
other configurable cache or table sizes. See “Displaying and Modifying System Parameter Default Settings” on
page 6-13.
To increase the maximum number of entries in the static ARP table you can configure, enter commands such as
the following at the global CONFIG level of the CLI:
BigIron
BigIron
BigIron
BigIron
RX(config)# system-max ip-static-arp 4000
RX(config)# write memory
RX(config)# end
RX# reload
Syntax: system-max ip-static-arp <num>
The <num> parameter indicates the maximum number of static ARP entries: 2048 - 4096 (default: 2048).
August 2009
© 2009 Brocade Communications Systems, Inc.
35
As of IronWare release 02.4.00 the maximum number of static ARP entries is 16384 (default: 2048).
NOTE: As of release 2.4.00, the system-max static-arp command no longer affects memory allocation for static
ARPs. Instead, the BigIron RX dynamically allocates memory for static-arp entries as required and this is only
limited by the memory allocation for all ARP entries, specified by the system-max ip-arp command.
Creating a Floating Static ARP Entry
Beginning with release 02.5.00, you can create a static ARP entry without port assignments.
When a floating static ARP entry (Static ARP entry without the outgoing interface defined) is added to the ARP
Inspection table, the mapping is checked against the current static ARP table. If an ARP entry with a matching IP
but mismatch MAC is found, it will be deleted and a re-arp on the IP will be issued.
When an ARP entry is deleted from ARP Inspection table, the corresponding entry in the static ARP table will also
be deleted.
To create a floating static ARP entry for a static MAC entry, enter a command such as the following:
BigIron RX(config)# arp 192.53.4.2 1245.7654.2348
The command adds a floating static ARP entry that maps IP address 192.53.4.2 to MAC address
1245.7654.2348.
Syntax: arp <ip-add> <mac-addr>
The <ip-addr> parameter specifies the IP address of the device that has the MAC address of the entry.
The <mac-addr> parameter specifies the MAC address of the entry.
Static Route ARP Validation Check
Beginning with release 02.5.00, you can configure the BigIron RX to perform validation checks on the destination
MAC address, the sender and target IP addresses, and the source MAC address.
You can enable ARP validation check on the global basis. When feature is enabled, the static route will only be
installed when the next hop ARP has been resolved.
Configuring an ARP Validation Check
To enable the ARP validation check globally, enter a command such as the following:
BigIron RX(config)#ip route validate-nexthop-arp
Syntax: [no] ip route validate-nexthop-arp
Use the no form of the command to disable the ARP validation feature. When ARP validation is disabled, the
static route will be installed without checking the validity of the next hop.
Enabling the Next Hop Validate ARP Timer
The next hop validate ARP timer works only on the ARP entries created when the ARP validation check feature
has been enabled. The timer is used to age out the ARP entries when the next hop goes down. All other ARP
entries in the system, which are NOT created due to static routes, follow the normal ARP age timer with default
value of 3 minutes.
Use the ARP validation timer to reduce the response time where the static route with the next hop down can be
replaced quickly with a route with active next hop.
To set the ARP validation timer to 30 seconds, enter commnads such as the following.
BigIron RX(config)#ip route validate-nexthop-arp
BigIron RX(config)#ip route validate-nexthop-arp timer 30
Syntax: [no] ip route validate-nexthop-arp timer <value>
The default is 200 seconds.
36
© 2009 Brocade Communications Systems, Inc.
August 2009
The value parameter speocifies the amount of time before a nexthop down is replaced by an active nexthop.
Possible values are10-200 seconds.
Use the no form of the command to disable the validation timer.
Displaying the Routes Waiting for the Next Hop ARP to Resolve
Use the following command to display which routes are waiting for the nexthop ARP to be resolved.
BigIron RX# show ip static route
IP Static Routing Table - 2 entries:
Type Codes: '*' - Installed, '+' - Waiting for ARP resolution
IP Prefix
Next Hop
Interface Dis/Metric/Tag
*10.0.0.0/8
10.43.14.1
1/1/0
+20.1.1.0/24
12.1.1.2
1/1/0
*20.1.1.0/24
12.1.1.6
1/1/0
+20.1.1.0/24
12.1.1.7
5/1/0
20.1.1.0/24
10.43.14.1
10/1/0
Displaying ARP
When the next hop entry is a staic route, enter the following command to display the route and the timer value.
BigIron RX# show arp 10.43.14.1
Total number of ARP entries: 1
IP Address
MAC Address
Type
Age
1
10.43.14.1
00ab.cdef.0100
Dynamic 5
ARP Debug Info
ArpIndex 0 InstId 16840 OutInt 2048 Vlan:0
HwMacIndex 0x0000ffff Router 0 PktCount 0
NumReq 0 ReplyTimeout 100
Port
mgmt1
Status
Valid
For additional information on the command syntax, see the syntax of the show arp command under “Displaying
the ARP Cache” on page 8-64.
Configuring Forwarding Parameters
The following configurable parameters control the forwarding behavior of the BigIron RX:
•
Time-To-Live (TTL) threshold
•
Forwarding of directed broadcasts
•
Forwarding of source-routed packets
•
Ones-based and zero-based broadcasts
All these parameters are global and thus affect all IP interfaces configured on the BigIron RX.
To configure these parameters, use the procedures in the following sections.
Changing the TTL Threshold
The TTL threshold prevents routing loops by specifying the maximum number of router hops an IP packet
originated by the BigIron RX can travel through. Each device capable of forwarding IP that receives the packet
decreases the packet’s TTL by one. If a device receives a packet with a TTL of 1 and reduces the TTL to zero, the
device drops the packet.
The default TTL is 64. You can change the TTL to a value from 1– 255.
To modify the TTL threshold to 25, enter the following commands:
BigIron RX(config)# ip ttl 25
Syntax: ip ttl <1-255>
August 2009
© 2009 Brocade Communications Systems, Inc.
37
Enabling Forwarding of Directed Broadcasts
A directed broadcast is an IP broadcast to all devices within a single directly-attached network or subnet. A netdirected broadcast goes to all devices on a given network. A subnet-directed broadcast goes to all devices within
a given subnet.
NOTE: A less common type, the all-subnets broadcast, goes to all directly-attached subnets. Forwarding for this
broadcast type also is supported, but most networks use IP multicasting instead of all-subnet broadcasting.
NOTE: The BigIron RX does not respond to Directed Broadcast ICMP request.
Forwarding for all types of IP directed broadcasts is disabled by default. You can enable forwarding for all types if
needed. You cannot enable forwarding for specific broadcast types.
To enable forwarding of IP directed broadcasts, enter the following command:
BigIron RX(config)# ip directed-broadcast
Syntax: [no] ip directed-broadcast
Brocade software makes the forwarding decision based on the router's knowledge of the destination network
prefix. Routers cannot determine that a message is unicast or directed broadcast apart from the destination
network prefix. The decision to forward or not forward the message is by definition only possible in the last hop
router.
To disable the directed broadcasts, enter the following command in the CONFIG mode:
BigIron RX(config)# no ip directed-broadcast
To enable directed broadcasts on an individual interface instead of globally for all interfaces, enter commands
such as the following:
BigIron RX(config)# interface ethernet 1/1
BigIron RX(config-if-e10000-1/1)# ip directed-broadcast
Syntax: [no] ip directed-broadcast
Disabling Forwarding of IP Source-Routed Packets
A source-routed packet specifies the exact router path for the packet. The packet specifies the path by listing the
IP addresses of the router interfaces through which the packet must pass on its way to the destination. The BigIron
RX supports both types of IP source routing:
•
Strict source routing – requires the packet to pass through only the listed routers. If the BigIron RX receives a
strict source-routed packet but cannot reach the next hop interface specified by the packet, the BigIron RX
discards the packet and sends an ICMP Source-Route-Failure message to the sender.
NOTE: The BigIron RX allows you to disable sending of the Source-Route-Failure messages. See
“Disabling ICMP Messages” on page 8-39.
•
Loose source routing – requires that the packet pass through all of the listed routers but also allows the
packet to travel through other routers, which are not listed in the packet.
The BigIron RX forwards both types of source-routed packets by default. You cannot enable or disable strict or
loose source routing separately.
To disable forwarding of IP source-routed packets, enter the following command:
BigIron RX(config)# no ip source-route
Syntax: [no] ip source-route
To re-enable forwarding of source-routed packets, enter the following command:
BigIron RX(config)# ip source-route
38
© 2009 Brocade Communications Systems, Inc.
August 2009
Enabling Support for Zero-Based IP Subnet Broadcasts
By default, the BigIron RX treats IP packets with all ones in the host portion of the address as IP broadcast
packets. For example, the BigIron RX treats IP packets with 209.157.22.255/24 as the destination IP address as
IP broadcast packets and forwards the packets to all IP hosts within the 209.157.22.x subnet (except the host that
sent the broadcast packet to the BigIron RX).
Most IP hosts are configured to receive IP subnet broadcast packets with all ones in the host portion of the
address. However, some older IP hosts instead expect IP subnet broadcast packets that have all zeros instead of
all ones in the host portion of the address. To accommodate this type of host, you can enable the BigIron RX to
treat IP packets with all zeros in the host portion of the destination IP address as broadcast packets.
NOTE: When you enable the BigIron RX for zero-based subnet broadcasts, the BigIron RX still treats IP packets
with all ones the host portion as IP subnet broadcasts too. Thus, the BigIron RX can be configured to support all
ones only (the default) or all ones and all zeroes.
NOTE: This feature applies only to IP subnet broadcasts, not to local network broadcasts. The local network
broadcast address is still expected to be all ones.
To enable the BigIron RX for zero-based IP subnet broadcasts in addition to ones-based IP subnet broadcasts,
enter the following command.
BigIron RX(config)# ip broadcast-zero
Syntax: [no] ip broadcast-zero
Disabling ICMP Messages
The BigIron RX is enabled to reply to ICMP echo messages and send ICMP Destination Unreachable messages
by default.
You can selectively disable the following types of Internet Control Message Protocol (ICMP) messages:
•
Echo messages (ping messages) – The BigIron RX replies to IP pings from other IP devices.
•
Destination Unreachable messages – If the BigIron RX receives an IP packet that it cannot deliver to its
destination, the BigIron RX discards the packet and sends a message back to the device that sent the packet.
The message informs the device that the destination cannot be reached by the BigIron RX.
Disabling Replies to Broadcast Ping Requests
By default, the BigIron RX is enabled to respond to broadcast ICMP echo packets, which are ping requests.
To disable response to broadcast ICMP echo packets (ping requests), enter the following command:
BigIron RX(config)# no ip icmp echo broadcast-request
Syntax: [no] ip icmp echo broadcast-request
If you need to re-enable response to ping requests, enter the following command:
BigIron RX(config)# ip icmp echo broadcast-request
Disabling ICMP Destination Unreachable Messages
By default, when the BigIron RX receives an IP packet that the device cannot deliver, the device sends an ICMP
Unreachable message back to the host that sent the packet. You can selectively disable a BigIron RX’s response
to the following types of ICMP Unreachable messages:
•
Administration – The packet was dropped by the Brocade device due to a filter or ACL configured on the
device.
•
Fragmentation-needed – The packet has the Don’t Fragment bit set in the IP Flag field, but the BigIron RX
cannot forward the packet without fragmenting it.
•
Host – The destination network or subnet of the packet is directly connected to the BigIron RX, but the host
specified in the destination IP address of the packet is not on the network.
August 2009
© 2009 Brocade Communications Systems, Inc.
39
•
Network – The BigIron RX cannot reach the network specified in the destination IP address of the packet.
•
Port – The destination host does not have the destination TCP or UDP port specified in the packet. In this
case, the host sends the ICMP Port Unreachable message to the BigIron RX, which in turn sends the
message to the host that sent the packet.
•
Protocol – The TCP or UDP protocol on the destination host is not running. This message is different from
the Port Unreachable message, which indicates that the protocol is running on the host but the requested
protocol port is unavailable.
•
Source-route-failure – The device received a source-routed packet but cannot locate the next-hop IP address
indicated in the packet’s Source-Route option.
You can disable the BigIron RX from sending these types of ICMP messages on an individual basis.
NOTE: Disabling an ICMP unreachable message type does not change the BigIron RX’s ability to forward
packets. Disabling ICMP unreachable messages prevents the device from generating or forwarding the
unreachable messages.
To disable all ICMP Unreachable messages, enter the following command:
BigIron RX(config)# no ip icmp unreachable
Syntax: [no] ip icmp unreachable [network | host | protocol | administration | fragmentation-needed | port | sourceroute-fail]
•
If you enter the command without specifying a message type (as in the example above), all types of ICMP
Unreachable messages listed above are disabled. If you want to disable only specific types of ICMP
Unreachable messages, you can specify the message type. To disable more than one type of ICMP
message, enter the no ip icmp unreachable command for each messages type.
•
The network parameter disables ICMP Network Unreachable messages.
•
The host parameter disables ICMP Host Unreachable messages.
•
The protocol parameter disables ICMP Protocol Unreachable messages.
•
The administration parameter disables ICMP Unreachable (caused by Administration action) messages.
•
The fragmentation-needed parameter disables ICMP Fragmentation-Needed But Don’t-Fragment Bit Set
messages.
•
The port parameter disables ICMP Port Unreachable messages.
•
The source-route-fail parameter disables ICMP Unreachable (caused by Source-Route-Failure) messages.
To disable ICMP Host Unreachable messages and ICMP Network Unreachable messages but leave the other
types of ICMP Unreachable messages enabled, enter the following commands instead of the command shown
above:
BigIron RX(config)# no ip icmp unreachable host
BigIron RX(config)# no ip icmp unreachable network
If you have disabled all ICMP Unreachable message types but you want to re-enable certain types, you can do so
entering commands such as the following:
BigIron RX(config)# ip icmp unreachable host
BigIron RX(config)# ip icmp unreachable network
The commands shown above re-enable ICMP Unreachable Host messages and ICMP Network Unreachable
messages.
Disabling ICMP Redirect Messages
You can disable or re-enable ICMP redirect messages. By default, the BigIron RX sends an ICMP redirect
message to the source of a misdirected packet in addition to forwarding the packet to the appropriate router. You
can disable ICMP redirect messages on a global basis or on an individual port basis.
40
© 2009 Brocade Communications Systems, Inc.
August 2009
NOTE: The device forwards misdirected traffic to the appropriate router, even if you disable the redirect
messages.
To disable ICMP redirect messages globally, enter the following command at the global CONFIG level of the CLI:
BigIron RX(config)# no ip icmp redirects
Syntax: [no] ip icmp redirects
To disable ICMP redirect messages on a specific interface, enter the following command at the configuration level
for the interface:
BigIron RX(config)# int e 3/11
BigIron RX(config-if-e100-3/11)# no ip redirect
Syntax: [no] ip redirect
Configuring Static Routes
The IP route table can receive routes from the following sources:
•
Directly-connected networks – When you add an IP interface, the BigIron RX automatically creates a route for
the network the interface is in.
•
RIP – If RIP is enabled, the BigIron RX can learn about routes from the advertisements other RIP routers
send to the BigIron RX. If the route has a lower administrative distance than any other routes from different
sources to the same destination, the BigIron RX places the route in the IP route table.
•
OSPF – See RIP, but substitute “OSPF” for “RIP”.
•
BGP4 – See RIP, but substitute “BGP4” for “RIP”.
•
Default network route – A statically configured default route that the BigIron RX uses if other default routes to
the destination are not available. See “Configuring a Default Network Route” on page 8-48.
•
Statically configured route – You can add routes directly to the route table. When you add a route to the IP
route table, you are creating a static IP route. This section describes how to add static routes to the IP route
table.
Static Route Types
You can configure the following types of static IP routes:
•
Standard – the static route consists of the destination network address and network mask, and the IP address
of the next-hop gateway. You can configure multiple standard static routes with the same metric for load
sharing or with different metrics to provide a primary route and backup routes.
•
Interface-based – the static route consists of the destination network address and network mask, and the
BigIron RX interface through which you want the BigIron RX to send traffic for the route. Typically, this type of
static route is for directly attached destination networks.
•
Null – the static route consists of the destination network address and network mask, and the “null0”
parameter. Typically, the null route is configured as a backup route for discarding traffic if the primary route is
unavailable.
Static IP Route Parameters
When you configure a static IP route, you must specify the following parameters:
•
The IP address and network mask for the route’s destination network.
•
The route’s path, which can be one of the following:
•
The IP address of a next-hop gateway
•
An Ethernet port
•
A virtual interface (a routing interface used by VLANs for routing Layer 3 protocol traffic among one
August 2009
© 2009 Brocade Communications Systems, Inc.
41
another)
•
A “null” interface. The BigIron RX drops traffic forwarded to the null interface.
The following parameters are optional:
•
The route’s metric – The value the BigIron RX uses when comparing this route to other routes in the IP route
table to the same destination. The metric applies only to routes that the BigIron RX has already placed in the
IP route table. The default metric for static IP routes is 1.
•
The route’s administrative distance – The value that the BigIron RX uses to compare this route with routes
from other route sources to the same destination before placing a route in the IP route table. This parameter
does not apply to routes that are already in the IP route table. The default administrative distance for static IP
routes is 1.
The default metric and administrative distance values ensure that the BigIron RX always prefers static IP routes
over routes from other sources to the same destination.
Multiple Static Routes to the Same Destination Provide Load Sharing
and Redundancy
You can add multiple static routes for the same destination network to provide one or more of the following
benefits:
•
IP load balancing – When you add multiple IP static routes for the same destination to different next-hop
gateways, and the routes each have the same metric and administrative distance, the BigIron RX can load
balance traffic to the routes’ destination. For information about IP load balancing, see “Configuring IP Load
Sharing” on page 8-50.
•
Path redundancy – When you add multiple static IP routes for the same destination, but give the routes
different metrics or administrative distances, the BigIron RX uses the route with the lowest administrative
distance by default, but uses another route to the same destination of the first route becomes unavailable.
See the following sections for examples and configuration information:
•
“Configuring Load Balancing and Redundancy Using Multiple Static Routes to the Same Destination” on
page 8-45
•
“Configuring Standard Static IP Routes and Interface or Null Static Routes to the Same Destination” on
page 8-46
Static Route States Follow Port States
IP static routes remain in the IP route table only so long as the port or virtual interface used by the route is
available. If the port or virtual routing interface becomes unavailable, the software removes the static route from
the IP route table. If the port or virtual routing interface becomes available again later, the software adds the route
back to the route table.
This feature allows the BigIron RX to adjust to changes in network topology. The BigIron RX does not continue
trying to use routes on unavailable paths but instead uses routes only when their paths are available.
Figure 8.6 on page 8-43 shows a network containing a static route. The static route is configured on Router A, as
shown in the CLI following the figure.
42
© 2009 Brocade Communications Systems, Inc.
August 2009
Figure 8.6
Example of a static route
Router A
Router B
207.95.6.188/24
e 1/2
207.95.6.157/24
207.95.7.7/24
207.95.7.69/24
The following command configures a static route to 207.95.7.0, using 207.95.6.157 as the next-hop gateway.
BigIron RX(config)# ip route 207.95.7.0/24 207.95.6.157
When you configure a static IP route, you specify the destination address for the route and the next-hop gateway
or BigIron RX interface through which the BigIron RX can reach the route. The BigIron RX adds the route to the IP
route table. In this case, Router A knows that 207.95.6.157 is reachable through port 1/2, and also assumes that
local interfaces within that subnet are on the same port. Router A deduces that IP interface 207.95.7.188 is also
on port 1/2.
The software automatically removes a static IP route from the IP route table if the port used by that route becomes
unavailable. When the port becomes available again, the software automatically re-adds the route to the IP route
table.
Configuring a Static IP Route
To configure an IP static route with a destination address of 192.0.0.0 255.0.0.0 and a next-hop router IP address
of 195.1.1.1, enter the following:
BigIron RX(config)# ip route 192.0.0.0 255.0.0.0 195.1.1.1
To configure a default route, enter the following:
BigIron RX(config)# ip route 0.0.0.0 0.0.0.0
To configure a static IP route with an Ethernet port instead of a next-hop address, enter a command such as the
following:
BigIron RX(config)# ip route 192.128.2.69 255.255.255.0 ethernet 4/1
The command configures a static IP route for destination network 192.128.2.69/24. Since an Ethernet port is
specified instead of a gateway IP address as the next hop, the BigIron RX always forwards traffic for the
192.128.2.69/24 network to port 4/1.
To configure an IP static route that uses virtual interface 3 as its next hop, enter a command such as the following:
BigIron RX(config)# ip route 192.128.2.71 255.255.255.0 ve 3
Syntax: ip route <dest-ip-addr> <dest-mask> | <dest-ip-addr>/<mask-bits>
<next-hop-ip-addr> | ethernet <slot/port> | ve <num>
[<metric>] [tag <num>] [distance <num>]
The <dest-ip-addr> is the route’s destination. The <dest-mask> is the network mask for the route’s destination IP
address. Alternatively, you can specify the network mask information by entering / followed by the number of bits
in the network mask. For example, you can enter 192.0.0.0 255.255.255.0 as 192.0.0.0/.24.
The <next-hop-ip-addr> is the IP address of the next-hop router (gateway) for the route.
For a default route, enter 0.0.0.0 0.0.0.0 xxx.xxx.xxx.xxx (use 0 for the <mask-bits> if you specify the address in
CIDR format).
If you do not want to specify a next-hop IP address, you can instead specify a port or interface number on the
BigIron RX. The <num> parameter is a virtual interface number. The <slot/port> is the port’s number of the BigIron
August 2009
© 2009 Brocade Communications Systems, Inc.
43
RX. If you specify an Ethernet port, the BigIron RX forwards packets destined for the static route’s destination
network to the specified interface. Conceptually, this feature makes the destination network like a directly
connected network, associated with a BigIron RX interface.
NOTE: The port or virtual interface you use for the static route’s next hop must have at least one IP address
configured on it. The address does not need to be in the same subnet as the destination network.
The <metric> parameter specifies the cost of the route and can be a number from 1 – 16. The default is 1.
NOTE: If you specify 16, RIP considers the metric to be infinite and thus also considers the route to be
unreachable.
The tag <num> parameter specifies the tag value of the route. Possible values: 0 - 4294967295. Default: 0.
The distance <num> parameter specifies the administrative distance of the route. When comparing otherwise
equal routes to a destination, the BigIron RX prefers lower administrative distances over higher ones, so make
sure you use a low value for your default route. Possible values: 1 - 255. Default: 1.
NOTE: The BigIron RX will replace the static route if it receives a route with a lower administrative distance. See
“Changing Administrative Distances” on page 27-24 for a list of the default administrative distances for all types of
routes.
Configuring a “Null” Route
You can configure the BigIron RX to drop IP packets to a specific network or host address by configuring a “null”
(sometimes called “null0”) static route for the address. When the BigIron RX receives a packet destined for the
address, the BigIron RX drops the packet instead of forwarding it.
To configure a null static route to drop packets destined for network 209.157.22.x, enter the following commands:
BigIron RX(config)# ip route 209.157.22.0 255.255.255.0 null0
BigIron RX(config)# write memory
Syntax: ip route <ip-addr> <ip-mask> | <dest-ip-addr>/<mask-bits> null0 [<metric>] [tag <num>] [distance
<num>]
To display the maximum value for your device, enter the show default values command. The maximum number
of static IP routes the system can hold is listed in the ip-static-route row in the System Parameters section of the
display. To change the maximum value, use the system-max ip-static-route <num> command at the global
CONFIG level.
The <ip-addr> parameter specifies the network or host address. The BigIron RX will drop packets that contain this
address in the destination field instead of forwarding them.
The <ip-mask> parameter specifies the network mask. Ones are significant bits and zeros allow any value. For
example, the mask 255.255.255.0 matches on all hosts within the Class C subnet address specified by <ip-addr>.
Alternatively, you can specify the number of bits in the network mask. For example, you can enter 209.157.22.0/
24 instead of 209.157.22.0 255.255.255.0.
The null0 parameter indicates that this is a null route. You must specify this parameter to make this a null route.
The <metric> parameter adds a cost to the route. You can specify from 1 – 16. The default is 1.
The tag <num> parameter specifies the tag value of the route. Possible values: 0 - 4294967295. Default: 0.
The distance <num> parameter configures the administrative distance for the route. You can specify a value from
1 – 255. The default is 1. The value 255 makes the route unusable.
NOTE: The last three parameters are optional and do not affect the null route, unless you configure the
administrative distance to be 255. In this case, the route is not used and the traffic might be forwarded instead of
dropped.
44
© 2009 Brocade Communications Systems, Inc.
August 2009
Dropping Traffic Sent to the Null0 Interface In Hardware
Traffic sent to the null0 interface is done in hardware; that is, by programming the CAM to discard traffic sent to the
null0 interface. This improves forwarding efficiency and reduces the burden on the BigIron RX’s CPU.
Hardware dropping for IP traffic sent to the null0 interface is supported.
You can optionally configure the BigIron RX to drop traffic sent to the default IP route address in hardware. To do
this, enter the following commands:
BigIron RX(config)# ip route 0.0.0.0 0.0.0.0 null0
BigIron RX(config)# ip hw-drop-on-def-route
Syntax: [no] ip hw-drop-on-def-route
Configuring the BigIron RX to drop traffic sent to the default IP route address in hardware causes the device to
program 32-bit host CAM entries for each destination address using the default route, which could consume the
CAM space. To prevent this from happening, you can enable the CAM Default Route Aggregation feature. To do
this, enter the following command:
BigIron RX(config)# ip dr-aggregate
Syntax: ip dr-aggregate
Static Route Tagging
Static routes can be configured with a tag value, which can be used to color routes and filter routes during a
redistribution process. When tagged static routes are redistributed to OSPF or to a protocol that can carry tag
information, they are redistributed with their tag values.
To add a tag value to a static route, enter commands such as the following:
BigIron RX(config)#ip route 192.122.12.1 255.255.255.0 192.122.1.1 tag 20
Syntax: ip route <dest-ip-addr> <dest-mask> | <dest-ip-addr>/<dest-mask> <next-hop-ip-address> tag <value>
The <dest-ip-addr> is the route’s destination. The <dest-mask> is the network mask for the route’s destination IP
address. Alternatively, you can specify the network mask information by entering a forward slash followed by the
number of bits in the network mask. For example, you can enter 192.0.0.0 255.255.255.0 as 192.0.0.0/.24. You
can enter multiple static routes for the same destination for load balancing or redundancy.
The <next-hop-ip-address> is the IP address of the next-hop router (gateway) for the route. In addition, the <nexthop-ip-address> can also be a virtual routing interface (for example. ve 100), or a physical port (for example,
ethernet 1/1) that is connected to the next hop router.
Enter 0 – 4294967295 for tag <value>. The default is 0, meaning no tag.
Configuring Load Balancing and Redundancy Using Multiple Static
Routes to the Same Destination
You can configure multiple static IP routes to the same destination, for the following benefits:
•
IP load sharing – If you configure more than one static route to the same destination, and the routes have
different next-hop gateways but have the same metrics, the BigIron RX load balances among the routes using
basic round-robin. For example, if you configure two static routes with the same metrics but to different
gateways, the BigIron RX alternates between the two routes. For information about IP load balancing, see
“Configuring IP Load Sharing” on page 8-50.
•
Backup Routes – If you configure multiple static IP routes to the same destination, but give the routes different
next-hop gateways and different metrics, the BigIron RX will always use the route with the lowest metric. If this
route becomes unavailable, the BigIron RX will fail over to the static route with the next-lowest metric, and so
on.
August 2009
© 2009 Brocade Communications Systems, Inc.
45
NOTE: You also can bias the BigIron RX to select one of the routes by configuring them with different
administrative distances. However, make sure you do not give a static route a higher administrative distance than
other types of routes, unless you want those other types to be preferred over the static route. For a list of the
default administrative distances, see “Changing Administrative Distances” on page 27-24.
The steps for configuring the static routes are the same as described in the previous section. The following
sections provide examples.
To configure multiple static IP routes, enter commands such as the following.
BigIron RX(config)# ip route 192.128.2.69 255.255.255.0 209.157.22.1
BigIron RX(config)# ip route 192.128.2.69 255.255.255.0 192.111.10.1
The commands in the example above configure two static IP routes. The routes go to different next-hop gateways
but have the same metrics. These commands use the default metric value (1), so the metric is not specified.
These static routes are used for load sharing among the next-hop gateways.
The following commands configure static IP routes to the same destination, but with different metrics. The route
with the lowest metric is used by default. The other routes are backups in case the first route becomes unavailable.
The BigIron RX uses the route with the lowest metric if the route is available.
BigIron RX(config)# ip route 192.128.2.69 255.255.255.0 209.157.22.1
BigIron RX(config)# ip route 192.128.2.69 255.255.255.0 192.111.10.1 2
BigIron RX(config)# ip route 192.128.2.69 255.255.255.0 201.1.1.1 3
In this example, each static route has a different metric. The metric is not specified for the first route, so the default
(1) is used. A metric is specified for the second and third static IP routes. The second route has a metric of two
and the third route has a metric of 3. Thus, the second route is used only of the first route (which has a metric
of 1) becomes unavailable. Likewise, the third route is used only if the first and second routes (which have lower
metrics) are both unavailable.
For complete syntax information, see “Configuring a Static IP Route” on page 8-43.
Configuring Standard Static IP Routes and Interface or Null Static
Routes to the Same Destination
You can configure a null0 or interface-based static route to a destination and also configure a normal static route to
the same destination, so long as the route metrics are different.
When the BigIron RX has multiple routes to the same destination, the BigIron RX always prefers the route with the
lowest metric. Generally, when you configure a static route to a destination network, you assign the route a low
metric so that the BigIron RX prefers the static route over other routes to the destination.
This feature is especially useful for the following configurations. These are not the only allowed configurations but
they are typical uses of this enhancement.
•
When you want to ensure that if a given destination network is unavailable, the BigIron RX drops (forwards to
the null interface) traffic for that network instead of using alternate paths to route the traffic. In this case,
assign the normal static route to the destination network a lower metric than the null route.
•
When you want to use a specific interface by default to route traffic to a given destination network, but want to
allow the BigIron RX to use other interfaces to reach the destination network if the path that uses the default
interface becomes unavailable. In this case, give the interface route a lower metric than the normal static
route.
NOTE: You cannot add a null or interface-based static route to a network if there is already a static route of any
type with the same metric you specify for the null or interface-based route.
Figure 8.7 on page 8-47 shows an example of two static routes configured for the same destination network. One
of the routes is a standard static route and has a metric of 1. The other static route is a null route and has a higher
metric than the standard static route. The BigIron RX always prefers the static route with the lower metric. In this
example, the BigIron RX always uses the standard static route for traffic to destination network 192.168.7.0/24,
unless that route becomes unavailable, in which case the BigIron RX sends traffic to the null route instead.
46
© 2009 Brocade Communications Systems, Inc.
August 2009
Figure 8.7
Standard and null static routes to the same destination network
Two static routes to 192.168.7.0/24:
--Standard static route through
gateway 192.168.6.157, with metric 1
--Null route, with metric 2
Router A
Router B
192.168.6.188/24
192.168.6.157/24
192.168.7.7/24
When standard static route
is good, Router A uses that
route.
192.168.7.69/24
Router A
Router B
192.168.6.188/24
192.168.6.157/24
192.168.7.7/24
X
If standard static route is
unavailable, Router A uses
the null route (in effect dropping
instead of forwarding the packets).
192.168.7.69/24
Null
Figure 8.8 on page 8-48 shows another example of two static routes. A standard static route and an interfacebased static route are configured for destination network 192.168.6.0/24. The interface-based static route has a
lower metric than the standard static route. As a result, the BigIron RX always prefers the interface-based route
when the route is available. However, if the interface-based route becomes unavailable, the BigIron RX still
forwards the traffic toward the destination using an alternate route through gateway 192.168.8.11/24.
August 2009
© 2009 Brocade Communications Systems, Inc.
47
Figure 8.8
Standard and interface routes to the same destination network
Two static routes to 192.168.7.0/24:
--Interface-based route through
port 1/1, with metric 1.
--Standard static route through
gateway 192.168.8.11, with metric 3.
Router A
192.168.6.188/24
Port 1/1
192.168.8.12/24
Port 4/4
192.168.6.69/24
When route through interface
1/1 is available, Router A always
uses that route.
192.168.8.11/24
Router B
If route through interface
1/1 becomes unavailable,
Router A uses alternate
route through gateway
192.168.8.11/24.
Router C
Router D
To configure a standard static IP route and a null route to the same network as shown in Figure 8.7 on page 8-47,
enter commands such as the following:
BigIron RX(config)# ip route 192.168.7.0/24 192.168.6.157/24 1
BigIron RX(config)# ip route 192.168.7.0/24 null0 3
The first command configures a standard static route, which includes specification of the next-hop gateway. The
command also gives the standard static route a metric of 1, which causes the BigIron RX to always prefer this
route when the route is available.
The second command configures another static route for the same destination network, but the second route is a
null route. The metric for the null route is 3, which is higher than the metric for the standard static route. If the
standard static route is unavailable, the software uses the null route.
For complete syntax information, see “Configuring a Static IP Route” on page 8-43.
To configure a standard static route and an interface-based route to the same destination, enter commands such
as the following:
BigIron RX(config)# ip route 192.168.6.0/24 ethernet 1/1 1
BigIron RX(config)# ip route 192.168.6.0/24 192.168.8.11/24 3
The first command configured an interface-based static route through Ethernet port 1/1. The command assigns a
metric of 1 to this route, causing the BigIron RX to always prefer this route when it is available. If the route
becomes unavailable, the BigIron RX uses an alternate route through the next-hop gateway 192.168.8.11/24.
Configuring a Default Network Route
The BigIron RX enables you to specify a candidate default route without the need to specify the next hop gateway.
If the IP route table does not contain an explicit default route (for example, 0.0.0.0/0) or propagate an explicit
default route through routing protocols, the software can use the default network route as a default route instead.
48
© 2009 Brocade Communications Systems, Inc.
August 2009
When the software uses the default network route, it also uses the default network route's next hop gateway as the
gateway of last resort.
This feature is especially useful in environments where network topology changes can make the next hop gateway
unreachable. This feature allows the BigIron RX to perform default routing even if the default network route's
default gateway changes.
The feature thus differs from standard default routes. When you configure a standard default route, you also
specify the next hop gateway. If a topology change makes the gateway unreachable, the default route becomes
unusable.
For example, if you configure 10.10.10.0/24 as a candidate default network route, if the IP route table does not
contain an explicit default route (0.0.0.0/0), the software uses the default network route and automatically uses
that route's next hop gateway as the default gateway. If a topology change occurs and as a result the default
network route's next hop gateway changes, the software can still use the default network route.
If you configure more than one default network route, the BigIron RX uses the following algorithm to select one of
the routes:
1.
Use the route with the lowest administrative distance.
2.
If the administrative distances are equal:
•
Are the routes from different routing protocols (RIP, OSPF, or BGP4)? If so, use the route with the lowest
IP address.
•
If the routes are from the same routing protocol, use the route with the best metric. The meaning of
“best” metric depends on the routing protocol:
•
RIP – The metric is the number of hops (additional routers) to the destination. The best route is the route
with the fewest hops.
•
OSPF – The metric is the path cost associated with the route. The path cost does not indicate the
number of hops but is instead a numeric value associated with each route. The best route is the route
with the lowest path cost.
•
BGP4 – The metric is the Multi-exit Discriminator (MED) associated with the route. The MED applies to
routes that have multiple paths through the same AS. The best route is the route with the lowest MED.
Configuring a Default Network Route
You can configure up to four default network routes. To configure a default network route, enter commands such
as the following:
BigIron RX(config)# ip default-network 209.157.22.0
BigIron RX(config)# write memory
Syntax: ip default-network <ip-addr>
The <ip-addr> parameter specifies the network address.
To verify that the route is in the route table, enter the following command at any level of the CLI:
BigIron RX(config)# show ip route
Total number of IP routes: 2
Start index: 1 B:BGP D:Connected
Destination
Gateway
1
209.157.20.0
0.0.0.0
2
209.157.22.0
0.0.0.0
R:RIP
S:Static O:OSPF *:Candidate default
Port
Cost
Type
lb1
1
D
4/11
1
*D
This example shows two routes. Both of the routes are directly attached, as indicated in the Type column.
However, one of the routes is shown as type “*D”, with an asterisk (*). The asterisk indicates that this route is a
candidate default network route.
August 2009
© 2009 Brocade Communications Systems, Inc.
49
Configuring IP Load Sharing
The IP route table can contain more than one path to a given destination. When this occurs, the BigIron RX
selects the path with the lowest cost as the path for forwarding traffic to the destination. If the IP route table
contains more than one path to a destination and the paths each have the lowest cost, then the BigIron RX uses
IP load sharing to select a path to the destination.1
IP load sharing is based on the destination address of the traffic. BigIron RX supports load sharing based on
individual host addresses or on network addresses.
You can enable a BigIron RX to load balance across up to eight equal-cost paths. The default maximum number of
equal-cost load sharing paths is four.
NOTE: IP load sharing is not based on source routing, only on next-hop routing.
NOTE: The term “path” refers to the next-hop router to a destination, not to the entire route to a destination.
Thus, when the software compares multiple equal-cost paths, the software is comparing paths that use different
next-hop routers, with equal costs, to the same destination.
In many contexts, the terms “route” and” path” mean the same thing. Most of the user documentation uses the
term “route” throughout. The term “path” is used in this section to refer to an individual next-hop router to a
destination, while the term “route” refers collectively to the multiple paths to the destination. Load sharing applies
when the IP route table contains multiple, equal-cost paths to a destination.
How Multiple Equal-Cost Paths Enter the IP Route Table
IP load sharing applies to equal-cost paths in the IP route table. Routes eligible for load sharing can enter the
table from the following sources:
•
IP static routes
•
Routes learned through RIP, OSPF, and BGP4
Administrative Distance
The administrative distance is a unique value associated with each type (source) of IP route. Each path has an
administrative distance. It is used when evaluating multiple equal-cost paths to the same destination from different
sources, such as RIP, OSPF and so on, but not used when performing IP load sharing.
The value of the administrative distance is determined by the source of the route. The BigIron RX is configured
with a unique administrative distance value for each IP route source.
When the software receives paths from different sources to the same destination, the software compares their
administrative distances, selects the one with the lowest distance, and puts it in the IP route table. For example, if
the BigIron RX has a path learned from OSPF and a path learned from RIP for a given destination, only the path
with the lower administrative distance enters the IP route table.
Here are the default administrative distances on the BigIron RX:
1.
50
•
Directly connected – 0 (this value is not configurable)
•
Static IP route – 1 (applies to all static routes, including default routes and default network routes)
•
Exterior Border Gateway Protocol (EBGP) – 20
•
OSPF – 110
•
RIP – 120
•
Interior Gateway Protocol (IBGP) – 200
•
Local BGP – 200
IP load sharing is also called “Equal-Cost Multi-Path (ECMP)” load sharing or just
“ECMP”
© 2009 Brocade Communications Systems, Inc.
August 2009
•
Unknown – 255 (the router will not use this route)
Lower administrative distances are preferred over higher distances. For example, if the router receives routes for
the same network from OSPF and from RIP, the router will prefer the OSPF route by default.
NOTE: You can change the administrative distances individually. See the configuration chapter for the route
source for information.
Since the software selects only the path with the lowest administrative distance, and the administrative distance is
determined by the path’s source, IP load sharing does not apply to paths from different route sources. IP load
sharing applies only when the IP route table contains paths from the same IP route source to the same
destination.
Path Cost
The cost parameter provides a basis of comparison for selecting among paths to a given destination. Each path in
the IP route table has a cost. When the IP route table contains multiple paths to a destination, the BigIron RX
chooses the path with the lowest cost. When the IP route table contains more than one path with the lowest cost to
a destination, the BigIron RX uses IP load sharing to select one of the lowest-cost paths.
The source of a path’s cost value depends on the source of the path.
•
IP static route – The value you assign to the metric parameter when you configure the route. The default
metric is 1. See “Configuring Load Balancing and Redundancy Using Multiple Static Routes to the Same
Destination” on page 8-45.
•
RIP – The number of next-hop routers to the destination.
•
OSPF – The Path Cost associated with the path. The paths can come from any combination of inter-area,
intra-area, and external Link State Advertisements (LSAs).
•
BGP4 – The path’s Multi-Exit Discriminator (MED) value.
NOTE: If the path is redistributed between two or more of the above sources before entering the IP route table,
the cost can increase during the redistribution due to settings in redistribution filters.
Static Route, OSPF, and BGP4 Load Sharing
IP load sharing and load sharing for static routes, OSPF routes, and BGP4 routes are individually configured.
Multiple equal-cost paths for a destination can enter the IP route table only if the source of the paths is configured
to support multiple equal-cost paths. For example, if BGP4 allows only one path with a given cost for a given
destination, the BGP4 route table cannot contain equal-cost paths to the destination. Consequently, the IP route
table will not receive multiple equal-cost paths from BGP4.
Table 8.8 lists the default and configurable maximum numbers of paths for each IP route source that can provide
equal-cost paths to the IP route table. The table also lists where to find configuration information for the route
source’s load sharing parameters.
August 2009
© 2009 Brocade Communications Systems, Inc.
51
The load sharing state for all the route sources is based on the state of IP load sharing. Since IP load sharing is
enabled by default on the BigIron RX, load sharing for static IP routes, RIP routes, OSPF routes, and BGP4 routes
also is enabled by default.
Table 8.8: Default Load Sharing Parameters for Route Sources
Route Source
Default Maximum
Number of Paths
Maximum Number
of Paths
See...
Static IP route
4
8
8-52
NOTE: This value
depends on the
value for IP load
sharing, and is not
separately
configurable.
NOTE: This value
depends on the
value for IP load
sharing, and is not
separately
configurable.
4
8
NOTE: This value
depends on the
value for IP load
sharing, and is not
separately
configurable.
NOTE: This value
depends on the
value for IP load
sharing, and is not
separately
configurable.
OSPF
4
8
8-52
BGP4
1
4
27-45
RIP
8-52
How IP Load Sharing Works
On the BigIron RX, IP load sharing (also known as ECMP load sharing) is done by the hardware. If there is more
than one path to a given destination, a hash is calculated based on the source MAC address, destination MAC
address, source IP address, destination IP address, and IP protocol. This hash is used to select one of the paths.
Changing the Maximum Number of Load Sharing Paths
By default, IP load sharing allows IP traffic to be balanced across up to four equal path. You can change the
maximum number of paths that the BigIron RX supports to a value of 2 – 8.
For optimal results, set the maximum number of paths to a value equal to or greater than the maximum number of
equal-cost paths that your network typically contains. For example, if the BigIron RX has six next-hop routers, set
the maximum paths value to six.
NOTE: If the setting for the maximum number of paths is lower than the actual number of equal-cost paths, the
software does not use all the paths for load sharing.
To change the number of paths, enter a command such as the following:
BigIron RX(config)# ip load-sharing 8
Syntax: [no] ip load-sharing [<number>]
Enter a value from 2 – 8 for <number> to set the maximum number of paths.
Response to Path State Changes
If one of the load-balanced paths becomes unavailable, the IP route table in hardware is modified to stop using the
unavailable path. The traffic is load balanced between the available paths using the same hashing mechanism
described above. (See “How IP Load Sharing Works” on page 8-52.)
52
© 2009 Brocade Communications Systems, Inc.
August 2009
Default Route ECMP
On the BigIron RX, IP load sharing (also known as ECMP load sharing) is done by the hardware. If there is more
than one path to a given destination, a hash is calculated based on the source MAC address, destination MAC
address, source IP address, destination IP address, and IP protocol. This hash is used to select one of the paths.
If there are multiple next-hop routers for the default route in the IPv4 routing table, routed packets on the default
route would be automatically load-balanced among these next-hops through a hashing formula, calculated based
on (IPv4 Destination Address, IPv4 Source Address, IPv4 Source Port, IPv4 Destination Port, DA-MAC, and SAMAC) of the packets received. This feature allows for load distribution of traffic among the available default route
next-hops.
NOTE: This feature is currently not applicable to IPv6 traffic.
To specify the ECMP default route, enter a command such as the following:
BigIron RX(config)# ip load-sharing default-route
Syntax: [no] ip load-sharing [<num> l <default-route>]
The <num> parameter specifies the number of paths and can be from 2 – 8.
The <default-router> parameter specifies the ECMP load sharing.
DIsplaying the ECMP Load Sharing
Use the show run command to display the ECMP load sharing.
BigIron RX(config)#show run
========show run =====================
!
logging console
hostname RW
ip route 0.0.0.0/0 100.1.1.2
ip route 0.0.0.0/0 100.1.2.2
ip route 0.0.0.0/0 100.1.3.2
ip route 0.0.0.0/0 100.1.4.2
ip route 10.0.0.0/8 10.43.2.1
ip route 40.0.0.0/24 100.1.1.2
ip load-sharing default-route
Use the show ip route command to display the traffic that will now be sent over all 4 links load balanced instead
of being on only 1 link.
BigIron RX#show ip route
Total number of IP routes: 9
Type Codes - B:BGP D:Connected I:ISIS S:Static R:RIP O:OSPF; Cost - Dist/Metric
Destination Gateway Port Cost Type
1 0.0.0.0/0 100.1.1.2 eth 7/1 1/1 S
0.0.0.0/0 100.1.2.2 eth 7/2 1/1 S
0.0.0.0/0 100.1.3.2 eth 7/3 1/1 S
0.0.0.0/0 100.1.4.2 eth 7/4 1/1 S
2 10.0.0.0/8 10.43.2.1 mgmt 1 1/1 S
3 10.43.2.0/24 DIRECT mgmt 1 0/0 D
4 40.0.0.0/24 100.1.1.2 eth 7/1 1/1 S
5 70.1.1.0/24 DIRECT eth 7/9 0/0 D
6 100.1.1.0/24 DIRECT eth 7/1 0/0 D
7 100.1.2.0/24 DIRECT eth 7/2 0/0 D
8 100.1.3.0/24 DIRECT eth 7/3 0/0 D
9 100.1.4.0/24 DIRECT eth 7/4 0/0 D
August 2009
© 2009 Brocade Communications Systems, Inc.
53
IP Receive Access List
The IP receive access list feature uses IPv4 ACLs to filter the packets intended for the management process to
protect the management module from being overloaded with heavy traffic that was sent to one of the Layer 3
Switch IP interfaces. The feature applies to IPv4 unicast and multicast packets.
Configuring IP Receive Access List
IP receive access list is a global configuration command. Once it is applied, the command will be effective on all
the management modules on the device. To configure the feature, do the following:
1.
Create a numbered ACL that will be used as the IP receive ACL. This ACL can be a standard (1– 99) or
extended (100–199) ACL. Named ACLs are not supported.
For example,
BigIron
BigIron
BigIron
BigIron
BigIron
2.
RX(config)#
RX(config)#
RX(config)#
RX(config)#
RX(config)#
access-list 10
access-list 10
access-list 10
access-list 10
write memory
deny host 209.157.22.26 log
deny 209.157.29.12 log
deny host IPHost1 log
permit any
Configure ACL 10 as the IP receive access list by entering the following command:
BigIron RX(config)# ip receive access-list 10
Syntax: [no] ip receive access-list <num>
Specify an access list number for <num>.
The IP receive ACL is applied globally to all interfaces on the device.
Displaying IP Receive Access List
To determine if IP receive access list has been configured on the device, enter the following command:
BigIron RX# show access-list bindings
L4 configuration:
ip receive access-list 101
Configuring IRDP
The BigIron RX uses ICMP Router Discovery Protocol (IRDP) to advertise the IP addresses of its router interfaces
to directly attached hosts. IRDP is disabled by default. You can enable it globally or on individual ports.
•
If you enable IRDP globally, all ports use the default values for the IRDP parameters.
•
If you leave IRDP disabled globally but enable it on individual ports, you also can configure the IRDP
parameters on an individual port basis.
NOTE: You can configure IRDP parameters only an individual port basis. To do so, IRDP must be disabled
globally and enabled only on individual ports. You cannot configure IRDP parameters if the feature is globally
enabled.
When IRDP is enabled, the BigIron RX periodically sends Router Advertisement messages out the IP interfaces
on which the feature is enabled. The messages advertise the BigIron RX’s IP addresses to directly attached hosts
who listen for the messages. In addition, hosts can be configured to query the BigIron RX for the information by
sending Router Solicitation messages.
Some types of hosts use the Router Solicitation messages to discover their default gateway. When IRDP is
enabled, the BigIron RX responds to the Router Solicitation messages. Some clients interpret this response to
mean that the BigIron RX is the default gateway. If another router is actually the default gateway for these clients,
leave IRDP disabled on the BigIron RX.
IRDP uses the following parameters. If you enable IRDP on individual ports rather than globally, you can configure
these parameters on an individual port basis.
54
© 2009 Brocade Communications Systems, Inc.
August 2009
•
Packet type – The BigIron RX can send Router Advertisement messages as IP broadcasts or as IP multicasts
addressed to IP multicast group 224.0.0.1. The packet type is IP broadcast.
•
Maximum message interval and minimum message interval – When IRDP is enabled, the BigIron RX sends
the Router Advertisement messages every 450 – 600 seconds by default. The time within this interval that the
BigIron RX selects is random for each message and is not affected by traffic loads or other network factors.
The random interval minimizes the probability that a host will receive Router Advertisement messages from
other routers at the same time. The interval on each IRDP-enabled BigIron RX interface is independent of the
interval on other IRDP-enabled interfaces. The default maximum message interval is 600 seconds. The
default minimum message interval is 450 seconds.
•
Hold time – Each Router Advertisement message contains a hold time value. This value specifies the
maximum amount of time the host should consider an advertisement to be valid until a newer advertisement
arrives. When a new advertisement arrives, the hold time is reset. The hold time is always longer than the
maximum advertisement interval. Therefore, if the hold time for an advertisement expires, the host can
reasonably conclude that the router interface that sent the advertisement is no longer available. The default
hold time is three times the maximum message interval.
•
Preference – If a host receives multiple Router Advertisement messages from different routers, the host
selects the router that sent the message with the highest preference as the default gateway. The preference
can be a number from 4294967296 to 4294967295. The default is 0.
Enabling IRDP Globally
To globally enable IRDP, enter the following command:
BigIron RX(config)# ip irdp
This command enables IRDP on the IP interfaces on all ports. Each port uses the default values for the IRDP
parameters. The parameters are not configurable when IRDP is globally enabled.
Enabling IRDP on an Individual Port
To enable IRDP on an individual interface and change IRDP parameters, enter commands such as the following:
BigIron RX(config)# interface ethernet 1/3
BigIron RX(config-if-e10000-1/3)# ip irdp maxadvertinterval 400
This example shows how to enable IRDP on a specific port and change the maximum advertisement interval for
Router Advertisement messages to 400 seconds.
NOTE: To enable IRDP on individual ports, you must leave the feature globally disabled.
Syntax: [no] ip irdp [broadcast | multicast] [holdtime <seconds>] [maxadvertinterval <seconds>]
[minadvertinterval <seconds>] [preference <number>]
The broadcast | multicast parameter specifies the packet type the BigIron RX uses to send Router
Advertisement.
•
broadcast – The BigIron RX sends Router Advertisement as IP broadcasts. This is the default.
•
multicast – The BigIron RX sends Router Advertisement as multicast packets addressed to IP multicast
group 224.0.0.1.
The holdtime <seconds> parameter specifies how long a host that receives a Router Advertisement from the
BigIron RX should consider the advertisement to be valid. When a host receives a new Router Advertisement
message from the BigIron RX, the host resets the hold time for the BigIron RX to the hold time specified in the new
advertisement. If the hold time of an advertisement expires, the host discards the advertisement, concluding that
the router interface that sent the advertisement is no longer available. The value must be greater than the value of
the maxadvertinterval parameter and cannot be greater than 9000. The default is three times the value of the
maxadvertinterval parameter.
The maxadvertinterval parameter specifies the maximum amount of time the BigIron RX waits between sending
Router Advertisements. You can specify a value from 1 to the current value of the holdtime parameter. The
default is 600 seconds.
August 2009
© 2009 Brocade Communications Systems, Inc.
55
The minadvertinterval parameter specifies the minimum amount of time the BigIron RX can wait between
sending Router Advertisements. The default is three-fourths (0.75) the value of the maxadvertinterval parameter.
If you change the maxadvertinterval parameter, the software automatically adjusts the minadvertinterval
parameter to be three-fourths the new value of the maxadvertinterval parameter. If you want to override the
automatically configured value, you can specify an interval from 1 to the current value of the maxadvertinterval
parameter.
The preference <number> parameter specifies the IRDP preference level of the BigIron RX. If a host receives
Router Advertisements from multiple routers, the host selects the router interface that sent the message with the
highest interval as the host’s default gateway. The valid range is 4294967296 to 4294967295. The default is 0.
Configuring UDP Broadcast and IP Helper Parameters
Some applications rely on client requests sent as limited IP broadcasts addressed to the UDP’s application port. If
a server for the application receives such a broadcast, the server can reply to the client. Routers do not forward
subnet directed broadcasts, so the client and server must be on the same network for the broadcast to reach the
server. If the client and server are on different networks (on opposite sides of a router), the client’s request cannot
reach the server.
To configure the BigIron RX to forward clients‘ requests to UDP application servers:
•
Enable forwarding support for the UDP application port, if forwarding support is not already enabled.
•
Configure a helper adders on the interface connected to the clients. Specify the helper address to be the IP
address of the application server or the subnet directed broadcast address for the IP subnet the server is in. A
helper address is associated with a specific interface and applies only to client requests received on that
interface. The BigIron RX forwards client requests for any of the application ports the BigIron RX is enabled to
forward to the helper address.
Forwarding support for the following application ports is enabled by default.
•
bootps (port 67)
•
dns (port 53)
•
tftp (port 69)
•
time (port 37)
•
netbios-ns (port 137)
•
netbios-dgm (port 138)
•
tacacs (port 65)
NOTE: The application names are the names for these applications that the BigIron RX recognizes, and might
not match the names for these applications on some third-party devices. The numbers listed in parentheses are
the UDP port numbers for the applications. The numbers come from RFC 1340.
NOTE: As shown above, forwarding support for BootP/DHCP is enabled by default. If you are configuring the
BigIron RX to forward BootP/DHCP requests, see “Configuring BootP/DHCP Forwarding Parameters” on page 858.
You can enable forwarding for other applications by specifying the application port number.
You also can disable forwarding for an application.
NOTE: If you disable forwarding for a UDP application, forwarding of client requests received as broadcasts to
helper addresses is disabled. Disabling forwarding of an application does not disable other support for the
application. For example, if you disable forwarding of Telnet requests to helper addresses, other Telnet support on
the BigIron RX is not also disabled.
56
© 2009 Brocade Communications Systems, Inc.
August 2009
Enabling Forwarding for a UDP Application
If you want the BigIron RX to forward client requests for UDP applications that the BigIron RX does not forward by
default, you can enable forwarding support for the port. To enable forwarding support for a UDP application, use
either of the following methods. You also can disable forwarding for an application using these methods.
NOTE: You also must configure a helper address on the interface that is connected to the clients for the
application. The BigIron RX cannot forward the requests unless you configure the helper address. See
“Configuring an IP Helper Address” on page 8-59.
To enable the forwarding of SNMP trap broadcasts, enter the following command:
BigIron RX(config)# ip forward-protocol udp snmp-trap
Syntax: [no] ip forward-protocol udp <udp-port-name> | <udp-port-num>
The <udp-port-name> parameter can have one of the following values. For reference, the corresponding port
numbers from RFC 1340 are shown in parentheses. If you specify an application name, enter the name only, not
the parentheses or the port number shown here.
•
bootpc (port 68)
•
bootps (port 67)
•
discard (port 9)
•
dns (port 53)
•
dnsix (port 90)
•
echo (port 7)
•
mobile-ip (port 434)
•
netbios-dgm (port 138)
•
netbios-ns (port 137)
•
ntp (port 123)
•
tacacs (port 65)
•
talk (port 517)
•
time (port 37)
•
tftp (port 69)
In addition, you can specify any UDP application by using the application’s UDP port number.
The <udp-port-num> parameter specifies the UDP application port number. If the application you want to enable
is not listed above, enter the application port number. You also can list the port number for any of the applications
listed above.
To disable forwarding for an application, enter a command such as the following:
BigIron RX(config)# no ip forward-protocol udp snmp
Syntax: [no] ip forward-protocol udp snmp
This command disables forwarding of SNMP requests to the helper addresses configured on BigIron RX
interfaces.
Configuring an IP Helper Address
To forward a client’s broadcast request for a UDP application when the client and server are on different networks,
you must configure a helper address on the interface connected to the client. Specify the server’s IP address or
the subnet directed broadcast address of the IP subnet the server is in as the helper address.
August 2009
© 2009 Brocade Communications Systems, Inc.
57
You can configure up to 16 helper addresses on each interface. You can configure a helper address on an
Ethernet port or a virtual interface.
To configure a helper address on interface 2 on chassis module 1, enter the following commands:
BigIron RX(config)# interface e 1/2
BigIron RX(config-if-e1000-1/2)# ip helper-address 207.95.7.6
The commands in this example change the CLI to the configuration level for port 1/2, then add a helper address
for server 207.95.7.6 to the port. If the port receives a client request for any of the applications that the BigIron RX
is enabled to forward, the BigIron RX forwards the client’s request to the server.
Syntax: ip helper-address <ip-addr>
The <ip-addr> command specifies the server’s IP address or the subnet directed broadcast address of the IP
subnet the server is in.
Configuring BootP/DHCP Forwarding Parameters
Beginning with release 02.7.00, the DHCP relay will allow for IP address grants that do not match the subnets
configured on the interface that the DHCP request was received. A host on an IP network can use BootP/DHCP
to obtain its IP address from a BootP/DHCP server. To obtain the address, the client sends a BootP/DHCP
request. The request is a subnet directed broadcast and is addressed to UDP port 67. A limited IP broadcast is
addressed to IP address 255.255.255.255 and is not forwarded by the BigIron RX or other IP routers.
When the BootP/DHCP client and server are on the same network, the server receives the broadcast request and
replies to the client. However, when the client and server are on different networks, the server does not receive the
client’s request, because the BigIron RX does not forward the request.
You can configure the BigIron RX to forward BootP/DHCP requests. To do so, configure a helper address on the
interface that receives the client requests, and specify the BootP/DHCP server’s IP address as the address you
are helping the BootP/DHCP requests to reach. Instead of the server’s IP address, you can specify the subnet
directed broadcast address of the IP subnet the server is in.
NOTE: The IP subnet configured on the port which is directly connected to the device sending a BootP/DHCP
request, does not have to match the subnet of the IP address given by the DHCP server.
BootP/DHCP Forwarding Parameters
The following parameters control the BigIron RX’s forwarding of BootP/DHCP requests:
•
Helper address – The BootP/DHCP server’s IP address. You must configure the helper address on the
interface that receives the BootP/DHCP requests from the client. The BigIron RX cannot forward a request to
the server unless you configure a helper address for the server.
•
Gateway address – The BigIron RX places the IP address of the interface that received the BootP/DHCP
request in the request packet’s Gateway Address field (sometimes called the Router ID field). When the
server responds to the request, the server sends the response as a unicast packet to the IP address in the
Gateway Address field. (If the client and server are directly attached, the Gateway ID field is empty and the
server replies to the client using a unicast or broadcast packet, depending on the server.)
By default, the BigIron RX uses the lowest-numbered IP address on the interface that receives the request as
the Gateway address. You can override the default by specifying the IP address you want the BigIron RX to
use.
•
Hop Count – Each router that forwards a BootP/DHCP packet increments the hop count by 1. Routers also
discard a forwarded BootP/DHCP request instead of forwarding the request if the hop count is greater than
the maximum number of BootP/DHCP hops allows by the router. By default, the BigIron RX forwards a BootP/
DHCP request if its hop count is four or less, but discards the request if the hop count is greater than four. You
can change the maximum number of hops the BigIron RX will allow to a value from 1 – 15.
NOTE: The BootP/DHCP hop count is not the TTL parameter.
58
© 2009 Brocade Communications Systems, Inc.
August 2009
Configuring an IP Helper Address
The procedure for configuring a helper address for BootP/DHCP requests is the same as the procedure for
configuring a helper address for other types of UDP broadcasts. See “Configuring an IP Helper Address” on
page 8-57 .
Changing the IP Address Used for Stamping BootP/DHCP Requests
When the BigIron RX forwards a BootP/DHCP request, the BigIron RX “stamps” the Gateway Address field. The
default value the BigIron RX uses to stamp the packet is the lowest-numbered IP address configured on the
interface that received the request.
The BootP/DHCP stamp address is an interface parameter. Change the parameter on the interface that is
connected to the BootP/DHCP client.
To change the IP address used for stamping BootP/DHCP requests received on interface 1/1, enter commands
such as the following:
BigIron RX(config)# int e 1/1
BigIron RX(config-if-e1000-1/1)# ip bootp-gateway 109.157.22.26
These commands change the CLI to the configuration level for port 1/1, then change the BootP/DHCP stamp
address for requests received on port 1/1 to 192.157.22.26. The BigIron RX will place this IP address in the
Gateway Address field of BootP/DHCP requests that the BigIron RX receives on port 1/1 and forwards to the
BootP/DHCP server.
Syntax: ip bootp-gateway <ip-addr>
Changing the Maximum Number of Hops to a BootP Relay Server
Each BootP/DHCP request includes a field Hop Count field. The Hop Count field indicates how many routers the
request has passed through. When the BigIron RX receives a BootP/DHCP request, the BigIron RX looks at the
value in the Hop Count field.
•
If the hop count value is equal to or less than the maximum hop count the BigIron RX allows, the BigIron RX
increments the hop count by one and forwards the request.
•
If the hop count is greater than the maximum hop count the BigIron RX allows, the BigIron RX discards the
request.
NOTE: The BootP/DHCP hop count is not the TTL parameter.
To modify the maximum number of BootP/DHCP hops, enter the following command:
BigIron RX(config)# bootp-relay-max-hops 10
This command allows the BigIron RX to forward BootP/DHCP requests that have passed through up to ten
previous hops before reaching the BigIron RX.
Syntax: bootp-relay-max-hops <1-15>
Default: 4
Displaying IP Information
You can display the following IP configuration information statistics:
•
Global IP parameter settings – see “Displaying Global IP Configuration Information” on page 8-60.
•
IP interfaces – see “Displaying IP Interface Information” on page 8-62.
•
ARP entries – see “Displaying ARP Entries” on page 8-64.
•
Static ARP entries – see “Displaying ARP Entries” on page 8-64.
•
IP forwarding cache – see “Displaying the Forwarding Cache” on page 8-66.
•
IP route table – see “Displaying the IP Route Table” on page 8-68.
August 2009
© 2009 Brocade Communications Systems, Inc.
59
•
IP traffic statistics – see “Displaying IP Traffic Statistics” on page 8-70.
The sections below describe how to display this information.
In addition to the information described below, you can display the following IP information. This information is
described in other parts of this guide.
•
RIP information – see “Displaying RIP Filters” on page 25-7.
•
OSPF information – see “Displaying OSPF Information” on page 26-39.
•
BGP4 information – see “Displaying BGP4 Information” on page 27-73.
•
DVMRP information – see “Displaying Information About an Upstream Neighbor Device” on page 24-72
•
PIM information – see “Displaying PIM Sparse Configuration Information and Statistics” on page 24-35.
•
VRRP or VRRPE information – see “Displaying VRRP and VRRPE Information” on page 18-17.
Displaying Global IP Configuration Information
To display IP configuration information, enter the following command at any CLI level:
BigIron RX> show ip
Global Settings
ttl: 64, arp-age: 10, bootp-relay-max-hops: 4
router-id : 207.95.11.128
enabled : UDP-Broadcast-Forwarding IRDP Proxy-ARP
disabled: BGP4 Load-Sharing RIP DVMRP FSRP VRRP
Static Routes
Index
IP Address
1
0.0.0.0
Policies
Index
1
64
Action
deny
permit
Subnet Mask
0.0.0.0
Source
209.157.22.34
any
OSPF
Next Hop Router
209.157.23.2
Destination
209.157.22.26
any
Protocol
tcp
Metric Distance
1
1
Port
http
Operator
=
Syntax: show ip
NOTE: This command has additional options, which are explained in other sections in this guide, including the
sections below this one.
60
© 2009 Brocade Communications Systems, Inc.
August 2009
This display shows the following information.
Table 8.9: CLI Display of Global IP Configuration Information
This Field...
Displays...
Global settings
ttl
The Time-To-Live (TTL) for IP packets. The TTL specifies the
maximum number of router hops a packet can travel before reaching
the BigIron RX. If the packet’s TTL value is higher than the value
specified in this field, the Brocade router drops the packet.
To change the maximum TTL, see “Changing the TTL Threshold” on
page 8-37.
arp-age
The ARP aging period. This parameter specifies how many minutes
an inactive ARP entry remains in the ARP cache before the router
ages out the entry.
To change the ARP aging period, see “Changing the ARP Aging
Period” on page 8-34.
bootp-relay-max-hops
The maximum number of hops away a BootP server can be located
from the Brocade router and still be used by the router’s clients for
network booting.
To change this value, see “Changing the Maximum Number of Hops to
a BootP Relay Server” on page 8-59.
router-id
The 32-bit number that uniquely identifies the Brocade router.
By default, the router ID is the numerically lowest IP interface
configured on the router. To change the router ID, see “Changing the
Router ID” on page 8-28.
enabled
The IP-related protocols that are enabled on the router.
disabled
The IP-related protocols that are disabled on the router.
Static routes
Index
The row number of this entry in the IP route table.
IP Address
The IP address of the route’s destination.
Subnet Mask
The network mask for the IP address.
Next Hop Router
The IP address of the router interface to which the Brocade router
sends packets for the route.
Metric
The cost of the route. Usually, the metric represents the number of
hops to the destination.
Distance
The administrative distance of the route. The default administrative
distance for static IP routes in Brocade routers is 1.
To list the default administrative distances for all types of routes or to
change the administrative distance of a static route, see “Changing
Administrative Distances” on page 27-24.
Policies
August 2009
© 2009 Brocade Communications Systems, Inc.
61
Table 8.9: CLI Display of Global IP Configuration Information
This Field...
Displays...
Index
The policy number. This is the number you assigned the policy when
you configured it.
Action
The action the router takes if a packet matches the comparison values
in the policy. The action can be one of the following:
•
deny – The router drops packets that match this policy.
•
permit – The router forwards packets that match this policy.
Source
The source IP address the policy matches.
Destination
The destination IP address the policy matches.
Protocol
The IP protocol the policy matches. The protocol can be one of the
following:
Port
•
ICMP
•
IGMP
•
IGRP
•
OSPF
•
TCP
•
UDP
The Layer 4 TCP or UDP port the policy checks for in packets. The
port can be displayed by its number or, for port types the router
recognizes, by the well-known name. For example, TCP port 80 can
be displayed as HTTP.
NOTE: This field applies only if the IP protocol is TCP or UDP.
Operator
The comparison operator for TCP or UDP port names or numbers.
NOTE: This field applies only if the IP protocol is TCP or UDP.
Displaying IP Interface Information
To display IP interface information, enter the following command at any CLI level:
BigIron RX(config)# show ip interface
Interface
Ethernet 1/1
Ethernet 1/2
Loopback 1
IP-Address
207.95.6.173
3.3.3.3
1.2.3.4
OK?
YES
YES
YES
Method
NVRAM
manual
NVRAM
Status
up
up
down
Protocol
up
up
down
Syntax: show ip interface [ethernet <slot/port>] | [loopback <num>] | [ve <num>]
62
© 2009 Brocade Communications Systems, Inc.
August 2009
This display shows the following information.
Table 8.10: CLI Display of Interface IP Configuration Information
This Field...
Displays...
Interface
The type and the slot and port number of the interface.
IP-Address
The IP address of the interface.
NOTE: If an “s” is listed following the address, this is a secondary
address. When the address was configured, the interface already had
an IP address in the same subnet, so the software required the
“secondary” option before the software could add the interface.
OK?
Whether the IP address has been configured on the interface.
Method
Whether the IP address has been saved in NVRAM. If you have set
the IP address for the interface in the CLI, but have not saved the
configuration, the entry for the interface in the Method field is
“manual”.
Status
The link status of the interface. If you have disabled the interface with
the disable command, the entry in the Status field will be
“administratively down”. Otherwise, the entry in the Status field will be
either “up” or “down”.
Protocol
Whether the interface can provide two-way communication. If the IP
address is configured, and the link status of the interface is up, the
entry in the protocol field will be “up”. Otherwise the entry in the
protocol field will be “down”.
To display detailed IP information for a specific interface, enter a command such as the following:
BigIron RX# show ip interface ethernet 1/1
Interface Ethernet 1/1
port state: UP
ip address: 192.168.9.51
subnet mask: 255.255.255.0
encapsulation: ETHERNET, mtu: 1500, metric: 1
directed-broadcast-forwarding: disabled
proxy-arp: disabled
ip arp-age: 10 minutes
Ip Flow switching is disabled
No Helper Addresses are configured.
No inbound ip access-list is set
No outgoing ip access-list is set
Displaying Interface Name in Syslog
By default an interface’s slot number (if applicable) and port number are displayed when you display Syslog
messages. You can display the name of the interface instead of its number by entering a command such as the
following:
BigIron RX(config)# ip show-portname
This command is applied globally to all interfaces on the BigIron RX.
Syntax: [no] ip show-portname
August 2009
© 2009 Brocade Communications Systems, Inc.
63
When you display the messages in the Syslog, you see the interface name under the Dynamic Log Buffer section.
The actual interface number is appended to the interface name. For example, if the interface name is "lab" and its
port number is "2", you see "lab2" displayed as in the example below:
BigIron RX># show logging
Syslog logging: enabled (0 messages dropped, 0 flushes, 0 overruns)
Buffer logging: level ACDMEINW, 3 messages logged
level code: A=alert C=critical D=debugging M=emergency E=error
I=informational N=notification W=warning
Static Log Buffer:
Dec 15 19:04:14:A:Fan 1, fan on right connector, failed
Dynamic Log Buffer (50 entries):
Dec 15 18:46:17:I:Interface ethernet Lab2, state up
Dec 15 18:45:15:I:Warm start
Displaying ARP Entries
You can display the ARP cache and the static ARP table. The ARP cache contains entries for devices attached to
the BigIron RX. The static ARP table contains the user-configured ARP entries. An entry in the static ARP table
enters the ARP cache when the entry’s interface comes up.
The tables require separate display commands.
Displaying the ARP Cache
To display the contents of the ARP cache, enter the following command at any CLI level:
BigIron RX# show arp
Total number of ARP entries: 5
IP Address
MAC Address
1
207.95.6.102
0800.5afc.ea21
2
207.95.6.18
00a0.24d2.04ed
3
207.95.6.54
00a0.24ab.cd2b
4
207.95.6.101
0800.207c.a7fa
5
207.95.6.211
00c0.2638.ac9c
Type
Dynamic
Dynamic
Dynamic
Dynamic
Dynamic
Age
0
3
0
0
0
Port
6
6
6
6
6
Syntax: show arp [ethernet <slot/port> | mac-address <xxxx.xxxx.xxxx> [<mask>] | <ip-addr> [<ip-mask>]]
[<num>] [| begin <expression> | exclude <expression> | include <expression>]
The ethernet <slot>/<portnum> parameter lets you restrict the display to entries for a specific port.
The mac-address <xxxx.xxxx.xxxx> parameter lets you restrict the display to entries for a specific MAC address.
The <mask> parameter lets you specify a mask for the mac-address <xxxx.xxxx.xxxx> parameter, to display
entries for multiple MAC addresses. Specify the MAC address mask as “f”s and “0”s, where “f”s are significant
bits.
The <ip-addr> and <ip-mask> parameters let you restrict the display to entries for a specific IP address and
network mask. Specify the IP address masks in standard decimal mask format (for example, 255.255.0.0).
NOTE: The <ip-mask> parameter and <mask> parameter perform different operations. The <ip-mask>
parameter specifies the network mask for a specific IP address, whereas the <mask> parameter provides a filter
for displaying multiple MAC addresses that have specific values in common.
The <num> parameter lets you display the table beginning with a specific entry number.
64
© 2009 Brocade Communications Systems, Inc.
August 2009
NOTE: The entry numbers in the ARP cache are not related to the entry numbers for static ARP table entries.
This display shows the following information. The number in the left column of the CLI display is the row number
of the entry in the ARP cache. This number is not related to the number you assign to static MAC address entries
in the static ARP table.
Table 8.11: CLI Display of ARP Cache
This Field...
Displays...
IP Address
The IP address of the device.
MAC Address
The MAC address of the device.
Type
The type, which can be one of the following:
Age
•
Dynamic – The BigIron RX learned the entry from an incoming
packet.
•
Static – The BigIron RX loaded the entry from the static ARP
table when the device for the entry was connected to the BigIron
RX.
The number of minutes the entry has remained unused. If this value
reaches the ARP aging period, the entry is removed from the table.
To display the ARP aging period, see “Displaying Global IP
Configuration Information” on page 8-60. To change the ARP aging
interval, see “Changing the ARP Aging Period” on page 8-34.
NOTE: Static entries do not age out.
Port
The port on which the entry was learned.
Displaying the Static ARP Table
To display the static ARP table, enter the following command at any CLI level:
BigIron RX# show ip static-arp
Static ARP table size: 512, configurable from 512 to 1024
Index
IP Address
MAC Address
Port
1
207.95.6.111
0800.093b.d210
1/1
3
207.95.6.123
0800.093b.d211
1/1
This example shows two static entries. Note that since you specify an entry’s index number when you create the
entry, it is possible for the range of index numbers to have gaps, as shown in this example. The entry number you
assign to a static ARP entry is not related to the entry numbers in the ARP cache.
Syntax: show ip static-arp [ethernet <slot>/<portnum> | mac-address <xxxx.xxxx.xxxx> [<mask>] |
<ip-addr> [<ip-mask>]] [<num>] [| begin <expression> | exclude <expression> | include <expression>]
August 2009
© 2009 Brocade Communications Systems, Inc.
65
For information on the command syntax, see the syntax of the show arp command under “Displaying the ARP
Cache” on page 8-64.
Table 8.12: CLI Display of Static ARP Table
This Field...
Displays...
Static ARP table size
The maximum number of static entries that can be configured on the
device using the current memory allocation. The range of valid
memory allocations for static ARP entries is listed after the current
allocation. To change the memory allocation for static ARP entries,
see “Changing the Maximum Number of Entries the Static ARP Table
Can Hold” on page 8-35.
Index
The number of this entry in the table. You specify the entry number
when you create the entry.
IP Address
The IP address of the device.
MAC Address
The MAC address of the device.
Port
The port attached to the device the entry is for.
Displaying the Forwarding Cache
To display the IP Forwarding Cache for directly connected hosts, enter the following command:
BigIron RX> show ip cache
Cache Entry Usage on LPs:
Module
Host
Network
15
6
6
Free
204788
Total
204800
Syntax: show ip cache [<ip-addr>] [| begin <expression> | exclude <expression> | include <expression>]
The <ip-addr> parameter displays the cache entry for the specified IP address.
The show ip cache command shows the forwarding cache usage on each interface module CPU. The CPU on
each interface module builds its own forwarding cache, depending on the traffic. To see the forwarding cache of a
particular interface module, use the rconsole.
BigIron RX>rconsole 15
Connecting to slave CPU 15/1... (Press CTRL-Shift-6 X to exit)
rconsole-15/1@LP>show ip cache
Total number of host cache entries 3
D: Dynamic P:Permanent, F:Forward U:Us C:Conected Network
W:Wait ARP I:ICMP Deny K:Drop R:Frament S:Snap Encap N:CAMInvalid
IP Address
Next Hop
MAC
Type
Port
VLAN
1
30.1.0.0
DIRECT
0000.0000.0000
PU
2/5
n/a
2
20.1.0.0
DIRECT
0125.0a57.1c02
D
3/5
n/a
3
7.7.7.3
DIRECT
0000.0000.0000
PU
4/2
12
Pri
0
0
1
You also use the rconsole to display the IP Forwarding Cache for network entries.
66
© 2009 Brocade Communications Systems, Inc.
August 2009
BigIron RX>rconsole 15
Connecting to slave CPU 15/1... (Press CTRL-Shift-6 X to exit)
rconsole-15/1@LP>show ip network
Total number of host cache entries 3
D: Dynamic P:Permanent, F:Forward U:Us C:Conected Network
W:Wait ARP I:ICMP Deny K:Drop R:Frament S:Snap Encap N:CAMInvalid
IP Address
Next Hop
MAC
Type
Port
VLAN
1
0.0.0.0/0
DIRECT
0000.0000.0000
PK
n/a
2
20.1.1.0/24
DIRECT
0000.0000.0000
PC
n/a
3
40.40.40.0/24
30.1.1.10
0000.0000.0033
PF
15/14
154
Pri
0
0
1
The show ip cache and show ip network commands entered on the rconsole display the following information.
Table 8.13: CLI Display of IP Forwarding Cache
This Field...
Displays...
IP Address
The IP address of the destination.
Next Hop
The IP address of the next-hop router to the destination. This field
contains either an IP address or the value DIRECT. DIRECT means
the destination is either directly attached or the destination is an
address on this Brocade device. For example, the next hop for
loopback addresses and broadcast addresses is shown as DIRECT.
MAC
The MAC address of the destination.
NOTE: If the entry is type U (indicating that the destination is this
Brocade device), the address consists of zeroes.
Type
The type of host entry, which can be one or more of the following:
•
D – Dynamic
•
P – Permanent
•
F – Forward
•
U – Us
•
C – Complex Filter
•
W – Wait ARP
•
I – ICMP Deny
•
K – Drop
•
R – Fragment
•
S – Snap Encap
Port
The port through which this device reaches the destination. For
destinations that are located on this device, the port number is shown
as “n/a”.
VLAN
Indicates the VLAN(s) the listed port is in.
Pri
The QoS priority of the port or VLAN.
August 2009
© 2009 Brocade Communications Systems, Inc.
67
Displaying the IP Route Table
To display the IP route table, enter the following command at any CLI level:
BigIron RX> show ip route
Total number of IP routes: 514
Start index: 1 B:BGP D:Connected
Destination
1.1.0.0
1.2.0.0
1.3.0.0
1.4.0.0
1.5.0.0
1.6.0.0
1.7.0.0
1.8.0.0
1.9.0.0
1.10.0.0
Gateway
99.1.1.2
99.1.1.2
99.1.1.2
99.1.1.2
99.1.1.2
99.1.1.2
99.1.1.2
99.1.1.2
99.1.1.2
99.1.1.2
R:RIP
Port
1/1
1/1
1/1
1/1
1/1
1/1
1/1
1/1
1/1
1/1
S:Static
Cost
2
2
2
2
2
2
2
2
2
2
O:OSPF *:Candidate default
Type
R
R
R
R
R
R
R
R
R
S
Beginning with release 02.4.00, the show ip route command has been enhanced to include the elapse time since
an IP route was installed.
BigIron RX(config)#show ip route
Total number of IP routes: 2
Type Codes - B:BGP D:Connected I:ISIS S:Static R:RIP O:OSPF; Cost - Dist/Metric
Uptime - Days:Hours:Minutes:Seconds
Destination
Gateway
Port
Cost
Type Uptime
1
10.0.0.0/8
10.43.1.1
mgmt 1
1/1
S
2:23:0:16
2
10.43.1.0/24
DIRECT
mgmt 1
0/0
D
2:23:0:18
Syntax: show ip route <num> | [<ip-addr> [<ip-mask>] [debug | detail | longer]] | connected | bgp | isis | ospf | rip
| static | summary] [| begin <expression> | exclude <expression> | include <expression>]
The <num> option display the route table entry whose row number corresponds to the number you specify. For
example, if you want to display the tenth row in the table, enter “10”.
The <ip-addr> parameter displays the route to the specified IP address.
The <ip-mask> parameter lets you specify a network mask or, if you prefer CIDR format, the number of bits in the
network mask. If you use CIDR format, enter a forward slash immediately after the IP address, then enter the
number of mask bits (for example: 209.157.22.0/24 for 209.157.22.0 255.255.255.0).
The longer | detail | debug parameter applies only when you specify an IP address and mask. This option
displays only the routes for the specified IP address and mask.
The bgp option displays the BGP4 routes.
The connected option displays only the IP routes that are directly attached to the BigIron RX.
The ospf option displays the OSPF routes.
The rip option displays the RIP routes.
The isis option displays the RIP routes.
The static option displays only the static IP routes.
The summary option displays a summary of the information in the IP route table.
The default routes are displayed first.
68
© 2009 Brocade Communications Systems, Inc.
August 2009
Here is an example of how to use the connected option. To display only the IP routes that go to devices directly
attached to the BigIron RX:
BigIron RX(config)# show ip route connected
Start index: 1 B:BGP D:Connected R:RIP S:Static
Destination
209.157.22.0
Gateway
0.0.0.0
Port
4/11
O:OSPF *:Candidate default
Cost
1
Type
D
Notice that the route displayed in this example has “D” in the Type field, indicating the route is to a directly
connected device.
Here is an example of how to use the static option. To display only the static IP routes:
BigIron RX(config)# show ip route static
Start index: 1 B:BGP D:Connected R:RIP
Destination
192.144.33.11
Gateway
209.157.22.12
S:Static
Port
1/1
O:OSPF *:Candidate default
Cost
2
Type
S
Notice that the route displayed in this example has “S” in the Type field, indicating the route is static.
Here is an example of how to use the longer option. To display only the routes for a specified IP address and
mask, enter a command such as the following:
BigIron RX(config)# show ip route 209.159.0.0/16 longer
Starting index: 1 B:BGP D:Directly-Connected R:RIP S:Static O:OSPF
Destination NetMask Gateway Port Cost Type
52
53
54
55
56
57
58
59
60
209.159.38.0
209.159.39.0
209.159.40.0
209.159.41.0
209.159.42.0
209.159.43.0
209.159.44.0
209.159.45.0
209.159.46.0
255.255.255.0
255.255.255.0
255.255.255.0
255.255.255.0
255.255.255.0
255.255.255.0
255.255.255.0
255.255.255.0
255.255.255.0
207.95.6.101
207.95.6.101
207.95.6.101
207.95.6.101
207.95.6.101
207.95.6.101
207.95.6.101
207.95.6.101
207.95.6.101
1/1
1/1
1/1
1/1
1/1
1/1
1/1
1/1
1/1
1
1
1
1
1
1
1
1
1
S
S
S
S
S
S
S
S
S
This example shows all the routes for networks beginning with 209.159. The mask value and longer parameter
specify the range of network addresses to be displayed. In this example, all routes within the range 209.159.0.0 –
209.159.255.255 are listed.
The summary option displays a summary of the information in the IP route table. The following is an example of
the output from this command:
BigIron RX# show ip route summary
IP Routing Table - 35 entries:
6 connected, 28 static, 0 RIP, 1 OSPF, 0 BGP, 0 ISIS, 0 MPLS
Number of prefixes:
/0: 1 /16: 27 /22: 1 /24: 5 /32: 1
Syntax: show ip route summary
August 2009
© 2009 Brocade Communications Systems, Inc.
69
In this example, the IP route table contains 35 entries. Of these entries, 6 are directly connected devices, 28 are
static routes, and 1 route was calculated through OSPF. One of the routes has a zero-bit mask (this is the default
route), 27 have a 22-bit mask, 5 have a 24-bit mask, and 1 has a 32-bit mask.
The following table lists the information displayed by the show ip route command.
Table 8.14: CLI Display of IP Route Table
This Field...
Displays...
Destination
The destination network of the route.
NetMask
The network mask of the destination address.
Gateway
The next-hop router.
Port
The port through which this router sends packets to reach the route's
destination.
Cost
The route's cost.
Type
The route type, which can be one of the following:
Uptime
•
B – The route was learned from BGP.
•
D – The destination is directly connected to this BigIron RX.
•
R – The route was learned from RIP.
•
S – The route is a static route.
•
* – The route is a candidate default route.
•
O – The route is an OSPF route. Unless you use the ospf option
to display the route table, “O” is used for all OSPF routes. If you
do use the ospf option, the following type codes are used:
•
O – OSPF intra area route (within the same area).
•
IA – The route is an OSPF inter area route (a route that
passes from one area into another).
•
E1 – The route is an OSPF external type 1 route.
•
E2 – The route is an OSPF external type 2 route.
The elapse time since an IP route was installed.
Clearing IP Routes
If needed, you can clear the entire route table or specific individual routes.
To clear all routes from the IP route table:
BigIron RX# clear ip route
To clear route 209.157.22.0/24 from the IP routing table:
BigIron RX# clear ip route 209.157.22.0/24
Syntax: clear ip route [<ip-addr> <ip-mask> | <ip-addr>/<mask-bits>]
Displaying IP Traffic Statistics
To display IP traffic statistics, enter the following command at any CLI level:
70
© 2009 Brocade Communications Systems, Inc.
August 2009
NOTE: In the BigIron RX, only those packets that are forwarded or generated by the CPU are included in the IP
traffic statistics. Hardware forwarded packets are not included.
BigIron RX> sh ip traffic
IP Statistics
146806 total received, 72952 mp received, 6715542 sent, 0 forwarded
0 filtered, 0 fragmented, 0 bad header
0 failed reassembly, 0 reassembled, 0 reassembly required
0 no route, 0 unknown proto, 0 no buffer, 0 other errors, 0 rpf discard
ARP Statistics
19022 total recv, 35761 req recv, 475 rep recv, 2803975 req sent, 1885 rep
sent
0 pending drop, 0 invalid source, 0 invalid dest
ICMP Statistics
Received:
9 total, 0 errors, 0 unreachable, 0 time exceed
0 parameter, 0 source quench, 0 redirect, 8 echo, 1 echo reply
Sent:
9 total, 0 errors, 0 unreachable, 0 time exceed
0 parameter, 0 source quench, 0 redirect
1 echo, 8 echo reply, 0 irdp advertisement, 0 irdp solicitation
UDP Statistics
7230 received, 5604608 sent, 1020 no port, 0 input errors
TCP Statistics
2706 in segments, 3689 out segments, 0 retransmission, 0 input errors
BigIron RX#
Syntax: show ip traffic
The show ip traffic command displays the following information.
Table 8.15: CLI Display of IP Traffic Statistics
This Field...
Displays...
IP statistics
received
The total number of IP packets received by the device.
sent
The total number of IP packets originated and sent by the device.
forwarded
The total number of IP packets received by the device and forwarded
to other devices.
filtered
The total number of IP packets filtered by the device.
fragmented
The total number of IP packets fragmented by this device to
accommodate the IP MTU of this device or of another device.
reassembled
The total number of fragmented IP packets that this device reassembled.
August 2009
© 2009 Brocade Communications Systems, Inc.
71
Table 8.15: CLI Display of IP Traffic Statistics
This Field...
Displays...
bad header
The number of IP packets dropped by the device due to a bad packet
header.
no route
The number of packets dropped by the device because there was no
route.
unknown proto
The number of packets dropped by the device because the value in
the Protocol field of the packet header is unrecognized by this device.
no buffer
This information is used by Brocade customer support.
other errors
The number of packets that this device dropped due to error types
other than the types listed above.
ICMP Statistics
The ICMP statistics are derived from RFC 792, “Internet Standard Subnetting Procedure”, and RFC 1256,
“ICMP Router Discovery Messages”. Statistics are organized into Sent and Received. The field descriptions
below apply to each.
total
The total number of ICMP messages sent or received by the device.
errors
This information is used by Brocade customer support.
unreachable
The number of Destination Unreachable messages sent or received
by the device.
time exceed
The number of Time Exceeded messages sent or received by the
device.
parameter
The number of Parameter Problem messages sent or received by the
device.
source quench
The number of Source Quench messages sent or received by the
device.
redirect
The number of Redirect messages sent or received by the device.
echo
The number of Echo messages sent or received by the device.
echo reply
The number of Echo Reply messages sent or received by the device.
timestamp
The number of Timestamp messages sent or received by the device.
timestamp reply
The number of Timestamp Reply messages sent or received by the
device.
addr mask
The number of Address Mask Request messages sent or received by
the device.
addr mask reply
The number of Address Mask Replies messages sent or received by
the device.
irdp advertisement
The number of ICMP Router Discovery Protocol (IRDP)
Advertisement messages sent or received by the device.
irdp solicitation
The number of IRDP Solicitation messages sent or received by the
device.
UDP statistics
72
© 2009 Brocade Communications Systems, Inc.
August 2009
Table 8.15: CLI Display of IP Traffic Statistics
This Field...
Displays...
received
The number of UDP packets received by the device.
sent
The number of UDP packets sent by the device.
no port
The number of UDP packets dropped because the packet did not
contain a valid UDP port number.
input errors
This information is used by Brocade customer support.
TCP statistics
The TCP statistics are derived from RFC 793, “Transmission Control Protocol”.
active opens
The number of TCP connections opened by this device by sending a
TCP SYN to another device.
passive opens
The number of TCP connections opened by this device in response to
connection requests (TCP SYNs) received from other devices.
failed attempts
This information is used by Brocade customer support.
active resets
The number of TCP connections this device reset by sending a TCP
RESET message to the device at the other end of the connection.
passive resets
The number of TCP connections this device reset because the device
at the other end of the connection sent a TCP RESET message.
input errors
This information is used by Brocade customer support.
in segments
The number of TCP segments received by the device.
out segments
The number of TCP segments sent by the device.
retransmission
The number of segments that this device retransmitted because the
retransmission timer for the segment had expired before the device at
the other end of the connection had acknowledged receipt of the
segment.
RIP statistics
The RIP statistics are derived from RFC 1058, “Routing Information Protocol”.
requests sent
The number of requests this device has sent to another RIP router for
all or part of its RIP routing table.
requests received
The number of requests this device has received from another RIP
router for all or part of this device’s RIP routing table.
responses sent
The number of responses this device has sent to another RIP router’s
request for all or part of this device’s RIP routing table.
responses received
The number of responses this device has received to requests for all
or part of another RIP router’s routing table.
unrecognized
This information is used by Brocade customer support.
bad version
The number of RIP packets dropped by the device because the RIP
version was either invalid or is not supported by this device.
bad addr family
The number of RIP packets dropped because the value in the Address
Family Identifier field of the packet’s header was invalid.
August 2009
© 2009 Brocade Communications Systems, Inc.
73
Table 8.15: CLI Display of IP Traffic Statistics
This Field...
Displays...
bad req format
The number of RIP request packets this router dropped because the
format was bad.
bad metrics
This information is used by Brocade customer support.
bad resp format
The number of responses to RIP request packets this router dropped
because the format was bad.
resp not from rip port
This information is used by Brocade customer support.
resp from loopback
The number of RIP responses received from loopback interfaces.
packets rejected
This information is used by Brocade customer support.
Displaying TCP Traffic Statistics
You can use the show ip tcp traffic command to display TCP traffic statistics:
BigIron RX# show ip tcp traffic
TCP Statistics
233 active opens, 0 passive opens, 1659 failed attempts 117547
active resets, 0 passive resets, 116511 input errors 141627 in
segments, 18866 out segments, 71 retransmission
Syntax: show ip tcp traffic
74
This Field...
Displays...
active opens
Number of TCP connection requests from the local router, resulting in
outbound TCP SYNC packets
passive opens
Number of TCP connection requests from remote routers/hosts,
resulting in outbound TCP SYNC-ACK packets
failed attempts
Number of unsuccessful TCP connection requests from either local or
remote
active resets,
Number of TCP RESET packets sent by the local router
passive resets,
Number of normal TCP connections closed
input errors
Number of TCP packets received with error (header too short,
checksum error, or not a listening TCP PORT)
in segments,
Number of TCP packet received
out segments,
Number of TCP packet sent
retransmission
Number of TCP packet re-transmitted
© 2009 Brocade Communications Systems, Inc.
August 2009