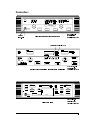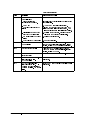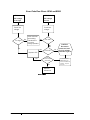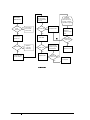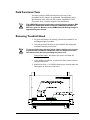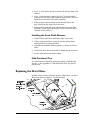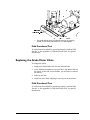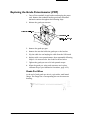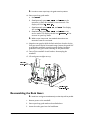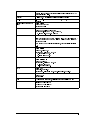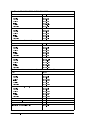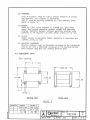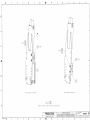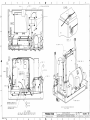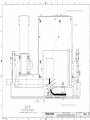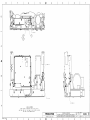
1
TREADMILL SERVICE MANUAL ClubTrack® ClubTrack Plus® HR ClubTrack HR ClubTrack Plus MedTrack®® CR60 MedTrack SR60 ® 000377-833 033387-005 Rev New Trademarks Quinton, ClubTrack, ClubTrack Plus, and MedTrack are registered trademarks of Quinton Instrument Company. ClubTrack 3.0, HR ClubTrack, HR ClubTrack Plus, Hyperdrive, Q-Series, and Series 90 are trademarks of Quinton Instrument Company. All other product and company names are trademarks or registered trademarks of their respective companies. Service Manual Publication Number 000377-833 Text Number 033387-005 Rev New Copyright © 1995, 1997 Quinton Instrument Co. All rights reserved. Quinton Instrument Company 3303 Monte Villa Parkway, Bothell, WA 98021-8906 Telephone 425/402-2000 Fax 425/402-2001 USA and Canada: Service: 800/426-0538 Sales: MedTrack 800/426-0347 ClubTrack 800/426-0337 Visit Quinton on the World Wide Web at www.quinton.com INTERNATIONAL SALES Latin America & Asia-Pacific Telephone 425/402-2000 Fax 425/402-2001 Europe/Hoofddorp, The Netherlands Telephone 31-23-5672400 Fax 31-23-5672410 Preface This manual contains information for servicing and repairing the following Quinton Hyperdive™ treadmills to the module level: ClubTrack P/N 00377 ClubTrack Plus P/N 00382 HR ClubTrack P/N 00402 HR ClubTrack Plus MedTrack MedTrack P/N 00425 CR60 P/N 00380 SR60 P/N 00390 The manual covers domestic and international versions of the treadmills, which are differentiated by dash numbersee Appendix C, Part Numbers. The manual is designed for Quinton-authorized service personnel with proper training. There are no user-serviceable parts in the treadmills. Any attempt by non-Quinton-trained personnel to service the treadmill may void the warranty. For service information, call Quinton Technical Service: 1-800-426-0538. Before servicing the treadmill, read the safety requirements listed in Appendix A. A Do not use this manual when servicing Series 90 , Q-Series , or ClubTrack 3.0 series treadmills. Preface - iii Contents Preface Overview ClubTrack® . . . . MedTrack® . . . . Configuration Plate Power . . . . . . . Operation . . . . . Controllers . . . . . . . . . . . . . . . . . . . . . . . . . . . . . . . . . . . . . . . . . . . . . . . . . . . . . . . . . . . . . . . . . . . . . . . . . . . . . . . . . . . . . . . . . . . . . . . . . . . . . . . . . . . . . . . . . . . . . . . . . . . . . . . . . . 1-1 1-1 1-2 1-2 1-2 1-3 Overview . . . . . . . . . . . . . . . Controller Assembly . . . . . . . Headframe Assembly . . . . . . . Deck and Roller Assembly . . . . Controller Assembly . . . . . . . . . Keypanel . . . . . . . . . . . . . User Inputs . . . . . . . . . . . . Output Displays . . . . . . . . . . Additional Functions . . . . . . . Controller to Treadmill Interface . HR ClubTrack Plus Interface . . . Headframe Assembly . . . . . . . . . Input Power Module . . . . . . . Drive Board . . . . . . . . . . . . Drive Motor Assembly . . . . . . Grade Motor Assembly and System Deck and Roller Assembly . . . . . . Heart Rate Monitoring Option . . . . Transmitter . . . . . . . . . . . . Receiver . . . . . . . . . . . . . . Microprocessor . . . . . . . . . . . . . . . . . . . . . . . . . . . . . . . . . . . . . . . . . . . . . . . . . . . . . . . . . . . . . . . . . . . . . . . . . . . . . . . . . . . . . . . . . . . . . . . . . . . . . . . . . . . . . . . . . . . . . . . . . . . . . . . . . . . . . . . . . . . . . . . . . . . . . . . . . . . . . . . . . . . . . . . . . . . . . . . . . . . . . . . . . . . . . . . . . . . . . . . . . . . . . . . . . . . . . . . . . . . . . . . . . . . . . . . . . . . . . . . . . 2-1 2-1 2-2 2-2 2-2 2-2 2-3 2-3 2-3 2-3 2-3 2-3 2-3 2-4 2-4 2-4 2-4 2-4 2-5 2-5 2-5 Theory of Operation Contents - v Troubleshooting Tools . . . . . . . . . . . . . . . . . . . Electrical Problems . . . . . . . . . . . . Electronic Problems . . . . . . . . . . . . Error Codes . . . . . . . . . . . . . . Service Mode . . . . . . . . . . . . . Firmware Revision . . . . . . . . . . Controller Keys . . . . . . . . . . . . Displays . . . . . . . . . . . . . . . Tri-color Display . . . . . . . . . . . Speed/Grade (Open-Loop Mode) . . . HR ClubTrack Plus™ LCD Display Test Testing Pin Signals . . . . . . . . . . Heart Rate Monitoring Option . . . . . . Testing Heart Rate Accuracy . . . . . Mechanical Problems . . . . . . . . . . . Walk Belt . . . . . . . . . . . . . . . Drive Belt . . . . . . . . . . . . . . . Treadmill Noise . . . . . . . . . . . . Flow Charts . . . . . . . . . . . . . . . . . . . . . . . . . . . . . . . . . . . . . . . . . . . . . . . . . . . . . . . . . . . . . . . . . . . . . . . . . . . . . . . . . . . . . . . . . . . . . . . . . . . . . . . . . . . . . . . . . . . . . . . . . . . . . . . . . . . . . . . . . . . . . . . . . . . . . . . . . . . . . . . . . . . . . . . . . 3-1 . 3-2 . 3-3 . 3-3 . 3-5 . 3-5 . 3-5 . 3-6 . 3-6 . 3-6 . 3-7 . 3-7 . 3-8 . 3-9 . 3-9 . 3-9 3-10 3-10 3-10 Cautions/Warnings . . . . . . . . . . . . . . Tools . . . . . . . . . . . . . . . . . . . . . Field Functional Tests . . . . . . . . . . . . Removing Treadmill Hood . . . . . . . . . . Replacing the Configuration Plate . . . . . . Replacing the Power Cord . . . . . . . . . . . Replacing the VSD Board/Card Cage Assembly Replacing the Tensioner . . . . . . . . . . . Replacing the Poly-V Drive Belt . . . . . . . . Installing the Front Shaft . . . . . . . . . Replacing the Drive Motor . . . . . . . . . . Replacing the Transformer . . . . . . . . . . Replacing the Grade Motor . . . . . . . . . . Replacing the Grade Motor Chain . . . . . . . Replacing the Grade Potentiometer (POT) . . Grade Pot Wires . . . . . . . . . . . . . Removing the Rack Gears . . . . . . . . . . Reassembling the Rack Gears . . . . . . . . Replacing a Jammed Rack Gear . . . . . . . . Replacing the Pinion Shaft . . . . . . . . . . Adjusting the Grade Limit Switches . . . . . Walk Deck Assembly . . . . . . . . . . . . . . . . . . . . . . . . . . . . . . . . . . . . . . . . . . . . . . . . . . . . . . . . . . . . . . . . . . . . . . . . . . . . . . . . . . . . . . . . . . . . . . . . . . . . . . . . . . . . . . . . . . . . . . . . . . . . . . . . . . . . . . . . . . . . . . . . . . 4-1 . 4-2 . 4-3 . 4-3 . 4-6 . 4-7 . 4-7 . 4-9 4-10 4-11 4-11 4-13 4-14 4-15 4-16 4-16 4-17 4-18 4-19 4-21 4-22 4-23 Repair/Replacement and Calibration Contents - vi Replacing the Rollers . . . . . . . . . . . . . . . . . . Replacing the Walk Belt or Deck . . . . . . . . . . . . Replacing Compression Mounts . . . . . . . . . . . . . Replacing the Deck . . . . . . . . . . . . . . . . . . . Adjusting the Walk Belt . . . . . . . . . . . . . . . . Walk Belt Tension . . . . . . . . . . . . . . . . . Walk Belt Tracking . . . . . . . . . . . . . . . . . Controller Assembly . . . . . . . . . . . . . . . . . . Removing the Enclosure . . . . . . . . . . . . . . Replacing the PCBA . . . . . . . . . . . . . . . . . Replacing the Fluorescent Tube (HR ClubTrack Plus) Replacing the HR Receiver Assembly . . . . . . . . Configuring the Controller . . . . . . . . . . . . . Removing the Keypanel . . . . . . . . . . . . . . . Replacing the Controller Cable . . . . . . . . . . . Cumulative Use . . . . . . . . . . . . . . . . . . . Limited Access Switch . . . . . . . . . . . . . . . Calibration Procedures . . . . . . . . . . . . . . . . . Grade Potentiometer (Grade Pot) . . . . . . . . . . Speed Calibration . . . . . . . . . . . . . . . . . . Grade Calibration . . . . . . . . . . . . . . . . . . . . . . . . . . . . . . . . . . . . . . . 4-23 4-24 4-25 4-25 4-26 4-26 4-27 4-28 4-28 4-29 4-30 4-30 4-30 4-31 4-31 4-32 4-33 4-33 4-33 4-34 4-34 . . . . . . . . . . Preventive Maintenance Recommended Service . . . . . . . . Routine Maintenance . . . . . . . . Vacuuming Under the Treadmill Hood Replacement Schedules . . . . . . . . Heart Rate Monitoring Option . . . . . . . . . . . . . . . . . . . . . . . . . . . . . . . . . . . . . . . . . . . . . . . . . 5-1 5-1 5-2 5-2 5-2 Safety Requirements Safety Requirements . . . . . . . . . . . . . . . . . . . . A-1 Symbol Definitions . . . . . . . . . . . . . . . . . . . . . A-2 Specifications ClubTrack® and MedTrack® Rehabilitation Treadmills . . . ClubTrack® & MedTrack® Controllers . . . . . . . . . . . ClubTrack Plus® Treadmill (P/N 00382) . . . . . . . . . . ClubTrack Plus® Controller (P/N 00382) . . . . . . . . . HR ClubTrack PlusTM with Heart Rate Control (P/N 00425) . B-1 . B-3 . B-4 . B-5 . B-5 Part Numbers Final Assemblies . . . . . . . . . . . . . . . . . . . . . . C-1 Operator and Service Manuals . . . . . . . . . . . . . . . C-1 Spares . . . . . . . . . . . . . . . . . . . . . . . . . . . C-2 Contents - vii Controllers . . . . . . . . . . . . . . . . . . . . . . . . . C-3 Accessories for Heart Rate Monitoring . . . . . . . . . . . C-5 Field Functional Tests Complete Field Functional Test . Test the Controller Displays Test the Multi Display . . . Test the Controller Operation Test the Grade Operation . . Test Speed Operation . . . . Test the Deck Friction . . . . Test the Walk Belt Operation Field Test No. 1 . . . . . . . . . Field Test No. 2 . . . . . . . . . Field Test No. 3 . . . . . . . . . Field Test No. 4 . . . . . . . . . Field Test No. 5 . . . . . . . . . . . . . . . . . . . . . . . . . . . . . . . . . . . . . . . . . . . . . . . . . . . . . . . . . . . . . . . . . . . . . . . . . . . . . . . . . . . . . . . . . . . . . . . . . . . . . . . . . . . . . . . . . . . . . . . . . . . . . . . . . . . . . . . . . . . . . . . . . . . . . . . . . . . . . . . . . . . . . . . . . . . . . . . . . . . D-1 . D-1 . D-2 . D-3 . D-4 . D-5 . D-5 . D-6 . D-6 . D-8 . D-9 D-11 D-11 Assembly Drawings . . . . . . . . . . . . . . . . . . . . . . . . E-1 Index Contents - viii 1 Overview ClubTrack Quintons ClubTrack series of treadmills are motorized treadmills with built-in controllers and are designed for fitness exercise. The series includes the ClubTrack, P/N 00377; HR ClubTrack with Heart Rate Monitoring, P/N 00402; ClubTrack Plus, P/N 00382; and the HR ClubTrack Plus, P/N 00425. The ClubTrack Plus provides manual and programmed operation. The HR ClubTrack Plus adds Heart rate control, interval programming, and a computer interface. MedTrack The MedTrack rehabilitation treadmills are designed for rehabilitation exercise. Two models are available: the CR60 for cardio-pulmonary rehabilitation (P/N 00380) and the SR60 for sports rehabilitation (P/N 00390). Both feature a built-in controller. See the Appendix of the applicable operator manual for installation requirements. Front of Hood Rear Sample Treadmill Overview 1-1 Configuration Plate ON I O OFF Circuit Breaker Power Cord Treadmills distributed for use outside the USA and Canada have detachable power cords. Power The circuit breaker on the front of the treadmill hood controls the power to the treadmill. The circuit breaker must be set to the treadmill to run. A ON for Turn off the circuit breaker before connecting or disconnecting the treadmill from the wall outlet. Operation The controller, which is mounted above the front handrail, is a computerized panel used to operate the treadmill. All commands, including power, are entered by pressing a soft-touch key on the panel. Visual indicators and displays show the operational status and exercise results. Overview 1-2 Controllers SPEED GRADE POWER UNITS SELECT CLEAR UP FASTER SLOWER DOWN Quinton STOP BELT COOL DOWN START BELT STOP BELT PCBA 33518-001 Magnet Keypanel 33504 ClubTrack and MedTra ck SR60/CR60 19296-001 Controller Assy 34506 Heart Rate Monitoring LEDs TM COMPATIBLE CLUBTRACK TM PCBA 34296-001 Keypanel 34298 HR ClubTrack Contro ller with Heart Rate Monitoring SPEED GRADE POWER CLEAR Controller Assy 34297 UNITS SELECT UP START COURSE FASTER INPUT DOWN Quinton FITNESS EQUIPMENT STOP BELT NEXT STAGE START BELT ENTER STAGE RESUME COURSE COOL DOWN SLOWER STOP BELT PCBA 33519-002 ClubTrack Plus Keypanel 33505 Controller Assy 34505 Overview 1-3 SPEED GRADE MPH POWER KM/H F1 UNITS F2 UP F3 PREVIOUS MENU QUINTON FITNESS EQUIPMENT STOP BELT FASTER SLOWER DOWN MENU START BELT COOL DOWN STOP BELT PCBA 35452 HR ClubTrack Plus Contro ller with Heart Rate Control Overview 1-4 Keypanel 35260 Controller Assy 35258 2 Theory of Operation Overview The treadmill consists of three major assemblies: controller, headframe, and deck and roller. Controller Assembly The controller assembly, which is mechanically attached to the deck, is the user interface. The user presses a key on the controller to enter a command. The controller processes the user-entered information displays all exercise data sends commands to the head frame assembly. Power Communications Treadmill Subassemblies Theory of Operation 2-1 Headframe Assembly The headframe assembly includes the drive and grade systems and the electronics that drive these systems. A three-phase AC motor drives the walk belt by supplying torque and speed to the drive pulley through a drive belt. A DC motor drives the front of the treadmill up and down to simulate hills. The headframe assembly receives speed and grade commands from the controller. Deck and Roller Assembly The deck and roller assembly is attached to the headframe and supports the rear of the treadmill. It provides the platform for the walk belt. The drive belt supplies torque to the walk belt through the drive roller pulley. Controller Assembly The controller assembly consists of a keypanel and PCBA mounted in an enclosure. The enclosure, which has a removable rear panel, mounts to the uprights. Controller Subassemblies Keypanel The keypanel assembly consists of a membrane key or switch panel and a PCBA. The keypanel and PCBA are connected through a flexible cable that is part of the keypanel. A keypanel connector mates to a PCBA connector. Theory of Operation 2-2 User Inputs The user enters all control commands through the keypanel. The controller scans the membrane switches on the keypanel. The controller PCBA interprets switch closure, updates the displayed values, and sends control commands to the drive board. Output Displays The controller assembly uses LED displays mounted on the controller PCBA. These displays show pertinent treadmill information including target speed and grade and accumulated exercise information. The HR CLubTrack Plus also displays data on an LCD screen. Additional Functions The controller assembly also: performs an electronic self-test when the treadmill is turned on provides a special mode for manufacturing and service testing includes circuitry for the magnetic access switch. Controller to Treadmill Interface The controller communicates with the treadmill drive board through a standard RS422 interface. The controller sends commands to the treadmill drive board and receives acknowledge and status statements from the treadmill drive board. The controller uses 12 VDC power from the treadmill drive board as the power source for all circuitry and for the LED displays. HR ClubTrack Plus Interface An RJ-45 interface connector on the rear of the HR ClubTrack Plus treadmill permits connecting the treadmill to a computer for exercise monitoring. The interface complies with the industry standard CSAFE communications protocol. Consult Quintons web site www.quinton.com, Fitness Products, for an internet link to the CSAFE specifications. Headframe Assembly The headframe assembly consists of the following components: Input power module Drive board assembly Transformer assembly Drive motor assembly Grade motor assembly Grade system consisting of a pinion shaft, rack gears, feedback potentiometer, and limit switches. Theory of Operation 2-3 Input Power Module The input power module receives line power from the power outlet. When sold for use in the United States and Canada, these treadmills use 115 VAC power. When sold for use in Europe and the United Kingdom, the treadmills use 230 VAC power. Drive Board The treadmill drive board uses line power to develop 300 VDC which is then used to create three-phase power for the drive motor assembly. The frequency of the three-phase signal sent to the drive motor determines the drive motor rotational speed. The motor current draw is a function of the torque load placed on the motor through the deck assembly by the user. The drive board uses 110 VAC power to generate a half wave rectified signal used to drive the grade motor. Two solid state relays drive the grade motor: one in the direction of increasing grade, the other in the direction of decreasing grade. Drive Motor Assembly The drive motor, which is driven by the drive board, delivers torque and speed to the front roller of the treadmill through a poly-V belt and a set of speed reduction pulleys. A flywheel, integral to the motor poly-V pulley, is used to average the pulsing runner loads. Grade Motor Assembly and System The grade motor drives the grade pinion shaft, using a chain and a set of speed reduction sprockets. The grade pinion shaft in turn drives a set of rack gears, which raise and lower the front of the treadmill. A grade potentiometer is used to sense the actual treadmill grade for the grade system feedback. Limit switches limit the travel of the rack gears in the event of potentiometer failure or incorrect calibration. Deck and Roller Assembly The deck and roller assembly provides the running surface for the user. This surface consists of a movable, flexible walk belt supported by a semi-rigid platform. The platform is supported by a steel-welded frame. A poly-V-belt, coupled through a pulley to the drive motor, drives the front roller. The front roller uses friction to drive the walk belt. A rear roller, acting as an idler pulley, tensions the walk belt. Both rollers are mounted to the steel support structure. Theory of Operation 2-4 Heart Rate Monitoring Option The heart rate monitoring function is a wireless system based on existing hardware purchased from POLAR Electro, Inc. The system consists of a transmitter worn on the chest of the user and a receiver mounted inside the controller enclosure. Electronics inside the belt sense electrical energy on the skin during a heart contraction. The transmitter emits a short electrical field burst. At the receiver, the burst is transformed into a digital signal that is monitored by the controller microprocessor. The microprocessor measures the time between digital pulses, then calculates and displays beats per minute. Transmitter The transmitter is imbedded inside the chest belt and begins transmitting as soon as it detects the users heart beat. Transmission frequency is approximately 5kHz. Receiver The receiver PCBA is encased in a shock-absorbing module. Electrical connections to the controller PCBA comprise three wires and a removable connector. Reception range is approximately 3 ft (1m). Proximity to electric motors, monitors, power supplies, T.V., etc. can cause directional and attenuating interference. Microprocessor The microprocessor calculates the heart rate and displays it in the multifunction display. Theory of Operation 2-5 3 Troubleshooting The tables and flow charts in this chapter cover the following potential problems: electrical problems: power, cable connections electronic problems: PCB, test points, signals mechanical problems: noise, vibration, grade, speed, belts See Chapter 4 for repair and replacement procedures. Tools These tools may be needed: Phillips screwdrivers ½-inch hex socket wrench stethoscope Ohm meter High voltage is present under the hood when the treadmill is plugged into a power source; residual high voltage remains for a few minutes after the power is removed. Turn off the treadmill circuit breaker, then unplug the treadmill from the power source before removing the hood. Use extreme caution at all times when the hood is removed. Secure loose clothing, jewelry, and long hair before working near treadmill parts. Never place your fingers near rotating parts. Do not start the walking belt when someone is on the treadmill. Troubleshootin g 3-1 Electrical Problems Use this table when: The treadmill will not start. There is no display on the controller. The treadmill stops unexpectedly. Possible Cause Action Treadmill not plugged in Plug power cord into appropriate outlet. Power not on Press the Power key on controller. Limited access control activated , Place magnet on Quinton logo, then press Power twice but magnet not in place (off/on). To disable the control, remove magnet, then press +, -, and Power simultaneo usly. Circuit breaker on treadmill set to Set treadmill circuit breaker to ON. OFF Building circuit breaker tripped Contact building maintenance to reset circuit breaker. If circuit breaker trips again, 1. Check outlet voltage. If necessary, verify that the power at the outlet and at the breaker is the correct rating for the treadmil l. 2. Verify that the power cord is not caught in the rack gear. 3. Replace the configuration plate (faulty in-rush limiter). Power cord damaged Remove cord from outlet and replace Blown fuse in treadmill If any of the transformer primary fuses, F3 through F6, are blown: 1. Check the primary transformer windings for continuity (P/N 327065-001). Should be 2 ohms or less. 2. Replace fuses and if the fuses blow again, isolate mechanical assembly and ensure that no parts are jammed (e.g. rack gear in grade change assembly). If F1 or F2 are blown, check the 21 Volt power supply. Control cable between VSD* and Check for bent or broken pins. Replace control cable. controller faulty VSD failure Replace VSD if necessary. Controller failure Replace controller circuit board. Configuration plate connectio n Check configuration plate connections; reattach or crimp faulty as required . If problem persists, replace configuration plate. Treadmill stops during run; Stop Look for loose ground wires. Reconnect and secure if loose. Belt has not been pressed. No error message appears LCD screen test failure Replace LCD, repeat test. If test fails again, replace PCBA. HR ClubTrack Plus LCD does not If the LEDs are on and the treadmill is functioning normally, come on check the LCD connector. If problem persists, replace the controller PCBA. External RS232 port failure Perform loop-back test. If test fails, replace PCBA. * VSD (variable speed drive): circuit board assembly that controls the motor Troubleshooting 3-2 Electronic Problems Error Codes The treadmill performs an electronic self-test each time that it is powered up. If a problem is detected during either power-up or operation, an error code appears on the display. Note the code recorded by the owner, then reference the table of error codes. If you replace a faulty PCB Assembly, return it to the factory and note the error code. Code Indication Recommended Action E001 Variable speed drive (VSD) Replace VSD. microprocessor chip failure E002 VSD microprocessor Replace VSD. EPROM/SRAM failure E004 VSD A/D failure Replace VSD. E101 Controller PCBA Replace controller. microprocessor failure E102 Controller PCBA EPROM failure Replace controller. E103 Controller PCBA interrupt Replace controller. failure E105 Controller PCBA NVRAM failure Re-initialize NVRAM: 1. Press Stop , Faster, and Slower to enter Service Mode. 2. Press Stop and Cool Down to reinitialize. (For HR ClubTrack Plus, press the NV PRO- GRAM LOAD TEST key. Proceed to step 4.) 3. Press Clear . 4. Reconfigure controller, pg 4-30 (HR Plus, adjust the contrast after reconfiguring.) If error E105 persists, replace controller. E106 ClubTrack Plus Controller Replace controller. display RAM failure E201 Grade error 1. Enter service mode. 2. Calibrate POT. 3. If error persists, replace POT. 4. If error persists, replace VSD. E202 Speed error. A software check Clear the error by pressing Clear or Power . of redundant speed variables Attempt to operate the treadmill again. If error has indicated a disagreeme nt persists, replace the VSD board. and the microprocessor will shut down the treadmill. continued Troubleshootin g 3-3 Error Codes (continued) Code Indication E203 Motor overload caused by one Recommended Action of the following: 1. Runner heavier than weight/speed envelope. 1. Restrict use to people within the weight/ speed specifications. 2. Deck wear 2. Check deck wear; replace if necessary. 3. Motor lead disconne cted or 3. If the motor does not turn, check the motor loose leads to ensure all leads are connected . One loose or disconne cted lead will cause overload. 4. Electrical short on the board near the power electronics 5. Power electronic compone nt 4. Examine board for shorts. Examine board for blackened componen ts or discoloration. 5. Replace board if damaged. failure E204 6. Motor blocked by obstruction 6. Remove obstruction. VSD and controller not Verify cable connections at both ends. Check for communicating bent or broken pins; replace if required . If error persists, replace VSD or controller as necessary. E205 Software tachometer fault Clear the error by pressing Clear or Power . Attempt to operate the treadmill again. If error persists, replace VSD board. E206 Controller or VSD performs Verify wire grounding system is intact. inadvertent reset EPHI VSD ABS voltage is too high. Refer to EPHI error code flow chart elsewhe re in Line voltage is too high. this chapter. VSD board failure EPLO VSD ABS voltage is too low. Refer to EPLO error code flow chart elsewhe re in Line voltage is too low. this chapter. Transformer connection is bad. Transformer failure. VSD board failure. Troubleshooting 3-4 Service Mode The treadmill provides a service mode for troubleshooting the electronics. To enter the service mode, press Stop Belt, Faster , and Slower simultaneously. P000 appears in the Select display, indicating that no key is pressed. In the ClubTrack Plus, the word Service scrolls across the tri-color display. To exit the service mode, press and release the same three keys simultaneously or press Power twice to power up into normal mode. A In service mode, the HR ClubTrack Plus screen lists the tests described below. To perform a test, press the softkey next to the test name, rather than pressing the indicated key combinations. Firmware Revision To display the firmware revision level of the PCB assemblies: 1. Enter the service mode. 2. Simultaneously press Stop Belt and Grade Up. The controller firmware revision level appears in the Select display. 3. Simultaneously press Stop Belt and Grade Down. The VSD revision level appears in the Select display. Controller Keys To test the keys on the key panel: 1. Enter the service mode. If a key has shorted out, P555 appears in the Select display. 2. Using the table below, press each key in succession to display the appropriate code in the Select display (the HR ClubTrack Plus displays text instead of code). P000 should reappear when you release each key. Key Code No key pressed P000 Shorted Key(s) P555 Clear P001 Up P002 Down P003 Stop Belt P004 Input + P005 Input - P006 Enter P007 Select P007 Next Stage* P008 Start Belt P009 Troubleshootin g 3-5 (continue d) Units P010 Start Course* P011 Resume Course* P012 Cool Down P013 Faster P014 Slower P015 *ClubTrack Plus only Displays To test the displays on the key panel: 1. Enter the service mode. 2. Simultaneously press Stop Belt, Grade Up, and Grade Down. 3. The display cycles through one digit at a time in each display, starting from left to right across the panel. Each digit displays the number 8 and the associated decimal point for one second, then turns off as the next one lights up. 4. When this is completed, the LEDs light up individually, starting from the top. The Select LEDs illuminate first, followed by the Units LEDs. 5. After the LEDs are tested, all the digits in all three displays simultaneously count up from 0 through 9. (No decimal points light during this count.) Tri-color Display (ClubTrack Plus P/N 000382 only) To test the color display on the ClubTrack Plus: 1. Enter the service mode. 2. Simultaneously press Next Stage, Up, and Down until the test begins. Vertical columns on the tri-color display light red, green, then yellow for one second each. The columns move from left to right until all display LEDs have been tested. Horizontal columns light red, green, then yellow for one second each. The columns move from top to bottom until all LEDs have been tested. All LEDs go dark when the test is finished. Speed/Grade (Open-Loop Mode) In Service mode, the treadmill operates as in open-loop mode, which is used to verify treadmill speed or grade. In this mode, the treadmill displays the actual speed or grade, rather than the target speed or grade. Troubleshooting 3-6 A The ClubTrack Plus is in both open-loop speed and open-loop grade modes simultaneously. Approximate speed and grade range: 1.0 to 12.0 mph (1.6 to 19.3 km/h) 0 to 15 %, 0 to 8.53°. Speed 1. Enter the service mode. 2. Press Up, Faster, and Slower simultaneously to enter open-loop speed mode. 3. Press Stop Belt, Faster , and Slower simultaneously to exit the service mode; do not press the Power key. 4. Ensure that no one is standing on the walking belt, then press Start Belt . 5. Press and hold Faster or Slower to change the speed. 6. When testing is finished, press Clear , or press Power twice to exit open-loop mode. Grade 1. Enter the service mode. 2. Press Faster, Up, and Down simultaneously to enter open-loop grade mode. 3. Press Stop Belt, Faster , and Slower simultaneously to exit the service mode; do not press the Power key. 4. Press and hold Up or Down to change grade. 5. When testing is finished, press Clear , or press Power twice to exit open-loop mode. HR ClubTrack Plus LCD Display Test ™ The LCD display test verifies that the display and its electronics are functioning correctly. If any of the six tests fails, see Electrical Problems troubleshooting table, page 3-2. Select the LCD Display Test to begin the series of six tests. To progress from one test to the next, select MENU. 1. Display Limits Test A box appears with a one-pixel border between the outer edge of the box and the edge of the display. A single horizontal and vertical line intersects the box. If the box does not appear as described, the test has failed. 2. All pixels ON The entire display should appear white. A corrupted pixel would be black. 3. All pixels OFF Troubleshootin g 3-7 The entire display should be off or dark. A corrupted pixel would be white. 4. Contrast The contrast changes smoothly from maximum contrast to minimum. Large jumps in contrast could indicate a failure in the contrast circuit or LCD. 5. Fluorescent tube brightness test The tube adjusts to its three possible states, going from bright to dim to off, then back to bright. The sequence continues until you press the MENU key. 6. Fonts The screen displays the alphabet. Garbled characters indicate an electronics or LCD problem. HR ClubTrack Plus LCD Contrast ™ Select the Set Screen Contrast key. After adjusting, press MENU to store the selected value. The setting remains when the treadmill is turned off. Always adjust the screen contrast after performing the NV PROGRAM LOAD testthe load test resets the contrast to the default value. HR ClubTrack Plus LCD External RS232 Port Test ™ The controller automatically tests the RS232 chip during power up using an internal loop-back test. To test further, connect an external loop-back connector, then select the RS232 Port Test key. The loop back connects the transmit out to the receive in, allowing the controller to verify proper operation through the external connector. As the test progresses, the LCD displays a series of messages: C—1, C—2, C—3, C—P. CEEE appears if an error occurs. Remove the loop-back connector after the test is finished. Testing Pin Signals on the Communications Cable Communication cable problems can cause an E204 error message. Use an ohmmeter to test for the following conditions: 1. Check each wire for continuity from one end of the cable to the other. 2. Check each wire for a short to another wire. 3. Check each wire for a short to the metal connector housing at the drive end. Troubleshooting 3-8 Signals on Control Cable Pins Pin No. VSD Pin No. DPU (J12) (J1) Signal 1 1 2 2 3 3 4 4 5 5 GND (Ground ) 6 6 N/C 7 7 GND (Ground ) 8 8 +12 VDC 9 9 +12 VDC T+ (Transmit+) T - (Transmit -) R+ (Receive+) R - (Receive -) NOTE: J12 is a D-sub connector. J1 is a MASCON connector. Heart Rate Monitoring Option The Polar system for heart rate detection and transmission has been time-tested and shown to be accurate and reliable; however, there is a small percentage of people for whom the system will not work. If all the steps in the following table are performed and the belt and controller appear to be operating correctly, the users heart rate may not be detectable by the system. Problem Possible Cause Remedy Heart rate reading Poor electrod e contact 1. Be sure that the logo is erratic or absent. on the belt is facing out, that the belt is tight enough, and that the electrod es are flat against the skin. 2. Moisten the electrod es again. 3. Be sure the receiver is within range32 inch (81 cm). 4. Wash belt. Heart rate is erratic or above 1. HRM treadmil ls too close together. 1. Move the treadmills at least 18 inch (46 cm) apart. 200. 2. Interference from 2. Move the treadmill electromagneti c signals away from the source (e.g., other belt trans- of interference . mitters, T.V., motors, computers, and such). Troubleshootin g 3-9 Problem Possible Cause Remedy No signal on 1. No electrod e contact 1. Reposition chest belt, 2. Faulty chest belt 2. Test signal using controller re-wet electrod es. different belt transmitter or a pulse simulator; replace old belt if faulty. 3. Faulty receiver 3. Test the belt transmitter using a different receiver. If transmitter is working correctly, replace receiver. Testing Heart Rate Accuracy Use a pulse simulator (P/N 34198-008) and a Polar watch receiver (P/N 34198-009) to test the accuracy of the controllers heart rate function. 1. Turn on the pulse simulator. The LED on the front of the simulator will blink in synch with the signal. 2. Place the Polar watch receiver next to the pulse simulator to begin receiving. The watch will display the digital heart rate. 3. Check the rate displayed on the watch against the rate displayed on the controller. If the controller differs by five beats, replace the receiver (P/N 34295) and retest. If the problem remains, replace the controller assembly (P/N 34297). Mechanical Problems Mechanical problems can include noise and vibration caused by loose or worn parts. Use the following tables to diagnose mechanical failures. Walk Belt Problem Possible Cause Action Belt stops and an 1. Heavy runner 1. Do not exceed overcurrent error code increased the weight envelope appears. resistance on belt. (see Specifications). 2. Runner holding 2. Do not resist belt for handrail stopped more than two belt movement for seconds. more than two seconds. 3. Worn deck 3. Turn over or replace deck. Troubleshooting 3-10 Problem Possible Cause Action Walk belt slipping 1. Improper walk belt 1. Adjust walk belt tension. 2. Incorrect drive belt tension. 2. Check drive motor tension or drive belt belt. Adjust worn. tensioner or replace drive belt if necessary. Walk belt not tracking Belt misaligned or Adjust tracking. tracking adjustme nt bolt overtightene d. Walk belt worn Various Replace belt and deck. Walk deck worn Various Replace belt and deck. Problem Possible Cause Action Squealing sound similar Drive motor belt Adjust drive belt to an automobile fan (poly-V belt) slipping tension. Replace drive Drive Belt belt if necessary. belt OR Walk belt slows when users foot strikes the deck Treadmill Noise Noise Possible Cause Action Knocking or thumpin g. Front or rear roller Isolate* and replace Rate increases or (pulley) assembly roller assembly decreases with walking bearings belt speed. Squealing (similar to Drive belt loose Adjust belt tension. loose automobile fan Replace belt if belt) necessary. Popping during grade Faulty elevation chain Adjust alignment of change alignment sprockets. * The rate of bearing noise can help determine which bearing is at fault. The number of knocks per minute varies with treadmill speed because the roller speeds change as the belt speed changes. Use a stethoscope with a tube-like end, or a piece of hose about two feet long, to isolate bearing noise. Hold one end of the hose near the suspected bearing and the other end near your ear. Compare several bearings to determine which is the faulty one. Flow Charts Use the following flow charts for step-by-step troubleshooting. Troubleshootin g 3-11 Error Code Flow Chart: EPHI and EPLO EPLO EPHI BUS voltage is too high BUS voltage too low Check line voltage. Check line voltage. Too high ? Yes Have customer get building Yes maintenance to correct voltage problem. Too low? No No Yes Is DS3 On? Replace VSD No Transformer output < 24.6 VAC Yes Replace transformer BUS Voltage Troubleshooting 3-12 No CAUTION! Disconnect power and wait for high voltage indicator to go off. Connect meter, THEN power up. Check transformer output: J7 pin 9 and 10. Error Code Flow Chart: E001 E001 VSD Microprocessor chip failure E002 VSD Microprocessor EPROM/ RAM failure Verify grounding system is wired correctly and is intact Enter Service Mode Replace VSD PCBA E205 Software tachometer fault E202 Speed Error E206 Inadvertant Reset E201 Grade Error Calibrate Pot Error Persists Press Power or Clear Yes Replace grade Pot and recalibrate No Error Persists Error Persists Yes Yes Replace VSD Replace VSD Complete No No VSD Board Troubleshootin g 3-13 Error Code Flow Chart: E204 E204 Communications Error Check Ds2 on VSD board. Verify communication cable connection at each end. Error Persists? Ds2 On? (Micro 5V) Yes No Yes Verify cable pins are not bent or broken or cable damaged. CAUTION! Disconnect power and wait for high voltage indicator to go off. Clip a volt meter onto F1 and F2 fuse holder base closest to J3. THEN turn on power. Measure 22 VAC secondary. Replace controller. No Damaged cable? Finished. Yes No Less than 17.0 VAC? No Error persists? Replace transformer. Yes Replace VSD. Replace cable. No Finished Communications Link Troubleshooting 3-14 Yes Error Code Flow Chart: E203 E203 Error Overcurrent Is motor turning? No Check for obstructions in motor pulleys or belt Yes Runner outside weight/ speed envelope Restrict use to Yes people within specified weight/ speed envelope. CAUTION! Disconnect power and wait for high voltage indicator to go out. No Are all motor leads connected? No Reconnect disconnected leads. Check resistance between motor leads. Yes Worn deck? Excessive deck Yes wear indicated. Replace deck. Resistance >100ohms No Replace VSD PCBA Yes No Replace motor. Motor Overcurrent Troubleshootin g 3-15 Cycle power. LED should be on momentarily then off. Drive motor does not turn Error code present? Yes Procede to Error Code Flow Chart On then off? CAUTION! Disconnect power and wait for high voltage indicator to go off. No Replace VSD Check resistance between motor leads. Yes No Perform keypanel test Press Start Resistance >100 ohms No Yes Key test fail Yes Replace controller assembly Is DS1 on? Yes Check motor leads for good connections No No Check DS1 LED on VSD board Replace VSD Does motor turn? Yes Drive Motor Troubleshooting Replace motor 3-16 No Complete Treadmill will not elevate Proceed to error code flow chart. Yes Error code present? No Perform keypanel test. Replace controller assembly. Yes Yes CAUTION! Disconnect power and wait for high voltage indicator to go off. Remove grade motor connector at J2 on VSD PCB. Place meter across J2 pin 2 and 4, THEN connect treadmill power. Check limit switch continuity between J1 pin 1 and 3, then pin 4 and 6. Press the Up, then the Down key on the controller. Key test fail Zero ohms? Yes Replace VSD No No Check and free rack gear. CAUTION! Disconnect power and wait for high voltage indicator to go off. DC No voltage approx. 50 VDC? Rack gear jammed? Adjust limit switches and retest. Yes No Replace fuse and retest. Yes F3, 4, 5, or 6 fuse blown? No Replace grade motor. Grade Problems Troubleshootin g 3-17 4 Repair/Replacement and Calibration The procedures that follow apply to the Hyperdrive ClubTrack, ClubTrack Plus, HR series, and MedTrack rehabilitation treadmills. The PCB assemblies are field-replaceable modules; no procedures are included for component-level repair. This includes: • • • • variable speed drive (VSD) enhanced display processor control unit (EDPU) used with the ClubTrack and MedTrack Rehab motivational control unit (MCU) used with ClubTrack Plus heart rate monitor (HRM) used with HR ClubTrack This section is designed only for Quinton-authorized service personnel with proper training. There are no user-serviceable parts in the treadmills. Any attempt by non-Quinton-trained personnel to service the treadmill may void the warranty. For service information, call Quinton Technical Service: 1-800-426-0538. Before servicing the treadmill, read the safety requirements listed in Appendix A. A Do not use this manual when servicing Series 90, Q-Series, or ClubTrack 3.0 series treadmills. Cautions/Warnings Electrical • High voltage is present beneath the treadmill hood while the treadmill is connected to a power source. Residual high voltage remains for a few minutes after power is removed. To prevent high-voltage electrical shock: unplug the power cord and use caution every time you remove the hood. before working on or around any electrical or mechanical component under the hood, wait at least two minutes from the time you unplug the power cord and be sure the red LEDs on the VSD board are off. • Turn off the circuit breaker on the treadmill before connecting or disconnecting the treadmill to the wall outlet. • The controller does not turn off electrical current to the treadmill. Repair/Replacement and Calibration 4-1 • Be sure treadmill area is free of liquid spills before removing hood. Burns • Allow pulleys, motor, and other treadmill parts to cool sufficiently before touching them. • Unplug the treadmill immediately if signs of overheating occur. Mechanical • Be sure the treadmill power cord is unplugged before working with chain, rack gear, belts, and pulleys. • Secure long hair, loose clothing, and jewelry before working near the treadmill, particularly near walking surfaces and rotating parts. • Before running the treadmill, check for worn parts which could break loose during service or operation. • Keep fingers away from rotating parts. • To avoid eye contaminants, clean away dust and debris from moving parts before servicing. • Beware of sharp edges when replacing worn parts. • Do not start the walk belt when someone is on the treadmill. • Improper lifting can cause back strain. It also can cause injury to others if the treadmill is dropped. Lifting the treadmill requires at least two people. • • • • • • • • • • • Phillips and flat blade screwdrivers Hex socket wrenches: 5 32 -in, 916 -in, 7 16 -in, 1 2 -in, 516 -in 11 32 -inch nut driver Heyco® strain relief pliers for replacing hard-wired power cord 1 2 -inch crowfoot open-end wrench for removing drive motor Torque wrench for rack wheel replacement, 46± 4ft-lbs Frequency counter Tachometer Wooden blocks (2" x 4" x 6" long) Belt tension calipers P/N 30113-001 (optional) Masking tape or heavy pencil Tools A Although some procedures are used for several applications (removing the hood, for example), each procedure is explained only once. Reference procedures under their headings for subsequent applications. A All references to front, rear, left, and right are given as though you were facing the controller while walking on the deck. Repair/Replacement and Calibration 4-2 Field Functional Tests You must perform a field functional test after any of the procedures in this chapter are performed. The applicable test is specified after each section in this chapter. Appendix D, Field Functional Tests, contains complete test instructions. The VSD PCBA generates high voltage, which is present whenever DS4 and DS5 are illuminated. Do not touch the VSD PCBA until DS4 and DS5 have gone out. Resistors on the PCBA bleed off the high voltage in approximately two minutes. Removing Treadmill Hood 1. For your convenience in working, elevate the treadmill to its maximum height if possible. 2. Turn off the circuit breaker on the treadmill and unplug the treadmill from the power outlet. To prevent high voltage electrical shock: Before working on or around any electrical or mechanical component under the hood, wait at least two minutes from the time you unplug the power cord. International units: Disconnect the power cord from the configuration plate. 3. Use a Phillips screwdriver to remove the four screws from the configuration plate. 4. Remove the three ¼-20 Phillips-head screws located under the label panel on the front of the hood. Screw - #10-32 x 0.375L (30579-016) Lock Washer - ext. star #10 (01182-001) Configuration Plate ¼-20 x 0.50L Screw (10835-205) Lock Washer Ext. Star ¼ (01182-005) Repair/Replacement and Calibration 4-3 5. Remove the three #8 Phillips-head screws located on the back of the hood, above the kick plate #8-32 x 0.375L (35239-183) 6. Grasp the front section of the hood cover at the top and bottom center. Pull and lift to remove while feeding the power cord through the hood cover opening. 7. Use a long screwdriver to remove the two screws holding the hood to the front of the siderails. International units: Remove the #10 screws that hold the hood to the upright. #10 screws (10835-325) Push to remove. 8. Gently tap the hood a half inch towards the rear until the rear screws disengage from the key slots. 9. Spread the sides of the hood slightly apart to clear the uprights. Tilt the hood upward, then slide it back and lift it off the treadmill. A Recommended: Vacuum hood area before replacing hood and applying power. Be careful near VSD card cage. Do not damage VSD board. 10. To replace the hood, follow steps 3-9 in reverse order. Field Functional Test To verify that the treadmill is operating properly, perform Field Test No. 1. See Appendix D, Field Functional Tests, for specific instructions. Repair/Replacement and Calibration 4-4 0.625 spacer (30895-001)0.625 spacer (30895-001) 0.625 spacer (30895-001) Instruction Panel ClubTrack Plus only (30910-00X) 0.375 spacer (30895-002) 10-24 x 1.50L (10830-335) 10-24 x 1.25 black (10830-315) Controller Hood Cover (32748-001) Upright Metal siderail, LH (32709-003) ClubTrack and MedTrack SR60 (32709-004) MedTrack CR60 Front Siderail Cover, LH (19488-002) Walk Belt (33509-002) VSD Card Cage (32975-002) Hood (32744-001) Siderail Cover, RH (19489-002) End caps LH (33309-001) RH (33180-001) Metal siderail, RH (32707-003) ClubTrack and MedTrack SR60 (32707-004) MedTrack CR60 Sample treadmill with hood cover removed Repair/Replacement and Calibration 4-5 Replacing the Configuration Plate On North American units, the configuration plate module includes the power cord, which is attached to the plate. On international units, the power cord is removable and is not part of the configuration plate module. 1. Turn off the treadmill circuit breaker, then remove the power cord from the power outlet. 2. Remove the hood as previously described. 3. Remove the two ¼-20 hex head screws that attach the power cord ground wires to the headframe. (They are located in the center of the headframe. The ground is marked with a ground symbol.) 4. Unplug the wires from the VSD board (North American units: 3 wires (115v) or 2 wires (230v)), International units: 2 wires). Note the wire colors and connection points. 5. Remove the two ¼-20 hex-head screws holding the configuration plate to the headframe. Do not let the plate fall into the VSD PCBA. 6. Replace the configuration plate module following Steps 2 through 5 in reverse order. Limit Switch (19082-001) Configuration Plate North American - 32776-001(115v) - 32776-005 (230v) International - 32776-002 30579-016 screw 01192-001 lockwasher ¼-20 UNCX 0.50L (10827-205) Step 5 Step 3 Ext. Star Washer (01182-005) ¼-20 x 0.50L (10827-205) Lock Washer ¼ Ext. Star (01182-005) 10835-205 screw,¼-20x½ Field Functional Test To verify that the treadmill is operating properly, perform Field Test No. 2. See Appendix D, Field Functional Tests for specific instructions. Repair/Replacement and Calibration 4-6 Replacing the Power Cord Hard-wired Cords Tools: Heyco strain relief hand pliers 1. Remove the configuration plate as described above. 2. Use strain relief pliers to squeeze the strain relief on the power cord and pull it free of the configuration plate. 3. Clip the power cord wire ties. 4. Remove the two hex nuts holding the power cord to the line filter: the hex nuts are behind the configuration plate, down and to the right. 5. Remove the groundwire. 6. Pull the power cord out of the configuration plate. 7. Feed the new cord into the configuration plate and reverse the procedure by following Steps 4 through 1. Twist the power cord leads before connecting. Connect the white wire to the bottom connector. Detachable Cords (International units): Unplug the power cord from the connector on the configuration plate and plug in the new cord. Field Functional Test To verify that the treadmill is operating properly, perform Field Test No. 2. See Appendix D, Field Functional Tests for specific instructions. Replacing the VSD Board/Card Cage Assembly The VSD board is installed within the card cage located in front of the drive motor. The board alone is not field replaceable; you must remove the card cage/board assembly and replace it with another card cage module. 1. Turn off the controller and the treadmill circuit breaker, then unplug the power cord from the power outlet. 2. Remove the hood as previously described. To prevent high voltage electrical shock: Before working on or around any electrical or mechanical component under the hood, wait at least two minutes from the time you unplug the power cord and be sure the red LEDs on the VSD board are off. 3. Disconnect the controller cable and the groundwire from the VSD board. Repair/Replacement and Calibration 4-7 4. Remove the two screws that hold the configuration plate to the headframe; the screws are located below the plate. Move the plate out of the way. A IMPORTANT: In the following steps, note the connection points and the colors of the wires as you remove them from the VSD board. All of the wires are harnessed. Cut the plastic ties to free the wires as necessary. Reference wiring schematic. 5. Unplug the grade motor wires from the VSD board. 6. Unplug the isolation transformer wires. 7. Unplug the non-isolated transformer wires. 8. Unplug the grade potentiometer wires. Clip the plastic ties around the cage only, not around the headframe. 9. Unplug the limit switch wires. 10. Unplug the drive motor wires. 11. Unplug the configuration plate wires. 12. Remove the two Phillips screws that hold the switch module plate to the headframe and remove the plate. Screw 10827-212 with split washer 10511-007 Sil pad 33174-002 Hold down plate 32963-001 VSD Module VSD Module Hardware 32963-001 33174-002 10827-212 10511-007 01164-003 Mounting Plate Sil Pad Insulator Screw 10-24x0.50 Split Ring Flat Washer Qty 1 1 2 2 2 PCBA Card cage (32975-002), VSD not shown Switch Plate Screws Config Plate Screws Card Cage Screws 13. Remove the four Phillips screws holding the card cage. 14. Remove the VSD/card cage assembly and return it to Quinton. 15. Replace the sil pad for the switching module before installing the new card cage. 16. Reassemble in reverse order. Use caution when reassembling the hold-down plate for the switching module. Alternate torquing the screws just until the split lock washer is compressed. Over-torquing the screws will damage the module. Field Functional Test To verify that the treadmill is operating properly, perform Field Test No. 2. See Appendix D, Field Functional Tests for specific instructions. Repair/Replacement and Calibration 4-8 Replacing the Tensioner The tensioner may need to be replaced if the poly-V belt slips, if the idler pulley bearing makes noise, or if the tensioner roller is damaged. Do not attempt to disassemble the tensioner. The internal springs are tightly compressed and could cause injury if released. 1. Turn off the controller and the treadmill circuit breaker, then unplug the power cord from the power outlet. Alignment Marks Large Nut (Step 7) - part of tensioner 3 -16 x 2.50L Bolt (Step 4) 8 (10820-207) Split LW (10511-011) Flat Washer (01164-006) Tensioner (32784-001) Poly-V Drive Belt (32387-001) ClubTrack and SR60 (32387-002) MedTrack CR60 2. Remove the hood as previously described. 3. Use a 916 -inch hex wrench to remove the 3 8 -inch bolt from the tensioner. Remove and discard the old tensioner. 4. Be sure the belt is centered on the pulleys. 5. Place the new tensioner onto the headframe in the same position as before and loosely bolt it to the headframe. 6. Use either a 1516 -inch open-end wrench or a large adjustable wrench to turn the large nut on the tensioner counterclockwise; put tension on the poly-V belt until the two lines on the tensioner line up. Tighten the 3 8 -inch bolt to 19 footpounds torque. 7. Replace the hood. Field Functional Test To verify that the treadmill is operating properly, perform the following functional tests: Repair/Replacement and Calibration 4-9 Test Speed Operation 1. Place a chalk mark or piece of tape on the walk belt across the direction of travel. 2. Place another mark or piece of tape on the top of the siderail cover. 3. Start the walk belt and increase its speed to 4.0 mph. 4. Count how many times the belt rotates in 2 minutes. This should be 62 ± 3 revolutions for all treadmill models. ClubTrack®, ClubTrack Plus™, HR ClubTrack™, HR ClubTrack Plus, MedTrack® SR60 5. Increase the walk belt speed to 10.0 mph. 6. Count the number of belt revolutions in 2 minutes. This should be 155 ± 3 revolutions. MedTrack® CR60 5. Increase the walk belt speed to 7.2 mph. 6. Count the number of belt revolutions in 2 minutes. This should be 112 ± 3 revolutions. If any of the measurements are not accurate, refer to Replacing the Tensioner and/or Adjusting the Walk Belt in this chapter. 7. Ensure that the speed will traverse from minimum to maximum and back. Walk Belt Test Procedure 1. With the walk belt speed at minimum, walk on the treadmill. 2. Grasp the handrail and resist the motion of the walk belt. If slippage is detected, determine if the walk belt or poly-V drive belt is the cause. Correct as necessary. 3. Stop the walk belt. Shut Down the Treadmill Turn off the circuit breaker, disconnect the power cord from the outlet, and place the treadmill back in service. Replacing the Poly-V Drive Belt 1. Remove the hood as previously described. The drive belt tensioner is spring loaded. Do not let it snap closed after removing the drive belt. 2. Loosen the belt tensioner by turning the 3 8 -inch mounting bolt counter-clockwise, then pivot the tensioner away from the belt. 3. Remove the drive belt from the drive motor pulley. Repair/Replacement and Calibration 4-10 4. Use a ½ -inch socket wrench to remove the end cap from each siderail. 5. Use a ½-inch wrench to remove the four 516 -inch hex bolts that hold the two front-roller retainers to the frame. There are two bolts on each side of the roller assembly. 6. Slide the drive roller assembly to the left and remove the poly-V belt from the right side of the roller. 7. Replace with a new belt, then remount the front drive roller assembly. (When replacing the poly-V belt, be sure the belt is centered on the pulleys.) Installing the Front Shaft Retainer 1. Install retainer with bolts moderately tight (180 in/lbs). 2. Using a large screwdriver or punch, tap the retainer down above each bolt to secure the shaft. 3. Assemble the treadmill following Steps 1-6 above in reverse order. 4. Tension the drive belt as described in Replacing the Tensioner. 5. Set the walk belt tension and tracking. Field Functional Test To verify that the treadmill is operating properly, perform Field Test No. 3. See Appendix D, Field Functional Tests, for specific instructions. Replacing the Drive Motor Replace the drive motor when the motor is inoperative: see Drive Motor flow chart in Chapter 3, Troubleshooting. Shaft Retainer 15689-002 Front Pulley Assy 33507-002 33507-001 CR60 Transformer 32706-001 Motor junction box Drive motor (32783-002) Flywheel Tensioner (32784-001) Repair/Replacement and Calibration 4-11 1. Turn off the treadmill circuit breaker and remove the power cord from the power outlet. 2. Remove the treadmill hood as previously described. 3. Release the drive belt tensioner and remove the poly-V belt from the motor drive pulley as previously described. 4. Remove the configuration plate as previously described. 5. Cut the wire ties that hold the drive motor cable to the headframe and disconnect the motor cable at the VSD board. 6. Remove the four hex nuts that hold the motor on the headframe. Note the arrangement of the isolation mounts. (You may need to use a ½-inch crowfoot, open-end wrench to remove the inner bolt near the card cage.) 7. Pull the motor off the headframe. 8. Loosen the two set screws on the flywheel/drive pulley and remove. Use a gear puller to pull the flywheel off the motor shaft. Flywheel Assembly 32446-001 - ClubTrack and SR60 32446-003 - CR60 ¼-20 x 0.25L Set Screws (10833-145) Key 01100-002 9. Reinstall the flywheel onto the motor shaft and loosely tighten the setscrews. 10. Replace the motor by following Steps 4 through 8 in reverse order. Use Loctite 242 adhesive on the motor mount studs before installing new motor mounting nuts. Tighten the motor mounting nuts until the lock washer flattens, then turn the nut ½ turn. Do not overtighten the nut. The new motor and flywheel assembly must be aligned with the front roller drive pulley. Use a straight-edged ruler placed on the outside of the front roller drive pulley to align the outside face of the motor drive pulley to within 0.020 inch. Tighten the set screws. 11. Replace the poly-V belt as previously described. 12. Replace the hood assembly as previously described. Field Functional Test To verify that the treadmill is operating properly, perform Field Test No. 3. See Appendix D, Field Functional Tests for specific instructions. Repair/Replacement and Calibration 4-12 Replacing the Transformer 1. Turn off the treadmill circuit breaker and remove the power cord from the power outlet. 2. Remove hood as previously described. To prevent high voltage electrical shock: Before working on or around any electrical or mechanical component under the hood, wait at least two minutes from the time you unplug the power cord and be sure the red LEDs on the VSD board are off. 3. Unplug the transformer wires from the VSD board. Note the wire colors and connection points. Cut the plastic cable ties that secure the transformer wiring. 4. Remove the Phillips-head screws that hold the transformer to the headframe. Transformer (32706-001) Two-sided Wiring One-sided Wiring Four Phillips screws secure the transformer. 5. Discard the old transformer. Replace with new one in reverse order. A Wire routing depends upon the transformer you are installing (see figures above). 6. Replace the hood assembly as previously described. Field Functional Test To verify that the treadmill is operating properly, perform Field Test No. 2. See Appendix D, Field Functional Tests, for specific instructions. Repair/Replacement and Calibration 4-13 Replacing the Grade Motor A Place a clean sheet of cardboard or a clean rag on the treadmill deck before starting this procedure. Do not elevate the treadmill. 1. Block the treadmill headframe securely with wooden blocks to ensure that the treadmill will not drop when you remove the grade motor. 2. Turn off the power and remove the hood as described. 3. Remove the cable ties that secure the grade motor wires, then disconnect the wire connector on the VSD board. 4. Remove the four screws that attach the grade motor to the headframe, then remove the motor. 5. Replace with a new grade motor, following Steps 3-4 in reverse order. Use a straight edge to align the sprockets. 6. Restore power to the treadmill and test the new grade motor. High voltage is present when the treadmill is plugged into a power source. Secure loose hair, clothing, and jewelry before working near rotating machinery. Verify that: a. it operates over the full range of 0-15%. b. there is no binding when it moves up or down. Grade Motor (33316-002) Grade Motor Bolts ¼-20 x 1.25L (10820-105) Flat Washer (01164-004) Kep Nut ¼-20, far side (30578-005) Repair/Replacement and Calibration 4-14 Grade Motor Pinion Shaft Chain (30448-001) c. the grade motor chain is aligned correctly. A popping sound in the chain indicates that it is misaligned. Field Functional Test To verify that the treadmill is operating properly, perform Field Test No. 4. See Appendix D, Field Functional Tests, for specific instructions. Replacing the Grade Motor Chain To change the chain: 1. Support the head frame with six-inch wood blocks. 2. Use a flathead screwdriver to pop off the C-clip master link on the chain. (If the link is inaccessable, you will have to remove the motor.) 3. Slide out the link. 4. Install the new chain, aligning it correctly on the sprockets. Field Functional Test To verify that the treadmill is operating properly, perform Field Test No. 4. See Appendix D, Field Functional Tests, for specific instructions. Repair/Replacement and Calibration 4-15 Replacing the Grade Potentiometer (POT) 1. Turn off the treadmill circuit breaker and unplug the power cord. Remove the treadmill hood as previously described. Maintain caution throughout the following steps. 2. Release the grade pot setscrew. Grade Pot (33171-002) Gear (30843-001) Setscrew, 10-32 x 0.25L (10833-144) 3. Remove the grade pot gear. 4. Remove the nut that holds the grade pot to the bracket. 5. Clip the cable ties and unplug the cable from the VSD board. 6. Replace with a new potentiometer, then reassemble following Steps 2-6 in reverse order. See Grade Pot Wires below. 7. Tighten the grade pot nut to 20 inch-pounds torque. 8. When the grade pot, wires, and setscrews are in place, calibrate the pot (see Calibration Procedures, page 4-33). Grade Pot Wires At the end of each grade pot wire is a pin with a small metal flange. The flange has a corresponding slot on the connector housing. Repair/Replacement and Calibration 4-16 Red wire: slot 4 Black wire: slot 5 BRN OR WHT 1. Insert each pin into the connector housing until it clicks slightly. The flanges will be visible through the slots in the housing. 45 2. Verify that the pin has engaged by pulling lightly on the wire. A The slot positions above apply to the ClubTrack, ClubTrack Plus, MedTrack SR60 and MedTrack CR60. Field Functional Test To verify that the treadmill is operating properly, perform Field Test No. 4. See Appendix D, Field Functional Tests, for specific instructions. Removing the Rack Gears 1. If the treadmill will change grade, set the grade to 12% (6-7°). 2. Lower the front of the headframe onto six-inch wooden blocks to take the weight off the wheels. 3. Turn off the treadmill circuit breaker and unplug the treadmill. 4. Remove the hood as previously described. 5. If the rack gear is jammed (no play in it), replace as described in Replacing a Jammed Rack Gear, page 4-19. 6. Restore power to the treadmill and decrease grade until the wheels are approximately half inch off the floor. 7. Remove the two 916 - inch hex-head bolts holding the wheels to the rack gears. Note the arrangement of washers used as spacers. 8. Loosen the setscrew that holds the grade potentiometer (pot) gear and remove the gear. 9. Rotate the grade pot until a positive number appears in the grade display window. (Step 11 will not work until the number is positive.) Repair/Replacement and Calibration 4-17 A In order to enter open loop, the grade must be positive. 10. Enter open-loop grade mode: a. Press Power . b. Simultaneously press Stop , Faster, and Slower on the controller to place the treadmill in service mode. The display will read 0.0 P000 0.0. c. Simultaneously press Faster, Up, and Down . The display will read 0.0 P000 0.0. d. Simultaneously press Stop , Faster , and Slower to exit service mode. The display should read 0.0 P555 0.0. You are now in open loop mode. A While in open loop mode, the treadmill takes about two seconds to react to a command. 11. (Requires two people) Hold the limit switches closed to let the rack gear travel beyond its normal range. Rotate the grade POT as required to maintain a positive grade display. Decrease grade until rack gears start bouncing on the pinion shaft. 12. Turn off the treadmill circuit breaker, then unplug the treadmill. 13. Lift rack gears straight out top. Rack Gear (032524-002) Rack Gear 3/8 x 16 x 2.50L Bolts (10820-207) Reassembling the Rack Gears A Install new rack gears simultaneously so that they will be parallel. 1. Restore power to the treadmill. 2. Enter open-loop grade mode as described above. 3. Insert the racks gears into the headframe. Repair/Replacement and Calibration 4-18 4. Decrease the grade until the gears bounce two or three times. While increasing the grade, push lightly on the top of the rack gears. This should cause both rack gears to mesh in exactly the same place. 5. Run the rack gears down past the bottom of the headframe. Hold the limit switches closed to allow the rack gear to travel beyond its normal lower limits. 6. Check under the bottom of the headframe to verify that the rack gears are meshing properly. The gears should protrude an equal distance. 7. Run the rack gears down until there is enough room to replace wheels. 8. Replace the two bolts that hold the wheels to the rack gears. Be sure to: a. replace washers used as spacers in the correct arrangement. b. Install wheel bolts in the proper holes. Use top hole for SR60, ClubTrack, ClubTrack Plus, and HR treadmills. Use bottom hole for CR60. b. torque the bolts tightly to 46 ft-lb +4 ft-lb. 10. Increase the grade until the wheels touch the floor. 11. Grease rack gears with wheel bearing grease. 12. Remove the blocks that support the headframe. 13. Reinstall the grade pot gear. 14. Calibrate the grade potentiometer. Field Functional Test To verify that the treadmill is operating properly, perform Field Test No. 4. See Appendix D, Field Functional Tests, for specific instructions. Replacing a Jammed Rack Gear 1. Turn off the treadmill circuit breaker and unplug treadmill. 2. Remove the hood as previously described. 3. Securely block the headframe with wooden blocks to take the weight off the wheels. Repair/Replacement and Calibration 4-19 4. Shake each gear lightly at the top to determine which rack gear is jammed. If there is no play in a rack gear, it is jammed. 5. Remove the rack gear wheels from the rack gear. 6. Remove the upright assembly: Upright Hex-head fasteners Pivot point Star washer Flat washer 5/16" Hex bolt a. Unbolt the six hex-head fasteners to let the treadmill uprights pivot. Note the order of the washer placement for reinstallation: the star washer is next to the upright bracket. b. Carefully lower the upright assembly onto the walk deck. c. Disconnect the controller cable and the ground wire from the VSD board. d. Use a 316 - inch Allen wrench to remove both pivot bolts from the two upright assemblies, then remove the assembly. 7. Remove the treadmill walk belt and deck as previously described. 8. Use a 916 - inch socket wrench with a 6 inch extension to remove the two hex-head bolts securing each siderail to the headframe. Reach the bolts through the holes in the siderail. A If you are replacing only one rack gear, it is necessary to remove only the siderail closest to that gear. 9. Remove the grade pot gear. Remove the four bolts that hold the rack gear cover plate in place and move it out of the way. 10. Slide the rack gear out sideways. 11. Inspect the gear on the pinion shaft. If it is damaged, replace both the rack gear and the pinion shaft as described below. 12. Bolt the rack gear cover plate back into place. 13. Reassemble the siderails, upright assembly, and walk belt. 14. Restore power and decrease the grade to run the other rack gear out the top as previously described. 15. Reassemble the rack gear as described above. Repair/Replacement and Calibration 4-20 16. Calibrate the grade potentiometer (see Calibration Procedures at end of chapter). 17. Test the treadmill grade. Verify that: a. it operates over the full range of 0-15%. b. there is no binding when it moves up or down. c. the grade motor chain is aligned correctly. A popping sound in the chain indicates that it is misaligned. Field Functional Test To verify that the treadmill is operating properly, perform Field Test No. 4. See Appendix D, Field Functional Tests, for specific instructions. Replacing the Pinion Shaft 1. Remove the right siderail, then remove the rack gear as previously described in Replacing a Jammed Rack Gear. Pinion Shaft (13044-001) 2. Restore treadmill power, then use the grade motor to turn the pinion shaft until the setscrew on the grade sprocket is visible. 3. Turn off the power and treadmill circuit breaker, then unplug the treadmill. 4. Loosen the setscrews from the grade sprocket. 5. Remove the grade motor chain as described previously. 6. Slide the pinion shaft out. 7. Slide the new pinion shaft into place: be sure to reinstall the grade sprocket while installing the pinion shaft. 8. Replace the rack gear cover plate. Repair/Replacement and Calibration 4-21 9. Align the grade sprocket and grade motor sprocket, then tighten the setscrew on the sprocket. 10. Replace the grade motor chain as described. 11. Reassemble the siderails, uprights, and walk belt. 12. Reassemble the rack gear. 13. Adjust the walk belt tension. 14. Calibrate the grade potentiometer (see Calibration Procedures, page 4-33). 15. Test the treadmill grade. Verify that: a. it operates over the full range of 0-15%. b. there is no binding when it moves up or down. c. the grade motor chain is aligned correctly. A popping sound in the chain indicates that it is misaligned. Field Functional Test To verify that the treadmill is operating properly, perform Field Test No. 4. See Appendix D, Field Functional Tests, for specific instructions. Adjusting the Grade Limit Switches Grade limit switches prevent the treadmill from exceeding the preset maximum grade. When a roller on the limit switch reaches a trigger in each rack gear, a lever moves outward, opening the switch and stopping the grade motor. Two grade limit switches, one on each side of the treadmill, are mounted on brackets attached to the front of the headframe. A Grade limit switch settings are preset at the factory and normally do not require adjustment. They should be adjusted if the rack gear is changed. 1. Turn off the treadmill circuit breaker, then unplug the power cord from the power source. Remove the hood as previously described. 2. Loosen, but do not remove, the two Phillips screws that secure each grade limit switch to its bracket. 3. Pivot the switch on the upper screw toward then away from the rack gear. You should hear a click as the switch opens or closes. 4. Set the switch wheel on a flat part of the rack gear, then pivot the switch toward the rack gear just until it stops. Tighten both screws. 5. If required, repeat Steps 2-4 for the other grade limit switch. 6. Replace the treadmill hood. Repair/Replacement and Calibration 4-22 7. Operate the treadmill to verify that it reaches the upper and lower grade limits (15% and 0%). Field Functional Test Ensure that the grade will traverse from minimum to maximum and back. Walk Deck Assembly Phillips screws holding deck to siderails (10 PL) ¼-20 x 1.25L (10836-105) 5/16-18 x 0.75L (10819-246) Flat Washer (01164-005) Lock Washer (10511-010) Retainer (15689-002) Siderail cover removed Walk belt removed for clarity Rear screws (2 PL) ¼-20 x 2.25L (10836-185) Rear roller (19138-002) Adjustment bolt 5/16-18 x 3.0L (10820-366) Flat Washer (19409-006) End cap Side rail cover Front roller (32386-002) ClubTrack, ClubTrack Plus, HR ClubTrack, and MedTrack SR60 (32386-001) MedTrack CR60 Replacing the Rollers 1. Turn off the treadmill circuit breaker and unplug the power cord. Remove the hood as previously described. 2. Remove the poly-V belt as described previously. 3. Lift the drive roller assembly out from under the walk belt. 4. Pull the walk belt towards the rear of the deck, then slide the rear roller assembly out from between the siderails toward the rear of the treadmill. 5. Replace the rollers and reassemble the treadmill following Steps 1-4 in reverse order. See Installing the Front Shaft earlier in this chapter. 6. Adjust the walk belt tension and tracking. Repair/Replacement and Calibration 4-23 Field Functional Test To verify proper operation, perform Field Test No. 3. See Appendix D, Field Functional Tests, for specific instructions. Replacing the Walk Belt or Deck A All instructions are given as if you were exercising on the treadmill. Whenever you install a new walk belt, you should install a new deck or turn over the existing deck (the deck is reversible). Inspect the compression mounts each time you replace the walk belt and replace if worn. 1. Raise the treadmill to its maximum height. Turn off the power, unplug the power cord, and remove the hood as previously described. 2. Remove the front and rear roller assemblies (see previous). 3. Remove the two Phillips screws from the siderails. These screws attach the hood to the siderails at the front of the hood. A When replacing the screws, the gap between the siderail cover and the head of each screw must be 0.050 inch ± 0.010, approximately the thickness of a dime. 4. Grasp the left siderail cover at the rear of the treadmill, then pull it up and away from the treadmill to roll the cover off. Repeat for the right cover. 5. Remove the 12 screws that hold the deck to the siderails. 6. Remove the deck and belt. 7. Install a new belt with the logo side up, and reassemble the treadmill following Steps 1-6 in reverse order. A When you install a new belt, verify that the closed end of the splice on the walk belt hits the roller first as the belt rotates. 8. Adjust the belt tracking and tension. Field Functional Test To verify that the treadmill is operating properly, perform Field Test No. 3. See Appendix D, Field Functional Tests, for specific instructions. Repair/Replacement and Calibration 4-24 Replacing Compression Mounts Inspect the compression mounts each time you change the walk belt. Replace the mounts if worn. 1. Remove the deck as previously described. 2. Locate and unscrew the compression mounts from the inside of each siderail; there are five long mounts and three short mounts on each siderail. The front two mounts are attached with hex nuts underneath. L S L L S S L S L S = Short Mounts (32235-002) L = Long Mounts (32235-001) Aluminum spacer (32240-001) 3. Unscrew the mounts from each siderail and replace. 4. Replace the deck as previously described. (Triple Flex Maintenance Kit p/n 33511-001) Field Functional Test To verify that the treadmill is operating properly, perform Field Test No. 3. See Appendix D, Field Functional Tests, for specific instructions. Replacing the Deck A The deck is reversible. You can turn it over if one side wears out. Follow Steps 1-7 in the previous section, Replacing the Walk Belt, to remove and replace the deck. Field Functional Test To verify that the treadmill is operating properly, perform Field Test No. 3. See Appendix D, Field Functional Tests, for specific instructions. Repair/Replacement and Calibration 4-25 Adjusting the Walk . Belt Walk Belt Tension Adjust the tension: • whenever the belt slips or moves unsteadily during operation • after installing a new walk belt. Two adjustment methods are specified. Method 1 is preferred, but two belt tension calipers (Quinton P/N 30113-001) are required. A Both adjustment screws must be completely slack before starting this procedure. Method 1 (Calipers available) 1. Turn both tension adjustment screws clockwise until most of the slack is removed from the belt. A Do not stretch the walk belt at this point. 2. Position one caliper on each side of the belt, approximately 18 inches from the rear roller assembly. 3. Grasp the belt with one caliper clamp. 4. Pull the slack out of the belt with your fingers, then grasp the belt with the second clamp. 5. Repeat Steps 3 and 4 on the other side of the belt using the other caliper. 6. Set the dials of both calipers to zero. 7. Alternately tighten each tension adjustment screw in 0.1% increments until both sides read 0.4%. Ensure that the pointer is exactly on the line increment of the dial for each setting. Do not overtighten the adjustment screws. Overtightening may damage the walk belt and roller assemblies. 8. Remove both gauges. 9. Adjust the walk belt tracking. Method 2 (Calipers not available) A Both adjustment screws must be completely slack before starting this procedure. Use this method only if two belt adjustment calipers are not available. An accurate measuring device is required. 1. Turn both tension adjustment screws clockwise until most of the slack is removed from the belt. Do not stretch the walk belt. 2. Place two pieces of masking tape or two light pencil marks on the right edge of the belt exactly 50.000 inch apart. 3. Repeat Step 2 on the left edge of the belt. Repair/Replacement and Calibration 4-26 4. Alternately turn the left and right adjustment screws one-half turn until the distance between the tape or pencil marks is 50.203 inch (±0.016) on both sides. Do not overtighten the adjustment screws. Overtightening may damage the walk belt and roller assemblies. 5. Remove the tape. 6. Adjust the walk belt tracking. Walk Belt Tracking Adjust the tracking: • whenever the belt moves to one side • after installing a new walk belt • each time you adjust the walk belt tension. Do not stand on the belt when adjusting the tracking. 1. Adjust the walk belt tension as described on the previous page. Start the treadmill and let it run for at least one minute at minimum speed and grade. Do not start the treadmill when some one is on the walk belt. 2. Make the following adjustment to the right adjustment screw only: a. If the belt moves to the right, turn the screw ¼ turn clockwise. b. If the belt moves to the left, turn the screw ¼ turn counter-clockwise. 3. Run the treadmill for at least one minute to observe the belt tracking. Adjustments may take some time to become apparent. 4. Repeat Steps 3 and 4 as required. Do not overtighten the adjustment screw. Overtightening may damage the walk belt and assemblies. 5. Increase the speed to 8 mph, then repeat Steps 3 and 4 as required. 6. Press Stop Belt to stop the treadmill, then press Power to turn it off. Repair/Replacement and Calibration 4-27 Controller Assembly The controller assembly includes the keypanel, the PCBA, and the enclosure that holds them to the treadmill: • The ClubTrack and MedTrack CR60 and SR60 use the enhanced display processor unit (EDPU). • The ClubTrack Plus uses the motivational control unit (MCU). • The HR ClubTrack uses the heart rate monitor (HRM). • The HR ClubTrack Plus uses the heart rate controller (HRC). You must configure the controller correctly after installing (pg 4-30). Removing the Enclosure 1. Turn the treadmill power off and disconnect the power cord from the power source. 2. Remove optional siderails if present. While performing Steps 2-7, hold the enclosure securely, so that it does not fall while you are removing the screws and the handrail. Be careful not to scratch the uprights. 3. Use a 18 -inch Allen wrench to remove the six socket screws from the rear cover of the enclosure. Socket screw on enclosure, 10-24 x 0.50L (10829-405) Flat Washer (19409-003) Interface Connector, HR ClubTrack Plus only 4. Use a 316 -inch Allen wrench to remove the two socket screws near the handrail 5. Slide the cover down the uprights to expose the PCBA. 6. Disconnect the controller cable, located on the left side of the PCBA. 7. Remove the hex nut that holds the ground wires to the chassis, then remove the wire. 8. Cut the cable tie that holds the cable to the controller. 9. Use a 5 32 -inch Allen wrench to remove the four socket-head screws that attach the controller assembly to each upright. 10. Lift the entire controller assembly clear of the uprights. 11. Reassemble following Steps 2-9 in reverse order. Repair/Replacement and Calibration 4-28 Field Functional Test To verify that the treadmill is operating properly, perform Field Test No. 5. See Appendix D, Field Functional Tests, for specific instructions. Replacing the PCBA 1. If possible, raise the treadmill to maximum height (15% grade). 2. Turn the treadmill off and disconnect the power cord from the outlet. 3. Use a 18 inch Allen wrench to remove the six screws from the rear panel of the enclosure. 4. Use a 316 -inch Allen wrench to remove the two socket screws near the handrail 5. Slide the rear cover down the uprights. 6. Remove the hex nut that attaches the PCBA groundwire, then remove the wire. 7. Unplug the control cable from the PCBA. If you have the optional heart rate monitoring function, unplug the Polar PCB connector from the controller PCBA. HR ClubTrack Plus treadmills, p/n 00425: a. Disconnect the ribbon cable to the LCD display. Disengage the connector from the cable by sliding the outer connector housing away from the PCB. The housing will slide approximately 1/8 inch, then stop. Once the housing is in this position, the cable should extract without any resistance. b. Disconnect the fluorescent tube wires from the PCBA. 8. Remove the 12 Phillips screws that hold the PCBA to the key panel. 9. Lower the PCBA, then unplug the ribbon cable connecting it to the key panel. 10. Remove the PCBA from the enclosure. 11. Replace the PCBA and reassemble following Steps 3-8 in reverse order. Repair/Replacement and Calibration 4-29 Replacing the Fluorescent Tube (HR ClubTrack Plus) 1. Remove the PCBA as described above (Replacing the PCBA). 2. Remove the LCD display from the keypanel and place it face up. 3. Remove the single screw that holds the white plastic fluorescent tube housing together. 4. Remove the fluorescent tube and replace with new tube. 5. Reassemble in reverse order. Field Functional Test To verify that the treadmill is operating properly, perform Field Test No. 5. See Appendix D, Field Functional Tests, for specific instructions. Replacing the HR Receiver Assembly 1. Follow Steps 1 through 5 in Replacing the PCBA. 2. Unplug the receiver assembly from the controller assembly. Connector for HR ClubTrack Plus 000425 Connector for HR ClubTrack 00402 Orient HR receiver as shown. 3. Remove the two screws holding the assembly to the keypanel. 4. Remove the receiver assembly. 5. Use the two mounting screws to install the new receiver assembly. Reassemble the controller assembly. Field Functional Test To test for proper heart rate monitoring operation, follow the instructions in Testing Heart Rate Accuracy, Chapter 3 Troubleshooting. Configuring the Controller When you replace a controller, you must configure it to work with the specific treadmill. Perform the following Steps to configure the treadmill. 1. Enter the service mode by simultaneously pressing Stop Belt, Slower , and Faster . 2. Choose the appropriate configuration number from the following: Repair/Replacement and Calibration 4-30 Treadmill Configuration No. ClubTrack CP3 ClubTrack Plus CP3 HR ClubTrack CP3 HR ClubTrack Plus CP3 MedTrack SR60 CP3 MedTrack CR60 CP1 No configuration CP- - 3. For the HR ClubTrack Plus, enter the configuration by using the menu choices on the service mode screen. For the other treadmills, hold down Stop Belt and press the + or - key until the correct configuration number appears in the center display. 4. Press Select to store the configuration. (For the HR ClubTrack Plus, select the Set Screen Contrast screen and use the contrast up and down buttons to select the optimum contrast. Select Enter to save the value.) 5. Exit the service mode by simultaneously pressing Stop Belt, Slower , and Faster . Field Functional Test To verify that the treadmill is operating properly, perform Field Test No. 1. See Appendix D, Field Functional Tests, for specific instructions. Removing the Keypanel To remove the keypanel: 1. Remove the PCBA following the above procedure. 2. Remove the 10 hex nuts that hold the keypanel to the enclosure. 3. Lift the keypanel off the enclosure. Replacing the Controller Cable 1. Disconnect the power and remove the hood as previously described. 2. Remove the controller assembly as previously described 3. Cut any cable ties that fasten the controller cable to the headframe. 4. Detach the cable ground wire at the VSD board. 5. Pull the cable up through the left upright to remove it. 6. Install a new cable following Steps 1-5 in reverse order. Repair/Replacement and Calibration 4-31 Field Functional Test To verify that the treadmill is operating properly, perform Field Test No. 5. See Appendix D, Field Functional Tests, for specific instructions. Cumulative Use The cumulative use feature lets you determine the amount of wear on the belt and motor by displaying the total distance or total time of use for each treadmill. This data can be useful for scheduling service. See separate procedure below for HR ClubTrack Plus (p/n 00425). A The cumulative time and distance are stored in the controller. Both values are zero if a new controller is installed. Loading a factory default program will reset the time and distance to zero. Distance To determine the total distance on each treadmill: 1. Press Power to turn on the treadmill controller. 2. Simultaneously press Stop and Slower. 3. Multiply the number that appears in the multifunction display by 10 to obtain the cumulative total in miles or hours. 4. Record the mileage and the date for your records. 5. Press Clear to reset the display for operation. Time To determine the total time of treadmill use: 1. Press Power to turn on the treadmill controller. 2. Simultaneously press Stop and Faster. 3. Multiply the number that appears in the center display by 10 to obtain the total number of hours of operation. 4. Record the total time and the date for your records. 5. Press Clear to reset the display for operation. For HR ClubTrack Plus Treadmills only A In the HR ClubTrack Plus, total time, total distance, and current distance are calculated and saved in the HRC; therefore, any controller replacement restarts the maintenance counters. Total time and distance are saved into non-volatile memory every time the stop belt function is activated. To view cumulated time and distance, enter custom mode and select Maintenance Information. The screen shows the cumulated time and distance. Repair/Replacement and Calibration 4-32 To open custom mode, 1. Turn the Power key off. 2. Press and hold the Menu key, then press Power. 3. Select Maintenance Information. Limited Access Switch If the limited access control is on, the treadmill will not operate unless the magnetic key is on the Quinton logo on the controller. Disabling the Limited Access Switch 1. Remove the magnetic key and press Power to turn off the treadmill. 2. Simultaneously press and hold the +, —, and Power keys until the 8s on the display go off, then release the keys. The control remains inactive, allowing unrestricted access, until you place the key over the logo again. Calibration Procedures Grade Potentiometer (Grade Pot) Calibrate the grade pot whenever you replace the grade pot, either rack gear, or the pinion shaft. 1. Disconnect power and remove the hood as previously described. 2. Loosen the setscrew that holds the grade pot gear to the grade pot shaft. 3. Restore power to the treadmill. Maintain caution when working near moving parts. A In order to enter open loop mode, grade must be positive. 4. Enter open-loop grade mode: a. Press Power . b. Simultaneously press Stop , Faster, and Slower on the controller to place the treadmill in service mode. The display will read 0.0 P000 0.0. c. Simultaneously press Faster, Up, and Down . The display will read 0.0 P000 0.0. d. Simultaneously press Stop , Faster , and Slower to exit service mode. The display should read 0.0 P555 0.0. You are now in open loop mode. A While in open loop mode, the treadmill takes approximately two seconds to react to a command. Repair/Replacement and Calibration 4-33 5. Lower the grade until the treadmill is level. Measure from the bottom of the siderail to the floor at both the front and rear of the treadmill. Adjust the grade until both measurements are identical. 6. Rotate the grade pot shaft with a screwdriver until the grade display reads 0.0. 7. Tighten the setscrew and verify that the display still reads 0.0. 8. Press Clear to exit open-loop mode. 9. Verify that the treadmill operates through its full grade range (0-15%) and that the treadmill is nearly all the way to the top of the rack gear when the display reads 15%. 10. Turn the treadmill circuit breaker off, disconnect the power cord, and replace the hood. Speed Calibration The speed of the belt can be checked for accuracy. The display and control are digitally controlled and cannot be adjusted. See Step E of the Complete Field Functional Test in Appendix D, Functional Field Tests. Grade Calibration The treadmill grade is controlled through the grade pot and grade pot installation procedure and cannot be adjusted. See Step D of the Complete Field Functional Test in Appendix D, Functional Field Tests. Repair/Replacement and Calibration 4-34 5 Preventive Maintenance Before working on the treadmill or its components, turn off the treadmill circuit breaker and unplug the power cord. High voltages remain under the treadmill hood for a few minutes even after the plug has been removed. Secure long hair, loose clothing, and jewelry before working near the treadmill, particularly near the walking surface or pulleys. Do not permit anyone to stand on the treadmill belt when it is started. Recommended Service With normal upkeep, no routine service is necessary. When service is required, repairs can be done to the modular level. Routine Maintenance Visual Inspection Inspect the power cord and walking belt for wear. Check the position of the walking belt; be sure it is not rubbing against the frame. The belt should be centered on the deck within 0.25 inch; adjust if necessary. Check optional siderails to be sure they are fastened securely. Remove potential hazards from the treadmill area. Cleaning the Exterior Follow these steps to clean the treadmill after servicing or as required: 1. Elevate the treadmill to maximum height and vacuum the floor under it to prevent excess dust and dirt from interfering with operation. Preventive Maintenance 5-1 2. Use a damp sponge to wipe the exteriors and walking belt; do not soak surfaces. Dry all surfaces thoroughly. Never wipe the deck under the belt, even when replacing a belt. Wiping can ruin the surface. Do not use detergents or cleaning agents on any part of the deck. Do not let liquid enter the interior of the treadmill or controller. Vacuuming Under the Treadmill Hood Accumulation of dust and dirt beneath the hood restricts the air flow needed to disipate heat from the drive motor and VSD board. To prevent damage to components, periodically vacuum the mechanical drive and the area behind the VSD board. Frequency Usage and environment determine how much dust accumulates and how frequently you need to vacuum the components. Inspect the internal components at least every six months. Adjust the inspection schedule as needed. To avoid electric shock, turn off the treadmill circuit breaker and unplug the treadmill before removing the hood. Before working near components, wait at least two minutes from the time you unplugged the power cord. Be sure the red LEDs on the VSD board are off. Use extreme caution to avoid physical damage to the internal components. Avoid static discharge, which can damage the electronic components. 1. Remove the hood as previously described (pg 4-3). 2. Vacuum the areas behind the VSD cage (deck side). Do not vacuum the VSD board. 3. Replace the hood. Replacement Schedules Replace belts if they are frayed or show excessive wear. Heart Rate Monitoring Option Cleaning dry thoroughlyresidual sweat and moisture keep the transmitter Clean the chest belt regularly with mild soap and water, then active and drain the battery in the transmitter. Do not use Preventive Maintenance 5-2 abrasives or chemicals such as steel wool or alcohol as they can damage the electrodes permanently. Battery The estimated life of the belt transmitter is 2500 hours of use. For a replacement belt and for recycling the old transmitter belt, contact Polar Electro at 800/227-1314. Storage Store the belt in a warm, dry place away from direct sunlight. Do not store in plastic or other material that can trap moisture. Do not store in soap and water bath. Preventive Maintenance 5-3 A Safety Requirements Read this manual in full before operating the treadmill. Do not start the treadmill when someone is standing on the belt. Keep speed and grade at the lowest settings when someone is getting on and off the treadmill. Keep the area underneath and around the treadmill clear. Before each use of this equipment, check the power receptacle for signs of damage. Do not operate the equipment if the integrity of these items is in question. To avoid potential safety and electrical problems, use parts and accessories that meet Quinton specifications. This equipment is classified Class I, Type B, ordinary equipment. Not protected against fluid ingress. Rated for continuous operation. Increased risk due to leakage current can result if this equipment is not grounded properly. The treadmill must be on an appropriate, dedicated electrical circuit. Nothing else should be connected to the circuit. Failure to follow these guidelines can produce a serious or possibly fatal electrical shock hazard or other serious injury. Consult a qualified electrician as required. A Continuous A-weighted sound measurements taken over the speed range of an unloaded ClubTrack treadmill are less than 70dB(A). For systems to be used in the U.S.: The American standard for chassis leakage current of electromedical apparatus when measured by interruption of the power ground (earth) conductor is 300mA. The current ANSI standard, ANSI/AAMI ES1-1993, contains the limits. The standard is also shown in the i lkg i lkg 10KΩ ± 1% 0.015µF 1KΩ ± 5% ± 1% 100Ω ± 1% V AAMI Standard test load (1mV=1uA) Safety Requirements A-1 National Fire Protection Association Standard for health care facilities, NFPA 99-1993. The leakage currents specified in the standards are for current frequencies up to 1KHz. The AAMI standard test load provides the proper attenuation for frequencies above 1 KHz. This load circuit, illustrated on the previous page, can be found in the referrenced ANSI standard. Symbol Definitions Quinton products display one or more of the following symbols. No one product displays them all. Earth ground (protective) Attention: Consult accompanying docume nts Off Type B equipment provides (power disconne cted adequate protection against from mains) electric shock, particularly regarding allowable leakage current; reliability of the protective earth connection (when present) On (power Type BF equipment contains an connecte d to F-type isolated patient mains) part providin g a high degree of applied protection against electric shock Alternating Type BF equipment with current defibrillation protection High voltage Type CF equipment: contains an F-type isolated patient appliedpart and provides a degree of protection against electric shock higher than that for type BF equipment regarding allowable leakage currents Earth ground Type CF equipment with (functional ) defibrillation protection Replace fuse Fuse only as marked Mains Power HZ A Safety Requirements A-2 Equipotentiality Warning T Hertz V VA Ampere s Timed fuse (slo-blo) Volts Volt Amperes B Specifications ClubTrack®(00377, 00402) and MedTrack® Rehabilitation Treadmills (00380, 00390) PERFORMANC E Maximum Rated Load Belt Speed Range: ± 0.2 mph (continuously adjustable) Rate of speed change Grade range ± 0.5% Rate of grade change PHYSICAL Weight Nominal walking surface Treadmill dimensions width x length x height Walking surface height from floor Handrail height from walking surface ENVIRONMENT AL Temperature Humidity (non-condensing) Atmospheric pressure ClubTrack & MedTrack SR: 320 lb (145 kg) MedTrack CR: 400 lb (181.4 kg) ClubTrack & MedTrack SR: 1.0 to 12 mph (1.6 to 19.3 km/h) MedTrack CR: 0.6 to 7.2 mph (1.0 to 11.6 km/h) Acceleration: ClubTrack & MedTrack SR: 1.0 to 12 mph in 35 secs MedTrack CR: 0.6 to 7.2 mph in 35 secs 0 to 15% Club Track & MedTrack SR: 0 to 15% in 60 secs max with 320 lb user MedTrack CR: 0 to 15% in 60 secs max with 400 lb. user 400 lb (181.4 kg) 20 in. x 60 in. (51 cm x 152 cm) 31 in. x 87.25 in. x 53 in. (78.7 cm x 221.6 cm x 134.6 cm) For MedTrack CR 60, add 0.5 in. (1.27 cm) to ht 6.0 in. (15.24 cm) For MedTrack CR 60, add 0.5 in. (1.27 cm) 39 in. (99 cm) Operating: 50 to 90°F (10 to 32°C) Storage: -13 to 122°F (-25 to 50°C) Operating: 3 to 95% relative Storage: 3 to 95% relative Operating: 8.60 to 15.0 psia, 445 to 775 mm Hg absolute Shipping & storage: 8.22 to 15.0 psia, 425 to 775 mm Hg absolute Specifications B-1 POWER REQUIREMENT S Dash Number Voltage/H z Current Min. Branch Draw in Circuit Amps Amps ClubTrack - P/N 00377 -001 -002 through -006 -007 -008 -009 99 - 132V, 60Hz 198 - 250V, 50/60Hz 90 - 132V, 50/60 Hz 180 - 250V, 50/60Hz 198 - 250V, 60Hz 20* 10 20 10 10* 20 10 20 10 15 99 - 132V, 60Hz 198 - 250V, 50/60Hz 90 - 132V, 50/60 Hz 180 - 250V, 50/60 Hz 198 - 250V, 60Hz 20* 10 20 10 10* 20 10 20 10 15 MedTrack CR - P/N 00380 MedTrack SR - P/N 00390 -001 -002 through -006 -007 -008 -009 HR ClubTrack - P/N 00402 -001 99 - 132V, 60 Hz 20* -002 through -006 198 - 250V, 50/60 Hz 10 -007 90 - 110V, 50/60 Hz 20 -008 180 - 250V, 50/60 Hz 10 -009 198 - 250V, 60Hz 10* *Full-load current is computed as described in section 430-24 of the National Electrical Code. FUSE RATINGS F1 & F2 F3, F4, F5, & F6 250Vac, 4A T, 5 x 20 mm (nominal) 250Vac, 2A T, 5 x 20 mm (nominal) ClubTrack® & MedTrack® Controllers SPEED Units Range Increment Rate of change Accuracy GRADE Units Range Increment Specifications B-2 20 10 20 10 15 3-digit display Miles per hour (mph) or kilometers per hour (km/h) ClubTrack and MedTrack SR: 0 to 12 mph (0 to 19.3 km/h) MedTrack CR: 0 to 7.2 mph (0 to 11.6 km/h) 0.1 mph Two increments (or decrements) per second for the first three seconds, five per second thereafter until you either release the key or reach the high/low limit. Within ± 0.2 mph (0.3 km/h) of actual speed during unchanging operation, 1 mph (1.k km/h) during speed decrease. Shows target, not actual, speed during speed changes. 3-digit display percent 0 to 15% 0.5% Rate of change Accuracy Multi-function Display Elapsed time or countdown timer Elapsed distance Pace Calories Caloric rate METS Heart rate (option) Scan Weight Two increments (or decrements) per second for the first three seconds, five per second thereafter until you either release the key or reach the high/low limit. Within ± 0.5% actual grade during unchanging operation 4-digit display. Displays exercise parameters, weight, and error messages Units: min:sec Range: 00:00 to 99:59 Increment: 00:01 Units: miles or kilometers Range: 0 99.9 miles or kilometers Increment: 0.001 from 0 to 9.999 mi or km, 0.01 from 10.00 to 99.99 mi or km Units: minutes:second per mile or minutes:second per kilometer ClubTrack range: 5:00 to 60:00 min:sec/mi (3:07 to 37:16 min:sec/km) MedTrack range: 8:20 to 99:59 min:sec/m (5:11 to 62:08 min:sec/km) Increment: 00:01 Zero speed: when walk belt speed is zero, the pace display indicates -.- Total calories expended Units: calories Range: 0.001 to 999.9 Increment: 0.001 from 0 to 9.999; 0.01 from 10 to 99.99; 0.1 from 100 to 999.9 Caloric rate expenditure Units: calories/min Range: 0.001 999.9 Increment: 0.001 from 0 to 9.999; 0.01 from 10 99.99; 0.1 from 100 to 999.9 Units: METS Range: 1.000 to 31.62 Increment: 0.001 from 1 to 9.999; 0.01 from 10.00 to 31.62 Units: beats per minute Range: 50-225 Increment: 1 Cycles through parameters, displaying each sequentially for 3 sec Default: 150 lb to 68 kg Minimum: 30 lb or 13 kg Maximum: 400 lb (181 kg) Increment: 1 lb or 1 kg Specifications B-3 ClubTrack Plus® Treadmills (P/N 00382, 00425) PERFORMANC E Maximum rated load Belt speed range (continuously adjustable) Grade range PHYSICAL Weight Nominal walking surface Treadmill dimensions width x length x height Walking surface height from floor Handrail height from walking surface ENVIRONMENT AL Temperature Humidity (non-condensing) Atmospheric pressure 320 lb (145 kg) 1.0 to 12 mph (1.6 to 19.3 k/h) 0 to 15% 400 lb (181.4 kg) 20 in. x 60 in. (51 cm x 150 cm) 31 in. x 87.25 in. x 53 in. (78.7 cm x 221.6 cm x 134.6 cm) 6.0 in. 15.24 cm) 39 in. (99 cm) Operating: 50 to 90°F (10 to 32°C) Storage: -13 to 122°F (-25 to 50°C) Operating: 3 to 95% relative Storage: 3 to 95% relative Operating: 8.60 to 15.0 psia, 45 to 775 mm Hg absolute Shipping & storage: 8.22 to 15.0 psia, 425 to 775 mm Hg absolute POWER REQUIREMENT S Part number 00382- Voltage/Hz Current Draw in Min Branch Circuit Amps Amps -001 99 - 132V, 60 Hz 20* 20 -002 through -006 198 - 250V, 50/60 Hz 10 10 -007 90 - 132V, 50/60 Hz 20 20 -008 180 - 250V, 50/60 Hz 10 10 -009 198 - 250V, 60Hz 10* 15 *Full-load current is computed as described in section 430-24 of the National Electrical Code. FUSE RATINGS F1 and F2 F3, F4, F5, F6 Specifications B-4 250VAC, 4A T, 5 x 20 mm (nominal) 250VAC, 2A T, 5 x 20 mm (nominal) ClubTrack Plus®Controller (P/N 00382) SPEED Units Range Increment Accuracy GRADE Units Range Increment Accuracy MULTI-FUNCTION DISPLAY Elapsed time or countdown timer Exercise time Stage time Elapsed distance Pace Calories Caloric rate METS Weight (3-digit display) Miles per hour (mph) or kilometers per hour (km/h) 1 to 12 mph, 1.6 to 19.3 km/h 0.1 mph Within ± 0.2 mph (0.32 km/h) of actual speed during unchanging operation, 1 mph (1.6 km/h) during speed decrease. Shows target, not actual, speed during speed changes. 3-digit display percent 0 to 15% 0.5% Within ± 0.5% actual grade during unchanging operation Four-digit display. Displays exercise parameters, weight, digital timer, and error messages Units: min:sec Range: 00:00 to 99:59 Increment: 00:01 0:00 to 96:00 min:sec 0:00 to 6:00 min:sec Units: miles or kilometers Range: 0 to 99.9 miles or kilometers Increment: 0.001 from 0 to 9.999 miles or kilometers; 0.01 from 10.00 to 99.99 miles or kilometers Units: minutes:seconds per mile or minutes:seconds per kilometer Range: 5:00 to 60:00 minutes:seconds per mile (3:07 to 37.16 min:sec/km) Increment: 00:01 Zero speed; when walk belt speed is zero, the pace display indicates -.- Total calories expended or caloric rate expenditure Units: calories or calories/min Range: 0.001 to 999.9 Increment: 0.001 from 0 to 9.999; 0.01 from 10 to 99.99; 0.1 from 100 to 999.9 0.001 to 999.9 cal/min 1.000 to 31.62 Increment: 0.001 from 1 to 9.999; 0.01 from 10.00 to 31.62 Default: 150 lb or 68 kg Minimum: 30 lb or 13 kg Maximum: 400 lb or 181 kg Increment: 1 lb or 1 kg Specifications B-5 HR ClubTrack Plus™ with Heart Rate Control (P/N 00425) SPEED Units Range Increment Accuracy GRADE Units Range Increment Accuracy LCD DISPLAY Time Elapsed distance Pace Calories Caloric rate METS Heart rate Enter Weight Enter Target Heart Rate Enter Exercise Time Serial interface Specifications B-6 (3-digit display) Miles per hour (mph) or kilometers per hour (km/h) 0 to 12 mph, 0 to 19.3 km/h 0.1 mph, 0.16 km/h Within ± 0.2 mph (0.32 km/h) of actual speed during unchanging operation, 1 mph (1.6 km/h) during speed decrease. Shows target, not actual, speed during speed changes. 3-digit display percent 0 to 15% 0.5% Within ± 0.5% actual grade during unchanging operation 4.75 in. x 3.61 in. area, 320 x 240 pixels resolution. Displays user prompts, graphs, weight, time, exercise parameters and stages, and error messages Units: min:sec Range: 00:00 to 99:59 Increment: 00:01 Units: miles or kilometers Range: 0 to 99.9 miles or kilometers Increment: 0.001 from 0 to 9.999 mi or km; 0.01 from 10.00 to 99.99 mi or km Units: minutes:seconds per mile or minutes:seconds per kilometer Range: 5:00 to 99:59 min:sec/mi (3:07 to 99:59 min:sec/km) Increment: 00:1 Zero speed; when walk belt speed is zero, the pace display indicates -.- Total calories expended or caloric rate expenditure Units: calories or calories/min Range: 0.001 to 999.9 Increment: 0.001 from 0 to 9.999; 0.01 from 10 to 99.99; 0.1 from 100 to 999.9 0.001 to 999.9 cal/min Range: 0.001 to 999.9 Increment: 0.001 from 1 to 9.999; 01 from 10.00 to 99.99 0.1 from 100 to 999.9 Units: beats per minute (BPM) Range: 50-200, Increment: 1 BPM Default: 150 lb or 68 kg Minimum: 30 lb or 13 kg Maximum: 400 lb or 181 kg Increment: 1 lb or 1 kg Default: 140 beats per minute (BPM) Minimum: 80 BPM Maximum: 200 BPM Increment: 1 BPM Default: 20 min Minimum: 7 min Maximum: : (no limit or owner-set maximum) Increment: 1 min RS-232 interface, complies with CSAFE standards for external commuications. Percent vs Angle Relationship for Treadmill Grade Rise θ Run Grade = Rise Run tan θ = Grade = tan θ θ = arctan(Grade) (Note: 15% Grade Grade 0.0% 0.5% 1.0% 1.5% 2.0% 2.5% 3.0% 3.5% 4.0% 4.5% 5.0% Angle (°) 0.00 0.29 0.57 0.86 1.15 1.43 1.72 2.00 2.29 2.58 2.86 Rise Run Grade 5.0% 5.5% 6.0% 6.5% 7.0% 7.5% 8.0% 8.5% 9.0% 9.5% 10.0% Grade = 0.15) Angle (°) 2.86 3.15 3.43 3.72 4.00 4.29 4.57 4.86 5.14 5.43 5.71 Grade 10.0% 10.5% 11.0% 11.5% 12.0% 12.5% 13.0% 13.5% 14.0% 14.5% 15.0% Angle (°) 5.71 5.99 6.28 6.56 6.84 7.13 7.41 7.69 7.97 8.25 8.53 Specifications B-7 C Part Numbers Final Assemblies ITEM PART NUMBER ClubTrack Fitness Treadmill Assembly 00377 HR ClubTrack Fitness Treadmill with Heart 00402 Rate Monitoring Assembly ClubTrack Plus Treadmill Assembly 00382 HR ClubTrack Plus Fitness Treadmill with 00425 Heart Rate Control Assembly MedTrack CR 60 Treadmill Assembly 00380 MedTrack SR 60 Treadmill Assembly 00390 The following dash numbers apply to all treadmill part numbers above: English U.S.A. 001 99 - 132V, 60 Hz, 20A English U.S.A. 009 198 - 250V, 60 Hz, 10A English U.K. 002 198 -250V, 50/60 Hz, 10A German, 198 - 250V, 50/60 Hz, 10A 003 French, 198 - 250V, 50/60 Hz, 10A 004 Italian, 198 - 250V, 50/60 Hz, 10A 005 Spanish, 198 - 250V, 50/60 Hz, 10A 006 Japanese, 90 - 132V, 50/60 Hz, 20A 007 Japanese, 180 - 250V, 50/60 Hz, 10A 008 Operator and Service Manuals Part No. 00377-84x 00382-84x 00425-84x 00380-84x 00377-83x Description ClubTrack /HR ClubTrack Users Guide ClubTrack Plus Users Guide HR ClubTrack Plus Users Guide MedTrack Rehabilitation Treadmills Operator Manual (Covers both CR60 and SR60) Service Manual (English language only) (x signifies the number of the latest revision.) Part Numbers C-1 Spares ELECTRIC AL Power Cord North America Japan 100V U.K Germany France Spain Italy Japan 200V Strain Relief Configuration Plate North America International PCBA Assy, Drive 30610-004 30610-004 30736-012 30736-015 30736-015 30736-015 30736-013 30736-020 01227-006 32776-001 32776-002 32975-002 DRIVE Drive Motor Assy Drive Motor Isolation Kit Flywheel Assembly Drive Belt Tensioner Assembly Transformer Assembly 32783-002 33503-001 32446-001 (-003 CR60) 32387-001 (-002 CR60) 32784-001 32706-001 GRADE Grade Motor Assy Grade POT Assy Grade Wheel Kit Grade Chain Kit Sprocket, chain, grade motor 33316-002 33171-002 33502-002 30448-001 19081-004 DECK Deck Front Roller Rear Roller Assy Walkbelt Triple Flex Maintenance Kit Siderail Cover, right Siderail Cover, left End Cap, Front Left End Cap, Front Right End Cap, Rear Left End Cap, Rear Right Left Handrail Kit Right Handrail Kit Left and Right Handrail Kit Weldment Side Rail, right Weldment Side Rail, left 30204-001 33507-002 (-001 CR60) 33508-002 33509-002 33511-001 19488-002 19489-002 19306-001 19306-002 19057-002 19058-002 30005-004 30005-005 30005-006 32707-003 (-004 CR60) 32709-003 (-004 CR60) HARDWARE Spare Hardware Magnet Part Numbers C-2 33372-001 19296-001 Controllers ClubTrack® P/N 00377 PCBA Keypanel English German French Italian Spanish Japanese Controller Assy (PCBA & keypanel) English German French Italian Spanish Japanese 33518-001 33504-001 33504-003 33504-005 33504-007 33504-009 33504-011 034506-001 034506-003 034506-005 034506-007 034506-009 034506-011 HR ClubTrack™ with Heart Rate Monitoring (HRM) P/N 00402 PCBA Keypanel English German French Italian Spanish Japanese Controller Assy (PCBA, keypanel, & receiver) English German French Italian Spanish Japanese Receiver Assy 34296-001 34298-001 34298-002 34298-003 34298-004 34298-005 34298-006 34297-001 34297-002 34297-003 34297-004 34297-005 34297-006 34295-001 HRM Upgrade Kit (Convert ClubTrack to HR ClubTrack with HRM) English German French Italian Spanish Japanese 34299-001 34299-002 34299-003 34299-004 34299-005 34299-006 English, U.S.A. English, International German French Italian Spanish Japanese 34328-001 34328-002 34328-003 34328-004 34328-005 34328-006 34328-007 ClubTrack Plus® Upgrade Kit (Convert ClubTrack to ClubTrack Plus) Part Numbers C-3 MedTrack® CR60 P/N 00380 & SR60 P/N 00390 PCBA Keypanel English German French Italian Spanish Japanese Controller Assy (PCBA & keypanel) English German French Italian Spanish Japanese 33518-001 PCBA Keypanel English German French Italian Spanish Japanese Controller Assy (PCBA & keypanel) English German French Italian Spanish Japanese 33519-002 ClubTrack Plus® P/N 00382 33504-002 33504-004 33504-006 33504-008 3 3504-010 33504-012 34506-002 34506-004 34506-006 34506-008 34506-010 34506-012 33505-001 33505-002 33505-003 33505-004 33505-005 33505-006 034505-001 034505-002 034505-003 034505-004 034505-005 034505-006 HR ClubTrack Plus™ with Heart Rate Control P/N 00425 PCBA Keypanel Assy English German French Italian Spanish Japanese Controller Assy (PCBA, keypanel, & receiver) English German French Italian Spanish Japanese Receiver Assy Interface Cable RS-232 Liquid Crystal Display (LCD) Fluorescent Tube (Backlight Assy) Part Numbers C-4 35452 35260-001 35260-002 35260-003* 35260-004* 35260-005 35260-006* 35258-001 35258-002 35258-003* 35258-004* 35258-005 35258-006* 34295-001 34721-001 35259-001 35428-001 HR ClubTrack Plus™ Upgrade Kit (Convert any Hyperdrive treadmill to HR ClubTrack Plus) English, U.S.A. German French Italian Spanish Japanese * 35371-001 35371-002 35371-003* 35371-004* 35371-005 35371-006* These versions may be available in the future. Accessories for Heart Rate Monitoring Transmitter Belt Pulse Simulator Polar Favor Wrist Monitor 34198-003 34198-008 34198-009 A To avoid potential safety and electrical problems, use parts and accessories that meet Quinton specifications. Part Numbers C-5 D Field Functional Tests The VSD PCBA generates high voltage which is present whenever DS4 and DS5 are illuminated: Never touch the PCBA when DS4 and DS5 are on. Bleeder resistors on the VSD PCBA bleed off the high voltage in approximately two minutes. Do not touch the VSD PCBA until DS4 and DS5 have gone out. These procedures apply to all Quinton Hyperdrive treadmills (ClubTrack, ClubTrack Plus, HR ClubTrack, HR ClubTrack Plus, MedTrack SR, and MedTrack CR. You may perform the complete test, or only the tests required after repair or replacement of parts as specified in Chapter 4, Repair/ Replacement and Calibration. Please read the entire chapter before starting. The appropriate test must be performed as verification whenever any of the procedures in Chapter 4 are used. Complete Field Functional Test A The following steps must be performed with the treadmill completely assembled, except as noted. With the power cord connected to the correct outlet, turn on the circuit breaker. A. Test the Controller Displays ClubTrack®, HR ClubTrack™, MedTrack® SR60, and MedTrack® CR60 Observe the controller displays during initialization. For the ClubTrack, ClubTrack with Heart Rate Monitor, MedTrack SR60, and MedTrack CR60, the normal sequence is: • • • • Seven segment displays show all 8s (888 8888 888). After 3 seconds, all displays go blank. Multi display briefly shows configuration code (0.0 CP.-x 0.0). Normal display is shown (00 150 00). If the normal sequence does not occur, refer to the following table for possible causes. Field Functional Tests D-1 ClubTrack, HR ClubTrack, MedTra ck SR60, and MedTra ck CR60 Problem Possible Cause Solution Seven segment displays ESD (static) Make sure control lock up with all 8s and panel is properly do not go blank. grounded . Check the following: All star washers are installed Green wire goes to VSD PCB Continuity to ground on power cord plug Less than two ohms neutral to ground at the power outlet Hall Effect Sensor (SW 1) and screw on key panel may have excessive clearance. Hall Effect Sensor (SW 1) and screw on key panel may be misaligned. Microprocessor socket Replace controller may be damaged . PCBA Microprocessor socket may be from nonapproved vendor (McKenzie). Seven segment displays Limited-access switch Deactivate limited- flash all 8s and then go is activated. access switch (see user blank and stay blank. manual) ClubTrack Plus® For the ClubTrack Plus, the normal sequence is: • • • • • • Seven segment displays show all 8s (888 8888 888). Tri-color display flashes all green, all red, all yellow. Seven segment displays blink, then go blank. Multi display briefly shows configuration code (0.0 CP.-x 0.0). Normal display shown on seven segment display (00 150 00). Tri-color display scrolls INPUT WT. +/- message. HR ClubTrack Plus™ For the HR ClubTrack Plus, the normal sequence is: • • • • Field Functional Tests D-2 Seven segment displays show all 8s. LCD screen is all white. Introduction screen appears on LCD. Zero speed and the current grade appear on the segmented displays. B. Test the Multi Display Observe the center Multi display on the controller. If an error code is displayed, refer to Error Codes in Chapter 3, Troubleshooting. C. Test the Controller Operation Test the Controller Keys 1. To enter Service mode, press Stop Belt+Faster+Slower. P000 appears in the Select display, indicating that no key is pressed. A On the ClubTrack Plus, the word Service scrolls across the tri-color display. On the HR ClubTrack Plus, the screen lists the tests described below. To perform a test, press the softkey next to the test name, rather than pressing the indicated key combinations. 2. Press and hold each key in succession to display the appropriate code in the Select display (the HR ClubTrack Plus displays text instead of code). P000 should appear when you release each key. Key Code No key pressed P000 Shorted key(s) P555 Clear P001 Up P002 Down P003 Stop Belt P004 Input+ P005 Input P006 Enter* P007 Select P007 Next Stage* P008 Start Belt P009 Units P010 Start Course* P011 Resume Course* P012 Cool Down P013 Faster P014 Slower P015 *ClubTrack Plus only Test the Keypanel Displays Press Stop Belt+Up+Down. • The display cycles though one digit at a time in each display, starting from left to right across the panel. Each digit displays the number 8 and the associated decimal point for one second, then turns off as the next one lights up. Field Functional Tests D-3 • When this is completed, the LEDs light up individually, starting from the top. The Select LEDs light up first, followed by the Units LEDs. • After the LEDs are tested, all digits in all three displays simultaneously count up from 0 to 9 (no decimal points are illuminated during this count). Test the Tri-color Display (ClubTrack Plus®only) 1. Press Next Stage+Up+Down until the test begins. Vertical columns on the tri-color display light red, green, and then yellow for one second each. The columns move from left to right until all display LEDs have been tested. Horizontal columns light red, green, then yellow for one second each. The columns move from top to bottom until all LEDs have been tested. All LEDs go dark when the test is finished. 2. Press Power twice to exit Service mode. Test the Heart Rate Monitoring (HR treadmills only) Use a pulse simulator (P/N 34198-008) and a Polar watch receiver (P/N 34198-009) to test the accuracy of the controller’s heart rate function. 1. Turn on the pulse simulator. The LED on the front of the simulator will blink in synch with the signal. 2. Place the Polar watch receiver next to the pulse simulator to begin receiving. The watch will display the digital heart rate. 3. Check the rate displayed on the watch against the rate displayed on the controller. If the controller differs by five beats, replace the receiver (P/N 34295) and re-test. If the problem remains, replace the controller assembly (HR ClubTrack, p/n 34297, HR ClubTrack Plus p/n 35258). D. Test the Grade Operation 1. Remove the hood (refer to Removing Treadmill Hood in Chapter 4, Repair/Replacement and Calibration). 2. Ensure the controller displays 0.0% grade. 3. Measure the distance from the floor to the lower edge of the sideòcal cover at the rear support and at the front grade wheel. Both measurements should be the same ± 3 8 in. If they are not, refer to Calibration Procedures in Chapter 4, Repair/ Replacement and Calibration. 4. Increase the grade to 15.0% 5. Measure the distance from the floor to the bottom front edge of the head. Refer to the following table for the correct measurement: Field Functional Tests D-4 Treadmill Measurement ClubTrack HR ClubTrack ClubTrack Plus 14 3 8 in ± 3 8 in HR ClubTrack Plus MedTrack SR60 MedTrack CR60 14 7 8 in ± 3 8 in 6. Ensure that the grade will traverse from minimum to maximum and back. 7. Replace the hood (refer to Removing Treadmill Hood in Chapter 4, Repair/Replacement and Calibration). E. Test Speed Operation 1. Place a chalk mark or piece of tape on the walk belt across the direction of travel. 2. Place another mark or piece of tape on the top of the siderail cover. 3. Start the walk belt and increase its speed to 4.0 mph. 4. Count how many times the belt rotates in two minutes. This should be 62 ± 3 revolutions for all treadmill models. ClubTrack®, ClubTrack Plus®, HR Treadmills, MedTrack® SR60 5. Increase the walk belt speed to 10.0 mph. 6. Count the number of belt revolutions in two minutes. This should be 155 ± 3 revolutions. MedTrack® CR60 5. Increase the walk belt speed to 7.2 mph. 6. Count the number of belt revolutions in two minutes. This should be 112 ± 3 revolutions. If any of the measurements are not accurate, refer to Replacing the Tensioner and/or Adjusting the Walk Belt in Chapter 4, Repair/ Replacement and Calibration. 7. Ensure that the speed will traverse from minimum to maximum and back. F. Test the Deck Friction 1. Increase the treadmill grade to 15% (maximum). 2. Do not start the belt. Stand on the treadmill walk belt and push away from the handrail. The belt should begin rotating with little forward pressure and continue to rotate for several Field Functional Tests D-5 steps. If additional pressure is required to keep the belt moving, replace the belt and deck. G. Test the Walk Belt Operation 1. With the walk belt speed at maximum, observe the tracking. If it needs adjustment, refer to Walk Belt Tracking in Chapter 4, Repair/Replacement and Calibration. 2. With the walk belt speed at 3.0 mph, walk on the treadmill. 3. Grasp the handrail and resist the motion of the walk belt. If any slippage is detected, refer to Replacing the Tensioner and/or Adjusting the Walk Belt in Chapter 4. Repair/Replacement and Calibration. 4. Stop the walk belt. H. Shut Down the Treadmill Turn the circuit breaker off, disconnect the power cord from the outlet, and place the treadmill back in service. Field Test No. 1 A The following steps must be performed with the treadmill completely assembled, except as noted. With the power cord connected to the correct outlet, turn on the circuit breaker. A. Test the Controller Displays ClubTrack®, HR ClubTrack™, MedTrack® SR60, and MedTrack® CR60 Observe the controller displays during initialization. For the ClubTrack, ClubTrack with Heart Rate Monitor, MedTrack SR60, and MedTrack CR60, the normal sequence is: • • • • Seven segment displays show all 8s (888 8888 888). After 3 seconds, all displays go blank. Multi display briefly shows configuration code (0.0 CP.-x 0.0). Normal display is shown (00 150 00). If the normal sequence does not occur, refer to the following table for possible causes: Field Functional Tests D-6 ClubTrack, HR ClubTrack, MedTrack SR60, and MedTrack CR60 Problem Possible Cause Solution Seven segment ESD (static) Make sure control panel is displays lock up properly grounded . with all 8s and do Check the following: not go blank. All star washers are installed Green wire goes to VSD PCB Continuit y to ground on power cord plug Less than two ohms neutral to ground at the power outlet Hall Effect Sensor (SW 1) and screw on key panel may have excessive clearance. Hall Effect Sensor (SW 1) and screw on key panel may be misaligned. Microprocessor socket Replace controller PCBA. may be damaged Microprocessor socket may be from non-approved vendor (McKenzie). Seven segment Limited-access switch is Deactivate limited- access displays flash all 8s activated . switch (see user manual) and then go blank and stay blank. ClubTrack Plus® For the ClubTrack Plus, the normal sequence is: • Seven segment displays show all 8s (888 8888 888). • Tri-color display flashes all green, all red, all yellow. • Seven segment displays blink, then go blank. • Multi display briefly shows configuration code (0.0 CP.-x 0.0). • Normal display is shown on seven segment display (00 150 00). • Tri-color display scrolls INPUT WT. +/- message. HR ClubTrack Plus™ For the HR ClubTrack Plus, the normal sequence is: • Seven segment displays show all 8s. • LCD screen is all white. • Introduction screen appears on LCD. • Zero speed and the current grade appear on the segmented displays. B. Test the Multi Display Observe the center Multi display on the controller. If an error code is displayed, refer to Error Codes in Chapter 3, Troubleshooting. C. Shut Down the Treadmill Turn the circuit breaker off, disconnect the power cord from the outlet, and place the treadmill back in service. Field Functional Tests D-7 Field Test No. 2 A The following steps must be performed with the treadmill completely assembled, except as noted. With the power cord connected to the correct outlet, turn on the circuit breaker. A. Test the Controller Displays ClubTrack®, HR ClubTrack™, MedTrack® SR60, and MedTrack® CR60 Observe the controller displays during initialization. For the ClubTrack, ClubTrack with Heart Rate Monitor, MedTrack SR60, and MedTrack CR60, the normal sequence is: • • • • Seven segment displays show all 8s (888 8888 888). After 3 seconds, all displays go blank. Multi display briefly shows configuration code (0.0 CP.-x 0.0). Normal display is shown (00 150 00). If the normal sequence does not occur, refer to the following table for possible causes. ClubTrack, HR ClubTrack, MedTrack SR60, and MedTrack CR60 Problem Possible Cause Solution Seven segment displays ESD (static) Make sure control lock up with all 8s and panel is properly do not go blank. grounded . Check the following: All star washers are installed Green wire goes to VSD PCB Continuit y to ground on power cord plug Less than two ohms neutral to ground at the power outlet Hall Effect Sensor (SW 1) and screw on key panel may have excessive clearance. Hall Effect Sensor (SW 1) and screw on key panel may be misaligned . Microprocessor socket Replace controller may be damaged. PCBA Microprocessor socket may be from nonapproved vendor (McKenzie). Seven segment displays Limited-access switch Deactivate limited- flash all 8s and then go is activated . access switch (see user blank and stay blank. Field Functional Tests D-8 manual) ClubTrack Plus® For the ClubTrack Plus, the normal sequence is: • • • • • • Seven segment displays show all 8s (888 8888 888). Tri-color display flashes all green, all red, all yellow. Seven segment displays blink, then go blank. Multi display briefly shows configuration code (00 CP.-x 0.0). Normal display is shown on seven segment display (00 150 00). Tri-color display scrolls INPUT WT. +/- message. HR ClubTrack Plus™ For the HR ClubTrack Plus, the normal sequence is: • • • • Seven segment displays show all 8s. LCD screen is all white. Introduction screen appears on LCD. Zero speed and the current grade appear on the segmented displays. B. Test the Multi Display Observe the center Multi display on the controller. If an error code is displayed, refer to Error Codes in Chapter 3, Troubleshooting. C. Test the Grade Ensure that the grade will traverse from minimum to maximum and back. D. Test the Speed Ensure that the speed traverses from minimum to maximum and back. E. Shut Down the Treadmill Turn the circuit breaker off, disconnect the power cord from the outlet, and place the treadmill back in service. Field Test No. 3 A The following steps must be performed with the treadmill completely assembled, except as noted. With the power cord connected to the correct outlet, turn on the circuit breaker. A. Test Speed Operation 1. Place a chalk mark or piece of tape on the walk belt across the direction of travel. Field Functional Tests D-9 2. Place another mark or piece of tape on the top of the siderail cover. 3. Start the walk belt and increase its speed to 4.0 mph. 4. Count how many times the belt rotates in two minutes. This should be 62 ± 3 revolutions for all treadmill models. ClubTrack®, ClubTrack Plus®, HR Treadmills, MedTrack® SR60 5. Increase the walk belt speed to 10.0 mph. 6. Count the number of belt revolutions in two minutes. This should be 155 ± 3 revolutions. MedTrack® CR60 5. Increase the walk belt speed to 7.2 mph. 6. Count the number of belt revolutions in two minutes. This should be 112 ± 3 revolutions. If any of the measurements are not accurate, refer to Replacing the Tensioner and/or Adjusting the Walk Belt in Chapter 4, Repair/ Replacement and Calibration. 7. Ensure that the speed will traverse from minimum to maximum and back. B. Test the Deck Friction 1. Increase the treadmill grade to 15% (maximum). 2. Do not start the belt. Stand on the treadmill walk belt and push away from the handrail. The belt should begin rotating with little forward pressure and continue to rotate for several steps. If additional pressure is required to keep the belt moving, replace the belt and deck. C. Test the Walk Belt Operation 1. With the walk belt speed at minimum, observe the tracking. If it needs adjustment, refer to Walk Belt Tracking in Chapter 4, Repair/Replacement and Calibration. 2. With the walk belt speed at minimum, walk on the treadmill. 3. Grasp the handrail and resist the motion of the walk belt. If any slippage is detected, refer to Replacing the Tensioner and/or Adjusting the Walk Belt in Chapter 4, Repair/Replacement and Calibration. 4. Stop the walk belt D. Shut Down the Treadmill Turn the circuit breaker off, disconnect the power cord from the outlet, and place the treadmill back in service. Field Functional Tests D-10 Field Test No. 4 A The following steps must be performed with the treadmill completely assembled, except as noted. With the power cord connected to the correct outlet, turn on the circuit breaker. A. Test the Grade Operation 1. Remove the hood (refer to Removing Treadmill Hood in Chapter 4, Repair/Replacement and Calibration). 2. Ensure the controller displays 0.0% grade. 3. Measure the distance from the floor to the lower edge of the siderail cover at the rear support and at the front grade wheel. Both measurements should be the same ± 3 8 in. If they are not, refer to Calibration Procedures in Chapter 4, Repair/ Replacement and Calibration. 4. Increase the grade to 15.0% 5. Measure the distance from the floor to the bottom front edge of the head. Refer to the following table for the correct measurement. Treadmill Model Measurement ClubTrack HR ClubTrack ClubTrack Plus 14 3 8 in. ± 3 8 in. HR ClubTrack Plus MedTrack SR60 MedTrack CR60 14 7 8 in. ± 3 8 in. 6. Ensure that the grade will traverse from minimum to maximum and back. 7. Replace the hood (refer to Removing Treadmill Hood in Chapter 4, Repair/Replacement and Calibration). B. Shut Down the Treadmill Turn the circuit breaker off, disconnect the power cord from the outlet, and place the treadmill back in service. Field Test No. 5 A The following steps must be performed with the treadmill completely assembled, except as noted. Field Functional Tests D-11 With the power cord connected to the correct outlet, turn on the circuit breaker. A. Test the Controller Displays ClubTrack®, HR ClubTrack™, MedTrack® SR60, and MedTrack® CR60 Observe the controller displays during initialization. For the ClubTrack, ClubTrack with Heart Rate Monitor, MedTrack SR60, and MedTrack CR60, the normal sequence is: • • • • Seven segment displays show all 8s (888 8888 888). After 3 seconds, all displays go blank. Multi display briefly shows configuration code (0.0 CP.-x 0.0). Normal display is shown (00 150 00). If the normal sequence does not occur, refer to the following table for possible causes. ClubTrack, HR ClubTrack, MedTra ck SR60, and MedTra ck CR60 Problem Possible Cause Solution Seven segment displays ED (static) Make sure control lock up with all 8s and panel is properly do not go blank. grounded . Check the following: All star washers are installed Green wire goes to VSD PCB Continuity to ground on power cord plug Less than two ohms neutral to ground at the power outlet Hall Effect Sensor (SW 1) and screw on key panel may have excessive clearance. Hall Effect Sensor (SW 1) and screw on key panel may be misaligned. Microprocessor socket Replace controller may be damaged . PCBA. Microprocessor socket may be from non-approve d vendor (McKenzie). Seven segment displays Limited-access switch Deactivate limited- flash all 8s and then go is activated. access switch (see user blank and stay blank. Field Functional Tests D-12 manual) ClubTrack Plus® For the ClubTrack Plus, the normal sequence is: • • • • • • Seven segment displays show all 8s (888 8888 888). Tri-color display flashes all green, all red, all yellow. Seven segment displays blink, then go blank. Multi display briefly shows configuration code (0.0 CP.-x 0.0). Normal display is shown on seven segment display (00 150 00). Tri-color display scrolls INPUT WT. +/- message. HR ClubTrack Plus™ For the HR ClubTrack Plus, the normal sequence is: • • • • Seven segment displays show all 8s. LCD screen is all white. Introduction screen appears on LCD. Zero speed and the current grade appear on the segmented displays. B. Test the Multi Display Observe the center Multi display on the controller. If an error code is displayed, refer to Error Codes in Chapter 3, Troubleshooting. C. Test the Controller Operation To test for proper controller operation: Test the Controller Keys 1. To enter Service mode, press Stop Belt+Faster+Slower. P000 appears in the Select display, indicating that no key is pressed. A On the ClubTrack Plus, the word Service scrolls across the tri-color display. On the HR ClubTrack Plus, the screen lists the tests described below. To perform a test, press the softkey next to the test name, rather than pressing the indicated key combinations. 2. Press and hold each key in succession to display the appropriate code in the Select display (the HR ClubTrack Plus displays text instead of code). P000 should appear when you release each key. Key Code No key pressed P000 Shorted key(s) P555 Clear P001 Up P002 Down P003 (continue d) Field Functional Tests D-13 Stop Belt P004 Input+ P005 Input P006 Enter* P007 Select P007 Next Stage* P008 Start Belt P009 Units P010 Start Course* P011 Resume Course* P012 Cool Down P013 Faster P014 Slower P015 *ClubTrack Plus only Test the Key Panel Displays Press Stop Belt+Up+Down. • The display cycles though one digit at a time in each display, starting from left to right across the panel. Each digit displays the number 8 and the associated decimal point for one second, then turns off as the next one lights up. • When this is completed, the LEDs light up individually, starting from the top. The Select LEDs light first, followed by the Units LEDs. • After the LEDs are tested, all digits in all three displays simultaneously count up from 0 to 9 (no decimal points are illuminated during this count). • Perform the LCD display test (pg 3-7). Test the Tri-color Display (ClubTrack Plus® only) 1. Press Next Stage+Up+Down until the test begins. Vertical columns on the tri-color display light red, green, and then yellow for one second each. The columns move from left to right until all display LEDs have been tested. Horizontal columns light red, green, and then yellow for one second each. The columns move from top to bottom until all LEDs have been tested. All LEDs go dark when the test is finished. 2. Press Power twice to exit Service mode. Test the Heart Rate Monitoring (HR treadmills only) Use a pulse simulator (P/N 34198-008) and a Polar watch receiver (P/N 34198-009) to test the accuracy of the controller’s heart rate function. 1. Turn on the pulse simulator. The LED on the front of the simulator will blink in synch with the signal. Field Functional Tests D-14 2. Place the Polar watch receiver next to the pulse simulator to begin receiving. The watch will display the digital heart rate. 3. Check the rate displayed on the watch against the rate displayed on the controller. If the controller differs by five beats, replace the receiver (P/N 34295) and re-test. If the problem remains, replace the controller assembly: HR ClubTrack p/n 34297, HR ClubTrack Plus, p/n 35258. D. Shut Down the Treadmill Turn the circuit breaker off, disconnect the power cord from the outlet, and place the treadmill back in service. Field Functional Tests D-15 E Assembly Drawings P/N Assembly 32706 Transformer 32975 Cage Assembly, Drive PCBA 32776 Configuration Plate 32976 ClubTrack/MedTrack CR60/SR60 Control Panel 34238 HR ClubTrack Control Panel 33046 ClubTrack Plus Control Panel, Motivational 34664 HR ClubTrack Plus Control Panel 33170 Harness Assembly, Limit Switch 32783 Motor, Drive, AC Variable 32359 System Wiring 33171 Assembly, Grade Pot Assembly Drawings E-1 Index A E204 adjusting the walk belt assemblies 3-11 F 2-1 assembly drawings 3-13 EPHI and EPLO 4-25 D-1 field functional tests B E-1 field replaceable modules battery life, heart rate transmitter C calibration procedures grade pot chain 4-33 4-7 chest belt, battery 3-11 E001 3-12 E203 3-14 E204 3-13 EPHI and EPLO G chest belt, storage circuit breaker grade motor 5-3 chest belt, cleaning cleaning flow charts, error grade limit switches 4-15 classification 3-5 4-32 4-26 card cage firmware revision 4-32 speed and grade calipers 5-3 calibrating 1-3 replacing A-1 wires 5-1 communications interface 2-3 grade range components H 1-1 configuration plate 4-24 controller headfram e 4-5 configuring the controller 4-30 assembly 2-3 1-1 maintenance cumulative use PCBA 3-5 theory I input power 2-4 deck assembly illustrated 4-23 2-4 4-11 2-4 4-3 2-3 1-1 interface connector (RJ-45) 2-3 3-9 drive belt, replacing drive motor installation 4-10 K keypanel 1-3, 2-2 keypanel, removing E electrical problem s electronic problem s error codes 3-2 3-3 3-3 error code flow charts E001 3-12 E203 3-14 5-2 4-28 hood, removing 4-31 drive board 3-8 3-7 1-3 option, p/n CSAFE protocol 2-3 drive belt 3-6 key panel 4-27 3-5 deck assembly 4-16 heart rate accuracy, testing 4-30 enclosure, removing D 4-32 heart rate 4-27 cable, removing keys, testing 4-13 4-15 heart rate monitoring 1-3 keys 4-22 2-4 grade potentiometer (POT) 5-3 compression mounts 3-11 grade motor, replacing 5-2 C-1 3-11 4-30 L limited access switch M manuals, part numbrs mechanical problem s 4-31 C-1 3-9 Index 1 microprocessor, theory models N noise service mode A-1 3-4 service, recommended 3-10 speed range operation options T 3-6 1-3 tension 1-4 overview theory tools 3-1, 4-2 C-1 PCBA, replacing transmitter 4-28 4-6 pulse simulator R rack gears 3-8 receiver, theory rollers, replacing Index 2 2-5 4-1 roller assembly 3-6 troubleshooting 3-1, 3-2 V VSD board walk belt 4-19 4-23 4-7 3-9 tension replacing warnings 2-4 5-3 tri-color Display W 4-17 rack gears, jammed repair 4-10 1-3 power cord 4-13 2-5 transmitter, battery 4-21 poly-V belt, replacing power 4-27 transformer part numbers pinion shaft 4-8 2-1 tracking 3-4 A-2 4-25 tensioner 1-1 5-1 3-6 symbol definitions open-loop mode P000 S safety requirements O P 2-5 1-1 A-1 4-25 4-23