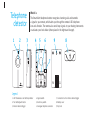
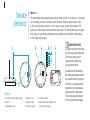
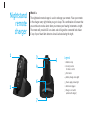
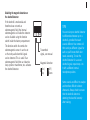
1
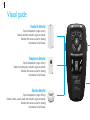
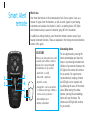
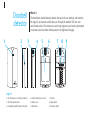
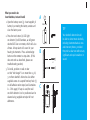
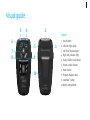
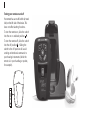
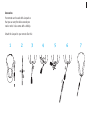
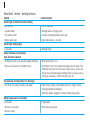
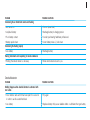
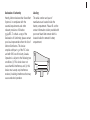
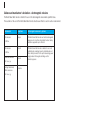
installation & user guide
smart alert system
™
Hear your home
1
Thank you for choosing Smart Alert™ System.
You’ve made a great choice: Smart Alert System provides
you with independence and peace of mind around your
home, around the clock – even when you’re sleeping. It’s
an all-in-one hearing and alerting system that brings together
your household alerts with your hearing solution, so you’ll
always be aware of important household signals – phone
calls, doorbells, smoke alarms and more.
In addition, your new Smart Alert remote is the same remote
control you’ll use for your hearing instrument functions,
like volume control, program changes and more – your hearing
and alerting controls are now combined into one very smart
and very easy to use remote.
This guide will help you set up and use your system so
you can start enjoying the benefits today.
See, hear and feel household alerts
Smart Alert System improves your awareness of household
signals by integrating three technologies:
• Telephone detector, doorbell detector and smoke detector
along with a bed shaker
• Smart Alert remote (the same remote used for your
hearing instrument functions)
• Your hearing instruments
When a household alert sounds, you will see an LED icon
light up on your remote, feel the remote vibrate and hear
a beep in your hearing instruments.
At night, while you are sleeping without hearing instruments,
the remote is in its nightstand charger, and together with
the bed shaker, instantly delivers alerts to let you know
a detector has been activated.
2
3
Getting started
Pages 7 to 10
System installation and alerting functions
Pages 11 to 26
Hearing instrument functions
Pages 27 to 34
Troubleshooting guide
Pages 35 to 47
4
Visual guide
Doorbell detector
System Components | pages 14 to 15
Detects doorbell, transmits signal to remote.
Remote then sends an alert to hearing
instruments or bed shaker.
Telephone detector
System Components | pages 16 to 17
Detects incoming calls, transmits signal to remote.
Remote then sends an alert to hearing
instruments or bed shaker.
Smoke detector
System Components | pages 18 to 19
Detects smoke, sounds alarm and transmits signal to remote.
Remote then sends an alert to hearing
instruments or bed shaker.
5
Nightstand remote charger
System Components | pages 20 to 21
Charges remote and works with bed shaker
as primary alert when hearing instruments
are not in use.
Hearing instrument functions
Discreet and advanced hearing instrument
control at the touch of a button.
See pages 27 to 33 for details
Bed shaker
System Components | page 22
Activated by the remote in
nightstand charger.
Smart Alert™ remote
Alerting functions | page 12
Hearing instrument functions | pages 27 to 33
Receives alerts from telephone, doorbell,
and smoke detector and transmits signal
to hearing instruments or bed shaker.
Alerting functions
See page 12
Doorbell
LED
Telephone
LED
Smoke
LED
Additional detectors
can be added here
Acknowledge
button
6
7
Getting started
Pages 7 to 10
What’s in the box
How it works
page 8
page 9
8
What’s in
the box
1. Smart Alert remote
2. Nightstand remote charger
3. Telephone detector
4. Telephone adaptor
5. Doorbell detector
6. Smoke detector (only with Safety Awareness Package*)
7. Bed shaker
8. Mounting hardware and self-adhesive velcro tape for installation
9. Batteries for detectors, remote, and back-up batteries for charger
Your hearing instruments are provided separately and come with
their own User Guide. They are an integral part of your Smart Alert System.
Additional detectors (also referred to as transmitters) can be purchased
through your hearing healthcare professional.
* If you selected the Safety Awareness package, it includes 3 detectors:
telephone, doorbell and smoke. If you selected the Awareness package,
it includes 2 detectors: telephone and doorbell.
9
How it
works
Smart Alert™ System
improves awareness
24 / 7
How it works:
• Detectors respond to specific household events and transmit identifying
signals to the Smart Alert remote
• The corresponding LED icon lights up on the Smart Alert remote indicating
which event is detected
• Smart Alert remote vibrates
When your hearing instruments are in use:
• Smart Alert remote sends beep signals to the hearing instruments
• Non-urgent alerts (doorbell, telephone) are heard as a double beep.
Urgent alerts (smoke) are heard as a faster quadruple beep
• Stop beeps by pressing acknowledge button
• For urgent (smoke) alerts, the remote continues to vibrate and beeps sound
in the hearing instruments until the situation is addressed directly at
the smoke detector
When your hearing instruments are not in use:
• The remote acts as primary alert when your hearing instruments are not in use.
Alerts are indicated through the remote’s LED icons and vibration
• At nighttime, the remote in the nightstand charger receives signals from the detectors,
then activates the remote’s LED icon lights as well as the bed shaker
System installation and alerting functions
Pages 11 to 26
Smart Alert™ remote
Remote care and cleaning
Doorbell detector
Telephone detector
Smoke detector
Nightstand remote charger
Bed shaker
Customizing your Smart Alert™ System
page 12
page 13
page 14
page 16
page 18
page 20
page 22
Smart Alert
remote
™
What it does
Your Smart Alert remote is the communications hub of your system. It acts as a
receiver of signals from the detectors, as well as sends signals to your hearing
instruments and activates bed shaker. It, itself, is an alerting device: LED lights
and vibration make you aware of a detector going off in the household.
In addition to alerting functions, your Smart Alert remote contains many of your
hearing instrument functions. These are explained in the Hearing instrument functions
section of this guide.
Acknowledge button
LED ICONS
LED icons are picture-and-color-coded
to specific events. When a detector
activates, the corresponding LED
icon illuminates for 30 seconds:
1. Green LED – doorbell
2
4
5
6
2. Yellow LED – telephone
3. Red LED – smoke
AAA
1
3
4. Orange LED – can be customized
to indicate another type of detector,
such as a baby cry monitor
5. Acknowledge button
6. Battery compartment
For non-urgent events, pressing this
button acknowledges and stops the
beeps in your hearing instrument and
vibration of your remote. However, the
LED light on the remote will continue
for 30 seconds. For urgent events
(smoke detector), beeping, vibration
and LED light can be stopped only
by addressing the cause of the smoke
alarm. (When testing the smoke
detector, pressing the acknowledge
button will stop the beeps. The
vibration and LED light will continue
for 30 seconds).
Replacing the battery
The battery compartment is located on
the back of the remote.
This warning will occur every 30 seconds
when the battery is approaching end of life.
Caring for your remote
Caring for batteries
• If the remote control will not be used for
long periods of time, open the battery
compartment and remove the battery.
2. Slide the battery cover.
Always discard batteries in a safe and
environmentally friendly way.
3. Grasp the old battery with your
thumb and index finger and remove.
• Do not use your remote in the bath
or shower or immerse it in water.
To prolong battery life, remember to
turn the remote off when not in use.
• If your remote does become wet,
do not attempt to dry it in an oven
or microwave. Do not adjust
any controls. Open the battery
compartment and allow your remote
to dry naturally for 24 hours.
1. Remove the remote belt clip.
4. Insert the new battery into the
battery compartment in the correct
+/- position, placing the battery’s
minus(-) end into the compartment first.
5. Slide the battery cover door closed.
IMPORTANT NOTE! If replacing with
non-rechargeable batteries, do not place
remote in the nightstand charger.
Low battery warning
When the left and right indicator lights
blink, alternating left and right for 2
seconds, your remote is warning you
that its battery is low.
Operating instructions
Before using your remote, turn on your
hearing instruments to ensure they are
able to receive the remote commands.
Your remote is designed to be used
comfortably in your hand at a maximum
distance of one arm’s length. You do not
have to point the remote at your hearing
instruments. Placing the remote control
directly next to or too close to your
hearing instruments may decrease the
remote’s effectiveness.
• Protect your remote from excessive
heat (hair dryer, vehicle glove box
or dashboard).
• Do not drop your remote or knock it
against hard surfaces.
Cleaning your remote
Do not use alcohol to clean your remote.
Use a damp cloth to clean the outside of
the remote.
Doorbell
detector
1
2
What it is
The Smart Alert doorbell detector detects the sound of your doorbell, and transmits
the signal to your remote, which alerts you through the remote’s LED door icon
and vibration alerts. The remote also sends beep signals to your hearing instruments
or activates your bed shaker (when placed in the nightstand charger).
3
4
5
6
7
Normal
Int. Mic 1
Int. Mic 2
Ext. Mic
Ext. Mic
Legend
1. LED Transmission and battery indicator
4. External microphone socket
7. Key hole
2. Test button/push button
5. Battery cover
8. Signal switch
3. Programming switch (remains ‘Normal’)
6. Microphone
9. Radio key switch
8
9
What you need to do:
insert batteries, test and install
A
1. Open the battery cover (5). Insert supplied 9V
battery by connecting the battery contacts and
close the battery cover.
Max 3cm
TIP
2. Press the test button (2). LED light
on detector (1) will illuminate, as will green
doorbell LED icon on remote, which will also
vibrate. A beep alert will sound in your
hearing instruments. Press acknowledge
button on the remote to stop alerts. (If this
does not work as described, please see
troubleshooting section).
B
3. To install, position on wall or door
so that “red triangle” is no more than 1.5 in/
3 cm from doorbell’s chime box. Use either
supplied screws to suspend from key hole (7),
or self-adhesive velcro tape (see illustrations
A – C this page). If tape is used, the wall
on which detector is to be positioned can be
cleaned using supplied wet wipe for best
adherence.
C
Your doorbell detector should
be able to detect most doorbells,
including electromechanical ones
and intercom phones, provided
they emit a clear tone without any
significant and rapid variations in
sound.
or
Telephone
detector
1
2
What it is
The Smart Alert telephone detector recognizes incoming calls and transmits
a signal to your remote, which alerts you through the remote’s LED telephone
icon and vibration. The remote also sends beep signals to your hearing instruments
or activates your bed shaker (when placed in the nightstand charger).
3
4
5
6
9
8
Ext. Trigger
7
Legend
1. LED Transmission and battery indicator
4. Signal switch
7. Connection box for interior external trigger
2. Test button/push button
5. Radio key switch
8. Battery cover
3. Exterior external trigger
6. Analogue telephone connector
9. Key hole
What you need to do:
insert battery, connect adaptor,
test and install
1. Open the battery cover (8).
Connect the telephone cable to
the telephone connector (6)
and insert the adapter plug in
the telephone socket. Insert 9V
supplied battery by connecting
the battery contacts and close
the battery cover.
2. Press the test button (2). LED (1)
on the telephone detector will
illuminate, as will yellow LED
telephone icon on the remote.
The remote will also vibrate.
A beep alert will sound in
your hearing instruments.
Press acknowledge button
on the remote to stop alerts.
(If this does not work as described,
please see troubleshooting section).
3. To install, position on wall or any
level surface. Use either supplied
screws to suspend from key hole,
or self-adhesive velcro tape.
If tape is used, the wall on which
detector is to be positioned can
be cleaned using supplied wet wipe
for best adherence.
NOTE:
Do not place detector on floor.
Smoke
detector
What it is
The Smart Alert smoke detector helps detect smoke and fire in the home. It is mounted
on the ceiling, just like an ordinary smoke detector. Should it detect smoke or fire,
it will sound an alarm, as well as send a signal to your remote. Your remote’s LED
smoke icon will illuminate and the remote will vibrate. The remote will send an urgent
beep signal to your hearing instruments and activate your bed shaker (when placed
in the nightstand charger).
3
1
4
8 7
5
6
IMPORTANT NOTES
For urgent alerts from the smoke
detector, beeping, vibration and
LED icon on remote can be
stopped only by addressing
cause of smoke alarm.
A smoke detector containing a
low battery will continue to alert
you until the battery is replaced.
2
Legend
1. LED Test button/sensitivity switch
4. Battery cover
7. Broadcast switch
2. Antenna
5. Ceiling bracket
3. Temperature sensor
6. Radio key switch
8. Switch for BE-1460 Bellman Visit
868 Fire Alarm System
The alerts are a supplementary
notification to the autonomous
operation of the smoke alarm.
The alerting signal will depend
on the environment and range.
What you need to do:
insert battery, test and install
1. Attach mounting bracket (5) then
install smoke detector by turning
counter-clockwise. Insert 9V battery
by connecting the battery contacts.
2. Wait about 10 seconds while
the smoke detector carries out
a self-test. The self-test is finished
when LED (1) flashes once.
3. Extend antenna (2) so that it points
down (fully extended outward). Hold
down test button (1). After several
seconds, the smoke detector will
sound a shrill alarm and transmit a
signal to your remote. The red LED
smoke icon will illuminate on your
remote, and your remote will vibrate.
An urgent beep alert will sound
in your hearing instruments.
Press acknowledge button on
remote to stop beep in your hearing
instruments, the alerts on your
remote will continue for 30 seconds.
(If this does not work as described,
please see troubleshooting section).
Placement of smoke detector:
follow these guidelines as closely
as your home permits:
• Place detector near or in place
of current smoke alarm/detector,
if possible at least 20 in/50 cm from
any wall. If bedrooms are located
in different areas of the house,
it is recommended to install smoke
detectors outside each bedroom.
• At least one smoke detector
should be installed on each floor
of a multi-storey dwelling.
• The antenna (2) should be straight
and pointed directly down (or fully
extended outward if the smoke
detector is mounted on a side wall)
to achieve the best coverage and
communication between detectors
and the remote.
• Confirm that the remote remains
within smoke detector’s coverage area:
have someone else press the test
button on the smoke detector when
the system is on, while you move as
far away from the detector with your
remote as possible. If your remote
activates, you are within range.
If it does not, you’ll know the remote
is too far away from the detector to
pick up its signals.
• Avoid installing detectors in kitchens,
by fireplaces or in garages, as cooking,
controlled fires and car exhaust may
cause detectors to activate.
• Do not install detectors in damp spaces
or close to fans.
• Never paint over smoke detectors.
Nightstand
remote
charger
1
What it is
The nightstand remote charger is used to recharge your remote. Place your remote
in the charger every night before you go to sleep. This combination will ensure that
you continue to receive alerts when you remove your hearing instruments at night.
The remote will provide LED icon alerts and will signal the connected bed shaker
if any of your Smart Alert detectors should activate during the night.
3
4
5
Legend
1. Retention clip
2. Correct position
of remote control
3. Test button
4. Battery charge status light
6
5. Power supply status light
6. Bed shaker plug-in
2
7. Charger cord outlet
(underneath charger)
7
What you need to do:
plug in, activate and connect bed shaker
1. Connect power plug into the charger
and then plug charger into an
electrical outlet near your bed.
2. Pull tab to activate the 4 NiMH
rechargeable batteries found in
the bottom of the charger.
3. Connect bed shaker to charger
by inserting the supplied bed shaker
connector into indicated output
on charger (see page 22 for
bed shaker detail).
4. Test the bed shaker and back-up
battery function by pressing the
“Test” button. Batteries need to
be charged.
Power supply status for nightstand
charger
The LED light on the charger
indicates the status of the
power supply:
• A steady LED light indicates the
charger is being powered by an
external power supply.
• Flashing LED light indicates the
charger is not connected to an
external power supply but that the
charger’s backup battery is providing
sufficient charge for operation.
Battery charge status for
Smart Alert remote
The charge level of the Smart Alert
remote is indicated by the LED
light pattern:
• A slowly flashing LED light indicates
the Smart Alert remote battery is
charging
• A constantly lit LED light indicates the
Smart Alert remote battery is fully
charged
• A rapid flashing indicates that battery
in the Smart Alert remote is either
damaged or that a non-rechargeable
battery is accidently inserted
TIP
The nightstand remote charger
has backup batteries that
continue to charge the Smart Alert
remote and supply power to the
bed shaker in the event of a
power failure. The rechargeable
batteries for the charger are
supplied with your system.
It is critical that rechargeable
batteries with the same capacity
be used when replacing.
Bed shaker
What it is
The bed shaker is placed between mattress and box spring of your bed. When
connected to the nightstand (with remote placed in charger), it provides a motion
alert at night if one of your detectors should go off. This helps ensure that you are
made aware of important alerts even when you are sleeping and your hearing
instruments are not in use.
What you need to do: connect to charger, place and test
• Connect the bed shaker to a power supply by inserting supplied connector
into indicated output on the charger.
• Place the remote in the charger.
• Press test button on any of the detectors, and check that bed shaker vibrates.
(If it does not, please refer to the troubleshooting section).
IMPORTANT NOTE! Your remote must be placed in the charger for the bed shaker
to be activated by an alert. The charger must be connected to a power supply or must
have sufficient charge, as indicated by the LED light located on the charger.
Additional Bellman & Symfon detectors
In addition to the detectors that come with your Smart Alert System, Bellman & Symfon offers a wide variety of alerting
products, including baby monitors, which may be added to your Smart Alert System. Talk to your hearing healthcare
professional for more information about customizing the system to meet your needs.
Customizing
your Smart
Alert System
™
When you receive your Smart Alert System, it is set to a default “radio key”
and ready to use with no further set-up required. However, in the event that
you have a neighbor with a similar system, you may need to change the
radio key to avoid interference. This can be done very easily using the radio
key switch on each detector. All detectors must be set to the same radio key.
After changing the radio key on each detector you will need to pair your
Smart Alert remote with detectors, as described on the following pages.
Pairing remote with detectors
1. Ensure all of your detectors are set
to the same radio key. Remove the
back cover from each detector and
locate the radio key by referring to
the component diagrams in this
guide.
2. Choose any combination of up and
down for the keys and repeat it
identically for all detectors.
3. Put your remote in pairing mode by
holding down the acknowledge
button for approximately 6
seconds. The green and yellow LED
icons will alternately illuminate.
When they do, release the
acknowledge button.
4. Once the 2 LED icons on the
remote begin alternating, press the
test button on any one of your
detectors. If the pairing is
successful, all 4 LED icons will
alternately illuminate.
5. Pairing is complete for all detectors.
6. Press the test button of any of the
detectors to check if the pairing
was successful. Your Smart Alert
remote should now give you the
alerting signal.
7. If pairing is not successful,
repeat Steps 3-6.
Training the doorbell detector to identify
different doorbells
The doorbell detector can be trained if
it does not activate when the doorbell
sound is presented or if it triggers a
false alarm. To train the doorbell
detector, follow these steps:
1. Change the programming switch
(on the side of the detector) from
Normal to the desired position,
either Int. Mic. 1 or Int. Mic. 2 or
Ext. Mic. (for detection via optional
Bellman External Door Microphone).
2. Place the doorbell detector near
the doorbell.
3. Make sure that it is quiet.
4. Press the test button on the
doorbell detector.
5. The LED lights up yellow to
indicate that the doorbell detector
is in training mode and is waiting
for the doorbell signal.
6. Activate your doorbell.
7. The LED will now blink green
while the doorbell detector
analyses the sound.
8a. If the detector has been trained
successfully, the LED will illuminate
solid green and the doorbell
detector is ready to use.
8b. If the sound cannot be analyzed,
the LED will illuminate yellow. You
can try to train for the sound again
by repeating steps 1 to 6. If it still
does not work, the doorbell has a
sound that the doorbell detector
cannot analyze.
9. Reset the programming switch on
the doorbell detector to Normal
position.
Disabling the magnetic detection on
the doorbell detector
If the doorbell is mechanical and
therefore does not emit an
electromagnetic field, the internal
electromagnetic coil inside the detector
can be disabled using the function
switch inside the battery compartment.
The function switch #1 controls the
electromagnetic sensor. It can be set
so that only audio doorbell signals
can be detected. This is useful if an
electromagnetic field from an inductive
loop system or transformer, etc. activates
the doorbell detector.
TIPS
Transmitted
signal, see manual
Magnetic Detection
On /
Up
Off /
Down
You can train your doorbell detector
to differentiate between up to 2
doorbells, provided that each
sounds different. Your remote will
then send you different signals for
each so you’ll know which door
needs answering. To train the
doorbell detector for a second
doorbell signal, repeat steps 1 to
8 with a different internal
microphone position.
Some sounds are difficult to analyze
and therefore difficult to detect
afterwards. Always check to ensure
that the doorbell detector is
detecting the doorbell correctly
after training.
Hearing instrument functions
Visual guide
Turning remote on and off
Hearing instrument selection and adjustment
Scroll wheel, volume control and program change
Buttons and accessories
Hearing instrument functions
Pages 27 to 34
page 28
page 29
page 30
page 31
page 31
page 32
Hearing
instrument
functions
In addition to your alerting functions, your Smart Alert remote includes controls
for your hearing instruments. It allows you to manage their performance in any
situation, to best suit your listening needs. While your hearing instruments do adjust
automatically, you may find in some circumstances that your personal adjustments
further improve your listening experience. With your Smart Alert remote’s hearing
functions, you can conveniently modify volume levels, switch between listening
programs and adjust the comfort and clarity of sounds, all in the palm of your hand.
Please note that this is a general guide and your hearing healthcare professional
may have enabled or disengaged certain features of your remote, depending on
your requirements. Always consult your hearing healthcare professional regarding
any adjustments you may require to ensure that you are happy with your remote.
Visual guide
3
4
2
Legend
6
7
8
5
9
10
1
1 On-off switch
2 Left-both-right switch
3 Left (blue) indicator light
4 Right (red) indicator light
5 Clarity / Comfort scroll wheel
6 Volume control buttons
7 Home button
8 Program change button
9 LearnNow™ button
10 Battery compartment
Turning your remote on and off
Your remote has an on-off switch (or travel
lock) on the left side of the device. This
does not effect alerting functions.
To turn the remote on, slide the switch
into the on or unlocked position
.
AAA
To turn the remote off, slide the switch
into the off position . . Sliding the
switch to the off position will avoid
sending unintentional commands to
your hearing instruments (while the
remote is in your handbag or pocket,
for example).
Selecting which hearing instrument
to adjust
At the top of the remote, there is a leftboth-right switch. This switch allows you
to select the hearing instruments you
want to adjust.
Slide the switch to the left position
to adjust your left hearing instrument
only. The left (blue) indicator light will
flash to indicate your left hearing
instrument is being adjusted.
Slide the switch to the right position
to adjust your right hearing instrument
only. The right (red) indicator light will
flash to indicate your right hearing
instrument is being adjusted.
Slide the switch to the center position
to adjust both hearing instruments. Both
indicator lights will flash to indicate that
your left and right hearing instruments
are being adjusted simultaneously.
Adjusting your hearing instruments
Volume control buttons
Your remote provides backlighting when
it is first turned on and each time a
button is pressed, allowing you to see
the remote buttons in dimly lit
environments.
To increase the volume on
your hearing instruments,
press the + button on your remote.
Adjusting the smartFocus™ scroll wheel
for comfort and clarity
The smartFocus scroll wheel
allows you to manage the
levels of speech and
background noise in your
hearing instruments and provides an
additional fine tuning adjustment
beyond a traditional volume control.
Scroll the wheel up slowly to increase
the clarity of sounds, such as speech.
Scroll the wheel down slowly to increase
comfort in noisy listening situations.
As the wheel is adjusted, your hearing
instruments may beep. Please refer to
your hearing instrument guide for more
detailed information about this feature.
To decrease the volume on your hearing
instruments, press the – button on your
remote.
As the volume is adjusted, your hearing
instrument may beep. Please refer to
your hearing instrument guide for more
detailed information about your hearing
instruments’ volume beeps.
Program change button
To change the currently set
listening program on your
hearing instruments, press
the program change button. The hearing
instrument will advance to the next
listening program. Please refer to your
hearing instrument guide to determine
which programs are available to you and
their program beep notifications.
LearnNow™ button
Home button
The learnNow button teaches
your hearing instruments
the volume and smartFocus
settings you prefer in different listening
environments. When you press the
learnNow button, your remote sends a
command to your hearing instruments to
change the pre-programmed volume and
smartFocus settings to your new preferred
settings. Your hearing instruments will
remember your preferred levels, thereby
personalizing these settings and minimizing
the need for adjustments when you are
in a similar listening environment in
the future.
Pressing the home button
returns your hearing instruments
to their start-up program, similar
to when you first turn on your hearing
instruments. This button can be useful
when you want your hearing instruments –
regardless of the position of the leftboth-right switch – to return to the
start-up program and the volume and
smartFocus settings when your hearing
instruments are first turned on. Please
refer to your hearing instrument guide
to determine which program is your
start-up program.
Note: The learnNow button on your
remote may be deactivated by your
hearing healthcare professional and,
therefore, could be inactive.
TIP
The learnNow button will work only
when your hearing instruments are
set to the automatic program and
should be pressed after you have
adjusted the volume and/or
smartFocus settings to your
preferred levels. After pressing the
learnNow button, your hearing
instruments will beep if the
command was successfully
received. Please refer to your
hearing instrument guide to learn
more about the automatic program.
Accessories
Your remote can be used with a lanyard so
that you can carry the device around your
neck or wrist. It also comes with a beltclip.
Attach the lanyard to your remote like this:
1
2
3
4
5
6
7
Smart Alert™ remote – alerting functions
Smart Alert™ remote – hearing functions
Doorbell detector
Telephone detector
Bed shaker
Smoke detector
Warnings
Declarations
Troubleshooting guide
Pages 35 to 47
page 36
page 37
page 37
page 39
page 40
page 40
page 42
page 43
Smart Alert™ remote – alerting functions
PROBLEM
Indicator lights on Smart Alert remote not flashing
• Not turned on
• Low/dead battery
• Poor battery contact
• Battery upside down
Indicator lights flashing rapidly
• Low battery
Hearing instruments not responding to
Smart Alert remote commands
• Holding the remote too far away from hearing instruments
• Only one side responds to Smart Alert remote
The remote does not charge when it is in the charger
• The remote is not placed correctly in the charger
Nothing happens when I use the remote
• Low battery
• Remote is not activated
• Remote is locked
POSSIBLE SOLUTIONS
•
•
•
•
Turn on (travel lock)
Recharge battery in charging station
Consult your hearing healthcare professional
Insert battery minus (–) side down
• Recharge battery
• Move remote closer to you
• Hold remote in front of you. Hearing instruments are in the range of the
Smart Alert remote (not more than 105 cm); make sure you are not near
devices that could create wireless interference with your system, such as
cell phones, microwaves, old CRT monitors/TV units, etc.
• Place remote in charger correctly. When remote is in charger correctly
the charge light will be illuminated.
• Check that charger is plugged into outlet and functioning properly.
• Charge battery
• Unlock remote using slider
PROBLEM
POSSIBLE SOLUTIONS
Indicator lights on Smart Alert remote not flashing
• Not turned on
• Turn on (travel lock)
• Low/dead battery
• Recharge battery in charging station
• Poor battery contact
• Consult your hearing healthcare professional
• Battery upside down
• Insert battery minus (–) side down
Indicator lights flashing rapidly
• Low battery
• Recharge battery
Hearing instruments not responding to remote commands
• Holding the remote device too far away
• Move remote device closer to you
Doorbell detector
PROBLEM
POSSIBLE SOLUTIONS
Nothing happens when doorbell detector is activated with
test button
• Door detector waits until it has been quiet for 2 seconds
in order to avoid acoustic feedback.
• Try again
• Low battery
• Replace battery. Only use an alkaline 6LR61 or a lithium 6F22 type battery.
Doorbell detector
PROBLEM
POSSIBLE SOLUTIONS
The LED light on door detector lights up yellow when
the doorbell detector is activated
• Low battery
• Replace battery. Only use 9V alkaline 6LR61 or a lithium 6F22 type battery.
The LED light on door detector lights up green when the
doorbell detector is activated, but remote is not signaling
• Low battery in remote
• Check battery in remote and recharge
• Remote too far from detector
• Move remote closer to detector
• Doorbell detector set to wrong radio key
• Check that all detectors are set to same radio key. If required follow
pairing instructions on page 24.
The doorbell rings but the detector is not activated
• Detector not positioned in optimal spot next to doorbell
• Move detector around the doorbell both closer and further away.
The maximum distance is 1.5 in/3 cm from the doorbell.
• Can’t detect doorbell sound
• Try to train detector to doorbell signal. If required follow pairing instruction
on page 24.
The LED blinks yellow
• Door detector is exposed to electromagnetic field from
loop system, etc.
• Turn off magnetic detection on door detector. INSTRUCTIONS on page 25.
Remote signals with no apparent reason
• There is probably another system nearby with same
radio key that is interfering with your system.
• Change radio key on all units to different setting. INSTRUCTIONS on page 24.
Telephone detector
PROBLEM
POSSIBLE SOLUTIONS
Nothing happens when the telephone detector is activated
with the test button
• Low battery
• Replace battery. Only use 9V alkaline 6LR61 or lithium 6F22 type battery.
• The remote is not paired with the detector. Follow the instructions to pair.
The LED lights up yellow when the telephone detector
is activated
• Low battery
• Replace battery. Only use 9V alkaline 6LR61 or lithium 6F22 type battery.
The LED lights up green when the telephone detector is
activated, but the remote is not signaling
• Low battery in remote
• Recharge
• Remote too far from detector
• Move the remote closer to the detector
• Telephone detector set to wrong radio key
• Change radio key on all units to different setting. INSTRUCTIONS on page 24.
Remote signals with no apparent reason
• There is probably another system nearby with same
radio key that is interfering with your system.
• Change radio key on all units to different setting. INSTRUCTIONS on page 24.
Bed shaker
PROBLEM
POSSIBLE SOLUTIONS
The bed shaker does not vibrate when a detector is triggered
• Remote is not placed in charger
• Check that bed shaker is correctly connected to charger and remote is
correctly inserted in charger.
Check that both lights are illuminated on charger.
• Bed shaker is not connected properly to charger
• Ensure charger is connected to power supply and working properly.
Press test button on top of charger to confirm connection between bed
shaker and nightstand remote charger.
Smoke detector
PROBLEM
POSSIBLE SOLUTIONS
Nothing happens when the smoke detector is activated
with the test button
• Low battery
• Replace battery. Only use 9V.
• Remote control is out of reach (wireless coverage area/distance)
The remote occasionally indicates a smoke alarm for
no apparent reason
• Low battery
• Change battery
The smoke detector beeps and chirps in a different way
from that indicated above for no reason
• The smoke detector is defective and needs to be sent in for service.
TIP
When any of your non-urgent
detectors are activated, the LED
on the detector will illuminate in
green, indicating the battery is in
good condition. If the LED
illuminates in yellow, the detector’s
battery is low and should be
changed. On the smoke detector,
the red LED light will flash
approximately one time per minute
when the battery is fully functional.
Should the battery become low,
the smoke detector will sound an
advisory signal about once per
minute. If it becomes completely
depleted, the detector will briefly
sound a smoke alarm until the
battery is replaced or completely flat.
NOTE! For any problems not
referenced in this troubleshooting
guide, please contact your hearing
healthcare professional. If you do not
have a hearing healthcare professional,
please contact the nearest office listed
on the back page of this booklet.
Warnings
Smart Alert remote should only be
used as directed by your hearing
healthcare professional.
Smart Alert remote uses a low-power,
digitally coded inductive transmission
to communicate to your hearing
instruments. Although unlikely,
interference with medical devices
such as pacemakers is possible.
Interference should not occur
with normal use, holding the remote
comfortably in the hand, 4 inches
(10 cm) or more from the body.
Therefore, it is recommended that
pacemaker users do not keep the
remote device in a breast pocket.
Do not use Smart Alert remote in
explosion hazard areas.
Do not use Smart Alert remote in
locations forbidden to use electronic
devices, such as an airplane.
Store your Smart Alert remote in
a safe location for CT and MRI scans
or other electromagnetic procedures.
Changes or modifications made to
Smart Alert remote not expressly
approved by Unitron may void the
user’s authority to operate the
equipment.
Battery Warnings
Never leave your remote control
or batteries where small children
and pets can reach them.
Never put your remote control or
batteries in your mouth. If a battery
is swallowed, call a physician
immediately.
Precautions
If your Smart Alert remote fails to
operate after you have correctly
inserted a new battery, contact your
hearing healthcare professional.
Always bring both your Smart Alert
remote and your hearing instruments
for service questions.
Your Smart Alert remote and your
hearing instruments are given
a unique communication code.
Because of this code, your Smart
Alert remote will not affect hearing
instruments worn by others.
Your Smart Alert remote uses the most
modern components to provide an
extremely reliable experience with
virtually no interference from other
devices. However, when operating
Smart Alert remote near a computer
terminal, communication devices such
as a digital cell phone, or other strong
electromagnetic field, it may be
necessary to be at least 24 inches
(60 cm) away to ensure proper
operation.
If your hearing instruments do not
respond to Smart Alert remote
because of an unusual field
disturbance, move away from the
disturbing field.
Declaration of Conformity
Labeling
Hereby, Unitron declares that Smart Alert
System is in compliance with the
essential requirements and other
relevant provisions of Directive
93/42/EEC. To obtain a copy of the
Declaration of Conformity, please contact
your local representative from the list of
Unitron Distributors. This device
complies with part 15 of the FCC rules
and with RSS 210 of Industry Canada.
Operation is subject to the following two
conditions: (1) This device does not
cause harmful interference, and (2) this
device must accept any interference
received, including interference that may
cause undesired operation.
The serial number and year of
manufacture are located inside the
battery compartment. Please fill out the
contact information sticker provided with
your new Smart Alert remote which is
located inside the remote’s battery
compartment.
Guidance and manufacturer’s declaration – electromagnetic emissions
The Model Smart Alert remote is intended for use in the electromagnetic environment specified below.
The customer or the user of the Model Smart Alert remote should assure that it is used in such an environment.
Emission test
Compliance
Electromagnetic environment – guidance
RF emissions
Group 2
The Model Smart Alert remote must emit electromagnetic
energy in order to perform its intended function. Nearby
electronic equipment may be affected.
Class B
The Model Smart Alert remote is suitable for use in all
establishments, including domestic establishments and
those directly connected to the public low-voltage power
supply network that supplies buildings used for
domestic purposes.
CISPR 11
RF emissions
CISPR 11
Harmonic emissions
Class A
IEC 61000-3-2
Voltage fluctuations/
flicker emissions
IEC 61000-3-3
Complies
Guidance and manufacturer’s declaration – electromagnetic immunity
The Model Smart Alert remote is intended for use in the electromagnetic environment specified below.
The customer or the user of the Model Smart Alert remote should assure that it is used in such an environment.
Immunity test
IEC 60601 test level
Compliance level
Electromagnetic environment – guidance
Electrostatic discharge (ESD)
±8 kV air
±8 kV air
Floors should be wood, concrete or ceramic tile. If floors are covered
with synthetic material, the relative humidity should be at least 30%.
±1 kV for input/output lines
±1 kV for input/output lines
±2 kV for power supply lines
Mains power quality should be that of a typical commercial or
hospital environment.
±2 kV line(s) to earth
±1 kV line(s) to line(s)
No protective earth
Mains power quality should be that of a typical commercial or
hospital environment.
IEC 61000-4-2
Electrical fast transient/burst
IEC 61000-4-4
Surge
IEC 61000-4-5
Voltage dips, short
interruptions and voltage
variations on power supply
input lines
IEC 61000-4-11
Power frequency (50/60 Hz)
magnetic field
±6 kV contact
±2 kV for power supply lines
±1 kV line(s) to line(s)
±6 kV contact
<5 % UT
(>95 % dip in UT) for 0.5 cycle
<5 % UT
(>95 % dip in UT) for 0.5 cycle
40 % UT
(60 % dip in UT) for 5 cycles
40 % UT
(60 % dip in UT) for 5 cycles
70 % UT
(30 % dip in UT) for 25 cycles
70 % UT
(30 % dip in UT) for 25 cycles
<5 % UT
(>95 % dip in UT) for 5 sec
<5 % UT
(>95 % dip in UT) for 5 sec
3 A/m
30 A/m
IEC 61000-4-8
NOTE UT is the a.c. mains voltage prior to application of the test level.
Mains power quality should be that of a typical commercial or
hospital environment. If the user of the Model Smart Alert remote
requires continued operation during power mains interruptions, it is
recommended that the Model Smart Alert remote be powered from an
uninterruptible power supply or a battery.
Power frequency magnetic fields should be at levels characteristic of a
typical location in a typical commercial or hospital environment.
Guidance and manufacturer’s declaration – electromagnetic immunity
The Model Smart Alert System is intended for use in the electromagnetic environment specified below.
The customer or the user of the Model Smart Alert remote should assure that it is used in such an environment.
Immunity test
IEC 60601 test level
Compliance level
Electromagnetic environment – guidance
Portable and mobile RF communications equipment should be used no closer to any part of the
Model Smart Alert remote, including cables, than the recommended separation distance calculated
from the equation applicable to the frequency of the transmitter.
Recommended separation distance
Conducted RF
3 Vrms
IEC 61000-4-6
150 kHz to 80 MHz
Radiated RF
3 V/m
IEC 61000-4-3
80 MHz to 2.5 GHz
3V
d = 1.2 √P
3 V/m
d = 1.2 √P 80 MHz to 800 MHz
d = 2.3 √P 800 MHz to 2.5 GHz
Where P is the maximum output power rating of the transmitter
in watts (W) according to the transmitter manufacturer and d is
the recommended separation distance in meters (m).
Field strengths from fixed RF transmitters, as determined by an
electromagnetic site survey,a should be less than the compliance
level in each frequency range.b
Interference may occur in the vicinity of
equipment marked with the following symbol:
NOTE 1 At 80 MHz and 800 MHz, the higher frequency range applies.
NOTE 2 These guidelines may not apply in all situations. Electromagnetic propagation is affected by absorption and reflection from structures, objects and people.
a
Field strengths from fixed transmitters, such as base stations for radio (cellular/cordless) telephones and land mobile radios, amateur radio, AM and FM radio broadcast
and TV broadcast cannot be predicted theoretically with accuracy. To assess the electromagnetic environment due to fixed RF transmitters, an electromagnetic site survey
should be considered. If the measured field strength in the location in which the Model Smart Alert remote is used exceeds the applicable RF compliance level above,
the Model Smart Alert remote should be observed to verify normal operation. If abnormal performance is observed, additional measures may be necessary, such as
re-orienting or relocating the Model Smart Alert remote.
b
Over the frequency range 150 kHz to 80 MHz, field strengths should be less than 3 V/m.
Recommended separation distances between portable and mobile RF communications equipment
and the Model Smart Alert™ System
The Model Smart Alert remote is intended for use in an electromagnetic environment in which radiated RF Disturbances are controlled.
The customer or the user of the Model Smart Alert System can help prevent electromagnetic interference by maintaining a minimum distance
between portable and mobile RF communications equipment (transmitters) and the Model Smart Alert System as recommended below,
according to the maximum output power of the communications equipment.
Separation Distance according to frequency of transmitter
m
Rated maximum output
power of transmitter W
150 kHz to 80 MHz
d = 1.2 √P
80 MHz to 800 MHz
d = 1.2 √P
800 MHz to 2.5 GHz
d = 1.2 √P
0.01
0.12
0.12
0.23
0.1
0.38
0.38
0.73
1
1.2
1.2
2.3
10
3.8
3.8
7.3
100
12
12
23
For transmitters rated at a maximum output power not listed above, the recommended separation distance d in meters (m) can be estimated using the equation
applicable to the frequency of the transmitter, where P is the maximum output power rating of the transmitter in watts (W) according to the transmitter manufacturer.
NOTE 1 At 80 MHz and 800 MHz, the higher frequency range applies.
NOTE 2 These guidelines may not apply in all situations. Electromagnetic propagation is affected by absorption and reflection from structures, objects and people.
Your Smart Alert™ System
The Smart Alert remote is a MEDICAL ELECTRICAL
EQUIPMENT and needs special precautions regarding
EMC and needs to be put in service according to
the EMC information provided.
Portable and mobile RF communications equipment
can affect MEDICAL ELECTRICAL EQUIPMENT!
Warning:
The Smart Alert remote should not be used adjacent
to or stacked with other equipment. If adjacent or
stacked use is necessary, the Smart Alert remote should
be observed to verify normal operation.
Declaration:
The device under test has no essential performance.
For surveillance purposes, the reception of alarms on
frequencies 433 MHz and 868 MHz and their transmission
on 40.96 kHz to the hearing aid were monitored.
Transmitter characteristics
Frequency range = 37.1 to 45.2 kHz
Modulation Type = CPFSK
Radiated Power = 35.2 dB µ A/m at 3 m
Hearing Healthcare Professional:
Telephone:
Model:
Serial Number:
Replacement Batteries:
Warranty:
Date of Purchase:
Unitron Distributors
Manufacturer
Denmark
Spain
20 Beasley Drive, P.O. Box 9017,
Kitchener, ON N2G 4X1 Canada
Nitivej 10, DK-2000 Frederiksberg
Australia
Daimlerstrasse 22, 70736
Fellbach-Oeffingen, Germany
Avenida de la Industria nº13/15,
Polígono de Canastell,
03690 Sant Vicent del Raspeig.
Alicante, España
France
Sweden
5, rue Maryse Bastié – BP 15 69671
Bron Cedex, France
Förmansvägen 2, 4 tr
SE-11743, Stockholm, Sweden
Netherlands
United Kingdom
Ir. D.S. Tuijnmanweg 10,
4131 PN VIANEN
St. George House, Cygnet Court,
Centre Park, Warrington, Cheshire
WA1 1PD
Level 2, Norwest Quay, 21 Solent
Circuit, Baulkham Hills, NSW,
NSW 2153
Belgium
Baron de Vironlaan, 60
b-1700 Dilbeek
Canada
20 Beasley Drive, P.O. Box 9017,
Kitchener, ON N2G 4X1
China
No. 78, Qi Ming Road,
Export Processing Zone District B,
Suzhou Industrial Park, P.R. 215021
European Representative
New Zealand
10/215 Rosedale Rd., M277 Private
Bag, 300987, Albany, Auckland
Norway
Postboks 301 Sentrum
0105 Oslo, Norway
South Africa
First Floor – Selborne House,
Fourways Golf Park, Roos Street,
Fourways, Johannesburg
U.S.A.
Suite A, 2300 Berkshire Lane North,
Plymouth, MN 55441
Distributor
smart alert system
™
Hear your home
powered by
At Unitron, we care deeply about people with hearing loss.
We work closely with hearing healthcare professionals to make
advanced, purpose-driven solutions available to everyone.
www.unitron.com/smartalert
09-061 029-5800-02
Printed in Canada
Bellman & Symfon