1
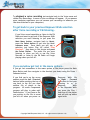
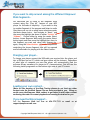
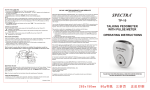
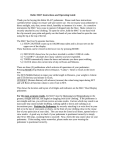
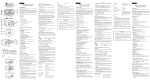
SanDisk Sansa Clip MP3 & Audio Book Player
Getting Started Operating the Player
Step 1
Remove all contents from Beta Kit packaging. Place the SanDisk Sansa Clip
MP3 player in front of you. It looks like the image below (front and back shown).
Unwrap the two other pieces in the box – the headphones and the USB cable.
Step 2
Plug the headphones
into the jack slot on
the right side of
player and place the
foamed-covered ear
buds in your ears
Step 3
Slide up the springloaded power switch
for one full second until
a SanDisk log appears
on the screen
In a couple of seconds you should see first Empower Walk selection cued up on
a screen with screen elements that resemble the image below. The yellow
numbers at the top will read “01/31” indicating that you are beginning with audio
file No. 1 (of 31).
Copyright 2008 Empower Walk, LLC – all rights reserved (Version 1.0)
1
[Note: if the player goes into battery-save mode and the screen goes blank
just quickly slide up the power switch as in Step 3 above to revive screen.]
Step 4
Press the Play /
Pause
button
to
initiate playback
You should now be hearing a voice announcing the beginning of the Empower
Walk Product Introduction.
Step 5
If needed, adjust the
volume
with
the
Volume Up / Down
rocker switch on right
side of the player
Step 6
Clip
the
player
to
your waist or
pocket with
the
spring
clip located
on the back
When you are finished listening for the day or for the moment, power off your
player by performing the following:
Step 7
To power off the
player simply slide up
the spring loaded power
switch for 2 full seconds
until you see the
SanDisk logo followed
by “Goodbye”
Copyright 2008 Empower Walk, LLC – all rights reserved (Version 1.0)
2
To Make Voice Recordings on Your Player
Step 1
Press the Main Menu
Button on the face of
the player above and to
the right of the controls
wheel
The Main Menu is comprised of four separate menu items shown below
Step 3
Step 2
Choose Voice
Press the Down /
Submenu button to
move through the 4
Main Menu selections pictured above
Step 4
Press the Select button in the center of the
controls wheel to select the Voice function.
Press the Select button again to select “Record
Now” which will start your recording.
Press the Select button again to stop your
recording producing a “Save Recording?” choice.
Press the Select button again while “Yes” is
highlighted to save your recording.
Copyright 2008 Empower Walk, LLC – all rights reserved (Version 1.0)
3
To playback a voice recording just navigate back to the Voice menu and
choose Play Recordings. A menu of your recordings will appear. (If you possess
some computer experience you can rename your recordings to whatever you
like when attached to your computer.)
To get back to your previous Empower Walk selection
after Voice recording or FM listening…
If you Voice record something or listen to the FM
Radio and want to get back to the Empower Walk
selection you were listening to just press the
Main Menu button, navigate back to Music,
press the Select button to get into the Music
submenu area. Once there you will see a
selection just below Play All called “Play
Previous”. Step down to this choice and press
the Select Button. The audio file you were
listening to when you left to use the Voice
Recorder or listen to the FM Radio will begin
playing where you left off.
If you somehow get lost in the menu options…
If you get lost somewhere in the menu system of the player press the Main
Menu Button and then navigate to the function you desire using the Down /
Submenu button.
If you find you’re on the wrong
number press the Left / Previous
buttons while watching the top of
way back to the file you were
another file of choice in the
program. All audio Components
program will play in order until
Pause button. If you Pause a file
you position in the file is saved
you left off when you power on
Empower Walk file
or Right - Forward
the screen to find your
listening to or to
Empower
Walk
in the Empower Walk
you press the Play /
and turn off the player
and will pick up where
again later.
Copyright 2008 Empower Walk, LLC – all rights reserved (Version 1.0)
4
If you want to skip around among the different Empower
Walk Segments…
We instructed you to listen to the Empower Walk
content using the “Play All” feature of your MP3
player for the sake of simplicity. If you want to skip
to another Segment of the program and listen to audio
files there you can do so using menu selections under
the Music menu choice. Just navigate to “Music” and
the move the highlight bar down to either “Artists” or
“Albums”. Choose either by using the center Select
button; choose Empower Walk using the center Select
button again and then move the highlight bar down to
the Segment you want and chose that Segment by,
again, using the Select button. All audio Components
underlying the chosen Segment title will be exposed
and be selectable for playing with the Select button.
Charging your player…
To charge your player connect the USB cable you received into the player and
into a USB port on our PC (which end goes where will be obvious). Regardless
of what type of computer you own the player will automatically load the
software drivers necessary for player-to-PC communication. You will see the
following install progression on the bottom right side of your PC screen:
Loading your own content…
[Note: for the duration of the Beta Testing please do not load any other
content onto the SanDisk Sansa Clip we have provided to you. Doing so
could cause the Empower Walk content to get mixed in with other content
confusing the order of content playback and causing frustration for you.
If you need technical support…
Call the Empower Walk hot line at 626-379-7313 or email us at
[email protected]
Copyright 2008 Empower Walk, LLC – all rights reserved (Version 1.0)
5
Sansa® Clip at a Glance
1 Display window
2 Left/Previous/Rewind
3 Select Button
4 Down/Submenu
5 Right/Forward
6 Up/Pause/Resume
7 Menu
8 MIC
9 Earphone Port
10 Volume Up
11 Volume Down
12 Hold/Lock
13 Power/Reset
14 USB Port
15 Clip
Display the information and status here
Press for previous track, rewind, or move left
Press to select the item
Press to move down or to options menu
Press for next track, fast forward, or move right
Press to move up one item, pause, or resume
Return to the Main Menu
Built-in microphone
Connect earphones here to listen
Turns up the volume
Turns down the volume
Factory sets to locked position (shows orange color). Slide to
center position for controls. When locked, all controls are
disabled to prevent accidental activation of controls.
• Slide up to turn on the player
• Slide up and hold for 2 seconds to turn off the player
• Slide up and hold for 15 seconds to reset your player
Plug USB cable here to connect to a computer
The removable clip accessory
Copyright 2008 Empower Walk, LLC – all rights reserved (Version 1.0)
6
Yamax SW-200 Pedometer
The Yamax SW-200 Pedometer is considered by experts to be the gold standard
by which all pedometers should be judged. Below are the simple instructions
to get you started using this highly accurate device.
How to open your
Pedometer
Cover clasp
cCl(level)
How to reset your
Pedometer
Hold on to the top of the
waistband clip with one
hand and, with the thumb
of your other hand, push
the clasp on the cover
away from you (below).
Push the button marked
“RESET” below the step
counter window.
The
counter resets to “0”.
Waisband clip
cCl(level)
How to Wear your Pedometer
Correct positioning of your pedometer is essential to obtaining accurate step
counts. Everyone has a unique body shape and people differ in their walking
style. For these reasons you may need to experiment a little to find the ideal
placement of your pedometer. The most common placement is on your belt or
waistband. In order for the counting mechanism to function correctly the
pedometer must be clipped on such that it is not tilted (forward or backward).
The face of the pedometer should be level such that the writing on the label is
horizontal. (See pictures below.)
Correct (not tilted forward)
Incorrect (tilted forward)
Copyright 2008 Empower Walk, LLC – all rights reserved (Version 1.0)
7
Correct (level)
Incorrect (not level)
To reset the electronics in the event of a malfunction
Push the button marked “RESET” below the step counter window and hold for
about 5 seconds and then release. The display go blank then read“8;8;8;8;8”
before returning to “0”. Your unit has been cleared.
Steps, not distance
It isn’t important how far your steps take you in terms of distance. The
distance you travel per a given number of steps is determined by your stride
length, which depends largely on your height, and computing stride length
introduces needless complication to the process. The important thing is to
reach your goal in terms of number of steps. As the program content explains,
find your average number of steps per day and per week and increase that
number by an additional 2000 steps per day or 14,000 steps per week.
Copyright 2008 Empower Walk, LLC – all rights reserved (Version 1.0)
8