1
PERFORMANCE
FRONT-LOADING
SERIES
AUTOMATIC WASHER
USE & CARE GUIDE
LAVEUSEAUTOMATIQUE
GUIDE
FOR QUESTIONS
ABOUT
FEi_IURES,
OPERATION/PERFORMANCE,
CAll:
1.800.688.9900
IN CANADA,
VISIT OUR
Certifid pour aseptiser
W10176966C
D'UTILISATION
PARTS, ACCESSORIES
OR SERVICE
ET D'ENTRETIEN
AU CANADA,
RENDEMEN
POUR
DES QUESTIONS
APROPOS
I, DES PIECES, DES ACCESSOIRES
DES CARACTERISTIQUES,
OU
DU SERVICE, COMPOSEZ
1.800.807.6777
OU VISITEZ
WEBSITE AT WWW.MAYTAG.COM
IN CANADA,
Certified to Sanitize
CAll:
A CHARGEMENT FRONTAL
NOTRE
WWW.
WWW.MAYTAG.CA
Designed to use only HE High Efficiency detergent
Con_:u pour I'utilisation d'un d6tergent haute efficacitd seulement
SITE INTERNET
MAYTAG. CA
DU FONCTIONNEMENT/
IE : 1.800.807.6777
,i_!_ii!i!i!i!i!i!i!i!i!i!i!i!i!i!i!i!i!i!i!i!i!i!i!i_i_i_ii!i
¸i!i!i!i!i!i!i!i_i_ii_ii_ii_ii_ii_ii_ii_ii_ii_ii_ii_ii_ii_ii_i_iiiiYiiiiii//li
¸il
¸iiii_ii,i_ii,i_ii,i_ii,i_ii,i_i_iii_i_ii_il
'ii_i_iil
'ii_i_iil
_i_ii_i_ii_i_ii_ii_i_ii_:ii:_:i_:ii:_:i_:ii:_:i_:ii:_:i_:ii:_:i_:ii:_:i_:ii:_:i_:_i_::
¸_iii!ii,l,ii_
,,¸¸¸¸_!_iiiiiiiii_i_
¸il
¸ii_ii_ii
¸I¸I
¸il
¸ii
_ii
¸ii
_ii
¸ii
_ii
¸ii_iil
¸ii
_i_iil
¸I
¸iiiii_iiiii_i_i_ii_i_iiiii_ii_iii_ii_iii_iiiiiiiiiiiiiiiiiiiiiiiiiiiiiiiiiiiiiiiiiiiiiiiiiiiiiiiiiiii_!_!!
ii!!i!ii!i!i!i!i!i!i!i!i!i!i!i!i!i!i!i!i!i!i!i!i!i!i!i!iiii!il
¸!I
¸_!_!_!_!_!_!iiiiii__ii_i__ii_i__ii_i__ii_i__ii_i__ii_i__ii_i__ii_iiiiiYiiiiiiI__
¸i¸il
¸iiiiiiiiiiiiiiiiiiiiiiiiiiiiiiiiiiiiiiiiiiiiiiiiiiiiiiiiiiiiiiiiiiiii
iiiiiili
iilii
_ii
¸ii
_ii_i_iiiii_i_i_iiiiii:ii:i:ii:ii:i:ii:ii:i:ii:ii:i:ii:ii:i:ii:ii:i:ii:i:i:ill
_iJiiiiiiiiiiiiiii_
_!!!i!iiii_!iii_!iii_!iii_!iii_!ii_i_!ii_i_!ii_i_!ii_i_!ii_i_!ii_i_!iii_!iiiiiiiiI_ii_iii
%
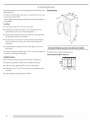
TABLE OF CONTENTS
WASHER
SAFETY ......................................................................................................................
INSTALLATION
REQUIREMENTS .............................................................................................
Tools and Parts .....................................................................................................................
Options
................................................................................................................................
I.ocation
Drain
Requirements
.........................................................................................................
System ........................................................................................................................
Electrical Requirements ........................................................................................................
INSTALLATION
INSTRUCTIONS
.............................................................................................
TABLE DES MATIERES
3
SI_CURITI_ DE LA LAVEUSE .....................................................................................................
28
4
4
EXIGENCES
30
DqNSTALLATION
Outillage
...............................................................................................
et pi_ces ..............................................................................................................
5
Options
6
Exigences d'emplacement
8
Syst_me de vidange ............................................................................................................
30
..............................................................................................................................
30
..................................................................................................
31
33
8
9
Sp6cifications
INSTRUCTIONS
Remove Transport System ....................................................................................................
Connect the Inlet Hoses .....................................................................................................
9
10
Elimination
Route the Drain
Hose .........................................................................................................
10
Acheminement
du tuyau de vidange ..................................................................................
35
Secure the Drain Hose .......................................................................................................
I_eve[ the Washer ................................................................................................................
11
11
Immobilisation
du tuyau de vidange
..................................................................................
36
Complete Installation
.........................................................................................................
FEATURES AND BENEFITS ......................................................................................................
11
12
de [a [aveuse .....................................................................................
..........................................................................................................
36
36
WASHER
13
USE ..........................................................................................................................
Starting Your Washer ..........................................................................................................
13
Using the Proper Detergent
13
................................................................................................
des accessoires
Raccordement
des tuyaux
R6g[age de ['aplomb
Achever ['installation
CARACTI_RISTIQUES
33
34
de transport .............................................................................
d'a[imentation
ET AVANTAGES
34
...........................................................................
35
...................................................................................
37
UTILISATION
DE LA LAVEUSE ...............................................................................................
Mise en marche de Ha[aveuse ............................................................................................
...........................................................................................................
14
Utilisation
Uti[isation
Pausing or Restarting .........................................................................................................
Using the Dispenser
6[ectriques ...................................................................................................
DqNSTALLATION
.......................................................................................
38
38
du d6tergent appropri6 ......................................................................................
du distributeur ...................................................................................................
39
39
15
Pause ou remise en marche ................................................................................................
41
Changing Cycles, Options, and Modifiers ..........................................................................
Status Indicator ...................................................................................................................
16
16
Changement
des programmes,
options et modificateurs .....................................................
T6moins [umineux ..............................................................................................................
41
41
Cycles .................................................................................................................................
17
Programmes
.......................................................................................................................
42
Options ..............................................................................................................................
Modifiers ............................................................................................................................
18
19
Options ..............................................................................................................................
Modificateurs
.....................................................................................................................
44
44
LAUNDRY
GUIDE
LAUNDRY
TIPS .......................................................................................................................
..................................................................................................................
20
Guide de [essivage .............................................................................................................
CONSEILS DE LESSIVAGE .......................................................................................................
46
47
I.oading ..............................................................................................................................
WASHER CARE ........................................................................................................................
21
21
Chargement ........................................................................................................................
ENTRETIEN DE LA LAVEUSE ...................................................................................................
47
48
Cleaning Your Washer .......................................................................................................
Water Inlet Hoses ...............................................................................................................
20
21
22
Nettoyage
Tuyaux
de Ha [aveuse .....................................................................................................
d'arriv6e
d'eau .......................................................................................................
Vacation, Storage, and Moving Care ..................................................................................
TROUBLESHOOTING
.............................................................................................................
22
23
Pr6cautions _ prendre avant [es vacances, un entreposage ou un d6m6nagement
DI_PANNAGE ..........................................................................................................................
ASSISTANCE OR SERVICE .......................................................................................................
In the U.S.A ........................................................................................................................
26
26
ASSISTANCE OU SERVICE ......................................................................................................
Aux Etats-Unis ....................................................................................................................
In Canada ...........................................................................................................................
WARRANTY
............................................................................................................................
26
27
Au Canada
GARANTIE
.........................................................................................................................
...............................................................................................................................
48
49
............. 49
50
54
54
54
55
Your
We have provided
many
important
safety
safety
and
the safety
messages
of others
in this manual
are very important.
and on your appliance.
Always
read and obey
all safety
messages.
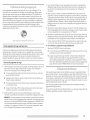
This is the safety alert symbol.
This symbol alerts you to potential hazards that can kill or hurt you and others.
All safety messages will follow the safety alert symbol and either the word "DANGER" or "WARNING."
These words mean:
All safety
happen
messages
will tell you what
if the instructions
the potential
hazard
You can be killed or seriously
follow instructions.
injured if you don't immediately
You can be killed or seriously
instructions.
injured if you don't follow
is, tell you how to reduce
the chance
of injury,
and tell you what
can
are not followed.
2,',',i'i
iMPORTANT
SAFETY
iNSTRUCTiONS
WARNING:
To reduce the risk of fire, electric shock, or injury to persons when using the washer, follow basic precautions,
including the following:
[] Read all instructions before using the washer.
[] Do not wash articles that have been previously cleaned
in, washed in, soaked in, or spotted with gasoline,
dry-cleaning solvents, other flammable, or explosive
substances as they give off vapors that could ignite or
explode.
[] Do not add gasoline, dry-cleaning solvents, or other
flammable, or explosive substances to the wash water.
These substances give off vapors that could ignite or
explode.
[] Under certain conditions, hydrogen gas may be
produced in a hot water system that has not been used
for 2 weeks or more. HYDROGEN GAS IS
EXPLOSIVE. if the hot water system has not been
used for such a period, before using the washing
machine, turn on all hot water faucets and let the water
flow from each for several minutes. This will release
[] Do not allow children to play on or in the washer. Close
supervision of children is necessary when the washer is used
near children.
[] Before the washer is removed from service or discarded,
remove the door or lid.
[] Do not reach into the washer if the drum, tub or agitator is
moving.
[] Do not install or store the washer where it will be exposed to
the weather.
[] Do not tamper with controls.
[] Do not repair or replace any part of the washer or attempt any
servicing unless specifically recommended in this manual or in
published user-repair instructions that you understand and
have the skills to carry out.
[] See "Electrical Requirements"
for grounding instructions.
any accumulated hydrogen gas. As the gas is
flammable, do not smoke or use an open flame during
this time.
SAVE THESEINSTRUCTIONS
State of California Proposition 65 Warnings:
WARNING:
This product contains a chemical known to the State of California to cause cancer.
WARNING:
This product contains a chemical known to the State of California to cause birth defects or other reproductive
: ........................................................................................
INSTALLATION
Gather the required
washer drum.
tools
and parts before
Tools needed for connecting
the water inlet hoses
•
Pliers (that open to 1'_/1_,"[39.5
•
Flashlight
4
starting
mm])
installation.
The parts supplied
are in the
REQUIREMENTS
Tools needed for installation
•
Open
•
I.eve[
end wrenches
•
Wood
•
Ruler or measuring
17 mm and 13 mm
block
(optional)
tape
harm.
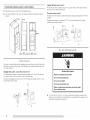
Parts supplied:
A
Pedestal
A pedestal will add to the total height of the washer for a total height of 53.5" (1359 mm).
D
E
A.Drain
hose form
B.Inlet
hose (2)
C.Inlet
hose washers
(4)
D. 7iansport boh hole plug
E.Beaded strap
Alternate
(4)
Optional pedestal
Parts
This pedestal
Your installation
rnay require additional
parts. If you are interested in purchasing one of the
items listed here, ca[[ the toll-free number on the cover or in the "Assistance or Service"
section.
If You Have
You Will
Laundry tub or standpipe
taller than 96" (2.4 m)
Surnp purnp
Overhead
Standard 20 gal. (76 I.), 30" (762 mm) tall drain tub or
utility sink and sump pump (available from local plumbing
suppliers)
sewer
Floor drain
Drain
systern (if not already
available)
Siphon break, Part Number 285834; additional
Part Number 8318155;
and connector
kit,
Part Number 285835
hose too short
Water faucets
of fill hoses
Need to Buy
beyond
4 ft (1.2 m) drain hose extension
reach
2 longer water fill hoses:
6 ft (1.8 m) Part Number 76314,
10 ff (3.0 m) Part Number 350008
kit, Part Number
drain
is available
in several colors.
''
To orde,; call the dealer frorn whorn you purchased
or Service" section.
you, washer
or refer to the "Assistance
Pedestal Height
Color
Part Number
10" (254 mm)
White
MHP1000SQ
10" (254 mm)
Black
MHP1000SB
15.5" (394 mm)
White
XHP1550VW
15.5" (394 mm)
Black
XHP1550VB
15.5" (394 mm)
Slate
XHP1550VE
15.5" (394 mm)
Crimson
15.5" (394 mm)
Oxide
XHP1550VJ
15.5" (394 mm)
Evergreen
XHP1550VP
:Z'I
hose
Red
XHP1550VF
285863
Stack Kit
Are you planning
a Stack Kit.
to stack your Maytag
washer
and dryer? To do so you will
To order; call the dealer from whom you purchased
Service" section. Ask for Part Number 8212640.
need to purchase
your dryer or refer to the "Assistance
or
Selecting
theproper
location
foryourwasher
improves
performance
andminimizes
noiseand
possible
washer
"walk."
Yourwasher
canbeinstalled
under
acustom
counter,
orinabasement,
laundry
room,closet,
orrecessed
area.
See"[)rainSystem."
Companion
appliance
location
requirements
should
alsobeconsidered.
Proper
installation
is
yourresponsibility.
You will
Washer
Dimensions
5i"
{I 295 ram}
need
•
A water heater set to deliver
120°F
•
A grounded electrical outlet located within 6 ft (1.8 m) of where the power cord
attached to the back of the washer. See "Electrical
Requirements."
•
Hot and cold water faucets
located
and water pressure of 20-100
(49°C) water to the washer.
within
is
4 ft (1.2 m) of the hot and cold water fill valves,
psi (137.9-689.6
kPa).
•
A level floor with a maximum
slope of 1" (250 mm) under entire washer. Installing the
washer on soft floor surfaces, such as carpets or surfaces with foam backing, is not
recommended.
•
A sturdy and solid floor to support
400 [bs (180 kg).
the washer
with
a total weight
(water and load) of
Recommended
Do not operate your washer in temperatures
below 32°F (0°C). Some water can remain
washer and can cause damage in low temperatures.
Installation
in the
The dimensions
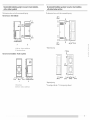
Custom
installation
spacing
for custom
shown are for the recommended
undercounter
installation
- Washer
undercounter
spacing.
only
clearances
•
The location
must be large enough
to allow
the washer
door to be fully
•
Additional
spacing should
•
Additional
clearances
•
Additional
spacing of 1" (25 mm) on all sides of the washer
noise transfer.
•
Companion
opened.
39" rain.
6
be considered
might be required
for ease of installation
for wall,
doob and floor
appliance spacing should also be considered.
and servicing.
(990 ram)
+
moldings.
is recommended
to reduce
1"-_1._-;,_
(25 ram)
27'--_1<-
(686 ram)
1"
(25 ram)
installation
Recommended installation spacing for recessed or closet installation,
with or without a pedestal
The dimensions
shown
Recessed area or closet
are for the recommended
Recommended installation spacing for recessed or closet installation,
with stacked washer and dryer
The dimensions shown are for the recommended spacing.
spacing.
installation
48 in.2 *
(310 cm 2)
--_
3"
3"* (76ram)
(76ram)
-i
34" '
48 in.2.
(864ram) (310cm2)
--
i_,,iii,_'/',_,,,_
,,_,_",_,_,i_,
o
24 in.2 *
--_
(155cm2) '
V
3"
(76ram)
T
11" _ 31Y2"-_[4"1_-(25rnrn)(800
rnrn)(102
ram)
3"* {76mm)
_1"*
24 in, 2*
A
A. Side view - closet or confined area
B. Closet door with vents
Recessed or closet installation
- Washer
* Required spacing
on pedestal
Z'I
I
18"rnin._
\v/
(457rnrn)
1" _._
(25mm) '
27"_.(686mm)
(25mm)
(155cm2)
B
1"
' (25mm)
ll"_ 31,/_"_1 4"
(25mm)(a00ram)(102ram)
B
A
A. Recessed area
B. Side view - closet
5v2"**-_,,.
(140 mm)
* Required
** For venting
or confined
area
_--
76"
(1930mm)
"_
1"_
{25mm)
_
27"-_
{686mm)
spacing
out the
side,
1" (25 mm)
spacing
is allowed.
_
1"
(25 mm)
Laundry
Recommended
•
The dimensions
•
For cabinet
required.
installation
shown
installation,
spacing for cabinet installation
are for the recommended
with
tub drain
(view
C)
The top of the laundry
tub must
spacing.
a doo_, the minimum
ventilation
openings
in the top are
Floor
drain
system
The floor drain
and Parts."
7"(178rnrn)
system
The laundry tub needs a minimum
20 gal. (76 I.) capacity.
be at least 30" (762 mm) above the floor.
7"(176rnrn}
(view
D)
system requires
a siphon
break that may be purchased
separately.
See "Tools
The siphon break must be a minimum of 28" (711 mm) from the bottom of the washer.
Additional hoses might be needed.
00
D
4"
311/2''
1"
1"
27"
1"
(102turn} (800rnrn}(25rnrn}(25rnrn}(686rnrn} (25rnrn}
The washer can be installed using the standpipe drain system (floor or wall), the laundry tub
drain system, or the floor drain system. Select the drain hose installation
method you need.
See "Tools and Parts."
Standpipe
drain
system
The standpipe drain
carry-away
capacity
- wall
or floor
requires a minimum
can be no less than
(views
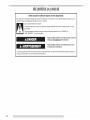
Electrical Shock Hazard
A & B)
diameter standpipe of 2" 150 rnrn). The minimum
17 gal. (64 I_) per minute.
The top of the standpipe must be at least 30" (762 mm) high and no higher
from the bottom of the washer.
Plug into a grounded
3 prong outlet.
Do not remove ground
than 96" (2.4 m)
prong.
Do not use an adapter.
Do not use an extension
cord.
Failure to follow these instructions can result in death,
fire, or electrical shock.
T
39"rnin.
•
(762ira)
A
8
B
A 120 volt, 60 Hz., AC only, 15- or 20-amp,
delay fuse or circuit breaker is recommended.
serving only this appliance be provided.
fused electrical
supply is required. TimeIt is recommended
that a separate circuit
•
This washer
•
To minimize
possible shock hazard, the cord must be plugged into a mating, 3 prong,
grounding-type
outlet, grounded in accordance
with local codes and ordinances.
If a
mating outlet is not available, it is the personal responsibility
and obligation
of the
customer to have the properly grounded outlet installed by a qualified
electrician.
•
If codes permit and a separate ground wire is used, it is recommended
electrician
determine that the ground path is adequate.
•
Do not ground
•
Check
•
Do not have a fuse in the neutral
with
is equipped
with a power
supply
cord having
a 3 prong
grounding
plug.
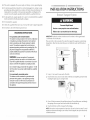
INSTALLATION
INSTRUCTIONS
that a qualified
to a gas pipe.
a qualified
electrician
if you are not sure the washer
or ground
GROUNDING
is properly
grounded.
Excessive
circuit.
Use two
Failure
iNSTRUCTiONS
For a grounded, cord=connected washer:
This washer must be grounded. In the event of a malfunction
or breakdown, grounding will reduce the risk of electrical
shock by providing a path of least resistance for electric
current. This washer is equipped with a cord having an
equipment-grounding conductor and a grounding plug. The
plug must be plugged into an appropriate outlet that is
properly installed and grounded in accordance with all local
codes and ordinances.
or more
people
to do so can result
IMPORTANT:
Position the washer
3 ff (900 mm) of its final location.
Weight
to move
in back
Hazard
and install
or other
so that the rear of the washer
There are 4 bolts in the rear panel of the washer
transportation.
These bolts also retain the power
removed.
washer.
injury.
is within
approximately
that support the suspension system during
cord inside the washer until the bolts are
....
6.
HHZ'
WARNING:
improper connection of the equipmentgrounding conductor can result in a risk of electric shock.
Check with a qualified electrician or serviceman if you are in
doubt as to whether the appliance is properly grounded.
Do not modify the plug provided with the appliance - if it will
not fit the outlet, have a proper outlet installed by a qualified
electrician.
For a permanently
connected
washer:
This washer must be connected
to a grounded
metal,
permanent
wiring system, or an equipment
grounding
conductor
must be run with the circuit conductors
and
connected
to the equipment-grounding
terminal
1.
Using
a 13 mm wrench,
loosen each of the bolts.
2.
Once the bolt is loose, move it to the center of the hole and completely
including the plastic spacer covering the bolt.
3.
Once all 4 bolts are removed, discard bolt and spacers. Then pull the power cord through
the opening of the rear pane[ and dose the hole with the attached cap.
4.
Close the bolt holes with
pull out the bolt,
or lead on
the appliance.
the 4 transport
bolt hole plugs.
NOTE: If the washer is to be transported at a later date, ca[[ your local service center. To avoid
suspension and structural damage to your washer, it must be properly set up for relocation
by
a certified technician.
9.
1,
Insert new flat washers
in the couplings.
(supplied)
Turn on the water faucets and check for leaks.
NOTE: Replace inlet hoses after 5 years of use to reduce the risk of hose failure.
Record hose installation
or replacement
dates on the hoses for future reference.
into each end of the inlet hoses. Firmly seat the washers
10. Periodically
A
and replace
hoses if bulges,
Proper routing of the drain hose protects
Read and follow these instructions.
B
Remove drain hose from washer
A. Coupling
B. Washer
drum
inspect
Gently
2,
Make sure the washer
3.
Attach the hose with the red color indicator
to the Hot (left) inlet valve. Attaching
coupling first makes it easier to tighten connection
with pliers. Screw on coupling
hand until it is seated on the washer.
the red
by
4,
Attach the hose with the blue color indicator
to the Cold (right) water inlet valve.
on coupling
by hand until it is seated on the washer.
Screw
pull the corrugated
kinks,
cuts, wear, or leaks are found.
your floors from damage
due to water leakage.
cabinet
drain hose from the shipping
clips.
is empty.
©
Laundry tub drain or standpipe
Connect
J
drain
the drain hose form to the corrugated
drain hose.
f-_
H. Hot water inlet
C. Cold water inlet
5°
Using
NOTE:
pliers, check the tightness
Do not overtighten.
of the hose couplings
Damage
to the coupling
already
Attach hot water hose to the hot water faucet. Screw on coupling
on the washer.
7.
Attach cold water hose to the cold water faucet.
seated on the washer.
8.
Using
the couplings
by hand until
Screw on coupling
with an additional
to the washer.
can result.
6.
pliers, tighten
attached
two-thirds
it is seated
by hand until
A
it is
A. _1naf9either
..... end of the drain hose form to the drain hose at the
point where the corrugation begins.
B. Bend drain hose over drain hose form and snap into place.
turn.
To keep drain water
from going back into the washer:
•
Do not straighten the drain hose, and do not force excess drain hose into standpipe.
Hose should be secure, but loose enough to provide a gap for air.
•
Do not lay excess hose on the bottom
Floor
I0
Do not overtighten.
Damage
to the coupling
can result.
of the laundry
tub.
drain
You may need additional
NOTE:
B
parts. See Floor drain
under
"Tools and Parts."
1,
Drape the power
cord over the washer
2.
Secure the drain
(See illustrations
hose to the laundry
A and B.)
A
top.
tub leg or standpipe
1.
Check the electrical
requirements.
Be sure that you have the correct
the recommended
grounding
method. See "Electrical
Requirements."
2.
Check that all parts are now installed.
see which step was skipped.
with the beaded strap provided.
B
3.
Check
4.
Dispose
5.
Check
that the water faucets are on.
6.
Check
for leaks around
electrical
If there is an extra part, go back through
supply
and
the steps to
that you have all of your tools.
of/recycle
all packaging
faucets
materials.
and inlet
hoses.
C
If the washer faucets and the drain standpipe are recessed (see illustration
C), put the
hooked end of the drain hose in the standpipe. Tightly wrap the beaded strap around the
water inlet hoses and the drain hose.
I)o not force excess drain
hose into the standpipe.
Electrical Shock Hazard
Plug into a grounded
Properly
1.
leveling
your washer
avoids excessive
Check the levelness of the washer
side to side, then front to back.
by placing
noise and vibration.
Do not remove
a level on the top edge of the washei;
first
ground
3 prong outlet.
prong.
Do not use an adapter.
Do not use an extension cord.
Failure to follow
fire, or electrical
If the washer is against a wall, move the washer out slightly before tipping back. If the
washer is not [eve[, first prop the front with a wood block and adjust the feet as necessary;
then prop the back and adjust feet as necessary. Repeat this step until washer is [eve[.
2.
Make sure all four feet are stable and resting on the floor. Then check that the appliance
perfectly [eve[ (use a [eve[).
3.
After the washer is [eve[, use a 1 7 mm open-end
against the washer cabinet.
IMPORTANT:
All four feet must be tightened.
cabinet, the washer may vibrate.
The washer
top edges.
should
5.
Slide the washer
6.
Confirm
wrench
to turn the nuts on the feet tightly
If the nuts are not tight against the washer
not move front to back, side to side, or diagonally
to its final
the levelness
location.
of the washer.
is
when
pushed
on its
these instructions can result in death,
shock.
7.
Plug into a grounded
8.
Read "Washer
3 prong outlet.
9.
To test and clean your washer, make sure there are no clothes in the washer and add one
AFFRESH r,, tablet to the washer drum. Select POWER/CANCEl_,
the Clean Washer cycle,
and then select START/PAUSE This cycle will take approximately
65 minutes to
complete.
Allow the washer to complete
the entire Clean Washer Cycle without
interruption.
Use."
Z'I
Electronic Controls
High-Efficiency
Flexible electronic controls are easy to use whether you are a beginner or an expert.
Your new front-loading,
high-efficiency
your water and energy bills by helping
Smart
Wash
System
washer saves time with fewer, larger loads, and lowers
conserve resources.
Dispensers
The Smart Dispensers make your washer truly automatic.
This washer provides a threecompartment
dispenser which includes separate compartments
for main wash detergent,
fabric softenec and chlorine bleach. The dispenser has large pour zones. The dispenser is
self-cleaning,
and can be easily removed. I_aundry products are diluted with fresh water and
added to the load at the proper time in the wash cycle.
Spin Speeds
This washer automatically
selects the spin speed based on the cycle selected. This factory
setting can be changed, however. This washer offers up to five different spin speed choices.
Heating
Element
This washer has a built-in steaming unit which is combined
with the Steam Clean option to
provide multiple temperatures
to help remove a variety of stains from garments. Steam Clean
may be active in the Whitest Whites, Heavy Duty, and Normal/Casual
cycles.
This washer has a heating element that automatically
heats the water to the optimal
temperature
on select cycles. This enables stepped cleaning, a process in which warm water
is brought in and mixed with detergent first, then the water is heated. Stepped cleaning starts
the wash cycle with warm water to help remove stains (such as blood and grass). This heater is
active in the Whitest Whites, Heavy Duty, and Normal/Casual
cycles.
Clean
Automatic
Steam Clean
Washer
with
AFFRESH
TM
Cycle
This cycle uses steam to raise the temperature of the unit and makes the washer self-cleaning,
flushing the machine's interior free of dirt and other residue. The use of AFFRESH r_, washer
cleaner or liquid chlorine bleach with this cycle will remove and help avoid odor-causing
residue.
Add
Auto
Water
Level
This washer automatically
adjusts water level for optimal cleaning and rinsing performance.
Two sensors determine
load size, load composition,
and suds level, then the sensors adjust
the water level to the proper setting. This eliminates guesswork. The water level is just right
for every wash load size.
Super
Size Capacity
Since there is no agitatob you can wash largeb bulkier items such as a king-sized
You are also able to wash more clothes at one time, which means fewer loads.
Smooth
To reduce
Balance
washer
_M Suspension
"walk"
System
and "off-balance"
•
2 Springs to isolate vibration
•
4 Shock absorbers
at the washer
bedspread.
base to minimize
your new washer
combines:
movement
Commercial
Quality Stainless Steel Drum
The commercial quality stainless steel drum eliminates corrosion and enables higher spin
speeds for more water extraction, reducing drying time compared to traditional front-load
washers.
12
Control
Clothes
Clothes can be added to the load during the first 8 minutes
the Status Indicator will indicate it is okay to add clothes.
Special
Cleaning
Action
with
Sensi-Care
_
Wash
of the cycle.
During
this time,
System
This washer channels 100% of the water through the dispensers to assure thorough rinse-out
and mixture of all the laundry products before they touch any garments. The water is then
sprayed from the top front onto the center of the load, providing
even distribution
and
optimum
cleaning performance.
It is normal for small amounts of water to remain in the
dispensers when the wash cycle is complete.
Efficient
conditions,
Temperature
The automatic
temperature
control electronically
senses and maintains a uniform water
temperature.
Automatic
temperature
control regulates incoming
hot and cold water.
Automatic
temperature
control is automatically
turned on when a cycle is selected.
Detergent
System
This washer has a specially designed valve that closes during the wash portion of the cycle
so that 100% of the water and detergent mixture is used on the load. The Efficient Detergent
System ensures that no water or detergent is wasted.
Dynamic
Off-Balance
Detection
This washer uses two sensors to detect load size and the amount
load. The suspension
automatically.
system and controls
are specially
designed
of off-balance
within
to redistribute
the load
the
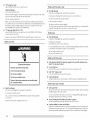
WASHER USE
5000
SERIES
sensimg_st_m_te_
time a
with steam (i,__
dot_e_
NOTE: The panel shown
above may be different
from
that of your model.
Use only
High Efficiency
detergents.
The package
for this type of detergent
will
be marked
"HE" or "High Efficiency." This wash system, along with less water, will create too much
sudsing with a regular non-HE detergent. Using regular detergent will likely result in washer
errors, longer cycle times, and reduced rinsing performance.
It may also result in component
failures and noticeable mold or mildew.
of suds for the best performance.
Follow
amount of detergent to use. Remember,
less detergent based on load size.
HE detergents are made to produce the right amount
the manufacturer's
instructions
to determine the
concentrated
detergents such as 2x or higher will use
Fire Hazard
Never place items in the washer that are dampened
with gasoline or other flammable fluids.
No washer can completely
Use only HE High Efficiency detergent.
remove oil
First Wash Cycle
Do not dry anything that has ever had any type of oil on
it (including cooking oils).
shock, or injury to persons,
operating this appliance.
The following
is a guide to using your washer.
for more detailed information.
Please refer to specific
read the
sections
For All Wash Cycles
of this manual
1.
Do not store laundry
operation.
products
on the top surface
of this washer. Vibration
is normal
Laundry
Before washing clothes for the first time, if not completed
during the final installation
step,
choose the Normal/Casual
cycle and run it without clothes. Use only HE High Efficiency
detergent. Use I/_ the manufacturer's
recommended
amount for a medium-size
load. This
initial cycle serves to ensure the interior is clean before washing clothes.
Doing so can result in death, explosion, or fire.
WARNING:
To reduce the risk of fire, electric
IMPORTANT
SAFETY INSTRUCTIONS
before
Without
during
Open the washer door by pulling on the handle. Sort laundry according
of fabric. Place a load of sorted clothes in the washer. Do not overload
Overloading
to color
washer.
and type
can cause poor cleaning.
•
The washer can be fully loaded, but not tightly
•
Mix
•
It is recommended
•
When unloading
garments, occasionally
front of the tub for small items.
large and small items and avoid washing
packed. Washer door should dose easily.
single
items. Load evenly.
that you wash small items such as infant socks in a mesh garment
check under
the gray colored
13
sea[ at the
bag.
"
,,_
2.
Close the washer door by pushing it firmly
remain locked during the wash cycle.
until the lock dicks.
The washer
door win
NOTE: After any wash cycle is completed,
the door must be opened and then dosed
before a new cycle can begin. The door can be opened only if START/PAUSE or POWER/
CANCEl_ is selected while the Add Clothes light is illuminated
or if the cycle was
canceled. See "To cancel a cycle" in Changing Cycles, Options,
and Modifiers
section.
3.
Open the dispenser drawer and add laundry products to the main wash detergent,
chlorine bleach, or fabric softener compartments.
Close drawer slowly to avoid spins. See
"Using the Dispenser."
4.
Turn on the washer by selecting POWER/CANCEl_.
Select one of the cycles by turning the
cycle selector. The indicator
light for the selected cycle will illuminate.
When selecting a
wash cycle, the preset Options, Wash Temp, Spin Speed, and Soil I_evel for the selected
cycle will illuminate.
The display shows the estimated time remaining.
The preset settings
provide the recommended
fabric care for the selected cycle. See "Cycles."
5.
Select the desired Options, such as Max Extract TM, Extra Rinse, and Steam Clean.
options are available with all cycles. See "Options."
6.
Select the desired Modifiers,
modifiers are available with
If desired, select SIGNAl_ ON/OFF. The signal is helpful when
should be removed from the washer as soon as it stops.
8.
To begin the wash cycle immediately
Select START/PAUSE.
•
If you do not select START/PAUSE
automatically
shuts off.
within
60 minutes
you are washing
of choosing
a cycle,
the Right
Detergent
Use only High Efficiency detergents. The package for this type of detergent will be marked
"HE" or "High Efficiency." This wash system, along with less water, win create too much
sudsing with a regular non-HE detergent. Using regular detergent win likely result in washer
errors, longer cycle times, and reduced rinsing performance.
It may also result in component
failures and noticeable mold or mildew. HE detergents are made to produce the right amount
of suds for the best performance.
Follow the manufacturer's
instructions
to determine the
amount of detergent to use. Remember, concentrated
detergents such as 2x or higher win use
less detergent based on load size.
Use only HE High Efficiency detergent.
Not all
such as Soil I_evel, Wash Temp, and Spin Speed. Not all
all cycles and options. See "Modifiers."
7.
Choosing
items that
the washer
When the wash cycle is complete, the status indicator shows Done, the door unlocks,
and the wash load can be removed from the washer. The washer powers down
automatically
5 minutes after the cycle is complete
and the Done light goes off. To
power clown the washer manually
after the wash cycle is complete,
select POWER/
CANCEl. once.
To fill dispenser compartments
1.
Pull out the dispenser
2.
Add the desired
3.
Push in the dispenser
drawer.
laundry
product
drawer
to the proper
slowly
compartment.
and completely
...........
Your new washer has a dispenser drawer with three separate compartments
for your laundry
products--one
is for detergent, one is for liquid chlorine bleach, and one is for liquid fabric
softener. I.aundry products are diluted and dispensed automatically
at the proper time during
the wash cycle, making it unnecessary for you to return to the washer during the cycle to add
them.
It is normal for small amounts
is complete.
of water to remain
I)o not put laundry products directly
when adding laundry products.
in the dispensers
into the wash tub. Always
when the wash cycle
use the proper
dispensers
Dispenser
A. Detergent
B. Main
D. Chlorine
E. Fabric
type selector
wash compartment
C. Dispenser
14
(to avoid a spill).
release
bleach
softener
lever
compartment
compartment
Main
wash compartment
(I.etter B in Dispenser
Chlorine
Illustration)
bleach
compartment
(I.etter I_)in Dispenser
Illustration)
Add liquid or powdered
HE detergent to this compartment
for your wash cycle. The detergent
type selector (A) must always be in the correct position for the detergent type used. Slide the
detergent type selector to the correct position.
Add no more than 2/-4cup (160 ml.) liquid chlorine bleach to this compartment.
The bleach
will be automatically
diluted and dispensed at the best time during the first rinse after the
wash cycle. This compartment
cannot dilute powdered bleach.
IMPORTANT:
•
•
I.iquid or powdered
color-safe bleach may be added to the Main Wash compartment
along with the same type of liquid or powdered detergent.
Always measure liquid chlorine
guess. Follow the manufacturer's
•
Do not fill beyond
•
Use the detergent
load size.
Fabric
•
•
and color-safe
bleach
manufacturer's
recommended
amount
for
If you are using the Delay Wash option, powdered
laundry products should be used
in the main wash compartment
because liquid products may seep out of the
compartment
before the main wash begins.
I.iquid
detergent:
softener
the "MAX"
bleach. Use a measuring cup with
directions for proper use.
[eve[. Overfilling
Illustration)
Pour measured
fabric
liquid
softener
into the fabric softener
detergent:
A
IJ,
I.
<::]L|QUiD
PREWASH A
MAINWASHV
LIQUI
SO
B
I
Selector in position for powdered detergent
A. Detergent type selector
B. Main wash compamnent
dispenser,
if desired.
•
Pour only
liquid
fabric
softener
•
Do not overfill.
•
The fabric softener is dispensed in the rinse cycle. If Extra Rinse is selected,
the fabric softener will be dispensed during the Extra Rinse.
•
Do not use fabric softener dispensing
operate correctly with this washen
•
Do not spill or drip any fabric
•
At the end of the cycle,
This is normal.
The dispenser
into the dispenser.
holds
_/4cup (60 ml.).
softener
a small amount
balls in this washer.
1,
To pause the washer
2.
To continue
the cycle,
Dispensing
balls will
not
onto the clothes.
of water may be left in the dispenser.
........
.....,
Powdered
damage.
NOTES:
SO
A. Detergent type selector
B. Main wash compartment
cause garment
compartment
(I.etter E in Dispenser
LIQUI
Selector in position for fiquid detergent
could
a pour spout; do not
i
ni!i
at any time, select START/PAUSE.
select START/PAUSE
(for approximately
1 second).
Z'I
To add items
..........
Not all Options
can be changed
O
_:'
_
.........
and Modifiers
are available with all cycles. Cycles,
anytime before START/PAUSE is selected.
Options and Modifiers
can be changed
start of the selected Option or Modifier.
anytime
after START/PAUSE
Options,
and Modifiers
is selected
and before
the
To cancel a cycle and begin a new cycle
1.
Select POWER/CANCEl.
2.
Select desired
3.
Select the desired
4.
Select START/PAUSE
of the new cycle.
1 second)
to restart the washer
at the beginning
To cancel a cycle
The washer
powers
once.
down,
the door unlocks,
NOTE: If the water [eve[ or the temperature
before the door unlocks.
To change
Options
or Modifiers
1.
Select START/PAUSE
2.
Select the desired
3.
Select START/PAUSE
To drain the washer
1.
and clothes
can be removed.
is too high, the washer
will
drain
Select DRAIN/SPIN.
3.
Select START/PAUSE
4.
When
3.
To unlock the door after the Add Clothes
This will cancel the Wash Cycle.
dose
the door and select START/PAUSE
period,
(for approximately
press POWER/CANCEl.
twice.
done
until
the door of the washer
is opened,
Cycles certified by NSF International
an independent,
third party testing and certification
organization
are those with the sanitize temperature
selection available. The certification
verified that these cycles reduce 99.9% of bacteria typically found on clothing, bedding,
and towels. There is no carryover of bacteria between loads after the cycle is complete. Only
cycles with sanitize wash temperature
selected have been designed to meet the requirements
of NSF Protocol P172 for Sanitizing Efficacy.
automatically
after the cycle has started
or MODIFIERS.
(for approximately
Certified
1 second)
to continue
Locking controls
The Control I.ock avoids unintended
once.
(for approximately
the spin is complete,
1 second)
the door unlocks.
to begin the drain.
Items can be removed
from the washer.
To lock the controls
Select and hold CONTROl.
lOCK
remaining
delay
add
clothes
estimated
wash
time
rinse
I_OCK status light illuminates.
the controls
Select and hold CONTROl.
spin
done
for 3 seconds.
Q
To unlock
sensing
button
lock
changes during a cycle. When Control I.ock light
except for the Control I.ock, Power/Cancel,
and
control
lock
hold 3 seconds
The CONTROl_
time
use of the washer. You can also use the control
feature to avoid unintended
cycle or option
is [it during a cycle, all buttons are disabled
Start/Pause buttons.
This indicator shows which portion of the cycle the washer is operating and the estimated
time remaining.
It also indicates when you can add an additional
item to the wash cycle and
when the controls are locked.
estimated
to Sanitize
the cycle.
manually
2.
To continue
1 second).
and items can be added.
once.
OPTIONS
Select START/PAUSE
2.
the cycle,
door unlocks,
Sanitize
(for approximately
2.
once. The washer
The cycle done indicator
stays on for 60 minutes,
or the Power/Cancel
button is pressed.
OPTIONS.
Select POWER/CANCEl
Select START/PAUSE
Cycle
twice.
cycle.
1.
1.
lOCK
for 3 seconds
until the Control
I.ock status light turns off.
Door Locked
When the status light illuminates, the door is locked.
Adding
items
This washer allows an 8-minute period in which other garments may be added to the load.
You can add items to the washer if the status indicator
shows Add Clothes.
16
Estimated
time
The cycle time
detergent, and
is unbalanced.
clothes. During
complete,
then
cycle time.
remaining
varies automatically
based on your water pressure, water temperature,
clothes load. The cycle time will be extended if oversudsing occurs or the load
The SUDs routine removes extra suds and assures proper rinsing of your
the unbalance
routine, the time displayed may pause until this activity is
resume with the cycle. These routines may add up to a half-hour to the default
Cycles can be selected by turning the Cycle control knob to the desired
is designed for different types of fabric and soil levels.
cycle.
Each cycle
Use this cycle to clean hand washable and special-care garments. Similar to the way garments
are hand washed in a sink, the wash action of this cycle combines periods of low-speed
tumbling
and soaking. I.ow-speed spin helps reduce wrinkling.
nornlal_
casual
delicate
quick wash
whitest
whites
Clean Washer with
handwash
soal_
Handwash
AFFRESH
TM
Use this cycle once a month to keep the inside of your washer fresh and clean. This cycle uses
a higher water level in combination
with AEERESH TM washer cleaner or bleach and steam, to
thoroughly
clean the inside of your washer. This cycle should not be interrupted.
See
Cleaning Your Washer in the Washer Care section.
lean washer
with aflresh
drain & spin
rinse
&
IMPORTANT:
:loor locked
sp'nl
press
pause
to untock
I)o not place garments
in the washer
during
the Clean Washer
cycle.
Rinse & Spin
Each cycle has a preset Soil Level (cycle time), Water Temperature,
and Spin Speed, and
may have preset options. The preset settings provide the recommended
fabric care for the
selected cycle.
Use this cycle to get a rinse and spin only. This cycle combines fast-speed tumbling
and extra
high speed spin. If desired, you can reduce the spin speed by selecting the speed you want
from the Spin Speed modifier.
The preset settings can be changed anytime before START is pressed. Not all options and
modifiers are available with all cycles. (To change settings after the cycle has started, press
PAUSE once, then select the desired settings. Press START again to continue the cycle.)
A Rinse & Spin cycle
Whitest
Duty
Use this cycle to wash loads of sturdy, colorfast fabrics, and heavily soiled garments. This
cycle combines fast-speed tumbling,
longer wash time, and extra high speed spin to shorten
drying times. If the water temperature
is lower than needed for this cycle, the heater will
warm the water to the optimum
temperature.
Normal/Casual
Use this cycle to wash normally
soiled cottons
speed tumbling
and extra high-speed spin.
and linens. This cycle
combines
medium-
Delicate
Use this cycle to wash no-iron fabrics and garments labeled "Permanent
Free" or that indicate using a "Gentle" cycle on the care label. This cycle
tumbling
and medium-speed
spin to help reduce wrinkling.
Quick
Press" or "Wrinkle
combines low-speed
Wash
Use this cycle to wash small loads of lightly soiled garments that are needed in a hurry. This
cycle combines fast-speed tumbling,
a shortened wash time, and extra high speed spin to
shorten drying time.
I.oads that need rinsing
for:
only,
like swimsuits.
NOTE: For more delicate loads, when using a Rinse & Spin cycle to rinse swimwear,
change the Speed Spin Modifier setting to Medium or I.ow to avoid fabric stress.
Whites
This cycle is especially designed for cleaning loads of soiled white fabrics with the addition of
bleach. Hot washing temperatures
assure optimal bleach activity. An additional
rinse provides
optimal rinse performance
to avoid chlorine residues on your laundry. This cycle combines
high-speed tumbling,
longer wash time, and fast-speed spin to shorten drying time.
Heavy
•
is useful
•
Adding
Drain
fabric
softener to a load.
Z'I
& Spin
Use this cycle to drain your washer or to drain and spin your wash load. The spin speed is
preset to extra high. If desired, you can reduce the spin speed by selecting the speed you want
from the Spin Speed modifier.
NOTE: I.oads of synthetics, delicate fabrics, hand washables, and washable
be drained with no spin or low spin speed to avoid fabric stress.
woolens
should
Soak
Use the Soak cycle to remove small spots of set-in stains on fabrics. This cycle provides a soak
time with warm or cold water followed by drain. Extra water, a short tumbling
phase for equal
distribution
of the laundry, and a soaking time without drum movement improve the removal
of set-in stains. Drain without spin assures gentle treatment, even for delicate articles.
Preset
cycle
settings
Each cycle has a preset Soil Level (cycle time), Water Temperature,
and Spin Speed. The
preset settings provide the recommended
fabric care for the selected cycle. See chart.
Cycles
Soil Level
(cycle time)
Water
Temp
Normal
(1:15)
Hot/Cold
Spin Speed
You can customize your wash by adding options to your cycle selections.
change an option after starting a cycle anytime before the selected option
options are available with all cycles.
power • cancel
Whitest
Whites
norma[,
casual
Extra High
start o pause
delicate
quick wash
dut
Heavy
Duty
Heavy
(1:20)
Hot/Cold
Normal/Casual
Normal
(0:50)
Warm/Cold
Extra High
Delicate
Normal
Warm/Cold
Medium
whites
whitest
handwash
:lean washer
Handwash
I_ight
(0:30)
Warm/Cold
Extra High
Normal
Cold/Cold
I.ow
[
signal on • off
J
soal
drain & spin
:[oor locked
& Spln
[st
See the "l.aundry
selection.
Guide"
for an overview
of possible
options
You can select more than one option for a cycle. Some options cannot
cycles; for example, Steam Clean cannot be added to the Quick Wash
Rinse & Spin
N/A
(0:22)
Cold/Cold
Extra High
Drain
N/A
(0:13)
N/A
Extra High
Signal On/Off
Use this option to turn the buzzer indicating the end of the cycle on or off.
Normal
(0:30)
Warm/Cold
No Spin
Max
Press the selector
Normal Washer
cycle
of each
N/A
If an option is available
when selected.
setting
until the desired
setting
illuminates.
Sounds
As with any new product, you will hear sounds that you are not accustomed
to. You may hear
various sounds when the door is locked and unlocked,
and during the washing, rinsing, and
spinning process. Between changes in wash actions, there will be momentary
pauses. You
will hear water spraying and splashing during the wash and rinse cycles. These new sounds
and pauses are part of normal washer operation.
18
with
a selected cycle,
the light for that option
If an option is unavailable
with a selected cycle, there
for that option will not illuminate
when selected.
will
lean
}
will
illuminate
be a short tone, and the light
Extract TM
Use this option to add an additional
spin to any cycle to improve
fabrics by reducing excess wateb which may save energy.
settings
....
be added to some
cycle.
(1:05)
the preset
]
for each Wash Cycle
N/A
To change
extrarinse
press pause to unlock
with
AFFRESH TM
Soak
[
with affrSSh
Clean Washer
& Spin
maxextract ]
options
(0:30)
Sanitize
[
_yd_s
rinse
Wash
_'_
Extra High
(0:40)
Quick
You can add or
begins. Not all
drying times for some heavy
Steam Clean
Use this option for heavily soiled loads that need improved stain treatment or loads with
multiple types of stains. When Steam Clean is selected, the water temperature
of the selected
wash cycle is automatically
set to warm. The water will then be slowly heated to the
temperature
selected, along with steam, to aid in stain removal
This option will provide
optimal removal of organic stains such as blood and temperature-sensitive
stains such as oil,
in the same cycle. This option is available on the following
cycles: Normal/Casual,
Heavy
Duty, and Whitest Whites.
Extra
Water Temp
Select a water temperature
based on the type of load you are washing.
water safe for fabrics. Follow garment label instructions.
Use the warmest
wash
Warm rinses leave the loads drier than cold rinses. Warm rinses increase wrinkling.
In cold
climates, a warm rinse makes the load more comfortable
to handle. Cold rinses save energy.
•
Rinse
Cycles certified by NSF International,
an independent,
third party testing and certification
organization
are those with the sanitize temperature
selection available. The certification
verified that these cycles reduce 99.9% of bacteria typically found on clothing, bedding,
and towels. There is no carryover of bacteria between loads after the cycle is complete.
A second rinse can be used to aid in the removal of detergent or bleach residue from
garments. This option provides an additional
rinse with the same water temperature
as the
normal rinse. This is the default rinse setting for the Whitest Whites cycle.
Certified
Preset cycle settings of Soil I.evel (cycle time), Wash Temperature,
and Spin Speed can be
changed. You can change these settings by using modifiers.
Modifiers
can be changed before
or during the cycle until that part of the cycle starts. Not all modifiers are available with all
cycles and options.
[m
extra
U
sanitize
[m
high
to Sanitize
•
The Sanitize water temperature
provides an extra high temperature
wash to remove
99.9% of certain bacteria. It is recommended
that you set your hot water heater to
120°F (49°C) to ensure proper performance
during this cycle.
•
The Sanitize water temperature
avoid garment damage.
is extremely
hot. Please check garment
care labels to
!
high
[U
heavy
U
ATC hot
_
medium
g
normal
B
ATCwarm
_
low
light
_
cold
_
no spin
In wash water temperatures
colder than 60°F (15.6°C), detergents do not dissolve well.
Soils may be difficult to remove. Only cycles with sanitize wash temperature
selected
have been designed
to meet the requirements
of NSF Protocol
Efficacy.
Wash
soilievel
}
[
washtemp
[
spinspeed
:::::::
,,,
Water
Temperature
Suggested
Fabrics
}
Wash Water
Temperature
Suggested Fabrics
modifiers
SANITIZE
To change Soil I.evel (cycle time),
illuminates.
select the SOIl. I.EVEI. button
To change the water temperature,
illuminates.
select the WASH TEMP button
To change the spin speed, select the SPIN SPEED button
illuminates.
until
until the desired
until
the desired
the desired
Sturdy colorfast
setting
Heavy
HOT
setting
WARM
fabrics
soils
Sturdy colorfast
setting
fabrics
Whites
and pastels
Heavy
soils
Bright colors
Moderate
COLD
Colors
to light soils
that bleed or fade
Light soils
In wash water temperatures
colder
Soils may be difficult to remove.
Automatic
Temperature
than 60°F (15.6°C),
detergents
do not dissolve
weft.
Control
The automatic
temperature
control electronically
senses and maintains a uniform water
temperature.
Automatic
temperature
control regulates incoming
hot and cold water.
Automatic
temperature
control is automatically
turned On when a cycle is selected.
See "Preset Cycle Settings"
in Cycles.
•
control
Automatic
.......
P172 for Sanitizing
temperature
works
for all wash and rinse temperature
settings.
Refer
tothischartforsuggested
loadtypesandtheircorresponding
cycles.
Listed
totherightaretheoptions
available
toeachofthese
washer
cycles.
CYCLE
SUGGESTED
Whitest
Whites
Heavy
Duty
LOAD TYPE
Heavily
soiled white
Heavily
soiled
Normal/Casual
Normally
or cotton
Quick
I.ight[y soiled
Wash
AVAILABLE OPTIONS
Signal
ON/OFF
Delay
Start
Extra
Rinse
Steam
Clean
Max
Extract
_/
_/
_/
_/
_/
_/
_/
_/
_/
_/
_/
_/
_/
_/
_/
_/
_/
_/
fabrics
underwear,
soiled blouses,
blends
towels,
work
clothes,
shirts, overalls,
sports wear made of cotton,
shirts, etc.
etc., made of polyester,
polyester,
nylon,
nylon,
or cotton
linen,
blends
Delicate
Use this cycle to wash no-iron fabrics and garments labeled "Permanent
Press,"
or "Wrinkle
Free" or that indicate using a "Gentle" cycle on the care [abe[.
_/
_/
_/
Handwash
Fabrics made of silk, special-care
_/
_/
_/
Soak
Fabrics made of cotton,
linen,
polyester,
or nylon
_/
_/
Rinse & Spin
Fabrics made of cotton,
linen,
polyester,
or nylon
_/
_/
Drain
Fabrics made of cotton,
linen,
polyester,
or nylon
J
J
& Spin
Clean Washer
items marked
"Handwashab[e".
No clothes
_/
TM
_/
J
_
iiiiiii[[[[iiiiiiiiiiiiiiiiiiiiiiiiiiiiiiiiiiiiiiiiiiiiiiii_
_i!i[ii!i_iii][iii_
LAUNDRY
Preparing
Follow
•
clothes
for washing
these recommendations
Use only
High Efficiency
to help you prolong
detergents.
the life of your garments.
The package for this type of detergent
will
be marked
"HE" or "High Efficiency." This wash system, along with less water, will create too much
sudsing with a regular non-HE detergent. Using regular detergent will likely result in
washer errors, longer cycle times, and reduced rinsing performance.
It may also result in
component failures and noticeable mold or mildew. HE detergents are made to produce
the right amount of suds for the best performance.
Follow the manufacturer's
instructions
to determine the amount of detergent to use. Remember, concentrated
detergents such as 2x
or higher will
use less detergent
based on load size.
Use only HE High Efficiency detergent.
Close zippers, snaps, and hooks to avoid snagging other items. Remove pins, buckles, and
other hard objects to avoid scratching the washer interior. Remove non-washable
trim and
ornaments.
20
TIPS
•
Empty pockets
•
Turn down
cuffs;
and turn them inside out.
•
Turn woo[
and synthetic
•
Tie strings and sashes so they will
brush away lint and dirt.
knits inside out to avoid pilling.
not tangle.
•
Mend tears, loose hems, and seams.
•
Treat spots and stains.
•
Stained or wet garments
•
Mix
•
Wash small items, such as infant socks, in a mesh garment bag. To create a balanced
it is recommended
that more than one garment bag be used, and that each garment
be filled with equal amounts of material
large and small
should
be washed
items, avoid washing
promptly
for best results.
single items, and load evenly.
load,
bag
Sorting
•
Separate heavily soiled items from lightly soiled ones, even if they would normally
washed together. Separate lint-givers (towels, chenille) from lint-takers (corduroy,
synthetics, permanent press). When possible, turn lint-givers inside out.
•
Separate dark colors
from
light colors,
•
Sort by fabric and construction
colorfast
(sturdy cottons,
items from
non colorfast
knits, delicate
be
Loading
items.
Heavy Work Clothes
items).
4 jeans
4 work pants
4 work shirts
Unloading
•
Remove clothes from washer after the cycle is completed.
Metal objects
snaps, and buckles may rust if [eft in the washer basket for a long time.
•
When unloading
garments,
of the tub for small items.
occasionally
check under
the gray colored
suggestions
such as zippers,
2 sweatpants
2 sweatshirts
Towels
1 0 bath towels
10 hand towels
seal at the front
Mixed
3
4
3
3
14 washcloths
Load
sheets (1 king, 2 twin)
pillowcases
shirts
blouses
9 T-shirts
9 shorts
10 handkerchiefs
WASHER CARE
Cleaning the door seal
1. Open the washer door and remove any clothing or items from the washer.
2. Inspect the gray colored seal between the door opening and the basket for stained areas.
Pull back the seal to inspect
areas under the seal. Remove
any foreign
objects.
d)
Wipe down
door open.
IMPORTANT:
area thoroughly
with a dry cloth
and let the washer
•
Wear rubber gloves when cleaning for prolonged periods.
•
Refer to the bleach
Washer
manufacturer's
Maintenance
instructions
for proper
interior
air dry with
use.
Procedure
This washer has a special cycle that uses higher water volumes and steam, in combination
with AFFRESH r_* washer cleaner or liquid chlorine bleach to thoroughly
clean the inside
of the washer.
NOTES:
•
Read these instructions
completely
before
beginning
the cleaning
process.
If necessary, the cleaning cycle may be interrupted
by pressing the START/PAUSE button.
However; this will not immediately
stop the cycle. The machine will display "int"
(interrupt) and continue with several rinse and drain steps to ensure that all remaining
bleach is rinsed from the washer.
A. Seal
3.
If stained areas are found, wipe down these areas of the seal, using the procedure that
follows.
a)
Mix a dilute solution, using 3/4 cup (177 ml.) of liquid
(3.8 I.) of warm tap water.
b)
Wipe
c)
I_et stand 5 minutes.
the seal area with the dilute
solution,
chlorine
using a damp
cloth.
bleach,
and 1 gal.
Begin procedure
1. Open the washer door and remove any clothing or items from the washer.
Cleaning
2.
1.
Open the dispenser drawer. Unlock the dispenser drawer by pressing the Release I.ever
on the [eft side of the dispenser drawer. See "Using the Dispenser".
Remove the drawer.
2.
Wash
3.
Return the dispenser
Using the AEERESH1Mwasher cleaner (Recommended):
Add one AFFRESHrMwasher cleaner tablet to the washer drum.
If using liquid chlorine bleach:
Open the dispenser drawer and immediately
bleach to the bleach compartment.
add 2/s cup (160 ml.) of liquid
chlorine
Close the washer
4.
Select the Clean Washer
door and dispenser
5.
Press START/PAUSE.
NOTE: The basket will
will continue.
•
6.
will
determine
rotate,
then the door will
unlock,
running
water to dean.
Allow
exterior
up any spills. Occasionally
wipe the outside of your
soap and water. Do not use abrasive products.
lock again, and then the cycle
whether
clothing
or other
rotate while
3 minutes.
Replace inlet hoses after 5 years of use to reduce the risk of hose failure.
and replace inlet hoses if bulges, kinks, cuts, weab or leaks are found.
When
the
replacing
your inlet hoses, record
Install and store your washer where it will not freeze. Because some water may stay in the
hoses, freezing can damage your washer. If storing or moving your washer during freezing
weatheb winterize
it.
b)
If any items are detected in the washeb "rl." will be
displayed, and the WASH and CONTROl_ I_OCK lights will
remain [it. The door will unlock. Open and remove any
garments in the wash drum.
Operate your washer only when you are at home. If you will
your washer for an extended period of time, you should:
•
•
Unplug
•
Turn off the water supply to the washer. This helps avoid
water pressure surge) while you are away.
•
Slightly
has begun,
it will
Once
After the cycle is complete,
leave the door open slightly
drying of the washer interior.
HE High
Efficiency
Repeat the cleaning
illuminates.
washer
Non-use
again.
to allow
for better ventilation
and
freshness
monthly
to allow
or when
for better ventilation
the CI.EAN WASHER
freshness,
and drying
REMINDER
If you are not ready to run the Clean Washer cycle, but the Clean Washer
is illuminated,
press the Clean Washer Reset button.
If the procedure does not sufficiently
improve the machine
installation
and usage conditions
for other causes.
or vacation
washer
open
To winterize
detergent
open after each cycle
procedure
to
the cycle to complete.
to maintain
I.eave the door slightly
of washer interior.
proceed
to cancel the failure code. Then
8.
do the following
allow
inspect
items are in the washer.
in the washeb
Press POWER/CANCEl.
Periodically
the date of replacement
If no items are detected
Step 7.
the cycle
to dry.
to drawer.
a)
7.
Use only
under
for easy cleaning.
Use a soft damp cloth or sponge to wipe
washer to keep it looking new. Use mild
drawer.
repeat steps 3, 4, and 5 to start the cycle
Always
the
Drawer
is removable
cycle.
The machine will bring in some inlet wateb and the basket will
washer runs a short sensing cycle. This will take approximately
The cycle
Dispenser
drawer
the dispenser
Cleaning
NOTE: Do not add any detergent to this cycle. Use of more than 2/3 cup (160 ml.)
of bleach will cause product damage over time.
3.
the
The dispenser
evaluate
Reminder
your
light
light
care:
or disconnect
door to provide
1.
Put 1 qt (1 I.) of R.V.-type
Run washer
3.
Unplug
4.
Shut off both water faucets.
5.
Disconnect
on a Drain
washer
ventilation.
antifreeze
water inlet
in the drum.
& Spin cycle.
or disconnect
or not using
power.
washer:
2.
be on vacation
power.
hoses from faucets
and drain.
unintended
flooding
(due to a
To use washer again:
1. Flush water pipes. Reconnect water inlet hoses to faucets. Turn on both water faucets.
2.
Plug in washer
3.
Run the washer through the Normal/Casual
cycle with I/2 the manufacturer's
recommended
amount of HE detergent for a medium-size
load, to clean the washer
remove the antifreeze, if used.
To transport
Electrical
Plug into a grounded
Do not remove
Shock
3 prong
ground
Hazard
outlet.
the
Do not use an adapter.
fire,
to follow
or electrical
cord.
these
instructions
and
washer:
1.
If washer will be moved during freezing weather, put in 1 qt (1 I.) of R.V.-type
in the drum. Run washer on a Drain & Spin cycle.
2.
Unplug
antifreeze
the power cord.
3.
Disconnect
4.
Shut off both water faucets.
5.
Disconnect
the water inlet hoses from faucets,
rear pane[ of the washer.
Reinstalling
Failure
power.
the drain hose from the drain
system and attach to rear pane[ clips.
then drain the hoses and clip them to the
IMPORTANT:
Ca[[ for service. Do not reuse transport bolts. Washer must be transported
in the
upright position. To avoid suspension and structural damage to your washer, it must be
properly set up for relocation
by a certified technician.
prong.
Do not use an extension
or reconnect
can result
in death,
shock.
the washer
1.
Follow
the "Installation
Instructions"
to locate,
[eve[, and connect
the washer.
2.
Run the washer through the Normal/Casual
cycle with % the manufacturer's
recommended
amount of HE detergent for a medium-size
load, to clean the washer
remove the antifreeze, if used.
and
ii.........
TROUBLESHOOTING
First try the solutions suggested here or visit our website
and reference
FAQs (Frequently
In the U.S.A. www.maytag.com/help
displaying
code
message
and
tone
sounds
Check the following:
Are both hot and cold water faucets completely
Are screens at inlet
hose connection
Are water
inlet hoses kinked?
Are water
inlet hoses frozen?
Plug in washer or reconnect power.
problem remains, ca[[ for service.
to washer
turned
(Drain
Problem)
Select POWER/CANCEl.
"F20" (Water Inlet Problem--no
water or insufficient water supply)
Select POWER/CANCEl.
twice to cancel the cycle. Unplug washer or disconnect
to possibly avoid the cost of a service call.
In Canada www.maytag.ca
"F21"
Washer
Asked Questions)
twice
to cancel the cycle.
power.
Is the drain
on?
or disconnect
power.
hose clogged?
Is the drain hose more than 96" (2.4 m) above the floor?
clogged?
"SUD"
cycle and press START/PAUSE.
washer
Is the drain hose frozen?
Plug in washer or reconnect power.
problem remains, ca[[ for service.
Re-select
Unplug
Check the following:
Is the drain hose kinked?
If the
When
Re-select
cycle and press START/PAUSE.
If the
(Suds Routine)
excessive
suds are detected,
a suds routine
automatically
starts. This routine
removes extra suds and assures proper rinsing of your garments. "SUI])" is displayed
during rinsing and at the end of the cycle to inform you that Suds Routine was activated.
Use only HE (High Efficiency) detergents.
"F22"(Front
DoorLock)
Select
POWER/CANCEl.
twicetocancel
thecycle.
Check
thefollowing:
Isthewasher
doorfirmlyshut?
Thedoormustbecompletely
dosedforthewasher
tooperate.
Thedoormaylookdosed,
butmaynotbelatched.
Openthedooranddosefirmly.
Wereyouwashing
alargeload?
Before
youdosethewasher
doobcheck
thatclothes
areinside
thewasher
drumand
away
fromthesea[areasotheclothes
cantumble
freely.
Anoverloaded
basket
maykeep
thedoorfromdosingcompletely.
Reduce
yourloadsizeifneeded.
Close
thedoor.
Press
POWER/CANCEl.
andthenpress
START/PAUSE.
"F"Codes
otherthanF20,F21,orF22
Select
POWER/CANCEl.
twicetocancel
thecycle.Select
DRAIN
&SPIN
ifthereis
excessive
waterinthewasher.
Re-select
cycleandpress
START/PAUSE.
Iftheproblem
remains,
callforservice.
Washer
won't
Washer
won't
fill, wash,
Check the following:
Is the power cord plugged
Is there power
or rinse
into a grounded
at the plug? Check
electrical
Are the hot and cold water faucets turned
Is the water
3 prong
outlet?
source or ca[[ an electrician.
on?
inlet hose kinked?
Are the water inlet valve screens dogged?
Turn off the water and remove inlet hoses from the washer. Remove any accumulated
or particles. Reinstall hoses, turn water on, and check for leaks.
Washer
film
stops
Check the following:
Is the power cord plugged into a grounded 3 prong outlet?
start
Is there power at the plug?
Check electrical source or call an electrician.
Has a household fuse blown, or has a circuit breaker tripped?
circuit breaker. If the problem continues, ca[[ an electrician.
Replace the fuse or reset the
Are you using an extension cord?
I)o not use an extension cord.
Washer
Do not remove ground
prong.
•
Is your voltage low?
Check electrical source or ca[[ electrician.
•
•
Failure to follow these instructions can result in death,
fire, or electrical shock.
door firmly
Has a cycle been selected,
for 1 second?
Was the door open after completion
has not been selected
of last cycle?
or the end of the drain
Do not use an extension
hose more
cord.
routine active?
complete
once extra suds are removed.
Is the load balanced?
A single or bulky
Washer
makes
item may cause imbalance.
noise
Add more
items or redistribute
the load.
or vibrates
The washer must be level. The four feet should
be tightened against the washer cabinet.
closed?
but START/PAUSE
will
hose clogged,
Is the washer level?
Check the following:
Is the power cord plugged into a grounded 3 prong outlet?
Is the washer
Is the"SUD"
Cycle
cord.
or spin
Is the drain hose kinked? Is the drain
than 96" (2.4 m) above the floor?
Do not use an adapter.
Do not use an extension
drain
•
Electrical Shock Hazard
Plug into a grounded 3 prong outlet.
won't
and held
be properly
installed,
As water is drained from the washer, you may hear air being pulled
This happens during the end of draining. It is normal
and the nuts should
through
the pump.
Are you washing items with metal snaps, buckles, or zippers?
You may hear metal items touching the washer drum. This is normal
Is washer installed on a sturdy and solid floor?
Refer to the "Installation
Instructions"
for flooring requirements.
Noise and vibration
may
be reduced by securing a piece of 3/4" (19.1 mm) plywood
underneath
your washer. The
plywood may extend underneath
both washer and dryer to keep them at equal heights.
24
Washer
Did you use enough HE detergent?
Use enough detergent to remove lint and hold it in suspension.
Follow the manufacturer's
instructions
to determine the amount
leaks
•
Check household
•
Are the inlet hose connections tight?
For inlet hose connections,
see "Connect
Dispensers
•
clogged
for leaks.
Is your water colder than 60°F (15.6°C)?
Wash water colder than 60°F (15.6°C) may not completely
the Inlet Hoses."
or leaking
Washer
Stains
bleach
type selector in the correct position?
be on the right for liquid detergent and to the [eft for powdered
detergent.
Your Washer."
Are you using HE detergent?
Use of non-HE detergent can cause a film
Did you leave the door open after use?
This washer has a tight sea[ to avoid water
allow the washer to dry between uses.
residue
which
leaks. To avoid
can result in odor.
odors leave the door open to
Use of the Max Extract
or lint
TM
option
is recommended
Did you unload the washer promptly?
To avoid the transfer of dye, unload the washer
for heavy
to
Use only HE detergent.
of detergent to use.
Did you use powdered detergent
Consider using liquid detergent.
Did you unload the washer
the washer
to
Did you sort properly?
Sort lint givers (towels, chenille) from lint takers (corduroy, synthetics). Also sort by color.
Did you overload the washer?
I]o not overload the washer. The washer can be fully loaded, but not tightly packed.
The wash load must be balanced.
I.int can be trapped in the load if overloaded.
in a low-speed
fabric softener
cycle?
soiled
loads.
Use the Delicate
promptly?
as soon as it stops.
Did you use the right
Do not add detergent
this washer. Add liquid
Did you use Quick Wash on a large load?
For best results, use Quick Wash for small, lightly
Unload
Did you add detergent to the dispenser?
For best results, add detergent to the Main wash compartment.
the washer drum.
Z'I
Load is wrinkled
loads.
on load
Check the following:
Was paper or tissue left in pockets?
not add detergent
as soon as it stops.
Did you use a fabric softener dispensing ball?
Dispensing balls will not operate correctly with
to the fabric softener compartment.
Did you wash a single item or bulky items or have you overloaded the washer?
A single item, bulky items, or overloading
may cause imbalance.
Add items or try to
evenly distribute your wet laundry in the drum, and start a L-)rain/Spin cycle. If the laundry
is still wet, take haft of the load out of the washer and try again.
Residue
I]o
Did you properly sort the load?
Sort dark clothes from whites and lights.
Did you use the right cycle for the load being washed?
Select a cycle with a higher spin speed.
NOTE:
Did you add detergent to the dispenser?
For best results, add detergent to the Main wash compartment.
the washer drum.
Is there above average iron (rust) in water?
You may need to install an iron filter.
Load too wet
•
on load
Did you use enough HE detergent?
Use enough detergent to remove soil and hold it in suspension.
Follow the manufacturer's
instructions
to determine the amount
odor
See "Cleaning
the detergent.
to the
compartments.
Is the detergent
Selector should
dissolve
Are you using a low speed wash cycle?
Powdered detergents may not dissolve well in a slow-speed
cycle. For best results, use
liquid detergent for slow-speed
cycles such as Delicate and Handwash.
Are the laundry products in the correct dispenser compartment?
Add the correct amounts of detergent, fabric softener, or liquid chlorine
correct
•
plumbing
Use only HE detergent.
of detergent to use.
cycle for the load being washed?
cycle
or another
Did you overload the washer?
The wash load must be balanced
cycle with
a low spin speed to reduce wrinkling.
and not overloaded.
I.oads should
tumble
freely during
washing.
Gray
whites,
dingy
colors
Did you properly sort the load?
The transfer of dye can occur when
from whites and lights.
mixing
whites
and colors
in a load. Sort dark clothes
Was the wash temperature too low?
Use hot or warm washes if safe for the load. Make sure your hot water system is adequate
to provide a hot water wash.
Did you wash a large load using the Quick Wash cycle?
The Quick Wash cycle is designed for smaller load sizes (2-3 iterns of lightly soiled
garments).
If larger loads are washed using this cycle, wash time will be increased.
Did you use enough detergent, or do you have hard water?
Use rnore detergent for washing heavy soils in cold or hard water.
Did you wash a large load using a gentle cycle?
When using the Delicate and Handwash
cycles, you should wash small loads. This
ensures a gentle wash for your garments without
increasing cycle times.
Cycle
too
Did the load cause imbalance?
long
When
Did
The
will
the
you choose the Whitest Whites cycle?
heater will be activated to provide maximum
cleaning performance.
Additional
time
be added to the regular cycle to heat the water. This additional
time will depend on
load size and the hot water inlet temperature.
Is "SUD" shown in the display?
Excessive sudsing has been detected and a suds routine
excessive suds. This routine will add time to the original
Before calling
for assistance
cost of a service
When
calling,
If you need
please check "Troubleshooting."
ca[[. If you still need help, follow
please
your appliance.
or service,
know the purchase
This information
replacement
will
has been started to destroy
cycle.
the instructions
date and the complete
help us to better
respond
mode[
It may save you the
and serial number
Door
•
below.
of
too much imbalance
occurs,
an imbalance
routine
will
start to redistribute
the
load. During the imbalance
routine, the time displayed may pause until this activity
complete, then resume with the remainder of the cycle.
locked
at end of wash
cycle
Did all of the water drain out of the washer during the spin?
Select I)RAIN & SPIN to rernove any water rernaining
in the washer. The washer door will
unlock at the end of the drain.
For further
assistance
If you need further
concerns at:
to your request.
is
assistance,
you can write
to Maytag _ appliances
with any questions
or
Maytag Services, I.I_C
ATTN: CAIR _ Center
P.O. Box 2370
parts
If you need to order replacernent
parts, we recornrnend
that you use only factory specified
parts. Factory specified parts will fit right and work right because they are made with the same
precision
used to build every new Maytag _k_appliance.
Cleveland,
TN 37320-2370
Please include
a daytime
phone
number
in your correspondence.
To locate factory specified parts in your area, ca[[ the Maytag Services, I.I.C Customer
Assistance telephone number, or your nearest designated service center.
Call the Whirlpool
Our
Call the Maytag
Services,
Our
provide assistance
consultants
I.I.C Customer
•
Features and specifications
•
Installation
toll free: 1-800-688-9900.
with:
on our full
line of appliances.
consultants
I_P Customer
experience
Centre toll free: 1-800-807-6777.
provide assistance with:
•
Features and specifications
•
Use and maintenance
•
Accessory
•
Referrals to local dealers, repair parts distributors,
and service companies.
Canada I_Pdesignated service technicians
are trained to fulfill the product
provide after-warranty
service, anywhere in Canada.
and repair
on our full
line of appliances.
procedures.
parts sales.
information.
•
Use and maintenance
•
Accessory
•
Specialized
etc.).
•
Assistance
Canada
and repair
customer
procedures.
parts sales.
assistance
(Spanish speaking,
hearing
impaired,
limited
Referrals to local dealers, repair parts distributors,
and service companies.
appliances designated service technicians
are trained to fulfill the product
provide after-warranty
service, anywhere in the United States.
To locate the Maytag <"appliances
look in your telephone directory
designated service
Yellow Pages.
company
vision,
Maytag _k_
warranty and
in your area, you can also
For further
Whirlpool
warranty
and
assistance
If you need further
concerns at:
assistance,
you can write
to Whirlpool
Canada
Customer eXperience
Centre
Whirlpool
Canada I_P
1901 Minnesota
Court
Mississauga,
Please include
Ontario
a daytime
1_5N 3A7
phone
number
in your correspondence.
I.P with any questions
or
_ii_u_
!_i_iiiii_,
iiiiiiiii_i_ii_i_iiiii_i_iiiiiil,'
,_i!iiiiii_,
¸,......
_iiiiii,iiill
_,_
_
MAYTAG ® LAUNDRY WARRANTY
LIMITED
WARRANTY
For one year from the date of purchase, when this major appliance
is operated and maintained
according to instructions
attached to or furnished with the product, Maytag brand of Whirlpool
Corporation
or Whirlpool
Canada I_P (hereafter "Maytag")
will pay for factory specified parts and repair labor to correct defects in materials or workmanship
that existed when this ma or
appliance was purchased. Service must be provided by a Maytag designated service company. YOUR SOI.E AND EXCI.USIVE REMEDY UNDER THIS I.IMITED WARRANTY
SHAI.I. BE
PRODUCT REPAIR AS PROVIDED HEREIN. This limited warranty is valid only in the United States or Canada and applies only when the major appliance
is used in the country in which it was
purchased. Proof of original purchase date is required to obtain service under this limited warranty.
ITEMS EXCLUDED
This limited
warranty
does
1.
Replacement
parts or repair
operator instructions
and/or
2.
Service calls to correct
3.
Service calls to repair
or replace
appliance
light bulbs,
4.
Damage resulting from accident,
not approved by Maytag.
alteration,
misuse, abuse, fire, flood,
5.
Cosmetic damage, including scratches, dents, chips or other damage
reported to Maytag within 30 days from the date of purchase.
to the finish
6.
Pick up and delivery.
in your
7.
Repairs to parts or systems resulting
labor if this major appliance
installation
instructions.
the installation
This major
8.
Expenses for travel and transportation
The removal
and reinsta[[ation
parts or repair
of your major
appliance
9.
10. Replacement
FROM
WARRANTY
not cover:
from
appliance,
is intended
unauthorized
for product
of your major
labor on major
is used for other
to instruct
appliances
Consumable
acts of God, improper
to be repaired
modifications
household
use or when
parts are excluded
installation,
of your major
to replace
that is inconsistent
or repair house fuses, or to correct
from warranty
installation
appliance,
it is used in a manner
house wiring
user or
or plumbing.
coverage.
not in accordance
unless such damage
to published
with electrical
or plumbing
results from defects in materials
codes,
or use of products
or workmanship
and is
home.
made to the appliance.
major
if it is installed
with original
single-family
you on how to use your major appliance,
air filters or water filters.
service if your
appliance
than normal,
appliance
is located
in an inaccessible
model/serial
numbers
DISCLAIMER
in a remote
location
area where service
or is not installed
that have been removed,
OF IMPLIED
by an authorized
in accordance
altered,
Maytag
with Maytag's
or cannot
be easily
servicer
published
ZI
is not available.
installation
instructions.
determined.
WARRANTIES
IMPLIED WARRANTIES,
INCLUDING
ANY IMPLIED WARRANTY
OF MERCHANTABII.ITY
OR IMPLIED WARRANTY
OF FITNESS FOR A PARTICULAR
PURPOSE, ARE I.IMITED TO ONE
YEAR OR THE SHORTEST PERIOD AI.I.OWED
BY LAW. Some states and provinces do not allow limitations
on the duration of implied warranties of merchantability
or fitness, so this limitation
may not apply to you. This warranty gives you specific legal rights, and you also may have other rights that vary from state to state or province to province.
LIMITATION
YOUR SOLE AND
CONSEQUENTIAl_
you. This warranty
If outside
OF REMEDIES;
EXCLUSION
OF INCIDENTAL
AND CONSEQUENTIAL
DAMAGES
EXCLUSIVE REMEDY UNDER THIS HMITED WARRANTY
SHALl_ BE PRODUCT REPAIR AS PROVIDED HEREIN. MAYTAG SHAI.I. NOT BE I_IABI.E FOR INCIDENTAl.
OR
DAMAGES. Some states and provinces do not allow the exclusion
or limitation of incidental or consequential
damages, so these limitations
and exclusions may not apply to
gives you specific legal rights, and you also may have other rights that vary from state to state or province to province.
the 50 United
States and Canada,
contact
your authorized
Maytag
dealer to determine
if another
warranty
applies.
If you think you need repair service, first see the "Troubleshooting"
section of the Use & Care Guide. If you are unable to resolve the problem after checking
can be found by checking the "Assistance or Service" section or by calling Maytag. In the U.S.A., ca[[ 1-800-688-9900.
In Canada, ca[[ 1-800-807-6777.
Keep this book and your sales slip together for future
purchase or installation date for ,'n-warranty
service.
reference.
You must provide proof of
Write down the following
information
about your major appliance to better help you obtain
assistance or service if you ever need it. You will need to know your complete
modem number
and serial number. You can find this information
on the modem and serial number [abe[
located
on the product.
Dealer
name
Address
Phone number
Model
number
Serial number
Purchase date
"Troubleshooting,"
additional
help
6/08
SECURITE DE LA LAVEUSE
Votre s_curit_
et celle
des autres
est tr_s importante.
Nous donnons de nombreu× messages de s_curit_ importants dans ce manuel et sur votre appareil m_nager. Assurez-vous
toujours lire tous les messages de s_curit_ et de vous y conformer.
de
Voici le symbole d'alerte de s_curit_.
Ce symbole d'alerte de s_curit_ vous signale les dangers potentiels de d_ces et de blessures graves & vous
et & d'autres.
Tousles messages de s_curit_ suivront le symbole d'alerte de s_curit_ et le mot "DANGER" ou
"AVERTISSEMENT". Ces roots signifient :
Risque possible de d_c_s ou de blessure grave si vous ne
suivez pas imm_diatement les instructions.
Risque possible de d6c_s ou de blessure
ne suivez pas les instructions.
Tous les messages de s_curite vous diront quel est le danger potentiel et vous disent comment
ce qui peut se produire en cas de non-respect des instructions.
28
grave si vous
r_duire le risque de blessure et
IMPORTANTES
iNSTRUCTiONS
DE SECURITI_
AVERTISSEMENT
: Pour reduire les risques d'incendie, de choc electrique ou de blessures Iors de I'utilisation de la
laveuse, suivre les precautions fondamentales dont les suivantes •
= Lire toutes les instructions avant d'utiliser la laveuse.
m=Ne pas laver des articles qui ont 6t_ nettoyes ou
laves avec de I'essence ou imbib6s d'essence,
solvants de nettoyage & sec, ou autres substances
inflammables ou explosives; ces substances
peuvent 6mettre des vapeurs susceptibles de
s'enflammer ou d'exploser.
m=Ne pas ajouter d'essence, solvant de nettoyage &
sec ou autre produit inflammable ou explosif dans
I'eau de lavage. Ces substances peuvent emettre
des vapeurs susceptibles de s'enflammer ou
d'exploser.
m=Dans certaines conditions, de I'hydrog_ne gazeux
peut se former dans un circuit d'eau chaude qui n'a
pas 6t6 utilise pendant 2 semaines ou plus. LE GAZ
HYDROG#NE EST EXPLOSIBLE. Si le circuit d'eau
chaude n'a pas 6t6 utilis6 pendant une telle periode,
avant d'utiliser la laveuse, ouvrir tousles robinets
d'eau chaude et laisser I'eau s'6couler pendant
plusieurs minutes par chaque robinet. Ceci
permettra I'evacuation de I'hydrogene gazeux
accumule. Comme ce gaz est inflammable, ne pas
fumer ou utiliser une flamme nue au cours de cette
periode.
CONSERVEZ
[] Ne pas laisser des enfants jouer sur ou a I'interieur de la
laveuse. Bien surveiller les enfants Iorsque la laveuse est
utilisee & proximit6 d'enfants.
[] Avant de mettre la laveuse au rebut ou hors de service,
enlever la porte ou le couvercle.
[] Ne pas tenter d'atteindre un article & I'interieur de la cuve de
la laveuse Iorsque le tambour, la cuve ou I'agitateur est en
mouvement.
[] Ne pas installer ou remiser cette laveuse & un endroit o0 elle
serait expos6e aux intemp6ries.
[] Ne pas modifier les organes de commande.
[] Ne pas r6parer ou remplacer un composant quelconque de
la laveuse, ni entreprendre une operation de service, si ce
n'est specifiquement recommand6 dans ce manuel ou dans
un manuel d'instructions de r6parations destin6 & I'utilisateur;
il est alors essentiel que la personne concern6e comprenne
ces instructions et soit competente pour les ex6cuter.
[] Voir "Specifications
liaison & la terre.
61ectriques" pour les instructions de
711_@
CES iNSTRUCTiONS
_ilJi7
Avertissements
de la proposition
AVERTISSEMENT
65 de I'Ft:tat de Californie "
" Ce produit contient un produit chimique connu par I'Ft:tat de Californie pour _tre & I'origine de cancers.
AVERTISSEMENT " Ce produit contient un produit chimique connu par I'Fttat de Californie pour _tre & I'origine de malformations
et autres d6ficiences de naissance.
Rassembler [es outils et pi6ces ndcessaires avant de commencer
fournies se trouvent dans le tambour de la laveuse.
Outils
n_cessaires
pour
raccorder
•
Pince (ouverture
•
I.ampe de poche (facultative)
Outils
n_cessaires
•
CI6s plates
•
Niveau
•
Bloc de bois
•
R@gleou
Pi_ces
jusqu'b.
pour
les tuyaux
d'arriv_e
['installation.
I.es pi6ces
d'eau
1'_/1_,
'' [39,5 ram])
Si vous avez
Vous devrez acheter
Evier de buanderie ou tuyau
de rejet b_1'6gout plus haut
que 96" (2,4 m)
5ystbme
Egout surdlev6
Evier de vidange standard de 20 gal. (76 I_) de 30" (762 mm)
de hauteur ou 6vier utilitaire et pompe de puisard
(disponibles chez votre fournisseur local d'articles de
plomberie)
Egout au plancher
Brise-siphon
(pi@ce n ° 285834), tuyau de vidange
suppldmentaire
(pi@ce n ° 8318155) et kit de connexion
(pi@ce n ° 285835)
I'installation
de pompe
de puisard
(si non d6jb. disponible)
de 17 mm et de 13 mm
ruban
fournies
_ mesurer
Tuyau de vidange
trop court
:
A
Robinets d'eau hors d'atteinte
des tuyaux d'admission
B
Trousse de rallonge du tuyau de vidange
Pi@ce numdro 285863
2 tuyaux d'admission
Pi@ce numdro 76314,
de 4 pi (1,2 m),
d'eau plus longs : 6 pi (1,8 m) 10 pi (3 m) - Pi@ce numdro 350008
C
Pi_destal
Un pi6destal augmentera
53,5" (1359 mm).
A. Bride de retenue
vidange
B. 7uyau d'arriv6e
du tuyau
d'eau
C. Rondefles du tuyau
d'eau (4)
Autres
(2)
de
la hauteur
totale de la laveuse pour une hauteur
D. Bouchon
du trou du
boulon de transport
(4)
_. Courroie
perl6e
d'arrivde
pii_ces
II se peut que I'installation
n6cessite des pi_ces suppl6mentaires.
Pour acheter I'un des
articles indiqu6s ici, composer [e numdro sans frais indiqu6 sur [a couverture ou b_[a section
"Assistance ou service".
Pi6destal facultatif
I.e pi6destal
est disponible
Pour commandeb
section
"Assistance
30
totale d'environ
en plusieurs
t616phoner
au marchand
ou service".
couleurs.
chez
qui la laveuse
a 6t6 achet6e
ou se r6f6rer
_ la
D_gagements
Hauteur
du pi_destal
Couleur
Piece n °
10" (254 mm)
Blanc
MHP1000SQ
10" (254 mm)
Noir
MHP1000SB
15,5" (394 mm)
Blanc
XH P1550VW
15,5" (394 mm)
Noir
XH P1550VB
15,5" (394 mm)
Ardoise
XH P1550VE
15,5" (394 mm)
Rouge 6rab[e
XH P1550VF
de s_paration
_ respecter
•
I.'emplacement
la laveuse.
dolt 6tre assez grand pour permettre
•
Pr6voir davantage
•
Un espace suppl6mentaire
pour les plinthes.
•
Un espace suppl6mentaire
de 1" (25 mm) de tousles
pour r6duire le transfert du bruit.
c6t6s de la laveuse est recommand6
•
II faut aussi prendre
les appareils
d'espace
pour faciliter
I'installation
peut @re requis pour
en compte
I'espace
requis entre
Oxyde
XH P1550VJ
15,5" (394 mm)
Vert 6c[atant
X H P1550VP
compl6tement
la porte de
et I'entretien.
les moulures
de porte
et de plancher
et
voisins.
Dimensions de la laveuse
27"
8i"
15,5" (394 mm)
d'ouwir
(080 ram}
(I 295 ram}
Ensemble de superposition
Pr6voyez-vous
de superposer votre [aveuse et votre
devrez acheter un ensemble de superposition.
s6cheuse
Maytag?
Pour ce faire, vous
Pour commander,
t6[6phoner
au marchand chez qui vous avez achet6 votre s6cheuse
consulter [a section "Assistance ou service". Demander [a pi6ce num6ro 8212640.
_ 8S ......................
I.e choix d'un emp[acement
appropr(6
minimum
[e bruff et [e "d6p[acement"
ou
........................
pour [a [aveuse en am6[iore
de [a [aveuse.
[e rendement
La )aveuse peut 6tre install6e sous un comptoir personnalis6,
dans un sous-so),
buanderie,
un placard ou un encastrement.
Voir "Syst6me de vidange".
et r6duit
au
une salle de
I) faut aussi prendre en compte )es exigences d'emplacement
des appareils voisins.
[luti[isateur
qulincombe
[a responsabi[it6
de r6a[iser une (nsta[[ation correcte.
C'est
Espacement
I.es dimensions
Installation
recommand_
indiqu6es
personnalis_e
pour
une installation
sont pour I'espacement
sous un comptoir
personnalis_e
sous un comptoir
............
'
recommand6.
- laveuse seulement
II vous faudra
•
Un chauffe-eau
pour fournir
{Ji7
de I'eau _ 120°F (49°C) _ la laveuse.
•
Une prise 6[ectrique
re[i6e _ [a terre situ6e _ moins de 6 pi (1,8 m) de [a prise du cordon
6[ectrique se trouvant _ ['arri6re de [a [aveuse. Voir "Sp6cifications
6[ectriques".
•
Des robinets
d'admission
(137,9-689,6
d'eau chaude et d'eau froide
d'eau chaude et d'eau froide,
kPa).
situ6s _ moins de 4 pi (1,2 m) des robinets
et une pression d'eau de 20-100 [b/po 2
•
Un p[ancher de niveau ayant une pente maxima[e de 1" (25 mm) sous ['ensemble de [a
[aveuse. I.'insta[[ation
de [a [aveuse sur des surfaces de so[ mo[[es, relies que tapis ou
surfaces avec sous-couche
en mousse n'est pas recommand6e.
•
Un p[ancher robuste et sonde capable
charge) de 400 [b (180 kg).
de soutenir
[e poids total de [a [aveuse (eau et
Ne pas faire fonctionner
la laveuse _ des temp6ratures
inf6rieures _ 32°F (0°C). Une quantit6
d'eau _eut demeurer dans [a [aveuse et causer des dommages _ des temp6ratures
basses.
39"min.
(990 ram}
_€
1" .-_1_--27"-----_1
_ 1"
(25 ram)
(880 ram)
(25 ram)
Espacement recommand_
pour une installation
ou dans un placard, avec ou sans pi_destal
I.es dimensions
Installation
indiquTes
sont pour I'espacement
dans un encastrement
dans un encastrement
Espacement recommand_
pour une installation dans un encastrement
ou dans un placard, avec laveuse et s_cheuse superpos_es
I.es dimensions indiqu6es sont pour I'espacement recommand6.
recommand6.
ou placard
48 po 2.
(310crn2}
3"* (76 ram}
(76ram}
48 po 2 * (884. ram}
T
(310 cm 2}
E}
O
24 po 2 * _
-._
(155cm2)
3"
3_
(76ram}
T
11"1<-31y2"_4"1-_-
3"* (76ram}
(25mm}(800ram}(102ram}
24po2.
A
B
A. Vue lat6rale - placard ou endroit exigu
B. Porte de placard avec orifices d'entr6e d'air
Installation
dans un encastrement
J_
1"* (25 ram}
(155crn2)
* Espacement
requis
ou placard - laveuse sur pi_destal
6"*Zmm)
1" --_,<--27" _
(25ram}
(886ram}
.,e- 1"
(25ram}
A
A.
11" [-.,i:- 31Y2"
_"l
4'1
(25mm)(800mm)(102mm)
B
5W'**--_(140 ram)
B. Vue /at6rale
- p/acard
ou endroit
exigu
*Espacement
1" _
(25 mm)
_
27"
(686 ram)
_
1"
(25ram)
requis
**En cas d'Tvacuation
32
_
Fncastrel_ent
par le c6t6, un espacement
de 1" (25 mm) est permis.
Presence
de taches
sur le linge
Blanc
Avez-vous vers6 le d6tergent dans le distributeur?
Pour des r6sultats optimaux,
verser [e d6tergent dans [e compartiment
pas verser le d6tergent clans le tambour de la laveuse.
de d6tergent.
Avez-vous bien tri6 la charge?
S6parer les articles de teinte fonc6e des articles
couleurs
d_fralchies
Avez-vous
bien tri6 la charge?
I.e transfert de teinture
peut se produire
Iors du m6lange
d'articles
blancs et de couleur
dans une m6me charge. S6parer les articles de teinte fonc6e des articles blancs ou clairs.
Ne
Avez-vous utilis6 suffisamment
de d6tergent HE?
Utiliser suffisamment
de d6tergent pour enlever la salet6 et la maintenir en suspension.
Utiliser uniquement
un d6tergent H E. Suivre les recommandations
du fabricant pour
d6terminer
la quantit6 de d6tergent _ utiliser.
La pr6sence de fer (rouille) dans I'eau est-elle sup_rieure
Vous aurez peut-6tre besoin d'installer
un filtre _ fer.
gris&tre,
La temperature
de lavage 6tait-elle
trop basse?
Utiliser les lavages _ I'eau tilde ou chaude si celle-ci est sans danger pour la charge.
S'assurer que [e syst6me d'eau chaude est ad6quat pour fournir un [avage _ ['eau chaude.
Avez-vous utilis_ suffisamment
de d6tergent, ou avez-vous une eau dure?
Utiliser plus de d6tergent pour laver la salet6 intense _ I'eau froide ou dure.
_ la moyenne?
Programme
trop
long
blancs ou clairs.
Avez-vous d6charg6 la laveuse imm6diatement?
Pour 6viter le transfert de teinture, d6charger la laveuse d_s qu'elle
Avez-vous s61ectionn6 le programme Whitest Whites?
I.e chauffe-eau
sera activ6 pour fournir
le rendement
de nettoyage
maximal.
I_a dur6e
du programme
normal sera prolong6e
pour chauffer
I'eau. Cette dur6e suppl6mentaire
s'arr&te.
Avez-vous utilis_ une boule distributrice
d'assouplissant de tissu?
I.es boules distributrices
ne fonctionnent
pas correctement
avec cette laveuse. Verser un
assouplissant de tissu liquide dans le compartiment
d'assouplissant
de tissu.
d6pendra
du volume
la laveuse.
Avez-vous utilis6 un d6tergent en poudre pour un programme _ vitesse faible?
Envisager I'utilisation d'un d6tergent liquide.
Un exc&s de mousse a 6t6 d6tect6 et une proc6dure contre
Cette proc6dure pro[ongera
[a dur6e initia[e du programme.
Avez-vous utilis_ le programme Quick Wash (lavage rapide) pour une grande charge?
Pour des r6sultats optimaux,
utiliser le programme
Quick Wash (lavage rapide) pour les
petites charges de linge 16g6rement sale.
Avez-vous lay6 une grande charge avec le programme Quick Wash (lavage rapide)?
I_eprogramme Quick Wash (lavage rapide) est conq:u pour les plus petites charges (23 articles de v6tements 16g&rement sales). Si des charges plus grandes sont lav6es avec
ce programme, [a dur6e de lavage augmentera.
Linge froiss_
[ibrement
durant
et pas surcharg6e.
charge en utilisant
Avec les programmes
Delicate (articles
devez uti[iser des petites charges. Ceci
augmenter
[es dur6es de programme.
Avez-vous utilis_ le bon programme pour la charge _ laver?
Utiliser le programme
Delicate (articles d6licats) ou un autre programme
vitesse d'essorage pour r6duire le froissement.
Avez-vous surcharg6 la laveuse?
I.a charge de lavage doit 6tre 6quilibr6e
et de la temp6rature
I.es charges
avec basse
doivent
pouvoir
se
de I'eau
5 son entr6e
dans
est-il affich6?
Avez-vous lay6 une grande
Avez-vous d6charg6 la laveuse imm6diatement?
I)6charger
la laveuse d_s qu'elle s'arr6te.
d6p[acer
Le mot "SUD"
de la charge
la mousse a commenc6.
un programme
d61icat?
d6licats) et Handwash (lavage _ la main) vous
assure un [avage d6[icat de vos v6tements sans
La charge a-t-elle caus6 un d6s6quilibre?
I.orsqu'il y a un trop grand d6s6quilibre,
une proc6dure de r66quilibrage
se met en
marche pour redistribuer
la charge. Durant la proc6dure de r66quilibrage,
I'affichage de
[a dur6e se mettra en pause jusqu'5 ce que cette activit6 soit termin6e, puis se r6activera
pour [e reste du programme.
[e [avage.
Porte
verrouill_e
_ la fin du programme
de lavage
Toute I'eau s'est-elle 6coul6e de la laveuse durant I'essorage?
S6lectionner DRAIN & SPIN (vidange etessorage) pour enlever toute eau rest6e dans la
laveuse. I.a porte de la laveuse se d6verrouillera _ la fin de la vidange.
...........
"""'
:: .....
Avant de faire un appel pour assistance ou service, veuillez
Cette v6rification
peut vous faire 6conomiser
[e coot d'une
encore besoin d'aide, suivez [es instructions
ci-dessous.
v6rifier la section "l)6pannage".
visite de service. Si vous avez
Pour plus d'assistance
Si vous avez besoin de plus d'assistance,
question ou prob[6me 5_:
I.ors d'un appe[, veui[[ez conna?tre [a date d'achat et [es num6ros de mod6[e et de s6rie
comp[ets de votre apparei[. Ces renseignements
nous aideront 5_mieux r6pondre 5_votre
demande.
Si vous avez
besoin
de pi_ces
toute
de rechange
Pour [oca[iser des pi6ces de rechange sp6cifi6es par ['usine dans votre r6gion, composer
num6ro de t6[6phone du Centre d'assistance
5_[a c[ient6[e de Maytag Services, I.I.C ou
appe[er [e centre de service d6sign6 par Maytag [e plus proche.
Etatg.U
_ la client6le
Nos consultants
pour :
de I_assistance
de notre gamme
[e
s
Tdldphoner
sans frais au Centre d'assistance
au : 1-800-688-9900.
de Maytage
comp[@e
Services,
d'apparei[s
I.I.C
•
Caract6ristiques
et sp6cifications
•
Renseignements
d'insta[[ation
•
Consignes
•
Vente d'accessoires
•
Assistance
•
I.es r6f6rences aux concessionnaires,
compagnies
de service de r6paration et distributeurs
de pi6ces de rechange [ocaux. I_es techniciens
de service d6sign6s par Maytag k_sont
form6s pour remp[ir [a garantie des produits et fournir un service apr6s garantie partout
aux Etats-Unis.
d'uti[isation
6crire 5_Maytag _ en soumettant
Maytag Services, I.I_C
ATTN: CAI R_ Center
RO. Box 2370
Cleveland,
TN 37320-2370
Si vous avez besoin de commander
des pi6ces de rechange, nous vous recommandons
d'uti[iser exc[usivement
des pi6ces sp6cifi6es par ['usine. Ces pi6ces conviendront
et
fonctionneront
bien parce qu'e[[es sont fabriqu6es se[on [es m6mes sp6cifications
pr6cises
uti[is6es pour fabriquer chaque nouve[ apparei[ Maytag k_.
foumissent
vous pouvez
m6nagers
I)ans votre correspondance,
joindre dans la journ6e.
veuillez
indiquer
un num6ro
Veuillez appeler sans frais le Centre d'interaction
au : 1-800-807-6777.
Nos consultants
vous renseigneront
et sp6cifications
de t616phone
avec la client6le
sur les sujets suivants
de Whirlpool
Canada
I.P
:
•
Caract6ristiques
•
Consignes
•
Ventes d'accessoires
•
R6f6rences aux marchands [ocaux, aux distributeurs
de pi6ces de rechange et aux
compagnies
de service. I.es techniciens
de service d6sign6s par Whirlpool
Canada I.P
sont form6s pour remp[ir [a garantie des produits et fournir un service apr6s [a garantie,
partout au Canada.
d'uti[isation
sur route notre gamme
o_ I'on peut vous
d'apparei[s
6[ectrom6nagers.
et d'entretien.
et pi6ces de rechange.
et d'entretien
Pour plus d'assistance
et de pi6ces de rechange
sp6cia[is6e
au client
([angue
espagno[e,
ma[entendants,
ma[voyants,
etc.)
Pour Iocaliser la compagnie de service d6signde par Maytag_dans votre r6gion, vous pouvez
6galement consulter les Pages jaunes.
Si vous avez besoin de plus d'assistance,
vous pouvez soumettre
pr6occupation
_ Whirlpool
Canada I.P _ I'adresse suivante :
Centre
d'interaction
par 6crit toute question
ou
avec la client61e
Whirlpool
Canada I_P
1901 Minnesota
Court
Mississauga,
Veuillez inclure
dans la journ6e.
Ontario
1.5N 3A7
dans votre correspondance
un num6ro
de t616phone o_ on peut vous joindre
GARANTIE
LIMITI_E
Pendant
unan_compter
deladated'achat,
Iorsque
cegrosappareil
m6nager
estutilis6etentretenu
conform6ment
auxinstructions
jointes
_oufournies
avecleproduit,
lamarque
Maytag
de
Whir[pool
Corporation
ouWhir[pool
Canada
I_P
(ci-apr6s
d6sign6es
"Maytag")
paiera
pour[espi6ces
sp6cifi6es
par['usine
et[amain-d'ceuwe
pourcorriger
[esvicesdemat6riaux
oude
fabrication
quiexistaient
d6j_[orsque
cegrosapparei[
m6nager
a6t6 achet6. I.e service d oit 6tre fourni par une compagnie de service d6sign6e par Maytag. I.E SEUI_ ET EXC!_USIF RECOURS
DU CLIENT DANS I.E CADRE DE I.A PRESENTE GARANTIE
Canada et s'app[ique exc[usivement
[orsque [e gros apparei[
[e cadre de [a pr6sente garantie [imit6e.
I.IMITEE CONSISTE EN I_A REPARATION PREVUE CI-DESSUS.
m6nager est uti[is6 dans [e pays o_ i[ a 6t6 achet6. Une preuve
Cettegarantie
[imit6e est va[ide uniquement
aux Etats-Unis ou au
de [a date d'achat d'origine
est exig6e pour obtenir un service dans
I_LI_MENTS EXCLUS DE LA GARANTIE
La pr_sente garantie
limit_e
ne couvre
pas :
1.
I.es pi_ces de rechange ou [a main d'oeuwe
instructions
de ['op6rateur
ou de ['uti[isateur
2.
I.es visites de service pour rectifier
p[omberie du domicile.
[orsque ce gros apparei[ m6nager
fournies ne sont pas respect6es.
['installation
du gros apparei[
pour r6parer ou remp[acer
m6nage_, montrer
_ ['uti[isateur
comment
uti[iser
3.
I.es visites de service
I.es dommages imputab[es
_ : accident, modification,
usage impropre ou abusif, incendie,
d'6[ectricit6
ou de p[omberie,
ou ['uti[isation
de produits non approuv6s par Maytag.
inondation,
5.
I_es d6fauts apparents, notamment
[es 6raf[ures, [es bosses, fissures ou tout autre dommage
ou de fabrication
et soient signa[6s _ Maytag dans [es 30 jours suivant [a date d'achat.
au fini du gros apparei[
6.
I.'en[6vement
7.
I.es r6parations
8.
I.es frais de d6p[acement
disponib[e.
9.
I_a d6pose et [a r6insta[[ation
Maytag.
Ce gros apparei[
aux pi6ces ou syst6mes
10. I.es pi6ces de rechange
faci[ement
identifi6s.
et de transport
m6nager
r6su[tant
d'une
pour [e service
de votre gros apparei[
ou [a main d'oeuwe
6[ectriques,
_ des fins autres que ['usage unifami[ia[
4.
et [a [ivraison.
[es ampou[es
est uti[is6
['apparei[,
[es fi[tres _ air ou [es fi[tres _ eau de ['apparei[.
normal
ou [orsque
remp[acer
ou r6parer des fusib[es
I_es pi6ces consomptib[es
actes de Dieu, installation
m6nager,
[es instructions
fautive
d'insta[[ation
ou rectifier
ne sont pas couvertes
ou installation
_ moins que ces dommages
non conforme
et/ou [es
[e c_b[age
ou [a
par [a garantie.
aux codes
soient dus _ des vices de mat6riaux
est conqu pour 6tre r6par6 _ domicile.
modification
non autoris6e
d'un produit
si votre gros apparei[
m6nager
si ce[ui-ci
pour [es gros apparei[s
est install6
m6nagers
CLAUSE D'EXONI_RATION
dont
faite _ ['apparei[.
m6nager
dans un endroit
[es num6ros
DE RESPONSABILITI_
est situ6 dans une r6gion
inaccessible
6[oign6e
ou n'est pas install6
de s6rie et de mod6[e
originaux
AU TITRE DES GARANTIES
o_ un service
conform6ment
ont 6t6 en[ev6s,
d'entretien
Maytag
aux instructions
modifi6s
autoris6
d'insta[[ation
ou qui ne peuvent
n'est pas
fournies
par
pas 6tre
IMPLICITES
I_ESGARANTIES
IMPI_ICITES, Y CO MPRIS I_ESGARANTIES
A PPI.ICABI.ES DE QUAI_ITE MARCHANDE
OU D'APTITUDE
_, UN USAGE PARTICULIER, SONT I.IMITEES _, UN AN OU _, I_A
PLUS COURTE PERIODE AUTORISEE PAR LA I.OI. Certains Etats et certaines provinces ne permettent
pas de [imitation
sur [a dur6e de garanties imp[icites de qua[it6 marchande ou d'aptitude
un usage particu[ie_, de sorte que [a [imitation
ci-dessus peut ne pas _tre applicable
dans votre cas. Cette garantie vous conf_re des droits juridiques
sp6cifiques,
et vous pouvez 6ga[ement
jouir d'autres droits qui peuvent varier d'une juridiction
_ I'autre.
I_ESEUI_ ET EXCI_USIF RECOURS
DU CLIENT
LIMITATION
DES RECOURS, EXCLUSION
I[)ANS I_ECADRE I[)E I_A PRESENTE GARANTIE
DES DOMMAGES
FORTUITS OU INDIRECTS
I.IMITEE CONSISTE EN I_A REPARATION PREVUE CI-DESSUS.
MAYTAG
N'ASSUME
AUCUNE
RESPONSABII.ITE
POUR I_ES DOMMAGES
FORTUITS OU INDIRECTS. Certains Etats et certaines provinces ne permettent
pas ['exclusion
ou [a [imitation des dommages fortuits ou indirects
sorte que ces [imitations et exclusions
peuvent ne pas _tre app[icab[es dans votre cas. Cette garantie vous conf_re des droits juridiques
sp6cifiques,
et vous pouvez 6ga[ement jouir d'autres
droits qui peuvent varier d'une juridiction
_ ['autre.
de
Sivousr6sidez
_ I'ext6rieur
duCanada
etdes50Etats
desEtats-Unis,
contactez
votremarchand
Maytag
autoris6
pourd6terminer
siuneautre
garantie
s'applique.
Sivousavezbesoin
d'unservice
der6paration,
voird'abord
lasection
"D6pannage"
duGuide
d'utilisation
etd'entretien.
Sivousn'6tes
pasenmesure
der6soudre
leprobl6me
apr6s
avoir
consult(}
lasection
"196pannage',
vouspouvez
trouver
deI'aidesuppl6mentaire
enconsultant
lasection
"Assistance
ouService"
ouenappelant
Maytag.
AuxE.-U.,
composer
le
1-800-688-9900.
AuCanada,
composer
le1-800-807-6777.
6/08
Conservez ce manuel et votre re_u de vente ensemble pour r_f_rence ult_rieure. Pour le
service sous garantie, vous devez presenter un document prouvant la date d'achat ou
d'installation.
Adresse
Inscrivez les renseignements
suivants au sujet de votre gros appareil m6nager pour mieux
vous aider _ obtenir assistance ou service en cas de besoin. Vous devrez conna?tre le num6ro
Num_ro
de t_l_phone
de mod61e et le num6ro de s6rie au complet.
signal6tique
situ6e sur le produit.
Num_ro
de module
Num_ro
de s_rie
Vous trouverez
ces renseignements
sur la plaque
Nom du marchand
Date d'achat
W10176966C
(020<)8
All rights reserved.
]bus droits r6serv6s.
<_)Registered
<_)Marque
trademark/{'_
Tradenrark
of Maytag Corporation
or its related corrrpanies.
Used under license by Maytag
Iimited
in Canada.
d6pos6e/_'_Marque
de commerce
of Maytag
Corporation
ou de ses compagnies
affili6es.
Emploi sous licence par Maytag
limited
au Canada.
AFFRESH is a trademark
of Whirlpool,
U.S.A.
AFFRESH est une marque de commerce
de Whirlpool,
U.S.A.
11/08
Printed in U.S.A.
[mprim6 aux I_.-U.