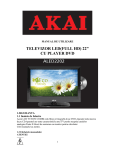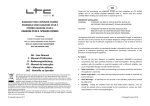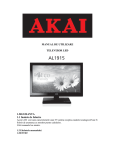
1
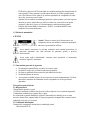
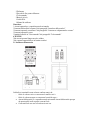
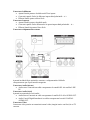
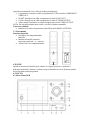
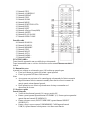
MANUAL DE UTILIZARE MICROSISTEM: RADIO/PLAYER CD cu USB si Cititor de CARD 1.SIGURANTA 1.1 Intentionati sa folositi Microsistemul DVD reda muzica de pe CD si muzica,video si fotografii de pe DVD si USB.Aparatul poate reda fotografii de pe CD inregistrate in system Kodak. Cititi manualul cu atentie. - datorita marei varietati de produse cu conectare de memorie externa (USB,SD/MC) si uneori datorita functiilor specifice producatorilor nu se poate garata ca aparatul va recunoaste toate sistemele sau ca va deschide toate variantele posibile teoretic. - - - DVD urile si playerele DVD sunt fabricate conform intelegerilor internationale de cod regional.Ca atare aparatul va reda numai discurile cu codul regional pentru care a fost fabricat. Daca codul de pe eticheta aparatului nu corespunde cu codul de pe disc acesta nu poate fi redat. Aparatul a fost construit in tehnologia protectiei copierii pentru a preveni copierea discului pe oricare media.Daca un video recorder este conectat la acest aparat ,imaginea video de la iesire va fi distorsionata pe toata durata inregistrarii. Fabricat sub licenta Dolby Laboratories. “Dolby” si simbolul dublu-D sunt simboluri ale acestor laboratoare. 1.2 Etichetele manualului. ATENTIE Atentie ! Pentru a reduce riscul electrocutarii, nu indepartati carcasa, nu umblati in interiorul aparatului, adresati-va personalului calificat. Acest simbol avertizeaza in privinta existentei unor tensiuni periculoase in interiorul aparatului care sunt suficient de puternice pentru a provoca electrocutarea. Acest semn indica utilizatorului existenta unor operatiuni si instructioni deosebite legate de intretinere. 1.3 Instructiuni generale de siguranta Nu impingeti aparatul.Poate sa cada si sa cauzeze raniri. Nu lasati sa curga nici un lichid in interiorul aparatului. Nu lasati sa patrunda obiecte metalice prin fantele de aerisire. Nu blocati fantele de aerisire. Acest aparat are dubla izolatie :de aceea nu este necesara impamantarea.Verificati numai daca tensiunea de alimentare locala corespunde cu cea de pa eticheta aparatului. 2.Pregatirea pentru folosire 2.1 Despachetarea *Despachetati aparatul cu grija *Verificati continutul conform celor de mai jos.Daca lipseste ceva contactati magazinul. * Indepartati etichetaa de pe panoul fata cu grija. Se recomanda sa pastrati ambalajul original si materialele de ambalaj in caz ca sunt necesare ulterior.Este singurul mod de a proteja aparatul la transport.Daca aruncati totusi ambalajul aveti grija sa-l reciclati. 2.2 Continutul ambalajului Urmatoarele componente sunt incluse in ambalajul primit: 1.Microsistem DVD 2.Difuzoare 2.Perechi de fire pentru difuzoare 1.Telecomanda 2.Baterii (AAA) 1.Cablu RCA 1.Manual de utilizare. 3.Instalare * Asezati aparatul pe o suprafata neteda orizontala *Conectati difuzoarele la aparat.Cititi paragraful “Instalarea difuzoarelor” *Conectati aparatele exterioare.Cititi paragraful “Conectarea echipamentelor externe” *Conectati aparatul la retea. * Instalati bateriile in Telecomanda.Cititi paragraful “Telecomanda” ATENTIE! *Nu asezati aparatul langa surse de caldura, *Nu expuneti aparatul direct in lumina soarelui. 3.1 Instalarea difuzoarelor Cablurile si terminalele sunt colorate conform unui cod: - firele de culoare rosie se conecteaza la mufele rosii + - firele de culoare neagra se conecteaza la mufele negre – Asezati difuzoarele pe o suprafata neteda orizontala.Asezati difuzoarele aproape de aparat astfel incat sa puteti conecta firele. Conectati firele asa cum a fost descris mai sus. Conectarea la difuzoare Apasati lamela pentru a deschide mufa.Tineti apasat . Conectati capetele firelor la difuzoare imperechind polaritatile – si + Eliberati lamele pentru a bloca firele. Conectarea la aparat. Apasati lamlele pentru a deschide mufa. Conectati capatele firelor difuzoarelor la aparat imperechind polaritatile – si +. Eliberati lamelele pentru a bloca firele. Conectarea echipamentelor externe. Aparatul include diferite optiuni de conectare a echipamentelor.Cablurile corespunzatoare pot fi procurate din magazine. Conectarea Audio (intrare) Audio stereo.Conectati un cablu corespunzator la canalele R/L ale mufelor LINE IN. Conectarea Audio (iesiri) Aparatul are urmatoarele iesiri audio: Audio Stereo:Conectati un cablu corespunzator la mufele R/L de la AUDIO OUT. Audio Coaxial Digital:Introduceti un cablu corespunzator la mufa COAXIAL AUDIO OUT. Conectarea Video Conectarea video permite sa transmiteti semnal video (imagini statice sau fime) la un TV conectat. Aparatul are urmatoarele iesiri video (in ordinea preferintelor) Componenta: Conectati un cablu corespunzator Pr/Y/Pb la mufele COMPONENT VIDEO OUT. SCART: Introduceti un cablu corespunzator la mufa SCART OUT. S-Video: Introduceti un cablu corespunzator la mufa S-VIDEO OUTPUT. Video compus: Introduceti un cablu corespunzator la mufa VIDEO OUTPUT. NOTA: Nu conectati simultan toate iesirile ,vor afecta calitatea semnalului. Conectarea cablului. Introduceti un cablu corespunzator aerian FM la mufa RADIO ANTENNA . 3.3 Telecomanda Instalarea bateriilor Deschideti usa compartimentului bateriilor Introduceti bateriile urmarind respectarea polaritati + si – marcate. Asezati la loc usa compartimentului. ATENTIE! Instalarea incorecta a bateriilor poate conduce la curgerea acestora si corodarea si defectarea aparatului.Corodarea ,oxidarea ,curgerea bateriilor sau orice defectare gradata de aceasta natura anuleaza garantia. 4. FUNCTII 4.1 Micro Sistem DVD Panoul Frontal 1. Butonul Standby 2. Afisajul 3. Locas Disc 4. Senzor Telecomanda 5. Jack Casca 6. Slot USB 7. Slot Card Memorie 8. Protectie pentru mufele conecatre echipamente externe 9. Butonul Melodi/Capitol Anterior 10. Butonul Melodie/Capitol Urmator 11. Butonul Volum 12. Butonul Play/Pauza 13. Butonul Dechide/Inchide Panoul Spate 14.Butonul de retea. 4.2 Telecomanda Functii generale 15 Butonul Standby 16 Butoanele digitale (0-10+) 17 Butonul SETUP(programare) 18 Butonul VOLUM +/19 Butoanele sageti 20 Butonul SOUND EFFECT(effect sunet) 21 Butonul USB 22 Butonul TONE 23 Butonul CHANNEL LEVEL (CH-LEVEL) 24 Butonul ENTER 25 Butonul SOURCE SELECT 26 Butonul VIDEO OUTPUT MODE (V-MODE) 27 Butonul MUTE. Functiile DVD 28 Butonul GO TO 29 Butonul PLAYBACK CONTROL (PBC) 30 Butonul PROGRAM(PROG) 31 Butonul FWD 32 Butonul REV 33 Butonul TITLE 34 Butonul AUDIO 35 36 37 38 39 40 41 42 43 44 45 46 47 Butonul STEP Butonul A-B REPEAT Butonul REPEAT Butonul STOP Butonul ZOOM Butonul MENU Butonul SUBTITLE/AUTO Butonul PREV Butonul NEXT Butonul Afisaj pe Ecran(OSD) Butonul ANGLE Butonul PLAY/PAUSE Butonul OPEN/CLOSE Functiile radio 48 Butonul SEARCH+ 49 Butonul SEARCH50 Butonul MEMORY 51 Butonul STOP 52 Butonul MO/ST 53 Butonul AUTO 54 Butonul RADIO + 55 Butonul RADIO – FUNCTIONAREA Toate functiile aparatului sunt accesibile de pe telecomanda Toate instructiunile sunt cu referire la folosirea cu telecomanda daca nu este altfel indicat. 5.1 Butonul de retea Aparatul este echipat cu un buton de retea (14) localizat pe panoul spate Fixati acest buton pe pozitia ON pentru a porni aparatul Fixati-l pe pozitia OFF daca il deconectati. Nota: Acest aparat este proiectat sa fie controlat prin telecomanda.La folosire normala dupa functionare trebuie comutat in standby.Daca doriti sa faceti economie de energie puteti actiona butonul general. Daca aparatul nu este folosit o perioada mare de timp recomandam sa-l deconectati de la retea. 5.2 Pornirea rapida Functii Generale Verificati daca butonul general (14) este pe pozitia ON Pentru a porni aparatul apasati butonul STANDBY (15) .Pentru oprirea aparatului apasati din nou butonul STANDBY(15) Pentru selectarea sursei (DVD/TUNER/LINE) apasati butonul SELECT SOURCE(25) Pentru a alege o sursa externa (USB/MEMORY CARD)apasati butonul USB(21).Apasati butonul o data pentru a iesi din aceasta functie. Pentru a regla volumul ,apasati butoanele VOL+ sau VOL- (18) Pentru a regla volumul la fiecare difuzor separat ,apasati butonul CH-LEVEL(23) .Apoi apasati butoanele VOL+ sau VOL – (18) Pentru a selecta tonul (bass/inalte) apasati butonul TONE(22) .Pentru reglajul tonului ,apasati butonul VOL+ sau VOL-(18) Pentru a comuta efectele sonore (concert/living/hall/bath/cave/arena/church),apasati butonul S.EFFECT (20).Apasati butonul inca o data pentru a iesi din aceasta functie. Pentru oprirea temporara a sunetului apasati butonul MUTE (27) .Apasandu-l inca o data si se revine la sunet normal. Pentru a conecta castile introduceti jackul castilor la mufa (5).Pentru a elimina defectarea castilor nu uitati sa reglati volumul la un nivel confortabil. Functiile DVD/CD Porniti aparatul .Alegeti modul DVD Introduceti un disc un disc in locasul discului.Pentru a deschide si inchide locasul disc ,apasati butonul OPEN/CLOSE (47).Afisajul va indica numarul total de melodii de pe CD. Pentru a porni redarea ,apasati butonul PLAY/PAUSE(46) Pentru instructiuni extinse cititi paragraful “Functiile DVD/CD” in paginile urmatoare ale acestui manual. Functiile Radio Porniti aparatul.Alegeti modul radio. Pentru a alege un post dorit ,apasati butonul SEARCH + (48) sau SEARCH - (49) repetata pana la gasirea frecventei dorite. Pentru instructiuni extinse cititi paragraful “Functiile Radio” in paginile urmatoare ale acestui manual. Functiile USB Porniti aparatul. Introduceti un dispozitiv USB in slot (6).Dispozitivul nu poate fi conectat decat intr-o singura pozitie. Alegeti modul DVD. Apoi selectati functia corecta cu butonul USB(21). Pentru pornirea redarii apasati o data butonul PLAY/PAUSE (46). Pentru instructiuni extinse cititi paragraful “Functiile USB” in paginile urmatoare ale acestui manual. Functiile SD/MMC Porniti aparatul Introduceti un dispozitiv SD/MMC in slotul (7). Dispozitivul se conecteaza intr-o singura pozitie. Alegeti modul DVD.Apoi alegeti functia corecta cu butonul USB(21) Pentru a porni redarea apasati butonul PLAY/PAUSE(46) o data. Pentru instructiuni extinse cititi paragraful “Functiile SD/MMC” in paginile urmatoare ale acestui manual. 5.3 Functiile DVD/CD Dupa ce ati incarcat un disc ,menu continut apare pe ecran. Apasati butoanele sageti (19) pentru a alege un parametru din menu. Apasati ENTER pentru a selecta parametrul. In timpul redarii urmatoarele functii sunt accesibile: Pentru a selecta un capitol (DVD) sau o melodie (CD) ,apasati butoanele digitale (16). Pentru a selecta capitolul anterior sau urmator (DVD) sau melodia (CD) apasati butonul PREV(42) sau NEXT(43). Pentru cautare inainte sau inapoi pe DVD apasati butonul FWD(31) sau REV(32).Vitezele posibile sunt :2x,4x,8x,16x,32x. Pentru pauza pe redare ,apasati o data butonul PLAY/PAUSE (46) ,pentru reluare apasati din nou. Pentru a opri temporar redarea ,apasati o data butonul STOP (38) .Apasati butonul din nou pentru oprire permanenta,sau apasati butonul PLAY/PAUSE (46) pentru reluarea redarii. Pentru a repeta un capitol (DVD) sau una sau toate melodiile (CD) : - Apasati butonul REPEAT (37) o data pentru repetarea melodiei sau capitolui curent. - Apasati o data butonul (2x) pentru repetarea titlului curent. - Apasati o data butonul (3x) pentru a repeta toate capitolele sau melodiile. - Apasati o data butonul (4x) pentru anularea functiei. Pentru redarea DVD cadru cu cadru , apasati butonul STEP(34).Apasati butonul PLAY/PAUSE (46) pentru reluarea redarii normale. Pentru a viziona un titlu specific al unui DVD ,apasati butonul TITLE(33).Folositi butoanele sageti pentru selectarea unui titlu. Pentru a selecta limba audio a unui DVD,apasati butonul AUDIO(34) repetat pana la obtinerea limbii dorite. Pentru a porni subtitlurile unui DVD,apasati butonul SUBTITLE (41) .Apasati butonul din nou pentru a opri subtitlurile. Pentru selectarea de informatii suplimentare ale DVD sau CD (timp ramas/timp redare trecut/numar melodie/numar capitol) apasati butonul OSD(44) Pentru a selecta unghiul camerei apasati butonul ANGLE(45) Nota: In mod normal daca este incarcat un CD MP3 ,aparatul va intarzia pana citeste datele initiale. Un DVD care este cu alt cod regional nu poate fi redat pe acest aparat. Daca discul are continut mixt(exemplu MP3 si fisiere video) aparatul va recunoaste si reda numai un singur tip. Salvarea ecranului devine activa daca nici un disc nu a fost incarcat in timp de 3 minute sau aparatul a fost in modul STOP mai mult de 3 minute. Folosirea functiei GO TO Functia GO TO poate fi folosita pentru a selecta un punct de pornire specific al unui DVD sau CD. Apasati butonul GO TO(28) Apasati butoanele sageti pentru a alege o intrare. Intrarile posibile pentru DVD sunt: - Timp disc - Capitol - Titlu - Timp Capitol - Timp Titlu. Intrarile posibile pentru CD sunt: - Timp Melodie - Melodie Specifica Apasati butoanele digitale pentru a alege selectia. Folosirea functiei PROGRAM Apasati butonul PROGRAM (30) pentru a intra in functia PROGRAM Apasati butoanele digitale pentru a selecta melodia dorita, si folositi butoanele sageti sus jos pentru a selecta intrarea urmatoare. Pentru a confirma selectia si a porni programul mutati selectia pe “START” si apasati butonul ENTER. Pentru a opri programul apasati butonul PROGRAM (30) si apoi ENTER. Folosirea functiei A-B REPEAT Functia A-B REPEAT poate fi folosita pentru a repeta o portinue specificata a DVD-ului. Apasati butonul A-B REPEAT (36) o data pentru a selecta punctul de pornire al repetarii (A). Apasati butonul A-B REPEAT din nou pentru a selecta punctul de sfarsit al repetarii (B).Aparatul va reda repetat sectiunea aleasa intre punctual A si B. Pentru a anula functia A-B REPEAT ,apasati butonul A-B REPEAT din nou.Aparatul reia redarea normala. Folosirea functiei ZOOM Aceasta functie poate fi folosita pentru mari/micsora imaginea pe fotografii si DVD. Rapoartele de marire/micsoarare posibile sunt: 2x,3x,4x,1/2,1/3,1/4 . Apasati butonul ZOOM(39) Apasati butonul ZOOM din nou pentru a alege dimensiunea corecta. Apsati butoanele sageti pentru a selecta portiuni de imagine. Folosirea functiei Redare CD in format imagine KODAK. Introduceti un CD imagine Kodak. Apasati butonul STOP(38) pentru a intra in modul redare.Alegeti o varianta (Slide show- arata automat imaginile/Menu/prev-next-anterior-urmator ) si apoi apasati ENTER(24) Apasat butonul PROG (30) pentru schimbarea modului.Apasati ENTER (24) pentru confirmare. Apasati butonul PLAY/PAUSE (46) pentru a opri expunerea la o imagine. Apasati butonul PREV(42) sau NEXT(43) pentru a selecta o imagine anterioara sau urmatoare. Pentru a mari imaginea ,apasati butonul ZOOM (39) .Pentru a mari sau micsora imaginea ,apasati butonul FastForward(repede inapoi) (31) sau Fasr Rewind(repede inainte) (32) .Pentru mutarea imaginii apasati butoanele sageti.(19). Pentru inversarea imaginii vertical sau orizontal ,apasati butoanele sageti sus/jos(19) Pentru rotirea imaginii stanga sau dreapta ,apasati butoanele sageti stanga/dreapta(19). NOTA: Derularea imaginilor(Slide Show ) se opreste in modul zoom.Rotatia imaginii si efectele de imagine nu sunt active in modul zoom. Folosirea functiei redare CD Video Apasati butonul PBC (29) pentru a comuta pe functia redare. Introduceti un CD Video Pentru a porni redarea apasati butonul PLAY/PAUSE(46) o data. Apasati butonul PBC(29) pentru a opri redarea si a reveni la menu principal! 5.4 Functiile Radio Pentru a cauta automat frecventele ,apasati butonul AUTO (53). Pentru acord fin al frecventei apasati butonul SEARCH +(48) sau SEARCH- (49). Pentru a selecta un post déjà memorat ,apasati butoanele digitale (16). Pentru a sari la postul urmator memorat ,apasati butonul RADIO – (54) sau RADIO = (55). Pentru a opri cautarea automata a frecventelor ,apasati butonul STOP (51) Pentru a comuta intre receptie Mono si Stereo ,apasati butonul MO/ST (52) Folosirea Functiei MEMORY (Memorie) Aceasta functie este folosita pentru a fixa frecventa unui post radio dorit. Apasati butonul MEMORY (50) Cautati frecventa dorita cu butoanele SEARCH +(48) sau SEARCH – (49). Apasati butonul MEMORY cand ati gasit frecventa dorita. Selectati un numar intre 1 si 40 din butoanele digitale unde sa fie salvata (memorata) frecventa postului Apasati MEMORY din nou pentru confirmarea selectiei. 5.5 Functiile USB Dupa ce aparatul a fost conectat ,un menu continut va fi afisat pe ecranul TV. Apasati butoanele sageti sus/jos (19) pentru a selecta folderul sau fisierul. Apasati butonul ENTER (24) pentru a intra in folderul sau fisierul selectat.Se pot folosi de asemenea si butoanele digitale (16) pentru a selecta un folder sau pentru a reda un fisier. Apasati butonul PROG(30) pentru a comuta intre foldere si fisiere.Apasati ENTER(24) pentru confirmare. Apasati butonul MENU(40) pentru a reveni la menu continut in timpul redarii. In timpul redarii urmatoarele functii sunt active: Pentru a selecta o melodie,apasati butonul PREV(42) sau NEXT(46) pana ajungeti la melodia dorita. Pentru pauza pe redare ,apasati PLAY/PAUSE (46) o data,pentru reluarea redarii apasati acelasi buton inca o data. Pentru a opri redarea ,apasati butonul STOP(38). Pentru a scoate dispozitivul ,trageti-l usor afara din slot. NOTA: Datorita marei varietati de produse cu porturi USB si fabricanti cu functii specifice nu se poate niciodata garanta ca acest aparat va recunoaste toate dispozitivele USB. 5.6 Functiile SD/MMC Dupa ce ati conectat dispozitivul ,menu continut se afiseaza pe ecranul TV. Apasati butoanele sageti sus/jos (19) pentru a selecta un folder sau un fisier. Apasati butonul ENTER (24) pentru intra in folderul sau fisierul selectat. Se pot folosi si butoanele digitale (16) pentru selectarea unui folder sau pentru redarea unui fisier. Apasati butonul PROG(30) pentru a comuta intre foldere si fisiere.Apasati ENTER (24) pentru confirmare. Apasati butonul MENU(40) pentru a reveni la menu continut in timpul redarii.In timpul redarii urmatoarele functii sunt active: Pentru a selecta o melodie,apasati butonul PREV(42) sau NEXT(46) pana ajungeti la melodia dorita. Pentru pauza pe redare ,apasati PLAY/PAUSE (46) o data,pentru reluarea redarii apasati acelasi buton inca o data. Pentru a opri redarea ,apasati butonul STOP(38). Pentru a scoate dispozitivul ,trageti-l usor afara din slot. 5.7 Folosirea Menu programare general Acest capitol explica programarea completa a aparatului,programarea afisajului pe ecran,programarea audio si video. Pentru a schimba programarile initiale. Urmatoarele actiuni trebuie facute din telecomanda. Apasati butonul SETUP(17) Apasati butoanele sageti (stanga si dreapta)(19) pentru a selecta menu.Submenu este afisat direct. Apasati butoanele sageti (sus si jos) pentru intrare in submenu Apasati butonul ENTER(24) pentru selectarea unui parametru,sau stanga pentru a anula selectia. Apasati butonul SETUP pentru memorarea programarii si iesire. Pagina Programare Generala. In sectiunea TV DISPLAY ,apasati butoanele sageti pentru a selecta 4:3 PANSCAN sau 4:3 LETTERBOX pentru un TV conventional .Selectati 16:9 sau WIDE SQUEEZE pentru un LCD sau PLASMA In sectiunea ANGLE MARK ,apasati butoanele sageti pentru a opri sau porni aceasta functie.La pornire aparatul va arata un semn de unghi acolo unde la filmare s-au folosit mai multe camere. In sectiunea OSD LANG ,apasati butoanele sageti pentru a alege limba dorita. In sectiunea CLOSED CAPTIONS ,apasati butoanele sageti pentru a porni sau opri aceasta functie.Cand este pornita aparatul va afisa textul ascuns acolo unde exista. In sectiunea SCEEN SAVER ,apasati butoanele sageti pentru a porni sau opri aceasta functie. In sectiunea LAST MEMORY apasati buroanele sageti pentru a porni sau opri aceasta functie.Cand este pornita aparatul isi aminteste ultimul timp de redare al discului. Pagina Programare Audio Programarea audio Analog. DOWNMIX:Alegeti LT/RT pentru mixarea canalelor 5.1 in canale stereo stangadreapta.Alegeti STEREO pentru a mixa canalele 5.1 in semnal audio stereo. NOTA: Aceasta functie este valabila pentru discurile avand 5.1 canale in format Dolby AC-3. Programare Audio digital DIGITAL OUTPUT (iesire digitala) Selectati SPDIF OFF pentru a opri iesirea de semnal audio digital. Selectati SPDIF RAW pentru a fixa iesirea audio de semnal digital la formatul initial (DTS/Dolby Digital 5.1) Selectati SPDIF PCM pentru a fixa iesirea de semnal audio digital I format PCM. NOTA: Cand SPDIF PCM este fixat ,raportul de samplare LPCM OUT pentru intrare de semnal analog este 48 kHz sau 96 kHz. Programarea Dolby Audio Digital DUAL MONO Stereo : amble canale asa cum sunt .Din fabrica este programat STEREO. L-Mono: canal stanga numai, R-Mono: canal dreapta numai. Mix-Mono : media intre canalele stanga si dreapta. NOTA: Aceasta functie este active numai pentru discurile codate cu Dolby AC-3. DYNAMIC Selectati valoarea pentru domeniul dynamic de compresie in ideea sa nu pierdeti detaliile suetului rezultate la volum mic. Digital Compatibil Inalta Definitie (HDCD) Alegeti valoarea (2x,1x sau OFF) pentru sunet complet imbogatit la CD-urile codate HDCD. Pagina Programare Video IEISRE VIDEO OFF: Selectati modul S-Video la conectarea S-Video. YUV: Fixati iesirea video I format componenta video analog. P_YUV: Fixati iesirea video in semnal progresiv YUV. RGB: Fixati iesirea video in format RGB cand este folosita conectarea SCART. NOTA: Iesirea video compus este programata din fabrica pentru iesire video Daca rezultatul iesirii video este imagine de calitate scazuta ,atunci apasati butonul V-Mode(26) pana la imbunatirea imaginii. PROGRAMAREA CULORII. SHARPNESS: Regleaza granulatia imaginii. BRIGHTNESS: Regleaza stralucirea imaginii. GAMMA: regleaza intensitatea culorii. LUMA DELAY: Compenseaza intarzierea semnalului de culoare Pagina Programare Preferinta NOTA: Functiile generale ale sistemului pot sa fie fixate pe un player fara disc. TIP TV Alegeti formatul iesire video pentru a se potrivi la sistemul TV :PAL,MULTI sau NTSC. PBC(Controlul Redarii) Comutati aceasta functie pe ON sau OFF. NOTA: Aceasta functie este active la VCD 2.0,SVCD,etc. LIMBA In sectiunea AUDIO ,alege limba audio In sectiunea SUBTITLE alege limba subtitlui. In sectiunea MENU,alege limba pentru menu disc. PARENTAL Fixati un rating pentru redarea filmelor pe aparat. Parola de stergere a ratingului este 136900. NOTA: Aceasta functie este activa la discurile care au codat rating parental. DEFAULT( din fabrica) Reveniti la programarile din fabrica ale aparatului. Pagina Programare Parola PASSWORD MODE: Porneste sau opreste functia parola.Introduceti parola corecta pentru a porni/opri parola. PASSWORD: Schimba parola initiala.Introduceti parola initiala in prima casuta.Introduceti noua parola in casuta a doua si mai introduceti inca o data parola in casuta a treia pentru confirmare. 6.Curatarea si intretinerea Atentie! Inainte de orice curatare sau operatie de intretinere ,opriti si decuplati de la retea aparatul. Curatati exteriorul aparatului cu o carpa moale.Daca aparatul este foarte murder ,muiati carpa in apa cu solutie neutrala. 6.1 Manuirea si mentinerea discurilor. Tineti discurile cu degetele de exterior sau de gaura din centru.Nu atingeti suprafata discului cu degetele. Nu indoiti sau apasati discul.Nu le expuneti la lumina soarelui sau nu le lasati langa surse de caldura. Curatati suprafata discurilor cu o carpa moale ,umeda .Stergeti suprafata usor radial dinspre centru catre exterior. Nu folositi tiner,alcool sau oricare alt solvent chimic sau spray-uri de curatare .Pot sa distruga iremediabil suprafata discurilor. 7. Probleme Problema Sunet lipsa sau incomplet Nu se alimenteaza Functionare defectuoasa Radio Zgomot sau sunet distorsionat pe posturile FM Indicatorul FM stereo nu se aprinde Actiunea Verificati daca echipamentul extern este conectat corect si este pornit. Verificati cablurile si conectarea lor Verificati daca ati selectat corect sursa. Verificati volumul si daca nu este actionat mutingul Verificati daca cablul de retea este corect conectat la retea Verificati daca butonul de retea de pe panoul spate este pornit. Daca functionarea este defectuoasa deconectati aparatul 30 minute .Dupa aceea incercati din nou.Aparatul trebuie sa revina la programarile din fabrica. Posturile nu sunt receptionare corect.Reglati din nou frecventa. Antena nu este pozitionata corect.Extindeti-o. Selectarea posturilor este pe mono Extindeti antenna FM Semnalul postului este prea slab.Incercati alte posturi cu semnal puternic. DVD/CD Nu reda Lipsa sunet sau sunet incomplet Nu este posibil scan sau skip Imagine distorsionata sau zgomotoasa Nu exista disc in aparat.Introduceti un disc . Discul este gresit introdus (trebuie cu eticheta in sus) Ratingul discului este mai mare decat ratingul fixat la aparat. Cod reginal incorect Discul este defect sau murder,curatati-l sau incercati alt disc. Poate sa fie condens in interiorul aparatului.Scoate-ti discul si lasati aparatul pornit cateva ore. Alegeti alta melodie In timpul SCAN.SLOW MOTION sau SINGLE STEP sunetul este oprit Unele discuri sunt programate sa refuze anumite actiuni pe anumite sectiuni.Nu este functionare gresita.Discurile cu un singur capitol sau melodie nu permit functia skip Discul este defect sau murdar,curatati-l sau incercati un alt disc Verificati sistemul TV(PAL/NTSC) Aveti un VCR conectat intre aparat si echipamentul extern.Conectati aparatul direct la A/V. Curatati discul Imaginea nu acopera ecranul Redarea MP3 Lipsa sunet sau sunet incomplet Alegeti formatul de ecran din menu setup(programare) Alegeti formatul ecran din menu de start al discului Daca MP3 este amestecat cu alte fisiere pe CD ,aparatul poate sa redea fisierele MP3 ca zgomot fara sunt sau sa rejecteze discul Verificati daca fisierele MP3 redate sunt in format corect sau alegeti alt fisier pentru redare. Redarea USB Nu reda Dispozitivul USB nu este conectat sau nu este conectat corect in slot. Folositi un dispozitiv USB incompatibil.Redati alt USB garantat.Incercati alt USB AUX Lipsa sunet la sistem Lipsa imagine Sursa de intrare are nivel mic.Cresteti volumul la sursa. Verificati daca TV este pornit si setat corect pe intrare A/V. Verificati daca nu sunt probleme de conectare a cablurilor. Verificati daca cablurile nu sunt defecte. Telecomanda Telecomanda nu functioneaza Verificati instalarea bateriilor Indreptati corect telecomanda catre senzorul aparatului Apropiati-va la 8 metri de aparat. 8.Date Tehnice Parametrii Value Tensiune 100 ~ 240 Vac/ 50 ~ 60Hz Putere consumata 11 W Putere audio max 2 x 25 W Impedanta casti 32 oHMI Conectare USB compatibil USB 2.0 Conectare memorie flash SD/MMC ________________________________________________________________________ Frecventa radio FM 87,5 – 108 Mhz Ieisre Disc Parametru Tip laser Raport semnal/zgomot Domeniu Frecventa valoare Semiconductor > 80 dB(1kHz) > 70dB(1kH) Distorsiuni Sistem televiziune Raspuns in frecventa Cod regiune Sistem difuzoare Parametru Impedanta Material carcasa Lungime fire Generale Telecomanda Tipuri disc redate Formate imagine Formate Video Formate audio Temperature de lucru Umiditate > -60 dB( 1kHz) PAL/NTSC 20 Hz ~ 20 kHz 2 valoare 4 ~ 16 ohmi lemn 100 cm baterii 2 x 1,5 V tip AAA DVD/DVD-R/DVD-RW/CD-R/CD-RW/DIVX /SVCD/VCD/CD-DA JPEG/Kodak Picture CD MPEG1,MPEG2,MPEG4,WMA,AVI MPEG 1 Layer I,II,III PCM Dolby Digital,MP3 - 10 ~ 40 C 5% - 90 % 9. Reciclarea ecipamentelor electrice si electronice uzate Acest simbol prezent pe produs sau pe ambalaj semnifica faptul ca produsul respectiv nu trebuie tratat ca un deseu menajer obisnuit .Nu aruncati aparatul la gunoiul menajer la sfarsitul duratei de functionare ,ci duceti-l la un centru de colectare autorizat pentru reciclare .In acest fel veti ajuta la protejarea mediului inconjurator si veti putea impidica eventualele consecinte negative pe care le-ar avea asupra mediului si sanatatii umane. Pentru a afla adresa celui mai apropiat centru de colectare : - Contactati autoritatile locale ; - Accesati pagina de internet :www.mmediu.ro - Solicitati informatii suplimentare de la magazinul de unde ati achizitionat produsul Microset: Radio / DVD-player with USB-port and Cardreader AMD20 User manual Gebruiksaanwijzing Manuel de l’utilisateur Manual de instrucciones Gebrauchsanleitung Οδηγίες χρήσεως GB 2 NL 29 FR 57 ES 85 DE113 EL 144 Table of contents 1. 2. 3. 4. 5. 6. Safety............................................................................ 3 1. Sa 1.1 Int 1.1 1.2 1.3 Intended use.....................................................................3 Labels in this manual........................................................3 General safety instructions...............................................4 The DVD Mic from DVDs a CDs. Read th 2.1 2.2 Unpacking.........................................................................4 Package contents.............................................................5 i 3.1 3.2 3.3 Installing the speakers......................................................6 Connecting random equipment.........................................7 Remote control.................................................................9 Preparations for use.................................................... 4 Installation.................................................................... 5 Functions.................................................................... 10 4.1 4.2 DVD Micro System.........................................................10 Remote control...............................................................11 5.1 5.2 5.3 5.4 5.5 5.6 5.7 Master power switch.......................................................13 Quick start.......................................................................13 DVD/CD functions...........................................................15 Radio functions...............................................................18 USB functions.................................................................18 SD/MMC functions..........................................................19 General setup menu operation.......................................19 6.1 Handle and care of a disc...............................................23 Due con ma dev pos 2 Operation.................................................................... 13 Cleaning and maintenance....................................... 23 7. Troubleshooting......................................................... 24 8. Technical data............................................................ 26 9.Disposal of used electrical and electronic equipment................................................................... 28 Copyright notice Design and specifications are subject to change without notice. i DVD agr only num alon The pre con dur D Man the Con Lab 1.2 La WAR Aw are CAU Ac ! ! .............. 3 AMD20 1. Safety 1.1 Intended use ..................3 ..................3 ..................4 The DVD Micro System plays music from CDs and music, videos and photos from DVDs and USB. The appliance also plays photos from Kodak picture CDs. Read the manual carefully before the first use. ..................4 ..................5 i .............. 4 .............. 5 ..................6 ..................7 ..................9 ............ 10 ................10 ................11 Due to the great variety of products with external memory connection (USB, SD/MMC, etc.) and their sometimes quite manufacturer-specific functions we can neither guarantee that all devices will be recognised, nor that all operating options that are possible in theory will actually work. 2 DVDs and DVD appliances are manufactured under the worldwide agreed DVD regional code system that the appliance will operate only with corresponding disc of the same regional code. If the code number on the label of a DVD does not match that on the label alongside, the DVD will not play on this appliance. The appliance has built in copyright protection technology that prevents copying from a disc to any media. If a video recorder is connected to the appliance, the video output image will be distorted during recording. ............ 13 ................13 ................13 ................15 ................18 ................18 ................19 ................19 ............ 23 ................23 ............ 24 ............ 26 ............ 28 i D Manufactured under license from Dolby Laboratories. "Dolby" and the double-D symbol are trademarks of Dolby Laboratories. Confidential unpublished works. Copyright 1992-1997 Dolby Laboratories. All rights reserved. 1.2 Labels in this manual WARNING A warning means that injury or death is possible if the instructions are not obeyed. CAUTION A caution means that damage to the equipment is possible. ! ! 3 i A note gives additional information, e.g. for a procedure. 1.3 WARNING Do not put force on the appliance. The appliance can fall and can cause serious injury. CAUTION Do not spill any liquid on the appliance. WARNING Do not insert any objects in the ventilation holes. CAUTION Do not block the ventilation holes. This appliance is double insulated; therefore no earth wire is required. Always check that the mains voltage corresponds to the voltage on the rating plate. ! ! ! L This appliance employs a laser system. To prevent direct exposure to the laser beam, do not open the appliance. Visible laser radiation when open and interlock defeated. 2. Preparations for use 2.1 Unpacking ● Unpack the appliance carefully. ● Check the package contents as described below. If any item is missing, please contact your reseller. ● Remove the labels from the front panel carefully if present. 4 We ma for aga pac env 2.2 Pa General safety instructions ! i i The following 1 DVD Mic 2 Speakers 2 Pair of sp 1 Remote c 2 Batteries 1 RCA cab 1 Operator i 3. If an In ● Put the ap ● Connect th "Installing ● Connect th "Connectin ● Connect th ● Install the "Remote c ! CAU ● Do not put ● Do not exp AMD20 e. i all and can 2.2 wire is onds to the ect exposure aser s missing, We recommend that you retain the original carton and packing materials in case it ever becomes necessary to return your product for service. This is the only way to safely protect the product against damage in transit. If you do dispose of the carton and the packing materials, please remember to recycle with due care to the environment. Package contents The following items are included in the received package: 1 DVD Micro System 2 Speakers 2 Pair of speaker wire 1 Remote control 2 Batteries (AAA) 1 RCA cable 1 Operator manual i 3. If any item is missing, please contact your reseller. Installation ● Put the appliance on a horizontal flat surface. ● Connect the speakers to the appliance. Read the paragraph "Installing the speakers". ● Connect the random equipment to the appliance. Read the paragraph "Connecting random equipment". ● Connect the appliance to the mains. ● Install the batteries in the remote control. Read the paragraph "Remote control". ! CAUTION ● Do not put the appliance near a heat source. ● Do not expose the appliance to direct sunlight. 5 i 3.1 This appliance is equipped with rubber feet to prevent it from moving. The feet are made from non-migrating material specially formulated to avoid leaving any marks or stains on furniture. However, certain types of furniture polishes, wood preservatives or cleaning sprays cause the rubber to soften and leave marks or a residue on the furniture, and potentially risk the surface to become damaged. To prevent damage to wooden surfaces, we recommend that you apply self-adhesive pads to the bottom of the rubber feet before installation. Installing the speakers Connectio ● Press the ● Connect th markings. ● Release th Connectio ● Press the ● Connect th and (-) pol ● Lift the latc 3.2 Co 6~16 ohm LINE INPUT The cables and terminals are colour-coded: - Red wires connect to red terminals (+). - Black wires connect to black terminals (-). ● Place the speakers on a horizontal flat surface. Place the speakers close enough to the appliance to be able to connect the wires. ● Connect the wires as described below. 6 The applianc equipment. S it from al specially niture. servatives or marks or a e to become recommend rubber feet akers close AMD20 Connection to speakers ● Press the latches to open the terminals. Keep the latches depressed. ● Connect the wire ends to the speakers matching the (+) and (-) polarity markings. ● Release the latches to lock the wire ends. Connection to the appliance ● Press the latches to open the terminals. ● Connect the wire ends of the speakers to the appliance matching the (+) and (-) polarity markings. ● Lift the latches to lock the wire ends. 3.2 Connecting random equipment 6~16 ohm LINE INPUT The appliance includes various options for permanent connection of random equipment. Suitable cables can be purchased at your reseller. 7 Audio connections (input) ● Stereo audio: Connect a suitable cable to the R/L channels of the LINE IN connection. Audio connections (output) The appliance has the following audio outputs: ● Stereo audio: Connect a suitable cable to the R/L channels of the AUDIO OUT connection. ● Coaxial digital audio: Insert a suitable cable into the COAXIAL AUDIO OUT connection. Video connections The video connections allow you to send to video signal (still images or movies) to a connected TV. The appliance has the following video outputs (in order of preference): ● Component: Connect a suitable cable to the Pr/Y/Pb channels of the COMPONENT VIDEO OUT connection. ● SCART: Insert a suitable cable into the SCART OUT connection. ● S-Video: Insert a suitable cable into the S-VIDEO OUTPUT connection. ● Composite video: Insert a suitable cable into the VIDEO OUTPUT connection. i Do not make all connections simultaneously as this will affect the output quality. Cable connection ● Insert an FM aerial or a suitable cable into the RADIO ANTENNA connection. 8 3.3 Re Install batt ● Remove th ● Insert the b polarity ma ● Re-install t ! CAU can cor app bat gra will AMD20 the LINE IN 3.3 Remote control Install batteries the AUDIO L AUDIO ages or ence): s of the ● Remove the battery cover. ● Insert the batteries matching the (+) and (-) polarity markings. ● Re-install the battery cover. ! CAUTION Incorrect installation can cause battery leakage and corrosion which will damage the appliance. Corrosion, oxidation, battery leakage and any other gradually acidic defect of this nature will invalidate the guarantee. on. onnection. PUT l affect the NNA 9 4. Functions Back pane 4.1 DVD Micro System 14 Master po 13 12 11 10 9 8 1 Front panel 1 2 3 4 5 6 7 8 9 10 11 12 13 10 2 3 4 Standby button Display Disc tray Remote sensor Headphone jack USB slot Memory card slot Cover for connection of external devices Previous track/chapter button Next track/chapter button Volume dial Play/Pause button Open/close button 5 6 7 4.2 Re General fu 15 16 17 18 19 20 21 22 23 24 25 26 Standby Digit butt SETUP b VOLUME Arrow bu SOUND E USB butt TONE bu CHANNE ENTER b SOURCE VIDEO O (V-MODE 27 MUTE bu AMD20 Back panel 14 14 Master power switch 13 12 6~16 ohm LINE INPUT 11 10 9 8 4.2 Remote control General functions 15 16 17 18 19 20 21 22 23 24 25 26 Standby button Digit buttons (0-10+) SETUP button VOLUME +/- button Arrow buttons SOUND EFFECT button (S.EFFECT) USB button TONE button CHANNEL LEVEL button (CH-LEVEL) ENTER button SOURCE SELECT button VIDEO OUTPUT MODE button (V-MODE) 27 MUTE button 15 16 17 18 19 20 21 27 26 25 24 23 22 11 5. DVD functions 28 29 30 31 32 33 34 35 36 37 38 39 40 41 42 43 44 45 46 47 GO TO button PLAYBACK CONTROL button (PBC) PROGRAM button (PROG) FWD button REV button TITLE button AUDIO button STEP button A-B REPEAT button REPEAT button STOP button ZOOM button MENU button SUBTITLE/AUTO button PREV button NEXT button On Screen Display button (OSD) ANGLE button PLAY/PAUSE button OPEN/CLOSE button 47 28 29 30 31 32 33 46 45 44 43 42 41 34 35 36 37 40 39 38 12 SEARCH + button SEARCH - button MEMORY button STOP button MO/ST button AUTO button RADIO + button RADIO - button All functions All instruction otherwise. 5.1 Ma The applianc back panel. ● Set the sw operation. ● Set the sw i ● The applia For regula standby m and not wa also switch ● When the switch the 5.2 Tuner functions 48 49 50 51 52 53 54 55 O 48 55 49 54 53 50 52 51 Qu General fu ● Check tha ● To switch o the applian ● To select t SELECT b ● To select a button (21 ● To adjust t ● To adjust t button (23 AMD20 5. 47 46 45 44 43 42 41 40 39 38 Operation All functions of the appliance are accessible using the remote control. All instructions refer to operation with the remote control, unless indicated otherwise. 5.1 Master power switch The appliance is equipped with a master power switch (14) located at the back panel. ● Set the switch into the ON position prior to taking the appliance into operation. ● Set the switch into the OFF position prior to disconnecting from the mains. i ● The appliance is designed to be operated using the remote control. For regular use you may find it convenient to switch the appliance to standby mode after use. However, if you wish to care for the environment and not waste energy by leaving the appliance in standby mode, you can also switch off at the master power switch. ● When the appliance is not in use for longer period, we recommend to switch the appliance off at the master power switch. 5.2 55 54 53 52 51 Quick start General functions ● Check that the master power (14) switch is in the ON position. ● To switch on the appliance, press the STANDBY button (15). To switch off the appliance, press the STANDBY button (15) again. ● To select the source mode (DVD/TUNER/LINE), press the SOURCE SELECT button (25). ● To select an extra signal source (USB/MEMORY CARD), press the USB button (21). Press the button once again to exit this function. ● To adjust the volume, press the VOL + button or the VOL - button (18). ● To adjust the volume of each speaker separately, press the CH-LEVEL button (23). Then press the VOL + button or the VOL - button (18). 13 ● To select the tone (bass/treble), press the TONE button (22). To adjust the tone, press the VOL + button or the VOL - button (18). ● To switch between sound effects (concert/living/hall/bath/cave/arena/ church), press the S.EFFECT button (20). Press the button once again to exit this function. ● To mute or restore sound, press the MUTE button (27). ● To connect a headphone, insert the cable plug in the headphone jack (5). To prevent hearing damage, remember to adjust the volume to a comfortable level. DVD/CD functions ● Switch on the appliance. Select the DVD mode. ● Place a disc in the disc tray. To open or close the disc tray, press the OPEN/CLOSE button (47). The display shows the total number of tracks on the CD. ● To start playback, press the PLAY/PAUSE button (46) once. ● For extended instructions, read the paragraph "DVD/CD functions" further on in this manual. Radio functions ● Switch on the appliance. Select the tuner mode. ● To tune to the station of your choice, press the SEARCH + button (48) or the SEARCH - button (49) repeatedly until the frequency is found. ● For extended instructions, read the paragraph "Radio functions" further on in this manual. USB functions ● Switch on the appliance. ● Insert the USB device in the slot (6). The device can only be connected one way. ● Select the DVD mode. Then select the correct function with the USB button (21). ● To start playback, press the PLAY/PAUSE button (46) once. ● For extended instructions, read the paragraph "USB functions" further on in this manual. SD/MMC functions ● Switch on the appliance. ● Insert the SD/MMC device in the slot (7). The device can only be connected one way. 14 ● Select the USB butto ● To start pla ● For extend on in this m 5.3 DV After the disc ● Press the ● Press ENT During playba ● To select a ● To select t PREV butt ● To forward button (32 ● To pause p playback, ● To stop pla button aga button (46 ● To repeat a -- Press th track. -- Press th -- Press th -- Press th ● To play the Press the ● To view a s Use the ar ● To select t repeatedly ● To switch o Press the ● To select e playtime/tr ● To select t AMD20 To adjust the e/arena/ nce again to one jack (5). oa ess the ions" further tton (48) or und. ns" further on connected he USB s" further on be ● Select the DVD mode. Then select the correct function with the USB button (21). ● To start playback, press the PLAY/PAUSE button (46) once. ● For extended instructions, read the paragraph "SD/MMC functions" further on in this manual. 5.3 DVD/CD functions After the disc has been loaded, a content menu will display on the TV screen. ● Press the arrow buttons (19) to select a menu item. ● Press ENTER to enter the selected menu item. During playback, the following functions are available: ● To select a chapter (DVD) or track (CD), press the digit buttons (16). ● To select the next or previous chapter (DVD) or track (CD), press the PREV button (42) or the NEXT button (43). ● To forward or rewind the DVD, press the FWD button (31) or the REV button (32). The available speed rates are: 2x, 4x, 8x, 16x, 32x. ● To pause playback, press the PLAY/PAUSE button (46) once; to resume playback, press the button again. ● To stop playback temporarily, press the STOP button (38) once. Press the button again to stop playback permanently, or press the PLAY/PAUSE button (46) to resume playback. ● To repeat a chapter (DVD) or one or all tracks (CD): -- Press the REPEAT button (37) once to repeat the current chapter or track. -- Press the button once again (2x) to repeat the current title. -- Press the button once again (3x) to repeat all chapters or tracks. -- Press the button once again (4x) to cancel the function. ● To play the DVD frame by frame, press the STEP button (35). Press the PLAY/PAUSE button (46) to resume normal playback. ● To view a specific title of a DVD, press the TITLE button (33). Use the arrow buttons to select the title. ● To select the audio language of a DVD, press the AUDIO button (34) repeatedly until the desired language is set. ● To switch on the subtitles of a DVD, press the SUBTITLE button (41). Press the button again to switch off the subtitles. ● To select extra information of a DVD or CD (remaining time/passed playtime/track number/chapter number), press the OSD button (44). ● To select the camera angle, press the ANGLE button (45). 15 i ● Normally, if an MP3 disc is loaded, the unit will take longer time to read the initial data. ● A DVD that does not match the region code cannot be read by this appliance. ● If a disc contains mixed content (e.g. MP3 and video files), the appliance will only recognise, list and play one content type. ● The screen saver becomes active if no disc has been loaded for 3 minutes, or if the appliance has been in STOP mode for 3 minutes. Using the GO TO function The GO TO function can be used to select a specific starting point on a DVD or CD. ● Press the GO TO button (28). ● Press the arrow buttons to select an entry. The possible entries for DVD are: - Disc time - Chapter - Title - Chapter time - Title time The possible entries for CD are: - Track time - Specific track ● Press the digit buttons to set a selection. Using the PROGRAM function ● Press the PROG button (30) to enter the PROGRAM function. ● Press the digit buttons to select a desired track, and use the arrow button down to highlight the next entry. ● To confirm the selection and start the program, move the highlight to "START" and press the ENTER button. ● To stop the progam, press the PROG button (30) and press ENTER. Using the A-B REPEAT function The A-B REPEAT function can be used to repeat a specific section of a DVD. ● Press the A-B REPEAT button (36) once to select the starting point (A). 16 ● Press the A The applia ● To cancel The applia Using the This function The available ● Press the ● Press the ● Press the Using the ● Insert an M ● Press the ● Press the ● Press the Press ENT Using the ● Insert a Ko ● Press the option (Slid ● Press the confirm. ● Press the picture. ● Press the previous o ● Press the ● To magnify the picture To move th ● To flip the i ● To rotate th i The and me to read y this e appliance for minutes. nt on a DVD . arrow button light to NTER. on of a DVD. point (A). AMD20 ● Press the A-B REPEAT button again to select the ending point (B). The appliance plays the section repeatedly. ● To cancel the A-B REPEAT function, press the A-B REPEAT button again. The appliance will resume the normal playback. Using the ZOOM function This function can be used for zooming in and out on photos and DVDs. The available zoom ratios are: 2x, 3x, 4x, 1/2, 1/3, 1/4. ● Press the ZOOM button (39). ● Press the ZOOM button again to set the correct size. ● Press the arrow buttons to move through the picture. Using the MP3/MPEG4 playback function ● Insert an MP3/MPEG4 disc. A content menu will display on the TV screen. ● Press the up/down arrow buttons (19) to select a folder or a file. ● Press the ENTER button (24) to enter the selected folder or file. ● Press the PROG button (30) to switch between folders and files. Press ENTER to confirm. Using the Kodak picture CD playback function ● Insert a Kodak picture CD. ● Press the STOP (38) button to enter the thumbnail mode. Choose an option (Slide show/Menu/prev-next) and press ENTER (24). ● Press the PROG button (30) to change the mode. Press ENTER (24) to confirm. ● Press the PLAY/PAUSE button (46) to hold the slide show at the current picture. ● Press the PREV button (42) or the NEXT button (43) to select the previous or next picture. ● Press the PLAY/PAUSE button (46) to resume the slide show. ● To magnify the picture, press the ZOOM button (39). To zoom in or out on the picture, press the FastForward button (31) or FastRewind button (32). To move the picture, press the arrow buttons (19). ● To flip the image vertical or horizontal, press the up/down arrow buttons (19). ● To rotate the image left or right, press the left/right arrow buttons (19). i The slide show is paused in the zoom mode. The image rotation and wipe effect functions are not available in the zoom mode. 17 Using the Video CD playback function ● Press the PBC button (29) to switch on the playback function. ● Insert a Video CD. ● To start playback, press the PLAY/PAUSE button (46) once. ● Press the PBC button (29) to quit the playback and return to the main menu. 5.4 Radio functions ● To search for frequencies automatically, press the AUTO button (53). ● To fine tune the frequency, press the SEARCH + button (48) or the SEARCH - button (49). ● To select a preset station, press the digit buttons (16). ● To skip to the next preset station, press the RADIO - button (54) or the RADIO + button (55). ● To stop the automatic search for frequencies, press the STOP button (51). ● To switch between Mono and Stereo reception, press the MO/ST button (52). Using the MEMORY function This function is used to set a frequency as a preferred station. ● Press the MEMORY button (50). ● Search for the desired frequency with the SEARCH + button (48) or the SEARCH - button (49). ● Press the MEMORY button when the desired frequency is found. ● Select the desired preset number (1-40) with the digit buttons to save the frequency as a preset station. ● Press MEMORY again to confirm the selection. 5.5 USB functions After the device has been connected, a content menu will display on the TV screen. ● Press the up/down arrow buttons (19) to select a folder or a file. ● Press the ENTER button (24) to enter the selected folder or file. You can also use the digit buttons (16) to select a folder or to play the file. ● Press the PROG button (30) to switch between folders and files. Press ENTER (24) to confirm. ● Press the MENU button (40) to return to the content menu during playback. 18 During playba ● To select a until the de ● To pause p playback, ● To stop pla ● To remove Due som gua opt 5.6 SD i After the dev TV screen. ● Press the ● Press the You can al ● Press the Press ENT ● Press the M During playba ● To select a until the de ● To pause p to resume ● To stop pla ● To remove 5.7 Ge This chapter display, audio To change The following . he main on (53). or the 54) or the P button (51). T button (52). 48) or the und. to save the y on the TV AMD20 During playback, the following functions are available: ● To select a track, press the PREV button (42) or the NEXT button (43) until the desired track is set. ● To pause playback, press the PLAY/PAUSE button (46) once; to resume playback, press the button again. ● To stop playback, press the STOP button (38). ● To remove the device, gently pull it out of the slot. i 5.6 Due to the great variety of products with USB ports and their sometimes quite manufacturer-specific functions we can neither guarantee that all devices will be recognised, nor that all operating options that are possible in theory will actually work. SD/MMC functions After the device has been connected, a content menu will display on the TV screen. ● Press the up/down arrow buttons (19) to select a folder or a file. ● Press the ENTER button (24) to enter the selected folder or file. You can also use the digit buttons (16) to select a folder or to play the file. ● Press the PROG button (30) to switch between folders and files. Press ENTER (24) to confirm. ● Press the MENU button (40) to return to the content menu during playback. During playback, the following functions are available: ● To select a track, press the PREV button (42) or the NEXT button (43) until the desired track is set. ● To pause playback, press the PLAY/PAUSE button (46) once; to resume playback, press the button again. ● To stop playback, press the STOP button (38). ● To remove the device, gently pull it out of the slot. 5.7 General setup menu operation le. le. You can file. es. This chapter explains a complete setup of the appliance: settings of screen display, audio setup and video setup. ng playback. The following actions have to be carried out with the remote control. To change the initial settings 19 ● Press the SETUP button (17). ● Press the arrow buttons (left and right) (19) to select a menu. The submenu is displayed directly. ● Press the arrow buttons (up and down) to enter the submenu. ● Press the ENTER button (24) to select a setting, or the left arrow button to cancel the selection. ● Press the SETUP button to store the settings and exit. General setup page ● In the TV DISPLAY section, press the arrow buttons to select 4:3 PANSCAN or 4:3 LETTERBOX for a conventional TV set. Select 16:9 or WIDE SQUEEZE for a wide screen TV set. ● In the ANGLE MARK section, press the arrow buttons to switch this function ON or OFF. When switched ON, the appliance shows the angle mark when multi-camera angles are available. ● In the OSD LANG section, press the arrow buttons to choose the language. ● In the CLOSED CAPTIONS section, press the arrow buttons to switch this function ON or OFF. When switched ON, the appliance shows hidden text when it is available. ● In the SCREEN SAVER section, press the arrow buttons to switch the screen ON or OFF. ● In the LAST MEMORY section press the arrow buttons to switch this function ON or OFF. When switched ON, the appliance remembers the disc's last playback time. Audio setup page Analog audio setup ● DOWNMIX: Select LT/RT to mix 5.1-channel audio into left channel and right channel. Select STEREO to mix 5.1 channel audio into signal stereo. i 20 This function is only available for Dolby AC-3 encoded 5.1-channel discs. Digital audio se DIGITAL OUT ● Select SPD ● Select SPD (DTS/Dolb ● Select SPD i Wh the Dolby digital au DUAL MONO ● Stereo: bo ● L-Mono: le ● R-Mono: ri ● Mix-Mono: i This disc DYNAMIC ● Select the details res High Definition ● Select the CDs. Video setu VIDEO OUTP ● OFF: Sele ● YUV: Set t ● P_YUV: Se ● RGB: Set AMD20 Digital audio setup row button to 4:3 ect 16:9 or ch this s the angle the to switch this s hidden text witch the tch this mbers the annel and ignal stereo. 5.1-channel DIGITAL OUTPUT ● Select SPDIF OFF to switch off the digital audio signal output. ● Select SPDIF RAW to set the digital audio signal output to its raw format (DTS/Dolby Digital 5.1). ● Select SPDIF PCM to set the digital audio signal output to PCM format. i When SPDIF PCM is set, the LPCM OUT feature sample rating for the analog audio input (48 kHz or 96 kHz). Dolby digital audio setup DUAL MONO ● Stereo: both channels as is. STEREO is the default setting. ● L-Mono: left channel only. ● R-Mono: right channel only. ● Mix-Mono: the average of both the left and right channel. i This function is only available for Dolby AC-3 encoded 2-channel discs. DYNAMIC ● Select the value for the dynamic range compression to avoid losing sound details resulting from a low volume. High Definition Compatible Digital (HDCD) ● Select the value (2x, 1x or OFF) for full sound richness of HDCD-encoded CDs. Video setup page VIDEO OUTPUT ● OFF: Select S-Video mode of the S-Video connection. ● YUV: Set the video output in analog component video format. ● P_YUV: Set the video output in progressive YUV signals. ● RGB: Set the video output in RGB format when SCART output is used. 21 i ● The composite video output is the default setting for video output. ● If the video output results in a poor image, then press the V-Mode button (26) until the image is good. COLOUR SETTING ● SHARPNESS: Adjust the screen sharpness. ● BRIGHTNESS: Adjust the screen brightness. ● GAMMA: Adjust the colour intensity. ● LUMA DELAY: Compensate the delay in the colour signal. Preference setup page i The general system functions can only be set with an empty DVD player. TV TYPE ● Select the video output format to match the appliance to the TV system: PAL, MULTI or NTSC. PBC (Playback Control) ● Switch this function ON or OFF. i This function is only available for VCD 2.0, SVCD etc. LANGUAGES ● In the AUDIO section, choose the audio language. ● In the SUBTITLE section, choose the subtitle language. ● In the DISC MENU section, choose the language for the disc menu. PARENTAL ● Set a rating for movies played by the appliance. ● The password to reset the rating is 136900. i 22 This function is only available with discs that have parental rating encoded. DEFAULT ● Restore th Password ● PASSWOR correct pas ● PASSWOR in the first password 6. ! C WAR Bef unp ● Clean the very dirty, 6.1 Ha ● Hold the d spindle ho ● Do not ben heating so ● Clean the surface ge ● Do not app Such clean put. Mode button empty DVD TV system: menu. AMD20 DEFAULT ● Restore the default settings of the appliance. Password setup page ● PASSWORD MODE: Switch the password function on or off. Enter the correct password to switch the mode on or off. ● PASSWORD: Change the default password. Enter the current password in the first box. Enter the new password in the second box. Enter the new password again in the third box to confirm. 6. ! Cleaning and maintenance WARNING Before performing any cleaning or maintenance, switch off and unplug the appliance. ● Clean the outside of the appliance with a soft cloth. When the appliance is very dirty, dampen the cloth slightly with water and a neutral solution. 6.1 Handle and care of a disc ● Hold the disc with fingers. Hold the disc outer edge and/or the centre spindle hole. Do not touch the disc surface. ● Do not bend or press the disc. Do not expose the disc to direct sunlight or heating sources. ● Clean the disc surface with a soft, dry cleaning cloth. Wipe the disc surface gently, radially, from centre towards the outer edge. ● Do not apply thinner, alcohol, chemical solvent, or sprays when cleaning. Such cleaning fluids will permanently damage the disc surface. ental rating 23 7. Troubleshooting Trouble Action No sound or incomplete audioCheck if the random equipment are switched on and set correctly. Check cables for connection problems. Check if the correct source is selected. Check volume or mute setting. No powerCheck if the power cord has been properly connected to the power outlet. Check if the master power switch on the back panel is ON. MalfunctionShould the appliance develop a serious malfunction, unplug the appliance for 30 minutes. After this, power on the appliance and restore to factory default. Radio No sound or in No scan or ski Picture distorte Picture not full Trouble Action Noise or sound distorted Station is not tuned properly. Adjust tuning control. on FM broadcasts.Wire aerial is not positioned correctly. Extend the aerial. FM stereo indicator does Selected station broadcasts in mono not light. Extend the aerial. Station signal is too weak. Try other strong stations. MP3 playb DVD/CD USB playb Trouble Action No playbackThere is no disc inserted. Load a disc in the appliance. Disc is loaded upside down. Place the disc with the label facing upward. Rating level of the disc is higher than the rating level setting of the appliance. Invalid region code. Incorrect type of disc. Disc may be damaged or dirty, clean the disc or try another disc. Moisture may have condensed inside the appliance. 24 Trouble No sound or in Trouble No playback AMD20 witched on and . . perly he back panel s malfunction, After this, factory ning control. Extend the rong stations. Remove the disc and leave the appliance powered on for one or two hours. No sound or incomplete audio Select another audio track. During SCAN, SLOW MOTION or SINGLE STEP the sound is muted. No scan or skip possibleSome discs are programmed to refuse user action at certain sections. This is no malfunction. Single chapter or track discs do not allow skip function. Picture distorted or noisyDisc may be damaged or dirty, clean the disc or try another disc. Check TV system setting (PAL/NTSC). A VCR is connected between the appliance and the random equipment. Connect the appliance to a A/V directly. Clean the disc. Picture not full screenSelect the screen format from the appliances setup menu. Select screen format in disc start menu. MP3 playback Trouble Action No sound or incomplete audioIf MP3 data is mixed with other files on CD, the appliance may play the non-MP3 files as noise or without sound or it rejects the disc. Check if the played file is in MP3 format or select another file to play. USB playback the appliance. disc with the he rating level Trouble Action No playbackUSB device is not installed or installed incorrectly. Insert USB device into slot. Incompatible USB device used. Playback using any USB device cannot be guaranteed. Please try another USB device. he disc or try the appliance. 25 AUX Trouble Action No sound on the unit system.Input source is low. Increase the volume level on the audio source device. No pictureCheck if the TV is switched on and set to the correct A/V input. Check cables for connection problems. Check cables for damage. Remote control (RC) Trouble RC does not function 8. Technical data Parameter Voltage Power consumption Standby power consumption Max power output Headphones output impedance USB connection Flash memory connection Dimensions (W x H x D) Weight Tuner Action Check the battery installation. Point the RC at the remote control sensor. Stay within 8 metres of the appliance. Parameter FM radio Value 100 ~ 240VAC / 50 ~ 60 Hz 100 W 11 W 2 x 25 W 32 Ω USB 2.0 compatible SD/MMC 220 x 135 x 250 mm 2.38 kg Value 87.5 mHz - 108 mHz Disc outpu Parameter Laser type Signal/noise ra Frequency ran Distortion Wow and flutte Television syst Frequency res Region code Speaker s Parameter Impedance Cabinet mater Wire length Dimensions (W Weight Remote co Parameter Power consum Battery size Supported Parameter Disc types Picture formats Video formats Audio formats Working e Parameter Operating tem Relative humid 26 AMD20 Disc output me level on the to the correct . nsor. Parameter Laser type Signal/noise ratio Frequency range Distortion Wow and flutter Television system Frequency response Region code Speaker system Parameter Impedance Cabinet material Wire length Dimensions (W x H x D) Weight Remote control Parameter Power consumption Battery size Value Semiconductor > 80 dB (1 kHz) ≥ 70 dB (1 kHz) ≤ -60 dB (1 kHz) Below the limit of the appliance PAL/NTSC 20 Hz ~ 20 kHz 2 Value 4 ~ 16 Ω Wood 100 cm 150 x 270 x 240 mm 262 g Value 2 x 1.5 V AAA Supported media formats Parameter Value Disc typesDVD / DVD-R / DVD-RW / CD-R / CD-RW / DIVX / SVCD / VCD / CD-DA Picture formats JPEG / Kodak Picture CD Video formatsMPEG1, MPEG2, MPEG4, WMA, AVI Audio formatsMPEG1 Layer I, II, III PCM Dolby Digital, MP3 Working environment Parameter Operating temperature Relative humidity Value -10 ~ +40 °C 5% ~ 90% 27 9. isposal of used electrical D and electronic equipment Z The meaning of the symbol on the material, its accessory or packaging indicates that this product shall not be treated as household waste. Please, dispose of this equipment at your applicable collection point for the recycling of electrical and electronic equipments waste. In the European Union and Other European countries which there are separate collection systems for used electrical and electronic product. By ensuring the correct disposal of this product, you will help prevent potentially hazardous to the environment and to human health, which could otherwise be caused by unsuitable waste handling of this product. The recycling of materials will help conserve natural resources. Please do not therefore dispose of your old electrical and electronic equipment with your household waste. For more detailed information about recycling of this product, please contact your local city office, your household waste disposal service or the shop where you purchased the product. For more information and warranty conditions, please visit: www.akai.eu 28