1
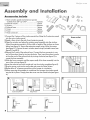
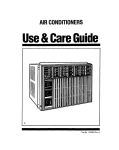
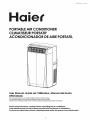
Meijer.com
aiet
PORTABLE AIR CONDITIONER
CLIMATISEUR PORTATIF
ACONDICIONADOR DE AIRE PORTATIL
User Manual, Guide de I'Utilisateur, Manual del Usario
HPDlOXCM
Some models may have an additional letter after the model number.
Sur certainsmodeles, le numero de modele peut etre suivi d'une lettre.
Algunos de los modelos pueden tener una letra adicional despues del numero de modelo.
Please read Instructions carefully before operating the air conditioner.
Lisez attentivement les instructions avant de faire fonctionner le climatiseur.
Por favor lea estas lnstrucctones cutdadosamente antes de operar el acondlclonador.
1
Meijer.com
2
Meijer.com
English
A Word From Haier America
Thank you for buying a dependable, energy saving and easy-to-operate Haier air
conditioner. This manual contains useful information for you to maintain, operate, install and
safely use your air conditioner. Your air conditioner cleans, cools and dehumidifies the air in
your room to provide you with the ultimate level of comfort.
Please read instructions carefully before using the product. Also, do not forget to fill out and
mail in the Product Registration Card.
Product Registration
Keep a record of your model and serial numbers.
Attach the sales receipt to this guide and keep for future reference. Model and serial number
can be obtained from the serial label, which is on your air conditioner. For all your service calls
during the warranty period the following information will be needed:
Model Number: ..............................................................................................................
Serial Number: ...... ..... .. .. ...... ..... .. .. ..... .. .... .. ....... .. ...... ... .. .. .. ...... ... .. .. .. ... ... ..... .. .. ... ... ....... .
Date of Purchase: ............................................................................................................
Dealer's Name: .. .. .. ........... .. .. ... ... .. ... .. .. ... ..... ... .. .. ..... ... ... .. .. ... .. ....... ... ... .. .. ... .. ... ... .. .. ... .. . .
Dealer's Address: ..... .. .......... .............. .... .. .......... ... .. .......... .................... ......................... .
Dealer's Phone Number: .. ..... .. .... .. .. ... .. .. .... .. .. ..... .. .... .. ... .. .. .. ...... ... .. .. .. ... ... ..... .. .. ... .. .. ...... .
1
3
Meijer.com
English
SAFETY PRECAUTIONS
A WARNING: Read all of the instructions before using this appliance. When using
a
A
1)
A 2)
A 3)
A
this appliance, always exercise basic safety precautions, including
the following:
Air conditioner must be connected to proper electrical outlet with the correct electrical
supply.
Proper grounding must be ensured to reduce the risk of shock and fire. DO NOT CUT OR
REMOVE THE GROUNDING PRONG. If you do not have a three-prong electric receptacle
outlet in the walt have a certified electrician install the proper receptacle. The wall receptacle
MUST be properly grounded.
Do not operate the air conditioner if the power cord is frayed or otherwise damaged. Avoid
using it if there are cracks or abrasion damage along the length, plug connector or if the unit
malfunctions or is damaged in any manner. Contact an authorized service technician for
examination, repairs or adjustments.
4)
DO NOT USE AN ADAPTER OR AN EXTENSION CORD.
5)
Do not block airflow around the air conditioner. The exhaust hose should be free of any
obstructions.
6)
Always unplug the air conditioner before servicing it or moving it.
7)
Do not install or use the air conditioner in any area where the atmosphere contains
combustible gases or where the atmosphere is oily or sulphurous. Avoid any chemicals coming
in contact with your air conditioner.
8)
Do not place any object on the top of the unit.
9)
Never operate the air conditioner without the filters in place.
10) Do not use the air conditioner near a bathtub, shower or wash basin.
SAVE THESE INSTRUCTIONS
CAUTION! If the air conditioner has been placed in a horizontal or tilted position for any period of
time, wait 24 hours before plugging the unit in.
2
4
Meijer.com
English
Important Instructions
• Please keep this manual in a safe place.
• Do not use liquid or a spray to clean this product. Use a damp cloth.
• Do not place the product in an insecure or elevated place as it may fall and cause damage or
injury.
• Never spill liquid on the control panel; it may cause electrical shock to the electronic parts inside
and disable them or cause them to function improperly.
• Never try to dismantle the product by yourself as this will void the warranty. Unsupervised
dismantling and incorrect reassembly of the inside of the back cover may damage the electrical
circuit and affect its performance. When maintenance is required, please contact the local service
center or local distributor.
3
5
Meijer.com
English
Assembly and Installation
CZ/ff?@rcy
Accessories Include
1. Main window panel and extension panels
-extends from 20 11 up to 46 11 •• • • ••••••• • • •••• 3 pieces
2 . Ex haust nozzle .... .... ... ... ..... ... .. .. . ..... .. 1 piece
3 . Screws ... ....... ...... .. .. . .... ...... ... .. ... .. ... 8 pieces
4 . Exhaust hose .... .. . ..... . ...... .. . ..... . ...... .. 1 piece
5 . Cover .. .... ...... .. ...... . ... .. ... ...... . . .. .. ... . 1 piece
6 . Foam ....... .. .... . .. ... ... .. .... . ... ... .. .. ...... . 2 pieces
7 . Hose connector . . ... .... . ...... . ... ... . . ...... .. 1 piece
®~ @~0(g
1)Connect the 3 pieces of the window panels by sliding the 2 extension panels
into the main window panel.
2)Apply a foam strip to the end of each extension panel.
3)0pen the wi ndow and place the window panel assembly into the window.
Adjust the extension panels to fit the width or height of the window as shown
below (see figure A). Secure the exten sion panels using 4 blunt tip screws
(see figure B-1 ). Secure the main window panel using 4 pointed screws (see
figure B-2 and B-3).
4)Expand the 2 ends of the exhaust hose. Connect the hose connector to one
end of the ex haust hose by turning clockwise. Then insert the exhaust nozzle
at the other end of the exhaust hose by turning clockwise (see figure C) to
create the hose assembly.
5)Siide the hose connector end (the square end) of the hose assembly into the
rear of the unit (see figure D).
6)1nsert the exhaust hose with nozzle end into the window panel(see figure E).
7)Piug the power cord into the wall outlet and press the "Reset"buHon.
8)Piease allow 8" of space around the unit for proper air circulation.
9)When removing the portable air conditioner for storage, the window panel
may be left in place . Simply place the cover over the nozzle hole (see figu re
c
D
A) .
A
\
-*
\
J
~
"I
~~
INDOOR
Doub le Hung Window
Sliding Windo w
B
4
B- 1
B-2
B-3
6
E
Hose outlet
Meijer.com
English
Parts and Features
1. Control panel
2. Air outlet
3. Handle
4. Casters
5. Air filter
3
6. Exhaust Hose Connection
7. Air Intake
8. Upper Drain
9. Lower Drain
(Note : Please ensure if the water
outlet drain is well installed
before use.)
10. Power supply cord
POWER CORD
c=J
RESET
7
c=::J
TEST
I
I
(
I
I
LH
TEST: When this button is pressed or
when there is a current leak, the unit
will not operate.
9
10
RESO: After resolving the problem,
press the reset button to resume
operation.
5
7
Meijer.com
English
Operation
NOTE: Wait 24 hours before turning on the air conditioner if the unit has been tilted for any reason .
This allows the oils and the coolants to settle and level off.
BEFORE USE
1. Use an 115V, 15Amp outlet for the air conditioner. Do not use any other electrical appliances on
this line or you may trip the fuse. Use a dedicated line for this air conditioner.
2. Do not place the air cond itioner in direct sunlight or close to any heating appliances (ie.,
baseboard heaters, stoves, etc.)
3 . Operate on a flat surface only.
4 . Keep the unit free of any obstructions such as drapes, curtains, blinds, etc.
5 . Keep unit at least 1 foot away from the wall.
DURING USE
1. When turning on the unit for the first time after plugging it into an electrical outlet, the unit will start
in a high fan cooling mode. The temperature display on the LCD will show the current room
temperature. When turning on the unit during regular usage, it will remember the last setting used.
If you want to operate the air conditioner as a dehumidifier, then adjust to dehumidification mode.
2 . After a normal shut down, wait for 3 minutes before restarting the unit so as to complete the
compressor cycle.
3 . In cooling mode, this portable air conditioner should not require water to be removed. The unit
has a unique design which continuously evaporates the water. When the unit is operated in high
humidity conditions, you may need to empty the water tank periodically. The unit will shut down
automatically when the water tank is full and the 11Tank Full 11 warning light will turn on.
4 . To empty the water tank: Place a shallow pan (not included) below the lower drain located on the
back of the unit (near the bottom of the air conditioner}, remove plug, and drain the water tank
completely. Re-insert the drain plug. You will then be able to restart your portable air conditioner.
5. Check and clean the filter once every week for highest efficiency.
NOTE: Do not operate unit without filter.
AFTER USE
If the unit is not being used for a long period of time, drain the water from the water tank.
Please see step 4 of the 11During Use11 section above for more information.
6
8
Meijer.com
English
Control Panel Operation
®®®
G) @)
Power On
I OH
®@ Mode: Press the mode button for desired setting .
Cool: ~ sign appears in LCD display when in cooling
Dehumidification: [ill sign appears in LCD display when in dehumidification mode.
Fan: [j] sign appears in LCD display when in fan mode.
® ® Fan Speeds There are 3 adjustable speeds in the cool and fan mode:
Low, Medium and High. In dehumidification mode, and room temperature is greater than 7TF, fan
speed can be adjusted; otherwise fan speed is fixed to "low."
@
@On
I OH Timer: The timer can
be used to automatically turn on or off the air conditioner.
To automatically turn on the air conditioner, set the timer while the power control is in
the OFF position.
1. Turn off the air conditioner.
2 . Press the Timer button.
3. Press the (A) or(v) button to change the delay start time from 1 to 24 hours.
4 . The delay start time will display on the control panel.
To automatically turn off the air conditioner, set the timer while the power control is in the
ON position.
1. Turn on the air conditioner.
2. Press the Timer button.
3. Press the (A) or (v) button to change the delay stop time from 1 to 24 hours.
4. The delay stop time will display on the control panel.
To
1.
2.
3.
0
@
clear the timer setting:
The power control can be either in the on or off position.
Press the Timer button.
Press and hold the (v) button until the timer display has been cleared .
e Time I Temperature Set Control:
8
The (A) and (v) buttons can be used for adjusting the timer
and temperature settings.
To set the timer: See "On
I
Off Timer" instructions above.
To set the temperature: While in the Cool mode, press the (A) or (v) button to raise or lower the
temperature. The set temperature is displayed and may be adjusted. The temperature can be set
between 61 o F and 89° F (Cool mode). After 15 seconds the display will revert back to the
room temperature.
NOTE: The temperature cannot be adjusted in the fan or dehumidification modes.
0
l!il When the red indicator flashes, the internal water tank has filled with condensed water
ISIDI!I
and the air conditioner will turn off automatically. See the "OPERATION, DURING USE" section
for directions on draining the water from the air conditioner.
7
9
Meijer.com
English
Remote Control Operation
CD ~ Power On
I OH
@ §) Mode
Cool: ~ sign appears in LCD display when in cooling
Dehumidification: 02] sign appears in LCD display when in dehumidification mode.
Fan: ~ sign appears in LCD display when in fan mode.
@ 1+1 Fan Speeds There are 3 adjustable speeds in the cool and fan
mode:
Low, Medium and High . In dehumidification mode, and room temperature is greater
than 7TF, fan speed can be adjusted; otherwise fan speed is fixed to "low."
@ [ill] On I OH Timer
To set the Timer for a 1 to 24-hour delay until the air conditioner turns off:
1. When you use the timer setting button while the unit is operating, you can preset a time for
the unit to turn off.
2. When you use the timer setting button while the unit is on standby, you can present a time
for the unit to turn on.
3. If you press the "ON/OFF" button, the preset timer function will be cancelled.
4. Timer setting range is 1...,24 hours.
To clear Timer Delay program:
NOTE: Air conditioner can be either on or off.
1. Press the Timer button.
2. Press and hold the minus button until the timer display has cleared.
To change the remaining time (in hours):
1. Press the Timer button.
2. Press the plus or minus button to change the delay time
from 1 to 24 hours.
3. The new delay time will display.
@ @ IA
1
IIvI SeHing the Temperature
To set the temperature, press the~ or 621 key to
raise or lower the temperature. The
temperature can be raised or lowered in the cool
mode. The temperature cannot be adjusted in fan
or dehumidification mode.
NOTE: The temperature can be set between
61 ·F to 89.F (Cool mode).
(!)
ON/OFF
I
I"" TEHP I TIHE
5
lv TEHP/TIHE f
6
3
+
SPEED
I
4
0
TIHER
I
I~
HODE
Haier
8
10
2
Meijer.com
English
AWARNING: Batteries can explode, or leak, and can cause injury or fire.
To reduce the risk:
Carefully follow all instructions and warnings on the battery label and packaging .
Always insert batteries correctly with regard to polarity(+ and -)marked on the
battery and the equipment.
Do not short battery terminals.
Do not charge batteries.
Do not mix old and new batteries.
Replace all of them at the same time with new batteries of the same brand and type.
Remove dead batteries immediately and dispose of per local codes.
Do not dispose of batteries in re.
Keep batteries out of the reach of children.
Remove batteries if the device will not be used for several months.
Care and Cleaning Guide
• Always unplug your air conditioner before cleaning.
• Air filter needs to be cleaned at least once a week for your unit to operate at
optimum efficiency. Slide out the filter from the back by pulling on the tab. The filter
may be washed or vacuumed. Remove the excess water from the filter by
gently shaking the filter. This will remove dust and particles trapped in the filter.
After cleaning, reinstall the filter. DO NOT use your air conditioner without the air
filter in place.
• To clean the cabinet, DO NOT use harsh chemicals, abrasives, ammonia, chlorine,
bleach, concentrated detergents, solvents or metal scouring pads. Some of these
chemicals may dissolve, damage and/or discolor your air conditioner.
• Always use a soft cloth dampened with water or a mild soap and water solution to
wipe the front of the cabinet. Wipe dry with a soft cloth.
Storage
• To store your air conditioner when not being used for a long period of time, drain
the water tank as described on page 6 under the 11 During Use 11 section, step 4 . Remove
exhaust hose, clean the filters, cover with plastic bag and store away.
9
11
Meijer.com
English
Troubleshooting
If air conditioner does not operate:
•
•
•
•
•
•
Check if unit is plugged in. The plug may have come loose.
Press "Reset" button on the plug to resume operation.
Check if the electrical wall receptacle is the proper voltage.
Check if the circuit breaker needs to be reset or if the fuse needs to be replaced .
11
11
Check if the unit is in 0ff mode.
If the warning light is on, drain the water drain pipe by removing the plug .
Air conditioner working but room not cooling:
•
•
•
•
•
•
•
•
•
Room may have appliances that produce heat. Use an exhaust fan to remove excess heat.
Check exhaust hose for proper installation.
Redirect the airflow. Remove any obstacles.
All doors and windows need to be closed so that cool air does not escape the room .
A ir filter may be blocked or may need cleaning .
Unit BTU may be too low for the required cooling area.
On extremely hot & humid days, air conditioners may take a little longer to cool.
Drain the water drain pipe by removing the plug .
Unit may be in fan or dry mode. Put air conditioner in cool mode.
Tank Full Warning Light Is On:
• Unit will shut down when the water pan is full. This condition may occur when
the unit is operated in high humidity conditions. See instructions in the "Operation"
section under "During use" .
10
12
Meijer.com
English
Limited Warranty
What is covered and for how long?
This warranty covers all defects in
workmanship or materials for a period of:
1 year parts (carry in only)
1 year labor (carry in only)
5 years sealed system
(carry in only)
The warranty commences on the date the item was
purchased and the original purchase receipt must
be presented to the authorized service center before
warranty repairs are rendered .
EXCEPTION: Commercial or Rental Use
Warranty
90 days labor (carry-in only)
90 days parts
No other warranty applies
What is covered.
1. The mechanical and electrical parts/ which serve as
a functional, purpose of this appliance for a period
of 1 year. This includes all parts except finish, and
trim.
2 . The components of the sealed system e.g. hermetic
compressor, condenser and evaporator from
manufacturing defects for a period of 5 years
from the date of purchase. Any damages to such
components caused by mechanical abuse or
improper handling or shipping will not be covered.
What will be done?
1. We will repair or replace, at our discretion any
mechanical or electrical part which proves to be
defective in normal usage during the warranty
period so specified.
THIS WARRANTY COVERS
APPLIANCES WITHIN THE
CONTINENTAL UNITED STATES,
PUERTO RICO AND CANADA.
IT DOES NOT COVER
THE FOUOWING:
Damages from improper installation.
Damages in shipping .
Defects other than manufacturing.
Damage from misuse, abuse, accident/ alteration, lack
of proper care and maintenance or incorrect current
or voltage.
Damage from other than household use.
Damage from service by other than an authorized
dealer or service center.
Decorative trims or replaceable light bulbs.
Transportation and shipping.
Labor (after the initial 1 year) .
THIS LIMITED WARRANTY IS GIVEN IN LIEU OF All
OTHER WARRANTIES/ EXPRESSED OR, INCLUDING
THE WARRANTIES OF MERCHANTABILITY AND
FITNESS FOR A PARTICULAR PURPOSE
The remedy provided in this warranty is exclusive and
is granted in lieu of all other remedies.
This warranty does not cover incidental or
consequential damages/ so the above limitations may
not apply to you. Some States do not allow limitations
on how long an implied warranty lasts, so the above
limitations may not apply to you.
This warranty gives you specific legal rights, and you
may have other rights, which vary/ from state to state.
New York, NY 10018
2. There will be no charge to the purchaser for parts
and labor on any covered items during the initial
1 year period. Beyond this period only parts are
covered in the remaining warranty. labor is not
provided and must be paid by the customer.
3 . Contact customer service:
1-877-337-3639.
11
13