1
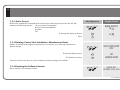
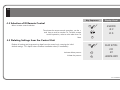
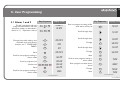
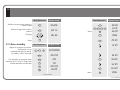
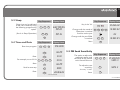
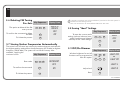
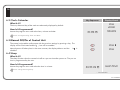
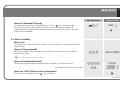
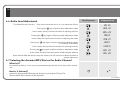
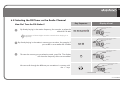
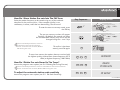
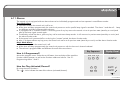
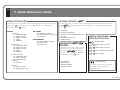
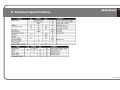
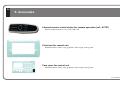
USER’S AND INSTALLATION MANUAL
42691/A1 CONTROL UNIT
CC-1035ENG-09
1
Important Safety Instructions
Before installing the unit, please read and follow the instructions provided in the
Installation Manual included .
Before operating the unit, please read and follow the instuctions provided in the User´s
Manual thoroughly and save it for future experience.
WARNING - To reduce the risk of fire or electric shock:
install in accordance with the manufacturer’s instructions
do not expose this apparatus to rain or moisture
Wiring Diagram
2
do not use this product near water
1. Introduction
3
2. Getting started
4
3. Installation
7
do not attempt to dissamble this unit
CAUTION
RISK OF ELECTRIC SHOCK
DO NOT OPEN
!
do not block any ventilation openings
do not install near any heat sources such as radiators, stoves or other
equipments that produce heat.
You are cautioned that any changes or modifications not expressly mentioned in this
manual could void your authority to operate this equipment.
This product has been designed and tested to provide reasonable protection against
harmful interference in residential installation. However there is no guarantee that
interference will not affect in a particular installation. In these cases, reorient the receiving
antenna, try to increase the separation between the equipment and the source of
interference and/or connect the equipment into an outlet on a circuit different from that to
which the source of interference is connected.
The entire risk of the installation, use, results and performance are borne by you.
When used as a mechanism to disconnect from the current network, a socket plug, or a
device connector; the disconnecting mechanism must be easily accessible at all times.
Protect the power cord from being walked on or pinched particularly at plugs,
convenience receptacles, and the point where they exit from the apparatus.
4. Settings
9
5. User Programming
11
6. Operation
15
7. Quick Reference Guide
24
8. Technical Specifications
25
9. Accesories
26
Only use attachments/accessories specified by the manufacturer.
Use a certified technician for installation, repair and/or maintenance of this equipment and
comply with all the regulations in force in each country. Servicing is required when the
apparatus has been damaged in any way, such as power-supply cord or plug is damaged,
liquid has been spilled or objects have fallen into the apparatus, the apparatus has been
exposed to rain or moisture, does not operate normally, or has been dropped.
Attention should be drawn to the environmental aspects of battery disposal.
CC-1035ENG-09
2
Wiring diagram
112 98
Rojo
+-
16 W
Negro
Rojo
+-
Negro
-
4 2
+
N L
N L
76 cm
-
M A
06 05 04
+
4 2
230V
16 W
CONTROL UNIT
CH
FM
1
2 abc
4 ghi
5
7 pqrs
8 tuv
jkl
PRG
3 def
6 mno
9 wxyz
0C
426 91
426 A1
CONNECTING TERMINALS
L
230V Power supply
N
05 Left loudspeaker output (red terminal/+)
It is advisable that the direct current that provides power to the power supply (ref.11298) be connected to a specific Automatic Switch in order to isolate and
allow you to disconnect the Audio System independently from the rest of the electrical appliances in the home. Other devices such as smoke extractors, air
conditioning units, fridges and ventilators can negatively affect the reception of the FM signal and produce noises on the audio lines.
06 Right loudspeaker output (red terminal/+)
04 Common loudspeaker ouput (black terminals/-)
2 15Vdc Sound regulator power supply
4 Mass
A FM tuner antenna signal
M FM tuner antenna mass
CC-1035ENG-09
3
1. Introduction
The new 42691/426A1 control unit is here. It provides the finest features offered by the
EISSOUND 400 Series, available in the convenient form of a kit.
Like the 400 Series, the 42691/426A1 control unit is user-friendly in design. Its clear and
easily accessible menus allow the user to failor the settings according to the needs of each
client. The direct FM tuning, the adjustable lighting, the screen with bigger letters and
numbers, the choice of language, etc. are just some of the functions available in this
customer-centered design.
What else does the 42691/426A1 control unit offer? It was designed for people who want to enjoy QUALITY sound in radio or music in
areas of the home with no television or stereo system, no sound pre-installation and who have no desire to undergo major improvements.
The 42691/426A1 control unit is the ideal accessory to enjoy the best possible sound in the kitchen and bathroom by means of a control unit
that blends right into the decor.
As always and with the 42691/426A1 control unit THE CUSTOMER ONLY HAS TO LISTEN.
KEYS TO UNDERSTANDING THE SYMBOLS
USED IN THIS MANUAL
The
symbol over a key
means the key should be pressed
for the time specified
5’’
In some cases it will be necessary
to press two keys simultaneously
to execute a
particular
PRG
command.
2’’
Some keys serve the function of a cursor to scroll through
the menus. When the key in question is used as a cursor,
it will be illustrated with the cursor symbols that appear
on the face of the control unit.
2 abc
4 ghi
5
jkl
6 mno
8 tuv
CC-1035ENG-09
4
2. Getting Started
2.1 The first time...
Installers
The control unit must be installed once power is fed for the first
time. By default, the control unit is set to stereo for 16W
loudspeakers. To configure other settings use the installation
menu option 3.2.1. - Mono/Stereo and 3.2.2. - Audio Output.
Users
Once the control unit has been installed it is ready for normal
operation.
Once the control unit is connected to the mains, it will remain
powered even it is in OFF state. That means that the OFF state
(as indicated in this manual) really means a “standby” state
Key Sequence
To turn on, press the on/off key. The display will light up and
the
icon enabled.
To select discman/MP3/iPod input for the control unit, press
07:18
CH
vol 55
To adjust the volume
The + - keys have multiple functions. The default function is to adjust the
volume. If no key is pressed on the keypad a few seconds after an
operation, the default function resumes.
To select the tuner, press FM
To tune to a station, key in the station frequency followed by
the FM key. For example, to tune to the station at 94.7 MHz.
To automatically seek stations
Display Visual
FM
9 wxyz 4 ghi 7pqrs FM
FM
95.50
94.70
96.70
CC-1035ENG-09
5
2.2 Programming Menus
Key Sequence
2.2.1 Three Access Levels
Display Visual
There are three menus to program different access levels.
Installation Menu
This menu stores information regarding the parameters that affect the installation's proper
operation. This programming should be done by a specialized technician.
Configuration Menu
This menu stores information regarding the personalized operating mode for each user.
Modifying this menu does not vitally affect the installation's operation and once the settings
are defined there will be no need to change them.
Programming Menu
This menu stores information regarding the features that can be programmed by the user
and which can be easily modified.
2’’
PRG
PRG
2’’
PRG
instal
config
progr
2.2.2 Scrolling Through the Menus
The programming menus are structured as levels of menus and submenus.
Once in a menu, the following keys can be used to scroll
through the list of options.
Goes back to the previous option on the same level
Goes into the level
Exits the level
1
2 abc
3 def
4 ghi
5
6 mno
7pqrs
8 tuv
jkl
0C
9 wxyz
Goes forward to the next option on the same level
CC-1035ENG-09
6
Key Sequence
Display Visual
When the item to be programmed appears on the display it will be
flashing, thus indicating it is ready to be modified. If there are several
choices possible (for example, the days of the week, the digits of a date),
the + and - keys can be used to scroll back and forth between the items.
The numeric keys can also be used to modify the item. In addition to using
the numeric keys, in some cases the + and - keys themselves can be used
to modify an item to be programmed.
PRG
To store the new setting, press PRG. The item will flash quickly, indicating
that the new setting has been stored.
0C
To delete a setting that has been entered, press the ZERO key for 1”.
1’’
To exit a programming option without saving a setting, press ON/OFF.
2.2.3 Immediate Access to a Menu Option
As an alternative to scrolling through the menus to reach an option, you can directly key in
the option code followed by the menu access key (see the list of codes in 7. CODES AND
TABLES).
To access programming menu option “adjust the tuner seek sensitivity”
To access the configuration menu option “personalize your greeting”
To access the installation menu option “select loudspeaker output
impedance”
2 abc
1
2 abc
2 abc
PRG
PRG
PRG
2’’
2’’
CC-1035ENG-09
7
3. Installation
3.1 Wiring Diagram
Installation involves three elements: a power supply, a control unit and loudspeakers. See on page 3.
· If the room is monophonic, connect any of the speakers and set the control unit to MONO. (See 3.2.1. Mono/Stereo Installation)
· 8W speakers can be connected to the control unit outputs. In this case, the control unit must be set to 8 W. (See 3.2.2. Audio Output
Installation).
· To connect the FM antenna, connect a 76 cm wire to terminal A or connect a 75 W antenna input to terminals A (signal) and M (mass).
· If it is necessary to connect an amplifier or power stage to a control unit's output, the control unit must be set to AMPLIFIER. (See 3.2.2.
Audio Output Installation). Connect the amplifier to terminals 2, 4, 05 and 06 on the control unit.
· All wire sections are 0.25 mm except supply wires (terminals 2 and 4), which are 1 mm. The network tapping wires are standard.
3.2 Installation Menu
The following information is, in its totality, the installation data for the control unit. To
modify the data, access the installation menu of the control unit itself.
See 7. CODES AND TABLES.
Key Sequence
Display Visual
3.2.1 Mono/Stereo
Defines whether the control unit's audio output (terminals 04, 05, 06) is connected in
mono or stereo mode. In a control unit in stereo, outputs 05 and 06 respond to the left
and right channels. In a control unit in mono, both outputs are identical and can
therefore be used interchangeably.
1
PRG
To change the output setting to mono
2 abc
Store
PRG
2’’
stereo/mono
stereo
mono
CC-1035ENG-09
8
Key Sequence
3.2.2 Audio Output
Defines the impedance connected to the control unit's audio output (terminals 04, 05, 06)
between the following options: 16 ohm passive loudspeaker
8 ohm passive loudspeaker
amplifier
line
To change the setting to 8 ohm
Store
2 abc
PRG
2’’
Display Visual
audio output
16
8
2 abc
PRG
3.2.3 Deleting Control Unit Installation. Manufacturer Reset.
Deletes all settings and programming data from the control unit, restoring manufacturer
default settings.
3 def PRG
To activate delete process
2 abc
To initiate the process
PRG
2’’
delete installation
off
on
loading data
Once the control unit starts up, the manufacturer default settings are enabled.
3.2.4 Knowing the Software Version
Shows control unit’s software version.
4 ghi PRG
2’’
version soft
software, 112702, 141211
CC-1035ENG-09
9
4. Settings
Key Sequence
4.1 Language
To select the language of all display text.
1
PRG
To select a different language (for example, English).
2 abc
Store
PRG
4.2 Greeting
Allows you to personalize the message that appears on the display when the control unit
is powered on (a maximum of 18 characters).
2 abc
2’’
2’’
PRG
6 mno
2 abc
7pqrs
7pqrs
7pqrs
4
4
ghi
4 ghi
2
abc
ghi
Store
greeting
hello
hello
hello m
hello ma
hello mar
hello mari
hello maria
PRG
4.3 Permission to Store/Delete FM Tuning Pre-sets
Disallows access to save and delete tuning pre-sets.
idioma españl
englsh
Scroll through the name until you reach the character
you want to change.
Key in the new greeting using the alphanumeric
keypad.
Display Visual
3 def
PRG
Disallow permission.
2 abc
Store
PRG
2’’
permission to store
fm presets
ON
off
CC-1035ENG-09
10
Key Sequence
Display Visual
4.4 Selection of IR Remote Control
Allows remote control selection
4 ghi
PRG
2’’
To activate the remote control operation, use the +
and keys to scroll to number 14. To block remote
control operation, select a value other than 14
ir remote
ir 14
ir 15
PRG
Store
4.5 Deleting Settings from the Control Unit
Deletes all setting and programming data from the control unit, restoring the initial
default settings. This option does not affect installation data (3. Installation)
5
PRG
jkl
2’’
delete settings
Activate delete process
2 abc
off
on
Initiate the process
PRG
loading data
CC-1035ENG-09
11
5. User Programming
5.1 Alarm 1 and 2
Key Sequence
The Kit is equipped with two
programmable alarms with two
operation modes, as described in
section 6.11. - Operation: Alarms
1
1
PRG
or
1
Display Visual
alarm 1
alrm1
Key Sequence
Enter to program the days of the
week alarm will be set
5
jkl
PRG
2 abc
Display Visual
MO on
TU on
Scroll through days
…
Change the enable setting, also
available as a quick access
function, see 7. CODES AND
TABLES.
5
jkl
on/off
5
jkl
off
2 abc
on
Store
PRG
on/off
Scroll to next program setting in
alarm mode
8 tuv
hh-mm
5
00-00
Enter to program time
jkl
Store
PRG
06-50
hh-mm
Scroll to next program setting in
alarm mode
8 tuv
dias
Set the time
0C
6 mno 5
jkl
0C
… CONTINUED
SA ON
Scroll through days
Change
2 abc
Scroll through days
Change
SA OFF
SU ON
2 abc
SU OFF
Store
PRG
Scroll to next program setting in
alarm mode
8 tuv
TYPE
5
beep
Enter program to select alarm
sound
jkl
Change
2 abc
Store
PRG
music
TYPE
… CONTINUED
CC-1035ENG-09
12
Key Sequence
Display Visual
8 tuv
volume
Scroll to next program setting in
alarm mode
5
vol 75
jkl
vol 86
Change
Store
Option to program a time for
the control unit to
automatically go into standby mode ( music) shuts off)
For example, to program auto
stand-by for 11:45 p.m. every day
except Saturday and Sunday
Store
PRG
Display Visual
3 def
autostandby
PRG
5
jkl
on/off
5
jkl
off
2 abc
PRG
8 tuv
3
PRG
8 tuv
days
def
5
Key Sequence
1
abc
Display Visual
00-00
23:45
hh-mm
5
2
Enter to program the alarm
volume
5.2 Auto standby
Key Sequence
jkl
4
jkl
ghi
5
jkl
mo on
tu on
…
…
SA ON
2 abc
on
on/off
hh-mm
SA OFF
su ON
Store
2 abc
su OFF
PRG
days
… CONTINUED
CC-1035ENG-09
13
5.3 Sleep
Key Sequence
Sleep time can be adjusted
to the user's needs by using
the following programming
option.
Display Visual
Key in the 10
4 ghi
1
(See 6.4. Sleep Operation)
PRG
5
3 def
sleep minutes
min 20
min 35
jkl
Key Sequence
Enter time program
1
Enter
For example, to set 10:54
1
Display Visual
jkl
5
jkl
hh-mm
5
jkl
13-43
PRG
5
jkl
4 ghi
10-54
Store
PRG
hh-mm
Scroll to next step
8 tuv
date
Enter
5
jkl
Change until the month of
December is reached
8 tuv
Display Visual
10-aug-02
1
0C
8 tuv
8 tuv
8 tuv
10-dec-02
02
Scroll to set the year
2 abc
Store
2 abc
10-dec-04
PRG
time-date
5
0C
th
Change until the year 2004
is reached
PRG
5.4 Time and Date
Key Sequence
28-aug-02
5.5 FM Seek Sensitivity
The option to adjust the
automatic station seek
sensitivity for the control
unit's internal FM tuner
Key Sequence
2 abc
1
To adjust the new
sensitivity;
4=max, 1=min.
2 abc
Store
PRG
PRG
Display Visual
fm sensitivity
sens 4
sens 2
… CONTINUED
CC-1035ENG-09
14
5.6 Deleting FM Tuning
Pre-Sets Key Sequence
The option to delete all the FM
tuner pre-sets
2 abc
2 abc
To confirm the command to delete
the data
2 abc
To initiate the process
PRG
PRG
Display Visual
delete fm
presets
off
on
5.6 and 5.7 options are only available if permission for this option is
enabled in the settings menu.
See 4.3. Permission to Save/Delete FM Tuner Pre-Sets
5.8 Saving “Ideal” Settings
Key Sequence
To store the current audio
settings (volume, balance, bass,
treble, loudness and selected
channel) as the “ideal settings”
3 def
To confirm the command
To initiate the process
2 abc
3 def
2
abc
PRG
PRG
AUTOSCAN
off
on
ideal
off
on
PRG
5.9 Off/On Dimmer
Window brightness for on/off
functions can be programmed
from this option
Key Sequence
3 def
2 abc
3 def
Display Visual
PRG
light off
PRG
light on
or
3 def
Enter code
PRG
2 abc
5.7 Storing Station Frequencies Automatically
The control unit will store into memory the stations that are received with
the highest quality, ordered from lowest frequency (87.5 MHz) to highest
frequency (108.0 MHz). The system will use all the memory slots
available, reaching the
Display Visual
Key Sequence
maximum of 20.
1
Display Visual
or
light 5
light 8
Adjust level
Store
PRG
CC-1035ENG-09
15
6. Operation
6.1 Quick Reference to Display and Keypad
NORMAL
PROGRAMMING
off/on
exit programming menu
audio adjustment mode (volume-bass-treble - loudness - balance)
discman/MP3/iPod selection
FM tuner selection
access to program / settings / installation menus
CH
FM
store
acoustic timer enabled (flashing)
PRG
start acoustic timer
1
2 abc
3 def
4 ghi
5
6 mno
7pqrs
8 tuv
jkl
stop acoustic timer
numeric keypad
numeric keypad
9 wxyz
numeric selection of setting to be selected
scroll through the programming options
FM station frequency
FM memory pre-set
programming options
0C
ON / OFF
delete
delete
adjust keys
Audio levels (volume-bass-treble-loudness-balance)
Automatic station seek
Digit-by-digit frequency band forward/reverse
adjust keys
discman/MP3/iPod input
IR receiver
FM station tuned
discman/MP3/iPod
FM tuner
FM tuner memory pre-sets
day of the week
1 2 3 4 5 6 7
FM
pre-set memory selected
STATIC
1
selection of program setting to be selected
scroll through options in the same
programming level
2
music enabled
FM station tuned in stereo
sleep enabled
alarm 1-2 enabled
FLASHING
auto-standby enabled
alarm 1-2 enabled and snoozed
CC-1035ENG-09
16
Key Sequence
6.2 Clock-Calendar
Display Visual
What Is It?
10:56
28 feb
The time, date and day of the week are alternately displayed by default
How Is It Programmed?
Access the program menu and select hour, minutes and date
1
5
PRG
jkl
time-date
See 5.4. Programming Time and Date
6.3 Manual Off/On of Control Unit
The control unit enables audio output with the previous settings by pressing a key. The
display will be illuminated and the
icon will be enabled
10:56
Manual power off takes place in the same manner, the display darkens and the
disabled
10:56
icon is
6.4 Sleep
What Is It?
The sleep function shuts the control unit off at a pre-set time after power on. The pre-set
time is programmed by the user
How Is It Programmed?
Access the program menu and select the time in minutes
1
4 ghi
1
PRG
sleep min 20
See 5.3 Programming Sleep
… CONTINUED
CC-1035ENG-09
17
Key Sequence
How Is It Activated/Cleared?
2’’
It is activated by pressing the ON/OFF key for 2”. The
icon will appear static.
Once the pre-set time has elapsed, the control unit will automatically power off
If the control unit is powered off manually before the end of the pre-set time, the sleep
function will be disabled
Display Visual
sleep
6.5 Auto standby
What Is It?
The control unit will go into stand-by mode ( music off) at the time and days of the week
programmed
How Is It Programmed?
Access the program menu and select the on/off status, time and days of the week to
execute the function
1
3 def
PRG
auto-standby
See 5.2 Programming Auto standby
How Is It Enabled/Disabled?
The function can be enabled or disabled from this option in the program menu
The quick function can also be used
1
3 def
1
3 def
PRG
PRG
on/off
standby
standby x
How Can I Tell If This Function Is Activated?
The function is activated when the
icon is flashing
CC-1035ENG-09
18
Key Sequence
6.6 Audio Level Adjustment
The default function for the + - keys when the control unit is on is to adjust the volume
Pressing the
vol 55
bas +12
bas +24
trb+11
trb +17
loud 1
loud 0
key switches to bass adjustment mode
In this mode, the keys have the function of adjusting the bass
Pressing the
key again switches to treble adjustment mode
In this mode, the keys have the function of adjusting the treble
Pressing the
key again switches to loudness selection mode.
(1=enabled, 0=disabled)
In this mode, the keys have the function of selecting loudness
Pressing the
Display Visual
bal -23
bal -28
key again switches to balance adjustment mode
In this mode, the keys have the function of adjusting the balance
A few seconds after the last key entry the control unit will return to its default function of
volume adjustment
6.7 Selecting the discman/MP3/iPod as the Audio Channel
What Is It?
It is possible to have a music source connected through the jack on the front of the control
unit
How Is It Selected?
CH
Access the discman/MP3/iPod channel directly by pressing the CH key. The
discman/MP3/iPod indicator will be displayed
CC-1035ENG-09
19
6.8 Selecting the FM Tuner as the Audio Channel
How Do I Tune An FM Station?
By directly keying in the station frequency, for example, to select the
station 89.10 Mhz
Key Sequence
Display Visual
frequency selection mode
station tuned
8 tuv 9 wxyz
1
0 C FM
FM
frequency
A minimum of three digits must be entered when keying in a
frequency.
stereo
memory pre-set number
station tuned
By directly keying in the station's memory pre-set value, for example, if
pre-set #6 is set to station 89.10 MHz
FM
6 mno FM
frequency
stereo
memory pre-set number
station tuned
To enter the memory pre-set selection mode, press FM. The display
will show the frequency of the current station
FM
FM
frequency
stereo
memory pre-set number
station tuned
We can scroll through the different pre-set stations in memory with
the + - keys
FM
frequency
… CONTINUED
stereo
CC-1035ENG-09
20
Key Sequence
Display Visual
FM
To enter the frequency selection mode, press FM again
FM
frequency selection mode
station tuned
automatic station seek
sensitivity level (1...4)
frequency
stereo
frequency selection mode
When pressed with a short key press, the + and - keys tune
the frequency in intervals of 0.05 Mhz
FM
automatic station seek
sensitivity level (1...4)
frequency
quickly pressed
Similarly, by keeping the + and - keys pressed down, the tuner
will automatically seek the next station (the sensitivity level is as
programmed in 5.5. FM Seek Sensitivity)
FM
frequency selection mode
station tuned
automatic station seek
sensitivity level (1...4)
frequency
held down
stereo
If the reception quality is not satisfactory in stereo, select the less
demanding “forced mono” mode by pressing FM again
To switch between stereo and “forced mono” modes, use the +
and - keys
station tuned
forced mono / stereo
FM
FM
station tuned
forced mono
FM
CC-1035ENG-09
21
How Do I Store Station Pre-sets Into The FM Tuner
Select the station frequency to be stored using any of the methods
described in the previous point. If the reception quality is not
satisfactory in stereo, select the less demanding “forced mono”
Key Sequence
Display Visual
pre-set memory number (flashing)
station tuned
forced mono / stereo
FM
To enter the store to memory mode, press
the FM key
FM
1’’
frequency
stereo
pre-set memory number (flashing)
station tuned
forced mono / stereo
The pre-set memory number will appear
flashing. By default, the control unit offers
the first available memory slot, which may be
changed using the + and - keys
FM
frequency
stereo
The associated permission must be
activated to execute this feature.
See 4.3. Permission to Store/Delete
FM Tuning Pre-sets
To confirm it has been
stored, press FM again
To store into memory the stations that are received with
the highest quality, ordered from lowest frequency (87.5
MHz) to highest frequency (108.0 MHz)
FM
FM
2 abc
3 def
PRG
AUTOSCAN
2 abc
2 abc
PRG
delete
fm pre-sets
How Do I Delete Pre-sets Stored In The Tuner?
Access the program menu option (see 5.6. Deleting FM Tuning Pre-sets)
The associated permission must be activated to execute this feature.
See 4.3. Permission to Store/Delete FM Tuning Pre-sets.
To adjust the automatic station seek sensitivity
Access the program menu option (see 5.5. FM Seek Sensitivity)
2 abc
1
PRG
fm sensit
CC-1035ENG-09
22
6.9 Ideal Settings Mode
What Is It?
Each control unit has the feature to store “ideal” audio settings, which are pre-programmed settings that can be enabled quickly and
immediately. These settings consist of an audio channel and pre-set levels of volume,
balance, bass, treble and loudness
Key Sequence
Display Visual
How Is It Programmed?
Select the music channel to be designated as the “ideal” settings mode. For example, to
select the tuner, press FM. The pre-set station will be saved as part of the “ideal” settings
mode. Adjust the levels of volume, bass, treble, balance and loudness as indicated in
section 6.6. Audio Level Adjustment.
Using the quick function indicated, the ideal settings mode will be automatically stored
98.6
Vol 72
FM
8 tuv
PRG
How is It Activated?
ideal
ideal
Pressing the + and - keys down simultaneously activates the audio ideal settings mode
6.10 Acoustic Timer
What Is It?
The kit is equipped with a programmable timer which sounds a specific acoustic signal
when the programmed waiting time has elapsed (between 1 and 240 minutes)
How Is It Programmed?
Key in the time desired for the timer, for example 121 minutes, followed by the timer
starter key.
1
2 abc
1
121:00
If the timer starter key is pressed without having selected a time, the last value entered for
this function will be taken as default.
How Is It Cleared?
Pressing the timer end key clears the operation
CC-1035ENG-09
23
6.11 Alarms
The control unit is equipped with two alarms that can be individually programmed and can operate in two different modes:
Beep Mode Alarm
\ Operates whether the control unit is off or on.
\ At the time and days programmed, the control unit powers on and a specific beep signal is sounded. The alarm 1 and alarm 2 beeps
are different and have programmable volumes.
\ Is equipped with a “snooze” function: a short key press of any key returns the control unit to its previous state (stand-by or music)and
after 4' the beep signal sounds again.
\ To definitely cancel the alarm, press any key until a continuous beep sounds: it will return to its previous state (stand-by or music) and
the alarm function ends.
\ If the control unit is powered off or on during the “snooze” period, the alarm function ends.
\ Also, if 4' elapse without any key press, the control unit returns to its previous state (stand-by or music) and the alarm function ends.
Music Mode Alarm:
\ Operates only when the control unit is off.
\ At the time and days programmed, the control unit powers on with the last music channel selected.
\ The volume is programmable and different for each of the two alarms.
Key Sequence
How Is It Programmed?
Access the program menu. Select the on/off status, time and days of the week the
function should operate, as well as the function mode and volume. See 5.1.
Programming Alarm 1 and 2
1
1
1
2
PRG
PRG
abc
How Are They Activated/Cleared?
1
PRG
By using the quick functions...
The 1 2 icons indicate the state of the alarms (activated/cleared).
2 abc
PRG
Display Visual
alarm 1
alarm 2
alrm1
alrm2
1
2
CC-1035ENG-09
24
7. Quick Reference Guide
MENU OPTIONS
SETTING OPTIONS
PRG
To directly access a function, key in that function's numeric sequence,
then press PRG and make any desired changes. To validate the
operation, press PRG again.
CLOCKS
1.1 Alarm 1
1.1.1 ON/OFF status
1.1.2 Hour, minutes
1.1.3 Days of week
1.1.4 Type
1.1.5 Volume
1.2 Alarm 2
1.2.1 ON/OFF status
1.2.2 Hour, minutes
1.2.3 Days of week
1.2.4 Type
1.2.5 Volume
1.3 Auto Stand-by
1.3.1 ON/OFF status
1.3.2 Hour, minutes
1.3.3 Days of week
1.4 Sleep
1.4.1 Minutes
1.5 Time
1.5.1 Hour, minutes
1.5.2 Day, month, year
FM TUNER
2.1 FM Seek sensitivity
2.2 Delete FM tunning pre-sets
2.3 Autoscan
ADJUSTMENTS
3.1 Store “IDEAL” settings
3.2 Dimmer off
3.3 Dimmer on
2’’
PRG
To directly access a function, key in that function's numeric sequence, then
PRG 2’’ and make any desired changes. To validate the operation,
press
press PRG again.
1. Language
2. Control unit greeting
3. Permission to save/delete FM tuner
pre-sets
4. IR remote control unit
5. Delete settings
INSTALLATION
OPTIONS
PRG
2’’ Enable Sleep
2’’
To directly access a function, key in
that function's numeric sequence,
PRG
2’’and make
then press
any desired changes. To validate
the operation, press PRG again.
1. Mono/Stereo
2. Sound output
3. Delete installation
4. Software version
SPECIAL FUNCTIONS
WITH QUICK ACCESS
PRG
Alarm status 1 on/off
2 abc + PRG
Alarm status 2 on/off
3 def + PRG
Auto stand-by status on/off
+
1
8
tuv
+
PRG
Store “Ideal”
Activate “Ideal”
To access this function, the keys
indicated must be pressed
simultaneously.
CC-1035ENG-09
25
8. Technical Specifications
CC-1035ENG-09
26
9. Accesories
Infrared remote control device for remote operation (ref.: 42791)
Exterior measurements in mm: 165 x 48 x 28
Front trim for control unit
Available colors: white, ivory, graphite. New range coming soon.
Face cover for control unit
Available colors: white, ivory, graphite. New range coming soon.
CC-1035ENG-09
Electrónica Integral de Sonido, S.A. reserves the right to make changes without prior notice.
Electrónica Integral de Sonido, S.A. is not responsible for any errors or omissions that may
appear in this manual.
CENTRAL
Polígono Malpica Calle F Oeste
Grupo Gregorio Quejido, 87-88
50016 Zaragoza (SPAIN)
Tel.: 34 976 465 550
Fax: 34 976 465 559
[email protected]
www.eissound.com
AENOR
Empresa
Registrada
ER-0634/1998
64460084
CC-1035ENG-09


![CC-1140-02 Manual de Uso e Ins[...]](http://vs1.manualzilla.com/store/data/006218676_1-1a958be277725ecc9e1a26233905808d-150x150.png)