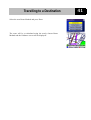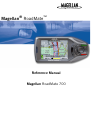
1
Magellan® RoadMate™
Reference Manual
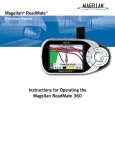
Magellan RoadMate 700
Thales Navigation
ZAC de la Fleuriaye
BP 60433
44474 Carquefou cedex
France
www.magellangps.com
PN 631161-18A
*** IMPORTANT SAFETY WARNINGS ***
The Magellan RoadMate is a vehicle navigation aid designed to assist you in arriving at your selected
destination. When using the Magellan RoadMate, these safety rules must be followed to prevent
accidents that can result in injury or death to yourself or others:
•
When driving, the need to view the display is minimal. Voice prompts will guide you to your
destination. The driver must not enter data or program the unit unless the vehicle has come to a
complete stop. Only a vehicle passenger should enter data or program the unit while the vehicle is
moving.
•
It is your responsibility to comply with all traffic laws.
•
While every attempt is made to ensure that the database is accurate, roadways, points of interest,
and business and service locations may change over time. The database does not include, analyse,
process, consider or reflect any of the following: legal restrictions (such as vehicular type, weight,
height, width, load and speed restrictions); road slope or gradient; bridge height, width, weight or
other limits; population density; neighbourhood quality or safety; availability or proximity of law
enforcement, emergency rescue, medical or other assistance; construction work zones or hazards;
road or lane closures; road, traffic or traffic facilities safety or condition; weather conditions;
pavement characteristics or conditions; special events; traffic congestion. It is your responsibility
to disregard any unsafe, hazardous or illegal route suggestions.
•
Protect the Magellan RoadMate from extreme temperature conditions. When the temperature has
exceeded safe operating limits, the Magellan RoadMate will not turn on until the internal
temperature is within operating limits. A warning will be displayed indicating that the operating
temperature of the Magellan RoadMate is outside of these limits.
© 2004 Thales Navigation, Inc. All rights reserved.
Magellan, RoadMate, Turn it on and go, TrueView, QuickSpell and FlexAddress are trademarks of
Thales Navigation.
No part of this user manual may be reproduced or transmitted in any form or by any means, electronically
or mechanically, including photocopying and recording, for any purpose other than the purchaser’s
personal use, without the prior written permission of Thales Navigation.
Table of Contents
Magellan RoadMate ............................................................................................................ 1
FRONT VIEW ............................................................................................................................................ 1
REAR VIEW .............................................................................................................................................. 2
Installing the Magellan RoadMate ...................................................................................... 3
Installation................................................................................................................................................... 3
Installation using the Windscreen Mount ................................................................................................... 3
Connecting to a Personal Computer.................................................................................... 5
Basic Operations ................................................................................................................. 6
Adjusting the Volume ................................................................................................................................. 6
Repeating the Last Command ..................................................................................................................... 6
Turning the Magellan RoadMate On .......................................................................................................... 7
Turning the Magellan RoadMate Off ......................................................................................................... 8
Inputting Text Characters ........................................................................................................................... 8
Additional Characters ("More" Button)...................................................................................................... 9
Numerical Characters ("123" Button)......................................................................................................... 9
Using QuickSpell® ..................................................................................................................................... 9
Using FlexAddressTM.............................................................................................................................. 11
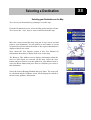
Selecting a Destination...................................................................................................... 12
Selecting a Destination Using Street Address .......................................................................................... 12
Selecting a Destination Using Street Address - Select the Country .................................................... 12
Selecting a Destination Using Street Address - Search by Town........................................................ 13
Select a Destination - Search by Postcode........................................................................................... 14
Selecting a Destination Using Street Address - Search By Area......................................................... 16
Select a Destination - Search in Previous Towns ................................................................................ 18
Selecting a Destination Using the Address Book ..................................................................................... 20
Selecting a Destination from a Previous Destination .......................................................................... 20
Selecting a Destination from a Previous Destination and Saving it to the Address Book .................. 21
Selecting a Destination from the Address Book.................................................................................. 23
Saving a New Address to your Address Book and select it as your destination ................................. 24
Selecting a Point of Interest as a Destination............................................................................................ 26
Selecting a Point of Interest as a Destination - Search by Name......................................................... 26
Selecting a Point of Interest as a Destination - Choose by Category .................................................. 27
Searching the POI Category using "Nearest" ...................................................................................... 28
Searching the POI Category using "List by Town"............................................................................. 29
Searching the POI Category using "All Areas" ................................................................................... 30
Selecting a Junction as a Destination........................................................................................................ 31
Selecting your Destination on the Map..................................................................................................... 33
Choosing the Routing Method .................................................................................................................. 34
Travelling to a Destination ................................................................................................ 35
Guidance Information Screens.................................................................................................................. 35
Guidance Screen ....................................................................................................................................... 36
Changing the Map Zoom Levels............................................................................................................... 36
List of Directions Screen .......................................................................................................................... 37
TrueView 3D Screen................................................................................................................................. 38
Deviating from the Planned Route........................................................................................................... 38
Excluding a Manoeuvre in a Planned Route ............................................................................................. 39
Cancelling a Planned Route ...................................................................................................................... 40
Changing the Route Method ..................................................................................................................... 40
Displaying Your Location .................................................................................................42
Displaying Information About Your Present Location............................................................................. 42
User Options ......................................................................................................................43
User Option Choices ................................................................................................................................. 43
Using the Trip Computer .......................................................................................................................... 44
Viewing the Current Trip on the Trip Computer................................................................................. 44
Stopping or Starting the Trip Computer .............................................................................................. 44
Resetting the Trip Computer................................................................................................................ 45
Saving the Current Trip Report ........................................................................................................... 45
Viewing a Saved Trip Report .............................................................................................................. 45
Deleting a Trip Report ......................................................................................................................... 46
Configuring the Magellan RoadMate ....................................................................................................... 47
Setting the Map Options ...................................................................................................................... 48
Setting the Map Colours ...................................................................................................................... 49
Setting the Route Preferences .............................................................................................................. 50
Setting the Voice Options .................................................................................................................... 51
Setting the Colour Options .................................................................................................................. 52
Setting the Contrast.............................................................................................................................. 53
Setting the Brightness .......................................................................................................................... 54
Setting the Display Options ................................................................................................................. 55
Setting the Tone Options ..................................................................................................................... 56
Selecting the Language........................................................................................................................ 57
Performing Diagnostic Checks ............................................................................................................ 58
Editing the User Name......................................................................................................................... 59
Selecting the Points of Interest to Display on the Map........................................................................ 60
Using the Magellan RoadMate Tutorial.................................................................................................... 61
Moving around the Tutorial................................................................................................................. 61
Loading Addresses from your PDA or SmartPhone®.............................................................................. 62
1
Magellan RoadMate
Magellan RoadMate
FRONT VIEW
2
3
4
5
6
1
7
8
12
11
10
9
1
On/Off Button
Press to turn the Magellan RoadMate on or off.
2
Volume Control
Adjust to set the speaker volume.
3
Repeat
Press to repeat the last spoken prompt.
4
Zoom In Button
Whilst viewing the map, press to zoom in on the centre of the
display.
5
Option Button
Press to access the User Option menu.
16
Enter Button
Press to confirm highlighted selections.
7
Cancel Button
Press to stop the current function.
8
8-Way Arrow Keypad
Press to move the cursor or to highlight other options.
9
Locate Button
Press to display the current location details.
10
Light Sensor
11
View Button
1
12
Zoom Out Button
Automatically the contrast and brightness of the display to allow
for changes in lighting.
Press to view map display, list of directions, or TrueView® 3D
display.
Whilst viewing the map, press to zoom out from the centre of the
display.
2
Magellan RoadMate
REAR VIEW
2
3
4
1
5
6
1
Speaker
Used for spoken directions.
2
Repeat Button
Press to repeat the last spoken prompt.
3
Volume Control
Adjust to set the volume of the speaker.
4
Detachable Antenna
Rotate upwards when in use to receive signals from the GPS
satellite network.
5
Compact Flash
Storage compartment for the CompactFlash memory card.
6
Power/Data Connector
Connection for power and data for the Magellan RoadMate.
Notepad
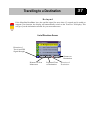
The Magellan RoadMate has a touchscreen display and keypad giving you two easy ways to
input information into your Magellan RoadMate. The examples in this manual describe how to
use the 8-way arrow keypad and the Enter button to input and accept changes.
If you prefer to use the touchscreen, touch the key directly on the screen with your finger. Please
use the method that is easiest for you.
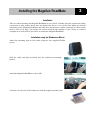
Installing the Magellan RoadMate
3
Installing the Magellan RoadMate
Installation
Take care when mounting the Magellan RoadMate in you vehicle, whether using the windscreen mount,
vent mount or other mount, that it does not obstruct the driver’s view of the road. Make sure that the
positioning of the Magellan RoadMate and cable does not interfere with the operation of vehicle safety
devices, such as air bags. You assume the risks associated with damage to your vehicle or vehicle’s
occupants as a result of how you choose to mount the Magellan RoadMate.
Installation using the Windscreen Mount
Attach the mounting plate to the cradle using the four supplied Phillips
screws.
Slide the cradle and plate assembly onto the windscreen mounting
bracket.
Attach the Magellan RoadMate to the cradle.
Clean the relevant area of the windscreen with the supplied alcohol swab.
4
Installing the Magellan RoadMate
Press the windscreen mount to the glass and rotate the locking lever
towards the glass.
Plug the power cable into the cradle. To do this simply connect the small
end of the vehicle power cable to the power connector on the cradle (see
the illustration below).
Power
connector
Plug the cigarette lighter connector into an appropriate 12V socket
(cigarette lighter) in your car.
Rotate the antenna upwards.
Installation is complete and you are ready to turn the Magellan RoadMate on and go.
Connecting to a Personal Computer
5
Connecting to a Personal Computer
The standard cradle is equipped with ports for connecting the Magellan RoadMate to a personal computer
and external power source. Connecting your Magellan RoadMate to your PC will allow you to download
future software and map updates.
USB Port
Power Port
Connecting to external power
When connecting to an external power source, leave the Magellan RoadMate attached to the cradle,
disconnect the vehicle power cable and remove the assembly (Magellan RoadMate and its cradle) from
the vehicle.
Connect the small end of the External Power Cable to the power port on the cradle and plug the other end
of the cable into a standard socket.
Connecting to a personal computer
When connecting to a personal computer, leave the Magellan RoadMate attached to the cradle,
disconnect the vehicle power cable and remove the assembly (Magellan RoadMate and its cradle) from
the vehicle.
Connect the small end of the USB Cable to the USB port on the cradle and the large end to an available
USB port on your personal computer.
6
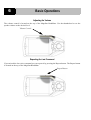
Basic Operations
Basic Operations
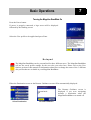
Adjusting the Volume
The volume control is located on the top of the Magellan RoadMate. Use the thumbwheel to set the
speaker volume to the desired level.
Volume Control
Repeating the Last Command
If you missed the last voice command you can repeat it by pressing the Repeat button. The Repeat button
is located on the top of the Magellan RoadMate.
Repeat Button
7
Basic Operations
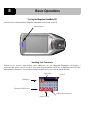
Turning the Magellan RoadMate On
Press the Power button.
If power is properly connected, a logo screen will be displayed
followed by the Warning screen.
Select the User profile to be applied and press Enter.
Notepad
The Magellan RoadMate can be personalised for three different users. The Magellan RoadMate
will use the saved profile settings for the user who you select here. Please refer to the User
Options section of this manual for information about how to change the name of the 3 different
user profiles that are available in your Magellan RoadMate.
Either the Destination screen or the Resume Guidance screen will be automatically displayed.
The Resume Guidance screen is
displayed if you were navigating
towards a destination when the
Magellan RoadMate was turned off.
Select Destination
Resume Guidance
8
Basic Operations
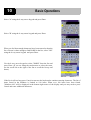
Turning the Magellan RoadMate Off
Press the Power button and the Magellan RoadMate will switch itself off.
Power Button
Inputting Text Characters
Whenever you need to input names, street addresses, etc., the Magellan RoadMate will display a
keyboard that allows you to use the 8-way arrow keypad and the Enter key to highlight and select the
alphanumeric characters. You can also simply touch the screen to select the required letter.
Space Bar
Cancel
Backspace
Numerical Characters
Additional Characters
Accept Entry
Basic Operations
9
Additional Characters ("More" Button)
When you are entering characters you may need to add hyphens or
other special or accented characters. When available, pressing the
"More" button brings up an additional keypad with the characters
shown here.
Numerical Characters ("123" Button)
When available, pressing the "123" button brings up a keypad with
the numeric characters. Numerical characters can be selected in the
same way as alphabetic characters.
Using QuickSpell®
What Is QuickSpell?
The Magellan RoadMate uses QuickSpell technology to provide you with the fastest
possible method of entering characters. QuickSpell eliminates the possibility of a misspelled
word or looking for a town or street that is not in the map database. As you begin entering
characters, the QuickSpell feature of the Magellan RoadMate greys out those characters
which are not available, thereby speeding up the data entry process.
Example:
Suppose that you need to input the name of a town, in this case,
PARIS.
Select "P" using the 8-way arrow keypad and press Enter.
10
Basic Operations
Select "A" using the 8-way arrow keypad and press Enter.
Select "R" using the 8-way arrow keypad and press Enter.
When you feel that enough characters have been entered so that the
list of towns is short enough to find PARIS in the list, select "OK"
using the 8-way arrow keypad and press Enter.
Use the 8-way arrow keypad to select "PARIS" from the list and
press Enter. (If you are using the touchscreen to select the town,
use the scroll bar to the right of the list to scroll the list up and
down.)
If the list is still too long press Cancel to return to the keyboard to continue entering characters. The list of
items found in the database is limited to 100 items. When over 100 items have been found,
"Matches>100" will be displayed in the bottom right corner of the display and you may need to press
Cancel and enter additional characters.
Basic Operations
11
Using FlexAddressTM
What is FlexAddress?
FlexAddress is a very powerful feature which allows you to search for an address by typing
any significant word in its name.
Example:
Suppose you want to go to Place Charles de Gaulle in Paris. Either
enter ’CHARLES’ to be presented with a list of all places
containing Charles in their names and pick ’Place Charles de
Gaulle’ from the list...
...or enter ’GAU’ and press OK to be presented with a list of all
places beginning with these three letters.
Both methods allow you to quickly select the same destination!
12
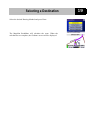
Selecting a Destination
Selecting a Destination
Selecting a Destination Using Street Address
When the address that you want to go to is not stored in your address book or your Previous Destinations
list, select your destination by entering the street address.
Your Magellan RoadMate uses one address database for each European country. The first step in
searching for a new address is to check that the correct country is selected. Once the correct country is
selected four search options are available:
•
•
•
•
use "Search by Town" to enter the name of the town that the address can be found in.
use "Search by Postcode when you do not know, or are unsure of, the town name but you do know the
postcode for the address. You will be given a list of all towns matching the postcode you entered.
use "Search by Area" when you do not know, or are unsure of, the town name but you do know
which area it is in. You will be given a listing of all the towns for the area you entered which have the
street name you are looking for. Please note that the type of area depends of the country currently
selected (County in England, Département in France, Kreis in Germany, etc.).
use "Previous Towns" to select the town that the address can be found in from a list of towns you
previously searched.
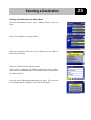
Selecting a Destination Using Street Address - Select the Country
From the Destination screen, check in the title bar that the
appropriate country is selected. In our example we are looking for
an address in Paris, France.
To select the required country select the Earth icon and press Enter
to display the list of all countries in your map database. Use the 8way arrow keypad to scroll the list up and down. When you see the
name of the country you are looking for, select it and press Enter.
France is now displayed in the screen title bar.
Selecting a Destination
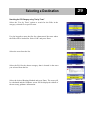
Selecting a Destination Using Street Address - Search by Town
From the Destination screen, check in the title bar that the correct
country is selected (if not, select the Earth icon and choose it from
the list) then highlight the "Select Address" option and press Enter.
Select "Search By Town" and press Enter.
Use the 8-way arrow keypad to enter the first few characters in the
town name. After you have selected these first few characters,
select "OK" and press Enter to display the list of all matching
towns.
Remember, if the list is too long, press Cancel while viewing the
list to return to this screen and continue to input characters.
Use the 8-way arrow keypad to scroll the list up and down. When
you see the name of the town you are looking for, select it and
press Enter.
Use the 8-way arrow keypad to enter the first few characters of the
street name. After you have selected the characters, select "OK"
and press Enter. If you wish, you may enter the entire street name.
Remember that FlexAddress allows you to enter any significant
word in the name of the street.
Use the 8-way arrow keypad to scroll the list up and down. When
you find the street name, select it and press Enter.
13
14
Selecting a Destination
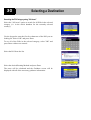
Use the 8-way arrow keypad to enter the street address. The
acceptable range of numbers is displayed at the top of the screen.
Once an acceptable street address has been entered, the "Done"
button will become active. Select "Done" and press Enter when
you are ready to continue.
Select the desired Routing Method and press Enter.
The Magellan RoadMate will calculate the route. When the
calculations are complete, the Guidance screen will be displayed.
Select a Destination - Search by Postcode
From the Destination screen check that the correct country is
selected (if not, select the Earth icon and choose it from the list)
then highlight the "Select Address" option and press Enter.
Select "Search By Postcode" and press Enter.
Selecting a Destination
On the Spell Postcode screen enter the full or partial postcode for
the street address which you are searching for. Select the ’ABC’
button and press Enter if you need to enter letters in the postcode
or the ’123’ button to enter numbers. Once the postcode is entered,
select OK and press Enter.
Select the town from the list of towns displayed (these are all the
towns which match the postcode you entered) and press Enter.
Use the 8-way arrow keypad to enter the first few characters for
the street name. After you have selected the characters, select
"OK" and press Enter. If you wish, you may enter the entire street
name. Remember that FlexAddress allows you to enter any
significant word in the street name.
Use the 8-way arrow keypad to scroll the list up and down. When
you find the street name, select it and press Enter.
Use the 8-way arrow keypad to enter the street address. The
acceptable range of numbers is displayed at the top of the screen.
Once an acceptable street address has been entered, the "Done"
button will become active. Select "Done" and press Enter when
you are ready to continue.
Select the desired Routing Method and press Enter.
15
16
Selecting a Destination
The Magellan RoadMate will calculate the route. When the
calculations are complete, the Guidance screen will be displayed.
Selecting a Destination Using Street Address - Search By Area
From the Destination screen check that the correct country is
selected (if not, select the Earth icon and choose it from the list)
then highlight the "Select Address" option and press Enter.
Select "Search By Area" and press Enter. Note that the name of
this option changes depending of the currently selected country,
e.g. If England is the selected country, the option is named "Search
by County".
Use the 8-way arrow keypad to enter the first few characters of the
area. Select "OK" and press Enter.
Use the 8-way arrow keypad to select the county and press Enter.
Selecting a Destination
Use the 8-way arrow keypad to enter the first few characters for the
street name. Remember that FlexAddress allows you to enter any
significant word in the street name. Select "OK" and press Enter.
Select "OK" and press Enter. Select the street name from the list
and press Enter.
Select the town from the list of displayed towns. (These are all the
towns in the selected county which have the street name you
selected.) Press Enter.
Use the 8-way arrow keypad to enter the street address. The
acceptable range of numbers is displayed at the top of the screen.
Once an acceptable street address has been entered, the "Done"
button will become active. Select "Done" and press Enter when
you are ready to continue.
Select the desired Routing Method and press Enter.
The Magellan RoadMate will calculate the route. When the
calculations are complete, the Guidance screen will be displayed.
17
18
Selecting a Destination
Select a Destination - Search in Previous Towns
From the Destination screen highlight the "Select Address" option
and press Enter.
Select "Previous Towns" and press Enter.
Select the town from the list of towns displayed (these are all the
towns you previously searched, in chronological order) and press
Enter.
Use the 8-way arrow keypad to enter the first few characters of the
street name. After you have selected the characters, select "OK"
and press Enter. If you wish, you may enter the entire street name.
Remember that FlexAddress allows you to enter any significant
word in the street name.
Use the 8-way arrow keypad to scroll the list up and down. When
you find the street name, select it and press Enter.
Use the 8-way arrow keypad to enter the street address. The
acceptable range of numbers is displayed at the top of the screen.
Once an acceptable street address has been entered, the "Done"
button will become active. Select "Done" and press Enter when
you are ready to continue.
Selecting a Destination
Select the desired Routing Method and press Enter.
The Magellan RoadMate will calculate the route. When the
calculations are complete, the Guidance screen will be displayed.
19
20
Selecting a Destination
Selecting a Destination Using the Address Book
The Address Book can store up to 100 addresses for each of the three users. When you select "Address
Book" you will be presented with three options. Selecting "Previous Destinations" lets you select from a
list of the last 20 destinations you have visited. You may also save an address from the Previous
Destination list to your address book. "List Addresses" displays a list of all the addresses you have in
your address book. "Create New Entry" lets you create a new address and put it in your address book
before setting it as your destination.
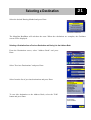
Selecting a Destination from a Previous Destination
From the Destination screen, select "Address Book" and press
Enter.
Select "Previous Destinations" and press Enter.
Select from the list of previous destinations and press Enter.
Select the "Route" button and press Enter.
(Note: You can select the "Edit" button if you want to edit the
displayed address and save it to your Address Book.)
Selecting a Destination
21
Select the desired Routing Method and press Enter.
The Magellan RoadMate will calculate the route. When the calculations are complete, the Guidance
screen will be displayed.
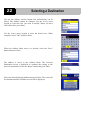
Selecting a Destination from a Previous Destination and Saving it to the Address Book
From the Destination screen, select "Address Book" and press
Enter.
Select "Previous Destinations" and press Enter.
Select from the list of previous destinations and press Enter.
To save this destination to the Address Book, select the "Edit"
button and press Enter.
22
Selecting a Destination
The top line (Name) and the bottom line (Information) can be
edited. The address cannot be changed. Use the 8-way arrow
keypad to select the line you want to modify. When you have
selected the line, press Enter.
Use the 8-way arrow keypad to enter the desired text. When
complete, select "OK" and press Enter.
When the Address Book entry is as desired, select the "Save"
button and press Enter.
The address is saved to the Address Book. The Previous
Destination screen is displayed to continue the routing to the
previous destination. Select the "Route" button and press Enter.
Select the desired Routing Method and press Enter. The route will
be calculated and the Guidance screen will be displayed.
Selecting a Destination
Selecting a Destination from the Address Book
From the Destination screen, select "Address Book" and press
Enter.
Select "List Addresses" and press Enter.
Select the destination from the list of addresses in the Address
Book and press Enter.
Select the "Route" button and press Enter.
(Note: before continuing, the address information can be edited
and saved to the Address Book or the address can be deleted from
the Address Book.)
Select the desired Routing Method and press Enter. The route will
be calculated and the Guidance screen will be displayed.
23
24
Selecting a Destination
Saving a New Address to your Address Book and select it as your destination
From the Destination screen, select "Address Book" and press
Enter.
Select "Create New Entry" and press Enter.
Select "Search By Town", "Search by Postcode", "Search by Area"
or "Previous Towns" and press Enter.
(Note: for more information about searching for an address, please
refer to the "Selecting a Destination using Street Address" section
in this manual.)
Once your address is selected, the Edit Address Book screen will
be displayed. From this screen you can choose to Edit the Name
and Information and to set a priority for this address.
Select the Edit Name option to display the keypad screen. Enter a
name for this address and select "OK". The address will be stored
to the address book under this name.
Select the Edit Information option to display and edit any
additional information related to this address and select "OK".
Selecting a Destination
You can now set a priority for this address. Select "1st", "2nd" or
"3rd" to set the rank of this address in your Address Book. All
addresses with a 1st priority will be displayed at the top of the list,
followed by 2nd and 3rd. This priority supersedes the alphabetical
order.
Select "Save" and press Enter to save this address to your address
book.
Select the ’List Addresses’ option from the Book Screen.
Scroll up and down the list to pick the address you want to set as
your destination and press Enter.
Select the desired Routing Method and press Enter. The route will
be calculated and the Guidance screen will be displayed.
25
Selecting a Destination
26
Selecting a Point of Interest as a Destination
Points of Interest (commonly referred to as POIs), are locations of commercial, recreation landmarks or
services that are preloaded into the Magellan RoadMate. These range from restaurants, parks, petrol
stations and banks to schools and police stations. The purpose of the POI database (accessed through the
"Points of Interests" menu option) is to provide you with a list of popular destinations that you might be
interested in visiting, without having to add them to your address book manually. These POIs are very
useful when you are travelling through an unfamiliar area. You can search for a POI by name or by
category.
Notepad
Your Magellan RoadMate uses one Points of Interests database for each European country. The first
step in searching for a new POI is to check that the correct country is selected.
Selecting a Point of Interest as a Destination - Search by Name
Check in the title bar of the Destination screen that the correct
country is selected. Select "Points of Interests" and press Enter.
Select "Spell Name" and press Enter.
Use the keypad to enter the name of the point of interest (you do
not need to enter the entire name). Select OK and press Enter.
Selecting a Destination
Use the 8-way arrow keypad to scroll through the list and select the
desired point of interest from the list. This list can be very long as
all points of interest beginning with the text entered are displayed.
To shorten the list, press Cancel to go back to the keypad screen in
order to input additional characters. Details for the selected POI are
displayed in the upper part of the screen. Select your desired POI
and press Enter to select it as your destination.
Select your desired Routing Method and press Enter. The route will
be calculated and the Guidance screen will be displayed.
Selecting a Point of Interest as a Destination - Choose by Category
Check in the title bar of the Destination screen that the correct
country is selected. Select "Points of Interests" and press Enter.
Select "Select Category" and press Enter.
The list of POI categories is displayed. Scroll through this list to
find the category you are interested in and press Enter.
27
28
Selecting a Destination
There are three methods for searching the POI category you
selected.
Searching the POI Category using "Nearest"
Select the Nearest option to search for the POIs that are closest to
your current location.
To see all of the POIs in the category that are nearest to your
position, select "OK" and press Enter with no text entered.
To narrow the list down, use the 8-way arrow keypad to enter the
first few characters for the POI you are looking for. Select "OK"
and press Enter.
Select the POI from the list.
Select the desired Routing Method and press Enter. The route will
be calculated and the Guidance screen will be displayed with all of
the necessary guidance information.
Selecting a Destination
Searching the POI Category using "List by Town"
Select the "List by Town" option to search for the POIs in the
category selected for a specific town.
Use the keypad to enter the first few charactersof the town where
the POIs will be looked for. Select "OK" and press Enter.
Select the town from the list.
Select the POI for the chosen category that is located in the town
you selected from the list.
Select the desired Routing Method and press Enter. The route will
be calculated and the Guidance screen will be displayed with all of
the necessary guidance information.
29
30
Selecting a Destination
Searching the POI Category using "All Areas"
Select the "All Areas" option to search for all POIs in the selected
category (i.e. in the whole database for the currently selected
country.)
Use the keypad to enter the first few characters of the POI you are
looking for. Select "OK" and press Enter.
To see all of the POIs in the selected category, select "OK" and
press Enter with no text entered.
Select the POI from the list.
Select the desired Routing Method and press Enter.
The route will be calculated and the Guidance screen will be
displayed with all of the necessary guidance information.
Selecting a Destination
Selecting a Junction as a Destination
You can set the junction between two streets as your trip destination.
From the Destination screen, check that the correct country is
selected then select the Junction option and press Enter.
Select "Search By Town", "Search by Postcode", "Search by Area"
or "Previous Towns" and press Enter.
(Note: for more information about searching for an address, please
refer to the "Selecting a Destination using Street Address" section
in this manual.)
Select one of the streets in the junction you are looking for.
Select the second street in the junction you are looking for. You can
either enter the partial or full name of the street or select ’OK’ and
press Enter without entering any text to display the list of all streets
that form a junction with the one you previously selected.
Select the second street from the list.
31
32
Selecting a Destination
Select the desired Routing Method and press Enter.
The route will be calculated and the Guidance screen will be
displayed with all of the necessary guidance information.
Selecting a Destination
Selecting your Destination on the Map
You can set your destination by pointing to it on the map.
From the Destination screen, select the Map option and press Enter.
You can use the + and - keys to zoom in and out from the map.
Move the cursor around the map using the 8 ways arrow pad and
point to your destination. You can point to a street name or a point
of interest.Press Enter when the name of the required destination is
displayed beside the cursor.
Note: check the User Options section in this User Manual for
information about how to display POI icons on the map.
The Route to This Address screen displays information about the
street or POI which you selected on the map. Select the Save
button and press Enter to save this address in your address book or
select the Route button and press Enter to calculate your route to
this destination.
Select the desired Routing Method and press Enter. The route will
be calculated and the Guidance screen will be displayed with all of
the necessary guidance information.
33
34
Selecting a Destination
Choosing the Routing Method
Every route calculation is based on the selected Routing Method criteria. Every time a new destination is
selected, the Magellan RoadMate prompts you for the method that will be used to calculate the route.
Shortest Time: This selection calculates a route that should take the
least amount of time taking into account speed limits and other
information in the database. Other factors, such as traffic
conditions, cannot be used in the calculation of shortest time.
Shortest Distance: This option calculates the route using the most
direct route to the destination. This route may not be the fastest due
to lower speed limits, numerous traffic lights or other factors.
Least Use of Motorways: This selection calculates the route
avoiding motorways whenever possible.
Most Use of Motorways: This selection calculates the route using
motorways whenever possible.
Travelling to a Destination
35
Travelling to a Destination
Guidance Information Screens
The Magellan RoadMate has three screens which you can use to assist you in travelling to your
destination: the Guidance screen, the List of Directions screen and the TrueView 3D screen.
Guidance: When a new destination is selected and calculated, the Guidance screen will be displayed. This
screen displays a map of your surrounding area along with the planned route and information about the
route. This screen can also be accessed when you have no route by selecting the "Map" button or by
pressing the View button when you are viewing the Destination screen. It can also be selected by pressing
the View button when you are viewing the TrueView 3D screen.
List of Directions: This screen is available only when you are travelling to a destination This screen
displays a list of the changes in direction (also known as manoeuvres) you will need to follow to arrive at
the destination. It can also be used to exclude a manoeuvre and re-route you to your destination. To
access the List of Directions screen, press the View button while viewing the Guidance screen.
TrueView 3D: This screen displays the next manoeuvre as a 3D graphic. It will help you know which lane
to be in and provides you with an easy to follow picture of the next manoeuvre. To access the TrueView
3D screen, press the View button while viewing the Manoeuvre List.
view
view
Guidance
TrueView 3D
List of Directions
View Button
view
36
Travelling to a Destination
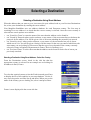
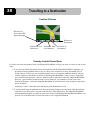
Guidance Screen
The Guidance screen is the most commonly used screen in the Magellan RoadMate and provides you
with detailed information about where you are and where you are going.
Planned Route (pink)
Position Cursor
Next Manoeuvre
Command
(shows your location and
the direction in which you
are heading)
Direction of
Travel and GPS
Signal Strength
Distance to
Destination
Blue = WAAS/EGNOS* Signal
Direction of
Destination
Green = Strong Signal
Yellow = Average Signal
Red = No Signal
Distance to Next
Manoeuvre
Estimated Time
to Destination
* WAAS and EGNOS are two satellite networks, similar to the GPS satellite network, that provide
increased accuracy for the Magellan RoadMate.
As you travel, the Guidance screen constantly updates your location and provides you with not only a
map, but also a visual indication of where you are on the map.
Changing the Map Zoom Levels
You can zoom in by pressing the "+" button or zoom out by pressing the "-" button.
’+’ Button
Zoom In Button
Travelling to a Destination
37
Notepad
If the Magellan RoadMate loses the satellite signal for more than 15 seconds and is unable to
compute your location, the display will automatically switch to the TrueView 3D display. This
will give you the information needed for your next manoeuvre.
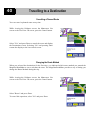
List of Directions Screen
Direction of
Travel and GPS
Signal Strength
Distance to
Destination
Distance to Next
Manoeuvre
Estimated Time
to Destination
Direction of
Destination
Travelling to a Destination
38
TrueView 3D Screen
Direction of
Travel and GPS
Signal Strength
Distance to
Destination
Distance to Next Estimated Time
Manoeuvre
to Destination
Direction of
Destination
Deviating from the Planned Route
If you deviate from the planned route, the Magellan RoadMate will get you back on course in one of two
ways.
1. If you deviated from the planned route and switched off the Magellan RoadMate: Suppose you
deviated from the planned route to stop at a shop for a moment or to drop something off at a
friend’s house. In this case you would normally come to a complete standstill and turn off your
vehicle’s ignition, which also switches off the Magellan RoadMate. After you have completed
your errand and turned your vehicle’s ignition back on (which switches the Magellan RoadMate
back on), you would be presented with a screen asking if you wanted to resume your route.
Selecting "Resume" causes the Magellan RoadMate to recalculate the route using the same destination as before.
Selecting "Cancel" clears the route and displays the Destination screen.
2. If you deviated from the planned route and kept driving: Suppose you deviated from the planned
route due to a traffic jam or you just wanted to do a little sightseeing. The Magellan RoadMate
will automatically guide you back to your route. After recalculating, the Magellan RoadMate will
provide you with directions to route you back to your original destination.
Travelling to a Destination
39
Notepad
The Magellan RoadMate will attempt to return you to your route three times. If after the third
attempt, you are still not back on your route, it assumes that you no longer plan to go to your
original destination and will clear the route. Please see the User Options section of this user
manual for information about how to switch off the automatic rerouting.
Excluding a Manoeuvre in a Planned Route
While travelling or setting up your destination you may find it necessary to exclude one of the
manoeuvres in the List of Directions. This could be due to an accident or street maintenance you want to
avoid. The Magellan RoadMate allows you to select a specific manoeuvre, exclude it from the planned
route and re-route the trip.
Within an active planned route and while viewing the Guidance
screen, press View to display the List of Directions screen.
Use the 8-way arrow keypad to select the manoeuvre to be
excluded and press Enter.
The details for the manoeuvre you selected are displayed. Select
the "Exclude" button and press Enter.
The trip will be re-calculated excluding the selected manoeuvre. This calculation is performed using the
same Route Method that was chosen when the destination was selected. Once the route has been
recalculated, the Guidance screen will be displayed.
40
Travelling to a Destination
Cancelling a Planned Route
You can cancel a planned route at any time.
While viewing the Guidance screen, the Manoeuvre List
screen or the TrueView 3D screen, press the Cancel button.
Select "Yes" and press Enter to cancel the route and display
the Destination screen. Selecting "No" and pressing Enter
returns the display to the last viewed screen.
Changing the Route Method
When you selected the destination for the first time, you indicated which route method you wanted the
Magellan RoadMate to use to calculate the route. The Magellan RoadMate provides a way of letting you
change the Route Method during the trip.
While viewing the Guidance screen, the Manoeuvre List
screen or the TrueView 3D screen, press the Cancel button.
Select "Route" and press Enter.
To cancel this operation, select "No" and press Enter.
Travelling to a Destination
Select the new Route Method and press Enter.
The route will be re-calculated using the newly chosen Route
Method and the Guidance screen will be displayed.
41
42
Displaying Your Location
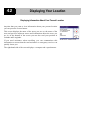
Displaying Your Location
Displaying Information About Your Present Location
Anytime that you want to view information about your present location
you can press the Locate button.
This screen displays the name of the street you are on, the name of the
next and previous adjacent streets and information about the town you
are in. At the bottom of the screen you can also read your position in
Latitude and Longitude.
If you need assistance when travelling, you can communicate this
information to ensure that the road assistance or emergency services can
quickly locate you.
The right hand side of the screen displays a compass and a speedometer.
User Options
43
User Options
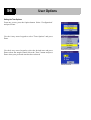
User Option Choices
The User Options section of Magellan RoadMate provides you with three options: Trip Computer,
Configuration and Tutorial. User Options can be accessed from any screen by pressing the Options
button.
•
Trip Computer Displays useful information about your trip that can be saved for future reference. Ideal for the business traveller who needs to record mileage and time spent on the
road.
• Configuration Provides access to customise the look and operation of the Magellan RoadMate.
• Tutorial Provides instructions on how to use the Magellan RoadMate for some of the common
functions available.
Notepad
The driver of the vehicle should never customise the look and operation of the Magellan
RoadMate or use the tutorial while the vehicle is in motion.
To access the User Options screen press the Option button.
44
User Options
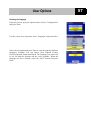
Using the Trip Computer
The Trip Computer is a valuable tool for anyone using the Magellan RoadMate for business purposes, as
well as anyone who wants to record the mileage and time spent driving while on holiday. The information
for the trip can be saved to the Magellan RoadMate as a report and viewed at any time, giving you easy
access to previous trip information as well as information for the trip you are currently on.
When you begin a new trip and you need to record the information, access the Trip Computer. There you
can save the information displayed for the current trip (if needed) and reset the Trip Computer to zero in
preparation for your new trip.
Viewing the Current Trip on the Trip Computer
From any screen press the Option button. Select "Trip Computer"
and press Enter.
Select "Current" from the list of saved Trip Reports.
The current Trip Report is displayed with useful information, such
as your average speed or the trip distance.
From this screen the Trip Computer can be started or stopped, reset
or saved.
Stopping or Starting the Trip Computer
Select the "Stop" or "Start" button and press Enter. The top of the
display will show "Running..." or "Stopped" depending on the
current status of the Trip Computer.
User Options
Resetting the Trip Computer
Select the "Reset" button and press Enter. The values for the Trip Computer
will be set to zero. Resetting the Trip Computer will also set the status of the
computer to "Running..." if it had been previously stopped.
Saving the Current Trip Report
Select the "Save" button and press Enter.
Use the keypad to enter a name for the saved Trip Report. When
the name is acceptable, select the "OK" button and press Enter.
Viewing a Saved Trip Report
From any screen, press the Option button. With "Trip Computer" selected,
press the Enter button.
45
46
User Options
Use the 8-way arrow keypad to select the Trip Report to be viewed
and press Enter.
The saved Trip Report is displayed. When you have finished
viewing the saved Trip Report you can press Cancel and you will
be returned to the "User Options" screen.
Deleting a Trip Report
From any screen, press the Option button. With "Trip Computer"
selected, press the Enter button.
Use the 8-way arrow keypad to select the Trip Report to be deleted
and press Enter.
The saved Trip Report is displayed. With the "Delete" button
selected, press Enter. The Trip Report is deleted and you will be
returned to the "User Options" screen.
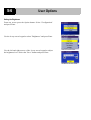
User Options
47
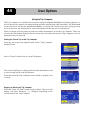
Configuring the Magellan RoadMate
The configuration options let you customise the Magellan RoadMate to your individual settings. All
settings are set for each individual user.
Remember that you must NOT customise your settings while you are driving. If you are operating the
vehicle, please bring it to a complete standstill BEFORE you configure your Magellan RoadMate.
From any screen press the Option button. Select "Configuration"
and press Enter.
Use the 8-way arrow keypad to select the configuration option you
want and press Enter.
The available configuration options are:
Map Options
Set the scrolling map, the Split TrueView mode, the heading of the map and the
unit of measurement used.
Select Map Colour
Select the map display from nine colour themes. .
Route Preferences
Set your preferences for the calculation of your route and switch automatic rerouting on or off.
Voice Options
Choose between a Male or Female voice for the guidance instructions.
Colour Options
Select from four colour themes.
Contrast
Set display contrast level.
Brightness
Set display brightness level.
Display Options
Set automatic brightness and contrast.
Tone Options
Select tone used for alerts before a change of direction.
Language
Select language for the displays and voice guidance.
Diagnostics
Perform selected diagnostic tests on the Magellan RoadMate and switch the
simulator mode on or off.
User - Edit Name
Enter or edit name of the currently selected user.
POI Selection
Select the Points of Interest you want to display on the map.
48
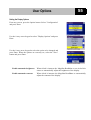
User Options
Setting the Map Options
From any screen, press the Option button. Select "Configuration"
and press Enter.
Use the 8-way arrow keypad to select "Map Options" and press
Enter.
Use the 8-way arrow keypad to select the option to be changed and
press Enter. When the map options are correctly set, select the
"Save" button and press Enter.
Guidance Option Sets the way the guidance information is displayed on the map. Choices are Map
Smart, Map Always or Map Manual. Map Smart automatically changes the display
from the Guidance screen to the TrueView 3D screen before the manoeuvre. Map
Always only shows the Guidance screen and the highlighted route. Map Manual
allows the TrueView 3D screen to be displayed only when the View button is
pressed.
Scrolling Map
When ticked, the position of the vehicle will be in the centre of the screen. When
unticked, the vehicle icon will move on the Guidance screen until it approaches the
edge, at which point it will return to the centre of the display.
Split TrueView
When ticked, the TrueView 3D screen will be displayed along the Map screen
before the manoeuvre.
Heading Up
Sets the map display so that the direction of travel is always at the top of the
screen.
North Up
Sets the map display so that North is always at the top of the screen.
Unit of Measurement Select miles or kilometres as the unit of measurement for distance.
User Options
Setting the Map Colours
From any screen, press the Option button. Select "Configuration"
and press Enter.
Use the 8-way arrow keypad to select "Select Map Colour" and
press Enter.
Use the 8-way arrow keypad to set your preferred colour theme for
the map display. Once you are happy with your choice, select the
"Save" button and press Enter.
49
50
User Options
Setting the Route Preferences
From any screen, press the Option button. Select "Configuration"
and press Enter.
Use the 8-way arrow keypad to select "Route Preferences" and
press Enter.
Use the 8-way arrow keypad to select the option to be changed and
press Enter. When the route preferences are correctly set, select the
"Save" button and press Enter.
Avoid Toll Roads
When ticked it instructs Magellan RoadMate to avoid known toll roads
when calculating a route.
Automatic Re-Routing When ticked, the Magellan RoadMate will makeup to three attempts to
automatically re-route to the destination when it detects that the vehicle is
not on the calculated route.
User Options
Setting the Voice Options
From any screen, press the Option button. Select "Configuration"
and press Enter.
Use the 8-way arrow keypad to select "Voice Options" and press
Enter.
Use the 8-way arrow keypad to select the Male or Female voice for
the guidance instructions and press Enter. When the voice option is
correctly set, select the "Save" button and press Enter.
51
52
User Options
Setting the Colour Options
From any screen press the Option button. Select "Configuration"
and press Enter.
Use the 8-way arrow keypad to select "Colour Options" and press
Enter.
Use the 8-way arrow keypad to select your preferred colour theme
and press Enter. When you are happy with your choice, select the
"Save" button and press Enter.
Default
Pastel
Forest
Desert
User Options
Setting the Contrast
From any screen press the Option button. Select "Configuration"
and press Enter.
Use the 8-way arrow keypad to select "Contrast" and press Enter.
Use the left and right arrows of the 8-way arrow keypad to adjust
the contrast. Select the "Save" button and press Enter.
53
54
User Options
Setting the Brightness
From any screen press the Option button. Select "Configuration"
and press Enter.
Use the 8-way arrow keypad to select "Brightness" and press Enter.
Use the left and right arrows of the 8-way arrow keypad to adjust
the brightness level. Select the "Save" button and press Enter.
User Options
55
Setting the Display Options
From any screen, press the Option button. Select "Configuration"
and press Enter.
Use the 8-way arrow keypad to select "Display Options" and press
Enter.
Use the 8-way arrow keypad to select the option to be changed and
press Enter. When the options are correctly set, select the "Save"
button and press Enter.
Enable automatic brightness
When ticked it instructs the Magellan RoadMate to use its built-in
sensor to automatically adjust the brightness of the display.
Enable automatic contrast
When ticked it instructs the Magellan RoadMate to automatically
adjust the contrast of the display.
56
User Options
Setting the Tone Options
From any screen, press the Option button. Select "Configuration"
and press Enter.
Use the 8-way arrow keypad to select "Tone Options" and press
Enter.
Use the 8-way arrow keypad to select the desired tone and press
Enter to hear the sample sound. Select the "Save" button and press
Enter when your preferred tone has been selected.
User Options
Selecting the Language
From any screen, press the Option button. Select "Configuration"
and press Enter.
Use the 8-way arrow keypad to select "Language" and press Enter.
Select the top button and press Enter to step through the different
languages available. You can choose from English, French,
German, Spanish, Italian and Dutch. The language you select will
be set for both the displays and the voice guidance. When the
language has been selected, select the "Save" button and press
Enter.
57
58
User Options
Performing Diagnostic Checks
From any screen, press the Option button. Select "Configuration"
and press Enter.
Use the 8-way arrow keypad to select "Diagnostics" and press
Enter.
Select the desired diagnostic test and press Enter. Follow the onscreen prompts to complete the chosen test.
Notepad
Most of the options available from the Diagnostics screen are not necessary for the normal
operation of your Magellan Road Mate.
Simulator Mode
This menu also features the Simulator Mode option that you can
use to simulate your route from your current position to any
destination. Select Simulator Mode from the Diagnostics screen.
Select the "Start" button and press Enter to activate the simulator
mode. You can now select a destination and your Magellan
RoadMate will simulate your route to this destination.
User Options
Editing the User Name
From any screen, press the Option button. Select "Configuration"
and press Enter.
Use the 8-way arrow keypad to select "User - Edit Name" and
press Enter.
Spell out the desired user name for the selected current user. When
the name is completed, select "OK" and press Enter.
59
60
User Options
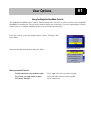
Selecting the Points of Interest to Display on the Map
From any screen, press the Option button. Select "Configuration"
and press Enter.
Use the 8-way arrow keypad to select "POI Selection" and press
Enter.
Use the 8-way arrow keypad to scroll down the list and press Enter
to check all Points of Interest categories which you want to be
displayed on the map. Select "Mark All" and press Enter to display
all categories, select "Clear All" to not display any category of
Points of Interest.
User Options
61
Using the Magellan RoadMate Tutorial
The Magellan RoadMate has a built-in Tutorial which you can view or refer to whenever the Magellan
RoadMate is switched on. Do not use the tutorial while you are driving. If you are operating the vehicle,
please come to a complete standstill before you review the tutorial topics.
From any screen, press the Option button. Select "Tutorial" and
press Enter.
Select the desired tutorial topic and press Enter.
Moving around the Tutorial
To skip ahead one step within a topic:
Press right side of 8-way arrow keypad.
To go back one step within a topic:
Press left side of 8-way arrow keypad.
To exit the Tutorial:
Press Cancel key.
62
User Options
Loading Addresses from your PDA or SmartPhone®
You can transfer addresses from your PDA or Smartphone to your Magellan RoadMate through its IRDA
Port. This feature is only available for PDAs which use the same IRDA protocol (Palm® OS, Pocket®
PC, Symbian(® and for SmartPhone. Simply activate the address transfer function on your PDA or
SmartPhone and stand it in front of, and in close proximity to, your Magellan RoadMate. A message will
be displayed on your Magellan RoadMate to confirm that the addresses have been successfully
transferred to its address book.
Do not transfer addresses to your Magellan RoadMate when you are driving.