1
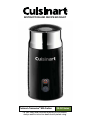
®
INSTRUCTION AND RECIPE BOOKLET
Cuisinart® TazzaccinoTM Milk Frother
FR-10C Series
For your safety and continued enjoyment of this product,
always read the instruction book carefully before using.
Always unplug unit from outlet when not in use,
before putting on or taking off parts and before
cleaning. To unplug, grasp plug and pull from
electrical outlet. Never pull cord. Allow to cool
before handling.
To protect against risk of electric shock, do not put motor
base, power cords and plugs in water or other liquids.
Close supervision is necessary when any appliance
is used by or near children.
Do not operate any appliance with a damaged cord or
plug, after the appliance malfunctions, or if appliance
has been dropped or damaged in any manner. Return
the appliance to the nearest authorized Cuisinart
Service Facility for examination, repair, and electrical or
mechanical adjustment.
The use of attachments not recommended or sold by
Cuisinart may cause fire, electric shock or injury.
Do not let cord hang over edge of table or counter,
or touch hot surfaces.
Do not plug in or take out plug when your hands are
wet.
Do not use outdoors.
2.
3.
4.
5.
6.
7.
8.
9.
2
14. Do not place on or near a hot gas or electric burner,
or in a heated oven.
13. Where applicable, always attach plug to appliance and
check that the control is off before plugging cord into
wall outlet. To disconnect, turn the control to OFF, then
remove plug from wall outlet.
12. Do not use the appliance for other than intended use.
11. Do not operate your appliance in an appliance garage
or under a wall cabinet. When storing in an appliance
garage always unplug the unit from the electrical
outlet. Not doing so could create a risk of fire,
especially if the appliance touches the walls of the
garage or the door touches the unit as it closes.
10. Do not touch hot surfaces.
READ ALL INSTRUCTIONS.
1.
When using electrical appliances, basic safety precautions
should always be followed, including the following:
IMPORTANT SAFEGUARDS
3
If a long extension cord is used, the marked electrical
rating of the extension cord should be at least as great
as the electrical rating of the appliance. If the
appliance is of the grounded type, the extension cord
should be a grounding 3-wire cord. The longer cord
should be arranged so that it will not drape over the
countertop or tabletop where it can be pulled on by
children or animals, or tripped over unintentionally.
A short power-supply cord is provided to reduce the
risks resulting from becoming entangled in or tripping
over a longer cord. Longer extension cords are available
and may be used if care is exercised in their use.
SPECIAL CORD SET
INSTRUCTIONS
For your protection, the Cuisinart® TazzaccinoTM Milk
Frother is supplied with a molded 3-prong groundingtype plug and should be used in combination with a
properly connected grounding-type outlet as shown in
the figure.
SAVE THESE
INSTRUCTIONS
FOR HOUSEHOLD
USE ONLY
GROUNDING
INSTRUCTIONS
17. Scalding may occur if the lid is removed during the
mid-cycle.
16. Do not move the unit while it is switched on. While being
moved, hot liquid can escape from the unit.
15. Be especially careful when opening the cover; the
contents in the unit tank can splash out.
GROUNDING PRONG
CIRCUIT GROUNDING
CONDUCTOR
CONNECTED PROPERLY
4
This appliance is for 120 volts only and should not be
used with a converter. Failure to comply voids the
warranty.
8
Detachable Cord
for easier storage
BPA-Free (not shown)
parts include everything that
comes into contact with food
8.
9.
5
Carefully unpack the unit and remove any packaging
and promotional labels in or on the milk frother. Rinse all
accessories thoroughly in warm soapy water and then
dry completely.
BEFORE THE FIRST USE
7
Froth Spoon
makes it easy to scoop
out froth
6
7.
5
3
4
Milk Warming Stirrer
stirs milk as it heats
to prevent burning
Cold Milk Button
lets you froth cold milk
4.
2
6.
Hot Milk Button
is used to froth hot milk
or warm up milk
3.
1
Milk Frothing Whisk
aerates milk to create
creamy foam
Double-Walled Housing
stays cool to the touch when
frothing hot milk
2.
5.
Transparent Cover with Seal
eliminates leaks and lets you
watch frothing
process. It is also magnetized
to store un-used attachment.
1.
FEATURES AND BENEFITS
6
Warming Milk
1. Remove the cover and insert the milk
warming stirrer.
2. Fill the tank with the desired amount of
milk.
Note: Never fill milk over the MAX fill line.
3. Put the cover back on the tank.
4. Start warming milk by pressing the
corresponding Hot Milk Button (top
position). The LED light will be illuminated
during operation.
Note: Preparation stops automatically after 2 minutes,
depending on the amount of milk.
5. Open the cover after warming is complete.
6. Pour the warmed milk into a cup or glass.
7. After using the unit, clean it as described in the
Cleaning and Maintenance section, next page.
Note: Wait for tank to cool before cleaning.
Frothing Milk
1. Remove the cover and insert the milk
frothing whisk in the recess in the bottom
of the housing.
2. Fill the tank with the desired amount of milk.
Note: Never fill milk over the MAX fill line.
Frothed milk expands and it will
overflow the tank if the level is too high.
3. Put the cover back on the tank.
4. Start frothing by pressing the corresponding
Milk Button (top position button for HOT and bottom
position button for COLD). The LED light will be
illuminated during operation.
Note: Preparation stops automatically after 2 minutes,
depending on the amount of milk.
5. Open the cover after frothing is complete.
6. Pour or ladle the milk froth into a cup or
glass.
7. After using the unit, clean it as described
in the Cleaning and Maintenance section,
next page.
Note: Wait for tank to cool before cleaning.
OPERATING INSTRUCTIONS
Clean out the tank with hot water and a soft cloth after
use. If the tank is still soiled, wash using a soap
solution and rinse thoroughly. Use a soft cloth to
prevent damaging the nonstick coating.
3.
Any service other than cleaning and normal user
maintenance should be performed by an authorized
Cuisinart Service Representative.
The plug is not plugged in. Make sure plug is placed
correctly in the socket.
Temperature monitoring has been triggered. Let the
unit cool for 5 minutes.
Filling level was too high. Reduce the amount of milk
in the tank.
Why is milk leaking from around the cover?
The seal ring is missing or dirty. Clean the seal ring and
replace.
The cover is not placed correctly over the milk tank.
Put the cover on so that it is flush with the tank and the
seal is not showing.
Why is the milk froth not coming out the way I want?
The wrong attachment may be in place in the milk tank.
Double check and make sure the milk frothing whisk
is inserted in the tank correctly.
A:
A:
A:
Q:
A:
A:
Q:
A:
7
Why are LED lights not illuminating after I push
the corresponding button?
Q:
TROUBLESHOOTING
4.
Remove the whisk or stirrer from tank and rinse them
with soap under warm running water. Seal on cover can
also be removed and rinsed under warm, soapy water.
2.
CAUTION: Never submerge the base, the power cord
or plugs in water or other liquids.
Clean the exterior of the unit with a soft, moist cloth.
If heavily soiled, a mild detergent can be used.
1.
Always make sure the appliance is unplugged before you
start cleaning it.
CLEANING AND MAINTENANCE
With the frothing whisk in place, add the milk to the
tank. Cover and press the hot milk button.
Pour espresso into a demitasse cup.
When the frothing process is complete, use the froth
spoon to dollop the foam on top of the espresso.
Serve immediately.
1.
2.
3.
Caffè Latte
Pour the espresso into a mug.
2.
2.
Pour espresso into a mug.
When the warming process is complete, pour the
cream into the espresso and serve immediately.
Cappuccino
2.
3.
With the frothing whisk in place, add the milk to the
tank. Cover and press the hot milk button.
Pour espresso into a mug.
When the frothing process is complete, pour the
milk into the espresso, using a spoon to hold back
the foam. Top with 2 to 3 tablespoons (30 ml- 45 ml)
of the foam. Serve immediately.
1.
2.
3.
8
cup (60 ml) cold skim milk
shot espresso
¼
1
Makes 1 serving
3.
With the frothing whisk in place, add the milk to the
tank. Cover and press the hot milk button.
1.
With the warming stirrer in place, add the half & half to
the tank. Cover and press the hot milk button.
1.
A thick layer of foam and bit of milk let the boldness of the
coffee shine through in this popular drink.
cup (60 ml) cold skim milk
shot espresso
tablespoon (15 ml) chocolate syrup
tablespoons (30 ml) sweetened whipped cream
teaspoon (5 ml) shaved bittersweet chocolate or
unsweetened cocoa powder (for garnish)
¼
1
1
2
1
cup (175 ml) cold half & half
shot espresso
¾
1
9
Top with a dollop of the foam, whipped cream, and
garnish with chocolate. Serve immediately.
Pour the espresso and chocolate syrup into a mug and
stir to combine. When the frothing process is complete,
pour the milk into the mug, using a spoon to hold back
the foam.
Makes 1 serving
This ultra-rich drink makes the perfect ending
to any special meal.
Caffè Mocha
When the frothing process is complete, slowly pour the
milk into the espresso, using a spoon to hold back the
foam. Top with foam and serve immediately.
With the frothing whisk in place, add the milk to the
tank. Cover and press the hot milk button.
1.
3.
cup (125 ml) cold skim milk
shot espresso
½
1
Makes 1 serving
Similar to a cappuccino, this drink contains more milk,
which makes it creamy.
Makes 1 serving
American version of a latte – substituting half & half for milk.
Espresso Breve
tablespoon (15 ml) cold skim milk
shot espresso
1
1
Makes 1 serving
A simple spot of foam makes this drink a classic.
Espresso Macchiato
RECIPES
With the frothing whisk in place, add the skim milk to
the tank. Cover and press the cold milk button.
Put the ice cubes, espresso, and whole milk into a
glass. Stir to combine.
When the frothing process is complete, top the drink
with the foam. Serve immediately.
1.
2.
3.
Pour the syrup into a mug.
When the warming process is complete, pour the milk
into the mug and stir well to combine. Serve immediately.
2.
3.
With the frothing whisk in place, add the milk to the
tank. Cover and press the hot milk button.
When the frothing process is complete, pour the
milk into a mug, using a spoon to hold back the foam.
Pour the espresso over the milk.
Top with a bit of the foam and serve immediately.
1.
2.
3.
10
cup (125 ml) cold skim milk
shot espresso
½
1
Makes 1 serving
Similar to a latte, this creamy espresso-based drink was
developed in Australia and New Zealand.
Flat White
With the warming stirrer in place, add the milk to the
tank. Cover and press the hot milk button.
1.
½ cup (125 ml) cold whole milk
1½ tablespoons (25 ml) chocolate syrup
Makes 1 serving
Why wait for the snow? Hot chocolate in an instant
is perfect anytime.
Hot Chocolate
tablespoons (30 ml) cold skim milk
ice cubes
shot espresso, chilled
cup (75 ml) whole milk
2
4
1
¹⁄³
Makes 1 serving
With the warming stirrer in place, add the milk to the
tank. Cover and press the hot milk button.
When the warming process is complete, simultaneously
pour the milk and coffee into a mug to mix. Serve
immediately.
1.
2.
Add the honey and the nutmeg into the bottom
of a mug.
2.
4
3
1
¾
1½
2
11
cups (1 L) water
whole cinnamon sticks
vanilla bean, cut into ½-inch (1.25 cm) pieces
teaspoon (3.75 ml) ground ginger
teaspoons (7 ml) allspice berries
teaspoons (10 ml) cardamom pods
Makes 1 serving*
Store leftover tea in the refrigerator and
serve over ice for a chilled version.
Chai Tea
When the warming process is complete, pour the milk
into the mug and stir to combine. Top with additional
nutmeg and serve immediately.
With the warming stirrer in place, add the milk to the
tank. Cover and press the hot milk button.
1.
3.
cup (250 ml) cold whole milk
tablespoon (15 ml) honey
teaspoon (0.5 ml) freshly grated nutmeg plus more
for garnish
1
1
¹⁄8
Makes 1 serving
This soothing concoction will make you feel warm and cozy,
whether before bed or on a wintry day.
Sleepy Time Milk
cup (125 ml) cold whole milk
cup (125 ml) strong, freshly brewed coffee
½
½
Makes 1 serving
Café au Lait
French for “coffee with milk,” serve this alongside fresh
pastries for a mid-morning treat.
Iced Cappuccino
Cool down during the warmer months with this refreshing drink.
Combine all ingredients except the sugar and milk in a
large saucepan. Bring to a boil; remove from heat and
steep mixture for 15 minutes.
Pour the liquid through a fine mesh strainer into a
clean saucepan. Add the brown sugar and cook
over medium-low heat for 5 to 10 minutes, stirring
occasionally to dissolve the sugar and slightly reduce
the tea. Remove from heat and measure out 1 cup
(250 ml) of tea into a mug.
With the warming stirrer in place, add the milk to the
tank and press the hot milk button. Pour milk into tea
and stir. Serve immediately.
1.
2.
3.
With the warming stirrer in place, add the milk to the
tank. Cover and press the hot milk button.
In a large mug or heatproof glass combine the rum,
brandy, sugar and vanilla.
When the warming process is complete, pour the milk
into the mug and stir well to combine and dissolve
the sugar. Top with freshly grated nutmeg and serve
immediately.
1.
2.
3.
12
cup (250 ml) cold whole milk
tablespoons (30 ml) dark rum
tablespoons (30 ml) brandy
teaspoons (7 ml) granulated sugar
teaspoon (1 ml) vanilla extract (optional)
freshly grated nutmeg, for garnish
1
2
2
1½
¼
Makes 1 serving
Stay warm with this cocktail, which is traditionally imbibed
during the holiday season.
Hot Milk Punch
*This recipe makes more tea than is needed for a single
serving; however, we like to prepare this as a larger batch
for having on hand when desired.
2
1
⁄3
teaspoon (3.75 ml) whole cloves
teaspoons (20 ml) loose black tea,
such as Darjeeling
tablespoons (30 ml) brown sugar
cup (75 ml) cold whole milk
¾
4
Creamy Irish Coffee
In a large mug or heatproof glass combine the coffee
and sugar and stir to dissolve. Add the Baileys and stir
to combine.
When the frothing process is complete, use a spoon to
dollop the foam on top of the drink. Serve immediately.
2.
3.
With the warming stirrer in place, add the milk to the
tank. Cover and press the hot milk button.
Empty the oatmeal packet into a serving bowl.
When the warming process is complete, pour the milk
into the oats and stir well to combine. Let stand for
1 to 2 minutes.
Stir in the remaining ingredients and serve.
1.
2.
3.
4.
13
cup (125 ml) cold whole milk
packet plain instant oatmeal
teaspoon (0.5 ml) kosher salt
teaspoons (7 ml) maple syrup
teaspoon (2 ml) ground cinnamon
tablespoons (30 ml) dried fruit or nuts
½
1
¹⁄8
1½
½
2
Makes 1 serving
Cut your morning cook-time with this quick
yet satisfying breakfast.
Maple Cinnamon Oatmeal
* Baileys Original Irish Cream is a trademark of
R & A Bailey & Co.
With the frothing whisk in place, add the milk to the
tank. Cover and press the hot milk button.
tablespoons (45 ml) cold skim milk
cup (250 ml) hot, fresh brewed coffee
teaspoon (5 ml) granulated sugar
tablespoons (45 ml) Baileys Original Irish Cream™*
1.
3
1
1
3
Makes 1 serving
A sweeter, more delicate version of the traditional drink.
Address:
We warrant that this Cuisinart product will be free of
defects in materials or workmanship under normal
home use for 3 years from the date of original
purchase. This warranty covers manufacturer’s
defects including mechanical and electrical defects.
It does not cover damage from consumer abuse,
unauthorized repairs or modifications, theft, misuse,
or damage due to transportation or environmental
conditions. Products with removed or altered
identification numbers will not be covered.
14
If the appliance should become defective within the
warranty period, do not return the appliance to the
store. Please contact our Customer Service Centre:
Your Cuisinart product has been manufactured to
the strictest specifications and has been designed
for use only in 120 volt outlets and only with
authorized accessories and replacement parts. This
warranty expressly excludes any defects or
damages caused by attempted use of this unit with
a converter, as well as use with accessories,
replacement parts or repair service other than those
authorized by Cuisinart.
This warranty is not available to retailers or other
commercial purchasers or owners. If your Cuisinart
product should prove to be defective within the
warranty period, we will repair it or replace it if
necessary. For warranty purposes, please register
your product online at www.cuisinart.ca to facilitate
verification of the date of original purchase and keep
your original receipt for the duration of the limited
warranty. This warranty excludes damage caused by
accident, misuse or abuse, including damage
caused by overheating, and it does not apply to
scratches, stains, discolouration or other damage to
external or internal surfaces that does not impair the
functional utility of the product. This warranty also
expressly excludes all incidental or consequential
damages.
1-800-472-7606
Limited Three-Year Warranty
15
To order replacement parts or accessories, call our
Customer Service Centre at 1-800-472-7606. For
more information, please visit our website at
www.cuisinart.ca.
Note: We recommend you use a traceable, insured
delivery service for added protection. Cuisinart will
not be held responsible for in-transit damage or for
packages that are not delivered to us.
*Product date code can be found on the underside
of the base of the product. The product date code is
a 4 or 5 digit number. Example, 90630 would
designate year, month & day (2009 June 30th).
• Any other information pertinent to the product’s
return
• Product date code*/copy of original proof of
purchase
• Description of the product defect
• Return address and phone number
• $10.00 for shipping and handling of the product
(cheque or money order)
To facilitate the speed and accuracy of your return,
please enclose:
FR-10C
Model:
[email protected]
Email:
Cuisinart Canada
100 Conair Parkway
Woodbridge, Ont. L4H 0L2
Toll-free phone number:
WARRANTY
®
Food
Processors
Juicers
Coffeemakers
Cookware
Tools and
Gadgets
Cuisinart offers an extensive assortment of top
quality products to make life in the kitchen easier
than ever. Try some of our other countertop
appliances, cookware, tools and gadgets.
www.cuisinart.ca
©2013 Cuisinart Canada
100 Conair Parkway,
Woodbridge, Ontario L4H 0L2
Consumer Call Centre E-mail:
[email protected]
Printed in China
13CC144063
IB-12106-CAN