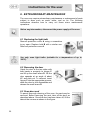
1
Contents
1.
INSTRUCTIONS FOR SAFE AND PROPER USE_______________ 20
2.
INSTALLATION OF THE OVEN_____________________________ 22
3.
DESCRIPTION OF CONTROLS ____________________________ 25
4.
USE OF THE OVEN ______________________________________ 26
5.
CLEANING AND MAINTENANCE ___________________________ 28
6.
EXTRAORDINARY MAINTENANCE _________________________ 30
7.
ADDITIONAL INSTRUCTIONS FOR STEAM OVENS______________ 31
INSTRUCTIONS FOR THE INSTALLER: these are intended for the
qualified technician who must install the appliance, set it functioning
and carry out an inspection test.
INSTRUCTIONS FOR THE USER: these contain user advice,
description of the commands and the correct procedures for cleaning
and maintenance of the appliance.
19
Introduction
1. INSTRUCTIONS FOR SAFE AND PROPER USE
THIS MANUAL IS AN INTEGRAL PART OF THE APPLIANCE AND
THEREFORE MUST BE KEPT IN ITS ENTIRETY AND IN AN ACCESSIBLE
PLACE FOR THE WHOLE WORKING LIFE OF THE OVEN. WE ADVISE
READING THIS MANUAL AND ALL THE INSTRUCTIONS THEREIN BEFORE
USING THE OVEN. INSTALLATION MUST BE CARRIED OUT BY QUALIFIED
ENGINEERS IN ACCORDANCE WITH THE REGULATIONS IN FORCE. THIS
OVEN IS INTENDED FOR COMMERCIAL USES AND CONFORMS TO
CURRENT REGULATIONS IN FORCE. THE APPLIANCE HAS BEEN BUILT TO
CARRY OUT THE FOLLOWING FUNCTIONS: COOKING AND HEATING-UP
OF FOOD. ALL OTHER USES ARE CONSIDERED IMPROPER.
THE MANUFACTURER DECLINES ALL RESPONSIBILITY FOR IMPROPER
USE.
DO NOT LEAVE THE PACKING IN THE HOME ENVIRONMENT. SEPARATE
THE VARIOUS WASTE MATERIALS AND TAKE THEM TO THE NEAREST
SPECIAL GARBAGE COLLECTION CENTRE.
IT IS OBLIGATORY FOR THE ELECTRICAL SYSTEM TO BE GROUNDED
ACCORDING TO THE METHODS REQUIRED BY SAFETY RULES.
WHEN LINKING UP TO MAINS BY PLUG AND SOCKET, MAKE SURE THAT
BOTH ARE COMPATIBLE AND CONNECT BY MEANS OF A POWER CABLE
COMPLYING WITH APPLICABLE REGULATIONS.
THE SOCKET MUST BE ACCESSIBLE AFTER THE APPLIANCE HAS BEEN
BUILT IN.
NEVER UNPLUG BY PULLING ON THE CABLE.
DO NOT OBSTRUCT VENTILATION OPENINGS AND HEAT DISPERSAL
SLITS.
IMMEDIATELY AFTER INSTALLATION CARRY OUT A BRIEF INSPECTION
TEST OF THE OVEN, FOLLOWING THE INSTRUCTIONS BELOW. SHOULD
THE APPLIANCE NOT FUNCTION, DISCONNECT IT FROM THE SUPPLY AND
CALL THE NEAREST TECHNICAL ASSISTANCE CENTRE.
NEVER ATTEMPT TO REPAIR THE APPLIANCE.
ALWAYS CHECK THAT THE CONTROL KNOBS ARE IN THE 0 (OFF)
POSITION WHEN YOU FINISH USING THE OVEN.
20
Introduction
NEVER PUT INFLAMMABLE OBJECTS IN THE OVEN: THEY COULD BE
ACCIDENTALLY LIGHTED AND CAUSE FIRES.
THE APPLIANCE BECOMES VERY HOT DURING USE. WEAR HEAT-PROOF
GLOVES AT ALL TIMES.
THE I.D. PLATE WITH TECHNICAL DATA, REGISTRATION NUMBER AND
BRAND NAME IS LOCATED IN AN EXPOSED POSITION AT THE REAR OF
THE OVEN.
THE PLATE MUST NOT BE REMOVED.
THE OVEN IS SIZED FOR A MAXIMUM LOAD OF 3.5 KG.
THE APPLIANCE IS INTENDED FOR COMMERCIAL USE BY
APPROPRIATELY TRAINED PERSONNEL. CHILDREN SHOULD ALWAYS BE
KEPT OUT OF ITS REACH AND NEVER BE ALLOWED TO PLAY WITH IT.
REPLACED APPLIANCES MUST BE TAKEN TO A SPECIAL GARBAGE
COLLECTION CENTRE.
The manufacturer declines all responsibility for damage to persons
or things caused by non-observance of the above prescriptions or by
interference with any part of the appliance or by the use of non-original
spares.
21
Instructions for the installer
2. INSTALLATION OF THE OVEN
The oven must be set up on a perfectly flat surface and left standing
free. Make sure to allow enough room at the back for easy access to the
terminal strip for connection of the power cable to mains.
Installation must be carried out by a qualified technician in compliance
with applicable regulations in force.
2.1 Electrical connection
Make sure that the power line voltage matches the specifications
indicated on the rating plate located to the rear of the oven. This rating
plate must never be removed.
The oven is equipped with a power
converter which is designed to adapt
power input to local current rating.
The converter is factory-set at 5450W.
If required, this value may be reduced
by adjusting the switch at the rear of
the oven by means of a screwdriver.
MIN = Minimum power (3650W).
MED = Medium power (4550W).
MAX = Maximum power (5450W).
The oven is supplied complete
with a H07RN-F three-core
supply cable for operation from a
230V∼ power supply.
For operation from a 400V3N∼
power supply, the original cable
must be replaced and the
terminal
board
connections
modified accordingly. For access
to the terminal board, remove the
door located at the back of the
oven.
22
Instructions for the installer
The standard cable is of the three-core
3 x 2.5 mm2 H07RN-F type.
For operation from a 400V3N∼ power
supply, replace the standard cable with
one of the H07RN-F type. The cross
section of the leads of the latter cable
must not be less than 1.5 mm2 (5 x 1.5
mm2); the ground (yellow-green) of the
termination to be linked up to the oven
must be at least 20 mm longer.
If connecting by plug and socket, make sure to use a 25 Amp. three-core
plug or a 16 Amp. five-core plug in case of operation at 400V3N∼. Make
sure that plug and wall socket are of the same type and are in conformity
with regulations in force. Also check that the power supply line is
provided with adequate earthing. Avoid using adapters or shunters.
In case of permanent connection, ensure that power cable is equipped
with an easily accessible omnipolar switch fitted in proximity to the
apparatus and with a gap between contacts equal to or greater than
3 mm.
2.1.1 Safety thermostat
The oven is fitted with a safety device which trips in case of serious
malfunction. To reset, contact the nearest servicing centre.
The manufacturer declines all responsibility for damage to persons
or things caused by non-observance of the above prescriptions or by
interference with any part of the oven.
23
Instructions for the installer
2.2 Levelling
Adjust the four feet so as to set the oven on a perfectly level plane. For
this purpose, loosen the lock nut and unscrew the foot. The range of
adjustment of the screw is 10 mm.
2.3 Steam exhaust pipe
An exhaust pipe is fitted on the top of the
oven to allow the discharge of steam
during cooking. Make sure that it's no
way obstructed and take care do not
crush it.
24
Instructions for the user
3. DESCRIPTION OF CONTROLS
All oven knobs and controls
are located on the side
panels.
THERMOSTAT KNOB
This permits selection of the ideal cooking temperature.
Rotate clockwise to the desired temperature (50° to 250°C).
Adjustment is progressive so that the oven also operates at
any intermediate value.
ORANGE LIGHT
When on, indicates that oven is heating up. When the set
temperature is reached, the light goes off. During the cooking
cycle, the light comes on and goes off various times signalling
that the temperature in the oven is being kept constant as per
the set value.
GREEN LIGHT
When off, indicates that timed cooking is in progress. When
on, indicates that the timed cooking cycle has been
completed.
TIMER KNOB
This permits to select manual or timer-controlled cooking with
automatic turning off of the oven at end of the cooking cycle.
To set to manual, turn the knob anticlockwise to
.
To set cooking time, turn the knob clockwise. Time is
expressed in minutes (5 to 60). Adjustment is progressive so
that time can also be set to any intermediate value. Upon
completion of the cooking cycle, the knob automatically
returns to 0, the oven turns off and a buzzer signal is set off,
which switches off automatically after 20 seconds.
25
Instructions for the user
4. USE OF THE OVEN
4.1 Warnings and general advice
When using for the first time, it is advisable to
heat up the oven to its maximum temperature
(250°C) for enough time to burn off any
possible oily manufacturing residues.
It should be borne in mind that when the oven
door is opened, the heating elements and the
fan are automatically switched off. This means
that, if the food being cooked needs to be
checked, it is best to leave the door open for as
short a time as possible in order to avoid the
temperature inside the oven from dropping too
much and thus compromising cooking results.
4.2 Oven lights
The lights inside the oven come on automatically upon turning the
thermostat knob.
4.3 Defrosting
TIMER KNOB
SET TO MANUAL
THERMOSTAT KNOB
SET TO VENTILATION
Moving air at ambient temperature causes frozen food to quickly thaw.
This type of thawing is ideal as the taste and appearance of the defrozen food, whether previously deep-frozen or frozen in the domestic
freezer, remain unaltered.
4.4 Pre-heating
Before cooking, it is advisable to pre-heat the oven to the desired
temperature for at least 15 minutes.
26
Instructions for the user
4.5 Manual cooking
TIMER KNOB
SET TO MANUAL
THERMOSTAT KNOB
SET TO BETWEEN 50° AND 250°C
Es.
The oven heats up as signalled by the orange light going on. Upon the
set temperature being reached, the light goes off. The orange light
comes on and goes off various times during the cooking cycle indicating
that the temperature in the oven is being kept constant.
4.6 Timed cooking
TIMER KNOB
SET TO BETWEEN 5' AND 60'
Es.
THERMOSTAT KNOB
SET TO BETWEEN 50° AND 250°C
Es.
The oven heats up as signalled by the orange light going on. Upon the
set temperature being reached, the light goes off. The orange light
comes on and goes off various times during the cooking cycle indicating
that the temperature in the oven is being kept constant. Upon completion
of the cooking cycle, the oven automatically turns off, the green light
comes on and the buzzer sounds for a few seconds. To completely turn
off, set the thermostat knob to 0.
27
Instructions for the user
5. CLEANING AND MAINTENANCE
Important:
never spray water directly on to the oven. Never use pressure nozzles.
Before any intervention, disconnect the power supply of the oven.
5.1 Cleaning stainless steel parts
To maintain stainless steel parts in perfect condition, clean regularly at
the end of the work day. Allow to cool first.
To clean and preserve the stainless steel surfaces, always use only
specific products that do not contain abrasives or chlorine-based acids.
How to use: pour the product on a damp cloth and wipe the surface,
rinse thoroughly and dry with a soft cloth or deerskin.
Do not use metallic sponges or sharp scrapers: they will
damage the surface.
Use normal non-abrasive products for steel, and a wooden or
plastic tool if necessary.
Rinse thoroughly and dry with a soft cloth or deerskin.
28
Instructions for the user
5.2 Cleaning the inside of the oven
To maintain the oven in perfect condition, clean it regularly at the end of
the work day. Allow to cool first. Take off all removable parts.
Remove the side guides by lifting them up from the front; slide them out
of the rear hole and take off.
•
•
Clean oven grill and side guides with warm water and non-abrasive
detergents. Rinse and dry.
Clean the inside walls of the oven with a soft cloth soaked in an
ammonia solution; rinse and dry. In case of persistent spots or dripoffs, place an ammonia-imbibed cloth on the bottom of the oven,
close the door and after a few hours wash the oven with warm water
and a liquid detergent. Rinse and dry.
5.3 Door glass
The door glass should always be kept clean. Use absorbent kitchen
paper to clean. In case of tough spots, clean with a damp sponge using
regular detergent.
29
Instructions for the user
6. EXTRAORDINARY MAINTENANCE
The oven may require extraordinary maintenance or replacement of parts
subject to wear such as seals, bulbs, and so on. The following
instructions describe how to carry out these minor maintenance
operations.
Before any intervention, disconnect the power supply of the oven.
6.1 Replacing the light bulb
Remove protection cover A using a screwdriver
to pry open. Replace bulb B with a similar one.
Remount protection cover A.
Use only oven light bulbs (suitable for a temperature of up to
300°C).
6.2 Removing the door
Catch the door at the two sides with
both hands in proximity to hinges C
and lift up the small levers D. Lift the
door upwards at an angle of about
45° and slide out. To remount, insert
hinges C into the appropriate grooves,
allow the door to rest downwards and
release the small levers D.
6.3 Oven door seal
To permit thorough cleaning of the oven, the seal may be
removed. Before removing the seal, take off the door as
described above. Once the door has been taken off, lift the
tabs at the corners as shown in the figure.
30
Additional instructions for steam ovens
7. ADDITIONAL INSTRUCTIONS FOR STEAM OVENS
7.1 General instructions
The hardness of the water used in the oven water reservoir for steaming
must not exceed 10-11°F. Use natural mineral water, or tap water that
has been treated with a water purification or softening system.
Water line connection
Connect the water intake valve on the back to the water supply using a
hose with a ¾ gas thread, making sure that the connections are secured
tightly.
If the water hose is new or has not been used for a long period of time,
run the water to ensure that the water is clear and free of impurities
before you connect it. This is a precautionary measure serving to avoid
the risk of the water causing blockage and thus damaging the appliance.
You are advised to supply the oven with a water pressure ranging
between a minimum of 50 KPa and a maximum of 500 KPa.
7.2 Description of the controls
All oven knobs and controls are located on the side panels.
TIMER KNOB
This knob serves for selecting manual oven use or the minute
minder with automatic oven switch-off at the end of cooking.
For manual control of the cooking time, turn the knob to the
symbol .
To set the cooking time, turn the knob clockwise. The
numbers 5 to 60 correspond to minutes. The regulation of the
time is progressive and all of the positions between the figures
indicated can be used as settings.
At the end of the cooking time, the knob automatically returns
to the 0 position, the oven switches off and an acoustic device
sounds.
THERMOSTAT KNOB
This knob serves for selecting the oven temperature most
suited to the foods to be cooked.
Selection is made by turning the knob clockwise to the desired
setting. The regulation of the temperature is progressive and
thus all of the positions between the figures can be utilised as
settings.
31
Additional instructions for steam ovens
GREEN INDICATOR LIGHT
When this light goes out it signals the beginning of the
cooking time.
When it comes on it signals the end of the cooking time.
ORANGE INDICATOR LIGHT
This light indicates that the oven is in the heating phase. It
switches off when the temperature set by the thermostat knob
has been reached inside the oven.
During oven use, the switching on and off of this light
indicates that the oven temperature is being kept constant.
STEAM EROGATION BUTTON
This serves for selecting the amount of steam most suited to
the foods to be cooked.
Steam continues to be supplied until the button is released;
once released the button automatically returns to the 0
setting.
N.B.: The oven thermostat knob must be set between 150°
and 250°C for steaming.
32
Additional instructions for steam ovens
7.3 Use of the oven
Warnings and general suggestions
To prevent any problems that could be caused from the steam in the
oven, open the door in two stages: keep the door ajar (about 5-6 cm) for
4-5 seconds and then open it fully.
N.B. The fan, oven elements and steam supply are all disconnected
automatically when the door is opened.
7.3.1 Steaming foods
STEAM DISTRIBUTION KNOB
THERMOSTAT KNOB
On pos. 1
(max. 10 sec. a time)
BETWEEN 150° AND 250°C
TIMER KNOB
No steam is created at temperatures lower than 150°C: temperatures
below 150°C give rise to condensation and consequent dripping.
Therefore, turn the thermostat knob to 150°C and wait until the (orange)
thermostat indicator light switches off before opening the steam supply.
33
Additional instructions for steam ovens
7.4 If the oven is not working properly
This product meets the current safety regulations in force for
electrical appliances. To prevent safety hazards for users, all
technical inspections or repairs must be carried out by qualified
persons.
If the appliance is not working properly, before calling Customer Service,
ensure that the procedures listed below have been performed. This will
help to avoid unnecessary expenses.
PROBLEM
The oven is not working
Foods either take too long
or too little to cook
No steam is being supplied
PROBABLE SOLUTION
• The minute minder knob is positioned on 0.
• The plug is not properly inserted in the socket.
• The electrical system is damaged or not
working properly.
• The fuses have blown or the circuit breakers
have been activated.
The temperature setting is incorrect.
• The control knobs have not been positioned
correctly.
• The oven door has not been closed properly.
Moisture forms inside the
oven and on the foods
The foods are being left in the oven for too long
after cooking. Do not leave them in the oven for
more than 15-20 minutes after the end of the
cooking time.
There is water inside the
oven
The device controlling the supply of water to
the water reservoir is not working properly.
34