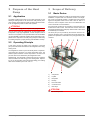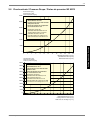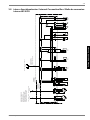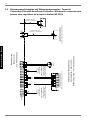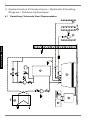
1
Wasser/WasserWärmepumpe für Innenaufstellung Installation and Operating Instructions English Instructions d’installation et d’utilisation Français Montage- und Gebrauchsanweisung Water-to-Water Heat Pump for Indoor Installation Bestell-Nr. / Order no. / No de commande : 452225.66.81 Deutsch WI 40 CS WI 90 CS Pompe à chaleur eau-eau pour installation intérieure FD 8903 Inhaltsverzeichnis Bitte sofort lesen .......................................................................................................................... D-2 1.1 1.2 1.3 1.4 2 Wichtige Hinweise ..................................................................................................................................D-2 Bestimmungsgemäßer Gebrauch...........................................................................................................D-2 Gesetzliche Vorschriften und Richtlinien ................................................................................................D-2 Energiesparende Handhabung der Wärmepumpe .................................................................................D-2 Verwendungszweck der Wärmepumpe ...................................................................................... D-3 2.1 Anwendungsbereich ...............................................................................................................................D-3 2.2 Arbeitsweise ...........................................................................................................................................D-3 3 Lieferumfang................................................................................................................................. D-3 3.1 Grundgerät..............................................................................................................................................D-3 3.2 Wärmepumpenregler ..............................................................................................................................D-4 4 Zubehör ......................................................................................................................................... D-4 4.1 Steuerleitung...........................................................................................................................................D-4 5 Transport....................................................................................................................................... D-4 6 Aufstellung.................................................................................................................................... D-5 6.1 Allgemeine Hinweise ..............................................................................................................................D-5 6.2 Schallemissionen....................................................................................................................................D-5 7 Montage......................................................................................................................................... D-5 7.1 7.2 7.3 7.4 8 Allgemein ................................................................................................................................................D-5 Heizungsseitiger Anschluss....................................................................................................................D-5 Wärmequellenseitiger Anschluss............................................................................................................D-5 Elektrischer Anschluss............................................................................................................................D-6 Inbetriebnahme............................................................................................................................. D-7 8.1 Allgemeine Hinweise ..............................................................................................................................D-7 8.2 Vorbereitung ...........................................................................................................................................D-7 8.3 Vorgehensweise bei Inbetriebnahme .....................................................................................................D-7 9 Pflege/Reinigung .......................................................................................................................... D-7 9.1 9.2 9.3 9.4 9.5 Pflege......................................................................................................................................................D-7 Reinigung Heizungsseite ........................................................................................................................D-7 Reinigung Wärmequellenseite................................................................................................................D-7 Wartung ..................................................................................................................................................D-8 Anforderungen an die Wasserqualität ....................................................................................................D-8 10 Störungen / Fehlersuche ............................................................................................................. D-9 11 Außerbetriebnahme / Entsorgung .............................................................................................. D-9 12 Geräteinformation ...................................................................................................................... D-10 13 Garantieurkunde......................................................................................................................... D-11 Anhang / Appendix / Annexes ............................................................................................................ A-I www.dimplex.de D-1 Deutsch 1 1 1 Bitte sofort lesen 1.1 1.2 Wichtige Hinweise Deutsch ACHTUNG! Arbeiten an der Wärmepumpe dürfen nur vom autorisierten und sachkundigen Kundendienst durchgeführt werden. ACHTUNG! Bei Geräten mit einer Kältemittelmenge von 6kg oder mehr ist der Kältekreis nach Verordnung (EG) Nr. 842/2006 jährlich auf Dichtheit zu prüfen. ACHTUNG! Das Brunnenwasser muss der geforderten Wasserqualität entsprechen. Die Abdeckhaube ist nicht überstreichbar. ACHTUNG! 1.3 Gesetzliche Vorschriften und Richtlinien Die Wärmepumpe entspricht allen relevanten DIN-/VDE-Vorschriften und EG-Richtlinien. Diese können der CE-Erklärung im Anhang entnommen werden. Die Wärmepumpe ist entsprechend den einschlägigen Vorschriften in die Wärmequellen- und Heizungsanlage einzubinden. Die Wärmepumpe ist nicht am Holzrost befestigt. ACHTUNG! ACHTUNG! Die Wärmepumpe darf nur bis zu einer Neigung von maximal 45° (in jeder Richtung) gekippt werden. ACHTUNG! Arbeiten an der Wärmepumpe dürfen nur vom autorisierten und sachkundigen Kundendienst durchgeführt werden. ACHTUNG! Vor Anschluss der Wärmepumpe Heizungsanlage spülen. Bei Geräten mit einer Kältemittelmenge von 6kg oder mehr ist der Kältekreis nach Verordnung (EG) Nr. 842/2006 jährlich auf Dichtheit zu prüfen. ACHTUNG! Beim Anschluss der Lastleitungen auf Rechtsdrehfeld achten. (Bei falschem Drehfeld bringt die Wärmepumpe keine Leistung und ist sehr laut). ACHTUNG! Montage- und ACHTUNG! Zur Vermeidung von Ablagerungen (z.B. Rost) im Kondensator der Wärmepumpe wird empfohlen, ein geeignetes Korrosionsschutzsystem einzusetzen. ACHTUNG! Vor Öffnen des Gerätes sind alle Stromkreise spannungsfrei zu schalten. D-2 Dieses Gerät ist nur für den vom Hersteller vorgesehenen Verwendungszweck freigegeben. Ein anderer oder darüber hinaus gehender Gebrauch gilt als nicht bestimmungsgemäß. Dazu zählt auch die Beachtung der zugehörigen Produktschriften. Änderungen oder Umbauten am Gerät sind zu unterlassen. Der elektrische Anschluss der Wärmepumpe muss nach den gültigen VDE-, EN- und IEC-Normen ausgeführt werden. Außerdem sind die Anschlussbedingungen der Versorgungsunternehmen zu beachten. ACHTUNG! Die Inbetriebnahme erfolgt gemäß der Gebrauchsanweisung des Wärmepumpenregler. Bestimmungsgemäßer Gebrauch Nähere Angaben dazu befinden sich im Kapitel Pflege / Reinigung. 1.4 Energiesparende Handhabung der Wärmepumpe Durch das Betreiben dieser Wärmepumpe tragen Sie zur Schonung unserer Umwelt bei. Für den effizienten Betrieb ist eine sorgfältige Bemessung der Heizungsanlage und der Wärmequelle sehr wichtig. Dabei ist besonderes Augenmerk auf möglichst niedrige Wasservorlauftemperaturen zu richten. Darum sollten alle angeschlossenen Wärmeverbraucher für niedrige Vorlauftemperaturen geeignet sein. Eine um 1 K höhere Heizwassertemperatur steigert den elektrischen Energieverbrauch um ca. 2,5%. Eine Niedertemperaturheizung mit Vorlauftemperaturen zwischen 30 °C und 50 °C ist für einen energiesparenden Betrieb gut geeignet. 3.1 Verwendungszweck der Wärmepumpe 2.1 Anwendungsbereich Die Wasser/Wasser-Wärmepumpe ist ausschließlich für die Erwärmung von Heizungswasser vorgesehen. Sie kann in vorhandene oder neu zu errichtende Heizungsanlagen eingesetzt werden. Als Wärmeträger dient Wasser. Dieses kann aus Brunnen oder ähnlichen Anlagen zugeführt werden. ACHTUNG! Das Brunnenwasser muss der geforderten Wasserqualität entsprechen. Im Regelfall ist ein Zwischenkreis vorzusehen. Um die Anlage ohne Zwischenkreis betreiben zu können ist unabhängig von den rechtlichen Bestimmungen eine Wasseranalyse erforderlich, um nachweislich die Verträglichkeit des Grundwassers für den Verdampfer der Wärmepumpe feststellen zu können (vergl. Projektierungs- und Installierungshandbuch, Heizungs-Wärmepumpen). 2.2 3 Lieferumfang 3.1 Grundgerät Das Grundgerät besteht aus einer anschlussfertigen Wärmepumpe für Innenaufstellung mit Abdeckhaube und einer Basissteuerung. Der Kältekreis ist "hermetisch geschlossen" und enthält das vom Kyoto-Protokoll erfasste fluorierte Kältemittel R407C mit einem GWP-Wert von 1525. Es ist FCKW-frei, baut kein Ozon ab und ist nicht brennbar. Die Abdeckhaube ist mit einer Schallisolation ausgekleidet. In der Basissteuerung sind alle für den Betrieb der Wärmepumpe notwendigen elektrischen Bauteile eingebaut. Die Lastzuführung und die Steuerleitung (Zubehör) zwischen Wärmepumpe und Basissteuerung sind bauseits zu verlegen. Die bauseits zu stellende Solepumpe ist in der Basissteuerung einzuklemmen. Dabei ist zu überprüfen, ob der werkseitig eingebaute Motorschutz für die bauseits eingebaute Pumpe ausreichend ist. Arbeitsweise Eine Brunnenpumpe fördert das Wasser in den Verdampfer der Wärmepumpe. Dort gibt es Wärme an das Kältemittel im Kältekreislauf ab. Das Kältemittel wird vom elektrisch angetriebenen Verdichter angesaugt, verdichtet und auf ein höheres Temperaturniveau "gepumpt". Die bei diesem Vorgang zugeführte elektrische Antriebsleistung geht nicht verloren, sondern wird größtenteils ebenfalls dem Kältemittel zugeführt. Daraufhin gelangt das Kältemittel in den Verflüssiger und überträgt hier wiederum seine Wärmeenergie an das Heizwasser. Abhängig vom Betriebspunkt erwärmt sich so das Heizwasser auf bis zu 60 °C. 1) Verdichter 2) Verflüssiger 3) Verdampfer 4) Schmutzfänger 5) Durchflussschalter 6) Anschlusskasten 7) Filtertrockner ACHTUNG! Die Abdeckhaube ist nicht überstreichbar. www.dimplex.de D-3 Deutsch 2 3.2 3.2 Wärmepumpenregler Deutsch Für den Betrieb Ihrer Wasser/Wasser-Wärmepumpe ist die Verwendung eines Wärmepumpenreglers unseres Liefersortiments zwingend notwendig. Der Wärmepumpenregler ist ein komfortables elektronisches Regel- und Steuergerät. Er steuert und überwacht die gesamte Heizungsanlage in Abhängigkeit von der Außentemperatur, die Warmwasserbereitung und die sicherheitstechnischen Einrichtungen. Funktionsweise und Handhabung des Wärmepumpenreglers sind in der dazu beiliegenden Gebrauchsanweisung beschrieben. 5 Transport Zum Transport auf ebenem Untergrund eignet sich ein Hubwagen. Muss die Wärmepumpe auf unebenem Untergrund oder über Treppen befördert werden, kann dies mit Tragriemen geschehen. Diese können direkt unter dem Holzrost hindurchgeführt werden. Alternativ dazu kann das Gerät auch an Ringschrauben, die an den Ecken des Grundrahmens eingeschraubt werden können, gehoben werden. ACHTUNG! 4 4.1 Zubehör Die Wärmepumpe ist nicht am Holzrost befestigt. Steuerleitung Mit zwei Steuerleitungen wird die Verbindung zwischen Wärmepumpenregler und Basissteuerung, sowie zwischen Basissteuerung und dem Anschlusskasten der Wärmepumpe hergestellt. Sie sind in mehreren Längen erhältlich ACHTUNG! Die Wärmepumpe darf nur bis zu einer Neigung von maximal 45° (in jeder Richtung) gekippt werden. D-4 7.3 6.1 Aufstellung 7 Allgemeine Hinweise 7.1 Das Gerät ist grundsätzlich in Innenräumen auf einer ebenen, glatten und waagrechten Fläche aufzustellen. Dabei sollte der Rahmen rundum dicht am Boden anliegen, um eine geeignete Schallabdichtung zu gewährleisten. Ist dies nicht der Fall, können zusätzliche schalldämmende Maßnahmen notwendig werden. Die Wärmepumpe muss so aufgestellt sein, dass ein Kundendiensteinsatz problemlos durchgeführt werden kann. Dies ist gewährleistet, wenn ein Abstand von ca. 1 m, vor und neben der Wärmepumpe eingehalten wird. Allgemein An der Wärmepumpe sind folgend Anschlüsse herzustellen: Vor-/Rücklauf Brunnenanlage Vor-/Rücklauf Heizung Stromversorgung 7.2 Heizungsseitiger Anschluss ACHTUNG! Vor Anschluss der Wärmepumpe Heizungsanlage spülen. Bevor die heizwasserseitigen Anschlüsse der Wärmepumpe erfolgen, muss die Heizungsanlage gespült werden, um eventuell vorhandene Verunreinigungen, Reste von Dichtmaterial oder ähnliches, zu entfernen. Ein Ansammeln von Rückständen im Verflüssiger kann zum Totalausfall der Wärmepumpe führen. P P Montage Deutsch 6 P Nach erstellter heizungsseitiger Installation ist die Heizungsanlage zu füllen, zu entlüften und abzudrücken. Mindestheizwasserdurchsatz P 6.2 Schallemissionen Aufgrund der wirkungsvollen Schallisolation arbeitet die Wärmepumpe sehr leise. Um eine Schwingungsübertragung auf das Fundament zu verhindern, sollte eine geeignete dämpfende Gummimatte unter den Grundrahmen der Wärmepumpe gelegt werden. Um die Übertragung von Geräuschen in das Heizsystem zu vermeiden, empfiehlt es sich, die Wärmepumpe mit Schlauchstücken an das Heizsystem zu koppeln Der Mindestheizwasserdurchsatz der Wärmepumpe ist in jedem Betriebszustand der Heizungsanlage sicherzustellen. Dieses kann z.B. durch Installation eines differenzdrucklosen Verteilers oder eines Überströmventiles erreicht werden. Die Einstellung eines Überströmventiles ist in Kapitel Inbetriebnahme erklärt. Frostschutz bei frostgefährdeter Aufstellung Sofern Regler und Heizungsumwälzpumpen betriebsbereit sind, arbeitet die Frostschutzfunktion des Reglers. Bei Außerbetriebnahme der Wärmepumpe oder Stromausfall ist die Anlage zu entleeren. Bei Wärmepumpenanlagen, an denen ein Stromausfall nicht erkannt werden kann (Ferienhaus), ist der Heizungskreis mit seinem geeigneten Frostschutz zu betreiben. 7.3 Wärmequellenseitiger Anschluss Die Brunnenleitungen am Vor-und Rücklauf der Wärmepumpe anschließen. Dabei ist das hydraulische Prinzipschema zu beachten. ACHTUNG! Das Brunnenwasser muss der geforderten Wasserqualität entsprechen. www.dimplex.de D-5 7.4 7.4 Elektrischer Anschluss Steuerspannung Die Basissteuerung wird vom Wärmepumpenregler über die Steuerleitung versorgt. Eine extra Leitung in die Basissteuerung ist nicht nötig. 1 Die Verbindungen zwischen dem Klemmkasten in der Wärmepumpe und der Basissteuerung, sowie zwischen der Brunnenpumpe und der Basissteuerung sind bauseits zu erstellen. 5 0 00 Deutsch Leistungsverbindung zwischen der Basissteuerung und dem Anschlusskasten der Wärmepumpe 5 0 0 ( :6 :6 7! 7! Die Leistungskabel werden in das verlegte Kunststoffrohr eingezogen. ( Anschlussklemmen Verdichter: X1-1/2/3/PE ) ) ) ) 3 3 7 ) X1-4/5/6/PE 0 1) Wärmepumpe 2) Steuerleitung (Zubehör) 3) Wärmepumpenregler 4) Basissteuerung 5) Peripherie 6) Steuerstrom L/N/PE 230 V AC 7) Laststrom 3/PE 400 V AC 8) Laststrom Brunnenpumpe 3/PE 400 V AC Alle für die Leistungsversorgung der Wärmepumpe notwendigen Bauteile befinden sich in der Basissteuerung. Die Basissteuerung wird im Haus auf einer ebenen Wand montiert. Für die Ansteuerung dieser Bauteile wird ein Wärmepumpenregler benötigt. Die Verbindung der Einzelkomponenten Basissteuerung und Wärmepumpenregler muss bauseits durchgeführt werden (Steckverbinder). Leistungszuführung zur Basissteuerung In der Leistungszuführung zur Basissteuerung für die Wärmepumpe ist eine allpolige Abschaltung mit mindestens 3 mm Kontaktöffnungsabstand (z.B. EVU-Sperrschütz, Leistungsschütz), sowie ein 3-pol. Sicherungsautomat, mit gemeinsamer Auslösung aller Außenleiter vorzusehen. Der benötigte Querschnitt der Leitung ist gemäß der Leistungsaufnahme der Wärmepumpe, der techn. Anschlussbedingungen des jeweiligen EVU und nach VDE 0100, zu wählen. Die Leistungsaufnahme der Wärmepumpe ist in den technischen Unterlagen aufgeführt. Die Anschlussklemmen (X1-L1/L2/L3 an den Sicherungsautomaten) sind für max. 16 mm2 ausgelegt. Für den Anschluss der Brunnenpumpe muss gewährleistet sein, dass die Spannungsversorgung für diese Klemmen nicht vom Tarifschütz abgeschalten werden kann, um die Abschaltverzögerung der Brunnenpumpe zu gewährleisten. Der werkseitig eingebaute Motorschutz ist entsprechend der Daten des Pumpenherstellers einzustellen. Die Anschlussklemmen der Brunnenpumpeneinspeisung sind X1-L11/L21/L31. D-6 Für die Leistungskabel sind die Querschnitte entsprechend der Leistungsaufnahme der Wärmepumpe (technische Daten) sowie der Leistungsaufnahme der verwendeten Brunnenpumpe zu wählen. Anschlussklemmen Brunnenpumpe: X1-7/8/9/PE Steuerungsverbindung zwischen der Basissteuerung und dem Anschlusskasten der Wärmepumpe Die Steuerungsverbindung zwischen dem Anschlusskasten der Wärmepumpe und der Basissteuerung wird durch die konfektionierte Steuerleitung hergestellt (siehe Preisliste). Die Steuerleitung wird mit dem runden 16-poligen Steckverbinder von der Basissteuerung zum Anschlusskasten der Wärmepumpe verlegt. Durch leichten Druck und vorsichtiges Drehen nach links oder rechts wird die Verdrehungssicherung des Steckverbinders gesucht. Danach den Steckverbinder soweit zusammenstecken, bis die Ringmutter am Steckverbinder greift. Durch Rechtsdrehung der Ringmutter wird dann die Steckverbindung hergestellt und gesichert. Die beiden rechteckigen Steckverbinder werden durch die Durchführung rechts unten in die Basissteuerung eingeführt und mit den Gegenstücken (unverwechselbar) zusammengesteckt. Das Steuerkabel ist mit der Zugentlastung in der Basissteuerung zu sichern. Eventuelle Überlängen des Steuerkabels können in einem Kabelkanal oder als Ring auf der Wand verbleiben. Anschluss Wärmepumpenregler-Basissteuerung (mit Steuerleitung 1,5 m, siehe Preisliste) Die Steuerleitung wird durch den runden Steckverbinder mit der Basissteuerung und mit den beiden rechteckigen Steckverbindern mit dem Wärmepumpenregler verbunden. Genauere Anweisungen sind der Montage- und Gebrauchsanweisung des Wärmepumpenreglers zu entnehmen. ACHTUNG! Beim Anschluss der Lastleitungen auf Rechtsdrehfeld achten. (Bei falschem Drehfeld bringt die Wärmepumpe keine Leistung und ist sehr laut). 9.3 Inbetriebnahme 8.1 9 Allgemeine Hinweise 9.1 Um eine ordnungsgemäße Inbetriebnahme zu gewährleisten, sollte diese von einem vom Werk autorisierten Kundendienst durchgeführt werden. Unter bestimmten Bedingungen ist damit eine Verlängerung der Gewährleistung verbunden (vgl. Garantieleistungen). 8.2 Vorbereitung Vor der Inbetriebnahme müssen folgende Punkte geprüft werden: Alle Anschlüsse der Wärmepumpe müssen, wie in Kapitel 7 beschrieben, montiert sein. Die Wärmequellenanlage und der Heizkreis müssen gefüllt und geprüft sein. Im Brunnen- und Heizkreislauf müssen alle Schieber, den den korrekten Fluss behindern könnten, geöffnet sein. Der Wärmepumpenregler muss gemäß seiner Gebrauchsanweisung auf die Heizungsanlage abgestimmt sein. 8.3 Vorgehensweise bei Inbetriebnahme ACHTUNG! Montage- und Wird der Mindestheizwasserdurchsatz mittels Überströmventil sichergestellt, so ist dieses auf die Heizungsanlage abzustimmen. Eine falsche Einstellung kann zu verschiedenen Fehlerbildern und einem erhöhten elektrischen Energiebedarf führen. Um das Überströmventil richtig einzustellen, empfehlen wir folgende Vorgehensweise: Schließen Sie alle Heizkreise, die auch im Betrieb je nach Nutzung geschlossen sein können, so dass der vom Wasserdurchsatz ungünstigste Betriebszustand vorliegt. Dies sind in der Regel die Heizkreise der Räume auf der Süd- und Westseite. Mindestens ein Heizkreis muss geöffnet bleiben (z.B. Bad). Das Überströmventil ist so weit zu öffnen, dass sich bei der aktuellen Wärmequellentemperatur die in der nachfolgend stehenden Tabelle angegebene maximale Temperaturspreizung zwischen Heizungsvorund Rücklauf ergibt. Die Temperaturspreizung ist möglichst nahe an der Wärmepumpe zu messen. Bei monoenergetischen Anlagen ist der Heizstab zu deaktivieren. Wärmequellentemperatur max. Temperaturspreizung zwischen Heizungsvor- und Rücklauf von bis 7° C 12° C 10 K 13° C 18° C 11 K 19° C 25° C 12 K Pflege Die Wärmepumpe arbeitet wartungsfrei. Um Betriebsstörungen durch Schmutzablagerungen in den Wärmeaustauschern zu vermeiden, ist dafür Sorge zu tragen, dass keinerlei Verschmutzungen in die Wärmequellen- und Heizungsanlage gelangen können. Sollte es dennoch zu derartigen Betriebsstörungen kommen, ist die Anlage wie unten angegeben zu reinigen. 9.2 Reinigung Heizungsseite Sauerstoff kann im Heizwasserkreis, insbesondere bei Verwendung von Stahlkomponenten, Oxidationsprodukte (Rost) bilden. Diese gelangen über Ventile, Umwälzpumpen oder Kunststoffrohre in das Heizsystem. Deshalb sollte besonders bei den Rohren der Fußbodenheizung auf eine diffusionsdichte Installation geachtet werden. ACHTUNG! Zur Vermeidung von Ablagerungen (z.B. Rost) im Kondensator der Wärmepumpe wird empfohlen, ein geeignetes Korrosionsschutzsystem einzusetzen. Auch Reste von Schmier- und Dichtmitteln können das Heizwasser verschmutzen. Die Inbetriebnahme der Wärmepumpe erfolgt über den Wärmepumpenregler. Die Inbetriebnahme erfolgt gemäß der Gebrauchsanweisung des Wärmepumpenregler. Pflege/Reinigung Sind die Verschmutzungen so stark, dass sich die Leistungsfähigkeit des Verflüssigers in der Wärmepumpe verringert, muss ein Installateur die Anlage reinigen. Nach heutigem Kenntnisstand schlagen wir vor, die Reinigung mit einer 5%-igen Phosphorsäure oder, falls häufiger gereinigt werden muss, mit einer 5%-igen Ameisensäure durchzuführen. In beiden Fällen sollte die Reinigungsflüssigkeit Raumtemperatur haben. Es ist empfehlenswert, den Wärmeaustauscher entgegen der normalen Durchflussrichtung zu spülen. Um zu verhindern, dass säurehaltiges Reinigungsmittel in den Heizungsanlagenkreislauf gelangt, empfehlen wir, das Spülgerät direkt an den Vor- und Rücklauf des Verflüssigers der Wärmepumpe anzuschließen. Danach muss mit geeigneten neutralisierenden Mitteln gründlich nachgespült werden, um Beschädigungen durch eventuell im System verbliebene Reinigungsmittelreste zu verhindern. Die Säuren sind mit Vorsicht anzuwenden und es sind die Vorschriften der Berufsgenossenschaften einzuhalten. Im Zweifelsfall ist mit dem Hersteller des Reinigungsmittels Rücksprache zu halten! 9.3 Reinigung Wärmequellenseite Im Wärmequelleneintritt der Wärmepumpe ist ein Schmutzfänger montiert, um den Verdampfer gegen Verunreinigungen zu schützen. Anfangs sollte das Filtersieb des Schmutzfängers in relativ kurzen Abständen gereinigt werden. Sobald weniger Verunreinigungen erkennbar sind, kann der Zeitabstand entsprechend verlängert werden. Störungen während des Betriebes werden am Wärmepumpenregler angezeigt und können, wie in der Gebrauchsanweisung des Wärmepumpenreglers beschrieben ist, behoben werden. www.dimplex.de D-7 Deutsch 8 9.4 9.4 Wartung Deutsch Gemäß der Verordnung (EG) Nr. 842/2006 müssen alle Kältekreise die eine Kältemittelfüllmenge von mindestens 3kg, bei „hermetisch geschlossenen“ Kältekreisen von mindestens 6kg enthalten, einmal jährlich durch den Betreiber auf Dichtheit geprüft werden. Die Dichtheitsprüfung ist zu dokumentieren und mindestens 5 Jahre aufzubewahren. Die Kontrolle ist gemäß Verordnung (EG) Nr. 1516/2007 von zertifiziertem Personal durchzuführen. Zur Dokumentation kann die Tabelle im Anhang verwendet werden. 9.5 Anforderungen an die Wasserqualität Unabhängig von den rechtlichen Bestimmungen dürfen keine absetzbaren Stoffe im Grundwasser enthalten sein und die EISEN- (< 0,2 mg/l) und MANGAN- (< 0,1 mg/l) Grenzwerte müssen eingehalten werden, um eine Verockerung der Wärmequellenanlage zu verhindern. Der Einsatz von Oberflächenwasser oder salzhaltigen Gewässern ist nicht erlaubt. Erste Hinweise über eine mögliche Nutzung des Grundwassers können bei den örtlichen Wasserversorgungsunternehmen erfragt werden. Wasseranalysen werden durch wassertechnische Labore erstellt. Im Regelfall ist ein Zwischenkreis vorzusehen. Um die Anlage ohne Zwischenkreis betreiben zu können ist unabhängig von den rechtlichen Bestimmungen eine Wasseranalyse erforderlich, um nachweislich die Verträglichkeit des Grundwassers für den Verdampfer der Wärmepumpe feststellen zu können (vgl. Tabelle). Wenn ein Merkmal negativ "-" oder zwei Merkmale "0" sind, ist die Wasserqualität für die Wärmepumpe nicht geeignet. Tabelle: Beständigkeit von kupfergelöteten Edelstahl-Plattenwärmetauschern gegenüber Wasserinhaltstoffen + normalerweise gute Beständigkeit; 0 Korrosionsprobleme können entstehen, insbesondere, wenn mehrere Faktoren mit 0 bewertet sind; - von der Verwendung ist abzusehen [<: kleiner als, >: größer als] D-8 Beurteilungsmerkmal Ungefährer Beurteilung KonzentrationsKupfer bereich (mg/l) 0 absetzbare Stoffe (org.) <2 2 bis 20 > 20 + 0 - < 300 > 300 + 0 < 10 μ S/cm 10 bis 500 μ S/cm > 500 μ S/cm 0 + - < 0,2 > 0,2 + 0 <5 5 bis 20 > 20 + 0 - MANGAN (Mn) gelöst < 0,1 > 0,1 + 0 NITRATE (NO3) gelöst < 100 > 100 + 0 < 7,5 7,5 bis 9 >9 0 + 0 <2 >2 + 0 < 0,05 > 0,05 + - >1 <1 + 0 < 70 70 bis 300 > 300 0 + 0 < 0,2 > 0,2 + 0 < 70 70 bis 300 > 300 + 0 - <1 + <1 1 bis 5 >5 + 0 - Ammoniak NH3 Chlorid elektrische Leitfähigkeit EISEN (Fe) gelöst freie (aggr.) Kohlensäure PH-Wert Sauerstoff Schwefelwasserstoff (H2S) HCO3-/SO42Hydrogenkarbonat (HCO3-) Aluminium (Al) gelöst SULFATE SULPHIT (SO3), freies Chlorgas (CI2) 11 Diese Wärmepumpe ist ein Qualitätsprodukt und sollte störungsfrei arbeiten. Tritt dennoch eine Störung auf, wird diese im Display des Wärmepumpenmanagers angezeigt. Schlagen Sie dazu auf der Seite Störungen und Fehlersuche in der Gebrauchsanweisung des Wärmepumpenmanagers nach. Wenn die Störung nicht selbst behoben werden kann, verständigen Sie bitte den zuständigen Kundendienst. ACHTUNG! 11 Außerbetriebnahme / Entsorgung Bevor die Wärmepumpe ausgebaut wird, ist die Maschine spannungsfrei zu schalten und abzuschiebern. Umweltrelevante Anforderungen in Bezug auf Rückgewinnung, Wiederverwendung und Entsorgung von Betriebsstoffen und Bauteilen gemäß den gängigen Normen sind einzuhalten. Dabei ist besonders Wert auf eine fachgerechte Entsorgung des Kältemittels und Kälteöles zu legen. Arbeiten an der Wärmepumpe dürfen nur vom autorisierten und sachkundigen Kundendienst durchgeführt werden. ACHTUNG! Vor Öffnen des Gerätes sind alle Stromkreise spannungsfrei zu schalten. www.dimplex.de D-9 Deutsch 10 Störungen / Fehlersuche 12 12 Geräteinformation 1 Typ- und Verkaufsbezeichnung WI 40CS WI 90CS Deutsch 2 Bauform 2.1 Schutzart nach EN 60 529 IP 24 IP 24 2.2 Aufstellungsort Innen Innen 3 Leistungsangaben 3.1 Temperatur-Betriebseinsatzgrenzen: Heizwasser-Vorlauf °C 58 ± 2 58 ± 2 Kaltwasser (Wärmequelle) °C +7 bis +25 +7 bis +25 3.2 Heizwasser-Temperaturspreizung bei W10 / W35 K 3.3 Wärmeleistung / Leistungszahl bei W7 / W55 1 kW / --- 2 18,1 / 3,0 40,3 / 3,2 kW / --- 3 38,6 / 3,2 80,1 / 3,2 kW / --- 2 20,6 / 3,8 45,8 / 4,0 kW / --- 3 43,0 / 4,0 88,1 / 3,8 kW / --- 2 22,0 / 4,3 21,4 / 4,2 47,8 / 4,0 46,4 / 3,9 kW / --- 3 43,7 / 4,1 42,4 / 4,0 89,6 / 4,1 86,9 / 4,0 kW / --- 2 23,4 / 5,9 22,7 / 5,7 49,8 / 5,9 48,4 / 5,7 kW / --- 3 44,4 / 5,7 43,1 / 5,5 91,2 / 5,4 bei W10 / W50 bei W10 / W45 bei W10 / W35 3.4 1 1 1 10,8 9,9 88,5 / 5,2 Schall-Leistungspegel dB(A) 3.5 Heizwasserdurchfluss bei interner Druckdifferenz m³/h / Pa 3.6 Kaltwasserdurchsatz bei interner Druckdifferenz (Wärmequelle) m³/h / Pa 3.7 Kältemittel; Gesamt-Füllgewicht Typ / kg 3.8 Schmiermittel; Gesamt-Füllmenge Typ / Liter 4 Abmessungen, Anschlüsse und Gewicht 4.1 Geräteabmessungen ohne Anschlüsse 4 H x B x L mm 4.2 Geräteanschlüsse für Heizung Zoll G 1 1/4'' außen G 2'' außen 4.3 Geräteanschlüsse für Wärmequelle Zoll G 1 1/2'' außen G 2'' außen kg 309 460 400 / 35 400 / 63 4.4 Gewicht der Transporteinheit(en) incl. Verpackung 5 Elektrischer Anschluss 5.1 Nennspannung; Absicherung 1 59 3,5 / 14000 7,4 / 49000 8,0 / 13000 15,2 / 48000 9,5 / 17500 9,5 / 17500 20,0 / 19000 20,0 / 19000 R407C / 6,7 R407C / 15,0 Polyolester (POE) / 3,54 Polyolester (POE) / 8,2 830 x 1480 x 890 830 x 1480 x 890 V/A 5.2 Nennaufnahme 5.3 Anlaufstrom m. Sanftanlasser W10 W35 kW A 5.4 Nennstrom W10 W35 / cos ϕ 5) A / --- 5.5 max. Leistungsaufnahme Verdichterschutz (pro Verdichter) W 6 Entspricht den europäischen Sicherheitsbestimmungen 7 Sonstige Ausführungsmerkmale 7.1 Wasser im Gerät gegen Einfrieren geschützt 6 7.2 Leistungsstufen 7.3 Regler intern / extern 70 7,78 7,84 16,89 17,02 26 60 14,1 / 0,8 30,7 / 0,8 70 70 5 5 ja ja 2 2 extern extern 1. Diese Angaben charakterisieren die Größe und die Leistungsfähigkeit der Anlage. Für wirtschaftliche und energetische Betrachtungen sind Bivalenzpunkt und Regelung zu berücksichtigen. Dabei bedeuten z.B. W10 / W55: Wärmequellentemperatur 10 °C und Heizwasser-Vorlauftemperatur 55 °C. 2. 1-Verdichter-Betrieb 3. 2-Verdichter-Betrieb 4. Beachten Sie, dass der Platzbedarf für Rohranschluss, Bedienung und Wartung größer ist. 5. siehe CE-Konformitätserklärung 6. Die Heizungs-Umwälzpumpe und der Regler der Wärmepumpe müssen immer betriebsbereit sein. D-10 13 Garantieurkunde Die nachstehenden Bedingungen, die Voraussetzungen und Umfang unserer Garantieleistung umschreiben, lassen die Gewährleistungsverpflichtungen des Verkäufers aus dem Kaufvertrag mit dem Endabnehmer unberührt. Für die Geräte leisten wir Garantie gemäß nachstehenden Bedingungen: Wir beheben unentgeltlich nach Maßgabe der folgenden Bedingungen Mängel am Gerät, die nachweislich auf einem Materialund/oder Herstellungsfehler beruhen, wenn sie uns unverzüglich nach Feststellung und innerhalb von 24 Monaten nach Lieferung an den Erstendabnehmer gemeldet werden. Bei gewerblichem Gebrauch innerhalb von 12 Monaten. Zeigt sich der Mangel innerhalb von 6 Monaten ab Lieferung und liegt eine erfolgreiche Inbetriebnahme (Heizungs-Wärmepumpe und zentrale Wohnungslüftungsgeräte) durch den autorisierten SystemtechnikKundendienst vor, wird vermutet, dass es sich um einen Material- oder Herstellungsfehler handelt. Dieses Gerät fällt nur dann unter diese Garantie, wenn es von einem Unternehmer in einem der Mitgliedstaaten der Europäischen Union gekauft wurde, es bei Auftreten des Mangels in Deutschland betrieben wird und Garantieleistungen auch in Deutschland erbracht werden können. Die Behebung der von uns als garantiepflichtig anerkannter Mängel geschieht dadurch, dass die mangelhaften Teile unentgeltlich nach unserer Wahl instandgesetzt oder durch einwandfreie Teile ersetzt werden. Durch Art oder Ort des Einsatzes des Gerätes oder schlechte Zugänglichkeit des Gerätes bedingte außergewöhnliche Kosten der Mängelbeseitigung werden nicht übernommen. Der freie Gerätezugang muss durch den Endabnehmer gestellt werden. Ausgebaute Teile, die wir zurücknehmen, gehen in unser Eigentum über. Die Garantiezeit für Nachbesserungen und Ersatzteile endet mit dem Ablauf der ursprünglichen Garantiezeit für das Gerät. Die Garantie erstreckt sich nicht auf leicht zerbrechliche Teile, die den Wert oder die Gebrauchstauglichkeit des Gerätes nur unwesentlich beeinträchtigen. Es ist jeweils der Original-Kaufbeleg mit Kauf- und/ oder Lieferdatum vorzulegen. Eine Garantieleistung entfällt, wenn vom Endabnehmer oder einem Dritten die entsprechenden VDE-Vorschriften, die Bestimmungen der örtlichen Versorgungsunternehmen oder unsere Montage- und Gebrauchsanweisung sowie die in den Projektierungsunterlagen enthaltenen Hinweise oder Einbindungsschemen nicht beachtet worden sind oder wenn unser funktionsnotwendiges Zubehör nicht eingesetzt wurde. Durch etwa seitens des Endabnehmers oder Dritter unsachgemäß vorgenommenen Änderungen und Arbeiten, wird die Haftung für die daraus entstehenden Folgen aufgehoben. Die Garantie erstreckt sich auf das Gerät und vom Lieferer bezogene Teile. Nicht vom Lieferer bezogene Teile und Geräte-/Anlagenmängel die auf nicht vom Lieferer bezogene Teile zurückzuführen sind fallen nicht unter den Garantieanspruch. Eine Verlängerung der Garantie auf 36 Monate für HeizungsWärmepumpen und zentrale Wohnungslüftungsgeräte ab Inbetriebnahmedatum, jedoch maximal 38 Monate ab Auslieferung Werk, wird gemäß den nachfolgenden Bedingungen gewährt: Voraussetzung für die Übernahme der verlängerten Garantie ist eine kostenpflichtige Inbetriebnahme durch den autorisierten Systemtechnik-Kundendienst mit Inbetriebnahmeprotokoll innerhalb einer Betriebszeit (Verdichterlaufzeit) von weniger als 150 Stunden. Im Inbetriebnahmeprotokoll vermerkte Mängel sind unverzüglich zu beseitigen. Dies ist Grundlage für die Garantie. Das Inbetriebnahmeprotokoll ist, innerhalb von einem Monat nach erfolgter Inbetriebnahme, an die unten angegebene Adresse einzureichen, von welcher auch die Garantiezeitverlängerung bestätigt wird. Die Inbetriebnahmepauschale beinhaltet die eigentliche Inbetriebnahme und die Fahrtkosten. Es wird keine Haftung für die ordnungsgemäße Planung, Dimensionierung und Ausführung der Gesamtanlage übernommen. Die Behebung von Anlagenmängel und Wartezeiten sind Sonderleistungen. Die Inbetriebnahmepauschale für alle Heizungs-Wärmepumpen von derzeit netto Euro 340,-- und für zentrale Lüftungsanlagen von netto Euro 400,--, jeweils je Gerät, wird durch den autorisierten Systemtechnik-Kundendienst dem Auftraggeber in Rechnung gestellt. Eine Preisanpassung ist vorbehalten. Im Kundendienstfalle wird der autorisierte Systemtechnik-Kundendienst vor Ort informiert, der für eine schnelle Abhilfe des Problems sorgt. Den für Ihre Region zuständigen autorisierten Systemtechnik-Kundendienst erfahren Sie über die zentrale Servicehotline der Glen Dimplex Deutschland GmbH. Glen Dimplex Deutschland GmbH Geschäftsbereich Dimplex Kundendienst Systemtechnik Am Goldenen Feld 18 95326 Kulmbach Tel.-Nr.: Fax.-Nr.: E-Mail-Adresse: Internet: +49 (0) 9221 709 562 +49 (0) 9221 709 565 [email protected] [email protected] www.dimplex.de Für die Auftragsbearbeitung werden die Erzeugnisnummer E-Nr. und das Fertigungsdatum FD des Gerätes benötigt. Diese Angaben befinden sich auf dem Typschild in dem stark umrandeten Feld. Kundendienstadresse: Sofern der Mangel nicht beseitigt werden kann, oder die Nachbesserung von uns abgelehnt oder unzumutbar verzögert wird, wird der Hersteller entweder kostenfreien Ersatz liefern oder den Minderwert vergüten. Im Falle einer Ersatzlieferung, behalten wir uns die Geltendmachung einer angemessenen Nutzungsanrechnung, für die bisherige Nutzungszeit, vor. Weitergehende oder andere Ansprüche, insbesondere solche auf Ersatz außerhalb des Gerätes entstandener Schäden sind soweit eine Haftung nicht zwingend gesetzlich angeordnet ist ausgeschlossen. Bei einer Haftung nach § 478 BGB wird die Haftung des Lieferers auf die Servicepauschalen des Lieferers als Höchstbetrag beschränkt. www.dimplex.de D-11 Deutsch 13 13 Deutsch D-12 Table of contents Please Read Immediately .............................................................................................................E-2 1.1 1.2 1.3 1.4 2 Important Information.............................................................................................................................. E-2 Intended Use .......................................................................................................................................... E-2 Legal Regulations and Directives ........................................................................................................... E-2 Energy-Efficient Use of the Heat Pump .................................................................................................. E-2 Purpose of the Heat Pump ...........................................................................................................E-3 2.1 Application .............................................................................................................................................. E-3 2.2 Operating Principle ................................................................................................................................. E-3 3 Scope of Delivery ..........................................................................................................................E-3 3.1 Basic Device ........................................................................................................................................... E-3 3.2 Heat Pump Controller ............................................................................................................................. E-4 4 Accessories ...................................................................................................................................E-4 4.1 Control Line ............................................................................................................................................ E-4 5 Transport........................................................................................................................................E-4 6 Set-up .............................................................................................................................................E-5 6.1 General Information ................................................................................................................................ E-5 6.2 Acoustic Emissions................................................................................................................................. E-5 7 Installation .....................................................................................................................................E-5 7.1 7.2 7.3 7.4 8 General Information ................................................................................................................................ E-5 Heating System Connection ................................................................................................................... E-5 Heat Source Connection......................................................................................................................... E-5 Electrical Connection .............................................................................................................................. E-6 Start-up...........................................................................................................................................E-7 8.1 General Information ................................................................................................................................ E-7 8.2 Preparation ............................................................................................................................................. E-7 8.3 Start-up Procedure ................................................................................................................................. E-7 9 Maintenance and Cleaning ...........................................................................................................E-7 9.1 9.2 9.3 9.4 9.5 Maintenance ........................................................................................................................................... E-7 Cleaning the Heating System ................................................................................................................. E-7 Cleaning the Heat Source System.......................................................................................................... E-7 Maintenance ........................................................................................................................................... E-8 Water Quality Requirements................................................................................................................... E-8 10 Faults / Trouble-Shooting .............................................................................................................E-9 11 Decommissioning / Disposal .......................................................................................................E-9 12 Device Information ......................................................................................................................E-10 Anhang / Appendix / Annexes ............................................................................................................ A-I www.dimplex.de E-1 English 1 1 1 Please Read Immediately 1.1 Important Information ATTENTION! Any work on the heat pump may only be performed by authorised and qualified after-sales service technicians. ATTENTION! English Devices with 6kg refrigerant or more must be leak-proof tested yearly according to ES842/2006. ATTENTION! The well water must comply with the required water quality standards. ATTENTION! The cover cannot be painted. ATTENTION! The heat pump is not secured to the wooden pallet. ATTENTION! The heat pump must not be tilted more than 45° (in any direction). ATTENTION! Flush the heating system prior to connecting the heat pump. ATTENTION! Observe that the rotary field rotates in a clockwise direction when connecting the mains cables. (If the rotary field is not clockwise, the heat pump will not work properly and will be very noisy). ATTENTION! Start-up must be performed in accordance with the installation and operating instructions of the heat pump controller. ATTENTION! We recommend the installation of a suitable corrosion protection system to prevent the formation of deposits (e.g. rust) in the condenser of the heat pump. ATTENTION! Disconnect all electrical circuits from the power source prior to opening the device. E-2 1.2 Intended Use This device is only intended for use as specified by the manufacturer. Any other use beyond that intended by the manufacturer is prohibited. This requires the user to abide by the manufacturers product information. Please refrain from tampering with or altering the device. 1.3 Legal Regulations and Directives This heat pump conforms to all relevant DIN/VDE regulations and EU directives. Refer to the EC Declaration of Conformity in the appendix for details. The heat pump must be connected to the power supply in compliance with all relevant VDE, EN and IEC standards. Any further connection requirements stipulated by local utility companies must also be observed. The heat pump is to be connected to the heat source system and the heating system in accordance with all applicable regulations. ATTENTION! Any work on the heat pump may only be performed by authorised and qualified after-sales service technicians. ATTENTION! Devices with 6kg refrigerant or more must be leak-proof tested yearly according to ES842/2006. More information is available in the chapter Care / Cleaning. 1.4 Energy-Efficient Use of the Heat Pump By operating this heat pump you are helping to protect our environment. Both the heating system and the heat source must be properly designed and dimensioned to ensure efficient operation. It is particularly important to keep water flow temperatures as low as possible. All connected heat consumers should therefore be suitable for low flow temperatures. Raising the heating water temperature by 1 K corresponds to an increase in electrical energy consumption of approx. 2.5%. Low-temperature heating systems with flow temperatures between 30 °C and 50 °C are particularly well-suited for energy-efficient operation. 3.1 Purpose of the Heat Pump 2.1 Application The water-to-water heat pump is to be used exclusively for the heating of heating water. It can be used in newly built or previously existing heating systems. Water is used as the heat carrier. It can be supplied by wells or other water systems. ATTENTION! The well water must comply with the required water quality standards. As a rule, these should be equipped with an intermediate circuit. Irrespective of any legal regulations, a water analysis must be carried out if a system is to be operated without an intermediate circuit to establish conclusively whether the ground water is compatible for the evaporator of a heat pump (compare “Heat Pump for Heating Purposes” project planning and installation manual). 2.2 3 Scope of Delivery 3.1 Basic Device The basic device consists of a ready-to-use heat pump for indoor installation, complete with cover and basic control. The refrigerant circuit is hermetically sealed. It contains the Kyoto protocol approved refrigerant R407C with a GWP value of 1525. It is CFC-free, does not deplete ozone and is non-flammable. The cover is lined with a sound insulation. All components required for the operation of the heat pump are located in the basic control. The load feed and the control line (accessories) between the heat pump and the basic control must be installed by the customer. The brine pump to be provided by the customer must be connected to the basic control. It is important to ensure that the integrated motor protection is sufficient for the pump provided by the customer. Operating Principle A well pump conveys the water to the evaporator of the heat pump. There the heat is transferred to the refrigerant in the refrigerating circuit. The refrigerant is drawn in by the electrically driven compressor, compressed and “pumped” to a higher temperature level. The electrical power needed to run the compressor is not lost in this process. Most of it is absorbed by the refrigerant as well. Subsequently, the refrigerant is passed through the condenser where it transfers its heat energy to the heating water. Depending on the set operating point (thermostat setting), the heating water is thus heated up to a max. of 60 °C. 1) Compressor 2) Liquifier 3) Evaporator 4) Dirt trap 5) Flow rate switch 6) Connection box 7) Filter dryer ATTENTION! The cover cannot be painted. www.dimplex.de E-3 English 2 3.2 3.2 Heat Pump Controller The use of a heat pump controller from our product range is absolutely essential for water-to-water heat pump operation. The heat pump controller is a convenient electronic regulation and control device. It controls and monitors the entire heating system on the basis of the external temperature, including domestic hot water preparation and safety systems. The operating instructions included in the scope of supply of the heat pump controller describe its function and use. 5 Transport A lift truck is suited for transporting the unit on a level surface. Carrying straps may be used if the heat pump needs to be transported on an uneven surface or carried up or down stairs. These straps can be passed directly underneath the wooden pallet. Alternatively, the device may be raised using eye bolts which can be screwed into the corners of the base frame. English ATTENTION! 4 4.1 Accessories The heat pump is not secured to the wooden pallet. Control Line Two control lines are used to connect the heat pump controller to the basic control as well as the basic control to the connection box. They are available in various lengths. ATTENTION! The heat pump must not be tilted more than 45° (in any direction). E-4 7.3 6.1 Set-up 7 General Information Installation 7.1 The unit must be installed indoors on a level, smooth and horizontal surface. The entire base of the frame should lie directly on the floor to ensure a good soundproof seal. If this is not the case, additional sound insulation measures may be necessary. The heat pump must be installed so that maintenance work can be carried out without hindrance. This can be ensured by maintaining a clearance of approx. 1 m in front of and on each side of the heat pump. General Information The following connections need to be established on the heat pump: Flow and return flow of the well system Flow and return flow of the heating system Power supply 7.2 Heating System Connection English 6 ATTENTION! Flush the heating system prior to connecting the heat pump. P P P Before connecting the heating water system to the heat pump, the heating system must be flushed to remove any impurities, residue from sealants, etc. Any accumulation of deposits in the liquifier could cause the heat pump to completely break down. Once the heating system has been installed, it must be filled, deaerated and pressure-tested. P 6.2 Acoustic Emissions The heat pump operates silently due to efficient sound insulation. To prevent noise transmission to the foundation, a suitable, sound dampening rubber mat should be placed underneath the base frame of the heat pump. To prevent any sound from being transmitted to the heating system, we recommend connecting the heat pump to the heating system by means of hose sections. Minimum heating water flow rate The minimum heating water flow rate through the heat pump must be assured in all operating states of the heating system. This can be accomplished, for example, by installing either a manifold without differential pressure or an overflow valve. The procedure for adjusting an overflow valve is described in the Chapter Start-up. Antifreeze protection for installation locations prone to frost The antifreeze function of the heat pump controller is active whenever the controller and the heat circulating pumps are ready for operation. If the heat pump is taken out of service or in the event of a power failure, the system has to be drained. The heating circuit should be operated with a suitable antifreeze if heat pump systems are implemented in buildings where a power failure can not be detected (holiday home). 7.3 Heat Source Connection Connect the well pipes to the heat pump flow and return flow. The hydraulic plumbing diagram must be adhered to. ATTENTION! The well water must comply with the required water quality standards. www.dimplex.de E-5 7.4 7.4 Electrical Connection Power connection between the basic control and the connection box of the heat pump The connections between the terminal box in the heat pump and the basic control as well as between the well pump and the basic control must be provided by the customer. 1 The cross sections for the power cables are to be selected according to the power consumption of the heat pump (technical data) as well as according to the power consumption of the well pump installed. 5 The power cables are routed through the installed plastic pipe. Connection terminals for the compressor: 0 English 00 X1-1/2/3/PE 5 X1-4/5/6/PE Connection terminals, well pump: X1-7/8/9/PE 0 0 ( :6 :6 7! 7! ( Control connection between the basic control and the connection box of the heat pump ) ) ) ) 3 3 7 ) 0 1) Heat pump 2) Control line (accessory) 3) Heat pump controller 4) Basic control 5) Periphery 6) Control voltage L/N/PE 230 V AC 7) Load voltage 3/PE 400 V AC 8) Load voltage for the well pump, 3/PE 400 V AC All components required for the power supply of the heat pump are located in the basic control. The basic control is installed inside the house on a wall with a level surface. A heat pump controller is required for controlling these components. The individual components such as the basic control and the heat pump controller must be connected on-site (plug connector). Power feed for basic control An all-pole disconnecting device with a contact gap of at least 3 mm (e.g. utility blocking contactor or power contactor) as well as a 3-pole circuit breaker with common tripping for all external conductors must be installed in the power supply for the basic control. The required conductor cross section is to be selected according to the power consumption of the heat pump, the technical connection requirements of the relevant electrical utility company and VDE 0100 regulations. The power consumption of the heat pump is specified in the technical documentation. The connection terminals (X1-L1/L2/L3 at the circuit breakers) are designed for a max. of 16 mm2. Ensure that the supply voltage for these terminals cannot be switched off by the tariff contactor when connecting the well pump in order to enable the turn-off delay of the well pump. The integrated motor protection must be adjusted according to the data provided by the pump manufacturer. The connection terminals for the well pump infeed are X1-L11/L21/L31. Control voltage The basic control is supplied with power via the control line. A separate line to the basic control is not required. E-6 The control connection between the connection box of the heat pump and the basic control is provided by a ready-for-use control line (see price list). The control line is laid with the round 16-pole plug connector from the basic control to the connection box of the heat pump. The anti-twist mechanism of the plug connector can be located by gently pushing in the control line while at the same time carefully turning it to the left or right. The plug connector must then be interlocked until the lifting eye nut locks with the plug connector. The plug connection is established and secured by turning the lifting eye nut to the right. The two rectangular plug connectors are guided through the feed on the lower right-hand side of the basic control and are (non-interchangeably) connected with their counterparts. The control cable must be secured with the strain relief in the basic control. Slack parts of the control cable can remain in a cable duct or be looped on the wall. Connecting the heat pump controller to the basic control (with a 1.5-m control line, see price list) The round plug connectors are used to connect the control line to the basic control and the rectangular plug connectors are used to connect it to the heat pump controller. More detailed information can be found in the installation and operating instructions of the heat pump controller. ATTENTION! Observe that the rotary field rotates in a clockwise direction when connecting the mains cables. (If the rotary field is not clockwise, the heat pump will not work properly and will be very noisy). 9.3 Start-up 8.1 9 Maintenance and Cleaning General Information To ensure that start-up is performed correctly, it should only be carried out by an after-sales service technician authorised by the manufacturer. This may be a condition for extending the guarantee (see Warranty). 8.2 Preparation The following items need to be checked prior to start-up: The heat pump must be fully connected, as described in Chapter 7. The heat source system and the heating circuit must have been filled and checked. All valves that could impair proper flow in the well and heating circuits must be open. The heat pump controller must be adapted to the heating system in accordance with the controller’s operating instructions. 8.3 The heat pump is started up via the heat pump controller. ATTENTION! Start-up must be performed in accordance with the installation and operating instructions of the heat pump controller. If an overflow valve is fitted to assure the minimum heating water flow rate, the valve must be set in accordance with the requirements of the respective heating system. Incorrect adjustment can lead to faulty operation and increased energy consumption. We recommend carrying out the following procedure to correctly adjust the overflow valve: Close all of the heating circuits that may also be closed during operation (depending on the type of heat pump usage) so that the most unfavourable operating state - with respect to the water flow rate - is achieved. This normally means the heating circuits of the rooms on the south and west sides of the building. At least one heating circuit must remain open (e.g. bathroom). The overflow valve should be opened far enough to produce the maximum temperature spread between the heating flow and return flow listed in the table below for the current heat source temperature. The temperature spread should be measured as close as possible to the heat pump. The heating element of mono energy systems should be disconnected. From To Max. temperature spread between heating flow and return flow 7° C 12° C 10 K 13° C 18° C 11 K 19° C 25° C 12 K Any faults occurring during operation are displayed on the heat pump controller and can be corrected as described in the operating manual of the heat pump controller. www.dimplex.de Maintenance The heat pump is maintenance-free. To prevent faults due to sediment in the heat exchangers, care must be taken to ensure that no impurities can enter either the heat source system or the heating system. In the event that operating malfunctions due to contamination occur nevertheless, the system should be cleaned as described below. 9.2 Cleaning the Heating System The ingress of oxygen into the heating water circuit may result in the formation of oxidation products (rust), particularly if steel components are used. These products enter the heating system via the valves, the circulating pumps and/or plastic pipes. It is therefore essential - in particular with respect to the piping of underfloor heating systems - that only diffusion-proof materials are used. ATTENTION! Start-up Procedure Heat source temperature 9.1 We recommend the installation of a suitable corrosion protection system to prevent the formation of deposits (e.g. rust) in the condenser of the heat pump. Residue from lubricants and sealants may also contaminate the heating water. In the case of severe contamination leading to a reduction in the performance of the liquifier in the heat pump, the system must be cleaned by a heating technician. According to today’s state of knowledge, we recommend using a 5% phosphoric acid solution for cleaning purposes. However, if cleaning needs to be performed more frequently, a 5% formic acid solution should be used. In either case, the cleaning fluid should be at room temperature. We recommend flushing the heat exchanger in the direction opposite to the normal flow direction. To prevent acidic cleaning agents from entering the heating system circuit, we recommend connecting the flushing device directly to the flow and return flow of the liquifier of the heat pump. It is important that the system be thoroughly flushed using appropriate neutralising agents to prevent any damage from being caused by cleaning agent residue remaining in the system. Acids must be used with great care and all relevant regulations of the employers’ liability insurance associations must be adhered to. If in doubt, contact the manufacturer of the chemicals! 9.3 Cleaning the Heat Source System A dirt trap is inserted in the heat source inlet of the heat pump to protect the evaporator against the ingress of impurities. When the system is first put into operation, the filter screen of the dirt trap should be cleaned in relatively short intervals. These intervals can be prolonged once the amount of impurities decreases. E-7 English 8 9.4 9.4 Maintenance Devices with a minimum of 3kg refrigerant, or hermetically sealed devices with a minimum of 6 kg refrigerant must be leakproof tested yearly by the operator according to ES842/2006. The leak-proof testing is to be documented and archived for a minimum of 5 years. The test is to be carried out by certified personnel only according to (EG) Nr. 1516/2007. The attached table can be used as a basis for the documentation. 9.5 Water Quality Requirements English Irrespective of any legal regulations, the ground water should not contain any substances that could form deposits. Iron (< 0.2 mg/ l) and Manganese (< 0.1 mg/l) limit values must be adhered to to prevent iron ochre sedimentation from forming in the heat source system. The use of surface water or water containing salt is not permissible. Your local water utility can provide you with general information regarding the possible use of ground water. Water analyses are carried out by specially-equipped laboratories. As a rule, your heat pump system should be equipped with an intermediate circuit. Irrespective of any legal regulations, a water analysis must be carried out if a system is to be operated without an intermediate circuit to establish conclusively whether the ground water is compatible for the evaporator of a heat pump (compare table). If one characteristic is negative “-” or two characteristics are “0”, the water quality is not sufficient for the heat pump. Evaluation characteristic Ammonia NH3 <2 2 to 20 > 20 + 0 - Chloride < 300 > 300 + 0 < 10 μ S/cm 10 to 500 μ S/cm > 500 μ S/cm 0 + - < 0.2 > 0.2 + 0 <5 5 to 20 > 20 + 0 - Manganese (Mn), dissolved < 0.1 > 0.1 + 0 Nitrate (NO3), dissolved < 100 > 100 + 0 < 7.5 7.5 to 9 >9 0 + 0 <2 >2 + 0 < 0.05 > 0.05 + - >1 <1 + 0 < 70 70 to 300 > 300 0 + 0 < 0.2 > 0.2 + 0 < 70 70 to 300 > 300 + 0 - <1 + <1 1 to 5 >5 + 0 - Electrical conductivity Iron (Fe), dissolved Free (aggr.) carbonic acid PH value Oxygen Hydrogen sulphide (H2S) HCO3-/SO42Hydrogen carbonate (HCO3-) Aluminium (Al), dissolved Resistance of copper-soldered stainless steel plate heat exchangers to substances contained in the water Sulphate Normally good resistance 0 Corrosion problems can arise, particularly if several factors receive an evaluation of “0” - Should not be used [<: less than, >: greater than] E-8 0 Substances that can settle (org.) Table: + Approximate Evaluation of concentration the copper range (mg/l) Sulphite (SO3), free Chlorine gas (Cl2) 11 10 Faults / TroubleShooting 11 Decommissioning / Disposal This heat pump is a quality product and is designed for troublefree operation. In the event that a fault should occur, it will be indicated on the heat pump manager display. Simply consult the Faults and Trouble-shooting page in the operating instructions of the heat pump manager. Before removing the heat pump, disconnect it from the power source and close all valves. All environmentally-relevant requirements regarding the recovery, recycling and disposal of materials and components should be observed in accordance with the applicable standards. Particular attention should be paid to the proper disposal of refrigerants and refrigeration oils. If you cannot correct the fault yourself, please contact your aftersales service technician. English ATTENTION! Any work on the heat pump may only be performed by authorised and qualified after-sales service technicians. ATTENTION! Disconnect all electrical circuits from the power source prior to opening the device. www.dimplex.de E-9 12 12 Device Information 1 Type and order code WI 40CS 2 Design 2.1 Degree of protection according to EN 60 529 2.2 Installation Location 3 Performance data 3.1 Operating temperature limits: WI 90CS IP24 IP24 Indoors Indoors Heating water flow °C 58 ± 2 58 ± 2 Cold water (heat source) °C +7 to +25 +7 to +25 English 3.2 Temperature spread of heating waterat W10 / W35 3.3 Heat output / COP K at W7 / W55 1 at W10 / W50 at W10 / W45 at W10 / W35 1 1 1 10.8 9.9 kW / --- 2 18.1 / 3.0 40.3 / 3.2 kW / --- 3 38.6 / 3.2 80.1 / 3.2 kW / --- 2 20.6 / 3.8 45.8 / 4.0 kW / --- 3 43.0 / 4.0 88.1 / 3.8 kW / --- 2 22.0 / 4.3 21.4 / 4.2 47.8 / 4.0 46.4 / 3.9 kW / --- 3 43.7 / 4.1 42.4 / 4.0 89.6 / 4.1 86.9 / 4.0 kW / --- 2 23.4 / 5.9 22.7 / 5.7 49.8 / 5.9 48.4 / 5.7 kW / --- 3 44.4 / 5.7 43.1 / 5.5 91.2 / 5.4 dB(A) 88.5 / 5.2 3.4 Sound power level 3.5 Heating water flow with an internal pressure differential of m³/h / Pa 3.5 / 14000 7.4 / 49000 8.0 / 13000 15.2 / 48000 3.6 Cold water flow rate at an internal pressure differential of (heat source) m³/h / Pa 9.5 / 17500 9.5 / 17500 20.0 / 19000 20.0 / 19000 3.7 Refrigerant; total filling weight type / kg 3.8 Lubricant; total filling weight type / litres 4 Dimensions, connections and weight 4.1 Device dimensions without connections 4 4.2 Device connections to heating system 4.3 59 70 R407C / 6.7 R407C / 15.0 Polyolester (POE) / 3.54 Polyolester (POE) / 8.2 H x W x L mm 830 x 1480 x 890 830 x 1480 x 890 Inch G 1 1/4'' external G 2'' external Device connections to heat source Inch G 1 1/2'' external G 2'' external 4.4 Weight of the transportable unit(s) incl. packing kg 309 460 5 Electrical Connection 5.1 Nominal voltage; fuse protection 400 / 35 400 / 63 1 V/A 5.2 Nominal power consumption 5.3 Starting current with soft starter W10 W35 kW A 5.4 Nominal current W10 W35 / cos ϕ 5) A / --- 5.5 max. power consumption of compressor protection (per compressor) W 6 Complies with the European safety regulations 7 Additional model features 7.1 Water in device protected against freezing 6 7.2 Performance levels 7.3 Controller internal/external 7.78 7.84 16.89 17.02 26 60 14.1 / 0.8 30.7 / 0.8 70 70 5 5 Yes Yes 2 2 External External 1. This data indicates the size and capacity of the system. For an analysis of the economic and energy efficiency of the system, both the bivalence point and the regulation should also be taken into consideration. The specified values, e.g. W10 / W55, have the following meaning: Heat source temperature 10 °C and heating water flow temperature 55 °C. 2. Operation with 1 compressor 3. Operation with 2 compressors 4. Note that additional space is required for pipe connections, operation and maintenance. 5. See CE declaration of conformity 6. The heat circulating pump and the heat pump controller must always be ready for operation. E-10 Table des matières 1 A lire immédiatement !.................................................................................................................. F-2 1.1 1.2 1.3 1.4 2 Remarques importantes ......................................................................................................................... F-2 Utilisation conforme ................................................................................................................................ F-2 Dispositions légales et directives............................................................................................................ F-2 Utilisation de la pompe à chaleur pour économiser de l'énergie ............................................................ F-2 Utilisation de la pompe à chaleur ................................................................................................ F-3 2.1 Domaine d’utilisation............................................................................................................................... F-3 2.2 Fonctionnement ...................................................................................................................................... F-3 3 Fourniture ......................................................................................................................................F-3 4 Accessoires ...................................................................................................................................F-4 4.1 Ligne de commande ............................................................................................................................... F-4 5 Transport........................................................................................................................................ F-4 6 Installation .....................................................................................................................................F-5 6.1 Généralités ............................................................................................................................................. F-5 6.2 Emissions sonores.................................................................................................................................. F-5 7 Installation .....................................................................................................................................F-5 7.1 7.2 7.3 7.4 8 Remarques d’ordre général .................................................................................................................... F-5 Branchement côté installation de chauffage........................................................................................... F-5 Raccordement côté source de chaleur ................................................................................................... F-5 Branchements électriques ...................................................................................................................... F-6 Mise en service.............................................................................................................................. F-7 8.1 Généralités ............................................................................................................................................. F-7 8.2 Préparation ............................................................................................................................................. F-7 8.3 Procédures à suivre lors de la mise en service ...................................................................................... F-7 9 Entretien / nettoyage..................................................................................................................... F-7 9.1 9.2 9.3 9.4 9.5 Entretien ................................................................................................................................................. F-7 Nettoyage côté chauffage....................................................................................................................... F-7 Nettoyage côté source de chaleur .......................................................................................................... F-8 Entretien ................................................................................................................................................. F-8 Exigences de qualité de l’eau ................................................................................................................. F-8 10 Défaillances / recherche de pannes ............................................................................................ F-9 11 Mise hors service / mise au rebut................................................................................................ F-9 12 Informations sur les appareils ...................................................................................................F-10 Anhang / Appendix / Annexes ............................................................................................................ A-I www.dimplex.de F-1 Français 3.1 Appareil de base..................................................................................................................................... F-3 3.2 Régulateur de pompe à chaleur ............................................................................................................. F-4 1 1 A lire immédiatement ! 1.1 Remarques importantes ATTENTION ! Les travaux sur la pompe à chaleur doivent être effectués uniquement par des techniciens agréés et qualifiés. ATTENTION ! Selon la directive européenne n° 842/2006/CE, l'étanchéité du circuit réfrigérant des appareils contenant 6 kg ou plus de fluide frigorigène doit être vérifiée tous les ans. ATTENTION ! L’eau du puits doit être conforme à la qualité de l’eau exigée. ATTENTION ! Français Ne pas peindre le capot de recouvrement. ATTENTION ! La pompe à chaleur n’est pas fixée à la palette en bois. ATTENTION ! Lors du transport, l’angle d’inclinaison de la pompe à chaleur ne doit pas dépasser 45° (dans tous les sens). ATTENTION ! Rincer l'installation de chauffage avant de brancher la pompe à chaleur. ATTENTION ! Lors du raccordement des câbles de charge, faire attention à la rotation à droite du champ (lorsque le champ magnétique est incorrect, la pompe à chaleur ne fournit aucune puissance et devient très bruyante). ATTENTION ! La mise en service doit s’effectuer conformément aux instructions de montage et d’utilisation du régulateur de pompe à chaleur. ATTENTION ! Il est recommandé de faire appel à un système approprié de protection contre la corrosion pour éviter les dépôts (rouille par ex.) dans le condensateur de la pompe à chaleur. ATTENTION ! Avant d’ouvrir l’appareil, assurez-vous que tous les circuits électriques sont bien hors tension. F-2 1.2 Utilisation conforme Cet appareil ne doit être employé que selon les conditions d'utilisation prévues par le fabricant. Toute autre utilisation est considérée comme non conforme. Les descriptions accompagnant les produits doivent également être prises en compte. Toute modification ou transformation de l'appareil est à proscrire. 1.3 Dispositions légales et directives La pompe à chaleur est conforme à toutes les prescriptions DIN/ VDE et à toutes les directives CE afférentes. Celles-ci sont énoncées dans la déclaration de conformité CE en annexe. Le branchement électrique de la pompe à chaleur doit être réalisé selon les normes VDE, EN et CEI en vigueur. D'autre part, les prescriptions de branchement des fournisseurs d'énergie doivent être respectées. La pompe à chaleur doit être intégrée à l'installation de source de chaleur et de chauffage en conformité avec les prescriptions afférentes. ATTENTION ! Les travaux sur la pompe à chaleur doivent être effectués uniquement par des techniciens agréés et qualifiés. ATTENTION ! Selon la directive européenne n° 842/2006/CE, l'étanchéité du circuit réfrigérant des appareils contenant 6 kg ou plus de fluide frigorigène doit être vérifiée tous les ans. Vous trouverez plus d'informations à ce sujet dans le chapitre Entretien / Nettoyage. 1.4 Utilisation de la pompe à chaleur pour économiser de l'énergie En utilisant cette pompe à chaleur, vous contribuez à la protection de l’environnement. Pour en obtenir un fonctionnement efficace, il est très important de dimensionner précisément l’installation de chauffage et la source de chaleur. Dans cette optique, une attention toute particulière doit être prêtée au maintien de températures de départ de l’eau aussi réduites que possible. C’est pourquoi, tous les consommateurs de chaleur reliés à l’installation doivent être dimensionnés pour des températures de départ basses. 1 K de température d’eau de chauffage supplémentaire entraîne une augmentation de la consommation d’électricité de 2,5 % environ. Un chauffage basse température avec des températures de départ entre 30 °C et 50 °C s’accorde bien avec un fonctionnement économique en énergie. 3.1 2 Utilisation de la pompe à chaleur 2.1 Domaine d’utilisation La pompe à chaleur eau/eau est prévue exclusivement pour le réchauffement de l'eau de chauffage. Elle peut être utilisée sur des installations de chauffage existantes ou pour des installations nouvelles. L'eau sert de fuide caloporteur. Elle peut être acheminée à partir de puits ou d'installations équivalentes. ATTENTION ! L’eau du puits doit être conforme à la qualité de l’eau exigée. 2.2 Fonctionnement Une pompe de puits amène l’eau vers l’évaporateur de la pompe à chaleur dans lequel la chaleur est délivrée au fluide frigorigène du circuit réfrigérant. Le fluide frigorigène est aspiré par le compresseur à commande électrique, compressé et « pompé » à un niveau de température plus élevé. L’énergie électrique mise à disposition tout au long de ce procédé n’est pas perdue, elle est transférée au contraire en grande partie au fluide frigorigène. 1) Compresseur 2) Condenseur 3) Evaporateur 4) Collecteur d’impuretés 5) Commutateur de débit 6) Boîte de connexion 7) Sèche-filtre Français Un circuit intermédiaire doit généralement être prévu. Pour pouvoir faire fonctionner l’installation sans circuit intermédiaire, une analyse de l’eau est nécessaire, indépendamment des dispositions légales, pour établir la compatibilité de l’eau de la nappe phréatique avec l’évaporateur de la pompe à chaleur (cf. manuel de conduite de projet et d’installation, pompes à chaleur de chauffage). ATTENTION ! Ne pas peindre le capot de recouvrement. Le fluide frigorigène arrive alors dans le condenseur où il transmet à son tour son énergie thermique à l’eau de chauffage. Ainsi, l’eau de chauffage chauffe et atteint des températures pouvant aller, en fonction du point de fonctionnement, jusqu’à 60 °C. 3 3.1 Fourniture Appareil de base Il s’agit d’une pompe à chaleur à installation intérieure, prête à brancher, avec capot de recouvrement et commande de base. Le circuit réfrigérant est "hermétiquement fermé" et contient le fluide frigorigène fluoré R407C avec une valeur de PRG de 1525, répertorié dans le protocole de Kyoto. Il est sans HCFC, inoffensif pour la couche d'ozone et ininflammable. Le capot de recouvrement est revêtu d’une insonorisation. Toutes les pièces électriques nécessaires à l’utilisation de la pompe à chaleur sont montées dans la commande de base. Le raccordement au courant de charge et la ligne de commande (accessoires) entre la pompe à chaleur et la commande de base doivent être posés par le client. La pompe à eau glycolée, installée par le client, doit être raccordée à la commande de base. Contrôlez si la protection moteur installée en usine est suffisante pour la pompe montée par le client. www.dimplex.de F-3 3.2 3.2 Régulateur de pompe à chaleur Un régulateur de pompe à chaleur, voir notre gamme de produits, est obligatoirement nécessaire au fonctionnement de votre pompe à chaleur eau/eau. Le régulateur de pompe à chaleur est un appareil de régulation et de commande électronique facile à utiliser. Il commande et surveille toute l’installation de chauffage en fonction de la température extérieure, la production d‘eau chaude et les dispositifs de sécurité. Mode de fonctionnement et utilisation du régulateur de pompe à chaleur sont décrits dans les instructions d’utilisation livrées avec l’appareil. 4 Accessoires 4.1 Ligne de commande La liaison entre le régulateur de pompe à chaleur et la commande de base, ainsi que celle entre la commande de base et la boîte de connexion de la pompe à chaleur sont effectuées à l’aide de deux lignes de commande. Elles sont disponibles dans différentes longueurs. 5 Transport Français Pour un déplacement sur surface plane, un chariot élévateur suffit. Si la pompe à chaleur doit être convoyée sur une surface non plane ou dans des escaliers, il est possible de le faire à l’aide de sangles, que l'on peut glisser directement sous la palette en bois. L’appareil peut également être soulevé à l’aide de vis à œillets qu’il est possible de visser à chaque coin du châssis de base. ATTENTION ! La pompe à chaleur n’est pas fixée à la palette en bois. ATTENTION ! Lors du transport, l’angle d’inclinaison de la pompe à chaleur ne doit pas dépasser 45° (dans tous les sens). F-4 7.3 6 6.1 Installation 7 Généralités Installation 7.1 Remarques d’ordre général En règle générale, l'appareil doit être installé à l'intérieur, sur une surface plane, lisse et horizontale. Ici, le châssis de la pompe à chaleur doit adhérer au sol sur toute sa circonférence afin de garantir une isolation acoustique appropriée. Si tel n'est pas le cas, des mesures d'absorption acoustique complémentaires seront éventuellement nécessaires. Les raccordements suivants doivent être réalisés sur la pompe à chaleur : La pompe à chaleur doit être mise en place de telle manière que le service après-vente puisse y accéder sans problèmes. Ceci est garanti si on laisse un espace d’env. 1 m devant et sur les côtés de la pompe à chaleur. 7.2 circuits départ et retour de l’installation de puits circuits départ et retour du chauffage alimentation électrique Branchement côté installation de chauffage ATTENTION ! P P P Avant de procéder au raccordement de la pompe à chaleur côté eau de chauffage, l’installation de chauffage doit être rincée pour éliminer d’éventuelles impuretés et les restes de matériaux d’étanchéité ou autres. Une accumulation de dépôts divers dans le condenseur est susceptible d'entraîner une défaillance totale de la pompe à chaleur. Une fois le montage côté chauffage terminé, l’installation de chauffage devra être remplie, purgée et éprouvée à la pression. Débit minimum d'eau de chauffage 6.2 Emissions sonores En raison de son insonorisation efficace, la pompe à chaleur est très silencieuse. Pour éviter la transmission de vibrations sur les fondations, un tapis amortissant caoutchouté approprié devrait être posé sous le châssis de base de la pompe à chaleur. Pour éviter la transmission de bruits au système de chauffage, il est recommandé de raccorder la pompe à chaleur au système de chauffage à l'aide de tuyaux souples. Quel que soit l'état de fonctionnement de l'installation de chauffage, un débit d'eau de chauffage minimum doit être garanti dans la pompe à chaleur. C'est tout à fait réalisable en montant un distributeur exempt de pression différentielle ou une vanne de tropplein. Vous trouverez des explications quant au réglage d'une vanne de trop-plein dans le chapitre « Mise en service ». Protection antigel dans le cas d’une installation exposée au gel La fonction de protection antigel du régulateur est activée dès que le régulateur et les circulateurs de chauffage sont prêts à fonctionner. L’installation doit être vidangée en cas de mise hors service de la pompe à chaleur ou de panne de courant. Pour les installations de pompe à chaleur qui pourraient être victimes de pannes de courant non décelables (maison de vacances), le circuit de chauffage doit fonctionner avec une protection antigel appropriée. 7.3 Raccordement côté source de chaleur Raccorder les conduites de puits aux circuits départ et retour de la pompe à chaleur. Suivre pour cela les indications du schéma hydraulique. ATTENTION ! L’eau du puits doit être conforme à la qualité de l’eau exigée. www.dimplex.de F-5 Français Rincer l'installation de chauffage avant de brancher la pompe à chaleur. P 7.4 7.4 Branchements électriques 1 Tension de commande La commande de base est alimentée par le régulateur de pompe à chaleur via la ligne de commande. Une ligne supplémentaire dans la commande de base n’est pas nécessaire. Raccordement en puissance entre la commande de base et la boîte de connexion de la pompe à chaleur Les raccordements entre le boîtier dans la pompe à chaleur et la commande de base, ainsi que ceux entre la pompe de puits et la commande de base doivent être effectués par le client. 5 0 00 Les sections des câbles de puissance doivent être choisies conformément à la puissance absorbée par la pompe à chaleur (Données techniques) et à celle de la pompe de puits utilisée. 5 Les câbles de puissance seront tirés dans le conduit plastique. Bornes de connexion compresseur : 0 0 ( Français :6 :6 7! 7! X1-1/2/3/PE ( X1-4/5/6/PE ) ) ) ) 3 3 7 ) Bornes de connexion pompe de puits : 0 1) Pompe à chaleur 2) Ligne de commande (accessoire) 3) Régulateur de pompe à chaleur 4) Commande de base 5) Périphérie 6) Courant de commande L/N/PE 230 V AC 7) Courant de charge 3/PE 400 V AC 8) Courant de charge pompe de puits 3/PE 400 V AC Toutes les pièces nécessaires à l’alimentation en puissance de la pompe à chaleur se trouvent dans la commande de base. La commande de base est accrochée dans la maison à un mur plat. Un régulateur de pompe à chaleur est nécessaire à la commande de ces pièces. Le raccordement des composants individuels commande de base et régulateur de pompe à chaleur doit être effectué par le client (connecteur). Alimentation en puissance de la commande de base Prévoir, pour l’alimentation en puissance de la commande de base, une déconnexion de tous les pôles avec au moins 3 mm d’écartement d’ouverture de contact (par ex. sur le contacteur de coupure du fournisseur d’énergie, sur le contacteur de puissance), ainsi qu’un coupe-circuit automatique tripolaire, avec déclenchement simultané de tous les conducteurs extérieurs. La section requise du conducteur doit être déterminée en fonction de la puissance absorbée de la pompe à chaleur, des conditions techniques de branchement de la société de production et de distribution d’énergie, et selon la prescription afférente VDE 0100. Vous trouverez les données sur la puissance absorbée par la pompe à chaleur dans la documentation technique. Les bornes de connexion (X1-L1/L2/L3 aux coupe-circuits automatiques) sont dimensionnées pour une section du conducteur de 16 mm2 max. Lors du branchement de la pompe de puits, il faut s’assurer que l’alimentation en tension de ces bornes ne puisse pas être interrompue par le contacteur tarif, afin de pouvoir garantir le retard de désenclenchement de la pompe de puits. La protection moteur installée en usine doit être réglée conformément aux données du fabricant de pompe. Les bornes de connexion pour alimenter la pompe de puits sont X1-L11/L21/L31. F-6 X1-7/8/9/PE Liaison de commande entre la commande de base et la boîte de connexion de la pompe à chaleur La liaison de commande entre la boîte de connexion de la pompe à chaleur et la commande de base est effectuée via la ligne de commande préconfectionnée (voir la liste de prix). La ligne de commande est posée à l’aide du connecteur rond à 16 pôles entre la commande de base et la boîte de connexion de la pompe à chaleur. Le blocage par rotation du connecteur est recherché en appuyant légèrement et en tournant avec précaution vers la droite ou vers la gauche. Enficher ensuite le connecteur de telle sorte que l’écrou cylindrique le saisisse. En tournant l’écrou cylindrique vers la droite, la connexion est alors réalisée et assurée. Les deux connecteurs rectangulaires sont introduits via le passe-câble dans la partie inférieure droite de la commande de base et enfichés dans les éléments complémentaires (faciles à reconnaître). Le câble de commande doit être sécurisé à l’aide du collier de fixation dans la commande de base. Si éventuellement le câble de commande est trop long, le surplus peut être passé simplement dans un canal de câble ou enroulé et accroché au mur. Connexion du régulateur de pompe à chaleur à la commande de base (avec ligne de commande d’1,5 m, voir la liste de prix) La ligne de commande est reliée à la commande de base à l’aide d’un connecteur rond, et au régulateur de pompe à chaleur à l’aide des deux connecteurs rectangulaires. Des consignes plus précises se trouvent dans les instructions de montage et d'utilisation du régulateur de pompe à chaleur ATTENTION ! Lors du raccordement des câbles de charge, faire attention à la rotation à droite du champ (lorsque le champ magnétique est incorrect, la pompe à chaleur ne fournit aucune puissance et devient très bruyante). 9.2 Mise en service 8.1 Généralités Pour garantir une mise en service en règle, cette dernière doit être effectuée par un service après-vente agréé par le constructeur. Ceci permet de prolonger la garantie sous certaines conditions. 8.2 tous les raccordements de la pompe à chaleur doivent être réalisés comme décrit au chapitre 7. l'installation de source de chaleur et le circuit de chauffage doivent être remplis et testés. dans les circuits de chauffage et de puits, toutes les vannes susceptibles de perturber l'écoulement doivent être ouvertes. le régulateur de la pompe à chaleur doit être accordé à l'installation de chauffage conformément à ses instructions de service. Procédures à suivre lors de la mise en service La mise en service de la pompe à chaleur s’effectue via le régulateur de pompe à chaleur. ATTENTION ! La mise en service doit s’effectuer conformément aux instructions de montage et d’utilisation du régulateur de pompe à chaleur. Si le débit minimal en eau de chauffage est assuré par une vanne de trop-plein, il faut adapter cette vanne à l'installation de chauffage. Un mauvais réglage pourra conduire à divers types d'erreur et à une augmentation du besoin en énergie électrique. Pour régler la vanne de trop-plein correctement, nous vous conseillons de procéder de la manière suivante. Coupez tous les circuits de chauffage pouvant, selon l’utilisation qui en est faite, être également fermés en phase de fonctionnement afin d’obtenir le débit le plus défavorable. En règle général, ce sont les circuits de chauffage des locaux donnant sur le côté sud et ouest. Au moins un des circuits de chauffage doit rester ouvert (par ex. salle de bains). La vanne de trop-plein est à ouvrir au maximum de telle sorte que, pour la température actuelle des sources d’énergie, l'écart maximal de température, indiqué dans le tableau suivant, entre circuits départ et retour du chauffage, soit obtenu. Il faut mesurer l'écart de température le plus proche possible de la pompe à chaleur. Sur les installations mono-énergétiques, la cartouche chauffante doit être désactivée. Température sources de chaleur de à Ecart de température max. entre circuits départ et retour du chauffage 7° C 12° C 10 K 13° C 18° C 11 K 19° C 25° C 12 K www.dimplex.de 9 Entretien / nettoyage 9.1 Préparation Avant la mise en service, il est impératif de procéder aux vérifications suivantes : 8.3 Les anomalies qui se produisent lors du fonctionnement sont également affichées sur le régulateur de PAC et peuvent être éliminées suivant les indications du manuel de service du régulateur. Entretien La pompe à chaleur travaille sans interventions en maintenance. Pour éviter des dysfonctionnements dus à des dépôts dans les échangeurs thermiques de la pompe à chaleur, il faut veiller à ce qu'aucune sorte d’impureté ne s'introduise dans les installations de source de chaleur et de chauffage. Si des dysfonctionnements dus à des impuretés devaient quand même se produire, l’installation devra être nettoyée comme indiqué ci-après. 9.2 Nettoyage côté chauffage L’oxygène est susceptible d’entraîner la formation de produits d’oxydation (rouille) dans l’eau de chauffage, notamment lorsque des composants en acier sont utilisés. Ces produits d’oxydation gagnent le système de chauffage par les vannes, les circulateurs ou les tuyaux en matière plastique. C’est pourquoi il faut veiller à ce que l’installation reste étanche à la diffusion, notamment en ce qui concerne les tuyaux du chauffage au sol. ATTENTION ! Il est recommandé de faire appel à un système approprié de protection contre la corrosion pour éviter les dépôts (rouille par ex.) dans le condensateur de la pompe à chaleur. L’eau de chauffage peut également être souillée par des résidus de produits de lubrification et d’étanchéification. Si, en raison d’impuretés, la puissance du condenseur de la pompe à chaleur se trouve réduite, l’installation devra être nettoyée par un chauffagiste. Dans l'état actuel des connaissances, nous conseillons de procéder au nettoyage avec de l’acide phosphorique à 5 % ou, si le nettoyage doit avoir lieu plus souvent, avec de l’acide formique à 5 %. Dans les deux cas, le liquide de nettoyage doit être à la température ambiante. Il est recommandé de nettoyer l'échangeur de chaleur dans le sens contraire au sens normal du débit. Pour éviter l’infiltration de nettoyant contenant de l’acide dans le circuit de l’installation de chauffage, nous vous recommandons de raccorder l’appareil de nettoyage directement sur le départ et le retour du condenseur de la pompe à chaleur. Il faut ensuite soigneusement rincer les tuyauteries à l’aide de produits neutralisants adéquats afin d’éviter tous dommages provoqués par d’éventuels restes de détergents dans le système. Les acides doivent être utilisés avec précaution et les prescriptions des caisses de prévoyance des accidents doivent être respectées. En cas de doute, il convient de prendre contact avec les fabricants des détergents ! F-7 Français 8 9.3 9.3 Nettoyage côté source de chaleur Sur la pompe à chaleur, un collecteur d’impuretés est monté dans l’ouverture d’admission de la source de chaleur afin de protéger l’évaporateur des impuretés. Il est recommandé au début de nettoyer le tamis du filtre du collecteur d’impuretés à des intervalles relativement courts. Dès que la quantité d’impuretés diminue, augmenter l’intervalle de temps entre deux nettoyages en conséquence. 9.4 Entretien Selon la directive européenne n° 842/2006/CE, l'utilisateur doit faire vérifier l'étanchéité de tous les circuits réfrigérants contenant une quantité de fluide frigorigène d'au moins 3 kg (pour les circuits réfrigérants "hermétiquement fermés" la quantité est d'au moins 6 kg) au moins une fois par an . Français L'utilisateur doit pouvoir fournir la preuve que l'étanchéité a été vérifiée et conserver cette preuve pendant au moins 5 ans. Selon la directive européenne n° 1516/2007/CE, ce contrôle doit être effectué par du personnel qualifié. Vous pouvez utiliser le tableau annexe pour votre dossier. 9.5 Exigences de qualité de l’eau Indépendamment des dispositions légales, l’eau de la nappe phréatique ne doit contenir aucune substance susceptible de se déposer et les valeurs limites de FER (< 0,2 mg/l) et MANGANESE (< 0,1 mg/l) doivent être respectées pour éviter un dépôt d’ocre dans l’installation. L’utilisation d’eau de surface ou d’eaux chargées de sel n’est pas autorisée. Vous pouvez vous adresser aux entreprises locales d’approvisionnement en eau pour obtenir des premiers renseignements sur une exploitation éventuelle de l’eau de la nappe phréatique. Les analyses d’eau sont effectuées par des laboratoires spécialisés dans les techniques de l’eau. Un circuit intermédiaire doit généralement être prévu. Pour pouvoir faire fonctionner l’installation sans circuit intermédiaire, une analyse de l’eau est nécessaire, indépendamment des dispositions légales, pour établir la compatibilité de l’eau de la nappe phréatique avec l’évaporateur de la pompe à chaleur (cf. tableau). Si un critère est négatif «-» ou deux critères sont «0», la qualité de l'eau ne convient pas à l'utilisation dans la pompe à chaleur. Tableau Résistance des échangeurs thermiques à plaques en inox brasés au cuivre aux substances contenues dans l’eau + Résistance normalement bonne ; 0 Des problèmes de corrosion peuvent apparaître, en particulier lorsque plusieurs facteurs portent la mention 0 ; - Utilisation déconseillée [< : inférieur à, > : supérieur à] Critère d'appréciation Matières susceptibles de dépôt (org.) Appréciation cuivre 0 <2 entre 2 et 20 > 20 + 0 - < 300 > 300 + 0 < 10 μ S/cm 10 à 500 μ S/cm > 500 μ S/cm 0 + - < 0,2 > 0,2 + 0 <5 entre 5 et 20 > 20 + 0 - MANGANESE (Mn) dissous < 0,1 > 0,1 + 0 NITRATE (NO3) dissous < 100 > 100 + 0 < 7,5 entre 7,5 et 9 >9 0 + 0 <2 >2 + 0 < 0,05 > 0,05 + - >1 <1 + 0 < 70 entre 70 et 300 > 300 0 + 0 < 0,2 > 0,2 + 0 < 70 entre 70 et 300 > 300 + 0 - <1 + <1 entre 1 et 5 >5 + 0 - Ammoniac NH3 Chlorure Conductibilité électrique FER (Fe) dissous Dioxyde de carbone libre (agressif) pH Oxygène Acide sulfhydrique (H2S) HCO3-/SO42Carbonate d'hydrogène (HCO3-) Aluminium (Al) dissous SULFATES SULFITE (SO3) libre Chlore (CI2) F-8 Plage approx. de concentrations (mg/l) 11 10 Défaillances / recherche de pannes Cette pompe à chaleur est un produit de qualité et elle devrait fonctionner sans dysfonctionnements. Si un dysfonctionnement devait quand même survenir, celui-ci sera affiché sur l’écran du gestionnaire de pompe à chaleur. Référez-vous pour cela à la page Dysfonctionnements et recherche de pannes dans les instructions d’utilisation du gestionnaire de pompe à chaleur. Si vous n'êtes pas en mesure de remédier vous-même au dysfonctionnement, veuillez vous adresser au service après-vente compétent. ATTENTION ! Les travaux sur la pompe à chaleur doivent être effectués uniquement par des techniciens agréés et qualifiés. Français ATTENTION ! Avant d’ouvrir l’appareil, assurez-vous que tous les circuits électriques sont bien hors tension. 11 Mise hors service / mise au rebut Avant de démonter la pompe à chaleur, il faut mettre la machine hors tension et fermer toutes les vannes. Il faut se conformer aux exigences relatives à l'environnement quant à la récupération, la réutilisation et l’élimination de consommables et de composants en accord avec les normes en vigueur. Une attention toute particulière doit être prêtée à l’évacuation du liquide frigorigène et de l’huile de la machine frigorifique, qui doit s’effectuer selon les règles de l’art. www.dimplex.de F-9 12 12 Informations sur les appareils 1 Désignation technique et commerciale 2 Forme 2.1 Degré de protection selon EN 60 529 2.2 Emplacement 3 Indications de puissance 3.1 Température - limites d’exploitation : WI 40CS WI 90CS IP 24 IP 24 intérieur intérieur Départ eau de chauffage °C 58 ± 2 58 ± 2 Eau froide (source de chaleur) °C entre +7 et +25 entre +7 et +25 3.2 Plage de températures eau de chauffagepour W10 / W35 K 3.3 Capacité thermique / coef. de puissancepour W7 / W55 1 kW / --- 2 18,1 / 3,0 40,3 / 3,2 kW / --- 3 38,6 / 3,2 80,1 / 3,2 kW / --- 2 20,6 / 3,8 45,8 / 4,0 kW / --- 3 43,0 / 4,0 88,1 / 3,8 kW / --- 2 22,0 / 4,3 21,4 / 4,2 47,8 / 4,0 46,4 / 3,9 kW / --- 3 43,7 / 4,1 42,4 / 4,0 89,6 / 4,1 86,9 / 4,0 kW / --- 2 23,4 / 5,9 22,7 / 5,7 49,8 / 5,9 48,4 / 5,7 kW / --- 3 44,4 / 5,7 43,1 / 5,5 91,2 / 5,4 pour W10 / W50 Français pour W10 / W40 pour W10 / W35 3.4 1 1 1 Niveau de puissance sonore dB(A) 10,8 9,9 88,5 / 5,2 59 70 3.5 Débit d’eau de chauffage avec pression diff. int. m³/h / Pa 3,5 / 14000 7,4 / 49000 8,0 / 13000 15,2 / 48000 3.6 Débit d’eau froide en cas de différence de pression interne (source de chaleur) m³/h / Pa 9,5 / 17500 9,5 / 17500 20,0 / 19000 20,0 / 19000 3.7 Fluide frigorigène ; poids au remplissage total type / kg 3.8 Lubrifiant - poids total au remplissage type / litres 4 Dimensions, raccordements et poids 4.1 Dimensions de l’appareil sans raccordements 4 4.2 Raccordements de l’appareil pour le chauffage 4.3 Raccordements de l’appareil pour la source de chaleur pouce 4.4 Poids de/des unités de transport, emballage compris kg 5 Branchements électriques 5.1 Tension nominale ; protection par fusibles 1 W10 W35 R407C / 6,7 R407C / 15,0 Polyolester (POE) / 3,54 Polyolester (POE) / 8,2 H x l x L mm 830 x 1480 x 890 830 x 1480 x 890 pouce G 1 1/4'' extérieur G 2'' extérieur G 1 1/2'' extérieur G 2'' extérieur 309 460 400 / 35 400 / 63 V/A 5.2 Consommation nominale 5.3 Courant de démarrage avec démarreur progressif A kW 5.4 Courant nominal W10 W35 / cos ϕ 5) A / --- 5.5 Puissance max. absorbée protection compresseur (par compresseur) W 6 Conforme aux dispositions de sécurité européennes 7 Autres caractéristiques techniques 7.1 Eau de chauffage dans l’appareil protégée du gel 6 7.2 Niveaux de puissance 7.3 Régulateur interne / externe 7,78 7,84 16,89 17,02 26 60 14,1 / 0,8 30,7 / 0,8 70 70 5 5 oui oui 2 2 externe externe 1. Ces indications caractérisent la taille et le rendement de l’installation. Le point de bivalence et la régulation sont à prendre en compte pour des considérations économiques et énergétiques. Ici, W10 / W55 signifie par ex. : température source de chaleur 10 °C et température départ eau de chauffage 55 °C. 2. Fonctionnement avec 1 compresseur 3. Fonctionnement avec 2 compresseurs 4. Tenir compte de la place nécessaire plus importante pour le raccordement des tuyaux, la commande et l’entretien. 5. Voir déclaration de conformité CE 6. Le circulateur de chauffage et le régulateur de la pompe à chaleur doivent toujours être prêts à fonctionner. F-10 Anhang / Appendix / Annexes 1 Maßbilder / Dimension Drawings / Schémas cotés................................................................... A-II 1.1 Maßbild / Dimension Drawing / Schéma coté WI 40CS ......................................................................... A-II 1.2 Maßbild / Dimension Drawing / Schéma coté WI 90CS ........................................................................ A-III 2 Diagramme / Diagrams / Diagrammes ....................................................................................... A-IV 2.1 Leistungskurven WI 40CS · 2 Verdichter / Output Curves WI 40CS · 2 Compressors / Courbes de puissance WI 40CS · 2 compresseurs...................................................................................................A-IV 2.2 Leistungskurven WI 40CS · 1 Verdichter / Output Curves WI 40CS · 1 Compressor / Courbes de puissance WI 40CS · 1 compresseur .....................................................................................................A-V 2.3 Druckverluste / Pressure Drops / Pertes de pression WI 40CS ............................................................A-VI 2.4 Leistungskurven WI 90CS · 2 Verdichter / Output Curves WI 90CS · 2 Compressor / Courbes de puissance WI 90CS · 2 compresseurs..................................................................................................A-VII 2.5 Leistungskurven WI 90CS · 1 Verdichter / Output Curves WI 90CS · 1 Compressor / Courbes de puissance WI 90CS · 1 compresseur ..................................................................................................A-VIII 2.6 Druckverluste / Pressure Drops / Pertes de pression WI 90CS ............................................................A-IX Stromlaufpläne / Circuit Diagrams / Schémas électriques....................................................... A-X 3.1 3.2 3.3 3.4 3.5 3.6 3.7 3.8 3.9 3.10 4 externe Basissteuerung / External Basic Control / Commande de base externe WI 40CS....................A-X Last / Load / Charge WI 40CS...............................................................................................................A-XI intern. Anschlusskasten / Internal Connection Box / Boîte de connexion interne WI 40CS .................A-XII Klemmenanschlussplan mit Wärmepumpenregler / Terminal Connection Plan with Heat Pump Controller / Schéma de connexion des bornes avec régulateur de pompe à chaleur WI 40CS ............................A-XIII Legende / Legend / Légende WI 40CS .............................................................................................. A-XIV externe Basissteuerung / External Basic Control / Commande de base externe WI 90CS................. A-XV Last / Load / Charge WI 90CS............................................................................................................ A-XVI intern. Anschlusskasten / Internal Connection Box / Boîte de connexion interne WI 90CS .............. A-XVII Klemmenanschlussplan mit Wärmepumpenregler / Terminal Connection Plan with Heat Pump Controller / Schéma de connexion des bornes avec régulateur de pompe à chaleur WI 90CS ......................... A-XVIII Legende / Legend / Légende WI 90CS .............................................................................................. A-XIX Hydraulisches Prinzipschema / Hydraulic Plumbing Diagram / Schéma hydraulique ........A-XX 4.1 Darstellung / Schematic View / Représentation................................................................................... A-XX 4.2 Legende / Legend / Légende.............................................................................................................. A-XXI 5 Konformitätserklärung / Declaration of Conformity / Déclaration de conformité ..............A-XXII 6 Wartungsarbeiten / Maintenance work / Opérations de maintenance................................A-XXIII www.dimplex.de A-I Anhang · Appendix · Annexes 3 A-II :lUPHTXHOOH(LQWULWW +HDWVRXUFHLQOHW (QWUpHVRXUFHGHFKDOHXU +HL]ZDVVHU(LQWULWW +HDWLQJZDWHULQOHW (QWUpHG HDXGHFKDXIIDJH ³,QQHQ$XHQJHZLQGH ³,QQHQ$XHQJHZLQGH ³LQWHUQDOH[WHUQDOWKUHDG ³LQWHUQDOH[WHUQDOWKUHDG )LOHWDJHLQWpULHXUH[WpULHXU³ )LOHWDJHLQWpULHXUH[WpULHXU³ +HL]XQJVVHLWLJH$QVFKOVVH :lUPHTXHOOHQVHLWLJH$QVFKOVVH &RQQHFWLRQVRQWKHKHDWLQJVLGH &RQQHFWLRQVRQWKHKHDWVRXUFHVLGH 5DFFRUGVF{WpFKDXIIDJH 5DFFRUGVF{WpVRXUFHGHFKDOHXU 'UHKYHUVFKOXVV 7XUQORFNIDVWHQHU )HUPHWXUHURWDWLYH 1.1 :lUPHTXHOOH$XVWULWW +HDWVRXUFHRXWOHW 6RUWLHVRXUFHGHFKDOHXU =XIKUXQJ6WHXHUOHLWXQJ/DVWNDEHO 6XSSO\FRQWUROOLQHORDGOLQH (QWUpHOLJQHGHFRPPDQGHFkEOHGHFKDUJH Anhang · Appendix · Annexes +HL]ZDVVHU$XVWULWW +HDWLQJZDWHURXWOHW 6RUWLHG HDXGHFKDXIIDJH 1 1 Maßbilder / Dimension Drawings / Schémas cotés Maßbild / Dimension Drawing / Schéma coté WI 40CS www.dimplex.de 'UHKYHUVFKOXVV 7XUQORFNIDVWHQHU )HUPHWXUHURWDWLYH Anhang · Appendix · Annexes 5DFFRUGVF{WpFKDXIIDJHHWF{WpVRXUFHGHFKDOHXU )LOHWDJHH[WpULHXU &RQQHFWLRQVRQWKHKHDWLQJDQGKHDWVRXUFHVLGH H[WHUQDOWKUHDG +HL]XQJVVHLWLJHXQGZlUPHTXHOOHQVHLWLJH$QVFKOVVH $XHQJHZLQGH :lUPHTXHOOH(LQWULWW +HDWVRXUFHLQOHW (QWUpHVRXUFHGHFKDOHXU +HL]ZDVVHU$XVWULWW +HDWLQJZDWHURXWOHW 6RUWLHG HDXGHFKDXIIDJH +HL]ZDVVHU(LQWULWW +HDWLQJZDWHULQOHW (QWUpHG HDXGHFKDXIIDJH 1.2 :lUPHTXHOOH$XVWULWW +HDWVRXUFHRXWOHW 6RUWLHVRXUFHGHFKDOHXU =XIKUXQJ6WHXHUOHLWXQJ/DVWNDEHO 6XSSO\FRQWUROOLQHORDGOLQH (QWUpHOLJQHGHFRPPDQGHFkEOHGHFKDUJH 1.2 Maßbild / Dimension Drawing / Schéma coté WI 90CS A-III 2 2 Diagramme / Diagrams / Diagrammes 2.1 Leistungskurven WI 40CS · 2 Verdichter / Output Curves WI 40CS · 2 Compressors / Courbes de puissance WI 40CS · 2 compresseurs +HL]OHLVWXQJLQ>N:@ +HDWLQJFDSDFLW\LQ>N:@ 3XLVVDQFHGHFKDXIIDJHHQ>N:@ :DVVHUDXVWULWWVWHPSHUDWXULQ>&@ :DWHURXWOHWWHPSHUDWXUHLQ>&@ 7HPSpUDWXUHGHVRUWLHGHO HDXHQ>&@ %HGLQJXQJHQÂ&RQGLWLRQVÂ&RQGLWLRQV Anhang · Appendix · Annexes +HL]ZDVVHUGXUFKVDW] +HDWLQJZDWHUIORZUDWH 'pELWG HDXGHFKDXIIDJHPñK .DOWZDVVHUGXUFKVDW] &ROGZDWHUWKURXJKSXW 'pELWG HDXIURLGHPñK /HLVWXQJV]DKOLP+HL]EHWULHELQFOGHUDQWHLOLJHQ3XPSHQOHLVWXQJHQ &23LQKHDWLQJRSHUDWLRQLQFOWKHSURSRUWLRQDOSXPSRXWSXWV &RHIILFLHQWGHSHUIRUPDQFHHQPRGHFKDXIIDJHSHUIRUPDQFHGHODSRPSHFRPSULVH /HLVWXQJVDXIQDKPHLQ>N:@LQFOGHUDQWHLOLJHQ3XPSHQOHLVWXQJHQ 3RZHUFRQVXPSWLRQLQ>N:@LQFOWKHSURSRUWLRQDOSXPSRXWSXWV 3XLVVDQFHDEVRUEpHHQ>N:@SHUIRUPDQFHGHODSRPSHFRPSULVH .DOWZDVVHUHLQWULWWVWHPSHUDWXULQ>&@ &ROGZDWHULQOHWWHPSHUDWXUHLQ>&@ 7HPSpUDWXUHG HQWUpH GHO HDXHQ>&@ A-IV 2.2 Leistungskurven WI 40CS · 1 Verdichter / Output Curves WI 40CS · 1 Compressor / Courbes de puissance WI 40CS · 1 compresseur +HL]OHLVWXQJLQ>N:@ +HDWLQJFDSDFLW\LQ>N:@ 3XLVVDQFHGHFKDXIIDJHHQ>N:@ :DVVHUDXVWULWWVWHPSHUDWXULQ>&@ :DWHURXWOHWWHPSHUDWXUHLQ>&@ 7HPSpUDWXUHGHVRUWLHGHO HDXHQ>&@ %HGLQJXQJHQÂ&RQGLWLRQVÂ&RQGLWLRQV +HL]ZDVVHUGXUFKVDW] +HDWLQJZDWHUIORZUDWH 'pELWG HDXGHFKDXIIDJHPñK .DOWZDVVHUGXUFKVDW] &ROGZDWHUWKURXJKSXW 'pELWG HDXIURLGHPñK Anhang · Appendix · Annexes 2.2 /HLVWXQJV]DKOLP+HL]EHWULHELQFOGHUDQWHLOLJHQ3XPSHQOHLVWXQJHQ &23LQKHDWLQJRSHUDWLRQLQFOWKHSURSRUWLRQDOSXPSRXWSXWV &RHIILFLHQWGHSHUIRUPDQFHHQPRGHFKDXIIDJHSHUIRUPDQFHGHODSRPSHFRPSULVH /HLVWXQJVDXIQDKPHLQ>N:@LQFOGHUDQWHLOLJHQ3XPSHQOHLVWXQJHQ 3RZHUFRQVXPSWLRQLQ>N:@LQFOWKHSURSRUWLRQDOSXPSRXWSXWV 3XLVVDQFHDEVRUEpHHQ>N:@SHUIRUPDQFHGHODSRPSHFRPSULVH .DOWZDVVHUHLQWULWWVWHPSHUDWXULQ>&@ &ROGZDWHULQOHWWHPSHUDWXUHLQ>&@ 7HPSpUDWXUHG HQWUpH GHO HDXHQ>&@ www.dimplex.de A-V 2.3 2.3 Druckverluste / Pressure Drops / Pertes de pression WI 40CS 'UXFNYHUOXVWLQ>3D@ 3UHVVXUHORVVLQ>3D@ 3HUWHGHSUHVVLRQHQ>3D@ 'UXFNYHUOXVWH9HUGDPSIHU :DVVHU:DVVHUEHL& 3UHVVXUHGURSVLQWKHZDWHUWRZDWHU FRPSUHVVRUDW& 3HUWHVGHSUHVVLRQGHO¶pYDSRUDWHXU GXFLUFXLWHDXHDXj& 'UXFNYHUOXVWN3DEHL .DOWZDVVHU1HQQGXUFKIOXVVPñK N3DSUHVVXUHGURSDWDQRPLQDO FROGZDWHUIORZUDWHRIPñK 3HUWHGHSUHVVLRQGHN3DSRXUXQ GpELWQRPLQDOG¶HDXIURLGHGHPñK Anhang · Appendix · Annexes .DOWZDVVHUGXUFKIOXVVLQ>PñK@ &ROGZDWHUIORZUDWHLQ>PñK@ 'pELWG HDXIURLGHHQ>PñK@ 'UXFNYHUOXVWLQ>3D@ 3UHVVXUHORVVLQ>3D@ 3HUWHGHSUHVVLRQHQ>3D@ 'UXFNYHUOXVWH9HUIOVVLJHU :DVVHU:DVVHUEHL& 3UHVVXUHGURSVLQWKHZDWHUWRZDWHU OLTXLILHUDW& 3HUWHVGHSUHVVLRQGXFRQGHQVHXU GXFLUFXLWHDXHDXj& 'UXFNYHUOXVWN3DEHL +HL]ZDVVHU1HQQGXUFKIOXPñK N3DSUHVVXUHGURSDWD QRPLQDOEULQHIORZUDWHRIPñK 3HUWHGHSUHVVLRQGHN3DSRXUXQGpELW QRPLQDOG¶HDXGHFKDXIIDJHGHPñK +HL]ZDVVHUGXUFKIOXVVLQ>PK@ +HDWLQJZDWHUIORZUDWHLQ>PK@ 'pELWG HDXGHFKDXIIDJHHQ>PK@ A-VI 2.4 2.4 Leistungskurven WI 90CS · 2 Verdichter / Output Curves WI 90CS · 2 Compressor / Courbes de puissance WI 90CS · 2 compresseurs +HL]OHLVWXQJLQ>N:@ +HDWLQJFDSDFLW\LQ>N:@ 3XLVVDQFHGHFKDXIIDJHHQ>N:@ :DVVHUDXVWULWWVWHPSHUDWXULQ>&@ :DWHURXWOHWWHPSHUDWXUHLQ>&@ 7HPSpUDWXUHGHVRUWLHGHO HDXHQ>&@ %HGLQJXQJHQÂ&RQGLWLRQVÂ&RQGLWLRQV +HL]ZDVVHUGXUFKVDW] +HDWLQJZDWHUIORZUDWH 'pELWG HDXGHFKDXIIDJHPñK .DOWZDVVHUGXUFKVDW] &ROGZDWHUWKURXJKSXW 'pELWG HDXIURLGHPñK Anhang · Appendix · Annexes /HLVWXQJV]DKOLP+HL]EHWULHELQFOGHUDQWHLOLJHQ3XPSHQOHLVWXQJHQ &23LQKHDWLQJRSHUDWLRQLQFOWKHSURSRUWLRQDOSXPSRXWSXWV &RHIILFLHQWGHSHUIRUPDQFHHQPRGHFKDXIIDJHSHUIRUPDQFHGHODSRPSHFRPSULVH /HLVWXQJVDXIQDKPHLQ>N:@LQFOGHUDQWHLOLJHQ3XPSHQOHLVWXQJHQ 3RZHUFRQVXPSWLRQLQ>N:@LQFOWKHSURSRUWLRQDOSXPSRXWSXWV 3XLVVDQFHDEVRUEpHHQ>N:@SHUIRUPDQFHGHODSRPSHFRPSULVH .DOWZDVVHUHLQWULWWVWHPSHUDWXULQ>&@ &ROGZDWHULQOHWWHPSHUDWXUHLQ>&@ 7HPSpUDWXUHG HQWUpH GHO HDXHQ>&@ www.dimplex.de A-VII 2.5 2.5 Leistungskurven WI 90CS · 1 Verdichter / Output Curves WI 90CS · 1 Compressor / Courbes de puissance WI 90CS · 1 compresseur +HL]OHLVWXQJLQ>N:@ +HDWLQJFDSDFLW\LQ>N:@ 3XLVVDQFHGHFKDXIIDJHHQ>N:@ :DVVHUDXVWULWWVWHPSHUDWXULQ>&@ :DWHURXWOHWWHPSHUDWXUHLQ>&@ 7HPSpUDWXUHGHVRUWLHGHO HDXHQ>&@ %HGLQJXQJHQÂ&RQGLWLRQVÂ&RQGLWLRQV +HL]ZDVVHUGXUFKVDW] +HDWLQJZDWHUIORZUDWH 'pELWG HDXGHFKDXIIDJHPñK .DOWZDVVHUGXUFKVDW] &ROGZDWHUWKURXJKSXW 'pELWG HDXIURLGHPñK Anhang · Appendix · Annexes /HLVWXQJV]DKOLP+HL]EHWULHELQFOGHUDQWHLOLJHQ3XPSHQOHLVWXQJHQ &23LQKHDWLQJRSHUDWLRQLQFOWKHSURSRUWLRQDOSXPSRXWSXWV &RHIILFLHQWGHSHUIRUPDQFHHQPRGHFKDXIIDJHSHUIRUPDQFHGHODSRPSHFRPSULVH /HLVWXQJVDXIQDKPHLQ>N:@LQFOGHUDQWHLOLJHQ3XPSHQOHLVWXQJHQ 3RZHUFRQVXPSWLRQLQ>N:@LQFOWKHSURSRUWLRQDOSXPSRXWSXWV 3XLVVDQFHDEVRUEpHHQ>N:@SHUIRUPDQFHGHODSRPSHFRPSULVH .DOWZDVVHUHLQWULWWVWHPSHUDWXULQ>&@ &ROGZDWHULQOHWWHPSHUDWXUHLQ>&@ 7HPSpUDWXUHG HQWUpH GHO HDXHQ>&@ A-VIII 2.6 2.6 Druckverluste / Pressure Drops / Pertes de pression WI 90CS 'UXFNYHUOXVWLQ>3D@ 3UHVVXUHORVVLQ>3D@ 3HUWHGHSUHVVLRQHQ>3D@ 'UXFNYHUOXVWH9HUGDPSIHU :DVVHU:DVVHUEHL& 3UHVVXUHGURSVLQWKHZDWHUWRZDWHU FRPSUHVVRUDW& 3HUWHVGHSUHVVLRQGHO¶pYDSRUDWHXU GXFLUFXLWHDXHDXj& 'UXFNYHUOXVWN3DEHL .DOWZDVVHU1HQQGXUFKIOXVVPñK N3DSUHVVXUHGURSDWDQRPLQDO FROGZDWHUIORZUDWHRIPñK 3HUWHGHSUHVVLRQGHN3DSRXUXQ GpELWQRPLQDOG¶HDXIURLGHGHPñK Anhang · Appendix · Annexes .DOWZDVVHUGXUFKIOXVVLQ>PñK@ &ROGZDWHUIORZUDWHLQ>PñK@ 'pELWG HDXIURLGHHQ>PñK@ 'UXFNYHUOXVWLQ>3D@ 3UHVVXUHORVVLQ>3D@ 3HUWHGHSUHVVLRQHQ>3D@ 'UXFNYHUOXVWH9HUIOVVLJHU :DVVHU:DVVHUEHL& 3UHVVXUHGURSVLQWKHZDWHUWRZDWHU OLTXLILHUDW& 3HUWHVGHSUHVVLRQGXFRQGHQVHXU GXFLUFXLWHDXHDXj& 'UXFNYHUOXVWN3DEHL +HL]ZDVVHU1HQQGXUFKIOXPñK N3DSUHVVXUHGURSDWD QRPLQDOEULQHIORZUDWHRIPñK 3HUWHGHSUHVVLRQGHN3DSRXUXQGpELW QRPLQDOG¶HDXGHFKDXIIDJHGHPñK +HL]ZDVVHUGXUFKIOXVVLQ>P K@ +HDWLQJZDWHUIORZUDWHLQ>PK@ 'pELWG HDXGHFKDXIIDJHHQ>PK@ www.dimplex.de A-IX Anhang · Appendix · Annexes A-X VDQVIRQFWLRQHQFDVGHIRQFWLRQQHPHQW DYHFUpJXODWHXUGHSRPSHjFKDOHXU QRIXQFWLRQLQ+3FRQWUROOHUPRGH 3.1 R) RKQH)XQNWLRQEHL:35%HWULHE :lUPHSXPSHQUHJOHU1 +HDWSXPSFRQWUROOHU1 5pJXODWHXUGHSRPSHjFKDOHXU1 3 3 Stromlaufpläne / Circuit Diagrams / Schémas électriques externe Basissteuerung / External Basic Control / Commande de base externe WI 40CS www.dimplex.de 1HW]Â0DLQVÂ5pVHDX (986SHUUVFKW] 8WLOLW\EORFNLQJFRQWDFWRU &RQWDFWHXUGHFRXSXUHGX IRXUQLVVHXUG pQHUJLH 1HW]Â0DLQVÂ5pVHDX Anhang · Appendix · Annexes RSWLRQDO 2SWLRQDO HQRSWLRQ %ODWWÂ6KHHWÂ)HXLOOH ;3( &¶HVWDXFOLHQWGHSUpYRLUOHVFRQGXLWHVHQFKDUJHYHUVODSRPSHjFKDOHXU 0DLQVFDEOHVIRUWKHKHDWSXPSPXVWEHSURYLGHGE\WKHFXVWRPHU /DVWOHLWXQJHQ]XU:lUPHSXPSHVLQGEDXVHLWV]XHUVWHOOHQ %ODWWÂ6KHHWÂ)HXLOOH ;3( &RPPDQGHGHEDVH&KDUJH 3.2 %DVLFFRQWURO±ORDG %DVLVVWHXHUXQJ/DVW 3.2 Last / Load / Charge WI 40CS A-XI A-XII %ODWWÂ6KHHWÂ)HXLOOH ;3( $QVFKOXVVNDVWHQ &RQQHFWLRQER[ %RvWHGHFRQQH[LRQ %ODWWÂ6KHHWÂ)HXLOOH ;3( &¶HVWDXFOLHQWGHSUpYRLUOHVFRQGXLWHVHQ FKDUJHYHUVODFRPPDQGHGHEDVH :lUPHSXPSH +HDWSXPS 3RPSHjFKDOHXU $FFHVVRLUHV/LJQHGHFRPPDQGH $FFHVVRU\&RQWURO/LQH =XEHK|U6WHXHUOHLWXQJ %ODWWXQGÂ6KHHWDQGÂ)HXLOOHHW ;; 'XUFKIOXVVVFKDOWHU )ORZUDWHVZLWFK &RPPXWDWHXUGHGpELW 3.3 0DLQVFDEOHVIRUWKHEDVLFFRQWUROPXVW EHSURYLGHGE\WKHFXVWRPHU Anhang · Appendix · Annexes /DVWOHLWXQJHQ]XU%DVLVVWHXHUXQJ VLQGEDXVHLWV]XHUVWHOOHQ 3.3 intern. Anschlusskasten / Internal Connection Box / Boîte de connexion interne WI 40CS 1HW]/DVWÂ0DLQV/RDGÂ5pVHDX&KDUJH www.dimplex.de 6WHXHUOHLWXQJÂ&RQWUROOLQHÂ /LJQHGHFRPPDQGH 6WHXHUOHLWXQJÂ&RQWUROOLQHÂ /LJQHGHFRPPDQGH &RQQHFWLRQER[IRUWKHKHDWSXPS %RvWHGHFRQQH[LRQGHODSRPSHjFKDOHXU &RQQHFWLRQER[IRUWKHKHDWSXPS %RvWHGHFRQQH[LRQGHODSRPSHjFKDOHXU Anhang · Appendix · Annexes $QVFKOXVVNDVWHQ:lUPHSXPSH $QVFKOXVVNDVWHQ:lUPHSXPSH 5pJXODWHXUGHSRPSHjFKDOHXU1 +HDWSXPSFRQWUROOHU1 :lUPHSXPSHQUHJOHU1 3.4 1HW]/DVW 0DLQV/RDG 5pVHDX&KDUJH $QVFKOXVVNDVWHQ:lUPHSXPSH &RQQHFWLRQER[IRUWKHKHDWSXPS %RvWHGHFRQQH[LRQGHODSRPSHjFKDOHXU 3.4 Klemmenanschlussplan mit Wärmepumpenregler / Terminal Connection Plan with Heat Pump Controller / Schéma de connexion des bornes avec régulateur de pompe à chaleur WI 40CS A-XIII 3.5 3.5 Legende / Legend / Légende WI 40CS Anhang · Appendix · Annexes E1 E2 Kurbelwannenheizung Verdichter 1 Kurbelwannenheizung Verdichter 2 Crankcase heater, compressor 1 Crankcase heater, compressor 2 Chauffage à carter compresseur 1 Chauffage à carter compresseur 2 F4 F5 F6 F8 F9 F10 Pressostat Hochdruck Pressostat Niederdruck Thermostat Eingefrierschutz Sicherungsautomat Verdichter 1 Sicherungsautomat Verdichter 2 Durchflussschalter High-pressure switch Low-pressure switch Flow temp. limit thermostat Circuit breaker for compressor 1 Circuit breaker for compressor 2 Flow rate switch Pressostat haute pression Pressostat basse pression Thermostat protection contre le gel Coupe-circuit automatique compresseur 1 Coupe-circuit automatique compresseur 2 Commutateur de débit K1 K3 K5 K15 K16 K17 Schütz für M1 Schütz für M3 Schütz für M11 Relais-M1 Relais-M3 Zeitrelais-Durchflussschalter Contactor for M1 Contactor for M3 Contactor for M11 Relay M1 Relay M3 Time relay, flow rate switch Contacteur pour M1 Contacteur pour M3 Contacteur pour M11 Relais-M1 Relais-M3 Relais temporisé-commutateur de débit M1 M3 M11* Verdichter 1 Verdichter 2 Primärpumpe Compressor 1 Compressor 2 Primary pump Compresseur 1 Compresseur 2 Pompe primaire N1* N7 N8 Wärmepumpenregler Sanftanlaufsteuerung für M1 Sanftanlaufsteuerung für M3 Heat pump controller Soft start control for M1 Soft start control for M3 Régulateur de pompe à chaleur Commande de démarrage progressif sur M1 Commande de démarrage progressif sur M3 Q1 Leistungs-Schutzschalter für M11 Miniature circuit breaker for M11 Disjoncteur M11 X1 X2 X4 X8 X11 X12 Klemmenleiste Netzeinspeisungen Klemmenleiste Wärmepumpe (Anschlusskasten) Steckverbinder Steuerleitung (N1) Steckverbinder Wärmepumpe (Basissteuerung) Steckverbinder Wärmepumpe (Basissteuerung) Steckverbinder Wärmepumpe (Anschlusskasten) Terminal strip for network supply Terminal strip for heat pump (connection box) Plug connector for control line (N1) Plug connector for heat pump (basic control) Plug connector for heat pump (basic control) Plug connector for heat pump (connection box) Bornier alimentation réseau Bornier pompe à chaleur (boîte de connexion) Connecteur ligne de commande (N1) Connecteur pompe à chaleur (commande de base) Connecteur pompe à chaleur (commande de base) Connecteur pompe à chaleur (boîte de connexion) * Bauteile sind extern beizustellen, bzw. als Zubehör erhältlich Components must be supplied by the customer or are available as accessories Pièces à fournir par le client (disponibles comme accessoires) A-XIV www.dimplex.de Anhang · Appendix · Annexes VDQVIRQFWLRQHQFDVGHIRQFWLRQQHPHQW DYHFUpJXODWHXUGHSRPSHjFKDOHXU QRIXQFWLRQLQ+3FRQWUROOHUPRGH 3.6 R) RKQH)XQNWLRQEHL:35%HWULHE :lUPHSXPSHQUHJOHU1 +HDWSXPSFRQWUROOHU1 5pJXODWHXUGHSRPSHjFKDOHXU1 3.6 externe Basissteuerung / External Basic Control / Commande de base externe WI 90CS A-XV A-XVI %DVLFFRQWURO±ORDG+3 (986SHUUVFKW] &RQWDFWHXUGHFRXSXUHGX IRXUQLVVHXUG pQHUJLH 8WLOLW\EORFNLQJFRQWDFWRU 3ULPlUSXPSH0DOV2SWLRQ 3ULPDU\SXPS0RSWLRQDOO\ 3RPSHSULPDLUH0HQRSWLRQ &¶HVWDXFOLHQWGHSUpYRLUOHVFRQGXLWHVHQFKDUJHYHUVODSRPSHjFKDOHXUHWODSRPSHSULPDLUH %ODWWÂ6KHHWÂ)HXLOOH ;3( 0DLQVFDEOHVIRUWKHKHDWSXPSDQGIRUWKHSULPDU\SXPSPXVWEHSURYLGHGE\WKHFXVWRPHU %ODWWÂ6KHHWÂ)HXLOOH ;3( /DVWOHLWXQJHQ]XU:lUPHSXPSHXQG]XU3ULPlUSXPSHVLQGEDXVHLWV]XHUVWHOOHQ 1HW]Â0DLQVÂ5pVHDX &RPPDQGHGHEDVH±&KDUJHSRPSHSULPDLUH %DVLFFRQWURO±ORDGSULPDU\SXPS %DVLVVWHXHUXQJ/DVW3ULPlUSXPSH 1HW]Â0DLQVÂ5pVHDX 3.7 &RPPDQGHGHEDVH±&KDUJH3$& Anhang · Appendix · Annexes %DVLVVWHXHUXQJ/DVW:3 3.7 Last / Load / Charge WI 90CS www.dimplex.de %ODWWÂ6KHHWÂ)HXLOOH ;3( $QVFKOXVVNDVWHQ &RQQHFWLRQER[ %RvWHGHFRQQH[LRQ %ODWWÂ6KHHWÂ)HXLOOH ;3( &¶HVWDXFOLHQWGHSUpYRLUOHVFRQGXLWHV HQFKDUJHYHUVODFRPPDQGHGHEDVH :lUPHSXPSH +HDWSXPS 3RPSHjFKDOHXU Anhang · Appendix · Annexes $FFHVVRLUHV/LJQHGHFRPPDQGH $FFHVVRU\&RQWURO/LQH =XEHK|U6WHXHUOHLWXQJ %ODWWXQGÂ6KHHWDQGÂ)HXLOOHHW ;; 3.8 0DLQVFDEOHVIRUWKHEDVLFFRQWURO PXVWEHSURYLGHGE\WKHFXVWRPHU /DVWOHLWXQJHQ]XU%DVLVVWHXHUXQJ VLQGEDXVHLWV]XHUVWHOOHQ 3.8 intern. Anschlusskasten / Internal Connection Box / Boîte de connexion interne WI 90CS A-XVII Anhang · Appendix · Annexes A-XVIII (LQVSHLVXQJ3ULPlUSXPSH ,QIHHG±SULPDU\SXPS $OLPHQWDWLRQ±3RPSHSULPDLUH (LQVSHLVXQJ:lUPHSXPSH ,QIHHG±KHDWSXPS $OLPHQWDWLRQ±3RPSHjFKDOHXU $QVFKOXVVSODQ%DVLVVWHXHUXQJ &LUFXLWGLDJUDP±EDVLFFRQWURO 6FKpPDpOHFWULTXH±&RPPDQGHGHEDVH $QVFKOXVVNDVWHQ:lUPHSXPSH &RQQHFWLRQER[IRUWKHKHDWSXPS %RvWHGHFRQQH[LRQGHODSRPSHjFKDOHXU 1HW]/DVW 0DLQV/RDG 5pVHDX&KDUJH 6WHXHUOHLWXQJÂ&RQWUROOLQHÂ /LJQHGHFRPPDQGH $QVFKOXVVNDVWHQ:lUPHSXPSH &RQQHFWLRQER[IRUWKHKHDWSXPS %RvWHGHFRQQH[LRQGHODSRPSHjFKDOHXU 3.9 1HW]/DVW 0DLQV/RDG 5pVHDX&KDUJH %DVLVVWHXHUXQJ %DVLFFRQWURO &RPPDQGHGHEDVH 3.9 Klemmenanschlussplan mit Wärmepumpenregler / Terminal Connection Plan with Heat Pump Controller / Schéma de connexion des bornes avec régulateur de pompe à chaleur WI 90CS 6WHXHUOHLWXQJÂ&RQWUROOLQHÂ /LJQHGHFRPPDQGH 3.10 E1 E2 Kurbelwannenheizung M1 Kurbelwannenheizung M3 Crankcase heater M1 Crankcase heater M3 Chauffage à carter M1 Chauffage à carter M3 F4 F5 F6 F10 F11 F12 F13 F14 Pressostat Hochdruck-Wächter Pressostat Niederdruck-Wächter Thermostat Eingefrierschutz Durchflussschalter Elektronischer Wicklungsschutz M3 Temperaturwächter / N7 Temperaturwächter / N8 Elektronischer Wicklungsschutz M1 Pressure switch, high-pressure monitor Pressure switch, low-pressure monitor Flow temp. limit thermostat Flow rate switch Electronic winding protection M3 Temperature monitor / N7 Temperature monitor / N8 Electronic winding protection M1 Pressostat contrôleur haute pression Pressostat contrôleur basse pression Thermostat protection contre le gel Commutateur de débit Protection électronique de l'enroulement M3 Contrôleur de température / N7 Contrôleur de température / N8 Protection électronique de l'enroulement M1 K1 K1.1 K1.2 K3 K3.1 K3.2 K5 K15 K16 KI17 Schütz M1 Anlaufschütz M1 Verzögerungsrelais K1 Schütz M3 Anlaufschütz M3 Verzögerungsrelais K3 Schütz M11 Relais-Verdichter 1 Relais-Verdichter 2 Verzögerungsrelais F10 Contactor M1 Accelerating contactor M1 Slow-acting relay K1 Contactor M3 Accelerating contactor M3 Slow-acting relay K3 Contactor M11 Relay, compressor 1 Relay, compressor 2 Slow-acting relay F10 Contacteur M1 Contacteur démarrage M1 Relais de temporisation K1 Contacteur M3 Contacteur démarrage M3 Relais de temporisation K3 Contacteur M11 Relais-compresseur 1 Relais-compresseur 2 Relais de temporisation F10 M1 M3 M11* Verdichter 1 Verdichter 2 Primärpumpe Compressor 1 Compressor 2 Primary pump Compresseur 1 Compresseur 2 Pompe primaire N1* N7 N8 Wärmepumpenregler Sanftanlaufplatine M1 Sanftanlaufplatine M3 Heat pump controller Soft starter PCB M1 Soft starter PCB M3 Régulateur de pompe à chaleur Carte de démarrage progressif M1 Carte de démarrage progressif M3 Q1 Q2 Q3 Leistungs-Schutzschalter M11 Leistungs-Schutzschalter M1 Leistungs-Schutzschalter M3 Miniature circuit breaker M11 Miniature circuit breaker M1 Miniature circuit breaker M3 Disjoncteur M11 Disjoncteur M1 Disjoncteur M3 X1 X2 X4 X8 X11 X12 Klemmenleiste Basissteuerung Klemmenleiste Wärmepumpe (Anschlusskasten) Steckverbinder Steuerleitung (N1) Steckverbinder Wärmepumpe (Basissteuerung) Steckverbinder Wärmepumpe (Basissteuerung) Steckverbinder Wärmepumpe (Anschlusskasten) Terminal strip for basic control Terminal strip for heat pump (connection box) Plug connector for control line (N1) Plug connector for heat pump (basic control) Plug connector for heat pump (basic control) Plug connector for heat pump (connection box) Bornier commande de base Bornier pompe à chaleur (boîte de connexion) Connecteur ligne de commande (N1) Connecteur pompe à chaleur (commande de base) Connecteur pompe à chaleur (commande de base) Connecteur pompe à chaleur (boîte de connexion) * Bauteile sind extern beizustellen, bzw. als Zubehör erhältlich Components must be supplied by the customer or are available as accessories Pièces à fournir par le client (disponibles comme accessoires) www.dimplex.de A-XIX Anhang · Appendix · Annexes 3.10 Legende / Legend / Légende WI 90CS 4 4 Hydraulisches Prinzipschema / Hydraulic Plumbing Diagram / Schéma hydraulique 4.1 Anhang · Appendix · Annexes A-XX Darstellung / Schematic View / Représentation 4.2 4.2 Legende / Legend / Légende Shutoff valve Robinet d’arrêt Absperrventil mit Entleerung Shutoff valve with drainage Robinet d’arrêt avec purge Überströmventil Overflow valve Vanne de trop-plein Sicherheitsventil Safety valve Vanne de sécurité Umwälzpumpe Circulating pump Circulateur Ausdehnungsgefäß Expansion vessel Vase d’expansion Raumtemperaturgesteuertes Ventil Room temperature-controlled valve Vanne commandée par température ambiante Rückschlagventil Check valve Clapet anti-retour Absperrventil mit Rückschlagventil Shutoff valve with check valve Robinet d’arrêt avec clapet anti-retour Wärmeverbraucher Heat consumer Consommateur de chaleur Schmutzfänger Dirt trap Collecteur d’impuretés Temperaturfühler Temperature sensor Sonde de température Flexibler Anschlussschlauch Flexible connection hose Tuyau de raccord flexible Wärmepumpe Heat pump Pompe à chaleur Pufferspeicher Buffer tank Réservoir tampon Wärmepumpenregler Heat pump controller Régulateur de pompe à chaleur Basissteuerung Basic control Commande de base Elektroverteilung Electrical distribution system Distributeur de courant électrique Warmwasserspeicher Hot water cylinder Réservoir d’eau chaude Fließrichtung Grundwasser Direction of flow ground water Sens du flux eau de la nappe phréatique Saugbrunnen Suction well Puits d’extraction Schluckbrunnen Absorption well Puits de remplissage M11 Brunnenumwälzpumpe Well circulating pump Circulateur de puits M13 Heizungsumwälzpumpe Heat circulating pump Circulateur de chauffage M18 Warmwasserumwälzpumpe Hot water circulating pump Circulateur d’eau chaude R1 Außenwandfühler External wall sensor Sonde de mur extérieur R2 Rücklauffühler Return flow sensor Sonde sur circuit de retour R3 Warmwasserfühler Hot water sensor Sonde sur circuit d’eau chaude KW Kaltwasser Cold water Eau froide WW Warmwasser Domestic hot water Eau chaude sanitaire www.dimplex.de Anhang · Appendix · Annexes Absperrventil A-XXI 5 5 Konformitätserklärung / Declaration of Conformity / Déclaration de conformité Anhang · Appendix · Annexes A-XXII 6 6 Wartungsarbeiten / Maintenance work / Opérations de maintenance Kältekreis: Refrigerating circuit Circuit réfrigérant Name: Name Nom __________________________________________ Anschrift: Address Adresse __________________________________________ Telefonnummer: Telephone number Numéro de téléphone __________________________________________ Kältemittelart: Refrigerant Fluide frigorigène __________________________________________ Füllmenge in kg: Total content weight in kg Quantité de remplissage en kg __________________________________________ Hermetisch geschlossen: hermetically sealed Hermétiquement fermé ja yes oui __________________________________________ nein no non Folgende Wartungsarbeiten und Dichtheitsprüfungen gemäß Verordnung (EG) Nr. 842/2006 wurden durchgeführt: The following maintenance and leak-proof tests have been carried out accordin to (EG) Nr. 842/2006: Les opérations de maintenance et les contrôles d’étanchéité suivants ont été effectués selon la directive (EG) n° 84272006: Datum Date Date www.dimplex.de entnommen / aufgefüllt extracted / completed prélevé / rempli Name der Fachfirma: Name of specialised company Nom de l’entreprise spécialisée Unterschrift des Prüfers Signature of examiner Signature de l’agent de contrôle A-XXIII Anhang · Appendix · Annexes Betreiber: Operator Opérateur 6 Anhang · Appendix · Annexes A-XXIV Anhang · Appendix · Annexes 6 www.dimplex.de A-XXV Glen Dimplex Deutschland GmbH Geschäftsbereich Dimplex Am Goldenen Feld 18 D-95326 Kulmbach Irrtümer und Änderungen vorbehalten. Subject to alterations and errors. Sous réserve d’erreurs et modifications. +49 (0) 9221 709 565 www.dimplex.de