1
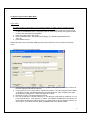
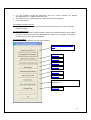
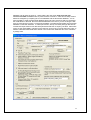
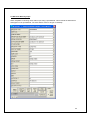
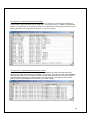
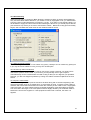
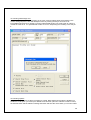
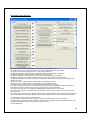
CableMatic Plus
User Guide
For Electrical Designer
June 9, 2014
1
TABLE OF CONTENTS
1.0 Abstract
2.0 Operational Overview
2.1 Catalogs and Rules
2.2 Cable Data
2.2 Raceway Matrix
2.3 Cable Routing Rules
2.4 Batch Cable Routing
2.5 Routing Individual Cables and Route Problem Diagnosis
2.6 Data Entry and Reporting Using Wintab
3.0 Project Login and The Main Menu
3.1 When making a new project
3.2 When logging in to an existing project
3.3 Deleting a Project From List
3.4 Open DB Exclusive
3.5 The Main Menu
4.0 Administrative Functions
4.1 Scope of Administrative Functions
4.2 Project Data Form and Issue
4.2.2 Making a Release and Effect on The Construction Database
4.3. Live Database and the consequences for Construction
4.4 Project Specific Pull Down Settings
4.4.1 Conductor sizes
4.4.2 Voltage Classes
4.5 Service Levels and Cable Segregation Rules
4.6 Raceway Types and Cable Segregation Rules
4.7 Cable Type Catalog Data
4.8 Raceway Catalog Data
4.9 Design Control / Revision Rules
4.10 Cable Wire Colors
5.0 Plant System Descriptions
6.0 Start-Up System Descriptions
7.0 Work Package Descriptions
8.0 Equipment Data
9.0 Electrical Raceway Input
9.1 Trays
9.1.1 From and To Points (Nodes)
9.2 Guide Conduits and Duct Bank Conduits
9.3 End Run Conduits
2
9.4 Drop- Outs
9.5 Air Ways
10.0 Cable Data
11.0 Wire Terminations
11.1 Cable Terminations and Jumpers Input Form
11.2 CableTerminations Spreadsheet
12.0 Logistical Checks
12.1 Report A1 - Missing Critical Cable Type
12.2 Report A2 - Missing or Invalid Cable Type in Cable Data
12.3 Report A3 - Missing or Invalid Routing Data in Cable Data
12.4 Report A4 - Missing or Invalid Routing Data in Raceway data
12.5 Report A5 – Raceway Connection Warnings
12.6 Report A6 – Parallel Raceways Not Size Locked
13.0 Batch Routing
14.0 Single Automatic and Manual Cable Routes
14.1 Cable Data Form
14.2 Committed Vias Tab
14.3 Design Vias Tab
14.4 Routing With Design Vias
14.5 Routing Options
15.0 Audits, Calcs and Tools
16.0 Reporting
16.1 Tray Report Request Form
16.2 Conduit Report Request Form
16.3 Cable Report Request Form
16.4 Equipment Report Request Form
16.5 Material Report Request Form
17.0 Advanced Tools
18.0 Interfaces For 3D
3
1.0 Abstract
Cable routing plus the planning/tracking of cable installations are the fundamental functions of
CableMatic Plus.
The Design Function
Using spreadsheet methods, the cable designer prepares a list of cables and includes the cable
type, origin/destination equipment and service level restrictions. The designer also is responsible
for preparing the main electrical raceway design which is input to this program using spreadsheet
methods, automated methods provided with 3D data extraction software or using TrayMatic - the
GSN 3d design tool. Initial guesses can be made to raceway sizes and CableMatic will compute
minimum sizes required using NEC rules. If raceway sizes are fixed, CableMatic will not overload
a raceway unless the designer chooses to ignore the overload. The designer is also responsible
for the transition of the cables from their respective origins and destinations to main raceway.
These transitions may be conduit end runs or drop-outs (drop-outs are not physical raceway
enclosures). If 3D functionality is implemented, CableMatic can find tentative transitions between
equipment and main raceway by determining what nearby main raceway are available which
respects each cable’s segregation requirements. Routing is either performed in batch or an
individual cable can be routed using either raceway restrictions or forcing the cable into specific
raceways. In addition to cable routing, CableMatic Plus will also record termination data. The
designer has methods of reporting that restrict the content to selected component attributes and
sorting is flexible by almost all data fields.
The Installation Planning Function
The designer will issue the CableMatic database to the installer. CableMatic will prepare and
maintain the installer’s database as new releases are made by the designer. Design control is
provided by automatic changes in revision for both cables and raceways. To facilitate in
identifying what attributes for raceway and cable are revised, the installer’s reports will highlight
the changes. The program also respects the input by the installer of Start-Up System, Work
Package and Termination data. When new input is made or changed by the installer, this data will
not be overwritten by design data. Installation status of equipment and tray may be recorded
using spreadsheet functions. Conduits and cables installation status are recorded using
installation tickets, which are prepared by the program. For the purpose of supporting installation
planning, the installer’s reports will highlight those equipment, raceways and cables that are not
installed. The installer has a very robust method of generating reports, which include the design
report methods and also can focus on start-up dates and/or the installation status of raceways
and equipment. Bills of material reports are available for tray, conduit and cable. CableMatic will
also record cable reel data to provide a method for cable inventory control.
4
2.0 Operational Overview
2.1 Catalogs and Rules
When starting a new project, use the latest CableMatic Plus database template that is provided
by the developer. After the new project is started, set up the project data as described in the
Administration Functions section of this guide.
Pay special attention to:
• Conductor Sizes
• Cable Type Catalog data
• Raceway Types Data
• Raceway Catalog Data
• Raceway Service Level Data
There are important relationships for this data that must be carefully maintained. Tray and
conduit loading and sizing depends upon accurate data entered in all of the above. The rules for
cable segregation are also contained in the above data. Be sure to run the logistic checks after
you input or change this data.
2.2 Cable Data
Crucial data for each cable are cable type, segregation code and from/to data. The cable
segregation code is a one or two character code that identifies what raceway service levels may
be used for the cable. A from or to equipment tag is limited to 24 characters. The associated
from and to data fields can be used for basically two purposes:
1) If you want to route to a raceway node (ex: a point at the end of a conduit or tray drop out),
enter the node number. Note: a node number may be anything you want and may represent
a location where several cables are routed.
2) If you are using TrayMatic and you want CM+ to find the closest tray or electrical box (JBOX
or MHOLE) to the equipment, use the AutoDoIT function (press the F5 key) which will create
a data string. This data string will instruct CM+ to find either the closest tray and or
conduit/dropout end connection (JBOX or MHOLE). The data string will also instruct CM+ to
create a conduit or dropout that can be imported by TrayMatic. Please review more about
this function in the Help menu AutoDoIT.
2.2 Raceway Matrix
A raceway type may be a ladder tray, solid bottom tray, conduit, duct bank, drop-out or air way.
Each raceway tag is limited to 15 characters and has two nodes with each node limited to 15
characters. The nodes are used to identify connections to other raceways. End run raceways
(conduits or drop-outs) may connect to a tray at an offset from a tray node. CableMatic will
maintain raceway fill for the tray recognizing that all portions of the tray may not be filled the
same. Each raceway must have a service level and raceway type. The raceway catalog number
is optional since CableMatic will automatically find the catalog item having the minimum size
required. This feature is activated when the raceway size is not locked.
When AutoDoIt raceways are created, they will be removed if they are no longer used. The
designer has the ability to remove the AutoDoIt indicator and save the raceway even if it is not in
use.
2.3 Cable Routing Rules
• Cables cannot use a raceway that has a service level that is incompatible to the cable’s
segregation code.
• Unless raceway fill checking is set to ignore or a raceway size is not locked, a cable will not
use the raceway if it will become overloaded. The rules for raceway fill checking can be
5
•
•
•
•
•
•
found in the document ‘NECRules.xls’ which will be provided by GSN Technologies, LLC
upon request.
When raceway utilization checking is in effect, a cable with a utilization code may not use a
raceway that does not match that code.
When conduit work package checking is in effect, a conduit with a work package will not be
used unless cable and conduit’s work package are the same.
When conduit work package checking is in effect, a conduit without a work package will not
be used if there is another parallel conduit with a work package that is the same as the
cable’s work package.
If a single raceway is available (direct run) that joins the from and to equipment that raceway
will be the route as a first choice.
If a cable’s from and to connect to offset raceways that connect to the same tray, then the
route will be the entry offset raceway, the connecting tray and then the to offset raceway.
CableMatic will use the first valid route that it finds regardless if other routes are shorter.
If the situation above does not occur, the program will find the route with the shortest length.
If 3D data is available, the cable route will be penalized by one foot for each bend. This
penalty does not contribute to the actual route length.
2.4 Batch Cable Routing
When CableMatic batch routes cables, the cables that are to be routed are first removed from
their currently stored raceways. Then each cable is routed and a log is presented at the end of
the run, which displays the results at any problems encountered. If your raceway system has only
one possible route for a cable you should consider locking the cable routes. Locking the routes
will make subsequent runs faster. If you change the raceway matrix that would affect current
routes, you can unlock the routes and re-route the cables.
CableMatic permits you to batch route cables using a list of cables or you can select any or all the
cable segregation codes. It is customary practice to route all power cables before routing the
control and signal cables.
2.5 Routing Individual Cables and Route Problem Diagnosis
Some cable routes may require special attention. An individual cable can be routed using a
raceway restriction list. In addition, you may input all or a portion of the cable route and
CableMatic will attempt to complete the route and fill in the missing raceways. If you suspect that
a routing problem occurs because of raceway overloads, reset the check for tray and/or conduit
raceway fill. If the route is successful, CableMatic will indicate the overload problem.
2.6 Data Entry and Reporting Using Wintab
Wintab provides spreadsheet functionality to edit data in each of the tables in the CableMatic Plus
database. In addition, a sophisticated searching function provides user friendly data searches
based upon any attributes. Copy/cut/paste functions provide the clipboard interface with Excel
and other data entry software. Tools include find/replace, prefixing, suffixing and auto numbering.
Reports can also be made to HTML web pages.
6
3.0 Project Log-In and the Main Menu
Log-In Form
3.1 When making a new project or if you need to register an exsiting project, use the program
MakeNewProject (use the button to Make or Register a Project)
1. Enter the project number and Project Name. The project number must be the same as the
number in the database name. The project name is used to help identify the project because
numbers are often difficult to remember.
2. Enter the model path for the project.
3. Enter the Employee ID. This ID is used to identify your Wintab spreadsheet file (ex:
Jerry.tbl).
4. Press Create Project.
Please read and use the document ‘Making a New Project’ which can to be viewed from the help
menu.
3.2 When logging in to an existing project:
1. Use the Project Number drop down to find the project. If the project is one of the choices, all
the other required data will be retrieved.
2. If the project is not one of the choices, register the project on your PC using the butto to Make
or Register a Project. The MakeNewProject program will launch. After completing the steps
as described in paragraph 3.1, start CM+ again to continue.
3. Next time you log in, the project will be in the list.
4. You may change the Local User Directory (or use browse). This directory should be on your
local computer drive. This directory is where your Wintab spreadsheets and reports are
saved. When dealing with multiple projects, you might want to have a separate directory for
each project. If you leave this entry blank, CableMatic will use a default location.
7
5. You may manually change the employeeId. This ID is used to identify your Wintab
spreadsheet file (ex: c:\CMP-ProjectId-Jerry.tbl).
6. The password is not required unless you require administrative privileges.
7. Press Open Project
.
3.3 Deleting a Project From List:
1. Use the program MakeNewProject to remove the project from your list. It will not actually
delete the project.
3.4 Open DB Exclusive
1. Used when a new software update requires change in the database structure, when making
an issue or performing functions that should restrict changes or use by others. This feature
permits only one user to open the database.
3.5 The Main Menu
When Open Project is pressed, the main menu appears.
When starting a new project, press this
button.
Hyper Link
Hyper Link
Hyper Link
Hyper Link
Hyper Link
Hyper Link
Please refer to CM+ BuilderGuide.pdf
paragraph 5.7.1
Hyper Link
8
4.0 Administrative Functions
4.1 Scope of Administrative Functions
The administrator is responsible for maintaining project data that includes catalogs, cable
segregation, design control rules, cable segregation rules and cable wire color data. In addition,
the administrator should be making the releases.
4.2 Project Data Form
The data on this form that requires explanation follows:
• Set the project id and project title
• Live database – if unchecked, CableMatic keeps the designer data separate from the
builders data. In order to make builders database, designer must first make an issue and
from the issue make a separate builders database. The builder has a capability to create
reports that highlite changes from the last issue. If unchecked, the CM+ database is used
by the builder with the capability to make any changes in the revisions accessible for the
builder right away. However the highlite capability between the revisions is lost. In order
to provide it the snapshot db function has been implemented.
• Additional Rt len - the value entered will be added to each cable’s route length
• Use TM
• PanelMatic – CableMatic supports a model type “PANEL”. When this setting is checked,
some common functionality of CM+ will be affected (mainly tolerance settings, but also
NEC fill calculations, bend penalty ) to adjust to the physical realities of panel design.
Also the Bundles function will be available.
• Pull Point Prefix Comma Delimited List - Nodes that begin with these prefixes will be
printed in the route. These prefixes must be two characters. The word ‘STUB’ is an
exception. If ‘STUB’ is in the list, any Nodes that have the word ‘STUB’ embedded will be
printed in the route.
• Project Units – set either to English or metric
• Max Auto Size For Conduits – when resizing conduits the entered value is used as
maximum.
• Cable Area Tolerance – used to calculate max fill reserve for conduits
• Cable Design Status Value For Cable Data Lock – cable is considered lock if the value in
Design Status field equals the entered value
• Wintab Snapshot – when checked, will perform advanced checking for overwriting data
entered by others in a multi-user environment. Data is checked at the cellular level and
unless you change data a data cell in your spreadsheet, the database data cell will not be
changed.
• Add spare jumpers to cable terminations refers to the Cable Termination and Jumper
form. We recommend that this remains unchecked.
• AutoDoIt Data – Default Conduit Type when creating AutoDoIt conduit the selected
conduit type is used.
• Import Company Catalog Data when starting a new project it is recommended to import
catalog data from a master database. This function will ask user to select a CM+
database to import data from. Then it prompts the user to “OK” every table to be
imported.
• Issue – enabled when Live Database is unchecked. It indicates the last issued database,
the date of the issue and an open current revision. The button Clear Last Released
Database causes all components to be issued as NEW
• Add QA to Pull and Term Tickets will add a form for QA sign off to these tickets.
Please refer to the guide “Making a New Project” for more details.
9
4.2.2 Making a Release and Effect on The Construction Database
This function applies only when the Live Database on the Project Data form is unchecked.
Internal releases for design usually use the letter codes A, B, C, etc. When making the first
internal release, press the command to clear the last released database and then set the current
open revision to ‘A’. Then press ‘Issue’. The issued database will have the same name as your
current database and will have the suffix ‘A’. When making the next internal issue, just press the
issue command. Cable and raceway revision letters are assigned by comparing the current
database with the last issued database. You do have the ability to reset the last issued database
but use this capability cautiously.
Releases for construction usually use the codes 0,1,2, etc. When making the first construction
release, press the command to clear the last released database and then set the current open
revision to ‘0’. Then press ‘Issue’. The issued database will have the same name as your current
10
database and will have the suffix ‘0’. When making the next issue, make sure that your
revision rules data is correct and then press the issue command. Cable and raceway revision
letters are assigned by comparing the current database with the last issued database. You do
have the ability to reset the last issued database but this should not be done without considering
the ramifications to the field. Send the released database to the field. If you are sending the first
issue, the field should not have a construction database. The field will import data form the design
database to start their database. In subsequent issues, start-up and work package data will not
override field input data but new data will replace data that was not input by the filed. Cable Wire
colors are the responsibility of design but the field may choose not to override their wire colors. In
addition cable termination data that is locked in the construction database will not be overridden
by design data.
11
4.3. Live Database and the consequences for Construction
When the Live Database is checked, Design and Construction share the Designer’s database.
Both disciplines cannot change the other’s data. The concept f Last Snap Shot database (see
above) is the same as Last Released Database. Raceways are handled the same way as before
and cables will have their revision advanced by 1 every time, a designer changes significant data.
When making a snap shot or refreshing what’s changed, a cables revision will be changed
according the option selected:
a) Use Classic Revs means that revisions are as before
b) Advance revs by 1, if changed means that the cable rev will be one more than the snap shot
database selected.
c) Do not change rev of cables means that the revision will not change (the user will be
responsible for the cable’s revision.
4.4 Project Specific Pull Down Settings
The CableMatic database table PROJECT_DATA contains pull down data to facilitate data entry
while using Wintab. An example is shown below. To customize this data:
1) Import data where DATA_TYPE=PULL DOWN VALUE
2) Save the Wintab tables (just in case you make mistakes in the process to follow)
3) Delete the records from the database (do not cut rows)
4) Make changes
5) Export to database
Note that DATA_1 contains the database table name and filed name. DATA_3 contains a pull
down value for that field.
4.4.1 Conductor sizes
Conductor sizes are a special case. DATA_3 contains the size range for the conductor size.
CableMatic only understands the size ranges below, restrict your input to these values. This data
is critical for tray sizing.
• <1/0
• 1/0-4/0
• >=1000
• 250-900
– For ">2KV POWER", width used =2 x OD x NumberOfCableJackets
• SPACED
• TRIPLEXED – For ">2KV POWER", width used =2 x OD + 2.15 x OD
• TRIPLEXED0X – For <=2KV POWER and >2KV POWER. This calc accomodates cable
types with 3-1/c and 1/c. The calculation essentially simulates a trifoil configuration where
each group of 3 cables are laid without a space.
• TOUCHING– For <=2KV POWER and >2KV POWER. This is essentially the same as a
SINGLE LAYER rule except that the pull ticket will read “TOUCHING” instead of “SINGLE
LAYER.”
• NOFILL – The cable will not cable fill to the tray.
12
•
4.4.2 Voltage Classes
Voltage Classes are restricted to: <=2KV POWER, >2KV POWER, ANY MIXTURE and CONTR/SIGNAL.
4.5 Service Levels and Cable Segregation Rules
Raceway service levels and cable segregation codes are limited to two characters. Input a
comma delimited list of cable segregation codes that may be used for each service level. When
you enter raceway data, the raceway service level must be on of the values you input to this
table. You should use this data to control what cables may use a raceway. By careful planning
of this data, you can restrict the cables by tray or by conduit. In some design situations, even
though trays may share cables of different segregation codes, conduits may have a restriction to
only one segregation code. The tray fill reserve is used for tray sizing. Enter this value in per
cent. When conduit fill restrictions limit the maximum number of conductors per conduit, enter the
13
appropriate value. You will find corresponding data in Cable Types where you will enter the
number of current carrying conductors.
4.6 Raceway Types and Cable Segregation Rules
Raceway types must begin with the words ‘COND’ or ‘TRAY SOLID’, ‘TRAY VENTED’, ‘TRAY
WIREWAY’ or ’TRAY LADDER’. Other types include ‘DROP OUT’, ‘AIR WAY’ or ‘GUIDE
CONDUIT’ which have special meaning to CableMatic. When inputting ‘TRAY something’
include the height and material eg: TRAY SOLID 6G, TRAY VENTED 4G, etc. The comma
delimited list of permissible cable segregation codes is used by CableMatic to report erroneous
use of of a raceway type. Whereas an error will not inhibit routing, this check may be important for
your project. Useable height is used for tray fill calculations.
14
4.7 Cable Type Catalog Data
Cable type data is critical of tray and conduit sizing. The cable OD is always used for tray sizing.
The override cable area is only used for conduits. Since separate ground conductors are not run
in tray but are run in conduit, you should input an override cable area when the ‘Ground
Conductor’ value is ‘Y” (meaning a separate ground is included with the cable). Please note that
number of conductors are for one cable jacket. Take care that the all conductor sizes have been
input to the pull downs in the project data table. If the number of conductors (per cable jacket) is
greater than ‘1’, CableMatic uses traysizing rules for multi-conductor cables.
The last field is “Number of Current Carrying Conductors”. This value is for the entire cable. If
you leave this value blank, CableMatic assumes the value to be the product of the Number if
Cable Jackets and Number of Conductors per Cable Jacket. This data is used to restrict cables
in conduits and is related to data that is entered in the Service Levels table. This value is used
during cable routing and when reporting conduit fill.
In addition the number of conductors plus the ‘Chart Name’ provides data for preparing
termination data.
Permissible segregation codes do not affect cable routing. However CableMatic provides a
check to identify cables that use a cable type that does not have a corresponding segregation
code.
15
4.8 Raceway Catalog Data
This data is crucial for tray and conduit sizing. The raceway catalog number is either input to each
raceway or CableMatic Plus will calculate it. CableMatic chooses the smallest size that matches
the raceway type that is input for the raceway. The description (if entered) will be reported on the
Tray and Conduit reports.
Our TrayMatic program uses this data for generating conduit cross sections. If Material is not
entered, the word following the COND in Type (Raceway Type) for the material value. The conduit
size will be taken as the first word in the Cat Nmbr field. In the event the Cat Nmbr field does not
have an embedded blank, the size will be taken from the first word in the description field.
For tray width, input both the inside and outside widths. These widths will be used by TrayMatic, If
Conduit O.D. is not input, TrayMatic will deaw conduits using the inside diameter.
16
4.9 Design Control / Revision Rules
When an issue is made that succeeds a previous issue, CableMatic compares the previous issue
with the current issue. Only the fields that are indicated in this data will be compared. If the data is
different or the component is new, the component will acquire the revision of the current open
revision. In addition, CableMatic records what fields changed for each component. These
recordings provide “user friendly option” to highlight changed data on the construction reports.
Although Work package and Start-Up System appear on Cable and Conduit reports, these
attributes should not be used to effect a revision change. The reason for this is that the field is
responsible for this data and changes made by design will not override the field’s data.
17
4.10 Cable Wire Colors
This data facilitates the data preparation for cable wire terminations. The Chart Name indicated
here is also input for each cable type. Be sure to use the SEQ NO to order the data.
To make changes when the chart name already exists:
1) Import the data for the chart
2) Save the Wintab table (in case you make errors in the following process)
3) Delete the chart data.
4) Make changes in the chart
5) Export the data to the database (insert and override or insert only)
18
5.0 Plant System Descriptions
Wintab will store descriptions for the plant systems. Plant system code is input for cables and
equipment and reports can be selected and sorted by this data.
6.0 Start-Up System Descriptions
Wintab will store descriptions for the start-up systems. Start-Up system code is input for cables
and equipment and reports can be selected and sorted by this data. Date required is input in the
format of YY-MM-DD. Once the first release database is delivered to construction, the field
should maintain start-up system data. If this is not the case, please have the field remove all
start-up system data in their corresponding table of their database.
19
7.0 Work Package Descriptions
Wintab will store descriptions for the work packages. Work package is input for cables and
conduits and reports can be selected and sorted by this data. Once the first release database is
delivered to construction, the field should maintain work package data. If this is not the case,
please have the field remove all work package data in their corresponding table of their database.
20
8.0 Equipment Data
Equipment descriptions are important data that helps in the construction activity. Data such as
Bldg, Area, Sub Area Xloc, Yloc, Zloc should probably be generated from other applications.
Xloc, Yloc and Zloc are intended to support the automated generation of conduits from equipment
to tray. The data source field can be used to record where data came from. In this example, the
data source ‘CABLE’ indicates that the equipment tags were generated from a tool within
CableMatic that created an equipment record for each cable from and to. The description was
probably inputted manually but theoretically, this description could be imported from an external
application. The ‘Is Single System’ field indicates whether a cable going to that equipment can
derive its start-up system code from the equipment. Rules on how this field is used is described
under the section Audits, Calcs and Tools. The Retrieval Code field, will be used in TrayMatic for
purposes of retrieving the location of the equipment by area, system, etc. The Box Size is used
when TrayMatic imports data from CM+ for the first time. You may enter one value to represent
all three dimensions or three values (Width, Depth and Height). Please refer to the
AutoCADBlocks.pdf for detail of how Block Name is used.
21
9.0 Electrical Raceway Input
When TrayMatic is not being used, data is input using a spreadsheet. This form lists the data entries
that appears in the spreadsheet. The same data is used for all type of raceways.
22
9.1 Trays
A tray is an electrical raceway that has at a minimum service level, raceway type, length and from
and to nodes. The From Offset field should be left blank. When the size lock is not ‘Y’ ,
CableMatic will size the tray and select the raceway catalog number according to NEC rules. The
user may change the raceway catalog number but that value should be consistent with the
raceway type. To ensure that the data is consistent, select a value using the F3 key pull down.
CableMatic can also store an accurate geometrical path of the tray. This type of data would be
imported from a 3D application. Utilization code may be used to keep cables from automatically
be assigned to the tray during automatic routing. The rule is that if a raceway has a utilization
code, then a cable using it, must have the same utilization code. From and To Location is printed
on the tray fill report. CM+ supports separators for the trays. See Using Tray Dividers or
Separators in the help menu.
9.1.1 From and To Points
The From and To points on Trays create a connectivity network between trays that enable
automatic Cable Routing. When designing trays in TrayMatic, From and To Points get entered
automatically by updating (synchronizing) CableMatic data with TM data. The format and the
naming conventions of the From/ToPoints are as follows.
The From point of a tray is on the side of a Tray that has the lower X, lower Y or lower Z location.
The To point is the other end of the tray. If a tray does not connect to another tray, the node point
will be named <tray name>:A or <tray name>:Z respectively.
Eg.: TC-001:A, TC-001:Z
If the tray connects to another tray or list of trays, the tray with the lowest name (alphabetically) will
be used as a node name, followed by “:”A” or “:Z”. That node name will be listed on the from or to
side of every tray connected.
If the project does not use TrayMatic, the user will use the ACRS_TRAY_END_CONNECTIVITY
table to enter the connecting tray ends himself . After that, run Advanced Tools->Process Tray
Connectivity List to update the From/To points.
9.2 Guide Conduits and Duct Bank Conduits
A Guide Conduit is a virtual conduit that represents a group of embedded conduits that follow the
same path. The idea is that all cables following that path can be routed (temporarily) in the Guide
Conduit without restriction to overfill or service level segregation. CM+ will report fill by the cross
sectional area of cable for each cable segregation code and therefore you can decide how many
conduits to input for each service level. When entering the Guide Conduit, use ‘00’ for the service
level and ‘GUIDE CONDUIT’ for Raceway Type. Utilization code is used for the duct bank
conduits to “force” cables into specific conduits. The rule is that if a raceway (or duct bank
conduit) has a utilization code, then a cable using it, must have the same utilization code. Data
required is the same as for trays (service level, raceway type, length and from and to nodes).
9.3 End Run Conduits
An end run conduit is an electrical raceway that has at a minimum service level, raceway type,
length and ‘From’ and a to node (should be an equipment tag). An end run conduits may leave a
tray at an offset or leave a tray or other conduit at a node. The ‘From’ may be a node or a tray.
When the ‘From’ is a tray, you must enter a ‘From Offset’. The ‘From Offset’ may have several
input options:
1) If a number is input, then that number is the length in feet from the ‘From node’ of the tray that
is in the ‘From’ field.
2) If a percentage is entered then that percentage is the portion of the length of tray in the ‘From’
field as measured from the ‘From node’.
3) To measure from the ‘To node’ of the tray in the ‘From’ field, input the node number followed
by a ‘\’ and then either a length in feet or a percentage.
When the size lock is not ‘Y’ , CableMatic will size the conduit and select the raceway catalog
number according to NEC rules. The user may change the raceway catalog number but that
23
value should be consistent with the raceway type. To ensure that the data is consistent, select a
value using the F3 key pull down.
When From and/or To Dwg Reference numbers are not entered, they will be retrieved from the
related reference drawing numbers of the connecting equipment. If no drawing is retrieved
connecting trays are used.
When From and/or To Location are not entered, the From and To Point is used if it has meaning.
For example, connecting equipment, man holes, stub ups and trays. If a conduit fitting is a
connection (JBOX), the connecting conduits would be used.
9.4 Drop-Outs
A drop-out is a raceway conveyor that is used when a cable leaves a tray and then connects an
equipment without using a conduit. It is a non physical raceway that has the same properties as
an end run conduit except that ‘size lock’ and raceway catalog number has no meaning. The
raceway type must be ‘DROP OUT’. The tag of a drop-out will appear in the route of the cable
when it is printed.
9.5 Air Ways
An air way connects two tray nodes and is used when there is a gap between trays. It is a non
physical raceway that has the same properties as a tray except that ‘size lock’ and raceway
catalog number has no meaning. The raceway type must be ‘AIR WAY’. An air way tag will not
appear in the route or the cable when it is printed on reports or pull tickets.
10.0 Cable Data
Cables have many attributes and we have to show the spreadsheet in two parts (see below).
Note that we checked the box ‘Freeze First Column’ so that we can
See the cable tag. This spread sheet also has a shorter layout with less attributes. That option is
set using the options menu on the Designer’s main menu screen.
Crucial data for each cable are cable type, segregation code and from/to data. The cable
segregation code is a one or two character code that identifies what raceway service levels may
be used for the cable. A from or to equipment tag is limited to 15 characters. This tag may also
be used as raceway node. When the tag is not a raceway node, you must use the associated
data field for the corresponding from or to. This associated data field may be a raceway node or
an “AutoDoIt” data string. The AutoDoIt data string provides the ability for automatic creation of a
conduit or drop-out from a raceway (usually a tray). The AutoDoIt field has a “wizard” that helps
prepare data. This is activated by menu or by pressing the ‘F5’ key while in the AutoDoIt field.
See the document AutoDoIt.hlp which can be viewed from the ‘Help’ menu.
Some attributes are used for retrieval and sorting and have no active functions. These are Design
Status, Design Note, Department Source and Pull Code.
Work package - cables with the same work package will be automatically routed in that raceway.
Manual selections using cable design vias are not affected.
Utilization Code – When a conduit is given a work package code, only cables with the same work
package will be automatically routed in that raceway. Manual selections using cable design vias
are not affected.
Both Rt Len and REV are protected fields that should not be changed
Rt Len – Calculated by CableMatic as the single circuit length plus an additional reserve length
that is set using the Project Data form. Rt Len Override will override this value in the cable report,
pull ticket or when cable inventory is being reported.
24
The NEC RULE OVERRIDE will override the related conductor size of the cable type to be used
for Tray fill calculations.
25
11.0 Wire Terminations
The purpose for preparing wire termination data is to offer the field a cable termination installation
ticket that records the wire connections. If this data is not prepared, the a cable termination
installation ticket can still be printed but the wire numbers and terminal numbers will be blank. At
the very least, the designer/administrator should input the Cable Wire Colors and the chart name
for each cable type.
There are two methods for preparing wire termination data. Data can be entered one cable at a
time using the Cable Terminations and Jumpers Input Form or many cables can be prepared
simultaneously using the Wintab.
Cable Terminations spreadsheet. The advantage of the spreadsheet is that data can be
prepared from other databases and/or Excel and then pasted to Wintab.
11.1 Cable Terminations and Jumpers Input Form
Press enter after you input or select the cable tag. If there is data recorded for the cable, it will
appear. If no data was saved, the wore colors from the Cable Wire Colors are displayed that
correspond to the cable type’s Chart Name The delete button will remove termination data for the
cable and Update will save whatever is shown. Reset colors is used in the event that the wire
colors are missing or have been incorrectly altered. You may edit the wire colors if required. You
should save the data if you want to print the ticket, otherwise the printed ticket will contain the
data that is stored in the database.
This example is for Style ‘B’ cable termination tickets. Style ‘A’ does not containt Cable Purpose,
From/To sections, Notes and reference drawings.
26
11.2 Cable Terminations Spreadsheet
In th example below, data was pasted from Excel, however the number/color fields were empty in
the Excel spreadsheet. When the Save Cable terminations button is pressed, any missing
number/color is retrieved from The Cable Wire Colors table and Seq No is automatically input by
CableMatic.
There are some special methods for recording JUMPERs and NOTEs. Below are instructions
which are displayed when you select the Wintab menu command - Help/For Current Table.
27
12.0 Logistical Checks
It is very important to check data before attempting to route cables. The reports in this section are
designed to identify errors, inconsistencies and missing critical data.
ggh
12.1 Report A1 - Missing Critical Cable Type
This report examines the CableType table for the following errors:
• Number of cable jackets not input
• Number of conductors not input
• Conductor Size not input or not defined in project data
• Diameter not input
• Override cable area not input And Ground Conductor=’Y’
• Permissible segregation codes not input
This data is used in connection with Report A3 (see below).
12.2 Report A2 - Missing or Invalid Cable Type in Cable Data
This report examines the Cable Data table and finds cables that do not have cable type input or if the
cable type is not input in the Cable Type table. In addition, this report, identifies cables that use cable
types which have are missing valid conductor size data. The report is used for a quick check for this
crucial data.
28
12.3 Report A3 - Missing or Invalid Routing Data in Cable Data
This report will only check cables that are routed in raceway or have a route note. The following
errors are reported:
• Cable type not input
• Segregation code not input
• From equipment not input
• To equipment not input
• Compatibility check of segregation code and cable type’s permissible segregation codes
• Connecting from raceway (which is compatible with segregation code) not found
• Connecting to raceway (which is compatible with segregation code) not found
12.4 Report A4 - Missing or Invalid Routing Data in Raceway data
• From point not input
• To point not input
• Where Offset >0, connecting tray not found
• From offset greater than tray length of connecting tray
• Where from point is a tray (or raceway), from offset is not input
• Service level not input
• Raceway type not input or not valid type
• Length not input
• Inconsistent raceway catalogue number and raceway type
29
12.5 Report A5 – Raceway Connection Warnings
This report identifies nodes that share the connections of trays (not conduits) that have different
service levels. The service level is shown after the ‘\’ next to the tray tag. In addition, it will indicate
when the node type has an inconsistent amount of connected trays. Node types are indicated in the
suffix of the node. Tray node types are E= End, T= Tee and X=Cross
12.6 Report A6 – Parallel Raceways Not Size Locked
When raceways have common from and to nodes, CableMatic will route in the first raceway (in
alphanumeric order) that will not be overloaded. If the raceway is not ‘Size Locked’, then CableMatic
assumes that it will not be overloaded. Therefore, some of the raceways will not be used if it was
preceded alphanumerically by a raceway that is not ‘Size Locked’. You might want to consider
having only the highest alphanumeric raceway as not ‘Size Locked.’
30
13.0 Batch Routing
When the main menu command for Batch Routing is selected,a variety of options will be displayed.
Only unlocked cables will be affected. If you choose to route by segregation code, you will be asked
to supply a list of codes separated by commas (eg: 1,2,2S). If you want to route specific cables, you
will be asked to supply the name of the text file containing the list and so you should prepare this file
(use extension .txt) before you choose to use the list of cables. Before the routing process actually
begins, CM+ will delete the cable routes for the cables that will be routed.
13.1 Build Fast Routing Matrix
The fast routing matrix is used to route cables very quickly. Usually it can be created very quickly but
if you only have a few cables to route, you may turn off that option.
13.2 Check Tray and/or Conduit Fill
If you have routing problems that are caused by tray and/or conduit overloads, you might want to
uncheck the option to avoid overfill. If you do this, you will probably want to get a report of
overloaded trays and/or conduits before and after routing so that you can diagnose your problems.
However, you also can diagnose problems by routing one cable at a time as explained in the next
section.
13.3 Report Locked Cables
After batch routing, CM+ will report the results of all cables along with a comment explaining if the
route has a problem such as no suitable entry or exit raceway is found. If Report Locked Cables is
checked, CM+ will list the locked cables and check the continuity of their cable routes. If segregation
codes are opted, only those cables having the inputted segregation codes are listed and checked.
The route ratio is the length of the route (without reserve length) divided by the rectilinear distance
between the from and to equipment. If the equipment locations are not stored, the value ‘0.0’
appears.
31
13.4 Resize/Set Fill for Raceway When Finished
CM+ will automatically size trays and conduits that are not ‘size locked’. In order to perform this
function quickly, CM+ resizes raceway when:
1) Requested by the user.
2) After Batch Routing (if option is checked).
3) When making a tray or conduit design report (as opted)
4) When making an issue.
Raceway fill is always maintained automatically during the routing process or when a cable is deleted.
However, there may be conditions that affect raceway fill and sizing such as:
1) Cable type is changed for cable
2) Cable diameter or area is changed for a cable type
3) A conductor size is changed for a cable type
4) Reserve fill is changed
5) A tray or conduit type is changed
6) A tray or conduit size is changed
7) Cable routes are added or deleted by some external process not controlled by CM+
Warning - If this option is not checked the % fill of trays and conduits are not recalculated for display
in the raceway data spreadsheet. You may choose to perform the Resize/Set % Fill function by
selecting the Audits, Calcs and Tools main menu command and then selecting Raceway – Regen
Fill/Resize.
32
14.0 Single Automatic and Manual Cable Routes
CM+ provides the ability to route one cable at a time so that it is easier to diagnose problems with
data. Use the Cable Data Form for this purpose. You may also use that form change cable and
equipment data.
14.1 Cable Data Form
The pull downs in the cable form work the same way as the pull downs in Wintab. For example, if
you are starting with a blank form and you select a specific cable type and then press the pull down
for cable tag, you will then be able to select a cable that use that cable type. If you don’t select a
cable and press the Search button, CM+ will retrieve all cables matching the cable type. You can then
use the left and right arrows to browse the cables. Using this form you can add a new cable, change
cable and equipment data and delete a cable.
33
14.2 Commited Vias Tab
Use this tab to review and existing cable route. In some cases you will want to change an existing
cable route using manual input of raceway tags. You can press the button Copy Committed Vias to
Design Vias and then choose the Design Vias tab. Note in the example shown, the cable enter tray
TIA110 in the middle of the tray and exits tray TIA108 10 feet after it enters that tray from tray
TAI110. CM+ maintains the tray fill at all points along the tray.
34
14.3 Design Vias Tab
Use this tab to input an entire route or partial route. Edit functions are provided using the right click of
the mouse.
Input the raceways in the order that the cable will route. If a raceway or group of raceways are not
included, CM+ will attempt to find the missing raceways. After editing the route, press Update Design
Vias and then the Route button. When using the Design Vias data you must select that option in the
routing form (see next paragraph). In general, CM+ ignore the length you input in the Design Via
data. However, if the raceway is not found, that length will be used to compute the route length.
35
14.4 Routing With Design Vias
You do not have to enter all the raceways in the route, however please enter the raceways in the
correct routing sequence. CM+ will attempt to insert any missing raceways. Errors such as
incompatible service level or raceway not found will be displayed and you will be given an option to
commit the cable as is. It is possible that if make an error in sequencing the raceways, CM+ may fix
it.
14.5 Routing Options
Here is an example where a cable rout exists for a cable. Note that the Route option is disabled. To
enable the route option you must opt for Delete Route and then press GO. When the cable is routed,
the Commit button will be enabled. Pressing that button will save the route. When you commit a cable
36
route, CM+ will offer to lock the route. The check options are self explanatory and provide for
diagnostic capability. For example, if you uncheck Tray Fill a route may be found but VM+ will indicate
what raceways rays are overloaded. Utilization and work package rule checking can also be
disabled. The Allocate Duct Bank conduits option is used when you want CM+ to route through
conduits in a Duct Bank. If this is not opted, the CM+ will route through the Duct Bank without
assigning conduits.
37
15.0 Audits, Calcs and Tools
Audits are reports (usually in spreadsheet format) that report problems such as:
A1) Creates a Tray End Connectivity List from Tray data in ACRS_RACEWAY_DATA table
A2) A cable route uses a raceway that is not in the raceway data table
A3) Cables segregation codes that are incompatible with the raceways that the cables are in
A4) Cable routes that do not link between raceways (an apparent gap)
A5) Reports all data for cable types plus includes the amt of cables using the cable type.
A6) Displays problem when cables of different start-up systems are routed in the same conduit.
A7) Reports cables that are routed in the same raceways at the start and end of the routes but diverge in the
middle of the route.
A8) Checks errors in cables routed in conduits with the wrong Work Package
A9) Checks errors in cables routed in conduits with the wrong Utilization Code
A10) Reports errors where the sum of tray separator widths exceed the tray width
A11) This function reports raceways and cables where the raceways in manual cable routes have lengths (in
Parenthesis) that are longer than the raceway length input to the raceway data table.
A12) Report optionally all or only cables with estimated length smaller than the route length.
A13) This function reports on cables that are IFC where the route is missing or where the route uses conduits
that are not IFC.
A14) This function compares IFC'd cables and conduits in the design database to the archive table and creates a
report of discrepancies in their data. Please read Discrepancy Report for IFC Components.pdf for more detail.
C1) Calculates the area of cable in Guide Conduits
C2) Lists cables contained and fill for a raceway. Fill can be obtained at any point on the raceway
C3) Resizes unlocked raceways and calculates % fill. Use this to refresh the data for spreadsheet queries. This
is handled automatically when batch routing and making an issue.
C4) Self explanatory.
38
C5) This will correct the cable route lengths that may be incorrect based upon the changes in raceway length.
This is automatic when an issue is made
C6) This function will refresh the EST_LEN field for each cable where the EST_LEN was not input by a user and
the From/To (or ASSOC Equip) locations are available. Lengths are calculated as 1.3 times the Delta XYZ length
between cable ends plus the Additional Len in Project Data.
C7) Deletes AutoDoIT unused conduits and dropouts
Tools provide functions that automate the preparation of data.
T1) Transfers equipment tags from cable from/to that are not in the equipment table.
T2) Sets start-up system for cables (which are blank) to the system of it’s connecting equipment. Please read the
rules procedure indicated below.
T3) This function is used only in PANEL model types. It calculates pull code.
T4) This function lists cables that are common pulls for the raceways that you input in the list.
Warning - cables listed in your output may be entering or exiting the tray at any point of the tray run. If
this is an issue, please use TrayMatic Cool Tools to show all the cables at the start the pull and then
selecting the cables at the end of the pull.
T5) Please refer to the CM+ BuilderGuide.pdf, paragraph 5.6.
39
16.0 Reporting
Select one of the report types and different constraints, options and sorts will be presented. The New,
Revised and Deleted reports (when checked) are provided as additional lists to the report that is
requested. The Sort by feature provides choices for each main field in the report. The default sort is
by the component tag and if that is the sort you want, the other sort choices will not be available.
When you make your selections, press ‘Create Report’ and you will be asked for a description. Enter
or select descriptions. Descriptions for each type of report are saved in the database for your
convenience. You may also delete a saved description. Reports for Cable, Trays, Conduits and
Equipment will have the option to restrict the report by a list of tags. In addition, the cable report has
the option to restrict by a list of connecting equipment tags.
16.1 Tray Report Request Form
40
16.2 Conduit Report Request Form
41
16.3 Cable Report Request Form
This cable report may be a cable schedule with the cable route or a termination report which lists the
termination details for the cable.
42
16.4 Equipment Report Request Form
43
16.5 Material Report Request Form
Cable conduit and tray bill of material reports list quantities for the cable, conduit and tray types and
sizes used. The tray material report (D43) is a basic report displaying tray length by tray type. The
Tray Len and Fittings report (D44) will offer ‘DbQuery’ type of filter and will include fittings. This report
uses data that is created by TrayMatic and this data will be created in the TrayMatic database when
required. In the event that data has changed by TrayMatic, there will be a delay before the report is
created while TrayMatic is automatically called upon to generate the data. The process of creating
data also includes creating information in the Commodity Mapping table in TrayMatic. Use TrayMatic
to add project commodity codes and revise descriptions.
44
17.0 Advanced Tools
AT1) Cable termination data can be imported from a project’s
CM+ database
AT2) Uses the RENAMING table to rename components
(trays, cables, conduits, equipment) . Please remove data
from the Renaming table after it the process is completed.
AT3) Moves the entire model to a location specified by the
user.
AT4) For each conduit or drop out that has 'CALC' in either
the LENGTH or FROM_OFFSET field, this function will
attempt to compute the value(s). You may input the tray tag
in the FROM column or enter 'CALC' to find the closest tray
(within 200FT (approx 66 Meters) with the same service level
as the conduit/drop out.
AT5) Used to create cable, equipment and raceway tables
for exporting to Excel. These spreadsheets can be sent to
contractors and clients in their required formats.
AT6) Reads the TRAY_END_CONNECTIVITY table and
based on the data sets the From/To Point for trays in the
ACRS_RACEWAY_DATA table. It checks the consistency of
the data and if errors are reported, the data will not be
committed.
AT7) Imports the Raceway Data from TM. Performs data
consistency checks and aborts when data not consistent (tray
names, service levels, etc.). When successful, assigns trays
node names.
18.0 Interfaces For 3D
TrayMatic is a GSN Technology software product that supports the design of all cable raceway in a
3D format. The benefits of using TrayMatic includes savings in time in preparing drawings and saving
in time in preparing raceway data for CableMatic.
45