1
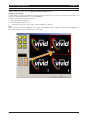
Baxall Vivid Viewer Application
User Manual
Please read this manual before using the Baxall Vivid DVR
Baxall Vivid Viewer Application
2
User Manual
User Manual
Baxall Vivid Viewer Application
CONTENTS
Starting the Viewer Application ...................................................................................................................................... 4
Setting up a new Configuration File (Site) ..................................................................................................................... 4
Toolbars ......................................................................................................................................................................... 7
Configure Toolbar ...................................................................................................................................................... 8
Main Display Toolbar ................................................................................................................................................. 9
Record and Playback Toolbar ................................................................................................................................. 10
Site Toolbar .............................................................................................................................................................. 10
Exported Data Toolbar ............................................................................................................................................. 10
Still Frame Toolbar ................................................................................................................................................... 11
Events Toolbar ......................................................................................................................................................... 13
Telemetry Functions ..................................................................................................................................................... 15
Status Bar .................................................................................................................................................................... 17
Changing Display ......................................................................................................................................................... 18
Sequences ................................................................................................................................................................... 19
Local Settings .............................................................................................................................................................. 20
Appendix A - Short-cut Keys ........................................................................................................................................ 21
Appendix B - Vivid DVR IP Addresses ......................................................................................................................... 22
Appendix C - Password Hierarchy ............................................................................................................................... 23
3
Baxall Vivid Viewer Application
User Manual
STARTING THE VIEWER APPLICATION
Launch the Vivid viewer application by selecting the Viewer icon which will be located in the VividVideoViewer folder under the
Start Menu.
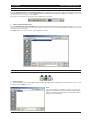
The screen shown below will be displayed.
In the System Login window, click either the User or Administration radio buttons to select how you want to log in to the viewer
application. Enter the 5-digit password and click OK.
To exit the viewer application click the Disconnect DVR button (
) on the main toolbar, and then select File > Exit.
SETTING UP A NEW CONFIGURATION FILE (SITE)
A Configuration File allows the viewer application to connect to a Vivid DVR. The configuration file stores the DVR’s IP address
and other settings pertinent to the site. Up to 50 configuration files can be set up and stored by the viewer. Configuration files
can be edited and opened as required.
To set up a new configuration file:
1.
Log in as the Administrator.
2.
Click the New Configuration File icon ( ) or click File > New Configuration.
3.
When the Password pop-up appears, enter the configuration password.
4
User Manual
Baxall Vivid Viewer Application
SETTING UP A NEW CONFIGURATION FILE (SITE)
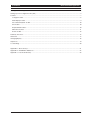
4.
When the View Configuration window opens, click the Add DVR button.
5.
In the Find Remote Unit window, enter the IP address of the Vivid DVR and click the OK button.
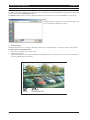
6.
Enter the details for the Vivid DVR when the Viewer Configuration window is displayed. Click Test Link. If connection is
successful, the Status icon ( ) should change to the ‘Connected’ icon ( ).
5
Baxall Vivid Viewer Application
User Manual
SETTING UP A NEW CONFIGURATION FILE (SITE)
Site Name - allows entry of a site name consisting of up to 16 alphanumeric characters.
Location - allows entry of a location consisting of up to 30 alphanumeric characters.
IP Address - displays the Vivid DVR’s IP address entered during step 5.
Cameras - allows you to select the number of cameras from a pull down list (for information purposes only)
User Passcode and Installer Passcode - If User and/or Installer passwords have been entered in these fields then the
viewer application will automatically carry out password verification according to the type of login used (User or Administration).
If no passwords have been entered, then the password validation window will be displayed for you to enter the Vivid DVR’s
password. If, when logging on to the viewer application, the password entered is a ‘User’ type password, then you will be
logged on to the Vivid DVR as a ‘user’ (rather than as an administrator).
PT sp - this field allows you to vary the telemetry response to compensate for network latency so that networks with limited
bandwidth do not have telemetry response times resulting in control overshoot. Select a value between 1 and 4.
Poll - allows automatic polling to be enabled or disabled. Ticking the box enables automatic polling for the connected Vivid
DVR.
Status - shows the status for the connected Vivid DVR.
device is connected.
indicates that the device is disconnected;
indicates that the
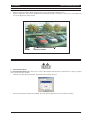
7.
If the status of the device shows ‘connected’, click the Save and Exit button in the Viewer Configuration window.
8.
The System Login window will reappear. Enter the password.
9.
Select the site from the pull-down box in the main window of the viewer application. The message ‘Connecting to DVR’ will
appear in the status bar (bottom left-hand corner of the main window).
6
User Manual
Baxall Vivid Viewer Application
TOOLBARS
The Vivid Viewer application has several toolbars. The main toolbar, located by default across the top of the viewer’s workspace,
is divided into seven smaller toolbars Configure, Main Display, Record and Playback, Sites, Export, Still Frame and Events..
These toolbars can be undocked from the main toolbar and positioned anywhere within the viewer application’s workspace by
click-and-drag. In addition, a telemetry toolbar is located, by default, along the bottom of the viewer’s workspace.
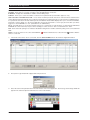
Main Toolbar
1.
Open configuration file - opens an existing configuration (site) file.
2.
New configuration file - opens the Viewer Configuration window to create a new configuration file.
3.
Edit configuration file - opens the Viewer Configuration window to edit an existing configuration file.
4.
Picture-in-picture - activates the viewer’s picture-in-picture (PIP) mode.
5.
Quad display - activates quad display for cameras 1, 2, 3 and 4.
6.
Quad display - activates quad display for cameras 5, 6, 7 and 8.
7.
Quad display - activates quad display for cameras 9, 10, 11 and 12.
8.
Quad display - activates quad display for cameras 13, 14, 15 and 16.
9.
Sequence - activates camera sequencing.
10. Single camera - activates single camera view.
11. Select camera - selects a single camera for viewing in single camera view mode.
12. Record - activates record mode for the connected Vivid DVR.
13. Stop playback - stops playback from the connected Vivid DVR and enters LIVE view mode.
14. Playback - starts playback from the last playback position.
15. Pause/Freeze - pauses playback in Playback mode; Freezes image in LIVE mode.
16. Reverse playback/rewind - activates reverse playback in Playback mode; Rewinds from current position.
17. Fast play back forwards /Fast forward - activates fast forward playback in Playback mode; Fast forward from current
position.
18. Select configuration file - selects a configuration file or site.
19. Connect DVR - restores the connection to a Vivid DVR.
20. Disconnect DVR - disconnects connection to a Vivid DVR.
21. Export image - exports video from the connected Vivid DVR.
22. Play back exported video files - plays back previously exported video files.
23. Open snapshot - opens a saved snapshot for viewing.
24. Take snapshot - takes a JP2K format still snapshot.
25. Print snapshot - prints an open JP2K snapshot.
26. Goto date/time event - opens a time and date selection window enabling you to play back recorded video from the selection.
27. Open event folder - opens the event folder window where events can be selected and viewed.
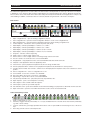
Audio and Telemetry Toolbar
1.
Audio - toggles audio on or off.
2.
Telemetry - toggles telemetry functionality on or off (only available when the selected camera has telemetry funtionality
e.g. PTZ or dome camera).
3.
Joystick - activates the joystick pop-up window which allows control of pan and tilt movement using a mouse or the arrow
keys.
4.
Dome flip - performs a dome camera flip function.
7
Baxall Vivid Viewer Application
User Manual
TOOLBARS
5.
Recall preset - enables a previously defined preset to be recalled and run.
6.
Zoom in - click and hold to zoom-in the camera’s zoom lens.
7.
Zoom out - click and hold to zoom-out the camera’s zoom lens.
8.
Recall pattern - enables a previously defined pattern to be recalled and run.
9.
Focus near - click and hold to focus on a nearby object.
10. Focus far - click and hold to focus on a far away object.
11. Auto focus - click to enable the camera’s auto focus feature.
12. Close iris - click and hold to close the camera’s iris.
13. Open iris - click and hold to open the camera’s iris.
14 Auto iris - click to enable the camera’s auto iris feature.
15. Aux - opens a pop-up window which provides access to the Camera power, Auto-pan, Wash and Wipe auxiliary functions.
16. Program preset - allows you to program and store a preset.
17. Dome menu access - opens the dome camera menu on a suitably equipped dome camera. The menu is displayed on the
currently selected monitor.
CONFIGURE TOOLBAR
The configure toolbar allows configuration files and sites to be created and edited.
1.
Open Configuration File
This button allows a complete configuration file to be opened. A configuration file can consist of up to 50 sites and is saved in
the Program Files > BaxallVivid folder. The default configuration file is called siteconfig.ini.
2.
New Configuration File
This button allows you to create a new Configuration file from scratch. See Setting up a New Configuration File for more
information.
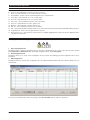
3.
Edit Configuration
This button allows the currently open configuration file to be edited. Clicking the button will open a window similar to the one
shown below:
Use the mouse and keyboard to make any changes. Click Save and Exit when the edits are completed.
8
User Manual
Baxall Vivid Viewer Application
MAIN DISPLAY TOOLBAR
The main display toolbar controls camera selection and display.
1.
Picture-in-picture
This button allows a picture-in-picture (PIP) display to be selected.
•
Click the picture-in-picture (PIP) button
•
Subsequent presses of the PIP button will move the picture-in-picture cameo around the main display area as shown
below.
2, 3, 4 and 5. Quad displays
These buttons allow up to four cameras to be displayed in a 4 x 4 matrix. To activate quad mode, click one of the four quad
buttons.
Button A will display cameras 1, 2, 3 and 4; button B will display cameras 5, 6, 7 and 8; button C will display cameras 9, 10, 11
and 12; button D will display cameras 13, 14, 15 and 16. The currently selected button will be indicated by a pale green highlight
(button A in the example above).
6.
Sequence
The Vivid DVR can display all of the cameras connected to it in sequence. Each camera will be displayed by the viewer
application for a short period of time. To start camera sequencing:
•
Select a camera in single camera view mode (sequencing can start from any camera).
•
Press the sequence button.
To stop sequencing:
•
Select a camera for full screen viewing by clicking the Single camera button (or by selecting any Quad display or PIP).
7.
Single Camera
Clicking this button activates the single camera view mode. A camera can be selected from the Select Camera pull-down for
display.
To select a single camera in full screen mode:
•
Click the Single camera button
•
Select the camera to be displayed from the camera pull-down.
Alternatively, if the viewer is showing a quad display and the camera you wish to view full-screen is being displayed in one of
the four cameos, simply double-click the cameo to display that camera full-screen.
8.
Select Camera
Allows you to select any of the cameras connected to the Vivid DVR for display in full-screen mode.
9
Baxall Vivid Viewer Application
User Manual
RECORD AND PLAYBACK TOOLBAR
This toolbar controls the recording and playback functions of the connected Vivid DVR using icons similar in function to the
keys on a VCR.
1.
Record
Clicking the Record button will create an AVI format file of the current display in full-screen mode.
Note: The record feature is only available in full screen single camera mode.
2.
Stop
Clicking this button will stop playback from the connected Vivid DVR and enter Live mode.
3.
Play
Clicking this button will play back recorded images from the connected Vivid DVR from the last playback position.
4.
Pause
Clicking this button in playback mode will pause playback. If the viewer is in Live mode, it will freeze the image(s).
5.
Playback/Fast Rewind
Clicking this button will play backwards and rewind from the current playback position.
5.
Play Forwards/Fast Forward
Clicking this button will play forwards and fast forward from the current playback position.
SITE TOOLBAR
This toolbar allows you to select sites and connect/disconnect Vivid DVR’s.
1.
Select Site
This pull down box allows you to select a site from those that are defined in the currently selected Configuration file. The file can
have up to 50 sites defined.
2.
Connect DVR
Clicking this icon will connect the Vivid DVR defined for the selected site.
3.
Disconnect DVR
Clicking this icon will disconnect the Vivid DVR defined for the selected site.
EXPORTED DATA TOOLBAR
This toolbar allows you to export images from the viewer and to play back previously exported images.
1.
Export Images from Unit
To retrieve export data from the Vivid unit to the hard disk drive of you computer, select this option from the File menu.
Once selected the Export Data dialogue box will be displayed.
10
User Manual
Baxall Vivid Viewer Application
EXPORTED DATA TOOLBAR
Enter the Start Date / Time and the End Date / Time then click OK. Once this is done the application will retrieve export data
from the Vivid unit and store it in a folder called export inside the folder where the Vivid Viewer application is installed (C:\Program
Files\BaxallVivid\export\ by default).
The progress of the export is shown in the viewer application’s status bar.
2.
Playback Exported Video Files
Selecting Playback Exported Video Files will open a window which automatically locates the default export folder (C:\Program
Files\BaxallVivid\export ) where export data is stored. If it is it not stored in the default location you can use this
window to browse and locate it.
The Open window can also be used to open and play Event data.
STILL FRAME TOOLBAR
This toolbar allows you to retrieve and capture still images, and to print them.
1.
Open Snapshot
To view a saved JP2 images click the Open Snapshot button. The Open window will appear. Use the window to select or locate
the image and click Open to view it.
Note:
JP2 is not installed as standard on many PC office type
applications. Should you experience problems in importing the
file into other applications, then please contact Baxall technical
support for more information.
11
Baxall Vivid Viewer Application
User Manual
STILL FRAME TOOLBAR
2.
Take Snapshot
To capture a still frame JP2 Image, select the image to be saved and ensure that the Pause key has been pressed on the VCR
controls. Next, click the Take Snapshot button.
The Save As window will open. Enter an appropriate file name for the picture to be saved. Click Save to save the image.
Note:
Using this screen you can also choose to save the image on any
local or network drive available to your PC.
3.
Print Still Image
Clicking this button allows you to print a still image from the Live or Playback modes, or from a previously saved snapshot.
To print from Live or Playback mode:
•
Select Live or Playback mode on the viewer.
•
Click the Pause button
•
Click the Print button. This will open the Windows Print dialogue window for the printer connected to your PC. Make any
necessary adjustments and click Print.
12
User Manual
Baxall Vivid Viewer Application
STILL FRAME TOOLBAR
To print from a saved Snapshot:
•
Open the snapshot using the Open Snapshot button as described in Open Snapshot above.
•
Click the Print button. This will open the Windows Print dialogue window for the printer connected to your PC. Make any
necessary adjustments and click Print.
EVENTS TOOLBAR
The Events toolbar allows you to select events and filter events.
1.
Goto Date/Time Event
The Goto Date/Time Event button allows you to select a date and time and play back recorded video. To replay a recorded
video from specific time and date:
•
Click the Goto Date/Time Event button. The Date Selection window will open.
•
Select the desired time and date and click OK. The video will be replayed from the selected time and date.
13
Baxall Vivid Viewer Application
User Manual
EVENTS TOOLBAR
2.
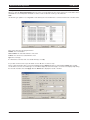
Open Event Folder
When you click the Open Event Folder button the event screen will appear. As the viewer retrieves the event data from the
Vivid DVR the screen will update with details of all the events stored in the event log of the Vivid unit.
Note:
The Event Log is capable of recording 5000 events and may show events that have occurred several weeks or months earlier.
Each event shows the following information:
Number - the event number
Start and End - the start and end times of the event
Camera - the camera associated with the event
Type - the event type
P - whether the event has video associated with it (Y) or not (N).
It is possible to filter events for specific details such as “Motion on camera 5 only”.
This is achieved using the filters screen which will appear if the Filtered check box is ticked and the Filters tab is clicked.
Use the Filters screen to select which types of event will be displayed. Select which types of event are to be displayed by ticking
the relevant checkbox, then click Apply. Click the Events tab to display the results of the filter.
14
User Manual
Baxall Vivid Viewer Application
EVENTS TOOLBAR
Events that can be played back are identified if the associated video column (P) shows a “Y”
Click on the line corresponding to the Event to be played back. An asterisk will be displayed in the left column. You will now be
able to play back by clicking the Show Event button,
Alternatively you can export the event to the Hard Disk Drive of your PC by clicking the Export Event button (see section 6).
If “N” is showing there was no video recorded with the event. This may occur if the disk has overwritten the video due to the
chosen record capacity or the event is not video related.
TELEMETRY FUNCTIONS
To access the Telemetry controls from the viewer application, the following conditions must be met:
•
The viewer application must be connected (via Ethernet) to a Vivid DVR capable of interpreting the PTZ commands.
•
The Vivid DVR unit must be connected to a PTZ controller.
•
The cameras must be capable of performing PTZ.
•
The viewer must establish a live connection, and must be in Live view mode.
To activate telemetry:
•
Select a telemetry enabled camera in single camera view, or click a telemetry enabled camera’s image in Quad view. If the
camera is suitable for control via telemetry, the border surrounding its image will turn to green.
•
Click the Telemetry On/Off button
. The telemetry toolbar will become active.
Most telemetry functions are self-explanatory (such as zoom in, zoom out, open iris, close iris, etc. and sufficient detail is
provided under the toolbars - Audio and Telemetry toolbar section). Other functions are described below.
1.
Joystick
Clicking the Joystick button will open the joystick pop-up window.
The joystick window can be repositioned anywhere within the viewer’s workspace by clicking and dragging it.
Click and drag the green circle with the mouse to pan and tilt the camera. If the camera has proportional speed control, the
further away from the centre position the green circle is moved, the faster the camera will move in that direction. The camera
will be moved as long as the mouse button is held down. Release the mouse button to immediately stop pan/tilt.
The keyboard’s arrow keys can also be used to pan and tilt the camera and provide movement at 1/2 of the maximum joystick
speed.
15
Baxall Vivid Viewer Application
User Manual
TELEMETRY FUNCTIONS
2.
Recall Preset
This button allows a previously defined preset to be recalled.
To recall a Preset:
•
Select a telemetry enabled camera in single camera view.
•
Activate telemetry by clicking the Telemetry On/Off button.
•
Click the Recall Preset button on the telemetry toolbar.
•
In the Preset pop-up, use the pull-down box to select the number of the preset to be recalled.
•
Click OK.
3.
Recall Pattern
This button allows a previously defined pattern to be recalled.
To recall a Pattern:
•
Click the Recall Pattern button on the telemetry toolbar.
•
In the Pattern pop-up, use the pull-down box to select the number of the pattern to be recalled.
•
Click OK.
4.
Program Preset
This button allows a new preset to be created.
To program a Preset:
•
Select a telemetry enabled camera in single camera view.
•
Activate telemetry by clicking the Telemetry On/Off button.
•
Using the Joystick control, move the camera to the required position (this can include other telemetry and lens functions
such as zoom).
•
Click the Program Preset button.
•
In the program pop-up, select a preset number from the pull-down box (note that creating a preset in this way will overwrite
a preset that may already be assigned to the selected preset number).
•
Click OK.
16
User Manual
Baxall Vivid Viewer Application
STATUS BAR
The status bar is located along the bottom edge of the viewer’s workspace. The status bar is used to show the current mode of
the software and is split into three parts:
Connection Status
This area of the status bar identifies the current connection status and may display one of the following:
Mode of Operation
This area of the status bar identifies the current operating mode of the viewer and may display one of the following:
This indicates that the viewer application is in Live mode and is playing back video at 40 frames per second.
This indicates that the viewer application is in Playback mode and is playing back video at 34 frames per second.
This indicates that the viewer is retrieving data from the Vivid unit to the hard disk drive of the PC.
Authentication
This area of the status bar indicates whether the image files being received from the vivid DVR have been authenticated. The
authentication feature may be turned on or off by checking/unchecking the tick box.
17
Baxall Vivid Viewer Application
User Manual
CHANGING DISPLAY
Under the Display > Monitor Output > Application option it is possible to change the default configuration of the Vivid
viewer’s display. This option opens the Application Monitor Output window.
Changing a quad display
You may prefer to have the quad displays showing groups other than (1,2,3,4), (5,6,7,8), etc. Instead you may wish to see
cameras 1,8,6,4 being displayed in one of the quad displays.
To display camera 8 in the top right hand cameo:
1.
Select the appropriate quad icon
2.
Click and drag the camera 8 icon...
3.
...and drop it into the active cameo that you want to display the camera in.
Note:
The procedure is the same for changing a PIP or single camera display. At step 1, simply select the appropriate display icon,
then click-and-drag the required camera icon into the cameo.
1
3
2
18
User Manual
Baxall Vivid Viewer Application
SEQUENCES
Sequences
The Application Monitor Output window can also be used to change a camera sequence.
To enter camera sequence edit mode, click the sequence strip.
1.
Click and drag a camera icon...
2.
...to one of the 16 sequence positions.
3.
Repeat until the desired sequence is complete
4.
Enter the dwell time (1-60 seconds) for each camera in the sequence (this is a global setting).
When completed, click OK to close the window.
2
Sequence strip
1
To run the sequence, click the Sequence button
on the main display toolbar.
19
Baxall Vivid Viewer Application
User Manual
LOCAL SETTINGS
This window is accessible from the Viewer Configuration window by clicking the Local Settings tab. Note: The configuration
password must be entered to gain access to the Viewer Configuration window. The Local Settings window allows you to
change the User, Admin and Config passwords. In addition, several system settings can be made.
Changing Passwords
To change any of the system passwords, click in the relevant field and enter a new 5-digit password. Click Save and Exit when
finished.
Automatically Connect to DVRs on program startup.
Checking this option will instruct the viewer application to attempt to connect to the Vivid DVR when the program is launched.
Alert user when unit goes offline
Checking this option will provide an alert should the network connection be lost.
20
User Manual
Baxall Vivid Viewer Application
APPENDIX A - SHORT-CUT KEYS
The following table shows the short-cut keys that can be used if a USB keyboard is connected to the Vivid DVR.
Key
Action
General
Spacebar
Enter
Menu
Enter
Camera Selection
1,2,3,4,5,6,7,8,9
0 (zero)
Q or q
W or w
E or e
R or r
T or t
Y or y
Camera 1,2,3,4,5,6,7,8,9
Camera 10
Camera 11
Camera 12
Camera 13
Camera 14
Camera 15
Camera 16
Telemetry control
{Enter} followed by A or a
Left arrow key
Right arrow key
Up arrow key
Down arrow key
d or D (or mouse wheel +)
c or C (or mouse wheel -)
Enter
Space bar
(Only after telemetry enabled)
Enable Telemetry
Pan Left
Pan Right
Tilt Up
Tilt Down
Zoom in
Zoom out
Focus near
Focus far
Vivid DVR controls
> or .
< or ,
L or l
: or ;
@ or ’
A or a
S or s
Z or z
X or x
D or d
C or c
Up/down/left/right arrow keys
Forward
Rewind
Play
Pause
Stop
Monitor
Sequence
PIP
Multiscreen
Goto
Event
Menu Navigation keys
21
Baxall Vivid Viewer Application
User Manual
APPENDIX B - VIVID DVR IP ADDRESSES
Use this page to record the IP addresses of Vivid DVR units.
IP ADDRESS
22
DESCRIPTION
User Manual
Baxall Vivid Viewer Application
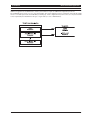
APPENDIX C - PASSWORD HIERARCHY
The Vivid viewer application has three password levels. At startup, the user can log on as a User or as an Administrator. In
addition, if logged on as an administrator, certain system functions require an additional Configuration password.
The Vivid DVR has two levels of access, User and Installer. The viewer application can be configured to automatically supply
the User or Installer password to the Vivid DVR (see Setting up a New configuration File). If this is the case, the password will
not be requested by the Vivid DVR for the type of logon made (i.e. User or Administrator).
23
Baxall Vivid Viewer Application
24
User Manual
Baxall Limited, Stockport, England.
Visit our web site at http://www.baxall.com
Baxall Limited reserve the right to make changes to the product and
specification of the product without prior notice to the customer.
HB-VIVIDVIEWER-2
Issue 2 10/05