1
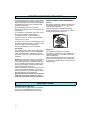
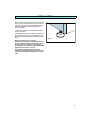
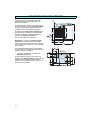
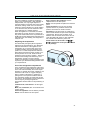
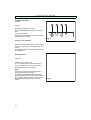
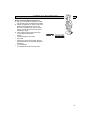
Instructions for use
MKV 1117
Bauknecht AG, Industriestrasse 36, 5600 Lenzburg, www.bauknecht.ch
Verkauf
Kundendienst
Ersatzteile
Telefon 0848 801 002
Telefon 0848 801 001
Telefon 0848 801 005
Fax 0848 801 017
Fax 0848 801 003
Fax 0848 801 004
[email protected]
[email protected]
[email protected]
.
INDEX
GB
BEFORE USING THE APPLIANCE
PAGE
16
INSTALLATION
PAGE
17
CONNECTING THE MINI-KITCHEN
PAGE
18
PRECAUTIONS AND GENERAL
RECOMMENDATIONS
PAGE
20
PAGE
21
USE OF THE ELECTRIC HOTPLATES
PAGE
23
USE OF THE TIMER
PAGE
24
CLEANING AND MAINTENANCE
PAGE
25
TROUBLESHOOTING GUIDE
PAGE
26
AFTER-SALES SERVICE
PAGE
27
REFRIGERATOR
USE OF THE REFRIGERATOR
ELECTRIC HOTPLATES
ADVICE
Refrigerator with
,
compartment and
automatic defrost.
The rated performance is obtained with the
appliance operating at ambient temperatures
between +16°C and +32°C.
The single appliances of the Mini-kitchen are in
compliance with VDE regulations, EEC
international directives, EEC directive
no. 87/308/CE relating to the suppression of
radio interference, and with current safety
standards.
The refrigerator has been tested for fluidtightness and conforms to VBG 20 accident
prevention standards for cooling systems.
To install an extractor hood...
observe the minimum distance from the
hotplates! Minimum distance between electric
hotplates and lower edge of extractor hood:
650 mm. For reasons of safety this distance
must absolutely be maintained!
15
BEFORE USING THE APPLIANCE
In purchasing this new product you have chosen
a household appliance capable of matching the
highest expectations from a technical standpoint
and affording an ease of use compatible with
practical requirements.
This new appliance offers you all that is
technically possible at the time of its design and
manufacture.
SAFEGUARDING THE ENVIRONMENT
Packing
The packing material is entirely recyclable, and
marked with the recycling symbol
. Follow
local disposal regulations.
Keep the packaging materials (plastic bags,
polystyrene parts, etc.) out of reach of children,
as they are potentially dangerous.
Your appliance is particularly economic in terms
of energy consumption and therefore
environment friendly, if used responsibly.
If treated properly, it will give you dependable
service for many years.
To get the most out of your new appliance, read
the user handbook thoroughly. You will find a full
description of the various components.
Keep this handbook for future consultation.
Information:
This appliance uses neither CFCs (refrigeration
circuit contains R134a) nor HFCs (refrigeration
circuit contains R600a - Isobutane). For more
information, refer to the data plate affixed to the
appliance.
Important In the past, the doors of refrigerators
and freezers were often equipped with spring
catch or bolt type locks. If a machine of this type
is to be scrapped and disposed of, destroy the
lock to ensure children cannot trap themselves
inside and put their lives at risk!
Having unpacked the equipment, make sure no
part of it has suffered damaged. Any damage
must be reported to your dealer within 24 hours
after taking delivery of the appliance.
Wait at least two hours before connecting the
appliance to the power supply in order to
ensure the refrigerant circuit is fully efficient.
Appliance
The appliance is made from recyclable
materials. If you decide to scrap the appliance, it
must be disposed of in compliance with local
waste disposal laws.
Make the appliance unusable by cutting off the
power cord. The appliance must be consigned to
an authorised collection centre for the recovery of
refrigerant gas.
INSTRUCTIONS
INSTRUCTIONS FOR USE
These indications contain important information
on the use of your appliance. There may be
differences in detail, depending on the model.
16
INSTALLATION
Before installation, make sure that the tubes on
the rear of the refrigerator have not been bent in
transit. If the tubes touch the refrigerator or the
wall, the refrigerator will be irritatingly noisy
during operation.
If necessary, bend them carefully to restore the
correct clearance.
The Mini-kitchen must be installed in a fixed and
plumb upright position. Any unevenness of the
floor can be accommodated by adjusting the feet
(fig. 1).
Fig. 1
Warm air must be free to escape
unobstructed at the rear of the refrigerator so
as not to affect operation (and not to cause
increased electrical power consumption).
Accordingly, the ventilation slots behind the
hotplates must not be covered.
The machine is approved only for freestanding installation against a wall. Items of
furniture may be placed adjacently on either
side.
17
CONNECTING THE MINI-KITCHEN
Connections to the water supply and waste
pipelines should be made preferably by a
professional installer.
The Mini-kitchen is designed for connection to
the earthed socket outlet of a 220-230 V/50 Hz
supply, provided with an isolating contact in
compliance with current safety regulations.
The Mini-kitchen with electric hotplates must
be protected by a 16 A fuse. The Mini-kitchen
can be converted by a qualified installer for
operation at 380-400 V 2 n 750 Hz.
In this case a 10 A fuse is required.
Important! In the case of a fixed electrical
installation of the Mini-kitchen, the installer
must fit a multi-pole switch with a gap between
open contacts of at least 3 mm, or an automatic
circuit breaker.
This multi-pole isolating device must be fitted
even if the plug is no longer accessible after the
appliance has been installed.
•
Important for appliances operating off
380-400 V (CH) supply.
The Mini-kitchen must be connected by the
installer to the 380-400 V 250 Hz supply, fitting a
10 A fuse and a multi-pole switch with gap
between open contacts of at least 3 mm, or an
automatic circuit breaker.
18
CONNECTING THE MINI-KITCHEN
For Great Britain only
The wires in the mains lead are coloured in
accordance with the following code:
BLUE - “NEUTRAL” (“N”)
BROWN - “LIVE” (“L”)
GREEN AND YELLOW - “EARTH” (“E”)
1. The GREEN AND YELLOW wire must be
connected to the terminal in the plug which is
marked with the letter “E” or by the Earth
symbol 4 or coloured green or green and
yellow.
2. The BLUE wire must be connected to the
terminal which is marked with the letter “N” or
coloured black.
3. The BROWN wire must be connected to the
terminal which is marked with the letter “L” or
coloured red.
Warning - this appliance must be
earthed
Fuse replacement
If the mains lead of this appliance is fitted with a
BS 1363A 13amp fused plug, to change a fuse in
this type of plug use an A.S.T.A. approved fuse
to BS 1362 type and proceed as follows:
1. Remove the fuse cover (A) and fuse (B).
2. Fit replacement 13A fuse into fuse cover.
3. Refit both into plug.
Important:
The fuse cover must be refitted when changing a
fuse and if the fuse cover is lost the plug must not
be used until a correct replacement is fitted.
Correct replacement are identified by the colour
insert or the colour embossed in words on the
base of the plug.
Replacement fuse covers are available from
your local electrical store.
Connection to a rewirable plug
If the fitted plug is not suitable for your socket
outlet, then it should be cut off and disposed of in
order to avoid a possible shock hazard should it
be inserted into a 13A socket elsewhere.
A suitable alternative plug should then be fitted
to the cable.
For the Republic of Ireland only
The information given in respect of Great Britain
will frequently apply, but a third type of plug and
socket is also used, the 2-pin, side earth type. In
this case, the wire which is coloured GREEN
AND YELLOW must be connected to the EARTH
contact, and the two wires to the two pins,
irrespective of colour. The supply to the socket
must be fitted with a 16 amp fuse.
19
PRECAUTIONS AND GENERAL RECOMMENDATIONS
•
•
•
•
•
•
•
Use the refrigerator compartment only for
storing fresh foods and the low temperature
compartment only for making ice cubes,
storing frozen food and freezing fresh food.
Do not cover or obstruct the air vents of the
appliance.
Do not store liquids in glass containers in the
freezer compartment - danger of bursting
Do not eat ice cubes or ice lollies immediately
after taking them out of the low temperature
compartment - risk of “cold” burns.
Do not allow children to play or hide inside the
appliance - risk of becoming entrapped and
suffocating.
Before any cleaning or maintenance
operation, unplug the appliance from the
mains or disconnect the electrical power
supply.
The power cable can only be replaced by an
authorized person.
Declaration of conformity
This appliance is intended to come into contact
with foodstuffs and conforms to D.L. 108 of
25.01.1992 (European Directive 89/109/EEC).
Information
Appliances with Isobutane (R600a)
Isobutane is a naturally occurring low
environmental impact gas. Caution is required,
however, because Isobutane is inflammable.
Accordingly, it is essential to ensure that
refrigerant pipelines are not damaged.
Electric hotplates
•
•
Use the appliance only in its complete state
with all safety devices in place.
Do not permit children to play with the
hotplates.
Attention! The surface of the hotplates and the
cooktop become very hot during use, and small
children must therefore be kept at a safe
distance.
• Overheated fats and oil can catch fire.
Accordingly, when preparing foods such as
French fries etc., do not leave pots and pans
unattended.
• Never under any circumstances allow food in
wrapping paper or in containers of synthetic
material to be placed on hotplate.
Attention! In the event that other electrical
appliances are plugged into sockets near the
Mini-kitchen, ensure that the cables do not come
into contact with the hotplates.
20
USE OF THE REFRIGERATOR
The use of adaptors, sockets and extension
leads is not recommended. If their utilization is
indispensable, use only single adaptors or
extension leads in conformity with current safety
standards, making certain not to exceed the
maximum current indicated on a single adaptor
or an extension lead, and the maximum rated
power indicated on a multiple adaptor.
When the appliance is connected, the interior
light switches on when the door is opened, as
long as the thermostat knob is not positioned at
the z symbol. After adjusting the temperature, as
indicated in the next heading, the refrigerator is
ready for use.
Adjusting the temperature
The thermostat (see figure) allows a gradual
adjustment of the temperature. The z position
indicates deactivation of the appliance and
interior light off. For food to keep in the best
condition possible, the knob should be set to
position 4. For colder temperatures rotate the
thermostat knob toward a higher number. Or, if
the temperature is too cold, rotate the knob
toward the lower numbers: position 1. Note that
the thermostat settings are affected by room
temperature, quantity of food in storage,
position, and frequency of opening the door: with
experience you will find the setting that best suits
your requirements.
Eggs, cheeses, dairy products: use the
compartments in the door panel.
Butter: use the special compartment in the door
panel.
Canned products: once the can has been
opened, remove any residual contents and
preserve in another non-metal container.
Important: do not place foods or containers in
direct contact with the rear part of the refrigerator
compartment. Ensure free circulation of air
between and around the various items. Do not
cover the grilles with paper or other materials.
Put cooked foods inside only when cool.
Frozen foods can be stored in the
or
compartments for the period indicated
on the package.
Use of the refrigerator compartment
In the compartment the temperature varies from
zone to zone. The coldest zones are those close
to the rear wall immediately above the crisper
drawers. To maintain the aroma, substance and
freshness of all foods, we suggest wrapping
them in sheets of aluminium or polythene, or
putting them in the special containers with lid.
This avoids the mingling of smells and aromas.
The space in the refrigerator can be organised in
various ways by moving the grilles as
appropriate. General advice on the positioning of
foods:
Cooked foods, hard cheeses: use the upper
grilles.
Meat, fish, cold meats, etc.: on the shelf of the
crisper drawer.
Fruit and vegetables: use the drawer provided.
Drinks: use the shelf in the door panel.
21
USE OF THE REFRIGERATOR
Freezing
Defrosting
The
compartment can be operated at
temperatures down to -18 °C, allowing a
maximum 1.5 kg of food to be frozen in 24 hours.
When freezing, the thermostat knob should be
set to position 2-3. Wrap the food to be frozen in
sheets of aluminium or polythene and apply
labels stating the date of freezing and the
contents. Take care that food already frozen
does not come into contact with food waiting to
be frozen. Never put hot foods into the low
temperature compartment, and do not refreeze
foods - even if only partially defrozen - but
consume them within 24 hours. Do not place
liquids in glass containers in the freezer.
-
Making ice cubes
Pour water into the ice tray up to 2/3 full and
place it in the freezer compartment. If the base of
the ice trays should freeze to the compartment,
do not attempt to remove with a sharp or cutting
object, but use a spoon handle.
Attention: Do not eat ice cubes or ice lollies
immediately after taking them out of the low
temperature compartment - risk of “cold” burns.
Defreezing foods
Some tips:
Vegetables to be cooked: do not defreeze, but
simply put into boiling water and cook as normal.
Meat in general (large cuts): defreeze in the
refrigerator compartment without removing the
original packing. Before cooking, leave for a
couple of hours at room temperature.
(small cuts): defreeze at room temperature or
cook straight away.
Fish: defreeze in the refrigerator with removing
the packing or cook straight away when half
defrozen.
Precooked foods: cook straight away in the
oven as appropriate without removing from the
aluminium container.
Fruit: defreeze in the refrigerator.
22
If the refrigerator is not equipped with a
or
compartment, defrosting occurs
automatically. During the defrost cycle, drops
of water will run down the rear wall of the
compartment. The defrost water is routed to
a drain outlet and into a container on the
compressor, from which it evaporates.
- If the refrigerator is equipped with a
or
compartment, excess frost should be
removed periodically to keep down electrical
power consumption. Never use sharp objects
or metal tools for this purpose. In any event,
the compartment should be defrosted
whenever the deposit reaches a thickness of
3 mm.
The defrosting procedure is as follows:
- unplug the appliance from the power socket;
- remove food from the
or
compartment;
- turn the thermostat knob to the z position;
- as defrosting takes place, gather up the
water with a sponge or a cloth;
Once the compartment has defrosted
completely, plug in again and set the thermostat
as desired (see “Adjusting the Temperature”).
Defrosting of the refrigerator compartment is
automatic for this model.
Note: The increase in temperature of frozen food
during defrosting can shorten its storage life.
USE OF THE ELECTRIC HOTPLATES
Figure 3
A = Hotplates
B = Knobs
The normal and fast hotplates offer six nominal
cooking temperatures.
In the 0 position the hotplate is off.
The fast hotplate, at the front, is identified by a
red dot at the centre. This plate is used for quick
boiling, frying, etc. For this type of use, turn the
control knob to position 3.
Use position 3 for quick cooking, and position 1
for slow cooking or simmering. Turn up or down
as required.
For braising, pot-roasting, etc., select position 3
until the fat is hot. Then put in the meat and turn
down to position 2, or select a higher or lower
setting as required.
To cook dishes of this type more delicately,
select a lower setting.
Both hotplates incorporate an overheating
protection system that reduces the electrical
input automatically if a hazard temperature level
is sensed.
Position
of knob
Type of
operation
0-6*
0-3*
0
0
off
6
3
quick cooking
5
2z
browning
4
2
pot-roast
3
1
2
1
1
0z
slow cooking
slow cooking
warming
* Design of knobs dependent on the type of
appliance.
Using residual heat to save energy
When preparing almost any type of dish, the
residual heat of the hotplates can be used for the
final 5-10 minutes of cooking. Accordingly,
remember to select “0” in good time.
The symbols on the knobs indicate the
different hotplates:
= knob controlling back hotplate
= knob controlling front hotplate
The yellow indicator remains alight as long as the
hotplates are in operation.
General warnings
Whatever the method of cooking, use only pots
and pans suitable for electric hotplates. These
have special bases which conduct heat more
effectively. A lid should always be used when
pot-roasting, braising etc., to save energy. Also,
water soluble flavours and vitamins will be lost if
cooking vapours are allowed to escape freely.
Abundant amounts of vapour indicate a high
temperature; select a lower temperature before
vapour builds up.
Take care that salt does not fall onto the
hotplates. An unused hotplate can rust over time
as a result of the moisture absorbed by the salt.
Cleaning the hotplates
Wipe off spills immediately, before they can dry
up. Do not scrape off dried food! Take a wet cloth
and place it on the hotplate (cold) until the
deposits are softened. Do not use aggressive or
abrasive
23
USE OF THE TIMER
Cooktop with timer
(if fitted)
Figure 4
B Hotplate control knob 1-6 (1-3).
Each radiant hotplate hob has its own control
knob.
C Timer control knob.
D The yellow indicator light remains on while the
hotplates are in operation.
Fig. 4
Turning on the hotplates
Set the control knob B between 1 and 6 (1 and 3).
Turn the control knob C to the right (as far as it
will go).
The hotplates operate when both knobs B and C
are switched on.
Setting the timer
(Figure 5)
Position of the control knob.
C1 for a cooking time of around 60 minutes.
C2 for a cooking time of around 30 minutes.
Intermediate settings are possible.
Note:
If the timer counts down completely before
cooking has finished, set it again.
If cooking is completed before the timer has
finished counting down, turn the control knob/s B
to 0 to switch off the hotplate/s. The timer turns
itself off automatically at the end of the set
interval.
24
Fig. 5
CLEANING AND MAINTENANCE
•
•
Clean the grilles and condenser at the rear of
the refrigerator periodically, using a vacuum
cleaner or brush.
Clean the outside with a soft cloth.
Prolonged absence
1. Empty the refrigerator.
2. Disconnect the appliance from the power
supply.
3. Defrost and clean the interior.
4. When not in use, leave the door of the
appliance open to prevent oxidation and the
formation of mould and unpleasant odours.
5. Clean the appliance.
• Clean the low temperature compartment
interior (if present) during the defrosting
operation.
• Periodically clean the inside of the refrigerator
compartment with a sponge moistened with
warm water and/or neutral detergent. Rinse
the interior and dry with a soft cloth. Do not
use abrasives.
• Clean the outside using a soft cloth moistened
with water. Do not use abrasive products,
scourers, stain-removers (e.g. acetone,
trichloroethylene) or vinegar.
25
TROUBLESHOOTING GUIDE
1. The appliance is not working properly.
• Is their a power failure?
• Is the plug properly inserted into the socket
outlet?
• Is the isolating switch set to ON?
• Has the fuse blown?
• Is the power cord in perfect condition?
• Is the thermostat set to z (off)?
2. The temperature in the compartments is
not sufficiently cold.
• Is the door shut properly?
• Is food preventing the door from closing?
• Is the appliance installed near a heat source?
• Is the thermostat setting correct?
• Are the air circulation vents blocked?
3. Temperature inside the refrigerator
compartment is too low.
• Is the thermostat setting correct?
Fig. 6
Interior light
Figure 6
To change a defective lamp, the appliance must
be unplugged or isolated by means of the multi
pole switch!
4. The appliance is excessively noisy.
• Has the appliance been installed correctly?
• Are the tubes at the back touching or
vibrating?
5. Water collects at bottom of refrigerator
compartment.
• Is the defrost water drain blocked? (Fig. 7).
6. Excessive frost build-up in the freezer
compartment.
• Is the door shut properly?
• Is food preventing the door from closing?
Notes:
• Gurgling and hissing noises due to
expansion in the refrigerant circuit are
normal.
Fig. 7
26
AFTER-SALES SERVICE
Before contacting After-Sales Service:
1. See if you can solve the problem yourself
with the help of the Troubleshooting Guide.
2. Switch the appliance on again to see if the
problem has been solved. If it has not,
disconnect the appliance from the power
supply and wait for about an hour before
switching on again.
3. If the problem persists after this action,
contact After-Sales Service.
Specify:
• a short description of the fault,
• the model,
• the Service number (the number after the
word SERVICE on the data plate inside the
appliance),
• your full address,
• your telephone number and area code.
27