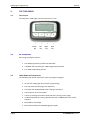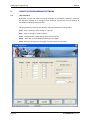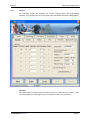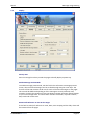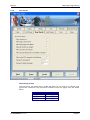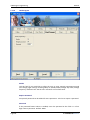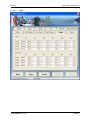
1
7900 Pager Programming Manual For USB software v1.5.0 (Manual Revision 4.60) Last updated 17/08/2009 Email [email protected] Web www.commtechwireless.com Asia Pacific PO Box 1037 OPDC 6916 PERTH, Western Australia Phone: +61 8 6240 0000 Fax: +61 8 6240 0001 Americas 8301 Cypress Plaza Drive, Suite 105 JACKSONVILLE, FL 32256-4416 Phone: +1 904 281 0073 Fax: +1 904 281 0074 EMEA Vindingaard Rinvej 1 DK-7100 Vejle DENMARK Phone: +45 8226 7280 Fax: +45 8226 7289 7900 Pager Programming Manual NOTICE This manual, software and electronic circuitry are copyrighted. All rights reserved. Under the copyright laws, this manual, software and electronic circuitry may not be copied, in whole or in part without written prior consent of Commtech Wireless. All information provided in this document is carefully prepared and offered in good faith as a guide in the installation, use and servicing of our products. Installers must ensure that the final installation operates satisfactorily within the relevant regulatory requirements. Commtech Wireless accepts no responsibility for incorrect installation. Commtech Wireless reserves the right to change products, specifications, and installation data at any time, without notice. Commtech Wireless makes certain limited warranties with respect to defective diskettes, documentation and electronic circuitry. Please see the associated information contained on this page. SOFTWARE LICENSE STATEMENT This manual, software and electronic circuitry are protected by international copyright laws. Under the copyright laws, this manual, software and electronic circuitry may not be copied, in whole or in part without written prior consent of Commtech Wireless, except in the normal use of the software to make an archival copy of the software for the sole purpose of backing up the software and protecting your investment from loss or damage. LIMITED WARRANTY With respect to the physical documentation and physical electronic circuitry enclosed herein, Commtech Wireless warrants the same to be free of defects in materials and workmanship for a period of one year from the date of purchase. In the event of notification within the warranty period of defects in material or workmanship, Commtech Wireless will replace the defective diskettes, documentation and electronic circuitry. The remedy for breach of this warranty shall be limited to replacement and shall not encompass any other damages, including but not limited to loss of profit, and special, incidental, consequential, or other similar claims. Commtech Wireless specifically disclaims all other warranties, expressed or implied, including but not limited to implied warranties of merchantability and fitness for a particular purpose with respect to defects in the documentation and electronic circuitry, and the program license granted herein, in particular, and without limiting operation of the program license with respect to any particular application, use, or purpose. COMPLIANCE NOTICES AUSTRALIA: Where applicable, to ensure compliance with ACA Technical Standards, this equipment is labeled with a Telecommunications Compliance Label. For safety reasons, this equipment should only be connected to compliant telecommunications equipment in accordance with the manufacturer’s instructions. NORTH AMERICA: Where applicable, this equipment has been tested and found to comply with FCC Rules and Regulations, Part 15 with the limits of a Class B digital device, designed to provide reasonable protection against harmful interference. This equipment generates, uses and can radiate frequency energy and if not installed and used in accordance with the instructions, may cause interference harmful to radio communications. On the base of the equipment is a label containing an FCC Registration Number, if applicable. Page 2 © CommtechWireless Manual 7900 Pager Programming Table of Contents 1.1 About This Handbook ............................................................................................................... 4 2. ABOUT THE 7900 PAGER......................................................................................................................5 Introduction ........................................................................................................................................ 5 3. THE 7900 PAGER ..................................................................................................................................6 3.1 Case Layout .............................................................................................................................. 6 3.2 Kit Components ........................................................................................................................ 6 3.3 Other Required Components .................................................................................................... 6 4. PROGRAMMING ..................................................................................................................................7 5. USING THE PROGRAMMING SOFTWARE ........................................................................................... 10 5.1 User Interface ......................................................................................................................... 10 5.1.1 General .............................................................................................................................. 11 5.1.2 Display ............................................................................................................................... 13 5.1.3 Alerting .............................................................................................................................. 15 5.1.4 Misc ................................................................................................................................... 17 5.1.5 Reminders ......................................................................................................................... 19 5.1.6 Duplicate Messages ........................................................................................................... 20 5.1.7 Folders ............................................................................................................................... 22 5.1.8 Out of Range ..................................................................................................................... 23 5.1.9 Over The Air ...................................................................................................................... 25 5.1.10 Hand Program ................................................................................................................... 28 5.1.11 Tones ................................................................................................................................. 29 5.1.12 Names ............................................................................................................................... 31 6. APPENDIX .......................................................................................................................................... 32 6.1 Further Help and Support ....................................................................................................... 32 © CommtechWireless Page 3 7900 Pager Programming 1.1 Manual About This Handbook This handbook is designed to assist you program the 7900 pager. Following the steps and checklists correctly will ensure that there will be no problems when using the 7900 pager. Conventions NOTE: A note preceded with this symbol indicates secondary information pertaining to the topic under discussion. IMPORTANT: A Right-pointing arrow followed by text in this manner presents important information. ▲ WARNING: Warnings like this alert you to the fact that you might damage your equipment or lose data if you don't follow instructions carefully. Page 4 © CommtechWireless Manual 2. 7900 Pager Programming ABOUT THE 7900 PAGER Introduction The CommtechWireless 7900 Pager is as clever as it is simple. Designed for alphanumeric, numeric and tone only paging applications, it’s a dream come true. © CommtechWireless Page 5 7900 Pager Programming Manual 3. THE 7900 PAGER 3.1 Case Layout The Commtech 7900 pager has four buttons on its case. | | | | Escape Left Right Read Key Key Key Key 3.2 Kit Components Each programming kit contains: 3.3 The 7900 programming cradle with USB cable A CDROM disk containing the 7900 programming software This 7900 programming manual Other Required Components The following will also be required in order to program the pagers: Page 6 At least one 7900 pager that requires programming. The cap codes that the pager will respond to. The baud rate of POCSAG data that is being transmitted. The frequency of the transmitter. A start-up message that will be observed when turning on the pager. An IBM compatible PC running Windows XP with a CDROM drive and a spare USB port. Basic IBM PC knowledge. Basic understanding of POCSAG paging principles. © CommtechWireless Manual 4. 7900 Pager Programming PROGRAMMING 1. Turn on your PC. Once it has booted up connect one end of the supplied cable into a spare USB port on the back or front of the PC case. This style of connector is shown circled below. 2. Plug the other end of the supplied USB cable into the connector on the programming cradle shown below. 3. Insert the supplied CDROM containing the programming software into your CDROM drive. 4. Browse the contents of this disk using the My Computer icon on your desktop. © CommtechWireless Page 7 7900 Pager Programming Manual 5. Run the setup file on the CDROM disk to install the software. 6. Once it has finished installing a new menu will be created on the Start Menu. Click the link and the software will start up with the Main Screen displayed as seen below. 7. The bottom window will show a list of USB programmers that are attached to the PC. In the example above, a 7900 programming jig is connected to the PC. NOTE: More than one USB programmer can be connected to the PC at a time! 8. Click the USB programmer you wish to use. The drop down box below should automatically jump to the corresponding pager type. If not choose 7900 here and then click the Configure button. 9. A new window will then be displayed showing all of the 7900 pagers settings. From here you can edit the settings, read/write settings from/to a pager or read/write settings from/to a file on the PC for future reference. Settings can also be printed if you need to keep a hard copy. 10. Whenever you wish to read or write from/to a pager, you will need to remove the rubber grommet protecting the programming pins. Page 8 © CommtechWireless Manual 7900 Pager Programming 11. Then place the pager facing upwards into the programming cradle as shown below. 12. Just prior to reading or writing you will need to press down hard so that there is a good contact between the pager and programmer pins. 13. Before reading or writing, you can always tell if the pager is making good contact with the programming jig by looking at the Status Bar. As seen below, it will show NO PAGER if it detects no pager, or if the pager is not properly inserted. 14. Once a good contact is made, it will show Pager Inserted. © CommtechWireless Page 9 7900 Pager Programming 5. USING THE PROGRAMMING SOFTWARE 5.1 User Interface Manual By default, only the cap codes and startup message can be viewed or edited. In order for the advanced settings to be configured the password “service123” must be entered in the Advanced Settings Password field. The programming screen has five buttons towards the bottom of the window. Print – Print a hardcopy of all settings to a printer. Save – Save all settings to a file on the PC. Load – Load previously saved settings from a file on the PC. Write – Write the currently displayed settings to the pager. Read – Read the settings from the pager and show them on the screen. Page 10 © CommtechWireless Manual 5.1.1 7900 Pager Programming General The following section will describe the various settings within the programming software. The software consists of many tabs. Each tab will be discussed in detail below. Capcodes The 7900 requires an identification address similar to a mobile phone number in order to receive pages. The 7900 pager has 6 such addresses that it can respond to. © CommtechWireless Page 11 7900 Pager Programming Manual Private Cap codes 1 - 3 are fixed at “Private”. Cap codes 4 - 6 can be set to “Private” or “Public”. If the tick-box is checked, then the cap code is set to Private, otherwise it defaults to Public. The Private option is used when the message has been sent to the pager for the users instant attention. The pager will beep or vibrate on receipt of a message depending on the call type or settings. For onsite paging this is normally the correct option. The Public option is used when the message will be sent to a mail box. This option would be used if you set a cap code to receive information reports (weather, statistics, system status etc). This is sometimes used for wide area paging. Auto Increment These drop-down boxes next to each cap code are a handy function which allows the cap codes to automatically increment upon successful writing of a pager. It can save time when writing to a large number of coasters where you need some of the cap codes to automatically increment after successfully writing. NOTE: You can press the Manually Increment button to manual increment any of the cap codes as per the setting in these drop-down boxes. Serial Number Enter the serial number of the pager if you wish to record it in the pagers memory. Note that the serial number is by default the same serial number as the sticker on the rear of the pager and gift box. Don’t Write Serial Number Tick this box to keep the existing serial number in the pagers memory. Frequency Enter the frequency that the pager will receive on. This must match the frequency of your transmitter. The valid frequency range is shown next to this field. (454-462 MHz in the figure above). The frequency range is shown on the rear sticker on the pager. Baud Rate This represents the POCSAG baud rate. The setting here must match that of your paging terminal. Select between 512, 1200 or 2400 bps. In order to use 2400 bps, a hardware modification is required to the pager. POCSAG Polarity Select either Standard or Inverted POCSAG polarity in this field. The setting here must match that of your paging terminal. Page 12 © CommtechWireless Manual 5.1.2 7900 Pager Programming Display Startup Text Enter a message here that you wish the pager to briefly display on power-up. Enable Message Preview Mode To enable message preview mode, tick this field. This will activate a message preview screen, where all stored messages can be scrolled through using the arrow keys. The first line of the LCD contains a small icon for each of the stored messages on the pager. The icon will be different depending on if the message is currently selected, read, unread or locked. The second line of the LCD shows message information which changes as you scroll through them. This information includes slot number, cap code number, beep code and receive time. Remove All Reference To Time On The Pager If this field is ticked, all references to time, date, time stamping and the daily alarm will be removed from the pager. © CommtechWireless Page 13 7900 Pager Programming Manual Disable The Message Status If this field is ticked, the message slot number information will not be added to the start of the message. The cap code and beep code information will also not be added to the end of each message. Time Stamp Messages Setting this field to NO, will force each message to be stamped with the time and date at the end of the message. Report Alert When Max Msgs Reached Ticking this field will enable the pager to display MEMORY FULL on the LCD when the pager receives a new message that it cannot fit in its memory. The pager can store up to 60 messages, but this can be altered in the Maximum number of stored messages field. Maximum Number Of Stored Messages This field refers to the maximum number of messages the pager will hold. You can choose between 10 and 60 messages. Message Number Display Format When the pager receives a message it gets assigned a slot number. Choose Only Number to make the display show just the slot number e.g.: 01:Message Choose Index/Total to make the display show the slot number, followed by the total number of messages in the pager e.g.: 02/04:Message Low Battery Alarm Timeout The low battery alarm timeout field refers to how long the pager will remind the user the battery is low. The warnings can stop after 30 minutes or be Continuous (forever). Vibrate When Battery Low Ticking this field will mean that the pager will emit a special vibration sequence every 15 minutes to remind the user that the battery is low. LCD Display Time The amount of time in seconds that the LCD will stay on for when there is no activity LCD Contrast Contrast setting for LCD screen. This does not normally need to be changed. Page 14 © CommtechWireless Manual 5.1.3 7900 Pager Programming Alerting Allow User To Select Tone This field is used to limit user access to changing tone and vibrate settings from within the pagers menus. There are three options. Setting Full System Select Full User Select Semi User Select © CommtechWireless Description The pager will have no Alert Settings menu. The pager will always beep linked to the received A, B, C or D beep code. Urgent call and priority override are always activated. User can select a beep code A/B/C/D or a melody M1/M2/M3/M4 for the alert tone. The pager is not linked to the beep code except urgent call and priority override. User can select between tone or melody M1/M2/M3/M4. When tone is selected, the tone will be linked to the received beep code A/B/C/D. When M1- M4 is selected pager will not link with function. Urgent call and priority override will take priority. Page 15 7900 Pager Programming Manual Vibrate Alert Pattern This field is used to select how the vibrator behaves when activated. There are three options available. Setting Continuous Description Constant vibration Pulsate Pulsating vibration Synchronize Synchronized with beeper. The synchronization will only work if the tone is activated. (not in mute or vibrate only mode) Visible Alert Modes The selectable alert modes in the pagers user menu can be altered in this field. By default it is: T + V + TV + M (tone, vibrate, tone&vibrate, mute) But this can be changed to any of the following combinations: V + T + TV + M T + V + TV V + T + TV T+M V+M T (with the pagers alert menu not displayed) V (with the pagers alert menu not displayed) TV (with the pagers alert menu not displayed) Alert Length When a message is received, this is the length of time the pagers will beep or vibrate for. (depending on pager alert settings) Replace Tone Only Messages With User Text Tick this option to enable the next function. Beep Code A-D Replacement Text When the pager receives a tone-only message, a canned text message can be displayed on the screen. This function can be setup per beep code (A, B, C, D). Enter the text in the relevant field. Beep Code Management Adjustable for each beep code A - D. The received beep code can be made to behave as a differently selected beep code. Example: If “Beep Code A” is set to “C Call” and the pager is then sent a message with beep code A, the pager will emit beep code C. Page 16 © CommtechWireless Manual 5.1.4 7900 Pager Programming Misc Message Slot Number Order When the pager receives a message it gets assigned a slot number. e.g.: “01:Fire in Rm5”. You can select how the slot number is assigned in this field. Date Format This field is used to toggle between the way the date is displayed on the pager. Select between DD/MM/YY or MM/DD/YY or YY/MM/DD. Ability To Protect Messages From Deletion If this field is ticked, the user will have access to the Protect Message option within the Message Delete Menu. © CommtechWireless Page 17 7900 Pager Programming Manual Show Daily Alarm In Menu If this field is ticked, the user will have access to the Daily Alarm menu on the pager. Disable Ability To Turn Pager Off If this field is ticked, the user will not have access to turn the pager off in the Settings Menu of the pager. The only way to turn the power off is to remove the battery from the pager. Ability To Delete Messages If this field is ticked, the user will have access to the Delete Menu on the pager where they can normally choose to delete messages, protect messages or delete all messages. Ability To Access The Telephone Directory If this field is ticked, the user will have access to the Telephone Book menu on the pager. POCSAG Error Reduction This field should be left ticked. Select Language Choose the language to be used on the pager. You can select between UK, Russian, Spanish, French, German, Italian, Thai or USA. Changing the language setting, changes the display of the day of the week, month and the am/pm display. Number of Keys Leave this field set to 4 for normal operation. Backlight control The LCD screen LED backlight can be activated in one of three ways. Setting Description Press ENT key for 2 sec The backlight is activated when the Press any key Activated when any key is pressed. The backlight will extinguish when the pager goes to Standby Mode. Activated when a message is received or when any key is pressed. The backlight will extinguish when the pager goes to Standby Mode. Note: this option causes considerable current draw and the battery life will be reduced severely. Press any key & RX Page 18 extinguishes when the to Standby Mode. key is held for two seconds. The backlight key is again held for two seconds, or when the pager goes © CommtechWireless Manual 5.1.5 7900 Pager Programming Reminders Unread Message Reminder Alert Set this field is ticked, the user will be alerted that there are unread messages waiting on the pager. The alert will be in the form of a short beep. Remind User Every This refers to the number of times the pager will remind the user that there is an unread message waiting. Select 1, 2, 5, 10 or 15 minutes. Number Of Reminder Beeps This refers to the number of times the pager will remind the user that there is an unread message two times, or until the message is read. Unread Message Indication If the pager contains a message that has not been read by the user, an icon can be displayed to alert the user, if this field is ticked. © CommtechWireless Page 19 7900 Pager Programming 5.1.6 Manual Duplicate Messages Enable If this field is ticked and a duplicate message is received, the original message will simply have its receive time updated and the pager will not alert the user at all. If this field is unticked and a duplicate message is received, the original message will have its receive time updated and the pager will alert. Display Duplicate Message Icon If this field is ticked, a small duplicate message icon to be displayed on the screen when viewing a duplicate message. Page 20 © CommtechWireless Manual 7900 Pager Programming Detect Time This field refers to the duplicate message rejection timeout period. It can be set to either 1, 2, 3, or 4 minutes. Repeat Message Tone Pattern When the pager receives a duplicate message, the pager can emit a tone. Using this field you can choose between a Short beep or the Normal alert tone. © CommtechWireless Page 21 7900 Pager Programming 5.1.7 Manual Folders The 7900 has capacity for 12 mail drop folders for use with wide area paging. Each folder is individually configured here. Name Each mail box folder can be assigned a four character alphanumeric name. This will be provided by your carrier. Alert Each mail box folder can be set to alert the user in one of three ways. It can be set to Mute, emit a Short beep or the Normal beep code tone. Page 22 © CommtechWireless Manual 5.1.8 7900 Pager Programming Out of Range Enable Tick this field to enable the out of range function. Enable Warning Message When Out Of Range When the pager detects that it has fallen out of range, ticking this field will make the pager display OUT OF SERVICE on the screen. Enable Vibrate When Out Of Range When the pager detects that it has fallen out of range, ticking this field will make the pager vibrate continuously. © CommtechWireless Page 23 7900 Pager Programming Manual Show Icon When The small antenna icon on the LCD can be displayed only when the pager is out of range or only when the pager is within range. Detect Time This field can be set between 1, 2, 3, 4, 5 and 6 minutes. If the pager does not detect a POCSAG carrier signal on its set frequency within this time frame, it will sense that it is out of range and warn the user according to the settings above. Page 24 © CommtechWireless Manual 5.1.9 7900 Pager Programming Over The Air Allow Setting Of Time Tick this field if you would like to enable the ability for the time to be altered using special OTA commands. The commands available to alter the pagers time are shown below. © CommtechWireless Function _ _ _ _24h time OTA Command [0090][_ _ _ _-0] _ _ _ _AM time [0090][_ _ _ _-1] _ _ _ _PM time [0090][_ _ _ _-2] Page 25 7900 Pager Programming Manual Allow Pager To Be Turned Off Tick this field if you would like to enable the ability to turn the pager off using a special OTA command. The default command for this function is shown below, however this can be altered by using the Allow Custom OTA Commands For The Following field described below. Function Turn pager off OTA Command [0091][0] Allow All Messages To Be Deleted Tick this field if you would like to enable the ability to delete all messages from the pager (including protected messages) using a special OTA command. The default command for this function is shown below, however this can be altered by using the Allow Custom OTA Commands For The Following field described below. Function OTA Command Delete all messages [0092][0] Allow Alert Mode To Be Changed Tick this field if you would like to enable the ability to set the alert type (beep, vibrate, mute etc) using special OTA commands. The commands available to alter the pagers alert mode are shown below. Function OTA Command Mute [0093][0] Beep Vibrate [0093][1] [0093][2] Beep & Vibrate [0093][3] Allow Cap Code To Be Changed Tick this field if you would like to enable the ability to change cap codes and baud rate using special OTA commands. The commands available to alter the pagers cap codes and baud rate are shown below. NOTE: Only the first cap code can be used to change cap codes over the air. Page 26 Function OTA Command cap code-1 _ _ _ _ _ _ _ 512 bps cap code-1 _ _ _ _ _ _ _ 1200 bps [0094][_ _ _ _ _ _ _] [1- 512] [0094][_ _ _ _ _ _ _] [1- 120] cap code-1 _ _ _ _ _ _ _ 2400 bps [0094][_ _ _ _ _ _ _] [1- 240] cap code-2 _ _ _ _ _ _ _ 512 bps cap code-2 _ _ _ _ _ _ _ 1200 bps [0094][_ _ _ _ _ _ _] [2- 512] [0094][_ _ _ _ _ _ _] [2- 120] cap code-2 _ _ _ _ _ _ _ 2400 bps [0094][_ _ _ _ _ _ _] [2- 240] cap code-3 _ _ _ _ _ _ _ 512 bps etc [0094][_ _ _ _ _ _ _] [3- 512] etc © CommtechWireless Manual 7900 Pager Programming Allow Capcodes/Beepcodes To Be Enabled Or Disabled Tick this field if you would like to enable the ability to enable and disable cap codes and beep codes using special OTA commands. The commands available to enable/disable cap codes are shown below. Function cap code 1 beep code A disabled OTA Command [0095][1A][0] cap code 1 beep code A enabled [0095][1A][1] cap code 1 beep code B disabled cap code 1 beep code B enabled [0095][1B][0] [0095][1B][1] cap code 1 beep code C disabled [0095][1C][0] cap code 1 beep code C enabled cap code 1 beep code D disabled [0095][1C][1] [0095][1D[0] cap code 1 beep code D enabled [0095][1D][1] cap code 2 beep code A disabled etc [0095][2A][0] etc Allow Custom OTA Commands For The Following The OTA commands used to control pager power off and deletion of all stored messages can be customized if required. To enable non standard messages to control these OTA functions, tick this field. The next two fields below will then become active. Command To Turn Pager Off Enter the custom trigger message to turn the pager off OTA here. It can be up to six alphanumeric characters long. Command To Delete All Messages Enter the custom trigger message to delete all messages here. It can be up to six alphanumeric characters long. © CommtechWireless Page 27 7900 Pager Programming 5.1.10 Manual Hand Program Enable Tick this field if you would like to allow the user to enter manual programming mode and change pager settings including ability to disable/enable/change cap codes, change frequency and baud rate. See the user manual for more information. Require Password An optional password can be added for extra protection. Tick this to require a password. Password If the password feature above is enabled, enter the password in this field. It is a four digit numeric password. Default: 0200. Page 28 © CommtechWireless Manual 5.1.11 7900 Pager Programming Tones © CommtechWireless Page 29 7900 Pager Programming Manual Priority Each beep code and cap code can also be independently assigned a special function if required. These are described in more detail below: Setting Normal Description Pager will alert based on the standard A,B,C or D beep codes or the user selected alert type Urgent Will override the standard A,B,C or D beep codes or the user selected alert type to emit a special alert that sounds like an urgent warble. If the pager is set to vibrate mode then this forces the pager to play the A,B,C or D beep code sent to the pager The pager will keep on alerting until a key is pressed. Priority Manual Manual+Priority Manual+Urgent The pager will change from vibrate mode to beep mode and will continue to beep until a key is pressed The pager will warble the urgent sound until a key is pressed Decoding In addition to a cap code, pagers may also be sent call types. Pagers respond to four specific types A, B, C & D. The 7900 can be setup to decode a message independently by cap code and beep code either alphanumeric (7-bit), numeric (4-bit), tone-only format. Each field can also be disabled if required. Page 30 © CommtechWireless Manual 5.1.12 7900 Pager Programming Names Display Text for Cap Codes And Beep Codes This feature allows each cap code and each beep code to be assigned a six character alphanumeric name. Each message then received by the pager, will then display this text at the end of the message after the time stamp. In Message Preview Mode (see display tab), this information acts as the preview as it changes as the messages are scrolled through. Cap Code/Beep Code 1 - 4 Description These fields are where the text you want to associate with each cap code or beep code go. Each field can be six alphanumeric characters long. © CommtechWireless Page 31 7900 Pager Programming 6. APPENDIX 6.1 Further Help and Support Manual Contact your Place of Purchase A CommtechWireless Authorized Distributor or Dealer sets up most systems. Contact your place of purchase with inquiries beyond the scope of this manual. This Product is Not Field Serviceable Should a fault develop with the hardware or software, contact your place of purchase for the most appropriate form of action. Do not attempt to open or repair any of the products as this may void any warranty. Page 32 © CommtechWireless