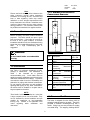
1
Date:
Revision:
Form:
8-4-2010
0
2396
Bryan Steam LLC
Installation and Operating Service Manual
Triple-Flex
High Efficiency Boilers
Date:
Revision:
Form:
8-4-2010
0
2396
INSTALLATION AND OPERATION SERVICE MANUAL
Triple-Flex 150, 200, 250, & 300
High Efficiency Boilers
Bryan Steam LLC
783 North Chili Avenue * Peru, IN 46970
Phone 765.473.6651 • Fax 765.473.3074
E-mail: [email protected] Internet: www.bryanboilers.com
Date:
Revision:
Form:
8-4-2010
0
2396
Table of Contents
Bryan Steam LLC ..............................................................................................................................i
Installation and Operating Service Manual........................................................................................i
Table of Contents ............................................................................................................................ iii
Tables ...............................................................................................................................................v
Figures..............................................................................................................................................v
Section 1 Installation Instructions– Triple-Flex High Efficiency Boilers........................................... 1
1.1 Boiler Foundation................................................................................................................... 2
1.2 Clearances ............................................................................................................................. 2
1.2.1 Minimum Clearances to Combustible Surfaces............................................................... 2
1.3 Receiving The Boiler.............................................................................................................. 2
1.4 Boiler Connections................................................................................................................. 3
1.4.1 Flow Connection .............................................................................................................. 3
1.4.2 Safety Relief Valves......................................................................................................... 3
1.4.3 Expansion Tank Connections .......................................................................................... 3
1.4.4 Drain Connection ............................................................................................................. 3
1.4.5 Condensate Drain Connection......................................................................................... 3
1.4.6 Gas Supply Connection ................................................................................................... 3
1.4.7 Drip Leg............................................................................................................................ 3
1.4.8 Gas Piping Leak Test....................................................................................................... 3
1.4.9 Venting Of Gas Train Components.................................................................................. 4
1.5 Electrical Requirements ......................................................................................................... 4
1.6 Combustion Air Supply .......................................................................................................... 4
1.6.1 Combustion Air Openings: ............................................................................................... 5
1.6.2 Louvers, Grilles, and Screens.......................................................................................... 5
1.7 Flue Gas Venting System ...................................................................................................... 6
1.7.1 Design & Installation ........................................................................................................ 6
1.7.2 Combustion Air and Venting Requirements for Canada.................................................. 7
1.7.3 Marking Of Gas Vents...................................................................................................... 8
1.8 Before Placing Boiler In Operation ........................................................................................ 8
1.8.1 Hydrostatic Test Of Boilers And System.......................................................................... 9
1.8.2 Test Of Gas Piping........................................................................................................... 9
Section 2 Start-Up and Operation Triple-Flex High Efficiency Boilers .......................................... 10
2.1 Boiler Assembly ................................................................................................................... 11
2.1.1 Triple-Flex Front View .................................................................................................... 11
2.1.2 Triple-Flex Rear View .................................................................................................... 12
2.1.3 Triple-Flex Left Side View .............................................................................................. 13
2.1.4 Triple-Flex Right Side View............................................................................................ 13
2.1.5 Triple-Flex Behind the Cabinet Door.............................................................................. 13
2.1.6 Pilot Spark Igniter Assembly .......................................................................................... 15
2.1.7 Triple-Flex Left Flue Collector View ............................................................................... 15
2.1.8 Triple-Flex Right Flue Collector View............................................................................. 16
2.2 SOLA Hydronic Control System .......................................................................................... 16
2.2.1 Power-up Validation....................................................................................................... 16
2.2.2 Home Page .................................................................................................................... 16
2.2.3 Page Navigation............................................................................................................. 17
2.2.4 Keyboard........................................................................................................................ 17
2.2.5 Status Page.................................................................................................................... 18
2.2.6 Configuration Page ........................................................................................................ 18
2.2.7 Configuration Password................................................................................................. 19
2.2.8 Change Parameter Settings........................................................................................... 20
2.2.9 Safety Verification .......................................................................................................... 20
2.2.10 Fault/Alarm Handling ................................................................................................... 21
Date:
8-4-2010
Revision:
0
Form:
2396
2.2.11 Operation Page ............................................................................................................ 22
2.2.12 Annunciation Page....................................................................................................... 23
2.2.13 Modulation Configuration ............................................................................................. 23
2.2.14 Firing Rate Control Page ............................................................................................. 23
2.2.15 Advanced Setup........................................................................................................... 24
2.2.16 System Time ................................................................................................................ 24
2.2.17 Calibrate Touch Screen ............................................................................................... 24
2.2.18 Reset / Reboot Display ................................................................................................ 25
2.2.19 Outdoor Reset.............................................................................................................. 25
2.2.20 Remote Setpoint (4 – 20 mA) ...................................................................................... 26
2.2.21 Central Heat Configuration .......................................................................................... 27
2.2.22 Sound Pressure Levels................................................................................................ 27
2.2.23 Modbus Communication .............................................................................................. 29
2.2.24 Alert Codes .................................................................................................................. 29
2.3 Boiler Commissioning .......................................................................................................... 35
2.3.1 Modulation...................................................................................................................... 35
2.3.2 Test Setup...................................................................................................................... 35
2.3.3 Pre Checks And Setup................................................................................................... 35
2.3.4 Dry Run .......................................................................................................................... 36
2.3.5 Pilot Adjustment ............................................................................................................. 36
2.3.6 Initial Light Off ................................................................................................................ 37
2.3.7 Adjusting Boiler Maximum Input .................................................................................... 37
2.3.8 Adjusting Boiler Minimum Input ..................................................................................... 37
2.3.9 Gas Meter Readings ...................................................................................................... 38
2.4 Troubleshooting ................................................................................................................... 39
Section 3 Care and Maintenance .................................................................................................. 50
3.1 Cleaning The Boiler And System – New Systems............................................................... 51
3.1.1 Pre-Boil Out Flushing Of System ................................................................................... 51
3.1.2 Boil Out Procedure......................................................................................................... 51
3.1.3 Draining The System ..................................................................................................... 52
3.2 Replacement Boiler Installations: Protection Against Corrosion And Sediment.................. 52
3.3 Boiler Water Treatment........................................................................................................ 52
3.4 External “Fire-Side” Cleaning............................................................................................... 53
3.5 Suggested Maintenance Schedule ...................................................................................... 53
Section 4 Lead Lag........................................................................................................................ 55
4.1 General Description Of The Lead Lag Application .............................................................. 56
4.2 Lead Lag (Ll) Master General Operation ............................................................................. 56
4.3 System Wiring Hookup ........................................................................................................ 58
4.4 Lead-Lag Operation ............................................................................................................. 59
4.5 Slave Operation And Setup ................................................................................................. 60
4.6 Slave Parameters ................................................................................................................ 60
4.7 Ll Master Operation And Setup ........................................................................................... 61
4.7.1 Overall Control ............................................................................................................... 61
4.7.2 Periodic Data Polling messages .................................................................................... 62
4.7.3 Slave Status Manager.................................................................................................... 62
4.7.4 Master Active Service .................................................................................................... 65
4.7.5 Modulation Sensor ......................................................................................................... 65
4.7.6 Demand and Rate .......................................................................................................... 66
4.7.7 Rate Adjustment............................................................................................................. 67
4.7.8 Implementation............................................................................................................... 67
4.7.9 Rate Allocation ............................................................................................................... 68
4.7.10 Burner Demand............................................................................................................ 70
4.7.11 Lead Drop-Stage On Error - LDSE: ............................................................................. 73
iv
Date:
8-4-2010
Revision:
0
Form:
2396
Tables
Table 1 Minimum Clearance............................................................................................................ 2
Table 2 Electrical Requirements...................................................................................................... 4
Table 3 Boiler Draft.......................................................................................................................... 7
Table 4 Water Flow Switch Settings.............................................................................................. 14
Table 5 Gas Limiting Orifice Rough Settings ................................................................................ 15
Table 6 Sound Pressure Readings................................................................................................ 28
Table 7 Modbus Terminals ............................................................................................................ 29
Table 8 Alert Codes ....................................................................................................................... 29
Table 9 Approximate Boiler Settings ............................................................................................. 38
Table 10 Gas Pressure Correction ................................................................................................ 38
Table 11 Gas Temperature Correction.......................................................................................... 38
Table 12 R7910A Lockout and Hold Codes .................................................................................. 39
Figures
Figure 1 Minimum Clearances......................................................................................................... 2
Figure 2 Main Gas Inlet Connection ................................................................................................ 4
Figure 3 Triple-Flex Front View ..................................................................................................... 11
Figure 4 Triple-Flex Rear View...................................................................................................... 12
Figure 5 Triple-Flex Left Side View ............................................................................................... 13
Figure 6 Triple-Flex Right Side View ............................................................................................. 13
Figure 7 Triple-Flex Behind the Cabinet Door............................................................................... 13
Figure 8 Air Flow Switch................................................................................................................ 14
Figure 9 Pilot Spark Igniter Assembly ........................................................................................... 15
Figure 10 Triple-Flex Left Flue Collector View .............................................................................. 15
Figure 11 Triple-Flex Right Flue Collector View............................................................................ 16
Figure 12 Home Page ................................................................................................................... 16
Figure 13 Keyboard ....................................................................................................................... 17
Figure 14 Status Page................................................................................................................... 18
Figure 15 Configuration Menu Page.............................................................................................. 18
Figure 16 Sample Configuration Page .......................................................................................... 19
Figure 17 Change Parameter Dialog............................................................................................. 20
Figure 18 Safety Parameter Verification ....................................................................................... 20
Figure 19 Safety Parameter User Confirmation ............................................................................ 21
Figure 20 Safety Parameter Reset ................................................................................................ 21
Figure 21 Home Page Lockout...................................................................................................... 22
Figure 22 Status Page Lockout ..................................................................................................... 22
Figure 23 History Dialog ................................................................................................................ 22
Figure 24 Lockout History Page .................................................................................................... 22
Figure 25 Operation Page ............................................................................................................. 22
Figure 26 Annunciation Page ........................................................................................................ 23
Figure 27 Modulation Configuration .............................................................................................. 23
Figure 28 Firing Rate Control Page............................................................................................... 23
Figure 29 Advanced Setup ............................................................................................................ 24
Figure 30 System Time ................................................................................................................. 24
Figure 31 Display Diagnostics ....................................................................................................... 24
Figure 32 Reset / Reboot Display.................................................................................................. 25
Figure 33 Outdoor Reset ............................................................................................................... 25
Figure 34 Outdoor Reset Curve .................................................................................................... 26
v
Date:
8-4-2010
Revision:
0
Form:
2396
Figure 35 Outdoor Reset Sensor Configuration ............................................................................ 26
Figure 36 Air / Gas Ratio Tappings ............................................................................................... 35
Figure 37 LL / Multi-Boiler Field Wiring ......................................................................................... 58
vi
Date:
8-4-2010
Revision:
0
Form:
2396
Section 1 Installation Instructions–
Triple-Flex High Efficiency Boilers
1
Date:
8-4-2010
Revision:
0
Form:
2396
1.2.1 MINIMUM CLEARANCES TO
COMBUSTIBLE SURFACES
Note:
Please read and save for future reference the
entire instruction manual before attempting
installation of or starting the unit. Insurance and
local or state regulatory codes may contain
additional or more stringent requirements than
those contained in this manual. Installation must
conform to these codes and any other authority
having jurisdiction. This instruction manual shall
be posted and maintained in a legible condition.
1.1 BOILER FOUNDATION
Before uncrating, the boiler location should be
prepared. The boiler should set upon a good
level concrete floor. If the boiler is not level or
the floor is not in good condition, a concrete
foundation should be built, the dimensions being
larger than the outside dimensions of the boiler
base.
A 4” high housekeeping pad is
suggested.
WARNING:
Figure 1 Minimum Clearances
Do not install boiler on combustible
flooring.
DIM.
A
B
1.2 CLEARANCES
C
See Table 1 for minimum clearances to walls,
ceilings, or obstructions. The clearances in
Table 1 are intended as a general
recommendation only. Local codes must be
applied to specific installations and the minimum
clearances established accordingly. Provisions
must also be made for service, accessibility and
clearance for piping and electrical connections.
Do not obstruct combustion air and ventilation
openings with piping or any other construction.
All boilers must be installed in a space that is
large compared to the boiler.
D
E
F
G
Description
Clearance Above Top of
Boiler
Right Side
From Chimney or Vent
Collector
Measured
Horizontally
Left Side – Tube Access
Side
On
Standard
Construction
From Chimney or Vent
Collector
Measured
Vertically
Front of Boiler – Gas Train
& Control Panel End
Rear of Boiler Opposite
Gas Train & Control Panel
End
Triple-Flex
150 - 300
18”
18”
18”
27”
18”
48”
18”
Table 1 Minimum Clearance
NOTE:
These boilers should be installed in a room that
is large compared to the size of the boiler. They
are not intended for alcove installation and are
suitable for installation on non-combustible
flooring only. Adhere to all applicable local
codes regarding boiler installation and
clearances.
1.3 RECEIVING THE BOILER
The boiler is shipped from the factory with (4)
shipping feet/legs bolted to the skids. These are
provided to facilitate unloading/moving with a
forklift. Lifting lugs are also provided to enable
over-head lifting. The shipping feet/legs MUST
2
Date:
8-4-2010
Revision:
0
Form:
2396
BE REMOVED after the boiler is set in-place on
its
concrete
foundation
before
any
piping/electrical connections are made.
It is
recommended that the plastic protective cover
be left on as long as possible to reduce finish
damage from the installation.
1.4.5 CONDENSATE DRAIN
CONNECTION
A 1” MPT connection is provided to drain the
condensed products of combustion from a trap
located beneath the boiler. This must be run to
a drain using stainless steel or PVC piping. The
condensate temperature should never exceed
212o F and the pH of the condensate should
never be greater than 3.5. NO VALVE is to be
installed in this line from the boiler to point of
discharge.
1.4 BOILER CONNECTIONS
Do not run any pipes along the tube access
panel side of the boiler. Maintain clearances as
shown on the dimensional drawing for servicing
of the boiler tubes. Provide at least 48" from the
front of the boiler, unless a larger dimension is
indicated on the dimensional. All piping should
be designed and installed to avoid any loadings
on the boiler connections or piping.
1.4.6 GAS SUPPLY CONNECTION
The installation must conform completely to the
requirements of the authority having jurisdiction,
or in the absence of such, requirements shall
conform in the U.S. to the current National Fuel
Gas Code, ANSI Z223.1-1984, or in Canada to
the current Natural gas and propane installation
code (CAN/CSA B149.1-05), and applicable
regional regulations for the class; which should
be followed carefully in all cases. Authorities
having jurisdiction should be consulted before
installations are made.
1.4.1 FLOW CONNECTION
The system supply and return flow connections
are shown on Figure 3 and Figure 4
respectively. A gate valve should be installed on
the boiler outlet and inlet lines. This allows the
boiler to be isolated from the heating system for
draining and servicing.
1.4.2 SAFETY RELIEF VALVES
1.4.7 DRIP LEG
Safety relief valve(s) are shipped loose.
Connections are provided in the top of the boiler
for the safety relief valve(s). The safety relief
valve discharge piping must be the same size as
the safety relief valve discharge opening and run
to a point of safe discharge. Avoid overtightening as this can distort valve seats. All
piping from the safety relief valve(s) must be
independently supported with no weight carried
by the valve.
A drip leg, or sediment trap, must be installed in
the gas supply line. See Fig. 1.5A. The gas line
must be connected to a supply main at least as
large as the gas train connection at the boiler.
This connection should be made with a union so
that the boiler gas train components and burner
may be easily removed for service.
1.4.8 GAS PIPING LEAK TEST
1.4.3 EXPANSION TANK
CONNECTIONS
Leaks shall be checked using a soap and water
solution.
Connection(s) to an expansion tank are to be
provided by others in the system piping separate
from the boiler.
After completion of the gas-piping hookup, the
installation must be checked for leaks. All joints
up to the main motorized gas valve shall be
checked. A pressure gauge shall be installed
down stream of the main motorized gas valve
and up stream of the manual gas shutoff valve in
the closed position to ensure the main motorized
valves are not leaking by.
During
commissioning, the remainder of the gas train
joints down stream of the main motorized gas
1.4.4 DRAIN CONNECTION
A drain valve must be installed on the boiler
drain connection, the same pipe size as this
connection, to allow draining of the boiler.
3
Date:
8-4-2010
Revision:
0
Form:
2396
valve shall be tested for leaks.
Model
TF300/250
TF200/150
200 V – 240 V / 60 Hz / 3 Ph
Blower Motor
3 (4.02)
N/A
KW (HP)
Full Load
15.6
N/A
Amps1
Service Fuse
(3) 20 Amp
N/A
400 V – 480V / 60 Hz / 3 Ph
Blower Motor
N/A
N/A
KW (HP)
Full Load
N/A
N/A
Amps1
Service Fuse
N/A
N/A
200 V – 240 V / 60 Hz / 1 Ph
Blower Motor
N/A
1.05 (1.41)
KW (HP)
Full Load
N/A
6
Amps1
Service Fuse
N/A
(2) 7 Amp
1.4.9 VENTING OF GAS TRAIN
COMPONENTS
Table 2 Electrical Requirements
Equipment Grounding
Figure 2 Main Gas Inlet Connection
The boiler must be grounded in accordance with
the current American National Standard
Electrical Code, ANSI/NFPA #70.
Normally open vent valves (when supplied) These valves must be piped to outdoors using
pipe no smaller than that of the valve.
1.6 COMBUSTION AIR SUPPLY
Gas pressure switches – All gas pressure
switches provided are of the VENTLESS type
and do not require venting to atmosphere.
Combustion Air:
For proper combustion it is necessary to provide
the boiler room with appropriate openings for
fresh air supply. Temporary air intakes such as
windows and doors should be avoided since
they may be closed. In addition to air needed
for combustion, sufficient air must be supplied
for ventilation as well as other air consuming
equipment that may be present in the boiler
room. Often when personnel are working in the
boiler room, combustion air openings are closed
due to the temperature of the outside air. THIS
MUST BE AVOIDED AT ALL COSTS!
Provisions should be made to heat the outside
combustion air, if necessary, for personnel
comfort.
Gas pilot pressure regulator – A vent limiter for
the pilot pressure regulator is provided
eliminating the need to run a vent line to
atmosphere.
NOTE:
Do not use Teflon tape for threaded joints in gas
piping.
1.5 ELECTRICAL REQUIREMENTS
WARNING:
All electrical connections must
conform to the National Electrical
Code and to all other applicable State
and Local Codes. See boiler wiring
diagram and equipment list for specific
voltage requirements.
Positive means for supplying an ample amount
of outside air, allowing for the complete
combustion of the gas, must be provided.
Movable combustion air dampers, automatic or
manually adjustable, must be electrically
1
Full load Amps include blower and control
circuit.
4
Date:
8-4-2010
Revision:
0
Form:
2396
interlocked with the boiler to prevent boiler
operation if the dampers are closed.
One Permanent Opening Method
Combustion air openings must never be blocked
or obstructed in any manner.
One opening commencing within 12” of the top
of the room shall be provided. The opening
shall be directly to the outside or shall be ducted
to the outside with a horizontal or vertical duct.
The boiler room must be at a positive or neutral
pressure relative to the outdoors. A negative in
the boiler room will result in downdraft problems
and incomplete combustion due to the lack of
air.
The opening or duct shall have a minimum free
area of:
1 in2 / 3000 BTU /hour of the total input ratting of
all appliances (boilers) in the room.
WARNING!
Not less than the sum of the areas of all vent
connectors in the room. A “vent connector” is
defined as the pipe or duct that connects a fuel
burning appliance to a vent or chimney.
Failure to provide an adequate air
supply will result in boiler damage and
hazardous conditions in the building
(fire and asphyxiation hazard as well
as equipment damage).
Additional area must be provided for other air
consuming equipment in the room.
Mechanical Air Supply Systems
1.6.1 COMBUSTION AIR OPENINGS:
The combustion air supply may be provided by a
mechanical air supply system. If utilized, the
combustion air must be provided from the
outside at a minimum rate of 0.35 ft3/min. for
every 1000 Btu/hr. input for all appliances
located in the space.
The design of combustion air openings MUST
comply with local and/or State codes or the
authority having jurisdiction. As a minimum,
combustion air openings to the boiler room shall
be provided as follows:
Note:
Combustion air provided solely from an indoor
source is discouraged. No dimension for a
round or rectangular opening shall be less than
3”.
If exhaust fans are utilized, additional air shall be
provided to replace the exhausted air.
Each boiler and other appliance must be
interlocked to prevent operation when the
mechanical air supply system is not in operation.
Two Permanent Opening Method
If the combustion air is provided by a buildings
mechanical ventilation system, the system shall
be sized to provide the specified combustion air
in addition to the ventilation air requirements.
One opening starting within 12” of the top of the
boiler room and one starting within 12” of the
bottom of the boiler room shall be provided. The
openings shall be open directly to the outside or
ducted directly to the outside.
1.6.2 LOUVERS, GRILLES,
SCREENS
When directly open to the outside or ducted to
the outside by vertical ducts, each opening or
duct shall have a minimum fee open area of 1
in2 per 4000 BTU total input rating of the
boiler(s) in the room.
AND
Louvers and Grilles:
The required size of openings for combustion,
ventilation, and dilution air shall e based on the
net free area of each opening. Where the free
area through a design of louver, grille, or screen
is know, it shall be used in calculating the size
opening required to provide the free area
If ducted to the outside through horizontal
ducts, each opening or duct shall have a
minimum free area of 1 in2 per 2000 BTU total
input rating of the boiler(s) in the room.
5
Date:
8-4-2010
Revision:
0
Form:
2396
specified. Where the louver and grille design
and free area are not know, it shall be assumed
that wood louvers have a 25 percent free area,
and met louvers and grilles have 75 percent free
area. Non-motorized louvers and grilles shall be
fixed in the open position.
BOCA, National Mechanical Code
WARNING:
Do not locate air intakes where
petroleum distillates, CFC’s,
detergents, volatile vapors or any
other chemicals are present. Severe
boiler corrosion and failure will result.
Screens
Minimum Screen Mesh Size:
Screens shall not be smaller than 1/4 “ mesh.
Motorized Louvers:
1.7 FLUE GAS VENTING SYSTEM
Motorized louvers shall be interlocked with the
appliance so they are proven in the full open
position prior to main burner ignition and during
main burner operation. Means shall be provided
to prevent the main burner from igniting should
the louver fail to opening during burner startup
and to shut down the main burner if the louver
close during burner operation.
Triple-Flex boilers are Category IV appliances
that vent with a positive exhaust vent pressure
and with a temperature that is likely to cause
condensation. Any venting system used with
the Triple-Flex boiler must comply with the
requirements for Special Gas Vents per UL
Category Code (CCN) DGSH, which are UL
Listed per UL 1738 or UL Category Code
DGSH7, which are cUL Listed (Canada) per UL
1738.
Combustion Air Ducts
Combustion air ducts shall comply with the
following:
WARNING:
Ducts shall be constructed of galvanized steel or
a material having equivalent corrosion
resistance, strength and rigidity.
Ducts shall terminate in an unobstructed space,
allowing free movement of combustion air to the
appliances.
Ducts shall serve a single space.
Ducts shall not serve both upper and lower
combustion air openings where both such
openings are used. The separation between
ducts serving the upper and lower combustion
air openings shall be maintained to the source of
combustion air.
Ducts shall not be screened where terminating
in an attic space.
Horizontal upper combustion air ducts shall not
slope downward toward the source of
combustion air.
The Triple-Flex boiler is NOT certified
for use with other types of venting
excepting Special Gas Vents. Use of
any other types of venting may cause
vent failure resulting in serious injury
or death.
1.7.1 DESIGN & INSTALLATION
A qualified venting professional experienced in
venting system designs should design the boiler
vent system. The vent size must be NO LESS
THAN 8” IN DIAMETER and sized such that the
pressure drop between the boiler and the point
of discharge does not exceed 0.20” WC. While
the vent must be UL Listed Special Gas Vent
per Category Code DGSH or DGSH7 for
Canada, Bryan Steam, LLC recommends the
use of venting components fabricated from
AL29-4C® material. The vent installation must
be in strict compliance with the vent
manufacturers requirements.
Clearances to
combustible
materials
and
supporting
requirements, per the vent manufacturers
installation instructions, must be maintained.
For informational purposes, there are several
codes that address the amount of air and/or size
of the opening(s) in walls for combustion air.
NFPA 54, National Fuel Gas Code (ANSI
Z223.1)
ASME CSD-1, Controls and Safety Devices for
Automatically Fired Boilers
ASME Section VI, Recommended Rules for
Care and Operation of Heating Boilers
6
Date:
8-4-2010
Revision:
0
Form:
2396
Horizontal sections of the flue vent system must
be pitched back towards the boiler at ¼ inch per
foot to avoid condensate pooling and allow for
proper drainage. Venting may be horizontal,
through the wall installation or vertical, through
the roof installation. The vent system, including
terminus, must be sized in accordance with the
flue gas flow(s) and pressure drop(s) per Table 3.
Boiler Model
Flue Gas
Flow,
ACFM
@40%X
SA
o
200 F
Comb Air
Req.
SCFM
@40%XS
o
A60 F
TF-150
452
330
TF-200
603
441
TF-250
753
550
TF-300
904
661
Note:
An existing masonry chimney may be utilized
PROVIDING that the existing chimney is lined
with Special Gas Vent material(s), primarily
AL29-4C®. There are venting manufacturers
that have these products available.
1.7.2 COMBUSTION AIR AND VENTING
REQUIREMENTS FOR CANADA
Permissible
∆P Thru
Venting
Canadian
Standard
CAN/CSA-B149.1-05,
Natural gas and propane installation code
specifies venting systems and air supply for
appliances in Section 8. Paragraph 8.1.4 states
“Air supply shall be provided in accordance with
Clause 8.4 when either an appliance or a
combination of appliances has a total input
exceeding 400,000 Btuh”. Air supply is defined
as combustion air, excess air, flue gas dilution
air, primary air, secondary air, and ventilation
air. The air supply requirements below are a
summation of Clause 8.4 specific to the TripleFlex boiler.
0.2” WC
(Max)
0.2” WC
(Max)
0.2” WC
(Max)
0.2” WC
(Max)
Table 3 Boiler Draft
Note:
NFPA 54-2009 (ANSI Z223.1-2009) paragraph
12.7.3.3 states, “The sizing of gas vents for
Category II, Category III, and Category IV
Appliances shall be in accordance with the
appliance manufacturers instructions.”
Air Supply Requirements per CAN/CSAB149.1-05 for Appliances having an input
exceeding 400 MBH.
Ventilation Air: an opening for ventilation air at
the highest point that opens to the outdoors shall
provide Ventilation of the space. The cross
sectional area of this opening shall be at least
10% of the area required for combustion air, but
in no case shall the cross-sectional area be less
that 10 in2 (6500mm2).
Combustion Air: For combustion air where the
air supply is provided by natural airflow from
outdoors, in addition to the opening for
ventilation air, there shall be permanent opening
having a total cross-sectional free area of not
less than 1 in2 for each 30,000 BTU/hr. (70 mm2
for each kW) of the total rated input of the
boiler(s). The location of the opening(s) shall
not interfere with the openings for ventilation air.
Please refer to CAN/CSA-B149.1-05, Para.
8.4.4, for combustion air openings if there are
natural draft, fan assisted or power draft
assisted equipment in the space.
When an air supply duct is used to supply
combustion air, it’s discharge opening shall be
located where there is no possibility of cold air
affecting steam or water lines or other
temperature sensitive equipment.
WARNING:
Do not use a barometric damper with
this boiler. This is a positive pressure
system. The use of a barometric
damper may cause flue gases to leak
into the boiler room.
The boiler vent must not be connected to any
portion of another vent system without
consulting the vent manufacturer. The boiler
shall not be connected to any part of a vent
system serving a Category I or Category II
appliance, nor shall a Category I or Category II
appliance be connected to the vent system
serving this boiler. Improper connection of
venting systems may result in leakage of flue
gases into building spaces.
7
Date:
8-4-2010
Revision:
0
Form:
2396
Combustion Air Supply Dampers, Louvers,
and Grilles
•
The free area of the combustion air supply
opening shall be calculated by subtracting the
blockage area of all fixed louvers, grilles or
screens from the gross area of the opening.
Openings in a fixed louver, grille, or screen shall
have no dimension smaller than ¼” (6 mm).
No manually operated damper or manually
operated adjustable louvers are permitted.
A motorized damper or louvers shall be
interlocked so the burner(s) cannot operate
unless the damper or louver is in the fully open
position.
•
Vent Sizing
•
Mechanical Combustion Air Supply
When combustion air is supplied by mechanical
means, an airflow sensing device shall be
installed and wired into the safety limit circuit of
the primary safety control to shut off the gas in
the even a an air supply failure.
•
Appliance Venting per CAN/CSA-B149.105
Paragraph 8.9 of CAN/CSA-B149.1-05 addresses
“Appliance Venting”. Paragraphs 8.9 through 8.31
address many facets of flue gas vents, many of which
do not apply to the Triple-Flex boiler, which is a
Category IV listed appliance requiring the use of
special venting systems as previously described.
•
•
A vent or chimney serving a single
appliance shall provide effecting venting
and shall be sized so that it’s effective
area is not less than that of the flue
outlet diameter of the boiler and in
accordance with engineering venting
tables acceptable to the authority having
jurisdiction.
A vent or chimney serving more than
one appliance shall provide effective
venting and shall be sized in
accordance with good engineering
practice, such as by the use of
engineering venting tables acceptable to
the authority having jurisdiction.
1.7.3 MARKING OF GAS VENTS
Where solid and liquid fuels are used, gas vents,
must be plainly and permanently identified by a
label. The label should read, "This gas vent is
for appliances that burn gas only. Do not
connect to incinerators or solid or liquid fuel
burning appliances."
This label must be attached to the wall or ceiling
at a point near where the gas vent connector
enters the wall, ceiling or chimney.
The authority having jurisdiction must determine
whether their area constitutes such a locality.
NOTE:
Please note that the information provided in this
manual relative to the Canadian Standard is not
meant to be all-inclusive. Reading the entire
Standard is strongly suggested.
The final
approval of all system designs must be
acceptable to the authority having jurisdiction.
•
shaft used for return air, hot air,
ventilating air, or combustion air.
An appliance that operates at a positive
vent pressure shall not be connected to
a venting system serving any other
appliance.
The Triple-Flex boiler
operates at a positive vent pressure.
A factory-built chimney used for venting
an appliance shall be certified.
Venting for Category IV appliances shall
be as specified or furnished by the
manufacturer of the listed appliance.
The Triple-Flex boiler is a Category IV
appliance requiring the use of special
vent that is certified.
A special venting system shall be
installed in accordance with the terms of
it’s listing and the vent manufacturers
certified installation manual.
A flue gas vent or a vent connector shall
not be installed in either a duct or a
Solid Fuel Appliance Vents
Gas appliances shall not be vented to a vent or
a chimney that serves a solid-fuel burning
appliance.
1.8 BEFORE PLACING BOILER IN
OPERATION
8
Date:
8-4-2010
Revision:
0
Form:
2396
1.8.1 HYDROSTATIC TEST OF
BOILERS AND SYSTEM
After completing the boiler and burner
installation, the boiler connections, fittings,
attachments and adjacent piping must be
inspected for leaks by filling the unit with water.
The pressure should be gradually increased to a
pressure just below the setting of boiler safety
relief valve(s).
Remove the boiler tube access panels (see
dimensional drawing in the boiler manual).
Inspect the tube to header joints to be certain
that all tube fittings are sealed.
This is
necessary because, although the boiler is
hydrostatically tested at the factory, minor leaks
in fittings and at attachments can develop from
shipping
vibration
or
from
installation
procedures. It is often necessary to retighten
such fittings after installation and after the boiler
has been operated for some time. Replace tube
access panels before proceeding to start boiler.
1.8.2 TEST OF GAS PIPING
Reference the gas system test under paragraph
Gas Supply Connection, in this manual.
9
Date:
8-4-2010
Revision:
0
Form:
2396
Section 2 Start-Up and Operation
Triple-Flex High Efficiency Boilers
10
Date:
8-4-2010
Revision:
0
Form:
2396
2.1.1 TRIPLE-FLEX FRONT VIEW
WARNING:
Improper servicing and start-up of this
equipment may create a potential
hazard to equipment, operators, or
persons in the building.
Only fully trained and qualified
personnel should do servicing and
start-up.
WARNING:
Before disconnecting or opening any
fuel line, cleaning or replacing parts of
any kind take the following
precautions.
Turn OFF the main fuel shutoff valves,
including the pilot gas cock if
applicable.
Turn OFF all of the electrical
disconnects to the burner, boiler and
any other equipment or systems
electrically interlocked with the burner
or boiler.
Figure 3 Triple-Flex Front View
1. The boiler cabinet door provides easy
access to boiler and burner components.
This door should remain closed during
normal operation to ensure proper flow of air
around the boiler flue collector.
2. The boiler supply water connection provides
heated water to the system.
This
connection is a standard ANSI 150# class 3”
flange.
3. The boiler water pressure gauge is 2”
diameter and will have a range not less than
1-1/2 nor more than 3-1/2 times the
pressure setting of the boiler safety relief
valve.
4. The boiler water temperature gauge is 2”
diameter and is located so that it will indicate
the boiler water temperature at the supply
water connection of the boiler.
5. The boiler touch panel display provides a
human interface for controlling the boiler.
Controlling the boiler with the touch panel
display will be explained in section 2.2.
6. The boiler on / off switch will turn on or off
the 120 volt ac control voltage for every
electrically connected device. This includes
All cover plates, enclosures, and
guards must be in place at all times
except during maintenance and
servicing.
2.1 BOILER ASSEMBLY
The Triple-Flex boiler is a fully integrated
assembly consisting of a Metal Fiber Pre-Mix
Burner Head and the necessary fittings, valves,
and safety devices. The boiler equipment list
provided in the boiler manual lists the
components supplied for the boiler assembly.
Refer to the boiler dimensional for location
dimensions.
A description of the major
components follows. For additional information
refer to the manufactures literature provided in
the boiler manual.
11
Date:
8-4-2010
Revision:
0
Form:
2396
the touch panel display. There is a soft
switch (paragraph 2.2.11) provided with the
SOLA hydronic control that will put the boiler
into standby for an indefinite period of time.
2.1.2 TRIPLE-FLEX REAR VIEW
WARNING:
The boiler on / off switch will not turn
off the 3 phase high voltage power to
the motor.
7. The boiler lockout reset button is a push
button used to reset the hydronic control
after a boiler failure.
8. The power on light will be white in color and
indicates that there is 120 volts ac being
supplied to electrically connected devices.
9. The enabled light will be green in color and
indicates that the boiler is enabled. Enabled
is a state in which the boiler is allowed to
operate within the boiler’s predefined
parameters.
10. The fuel on light will be amber in color and
indicates that the boiler is firing and
producing heated water.
11. The boiler lockout light will be red in color
and indicates that the boiler has failed. The
SOLA
control
will
have
additional
information displayed on the touch panel
display. These failures will be explained in
section 2.3.9.
Figure 4 Triple-Flex Rear View
1. The flue gas vent is 8” diameter and
exhausts products of combustion. Refer to
section 1.7 for installation details.
2. The rear jacket access panel provides
access to the combustion air blower for
servicing.
3. The boiler return water connection receives
cooled water from the system.
This
connection is a standard ANSI 150# class 3”
flange.
4. The drain connection is 1” NPT and provides
a means for draining water from the boiler.
For installation details refer to paragraph
1.4.4.
12
Date:
8-4-2010
Revision:
0
Form:
2396
1. Main gas inlet connection. This connection
is a 2” male national pipe thread.
2. Condensate Drain Connection.
This
connection is a 1” male national pipe thread.
For installation details refer to paragraph
1.4.5.
3. This jacket access panel will permit access
to the majority of the boiler devices.
4. These jacket access panels will permit
access to the flue collector. There is no
practical reason for the removal of these
panels.
5. This jacket access panel will permit access
to the condensate trap. The condensate
trap is provided with a ½” NPT plugged
connection for cleanout purposes.
6. This jacket access panel will permit access
to the primary air-to-air exchanger.
2.1.3 TRIPLE-FLEX LEFT SIDE VIEW
Figure 5 Triple-Flex Left Side View
1. This jacket access panel will permit access
to the primary air-to-air exchanger.
2. This jacket access panel will permit access
to the primary air-to-air exchanger and the
boiler convection tube access panels.
3. These jacket access panels will permit
access to the convection and furnace tube
access.
4. Flame observation port. This port provides
visual access to observe the pilot and main
flame during operation and service.
5. This jacket access panel will permit access
to the majority of the boiler devices.
2.1.5 TRIPLE-FLEX BEHIND THE
CABINET DOOR
WARNING:
The flame observation port will
become very hot during normal
operation. Burn injuries can occur if
come in contact with the skin.
2.1.4 TRIPLE-FLEX RIGHT SIDE VIEW
Figure 7 Triple-Flex Behind the Cabinet Door
1. Auxiliary gas shutoff valve actuator.
2. Low fire displacement adjustment that can
be adjusted by removing the cap and
rotating the slotted screw clockwise to
increase gas flow and counter-clockwise to
decrease gas flow.
Fig. 2.1.2 Triple-Flex Rear View
Figure 6 Triple-Flex Right Side View
13
Date:
8-4-2010
Revision:
0
Form:
2396
port is also used to record the furnace
pressure.
15. Boiler water flow switch. The boiler water
flow switch is adjustable within the
parameters listed in the table.
NOTE:
The low fire displacement final adjustment
should be made at low fire only.
3. Main gas pressure regulating and shutoff
valve actuator. The pressure regulating
actuator provides slow opening fast closing
safety shutoff and air/gas ratio control. The
actuator controls the pressure difference
across the gas limiting orifice valve (Figure 7
item 26) as a function of the pressure
difference across the furnace section so that
the air to gas ratio remains constant
irrespective of air volume changes. There is
no need for an upstream constant pressure
regulator when the supply gas pressure
does not exceed 56 inches of water column.
A minimum of 14 inches of water column
must be supplied at the gas inlet connection
(Figure 6 item 1). The supply pressure can
be measured at the test port (Figure 7 item
28).
Settings
Minimum
Maximum
Table 4 Water Flow Switch Settings
16. Low Water Cutoff (Manual Reset Probe
Type).
17. Combustion air-flow switch.
An airflow
switch is provided to prove that air is being
provided to the burners before main flame
can be established. The airflow switch can
be adjusted by turning the screw (Figure 8
item A) clockwise to increase the pressure
setting and counter-clockwise to decrease
the pressure setting. The switch will open
on pressure drop. When the blower is
running there should be continuity between
the common and the normally open contacts
(Figure 8 item B and C). When the blower is
interrupted the switch should open and
cause a safety shutdown.
NOTE:
The supply pressure is not static. The supply
pressure is at the maximum full flow of gas
through the burner.
4.
5.
6.
7.
8.
9.
10.
11.
12.
13.
14.
Mode Of Operation
Switch
Switch
Closed
Open
30 gpm
12 gpm
52.1
46.1
gpm
gpm
Manual main gas shutoff valve.
Pilot ignition transformer.
Manual pilot gas shutoff valve.
Pilot gas pressure regulator. This regulator
provides a constant gas pressure to the pilot
when the solenoid valve is energized. The
pressure can be adjusted by removing the
cap and adjusting the slotted screw
clockwise to increase the pressure and
counter-clockwise to decrease the pressure.
The pilot gas supply is taken upstream of
the main gas cock so the pilot may be
lighted and adjusted with the main gas cock
closed.
Low pilot gas pressure switch (Manual
Reset)
Pilot spark igniter assembly. For further
detail see Figure 9.
Pilot gas solenoid valve.
Flame scanner.
Main gas manifold pressure test port (1/4”
NPT).
Main high gas pressure switch (Manual
Reset). This switch should be set 1” of
water column above the maximum gas
manifold pressure.
Pilot gas pressure test port (1/4” NPT). This
A
B
C
Figure 8 Air Flow Switch
18. High burner air pressure switch manual
reset. This switch will trip when the air
pressure in the burner rises above the setpoint, indicating that the burner has become
plugged with dust or other foreign matter.
19. Gas and air mixer assembly.
20. Main 3-phase power connection and fuse
14
Date:
8-4-2010
Revision:
0
Form:
2396
block.
Control circuit transformer.
24 volt ac transformer.
12 volt dc power supply.
SOLA hydronic and flame supervision
control.
25. Repeat cycle timer. This timer will ensure
that a forced shut down and pre-start safety
check is performed at least once in a 24
hour period.
This timer has been
incorporated into the SOLA control for newer
boilers.
26. Gas limiting orifice valve. This valve is used
to increase or decrease the gas / air ratio for
combustion.
Adjustments are made by
removing the cap and using a flathead
screwdriver. Clockwise rotation will increase
the flue outlet % O2 levels and counterclockwise will decrease the flue outlet % O2
level. Starting point adjustments are listed
in the table. This vale is factory set and the
number of turns out is written in black
adjacent to the adjustment cap.
2.1.6 PILOT SPARK IGNITER
ASSEMBLY
21.
22.
23.
24.
Boiler Model
TF300
TF250
TF200
TF150
Figure 9 Pilot Spark Igniter Assembly
1.
2.
3.
4.
5.
6.
7.
Spark grounding screw.
Pilot igniter gas orifice (#49 Drill)
Shell body ¾”.
Gland nut.
Igniter electrode.
Brass bushing.
Gas inlet fitting.
2.1.7 TRIPLE-FLEX LEFT FLUE
COLLECTOR VIEW
Turns Out From
Bottom
8-1/2 to 9
8-1/2 to 9
6-1/2 to 7
6-1/2 to 7
Table 5 Gas Limiting Orifice Rough Settings
27. Main low gas pressure switch (Manual
Reset). This switch should be set 2 – 3
inches of water column below the minimum
required supply gas pressure.
28. Supply gas pressure test port (1/4” NPT).
29. (-) Air pressure sensing line connection.
30. (+) Air pressure sensing line connection.
31. (-) Gas pressure sensing line connection.
32. (+) Gas pressure sensing line connection.
33. Burner internal temperature fuse. This fuse
senses the internal burner temperature and
will open at a temperature greater than
425oF.
Figure 10 Triple-Flex Left Flue Collector View
1. 3” Lower drum cleanout and inspection
opening.
2. Furnace tube access panel.
3. Convection tube access panel.
4. Primary air-to-air exchanger access cover.
5. ASME name-plate stamping.
6. Combustion air blower.
7. 3” Upper drum cleanout and inspection.
8. ASME Safety relief valve.
9. Air filter 20” x 25”. This filter is a polyester
coated fiberglass. The frame is made of
fiberboard and has two tin-plated steel grills
(one bonded to each side) as well as sealed
corners to prevent dust leakage. Filters are
marked with size and airflow direction.
15
Date:
8-4-2010
Revision:
0
Form:
2396
Actual length and width are 3⁄8” less than
trade size shown. Filters meet UL Class 2
flame retardance requirements. Maximum
temperature is 180° F.
2.2.2 HOME PAGE
Make sure a screen similar to Figure 12 appears
after the system is completely powered up. The
directional map shown before each page
description in this manual will start with this
2.1.8 TRIPLE-FLEX RIGHT FLUE
COLLECTOR VIEW
symbol
. Pressing this symbol will return
you to the home page.
Figure 11 Triple-Flex Right Flue Collector View
Figure 12 Home Page
1. High primary air-to-air exchanger pressure.
This switch will trip when the air pressure in
the primary air-to-air exchanger rises above
the set-point, indicating that the primary airto-air exchanger has become plugged with
dust or other foreign matter.
2. Condensate trap cleanout. This connection
is ½” NPT.
3. Condensate trap. The condensate trap is
welded and fixed into place.
4. Flue vent temperature sensor.
On multi-boiler applications, each boiler in the
hydronic system is represented on the Home
page by an icon and name. Pressing the boiler
icon allows the user to zoom in on that boiler
and see specific details about it. These details
are provided on a new page, which can include
additional buttons that display additional detail
and operation information, which itself leads to
other pages. The pages are traversed in a tree
structure method. The boiler icon button will
appear in one of four colors indicating the boiler
status.
2.2 SOLA HYDRONIC CONTROL
SYSTEM
•
•
•
•
The Triple-Flex is equipped with a Honeywell
SOLA control system (Figure 3 item 5). This
section will explain navigation, configuration,
history, and diagnostics.
Blue: Normal operation
Red: Lockout condition
Gray: Standby mode (burner switch off)
Gray and crossed out: Hydronic control
communication error (disconnected or powered
off)
2.2.1 POWER-UP VALIDATION
Up to 8 boilers can be displayed on the System
Home page.
The name of each boiler is displayed next to the
boiler icon. When Lead Lag is enabled, the
system header temperature and firing rate are
displayed for each boiler. When the burner is in
standby or not firing the firing rate is not
displayed.
Flip the power button, (Figure 3 item 6), to the
on position. After a few seconds the Home page
will appear and the POWER LED will be blinking
when the device is properly powered. Select the
Setup button to adjust the contrast as desired.
16
Date:
8-4-2010
Revision:
0
Form:
2396
2.2.4 KEYBOARD
NOTE:
The boiler name may be cut off on the Home
page when all boilers are present for the
hydronic system.
The Home page also includes a System
Analysis button that allows the user to view
status information on a system-wide (that is,
multiple boiler) basis. The user can choose
which status information to compare from the
boilers in the system. Pressing the Setup button
on the Home page displays miscellaneous
display setup and diagnostic functions.
2.2.3 PAGE NAVIGATION
Figure 13 Keyboard
The System Display, (Figure 3 item 5), presents
information and options in a paged manner.
Pages are displayed in a tree structure in which
the user navigates up and down to arrive at the
desired function. The page descriptions are
provided below so that you can understand the
purpose of each and view the selections,
parameters, and information that are available or
required on each. Most pages have a Home
Some pages request user entry of characters.
When this type of input is required, a keyboard
page appears, as shown in Figure 13.
The text box at the top of the screen displays the
current (or default) setting of the user input. The
user can add to this text, clear it, or change it.
The Shift key on the left side of the screen shifts
between upper- and lowercase characters.
Pressing the Shift key toggles the keyboard from
one mode to the other (continuous pressing of
the Shift button is not required). The OK button
should be pressed when the user is done
entering the text input. The Cancel button on the
bottom of the screen allows the user to ignore
any text changes that have been made and
keep the original text value. Pressing the OK or
Cancel buttons returns the user to the page
displayed prior to the keyboard page.
in the top-left corner of the screen
button
and a Back button in the top-right corner of the
screen. The Home button returns the user to the
Home page and terminates any operation in
progress. The Back button
returns the user
to the previous page. Two other icons may be
will be
noticed near the boiler name. A bell
displayed if the system is in lockout that reset
will be shown on
will be required. A padlock
screens that a password is needed to change
the parameter. An unlocked padlock
indicates the password has been entered to
change the parameter (either the installer or
OEM), depending on the security level entered.
17
Date:
8-4-2010
Revision:
0
Form:
2396
2.2.5 STATUS PAGE
Details:
Used to view boiler detail status information.
►
History:
Used to view R7910 history.
Modulation:
Used to toggle between two different status
displays: modulation, and setpoints.
2.2.6 CONFIGURATION PAGE
►
►CONFIGURE
Figure 14 Status Page
The status page (Figure 14) is displayed when a
boiler is selected on the Home page. The status
page displays the current condition of the boiler
and displays some of the more important
configuration settings.
The boiler name is
displayed in the title bar of the status page.
NOTE:
When the boiler has no name defined, the
display will use the Modbus address to identify
the boiler.
Figure 15 Configuration Menu Page
The standard status page displayed for the
Triple-flex boiler contains summary status
information as shown in Figure 14. Any status
information not applicable for the installation is
blanked out on the screen. Buttons on this
screen include:
The configuration page allows the user to view
and set parameters that define how the boiler
functions in the hydronic heating system.
Configuration parameters for any boiler
connected in the Global Modbus™ network can
be accessed from the display. Press the boiler’s
button on the Home page to acess the Status
page. Pressing the Configure button on the
status page starts a configuration session. The
configuration page contains a menu of
parameters grouped into functional areas that
the user selects for configuration (see Figure
15).
Configure:
Used to configure the R7910 (see “Configuration
Page” 2.2.6 page 18 for more details).
Operation:
Used to perform daily/frequent functions with the
R7910, such as setpoint adjustment, etc. (See
“Operation Page” 2.2.11 page 22 for more
details.)
No specific order for configuring the boiler is
required. All parameters are enabled for editing,
though some may not be applicable (e.g., a
configuration parameter may disable a boiler
feature). Selecting a parameter group from the
menu
displays
parameters
exclusively
Diagnostic:
Used to view R7910 diagnostic information.
18
Date:
8-4-2010
Revision:
0
Form:
2396
applicable for the functional group on the page
(Figure 16).
for a parameter that has a lower access level
than the access level achieved by an earlier
password entry for any configuration group (as
long as the user stays in the configuration
pages). The user only needs to enter a
password once until a parameter that has a
higher access level is selected.
The user enters the password from a keyboard
as shown in Figure 13. After the password is
entered, select the OK button. The Cancel
button aborts the password login.
WARNING:
Explosion Hazard.
Figure 16 Sample Configuration Page
These parameters can be edited, and when the
user is finished, control returns back to the
configuration menu page. Each parameter is
displayed in its group. If there are more
parameters than will fit on the screen, a vertical
scroll bar allows the user to scroll up and down
to view all parameters. The parameter name is
displayed on the left and the current setting is
displayed in the text box on the right.
Improper configuration can cause fuel
buildup and explosion. Improper user
operation may result in PROPERTY
LOSS, PHYSICAL INJURY or DEATH.
Changing parameters, must be
attempted by only experienced and/or
licensed burner / boiler operators and
mechanics.
2.2.7 CONFIGURATION PASSWORD
Three levels of write access to boiler parameters
are permitted. Each access level has defined
rights when interfacing with configuration and
status parameters in the Boiler.
Any user can view the configuration parameters
(default mode). No access-level password is
required to view the parameters.
A valid
configuration password for the parameter’s level
must be entered before the parameter can be
changed. The password need only be entered
once while the user remains on the configuration
pages. Leaving the configuration pages ends
the scope of the password entry. The user is
notified that a new password is needed upon the
first attempt to change a parameter (or until a
password is entered successfully). The user can
continue viewing the configuration parameters
regardless of whether a password is entered
successfully.
• End user:
The lowest access rights (no
password login). The end user can, in most
cases, only read or view boiler parameters. In
some instances the end user can change boiler
parameters, e.g., change the CH, central heat,
setpoint.
• Installer: The next highest level. The installer
can read all boiler parameters and change most
boiler parameters. This access level is used to
customize the boiler for a particular installation.
The default installer password is ‘bryan’.
• OEM: The highest access level. The OEM can
read and change all R7910 parameters, as well
as change sensor limits and burner control
safety parameters.
The boiler also maintains a password timeout
that limits the scope of the password entry.
Once a password is successfully entered the
boiler starts an internal timer that expires after
10 minutes of inactivity. After the timer expires,
the user is required to re-enter a password
before a parameter can be changed. The user
is not required to enter a configuration password
Different passwords exist in the boiler for each
access level. The end user level requires no
password, but the installer and OEM levels have
unique passwords defined for them. The display
19
Date:
8-4-2010
Revision:
0
Form:
2396
validates all password entry attempts with the
boiler, but doesn’t conduct the validation itself.
The boiler has sole responsibility to accept a
password entry.
There are two classes of parameters.
Non-Safety: Non-safety parameters can be
changed without placing the boiler in a
dangerous state. These parameters typically do
not require a password to modify.
The display gets information from each boiler
about the access level settings for the status
and configuration parameters.
The installer and OEM passwords can
changed in the boiler after logging in with
current password. When the password
changed at the S7999B1026 it is saved in
R7910 and effective for all future logins.
Safety: Safety parameters can be viewed the
same way non-safety parameters can be
viewed. If the user makes no attempt to change
a safety parameter, the user isn’t required to
enter safety verification mode.
be
the
is
the
Safety parameters are grouped into blocks that
include only safety parameters, not a mixture of
safety data and non-safety data. All parameters
within the safety group undergo a verification
process,
(see
paragraph
2.2.9
Safety
Verification).
A safety parameter group is
identified on the display to indicate when the
configuration parameters are safety-related.
NOTE:
Each boiler in a multi-boiler configuration has its
own set of installer and OEM passwords. To
avoid user confusion the passwords should be
changed to the same setting in all the boilers,
but there is no requirement to do so.
2.2.9 SAFETY VERIFICATION
2.2.8 CHANGE PARAMETER SETTINGS
►
► CONFIGURE ►VERIFY
Figure 17 Change Parameter Dialog
Change parameter settings by selecting the
parameter on the page. A dialog box displays
for the parameter with controls allowing the user
to change the value (Figure 17).
Figure 18 Safety Parameter Verification
For safety configuration parameters, safety
verification is required to commit the changes.
After changing the setting to a new value, press
the OK button. Pressing the Cancel button
leaves the parameter unchanged.
All safety configuration parameters in the group
should have the same access level. If this
condition isn’t so, the user is asked to enter
another password when a higher access level is
needed.
The changed setting is reflected on the screen
and sent to the boiler when the OK button is
pressed.
Each safety parameter group is verified one at a
time until all have been verified (Figure 18).
20
Date:
8-4-2010
Revision:
0
Form:
2396
A verification step is required for each safety
parameter block that is changed. The verification
steps do not have to be completed immediately;
the user can traverse between parameter
groups before the verifications are done. If the
user is logged in with the appropriate password
and has changed a safety configuration
parameter, a verify button is enabled that allows
the user to conduct verification sessions.
After all safety parameter blocks have been
confirmed, the user is asked to press and hold
the reset button, (Figure 3 item 7), on the boiler
to complete the safety configuration session
(Figure 20).
If the user terminates the safety configuration
session after it has started, the boiler is left in an
un-configured (boiler will not operate) state.
The user can terminate the session by pressing
the Menu button or by attempting to leave the
Verification page with the Home or Back buttons
(top-left and -right screen corners, respectively).
The user is warned that leaving the session at
this point leaves the boiler in an un-configured
state and confirms whether the user still wants
to do so.
Figure 20 Safety Parameter Reset
When the Reset button is pressed and held for 3
seconds the confirmed safety parameters are
committed in the boiler. The above reset dialog
box automatically closes when this step is
completed.
The settings of all parameters in each safety
block must be confirmed to commit them to the
boiler.
Selecting the begin button will start the
verification process. The settings for all safety
parameters in each changed block are
presented and confirmed by the user (Figure
19).
NOTE:
If the user doesn’t perform this step, the boiler
remains in a locked state until the user resolves
the unconfirmed safety parameters.
Press the Yes button to confirm each safety
parameter block. If the user selects the No
button, the safety parameter block remains
unconfirmed and the configuration menu page is
displayed.
The boiler remains in an unconfigured state in this case.
2.2.10 FAULT/ALARM HANDLING
Each boiler reports a fault code when a lockout
condition occurs for one of the following
annunciations:
• Burner control
• Lockout
• Lead/Lag control
A less serious alarm condition may also occur
that is treated as a warning instead of a fault.
Each boiler can report active fault and warning
codes for each annunciation.
Any new fault code detected in a boiler is
indicated as a lockout condition at the display.
The notification method used depends on the
page that is displayed. On the Home page the
button for the boiler with the fault turns red
(Figure 21). On a boiler status page the History
Figure 19 Safety Parameter User Confirmation
21
Date:
8-4-2010
Revision:
0
Form:
2396
button turns red (Figure 22). On all other pages
and when the user is looking at a different boiler,
a notification dialog box displays indicating
which boiler just locked out.
Figure 23 History Dialog
The lockout history can be displayed for each
boiler. The state information about each lockout
is displayed along with the date/time that the
lockout occurred.
Figure 21 Home Page Lockout
Figure 24 Lockout History Page
Use the following to clear a lockout and reset the
boiler.
►
► INFO BAR ► LOCKOUTS ►
CLEAR LOCKOUT
2.2.11 OPERATION PAGE
►
►OPERATION
Figure 22 Status Page Lockout
Selecting the info bar will display the history
dialog. If none of the buttons are selected the
dialog box closes after 30 seconds.
Figure 25 Operation Page
The operation page displays the boiler running
operation, including set point and firing rate
values expressed in rpm. From this page the
user can change set points, manually control the
boiler’s firing rate, manually turn pumps on, view
22
Date:
8-4-2010
Revision:
0
Form:
2396
annunciation information, and switch between
heating loops (Central Heat and Domestic Hot
Water), as shown in Figure 25. If a password is
required to change any of the settings on this
page, the user can press the Login button to
enter the password.
2.2.13 MODULATION CONFIGURATION
►
► CONFIGURE ► MODULATION
CONFIGURATION
2.2.12 ANNUNCIATION PAGE
► ►OPERATION►
ANNUNCIATION
Figure 27 Modulation Configuration
The modulation configuration page is used to set
the modulation range of the boiler.
The
recommended maximum and minimum rpm
values can be found in
2.2.14 FIRING RATE CONTROL PAGE
Figure 26 Annunciation Page
The annunciation page shows the status of the
load control input (call for heat), pre-ignition
interlock (proof of gas valve closure), and the
running interlock strings. The components are
listed in the order they are wired. This page can
be called up at any time from the operation page
(Figure 25). This page is very helpful for
troubleshooting a lockout 67 (ILK off). All
components for a given string are wired in
series. The first component that indicates off will
be the safety device to check.
►
► OPERATION ► FIRING RATE
FIELD
Figure 28 Firing Rate Control Page
The firing rate control page enables the user to
change how the firing rate is controlled. The first
option is for automatic control based on the
current set point. The second option enables
23
Date:
8-4-2010
Revision:
0
Form:
2396
the user to manually control the firing rate while
the boiler is firing. The third option can be
selected to change the rpm of the blower while
the boiler is off or in standby. The manual firing
rate can be changed by pressing the clear
button and entering the new value or by using
the up and down arrows. To accept the new
value press the ok button and the boiler will
change the firing rate to the new value. An error
message will display if the value entered
exceeds the maximum firing rate or falls below
the minimum firing rate.
2.2.16 SYSTEM TIME
► 1234 SETUP ► ADVANCED
SETUP ► DATE & TIME
Note:
The firing rate control should come from the
factory set to ‘Manual in Run’ with the manual
firing rate value set to the light off rpm.
2.2.15 ADVANCED SETUP
Figure 30 System Time
► 1234 SETUP ►ADVANCED SETUP
Set the date and time by adjusting the
appropriate boxes using the up and down arrow
keys. Select the OK button when finished.
Note:
Currently the date and time will need to be reset
when a loss of power to the display occurs.
2.2.17 CALIBRATE TOUCH SCREEN
► 1234 SETUP ► ADVANCED
SETUP ► DIAGNOSTICS
Figure 29 Advanced Setup
The advanced setup page displays many more
options that can be changed by the user.
Figure 31 Display Diagnostics
Occasionally the touch screen will need to be
24
Date:
8-4-2010
Revision:
0
Form:
2396
calibrated. When the screen is touched in a
spot and unexpected results occur this is a good
indication that the display needs to be
calibrated. To calibrate the touch screen select
the ‘Calibrate’ button and follow the on screen
directions. Try using a stylus of some kind if the
problem persists. The eraser end of a pencil or
the blunt end of a pen can be used as a good
stylus.
2.2.19 OUTDOOR RESET
►
► CONFIGURE
► OUTDOOR RESET
► (page) CENTRAL HEAT
2.2.18 RESET / REBOOT DISPLAY
► 1234 SETUP
► ADVANCED SETUP
► DISPLAY RESET
Figure 33 Outdoor Reset
Max outdoor temp
(x2)
Figure 32 Reset / Reboot Display
Min outdoor temp
(x1)
The display can be reset or rebooted without
powering down the boiler. Select the ‘OK’
button and the display will reboot as shown in
paragraph Power-up Validation 2.2.1.
Low water temp
(y2)
Min water temp
Max off point
When the outdoor
temperature is equal
or greater than this
value the boiler
setpoint will be set to
the low water
temperature.
When the outdoor
temperature is equal
or less than this value
the boiler setpoint will
be set to the Central
Heat Setpoint value
(y2) see 2.2.21.
This value represents
the water temperature
setpoint when the
maximum outdoor
temperature is
reached.
This value is used to
override the low water
temperature of the
curve created with the
above points without
changing the slope.
Undefined / Not Used
Select the ‘Show Line’ button to display a
graphical representation for the inputted data
25
Date:
8-4-2010
Revision:
0
Form:
2396
(Figure 34). The normal reset curve is shown in
green and the time of day is red.
►
► CONFIGURE
► CH - CENTRAL HEAT
CONFIGURATION
► (page) CENTRAL HEAT
► (Outdoor Reset) ENABLED
Note:
y1 is the maximum water setpoint value found in
‘CH – Central heat Configuration’ on the
‘Setpoint’ page.
2.2.20 REMOTE SETPOINT (4 – 20
MA)
Figure 34 Outdoor Reset Curve
►
► CONFIGURE
►
► SENSOR CONFIGURATION
► CONFIGURE
► SENSOR CONFIGURATION
► (Sensor) S5 (J8-11) sensor
► (Sensor) S2 (J8-6) sensor
► (Connector type) 10K NTC single
non-safety
► (Connector type) 4-20mA
► SAFETY VERIFICATION 2.2.9
► (Outdoor temperature source) S5
(J8-11) sensor
►
► CONFIGURE
► CH - CENTRAL HEAT
CONFIGURATION
► (page) SETPOINT
► (Setpoint Source) S2 (J8-6) 4-20mA
► (4 mA water temperature) MIN
► (20 mA water temperature) MAX
Figure 35 Outdoor Reset Sensor Configuration
Note:
Update the sensor name to ‘Outdoor Sensor’ by
selecting a different sensor then reselecting the
S5 (J8-11) sensor.
26
Date:
8-4-2010
Revision:
0
Form:
2396
Setpoint source
2.2.21 CENTRAL HEAT
CONFIGURATION
►
Setpoint
Time of day setpoint
► CONFIGURE
► CH - CENTRAL HEAT
CONFIGURATION
Off hysteresis
On hysteresis
4 mA water temperature
20 mA water temperature
Local
S2 (J8-6) 4-20mA
Setpoint for normal
Central Heat modulation:
50 °F to 190 °F
Setpoint when Time Of
Day switch is on. 50 °F to
190 °F
Differential above
setpoint when boiler is
turned off. 2 °F to 5 °F
Differential from setpoint
when boiler is turned on.
2 °F to 30 °F
50 °F to 190 °F
50 °F to 190 °F
Figure 36 Central Heat Configuration (Central Heat Page)
CH enable
Demand switch
Disable or Enable Central
Heating Loop
Sensor for Central Heat
demand:
Figure 38 Central Heat Configuration (Modulation Page)
Outdoor reset
CH has priority over Lead
Lag
Sensor only
Sensor & STAT terminal
Sensor & Remote Stat
LCI & Sensor
Enabled
Disabled
Yes, No, Cancel
Modulation sensor
Modulation Rate Source
P-gain Gain
I-gain Gain
D-gain
Hysteresis
(0=Disable
stepping)
step time
hysteresis
Outlet
sensor,
Inlet
sensor, S5 (J8-11)
Local
applied for the P portion
of the PID equation 0-400
applied for the I portion of
the PID equation 0-400
Gain applied for the D
portion of the PID
equation 0-400
Time between hysteresis
step changes: 0-600
seconds
2.2.22 SOUND PRESSURE LEVELS
Sound pressure levels were measured at 4-1/2’
above the floor and 3’ from the boiler at the
front, rear and two sides. See Table 6 for
decibel readings.
Figure 37 Central Heat Configuration (Setpoint Page)
Model
27
Front
Decibel Readings
Tube
Rear
Side
Right
Side
Date:
8-4-2010
Revision:
0
Form:
2396
Model
Front
TF150
TF200
TF250
TF300
55.5
62.1
77.7
77.7
Decibel Readings
Tube
Rear
Side
58.0
59.5
65.1
66.3
82.8
82.7
82.8
82.7
Right
Side
58.5
65.4
82.8
82.8
Table 6 Sound Pressure Readings
28
Date:
8-4-2010
Revision:
0
Form:
2396
13
2.2.23 MODBUS COMMUNICATION
14
The hydronic control Global Modbus port is a 3pin connector that interfaces to the following RS485 signals:
15
16
17
Table 7 Modbus Terminals
Signal
Data +
Data Common
Terminal
a
b
c
18
19
20-26
27
28
29
30
Modbus connections can be made at the display
(Figure 3 item 5) or the hydronic control (Figure
7 item 24).
For the modbus register map and other related
information please download Honeywell’s
R7910A product manual at:
31
32
http://customer.honeywell.com/TechLit/pdf/660000s/66-1171.pdf
33
34
2.2.24 ALERT CODES
36
Table 8 Alert Codes
37
Code
0
1
2
3
4
5
6
7
8
9
10
11
12
Description
None (No alert)
Alert PCB was restored from factory
defaults
Safety configuration parameters were
restored from factory defaults
Configuration
parameters
were
restored from factory defaults
Invalid Factory Invisibility PCB was
detected
Invalid Factory Range PCB was
detected
Invalid range PCB record has been
dropped
EEPROM
lockout
history
was
initialized
Switched application annunciation
data blocks
Switched application configuration
data blocks
Configuration was restored from
factory defaults
Backup configuration settings was
restored from active configuration
Annunciation
configuration
was
restored from factory defaults
38
39
40
41
42
43
44
45
46
47
48
49
50
51
52
29
Annunciation
configuration
was
restored from backup
Safety group verification table was
restored from factory defaults
Safety group verification table was
updated
Invalid Parameter PCB was detected
Invalid Range PCB was detected
Alarm
silence
time
exceeded
maximum
Invalid safety group verification table
was detected
RESERVED
Safety processor was reset
Application processor was reset
Burner switch was turned OFF
Burner switch was turned ON
Program Module (PM) was inserted
into socket
Program Module (PM) was removed
from socket
Alert PCB was configured
Parameter PCB was configured
35 Range PCB was configured
Program Module (PM) incompatible
with product was inserted into socket
Program
Module
application
parameter revision differs from
application processor
Program Module safety parameter
revision differs from safety processor
PCB incompatible with product
contained in Program Module
Parameter PCB in Program Module is
too large for product
Range PCB in Program Module was
too large for product
Alert PCB in Program Module was
too large for product
IAS start check was forced on due to
IAS enabled
Low voltage was detected in safety
processor
High line frequency occurred
Low line frequency occurred
Invalid subsystem reset request
occurred
Write large enumerated Modbus
register value was not allowed
Maximum cycle count was reached
Maximum hours count was reached
Illegal Modbus write was attempted
Modbus write attempt was rejected
(NOT ALLOWED)
Date:
8-4-2010
Revision:
0
Form:
2396
53
54
55
56
57
58
59
60
61
62
63
64
65
66
67
68
69
70-74
75
76
77
78
79
80
81
82-89
90
91
92
93
94
95
96
Illegal Modbus read was attempted
Safety processor brown-out reset
occurred
Application processor watchdog reset
occurred
Application processor brown-out reset
occurred
Safety processor watchdog reset
occurred
Alarm was reset by the user at the
control
Burner control firing rate was >
absolute max rate
Burner control firing rate was <
absolute min rate
Burner control firing rate was invalid,
% vs. RPM
Burner control was firing with no fan
request
Burner control rate (nonfiring) was >
absolute max rate
Burner control rate (nonfiring) was <
absolute min rate
Burner control rate (nonfiring) was
absent
Burner control rate (nonfiring) was
invalid, % vs. RPM
Fan off cycle rate was invalid, % vs.
RPM
Setpoint was overridden due to
sensor fault
Modulation was overridden due to
sensor fault
RESERVED
Absolute max fan speed was out of
range
Absolute min fan speed was out of
range
Fan gain down was invalid
Fan gain up was invalid
Fan minimum duty cycle was invalid
Fan pulses per revolution was invalid
Fan PWM frequency was invalid
RESERVED
Modulation output type was invalid
Firing rate control parameter was
invalid
Forced rate was out of range vs.
min/max modulation
Forced rate was invalid, % vs. RPM
Slow start ramp value was invalid
Slow start degrees value was invalid
Slow start was ended due to outlet
sensor fault
97
98
99
100
101
102
103
104
105
106
107
108
109
110
111
112114
115
116
117
118
119
120
121
122
123
124
125
126
127
128
30
Slow start was end due to reference
setpoint fault
CH max modulation rate was invalid,
% vs. RPM
CH max modulation rate was >
absolute max rate
CH modulation range (max minus
min) was too small (< 4% or 40 RPM)
DHW max modulation rate was
invalid, % vs. RPM
DHW max modulation rate was >
absolute max rate
DHW modulation range (max minus
min) was too small (< 4% or 40 RPM)
Min modulation rate was < absolute
min rate
Min modulation rate was invalid, %
vs. RPM
Manual rate was invalid, % vs. RPM
Slow start enabled, but forced rate
was invalid
Analog output hysteresis was invalid
Analog modulation output type was
invalid
IAS open rate differential was invalid
IAS open step rate was invalid
RESERVED
Fan was limited to its minimum duty
cycle
Manual rate was > CH max
modulation rate
Manual rate was > DHW max
modulation rate
Manual rate was < min modulation
rate
Manual rate in Standby was >
absolute max rate
Modulation commanded rate was >
CH max modulation rate
Modulation commanded rate was >
DHW max modulation rate
Modulation commanded rate was <
min modulation rate
Modulation rate was limited due to
outlet limit
Modulation rate was limited due to
Delta-T limit
Modulation rate was limited due to
stack limit
Modulation rate was limited due to
anti- condensation
Fan Speed out of range in RUN
Modulation rate was limited due to
IAS was open
Date:
8-4-2010
Revision:
0
Form:
2396
129
130
131
132
133
134
135
136
137
138
139
140
141145
146
147
148
149
150156
157
158
159
160
161
162
163
164
165
166
167170
171
172
173
174
175182
183
184
185
186
187
188
189
190203
Slow start ramp setting of zero will
result in no modulation rate change
RESERVED
CH demand source was invalid
CH P-gain was invalid
CH I-gain was invalid
CH D-gain was invalid
CH OFF hysteresis was invalid
CH ON hysteresis was invalid
CH sensor type was invalid
CH hysteresis step time was invalid
CH remote control parameter was
invalid
CH ODR not allowed with remote
control
204
205
206
207
208
209221
222
223
RESERVED
224
CH control was suspended due to
fault
CH header temperature was invalid
CH outlet temperature was invalid
CH steam pressure was invalid
225230
231
232
233
RESERVED
234
DHW demand source was invalid
DHW P-gain was invalid
DHW I-gain was invalid
DHW D-gain was invalid
DHW OFF hysteresis was invalid
DHW ON hysteresis was invalid
DHW hysteresis step time was invalid
DHW sensor type was invalid
Inlet sensor type was invalid for DHW
Outlet sensor type was invalid for
DHW
235
236
237
238
239
240
241245
246
247
248
RESERVED
DHW control was suspended due to
fault
DHW temperature was invalid
DHW inlet temperature was invalid
DHW outlet temperature was invalid
249
250
251
252
253
RESERVED
Lead Lag P-gain was invalid
Lead Lag I-gain was invalid
Lead Lag D-gain was invalid
Lead Lag OFF hysteresis was invalid
Lead Lag ON hysteresis was invalid
Lead Lag slave enable was invalid
Lead Lag hysteresis step time was
invalid
254
255
256260
261
262
RESERVED
31
Lead Lag master was suspended due
to fault
Lead Lag slave was suspended due
to fault
Lead Lag header temperature was
invalid
Lead Lag was suspended due to no
enabled Program Module installed
Lead Lag slave session has timed out
RESERVED
CH frost protection temperature was
invalid
CH frost protection inlet temperature
was invalid
DHW frost protection temperature
was invalid
RESERVED
LL setpoint was invalid
LL time of day setpoint was invalid
LL outdoor temperature was invalid
LL ODR time of day setpoint was
invalid
LL ODR time of day setpoint
exceeded normal setpoint
LL max outdoor setpoint was invalid
LL min outdoor setpoint was invalid
LL min water setpoint was invalid
LL outdoor temperature range was
too small (minimum 12 C / 22 F)
LL water temperature range was too
small (minimum 12 C / 22 F)
RESERVED
CH setpoint was invalid
CH time of day setpoint was invalid
CH outdoor temperature was invalid
CH ODR time of day setpoint was
invalid
CH ODR time of day setpoint
exceeds normal setpoint
CH max outdoor setpoint was invalid
CH min outdoor setpoint was invalid
CH min water setpoint was invalid
CH outdoor temperature range was
too small (minimum 12 C / 22 F)
CH water temperature range was too
small (minimum 12 C / 22 F)
RESERVED
DHW setpoint was invalid
DHW time of day setpoint was invalid
Date:
8-4-2010
Revision:
0
Form:
2396
263271
272
273
274
275
276
277
278
279
280
281
282
283
284
285
286
287
288
289
290
291
292
293
294
295
296
RESERVED
297
Abnormal Recycle: Pressure sensor
fault
Abnormal Recycle: Safety relay drive
test failed
Abnormal Recycle: Demand off
during Pilot Flame Establishing
Period
Abnormal Recycle: LCI off during
Drive to Purge Rate
Abnormal Recycle: LCI off during
Measured Purge Time
Abnormal Recycle: LCI off during
Drive to Lightoff Rate
Abnormal Recycle: LCI off during
Pre-Ignition test
Abnormal Recycle: LCI off during
Pre-Ignition time
Abnormal Recycle: LCI off during
Main Flame Establishing Period
Abnormal Recycle: LCI off during
Ignition period
Abnormal Recycle: Demand off
during Drive to Purge Rate
Abnormal Recycle: Demand off
during Measured Purge Time
Abnormal Recycle: Demand off
during Drive to Lightoff Rate
Abnormal Recycle: Demand off
during Pre-Ignition test
Abnormal Recycle: Demand off
during Pre-Ignition time
Abnormal Recycle: Flame was on
during Safe Start check
Abnormal Recycle: Flame was on
during Drive to Purge Rate
Abnormal Recycle: Flame was on
during Measured Purge Time
Abnormal Recycle: Flame was on
during Drive to Lightoff Rate
Abnormal Recycle: Flame was not on
at end of Ignition period
Abnormal Recycle: Flame was lost
during Main Flame Establishing
Period
Abnormal Recycle: Flame was lost
early in Run
Abnormal Recycle: Flame was lost
during Run
Abnormal Recycle: Leakage test
failed
Abnormal Recycle: Interrupted air
flow switch was off during Drive to
Purge Rate
298
299
300
301
302
303
304
305
306
307
308
309
310
311
312
313
314
315
316
317
318
319
320
321
322
32
Abnormal Recycle: Interrupted air
flow switch was off during Measured
Purge Time
Abnormal Recycle: Interrupted air
flow switch was off during Drive to
Lightoff Rate
Abnormal Recycle: Interrupted air
flow switch was off during Pre-Ignition
test
Abnormal Recycle: Interrupted air
flow switch was off during Pre-Ignition
time
Abnormal Recycle: Interrupted air
flow switch was off during Main
Flame Establishing Period
Abnormal Recycle: Ignition failed due
to interrupted air flow switch was off
Abnormal Recycle: ILK off during
Drive to Purge Rate
Abnormal Recycle: ILK off during
Measured Purge Time
Abnormal Recycle: ILK off during
Drive to Lightoff Rate
Abnormal Recycle: ILK off during PreIgnition test
Abnormal Recycle: ILK off during PreIgnition time
Abnormal Recycle: ILK off during
Main Flame Establishing Period
Abnormal Recycle: ILK off during
Ignition period
Run was terminated due to ILK was
off
Run was terminated due to
interrupted air flow switch was off
Stuck reset switch
Run was terminated due to fan failure
Abnormal Recycle: Fan failed during
Drive to Purge Rate
Abnormal Recycle: Fan failed during
Measured Purge Time
Abnormal Recycle: Fan failed during
Drive to Lightoff Rate
Abnormal Recycle: Fan failed during
Pre-Ignition test
Abnormal Recycle: Fan failed during
Pre-Ignition time
Abnormal Recycle: Fan failed during
Ignition period
Abnormal Recycle: Fan failed during
Main Flame Establishing Period
Abnormal Recycle: Main Valve off
after 10 seconds of RUN
Abnormal Recycle: Pilot Valve off
after 10 seconds of RUN
Date:
8-4-2010
Revision:
0
Form:
2396
323
324
325
326
327
328
329
330
331
332
333
334
335
336
337
338
339
340
341
342
343
344
345
346
347
348
349
Abnormal Recycle: Safety Relay off
after 10 seconds of RUN
Abnormal Recycle: Hardware flame
bias
Abnormal Recycle: Hardware static
flame
Abnormal Recycle: Hardware flame
current invalid
Abnormal Recycle: Hardware flame
rod short
Abnormal Recycle: Hardware invalid
power
Abnormal Recycle: Hardware invalid
AC line
Abnormal Recycle: Hardware SLO
flame ripple
Abnormal Recycle: Hardware SLO
flame sample
Abnormal Recycle: Hardware SLO
flame bias range
Abnormal Recycle: Hardware SLO
flame bias heat
Abnormal Recycle: Hardware SLO
spark stuck
Abnormal Recycle: Hardware SLO
spark changed
Abnormal Recycle: Hardware SLO
static flame
Abnormal Recycle: Hardware SLO
rod shorted
Abnormal Recycle: Hardware SLO
AD linearity
Abnormal Recycle: Hardware SLO
bias not set
Abnormal Recycle: Hardware SLO
bias shorted
Abnormal Recycle: Hardware SLO
electronics
Abnormal
Recycle:
Hardware
processor clock
Abnormal Recycle: Hardware AC
phase
Abnormal Recycle: Hardware A2D
mismatch
Abnormal Recycle: Hardware VSNSR
A2D
Abnormal Recycle: Hardware 28V
A2D
Abnormal Recycle: Hardware HFS
IAS shorted
Abnormal Recycle: Hardware PII
INTLK shorted
Abnormal Recycle: Hardware HFS
LCI shorted
350
351
352
353
354
355
356
357
358
359
360
361
362
363
364
365
366
367
368
369
370
371
372
373
374459
460
461
462
463
464466
467
468
33
Abnormal Recycle: Hardware HFS
LFS shorted
Abnormal Recycle: Invalid zero
crossing
Abnormal Recycle: fault stack sensor
Abnormal Recycle: stack limit
Abnormal Recycle: delta T limit
Abnormal Recycle: fault outlet sensor
Abnormal Recycle: outlet high limit
Abnormal Recycle: fault DHW sensor
Abnormal Recycle: DHW high limit
Abnormal Recycle: fault inlet sensor
Abnormal
Recycle:
Check
Parameters Failed
Internal error: No factory parameters
were detected in control
Internal error: PID iteration frequency
was invalid
Internal error: Demand-Rate interval
time was invalid
Internal error: Factory calibration
parameter for modulation was invalid
Internal error: CH PID P-scaler was
invalid
Internal error: CH PID I-scaler was
invalid
Internal error: CH PID D-scaler was
invalid
Internal error: DHW PID P-scaler was
invalid
Internal error: DHW PID I-scaler was
invalid
Internal error: DHW PID D-scaler was
invalid
Internal error: Lead Lag master PID
P-scaler was invalid
Internal error: Lead Lag master PID Iscaler was invalid
Internal error: Lead Lag master PID
D-scaler was invalid
RESERVED
LCI demand lost in run
Demand lost in run
STAT demand lost in run
Demand lost in run due to no flame
RESERVED
Internal error: EEPROM write was
attempted before EEPROM was
initialized
Internal error: EEPROM cycle count
address was invalid
Date:
8-4-2010
Revision:
0
Form:
2396
469
470
471
472
473
474
475
476
477
478
479
480
483
484
485
486
487
488
489
490
491
492
493
494
495
496
Internal error: EEPROM days count
address was invalid
Internal error: EEPROM hours count
address was invalid
Internal
error:
Lockout
record
EEPROM index was invalid
Internal error: Request to write PM
status was invalid
Internal error: PM parameter address
was invalid
Internal error: PM safety parameter
address was invalid
Internal error: Invalid record in lockout
history was removed
Internal error: EEPROM write buffer
was full
Internal error: Data too large was not
written to EEPROM
Internal error: Safety key bit 0 was
incorrect
Internal error: Safety key bit 1 was
incorrect
Internal error: Safety key bit 2 was
incorrect
481 Internal error: Safety key bit 3
was incorrect
482 Internal error: Safety key bit 4
was incorrect
Internal error: Safety key bit 5 was
incorrect
Internal error: Safety key bit 6 was
incorrect
Internal error: Safety key bit 7 was
incorrect
Internal error: Safety key bit 8 was
incorrect
Internal error: Safety key bit 9 was
incorrect
Internal error: Safety key bit 10 was
incorrect
Internal error: Safety key bit 11 was
incorrect
Internal error: Safety key bit 12 was
incorrect
Internal error: Safety key bit 13 was
incorrect
Internal error: Safety key bit 14 was
incorrect
Internal error: Safety key bit 15 was
incorrect
Internal error: Safety relay timeout
Internal
error:
Safety
relay
commanded off
Internal error: Unknown safety error
occurred
497
498
499
500
34
Internal error: Safety timer
corrupt
Internal error: Safety timer
expired
Internal error: Safety timings
Internal error: Safety shutdown
was
was
Date:
8-4-2010
Revision:
0
Form:
2396
The regulating gas valve is a 1:1 differential
pressure air / gas ratio controller. This means
that the control adjusts the same pressure
difference on the gas side as it senses on the
airside. The airside pressure is the difference
between the pressure in the burner housing and
the pressure downstream of the furnace section.
The gas side pressure is the difference between
the pressure upstream and downstream of the
gas limiting orifice valve. For the locations of the
+/- gas and air connections see (Figure 39). Air
to gas ratios are adjusted with the gas limiting
orifice valve (Figure 7 item 26).
2.3 BOILER COMMISSIONING
NOTE:
All of the installation instructions found in section
1 must be completed before commissioning the
boiler.
WARNING:
The following procedures must be
followed carefully before putting the
boiler in operation. Failure to do so
will present severe hazards to
equipment, operating personnel and
building occupants.
During the burner pre-purge period, when the
gas valve is closed, only the air pressure
difference acts on the regulator causing the air
diaphragm to move to the left and closes the
regulating hydraulic bypass valve. When the
actuator is powered, the gas valve begins to
open. The downstream gas pressure difference
immediately begins to increase until the gas
pressure difference is in balance with the air
pressure difference.
2.3.1 MODULATION
2.3.2 TEST SETUP
Connect a u-tube manometer to the gas
manifold pressure tapping (Figure 7 item 12).
Connect a 0 – 5 psi gauge in the port provided in
the low gas pressure switch connection (Figure
7 item 28).
Connect a u-tube manometer to the pilot gas
pressure port provided (Figure 7 item 14).
A suitable combustion analyzer shall be used for
measuring O2, CO, and Nox levels.
The
analyzer probe should be inserted in the stack
above the boiler outlet and before any draft
controls. Calibration is required for the Nox and
CO cells at the time of commissioning.
Figure 39 Air / Gas Ratio Tappings
2.3.3 PRE CHECKS AND SETUP
Modulation on the Triple-flex boiler is
accomplished with air / gas ratio control. The
system consists of two major components, a
blower (Figure 10 item 6) and a regulating gas
valve (Figure 7 item 3). The blower is variable
speed and provides combustion air to the
burner. The blower rpm is controlled by a PWM
(pulse width modulation) signal. The PWM
signal increases or decreases as the load
increases or decreases in the hydronic system.
Close the manual gas cock (Figure 7 item 4).
35
Date:
8-4-2010
Revision:
0
Form:
2396
seconds the purge timer will start and count to
30. After 30 seconds the fan speed is reduced
to the light off rate. When the fan speed is with
in +/- 3% of the firing rate for 3 seconds the
ignition transformer and the pilot valve are
energized. The pilot will light and can be
observed from the observation port (Figure 5
item 4). After a duration of 5 seconds the
ignition transformer will de-energize. The pilot
valve will stay energized for another 5 seconds
before the main gas valves are energized.
During this 10 second period the pilot should be
adjusted according to paragraph 2.3.5.
WARNING:
Do not open the manual main gas cock
(Figure 7 item 4) before all pre checks,
setups, and dry runs have been
successfully completed.
With a voltmeter check for the proper incoming
main voltage and the proper control voltage from
the control circuit transformer. Refer to the
electrical wiring diagram and boiler-rating label
for proper voltages.
The main gas valves will energize for 10
seconds. After this 10 second duration the pilot
valve is de-energized. The control will lockout
with a code of 106, Flame lost in Main Flame
Establishing Period.
Make sure the boiler is full of water and proper
flow has been established.
Power up the boiler see (paragraph 2.2.1).
WARNING:
Navigate to the ‘Operation Screen’ (paragraph
2.2.11). Select the burner switch to toggle the
burner to the off state.
During the first 10 seconds of this
process the automatic gas valves
should not have opened or been
energized. If any of the automatic gas
valves are energized or open at this
point correct the problem immediately.
Navigate to the ‘Firing Rate Control Page’
(paragraph 2.2.14). Select the ‘Manual in Run”
option and enter the light off RPM from (Table 9
Approximate Boiler Settings) in the Manual
Firing Rate box. This will prevent the burner
from ramping up to high fire after the flame
stabilization period.
Navigate to the ‘Annunciation Page” (paragraph
2.2.12). All load control inputs and interlocks
should be in the on state with the exception of
the air flow switch. The air flow switch will close
when the burner is commanded to start. Correct
any problem indicated. Refer to trouble shooting
(paragraph 0) for further help.
2.3.5 PILOT ADJUSTMENT
Adjust the pilot gas pressure between 3.5 iwc
and 4 iwc. The pilot flame signal can be
observed from the status page (paragraph
2.2.5). The minimum flame signal is .8 volts.
The flame signal can vary between 4 volts and
15 volts. A flame signal closer to 15 volts is
preferred. Observe the pilot flame through the
flame observation port (Figure 5 item 4). The
pilot should appear stable. A stable pilot will not
flicker on and off. Recycle the boiler as many
times as needed to establish a good pilot. If the
pilot fails to light refer to trouble shooting
(paragraph 1.1.1) for further help.
Navigate to the ‘Operation Screen’ (paragraph
2.2.11). The boiler is now prepared to be placed
in the on state by toggling the burner switch to
on.
2.3.4 DRY RUN
Navigate to the ‘Operation Screen’ (paragraph
2.2.11). Toggle the burner switch to on.
Navigate to the ‘Status Page’ (paragraph 2.2.5).
If there is demand for hot water the burner state
will display driving to purge. When the fan
speed is within +/- 3% of the firing rate for 3
36
Date:
8-4-2010
Revision:
0
Form:
2396
for NOx, O2, and CO should be made at the
maximum firing rate. No further adjustments are
required of the gas limiting orifice valve. Return
to the minimum low fire rate (paragraph 2.2.13)
in increments of 500 rpm. For each increment
verify combustion readings. Refer to trouble
shooting (paragraph 0) for further help.
WARNING:
During pilot adjustment leave the
manual main gas cock (Figure 7 item
4) closed.
NOTE:
Use rpm values that fall between the rpm values
used going to high fire. This will give more
points to verify on the modulation curve.
NOTE:
Pilot gas pressures in excess of the
recommended will lead to the formation of
carbon hairs that will ground out the pilot igniter
causing a safety shutdown.
2.3.8 ADJUSTING BOILER MINIMUM
INPUT
2.3.6 INITIAL LIGHT OFF
NOTE:
The boiler maximum input must be adjusted
before final adjustments can be made for
minimum input.
Open the manual main gas cock (Figure 7 item
4). Clear the lockout fault (paragraph 2.2.10)
and allow the burner to cycle and attempt to light
off. If the main flame fails to light, the low fire
displacement of the pressure regulating actuator
(Figure 7 item 2) may need to be increased.
Decrease the boiler firing rate to the minimum
modulation rate (paragraph 2.2.13). Adjust the
O2 level to obtain Nox levels desired by
adjusting the low fire displacement on the gas
pressure
regulating
actuator
to
obtain
appropriate NOx, O2, and CO levels. Allow
sufficient time for combustion to stabilize after
each ¼ to ½ turn of the low fire displacement
(Figure 7 item 2).
WARNING:
Do not adjust the low fire displacement
more than 1/4 to 1/2 turn for each main
flame-establishing period.
WARNING:
The boiler will light off at approximately 1.5 times
the minimum firing rate rpm. The boiler will hold
in this position for no less than 5 minutes to
establish a stable flame before releasing the
boiler to full modulation. Observe combustion
readings and make small adjustments to the low
fire displacement of the pressure regulating
actuator (Figure 7 item 2) when the O2 is not
within 6% to 10%. Allow sufficient time for
combustion to stabilize after each ¼ to ½ turn of
the low fire displacement (Figure 7 item 2).
O2 levels below 6% will overheat the
metal fiber burner and cause the fuel /
air mixture to ignite inside the burner.
An internal temperature fuse is
provided to open when the internal
burner temperature reaches 425 oF.
2.3.7 ADJUSTING BOILER MAXIMUM
INPUT
Pilot Gas
Pressure
(IWC)
Light Off
RPM
High Fire
After the flame stabilization period increase the
firing rate in 500 rpm increments until the
maximum modulation rate (paragraph 2.2.13) is
reached. For each 500 rpm increment observe
combustion readings and make adjustments to
the gas limiting orifice (Figure 7 item 26) if the
O2 is not within 6% to 10%. Final adjustments
37
Boiler Model
TF300 TF250
TF200
TF150
3.5 - 4
3.5 - 4
3.5 - 4
3.5 - 4
1800
1800
1200
1200
Date:
8-4-2010
Revision:
0
Form:
2396
Gas
Manifold
Pressure
(IWC)
4.4
3.6
4.0
2.0
Max RPM
60007000
51005500
35504200
27002850
Low Fire
Gas
Manifold
Pressure
(IWC)
Min RPM
.3
.3
.2
.2
12001600
12001600
800950
800950
cubic feet per hour). Consult the National Fuel
Gas Code (ANSI Z223.1, NFPA 54) or the local
gas utility for further information. Refer to Table
10 for correction factors for the gas pressure at
the meter. Refer to Table 11 for the gas
temperature correction factors.
Gas Pressure at Meter
14" w.c.
21" w.c.
1 psig
2 psig
5 psig
Table 10 Gas Pressure Correction
Table 9 Approximate Boiler Settings
2.3.9 GAS METER READINGS
Gas Temp. at Meter
40 °F
50 °F
60 °F
70 °F
80 °F
90 °F
Burner input rate can be checked by taking
readings from the gas meter. Please note
checking the rate with a meter is the only way to
be sure of input. Manifold readings are only an
approximate value and may vary from unit to
unit.
Corr. Factor
1.04
1.02
1.0
.981
.963
.945
Table 11 Gas Temperature Correction
In order to obtain accurate data, there must be
no other appliances using gas from the same
meter while the burner input rate is being
checked.
To correct for pressure and temperature use the
following formula.
Qc = Qt p t t
t p = pressure correction table 2.2A
A stopwatch or a watch with a second hand is
required to obtain a meter reading. Clock the
amount of time it takes for the smallest dial to
complete one revolution in seconds. Use the
following formula to obtain the cubic feet per
hour throughput of the unit.
CFH =
Corr. Factor
1.034
1.051
1.061
1.136
1.340
t t = temperature correction table 2.2B
3600Vc
gc
CFH = ft 3 hr −1 of gas
Vc = ft clocked
g c = time in seconds
To obtain the Btu per hour throughput of the unit
use the following formula.
Q = CFH (hv )
hv = heating value of fuel in Btu ft -3
If the meter is not calibrated for gas temperature
and pressure, correction factors must be applied
to determine correct rate in SCFH (standard
38
Date:
8-4-2010
Revision:
0
Form:
2396
2.4 TROUBLESHOOTING
To support the recommended Troubleshooting, the R7910 has an Alert File. Review the Alert history for
possible trends that may have been occurring prior to the actual lockout.
Note Column:
H = Hold message
L = Lockout message
H or L = either Hold or Lockout depending on Parameter Configuration
Table 12 R7910A Lockout and Hold Codes
Code
1
Description
Unconfigured
safety data
2
Waiting for safety
data verification
3
Internal
fault:
Hardware fault
Internal
fault:
Safety Relay key
feedback error
Internal
fault:
Unstable
power
(DCDC) output
Internal
fault:
Invalid
processor
clock
Internal
fault:
Safety relay drive
error
Internal fault: Zero
crossing
not
detected
Internal
fault:
Flame bias out of
range
Internal
fault:
Invalid
Burner
control state
Internal
fault:
Invalid
Burner
control state flag
Internal
fault:
Safety relay drive
cap short
Internal fault: PII
shorted to ILK
Internal fault: HFS
shorted to LCI
4
5
6
7
8
9
10
11
12
13
14
Recommended Troubleshooting of Lockout Codes
1.New Device, complete device configuration and safety
verification.
2. If fault repeats, replace module.
1. Device in Configuration mode and safety parameters need
verification and a device needs reset to complete verification.
2. Configuration ended without verification, re enter
configuration, verify safety
parameters and reset device to complete verification.
3. If fault repeats, replace module
Internal fault
1. Reset module
2. If fault repeats, replace module.
Code
L
L
H
H
H
H
H
H
H
L
L
H
H OR L
H OR L
39
Date:
8-4-2010
Revision:
0
Form:
2396
Code
15
16
17
18
19
20
21
22
23
24
25
26
27
28
29
30
31
Description
Internal
fault:
Safety relay test
failed
due
to
feedback ON
Internal
fault:
Safety relay test
failed due to safety
relay OFF
Internal
fault:
Safety relay test
failed due to safety
relay not OFF
Internal
fault:
Safety relay test
failed
due
to
feedback not ON
Internal
fault:
Safety RAM write
Internal
fault:
Flame ripple and
overflow
Internal
fault:
Flame number of
sample mismatch
Internal
fault:
Flame bias out of
range
Internal fault: Bias
changed
since
heating cycle starts
Internal fault: Spark
voltage stuck low or
high
Internal fault: Spark
voltage
changed
too much during
flame sensing time
Internal fault: Static
flame ripple
Internal
fault:
Flame rod shorted
to ground detected
Internal fault: A/D
linearity test fails
Internal
fault:
Flame bias cannot
be set in range
Internal
fault:
Flame bias shorted
to adjacent pin
Internal fault: SLO
electronics
unknown error
Recommended Troubleshooting of Lockout Codes
Code
L
L
L
L
L
H
H
H
H
H
H
H
H
H
H
H
H
40
Date:
8-4-2010
Revision:
0
Form:
2396
Code
32-46
47
48
49
50
51
52
53
54-57
58
Description
Internal
fault:
Safety
Key
0
through 14
Flame
Rod
to
ground leakage
Static flame (not
flickering)
24VAC voltage low/
high
Modulation fault
Pump fault
Motor tachometer
fault
AC inputs phase
reversed
63
RESERVED
Internal fault: HFS
shorted to IAS
Internal Fault: Mux
pin shorted
Internal Fault: HFS
shorted to LFS
Anti short cycle
Fan speed not
proved
LCI OFF
64
PII OFF
65
Interrupted Airflow
Switch OFF
Interrupted Airflow
Switch ON
59
60
61
62
66
67
ILK OFF
Recommended Troubleshooting of Lockout Codes
Code
L
H
H
1. Check the Module and display connections.
2. Check the Module power supply and make sure that both
frequency, voltage and VA meet the specifications.
Internal sub-system fault.
1. Review alert messages for possible trends.
2. Correct possible problems.
H
1. Check the Module and display connections.
2. Check the Module power supply and make sure that both
frequency and voltagemeet the specifications.
3. On 24Vac applications, assure that J4 terminal 10 and J8
terminal 2 are connected together.
L
Internal Fault.
1. Reset Module.
2. If fault repeats, replace module
L
H
H
H
L
L
Will not be a lockout fault. Hold Only.
H
H
1. Check wiring and correct any faults.
2. Check Interlocks connected to the LCI to assure proper
function.
3. Reset and sequence the module; monitor the LCI status.
4. If code persists, replace the module
1. Check wiring and correct any faults.
2. Check Preignition Interlock switches to assure proper
functioning.
3. Check the valve operation.
4. Reset and sequence the module; monitor the PII status.
5. If code persists, replace the module.
1. Check wiring and correct any possible shorts.
2. Check airflow switches to assure proper functioning.
3. Check the fan/blower operation.
4. Reset and sequence the module; monitor the airflow status.
5. If code persists, replace the module.
1. Check wiring and correct any possible shorts.
2. Check Interlock (ILK) switches to assure proper function.
3. Verify voltage through the interlock string to the interlock input
with a voltmeter.
4. If steps 1-3 are correct and the fault persists, replace the
module.
H
41
L
H or L
H or L
L
Date:
8-4-2010
Revision:
0
Form:
2396
Code
68
Description
ILK ON
69
Pilot test hold
70
Wait for leakage
test completion
RESERVED
Demand Lost in
Run
71-77
78
79
Outlet high limit
80
DHW high limit
81
Delta T limit
82
Stack limit
83-90
91
RESERVED
Inlet sensor fault
92
93
94
95
Outlet sensor fault
DHW sensor fault
Header sensor fault
Stack sensor fault
Recommended Troubleshooting of Lockout Codes
This lockout occurs when the interlock string is closed before the
blower starts. The airflow switch is the only device in the
interlock string that will open when in standby. Probable causes
are.
1. Air pressure in the boiler room has become negative.
2. Excessive downdraft in the stack.
3. Blower is spinning before being commanded by the
hydronic control. Make sure blower is not running in
standby.
4. Airflow switch is stuck closed.
1. Verify Run/Test is changed to Run.
2. Reset Module.
3. If fault repeats, replace module.
1. Internal Fault. Reset Module.
2. If fault repeats, replace module.
Code
L
H
H
1. Check wiring and correct any possible errors.
2. If previous steps are correct and fault persists, replace the
module.
1. Check wiring and correct any possible errors.
2. Replace the Outlet high limit.
3. If previous steps are correct and fault persists, replace the
module.
1. Check wiring and correct any possible errors.
2. Replace the DHW high limit.
3. If previous steps are correct and fault persists, replace the
module.
1. Check Inlet and Outlet sensors and pump circuits for proper
operation.
2. Recheck the Delta T Limit to confirm proper setting.
3. If previous steps are correct and fault persists, replace the
module.
1. Check wiring and correct any possible errors.
2. Replace the Stack high limit.
3. If previous steps are correct and fault persists, replace the
module.
H
1. Check wiring and correct any possible errors.
2. Replace the Inlet sensor.
3. If previous steps are correct and fault persists,
module.
1. Check wiring and correct any possible errors.
2. Replace the Outlet sensor.
3. If previous steps are correct and fault persists,
module.
1. Check wiring and correct any possible errors.
2. Replace the DHW sensor.
3. If previous steps are correct and fault persists,
module.
1. Check wiring and correct any possible errors.
2. Replace the header sensor.
3. If previous steps are correct and fault persists,
module.
1. Check wiring and correct any possible errors.
H
42
H or L
H or L
H or L
H or L
replace the
H
replace the
H
replace the
H
replace the
H
Date:
8-4-2010
Revision:
0
Form:
2396
Code
Description
96
Outdoor
fault
97
Internal Fault: A2D
mismatch.
Internal
Fault:
Exceeded VSNSR
voltage tolerance
Internal
Fault:
Exceeded
28V
voltage tolerance
Pressure
Sensor
Fault
98
99
100
101104
105
106
107
108
109
110
111
112
113
114121
sensor
Recommended Troubleshooting of Lockout Codes
2. Replace the stack sensor.
3. If previous steps are correct and fault persists, replace the
module
1. Check wiring and correct any possible errors.
2. Replace the outdoor sensor.
3. If previous steps are correct and fault persists, replace the
module.
Internal Fault.
1. Reset Module.
2. If fault repeats, replace module.
Code
H
L
L
L
1. Verify the Pressure Sensor is a 4-20ma source.
2. Check wiring and correct any possible errors.
3. Test Pressure Sensor for correct operation.
4. Replace the Pressure sensor.
5. If previous steps are correct and fault persists, replace the
module.
H
1. Check that flame is not present in the combustion chamber.
Correct any errors.
2. Make sure that the flame detector is wired to the correct
terminal.
3. Make sure the F & G wires are protected from stray noise
pickup.
4. Reset and sequence the module, if code reappears, replace
the flame detector.
5. Reset and sequence the module, if code reappears, replace
the module.
1. Check pilot valve (Main Valve for DSI) wiring and operation correct any errors.
2. Check the fuel supply.
3. Check fuel pressure and repeat turndown tests.
4. Check ignition transformer electrode, flame detector, flame
detector setting or flame rod position.
5. If steps 1 through 4 are correct and the fault persists, replace
the module.
Hold time of recycle and hold option. Will not be a lockout fault.
Hold Only. Internal hardware test. Not a lockout.
H or L
RESERVED
Flame detected out
of sequence
Flame lost in MFEP
Flame lost early in
run
Flame lost in run
Ignition failed
Ignition
failure
occurred
Flame
current
lower than WEAK
threshold
Pilot test flame
timeout
Flame
circuit
timeout
RESERVED
L
L
L
L
H
H
Interrupted Pilot or DSI application and flame lost when system
in “test” mode.
1. Reset the module to restart.
Flame sensed during Initiate or off cycle, hold 240 seconds, if
present after 240 seconds, lockout.
43
L
L
Date:
8-4-2010
Revision:
0
Form:
2396
Code
122
123
124
125
126
127
128
129
130
131
132
133135
136
Description
Lightoff
rate
proving failed
Purge rate proving
failed
Recommended Troubleshooting of Lockout Codes
1. Check wiring and correct any potential wiring errors.
2. Check VFDs ability to change speeds.
3. Change the VFD
4. If the fault persists, replace the module.
High fire switch
OFF
High fire switch
stuck ON
Low fire switch
OFF
Low fire switch
stuck ON
Fan speed failed
during prepurge
Fan speed failed
during preignition
Fan speed failed
during ignition
Fan
movement
detected
during
standby
Fan speed failed
during run
RESERVED
1. Check wiring and correct any potential wiring errors.
2. Check High Fire Switch to assure proper function (not welded
or jumpered).
3. Manually drive the motor to the High Fire position and adjust
the HF switch while in this position and verify voltage through
the switch to the HFS input with a voltmeter.
4. If steps 1-3 are correct and the fault persists, replace the
module.
1. Check wiring and correct any potential wiring errors.
2. Check VFDs ability to change speeds.
3. Change the VFD
4. If the fault persists, replace the module.
Interrupted Airflow
Switch failed to
close
1. Check wiring and correct any possible wiring errors.
2. Check Interrupted Airflow switch(es) to assure proper
function.
3. Verify voltage through the airflow switch to the IAS input with
a voltmeter.
4. If steps 1-3 are correct and the fault persists, replace the
module.
1. Check wiring and correct any possible shorts.
2. Check Interlock (ILK) switches to assure proper function.
3. Verify voltage through the interlock string to the interlock input
with a voltmeter.
4. If steps 1-3 are correct and the fault persists, replace the
module.
H
OEM Specific
1. Holds if flame detected during Safe Start check up to Flame
Establishing period.
OEM Specific
1. Sequence returns to standby and restarts sequence at the
beginning of Purge after the HF switch opens. if flame detected
during Safe Start check up to Flame Establishing period.
OEM Specific
H or L
137
ILK failed to close
138148
RESERVED
149
FAULT
CODES
149
THROUGH
165 ARE OEM
SPECIFIC FAULT
CODES.
Flame detected
150
Flame not detected
151
High fire switch ON
Code
L
L
H
H
H
H or L
H or L
H or L
H or L
H
H
44
H
H
H or L
Date:
8-4-2010
Revision:
0
Form:
2396
Code
Description
152
Combustion
pressure ON
Combustion
Pressure Off
153
154
155
156
157
Purge Fan switch
On
Purge fan switch
OFF
Combustion
pressure
Flame ON
Combustion
pressure
Flame OFF
and
and
158
159
Main valve ON
Main valve OFF
160
161
Ignition ON
Ignition OFF
162
163
Pilot valve ON
Pilot valve OFF
164
Block intake ON
Recommended Troubleshooting of Lockout Codes
1. Check wiring and correct any potential wiring errors.
2. Check High Fire Switch to assure proper function (not welded
or jumpered).
3.Manually drive the motor to the High Fire position and adjust
the HF switch while in this position and verify voltage through
the switch to the HFS input with a voltmeter.
4. If steps 1-3 are correct and the fault persists, replace the
module.
OEM Specific
1. Check wiring and correct any errors.
2. Inspect the Combustion Pressure Switch to make sure it is
working correctly.
3. Reset and sequence the relay module.
4. During STANDBY and PREPURGE, measure the voltage
between J6 terminal 5 and L2 (N). Supply voltage should be
present. If not, the lockout switch is defective and needs
replacing.
5. If the fault persists, replace the relay module.
OEM Specific
1. Purge fan switch is on when it should be off.
2. Check wiring and correct any errors.
3. Inspect the Purge Fan switch J6 terminal 3 and its
connections. Make sure the switch is working correctly and is
not jumpered or welded.
4. Reset and sequence the relay module.
5. If the fault persists, replace the relay module.
OEM Specific
1. Check that flame is not present in the combustion chamber.
Correct any errors.
2. Make sure that the flame detector is wired to the correct
terminal.
3. Make sure the F & G wires are protected from stray noise
pickup.
4. Reset and sequence the module, if code reappears, replace
the flame detector.
5. Reset and sequence the module, if code reappears, replace
the module.
OEM Specific
1. Check Main Valve terminal wiring and correct any errors.
2. Reset and sequence the module. If fault persist, replace the
module.
OEM Specific
1. Check Ignition terminal wiring and correct any errors.
2. Reset and sequence the module. If fault persist, replace the
module.
OEM Specific
1. Check Pilot Valve terminal wiring and correct any errors.
2. Reset and sequence the module. If fault persist, replace the
module.
OEM Specific
45
Code
H or L
H or L
H or L
H or L
H or L
L
L
L
L
L
L
L
L
Date:
8-4-2010
Revision:
0
Form:
2396
Code
165
Description
Block intake OFF
166171
172
RESERVED
173
174
175
176
177
178
179183
184
185
186
187
188
189
190
191
192
193
194
195
Recommended Troubleshooting of Lockout Codes
1. Check wiring and correct any errors.
2. Inspect the Block Intake Switch to make sure it is working
correctly.
3. Reset and sequence the module.
4. During Standby and Purge, measure the voltage across the
switch. Supply voltage should be present. If not, the Block Intake
Switch is defective and needs replacing.
5. If the fault persists, replace the relay module.
Code
L
Main
relay
feedback incorrect
Pilot relay feedback
incorrect
Safety
relay
feedback incorrect
Safety relay open
Main relay ON at
safe start check
Pilot relay ON at
safe start check
Safety relay ON at
safe start check
RESERVED
Internal Fault.
1. Reset Module.
2. If fault repeats, replace module.
L
Invalid BLOWER /
HSI output setting
Invalid Delta T limit
enable setting
Invalid Delta T limit
response setting
Invalid DHW high
limit enable setting
Invalid DHW high
limit
response
setting
Invalid
Flame
sensor type setting
Invalid interrupted
air switch enable
setting
Invalid interrupted
air switch start
check
enable
setting
Invalid igniter on
during setting
Invalid ignite failure
delay setting
Invalid ignite failure
response setting
Invalid ignite failure
retries setting
1. Return to Configuration mode and recheck selected
parameters, reverify and reset module.
2. If fault repeats, verify electrical grounding.
3. If fault repeats, replace module.
L
L
L
L
L
L
L
L
L
L
L
L
L
L
L
L
L
L
46
Date:
8-4-2010
Revision:
0
Form:
2396
Code
196
197
198
199
200
201
202
203
204
205
206
207
208
209
210
211
212
213
214
215
216
217
218
Description
Invalid
ignition
source setting
Invalid
interlock
open
response
setting
Invalid
interlock
start check setting
Invalid LCI enable
setting
Invalid lightoff rate
setting
Invalid lightoff rate
proving setting
Invalid Main Flame
Establishing Period
time setting
Invalid MFEP flame
failure
response
setting
Invalid NTC sensor
type setting
Invalid Outlet high
limit
response
setting
Invalid Pilot Flame
Establishing Period
setting
Invalid PII enable
setting
Invalid pilot test
hold setting
Invalid Pilot type
setting
Invalid Postpurge
time setting
Invalid Power up
with lockout setting
Invalid Preignition
time setting
Invalid
Prepurge
rate setting
Invalid
Prepurge
time setting
Invalid Purge rate
proving setting
Invalid Run flame
failure
response
setting
Invalid
Run
stabilization
time
setting
Invalid Stack limit
enable setting
Recommended Troubleshooting of Lockout Codes
Code
L
L
L
L
L
L
L
L
L
L
L
L
L
L
L
L
L
L
L
L
L
L
L
47
Date:
8-4-2010
Revision:
0
Form:
2396
Code
219
220
221
222
223
224
225
226
227
228
229
230
231
232
233
234
235
236
237
238
239
240
Description
Invalid Stack limit
response setting
Unconfigured Delta
T limit setpoint
setting
Unconfigured DHW
high limit setpoint
setting
Unconfigured
Outlet high limit
setpoint setting
Unconfigured Stack
limit setpoint setting
Invalid
DHW
demand
source
setting
Invalid
Flame
threshold setting
Invalid Outlet high
limit setpoint setting
Invalid DHW high
limit setpoint setting
Invalid Stack limit
setpoint setting
Invalid Modulation
output setting
Invalid CH demand
source setting
Invalid Delta T limit
delay setting
Invalid
Pressure
sensor type setting
Invalid IAS closed
response setting
Invalid Outlet high
limit enable setting
Invalid
Outlet
connector
type
setting
Invalid
Inlet
connector
type
setting
Invalid
DHW
connector
type
setting
Invalid
Stack
connector
type
setting
Invalid
Header
connector
type
setting
Invalid
Outdoor
connector
type
setting
Recommended Troubleshooting of Lockout Codes
Code
L
L
L
L
L
L
L
L
L
L
L
L
L
L
L
L
L
L
L
L
L
48
Date:
8-4-2010
Revision:
0
Form:
2396
Code
241255
Description
RESERVED
Recommended Troubleshooting of Lockout Codes
49
Code
Date:
8-4-2010
Revision:
0
Form:
2396
Section 3 Care and Maintenance
50
Date:
8-4-2010
Revision:
0
Form:
2396
important to keep these fumes from air intakes
that would distribute them throughout the
building.
WARNING:
The boiler area should be kept free of
combustible materials, gasoline and
other flammable liquids.
3.1.2 BOIL OUT PROCEDURE
The boil out of the boiler and system is neither
difficult nor expensive. The chemicals needed
for cleaning are readily available. Tri-sodium
phosphate, and sodium hydroxide (lye) are the
most commonly used chemicals. Be certain the
chemicals used contain NO CHLORIDES. Use
only one type of solution in the system. The
amount of chemical required will vary according
to conditions, but one pound per fifty gallons of
water is suggested.
The boiler and venting system must be
kept free of obstructions of the air
louvers.
The following procedures must be
conducted as outlined to prevent
damage to and assure safe operation
of the boiler.
Fill the system with this solution, venting all air.
Then, with the circulating pump running, bring
the system to design or operating temperature.
After circulating water for two to three hours, the
system should be drained completely, and
refilled with fresh, softened water.
Usually
enough of the cleaning solution will adhere to
the piping to result in an alkaline solution
satisfactory for operation.
A pH reading
between 7 and 8 is preferred. If necessary, to
increase the pH, a small amount of cleaner may
be added.
All cover plates, enclosures, and
guards must be in place at all times,
except during maintenance and
servicing.
3.1 CLEANING THE BOILER AND
SYSTEM – NEW SYSTEMS
3.1.1 PRE-BOIL OUT FLUSHING OF
SYSTEM
WARNING:
The boil out procedure outlined must
be performed by, or under the direct
supervision of, a qualified technician.
The chemicals used present a hazard
of burns and physical injury if
mishandled. Always use a suitable
facemask, goggles, protective gloves,
and garments when handling caustic
chemicals. Do not permit the chemical
to come into contact with skin or
clothing. Always follow the safety
precautions on the container's label.
Add chemicals slowly and in small
amounts to prevent excessive heat
and agitation.
Much of the dirt and contamination in a new hot
water system can be flushed out before the boil
out of the system. First, flush the system of
waste with clear water.
The boiler and
circulating pumps must be isolated through the
successive zones of the system to waste,
carrying metal shavings, dirt, pipe joint
compound, etc. with it. Follow with a chemical
flush. NOTE! Be CERTAIN that the chemicals
used to flush and boil-out the boiler and system
contain NO CHLORIDES.
The boiler is
fabricated with austenitic stainless steels that
can be severely damaged when exposed to
chlorides. The removal of pipe chips and other
debris from the system before opening the
isolation valves to the boiler and pumps will help
to protect this equipment from damage by such
debris.
In combination with system contamination,
bacteria from ground water boiler water may
produce objectionable odors, sometimes
resembling the odorant used in natural gas. It is
51
Date:
8-4-2010
Revision:
0
Form:
2396
the tank.
3.1.3 DRAINING THE SYSTEM
Install a strainer in the boiler return piping.
A clean neutral hot water system should not be
drained, except for an emergency or when
unavoidable for servicing of equipment. See
Section 3.3 for water treatment required when
refilling.
3.3 BOILER WATER TREATMENT
Purpose of water treatment
3.2 REPLACEMENT BOILER
INSTALLATIONS: PROTECTION
AGAINST CORROSION AND SEDIMENT
Water treatment is required for satisfactory
operation of the boiler. It must be devised to
prevent depositing of scale and corrosion from
acids, oxygen and other such harmful elements
that may be in the water supply. A qualified
water treatment chemist should be consulted
and the water systematically treated.
Clean or replace all system piping and
heating units
Arrange for chemical or mechanical cleaning of
the entire system.
A chemical treatment
company should be consulted for the proper
means of any chemical cleaning.
Replace any piping that is deteriorated beyond
safe or cleanable condition.
Flush the system clean, being certain to isolate
the boiler.
Objectives
The basic objectives of water treatment are:
Prevent the accumulation of scale and deposits
in the boiler.
Remove dissolved gases from the water.
Protect the boiler against corrosion.
Maintain the highest possible boiler fuel
efficiency.
Decrease the amount of boiler down time from
cleaning.
WARNING:
Water softener
DO NOT FLUSH THE SYSTEM
THROUGH THE BOILER.
It is highly recommended that a zeolite water
softener be used for all make-up to the boiler. It
is intended that this be used in addition to the
chemical treatment of the boiler.
Water
softening removes calcium and magnesium, the
primary causes of hard boiler scale.
For some old systems, there is a reluctance to
clean the piping because of possible leaks
occurring in badly corroded lines. Should the
customer refuse cleaning, it is necessary to
install filtration equipment.
Install either a
fibrous filter or a centrifugal filter in the boiler
return piping. This will collect and remove
sediment from the system. A booster pump may
be required to overcome the additional pressure
drop introduced in the line by the filter. When
filling the system, provide chemical treatment as
outlined in Section 3.3.
Continuous monitoring required
Water treatment should be checked and
maintained whenever the boiler is operating.
The boiler operator should be sure that the
boiler is not operating for long periods without
proper water treatment.
Water treatment may vary from season to
season or over a period of time. Therefore, the
water treatment procedure should be checked
not less than four times a year, and possibly
more frequently as the local water conditions
may indicate.
It should be noted that water boilers may well
need chemical treatment for the first filling plus
additional
periodic
chemical
treatment,
depending on system water losses and the
makeup requirements.
Water treatment may vary from season to
season or over a period of time. Therefore, the
water treatment procedure should be checked
Failure to properly clean the system or to install
mechanical sediment removal equipment can
result in tube blockage and severe corrosion
plus damage to pumps, controls, and air
removal devices.
Inspect, repair as necessary, or replace system
air control devices.
Install gauge glasses on air expansion tanks and
install a tank fitting in the system connection to
52
Date:
8-4-2010
Revision:
0
Form:
2396
not less than four times a year, and possibly
more frequently as the local water conditions
may indicate. All water introduced into the boiler
should be softened and should include an
oxygen scavenger like sodium sulfite. This is
required to remove dissolved oxygen from the
water. Dissolved oxygen will cause severe
boiler tube corrosion.
WARNING:
If soot or condensation is apparent, a
boiler service technician should be
consulted. The presence of soot
indicates poor combustion and
possibly hazardous boiler operation.
Failure to do so may result in fire,
explosion potential, or asphyxiation. A
combustion test and burner
adjustments should be undertaken at
once.
Draining and refilling the boiler & system
If the system is drained and then refilled,
chemical treatment is essential to treat the raw
water. Use only clean, softened water.
3.4 EXTERNAL “FIRE-SIDE”
CLEANING
3.5 SUGGESTED MAINTENANCE
SCHEDULE
Purpose
Carbon (soot) is an insulator and corrosive. The
heating surfaces of a boiler must be kept free
from soot accumulation to keep the boiler
operating at its highest efficiency and to avoid
damage from corrosion.
Daily
1. Make visual inspection of gauges,
monitors, and indicators and record
readings in boiler log.
2. Make visual check of instrument and
equipment settings against factory
recommended specifications.
3. Check operation of probe type low water
cutoff(s) to ensure control is functioning.
Soot removal
If the yearly inspection of the boiler tube
surfaces reveals a build-up of soot or rust
(usually due to condensation), the tubes should
be thoroughly brushed. (Tube cleaning brushes
are available from Bryan Steam) To inspect
and, if necessary, clean the tube surfaces and
flue collector, first remove the tube access
panels. Examine the exterior of the tubes for
evidence of soot or rust. Using a flashlight,
carefully look between the tubes. There should
be an unobstructed opening between all tubes,
and the top surfaces of the tube must be free
from soot accumulation. Also inspect the interior
of the flue collector. Brush or vacuum the soot
from all surfaces. Be sure to cover Triple-Flex
burner with a protective cover during cleaning to
prevent soot from falling onto it.
If the buildup of soot is appreciable, the flue gas
venting system must be thoroughly inspected
internally as well, and cleaned as necessary.
Weekly
1. Confirm boiler area is free of
combustible materials and that there is
nothing obstructing air openings, draft
hood relief openings, etc.
2. Check combustion safety controls for
flame failure and flame signal strength
as
specified
in
manufacturer's
instructions located at the back of this
manual.
3. Check all limit controls.
4. Check low water cutoff as described
above.
Monthly
1. Check high and low gas pressure
interlocks.
Refer to manufacturer's
instructions for correct procedure.
Annually
1. The flue gas passages and the exterior
surfaces of the boiler tubes should be
53
Date:
8-4-2010
Revision:
0
Form:
2396
inspected at least annually.
Any
accumulation of soot or debris should be
thoroughly cleaned out.
2. If the yearly inspection of the boiler tube
surfaces reveals a build-up of soot
(carbon), the tubes surfaces should be
thoroughly brushed. Failure to do so
may result in fire or asphyxiation
hazards.
3. The boiler pressure vessel and piping
should be checked annually.
54
Date:
8-4-2010
Revision:
0
Form:
2396
Section 4 Lead Lag
55
Date:
8-4-2010
Revision:
0
Form:
2396
There are parameters that are available to set
the features for Lead Lag.
The LL master turns the first stage on and
eventually turns the last stage off using the
same criteria as for any modulation control loop.
When the operating point reaches the Setpoint
minus the On hysteresis, then the first Sola is
turned on. When the operating point reaches
the Setpoint plus the Off hysteresis then the last
slave Sola (or all slave Solas) are turned off.
Many of the descriptions used are internal
functions or tables. The names help define the
functions but are not controlled or selectable
outside Sola, unless noted as a parameter.
4.1 GENERAL DESCRIPTION OF THE
LEAD LAG APPLICATION
The LL master PID operates using a percent
rate that is, 0% is a request for no heat at all,
and 100% means firing at the maximum
modulation rate.
Sola devices contain the ability to be a stand
alone control, operate as a Lead Lag Master
control which also uses the Sola control function
as one of the slaves or to operate solely as a
slave to the lead lag system. Conceptually it is
not a part of that specific control, but is an entity
that is "above" all of the individual Sola controls
(including the one that hosts it). The master
sees each slave (including the one that hosts it)
as a set of Modbus devices, each having certain
registers, and in this regard it is entirely a
communications bus device, talking to the slave
Sola controls via Modbus.
This firing rate sent to the slaves as a
percentage, but this is apportioned to the slave
Solas according to the rate allocation algorithm
selected by the Rate allocation method
parameter.
For some algorithms this rate might be common
to all slave Solas that are firing. For others it
might represent the total system capacity and be
allocated proportionally.
For example, if there are 4 slaves and the LL
master's percent rate is 30%, then it might
satisfy this by firing all four slaves at 30%,
Or
by operating the first slave at 80% (20% of the
system’s capacity) and a second slave at 40%
(10% of the system’s capacity).
Sola devices utilize two ‘ModBus™’ ports (MB1
and MB2) for communications. One port will be
designated to support a system S7999B display
and the other port will support communications
from the LL Master with its slaves. The diagram
on page 4 shows a simplified wiring diagram
connecting the system display with a 4 system
Lead Lag arrangement.
The LL master may be aware of slave Sola’s
minimum firing rate and use this information for
some of its algorithms, but when apportioning
rate it may also assign rates that are less than
this. In fact the add-stage and drop-stage
algorithms may assume this and be defined in
terms of theoretical rates that are possibly lower
than the actual minimum rate of the Sola control.
In any case a Sola that is firing and is being
commanded to fire at less than its minimum
modulation rate will operate at its minimum rate:
this is a standard behavior for a Sola control in
stand-alone (non-slave) mode.
The Lead Lag master is a software service that
is hosted by a Sola control.
The LL master uses a few of the host Sola's
sensors (header temperature and outdoor
temperature) and also the STAT electrical inputs
in a configurable way, to provide control
information.
4.2 LEAD LAG (LL) MASTER GENERAL
OPERATION
If any slave under LL Master control is in a RunLimited condition, then for some algorithms the
LL master can apportion to that stage the rate
that it is actually firing at.
The LL master coordinates the firing of its slave
Solas. To do this it must add stages and drop
them to meet changes in load, and it sends firing
rate commands to those that are firing.
Additionally when a slave imposes its own Runlimited rate this may trigger the LL
Master to add a stage, if it needs more capacity,
56
Date:
8-4-2010
Revision:
0
Form:
2396
three groups: "Use First", "Equalize Runtime", or
"Use Last". If one or more Solas are in the "Use
First" category, then one of these (the one with
the lowest sequence number) will always be the
first boiler to fire. If there is no Sola in the "Use
First" category and one or more are in the
"Equalize Runtime" category, then the First
boiler is also the Lead boiler.
or drop a stage if the run-limiting is providing too
much heat (for example if a stage is running at a
higher-than commanded rate due to anticondensation).
By adjusting the parameters in an extreme way
it is possible to define add-stage and drop-stage
conditions that overlap or even cross over each
other. Certainly it is incorrect to do this, and it
would take a very deliberate and non-accidental
act to accomplish it. But there are two points in
this:
LL master does not prevent it, and more
important;
it will not confuse the LL master because it is
implemented as a state machine that is in only
one state at a time; for example:
• if its add-stage action has been triggered, it will
remain in this condition until either a stage has
been added, or
• the criteria for its being in an add-stage
condition is no longer met; only then will it take
another look around to see what state it should
go to next.
Add-stage method
Add-stage detection timing
Add-stage request An Add-stage method
implements the criteria for adding another stage.
Criteria that may apply are the firing rate of a
stage or stages vs. a threshold, the amount of
operating point versus setpoint error seen by the
master, the rate at which setpoint error is
developing, and the rate at which a stage or
stages are approaching their maximum or
baseload firing rate.
Typically these use Add-stage detection
timing to determine how long these things have
persisted. When all criteria have been met for a
sufficient time, then an Add-stage request is
active.
Assumptions:
Modulating stage The modulating stage is the
Sola that is receiving varying firing rate requests
to track the load.
Drop-stage method
First stage This is the Sola that was turned on
first, when no slave Solas were firing.
Drop-stage detection timing
Drop-stage request A Drop-stage method
implements the criteria for dropping a stage.
Criteria that may apply are the firing rate of a
stage (or stages) vs. a threshold, the amount of
operating point versus setpoint error seen by the
master, the rate at which setpoint error is
developing, and the rate at which a stage or
stages are approaching their minimum firing
rate.
Previous stage The Sola that was added to
those stages that are firing. Just prior to the
adding of the Sola that is under discussion.
Next stage The Sola that will or might be added
as the next Sola to fire.
Last stage The Sola that is firing and that was
added the most recently to the group of slaves
that are firing. Typically this is also the
modulating stage, however as the load
decreases then the last-added stage will be at
its minimum rate and the previous stage will be
modulating.
Typically these use Drop-stage detection
timing to determine how long these things have
persisted. When all criteria have been met for a
sufficient time, then an Drop-stage request is
active.
Lead boiler The Lead boiler is the Sola that is
the first stage to fire among those stages which
are in the equalize runtime (Lead/Lag) group. If
a boiler is in the "Use first" group it may fire
before the Lead boiler fires.
First boiler A Sola may be assigned to any of
57
Date:
8-4-2010
Revision:
0
Form:
2396
4.3 SYSTEM WIRING HOOKUP
Figure 40 LL / Multi-Boiler Field Wiring
58
Date:
8-4-2010
Revision:
0
Form:
2396
be used (a)Lead Outlet - Outlet temperature of
the lead boiler will be used as the backup during
firing (i) Slave Outlet Average - Average of the
outlet temperatures of all slave boilers that are
firing will be used as a backup (b) If the sensor
chosen by the above parameter is faulty then
the backup sensor provided may be used. When
burner demand is off and no burners are firing
then, for either "Lead Outlet" or "Slave Outlet
Average", the lead boiler's outlet temperature is
used to monitor for burner demand. 4. Local
Display Configuration and Operation a. The
configuration parameters available on the local
display are edited in the Service Mode b. Access
to the Service Mode is accomplished by
pressing both up/down buttons for 3 seconds. c.
Status and Operation (1) Slave status (a) “Rmt”
and “Adr” icons are on to show slave (follower)
has been enabled. (b)Current burner status is
shown (c) To show slave CFH (i) Alternate “%”
firing rate and actual (slave) Outlet temp to
indicate slave CFH otherwise show the Home
screen. (2) Master status (a)Rmt icon is on, Adr
icon is off to show Master (Leader) has been
enabled. (b)Current burner status is shown (c)
Actual temperature LL (Header) temperature is
shown as described in 4e below. (d)Pressing the
up/down buttons allows setpoint adjustment for
LL-CH only (not LL-DHW or LL-Mix or others). (i)
All pump configurations must be done using the
PC Configuration tool in the OEM factories.
(e)To show Master CFH (i) Alternate “CH” or
“LL” or “Hdr” in numbers field with the actual
temperature to indicate LL CH CFH. d.
Configuration (1) Continue scrolling through setup screens until “Remote Firing Control” screen
is reached. (2) Rmt On/Off selection chooses to
navigate the user through the Master/Slave
configuration as existing today (3) Set
master/slave remote address as is done on
currently on the local display. (4) The following
parameters are mapped to Modbus addresses.
LEAD LAG 5 66—A1171 (a) “LL” = LL Operation (3
user selections available) (i) “Ldr” (i-a)Master
Enable (i-b)Slave Enable (ii)“SLA” (ii-a)Slave
Only Enable (ii-b)Master Disable (i) “OFF” (iiia)Master Disable (iii-b)Slave Disable (b)HS =
On/Off Hysteresis (One value used for all LL
boilers) (i) “HS” for on and off hysteresis values.
(i-a)Only allow 1 setting for both on and off
hysteresis values. (a-1)Must adhere to the
strictest of either the HS On or Off limits. •
Highest value of the “low” range limit in Sola
control • Lowest value of the “high” range limit in
Sola control (a-2)See Sola Modbus specification
for details. • Typical values: 2-15 (c) BL =
4.4 LEAD-LAG OPERATION
This is a summary of the functional capability of
the embedded lead-lag on the Sola control.
OEM Configurable parameters may be adjusted
as part of the OEM factory configuration and in
the field using the System Display with
appropriate password permissions. Specific
parameters may also be configured in the field
by the local display 1. Field Installation
Configuration a. The master and slave
controllers are enabled via the S7910 or S7999
display. b. All Sola controllers are programmed
with a default address of 1. Assuming the
Master Sola controller remains address 1, the
address of the slave controllers in the system
must have a unique address (1..8) via the local
display. 2. Basic Operation a. Firing rate
determination – Parallel common-base limited
(1) All boilers have a single assignable base
load firing rate. (2) Allocation (a)As load
increases: (i) Until all stages are Firing - No
stage is requested to exceed the common base
load rate. (ii)After all stages are Firing - There is
no restriction on the slave's commanded firing
rate. (b)As load decreases: (i) As long as all
available stages are firing - There is no
restriction on the slave's commanded firing rate.
(ii)When at least one stage has been dropped No stage is requested to exceed the common
base load rate. b. Rotation (1) The lead boiler is
rotated based sequence order. The lead boiler
rotation time is a configurable OEM assigned
parameter. Rotation is sequential by address (12-3-4; 2-3-4-1; etc.) (2) Rotation trigger occurs at
the start of each new heat cycle. c. Source of
heat for call – The call for heat originates at the
master boiler. This source may be configured to
be an external thermostat or via EnviraCOM
Remote Stat. d. Slave boiler lockout – If any
slave is in lockout the master boiler will cause it
to be skipped and all system load setting
calculation settings will be based only on
available boilers. e. Master boiler lockout – If the
master boiler is in lockout then its burner control
function will be skipped in the rotation the same
as the slave controllers. However, the master
boiler function will continue to operate. 3.
System Component Failure Responses a. If the
system header sensor becomes disconnected
from the master boiler then the master boiler will
control off of one of the following OEM
configurable actions (1) Disable - No backup will
59
Date:
8-4-2010
Revision:
0
Form:
2396
diagram below:
Baseload common (i) “BL” for baseload (ii)User
selection 0 – 100 % (d)Use existing timeout,
Done button, and Next button functionality to
enter these parameters. (e)User selections will
be selected by MMI. (i) The local display does
not adhere to the PCB (OEM parameter
selections used by S7999). (5) In normal display
operation the display allows a user to scroll
through a list of temperatures with associated
icons (CH, Inlet, Delta, DHW, Stack, Outdoor)
using the Next button. With LL active the display
will show the header temperature at the end of
the list of temperatures as follows: (a)The
characters “LL” are displayed in the number field
(b)When the next button is pressed again the
temperature is displayed. (c) If the Up or Down
buttons are pressed then the LL set-point is
changed. 5. System Display Configuration – The
following parameters are available for OEM
configuration and may be adjusted through a
System Display or programmed at the OEM
production facility. Master Sola Slave Sola LL
frost protection enable Slave mode LL frost
protection rate Base load rate Base load rate
Slave sequence order LL CH demand switch LL
Demand to firing delay LL CH set point source
LL Modulation sensor LL Base load common LL
Modulation backup sensor LL CH 4mA water
temperature LL Lead selection method LL CH
20mA water temperature LL Lag selection
method LL Add stage method 1 LL Add stage
detection time 1 LL Add stage error threshold LL
Add stage rate offset LL Add stage inter-stage
delay LL Drop stage method 1 LL Drop stage
detection time 1 LL Drop stage error threshold
LL Drop stage rate offset LL Lead rotation time
LL Force lead rotation time LL Drop stage interstage delay
Frost protection requests
The frost protection in this status register will be
set or cleared to match the status generated by
the frost protection detection functions.
Firing for local frost protection This
provides indication to the LL master that
although the burner is firing independently, it is
doing so for frost protection and thus is still
available as a lead/lag slave. This is set when 1)
frost protection is controlling the Sola per the
priority scheme (which occurs only if frost
protection is enabled), and 2) burner demand is
true and the burner is currently firing or
preparing to fire to serve that demand.
Otherwise it will be clear.
Aux Pump X, Y, and Z The pump control in
the Slave can be used by previously existing
command devices to create the same behavior.
However before these bits controlled actions is
specific pump blocks, they are now more
general. The pump X, Y, and Z bits control
actions in any pump block defined to handle
them (see the pump control block definition).
4.6 SLAVE PARAMETERS
SLAVE ENABLE: DISABLE, ENABLE VIA
MODBUS, ENABLE FOR SOLA MASTER
It enables or disables the "LL Slave" Demand
and Rate module. If the slave mode is set to
Disable then: none of the slave functions are
active, Slave Status register is zero, the LL –
Master Service Status register is not writable
and is held at zero (this is important for pump
control which might otherwise use values in this
location). The Slave Command register is
writable but it is mostly ignored, however the
Aux pump X, Y, and Z are effective for any
setting of the Slave enable parameter. The
Enable for Sola Master option Slave write and
Slave read parameters; if "Enable for Sola
Master" is not selected, then these parameters
are disabled.
4.5 SLAVE OPERATION AND SETUP
Slave Data Supporting Lead Lag
This data is provided by each slave Sola control
to support operation when a LL master exists.
The illustration below summarizes the slave's
registers and data:
SLAVE MODE: USE FIRST, EQUALIZE
RUNTIME, USE LAST
If set to Use First, then this Sola will be used
prior to using other Solas with other values. If
set to Equalize Runtime, then this Sola will be
staged according to a run time equalization
LL Slave
Some slave changes relate to pump control,
frost protection, and also are available to 3rd
party (non Sola) LL master devices. The generic
LL slave is updated to operate as shown by the
60
Date:
8-4-2010
Revision:
0
Form:
2396
algorithm. (Any Solas set to Use First will
precede any that are set to Equalize Run time.)
If set to Use Last, then this burner will be used
only after all Use First and Equalize Runtime
Solas have been brought online.
parameters that enable and disable its
operation.
• Periodic data polling - The LL master uses
polling to discover new slave Sola devices and
to periodically refresh the information it has
about a known slave Sola devices.
• Slave control - the LL master sends each
active slave a command and also performs a
slave status read for each known slave device. It
also sends a Master status broadcast that is
heard by all slaves.
• Slave status manager - The LL master keeps
track of slave status for each Sola that is
enabled as a slave device.
• Demand and priority - different sources of
demand can cause the LL master to operate in
different ways. These sources have a priority
relationship.
• Modulation - each demand source has one or
more setpoints that may be active and an
operation sensor. These are used to detect turnon and turn-off conditions. The difference
between
operating
point
and
setpoint
determines the LL master's firing rate.
• Stager - the stager determines when slave
Solas should turn on as the need for heat
increases, and when they should turn off as the
need for heat decreases.
Rate allocation - the PID block's output is used
to determine the firing rate of each slave Sola
using various rate allocation techniques.
• Add-stage methods - various methods can be
used to determine when a new stage should be
added.
• Drop-stage methods - various methods can
be used to determine when a stage should be
dropped
• Sequencer - the Sola sequencer determines
which Sola will be the next one to turn on or turn
off.
SLAVE SEQUENCE ORDER: 0-255
Slave sequence order is used to determine the
order in which Solas will be used (staged on) for
those Solas which the same Slave mode setting.
Numbers may be skipped, that is 3 will be first if
there is no 1 or 2. Note: For Equalize Runtime
purposes, 1 does not mean the Sola will be used
first every time; that will vary over time based on
the master's run time equalization scheme. In
this case the sequence number determines the
relative order in which Sola controls will be used
in a round-robin scheme. If the slave sequence
number value is zero, then the slave Sola's
ModBus address will be used instead. If two
Solas which are set the same mode both have
the same sequence number then an alert will
occur and the order in which they are used will
be arbitrary and is not guaranteed to be
repeatable.
DEMAND-TO-FIRING DELAY: MM:SS OR
NONE
This delay time is needed by the LL master to
determine the length of time to wait between
requesting a slave Sola to fire and detecting that
it has failed to start. It should be set to the total
time normally needed for the burner to transition
from Standby to Run, including such things as
transition to purge rate, prepurge time, transition
to lightoff rate, all ignition timings, and some
extra margin.
BASE LOAD RATE: RPM OR %
This specifies the preferred firing rate of a
burner, which is used for some types of control
algorithms.
FAN DURING OFF-CYCLE RATE: RPM OR %
(0=DISABLE)
This determines if or where the fan is to be
operating during the standby period.
4.7.1 OVERALL CONTROL
LL MASTER ENABLE: DISABLE, ENABLE, LL
MASTER MODBUS PORT: MB1, MB2 If
Disable is selected then all LL master functions
are inactive. If Enable is selected then it acts as
the active bus master on the ModBus port it is
assigned. LL OPERATION SWITCH: OFF, ON
This controls the LL master in the same way that
the Burner switch controls a stand-alone Sola. If
"On" then the LL master is enabled to operate. If
this parameter is "Off" then the LL master turns
4.7 LL MASTER OPERATION AND
SETUP
LL master operation is subdivided into the
following functions:
• Overall control - The LL master has
61
Date:
8-4-2010
Revision:
0
Form:
2396
off all slaves and enters an idle or standby
condition.
discover what happened in a subsequent status
response). The LL master also sends this
message to a slave that is OnLeave. (This
ensures that if the slave is firing when it returns
to LL master control, it will stay that way until the
master has decided whether to use it; or
conversely, if the slave stops firing for some
reason that it will not start up again until the LL
master has requested this. In either case, the
command will be to turn on the off cycle fan if
any other slave burners are firing, or to turn the
fan off if the slave is the only slave that might (or
might not) be firing.
• The LL master sends message to turn the
burner on and to assign the burner’s firing rate.
If the commanded modulation rate is less than
the burner’s minimum modulation rate, then the
burner should always operate at its minimum
rate.
4.7.2 PERIODIC DATA POLLING
MESSAGES
The LL master uses polling to discover new
slave Sola devices and to periodically refresh
the information it has about a known slave Sola
devices. Thereafter it polls the known devices to
make sure they are still present and to obtain
updated status information. It also periodically
polls the entire slave address range to discover
any new slave devices. A polled Sola is read to
determine the values of the following data items:
a. The slave's type (compatibility) as indicated
by the Slave type b. The slave enable status
Slave enable c. The slave mode as set in Slave
mode d. The slave sequence order as set in
Slave sequence order e. Demand-to-firing
delay: mm:ss or None This delay time is
needed by the LL master to determine the length
of time to wait between requesting a slave Sola
to fire and detecting that it has failed to start. It
should be set to the total time normally needed
for the burner to transition from Standby to Run,
including such things as transition to purge rate,
prepurge time, transition to lightoff rate, all
ignition timings, and some extra margin. f. CT Burner run time This parameter will be needed
if measured run-time equalization is being used.
4.7.3 SLAVE STATUS MANAGER
The LL master keeps track of slave status for
each Sola that is enabled as a slave device. The
slave status manager operates internally for
each slave Sola devices (up to 8). There is a
table entry for each device containing the
following data:
• SlaveState:
Unknown - indicates the table entry is unused
and empty
Available - indicates the slave is OK and ready
to use, but is not
currently firing as a slave
AddStage - stage is getting ready to fire
SuspendStage - stage was getting ready but is
not needed
Firing - indicates the slave is currently firing
OnLeave - indicates the slave is operating for
some other demand source within it that has
higher priority than slave demand.
Disabled - indicates the slave is locked out or
disabled in some way
Recovering - indicates the slave is in a time
delay to ensure that it is OK before it is again
considered to be available.
• RecoveryTime: Saves how long the slave
must be OK to recover.
• RecoveryTimer: Used to measure the slaves
recovery time
• RecoveryLimitTimer: Enforces a maximum
slave recovery time
• DataPollFaultCounter: Used to tolerate
Slave Control
The LL master sends each active slave a
command and also performs a slave status read
for each known slave device. It also sends a
Master status broadcast that is heard by all
slaves. There are 5 commands that might be
sent:
• All slaves are commanded to turn off and
remain off.
• The LL master sends message to Solas that
are off, to turn their fans on.
• The LL master suspends operation which
request a burner to recycle and remain in
Standby if it has not yet opened its main valve
(e.g. it is in Prepurge or PFEP) but to keep firing
if it has reached MFEP or Run. This suspend
may be for the fan to be on or off in standby.
This message is used to abort the startup of a
slave that is not yet firing (because demand
went away just before it was firing), but to keep it
on if it actually is firing (the LL master will
62
Date:
8-4-2010
Revision:
0
Form:
2396
INVALID RESPONSE OR NO RESPONSE
momentary communication problems and to act
on
these
if
they
are
excessive.
•
StatusReadFaultCounter: Used to tolerate
momentary communication problems and to act
on these if they are excessive.
• AbnormalFaultCounter: Used to tolerate
momentary abnormality
• StagingOrder: Used to record the stage-on
order, for use by the sequencer when it needs to
drop a stage.
• Storage for each item described in the Periodic
data polling section • Storage for each item
described in the Slave status read response
section • Slave Command - the command word
from the master to the slave.
Features common to all states
• Whenever a slave Sola device is not in an
expected condition then a recovery function is
used to set up timers to give a faulty slave: —
minimum time that it must appear to be OK, and
— limit how long a slave has to recover from any
error.
• If the slave status read was bad then the
slave's FaultCounter is incremented and if it to
reaches the fault value tries, then a recovery
action is invoked. This action does nothing else
if the status read was Bad. If the slave status
read was OK then the status function puts the
slave read response data in a slave status table.
If a transition to another state is indicated then
the SlaveState is simply set to the indicated
state.
When a Sola responds to a data poll with an
improperly formatted message or it does not
respond then the slave status table is checked
and: If the polled slave device is in the table then
the Data Poll Fault is noted. If this causes a
fault counter to exceed the fault value then the
SetRecovering handling is invoked.
SlaveState states
Recovering A slave that is recovering is
checked once per second. If the slave has
recovered the SlaveState table is changed to
Available. If the slave has not yet recovered
when its recovery timer reaches the
RecoveryTimeLimit then: If the slave is not
enabled for the Sola LL master its SlaveState
table is Set to Unknown (which logically
removes it from the slave table). Otherwise the
Recovery- LimitTimer is cleared which starts a
new recovery measurement and the slave
remains in recovery (indefinitely).
Available A slave in the Available state remains
that way until the Stager moves it into the
AddStage state or the ProcessSlaveStatus
action moves it to some other state.
AddStage A slave in the AddStage state
remains that way until the ProcessSlaveStatus
moves it to Firing or some other state, or the
Stager times out and moves it into the
Recovering state if it fails to fire.
SuspendStage A slave in the SuspendStage
state
remains
that
way
until
the
ProcessSlaveStatus moves it to some other
state, or the Stager times out and moves it into
either the Firing or the Available state.
Firing A slave in the Firing state remains that
way until the ProcessSlaveStatus moves it to
some other state, or the Stager drops the stage
and moves it into the Available state.
OnLeave A slave in the OnLeave state remains
that way until the ProcessSlaveStatus moves it
to some other state.
Disabled A slave in the Disabled state remains
that way until the ProcessSlaveStatus moves it
to Recovering.
Data poll response handling
Valid Response Message
When a slave Sola responds with a properly
formatted message it is examined to see if
Slave enable value is "Enable for Sola Master".
• If the "Enable for Sola Master" value is not
present then the slave status table is checked
and if the slave is not in the table then the
message is ignored (this is normal). However if
the slave is in the table then the message is
stored as usual and the slave will invoke the
action as a disabled slave and cause recovery
action to occur.
• If the "Enable for Sola Master" value is present
then the slave status table is checked and if the
slave is not in the table then the slave data is
stored in an empty position in the table.
However if the slave is in the table then the
message is stored as usual (this is the normal
case).
Demand and Priority
Different sources of demand can cause the LL
master to operate in different ways. These
sources have a priority relationship.
CH Demand
63
Date:
8-4-2010
Revision:
0
Form:
2396
New occurrences of CH demand is inhibited.
DHW demand is not affected.
LL CH DEMAND SWITCH: DISABLE, STAT,
ENVIRONCOM REMOTE STAT
The inputs that can function as the CH demand
switch are: STAT, EnvironCOM Remote Stat. If
the CH demand switch value is Disable, the LL
master does not respond to CH demand.
Warm Weather Shutdown
WARM WEATHER SHUTDOWN ENABLE:
DISABLE, SHUTDOWN AFTER DEMANDS
Frost protection
LL master frost protection is enabled with Frost
protection enable: Disable, Enable
The need for frost protection is actually detected
independently by each slave which notifies the
master whether frost detection occurred in CH
frost detection, and/or its DHW frost detection,
and whether it is severe enough to require
burner firing as well as pump operation. This is
done via its Slave status parameter.
HAVE ENDED, SHUTDOWN IMMEDIATELY
WARM WEATHER SHUTDOWN SETPOINT:
TEMPERATURE OR NONE
When warm weather shutdown is Disabled then
it has no effect (i.e. the Warm Weather
Shutdown (WWSD) status shown on the priority
diagram is false).
If Frost protection enable is Enable then the
master's Slave write message, will indicate CH
or DHW frost protection or both as read from
each slave's Slave Status. This will cause any
slave pumps which are enabled to follow this
status to turn on without any other action
required from the master.
These two parameters are shared by the standalone Sola control and the LL master and have
the same effect for either control.
If any slave is indicating CH or DHW frost
protection, and additionally that slave's Slave
status register indicates burner firing is
requested then the LL master's frost protection
burner demand will be true.
This function requires the outdoor temperature.
This temperature may be obtained from either a
local sensor or a LL slave. If WWSD is enabled
but the outdoor temperature is invalid and
unknown, then the WWSD function acts as if it is
disabled and has no effect and an alert is issued
indicating an invalid outdoor temperature.
If the priority scheme allows the master to honor
this demand, then it will fire a single burner (the
current lead burner as specified by the
sequencer) at the rate indicated by Frost
protection rate: 0-100%. (100% represents
100% firing of this boiler, and where 0% or any
value less than the boiler's minimum firing rate
represents the minimum firing rate).
If it is enabled then it uses a 4°F (2.2°C)
hysteresis:
If WWSD is false, then when the Outdoor
temperature is above the value provided by
Warm weather shutdown setpoint then:
Priority Control
If "Shutdown after demands have ended" is
selected then any current CH demand that is
present prevents WWSD from becoming true;
that is if CH demand is false then WWSD
becomes true.
CH heat demand is a simple signal such as
STAT, Enviro- COM remote stat, or Warm
Weather Shutdown.
Otherwise if "Shutdown immediately" is
selected then WWSD becomes true, it
immediatetly causes CH demand to end.
Frost protection input to the priority logic is not a
heat demand, it is a burner demand (because
frost protection always turns on pumps without
regard to the priority control - it is a priority item
only if it also wants to fire).
If WWSD is true, then when the Outdoor
temperature is below the value provided by
Warm weather shutdown setpoint minus 4°F
(2.2°C) then WWSD becomes false.
Master Status
MASTER HEAT DEMAND
When warm weather shutdown is true then:
Is a data item which contains the status for the
64
Date:
8-4-2010
Revision:
0
Form:
2396
following sources of demand. All sources that
are currently calling for heat will be true (multiple
items may be true at the same time) except
when WWSD is active, then CH demand is
inhibited.
These are used to detect turn-on and turn-off
conditions. The difference between operating
point and setpoint determines the LL master's
firing rate
CH Demand
CH Frost demand – true if any slave is calling for
CH frost protection and Frost protection
enable is true.
4.7.5 MODULATION SENSOR
LL MODULATION SENSOR: S5
The LL master's modulation sensor uses the S5
sensor (connector J8 terminal 11 and 12). If the
LL master is enabled and its sensor is faulty
then an alert will be issued.
4.7.4 MASTER ACTIVE SERVICE
Is a data item which contains the identity of a
single source of demand that the LL Master is
currently serving according to its priority:
• None – no active service, LL master is idle
• CH
• Frost – burner demand is true for frost
protection
• WWSD – no high priority demand is active, and
WWSD is inhibiting CH demand (if any).
LL
MODULATION
BACKUP
SENSOR:
DISABLE, LEAD OUTLET, SLAVE OUTLET
AVERAGE
If the sensor chosen by the LL Modulation
sensor is faulty then the backup sensor
provided here may be used.
If Disable is selected then no backup will be
used.
MASTER SERVICE STATUS
If Lead Outlet is selected then the outlet
temperature of the lead boiler will be used as the
backup during firing.
Is a data item used by pump control logic that
combines the Master Heat Demand and Master
Active Service data. It is implemented as
described by the Pump Control Block diagram.
If Slave Outlet Average is selected then
average of the outlet temperatures of all slave
boilers that are firing will be used as a backup.
When the burner demand is off and no burners
are firing then, for either Lead Outlet or Slave
Outlet Average, the lead boiler's outlet
temperature is used to monitor for burner
demand.
Outdoor Temperature
For a Sola that hosts a LL master, the outdoor
temperature may be known from either of two
sources. If the host Sola has an outdoor sensor
that is reporting a valid temperature then this
sensor reading is used. Otherwise, if any slave
Sola is reporting a valid temperature as part of
its Data Poll message, then this temperature is
used.
Setpoints
LL CH SETPOINT SOURCE: LOCAL, S2 420MA
If the setpoint source is Local then the Sola
control's local setpoint system is used. This
setting enables the normal use of the CH
setpoint, CH TOD setpoint, and the CH outdoor
reset parameters and functions.
The resulting outdoor temperature provides all
outdoor temperature needs for both stand-alone
and LL master purposes. If neither source has a
valid temperature then the outdoor temperature
is simply invalid and unknown, and the functions
which need this information handle it accordingly
per their individual definitions.
If the setpoint source is S2 4-20mA then the
setpoint is determined by the 4-20mA input on
S2, and the two parameters described below. If
the 4-20mA signal goes out of range or is
invalid, and this persists for a specified time,
then the setpoint source reverts to "Local". In
this case once it has gone to "Local", it remains
Modulation
Each demand source has one or more setpoints
that may be active and an operation sensor.
65
Date:
8-4-2010
Revision:
0
Form:
2396
None
• LL CH ODR boost step: degrees or None
• LL CH ODR boost recovery step time:mm:ss or
None
that way until the 4- 20mA signal is stable again.
LL CH 20MA WATER
TEMPERATURE OR NONE
TEMPERATURE:
The outdoor reset function requires the outdoor
temperature. This temperature may be obtained
from either a local sensor or a LL slave as
described earlier. If the outdoor temperature is
invalid and unknown, then no outdoor reset
action occurs and an alert is issued indicating an
invalid outdoor temperature.
CH
4MA
WATER
TEMPERATURE:
TEMPERATURE OR NONE
These provide the 20mA and 4mA temperatures
for the interpolation curve. If either of these have
the None value, are invalid, are out of range, or
are too close for interpolation, an alert is issued
and the setpoint reverts to "Local" when it is
selected as 4-20mA.
LL
CH
ODR
MINIMUM
WATER
TEMPERATURE: DEGREES OR NONE
LL CH SETPOINT: DEGREES OR NONE
This setpoint is used when the time-of-day input
is off. If the ODR function is inactive then the
setpoint is used as-is. If the ODR function is
active then this setpoint provides one coordinate
for the outdoor reset curve.
This specifies the minimum outdoor reset
setpoint for the LL master. If the outdoor reset
function calculates a temperature that is below
the temperature specified here, then this
parameter's temperature will be used. If this
parameter is invalid or None then the outdoor
reset function will be inhibited and will not run: if
it is enabled then an alert is issued.
LL CH TOD SETPOINT: DEGREES OR NONE
This setpoint is used when the time-of-day input
is on. If the ODR function is inactive then the
setpoint is used as-is.
4.7.6 DEMAND AND RATE
If the ODR function is active then this setpoint
provides one coordinate for the shifted (because
TOD is on) outdoor reset curve.
On/Off Hysteresis Includes hysteresis shifting
at turn-on, turn-off
TIME OF DAY
The Time of Day has one sources of control: a
switch contact. Closed TOD is an on condition;
open, then TOD is off.
LL OFF HYSTERESIS: DEGREES OR NONE
LL ON HYSTERESIS: DEGREES OR NONE
OUTDOOR RESET AND BOOST (BOOST IS
FUTURE)
The outdoor reset and boost functions for the LL
CH functions will be implemented as described
for a stand-alone CH loop.
The LL hysteresis values apply to all setpoint
sources. The behavior of the hysteresis function
is identical to the behavior of the stand-alone CH
hysteresis function, except:
Each of the loops which implements outdoor
reset and boost has its own parameters. The
parameters used by the LL master are:
• LL setpoint
• LL CH TOD Setpoint
• LL Outdoor reset enable: Disable, enable
• LL CH ODR minimum outdoor degrees or
None
• temperature:
• LL CH ODR maximum outdoor degrees or
None temperature:
• LL CH ODR low water temperature: degrees or
None
• LL CH ODR boost time: mm:ss or None
• LL CH ODR boost max setpoint: degrees or
• where stand-alone CH hysteresis uses the
on/off status of a single burner, the LL hysteresis
uses the on/off status of all slave burners: this
status is true if any slave burner is on, and false
only if all are off.
• where stand-alone CH hysteresis uses time of
turn-on and turn-off of a single burner, the LL
hysteresis uses the turn-on of the first slave
burners and the turn-off of the last slave burner.
LEAD LAG PID
The behavior of the Lead Lag PID function is
identical to the behavior of the stand-alone CH
PID function. The same gain scalars and
66
Date:
8-4-2010
Revision:
0
Form:
2396
algorithms are used. Additionally:
of step 1 are no longer true (demand has
decreased) then it clears the flag.
Whenever the rate allocator completes an
execution pass and detects both conditions of
step 1 are true, and it also detects that the total
rate potentially absorbed by the system (the
commands have not yet been sent) has
increased from the value that was saved when
the flag was set, then it re-computes the
integrator value based on the old commanded
maximum, clears the flag, and actually allocates
the old rate that was saved when the flag was
set.
4.7.7 RATE ADJUSTMENT
When the Slave dropout/return compensation
parameter specifies a rate adjustment and a rate
compensation event occurs (a slave leaves
while firing, or a slave returns) then rate
adjustment will alter the integrator value so that
the commanded rate compensates for the added
or lost capacity.
INTEGRATOR COMPENSATION
A stand-alone Sola includes a feature to smooth
the response when a rate override has occurred
(such as delta-T rate limit) causing the PID
output to be ignored.
Whenever an override has occurred then, at the
moment the override ends, the integrator is
loaded with a value that causes the PID output
to match the current rate, whenever this is
possible within the integrator’s limits. The Lead
Lag PID will implement similar behavior: The
rate allocator will provide a trigger that causes
the integrator's value to be recomputed and this
trigger will activate whenever a rate allocation
limit is released; that is, this event will occur any
time the system transitions from the condition in
which it is not free to increase the total
modulation rate, to the condition where this rate
may increase.
Examples include:
• The rate allocator has encountered a limit such
as base load (for a "limited" rate allocation
scheme) and this limit is released.
• All stages are at their maximum (base load, or
max modulation) and one or more stages are
rate-limited (such as due to slow-start or
stepped modulation limiting due to high stack
temperature, etc.) and the rate limited stage
recovers, changing from rate-limited to free to
modulate.
(This is indicated by the Slave Status "slave is
modulating": the changing from false to true is
not, itself, a trigger, but while it is true the rate
allocator can assign to the slave only the firing
rate that it is reporting; thus the release of this
might allow more rate to be absorbed by the
system. It also might not do this, if for example
the slave was in anticondensation and thus the
rate limit was maximum modulation rate.)
4.7.8 IMPLEMENTATION
• All firing stages are at their maximum (base
load, or max modulation) and a stage which was
OnLeave returns in the firing state and is
available for modulation.
The examples below are ways in which this may
occur, but in implementation what is necessary,
first of all, is to use a rate allocator that assigns
rate to each slave and can detect when all of the
assigned rate is absorbed, or if there is excess
requested rate that the firing stages could not
absorb.
Then:
Whenever the system is rate limited, that is,
when A) all firing stages are commanded to their
respective maximums and also B) the PID is
asking for more heat than that, note that this has
occurred by setting a flag and also record total
rate that the system absorbed (the total of the
commanded maximums, not the PID's requested
rate which might include excess).
Whenever the rate allocator completes an
execution pass and detects that both conditions
• An add-stage is in-progress and all firing
burners are at their limits (max modulation rate
or base load) and then the new stage becomes
available.
This also applies when the system is first
starting up, that is, all firing burners are at their
limits (zero) because non are firing, and thus
when the add-stage is finished the system
transitions from no modulation at all, to
modulating the first stage.
Lead Lag Burner Demand
67
Date:
8-4-2010
Revision:
0
Form:
2396
Lead Lag burner demand will be present when
Frost protection burner demand is true, as
described in the section on Frost protection. For
the CH, and DHW demand sources, Lead Lag
burner demand will be true when one of these is
true and also setpoint demand from the
hysteresis block is true.
each slave. Some rate allocation algorithms may
specify the use of this parameter, and that the
slave base load settings are ignored.
4.7.9 RATE ALLOCATION
it determines how the LL master allocates firing
rate to each active stage,
the modulating stage and last stage are
determined for the Add-stage and Drop-stage
methods,
it determines the overflow rate and underflow
rate and can provide this to staging algorithms.
RATE ALLOCATION METHOD: PARALLEL
COMMONBASE LIMITED
This selects the rate allocation method. This
performs three purposes:
The PID block's output is used to determine the
firing rate of each slave Sola using various rate
allocation techniques.
Common Features
OVERFLOW RATE AND UNDERFLOW RATE
The rate allocator knows the rate assigned to
each stage, and the requested rate, and thus
can determine the difference between these.
All rate allocation methods share certain
features. The rate allocator first generates the
Slave Command. Except for the Firing state,
the value ultimately depends only upon the
SlaveState. The values are:
This difference has two forms: overflow (used by
Addstage methods), underflow (used by Dropstage methods).
Available
AddStage
SuspendStage depending on whether any other
slave stage is firing, no matter what SlaveState it
is in.
Firing
OnLeave - same as SuspendStage
This ensures that when a slave returns and is
already firing, it will remain firing until the master
decides what to do about that, or if it is not firing
it will remain off.
Disabled - same as Available
Recovering - same as Available
It next runs a rate allocator that depends upon
the rate allocation method. This routine fills in
the modulation rate for all Firing boilers.
When asked for rate overflow the threshold that
is used is the upper limit of the modulating stage
per the current rate allocation rules. Additionally
this threshold may be shifted if the Add-stage
method is using a dRate/dt behavior. Rate
overflow is a positive or negative percentage
offset from the threshold. For example:
If the modulating stage is at the staging
threshold position but the
LL master is not asking for more heat than this,
then the overflow rate is 0%. If it is at this
location (limited) or above this location
(unlimited) and the LL master is asking for 10%
more than the threshold value, then the overflow
rate is 10%. If it is below the staging threshold
position by 5%, then the overflow rate is -5%.
Each rate allocation method also provides
functions to return identification of the
modulating stage and the last stage, for use by
the Add-stage and Drop-stage methods.
When asked for rate underflow the threshold
that is used is the minimum modulation rate of
the last stage. Additionally this threshold may be
shifted if the Dropstage method is using a
dRate/dt behavior.
Rate Allocation Parameters
BASE LOAD COMMON: 0-100%
If set to zero, this parameter is disabled. For any
non-zero value, it uses the individual base load
rates of each slave to be ignored by the LL
master's routines and this common value to be
used instead. It is an easy way to set all base
loads to the same value, without having to set
Rate underflow is a positive or negative
percentage offset from the threshold. For
example:
If the last stage is at the threshold position but
68
Date:
8-4-2010
Revision:
0
Form:
2396
For the Parallel common-base limited the
minimum modulation rate provides the underflow
threshold.
the LL master is not asking for less heat than
this, then the underflow rate is 0%. If it is at this
location and the LL master is asking for 10%
less than the threshold value, then the underflow
rate is -10%. If the last stage is 5% above the
threshold then the underflow rate is 5%.
Stager
The Stager is an internal program that
determines when slave Solas should turn on as
the need for heat increases, and when they
should turn off as the need for heat decreases.
Rate allocation methods
PARALLEL
Allocation
COMMON
BASE
LIMITED
In all cases:
• The first burner turns on due to the
combination of heat demand (call for heat) and
setpoint demand (operating point falls below the
setpoint minus the on hysteresis).
• The last burner (or all burners) turn off due to
the loss of burner demand which is caused by
either the loss of heat demand (no call for heat)
or the loss of setpoint demand (the operating
point climbs above the setpoint plus the off
hysteresis).
• In between those two extremes the Add-stage
and Dropstage methods determine when staging
occurs. The stager handles burner on and
burner off events. It operates according to this
state transition diagram.
All stages that are Firing receive the same firing
rate.
Only the Base load common parameter is used
for base loading, the individual slave's base load
values are ignored.
As load increases:
Until all stages are Firing:
No stage is requested to exceed the common
base load rate.
After all stages are Firing:
There is no restriction
commanded firing rate.
on
the
slave's
The stager has the following variables:
StagerState: encodes the current state of the
stager.
StagerTimer: multipurpose 1 second timer used
by states which measure time.
StagerTimeLimit: the timeout value for the
StagerTimer
LeadStartup: flag indicating the lead boiler is
starting
AddStageA: the stage being added to those
already firing
As load decreases:
As long as all available stages are Firing There
is no restriction on the slave's commanded firing
rate.
When at least one stage has been dropped:
No stage is requested to exceed the common
base load rate.
MODULATING STAGE
Stager Parameters
Since all Firing stages receive the same rate,
any stage can be considered to be the
modulating stage. The one with the highest
StagingOrder number is considered to be the
modulating stage.
ADD-STAGE INTERSTAGE DELAY: MM:SS
This specifies the minimum time that the Stager
waits after adding one stage before adding
another stage or dropping a stage.
Last stage
DROP-STAGE INTERSTAGE DELAY: MM:SS
This parameter specifies the minimum time that
the Stager waits after dropping one stage before
dropping another stage or adding a stage.
The stage with the highest StagingOrder
number is the last stage.
OVERFLOW AND UNDERFLOW
Functions common to all stager states
These functions handle overall burner demand
responsibility, and take care of cleaning up any
anomalous conditions.
For the Parallel common-base limited the
Base load common parameter provides the
overflow threshold.
69
Date:
8-4-2010
Revision:
0
Form:
2396
4.7.10 BURNER DEMAND
If so then the stager: Changes the SlaveState to
Suspend- Stage, resets and starts its
StagerTimer, sets the StagerTimeLimit to
T_StagerSuspend. This allows additional time
for the slave to reach its firing condition.
The stager checks the Master’s LL burner
demand. If this demand is off all slaves with
SlaveStates of AddStage, SuspendStage, or
Firing are set to Available by the Rate Allocator
turning them all off and the StagerState is set to
be Idle.
STAGERSTATE = ADDSTAGESUSPEND
During this state the stager is waiting to see if
the slave has transitioned to Firing or Available.
STAGERSTATE = IDLE WITH SLAVES ACTIVE
If the stager runs and its state is Idle, it checks
the status of all slaves. If any of these have
SlaveState=AddStage, SuspendStage, or Firing
then these are set to Available (this will cause
the Rate Allocator to turn them all off).
If the identified boiler has a SlaveState=Firing
then the stager:
Resets and starts its StagerTimer, sets the
StagerTime- Limit to Add-stage interstage
delay, it changes the StagerState to
InterstageDelay.
Stager States
The stager's operation is defined for each of its
states:
STAGERSTATE = IDLE
Burner demand means that a demand source is
calling for heat and there is also setpoint
demand.
The stager checks to see if the StagerTimer
has reached the StagerTimeLimit.
If so then:
If the boiler's SlaveState is set to Available.
When there is no burner demand the stager is
forced to be Idle.
If any slave boiler is firing then StagerState =
Active
Otherwise StagerState = Idle
When burner demand becomes true (Call for
Heat) the stager checks the sequencer to
identify the lead boiler. That boiler is given a
command to start.
STAGERSTATE = ACTIVE
During this state the stager is ready to manage
add-stage and drop-stage requests.
If AddStageRequest is true
The stager resets (to verify it is at 0) and starts
its
StagerTimer,
and
sets
the
StagerTimeLimit to the value of the slave's
Demand-to-firing delay time.
The Stager ask the Sequencer for an available
slave.
When an available slave is found the stager
repeats the above steps to bring this stage to
Active.
If the Stager fails to get even one boiler from the
Sequencer, it issues an alert and suspends until
it runs again.
If DropStageRequest is true and more than 1
slave burner is firing, the stager:
STAGERSTATE = ADDSTAGERESPONSE
During this state the stager is waiting for slave to
transition to Firing. If the identified boiler has a
SlaveState=Firing then the stager:
Resets and starts it’s StagerTimer, sets the
StagerTime- Limit to Add-stage interstage
delay, and changes the StagerState to
InterstageDelay.
Invokes SetRecovering for the stage identified
by DropStageRequest. This will turn the stage
off and put it into the recovering state until it has
finished its postpurge (if any).
Resets and starts its StagerTimer, sets
StagerTime- Limit to Drop-stage interstage
delay,
changes
the
StagerState
to
InterstageDelay, invokes an action to reset the
Add/Drop detection timers.
If the boiler's SlaveState is still AddStage then:
The stager checks to see if the StagerTimer
has reached the StagerTimeLimit.
When the Interstage time has elapsed, the
70
Date:
8-4-2010
Revision:
0
Form:
2396
Stager can execute an AddStage or DropStage
request.
amount greater than or equal to Add-stage
error threshold
Add Stage Methods
When the Add-stage condition is false then
AddStage- DetectTimerN is set to zero. (If the
condition is true then AddStageDetectTimerN
is not zeroed and thus allowed to run.) If this
timer reaches or exceeds LLAdd- stage
detection timeN then AddStageRequestN is
true.
Various methods can be used to determine
when a new stage should be added. The internal
algorithms that generate AddStageRequests
are called Add-stage methods.
All methods work by observing various criteria
such as the Firing stages, the commanded rate,
or setpoint error.
RATE THRESHOLD For rate based staging, a
stage is added based on the rate of the
modulating stage.
Adding Stages Parameters:
ADD-STAGE CONDITION:
The modulating burner is at a rate that is at or
above the rate which is calculated by adding the
Add-stage rate offset to the maximum position
per the rate allocation rules.
ADD-STAGE DETECTION TIME1: MM:SS
This provides time thresholds.
In the descriptions below, the relevant
parameter is referred to as Add-Stage
detection timeN.
Examples: rate offset = 20% The add-stage
condition will occur if the modulating stage is
20% above base load for unlimited allocations,
or, if limited, when there is 20% more rate to
distribute than can be absorbed by firing the
stages at base load.
Add-Stage method1:
Disable,
Error threshold,
Rate threshold,
dError/dt and threshold,
dRate/dt and threshold }
rate offset = -20% The add-stage condition will
be as described just above, but the threshold is
now 20% below the modulating stage's base
load rate.
In the descriptions below, the relevant
AddStageDetect- Timer is referred to as
AddStageDetectTimerN.
ADD-STAGE
DEGREES
ERROR
To support this, the current Rate Allocation
method asks for the current "Overflow rate" see the Rate Allocator section.
THRESHOLD:
Drop Stage Methods
This provides the error threshold as defined by
the methods below.
Various methods can be used to determine
when a stage should be dropped. The internal
algorithms that generate DropStageRequests
are called Drop-stage methods.
ADD-STAGE RATE OFFSET: -100% TO +100%
This provides the rate offset threshold as
defined by the methods below.
One or two methods may be active at any time.
If two are active then their requests are OR'd
together.
Add-stage methods
ERROR THRESHOLD
For error threshold staging, a stage is added
when the error becomes excessive based on
degrees away from setpoint, and time.
All methods work by observing various criteria
such as the Firing stages, the commanded rate,
or Setpoint.
ADD-STAGE CONDITION:
- The modulating burner(s) is at its (their)
maximum position per the rate allocation rules,
- The operating point is below the setpoint by an
Dropping Stages Parameters:
DROP-STAGE DETECTION TIME: MM:SS
This provides time thresholds. They differ only in
71
Date:
8-4-2010
Revision:
0
Form:
2396
DropStageDetectTimerN is set to zero. (If the
condition is true then DropStageDetectTimerN
is not zeroed and thus allowed to run.) If this
timer reaches or exceeds Dropstage detection
timeN then DropStageRequestN is true.
that:
Drop-Stage detection time is used with
DropStageDetectTimer
In the descriptions below, the relevant
parameter is referred to as LL – Drop Stage
detection timeN}.
Drop-Stage method:
Disable,
Error threshold,
Rate threshold,
dError/dt and threshold,
dRate/dt and threshold
RATE THRESHOLD
For rate based staging, a stage is dropped
based on the rate of the last stage.
DROP-STAGE CONDITION:
modulating burner(s) is at a rate that is at
or below the minimum modulation rate plus a
rate offset.
Examples:
rate offset = 20% The Drop-stage condition will
occur when the last stage is less than a
threshold that is the minimum modulation rate
plus another 20%.
-The
DROP-STAGE
ERROR
THRESHOLD:
DEGREES
This provides the error threshold as defined by
the methods below.
DROP-STAGE RATE OFFSET: -100% TO
+100%
This provides the rate offset threshold as
defined by the methods below.
rate offset = 0% The Drop-stage condition will
occur when the last stage is at the minimum
modulation rate.
LL boiler off options:
Options disabled,
Enable all boilers off (ABO)
Enable lead drop-stage on error (LDSE)
Enable both ABO and LDSE
rate offset = -20% The Drop-stage condition will
occur if the last stage is at minimum modulation
and there is 20% less rate to distribute than can
be absorbed; that is, the rate allocator would like
the minimum modulation rate to be lower than it
is.
This provides options for customizing the way
stages are dropped, as described below.
To support this, the current Rate Alloction
method asks for the current "Underflow rate" see the Rate Allocator section.
LL ALL BOILERS OFF THRESHOLD:
TEMPERATURE OR NONE
When the LL boiler off options specifies "Enable
all boilers off (ABO)" or "Enable both ABO and
LDSE" then this parameter provides the boiler
off threshold temperature that is used. In this
case, if the temperature is the None value then a
parameter error lockout occurs.
Boiler off options
The LL boiler off option controls two optional
behaviors. One option is to enable the use of the
LL all boilers off threshold and is abbreviated
"ABO", and the other controls whether a lead
boiler is affected by a drop-stage method based
upon error, and is abbreviated as "LDSE".
Drop-stage methods Error threshold
For error threshold staging, a stage is dropped
when the error becomes excessive based on
degrees away from setpoint and time.
ALL BOILERS OFF - ABO:
The ABO temperature provides a Burner Off
threshold that essentially replaces the normal
Burner Off threshold as given by the LL off
hysteresis parameter; it is processed by the
same logic block using some additional rules.
DROP-STAGE CONDITION:
- The modulating burner(s) is at its (their)
minimum position per the rate allocation rules,
- The operating point is above the setpoint by an
amount greater than or equal to Drop-stage
error threshold
If ABO is enabled then:
• When the LL master operating point reaches or
exceeds the ABO threshold this turns off LL
master burner demand.
• The Burner Off threshold provided by LL off
When the Drop-stage condition is false then
72
Date:
8-4-2010
Revision:
0
Form:
2396
hysteresis is ignored if one or more lag boilers
are firing.
• If LDSE is enabled:
The Burner Off threshold provided by LL off
hysteresis is ignored also for the lead boiler
when it is firing solo (i.e. when no lag boilers are
firing).
• If LDSE is disabled:
When the lead is firing solo and the operating
point reaches the Burner Off threshold specified
by LL off hysteresis turns off LL master burner
demand (and thus the lead boiler).
modulation rate. When LDSE is enabled and the
lead is firing solo, then simply reaching the dropstage threshold causes a dropstage event that
causes the lead to turn off and [rf3259] which thus
ends LL master demand until the operating point
again falls to the Burner On threshold.
As usual, whenever LL master burner demand is
turned off by its hysteresis block, it does not
recur until the operating point falls below the
Burner On threshold.
LeadBoilerSeqNum - sequence number of the
current lead boiler in the Slave Status table.
Sequencer
The Sola sequencer determines which Sola will
be the next one to turn on or turn off whenever
an Add-stage event occurs. It maintains the
following variables:
Lead BoilerRunTime - the cumulative time that
the current lead boiler has been running.
Summary of the burner-off thresholds that are
used:
In all cases, if a boiler sequence number is
needed and Slave sequence order is 0, then
the boiler's ModBus address is used as its
sequence number.
4.7.11 LEAD DROP-STAGE ON ERROR
- LDSE:
In all cases, if two boilers being compared have
the same effective sequence number, then the
one that is selected is undefined (either may
prevail).
If LDSE is enabled then either Drop-stage
method1 must be enabled to provide staging
based on "Error threshold"; otherwise a
parameter error lockout occurs.
Sequencer Parameters
LEAD SELECTION METHOD: ROTATE IN
SEQUENCE ORDER, MEASURED RUN TIME
This determines the selection method for lead
selection and sequencing, as described below.
Normally, for a lag boiler, dropping a stage
based on error involves meeting three criteria: 1)
the operating point temperature must exceed an
offset from setpoint, 2) this condition must
persist for a period of time, and 3) the measured
time starts only when the modulating boilers are
firing at the minimum modulation rate. And
normally when LDSE is not enabled, the lead
boiler is special case that is not affected by a
drop-stage event: it shuts down only when the
operating point reaches the burner-off threshold
(or ABO threshold, if that is enabled).
LAG SELECTON METHOD: SEQUENCE
ORDER, MEASURED RUN TIME
This determines the selection method for lag
selection and sequencing, as described below.
LEAD ROTATION TIME: HH:MM OR NONE
This determines the lead rotation time as
defined below.
If LDSE is enabled:
• Enabling (or disabling) LDSE has no effect on
the dropstage behavior for a lag boiler; however
• When only the lead boiler is firing then an error
based drop-stage event does act to drop the
lead boiler, and moreover, only one of the three
criteria above are considered by the method in
this case: the operating point temperature. Thus
dropping the lead does not depend on
exceeding this temperature for a period of time,
nor does it require the lead to be at minimum
FORCE LEAD ROTATION TIME: HH:MM OR
NONE
If this parameter is a non-zero time, then it is
used to force the rotation of the lead boiler if it
stays on longer than the time specified.
Sequencer Add Boiler Selection
The sequencer selects the next boiler to be
added according to a sorted order. This
description assumes this is implemented by
73
Date:
8-4-2010
Revision:
0
Form:
2396
a sequence number greater than this number is
used, or
— If no boiler has a greater sequence number,
then the one that has the smallest sequence
number is used (wrap around).
assigning an ordering number and that the
lowest numbers are the first to be added.
• Any Available slaves that have a mode of Use
First will have the lowest ordering numbers. If
two or more Use First boilers exist, they are
numbered according to their assigned Slave
sequence order or Modbus address if this value
is zero, as descibed above.
• Next are slaves that have the mode of Equalize
Runtime. When the add boiler routine gets to
this group it first invokes the Voluntary Lead
Rotation routine (to make sure this is done, but
only once) and then selects an Available boiler,
if any, ordered according to:
— The first is the lead boiler per the
LeadBoilerSeqNum parameter.
— The rest are the other slaves ordered
according to the LL –Lag selection method}
parameter:
• If this parameter is "Rotate in sequence order",
then they are ordered according to their LL –
Slave sequence order or Modbus address if
this value is zero, as descibed above.
• If this parameter is "Measured run time" then
they are ordered according to their reported run
time. If two have the same measured run time,
then either may be selected.
• Last are any Available slaves that have a mode
of Use Last. These will have the highest
numbers. If two or more Use Last boilers exist,
they are numbered according to their assigned
Slave sequence order or Modbus address if
this value is zero, as described above.
Otherwise when the Lead selection method is
"Measured run time", then the lead boiler is the
one having the lowest Measured run time value.
If two have the same measured run time, then
either may be selected.
The LeadBoilerRunTime value is then set to
zero to give the new lead boiler a fresh
allotment. Note: if the old lead boiler is the only
one, then this process may end up redesignating this as the "new" lead with a fresh
time allotment.
Sequencer ordering function
Part of the sequencer is called by the stager just
before the stager runs, to give the sequencer a
chance to assign order numbers to stages that
very recently turned on, and to maintain these in
a sequence. It uses the StagingOrder item in
the Slave Status table for this purpose.
The sequencer ordering function examines all
slaves and sets to zero the StagingOrder of any
stage that is not Firing.
This ensures that any stage that has left the
Firing condition recently is no longer in the
number sequence.
Voluntary Lead Rotation
Next, skipping all of those that have 0 values in
StagingOrder it finds the lowest numbered
StagingOrder and gives it the value 1, the next
receive 2, etc.
The current lead boiler is identified by the
LeadBoilerSeqNum value. This value will
change when the stager has asked the
sequencer for a boiler to add and either:
• the boiler identified by LeadBoilerSeqNum is
neither Available nor Firing (i.e. it has a fault or
is OnLeave), or
• the LeadBoilerRunTime value exceeds Lead
rotation time.
Thus if gaps have developed due to a slave
dropping out these are filled in.
Finally, the ordering function continues on,
giving the next numbers to and Firing stages
which have a 0 StagingOrder values (i.e. they
recently were added, or they recently returned
from OnLeave).
In either of these cases, the algorithm performed
is: If the Lead selection method is "Rotate in
sequence order", then LeadBoilerSeqNum is
incremented, and then new lead boiler is the one
that is a slave in Equalize Runtime mode that is
responding to the LL master (i.e. not OnLeave or
Recovering, but it might be Firing), and:
— has a sequence number equal to
LeadBoilerSeqNum, or.
— If no boiler has this then the closest one with
Example: Before After Notfiring 3 0 Notfiring 0 0
Firing 2 1 Firing 5 3 Firing 0 4 Firing 4 2
Sequencer Drop Lag boiler selection
When the stager asks the sequencer for a lag
boiler to drop the sequencer looks at the
74
Date:
8-4-2010
Revision:
0
Form:
2396
3 will be first if there is no 1 or 2.
StagingOrder numbers of all Firing boilers. If
only one Firing boiler is found, or none are
found, then this selection function returns a
value that indicates no boiler may be dropped.
Otherwise it returns an identifier for the boiler
having the highest StagingOrder number.
NOTE: For Equalize Runtime purposes, 1 does
not mean the Sola will be used first every time;
that will vary over time based on the master's
run time equalization scheme. In this case the
sequence number determines the relative order
in which Sola controls will be used in a roundrobin scheme.
SEQUENCER 1 MINUTE EVENT
Part of the sequencer is called by the timing
service at a 1 minute rate to implement lead
rotation.
If the slave sequence number value is zero, then
the slave Sola's ModBus address will be used
instead.
The 1 minute event checks the boiler identified
by Lead- BoilerSeqNum. If it is Firing then the
LeadBoilerRunTime is incremented.
If two Solas are set the same mode and both
have the same sequence number then an alert
will occur and the order in which they are used
will be arbitrary and is not guaranteed to be
repeatable.
FORCED LEAD ROTATION:
When
the
boiler
identified
by
LeadBoilerSeqNum is firing and also
LeadBoilerRunTime reaches the Force lead
rotation time parameter time then:
1. The current lead boiler is noted.
2. Lead rotation occurs as described above
under Voluntary Lead Rotation (this changes the
designation, but does not change the actual
firing status).
SLAVE WRITE: DATA
This allows the slave to accept command
messages from a Sola master
SLAVE READ: DATA
This provides the slave status message to be
read by a Sola Master. It includes all of the data
that is read from a slave.
SLAVE MODE: USE FIRST, EQUALIZE
RUNTIME, USE LAST
• If set to Use First, then this slave Sola will be
used prior to using other slave Solas with other
values.
• If this parameter is set to Equalize Runtime,
then this slave Sola will be staged according to a
run time equalization. (Any Solas set to Use
First will precede any that are set to Equalize
Runtime.)
• If this parameter is set to Use Last, then this
slave Sola will be used only after
• all Use First and Equalize Runtime Solas have
been brought online.
SLAVE PRIORITY SEQUENCE ORDER: 0-255
Slave sequence order is used to determine the
order in which the slave Solas will be used
(staged on) for those Solas with the same Slave
mode setting. Numbers may be skipped, that is
75