1
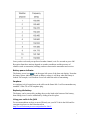
Owner’s Manual
Table of Contents DISCLAIMER 2 COMPONENT OUTLINE 2 GETTING STARTED 2 Charging battery 3 Detaching and attaching Smart Mic 3 Attaching to backpack 3 Basic functions 4 User interface 4 Presetting the channels 4 Selecting the preset channel 5 Keylock 5 Communication 5 ADVANCED FUNCTIONS 5 Weak channel indicator 5 Button sounds 5 Roger beep 6 Weather channels 6 Battery power indicator 7 Earphone 7 Replacing the battery 7 Using your radio in the field 7 Tech specs 8 FCC Licensing 8 Limited warranty 9 1
BC Link Advanced User Manual Congratulations on purchasing your BC Link radio from Backcountry Access. This is an
important step toward improving communication within your group in the backcountry.
At BCA, we believe that backcountry safety starts with good planning and clear
communication. While gear like the BC Link and other BCA safety products are
essential, they are only part of the equation. Education is equally important, especially
regarding terrain selection, avalanche safety, and first aid. For more information on
backcountry and snow safety, see www.backcountryaccess.com/education.
Disclaimer All snow sports involve inherent risks, and injuries or death may occur during these
activities. Do not rely on this product as your only means of communication. Never ski
or travel alone and always make sure that a responsible person knows where you are
going and when you plan to return. Familiarize yourself with the area in which you are
skiing or traveling and the current weather and avalanche conditions. Backcountry
Access, Inc. is not responsible for any loss of communication between you and your
group due to this product’s improper use, the failure to properly charge and maintain the
product’s battery, and/or poor or no reception in the operating area.
Component Outline Getting started In the BC Link package you will find the radio base unit, Smart Mic, recharger, USB
cable, and quick reference card. To start, attach the battery pack to your radio base unit
check the attachment of the Smart Mic, and recharge the battery.
2
Charging battery To charge the battery, attach the micro-USB cable to the USB port in the battery. You
can use any powered USB port to recharge, but use of the recharger provided with the
package is recommended. If you are using the recharger provided with the package, the
LED light on the top of recharger will be red when the battery is charging; it will turn
green when fully charged.
NOTE: After recharging the battery, make sure to put the protective cap back on the
battery USB port. This is vital to make sure that snow or condensation does not enter the
battery compartment.
Detaching and attaching Smart Mic Detach the Smart Mic by rotating the connection cord lock ring counter-clockwise and
pulling the connection cord out of the socket. Rotate the lock ring only; do not rotate the
cord housing above the lock ring. When attaching the Smart Mic, make sure the notch
and groove in the plug and socket are aligned. Lock the Smart Mic to the radio base unit
by turning the lock ring clockwise. When the base unit and Smart Mic are separated, use
the rubber cap to protect the open socket.
Attaching to backpack To attach to a backpack, fasten the alligator clip on the back of the Smart Mic to your
shoulder or sternum strap. Then place the radio base unit inside your backpack or clip it
to your waist belt. If your backpack has a hydration sleeve built into the shoulder strap, it
may be possible to run the cable through the sleeve. First detach the Smart Mic from the
radio base unit as described above. Then run the Smart Mic connection cord through the
hydration sleeve until it reaches the inside of the pack. Reattach the cord to the socket in
the base unit.
If you are using a Stash 20, Stash 30, or Stash 40 backpack, then your base unit should fit
snugly in the fleece-lined radio pocket inside your Stash pack, with the antenna
protruding. Detach and reattach the Smart Mic connection cord as described above.
3
Basic functions This chapter describes how to use basic functions on your BC Link.
User interface Presetting the channels The BC Link comes with preset channels from the factory:
A Channel 1 privacy code off
B Channel 5 privacy code 10
C Channel 4 privacy code 20
D Channel 8 privacy code 10
E Channel 9 privacy code 11
F Channel 20 privacy code off
With the BC Link, it is possible to preset your own channels using the dial on the Smart
Mic. These can be set to A, B, C, D, E, or F by following these steps:
Turn the radio on, using the power/volume dial.
Select the preset channel (A-F) on the Smart Mic channel selection dial.
Press Menu once (to deactivate the keylock, see below). The channel number will start
flashing in the display. Select desired channel using the up/down buttons. Accept by
4
waiting for five seconds or pressing OK.
Press Menu again. The privacy code number will start flashing. Select desired privacy
code.
If the channel or privacy code digit stops flashing while presetting the channels, press
Menu again.
Repeat this process for each channel (A-F) that you would like to preset. All members of
your party must select the same channels AND privacy codes.
Channels 1 through 7 are combined GMRS/FRS channels. Channels 8 through 14 are
FRS channels. Channels 15 through 22 are GMRS channels. The FRS channels (8-14)
transmit at 0.5 W, while all other channels transmit at 1.0W. While battery life is longer
when using channels 8-14, the range of transmission is shorter.
Selecting the preset channel After channels have been preset, the desired channel and privacy code combination can
be selected with the dial on the Smart Mic. Therefore you don’t need touch the base unit
to change channels.
Keylock The keylock applies to the keys on the base unit only; it does not lock the controls on the
Smart Mic. Activate the keylock by pressing the Menu and Ok buttons simultaneously for
3 seconds. During this time, a countdown from 3 to 1 is shown in the display. Keylock
can be deactivated the same way it is activated.
Communication To communicate between all units, all radios in the group must be set to the same
frequency and privacy setting. This includes radios of other brands. To talk to other
members in your group, hold the Smart Mic two inches from your mouth. Press the Pushto-talk (PTT) button and keep it pressed for at least two seconds before talking. To listen,
release the PTT button.
Your BC Link is designed to maximize performance and transmission range. Do not use
them when the units are less than five feet apart.
Advanced functions Weak channel indicator The weak channel indicator icon is located in the upper left corner of the base unit
display. When the BC Link is transmitting at 0.5W power (FRS channels 8-14), the icon
is empty. When channels other than 8-14 are being used and the BC Link is transmitting
at 1.0W power, the icon is full
.
5
Button sound When the button sounds are activated, the BC Link beeps when any button is pressed or
when the user turns on the Smart Mic. These button sounds can be activated by pressing
the Menu button three times until the icon and “ON” or “OFF” are displayed. Turn the
button sounds on or off using the up or down buttons. Accept by waiting five seconds or
pressing OK.
Roger beep The Roger beep is a tone that sounds at the end of each transmission, when the PTT
button is released. The Roger beep is activated or deactivated by pressing the Menu
button four times until the Roger beep icon and “ON” or “OFF” are displayed. Turn
the Roger beep on or off using the up or down buttons. Accept by waiting five seconds or
pressing OK.
Weather channels Weather channels can be activated by scrolling past channel 22. There are 11 weather
channels; they can only be accessed within the U.S. Weather channels are receive-only
channels, which means that when the weather channel is activated, transmitting is not
possible. When a weather channel is active, the weather icon
is displayed.
To choose your local weather channel, find the corresponding frequency of the closest
weather station here:
http://www.nws.noaa.gov/nwr/nwrbro.htm
That frequency corresponds to the weather channels listed below:
6
6)>$4':>6%%$?8'
8D==9G>!A<I!B9D@89I!A<I9;D>@!AI9]N9=;?9>!DI9!G?>@9F!P9G<Bc!
!
!
!
8$)':>6%%$?8' Once you have selected your preferred weather channel, wait five seconds or press OK.
Reception from these stations depends on weather conditions and the presence of
obstacles such as mountains, buildings, and trees between the transmitter and receiver.
9>9@!;8D==9G>!=DC9F!*7!27!"7!'7!(7!%7!DI9!G?>@9F!P9G<Bc!
Battery power indicator The battery power icon
is in the upper left corner of the base unit display. Note that
the battery power indicator is based on battery voltage: it will drop when the battery is
loaded. For example, it will indicate fewer bars when the radio is transmitting.
Earphone An earphone jack is located next to the cable on the Smart Mic. It will accommodate any
standard 3.5mm TS or TRS earphone plug.
!
!
Replacing the battery !
The battery can be removed by pushing down on the latch at the bottom of the battery,
then sliding it out. It can be reattached by sliding it back in place.
!
Using your radio in the field !
"#$%&'($)&*+!
For recommendations on
your BC Link in the field and for
2*"3"#4$)56!*""(--7!&$"/
! how to most efficiently
Page 7 use
of 11!
emergencies please see the Education tab at
http://www.backcountryaccess.com/product/bc-link-2/ .
7
Tech specs Product Radio/Remote Unit Smart Mic Smart Mic Base Unit Base Unit Weight Weight Dimensions Dimensions Dimensions Dimensions (oz) (g) (in.) (cm) (in) (cm) 12.0 340 3.3 x 1.0 x 1.8 8.0 x 4.0 x 4.5 2.5 x 2.0 x 6.0 6 x 5 x 15 Battery: 3.7 VDC Li-ion with 2200mAh of usable capacity.
Battery life: dependent on usage; 80 hours normal use when radio is stored in backpack.
Transmitting in high power mode will shorten battery life.
Range: Approximately 2 miles in typical backcountry environment. Electrical
interference and objects between the transmitting and receiving radio can decrease range.
In optimum circumstances range can be significantly greater.
Case material: polycarbonate.
Water and dust resistance: conforms to ISO IP56.
Charger: 5V/1A power can be used on 110V AC.
Temperature operating range: -20C to +70 C.
Maximum transmitting power: 1W.
Warning: Do not disassemble or subject battery pack to fire. Risk of injury.
FCC licensing Using GMRS channels requires obtaining a license from the FCC. To apply for a license,
fill out FCC Form 605. This can be downloaded at http://www.fcc.gov/Forms/ or by
calling (800)418-3676. No license is required to operate on GMRS channels in Canada,
however, GMRS repeater channels are not approved.
This device complies with Part 15 of the FCC Rules. Operation is subject to the following
two conditions: (1) this device may not cause harmful interference, and (2) this device
must accept any interference received, including interference that may cause undesired
operation.
FCC IDENTIFIER: OUNBCLINK
Name of Grantee: Backcountry Access, Inc.
8
Limited Warranty Backcountry Access, Inc. (BCA) warrants that for a period of three (3) years from the
date of purchase, this product will be free from defects in material and workmanship.
Should a defect occur during the three (3) year warranty period, BCA will repair or
replace the defective product or component part at its option, free of charge. BCA will
repair or replace the product with an identical or reasonably equivalent product, at its
election, or it may elect to refund the purchase price (less reasonable depreciation based
on actual use) if it cannot readily and quickly provide a replacement. Replacement
products provided pursuant to this warranty are under warranty only for the remainder of
the original warranty period.
This warranty is valid for the original retail purchaser from the date of initial retail
purchase and is not transferable. Keep the original sales receipt. Proof of purchase is
required to obtain warranty performance. If the original proof of purchase cannot be
provided, BCA will use the product’s manufacture date as the start of the warranty
period. BCA dealers do not have the right to alter, modify or in any way change the terms
and conditions of this warranty.
Limitations
This warranty shall not apply if the product (a) is altered, modified, or tampered with in
any way by anyone or (b) is damaged by negligence, accident, unreasonable/abnormal
use or by other causes unrelated to defective materials or workmanship. Further, the
warranty does not cover Acts of God, such as fire, flood, hurricanes and tornadoes.
BCA SHALL NOT BE LIABLE FOR DEATH OR INJURIES TO PERSONS,
DAMAGE TO PROPERTY, OR FOR ANY INCIDENTAL, CONTINGENT, OR
CONSEQUENTIAL DAMAGES CAUSED BY THE BREACH OF ANY EXPRESS
OR IMPLIED WARRANTY. BCA’S SOLE LIABILITY FROM THIS WARRANTY IS
LIMITED TO REPAIR OR REPLACEMENT OF DEFECTIVE PRODUCT. EXCEPT
TO THE EXTENT PROHIBITED BY APPLICABLE LAW, ANY IMPLIED
WARRANTY OF MERCHANTABILITY OR FITNESS FOR A PARTICULAR
PURPOSE IS LIMITED IN DURATION TO THE DURATION OF THE ABOVE
WARRANTY. SOME STATES, PROVINCES OR JURISDICTIONS DO NOT
ALLOW THE EXCLUSION OR LIMITATION OF INCIDENTAL OR
CONSEQUENTIAL DAMAGES OR LIMITATIONS ON HOW LONG AN IMPLIED
WARRANTY LASTS, SO THE ABOVE LIMITATIONS OR EXCLUSION MAY NOT
APPLY TO YOU. THIS WARRANTY GIVES YOU SPECIFIC LEGAL RIGHTS,
AND YOU MAY ALSO HAVE OTHER RIGHTS THAT VARY FROM STATE TO
STATE OR PROVINCE TO PROVINCE.
9
How to Obtain Warranty Service
Prior to the expiration of the three (3) year warranty period, take the product, along with
proof of purchase, to the BCA dealer from which you purchased the product or obtain a
Return Authorization (RA) number and instructions directly from BCA by clicking here:
http://www.backcountryaccess.com/customer-service/warranty-service/
If you have questions, contact the BCA warranty service department at (800)670-8735 or
[email protected].
The purchaser and/or dealer are responsible for shipping and handling charges to the
BCA warranty service department. BCA will return the repaired or replacement product
at its expense, but if it is determined that there is no defect or that the defect resulted from
causes not within the scope of this warranty, storage or return of the product will be at the
purchaser’s expense.
10