1
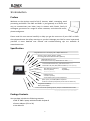
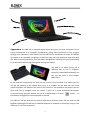
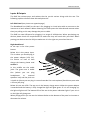
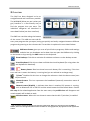
User Manual 1 Introduction Preface Welcome to the wireless world of Wi-Fi internet, eMail, messaging, word processing and MP3s. The ONE and ONE+ is your gateway to a whole new way to communicate your ideas, keep in contact with friends, family & colleagues, get access to a range of online resources, and relax with music, photos and games. Please read this user manual carefully to help you get the most out of your ONE or ONE+. Also please observe the safety warnings so you don’t damage your ONE or more importantly yourself! A more detailed user manual and trouble-shooting tips are available at www.elonex.com Specification 7” High Resolution TFT LCD display; 800 x 480pix Widescreen. W 22cm x L15cm x H3cm; Weight – 0.95kg; Interchangeable Outer Rubberised Skin (optional) 300MHz Mobile Processor Dedicated Linux Memory 128MB DDR-II SD RAM (256MB) On-board 1Gb Flash Memory ,optimised for Linux (2Gb) Removable 1Gb, 2Gb, 4Gb, 8Gb wristVAULT (purchased separately) Networking Wi-Fi 802.11b/g (Wireless) Ethernet (Wired) Bluetooth (Wireless) - 54 Mbps -10/100 Mbps USB 2.0 ports x 2 2 x built-in speakers; 3.5mm audio-in/mic; 3.5mm headphones Splash-proof, removable QWERTY keyboard 2 x Mouse emulator (on keyboard, and on rear for Tablet use) Integrated 3 cell Battery Mains power adapter Linux – Linos 2.6.21 operating system, with pre-installed software bundle Grey text indicates the spec of the ONE+ Package Contents Your package includes the following contents: ONE or ONE+ laptop with detachable keyboard Power Adapter (15V at 2A) User Manual 2 ONE User Manual Warranty To help you get started and get the best out of your ONE or ONE+, we provide you with a 12 months Parts and Labour warranty (Terms apply, see www.elonex.com for details). If you have any technical support issues with either problems on how you actually do various things on the laptop or if you have faulty hardware then please call us on 0871 90 296 90 (national rate). Warranty Registration To register your laptop please fill in this warranty registration card below and send the slip to the below address or register online at www.elonex.com/support . Warranty Registration Elonex International, 23 Sherwood Rd, Bromsgrove, Worcestershire, B60 3DR 3 Appearance The ONE has a standard laptop layout that gives first time computer users a typical introduction to a computer configuration, giving them familiarity as they progress through their education. Skills learned on the ONE can be transferred to nearly all laptops. The laptop is very portable, weighing in at less than 1kg, and hard wearing to cope with daily life. With no moving electronic parts the ONE is designed for reliability but you should always try to be careful when using placing and moving your laptop. The ONE is all about giving you a different way to use a computer. Featuring a detachable keyboard, you can use the ONE in ultra mobile, tablet form. All the essential components are built into the screen part of the ONE. This means you can still get full usability of the laptop when using it as a tablet. On the back you will find a mouse emulator and buttons that mimics the mouse on the keyboard and means you can point and click to navigate round the screen. It also has a virtual keyboard that appears on-screen letting you type without the use of a real keyboard. Click the button on the taskbar to toggle the virtual keyboard on and off. The ONE can also be used with an external USB mouse and also with a full size external USB keyboard (although the ONE has a modified keyboard as standard so some keys may be a bit different on a full size keyboard.) 4 ONE User Manual Inputs & Outputs The ONE has various ports and sockets that let you do various things with the one. The following explains what all those bits and pieces do. Left Side Panel (see picture on opposite page) The Broadband Port (RJ45) at the top is for plugging in a hard wire cable to connect to the internet or a local network. When removing the cable press the little tab and remove rather than just pulling as this may damage the port or cable. The ONE has two USB ports for plugging in a range of USB devices. When purchasing any devices please check the requirements to make sure they will work with your ONE. When putting your device into the USB just make sure it is the right way round and slot it in. Right Hand Panel At the top is the silver power button. Below this is the power input. This is where you should plug in the power adapter (15V, 2A). For advice on how to best charge the battery please read section 2. In the middle are the audio jacks. The green one is Audio Out (where you can plug headphones or external speakers into) and the pink one is Audio In (where you can plug in a sound recorder like a microphone). Both these ports take a 3.5mm jack plug. Below this are two LEDs. The top one is the battery charge status. When the power adapter is attached and the battery is fully charged the light will glow green. If it is still charging up, the light will glow red. The bottom LED of the two is the power indication light. If your unit is on the light will glow green. When playing music you can use the Volume Rocker at the bottom of the panel to increase or decrease the volume. 5 2 Using your ONE Getting Started After unpacking your ONE please check you have all the package contents and they are in good order. If you are missing anything or any item has been damaged please contact your retailer. Power and Battery Charging The ONE has a rechargeable battery which will give you up to 3 hours of use when fully recharged. You can also use the power adapter plugged into mains electricity for continuous use (the ONE will recharge its battery while in operation). Elonex recommends that the first time you charge your battery you should charge it for 8 hours to get the best battery life out of your ONE. Plug the power adapter into the power port (see Appearance) and mains electricity. To turn your ONE on, press the power button and wait for the operating system to fully load. For safety warnings regarding power please refer to the back of this manual Shutting Down When you have finished using the ONE you can shut down like this Full system shutdown: (recommended) Clicking ‘Shut Down’ on the ONEmenu or selecting ‘Quit’ from the ‘System’ tab will cause a full system shutdown. One-touch shutdown: Pressing the power switch will cause an immediate shutdown Low power shutdown: when the ONE detects that its battery is very low it will automatically power down to keep the data integrity. Force shutdown: If the system crashes due to an unknown cause press and hold the power button for over 4 seconds to force a shutdown. You can then start up normally. 6 ONE User Manual 3 Overview The ONE has been designed to be as straightforward and intuitive as possible. The WYSIWYG (What you see is what you get) interface is a user-friendly way to find the program that you want. The individual categories are described in more detail below (see User Interface). The ONE has a task bar along the bottom of the screen. This adds an extra tab for every new program that you open, letting you quickly and easily navigates between different programs by pressing on the relevant tab. The task bar is explained in more detail below: ONEmenu button gives you a set of quick links to programs, folders and settings and also lets you shutdown and re-boot. You can open the ONEmenu by clicking on the button or by pressing the ONE button on the keyboard. Show Desktop. Click this to minimize all windows and return to the desktop screen Virtual keyboard. Click this to show and hide the virtual keyboard (for using when the real keyboard is detached). Battery Status. Blue bars show how much battery life is remaining, if the icon turns red icon it means the battery is running low (you are advised to recharge asap). Volume1. Double click this icon to change the volume or check the box to mute (turn off) the sound. Network status. This icon represents the broadband (network) connection status of your ONE. Network status (Disable), it indicates that there is another PPP process is running, such as Bluetooth PPP or 3G PPP and the wired network will be forced down. Choose PPP stop of the related application from the start menu, the prohibit icon will disappear and wired network will be back to work. Wireless status. When this icon shows it means that the Wi-Fi (wireless) is enabled. 1 User can volume up/down by flipping up or down the ‘volume knob’. Mouse over the volume control of XMMS. In addition, mouse over the right side of the scroll bar of whichever running application, flip up/down to scroll up/down the content. 7 WIFI status (Disconnected) (RT73 / RutilT), it shows that One/One+ does not connect to the wireless network, right click to choose a preset connection profile to make the connection or choose Site survey from show window to discover the onsite AP. WIFI status (Connected), it shows that One/One+ has connected to the wireless network, right click to choose show window to see the connection information. Clock. Shows the current time. Double click the icon to change the time and date settings Task Bar Toggle. Click this button to hide and show the task bar Bluetooth status (ONE+ only) This shows whether Bluetooth is enabled and ready to connect to the Bluetooth device Bluetooth status (Disable), it means the Bluetooth is not ready or there is no built-in Bluetooth module. Bluetooth status (Obex), it means the Bluetooth connection is ready for the data transmission Bluetooth status (Audiogateway), it represents the Bluetooth device is ready for playing music from One/One+. 8 ONE User Manual 4 User Interface The desktop is divided into 6 categories: FILEfolders which contain your personal and shared files DOCprograms to help you make personal documents MEDIAprograms to help you make and enjoy media files INTERNETthe internet, eMail and messenger GAMEthe ONE’s arcade style games section SYSTEMmake system changes to your ONE and shut down The following gives a description of what each program does and a brief description of how to use them. In general the most useful functions of a program have a small button in the toolbar and if you want to quickly see what it does, simply hover your mouse over the button and a small description will pop up. The support section at www.elonex.com has a more detailed description of all the programs. File -contains links to the folders which contain your personal and shared files USB Disk: Press this button to browse files on your wristVAULT or USB disk once you’ve plugged it into the USB port. My Files: Press this button to open and browse files saved on the ONE. Neighbours: Press this button to browse any files saved in shared folder in your network. (Note: shared folders must be set up through Settings.) Auto Update: Press this button to connect the ONE support server, so you can update your ONE with the latest software releases from Elonex. 9 DOC -contains links to programs that help you make personal documents AbiWord: is a standard format word processing program. You can use this to create and print homework, letters, or text files. The following shows you what buttons do what, although if you hover your mouse over the button it will give you a description of what it does. creates a new file opens a file print saves your file save your file as something new cut your selection change the font pastes your selection copies your selection undo or redo your last action change the font size Here are a few shortcuts that if you press the keys together will do some of the most frequent actions and will become your best friends very quickly! Ctrl + S saves your document (you should save your file as often as possible so you don’t lose any changes to your work) Ctrl + C copies anything you’ve highlighted Ctrl + V pastes anything you’ve copied to the point where your cursor is. Ctrl + Z lets you undo anything that’s just gone wrong! 10 ONE User Manual Spreadsheet lets you number-crunch and manipulate numbers and data in various ways. You can create spreadsheets that will let you solve maths problems, create graphs or make spreadsheets to give you a helping hand to solve various problems. ONEleafpad, is a very simple text editor. If you want to make a simple un-complicated word processor document then ONEleafpad is best. It only has a few features so please refer to AbiWord (above) as the functions are generally the same. Xpdf lets you view PDF files. 11 ONEdict is a digital dictionary. You can use ONEdict’s various search criteria to find meanings to an entire dictionary of words. ONEcalc is a calculator that can help you calculate using the four main arithmetic operators (+-*/) as well as doing more complicated scientific and engineering calculations. In order to change between a simple calculator and the scientific calculator go to View and choose between Basic Mode / Scientific Mode. If you need to know what the scientific functions do –go and ask you maths teacher! 12 ONE User Manual MEDIA -view your photos, create images and listen to music Photo lets you view your digital photos. Right click on the current image and an action menu will pop up which will give you a variety of options that you can do with the photo. Tux Paint is an award-winning drawing program designed for children ages 3 to 12. It combines an easy-to-use interface, interesting sound effects and an encouraging cartoon penguin will guide children to use this program. Kids are presented with a blank canvas and a variety of drawing tools to help them being creative. mtPaint: A painting program with lets you create small masterpieces, pixel art and manipulate any digital photos you’ve taken. XMMS is a multimedia player which can play MP3 and WAV music files. Listen to music through the ONEs onboard speakers or output it to some headphones or speakers via the Audio Out jack. 13 INTERNET -web browser, IM, E-Mail, Weather forecast, internet photo album Internet: Browse the internet by typing the URL (www.address.com) into the bar at the top of the screen. Wait for the page to download and you can navigate around the website by clicking on links that are of interest to you. Scroll up and down using the bar on the right. Go back to the previous webpage using the ‘Back’ button. Press Reload to refresh the webpage you are looking at with the most up to date information View the download status of the page at the bottom of the screen. When the page is fully downloaded the bar will read Done. Wirelessly connecting to the internet You can connect to wireless internet using RT73. The ONE/ONE+ has the WiFi disabled by default, so you have to manually activate it when using it for the first time. The procedure is as follows: <Step 1> Right click RT73 icon in your system tray and a menu will appear. The first is show/hide window2, the second is Apply profile3 and the last is Quit4. 2 The message ‘show or hide’ will appear according to the window status, when the window is on the desktop, the message will be ‘hide window’, and vice versa. 3 Once the connection setting has been saved, there will a profile to keep these settings. Multiple profiles can be saved 14 ONE User Manual Choose show window. <Step 2> Click Site Survey and then the Scan button to search for all available wireless access points. <Step 3> Pick one of the wireless networks listed and press Connect. If the connection is password protected you will have to enter a key, all the other settings will be automatically filled in5. If your key has a combination of numbers and letters you need to click the small box next to ASCII key. Click OK to save this profile. for use with different WiFi spots but only one profile can be used at once. 4 Once you quit RT73, the icon will disappear. Right click and choose ‘enable’ to restart RT73. There are 3 options for IP settings: Disabled, Automatic (DHCP) and Manual. Usually the DHCP function will be enabled so the second option is checked out by default. 5 15 Other information show by RT73 Link status: shows all the information about your wireless connection Statistics: shows all the information about the data transmission since you connected to the internet Profiles: Lets you edit and delete current internet connection profiles or manually6 add a new connection. 6 If the wireless access point does not broadcast its name then the scan result won’t list this access point and you will have to manually add this as a new profile. 16 ONE User Manual Options: Maximum Tx rate is the maximum speed you wish to connect to the internet7. RT73 WLAN: Wireless Mode: One/One+ supports 2 modes (802.11b and 802.11g), its recommended you choose ‘Mixed’ as this will always select the best option for you. B/G Protection: Choose ‘Auto’ for the best results. Tx Preamble : Choose ‘Auto’ to let the wireless LAN card measure itself the distance between AP and ONE/ONE+ and automatically achieve the best transmission of data. 7 One supports 802.11b and 802.11g for the wireless connection. The former has a maximum raw data rate of 11 Mbit/s and its broadcast rang is 30 m (100 ft) at 11 Mbit/s and 90 m (300 ft) at 1 Mbit/s; the later has a maximum raw data rate of 54 Mbit/s and its broadcast range is up to 30 m (100 ft). 17 Pidgin: is an instant messenger that lets you chat with friends and colleagues. It supports many of the popular IM network protocols and you can even connect to multiple IM networks simultaneously. Pidgin supports typical IM features including file transfer and chat between your contacts and you. 18 ONE User Manual eMail: The ONE has its own email agent that can be used to receive eMails, and files such as documents or photos. There are also a variety of web based eMail agents you can use directly over the internet. The settings of the E-mail need to be set up so they match those of your internet service provider (ISP). The steps to set up your eMail are as follows: <Step 1> In the top menu-bar press “Configuration” then “Create new account…” and the “Preferences for new account” dialog box pops out. <Step 2> Type in the name you would like to call the account in the column “Name of this account” and then fill in your name in personal information. <Step 3> in the column “Mail address”, enter the mail address arranged when you set up with your account with your ISP. <Step 4> Pick a protocol from “Protocol” dropdown menu, the default setting is POP3 (Choose the protocol according to the settings provided from your ISP) <Step 5> Type in the necessary information into the “Server for receiving” and “SMTP server (send)” columns. (Enter the information provided to you from your ISP) <Step 6> Enter your “User ID” and “Password” (Enter the information provided to you from your ISP) Note : Add another eMail account from “Configuration” -> “Edit accounts”. Press “Add” to create a new mail account. 19 <Step 7> In the “Receive” tab, enter the relevant settings are here. (Default settings are recommended) <Step 8> The authentication methods can be assigned in the tab “Send”. Check on “SMTP Authentication (SMTP AUTH) then enter User ID and Password (If the two columns are empty then the application will use the User ID and Password entered in the “Receive” tab for sending the email.) <Step 9> Message composition setting includes the signature which has 2 formats: direct input and pre-edited file. You can also set up an automatic reply. <Step 10> Mail security setting shall be configured according to the mail server: 20 ONE User Manual <Step 11> The advanced setting includes port number and the location of the received messages; the former should be configured according to the mail server and the later is the user’s preferences. Receiving and Sending eMails After the settings are done, press “Get” icon to connect the mail server to retrieve eMails sent to you. If you want to send an eMail then press the “Compose” icon and the mail composer will pop up. Enter the subject and your content, fill in the email address of the recipient in the box next to To: then press “Send” to eMail your message. 21 GAME The ONE has a variety of arcade style games to keep you entertained and help you learn. BLOCKOUT. The player must rotate and move 3D blocks to completely fill up the game floor. The game is real-time and the speed increases with the player skill. Don’t get beaten by the Blocks! Controls Arrow keys s,q,x,w,z,a p Space bar -- Move the block up, down, left or right -- Rotate the blocks in 3D -- Pause the game -- Move down the pieces quickly GALAGA: Defend yourself from the alien attackers and bomb them! Play with the keyboard (press K) or with the mouse (press M) Controls Space bar (mouse click) Left and Right Arrows s -- Fire -- Direction -- Sound X Solitare: The classic card game solitaire Controls Use mouse to drag and drop the playing cards so that cards are in descending order and alternate between being red and black. 22 ONE User Manual X Bomb: Be a mine sweeper and clear the grid without getting bombed. Choose the size and number of bombs with “Level” and the difficulty with “Game Type”. Use your mouse to click on the grid XBubble: Rotate the canon and fire a colored bubble. When you stick three or more adjacent bubbles of the same color they all explode, and any bubble left hanging free falls down. Periodically, all bubbles are lowered by one row. The goal is to clear all bubbles from your board and avoid bubbles dropping below the line at the bottom of the screen. Controls Left and Right Arrow -- Direction of Aim Up key -- Fire the bubbles XDigger: You are a Miner and need to collect as many diamonds as possible. Beware of cave ins from the boulders! Controls P Arrow Keys M 23 -- Start the game -- Dig up, down and around! -- Back to the main menu Xscavenger: Get all the blue diamonds without being robbed by their other scavengers. Controls Space bar -- Main menu & new game Use the Left, Right, Up and Down arrows to control the direction F7 F8 F4 -- Select level -- Start the game XSoldier: Defend your spaceship from alien attacks and laser beam them out of existence. Controls Arrow Keys --Move the spaceship up, down and around Space bar Shift p -- Start the game -- Fire -- Pause Xpatience2: Use your mouse to drag and drop the playing cards so that they are in descending order and alternate between being red and black. Controls Cards -- Flip the card Undo -- Undo the last action Redo -- Redo the last action Score -- Score Hint -- Hint Move to Stack -- Stack the cards in order 24 ONE User Manual Xtris: The classic block stacking game. Create a solid wall with no gaps and the line will disappear. Press the up arrow to rotate the blocks, left and right to move around and down to speed up the fall. Don’t let the blocks get too high or youre outta there! Xletters: Practice your typing. Words fall from the top of the screen and you have to type the word exactly to score points. See how quickly you can type- it’s a really useful skill! Xpuyopuyo: A puzzle game where you strive to match up four “blobs” of the same color. Each match gives you points, and also dumps grey rocks on your opponent which are irritating and troublesome to get rid of! First person to fill up their screen with puyopuyo blobs loses. Controls Player 1: Player 2: Left & Right -- Left, Right Up arrow Down arrow -- Rotate -- Downward A,D -- Left, Right S -- Rotate X -- Downward 25 SYSTEM -Make changes to the system settings Quit: Press this to properly shutdown the software and hardware Reboot: Press this to Restart the software Time & Date: Press this to change the time and the date. After adjusting the time, press the SET TIME button to finish the setting and the time on the clock icon will be updated simultaneously. Settings: Sys-manger is a hub where the system settings reside and lets you make changes over the system. In the wired network area, the networking can be done by plugging the broadband cable into the RJ45 socket. Once the LED in the socket flashes, the networking is active. Then the IP address can be assigned dynamically or manually. The dynamic IP address assignment is the default setting, and the procedures of the IP address assignment are as follows: Dynamic IP address assignment <Step 1> Check on Dynamic in the column of IP and DNS, and then the system will request the networking information from the existing DHCP server (or a broadband router as a DHCP server) and an IP address will be assigned from the server. <Step 2> Press “Activate” button, the connection will be processed <Step 3> The “connect success” dialog will pop out. Press “OK” button to finalize the settings. 26 ONE User Manual USB Disk Drive Once the USB disk drive has been plugged in, the ONE will automatically mount the disk on the system and an USB disk icon will reside on the system tray and the contents of the disk drive will pop up. To remove the USB disk properly right click on the icon and choose Deviceinfo and the USB Mass Storage windows will pop up. Right click the currently mounted USB disk and remove the attached USB disk till the UDEV icon disappears. If the auto-mounting procedure fails, the mounting procedure via Sys-manager will be necessary. Use two buttons to mount and unmount the USB disk drive. Attach the USB disk drive into the USB socket; the system will automatically detect the attached device. Follow the steps mentioned below to mount (unmount) the USB disk drive: <Step 1> After attaching the USB disk drive, press “Refresh”, the system will display the disk partitions and list them in the “Device Info” column, highlight the partition to mount. <Step 2> Press “mount device” button, the asterisk will appear in the state column and the attached device has been mounted. <Step 3> Choose the partition with an asterisk in the State column then press “umount” button, the asterisk will disappear and the attached device has been unmounted. 27 Password Setting Password setting helps you to prevent anyone other than yourself making changes to the ONE’s settings. Enter your own password and press “Enable Password” to activate personal authentication. Afterwards, every time you want to access the System Manager you will be asked for password authentication- so remember what your password is!! System Status The system status displays three primary pieces of information about the current status of your ONE (1) Mem - Memory Usage and most importantly how much free space you have remaining (2) File system status (3) MAC address of the network interface 28 ONE User Manual Adding a Network Printer In order to print you need to add a new printer using the following steps <Step 1> Press ”Add” button to add a new printer <Step 2> Check on “SMB shared printer” to use the shared printer in the windows network. Then press “Next” button. <Step 3> Enter the login user ID and the password, if the password authentication is necessary, otherwise check on Anonymous or Guest account, and then click “Next”. <Step 4> Enter the IP address of the shared printer and the shared name according to the setting of the present network environment, then click “Next”. <Step 5> Select the device driver and click “Next”. <Step 6> Press “Test” button to test whether the setting is correct or not, if the setting is incorrect, the test page won’t be printed out, click Back to modify the setting. Otherwise, click “Next”. <Step 7> Enter the information of this shared printer, Name column is necessary, Location is optional and Description is entered by the system, then click Next and press Finish button to end the setting. <Step 8> To set the printer as a default printer, highlight the printer and press “Default” button. To remove a printer, highlight it and press “Remove” button. 29 Adding a Local Printer <Step 1> After having attached the USB printer, please press ‘Scan’ button and the found printer will be listed. Press ‘Next’ to the next step. <Step 2> Pick a proper driver to fit the local printer then press ‘Next’ and end the installation. <Step 3> Press “Test” button to test whether the setting is correct or not, if the setting is incorrect, the test page won’t be printed out, click Back to modify the setting. Otherwise, click “Next”. <Step 4> Enter the information of this shared printer, Name column is necessary, Location is optional and Description is entered by the system, then click Next and press Finish button to end the setting. <Step 5> To set the printer as a default printer, highlight the printer and press “Default” button. To remove a printer, highlight it and press “Remove” button. 30 ONE User Manual Connecting Via Bluetooth (ONE+ only) How to connect to a Bluetooth enabled device (for example your mobile phone.) <Step 1> Turn on the Bluetooth connection of the mobile phone or other Bluetooth enabled device <Step 2> Press Scan button and the system will locate the address of the mobile phone. <Step 3> Highlight the mobile phone found, press Add button and select Bluetooth/HID option form the start menu then the mobile phone will pop out the Bluetooth menu. <Step 4> Proceed the Bluetooth connection via system tray: <Step 5> HIDD Connection 1. Scan Bluetooth device which you want to connect via Sys-Manager, once found, press Add button to make it as the default device. 2. Right click the icon of Bluetooth and choose hidd to enable the remote control via mobile phone Connection dialog will pop up to request permission, choose yes and enter the default password(0000)8 Choose Desktop to start the remote control. Press Hang up button to return previous menu and stop the remote control. 8 Bluetooth connection password can be changed via system tray, select preferences to make the change. The default password is 0000. 31 <Step 6> OBEX Connection 1. Make sure the mobile phone has been set to default device on One/One+. 2. Right Click the icon of Bluetooth and choose obex > enable. 3. Use default Bluetooth device which is the mobile phone connected to One/One+ , and pick whichever image/video clip and choose send via Bluetooth, then it will ask to connect the device 4. One/One+ will show the Obex Transfer status, and once the transfer is complete the file will be saved into the Bluetooth folder in MyFiles. <Step 7> AUDIOGATEWAY Connection 1. Make sure the mobile phone has been set to default device on One/One+ and has the function of the music playback via Bluetooth. 2. Right Click the icon of Bluetooth and choose audiogateway > audioenable. 3. Use default Bluetooth device which is the mobile phone connected to One/One+ , and pick the mp3 file then choose play via Bluetooth, then One/One+ starts playing music without XMMS. <Step 8> PPP Connection 1. Make sure the mobile phone has been set to default device on One/One+. 2. Right Click the icon of Bluetooth and choose ppp > connect to enable the remote control via mobile phone Connection dialog will pop up to request the permission, choose yes and enter the password(0000) Once the password is confirmed, One/One+ can connect on internet via Bluetooth 32 ONE User Manual MyNeighbor MyNeighbor lets you share documents via a remote folder in the network environment. Follow the procedures below to enable this function. <Step 1> Initiate MyNeighbor and press the Add button and get into the Neighbor add wizard dialog. <Step 2> Press Scan, the system will list any surrounding wireless devices. Highlight the neighbor you wish to connect to and then press Next. <Step 3> Neighbor Wizard will list all the shared folders of the file server, highlight the shared folder once a time, and then enter the Username and the Password as the password authentication. Then click Finished. <Step 4> Once the setting is finished, the Neighbor will list all the shared folders. Highlight the Path and press Mount button to mount the remote folder into the system (the asterisk will appear on the Status column). Furthermore multiple mounting is allowed. Exit Sys-manager and double click MyNeighbor icon on the desktop, the remote folder(s) will show up as the local ones. 33 5 Important Safety Precautions Please read and follow all these safety instructions and precaution. Failure to do so may result in damage to your ONE laptop or yourself, and may invalidate your warranty. CAUTION- To reduce the risk of electrical shock do not remove the cover as there are no user serviceable parts inside. Refer all servicing to Elonex Service Personnel only. To prevent fire or shock hazard, do not use near water or expose the unit to rain or moisture. Do not spill any kind of liquid on the unit. Do not block any ventilation openings, adequate ventilation is essential to prevent heat buildup that can reduce the service life of your unit or lead to failure of electronic components. Avoid exposing the unit to direct sunlight. Do not place the unit near any heat sources such as radiators, heaters, stoves, or naked flame sources. Do not place next to any sources of EM or magnetic radiation, eg microwaves, large speakers Do not drop or push any objects into holes or slots in the case. Always store your unit carefully and avoid shocks or dropping. Power Safety It is advised that you unplug the unit from mains electricity during prolonged periods of unuse or during lightning storms. Avoid directly pulling out the power cord when unplugging from the mains. Before running out of power plug in the adapter to recharge the battery as this can extend the lifecycle of the battery. 34 ONE User Manual Cleaning Before cleaning always shut down your unit and unplug the adapter. You should clean with an anti-static dry cloth only. Do not clean with water, abrasive cleaners or any other fluid. Ergonomics Here are some suggestions on how to best position and use the computer: The top of the LCD should be slightly below eye-level or slightly below and directly in front of you. Sit with good posture and use a chair which offers good back support (especially lower-back). The seat should allow your feet to rest flat on the floor. Where possible, illuminate your working environment with natural daylight or use a non-flickering light source. Place the keyboard and mouse so that your arms are at your sides and your forearms are roughly parallel to the floor. Take a break, get up, stretch, flex your wrists, walk about, and look at something else for about 10 minutes every hour. Servicing Do not attempt to service the computer yourself. Doing so may violate your warranty and expose you and the computer to electric shock. Refer all servicing to authorized serviced personnel. 35