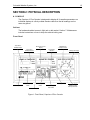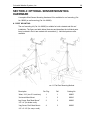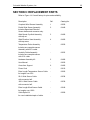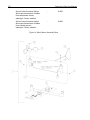
1
CAPRICORN II PLUS™ WEATHER STATION
USER MANUAL
Version 3.0
Cat. No. 81621
Columbia Weather Systems, Inc.
2240 NE Griffin Oaks Street, Suite 100
Hillsboro, OR 97124
Phone (503) 629-0887 - Fax (503) 629-0898
www.columbiaweather.com
[email protected]
All specifications subject to change without notice.
Printed in U.S.A.
© Copyright 1998 Columbia Weather Systems, Inc. All Rights Reserved.
Proprietary Notice: Capricorn II Plus is a trademark of Columbia Weather Systems, Inc. The
information and drawings contained herein are the sole property of Columbia Weather
Systems, Inc. Use of this publication is reserved exclusively for customers of Columbia
Weather Systems and their personnel. Reproduction of this material is forbidden without the
express written consent of Columbia Weather Systems, Inc.
2
Capricorn II Plus User Manual
Columbia Weather Systems, Inc.
WELCOME!
Welcome to the Capricorn family of users and congratulations on your purchase of
the Capricorn II Plus Digital Weather Station.
Please be sure to fill in and return the Capricorn Product Registration Card located
in the front of the manual. The Capricorn II Plus has been in use since 1982, during
which time it has earned a reputation as a rugged, reliable product. It is a precision
instrument, however, and requires proper installation and a certain amount of regular maintenance.
The Capricorn II Plus is quite easy to install and you may be tempted to skip the
installation procedure or other portions of this manual. We recommend that you
resist that urge. A thorough knowledge of these installation and calibration procedures will greatly increase the usefulness and the accuracy of your instrument. In
particular, a proper installation will help prevent problems with both operation and
maintenance.
Please read this manual completely prior to installation.
3
4
Capricorn II Plus User Manual
Columbia Weather Systems, Inc.
IMPORTANT NOTICE: SHIPPING DAMAGE
BEFORE YOU READ ANY FURTHER, please inspect all system components for
obvious shipping damage. The Capricorn II Plus is a precision instrument and can
be damaged by rough handling. Your unit was packaged to minimize the possibility
of damage in transit. Therefore, we recommend that you save the specially designed shipping container for any future shipment of your Capricorn unit.
In the event your order arrives in damaged condition, it is important that the following steps be taken immediately. The title transfers automatically to you, the customer, once the material is entrusted to the transport company.
NOTE: DO NOT RETURN THE INSTRUMENT TO COLUMBIA WEATHER until the
following steps are completed. Failure to follow this request will jeopardize your
claim.
1.
Open the container and inspect the contents. Do not throw away the container
or any damaged parts. Try to keep items in the same condition as originally
received.
2.
Notify the transport company immediately in writing, preferably by facsimile
about the shipping damage.
3.
Wait for the transport company’s representative to inspect the shipment.
4.
After inspection, request permission and a Return Materials Authorization
(RMA) number from Columbia Weather for return of the damaged instrument
by calling (503) 629-0887.
5.
Return approved items to the following address:
Columbia Weather Systems, Inc.
2240 NE Griffin Oaks Steet, Suite 100
Hillsboro, OR 97124
6.
After return permission is given and we receive the instrument, an estimate of
the cost of repair will be sent to you for submittal to the transport company as a
claim.
5
6
Capricorn II Plus User Manual
Columbia Weather Systems, Inc.
Table of Contents
WELCOME! ............................................................................................................................ 3
IMPORTANT NOTICE: SHIPPING DAMAGE ........................................................................ 5
SECTION 1: INTRODUCTION ............................................................................................... 9
A. The Capricorn II Plus System ....................................................................................... 9
B. Specifications .............................................................................................................. 10
SECTION 2: PHYSICAL DESCRIPTION ............................................................................. 13
A. Console ....................................................................................................................... 13
B. List of Parts ................................................................................................................. 15
SECTION 3: INSTALLATION ................................................................................................ 17
A. Unpacking the Unit ..................................................................................................... 18
B. Installing the Console ................................................................................................. 18
C. Installing the Barometric Pressure Sensor ................................................................. 20
D. Installing the Temperature Sensors ........................................................................... 20
E. Installing the Humidity Sensor .................................................................................... 22
E. Installing the Wind Sensors ........................................................................................ 23
F. Lightning Earth Ground ............................................................................................... 28
SECTION 4: OPTIONAL SENSOR MOUNTING HARDWARE............................................ 30
A. Roof Mounting ............................................................................................................ 30
B. Wall Mounting ............................................................................................................. 31
SECTION 5: CALIBRATION ................................................................................................. 34
A. Calibrating the Temperature Sensors ......................................................................... 34
B. Calibrating the Humidity Sensor ................................................................................. 34
C. Calibrating the Barometric Pressure Sensor .............................................................. 35
D. Calibrating the Wind Sensors .................................................................................... 36
SECTION 6: OPERATION .................................................................................................... 38
A. Temperature ............................................................................................................... 38
B. Relative Humidty......................................................................................................... 38
C. Barometric Pressure .................................................................................................. 39
D. Wind Speed ................................................................................................................ 40
E. Wind Direction ............................................................................................................ 41
E. Alarm Feature ............................................................................................................. 41
G. Memory Feature ......................................................................................................... 45
H. Memory Protection Feature ........................................................................................ 45
SECTION 7: MAINTENANCE ............................................................................................... 46
A. Console Maintenance ................................................................................................. 46
B. Barometric Pressure Sensor Maintenance ................................................................ 46
C. Temperature Sensor Maintenance ............................................................................. 46
D. Humidity Sensor Maintenance ................................................................................... 46
E. Wind Sensor Maintenance ......................................................................................... 47
SECTION 8: TROUBLESHOOTING .................................................................................... 48
A. Console Operation Problems ..................................................................................... 48
B. Alarm Display Problems ............................................................................................. 48
C. Temperature Display Problems .................................................................................. 49
D. Humidity Display Problems ........................................................................................ 49
7
8
Capricorn II Plus User Manual
E. Barometric Pressure Display Problems...................................................................... 50
F. Wind Speed Display Problems.................................................................................... 50
F. Wind Speed Display Problems (Continued) ................................................................ 51
G. Wind Direction Display problems ............................................................................... 52
H. Wind Sensor Tests ..................................................................................................... 53
SECTION 9: REPLACEMENT PARTS ................................................................................. 56
SECTION 10: USER SUPPORT INFORMATION ................................................................ 58
A. Limited Warranty ........................................................................................................ 58
B. Return for Repair Procedure ...................................................................................... 59
ADDENDUM: WIND CHILL ALGORITHM ............................................................................ 60
Columbia Weather Systems, Inc.
SECTION 1: INTRODUCTION
A. THE CAPRICORN II PLUS SYSTEM
The Capricorn II Plus weather station provides at-a-glance display of temperature,
wind chill temperature, relative humidity, barometric pressure, wind speed and wind
direction. Temperature may be displayed in Fahrenheit or Celsius. Barometric
pressure may be displayed in inches of mercury (in. Hg) or in millibars, at 0.01 in.
Hg (1 millibar) resolution. Wind speed may be displayed in miles per hour (mph),
kilometers per hour (km/h) or knots. Wind direction is displayed on a 16 point compass.
User calibration is required for only wind direction and barometric pressure at the
time of installation. No other calibrations are required. The temperature sensor and
humidity sensor have been factory calibrated.
A memory feature keeps track of the highest and lowest temperatures and barometric pressures, and the highest wind speeds. A battery backup feature assures that
these readings will not be forgotten if power is either interrupted or cut off entirely.
An alarm feature provides an audible and visible alert when temperatures reach
predetermined highs or lows, or when the wind speed reaches limits set by the user.
The alarm can be coupled with an external relay to control remote electrical devices
such as pumps, motors and fans.
For those who need to record or transmit their weather data, the Capricorn II
RS232C Interface/Data Formatter option provides an easy connection to printers,
terminals, computers and modems. This option may be added at any time, and can
be easily installed by the user.
For those who want greater flexibility in the management and manipulation of their
weather data, WeatherView 32TM software (for IBM and compatible personal computers) provides user-selectable data in a variety of formats. The flow of weather
data can be customized to fit the needs of each user. It can be printed, stored or
integrated into other databases to provide local forecasts.
9
10
Capricorn II Plus User Manual
B. SPECIFICATIONS
Temperature
Display: Either Fahrenheit or Celsius via a slide switch on the front panel for three
Function Modes; indoor only, outdoor only, or four-second alternating.
Sample Rate: “Indoor” and “outdoor” temperatures are sampled for 0.5 seconds
every 1.5 seconds, followed by a comparison of two sequential readings. If
they differ, a third reading is taken. In all, eight 0.5-second samples are taken,
averaged and output to the display. In the Operating Mode, the display is
updated every 12 seconds. The Calibrate Mode does not average, so the
display is updated every 1.5 seconds.
Display Resolution: 1o F or C; 0.2o F (0.1o C) Calibrate Mode.
Range: -67o to 140o F (-55o to 60o C).
Accuracy: +/- 1.0o F (0.5o C) or better from 20o to 105o F (-7o to 41o C); calibrated at
32.0o F.
+/- 2.0o F (1.0o C) or better from -67o to 140o F (-55o to 60o C).
Chill Factor Temperature
Definition: The still-air temperature that would have the same cooling effect on
exposed skin as a given combination of wind and temperature. Please refer to
Addendum: Wind Chill Algorithm.
Display: Replaces normal temperature display via a front panel slide switch.
Range: -99o F to 91o F (-99o C to 33o C).
Relative Humidity
Display: Unit-less percentage
Sample Rate: Relative Humidity is sampled for 0.5 seconds every 1.5 seconds,
followed by a comparison of two sequential readings. If they differ, a third reading is
taken. In all, eight 0.5-second samples are taken, averaged, and output to the
display. In the Operate Mode, the display is updated every 12 seconds. The Calibrate Mode does not average, so the display is updated every 1.5 seconds.
Accuracy: +/-5% or better at 25° C for a range of 20% to 95% RH
Display Resolution: 1% RH, 0.1% RH is Calibration Mode Range: 0 to 99% RH in a
non-condensing -40° to +130° F temperature range.
Barometric Pressure
Display: Either millibars or inches of mercury (in. Hg), via a slide-switch on the back
panel.
Sample Rate: One 0.5-second sample is taken every 1.5 seconds, followed by a
comparison of two sequential readings. If they differ, a third reading is taken.
In all, eight 0.5 second samples are taken, averaged and output to the display.
Columbia Weather Systems, Inc.
11
In the Operate Mode the display is updated every 12 seconds. The Calibrate
Mode does not average, so the display is updated every 1.5 seconds.
Display Resolution: 0.01 in. Hg; 1 mbar.
Sea Level
Total Range
Inches of Mercury (In. Hg)
27 - 32
8.9 - 35.5
Millibars (mbar)
914 - 1084
300 - 1200
Range:
Accuracy: +/- 0.15% (or better) from 29 to 31 in. Hg (982 to 1050 mbar) at sea level
for an ambient temperature of 64o to 82o F (18o to 28o C).
Altitude Correction: Altitude correction permits use within the range of -1000 ft. to
25,000 ft. altitude.
Wind Speed
Display: Either knots, mph, or km/h via a slide switch on the front panel.
Sample Rate: Computed over a 0.5-second period and output to the display every
0.5 second.
Electronic Display Resolution: 1 mph
Mechanical Threshold Speed: Responds to winds of 0.5 mph
Memory Mode: Two wind speed values are retained in memory for subsequent
display (see “Memory Feature” below)
Peak Wind Gust – highest 0.5-second reading since reset.
Highest Average Wind Speed – highest four-second average since reset.
Range: 0 to 125 mph/200 km/h /108 knots (sustained); higher gusts may be recorded.
Accuracy: +/- 5% of reading (or better) from 20 to 125 mph; +/- 1 mph from 5 to 20
mph.
Wind Direction
Display: 16 compass points indicated by LEDs
Sensor Range: 360 degrees
Alarm Feature
Functions: “Outdoor” temperature (rising or falling) and wind speed (rising).
Modes: Visual (“alarm” light), audible (2" internal speaker defeatable by a front panel
switch) and a relay contact closure.
12
Capricorn II Plus User Manual
Memory Feature
The following values may be displayed (and output via the Capricorn RS232C
Interface Option) on command:
Highest outdoor temperature
Lowest outdoor temperature
Highest barometric pressure
Lowest barometric pressure
Peak wind gust
Highest average wind speed (four-second
average)
Each value is displayed for four seconds and continues until the springloaded slide
switch is reset to either a) clear the memory or b) return to current condition display.
Alarm-Controlled Output Feature
The maximum control signal that may be switched by the Capricorn II’s contact
closure (see “Alarm Feature” above) is 12 volts DC, 100 milliamps.
Input Voltage
115 volts AC +/- 10%, 50/60 Hz (Domestic)
230 volts AC +/- 10%, 50/60 Hz (Foreign)
9 volt DC, for Memory Backup
Console Dimensions
15.25" L x 7.5" W x 6.5" H (39 cm x 19 cm x 16.5 cm)
Weight
Net (console only)
17 lbs/7.7 kg
Shipping
20 lbs/10 kg
Columbia Weather Systems, Inc.
13
SECTION 2: PHYSICAL DESCRIPTION
A. CONSOLE
The Capricorn II Plus Console is designed to display all it's weather parameters on
individual displays in a finely crafted wooden cabinet so that all readings can be
seen at a glance.
Cabinet
The hardwood cabinet comes in light oak or dark walnut. Section 7: Maintenance
includes instructions on how to keep the cabinet looking new.
Front Panel
Temperature/
Humidity Display
Temperature/
Humidity Indicator
oF/oC
Temp Switch
Wind Direction
Compass Rosette
Barometric Pressure
Display
Real/Chill Temp
Switch
Rising Falling
Indicator
Alarm Temp Slide
Switch
Alarm Switch
Wind Speed Display
Memory Switch
Alarm Wind Speed
Slide Switch
Figure 1: Front Panel, Capricorn II Plus Console
MPH/Knots/KPH
Wind Speed Switch
14
Capricorn II Plus User Manual
Back Panel
Wind Sensors Cable
Connectors
Humidity Sensor
Cable Connectors
Inches/Mbars
Barometric Pressure
Switch
Temperature/
Humidity Display
Switch
Chassis Ground
Terminal
Temperature Sensor
Cable Connectors
Calibrate/Operate
Mode Switch
Temperature Alarm
Switch
9V Battery
Connector
12V Relay Connector
(Alarm Controlled
Output)
115 or 230V Power
Connector
RS232C Interface
Connector
Figure 2: Capricorn II Plus, Back Panel
0.5 or 0.25 Amp
Fuse
Columbia Weather Systems, Inc.
15
B. LIST OF PARTS
Figure 3: Wind Sensor Assembly
Figure 4: Hardware Assembly Kit
8
SHEET METAL SCREW
FOR CROSS-ARM SUPPORT,
STAINLESS STEEL (QTY 2)
7
TOP SCREW
FOR DIRECTION VANE,
STAINLESS STEEL
10
TOP LOCK NUT
FOR WIND SPEED SENSOR,
STAINLESS STEEL
9
5
U-BOLT
ASSEMBLY
PLATED STEEL
INTERNAL STAR WASHER
FOR WIND DIRECTION SENSOR,
STAINLESS STEEL
6
BLACK PLASTIC TIE-WRAPS (QTY 6)
16
Capricorn II Plus User Manual
Refer to Figures 3 & 4 for key references. The following parts should be included in
the shipping carton:
Ref. Qty Description
-
(1)
User Manual
1
(1)
Cross Arm Support
2
(1)
Wind Cup Hub Assembly (with spare top lock nut)
3
(1)
Wind Direction Vane (with spare top screw)
-
(1)
Console
-
(1)
25-foot cables attached to temperature sensors for console display
-
(1)
25-foot cable attached to humidity sensor assembly for console display
4
(1)
3-foot cable coil with connector half molded to a wind direction sensor body (4a)
(white, T-shaped, PVC fitting with two cables protruding) which in turn is connected by a single cable to a wind speed sensor body (4b) (white, T-shaped,
PVC fitting).
-
(1)
50-foot wind sensor cable coil with connector half.
-
(1)
Hardware Assembly Kit (see Fig. 4) consisting of:
5
(1)
U-Bolt
5
(2)
U-bolt nuts
5
(2)
Locking washers
5
(2)
U-bolt plates, one serrated, one rounded
6
(6)
Black plastic tie wraps (UV-resistant)
7
(1)
Top screw (for clamping the direction vane shaft to the vane holder)
8
(2)
Stainless steel sheet metal screws (for mounting wind sensors to Cross
Arm Support)
9
(1)
10 (1)
Internal locking star washer (for threaded shaft of wind direction sensor
Top lock nut (to be placed on threaded shaft of wind speed sensor,
above wind cup assembly)
-
(1)
11 (1)
Console power cord
Wind Sensor Cable Connector
Columbia Weather Systems, Inc.
SECTION 3: INSTALLATION
Tools Needed
#3 (med.) Phillips Screwdriver
#2 (small) Phillips Screwdriver
Power Drill and 3/8" or 1/2" Bit (1/2" bit needed to thread temperature and wind
sensor cables through same hole.)
3/8" or Adjustable Wrench
Wire Cutter
Compass
Pencil
Materials Needed (See also Section 4: Optional Sensor Mounting Hardware.)
Black PVC Electrical Tape
(2-4) Plastic Wall Bushings
Mast: Height above structure: Minimum 5 ft., recommended 10 ft. (Taller may be
preferred)
for Roof Mount
“Cold Patch” Roofing Tar
50' Guy Wire
Roof Anchor Mount
Guy Ring & Collar
(3-4) Eye Bolt Screws
for Wall Mount:
(2) 4" Wall Mount Bracket Assy.
(4) Bracket Mounting Screws
Optional Items:
9 Volt Battery (Memory Backup)
Surge Suppressor (highly recommended; see Cat. No. 8351 or 8350)
17
18
Capricorn II Plus User Manual
A. UNPACKING THE UNIT
Unpack the Capricorn II Plus console and verify that all parts are included. (See
page 16 for a complete parts list.)
Inspect all system components for obvious shipping damage. The Capricorn II Plus
is a precision instrument and can be damaged by rough handling. (Refer to page 5
in case of damage.)
Save the shipping carton and packing material in case the unit needs to be returned
to the factory.
Note: If items are missing or if there is damage, see page 5. If the system does not
operate or calibrate properly, see Section 7: Maintenance and Section 8: Troubleshooting, for further instructions.
B. INSTALLING THE CONSOLE
The Capricorn II Plus will operate on 98 VAC to 130 VAC or 196 VAC to 250 VAC at
50 or 60 Hz. Many international standard power outlets can be accommodated with
available power cords that are compatible with the IEC 320 standard power receptacle on the rear of the console.
Before connecting the Capricorn II Plus to the power line, verify the line voltage
selection by looking into the fuse compartment adjacent to the power connector. The
nominal value of the selected range is shown by etched markings on a small circuit
board (120 or 240). If the incorrect range is selected, open the fuse cover and firmly
pull the circuit board out of the fuse compartment. Reinsert the board with the
desired line voltage range as indicated on the back panel. Close the fuse cover and
insert the power cord in the receptacle.
If a different male end of the supplied power cord needs to be attached rather than
the male connector supplied; the installed should be aware that the GREEN conductor is GROUND. Only use connectors which can be grounded.
Place the Capricorn II Plus Console in a clean, dry location at room temperature,
close to a grounded power outlet. Avoid areas subject to extreme or rapid changes
in temperature, such as locations near furnace vents, heaters, stoves, televisions or
other heat generating appliances. Also avoid placing the console in the path of
constant direct sunlight to prevent bleaching of the wood cabinet. Do not plug the
power cord in at this time.
With the uninstalled temperature, humidity and wind sensors just out of the shipping
carton, connect all of the wires from the wind sensors (7), the temperature probe (3),
and the humidity sensor (3) to the back panel of the console. The "bare" wires from
temperature and humidity sensors should be connected to the chassis ground
terminal. For wind sensors which have the shielded cable option, the "bare" wire
should be connected to the chassis ground terminal. To avoid confusion and simplify
troubleshooting, hook up all wires at this time, even if you do not intend to use a
particular display.
Columbia Weather Systems, Inc.
Plug the power cord into a convenient grounded outlet. (Foreign users may need to
remove the standard plug and replace it with one compatible with local requirements.)
Note: It is strongly recommended that you protect your unit from power line spikes
(caused by lightning or electrical discharge) by installing a good quality spike-surge
suppression device between the Capricorn II Plus and the power source. This
becomes critical if the installation occurs in areas which tend to experience frequent
electrical storms, such as the southeastern United States. More than 80% of repairs
performed on Capricorn II Plus units are caused by electrical storms.
Theoretically, there is no way to avoid the risk of damage entirely, but there has
never been a reported case of electrical damage by power line transients to a
Capricorn II Plus console that was protected by a good quality spike-surge suppressor. A good spike-surge suppression device is relatively inexpensive damage insurance and may be purchased from finer computer and electronics outlets, or from the
factory. If ordering from Columbia Wather Systems, Inc., specify Cat. No. 8350 (six
outlets) or 8351 (single outlet).
After waiting 30 seconds to give the microcomputer time to achieve normal operating condition, check to see that all displays light properly. When power is first applied, the display digits may not come on, or the values may be incorrect. This is
normal. If the display does not light up within 30 seconds unplug the unit, wait 15
seconds and plug it in again. The Capricorn II Plus should warm up at least one
hour to achieve the specified sensor and display accuracies. The temperatures
displayed should be around room temperature.
Disconnect the temperature wires from the console back panel (in preparation for
installing the temperature sensors). Do not disconnect the wind sensor wires at this
time.
After the computer has been operating for some time, the back panel will be warm
to the touch. This is normal and is an indication that Capricorn II Plus is operating
correctly. The instrument is designed so that heat will be released through the back
panel. Insure that sufficient air circulation is available all around the console.
Backup battery
Attach an alkaline 9-volt battery (user supplied) to the “Keep-Alive” battery clip on
the back panel to insure continuous memory protection. See the Memory Protection
Feature section on page 40 for further details on this feature
Alarm Controlled Output
If Alarm Controlled Output is desired, a security-alarm contractor, a local electrician
or an electrical supplier should be contacted to supply an external 12-volt (or less)
relay. A qualified contractor should assist in connecting the relay to the control
system. (The alarm output relay contact is rated 100 mA maximum DC current, 12
volts.) See Figure 5.
19
20
Capricorn II Plus User Manual
Power source
12 volt DC or less
(to energize external relay)
Alarm controlled output relay
(normally open)
Contanct rated at 12 VDC,
100 mA maximum
Relay SPST (normally open)
Motor
Source voltage
AC or DC for motor
Figure 5: Typical Wiring Diagram for Alarm Controlled Output
C. INSTALLING THE BAROMETRIC PRESSURE SENSOR
The barometric pressure sensor is located inside the console; no user installation is
required. The sensor does need to be calibrated, however. Allow a one-hour warmup period before carrying out the barometric pressure calibration steps listed in
Section 5: Calibration.
D. INSTALLING THE TEMPERATURE SENSORS
The temperature sensor is wound into 25 ft. coils.
If the temperature cable provided is not long enough, it may be extended by splicing
on the extra length of 22 gauge, stranded, 2 conductor shielded cable with a ground
drain wire. When cutting and splicing, insure good contacts, proper color coding of
the terminal leads, and a good seal. (A good solder splice and waterproof insulation
are essential; merely twisting the respective wires together is not adequate.) Additional cable (Cat. No. 81560) and a water tight splice kit (Cat. No. 81580) are available from the factory. The maximum length of the cable (original cable plus spliced
section) should not exceed approximately 1500 ft. (457 m).
Columbia Weather Systems, Inc.
As a general precaution, avoid placing or routing the temperature sensors or cable
near cables from other systems in order to decrease the possibility of picking up
disruptive signals and of interfering with other systems. Also, avoid placing and
routing sensors on or near metal gutters, metal windows, metal door frames, or
directly on a metal tower. These items may attract an electrostatic discharge (possibly lightning) which could jump to the grounded cables and cause damage to the
sensors and/or console.
Note: Sensors and cables mounted to properly earth grounded metal masts and
towers may receive some protection from electrostatic discharge.
Using insulated standoffs (user supplied, or see Section 4) when routing cable helps
avoid these problems.
Mount the temperature sensor. It may be located anywhere, but in order to obtain an
accurate wind chill reading, it must be located outdoors. It should be mounted in a
location shielded from direct or reflected sunlight. Mounting the sensor under roof
eaves is appropriate in most applications. Avoid locations where ice and snow will
accumulate, or near heat radiating objects such as patios, sidewalks, reflective
siding, attic vents, etc.
Note: If desired, radiation shields (reflector type or aspirated) that will house the
temperature sensor are available from various sources. Contact Columbia Weather
Systems for more information if interested.
Once the temperature sensor has been placed, route the cable back to the console.
CAUTION - There may be electric wires in the wall. We recommend that you
shut off the electricity in the room(s) where you are drilling.
For best results:
a.
drill a 3/8" hole though the wall
b.
insert small plastic wall bushings (user supplied, or see Section 4) on either
side of the wall; and
c.
thread the cable through the bushings. (It may be convenient to combine this
step with routing of the wind sensor cable. See “Mounting the Wind Sensor
Assembly,” page 27.)
Using a Phillips screwdriver, attach the three wires from the cable to the “Temperature” terminal post screws labeled “red,” “black,” and “bare” on the back panel.
21
22
Capricorn II Plus User Manual
E. INSTALLING THE HUMIDITY SENSOR
Figure 6: Humidity Sensor Mounting
The Relative Humidity sensor should be mounted in a sheltered area, preferably on
the north side of a building under the eaves to prevent sun-heated air from rising up
the side of the building and affecting the relative humidity at the sensor. If a sheltered area is not available the sensor can be mounted in a self-aspirating radiation
shield.
Wiring should be through 1/2" conduit or alternatively through the rubber grommet
provided in the 1/2" EMT elbow conduit.
The relative humidity sensor is supplied with a standard 25-foot cable. The cable
provided is a 22 gauge, 2 conductor shielded cable with a ground drain lead. If
additional cable is required, a good splice and waterproof insulation are essential;
merely twisting the respective wires together is not adequate.
Once the sensor has been placed, route the cable back to the console. It may be
convenient to combine this step with routing of the wind sensor cable.
Using a Phillips screw driver, attach the humidity cable to the back of the console.
The black and red wire should be attached to the appropriately labeled section on
the back panel. Attach the "bare" wire to the chassis ground terminal.
Columbia Weather Systems, Inc.
E. INSTALLING THE WIND SENSORS
Assembling the Wind Speed Sensor
Figure 7: Wind Speed Sensor
Locate the wind speed sensor body. (It has one cable attached.)
Remove and discard the red vinyl shipping bumper from the threaded shaft. (The
purpose of this shaft bumper is to protect the precision internal bearings from any
damage during shipment and pre-installation handling that might be caused by
accidental shock to the shaft.)
Place the wind cup/hub assembly on the threaded shaft of the wind speed sensor so
that the cup assembly rests on and mates to the inverted shaft nut which has been
installed at the factory.
Thread the lock nut (from the Hardware Kit) onto the shaft above the wind cup
assembly.
While holding the wind cup/hub assembly with one hand, use a 3/8" wrench to screw
the lock nut down onto the cup assembly. DO NOT OVER TIGHTEN.
Spin the wind cup/hub assembly to make sure the wind speed display is functional.
The number displayed on the front panel should be greater than zero.
23
24
Capricorn II Plus User Manual
Assembling the Wind Direction Sensor
Figure 8: Wind Direction Sensor
Remove and discard the red vinyl shipping bumper from the threaded direction
shaft.
Place the internal star washer from the Hardware Kit onto the shaft of the wind
direction sensor body so that the washer sits on the inverted nut. (Note: The wind
direction sensor body has two cables attached to it.)
Place a 3/8" wrench on the inverted nut. Holding the direction vane assembly with
one hand, firmly tighten the vane hub onto the nut.
Gently spin the wind direction vane to make sure the wind direction display is functional. The LEDs should light up in sequence around the rosette on the front panel.
Columbia Weather Systems, Inc.
Attaching the Wind Sensors to the Cross Arm Support
Refer to Figure 3 as the individual wind sensors are assembled to the cross arm
support.
Set the wind speed and direction sensor bodies onto their respective ends of the
cross arm support. Each sensor body is marked with either an "I” or “II” and should
be matched to the same mark on either end of the cross arm support.
Line up the marked hole in each sensor body with the correspondingly marked holes
(1/8" diameter) at either end of the cross arm support.
Using a Phillips screwdriver, screw the stainless steel sheet metal screws from the
Hardware Kit through the predrilled holes and directly into the pilot holes in the cross
arm support.
Assemble the U-bolt Assembly onto the Cross Arm Support. Refer to Figure 3 for
the proper order of assembly. Thread the two nuts onto the ends of the U-bolt arms
so that the ends of the arms are flush with the outside faces of the nuts. (The nuts
will be tightened later after the mast is inserted through the U-bolt assembly.)
Pre-Calibrating the Wind Direction Sensor
Figure 9: Marking the Wind Direction Sensor
With the wind sensor cable still connected to the console back panel, hold the
sensor body vertical so the vane rotates in a horizontal plane. Then rotate the vane
and the rain cap on the wind direction assembly clockwise (when viewed from
above); stop as soon as the NNE light on the front panel is illuminated. Mark the
position of the rain cap to the sensor body with a pencil by marking a vertical line
that extends from the rain cap down onto the sensor body.
25
26
Capricorn II Plus User Manual
Rotate the vane and rain cap counterclockwise; stop as soon as the NNW light is
illuminated. Make a second pencil mark on the sensor body which is directly below
the pencil mark on the rain cap (that was made in the previous step).
Divide the distance between the two marks on the sensor body, and mark that point
with a pencil. This center mark indicates north in relation to the console display.
Rotate the rain cap so that its mark aligns with the middle mark on the sensor body.
Secure the rain cap to the sensor body with a piece of tape so that the rain cap
cannot rotate around the sensor body.
Disconnect the wind sensor wires from the console back panel and prepare to take
the Wind Sensor Assembly to the roof for the final installation procedure.
Installing the Mast
The Capricorn II Plus will measure wind speeds of up to 125 mph (200 km/h).
However, unless the Wind Sensor Assembly is properly mounted to withstand such
high winds, this capability is useless. Please read these instructions carefully to
insure a safe and reliable installation. Mounting the mast and the wind speed and
direction sensors should be comparable in scope to installing a TV antenna.
There are three acceptable methods for mounting the mast to a roof or building
structure. Sloped roof mounting, flat roof mounting or wall mounting. See Section 4:
Optional Sensor Mounting Hardware for more information.
Location
Do not attach the Wind Sensor Assembly to a chimney or a TV or radio transmitting
mast or tower.
Select a mounting location that will allow the Wind Sensor Assembly cables to be
routed away from TV antenna cables and other data cables to avoid interference.
Do not mount sensors close to power lines or telephone lines. For normal roof
mounting, the recommended minimum distance from power or telephone lines is 25
ft. (8 m). Use extreme caution when working close to power lines
Never route sensor cables in tall trees.
Mounting Method
Choose the appropriate mounting method for the installation and obtain the necessary mounting hardware. Refer to Section 4 for information on optional sensor
mounting hardware and accessories which are available from the factory.
If the mounting hardware is not obtained from the factory, be certain to use metal
parts which are plated or galvanized to assure maximum longevity.
In marine locations (or other areas) which experience severe corrosion problems, a
watertight, rubberized spray coating is recommended. This can be sprayed on all
metal parts from the cross arm support down (not the wind sensors) after the installation is completed. Refer to Columbia Weather Systems Cat. No. 83500 as noted in
Columbia Weather Systems, Inc.
Section 4.
Secure the mast to the roof, using guy wires with sufficient tensile strength. The
Wall Mounting Method should utilize a mast of no more than 5 ft. maximum height,
unless it can be secured with guy wires.
Routing Cable
Avoid routing the cable near metal windows, metal door frames, metal gutters, or on
a metal tower.
Any mast or tower should always be properly earth grounded to minimize electrical
storm damage. The use of a properly grounded metal mast or tower, however, does
not insure protection from electrostatic discharge. These items could become electrically charged resulting in damage to the sensors and/or console. This could
damage the system in the event of an electrical storm. Use insulated standoffs (user
supplied, see Section 4) when routing cable to help avoid this problem.
Mounting the Wind Sensor Assembly
Note: At this point, you will need to take the assembled and pre-calibrated Wind
Sensor Assembly and tools (including wrench and compass) to the roof mounting
location.
Attach the Wind Sensor Assembly to the mast. The mast should be inserted between the rounded section of the U-bolt assembly and the serrated edge of the Ubolt clamp.
Tighten the two nuts on the U-bolt assembly so that the Wind Sensor Assembly is
lightly fastened to the mast. Final adjustment and tightening are described below.
With the direction vane/rain cap still secured with tape to the sensor body, rotate the
entire cross arm support/sensor assembly around the mast until the pointer on the
secured direction vane is pointing toward true north. Use a compass to help align
the pointer to the north. Once north has been located, tighten the cross arm support
U-clamp nuts securely with a wrench. Remove the tape from the rain cap/sensor
body. It should now rotate freely.
Use six plastic tie wraps to secure the cables to the cross arm support and mast.
Use one tie wrap for the wind speed cable and one for the wind direction cables.
The other four tie wraps can be placed on the mast. Be sure that one is used at the
mast base. Tighten the tie wraps securely and clip off any excess length with a wire
cutter tool.
Route the cable back to the Capricorn II Plus Console. If mounting on a roof, route
the sensors through a vent or other opening into an attic or crawl space.
CAUTION - There may be electric wires in the wall. We recommend that you
shut off the electricity in the room(s) where you are drilling.
For best results when routing the cable through the exterior wall adjacent to the
console:
27
28
Capricorn II Plus User Manual
a. drill a 3/8" hole though the wall (1/2" if combined with the temperature sensor
cable);
b. insert a pair of small plastic wall bushings (available as an option; see Section 4)
on either side of the wall (or, insert a wall feed-through tube, also optionally available); and
c. thread the cable through the bushings or tube.
Make sure that the exposed portion of the sensor cable that is beyond the mast will
not be blown about by the wind. Use insulated eye bolt standoffs or other fasteners
if necessary. (See Section 4.)
Note: If the standard 50 ft. cable provided with the wind sensor assembly is not
long enough, it may be extended by splicing on an appropriate length of 22 gauge,
stranded, seven conductor cable with the same color code. When cutting and
splicing, insure good contacts, proper color coding of the terminal leads, and a good
seal. (A good solder splice and water proof insulation are essential; merely twisting
the respective wires together is not adequate.) Additional cable (Cat. No. 81540)
and a water tight splice kit (Cat. No. 81580) are available from the factory. The
maximum length of the cable (original cable plus spliced section) should not exceed
1000 ft. (305 m).
Using a Phillips screwdriver, attach the seven colored wires from the end of the wind
sensor cable to the matching terminal post screws protruding from the back panel of
the console below the label, “Wind Sensor Cable.” The screws are labeled to match
the corresponding wire colors. See Figure 2.
F. LIGHTNING EARTH GROUND
Customers who desire to provide a lightning earth ground for the Capricorn II Plus
console are encouraged to do so.
Drive a 5/8" x 8 foot solid copper ground into the earth. Use a suitable ground rod
wire clamp and connect a #12 AWG. solid copper wire from the ground rod to the
chassis ground terminal on the Capricorn II Plus rear panel. A solderless crimp
terminal is provided for this purpose on the back panel of the console.
Columbia Weather Systems, Inc.
29
SECTION 4: OPTIONAL SENSOR MOUNTING
HARDWARE
A complete Wind Sensor Mounting Hardware Kit is available for roof mounting (Cat.
No. 88002) or wall mounting (Cat. No. 88003).
A. ROOF MOUNTING
The roof mounting kit (Cat. No. 88002) is suitable for both a slanted and flat roof
installation. The figure and table below illustrates and describes the individual parts.
Items included in the kit are marked with an asterisk (*). Individual parts are also
available.
Figure 10: Sloped Roof Mounting Method / Figure 11: Flat Roof Mounting Method
Description
Per Pkg
Ref
Catalog No
*Mast, 10 ft. (two 5 ft. sections)
1
1
88005
*Universal Mast Mount
1
2
88010
Lag Screw, Roof Mast Mount1
3
3
88020
4
3
88030
1/4" x 4" (for shake roofs)
*Lag Screw, Roof Mast Mount1
1/4" x 2 1/4" (for comp. roofs)
30
Capricorn II Plus User Manual
*Guy Ring and Collar
1
4
88040
*Cable Standoffs, Wood Screw1
4
5
88050
Cable Standoffs, Nail-In1
2
5
88060
3
50 ft.
(not shown)
6
88070
88080
*Eye Bolt Wood Screws, 1/4" x 3"
4
7
88090
Turnbuckles, 6" open x 4" closed
2
(not shown)
88100
*Cable Nail Clips
20
8
88110
1
10
88130
4
10
88140
17.75oz
(not shown)
83500
(for masonry application)
Guy Wire Clamps, 1/8"
*Steel Guy Wire, Galvanized
Wall Feed Through Tube
1
*Cable Feed Through Bushings1
Watertight Rubberized Spray
1
Select one type
B. WALL MOUNTING
The figure and table below illustrates and describes the individual parts in the wall
mounting kit (Cat. No. 88003). Items included in the kit are marked with an asterisk
(*). Individual parts are also available.
Figure 12: Wall Mounting Method
Columbia Weather Systems, Inc.
Description
31
Per Pkg
Ref
Catalog No.
*Mast, 10 ft. (two 5 ft. sections)
1
1
88005
*4" Wall Mount
2
9
88120
Lag Screw, 1/4" x 2 1/4"
4
3
88030
*Cable Nail Clips
20
8
88110
Wall Feed Through Tube1
1
10
88130
*Cable Feed Through Bushings1
4
10
88140
(not shown)
83500
Watertight Rubberized Spray Coating 17.75oz
1
Select one type
Figure 13: Optional Sensor Mounting Hardware
32
Capricorn II Plus User Manual
Columbia Weather Systems, Inc.
SECTION 5: CALIBRATION
Tools Needed:
Small Slotted Screwdriver
Insulated, Watertight Container
Materials Needed:
Crushed Ice
Water
A. CALIBRATING THE TEMPERATURE SENSORS
The Capricorn II Plus temperature probe is carefully calibrated at the factory and
should not require any re-calibration for sometime. In any event, the probe should
not be calibrated until the unit has had a sufficient warm-up time, at least one hour.
To re-calibrate, perform the following steps:
1.
Move the Mode switch on the back panel of the console from “operate” to
“calibrate.”
2.
Move the Temperature Display switch on the back panel of the console to the
“Temperaturer” position.
3.
Move the oF/oC switch on the front panel to oC.
4.
Create an ice bath by mixing two cups of crushed ice in one cup of water. Use
an insulated container for best results. A Thermos-type container is preferable.
Allow the temperature throughout the ice bath to stabilize by waiting five
minutes before proceeding.
5.
Place the temperature probe in the ice bath. Stir the ice bath with the probe.
Keeping the probe tip from touching the sides or bottom of the container,
continue stirring during step 6.
6.
Use a small flat head screwdriver to turn the “Calibration; Temperature.” screw
on the back panel of the console. Turn it clockwise to decrease the value of
the display, counterclockwise to increase the value of the display. Adjust the
screw until the Temperature Display reads 0.0o C.
8.
When finished with re-calibration, move the Mode switch back to the “operate”
position.
B. CALIBRATING THE HUMIDITY SENSOR
The relative humidity sensor is pre-calibrated at the factory. The entire console and
humidity sensor must be returned to the factory to maintain factory specifications.
Call the factory regarding information on this procedure.
33
34
Capricorn II Plus User Manual
C. CALIBRATING THE BAROMETRIC PRESSURE SENSOR
The electronic transducer used to measure air pressure is sensitive to changes in
elevation of as little as 10 ft. (3 m),* and the user will need to calibrate the barometric pressure display for each installation to compensate for local conditions. In
addition to elevation, several other factors affect the overall accuracy of the barometric pressure display when calibrated for local conditions. These include:
•
The accuracy of the reference barometer (mercury column, aneroid, etc.) used
to calibrate the Capricorn II Plus on-site.
•
The accuracy with which the reading is taken from the reference barometer
and how recently the reading was taken.
•
The difference in the barometric pressure between the reference barometer
location and the Capricorn II Plus location.
•
The variations in the immediate environment around the console due, for
example, to window fans, air conditioners, opening and closing of doors and
windows. Minor effects such as these can be reflected in the last digit of the
display.
•
Subsequent relocation of the Capricorn II Plus after calibration
•
Stability of actual barometric pressure conditions during calibration. The best
time to perform the calibration is during stable and steady barometric pressure
conditions.
*(10 feet in height equals 0.01 in. Hg; 3 meters in height equals approximately 0.33
mbar).
With these considerations in mind, calibrate the barometric pressure display for
each installation by performing the following steps:
1.
Allow a one-hour warmup period before performing a calibration.
2.
Locate the nearest, most accurate barometric pressure at an elevation closest
to the elevation of the Capricorn II Plus site.
The most accurate calibration would involve a precise determination of the
elevation of the Capricorn II Plus installation by consulting the original building/
site construction plans (or, alternatively, by consulting a civil engineer), followed by determination of the actual barometric pressure at the site under
stable conditions with an accurate mercury column or aneroid barometer.
However, since this usually involves more time and expense than most installations require, there are other means of obtaining a reasonably precise barometric pressure reading for your installation. Call a nearby National Weather
Service office, airport, radio station, or television station, etc., and ask for the
barometric pressure at that location. This will probably be an “adjusted-tomean-sea-level” reading, as is usually reported by NWS offices. This is your
calibrate value. Because of FAA requirements, an airport Flight Service Station
(FSS) is usually best for this purpose. Be sure to ask when the last reading
Columbia Weather Systems, Inc.
was taken, and use the most current information you can obtain.
If you do not have a local barometric pressure reference (within 10 miles), but
know your elevation (mean sea level), you can use the factory calibration and
correct for your elevation. Every ten feet of elevation is equal to approximately
0.01 in. Hg, so divide your elevation in feet by ten and multiply by 0.01. This is
the correction factor to be subtracted (elevations above sea level) from the
reading (using “Calibration; baro. fine” screw) if units are in in. Hg.
3.
Move the Mode switch on the back panel of the console to the “calibrate”
position.
4.
Use a small flat head screwdriver to turn the “Calibration; baro. coarse” screw
clockwise until lowest value is displayed. Then slowly turn the screw counterclockwise until the display is near the calibrate value (see Step 2). Make the
final adjustment by turning the “Calibration; baro. fine” screw until the display
reads the same as the calibrate value within the nearest hundredth of an inch
(or nearest Millibar, as appropriate).
5.
When finished with calibration, move the Mode switch back to the “operate”
position. The first update of the display will occur within 12 seconds. It will take
from one to two update readings to reach the correct average pressure reading.
D. CALIBRATING THE WIND SENSORS
The wind speed sensor contains no components that can be calibrated by the user.
Refer to Section 7: Maintenance and Section 8: Troubleshooting if there appears to
be a problem. The wind direction sensor is calibrated during installation. Refer to
Section 3: Installation.
35
36
Capricorn II Plus User Manual
Columbia Weather Systems, Inc.
SECTION 6: OPERATION
A. TEMPERATURE
Actual temperature is displayed in the range -67o F to 140o F or -55o C to 60o C. The
Capricorn II Plus continuously averages the temperature detected by the probes and
updates the display approximately every 12 seconds.
1.
Temperature Display: For a continuous display of temperature move the
Temperature/Humidity Display switch on the back panel of the console to the
“temperature” position.
3.
Alternating Display: By moving the Temperature/Humidity Display switch to the
“alternating” position, the display will alternate between the temperature and
humidity every four seconds.
4.
Sensor Indicator Display: Two LED lights to the right of the Temperature/
Humidity display on the front panel indicate which reading (“temperature” or
“humidity”) is being displayed.
5.
Units of Measure: Temperature may be displayed in either units Fahrenheit (F)
or Celsius (C), as determined by the position of the F/C switch below the
Temperature/Humidity display on the front panel.
6.
Display Resolution: To display temperature with 0.2o F (0.1o C) resolution,
move the Mode switch on the back panel to the “calibrate” position.
Note: When the unit is in the “calibrate” mode, the averaging will not be performed and the memory will not be updated with high/low temperature values.
The temperature display may appear unstable as a result of the lack of averaging.
7.
Wind Chill Display: The “wind chill” temperature is displayed when the Real/
Chill switch on the front panel is in the “chill” position. It is a computed value
based on the actual temperature and the average wind speed. (Please refer to
Addendum: Wind Chill Algorithm.) The microcomputer does not calculate the
“wind chill” temperature when the temperature exceeds approximately 91o F or
33o C. Above this point the temperature displayed will be the same whether or
not the switch is in the “real” or “chill” position. The lowest temperature that can
be displayed for the wind chill temperature in the Celsius position is 99o C (146o F). In the Fahrenheit position, -99o F (-73o C) is the lowest temperature.
B. RELATIVE HUMIDTY
Relative Humidity is displayed in the range 0 to 99% RH in a non condensing -40° to
130° F or -40° to 55° C temperature range. The Capricorn II Plus averages the
continuous relative humidity readings from the sensor and updates the display
approximately every 12 seconds.
1.
Humidity Display: For a continuous display of the relative humidity, move the
Temperature/Humidity Display switch to the "humidity" position.
37
38
Capricorn II Plus User Manual
2.
Alternating Display: By moving the Temperature/Humidity Display switch to the
"alternating" position, the displaywill alternate between the temperature and
humidity every four seconds.
3.
Sensor Indicator Display: Two LED lights to the right of the Temperature
display on the front panel indicate which reading ("temperature" or "humidity")
is being displayed.
4.
Units of Measure: Relative Humidity is displayed as a unit-less percentage, %
RH.
5.
Display Resolution: Normal operating resolution is 1% RH. To display relative
humidity with 0.1% RH resolution, move the Mode switch on the back panel to
the "calibrate" position.
Note: When the unit is in the "calibrate" mode, the averaging will not be performed.
The humidity display may appear unstable as a result of the lack of averaging.
C. BAROMETRIC PRESSURE
The barometric pressure measuring range is from at least 27.00 inches of mercury
(Hg) to 32.00 inches in 0.01 increments. The range in Millibars is 914 to 1084 in 1
mbar steps. The accuracy is 0.15% or better from 29 to 31 in. Hg (982 to 1050
mbar) at an ambient temperature of between 64o and 82o F (18o and 28o C.)
Each digit in the Barometric Pressure display has varying levels of importance. For
example, 29.96 in. Hg. would read:
Digit Number
1
2
3
4
Sample Reading
2
9
9
6
Digit 1 is significant, but relatively unchanging in the measurement of barometric
pressure. This digit will display a reading of either 2 or 3. Digits 2 and 3 are the most
meaningful in indicating weather activity. A change in either of these digits indicates
that a “high” or a “low” pressure weather system may be passing through the area
with a resulting effect on local weather conditions. Digit 4 is more interesting than
important. It can change due to slight variations in pressure caused by the opening
and closing of doors or windows, or the operation of fans and air conditioners.
Frequent changes in the fourth digit are usually related to changes in the immediate
environment. Slow changes are usually a true indicator of barometric pressure
variations.
Note that the rate and direction of change are normally more significant than the
actual barometric pressure level itself.
During each measuring cycle, the Capricorn II Plus will read the barometric pressure
eight times, compute the average, and update the Barometric Pressure display. The
display update will occur approximately every 12 seconds.
1.
Inches of Hg Display: For a continuous display of barometric pressure in
Columbia Weather Systems, Inc.
39
inches of mercury (in. Hg.) move the Pressure switch on the back panel of the
console to the “inches” position.
2.
Millibars Display: For a continuous display of barometric pressure in Millibars,
move the Pressure switch on the back panel of the console to the “millibars”
position.
3.
Pressure Trend Indicators: Two LED lights to the right of the barometric pressure display indicate when the pressure is rising or falling.
If there has been no change over a three-hour period (i.e., the pressure conditions
are steady), neither light will be illuminated. The Capricorn II Plus takes a sample
approximately every hour to see if there has been a significant change in barometric
pressure from the reading taken three hours previously. If there has been a change
in the averaged barometric pressure of 0.06 in. Hg (2 mbar) or more over the last
three hours, the Rising or Falling light will illuminate, as appropriate. During the first
three hours of operation, the barometric pressure readings will be compared every
hour with the reading taken at the start.
Since the barometric pressure readings broadcast on radio and television are
frequently several hours old, it is likely that the Capricorn II Plus will not agree with
the broadcast readings during changing weather conditions. Additionally, the Capricorn II Plus will differ from broadcast readings if it is not located in the immediate
vicinity or elevation of the broadcast pressure site.
The United States Weather Service measures barometric pressure in Millibars and
converts the readings into inches of mercury (Hg). Use the following chart for conversion of values:
One inch Hg (mercury)
= 33.8639 Millibars
One millimeter Hg
= 1.3333 Millibar
One Millibar
= 0.02953 inches Hg
One Millibar
= 0.750 millimeter Hg
One atmosphere
= 760 millimeters Hg
One atmosphere
= 1013.3 Millibars
One atmosphere
= 29.921 inches Hg
D. WIND SPEED
The Capricorn II Plus measures wind speed by using a precision wind cup anemometer which turns an infrared optical chopper. The unique design of the wind speed
sensor assembly virtually eliminates the effect of friction on the sensor hub. The
mechanical threshold wind speed at which the anemometer starts to turn is 0.5 mph.
Measurable wind speeds range from 0 to 125 mph (0 to 200 km/h or 0 to 108 knots).
Accuracy is +/- 5% (or better) of the wind (gust) speed reading. The displayed wind
speed is the 0.5-second average. A measurement is taken and displayed every 0.5
second.
40
Capricorn II Plus User Manual
The Capricorn II Plus also records (but does not display) the average wind speed.
The average wind speed is determined by averaging wind gusts over a four-second
period. Average wind speed has three purposes. It is used to calculate the wind chill
factor. It is also used to trigger the wind speed alarm. Finally, the highest average
wind speed is also kept in memory and displayed during operation of the Memory
function.
The flashing LED light located in the bottom right-hand corner of the Wind Speed
display indicates that the microcomputer is active. A steady light indicates an “inactive” condition. If this occurs, unplug the power cord, wait 15 seconds and reconnect
the power cord.
Units of Measure – Move the MPH/Knots/KPH switch on the front panel of the
console to display wind speed in either miles per hour, knots or kilometers per hour,
respectively.
1 knot =
1.15078 mph
1 km/h =
0.62137 mph
E. WIND DIRECTION
Wind direction is displayed in a rosette of 16 LED compass points, 22.5o apart. If the
wind direction sensor is installed as described in Section 3: Installation, the sensor
should be accurate to within +/- 11.25o (or better). The illuminated compass point
indicates the direction the wind is coming from. For example, when the unlabeled
light between “N” and “NE” is illuminated, the wind is blowing from (or “out of”) the
“NNE.”
The Wind Direction display will always record the direction of the wind vane, even
when there is no detectable wind. As a result, when the wind speed display reads
“0”, the compass point indicating the direction of the last detectable wind activity will
remain illuminated.
E. ALARM FEATURE
The alarm feature allows the user to be warned of temperature and/or wind speed
alarm conditions by providing visual, audible, and output contact closure response.
Once set, the Capricorn II Plus simultaneously evaluates both wind speed and
outdoor temperature for alarm conditions.
Activating the Alarm
The purpose of the alarm feature is to draw the user’s attention to the alarm condition. The purposes of the LEDs in the “Alarm” box on the front panel are 1) to provide a visual indication of an alarm condition and 2) to indicate whether the alarm
condition relates to temperature or wind speed. A speaker mounted inside the back
panel provides an audible indication of an alarm condition, if desired.
To activate the alarm, move the Alarm switch on the front panel of the console from
the “Off” position to either the “Silent” or ”Audible” position.
Columbia Weather Systems, Inc.
1.
In the “Silent” mode, only the LED light(s) corresponding to the sensor that is
set, either “Temperature” or “Speed” or both, will illuminate upon detection of
the set condition. The LEDs will remain lit until the condition ceases or the
Alarm switch is moved to the “Off” position.
2.
In the “Audible” mode, in addition to the visible LED alarm, a speaker mounted
inside the back panel will sound an audible alarm upon detection of a set
condition. The audible alarm may be disabled by moving the Alarm switch to
the “Off” position. Simply moving the switch to the “Silent” position will not
disable the audible alarm unless the alarm condition has ceased to exist (LED
is no longer lit).
3.
A sudden power interruption (drop, loss or surge) may also cause the alarm to
activate. If this occurs, the audible alarm can be disabled by moving the alarm
switch to the “Off” position. (It is also possible that the system microprocessor
has not been properly reset. To insure proper reset, unplug and then replug the
console power cord from the wall receptacle.)
Setting The Temperature Alarm
Two temperature scales are available to set the temperature alarm. The scale on the
right is for setting the alarm to be activated when detecting temperatures below the
freezing point of water, and the one on the left is for temperatures at or above the
freezing point. The scale selector switch, below the Alarm switch and to the left of
the Temperature scales, is used to select the desired scale.
Note: Only when a sensor is attached to the temperature terminals on the back
panel will activate the alarm feature.
1.
First, move the Alarm switch on the front panel of the console to the “Off”
(reset) position to reset the feature.
2.
After the temperature/wind alarm values are set, move the switch to either the
“Silent” or “Audible” position, as desired, to set the alarm.
3.
To set the alarm to activate when the temperature rises above a certain point,
move the Temperature Alarm switch on the back panel of the console to “when
rising.”
4.
To activate the alarm when the temperature drops below a certain point, move
the Temperature Alarm switch to “when falling.”
For example, if you wanted the alarm to activate when the outdoor temperature falls to 32o F, you would:
a.
move the Alarm switch on the front panel to the “Off” position;
b.
move the Temperature scale selector switch to the up position;
c.
move the Temperature slide switch to the bottom setting (32o F);
d.
move the Temperature Alarm switch on the back panel to the “when
falling” position; and
41
42
Capricorn II Plus User Manual
e.
5.
move the Alarm switch on the front panel to the “Silent” or “Audible”
sition, as desired.
po-
To set alarm conditions equal to or greater than 32o F (0o C), move the
scale selector switch to the up position. To set alarm conditions of less
than 32o F (0o C), move the switch to the down position.
Setting the Wind Speed Alarm
1.
First, move the Alarm switch on the front panel of the console to the "Off"
(reset) position to reset the feature.
2.
Move the “Speed” slide switch on the front panel to the wind speed at which an
alarm is desired, to set the alarm.
3.
Move the Alarm switch on the front panel to either the “Silent” or “Audible”
position, as desired, to activate the alarm.
4.
To be warned of a wind speed alarm condition independent of temperature
conditions, set the desired wind speed alarm as described above, move the
temperature scale switch (below the alarm switch) to the “down” position, move
the Temperature slide switch down to -30o F, and move the Temperature Alarm
switch on the back panel of the console to “when falling.” In this configuration
the temperature alarm will not activate unless the actual temperature reaches 30o F.
When the average wind speed (see pages 39) reaches or exceeds the alarm condition, the LED light above the word “Speed” on the front panel will illuminate, the
alarm will sound (if the Alarm switch is in the “Audible” position), and the Alarm
Controlled Output relay contact will close (12V/100mA maximum contact rating).
The scale reads in mph units of measure (km/h for optional foreign front panels), but
the alarm is designed to trigger at the actual wind speed regardless of the unit of
measure being displayed. Therefore, if the alarm is set at 10 mph the alarm will
trigger when the display reads 16 km/h (10 mph = 16 km/h) if the Wind Speed
Columbia Weather Systems, Inc.
43
switch is set on “KPH.”
Alarm Controlled Output
The Alarm Controlled Output terminal on the rear panel makes it possible to attach a
relay device rated 12V (or less) to the Capricorn II Plus so that independent electrical equipment such as external speakers, fans, heaters and pumps can be controlled by the alarm output.
When one or more alarm conditions are reached, a contact closure will be present
at the Alarm Controlled Output terminals until the alarm condition(s) cease(s), the
temperature and/or wind settings are changed, or the Alarm switch is moved to the
“Off” position.
The Alarm Controlled Output contact has ratings of 12V and 100mA maximum. If
inductive loads are switched, appropriate capacitor and resistor contact protection
needs to be added. Contact an electrical supply store for this.
Alarm Function Table
The following table shows the status of the alarm functions under different conditions.
Switch
Settings
Off
Silent
Audible
LED Indicator
Lights
LED Display
Digits
Off
Displays
sensor
readigns as
normal
On while
condition
exists, off once
condition
ceases to exist
On while
condition
exists, off once
condition
ceases to exist
Speaker
Relay
contact
Off
Relay off
(Contact
open)
Displays
sensor
readings as
normal
Off
Closed
(on) while
condition
exists,
open once
condition
ceases to
exist
Displays
sensor
readings as
normal
Tone on
when alarm
condition
exists;
contimues
until Alarm
switch
moved to
"Off"
Closed
(on) while
condition
exists
open once
condition
ceases to
exist
44
Capricorn II Plus User Manual
G. MEMORY FEATURE
The Memory Feature permits immediate display of high and low temperature, high
and low barometric pressure, peak wind gust and high average wind speed.
Note: When the unit is in the “calibrate” mode, the averaging will not be performed
and the memory will not be updated with high/low values.
1.
Memory Display: To activate the Memory feature, move the Memory switch on
the front panel up to the “Display” position. The Capricorn II Plus will then
display for four seconds each the highest temperature, the highest barometric
pressure reading, and the highest wind gust. Then the lowest outdoor temperature, the lowest barometric pressure reading, and the highest average
wind speed (four-second average) will be displayed for four seconds. A complete rotation of high and low memory values will take approximately eight
seconds. Move the switch back to the “On” position to return the unit to
normal operation.
2.
Memory Clear: To clear the Memory, move the Memory switch to the “Erase”
position. The Capricorn II Plus will immediately purge the previously stored
high/low readings and begin storing new information.
3.
Current Display: Move the switch to the “On” position to return the unit to
normal operation.
H. MEMORY PROTECTION FEATURE
In order to retain stored Memory values in the event of a power failure or interruption, a 9-volt battery (user supplied) may be attached to the Capricorn II. Plus With
the battery properly attached, Memory values will be retained in the event of a power
loss.
Attach a high quality, alkaline 9 volt battery to the "Memory Keep Alive Battery”
terminals on the back panel. Be sure to match the positive and negative terminals
with the red (positive) and black (negative) wires of the supplied battery clip. If they
are reversed, memory will not be retained in the event of a power loss.
The Memory Protection feature only provides power to save the values stored in the
memory in case of power failure or power interruption. The battery does not provide
power for the instrument to continue operating during power failure.
The console will display erratic values when the 9V battery wears out and the
memory is displayed.
Columbia Weather Systems, Inc.
SECTION 7: MAINTENANCE
In normal use, the Capricorn II Plus should require very little maintenance, other
than normal care of the hardwood cabinet and a periodic check of the sensor calibration. In the event of any problems, follow the procedures contained in Section 8:
Trouble‚ shooting to determine whether the unit is defective. If it is and the unit
needs to be returned to the factory for repair, refer to the Return For Repair Procedure on page 58 in Section 10: User Support Information.
A. CONSOLE MAINTENANCE
Keep your cabinet like new by wiping it occasionally with a good quality wood polish
or wax. Sparingly spray a soft cloth, then wipe or rub on the cabinet. Avoid getting
wax or dusting products on the painted front and rear panels as these will stain the
panels. The console contains sensitive and dangerous electrical components and
should not be serviced by the user. If none of the displays light at all, check to see if
the fuse on the back panel needs to be replaced. If it does, replace it with a 0.5 amp
250V fast acting fuse. (0.25 amp 250V fast acting fuse for the 230V foreign voltage
unit.) If the problem persists, or the digits all display “0”s or are otherwise erratic, the
console (or any of the sensors) may be defective. Refer to Section 8: Troubleshooting, and call the factory for service as required.
B. BAROMETRIC PRESSURE SENSOR MAINTENANCE
The barometric pressure sensor is located inside the cabinet and should not be
serviced by the user. If the barometric pressure display does not light, displays “0” or
is otherwise erratic, it may be defective. Refer to Section 8: Troubleshooting, and
call the factory for service as required.
C. TEMPERATURE SENSOR MAINTENANCE
Check the temperature sensor cables during installation and periodically thereafter
to make sure they contain no cuts, kinks or other abnormalities, and that any splices
are properly connected and insulated. If the temperature display does not light or is
erratic, the console or the temperature sensor, or both the console and the sensor
may be defective. A new sensor, which can be installed in the field, may be all that is
necessary. In any event, refer to Section 8: Troubleshooting, and call the factory for
service as required.
D. HUMIDITY SENSOR MAINTENANCE
Check the humidity sensor assembly cables during installation and periodically
thereafter to make sure it has no cuts, kinks, or other abnormalities, and that any
splices are properly connected and insulated. If humidity display does not light or is
erratic, the console or the humidity, or both the console and the sensor may be
defective. If this occurs, refer to Section 8: Troubleshooting, and call the factory for
service as required.
45
46
Capricorn II Plus User Manual
E. WIND SENSOR MAINTENANCE
Do not attempt to oil, grease or otherwise lubricate the wind sensors. The wind
speed and direction bearings are permanently sealed and should not be tampered
with. If it appears that the displayed wind speed values are substantially less than
existing conditions, or that the wind direction display is sluggish in responding to
changes in wind direction, it may be that the bearings need service. This can be
tested by spinning the sensors. They should spin freely. If they do not, call the
factory for service. All or part of the wind sensors may need to be replaced. Since
the circuit is molded into the wind sensor housing, an electronic defect requires
replacement of the sensor. The wind sensors are not designed for field repair.
In the event the wind speed or wind direction displays do not light, display “0” constantly regardless of wind conditions, or are erratic, either the console or the sensors
(or both) may be defective. Refer to Section 8: Troubleshooting for recommended
tests that will help locate the source of the problem.
Columbia Weather Systems, Inc.
47
SECTION 8: TROUBLESHOOTING
A. CONSOLE OPERATION PROBLEMS
Symptom
Probable Cause
Correction
No illumination of lights.
No power.
Instrument not plugged in. Plug power cord into 120
Or;
VAC, 60 Hz source (or
240 VAC, 50 Hz for
applicable models.
Fuse blown.
Check and replace fuse.
Display never changes.
Microcomputer is not
running and needs to be
reset.
Unplug unit, wait 15
seconds, plug in again.
Flashing dot by wind
speed display indicates
that the microprocessor
is running. Flashing will
stop when the
microprocessor is
inactive.
Erratic console dispaly.
Unit just turned on:
microprocessor needs
time to calculate
averages and change
display.
Or;
Allow several seconds for
warm-up.
In calibrate mode
Move mode switch to
operate.
Erratic front panel display Memory backup battery is Replace 9V battery with
when accessing memory. low or drained and a
a fresh one and erase the
brown out or power
memory.
failure occurred.
B. ALARM DISPLAY PROBLEMS
Symptom
Probable Cause
Correction
Temperature alarm light
connont be turned off by
moving the scale and
toggle switches.
Temperature alarm switch Properly set the
on back panel is
temperature alarm switch
incorrectly positioned.
on back panel. (See
Section 6: Operation).
48
Capricorn II Plus User Manual
C. TEMPERATURE DISPLAY PROBLEMS
Symptom
Probable Cause
Correction
195°F/273°C displayed
constantly for indoor
and/or outdoor
temperature.
Sensor wire broken or
disconnected.
Or;
Repair broken wires
and/or reconnect.
Temperature circuit in
console may be
defective.
Or;
Indoor and outdoor
sensors can be
interchanged to see if the
problem follows the
sensor in question.
Red and black sensor
wires installed backward.
Or;
Proberly connect probe
wires to console.
Temperature sensor
defective.
Replace sensor
assembly.
Display is blank.
Microcomputer inactive
(power interruption).
Umplug power cord and
replug after 15 seconds.
Temperature changes
when wind blows.
Real/Chill switch in "Chill"
position.
Move Real/Chill switch to
"Real" position.
D. HUMIDITY DISPLAY PROBLEMS
Symptom
Probable Cause
Correction
-25 displayed Constantly.
Wires not connected.
Or;
Reconnect wires.
Wires broken.
Call factory to replace.
Microcomputer inactive
(power interruption).
Unplug power cord and
replug after 15 seconds.
Display is blank.
Columbia Weather Systems, Inc.
49
E. BAROMETRIC PRESSURE DISPLAY PROBLEMS
Symptom
Probable Cause
Correction
Display never changes.
Microcomputer stopped
running and needs to be
reset.
Unplug the power cord
and replug after 15
seconds.
Rising and falling lights
do not agree with
broadcast readings.
Capricorn II determines
trend every three hours;
therefore it might not
agree with broadcast.
No corrective action
required.
Pressure display reading
floats abnormally.
Console not grounded.
Supply an adequate
electrical ground for the
power cord. (See Sect 3:
Lightning Earth Ground).
F. WIND SPEED DISPLAY PROBLEMS
Symptom
Probable Cause
Correction
No apparent wind but
number higher than 0
occasionally flashed on
the display.
Electrical interference
picked up via the wind
sensor cable.
This is not critical to
Capricorn II operation. To
eliminate this
inconvenience, determine
the source of
interference, and re-route
the cable. (Shielded
cable is available from
the factory as an optional
solution.)
Display show 0
constantly
No wind.
Or,
No correction necessary.
Wind cable connector
unplugged.
Or,
Plug in wind connector.
Sensor not properly
located
Reposition the wind
sensor assembly to more
accurately monitor
prevailing winds.
50
Capricorn II Plus User Manual
F. WIND SPEED DISPLAY PROBLEMS (CONTINUED)
Symptom
Probable Cause
Correction
Sensor cable is broken.
Or;
See above. Check
sensor cable at roof
sensor assembly. Look
for cuts or breaks in the
cable. Repair the cable
or consult manufacturer
for a new sensor
assembly or wind sensor
cable with connector half.
Sensor has fallen from
mount.
Or;
Re-install sensor if it is
not damaged. Otherwise
consult manufacturer or
dealer for new sensor
assembly.
Wind cup/hub assembly
arm is broken.
Or;
Contact factory for a new
wind cup/hub assembly.
Ice on sensor.
Or;
Allow to thaw. Do not use
a flame source to thaw
the sensor.
Microcomputer stopped
running and needs to be
reset
Unplug power cord and
replug after 15 seconds.
Display is blank or erratic Console and/or sensors
are defective.
Or;
Vane assembly and
cup/hub set are on the
wrong sensor bodies.
Perform test described
following.
Switch location of the
vane and cups.
Columbia Weather Systems, Inc.
51
G. WIND DIRECTION DISPLAY PROBLEMS
Symptom
Probable Cause
Correction
"N" (north) light
illuminated continuously.
Sensor wires not properly Make certain that no
connected to console.
frayed or bare wires are
Or:
touching, that wires are
attached according to the
color code, that there are
no loose terminal screws
and that all wires are
attached to a terminal.
Peform test described
following.
Wind cable connector
unplugged.
Plug in wind cable
connector.
Lights do not light
sequentially as is rotated
Same as above.
Same as above.
Lights indicate that wind
direction is rotating
continuously.
Winds vane is not
balanced.
Or;
Balance wind vane (See
Section 3: Installation),
Winds speed cup
Switch location of the
assembly is mounted on vane and wind cups.
the direction sensor body.
Display is erratic
Console or sensors (or
both) are defective.
Perform test describe
below.
52
Capricorn II Plus User Manual
H. WIND SENSOR TESTS
In the event the wind speed or wind direction display does not light, displays "0"
constantly regardless of wind conditions, or is inexplicably erratic, perform the
following tests as appropriate to help locate the source of the problem.
Tools required:
One small Phillips screwdriver
One 6" (15 cm) jumper wire, 22 gauge (approximately the same size as the individual wind sensor conductor wires)
Wind Speed Test:
1.
Unplug the power supply cord from the Capricorn II Plus.
2.
Remove the seven wind sensor wires from their terminals at the back of the
console.
3.
Connect one end of the jumper wire to the wind sensor terminal marked "Red"
on the back panel of the console.
4.
Reconnect the power supply cord to the Capricorn II Plus. If the dot is flashing
in the lower right corner of the wind speed display on the front panel, you are
ready to proceed with the individual tests for speed and direction.
5.
With one end of the jumper wire connected to the "Red" terminal, rapidly tap
the loose end of the wire to the "White" terminal for several seconds. A wind
speed display of any number (other than "0") should appear as the white
terminal is being tapped. If that is the case, the console is functioning properly.
Check the entire length of the cable for any cuts, kinks or other abnormalities.
If there are none, or if problems persist after adjusting the cable, contact the
factory for service. Only the sensors need to be returned for repair. Unplug the
wind sensors form the main cable. Do not send the cup/hub assembly or the
wind vane as they may be damaged in shipping.
6.
If no other numbers appear in the wind speed display, repeat the procedure to
confirm the results. If the result is the same, the console is defective (although
it is possible that the wind sensor is also defective). The wind sensors are not
designed for field repair. Contact the factory for service. Both the console and
the sensors need to be returned. Unplug the wind sensors from the main
cable. Do not send the cup/hub assembly or the wind vane as they may be
damaged in shipping.
Wind Direction Test:
1.
With one end of the jumper wire connected to the "Red" terminal, connect the
other end to the "Blue" terminal; the NNW light should appear on the wind
direction display. Proceed to touch the loose end of the jumper wire to the
other terminals listed below and observe the wind direction display to confirm
Columbia Weather Systems, Inc.
53
that the appropriate direction light appears as its respective terminal is
touched.
Terminal
Direction
Blue
Green
Orange
Brown
NNW
SSE
ENE
NNE
2.
If all the direction lights perform as indicated, the console is functioning properly. Check the entire length of the cable for any cuts, kinks or other abnormalities. If there are none, or of problems persist after adjusting the cable, contact
the factory for service. Only the sensors need to be returned for repair. Unplug
the wind sensors from the main cable. Do not send the cup/hub assembly or
the wind vane as they may be damaged in shipping.
3.
If any or all of the direction lights do not light up as indicated, repeat the procedure to confirm the results. If the result is the same, the console is defective
(although it is possible that the wind sensor assembly is also defective). The
wind sensors are not designed for field repair. Contact the factory for service.
Both the console and the sensors need to be returned for repair. Unplug the
wind sensors from the main cable. Do not send the cup/hub assembly of the
wind vane as they may be damaged in shipping.
54
Capricorn II Plus User Manual
Columbia Weather Systems, Inc.
55
SECTION 9: REPLACEMENT PARTS
Refer to Figure 14. Consult factory for price and availability.
Description
Ref.
Catalog No.
Complete Wind Sensor Assembly
1
81500
Partial Wind Sensor Assembly
Includes Speed and Direction
Sensor bodies and connector only.
2
81440
Wind Speed Cup/Hub Assembly,
with top nut.
3
81400
Wind Direction Vane Assembly
with top screw.
4
81420
Temperature Probe Assembly
Includes one complete sensor
Assembly with 25 ft. cable.
-
81520
Humidity Proble Assembly
Includes one complete sensor
with 25 ft. calbe
-
81525
Hardware Assembly Kit
5
81480
User Manual
-
81620
Cross-Arm Support
6
81460
Power Cord
-
81610
Extra Length Temperature Sensor Cable
for lengths over 25 ft.
-
81560
50 ft. Wind Sensor Cable
with connector half.
-
81538
100 ft. Wind Sensor Cable
-
81539
Extra Length Wind Sensor Cable
for lengths over 100 ft.
-
81540
Cable Splice Kit
for user installation/repair of cable.
-
81580
with connector half.
56
Capricorn II Plus User Manual
Sensor Cable Connector Option
Allows quick disconnect of cables
from temperature sensor;
watertight. Factory installed.
-
81585
Sensor Cable Connector Option
Allows quick disconnect of cables
from humidity sensor;
watertight. Factory installed.
-
81590
Figure 14: Wind Sensor Assembly Parts
Columbia Weather Systems, Inc.
SECTION 10: USER SUPPORT INFORMATION
Please fill out and return the Capricorn Product Registration Card immediately. If the
card is missing from the front of this manual, please call the Capricorn Service
Department to obtain one.
Columbia Weather Systems, Inc. makes every attempt to ensure that the Capricorn
II Plus Digital Weather Station is a product of superior quality and workmanship. Our
documentation is detailed to provide you with the maximum product support for the
operation of your instrument. Additionally, our Capricorn Service personnel are
available to assist you from 8:00 a.m. to 4:30 p.m. PST.
This section consists of the following items:
1.
Two-Year Limited Warranty: Please read this document carefully.
2.
Return for Repair Procedure: This procedure is for your convenience in the
event you must return your Capricorn II Plus for repair or replacement. Follow
the packing instructions carefully to protect your instrument in transit.
A. LIMITED WARRANTY
Columbia Weather Systems, Inc. (CWS), warrants the Capricorn II Plus Digital
Weather Station to be free from defects in materials and/or workmanship when
operated in accordance with the manufacturer’s operating instructions, for two (2)
years from date of purchase, subject to the provisions contained herein. CWS
warranty shall extend to the original purchaser only and shall be limited to factory
repair or replacement of defective parts.
EXCLUSIONS
Certain parts are not manufactured by Columbia (i.e., certain purchased options,
etc.) and are therefore not covered by this warranty. These parts may be covered by
warranties issued by their respective manufacturers and although Columbia will not
co-warrant these parts, Columbia will act as agent for the administration of any such
independent warranties during the term of this warranty. This warranty does not
cover normal maintenance, damage resulting from improper use or repair, or abuse
by the operator. Damage caused by lightning or other electrical discharge, is specifically excluded. This warranty extends only to repair or replacement, and shall in no
event extend to consequential damages. In the event of operator repair or replacement, this warranty shall cover neither the advisability of the repair undertaken, nor
the sufficiency of the repair itself.
THIS DOCUMENT REFLECTS THE ENTIRE AND EXCLUSIVE UNDERSTANDING
OF THE PARTIES, AND EXCEPT AS OTHERWISE PROVIDED HEREIN, ALL
OTHER WARRANTIES, EXPRESS OR IMPLIED, PARTICULARLY THE WARRANTIES OF MERCHANT ABILITY AND/OR FITNESS FOR A PARTICULAR PURPOSE
ARE EXCLUDED.
This warranty gives you specific legal rights, and you may also have other rights
which vary from state to state.
57
58
Capricorn II Plus User Manual
B. RETURN FOR REPAIR PROCEDURE
1.
In the event of defects or damage to your unit, first call the factory Capricorn
Service Department Monday through Friday, 8:00 am to 4:30 pm PST, (503)
690-2000 to determine the advisability of factory repair.
2.
In the event factory service is required, return your Capricorn II Plus as follows:
a.
Packing
- wrap console in plastic bag first.
- pack in original shipping carton or a sturdy oversized carton.
- use plenty of packing material.
b.
Include
- a brief description of the problem with all known symptoms.
- your phone number.
- your return street shipping address (UPS will not deliver to a P.O. box).
c.
Shipping
- send freight prepaid (UPS recommended).
- insurance is recommended. (The factory can provide the current replacement
value of the item being shipped for insurance purposes.)
d.
Send to:
Capricorn Service Dept.
Columbia Weather Systems
2240 NE Griffin Oaks Street, Suite 100
Hillsboro, Oregon 97124
C.O.D. shipments will not be accepted.
3.
If your unit is under warranty, after repair or replacement has been completed,
it will be returned by a carrier and method chosen by Columbia Weather
Systems, Inc. to any destination within the continental U.S.A. If you desire
some other specific form of conveyance or if you are located beyond these
borders, then you must bear the additional cost of return shipment.
4.
If your unit is not under warranty, we will call you with an estimate of the
charges. If approved, your repaired unit will be returned after all charges,
including parts, labor and return shipping and handling, have been paid. If not
approved, your unit will be returned as is via UPS COD for the amount of the
UPS COD freight charges.
Columbia Weather Systems, Inc.
59
ADDENDUM: WIND CHILL ALGORITHM
To compute the wind chill, first calculate the CORRECTION FACTOR (CF) from the
following table and formulas:
Using the wind speed in mph, calculate the wind speed index. (Range is 5 to 50
mph.)
Index = 10 - Integer (Wind Speed/5)
Example: 37 mph/5 = 7 R2, where 7 = integer and 2 = remainder
Index
Table #1
Table #2
Wind Speed (mph)
0
156
0
50
1
151
16
45
2
146
16
40
3
141
16
35
4
133
25
30
5
123
33
25
6
110
41
20
7
87
74
15
8
61
82
10
9
14
152
5
10
0
0
<5
CF = Table #1 + (Table #2 * 1/16 * Remainder (Wind Speed/5)
Then compute the WIND CHILL (WC), use the following formula:
IF temperature (in °C) - 33 (or in °F -91.4) is > 0;
Then WC = (CF* (Temp. in °C - 33 (or Temp. in °F - 91.4))/256) + temperature
IF temperature (in °C) - 33 (or in °F -91.4) is < 0;
Then WC = actual temperate (there is no wind chill)
Examples:
1.
Given 25 mph and 20°C:
Index = 10 - 25/5 = 5
CF = 123 + (33 * 1/16 * 0) = 123
WC = (123 * (20 - 33)/256) +20
WC = -123 (0.05078) + 20 = 13.75° C
2.
Given 27 mph and 68° F:
Index = 10 - Integer(27/5) = 10 -5 = 5, Remainder = 2
CF = 123 + (33 * 1/16 * 2) = 127.125
WC = (127.125 * (68 - 91.4)/256) + 68 = 56.38° F