1
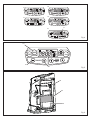
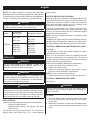
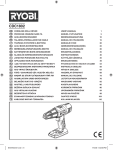
CDR180 COMPACT DIGITAL RADIO OWNER’S OPERATING MANUAL ORIGINAL INSTRUCTIONS DESCRIPTION 1. 2. 3. 4. 5. 6. 7. 8. Digital display Integrated auxiliary cable Retainer strap Touch pad controls Antenna Screw Battery cover AAA batteries 17. Low battery indicator 18. Tune/seek 19. Clock button 20. Volume up button 21. Volume down button 22. MP3 player (not included) 23. Retainer strap 24. Integrated auxiliary cable 9. Battery compartment 10. Battery pack 11. Battery port 12. Latches 13. On/off button 14. Volume 15. Mode 16. Preset 5 1 4 2 3 Fig. 1 6 12 A A A A A A 10 11 9 7 8 Fig. 2 Fig. 3 15 13 16 14 17 18 Fig. 4 19 21 20 Fig. 5 24 23 22 Fig. 6 Important! It is essential that you read the instructions in this manual before operating this machine. Subject to technical modifications. English 3. PERSONAL SAFETY a. Stay alert, watch what you are doing and use common sense when operating a power tool. Do not use a power tool while you are tired or under the influence of drugs, alcohol or medication. A moment of inattention while operating power tools may result in serious personal injury. b. Use personal protective equipment. Always wear eye protection. Protective equipment such as dust mask, non-skid safety shoes, hard hat, or hearing protection used for appropriate conditions will reduce personal injuries. c. Prevent unintentional starting. Ensure the switch is in the off-position before connecting to power source and/or battery pack, picking up or carrying the tool. Carrying power tools with your finger on the switch or energising power tools that have the switch on invites accidents. d. Remove any adjusting key or wrench before turning the power tool on. A wrench or a key left attached to a rotating part of the power tool may result in personal injury. e. Do not overreach. Keep proper footing and balance at all times. This enables better control of the power tool in unexpected situations. f. Dress properly. Do not wear loose clothing or jewellery. Keep your hair, clothing and gloves away from moving parts. Loose clothes, jewellery or long hair can be caught in moving parts. g. If devices are provided for the connection of dust extraction and collection facilities, ensure these are connected and properly used. Use of dust collection can reduce dust-related hazards. GENERAL POWER TOOL SAFETY WARNINGS WARNING Read all safety warnings and all instructions. Failure to follow the warnings and instructions may result in electric shock, fire and/or serious injury. Save all warnings and instructions for future reference. The term “power tool” in the warnings refers to your mains-operated (corded) power tool or battery-operated (cordless) power tool. 1. WORK AREA a. Keep work area clean and well lit. Cluttered or dark areas invite accidents. b. Do not operate power tools in explosive atmospheres, such as in the presence of flammable liquids, gases, or dust. Power tools create sparks which may ignite the dust or fumes. c. Keep children and bystanders away while operating a power tool. Distractions can cause you to lose control. 2. ELECTRICAL SAFETY a. Power tool plugs must match the outlet. Never modify the plug in any way. Do not use any adaptor plugs with earthed (grounded) power tools. Unmodified plugs and matching outlets will reduce risk of electric shock. b. Avoid body contact with earthed or grounded surfaces such as pipes, radiators, ranges and refrigerators. There is an increased risk of electric shock if your body is earthed or grounded. c. Do not expose power tools to rain or wet conditions. Water entering a power tool will increase the risk of electric shock. d. Do not abuse the cord. Never use the cord for carrying, pulling or unplugging the power tool. Keep cord away from heat, oil, sharp edges or moving parts. Damaged or entangled cords increase the risk of electric shock. e. When operating a power tool outdoors, use an extension cord suitable for outdoor use. Use of a cord suitable for outdoor use reduces the risk of electric shock. f. If operating power tools in a damp location is unavoidable, use a residual current device (RCD) protected supply. Use of an RCD reduces the risk of electric shock. 4. POWER TOOL USE AND CARE a. Do not force the power tool. Use the correct power tool for your application. The correct power tool will do the job better and safer at the rate for which it was designed. b. Do not use the power tool if the switch does not turn it on and off. Any power tool that can not be controlled with the switch is dangerous and must be repaired. c. Disconnect the plug from the power source and/or the battery pack from the power tool before making any adjustments, changing accessories, or storing power tools. Such preventive safety measures reduce the risk of starting the power tool accidentally. d. Store idle power tools out of the reach of children and do not allow persons unfamiliar with the power tool or these instructions to operate the power tool. Power tools are 1 English dangerous in the hands of untrained users. e. Maintain power tools. Check for misalignment or binding of moving parts, breakage of parts and any other condition that may affect the power tools operation. If damaged, have the power tool repaired before use. Many accidents are caused by poorly maintained power tools. f. Keep cutting tools sharp and clean. Properly maintained cutting tools with sharp cutting edges are less likely to bind and are easier to control. g. Use the power tool, accessories and tool bits etc., in accordance with these instructions and in the manner intended for the particular type of power tool, taking into account the working conditions and the work to be performed. Use of the power tool for operations different from intended could result in a hazardous situation. near fire or heat. This will reduce the risk of explosion and possibly injury. Do not crush, drop or damage battery pack. Do not use a battery pack or charger that has been dropped or received a sharp blow. A damaged battery is subject to explosion. Properly dispose of a dropped or damaged battery immediately. Batteries can explode in the presence of a source of ignition, such as a pilot light. To reduce the risk of serious personal injury, never use any cordless product in the presence of open flame. An exploded battery can propel debris and chemicals. If exposed, flush with water immediately. Do not charge battery product in a damp or wet location. Following this rule will reduce the risk of electric shock. For best results, your battery product should be charged in a location where the temperature is more than 50°F but less than 100°F. To reduce the risk of serious personal injury, do not store outside or in vehicles. 5. BATTERY TOOL USE AND CARE a. Recharge only with the charger specified by the manufacturer. A charger that is suitable for one type of battery pack may create a risk of fire when used with another battery pack. b. Use power tools only with specifically designated battery packs. Use of any other battery packs may create a risk of injury and fire. c. When battery pack is not in use, keep it away from other metal objects, like paper clips, coins, keys, nails, screws or other small metal objects, that can make a connection from one terminal to another. Shorting the battery terminals together may cause burns or a fire. d. Under abusive conditions, liquid may be ejected from the battery; avoid contact. If contact accidentally occurs, flush with water. If liquid contacts eyes, additionally seek medical help. Liquid ejected from the battery may cause irritation or burns. Under extreme usage or temperature conditions, battery leakage may occur. If liquid comes in contact with your skin, wash immediately with soap and water, then neutralize with lemon juice or vinegar. If liquid gets into your eyes, flush them with clean water for at least 10 minutes, then seek immediate medical attention. Following this rule will reduce the risk of serious personal injury. To reduce the risk of personal injury and electric shock, the product should not be played with or placed where small children can reach it. To reduce the risk of electric shock, do not expose to water or rain. Do not use the radio to listen to music or other audio programs while operating machinery. Doing so may cause distractions that could result in serious personal injury. 6. SERVICE a. Have your power tool serviced by a qualified repair person using only identical replacement parts. This will ensure that the safety of the power tool is maintained. This radio is capable of producing sound levels that can be dangerous to long-term hearing. Listening to music at high volume for any period of time may cause noise-induced hearing loss. The higher the volume, the less time required before your hearing may be affected. SPECIAL SAFETY RULES Battery products do not have to be plugged into an electrical outlet; therefore, they are always in operating condition. Be aware of possible hazards when not using your battery product or when changing accessories. Following this rule will reduce the risk of electric shock, fire, or serious personal injury. SPECIFICATIONS Do not place battery products or their batteries Voltage 2 18 V MW tuner 522-1620 KHz FM tuner 87.5-108.0 MHz Auxiliary cable 3.5 mm English NOTE: This radio is capable of receiving AM (Amplitude Modulated) and FM (Frequency Modulated) radio signals. The AM frequency range is 522-1620 KHz or MW (Medium Wave). The display on the radio will show MW and FM. battery packs. BATTERY PROTECTION FEATURES Ryobi 18 V lithium-ion batteries are designed with features that protect the lithium-ion cells and maximise battery life. Under some operating conditions, these built-in features may cause the battery and the tool it is powering to act differently from nickel-cadmium batteries. During some applications, the battery electronics may signal the battery to shut down, causing the tool to stop running. To reset the battery and tool, release the trigger and resume normal operation. NOTE: To prevent further shut down of the battery, avoid forcing the tool. If releasing the trigger does not reset the battery and tool, the battery pack is depleted. If depleted, the battery pack will begin charging when placed on a lithium-ion charger. CAUTION Danger of explosion if battery is incorrectly replaced. Replace only with the same or equivalent type. Model CDR180 Compatible battery pack Compatible charger BPL-1820 BPL-1815 BCL-1800 BCL1418 BCS618 ABP1801 ABP1802 ABP-1813 ABP-1815 BCL-1800 BCS618 BCL1418 ACR1800 260022029 TO INSTALL/REMOVE AAA BATTERIES (INCLUDED) See Figure 2. It is advisable to write down stored frequencies before replacing the clock batteries. There is a 15-second time frame for replacing the AAA batteries. If batteries are not replaced within 15 seconds, the radio will lose all settings previously stored in memory, and they will require reprogramming. OPERATION WARNING Always use new alkaline batteries for replacement. 1. Loosen the screw from the battery cover. 2. Remove the battery cover. 3. Install two new AAA batteries according to polarity indicators inside the battery compartment. NOTE: Do not mix old and new batteries. 4. Replace the battery cover and secure with the screw. Do not allow familiarity with products to make you careless. Remember that a careless fraction of a second is sufficient to inflict serious injury. WARNING Do not use any attachments or accessories not recommended by the manufacturer of this product. The use of attachments or accessories not recommended can result in serious personal injury. TO INSTALL/REMOVE BATTERY PACK See Figure 3. WARNING WARNING Always remove battery pack from the product when assembling parts, making adjustments, cleaning, or when not in use. This radio is capable of producing sound levels that can be dangerous to long-term hearing. Listening to music at high volume for any period of time may cause noiseinduced hearing loss. The higher the volume, the less time required before your hearing may be affected. To install: 1. Place the battery pack in the radio, aligning the raised rib on the battery pack with the groove in the radio’s battery port. 2. Make sure the latches on each side of the battery pack snap in place and that battery pack is secured in the radio. APPLICATIONS You may use this product for the purposes listed below: Listening to MW/FM radio Amplifying MP3 players, CD players, and other audio devices This product will accept Ryobi One+ 18 V lithium-ion battery packs and Ryobi One+ 18 V nickel-cadmium 3 English To remove: Depress the latches on both sides of the battery pack to release and remove the battery pack. MANUAL TUNING See Figure 4. The TUNE/SEEK buttons are used to manually tune to the desired radio frequency. The selected frequency is displayed on the digital display. DIGITAL DISPLAY See Figure 4. To use tune feature: The digital display on the front of the radio illuminates when the radio is switched on, displaying the time or frequency, and mode. If the battery charge is low, a flashing low / battery indicator will also be displayed: Press the TUNE/SEEK DOWN button and quickly release to tune to the next lowest frequency step. Press the TUNE/SEEK UP button and quickly release to tune to the next highest frequency step. NOTE: Charge battery when low battery indicator begins to flash. If the radio continues to operate with the low battery indicator flashing, the radio will drain the battery until the radio no longer emits sound. To avoid deep discharge, remove the battery pack from the radio and charge immediately. To use seek feature: Press and hold TUNE/SEEK DOWN button for one second to tune to the next lowest frequency with clear reception. Press and hold TUNE/SEEK UP button for one second to tune to the next highest frequency with clear reception. TURNING THE RADIO ON/OFF See Figure 4. Press the on/off button to turn the radio on or off. NOTE: When the radio is off, the time will be shown on the display even if the 18 V battery is removed after the AAA batteries have been installed. To use the antenna: Raise or lower radio antenna until radio channel can be heard clearly. ADJUSTING THE VOLUME STORING A PRESET IN MEMORY See Figure 4. See Figure 4. When the radio is turned on, it will return to the last volume setting used. The memory feature saves up to 20 frequencies as presets in the radio’s memory. You can save 10 frequencies in FM mode and 10 in MW mode. NOTE: If the 18 V battery is removed from the radio or has no charge, the radio will return to the default volume setting. To store a frequency in memory: Tune to the frequency you want to save. To increase the volume: Push the VOLUME UP button. Press and hold the PRESET button. A memory location number will blink on and off. To decrease the volume: Push the VOLUME DOWN button. Press the TUNE/SEEK UP or TUNE/SEEK DOWN button to select a memory location. NOTE: To change volume quickly, hold the VOLUME UP or VOLUME DOWN button. MODE SELECTION Press the PRESET button to store the frequency in the selected memory location. See Figure 4. To recall a preset frequency: To switch modes, press the mode button. The selected mode will be shown in the digital display. There are three modes: Press the PRESET button and quickly release to cycle through stored frequencies. FM mode SETTING THE CLOCK MW mode See Figure 5. AUX mode Press the CLOCK button to view the time in the digital display. To return to the frequency view, press the CLOCK button again. NOTE: When turned on, the radio will return to the last mode that was used unless the 18 V battery is removed or has no charge. NOTE: In AUX mode, the time is always displayed. 4 English To set the clock: MAINTENANCE Press the CLOCK button until the time is displayed on the digital display. WARNING Press and hold the CLOCK button. The number representing the hours will blink on and off. When servicing, use only identical Ryobi replacement parts. Use of any other parts may create a hazard or cause product damage. Press the VOLUME UP or VOLUME DOWN button to set the hour. NOTE: To set the clock to an hour between noon and midnight, press the VOLUME UP or VOLUME DOWN button until "PM" appears in the display. Avoid using solvents when cleaning plastic parts. Most plastics are susceptible to damage from various types of commercial solvents and may be damaged by their use. Use clean cloths to remove dirt, dust, oil, grease, etc. Press the CLOCK button. The number representing the minutes will blink on and off. WARNING Press the VOLUME UP or VOLUME DOWN button to set the minutes. Do not at any time let brake fluids, gasoline, petroleum based products, penetrating oils, etc., come in contact with plastic parts. Chemicals can damage, weaken or destroy plastic which may result in serious personal injury. Press the CLOCK button. The clock is now set. NOTE: If AAA batteries are removed or lose charge for more than 15 seconds, clock settings will be lost. Settings are not affected by the removal of the 18 V battery. USING MP3 AND CD PLAYERS (NOT INCLUDED) WARNING See Figure 6. Do not abuse power tools. Abusive practices can damage the tool as well as your workpiece. Select AUX mode. The retainer strap may be used to secure an MP3 player into position. WARNING NOTE: The retainer strap cannot secure CD players. Connect the integrated auxiliary cable to the MP3 or CD player. Do not attempt to modify this tool or create accessories not recommended for use with this tool. Any such alteration or modification is misuse and could result in a hazardous condition leading to possible serious personal injury. NOTE: The auxiliary cable cannot be removed from the radio. The CD or MP3 player must be ON and in PLAY mode for sound to be heard through the speaker. All MP3 player controls can be used normally while connected to the radio. SYMBOL NOTE: Volume for any device connected through the auxiliary connector can be adjusted using the volume control for that device or with the VOLUME UP or VOLUME DOWN buttons on the radio. Safety Alert V Turning the radio OFF will NOT turn the MP3 player OFF. Hz The integrated auxiliary cable DOES NOT provide charging function. W For complete operating instructions for all MP3 and CD players, always refer to the manual that was included with your model. min-1 no Volts Hertz Alternating Current Watts No-load speed Revolutions or reciprocations per minute Double insulation Recycle unwanted 5 English Wear ear protection Wear eye protection Please read the instructions carefully before starting the machine. Waste electrical products should not be disposed of with household waste. Please recycle where facilities exist. Check with your Local Authority or retailer for recycling advice. 6 TECHTRONIC INDUSTRIES (AUSTRALIA) PTY. LTD. Level 1. 666 Doncaster Road, Doncaster, Victoria 3108 Australia. Tel: 61 3 9840 3226 Fax No.: 613 9840 6133 www.ryobi.com.au