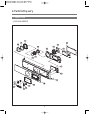
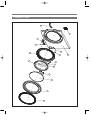
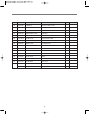
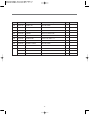
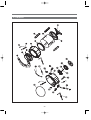
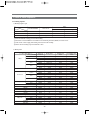
1
S/M No. :
Service Manual
Drum Washing Machine
Model: KUD-UD122RF
✔ Caution
: In this Manual, some parts can be changed for improving,
their performance without notice in the parts list. So, if you
need the latest parts information, please refer to PPL(Parts
Price List) in Service Information Center (http://svc.dwe.co.kr).
Mar. 2010
DRUM WASHING MACHINE
SERVICE MANUAL
1. What is Drum?...............................................................................1
2. Washer Specification.....................................................................4
3. Operating Mechanism Diagram.....................................................6
4. Each Part of Drum Washing Machine ...........................................8
5. Parts List By ASS'Y .....................................................................10
6. Control Part Function Specification .............................................25
7. Electronic Field Parts List and Specification................................56
8. Wiring Diagram............................................................................78
9. Trouble Shooting Regarding Drain ..............................................79
10. Installation .................................................................................80
11. Attention Point With Servicing ...................................................82
1. WHAT IS DRUM Washing Machine?
1. Drum Washing Machine
Water consumption is reduced by using the power of the laundry falling (free-fall) created when rotating
the drum. With temperature control system, this drum washing machine saves energy and improves
washing performance at the same time.
2. Key Features
◆ Waist Care
Designed by the waist, and the most comfortable
angle eject into the laundry is convenient and easy
to manipulate.
◆ The World's First Shoes Course Enable to wash
shoes.
◆ DD inverter motor
The direct-drive type of which motor is directly
connected to drum without an interim chuth,
significantly reduces noise and vibration.
◆ The World's First Steam White Course
The Steam White Course save more 50 percent of
Electricity, Water, Time than previous White
Course.
◆ Self-Cleaning Course of Drum.
Enable to Self-Cleaning of Drum.
◆ Star Drum
Using Star Drum is able to higher Washing
Performance and Minimal damage of laundry,
water consumption.
◆ Digital Condensing Dry System.
Condensing Dry System with saveing energy.
◆ For pump drainage, the powerful pump speeds up
drainage process.
◆ The biggest capacity with compact size
12 Kg Capacity enable to wash bigger laundry.
◆ AUTO DETERGENT SYSTEM
No more prepare detergent before every washing
(only liquid detergent and fabric softener)
◆ Sumultaneous supply of cold and hot water
As cold and hot water is supplied at the same time
heating time and energy is saved.
◆ SMART WASH
you can wash easily like stocking,lingerie use
smart wash system
◆ Luxury Audio Dial
Using the advanced Audio Dial is luxury design of
exterior.
1
3. Power System
LAUNDRY
LAUNDRY
LIFTER
Pump Drainage
BLDC
Natural Drainage
• DD Control: Direct drive type of direct connection between drum and motor
• Rotation by powerful high-performance BLDC motor
• Pump drainage type for built-in installation and Natural drainage
2
4. Major Functions
1 Washing
When rotating drum after putting in the laundry and detergent into the drum, the laundry are rotated by
protrusions (lifters) attached inside the drum.
Washing is carried out with bending and impact actions generated by falling of the laundry to the
bottom part of drum.
2 Rinsing
Rinsing cleanly washes out detergent and dirt removed from the laundry after washing cycle.
3 Spin-drying
Weak, standard and strong spin cycle can be selected according to types of fabrics to be washed. spinwringing is carried out by rotation (the centrifugal force) of drum according to the designated speed.
4 Drainage
Pump Drainage: Powerful pump for built-in installation and application of filter to remove foreign
substances
Natural Drainage: Applied Natural Drainage as the same pullsator.
3
2. Washer Specification
1. Product Specification
1 UD123X SERIES
6
4
8
5
7
3
1
2
DIMENSION(WxDxH)
WASH 91
WASHING CONSUMPTION
POWER SOURCE
CAPACITY
1
CABINET F
2
FRAME DOOR O
3
PROTECT GLASS
4
PANEL F
5
CASE DETERGENT
6
PLATE TOP
7
CABINET
8
BUTTON DIAL
82 kg
WATER CONSUMPTION
CONSUMPTION
PARTS NAME
630mm(W) x 792mm(D) x 991mm(H)
MACHINE WEIGHT
POWER
NO
/ DRY 51
31
220-240V/50Hz , 220-240V/60Hz, 100-127V/60Hz
WASHING
200W (Heating ) ~ 2000W
DRY
1200W ~ 2100W
WASHING
12 kg
SPIN
12 kg
DRY
7 kg
WASHING TYPE
DRUM TYPE
DRY TYPE
OPERATION WATER PRESSURE
Digital condensing dry system
29kPa ~ 784kPa(0.3kgf/cm2~8kgf/cm2)
4
2 UD124X SERIES
6
4
8
5
7
3
1
2
DIMENSION(WxDxH)
WASH 91
WASHING CONSUMPTION
POWER SOURCE
CAPACITY
1
CABINET F
2
FRAME DOOR O
3
PROTECT GLASS
4
PANEL F
5
CASE DETERGENT
6
PLATE TOP
7
CABINET
8
BUTTON DIAL
82 kg
WATER CONSUMPTION
CONSUMPTION
PARTS NAME
630mm(W) x 792mm(D) x 991mm(H)
MACHINE WEIGHT
POWER
NO
/ DRY 51
31
220-240V/50Hz , 220-240V/60Hz, 100-127V/60Hz
WASHING
200W (Heating ) ~ 2000W
DRY
1200W ~ 2100W
WASHING
12 kg
SPIN
12 kg
DRY
7 kg
WASHING TYPE
DRUM TYPE
DRY TYPE
OPERATION WATER PRESSURE
Digital condensing dry system
29kPa ~ 784kPa(0.3kgf/cm2~8kgf/cm2)
5
3. Operating Mechanism Diagram
4. WATER SUPPLY PART
• Cold Water: 3 holes
Cold water, pre-washing
• Hot Water: 1 hole
• Water supply box, hose
Water
Supply
6. DRY PARTS
• HEATER DRY : OPTION
• BLOWER FAN
• FAN MOTOR : BLDC
• THERMISTOR
• THERMOSTAT
: FUSE, BI-METAL
• CONDENSING SYSTEM
• DRY FAN DRIVE
→ GENERATION OF HEATER’S
HEAT
→ TEMP. SENSOR
→ 110°C Off 100°C On : OPTION
Detergent
Container
Thermister
Door
Door
Switch
5. DOOR
• Door lock S/W
• Lock hinge
• Door AS: Glass
• Gasket
Drainage
Pump
7. DRAINAGE PART
• Drainage pump
• Valve housing
• Hose
6
Washing
Heater
1. CONTROL PART
• Main PCB
• Front PCB
• Harness
• Noise filter
• Power Cord: 15A
Electricity Input
Noise Filter
Program
2. DRIVING PART
• BLDC motor
• Drum
• Bearing
• Spider/ shaft
• Tub
• Weight balancer
BLD
C
Motor
Drum
3. HEATING PART
• Water Heater: 1000W ~ 2000W
• Washing temperature sensor
Thermister
8. SUPPORTER
• DAMPER AS : Front 2(70) / Rear 2(110N)
• Spring : 2
7
4. Parts list by ass’y
1. PANEL F AS
1 UD123X SERIES
8
No
Part Name
Part Code
Description
Qt'y
P1
BUTTON LIQUID
3616641600
ABS
1
P2
BUTTON RES
3616641700
ABS
1
P3
BUTTON SELECT DETERGENT
3616641800
ABS
1
P4
BUTTON ADD
3616641900
ABS
1
P5
BUTTON FUNCTION
3616643200
ABS
1
P6
SPRING BUTTON
3615116300
SUS, ID=9.5,d=0.5,L=15
4
P7
DECORATOR WINDOW DISPLAY
3611692700
ABS
1
P8
PANEL INNER
36142T1G00
ABS
1
P9
PANEL OUTER
36142T1F00
ABS
1
P10
BUTTON PS
3616641500
ABS
1
P11
WINDOW DISPLAY
3615508400
투명 ABS
1
P12
WINDOW COURSE
3615508500
투명 ABS
1
P13
DECORATOR FILM COURSE
P14
DECORATOR WINDOW COURSE
3611692800
ABS
1
P15
DECORATOR BUTTON DIAL
3611692900
ABS
1
P16
BUTTON DIAL OUTER
3616643700
ABS
1
P17
BUTTON DIAL INNER
3616642500
ABS
1
P18
CASE PCB F
36111T1G00
HIPS
1
P19
HOLDER LED COURSE
3613057100
HIPS
1
P20
PCB ASS'Y
1
P21
CUSTOM LED
1
P22
PROTECTOR PCB
P19
SCREW TAPPING
1
3618345400
9
SECC 0.6t
1
T2 TRS 4x14
10
Remarks
1. PANEL F AS
2 UD124X SERIES
10
No
Part Name
Part Code
Description
Qt'y
P1
WINDOW COURSE R
3615508700
투명 ABS
1
P2
WINDOW COURSE L
3615508800
투명 ABS
1
P3
BUTTON POWER
3616643100
ABS
1
P4
DECORATOR BUTTON POWER
3611693300
ABS, 증착
1
P5
BUTTON START
3616643000
ABS
1
P6
DECORATOR BUTTON START
3611693200
ABS, 증착
1
P7
SPRING BUTTON
3615116400
SUS, ID=15,d=0.7,L=20
2
P8
PANEL INNER
36142T1J00
ABS
1
P9
PANEL OUTER
36142T1H00
ABS
1
P10
BUTTON FUNCTION
3616642800
ABS, 증착
1
P11
BUTTON SELECT & ADD
3616642700
ABS
1
P12
WINDOW DISPLAY
3615508600
투명 ABS
1
P13
BUTTON LIQUID & RES
3616642600
ABS
1
P14
DECORATOR DISPLAY
3611693000
ABS, 증착
1
P15
DECORATOR BUTTON DIAL
3611693100
ABS, 증착
1
P16
BUTTON DIAL
3616642900
ABS
1
P17
PCB AS
P18
PROTECTOR PCB
P19
SCREW TAPPING
PRPSSW2D62
1
3618345400
11
SECC 0.6T
1
T2 TRS 4x14
10
Remarks
2. INLET BOX AS
B25
B26
B22
B28
B03
B23
B27
B04
B29
B21
B08
B09
B07
B10
B11
B19
B18
B17
B06
B20
B12
B01
B02
B16
B05
B13
B14
B15
B20
12
B24
No
Part Code
Part Name
Description
B01
3610528200
BOX INLET
PP
1
B02
3613274100
HOSE INLET
EPDM
1
B03
3618110600
NOZZLE TOP
PP
1
B04
3618110700
NOZZLE UNDER
PP
1
B05
36189L7000
UNIT PUMP AS
DWD-U120R 220-240V 50/60HZ
2
-
3612799200
HARNESS FEED
DRUMUP-2ND, AUTO-FEED SUB-HARNESS
1
B06
3615304800
SUPPORTER BOX
SBHG 1.2T
1
B07
3610610500
BRACKET SENSOR
ABS
4
B08
3614825900
SENSOR LIQUID A
TAB#250+PIPE(59.5)
1
B09
3614826400
SENSOR LIQUID B
TAB#250+PIPE(64.5)
1
B10
3614826500
SENSOR LIQUID C
TAB#250+PIPE(77.8)
1
B11
3614826600
SENSOR LIQUID D
TAB#250+PIPE(82.8)
1
B12
3614426000
PIPE JOINT I
PP
1
B13
3614426100
PIPE JOINT Y
PP
1
B14
3613273500
HOSE CLEANING TANK L
EPDM
1
B15
3613273700
HOSE CLEANING TANK R
EPDM
1
B16
3613273600
HOSE CLEANING TUB
EPDM
1
B17
3614010300
PACKING CLEANING
EPDM
2
B18
3611910500
FILTER
SUS. MESH 100
2
B19
3614825200
SENSOR PRESSURE
5V DRUM, DN-DD01, DL-DW01 INLET 90
1
B20
3611203200
CLAMP AS
ID=60, WIRE+GUIDE+BOLT+NUT
2
B21
3613270930
HOSE WATER SUPPLY
EPDM ID8.5 OD12.5_SHOWER
0.23
B22
3613270930
HOSE WATER SUPPLY
EPDM ID8.5 OD12.5_SHOWER
0.125
B23
3613270930
HOSE WATER SUPPLY
EPDM ID8.5 OD12.5_SHOWER
0.4
B24
3613270930
HOSE WATER SUPPLY
EPDM ID8.5 OD12.5_SHOWER
0.165
B25
3615414800
VALVE INLET
220-240V 1-WAY HOT PP-BRACKET
1
B26
3615415050
VALVE INLET
220~240V,3WAY,RINSE GUIDE유,PP/BRACKET
1
B27
3611205800
CLAMP HOSE
100H, ID=13.8 W=10.0 0.9T
12
B28
3614413300
PIPE JOINT(HOSE INLET)
PP
1
B29
3613270930
HOSE WATER SUPPLY
EPDM ID8.5 OD12.5_SHOWER
13
Qt'y
0.67
Remarks
3. CABINET F ASSY
C02
C16
C08
C09
C04
C03
C05
C06
C13
C14
C15
C12
C07
C10
C11
14
C01
No
Part Code
Part Name
Description
C01
3610813000
CABINET F
SECD 0.8T, DWD-T120R
1
C02
3614539800
PLATE HINGE SUPPORT
SPG 0.8T, DWD-T110R
1
C03
3612209800
FRAME DOOR I
PP, DWD-T110R
1
C04
3612904100
HINGE SAFETY LOCK
NYLON66
1
C05
361A113200
DOOR SAFETY LOCK
NR
1
C06
361A110600
DOOR GLASS
GLASS (DWD-100DR)
1
C07
3618304300
PROTECTOR GLASS
ABS UT0510TNP
1
C08
3612903800
HINGE DOOR
AL, DWD-T110R
1
C09
3610916500
CAP HINGE DOOR
POM
4
C10
3612211400
FRAME DOOR O
ABS
1
C11
3611692500
DECORATOR DOOR O
ABS
1
C12
3612612200
HANDLE DOOR
ABS
1
C13
3613100900
HOOK DOOR
ZNDC
1
C14
3615115400
SPRING HOOK
SUS304,
1
C15
3613101000
HOOK SHAFT
SUS, D=3.0
1
C16
3619047200
SWITCH DOOR LOCK
DL-S1.250V16A.BITRON
1
3619047210
SWITCH DOOR LOCK
DL-S1.125V 16A , BITRON
1
15
Qt'y
Remarks
4. CABINET ASSY
16
No
Part Code
Part Name
Description
D01
3618103110
NOZZLE AIR
PP, DWD-100DR
1
D02
3612209300
FRAME TOP R
DWD-T110R, GI 1.6T
1
D03
3612209400
FRAME TOP L
DWD-T110R, GI 1.6T
1
D04
3610812900
CABINET
SGCC 0.8T, DWD-T120R
1
D05
3611425540
COVER BACK AS
COVER BACK + PAD CABINET
1
D06
3612209500
FRAME UPPER
DWD-T110R, SBHG 1.2T
1
D07
3612204201
FRAME LOWER
SGCC 1.0TX634*186 DWD-110RP
1
D08
3612608100
HANDLE CABINET
PP, DWD-100DR
2
D09
3612209600
FRAME COVER
DWD-T110R, SBHG 1.6T
1
D10
3611146200
CASE PCB MAIN
HIPS, DWD-T110R
1
3610PCBC11
PCB AS
C-UD123XNHS
1
3610PCBC10
PCB AS
C-UD123XLHS
1
17
Qt'y
Remarks
5. BASE U AS
18
No
Part Name
Part Code
Description
Qt'y
Remarks
E01
BASE U
3610393200
PP, DWD-T120R
1
E02
SUPPORTER LEG
3615303600
PO+도금, 3.0T
4
E03
FIXTURE LEG
3612006400
ABS, DWD-100DR
4
E04
SPECIAL BOLT
3616029000
10 X 1.25, 51MM
4
E05
FOOT
3612100600
BUTYL, DWD-100DR
4
E06
REACTOR
52G043J002
DWD-100DR, 4A
1
E07
DAMPER FRICTION
361A700150
110N AKS ST=170-260 DL=197.5 LOW NOISE
2
다른 끝단은 TUB AS에 체결
E08
DAMPER FRICTION
361A700110
70N AKS ST=170-260 DL=197.5 LOW NOISE
2
다른 끝단은 TUB AS에 체결
E09
DAMPER PIN
361A700200
AKS D=14.5
4
E10
EMI FILTER(K19B)
3611909300
DWLF-K19(B110),X0.47U.Y1000P.VAR471K.NON FUSE
1
19
6. TUB ASSY
20
No
Part Name
Part Code
Description
Qt'y
F01
F02
F03
F04
F05
F06
F07
F08
F09
F10
F11
F12
F13
F14
F15
BALANCER WEIGHT
GASKET DRY
NOZZLE SHOWER
DAMPER PIN
DAMPER FRICTION
TUB FRONT
DRUM FRONT
LIFTER WASH
DRUM CENTER
DRUM REAR
SPIDER AS
GASKET TUB
AIR TRAP AS
SPRING SUSPENSION
UNIT BUBBLE PUMP
F16
F17
F18
F19
F20
F21
HOSE AIR
TUB REAR
BEARING HOUSING
BEARING INNER
BEARING OUTER
UNIT STATOR BLDC
F22
UNIT ROTOR BLDC
F23
HEATER WASH
3616109000
3612323900
3618104000
361A700200
361A700110
3618829800
3617003101
361A400600
3617003010
3617003210
361A300200
3612324300
3610AAR120
3615115800
36189L4150
3618L4G40
3613266300
3618829700
3616304600
3616303100
3616303200
36189L620A
36189L4800
36189L6300
36189L4900
3612802400
3612802410
3612802420
3612802430
3612802440
3612803600
3612803700
3612803800
3613266100
3612009300
36196TAJ00
361A700150
36189L5K30
36189L5J30
36189L5710
DWD-T120R
EPDM
PP, DWD-100DR
AKS D=14.5
AKS, 70N
FRPP, DWD-T120R
SUS, 0.5T
PP NANO-SILVER
SUS, 0.6T
SUS, 0.6T
SPIDER(ALDC)+SHAFT(S45C)
L=1810
DWD-T120R
DWD-T120R
220-240V
110-130V
EPDM
FRPP, DWD-T120R
ALDC
6206Z
6205Z
AL,DON1300W 30T 36POLE,NMT,PBT
36SLOT
DON1300W SR-FERRITE12,30~32T,NMT
MAGNET24
220V, 2KW
230V 2KW
240V,2KW
110V,1KW
120V,1KW
220V,2KW FUSE 2EA
230V,2KW FUSE 2EA
240V,2KW FUSE 2EA
EPDM
SUS0.7T
SV-MXT20D
AKS
220V-240V 50HZ
220L 60HZ
110-127V/60HZ
1
1
1
4
2
1
1
3
1
1
1
1
1
2
1
1
1
1
1
1
1
1
1
1
1
1
1
1
1
1
1
1
1
1
1
1
2
1
1
1
F24
F25
F26
F27
F28
HOSE DRAIN I
FIXTURE HEATER
DRAIN MOTOR
DAMPER FRICTION
UNIT DRAIN PUMP AS
21
Remarks
20091211~
~20091211(changed)
20091211~
~20091211(changed)
EU
EU
EU
ONLY PUMP MODEL
ONLY PUMP MODEL
ONLY PUMP MODEL
7. DUCT B AS + DUCT PIPE AS
22
No
Part Name
Part Code
Description
Qt'y
G01
UNIT FAN MOTOR
36189L3Z20
ISM-7780 6DWWA 24V.
1
G02
COVER DUCT
3611428700
ALDC
1
G03
DUCT B UPPER
361A202100
ALCOST 0.5T
1
G04
CLAMP CORD
3611203330
DABE-2, A=9, B=5,3, L=105
3
G05
FAN AS
3611885900
DI33 FAN
1
G06
SCREW TAPPING
7122400811
T2S TRS 4x8
1
G07
SPECIAL SCREW AS
3616030100
TAPTITE P, TRS 4*16, WASHER
1
G08
FUSE TEMPERATURE
361A800120
128ûC(G4A0115C) 15A 250V
1
G09
FRAME HEATER FRANGE
3612209700
SBHG 1.2t
1
G10
DUCT B LOWER
361A202200
AL, 3t
1
G11
PACKING THERMOSTAT
3614009900
SILICON
1
G12
SWITCH THERMOSTAT
3619046500
ON 120ûC OFF 150ûC 230V
1
G13
HEATER DRY
3612800900
220V, 2100W
1
3612801400
230V 2.1KW
1
3612801600
240V 2.1KW
1
3612801300
110V 1.2KW
1
3612802100
120V 1.2KW
1
R40=26.065k∆Ω, R90=4.4278∆Ω
1
G14
THERMISTOR DRY
361AAAAC30
G15
PACKING RUBBER
3614009800
SILICON
1
G16
CUSHION DRY
3611570500
NBR, 20 x20 x 3T
2
G17
GASKET SEAL A
3612324200
EPDM FOAM, DIA=5, L=1335
1
G18
GASKET SEAL B
3612320810
EPDM FOAM, L=412, 4.9 x 4.4 x 4.8
1
G19
GASKET INLET
3612323800
EVA, 10 x 211 x 1T
1
G20
DUCT GUIDE
361A202300
AL, 3T
1
G21
DUCT AS
361A200850
T120R
1
G22
CLAMP AS(DUCT)
3611203700
DUCT
2
G23
BELLOWS DUCT
3616403000
EPDM
1
G24
H0SE WATER SUPPLY
3613270900
T120R응축수용
1
G25
CLAMP SPRING
3611203800
ID=15.5, T=0.6, B=10
2
23
Remarks
8. PLATE TOP ASSY
No
Part Code
Part Name
Description
H01
3614539910
PLATE T
DWD-U12
1
H02
3613559300
LABEL TOP UNIFICATION
DWD-T'S PLATE TOP
1
24
Qt'y
Remarks
9. Cover Plate AS
I04
I07
I06
I01
I02
I03
I05
No
Part Code
Part Name
Description
I01
3611430000
COVER LIQUID TANK
ABS
2
I02
3615304900
SUPPORTER LIQUID TANK L
ABS
1
I03
3615305000
SUPPORTER LIQUID TANK R
ABS
1
I04
3611430100
COVER DETERGENT
MBS
1
I05
3611430200
COVER PLATE
ABS
1
I06
3612511700
GUIDE DETERGENT MAIN
PP
1
I07
3612511800
GUIDE DETERGENT PRE
PP
1
25
Qt'y
Remarks
5. Control Part Function Specification
1. Function Specification
1) Sequence chart
Division
Senising
P
Water Supply
r
Pre. Wash
e.
W
a
Drain
s Balancing Spin
h
Mid. Spin
Senising
Water Supply
W
a
s
h
i
n
g
R
i
n
s
e
S
p
i
n
Washing 1
(Heating)
Washing 2
Drain
Balancing Spin
Mid. Spin
Water Supply
Washing 1
Drain
Balancing Spin
Mid. Spin
Water Supply
WASHING 2
Drain
Balancing Spin
MID. SPIN
Water Supply
WASHING 3
Drain
Balancing Spin
Main Spin
Normal
Heavy stain
Liquid DET. Power DET. Middle
Time
20sec
2min
10min
8min
1min
2min
3min
20sec
2min
90min
80min
35min
30min
25min
40min
25min
20min
15min
1min
2min
3min
2min
3min
1min
2min
3min
2min
3min
1min
2min
3min
2min
3min
1min
2min
7min
5min
3min
60sec
10sec
■
■
■
■
■
■
■
■
■
■
■
75min
■
■
■
85min
32min
27min
■
■
■
■
■
■
■
■
■
■
■
■
■
■
■
■
■
■
■
■
■
■
■
Crease care
■
End
■
Remain Time Display
1:42
NOTE 1. The heavy stains washing course includes pre-washing in the basic cycle.
End
Whites
Memory
small
Middle Middle
2. In the standard course, rinsing is done twice.
3. For the standard course at 40 degrees, the heating washing time includes
the first seven minutes without heating. The duration of washing 2 is 40
minutes which is 20 minutes longer.
4. Depending on the water temperature, the heating washing time is
changed.
5. In the standard course, if full capacity (LS480 or higher) is detected, then
additional one hour of cold water washing is added. The result is 2:47.
(For the domestic inspection in the future.)
26
■
■
■
■
■
■
■
■
■
■
■
■
■
■
■
■
■
■
■
■
■
■
■
■
■
■
■
■
■
■
■
■
■
■
■
■
■
■
■
■
■
■
■
■
■
■
■
■
■
■
■
■
■
■
■
■
■
■
■
■
■
■
■
■
■
■
■
■
■
■
■
■
1:47
■
■
1:59
■
■
2:26
■
■
2:36
■
■
1:36
6. For the liquid DET + standard course, the default water temperature is
COLD.
7. For the powder DET + standard course, the default water temperature is
40 degrees.
8. For the standard course with COLD water, the total washing time with
liquid DET is 1:00 and it is 1:47 with powder DET.
9. The default setting for My Preferred Course is 40 degrees of water
temperature, rinsing three times and med spin. After that, you should
select your own setting.
Division
W
a
s
h
i
n
g
Soal
Water Supply
Washing 1
(Heating)
Washing 2
R
i
n
s
e
S
p
i
n
D
r
y
Drain
Balancing Spin
Mid. Spin
Water Supply
Washing 1
Drain
Balancing Spin
Mid. Spin
Water Supply
Washing 2
Drain
Balancing Spin
Mid. Spin
Water Supply
Washing 3
Drain
Balancing Spin
Main Spin
Crease care
Dry
Delicate Sports wear
Small
Small
Time
30min
2min
60min
50min
35min
30min
20min
25min
20min
15min
1min
2min
3min
2min
3min
1min
2min
3min
2min
3min
1min
2min
3min
2min
3min
1min
2min
7min
5min
3min
60sec
100min
30min
5min
10sec
30min
60sec
10sec
■
■
Blankel
Middle
■
Sports shoes Tub clean
Air wash
Small Medium
■
■
■
■
15min
8min
■
■
■
■
■
■
■
■
■
■
■
■
■
■
■
■
■
■
■
RINSE
WATER+
■
■
10min
■
■
■
■
■
■
■
■
■
■
■
■
■
■
■
■
■
Cooling
End
Wrinkle-free drying
Crease care
■
■
End
End
■
■
■
Remain Time Display
49
32
1:11
NOTE
1. The full drying course includes drying in the basic cycle.
■
■
■
■
■
■
■
■
■
■
■
■
■
■
■
■
■
■
■
■
■
■
■
■
■
■
■
■
■
■
■
■
■
■
■
1:51
35
■
1:47
2. The wrinkle-free operation is performed when the laundry is not removed after the cycle is
completed. It is not included in the entire cycle.
3. Shoes course does not include wrinkle-free operation.
4. The shoes drying course does not follow the default spin sequence.
27
Division
Crease care
Steam water supply
Steam washing
D
r
y Steam washing
W
a
s
h
i
n
g
R
i
n
s
e
S
p
i
n
Finishing water supply
Finishing washing
Soal
Water Supply
Washing1
(Heating)
Washing2
Drain
Balancing Spin
Mid. Spin
Water Supply
Washing 1
Drain
Balancing Spin
Mid. Spin
Water Supply
Washing 2
Drain
Balancing Spin
Mid. Spin
Water Supply
Washing 3
Drain
Balancing Spin
Mid. Spin
Water Supply
Washing 4
Drain
Balancing Spin
Main Spin
Baby Care
Middle
Time
20sec
1min
20min
15min
25min
15min
10min
7min
1min
25min
30min
2min
60min
50min
35min
30min
15min
25min
20min
15min
1min
2min
3min
2min
3min
1min
2min
3min
2min
3min
1min
2min
3min
2min
3min
1min
2min
3min
2min
3min
1min
2min
7min
5min
3min
60sec
10sec
Steam soak
Small Middle
■
■
■
■
■
■
■
■
■
■
■
■
■
■
■
■
■
■
Crease care
■
■
■
End
■
■
■
Remain Time Display
2:32
2:10 2:10
NOTE
1. The baby care and steam soak course performs 25 minutes of steam washing.
2. The baby love course has 4 rinsing times.
End
28
Division
W
a
s
h
i
n
g
R
i
n
s
e
S
p
i
n
Soal
Water Supply
Washing1
Drain
Balancing Spin
Mid. Spin
Water Supply
Washing 1
Drain
Balancing Spin
Mid. Spin
Water Supply
Washing 2
Drain
Balancing Spin
Main Spin
Time
rag
Small
stocking
Small
lingerie
Small
■
■
■
■
■
■
■
■
■
■
■
■
■
■
■
■
■
■
■
■
■
■
■
■
30min
1min
5min
3min
1min
1min
1min
1min
1min
2min
1min
1min
1min
1min
2min
1min
1min
3min
2min
1min
60sec
10sec
■
■
■
■
■
■
■
■
Crease care
End
End
■
■
■
Remain Time Display
19
13
18
NOTE
1. The stocking course skips medium spins.
2. The lingerie course performs a total of 1 minute of balancing spin and medium spin.
29
2. Skill of each Sequence
2-1. Washing Sequence
1) Washing Sequence part
Time
Part
LOAD SENSING
Water Level
Main
O
Pre
O
Soak
O
Course
HEATING
Washing
Decision Level
Decision Level
Decision Level
Decision Level
X
8 or 10 min
High
X
30 min.
1 Prewash and Soak working previous main washing.
2 Decision Level’ decide Water Level and Time to Load Sensing in Normal, White, Eco-white course.
3 Soak consist of water supply and washing, after this, start main washing.
4 Heater does not working in prewash and soak course.
2) Wahing Time
Part
Water
cold(Liquid DET.)
cold(Powder DET.)
Water
30ûC
40ûC
60ûC
Whites
30,40ûC
Steam soak
60ûC
90ûC
Heavy stain
30,40ûC
60ûC
Delicate
Sports wear
Blanket
Sports shoes
rag
stocking
lingerie
30,40ûC
60ûC
90ûC
Baby care
Air wash
Tub Clean
Heating Time
20min
25min
20min (+7)
25min (+7)
30min
45min
75min
85min
25min
25min
30min
30min
50min
50min
30min
50min
X
X
X
20min
X
X
X
25min
30min
50min
X
X
Water Level
Small/Middle
Small/Middle
Small
Middle
Small
Middle
Small
Middle
Small
Middle
Small
Middle
Small
Middle
Small
Middle
Middle
Middle
Small
Small
Middle
Small
Small
Small
Small
Middle
Middle
Middle
X
Middle
30
Washing Time
25min
72min
25min
25min
40min
40min
25min
25min
25min
25min
25min
25min
25min
25min
25min
25min
25min
25min
15min
8min
25min
20min
3min
3min
3min
25min
25min
25min
X
10min
Total Washing Time
45min
72min
45min
50min
67min
72min
55min
70min
100min
110min
50min
50min
55min
55min
75min
75min
55min
75min
15min
8min
25min
40min
3min
3min
3min
50min
55min
75min
X
10min
1 Washing Heater isn’t reworking after reach decision temperature.
2 The washing time is divided into the heating time and the main washing time that follows it. The heating time is gone
immediately after the heating is finished or stopped until the heating is completed.
3 The heating time for the standard course with water temperature of 40 degrees includes seven minutes without any heating in
the early stage. During this period, the textile is soaked in water fully before heating can be done, so that the temperature drop
in the washing tank caused by water supply after heating starts can be prevented.
4 The main washing time of 40 minutes is only for the standard course with water temperature of 40 degrees.
5 If the LS is greater than 480 for the standard course, one hour of extra washing time is added. The result is 2:47.
- Achieving target cleanness (for post management)
3) Electric Current Time of Washing Motor
MOTOR TIME On/Off (sec)
Part
water level
Course
Normal
Whites
Steam soak
Heavy stain
Water Supply
Washing
Heating
main Washing
Soal
Crease care
Speed
0~40ûC
5/15
10/10
18/6
15/180
10/5
45 r.p.m
60ûC
5/15
10/10
10/10
15/180
10/5
45 r.p.m
95ûC
5/15
10/15
7/15
15/180
10/5
45 r.p.m
30~40ûC
5/5
10/10
10/10
15/180
10/5
45 r.p.m
60ûC
5/5
10/10
10/10
15/180
10/5
45 r.p.m
95ûC
5/5
10/15
7/15
15/180
10/5
45 r.p.m
0~40ûC
5/15
18/7
10/5
15/180
10/5
45 r.p.m
60ûC
5/15
18/7
10/7
15/180
10/5
45 r.p.m
Delicate
cold
X
X
2/15
X
X
45 r.p.m
Blanket
cold
5/15
X
10/7
X
10/5
45 r.p.m
Sports shoes
0~40ûC
5/15
10/10
10/7
15/180
10/5
45 r.p.m
rag
cold
5/15
X
18/6
15/180
X
35 r.p.m
stocking
cold
X
X
1/5
X
X
35 r.p.m
lingerie
cold
X
X
1/5
X
X
35 r.p.m
30~40ûC
5/5
10/10
10/10
15/180
10/5
45 r.p.m
60ûC
5/5
10/10
10/10
15/180
10/5
45 r.p.m
95ûC
5/5
10/15
7/15
15/180
10/5
45 r.p.m
cold
5/15
X
10/30
15/180
10/5
45 r.p.m
Baby care
Tub clean
1 It works decision cycle.
2 If Motor Restriction occur by overload, Motor try to rework opposite direction.
3 While Water Supply, Motor Stick proceed ON first.
4 Crease Care is process of removal laundry that stick to drum It works after Spin Sequence.
5 The heating washing motor conduction on/off time for the steam boiling and baby care course refers to finishing
washing.
6 The motor conduction on/off time for steam heating/washing in the steam boiling and baby love course are 10/5 and
18/6.
7 The motor speed for the stocking and lingerie course is 35 rpm.
31
4) Water supply
1 Depending on the course setting or load sensing, the water supply level is selected to be either low or extra low.
2 For powder DET injections, the main washing valve is opened and closed five times.
3 If liquid DET is selected, the liquid DET stirring motor operates 30 seconds for low levels and 20 for extra low
levels.
4 When liquid DET is fully injected, the washing water supply including constant temperature control begins.
5 If powder DET is selected or liquid DET injection completion is memorized, the liquid DET injection process can
be skipped.
6 When the water supply is completed, the door glass is washed and to clean the tub, the main washing valve and the
reserved washing valve operate for ten seconds.
5) Water re-supply
1 Water is resupplied when the water level is found to be low by monitoring it every 2 minutes after completing the
water supply.
2 The motor is stopped during the water re-supply.
3 During washing, a max fifteen times of water re-supply can be done If the water level drops after that, no extra
water is supplied.
4 If the water level is lower than the reset level during water re-supply, the IE error is issued and the heater is turned
off.
2-2 Rinse operation
1) Water supply
Part
Level height (mm)
Frequency (KHz)
Remark
Medium
240
22.96
Additional rising water supply level
Small
255
22.61
Water level during rinsing
Small
225
23.18
Rinsing water level
Water Level
1 If clean rinsing is selected, the water is filled up to mid-level.
2 In the rinsing cycle, only cold water is supplied.
3 In the final rinsing cycle, the cold water v/v and the reserved washing v/v are opened to inject softener.
4 In the final rinsing cycle, the softener stirring motor operates for 30 seconds for extra low levels and for 40 seconds
for low levels.
5 The hand cloth and lingerie course’s water level is medium (22.61KHz).
2) Re-Water Supply
1 After 1 min. in Rinse Sequence, check water level and work Re-Water Supply.
32
3) Sinse Sequence
part
Level
height(mm)
Water Temp. Rinse Time
MOTOR On/OFF (sec)
Mid. Spin
Mid. Spin
r.p.m
rpm.
Water supply
rinse
Normal
Cold
3min
3min
Medium
45 r.p.m
5/15
10/5
Whites
Cold
3min
3min
Small
45 r.p.m
5/15
10/5
Steam soak
Cold
3min
3min
Medium
45 r.p.m
5/15
10/5
Heavy stain
Cold
3min
3min
Medium
45 r.p.m
5/15
10/5
Baby care
Cold
3min
3min
Small
45 r.p.m
5/15
10/5
Sports shoes
Cold
3min
3min
Small
45 r.p.m
X
10/5
Delicate
Cold
3min
3min
Small
45 r.p.m
X
2/20
rag
Cold
2min
1min
Medium
45 r.p.m
5/15
10/5
stocking
Cold
2min
X
X
35 r.p.m
X
1/5
lingerie
Cold
2min
1min
Small
35 r.p.m
X
1/5
Blanket
Cold
3min
3min
Small
45 r.p.m
5/15
10/5
Tub clean
Cold
3min
3min
Small
45 r.p.m
5/15
10/5
1 The motor speed for the stocking course and the lingerie course are 35 rpm.
4) Drain
1 Befor Drainge Sequence, Water Temp is dropped by cold water supply.
2 After Drainage Sequence, Drain Motor is still ON.
5) Medium spins
1 In the medium spin cycle, the designated rpm is achieved for each course After performing pre-B and B spins
twenty times, if it fails to enter into drying R, then it skips to the next operation.
2 When washing is terminated, load sensing is done to detect the amount of water before performing the first
medium spins By changing the reference value for unbalance depending on the amount of water, the main spin
operation can be performed
3 The medium spin for the sports shoes does not perform balanced spins For three minutes, instead of the main
spins, the motor operates at 45 rpm (10 sec on, 10 sec off)
4 The stocking course omits the medium spins cycle.
33
2-3 Spin Sequence
1) Water discharge
1 It is done according to functional organization 3-5, water discharge sequence.
2) Balanced spin
1 Depending on the amount of water, 3 steps of unbalance checks are done. If the criteria is satisfied, then it
advances to the next stage, spin R.
2 Spin B refers to the unbalance detection area at 350 rpm. If the amount of unbalance exceeds the reference value,
then it turns back to the textile attachment region.
3 Press the pause button in the middle of spin B. It restarts at the textile unfolding region.
4 The stocking and the lingerie course omits the unbalance region of 350 rpm.
5 The hand cloth/stocking/lingerie course reduces the duration of spin B by one minute. In other courses, reduction is
two minutes.
3) R (Real) spins
1 After passing spin B, spin R continues until the entire spin operation is completed.
2 Depending on the selected spin operation, the target rpm can be varied.
3 During the standard and heavy spin operation, the unbalance value is measured to determine the final target rpm.
4 If drying is selected and medium spin is selected, then the strongest spin sequence is performed.
5 If acceleration during spins is stopped, the cycle continues at constant rpm and performs braking.
6 If you press the pause button during spins, braking will stop the motor.
4) Spins for the sports shoes
1 No spin B is performed.
2 Like the washing motor operation, it repeats on/off operation with an interval of 10 seconds for five minutes at 45
rpm.
3 To remove water, textile pulling is skipped and low temperature drying is done for 36 minutes.
4 When the cycle is completed, to clean the tub, one cycle of rinsing and medium spin is used.
5) Hand cloth spins
1 Spin B’s duration is one minute.
2 The main spin time is 1 minute. The speed changes quickly from 350 rpm to 710rpm.
3 Textile pulling is skipped. When the cycle is completed, to clean the tub, one cycle of rinsing and medium spin is
used.
6) Stocking course spins
1 Spin B’s duration is one minute.
2 Spin B reaches 160 rpm. (350rpm and ascending region omitted.)
3 The main spin’s duration is 1 minute and the motor turns at 160 rpm.
4 To reduce damage to the stocking, textile pulling is omitted.
7) Lingerie spins
1 Spin B’s duration is one minute.
2 Spin B reaches 160 rpm. (350rpm and ascending region omitted.)
3 The main spin’s duration is two minutes and the motor turns at 200 rpm.
4 To reduce damage to the lingerie, textile pulling is omitted.
34
2-4 Termination
1) Textile pulling
1 After the spin is completed, the laundry is taken off from the drum wall to prevent wrinkles. It lasts for 30 seconds.
2 The motor operation depends on the type of textile pulling.
3 No textile pulling is done for soft textile, sports shoes, hand cloths, stockings and lingerie.
2) Termination
1 The buzzer sound will be heard for 10 seconds after completing textile pulling. Also the power is off.
2 If a drying cycle is added, then it will proceed to drying.
3 When termination begins, the door lock is released.
2-5 Drying cycle
1) Organization of a drying cycle
Ex) If standard drying is selected (total time of 2:30)
Water discharge
(one minute)
Drying (144 minutes)
Cooling (5 minutes)
Termination (10 seconds)
Wrinkle-free operation (30 minutes)
no time displayed
2) Drying spins
If a drying cycle is added to general operation, to improve the dryness, operation takes place at constant rpm higher
than the selected spin rpm for a certain duration.
Course
Drying spins
Remarks
Standard
Strongest
High temp boiling
Strongest
Strongest spin selected regardless of
the selected spin operation.
Steam boiling
Strongest
Heavy stains
Strongest
High speed
Strongest
1 The drying spin sequence is the same as the general strongest drying sequence.
3) Textile pulling
1 At the time of textile pulling, the fan motor starts operating.
2 Textile pulling is done for sixty seconds.
35
4) Motor conduction time for a drying cycle
Textile pulling
Drying
Cooling
Wrinkle free
Cycle time (min)
Heater off/on
Low temperature
10/5
15/5
10/10
10/50
110
70/60
Low temperature (sports shoes)
10/5
2/30
2/30
X
36
70/60
Iron
10/5
15/5
10/10
10/50
60
105/95
Normal
10/5
15/5
10/10
10/50
150
105/95
Very
10/5
15/5
10/10
10/50
200
105/95
1 You can select one of 1 hr/ 90 minutes/2 hours.
2 If a sports shoes course is selected and the time is selected, the motor conduction time is determined by a sports
shoes course.
3 Except for a sports shoes course, if the time is selected then the motor conduction time is determined by the
standard course.
5) Drying valve operation
1 20 seconds after drying starts, it continues until drying is completed) 30 sec on/5 sec off.
6) Cooling operation
1 Its purpose is to lower the temperature of the tank after drying is completed) The fan motor and the main motor
operate at the same time.
2 If the drum internal temperature is below 50 degrees, cooling is terminated.
3 The total duration of cooling is five minutes) If the internal temperature can’t be lowered, then the time is not
reduced anymore.
7) Drying heater operation
1 The drying heater continues to operate until drying is completed) 105 deg off/95 deg on.
2 70 deg off/60 deg on for low temperature drying) 50 deg off/40 deg on for a sports shoes course.
3 For air washing, 80 deg off/70 deg on.
8) Wrinkle-free operation
1 It lasts for 30 minutes after drying is completed.
2 During wrinkle-free operation, the motor only operates) The fan motor and the drying v/v do not operate.
3 If you press the pause button during wrinkle-free operation, the motor is stopped and the door is opened.
2-6 Steam operation
1) Steam water supply
1 In steam operation, the water is supplied twice for one minute each.
2 Constant temperature control is done until reaching the initial phase steam water supply point.
3 If the laundry is soaked in the water and the water level drops, then water is supplied again) To reduce the number
of water supplies, the water supply level is set to 10mm higher than the steam point (1.5 phase).
4 Depending on load sensing or the course setting value, the water supply level is chosen to be low or extra low.
5 If powder DET is injected, then the main washing valve is opened and closed five times.
6 If liquid DET is selected the liquid DET stirring motor operates for 30 sec for low levels and for 20 sec for extra
low levels) At this time, the main washing valve operates too.
7 When liquid DET is fully injected, then washing water supply including constant temperature control begins.
8 If powder DET is selected or liquid DET injection completion is memorized, then liquid DET injection process is
skipped.
9 If the water supply is completed, to clean the DET box, the main washing valve and the reserved washing valve
operate for 10 seconds.
36
2) Steam heating
1 The heater operates until the target water temperature is reached.
2 Steam heating temperature setting
Course
Temperature setting
Time setting
Power saving
70ûC
15 min
Standard
75ûC
15 min
Strong
90ûC
20 min
3 When the target temperature is reached, the time set for steam heating is reduced.
3) Steam washing
1 The water temperature is maintained and the steam effect is maximized in this operation.
2 Steam washing time
Course
Temperature setting
Time setting
Power saving
7 min
70ûC/75ûC
Standard
10 min
75ûC/80ûC
Strong
15 min
90ûC/95ûC
Strong
25 min
90ûC/95ûC
3 The reserved washing v/v operates for three seconds every three minute to flow the water to the door glass.
4) Finishing steam water supply
1 Steam washing is completed and it is advanced to the main washing) For this purpose, the same water level as the
general standard is achieved.
2 The time set for water supply is one minute.
5) Finishing steam washing
1 It is required when you failed to reach the target temperature in the main washing.
2 The time set for water supply is 25 minutes.
6) Main washing
1 Same as the general standard washing.
37
3. Main Function of PCB Program
3-1. LOAD SENSING
1) Water level-determining load sensing
1. When the standard, boiling and saving boiling courses are selected, load sensing is performed.
2. Prior to the washing cycle, sensing is performed on dry laundry.
3. After running the motor at 65 rpm, the rotation time for the drum is measured to determine the
amount of laundry.
2) Spin B load sensing
1. After the washing cycle is terminated, in the first medium spinning condition, sensing is performed
on wet laundry.
2. After running the motor at 65 rpm, the rotation time for the drum is measured to determine the
amount of laundry.
3. Depending on the measured amount of laundry, the unbalance reference value for Spin B in the main
spinning cycle and the medium spinning cycle is selected.
3) Load data
1. Water level-determining load data
A value to determine the water level for washing.
Laundry (dry)
Small (0 to 4kg)
Large (4kg or more)
Standard course (full detection L/S)
L/S valve
380 or less
380 or more
480 or more
Remark
2. Spin B laundry data
: Sensing data for selecting a reference value of unbalance in Spin B.
Laundry (dry)
0 ~ 1.4Kg
1.4 ~ 7Kg
7Kg
L/S valve
0 ~ 430
431 ~ 730
731 ~
38
Remark
3-2 Balanced spin
1) Motor operation in balanced spin cycles
- Spin sequence before changes
Program
change region
Ascending speed
repeated at 5.45 rpm
Laundry
pulling region
- +Spin sequence after
changes
Laundry
pulling region
1. Divide the laundry attachment region into two levels (35, 95rpm) and shift the ascending speed from 35 to 95 rpm
between 5 rpm and 45 rpm every second to improve the condition of laundry attachment.
2. The unbalanced load is detected twice at 95 rpm and once in the region ascending to 350 rpm and once at 350 rpm.
3. In case of turn back due to being unbalanced, you should return not to the beginning of the balanced spin sequence
but to the laundry pulling region.
4. The balanced spin time is set to 2 minutes. When 350 rpm is passed, it is reduced by two minutes.
39
2) Unbalanced reference value for balanced spins
Region
1st 95RPM UB
2nd 95RPM UB
350RPM increase UB
350RPM UB
Reference (LS measurement)
0 ~ 430
431 ~ 730
731 ~
0 ~ 430
431 ~ 730
731 ~
0 ~ 430
431 ~ 730
731 ~
0 ~ 430
431 ~ 730
731 ~
Unbalanced reference valve
Under 250
Under 250
Under 120
Under 250
Under 250
Under 120
Under 300
Under 250
Under 250
Under 300
Under 300
Under 300
Remark
1) If the pass criterion is not met, then it is moved to the laundry pulling region.
2) The final rpm is measured at 350 rpm as shown below. Target rpm
LS
340 under
340 over
350 RPM UB
200 ~ 25 over
20~25
20 under
200 over
200 under
reach available RPM
820RPM
950RPM
1030RPM
710RPM
820RPM
- Even if you select the strongest spin mode, as long as the LS value is greater than 340, it will only reach 820 rpm.
3) Organization of the balanced spin cycle
1. In the medium spin cycle, a max 20 times of balanced spin can be performed. If it fails to enter spin R after twenty
times of balanced spin, spin R is abandoned and it moves to the next cycle.
2. If it fails to enter spin R region after attempting 20 balanced spins in the main spin cycle, then controlled rinsing is
done once and spin B is performed twenty times.
3. If it fails to enter into spin R after 40 times of spin B including one time of controlled rinsing, the UE error message is
displayed.
4. Controlled rinsing follows the same sequence as the rinsing cycle in the standard course.
40
3-4 Constant Temperature Control
1) Constant temperature control is performed on the washing water supply only and for rinsing or drying, only cold water
v/v is used to supply water.
2) Supplied water level
Water level
classification
Overflow
Rinsing water level
Medium rinsing water level
Clean rinsing
Low (early)
Low (resupply)
Small (early)
Small (resupply)
SAFETY
RESET
Water level (mm)
265
225
255
240
235
195
195
168
135
90
Frequency (KHz)
22.6
23.18
22.61
22.96
23.2
23.75
23.75
24.05
24.55
25.2
1. Reset
: Water supply reference level. After reaching the reset water level, 30 minutes pass before the spin begins. The minimum
necessary water level required for operation of the heater.
2. Safety
The water level where the door can be opened. The door only opens when it is below the safety water level.
3. Small water level
: Water level corresponding to ‘small’ selected as the washing water level.
4. Low water level
Water level corresponding to ‘low’ selected as the washing water level.
5. Rinsing water level
: Water level for rinsing selected in all courses except hand cloths, stockings or lingerie.
6. Medium rinsing water level
: Water level for rinsing selected in the hand cloths, stockings or lingerie course.
7. Clean rinsing water level
: Water level when clean rinsing is selected.
8. Overflow water level
The water level where forceful discharge is deemed necessary because the water level is too high. When this level is
reached, the water supply is halted and then it is discharged until it reaches the reset water level.
41
3) Constant temperature control
To minimize the energy consumed by the heater and reduce the time required for washing, the cold water v/v and the hot
water v/v are properly controlled until the required water temperature is reached.
1. After operating the hot water v/v until it reaches the water level where it is possible to detect the water temperature, if it
fails to reach the target temperature, the hot water v/v will continue to operate. If the target temperature is met, then the
cold water v/v is operated.
2. Depending on whether the target temperature is reached, the cold and hot water v/v keeps turning on and off. In other
words, to prevent the water temperature from continuing to rise after reaching the target temperature, the hot water v/v
is turned off and the cold water v/v is turned on. As the cold water is supplied, the water temperature drops and when it
is 5 degrees below the target water temperature, then the hot water v/v is turned on and the cold water v/v is turned off
to raise the water temperature.
3. For the water supply cycle shown in 1 and 2, if the water level is met, then the water supply stops and it moves onto the
next washing cycle.
4. In the earlier stage, the hot water valve is used to supply water. If the hot water valve is closed or not connected then
there would be no difference in water level for 60 seconds. In this case, the constant water temperature control is
ignored and only cold water is supplied.
4) Constant temperature control valve operation algorithm
1. When 30 degrees is selected – target temperature of 35 degrees
30ûC
Cold water v/v:
35ûC
10 seconds
Hot water v/v:
2. When 40 degrees is selected – target temperature of 45 degrees
Cold water v/v Off
Hot water v/v On
40ûC
Cold water v/v:
10 seconds
Hot water v/v:
42
45ûC
Cold water v/v On
Hot water v/v Off
3. When 60 degrees is selected – target temperature of 65 degrees
25ûC
Cold water v/v:
30ûC
60ûC
65ûC
55ûC
90ûC
10 seconds
Hot water v/v:
4. When 95 degrees is selected – target temperature of 95 degrees
25ûC
Cold water v/v:
30ûC
50ûC
95ûC
10 seconds
Hot water v/v:
3-5 Door S/W
1) Door S/W operation
1. Door locking
Three seconds after the bimetal of the door S/W starts operating, a 20 msec duty cycle pulse is applied twice to the
solenoid until it is locked. The bimetal starts operating as soon as you press the power button.
2. Door unlocking
Turn off the bimetal of the door S/W and a 20 msec duty cycle pulse is applied twice to the solenoid until it is unlocked.
3. Door locking is required so that the motor and other electrical components can operate to maintain the normal cycles.
4. After the power button is pressed, if the washing water temperature sensor indicates a temperature higher than 61
degrees or the water level is above the safety level, the door is closed.
5. When the cycle is terminated, the door is opened immediately.
6. When the cycle is halted, the door is always opened if it is allowed to.
2) Door opening system
1. If laundry is added during washing or you want to open the door forcefully, then you can press the door closing cancel
button to open the door.
2. The door opening system using the door closing cancel button is for you to open the door forcefully when it is not in
the normal cancelation condition. There are some necessary sequences to satisfy the condition for opening the door.
43
Start/Hold
Door unlock button,
2sec ON
Water level is less than
safety level?
NO
Drainage
YES
Temperature is less
than 50℃?
NO
YES
DISPLAY
‘LOCK’ OFF
Door Open
44
Cold water
supply
3-6 Child lock
1. If you press the spin and condensing dry button at the same time while in the cycle, it will enter into the child lock
mode.
2. In the child lock mode, no buttons except the power button can operate.
3. In the child lock mode, ‘CHL’ indicates the fact that the child lock is on and ‘CHL’ and the remaining cycle time,
‘18:88’ are displayed in turns.
4. When you enter into child lock mode, press the water temperature button and the dry button at the same time to cancel
the lock.
3-7 Water discharge sequence
1. If the reset water level is reached within one minute after water discharge is started, then the standby time after reset is
30 seconds.
2. If the reset water level is reached more than one minute after water discharge starts, then the standby time after reset is
120 seconds.
3. If it fails to reach the reset water level for 10 minutes, ‘OE’ is displayed.
3-8 Detergent sensing
1. If no liquid detergent or softener is in the detergent container or detergent has been used less than twice, the sensor
determines that there is no detergent.
2. If makes such a decision, then the ‘No detergent’ or ‘No softener’ LED is on.
3. If it determines that there is no detergent in the early stage, then the ‘No detergent’ or ‘No softener’ LED will blink and
the buzzer sound will be heard.
4. If it determines that there is no detergent during the cycle, then the ‘No detergent’ or ‘No softener’ LED will be turned
on and the cycle will progress regardless.
5. If the liquid detergent is selected but no liquid detergent is detected in the early stage, the cycle can’t progress.
6. If the powder detergent is selected but no powder detergent is detected, then the ‘No detergent’ LED is not turned on
and there is no buzzer sound.
45
4. Test Mode
4-1 Load operation test mode
: You can easily check the operational status of each load and PCB assy.
1) How to enter
: Power S/W on -> While holding down the washing button, turn on the spin button three times -> The custom LED
window displays ‘Ld’. –> Each time you press the water temperature button, the load operates as follows.
MICOM version -> L C (lock close) _> run -> b1,b2,b3,b4,b5,b6,b7 -> F (fan motor) -> H (Hot v/v) ->C (Cold v/v) ->
P (Pre-washing v/v) -> d ( dry v/v) -> bb (bubble) ->L1 (Liquid detergent auto injection device’s sync motor) -> L2
(softener auto injection device’s sync motor) ->dr (water discharge sync motor) -> L O (Lock S/W open)
**Motor error related items
1. b1: Hole sensor signal not received
2. b2: IPM FAULT (overcurrent) error
3. b3: Motor start
4. b4: Motor align error (RPM not equal to zero one minute after the motor brake starts operating.)
5. b5: The difference between the target RPM and the current RPM is greater than 120 RPM.
6. b6: Overvoltage error (detects more than 450V)
7. b7: Undervoltage error (detects more than 140V)
2) Characteristics
1. All the electrical components can operate when MICOM successfully detects the closed door (LC, Lock Close) and the
custom LED’s Lock lamp is on.
It takes 0.5 to 1 seconds until the MICOM detects the closed door since it is actually closed.
2. While operating the load, it checks various sensors such as washing, drying temperature and water level. If any defect
is found, an error message is displayed.
3. The main BLDC motor is not inspected. To inspect the main motor, a spin or washing cycle should be selected.
4. If the water level sensor, main motor hall IC, drying temperature sensor or washing temperature sensor malfunctions,
an error message will be shown in test mode.
5. Motor operation is omitted. To check motor operation, you need to select a washing or spin cycle.
46
4-2 PCB inspection test mode
1) How to enter
: While holding down the washing/rinsing/spin button, turn on the power S/W. It will progress in the following sequence.
ALL LED On -> Spin button -> All LED Off - >L C (Lock Close) -> R (Motor right) -> L (Motor left) -> F (Fan
motor) ->H (hot v/v) -> C (cold v/v) ->P (pre-washing v/v) -> d (dry v/v) ->bb (bubble) -> h1 (washing heater) ->h2
(drying heater) ->dr (water discharge sync motor on) -> LO (lock S/W open)
2) Characteristics
1. Using all LED on/off, you can determine whether the display is erroneous or not.
2. While operating the load, it checks various sensors such as washing, drying temperature and water level. If any defect
is found, an error message is displayed.
4-3 Water level frequency check mode
1) How to enter and control
: Power S/W on -> while holding down the washing button, turn on the dry button three times.
1. In the 18:88 LED window, the current water level frequency is displayed initially.
: Only the three digits in 25.2 kHz are displayed.
262
2) Characteristics
1. As the initial frequency and the water level are changed, you can check the corresponding frequency.
2. When the water level sensor is normal, then the frequency varies depending on the amount of water.
47
4-4 Line test mode
: This is the main line set test mode.
1) How to enter
1. Water temperature button + power S/W on
: Washing and drying heater operate and fan motor operates.
H1 (drying heater on for two seconds) -> H1 off for one second -> H2 (washing heater on for two seconds) -> H2 off
for one second
The fan motor keeps operating since you have entered the test mode and until terminated.
2. Spin button + power S/W on
: All the load/sensor including the motor are tested.
L T (Left and right shifted motor operation) -> Spin button pressed once (H, C, d, P v/v operate)
->Spin button pressed once (water discharge sync motor on)
After discharging water, it runs at 95 rpm. It measures the unbalance valve and it spins at 750 rpm (unbalance reference
value of 100)
-> During tests, it keeps sensing whether the liquid detergent and the softener exist. If no detergent, then the ‘No
detergent’ and ‘No softener’ LED will be on and buzzer sounds will be heard.
Sensing
Detergent
sensing
Valve
operation display
Detergent
sync
motor
HCDP
Valve and sync motor operation status
L_t
L/R shifted motor operation
Dry button once
D_o
Liquid detergent and softener sync motor ON
H
Hot water valve on for two seconds
C
Cold water valve on for two seconds/hot water valve off
d
Drying water valve on for two seconds/hot water valve off
P
Pre-washing valve on for two seconds/drying valve off
d_c
Liquid detergent & softener sync motor OFF/pre-washing valve OFF
Spin button once
dr
Water discharge sync motor ON.
After discharging water, it runs at 95rpm. It measures the unbalance valve
and spins at 750 rpm.
48
4-5 Detergent injection control test mode
1) How to enter: Power ON -> While holding down the washing button, press the detergent selection button three times. ->
‘DEt’ displayed.
2) Pressing the rinsing button, 1, 2 and 1 will be displayed.
3) If you press the rinsing button, the above number is displayed. At this time, press the water temperature button to display
the current settings.
4) How to change the settings
- Up: Press the spin button to go up.
- Down: Press the reserve button to go down.
- Save after changes -> Press the operation button -> Auto power off and the value saved.
5) Set values
1. ‘1’: On time for the liquid detergent sync motor for washing.
- Default: 30
- Range: 20 to 50
- Unit: 5
2. ‘1’: On time for the liquid detergent sync motor for rinsing.
- Default: 40
- Range: 30 to 60
- Unit: 5
49
1. Viewing the EEPROM data
1) Method: Power on-> While holding down the washing button, press the water temperature button 10 times. -> EEP is
displayed.
2) Press the rinsing button. It will display 1, 2, 3, 4, 5, 6, 7, 8 and then 1 again.
3) If you press the rinsing button, the above numbers are displayed. At this time, press the water temperature button to
display the numbers below.
- A red figure is the current setting.
Displayed
number
1
2
3
4
5
6
7
8
Water temp button
pressed once
95#1 UB ref value
(LS: 0 to 350)
250
95#2 UB ref value
(LS: 0 to 350)
250
Inc. region UB ref
value
(LS: 0 to 350)
300
350rpm UB ref value
(LS: 0 to 350)
300
350rpm UB ref value
to reach 820rpm
(LS: 0 to 350)
200
LS ref value to
determine the
low/small water level
380
Water temp button
pressed twice
95#1 UB ref value
(LS: 351 to 650)
250
95#2 UB ref value
(LS: 351 to 650)
250
Inc. region UB ref
value
(LS: 351 to 650)
250
350rpm UB ref value
(LS: 351 to 650)
300
350rpm UB ref value
to reach 820rpm
(LS: 351 to 650)
25
UB ref value
depending on the
amount of laundry:
350
430
Fan duty
200
Washing heater off Steam resupply water
water level
level
Water temp button Water temp button Water temp button
pressed three times pressed four times
pressed five times
95#1 UB ref value
(LS: 651 or greater)
120
95#2 UB ref value
(LS: 651 or greater)
120
Inc. region UB ref
value
(LS: 651 or greater)
250
350rpm UB ref value
(LS: 651 or greater)
300
350rpm UB ref value
to reach 820rpm
(LS: 351 to 650)
20
UB ref value
LS ref value to output LS ref value to add
depending on the
1030rpm
one hour of washing
amount of laundry:
340
480
650
730
Steam 1st target
water level
4) How to change the setting
- Up: Press the spin button to go up.
- Down: Press the reserve button to go down.
-Save after changes -> Press the operation button -> Auto power off and the value saved.
50
5. Error reporting function
5-1. IE (Input Error) - Error in water supply
1) Conditions of Occurrence
① In case the designated water level is not reached in 5 minutes during water supply or re-supply
2) All LEDs are turned off and 'IE' blinks in18:88 display.
3) Error buzzer alarm is sounded for 10 seconds per every 10 minutes.
4) Error display is cleared when turning off/ on power.
5-2. OE (Output Error) - Error in drainage
1) Conditions of Occurrence
① In case water level does not reach reset point in 10 minutes after drainage starts
2) All LEDs are turned off and 'OE' blinks in 18:88 display.
3) Error buzzer alarm is sounded for 10 seconds per every 10 minutes.
4) Error display is cleared when turning off/ on power.
5-3. UE (Unbalance Error)
1) Conditions of Occurrence
① In case main spin-drying is not reached within 20 cycles of balance spin-drying
② In case balance spin-drying fails during interim spin-drying, UE occurs as the cycle moves to the next
process.
2) All LEDs are turned off and 'UE' blinks in 18:88 display.
3) Error buzzer alarm is sounded for 10 seconds per every 10 minutes.
4) Error mode is cleared by opening door and organizing the laundry in spin-dry chamber, closing door and
pressing start/ temporary stop button. Then, spin-drying begins again.
51
5-4. LE (Lock Error) - Door opening error
1) Conditions of Occurrence
① When intending to begin cycle by pressing start/ temporary stop button while door is opened
2) All LEDs are turned off and 'LE' blinks in 18:88 display.
3) Error buzzer alarm is sounded for 10 seconds per every 10 minutes.
4) Error display is cleared when turning off/ on power.
5-5. E1 - Water level detection error
1) Conditions of Occurrence
① In case water level is below reset or overflow is detected in line test mode
2) Water supply motor is kept on until water level falls below reset.
3) All LEDs are turned off and 'E1' blinks in 18:88 display.
4) Error buzzer alarm is sounded for 10 seconds per every 10 minutes.
5) Error display is cleared when turning off/ on power.
5-6. E2 - Overflow error
1) Conditions of Occurrence
① In case water level in water tank is above overflow level due to continuous operation of water supply
valve
2) Water supply motor is kept on until water level falls below reset.
3) All LEDs are turned off and 'E2' blinks in 18:88 display.
4) Error buzzer alarm is sounded for 10 seconds per every 10 minutes.
5) Error display is cleared when turning off/ on power.
52
5-7. E4 - Water leakage during washing
1) Conditions of Occurrence
① In case water level falls below re-supply even after 15 times of re-supply prior to finishing of water
heating
2) All LEDs are turned off and 'E4' blinks in 18:88 display.
3) Error buzzer alarm is sounded for 10 seconds per every 10 minutes.
4) Error display is cleared when turning off/ on power.
5-8. E9 - Abnormalities in water level sensor
1) Conditions of Occurrence
① In case water level frequency is of 15KHz or lower and 30KHz or higher during cycle due to
abnormalities in water level sensor, etc.
2) All LEDs are turned off and 'E9' blinks in 18:88 display.
3) Error buzzer alarm is sounded for 10 seconds per every 10 minutes.
4) Error display is cleared when turning off/ on power.
53
5-9. Motor-related Error
1) E5 (DC-Link High Voltage) Error
① In case DC-link voltage to IPM increases to 450V or higher
② Motor operation is stopped and 'E5' is shown in display window.
③ Error buzzer alarm is sounded for 10 seconds per every 10 minutes.
④ Error display is cleared when turning off/ on power.
2) E6 (EMG) Error
① In case current detected with EMG port is of 20A or higher
② Motor operation is stopped and 'E6' is shown in display window.
③ Error buzzer alarm is sounded for 10 seconds per every 10 minutes.
④ Error display is cleared when turning off/ on power.
3) E7 (Direction) Error
① In case signal of Hall IC is different from the predicted signal according to direction of rotation
② Motor operation is stopped and 'E7' is shown in display window.
③ Error buzzer alarm is sounded for 10 seconds per every 10 minutes.
④ Error display is cleared when turning off/ on power.
4) E8 (Initial Operation Fail) Error
① In case input signal of Hall IC is abnormal due to problems in motor connection, etc.
② Motor operation is stopped and 'E8' is shown in display window.
③ Error buzzer alarm is sounded for 10 seconds per every 10 minutes.
④ Error display is cleared when turning off/ on power.
5-10. Error in Temperature Sensor
1) H2 Error - Washing temperature sensor open/ short
① In case washing temperature sensor is defective or not connected
② Error buzzer alarm is sounded for 10 seconds per every 10 minutes.
③ Error display is cleared when turning off/ on power.
2) H4 Error - Washing temperature sensor overheating
① In case temperature detected by washing temperature sensor is 95ûC or higher
② Error buzzer alarm is sounded for 10 seconds per every 10 minutes.
③ Error display is cleared when turning off/ on power.
54
3) H5 Error - Water temperature error in wool/ delicate course
① In case water temperature in wool/ delicate course is 45ûC or higher
② Error buzzer alarm is sounded for 10 seconds per every 10 minutes.
③ Error display is cleared when turning off/ on power.
4) H6 Error - Abnormality in washing heater
① Within 15 minutes after heater operation begins;
In case standard temperature is of 42ûC or lower: If temperature does not increase by 2ûC or more In
case standard temperature is higher than 42ûC: If temperature does not increase by1ûC or more
② If temperature falls below standard temperature by 2ûC or more due to re-supply of water, etc.,
standard temperature is reset as the current temperature and error check time of15 minutes is reset.
③ Error buzzer alarm is sounded for 10 seconds per every 10 minutes.
④ Error display is cleared when turning off/ on power.
5) H8 Error - Washing heater overheating
① In case washing heater temperature increases by 5ûC or more within 30 seconds when there is no
water in tank, etc.
② Error buzzer alarm is sounded for 10 seconds per every 10 minutes.
③ Error display is cleared when turning off/ on power.
55
7. ELECTRONIC FIELD PARTS LIST AND SPECIFICATION
1. PCB PIN
Relay (S/W)
Relay
(Heater S/W)
세탁전용일 경우 삭제됨.
WF05: REACTOR
iGBT
Capacitor
56
2. VALVE INLET
Classification
3-hole Valve and Hot Water Valve
Code
3-hole: 3615415070, 3615415050, Hot Water: 3615415700, 3615414800
Color
Gray
Coil Resistance
4320 ~ 5280 Ω
Use
Supplying water for washing/ pre-washing and bleach
Appearance
Washing Water Input
Valve
Structure
Rre-washing Water
Input Valve
Hot Water Input Valve
M4×4
: CABINET 4
Bleach Input
Valve
Symptoms of
Breakdown
Water not
supplied
Detailed
Symptoms
Cause
Diagnosis of Defect
Water supply not Water tap not opened
carried, only noise Coil short
is heard
Water supply not
carried out without
noise
Check for tap opening.
Check if resistance between water supply valve terminals is
within 4320~5280Ω.
Excessive foreign
Remove water supply hose and check for foreign substances in
substances in SUS filter filter.
Foreign substances in valve
Connector loosened
Visually check connector connection status.
Coil short
Check if resistance between water supply valve terminals is
within 4320~5280Ω.
Wiring short
Wiring short -> Conduction test
Defect in water level
Refer to water level sensor defect check method.
sensor
Defect in pressure hose Check for blocking of holes in pressure hose.
Defect in water supply valve
Water is
Continuous water
continuously supply in power
supplied
'on' state
(inside tub)
Continuous water
supply in power 'off'
state
Defect in water supply
Others
Water leakage
through sides
valve assembly, etc.
Floater restraint, loosening -> S/W not working
Check for leakage through the sides of water supply valve.
57
Solution
PCB Error
Mode
Open water tap.
"IE"
"IE"
Clean out foreign substances
from inside the filter.
Replace water supply
valve.
Administer re-insertion.
Replace water supply
valve.
"IE"
Replace water level
sensor.
Replace defect parts.
Replace water supply
valve.
Replace water supply
valve.
"IE"
"IE"
"IE"
"IE"
"E2"
"E2"
-
-
Water supply not
carried out (IE)
Defect in
Water
Supply
Continuous water
supply (IE)
• Suspension of water supply
• Tap frozen
• Tap closed
• Hot & cold water hose switched for connection
• Low water pressure (0.2kgf/cm or less)
• Blocking of water supply valve filter by foreign substances
• Defect in cold & hot water valve
• Defect in connection of water supply terminal (not connected)
• Defect in pressure switch
• Defect in water supply relay drive circuit
• Defect in PCB
• Water supply relay open
• Defect in water supply valve
• Leakage in air hose (air leakage from pressure switch hose)
• Air trip blocked, damaged
• Defect in pressure switch
• Defect in drainage valve: Continuous water supply
• Blocking by foreign substances in drainage bellows
• Defect in PCB
• Water supply relay short
Immediate water
supply when power
is turned on
• Defect in PCB
Water supply
continued when
power is turned off
• Defect in water supply valve
58
• Water supply relay short
Symptoms of Inspection
Spot
Breakdown
Water
supply not
carried out
Inspection Method
Inspection Result
Problem Identified
1) Suspension of water supply
2) Water tap locked
3) Cold-hot water hose incorrectly
- Cold/ hot water hose switched -Defect in cold/ hot water
connected
-Large amount of rust, sand and hose assembly
4) If no defect is found, dismantle water dust, etc.
-Defect in cleaning of water
supply hose and check water supply
supply filter (blocked)
valve filter.
Water 1) Measure coil resistance in water
supply valve supply valve.
2) Remove top cover and visually
check for separation of water supply
valve terminal connector and wiring
short/ connection status.
3) In case water valve operation sound
is heard, but water supply is not
carried out, check for blocking of
water supply valve or restraint on
plunger.
Pressure 1) Check for ‘E9’ in display window.
Switch
Repair Method
-Assemble cold/ hot
water hose correctly.
-Clean water supply filter.
-Replace water supply
valve.
-Try reconnection or
remove elements of
connection defect.
-5.3kW or higher
-Coil short
-Connector loosened/ not
inserted
-Connection defect
-Electric wire short
-Sound and defect in water
supply due to foreign
substances in bellows
-Electric wire short
-Structural defect in water
supply valve
-Try reconnection or
remove elements of
connection defect.
-Replace water supply
valve.
-E9
-Loosening of pressure S/W
terminal or electric wire
short
-Defect in pressure S/W
-Connect terminal of
pressure S/W.
-Connect terminal of
PCB.
-Replace pressure S/W.
Water
supply not
carried out
PCB
1. Check PCB pin connector insertion
status.
2. Power is supplied to water supply
valve terminal, but water supply is
not administered.
Electric wire easily loosened
when tugged
PCB water supply circuit open,
damaged (water supply relay
operation not carried out)
Pin connector housing not
inserted
Defect in water supply circuit
Completely insert
connector housing.
Replace PCB.
Continuous
water supply
PCB
1. Immediate supply when power is
turned on
PCB water supply circuit or
relay short (continuous
conduction to valve)
Water supply relay short
Replace PCB.
Defect in water supply valve
Replace water supply
valve.
Water 1. Check if water supply is continuously Water supply bellows
supply valve carried out even if power is not on. blocked/ deformed
Drainage 1. Check for normal operation of water -Not closed due to foreign
-Foreign substances in valve -Remove foreign
drive motor
supply valve/ water supply status.
substances.
housing
substances inside drainage
(valve 2. Check if water is drained through
-Remove foreign
-Foreign substances
housing
housing)
drainage hose.
substance.
-Defect in drive motor
-Wire caught by foreign
3. Check for foreign substances inside
-Replace drive motor.
restoration
substances outside drive
valve housing.
motor
4. Check for foreign substances in drive -Forced restoration not possible
motor wire.
5. Forcefully restore SUS wire.
59
3. Water Level Sensor
1) Spec. of Water Level Sensor
(kHz)
HEATER SAFETY
24.55
STEAM
24.736
O/F: Forced drainage is
necessary as water
level is high. When
this level is reached,
water supply must be
stopped and drainage
must be forcefully
administered.
RESET
25.2
LOW
23.2
RESET :
MID
23.75
RINSE
23.18
ADD WATER OVERFLOW
22.96
22.6
Low: Small load of laundry, therefore considered to
be water level of 'low'
1. Spin-drying begins
30sec after drainage
level reset is reached.
Medium: Large load of laundry
Medium High: Water level for rinsing
2. Heater operation level
Safety: Door open possible
Door opened only when water level is below
safety level
2) Breakdown Analysis
Symptoms
Detailed Symptoms
Cause
Diagnosis
Solution
PCB Error
Mode
Continuous Water valve normal
water
supply
"E9"
Occurrence in water level
sensor
30kHz or higher
Defect in pressure sensor
hose
Check for holes.
Replace hose.
"E2"
Blocking of pressure sensor
hose
Visual checking
Remove foreign substances.
"E2"
Connector loosened
Visually check connector
connection status.
Administer re-insertion.
"E9"
Wiring short
Wiring short ->
conduction test
60
"E9"
4. POWER CORD
1) Specificafion
Classification
Rated
Cord Thickness
Color
DEC
250V/15A
1.5sq
Gray
DEC
125V/13A
1.5sq
DEC
250V/16A
DEC
125V/15A
Code
Type
Length
Remarks
3611339340 LP-31 SJT
2.3m
-
Gray
3611340410
UL.SJT
2.3m
-
1.5sq
Gray
3611339930
EU-2P
2.3m
-
2.0sq
Gray
3611339810
BSMI
2.3m
-
2) Assembly
4 embossed parts in cabinet
-> To prevent loosening after assembly
-> SS: 2 special screws
-> LG: Forced indentation
[Before]
[After]
. CONNECTOR
-> #1806 Housing 3P Used: Using both ends only and not the hole in the middle (materials highly
resistant to flame)
-> To prevent fire caused by high current
61
5. DOOR LOCK SWITCH
PART CODE
DESCRIPTION
3619047200
DOOR LOCK DL-S1 250V PTC-SOLENOID TYPE
3619041210
DOOR LOCK DL-S1 125V L6A BITRON
1) DOOR LOCK S/W
62
4) Diagnosis of Defect
Symptoms Detailed Symptoms
Cause
Diagnosis of Defect
Solution
Ticking
noise
Tick' during initial
operation and 'tick-tick'
during temoprary
suspension: 'DF' type
only
Normal noise
Normal sound generated during solenoid operation when
'sliding CAM' is locked/ unlocked to close or open door.
LE'
Continuous occurrence
of 'tick' noise
and 'LE': 'DF' type only
Connector loosened
Visually checking connector connection
status
1. 'LE' occurrence
without 'tick' noise in
'DF' type
Door does
not open.
Error
Mode
–
Insert connector.
"LE"
Terminal loosened from Referring to door lock S/W dismantling
connector
and checking methods below
Insert connector.
S/W 4 or 5 terminal
"LE"
Door not completed
closed
-
Completely close
door.
"LE"
Abnormality in hook of
door
-
Replace door AS.
"LE"
Defect in catch CAM
operation
Occurrence of continuous 'tick' noise
unlike normal sound
Replace door S/W.
"LE"
Connector loosened
Visually checking connector connection
status
Insert connector.
"LE"
Terminal loosened from Referring to door lock S/W dismantling
connector
and checking methods below
Insert terminal. S/W
2 or 3 terminal
"LE"
Breaking of solenoid coil
Replace door S/W.
"LE"
Referring to picture below
Power failure, forced
power off during
operation
PCB MICOM' cannot open door in case of power failure or forced power S/W off during operation.
Door can be opened in the max. of 5min.
No power failure and
power on
Water in drum
Checking if water level is higher than
safety level
Inside the drum hot
Prevention of door opening to prevent burn caused by hot laundry after
drying
Others
Door opens after
drainage.
–
Door does not open normally in case of loosening of connector/ terminal and breaking of solenoid
coil during operation. Administer measures after test according to the following method.
63
1. Heater
1) Spec of Heater of Washing Machine
E
C
G
Classification
D
B
A
I
J
F
64
H
Parts name
A
DUCT COVER
B
FAN MOTOR
C
HEATER DRY
D
DUCT B LOWER
E
VALVE INLET(DRY)
F
THERMOSTAT
G
THERMISTOR
H
DUCT B UPPER
I
FAN AS
J
FUSE TEMPERATURE
2) Dry Function Diagram
T : Thermistor
(CONTROL
HEATER’S
TEMPERATURE )
DRY DUCT
HEATER
T
FAN MOTOR
WATER SUPPLY
CONDENSING
DUCT
DRUM
DRAIN
HOUSING
While rotating DRUM, DRY HEATER applice heat to air and FAN blows it into DRUM evaporating water in the laundry.
• Evaporated water is sucked into CONDENSING DUCT, and condensed in DUCT contacting WATER SUPPLY (condensed
water is extracted through DRAIN HOUSING).
• Dry function is performed by continuous repetition of evaporating and condensing circulation as above.
3) Temp- Time Graph During Dry Cycle
DRYING PROCESS
ZONE
건조진행구간
TEMP.
온도
INSIDE
DRUM
TEMPERATURE OF
내부온도
PRE예열
HEATING
구간
TIME
시간
65
4) Dry Course
COURSE
LOW TEMP.
IRON
DRY COURSE
Heater control temperature is 60°C On/70°C Off
Drying Time is 110min according to Load Sensing Data
Heater control temperature is 95°C On/105°C Off, with good condition for ironing
Drying Time is 60min according to Load Sensing Data
Cupboard
Heater control temperature is 95°C On/105°C Off, drying time is 150 min
STRONG
Heater control temperature is 95°C On/105°C Off, drying time is 200 min
SELECTING TIME
Heater control temperature is 95°C On/105°C Off, customer can select the drying time
out of 1:00, 1:30, 2:00
In order to check the drying temperature during process going on : --> press the "DRY" button, the display shows as
below.
UPPER LED:
Temperature for DRY
REMAIN TIME
남은시간
The current temperature is 98℃
분
LOWER LED:
Temperature for WASH
66
5) TROUBLE SHOOTING OF DRY SYSTEM
✦ HEATER DRY
Function : heating the air during dry
• FAILURE MODE : * "H7" - The air cannot be heated to 10°C during 2 min.
• CHECKING METHOD : * Check the resistance of heater coil and replace with new one.
✦ Thermistor
Function : sensing the air temperature.
• FAILURE MODE : * The air cannot be heated even though water is supplied.
* "H1" - shot or cut-off
* "H3" - air temp. is reached over 150°C
• CHECKING METHOD : * Check the resistance of thermistor, replace with new one.
✦ FUSE TEMPERATURE
function : protecting from the fire hazard or overheating, if the temp., rises over 128°C, power supply will be cut-off.
• Pictures
FIXED BY
WASHER
+SCREW
• FAILURE MODE : Dry is not performed.
• CHECKING METHOD : Check if fuse is short, and replace with new one.
67
✦ SWITCH THERMOSTAT(BIMETAL)
function : control the duct temperature, if the temp reached over 150°C, all power supply will be cut. and if the temp go
down 120°C the power will be ON.
protecting overheating by cutting off heater power supply if the temperature rises over 150°C, and reoperating
heater by connecting heater power supply if the temperature falls under 120°C.
• OPERATING TEMPERATURE
• PICTURE
OPEN TEMPERATURE(OFF)
150°C ± 5°C
CLOSE TEMPERATURE(ON)
120°C ± 5°C
✦ UNIT FAN MOTOR
function : circulating the inside air during dry process.
• SPEC
• PICTURE
ITEMS
SPEC
RATING VOLTAGE
24V
RPM
MOTOR
3700 ± 10%
DUCT FAN AS
1900 ± 10%
ROTAING DIRECTION
CW
• FAILURE MODE : * E3 shown : FAN MOTOR cannot work.
• CHECKING METHOD : Check the FAN MOTOR is short, and replace with new one.
68
6) LACK OF DRY PERFORMANCE
• Situation : after drying, the clothes still get wet.
cause)
☞ The laurdry amount is more than the recommendation capacity 7.0kg.
☞ Condensing cold water is not supplied.
☞ Clogging Bellows Duct results in poor air circulation.
checking method)
part name
checking point
checking results
BELLOWS
DUCT
VALVE INLET
CONDENSING
HOSE
repair method
clogging
bellows duct
heater was
overheated
owing to poor air
circulation
no water supply
from inlet valve
VALVE INLET
connect normally
connector slipped
out
BELLOW
DUCT
VALVE INLET
+Condensing
HOSE
jurge
VALVE INLET
broken
clean the bellow
duct
replace valve inlet
ill-connection of
connect normally
condensing hose to
duct pipe
• Situation after drying, the clothes was soaked and hot.
cause)
☞ The dry is done from bad spin performance because of unbalance.
☞ no spin was done before the dry had started.
• Situation : PCB shows "H1" or "H3".
cause)
☞ Thermistor is broken.
☞ Thermistor is short or cut-off.
countermeasures)
☞ replace the Thermistor.
69
• Situation : PCB shows "H7".
cause)
☛ Dry heater is cut-off.
☛ Fuse temp. is cut-off.
repaire method)
☛ replace the Dry heater.
☛ replace the Fuse temp.
checking point
FUSE
TEMPERATURE
part name
checking results
HEATER
dry Heater is short or cut-off.
replace the
dry Heater.
SENSOR TEMP. Thermistor is short or cut-off.
replace the
Thermistor.
FUSE TEMP.
FUSE TEMPERATURE is cut-off.
HEATER DRY
THERMISTOR
70
repaire method
replace the
FUSE
TEMPERATURE.
• situation : PCB shows "E3".
☞ FAN MOTOR can not work.
☞ Replace the Fan Motor.
cause)
countermeasures)
part name
checking results
repair method
FAN MOTOR
fan motor failure
replace
fan motor
disassemble process of Fan Motor
1 Disassemble Duct Cover As from Duct B As
(Screw 4EA)
DUCT COVER
AS
2 Disassemble FAN AS From Duct Cover As
(Fixed by 8mm NUT)
Fixed By 8mm NUT
3 Disassemble the FAN MOTOR(SCREW 3EA)
Remarks) control times of each parts during dry process
parts
Control time
MOTOR
15 sec On, 5sec Off
DRAIN MOTOR
Continous working
FAN MOTOR
Continous working
DRY HEATER
95°C On, 105°C Off
INLET VALVE
30sec On, 5sec Off
71
Washing Heater Temp. Sensor Table
TEMP
℃
-40
-39
-38
-37
-36
-35
-34
-33
-32
-31
-30
-29
-28
-27
-26
-25
-24
-23
-22
-21
-20
-19
-18
-17
-16
-15
-14
-13
-12
-11
-10
-9
-8
-7
-6
-5
-4
-3
-2
-1
R25 : 11.981KΩ ± 4.04%
R80 : 1.704KΩ ± 3%
B25/100 : 3760K ± 1%
MIN NORMAL MAX TEMP MIN NORMAL MAX TEMP MIN NORMAL MAX TEMP MIN NORMAL MAX
KΩ
KΩ
KΩ
℃
KΩ
KΩ
KΩ
℃
KΩ
KΩ
KΩ
℃
KΩ
KΩ
KΩ
282.914 298.650314.387 0
34.352 35.975 37.599 40
6.403 6.653 6.903 81
1.603 1.653 1.703
266.642 281.416296.191 1
32.776 34.318 35.861 41
6.169 6.409 6.648 82
1.555 1.603 1.652
251.432 265.311279.190 2
31.284 32.749 34.214 42
5.946 6.176 6.405 83
1.508 1.556 1.603
237.208 250.252263.296 3
29.869 31.262 32.655 43
5.732 5.952 6.172 84
1.463 1.510 1.556
223.900 236.165248.430 4
28.528 29.852 31.177 44
5.527 5.738 5.949 85
1.419 1.464 1.509
211.440 222.978234.516 5
27.256 28.516 29.776 45
5.320 5.523 5.725 86
1.377 1.421 1.465
199.683 210.537221.392 6
26.044 27.242 28.440 46
5.131 5.325 5.518 87
1.336 1.379 1.422
188.669 198.885209.101 7
24.893 26.033 27.174 47
4.949 5.135 5.321 88
1.297 1.339 1.381
178.347 187.967197.587 8
23.801 24.887 25.972 48
4.774 4.953 5.131 89
1.259 1.300 1.342
168.668 177.731186.793 9
22.764 23.798 24.831 49
4.607 4.778 4.950 90
1.222 1.262 1.302
159.588 168.129176.670 10 21.780 22.764 23.748 50
4.443 4.608 4.772 91
1.186 1.226 1.265
150.999 159.049167.099 11 20.836 21.773 22.710 51
4.289 4.447 4.605 92
1.152 1.191 1.229
142.937 150.527158.117 12 19.939 20.832 21.725 52
4.141 4.292 4.444 93
1.119 1.157 1.194
135.366 142.526149.685 13 19.087 19.938 20.788 53
3.999 4.144 4.290 94
1.087 1.124 1.161
128.253 135.009141.766 14 18.277 19.088 19.899 54
3.862 4.002 4.142 95
1.057 1.093 1.129
121.566 127.945134.324 15 17.506 18.279 19.052 55
3.722 3.856 3.990 96
1.027 1.063 1.098
115.230 121.252127.274 16 16.770 17.507 18.244 56
3.595 3.723 3.852 97
0.999 1.033 1.067
109.271 114.959120.647 17 16.069 16.772 17.475 57
3.473 3.596 3.720 98
0.971 1.005 1.038
103.665 109.039114.413 18 15.402 16.072 16.743 58
3.355 3.474 3.593 99
0.944 0.977 1.010
98.387 103.467108.547 19 14.767 15.407 16.046 59
3.243 3.357 3.471 100 0.918 0.950 0.982
93.416 98.220 103.024 20 14.162 14.773 15.383 60
3.133 3.243 3.353 101 0.893 0.924 0.955
88.603 93.141 97.679 21 13.576 14.158 14.741 61
3.029 3.135 3.240 102 0.868 0.899 0.930
84.072 88.361 92.649 22 13.018 13.574 14.130 62
2.929 3.030 3.132 103 0.845 0.875 0.905
79.806 83.860 87.914 23 12.486 13.017 13.548 63
2.833 2.930 3.028 104 0.822 0.851 0.881
75.788 79.622 83.456 24 11.980 12.487 12.993 64
2.740 2.834 2.928 105 0.799 0.827 0.856
72.000 75.628 79.255 25 11.497 11.981 12.465 65
2.654 2.744 2.835 106 0.777 0.805 0.833
68.408 71.840 75.272 26 11.037 11.499 11.962 66
2.569 2.656 2.743 107 0.756 0.784 0.811
65.021 68.270 71.518 27 10.598 11.040 11.482 67
2.487 2.571 2.654 108 0.736 0.763 0.790
61.825 64.902 67.978 28 10.179 10.601 11.024 68
2.408 2.489 2.569 109 0.716 0.743 0.769
58.810 61.724 64.637 29
9.780 10.183 10.587 69
2.333 2.410 2.487 110 0.697 0.723 0.749
55.963 58.724 61.485 30
9.400 9.786 10.172 70
2.258 2.332 2.407 111 0.679 0.704 0.729
53.214 55.829 58.443 31
9.036 9.405 9.775 71
2.187 2.259 2.331 112 0.661 0.686 0.710
50.620 53.097 55.573 32
8.688 9.042 9.395 72
2.119 2.188 2.257 113 0.644 0.668 0.692
48.171 50.517 52.864 33
8.356 8.695 9.033 73
2.054 2.120 2.187 114 0.627 0.651 0.674
45.857 48.081 50.305 34
8.039 8.363 8.686 74
1.991 2.055 2.119 115 0.610 0.634 0.657
43.670 45.779 47.889 35
7.737 8.047 8.357 75
1.928 1.990 2.051 116 0.595 0.617 0.640
41.594 43.594 45.594 36
7.448 7.744 8.041 76
1.869 1.928 1.988 117 0.579 0.602 0.624
39.630 41.528 43.425 37
7.170 7.455 7.739 77
1.812 1.869 1.927 118 0.565 0.586 0.608
37.773 39.574 41.375 38
6.905 7.178 7.450 78
1.758 1.813 1.868 119 0.550 0.572 0.593
36.016 37.725 39.435 39
6.652 6.912 7.173 79
1.705 1.758 1.811 120 0.536 0.557 0.578
72
R40 : 26.065KΩ ± 3%
R100 : 3.3KΩ ± 11.1%
B40/100 : 4025K ± 2%
Day Heater Temp. Sensor Table
T(℃)
0
1
2
3
4
5
6
7
8
9
10
11
12
13
14
15
16
17
18
19
20
21
22
23
24
25
26
27
28
29
30
31
32
33
34
35
36
37
38
39
40
41
42
43
44
45
46
47
48
49
50
51
52
53
54
55
Rmin
142.55
135.55
128.93
122.68
116.76
111.17
105.87
100.86
96.12
91.62
87.37
83.33
79.51
75.88
72.44
69.17
66.07
63.13
60.34
57.68
55.16
52.76
50.48
48.31
46.25
44.28
42.41
40.63
38.94
37.32
35.78
34.31
32.91
31.58
30.31
29.09
27.93
26.83
25.77
24.76
23.80
22.87
21.99
21.15
20.34
19.57
18.84
18.13
17.46
16.81
16.19
15.60
15.03
14.48
13.96
13.46
Rcent
162.21
154.09
146.41
139.17
132.32
125.86
119.74
113.96
108.50
103.32
98.43
93.79
89.40
85.24
81.30
77.56
74.01
70.65
67.46
64.43
61.56
58.83
56.24
53.77
51.43
49.20
47.08
45.07
43.15
41.32
39.58
37.93
36.35
34.85
33.41
32.05
30.75
29.50
28.32
27.19
26.11
25.07
24.09
23.15
22.25
21.39
20.57
19.78
19.03
18.31
17.62
16.96
16.33
15.73
15.15
14.60
Rmax
184.12
174.72
165.85
157.48
149.59
142.13
135.09
128.45
122.16
116.22
110.61
105.30
100.27
95.51
91.01
86.74
82.70
78.87
75.24
71.80
68.53
65.43
62.49
59.70
57.05
54.53
52.13
49.86
47.69
45.64
43.68
41.82
40.04
38.36
36.75
35.22
33.76
32.37
31.04
29.77
28.57
27.42
26.32
25.27
24.27
23.31
22.40
21.53
20.69
19.90
19.13
18.40
17.71
17.04
16.40
15.79
T(℃)
56
57
58
59
60
61
62
63
64
65
66
67
68
69
70
71
72
73
74
75
76
77
78
79
80
81
82
83
84
85
86
87
88
89
90
91
92
93
94
95
96
97
98
99
100
101
102
103
104
105
106
107
108
109
110
111
Rmin
12.980
12.520
12.078
11.655
11.248
10.857
10.483
10.123
9.777
9.445
9.125
8.818
8.524
8.240
7.967
7.705
7.452
7.210
6.976
6.751
6.534
6.326
6.125
5.931
5.745
5.565
5.392
5.225
5.064
4.909
4.759
4.615
4.476
4.341
4.212
4.086
3.965
3.849
3.736
3.627
3.522
3.420
3.322
3.227
3.135
3.043
2.954
2.867
2.784
2.704
2.626
2.551
2.478
2.408
2.340
2.274
Rcent
14.066
13.557
13.069
12.601
12.153
11.722
11.309
10.913
10.533
10.168
9.817
9.481
9.157
8.846
8.548
8.261
7.985
7.719
7.464
7.218
6.982
6.755
6.536
6.325
6.123
5.927
5.739
5.558
5.383
5.215
5.053
4.896
4.746
4.600
4.460
4.325
4.194
4.068
3.947
3.829
3.716
3.606
3.501
3.399
3.300
3.205
3.113
3.024
2.937
2.854
2.774
2.696
2.621
2.548
2.477
2.409
73
Rmax
15.203
14.643
14.105
13.591
13.097
12.624
12.171
11.736
11.319
10.919
10.535
10.167
9.813
9.474
9.148
8.834
8.533
8.244
7.966
7.699
7.442
7.195
6.957
6.729
6.509
6.297
6.093
5.897
5.708
5.526
5.351
5.182
5.019
4.862
4.711
4.566
4.425
4.289
4.159
4.033
3.911
3.793
3.680
3.571
3.465
3.367
3.272
3.180
3.092
3.006
2.923
2.842
2.764
2.689
2.616
2.546
T(℃)
112
113
114
115
116
117
118
119
120
121
122
123
124
125
126
127
128
129
130
131
132
133
134
135
136
137
138
139
140
141
142
143
144
145
146
147
148
149
150
Rmin
2.211
2.149
2.090
2.032
1.977
1.923
1.870
1.820
1.771
1.723
1.678
1.633
1.590
1.548
1.508
1.468
1.430
1.393
1.357
1.323
1.289
1.256
1.225
1.194
1.164
1.135
1.107
1.080
1.053
1.027
1.002
0.978
0.954
0.931
0.909
0.887
0.866
0.846
0.826
Rcent
2.343
2.279
2.217
2.158
2.100
2.043
1.989
1.936
1.885
1.836
1.788
1.741
1.696
1.652
1.610
1.569
1.529
1.490
1.453
1.416
1.381
1.346
1.313
1.281
1.249
1.219
1.189
1.160
1.132
1.105
1.079
1.053
1.028
1.004
0.980
0.958
0.935
0.914
0.893
Rmax
2.477
2.411
2.347
2.285
2.225
2.166
2.110
2.055
2.002
1.950
1.900
1.852
1.805
1.759
1.715
1.672
1.630
1.590
1.550
1.512
1.475
1.439
1.404
1.370
1.337
1.305
1.274
1.244
1.215
1.186
1.158
1.131
1.105
1.080
1.055
1.031
1.007
0.984
0.962
7. HEATER
1) Spec of Heater of Washing Machine
WASH
MAKER
IRCA
IRCA
IRCA
IRCA
RATED
220V
230V
130V
110V
2000W
2000W
1000W
1000W
3612802400
3612802410
3612802440
3612802430
CONSUMPTION POWER
PART CODE
DRYER
MAKER
IRCA
IRCA
IRCA
IRCA
RATED
220V
230V
120V
110V
2100W
2100W
1200W
1200W
3612800900
3612801400
3612802100
3612801300
CONSUMPTION POWER
PART CODE
Temp. Fuse of Washing Heater (184°C CUT OFF TYPE)
: Located inside heater to prevent fire, etc. caused by heating without water due to breakdown of water
level sensor, etc.
: Cut-off in app. 1min in case of overheating, heater temp. of app. 270°C
: Washing heater must be used under water.
※Wash Heater
※Day Heater
Drying Temp.
Sensor
Washing
Temp. Sensor
Dry Heater
Wash Heater
74
2) Breakdown Diagnosis
Breakdown
Symptoms
Solution
PCB
Error Mode
Check for short
Connect the cut-off part.
"H6"
Check for short: Normal if 23.3~25.7ohm between both
terminals of washing heater
Replace washing
heater.
"H6"
Connector/ terminal
loosening
Check for loosening: Common for drum
Insert terminal.
"H6"
Defect in washing
heater temp. sensor
Measuring resistance between both terminals of sensor: Replace temp. sensor.
"H2"
Overheating of Defect in washing
washing water heater temp. sensor
Measuring resistance between both terminals of sensor: Replace temp. sensor.
"H2" or "H4"
Cause
Washing
Wiring short
water
not heated
(common for Washing heater or
drum)
temp. fuse short
Diagnosis
Heater Replacement
* How to Replace Washing Heater and Temp. Sensor
1. Dismantling Connector
2. Loosening Earth and Heater Nuts
3. Replacing Heater and Temp. Sensor
4. Administer assembly in reverse order and make sure to fasten heater nuts first before the earth nuts.
75
7. HEATER
1) Structure of BLDC Motor
BLDC MOTOR
2) Power Transmission System of BLDC Motor
76
3) Specification
Classification
1. General
2. Performance
3. Structure
Item
BLDC : DD Motor
Rated Voltage
Vm = 310 [Vdc], Hall IC Voltage 5 [Vdc]
Insulating Structure
Type B, insulator method
External Appearance
Shaft connection and stator connection
structure, Air-gap : 1mm
No. of Poles
24 poles, Core: 36 slots, Layer: [30mm]
Consumption Power
390[W]±10[%], during washing
(picked value)
RPM
During Washing: 45RPM,
During Spin-drying:1300RPM
Output
Characteristics
Torque: 300Kgf.cm (washing: 45rpm)
Current: 1.5A (washing: 45rpm),
2.5A (spin-drying: 800rpm)
AC Input Terminal - Washing: 250Wo,
Spin-drying: 380Wo
Stator
Resistance
ø265x30H
U(blue) - V(purple) : 13.8Ω[at 75°C]
V(purple) - W(pink) : 13.8Ω[at 75°C]
W(pink) - U(blue) : 13.8Ω[at 75°C]
cf) Motor resistance at ambient temp. of
0 ~ 35°C
7.04 ~ 8.1Ω
Rotor
Magnet : 24 segments, bracket, serration
Hall IC
2-sensor Control Type, Top Central Angle:
7.5 degrees
Signal Error Angle (phase difference):
90±5 degrees (based on electric angle)
77
8. WIRING DIAGRAM
78
9. TROUBLE SHOOTING REGARDING DRAIN
1) Structure of Dran Parts by TUB
HOSE DRAIN I
HOUSING VALVE
DRAIN MOTOR
VALVE AIR AS
2) Checking Methods
• Situation : * "OE" is shown on PCB.
* Not finishing drain during 10 min.
* The water level can not reach to RESET POINT during 10 min of drain.
Checking Methods
Replacing methods
* Check the hose drain O condition; twisted or
frozen.
* replace HOSE DRAIN O
* Check the hose drain O condition, blocked.
* clean the inside of Filter.
* DRAIN MOTOR is broken.
* replace DRAIN MOTOR
79
10. INSTALLATION GUIDE
1) Related Parts and Configuration
FIGURES
PARTS NAME
REMARKS
FIXTURE UP/DOWN AS
SPECIAL
FIXTURE UP FIXTURE
SCREW UP
DOWN
SPECIA
L
SCREW
FIXTURE UP AS
(3612008200)
: L= 109mm
FIXTURE DOWN AS
(3612008300)
: L=143mm
① Remove Fixture
UP/DOWN AS
② Adjust Leg
UNIT SERVICE WRENCH
LEG ADJUST AS
FIXTURE
LEG
FOOT
2) INSTALLATION PROCESS
1 Remove the FIXTURE UP/DOWN AS
Removal Method
Remarks
☞ Disassemble the FIXTURE UP/DOWN AS by
turning CCW direction.
☞ Please keep FIXTURE UP/DOWN AS for later
use.
☞ When fixing FIXTURE UP/DOWN AS, turn it CW
direction.
2 Insert CAP HOLDER(4EA) after removing FIXTURE UP/DOWN AS.
CAP HOLDER
80
3 Please install the DRUM WASHING MACHINE properly on even and hard floor as below.
4 Adjust the level of washer using LEG ADJUST AS.
Adjusting Method
Remarks
☞ If turned CW, the LEG ADJUST AS moves the
washer upward.
☞ If turned CCW, the LEG ADJUST AS moves the
washer downward.
5 After adjusting level, fix SPECIAL BOLT.
Adjusting Method
Remarks
✰ Please fix the SPECIAL BOLT by rotating it CCW
in order to prevent washer vibration.
81
11. ATTENTION POINT WITH SERVICING
No
Item
1 Replacing Thermistor
Dry
2 Replacing Duct B As
& Duct Pipe
3 Replacing &
Repairing Inlet Valve
4 Replacing Hose Drain
5 Replacing HOSE
A,B,C
6 Replacing
Part Name
Thermistor Dry
DUCT B AS &
DUCT PIPE
Inlet Valve
Hose Drain
HOSE A,B,C
Heater Wash
Heater Wash
7 Replacing
“Thermistor Wash”
8 Assembling
“Hinge Door”
Thermistor Wash
9 (Dis)assembling
Door As
“Door AS”
MOTOR AS
10 (Dis)assembling
“Motor AS”
11 Damper AS
Hinge Door
Damper AS
Checking Point
Keep the Packing from seperating (Hold Packing when replacing)
Keep the Packing from folding
Check the sealing between Duct Pipe & Duct B AS
Use only screw M4*8 for fixing Inlet Valve
Keep the sealing condition of Tub O tightly
Check the assembling order between INLET BOX & Hose A,C :
Pre Wash-Cold
Unfastening the nut for fixing earth first then unfasten
the nut for fixing heater
At assembling the heater dry, check if the assembling condition
between fixture heater is tight.(little gap on left & right)
At fastening the nut for fixing the heater wash, keep the protrusion
length of bolt to 10~12mm.
(if under 10mm, water can leak, and if over 12mm, fixture heater can
deform)
Unfasten the Nut for fixing heater, replace the thermistor, and
fasten the nut for fixing heater
At fastening screw for fixing Door AS, be careful so that scratching at
the related parts does not happen
: If the scratching happens, it is possible to be claimed about
appearance damage
Be careful about the up/down direction of Door Glass : Keep the
indication point of the part code downward.
To avoid the injury on the hand, grip the rim of the rotor
At initiating the assembling operation of the stator, grip the
stator and fasten the screw; at unfastening the screw, grip the stator
so that it does not fall.
Fixed 4 Dampers with spring when assemble.
82
DAEWOO ELECTRONICS CORP.
1-2, Jeo-dong 1(il)-ga, Jung-gu, Seoul, Korea
C.P.O. BOX 8003 SEOUL, KOREA
TELEX: DWELEC K28177-8
CABLE: “DAEWOOELEC”
S/M NO. :
PRINTED DATE: Mar. 2010
ABOUT THIS MANUAL
VISION CREATIVE, INC.
서울 종로구 통의동
6번지 이룸빌딩 4층
담
당
이영배 님
MODEL
DWD-UD123X (S/M)
접
2010.03.02 총 76페이지
수
1차
2차
일
정
3차
4차
5차
제
판
규
격
인
한
쇄
MEMO 총 76p
10.03.02-전체 신규 76p
10.03.04-11p, 17p, 21p, 31p, 33p 수정_ 신규 5p
10.03.15-4p, 5p, 8p, 10p, 15p, 21p, 23p, 27p, 38p, 39p, 40p, 41p,
42p, 43p, 44p, 45p, 46p, 47p, 48p, 49p, 50p, 51p, 52p,
53p, 54p 수정_ 신규 25p
10.03.17-21p, 41p, 42p, 43p, 45p, 46p, 47p, 48p, 49p, 50p, 51p
수정_ 신규 11p
10.03.18-30p, 31p, 32p, 36p, 40p 수정_ 신규 5p
연락처
VISION 담 당
방 문 수
TEL: 730-0660 FAX: 730-3788