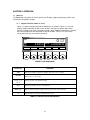
1
Revision 1.0
July, 2003
Contents subject to change without notice.
Salter Brecknell Weighing Products.
1000 Armstrong Drive
Fairmont, MN 56031
Tel (800) 637-0529
Tel (507) 238-8702
Fax (507) 238-8271
E-mail: [email protected]
Web: www.salterbrecknell.com.
This equipment has been tested and found to comply with the limits for a Class A digital device,
pursuant to Part 15 of the FCC Rules. These limits are designed to provide reasonable protection
against harmful interference when the equipment is operated in a commercial environment. This
equipment generates, uses and can radiate radio frequency energy and, if not installed and used
in accordance with the instructions manual, may cause harmful interference to radio
communications. Operation of this equipment in a residential area is likely to cause harmful
interference in which case the user will be required to correct the interference at his/her own
expense.
2
TABLE OF CONTENTS
Page
Chapter 1:
Introduction to the Salter Brecknell 650 Series Digital Counting Scale ........................ 7
Chapter 2:
Getting Started.............................................................................................................. 8
Chapter 3:
Basics of Operation....................................................................................................... 10
3.1
Display .......................................................................................................................... 10
3.1.1
3.2
3.3
Chapter 4:
4.1
Keyboard....................................................................................................................... 11
3.2.1
Soft Keys.......................................................................................................... 11
3.2.2
Function and Numeric Keys............................................................................. 11
General Scale Operation .............................................................................................. 12
3.3.1
Weighing an Item............................................................................................. 12
3.3.2
Taring an Item of Unknown Weight ................................................................. 12
3.3.3
Taring an Item of Known Weight ..................................................................... 12
3.3.4
Clearing a Tare ................................................................................................ 13
3.3.5
Piece Counting................................................................................................. 13
3.3.6
Clearing the Piece Count ................................................................................. 13
Advanced Features and Operation ............................................................................... 14
Unit Weight Entry .......................................................................................................... 14
4.1.1
4.2
4.3
Liquid Crystal Display (LCD) ............................................................................ 11
Unit Weight Entry............................................................................................. 14
Item ID Storage............................................................................................................. 15
4.2.1
Recalling an Existing Item Entry ...................................................................... 15
4.2.2
Adding a New Item Entry ................................................................................. 16
4.2.3
Editing an Item Entry........................................................................................ 16
4.2.4
Deleting an Item Entry ..................................................................................... 18
4.2.5
Deleting All Item Entries................................................................................... 18
Memory Accumulator .................................................................................................... 18
4.3.1
Displaying the Memory Accumulator ............................................................... 19
4.3.2
Adding to the Memory Accumulator................................................................. 19
4.3.3
Clearing the Memory Accumulator................................................................... 19
4.4
Using the Target Value ................................................................................................. 19
4.5
Charging the battery ..................................................................................................... 21
CHAPTER 5 Setup ...................................................................................................................... 22
5.1
Setup Overview............................................................................................................. 22
5.2
Configuration Sub-Menu ............................................................................................... 22
5.3
Super Sub Menu ........................................................................................................... 23
3
5.4
5.5
5.3.1
Accuracy .......................................................................................................... 23
5.3.2
Minimum Sample Size ..................................................................................... 24
5.3.3
Local & Remote Filter ...................................................................................... 24
Service Sub-Menu ........................................................................................................ 24
5.4.1
Calibration – Three Point ................................................................................. 25
5.4.2
Calibration – Single Point................................................................................. 25
5.4.3
KCalZR ............................................................................................................ 26
5.4.4
KCalSP ............................................................................................................ 26
5.4.5
Local .................................................................................................................. 26
5.4.6
Remote ............................................................................................................ 26
5.4.7
Setcom............................................................................................................. 27
5.4.8
Restore System defaults................................................................................... 28
5.4.9
Light .................................................................................................................. 28
Print Format
5.5.1 Margins ............................................................................................................. 29
5.5.2 Header .............................................................................................................. 29
5.5.3 Print Model ......................................................................................................... 29
5.5.4 Fields ................................................................................................................. 29
5.5.5 Label .................................................................................................................. 30
5.5.1 Download from PC................................................................................................ 30
5.5.6 Diagnostics ........................................................................................................ 30
5.6
Item ID Sub-menu......................................................................................................... 32
5.6.1 Initial Item............................................................................................................. 32
5.6.2 Enable Save......................................................................................................... 32
5.6.3 Downlaod & Upload ............................................................................................ 32
5.6.4 Print..................................................................................................................... 32
5.6.5 List ....................................................................................................................... 32
Chapter 6:
Calibration ..................................................................................................................... 33
6.1
Calibration Overview ..................................................................................................... 33
6.2
Calibration Menu ........................................................................................................... 33
4
Appendix A: Specifications................................................................................................................ 35
Appendix B: Serial Port Information .................................................................................................. 36
B.1
B.2
COM1 Serial Port.......................................................................................................... 36
B.1.1
Connecting the Serial Printer ........................................................................... 36
B.1.2
B.1.3
Default Print Format......................................................................................... 37
Connecting to MP-20....................................................................................... 37
COM2 Serial Port.......................................................................................................... 37
B.2.1
Connecting the Scanner, Remote Display or Computer .................................. 37
B.2.2
Full Duplex Modes for COM2........................................................................... 38
B.2.2.1
Demand Mode ................................................................................. 38
B.2.2.2
B.2.3
Continuous Mode............................................................................. 39
Connection to a 610 or 630 ............................................................ 40
Appendix C: Error Messages............................................................................................................. 42
C.1
Error Messages............................................................................................................. 42
C.1.1
Operator Errors ................................................................................................ 42
C.1.2
Calibration Errors ............................................................................................. 43
Appendix D: Remote Scale Wiring .................................................................................................... 44
D.1
Remote Scale Wiring .................................................................................................... 44
LIST OF FIGURES
1-1
2-1
3-1
3-2
4-1
4-2
B-1
B-2
B-3
B-4
B-5
B-6
B-7
B-8
B-9
D-1
D-2
650 Series Front Panel ...........................................................................................................
650 Back Panel.......................................................................................................................
650 Display Detail ...................................................................................................................
Function and Numeric Keys Layout ........................................................................................
Item ID List Screen .................................................................................................................
Edit Item ID Screen.................................................................................................................
Pin Assignments for COM1 Serial Port ..................................................................................
Cable Diagram for Scale to Dot Matrix Printer .......................................................................
Cable Diagram for Scale to Thermal Printer...........................................................................
Default Print Format for Thermal Printer ................................................................................
Pin Assignments for COM2 Serial Port ..................................................................................
Cable Diagram for Scale to Computer....................................................................................
Cable Diagram for Scale to Scanner ......................................................................................
Consolidated Controls Demand Mode....................................................................................
Consolidated Controls Continuous Mode ...............................................................................
Color Codes for Shielded Load Cell Cable .............................................................................
Pin Assignments for the Load Cell Port ..................................................................................
5
7
8
10
11
16
17
36
36
36
36
38
38
38
38
39
44
44
LIST OF TABLES
1-1
3-1
4-1
5-1
5-2
5-3
5-4
5-5
5-6
5-7
5-8
6-1
B-1
650 Series Product Matrix ......................................................................................................
650 Series Annunciator Definitions.........................................................................................
Entering Alphanumeric Characters.........................................................................................
Configuration Sub-Menu Items ...............................................................................................
Supervisor Sub-menu Items ...................................................................................................
Sample weight required for minimum controlled accuracy.....................................................
Service Sub-menu Items ........................................................................................................
Local/Remote Scale Sub-menu Items ....................................................................................
COM1 and COM2 Sub-Menu Items .......................................................................................
Print commands for formatting a label with WYSIWYG software ..........................................
Diagnostic submenu...............................................................................................................
Minimum / Recommended Calibration Test Weights for Local Scale ....................................
Cable Diagram for Scale to Printer .........................................................................................
6
7
10
17
22
23
23
25
26
28
30
31
34
36
CHAPTER 1:
INTRODUCTION TO THE SALTER BRECKNELL 650 DIGITAL COUNTING SCALE
The Salter Brecknell Model 650 Series Digital Counting Scale is an easy to use, high-resolution
counting scale featuring keyboard tare, average piece weight entry, item ID storage and custom
programmable label formatting. It is equipped with many useful features that are normally found
on much more expensive scale products, including dual-channel, memory accumulator and set
point target values (under/target/over).
Options include three 5V TTL outputs and a rechargeable battery for portable applications.
The scale is available in four avoirdupois weight capacities. There are five units of measure
available. Table 1-1 shows the 650 series product matrix.
Prior to using the scale, please read this user’s guide carefully and completely. Store the manual
in a safe and convenient place so it will be available if you have questions concerning the
operation of the scale.
OVERVIEW
Installation and wiring instructions for a remote scale are found in Appendix D. The scale contains
two main setup menus - the Service Menu and the Supervisor Menu. The Service Menu
configures the scale to your remote weigh platform. The Supervisor Menu configures the serial
communication ports and enables user options. Chapter 5 covers both menus in detail. Chapter 6
covers system calibration. Prior to installing the scale, please read this manual carefully and
completely. Store the manual in a safe and convenient place so it will be available if you have
questions concerning the setup and operation of the scale.
MODEL
650-12
650-30
650-60
650-120
POUNDS
12 x .001 lb
30 x .002 lb
60 x .005 lb
120 x .01 lb
KILOGRAMS
6 x 0.0005 kg
15 x 0.001 kg
30 x 0.002 kg
60 x 0.005 kg
GRAMS
6000 x 0.5 g
15000 x 1 g
30000 x 2 g
60000 x 5 g
TABLE 1-1: 650 Series Product Matrix
FIGURE 1-1: 650 Series Front Panel
7
OUNCES
192 x 0.02 oz
480 x 0.05 oz
960 x 0.1 oz
1920 x 0.2 oz
CHAPTER 2: GETTING STARTED
After unpacking the scale, a small amount of preparation is required before the scale can be
used. .
2.1 REAR PANEL
Battery Charger Switch
ON/OFF Switch
1
0
COM 2 Serial Port (RS-232)
Remote Scale Connector
DC Power Jack
COM 1 Serial Port (RS-232)
Figure 2-1: 650 Rear Panel
Step 1. Position the scale in its area of intended use. Observe the following guidelines for
suitable location.
1. Choose a firm, stable floor or table.
2. Do not share an AC outlet with electrical noise producing equipment, such as
refrigeration units. This includes products with electrical motors and/or relays.
3. Do not place the scale in an area with changing ambient temperature and/or high
humidity.
4. Do not place the scale in an area prone to exposure to direct sunlight, wind, or dust.
5. Do not place the scale in an area with vibrating equipment.
Step 2. Install the power supply - Non-battery-powered Units Only
1. After placing the scale in its area of use, locate the AC Adapter that shipped with the
scale.
2. Connect the female end of the AC Adapter to the connector on the rear of scale, and
then plug the adapter into an AC outlet. Make sure that the AC voltage appearing
at the wall outlet matches the input voltage marked on the AC adapter.
Step 3. If applicable, install the serial device(s).
1. Connect the optional serial printer using the serial cable supplied with the printer or
TTL Outputs to the COM1 port. See Appendix B for cabling requirements and pin
outs for TTL output.
NOTE: If interfacing to a printer not supplied by Salter Brecknell, see Appendix B for
pin outs.
1. Connect the optional scanner or QWERTY keyboard or Bar Code Scanner to COM2
port. Both devices come with their own built-in cable.
8
NOTE: If interfacing to a computer or remote display, see Appendix B for pin outs.
2. Configure the communication parameters and select the device type as detailed in
Section 5.4.7
NOTE 1: If using a printer with your system, be sure to set the time and date. See Sections 5.2.
Step 4. If applicable, install the remote scale.
1. Connect the remote scale to the 650’s remote scale port using the provided remote
scale cable. Consult Appendix D for proper cabling.
2. Configure the remote scale’s parameters in the Service Menu as detailed in Chapter
5.
3. Calibrate the remote scale as detailed in Chapter 6.
4. Enable the remote scale in the Supervisor Menu as detailed in Chapter 5.
Step 5. Switch the scale ON to begin use.
9
CHAPTER 3: OPERATION
3.1
DISPLAY
The Model 650 scale utilizes an LCD (Liquid Crystal Display) capable of displaying various sizes
of characters and graphic images.
3.1.1
LIQUID CRYSTAL DISPLAY (LCD)
Figure 3-1 shows the display detail of the 650 Series. As shown in Figure 3-1, the scale
displays weight information as well as the soft keys. Soft keys are generic keys whose
functions change as the scale’s operation changes. When additional information is needed,
the scale will prompt for the information in pop-up windows. Table 3-1 lists the various
annunciators you may see and their meanings.
PCS
0 LOC
GR
Net
Wt
Zero
0.000 lb
Tare
APW
Print
Sample
0.000000 lb
Item ID
Mode
FIGURE 3-1: 650 Display Detail
Annunciator
APW
GR, NET
lb, kg, g, oz,
lb-oz
PCS
REM, LOC
T
MEANING
Indicates the APW (Average Piece Weight) of the items you are counting.
Indicates Gross or Net weight.
Indicates the unit of the displayed weight.
Indicates the number of pieces on the platform.
Indicates that the displayed weight is from the remote scale or the local scale.
Indicates that a tare has been established in the system.
TABLE 3-1: 650 Series Annunciator Definitions
10
3.2
KEYBOARD
The keyboard is composed of six soft keys, six function keys and ten numeric keys. Refer to Figure 31 and Figure 3-2 for the overall layout and key locations.
3.2.1
SOFT KEYS
Here are some soft keys that you will encounter during normal scale operation.
Zero - This key sets the scale to display zero.
Tare - This key is used to establish a Tare as long as the scale is not at or below Gross zero.
Sample – This key puts the scale into sampling mode, which is used for piece counting. See
Section 3.3.5 for more information.
Print - This key is used to send weight information out to the serial interface port as long as
the scale is in a state of stability.
Item ID – This key is used to enter/recall an item record stored in the scale’s database.
Mode – This key toggles the scale among the weight, pieces and APW (average piece weight)
display screens.
*
LOCAL
REMOTE
FUNC
TIONS
2
1
4
ABC
DEF
5
6
JKL
GHI
7
8
PQRS
CLR
3
MNO
9
TUV
WXYZ
0
ENT
FIGURE 3-2: Function and Numeric Keys Layout
3.2.2
FUNCTION AND NUMERIC KEYS
CLR - This key is used to clear the current APW and tare from the scale. This key is also used
to escape from a screen that you may have entered accidentally.
Decimal Point - This key is used to enter a decimal point when entering numeric values. This
key is also used to activate and deactivate the hold feature if enabled in the Supervisor Menu.
ENT - This key is used to enter a numeric entry and to answer “YES” to a Yes/No question.
LOCAL/REMOTE - This key is used to select the local or remote scale. The scale displays
information pertaining only to the scale that is selected.
FUNCTIONS - This key is used to access the scale’s advanced features and operations. See
Chapter 4 for more information.
* – This key is used to access the scale’s Supervisor, Service and Configuration Menus. See
Chapter 5 for more information.
0-9 – These keys are used to enter numeric and alphanumeric data into the scale.
11
3.3
GENERAL SCALE OPERATION
3.3.1
WEIGHING AN ITEM
1.
If your 650 is connected to remote scale, use the LOCAL/REMOTE key to select the
scale you wish to use to do the weighing.
2.
If necessary, press the “Zero” soft key to obtain a weight reading of zero.
3.
Place the object to be weighed on the scale’s platter and allow the weight indication to
stabilize. If the item weight exceeds the scale’s weight capacity, it displays “Maximum
Scale Weight Exceeded”.
4.
Read the weight shown on the display.
Note: If you wish to change the unit of measure, press the “Mode” soft key followed by the “Unit”
soft key.
3.3.2
TARING AN ITEM OF UNKNOWN WEIGHT
To weigh an item in a container, the weight of that container must first be subtracted from the
overall weight to obtain an accurate weight reading. This is known as a Tare.
3.3.3
1.
If your 650 is connected to remote scale, use the LOCAL/REMOTE key to select the
scale you wish to use to do the weighing.
2.
If necessary, press the “Zero” soft key to obtain a weight reading of zero.
3.
Place the empty container on the scale’s platter and allow the weight indication to
stabilize.
4.
Press the “Tare” soft key. The display shows zero weight and turns on the TARE and
NET annunciators.
5.
Place the material to be weighed in the container and allow the weight indication to
stabilize.
6.
Read the weight shown on the display.
TARING AN ITEM OF KNOWN WEIGHT
If the weight of the container or object is known, you may enter this weight via the keyboard. This
value must be rounded to the nearest scale division. For example, on a 60 x 0.002 lb scale, you
must enter the tare weight value to the nearest 0.002 lb.
1.
If your 650 is connected to remote scale, use the Local/Remote key to select the scale you
wish to use to do the weighing.
2.
Press the FUNCTIONS hard key.
3.
Press the MORE soft key.
4.
Press the KTARE soft key. Scale prompts “Key in tare value in XX” (either lb or kg
depending on unit selected)
5.
Using the numeric keys, enter the known tare weight using the scale keyboard and press
ENT. The display shows minus weight and turns the NET annunciator on. Place the
material to be weighed in the container and allow the weight indication to stabilize.
6.
Read the weight shown on the display.
12
3.3.4
CLEARING A TARE
1.
3.3.5
To clear a tare, press the CLR key twice at any time. The TARE and NET annunciator
disappears and gross weight is displayed.
PIECE COUNTING
This mode is used to indicate the number of pieces of an item you have placed on the scale’s
platform and is accessed by pressing the “Sample” soft key.
Piece counting is accomplished by determining an average piece weight (APW). The two
variables that affect the accuracy of the APW are the number of samples used and the total
weight of the samples. The 650 allows you control over these two variables. See section 5.3.1
Minimum Accuracy Feature and see section 5.3.2 Minimum Sample Size. Setting these two
functions guards against an APW of the items that is too light and also guards against the total
weight of the sample being too light. Accuracy cannot be guaranteed without adequate sample
size and sample weight. If the sample pieces don’t meet the minimum requirements, you will get
an error message to add additional pieces to achieve the preset level of counting accuracy.
3.3.5.1 Create a new APW from sampling
1.
If the items you will be counting require a container, you must first place the empty
container on the scale platform and then press the “Tare” soft key. The scale switches
to NET mode and sets the displayed weight to zero.
NOTE: Enabling the Auto Tare feature in the Supervisor Menu (Chapter 5) can
eliminate this step.
2.
Press the “Sample” soft key. The scale will display “Add X PCS to Platter then Press
the ENT key” as determined from section 5.3.2 Minimum Sample Size. You may
choose a larger sample size from the soft keys or press the KEYIN soft key and enter
any size sample number.
3.
Place the sample pieces on the platform all at once and press the ENT key to complete
the sample process. If the sample pieces used meet the accuracy criteria set in section
5.3.1 Minimum Accuracy Feature and 5.3.2 Minimum Sample Size, the scale will now
calculate the APW and display the number of pieces and APW on the scale. If it does
not, the scale displays a prompting message to add a certain number of pieces to
continue piece counting.
NOTE 1: You can eliminate the need to press the ENT key by enabling the Auto
Sampling feature in the Supervisor Menu (Chapter 5).
NOTE 2: You can program the scale to automatically switch from the local scale to
the remote scale (if equipped) by enabling the Auto Switch Channel feature in the
Configuration Menu (Chapter 5). The scale will automatically switch channels after a
successfully sample has been made.
3.3.6
CLEARING THE PIECE COUNT
1.
To clear the piece count, either press the CLR key twice or press the SAMPLE soft key
and begin a new sample process.
NOTE: You can eliminate the need to press the CLR key by enabling the Auto Tare
APW Clear feature in the Configuration Menu (Chapter 5). Be careful here, enabling auto
clear functions require a new tare and APW input each time the scale weight goes to zero.
13
CHAPTER 4: ADVANCED FEATURES AND OPERATION
4.1
UNIT WEIGHT ENTRY
The APW may already be known from using another scale, an engineered standard or from
a bar coded label. If you already know the APW (Average Piece Weight of the items you
wish to count, then use one of the following procedures.
4.1.1 APW ENTRY FROM KEYBOARD
1. Press the “Sample” soft key. The scale prompts you to add pieces to the platter.
2. Press the “APW” soft key. The scale prompts you to choose either KEYIN or
TCS.
3. Press the KEYIN soft key. The scale prompts you to input the average piece
weight.
4. Using the numeric and decimal point keys, key-in the actual APW value.
5. Press the ENT key. If the unit weight is large enough, the scale will now display
the number of pieces on the scale. If it does not, the scale briefly displays an
error message, but still allows piece counting.
NOTE 1: If the scale displays a “Low Resolution” message, the unit weight of the
items you wish to count is too light for your scale to process accurately.
4.1.2 APW ENTRY FROM SCANNER
To use this method, you must have a working CCD or laser scanner plugged into the
COM2 port and the 650 scale must have printed the barcode you are scanning. See
section 5.4.7 for COM 2 setup.
1. If an APW is already showing on the display, press the CLR key twice to clear
APW from scale.
2. Aim the scanner at the APW barcode you wish to scan and press the trigger.
When the scanner beeps, the 650 scale will briefly display the scanned-in APW.
3. Place your parts on the 650 scale. If the APW is large enough, the 650 scale will
now display the number of pieces on the scale. If it does not, the scale briefly
displays an error message, but still allows piece counting.
1
4.1.3 UPLOAD APW FROM TC SERIES SCALE
To use this method, you must have either a 610 or a 630 scale connected to COM2.
See Appendix B for pin outs. NOTE: Scanner must be selected for COM2 in section
5.4.7.
NOTE: The 610 or 630 scale must be configured for “Transmit APW Mode”. See
scale manual for more information.
1. If an APW is already showing on the display, press the CLEAR key twice on the
650 scale to clear current APW.
2. Perform the sampling on the 610 or 630 scale.
1
Also works with PBS Series scale.
14
3. On the 650 scale, press the “Sample” soft key. The scale prompts you to add
pieces to the platter.
4. Press the “APW” soft key. The scale prompts you to choose either KEYIN or
TCS (TC Series).
5. Press the “TCS” soft key. The 650 attempts to communicate with the TC Series
scale. If successful, the 650 will briefly display the uploaded APW.
6. Place your parts on the 650 scale. If the APW is large enough, the 650 scale will
now display the number of pieces on the scale. If it does not, the scale briefly
displays an error message, but still allows piece counting.
4.2
ITEM ID STORAGE
Your scale can store piece weight information for up to 2000 item records. These items are stored
and retrieved under an Item ID number. The Item ID numbers are sequential 0 –2000,
maintained automatically by the scale and cannot be changed. Each item record stores the
following information:
•
•
•
•
•
•
•
•
Item ID – a 4 digit sequential number automatically assigned each time a new
is stored
Product ID – an alphanumeric field consisting of up to 15 characters
Name – an alphanumeric filed consisting of up to 25 characters
Accumulator – whole number up to approx 99,999,999.
Average Piece Weight (APW)
NOTE: After sampling, the APW is automatically stored in this field.
Tare Weight – of the Container for Local Scale
Tare Weight – of the Container for Remote Scale (if equipped)
Unit – unit of measure (saved automatically)
Item ID
After sampling an item, you can store its information automatically by adding a new item entry.
Once created and stored, you can recall and modify the item’s information by calling up its Item ID
number. A list of all stored items can be called up very easily.
4.2.1
RECALLING AN EXISTING ITEM ENTRY
1.
Press the Item ID soft key. The scale prompts for the Item ID number.
2.
Key-in the sequential four digit Item ID number and press the ENT key. The scale
automatically recalls the stored information.
NOTE 1: If you do not know the four digit Item ID number, press the LIST soft
key. The scale displays the screen shown in Figure 4-1. Four Item Ids are shown
for each screen. Use the up/down arrow soft keys to move within the four Item
Ids shown. Use the PgUp and PgDn soft to recall additional groups of four Item
Ids. If your list of Item Ids is long, press the ENT key and the scale prompts
“Input Item ID:” Enter the starting Item Id number and the list will begin with that
number. Some fields may be truncated due to display limitations. Once the
desired item is highlighted, press the Recall soft key.
NOTE 2: If you wish to key in the Product ID rather than the sequential Item ID,
Press the ITEM ID soft key, then press the KEYIN soft key and the scale
prompts “Enter Product ID”. Enter the Product ID and press ENT. The scale
loads the APW and other record information and begins counting.
NOTE 3: If so equipped, you may use your scale’ s barcode scanner to scan in
the Product ID rather than the sequential Item ID number from a pre-printed
label. The scale loads the APW and other record information and begins
15
counting.
NOTE 4: If using the remote QWERTY keyboard, use the ENTER key from the
remote keyboard for Product ID.
FIGURE 4-1: Item ID List Screen
4.2.2
ADDING A NEW ITEM ENTRY
1.
Sample the new item or enter its APW into the scale as previously described.
2.
Press the Item ID soft key. The scale prompts for the Item ID number. See FIGURE 4-2
3.
The Product ID field is highlighted. If you want to enter a Product ID
a. Press the Edit soft key. You will see a flashing cursor.
b. Use the scale keyboard or optional QWERTY keyboard to enter the Product ID.
See TABLE 4-1: Entering Alphanumeric Characters
c. Press the ENT key.
4.
Press the Done soft key. The scale confirms that you wish to save the changes.
5.
Press the Yes soft key to save the changes.
NOTE: You may instead choose to download an item ID database from a PC. See separate
manual. If using the remote QWERTY keyboard, use the ENTER key from the remote
keyboard for Product ID and Name. Use the ENT keyboard from the scale for the other
fields.
4.2.3
EDITING AN ITEM ENTRY
1.
Press the Item ID soft key. The scale prompts for the Item ID number.
2.
Press the List soft key to edit by Item ID (see note 1) or press the Product ID key (see note
2) to edit by Product ID.
3.
Key-in the sequential four digit Item ID number and press the ENT key. The scale
automatically recalls the stored information.
NOTE 1: If you do not know the four digit Item ID number, press the LIST soft
key. The scale displays the screen shown in Figure 4-1. Four Item Ids are shown
for each screen. Use the up/down arrow soft keys to move within the four Item
Ids shown. Use the PgUp and PgDn soft to recall additional groups of four Item
Ids. If your list of Item Ids is long, press the ENT key and the scale prompts
“Input Item ID:” Enter the starting Item Id number and the list will begin with that
number
NOTE 2: If you wish to key in the Product ID rather than the sequential Item ID,
16
Press the ITEM ID soft key, then press the KEYIN soft key and the scale
prompts “Enter Product ID”. Enter the Product ID and press ENT. The scale
loads the record information.
NOTE 3: If using the remote QWERTY keyboard, use the ENTER key from the
remote keyboard for Product ID and Name. Use the ENT keyboard from the scale
for the other fields.
4.
Once the desired item is highlighted, press the Edit soft key. The scale displays a list
of stored item entries. The scale displays a summary of the item’s information on the
screen shown in Figure 4-2.
Unit: LB
Item 0001 INFO
Product ID:
123456789
ACC:
16
0.085200000
APW:
Tare Wt (L):
0.1230
Tare Wt (R): 0.9980
Name: EYEBOLT
Edit
APW
Tare
Done
FIGURE 4-2: Edit Item ID Screen
5.
Use the Up and Down soft keys to highlight alphanumeric fields or the APW or TARE soft
key to select those numeric fields you wish to edit.
6.
Once the desired field is highlighted, press the Edit soft key.
To edit a numeric field, simply enter in the new data using the numeric keys
followed by the ENT key, or you can use the optional QWERTY keyboard.
Numeric fields include APW, Tare Wt (Local) and Tare Wt (Remote). If you
make an entry mistake, press the CLR key to restore the original data.
To edit the Product ID and the Name field, use the numeric keys to enter
alphanumeric characters, or you can again use the optional QWERTY keyboard.
On the 650, two numeric keystrokes are required to enter one alphanumeric
character. Use Table 4-1 to determine how to enter each alpha character.
When you are done entering the Name field, press the ENT key. If you make an
entry mistake, press the CLR key to restore the original data.
“0” = 0 + 0
“1” = 0 + 1
“2” = 0 + 2
“3” = 0 + 3
“4” = 0 + 4
“5” = 0 + 5
“6” = 0 + 6
“Z” = 9 + 4
“7” = 0 + 7
“8” = 0 + 8
“9” = 0 + 9
“A” = 2 + 1
“B” = 2 + 2
“C” = 2 + 3
“D” = 3 + 1
“ ”=1+1
“E” = 3 + 2
“F” = 3 + 3
“G” = 4 + 1
“H” = 4 + 2
“I” = 4 + 3
“J” = 5 + 1
“K” = 5 + 2
“L” = 5 + 3
“M” = 6 + 1
“N” = 6 + 2
“O” = 6 + 3
“P” = 7 + 1
“Q” = 7 + 2
“R” = 7 + 3
“S” = 7 + 4
“T” = 8 + 1
“U” = 8 + 2
“V” = 8 + 3
“W” = 9 + 1
“X” = 9 + 2
“Y” = 9 + 3
TABLE 4-1: Entering Alphanumeric Characters
7.
Once all fields are edited, press the Done soft key. The scale confirms that you wish to
save the changes.
8.
Press the Yes soft key to save the changes. Otherwise, press the No soft key.
17
NOTE: By default, the operator is not allowed to make changes to the APW or Tare values.
You may edit the APW and Tare values by pressing the APW or TARE soft keys in the edit
item screen, and then continue to follow the prompts.
4.2.4
DELETING AN ITEM ENTRY
1.
Press the Item ID soft key. The scale prompts for the Item ID number.
2.
Press the List soft key to delete by Item ID (see note 1) or press the Product ID key
(see note 2) to delete by Product ID.
NOTE 1: If you do not know the four digit Item ID number, press the LIST soft
key. The scale displays the screen shown in Figure 4-1. Four Item Ids are shown
for each screen. Use the up/down arrow soft keys to move within the four Item
Ids shown. Use the PgUp and PgDn soft to recall additional groups of four Item
Ids. If your list of Item Ids is long, press the ENT key and the scale prompts
“Input Item ID:” Enter the starting Item Id number and the list will begin with that
number
NOTE 2: If you wish to key in the Product ID rather than the sequential Item ID,
Press the ITEM ID soft key, then press the KEYIN soft key and the scale
prompts “Enter Product ID”. Enter the Product ID and press ENT. The scale
loads the record information.
4.2.5
3.
Once the desired item is highlighted, press the More soft key.
4.
Press the Delete soft key. The scale asks you to confirm this action.
5.
Press the Yes soft key to delete the item or press the No soft key to exit without deleting.
DELETING ALL ITEM ENTRIES
NOTE: This procedure erases ALL items from memory storage. Once
completed, this procedure cannot be undone. Use with extreme caution.
4.3
1.
Press the * key. The scale prompts for the menu you wish to enter.
2.
Select the Item ID soft key. The scale prompts for a password.
3.
Enter in the password (6666). There is no need to press the ENT key.
4.
Press the Int Item soft key. The scale asks you to confirm this action.
5.
Press the Yes soft key to erase all of the items from memory. The scale confirms the
action and returns to the previous screen. Press the No soft key to exit without
deleting.
6.
Press the CLR key twice to return to normal operating mode.
MEMORY ACCUMULATOR
Your scale comes equipped with a handy memory accumulator, which can be used in
conjunction with the piece counting feature. As with a hand-held calculator, the memory
accumulator can be added to, displayed and cleared at anytime. If an item ID is loaded into
memory, the accumulator field for that item is manipulated and stored every time you use
the accumulator.
To access the memory accumulator soft keys, press the FUNCTIONS key.
NOTE: This feature can be used when in PCS mode only.
18
4.3.1
DISPLAYING THE MEMORY ACCUMULATOR
1.
4.3.2
ADDING TO THE MEMORY ACCUMULATOR
1.
4.3.3
4.3.4
Press the MR soft key. The scale briefly displays the total number of pieces.
Press the M+ soft key. The scale adds the current number of pieces to the memory
accumulator, and then briefly displays the total number of pieces.
SUBTRACTING FROM THE MEMORY ACCUMULATOR
1.
Place the pieces you wish to subtract on the scale.
2.
Press the FUNCTIONS key.
3.
Press the M - soft key. The scale subtracts the current number of pieces from the
memory accumulator, and then briefly displays the total number of pieces.
4.
When finished, press the CLR key to return to the main screen.
CLEARING THE MEMORY ACCUMULATOR
1.
Press the MC soft key. The scale asks if you wish to clear the memory accumulator.
2.
Press the Yes soft key to clear the accumulator memory or press the No soft key if you
do not wish to clear the accumulator memory.
NOTE: To exit the memory accumulator function, press the CLR key once.
4.4
USING THE TARGET VALUE
This function works in conjunction with the piece counting or weighing mode feature and
allows your scale to act as a checkweigher. This is useful if you are filling a container with a
pre-determined amount of items or material.
To use, you must enter two values – a lower limit value and an upper limit value. These are
chosen based on the tolerance of your target value. For example, if you wish to fill a bottle
with 100 items and you have a tolerance of ± 2 pieces, you would set your lower limit value
to 98 and your upper limit value to 102. The lower and upper limit values may be the same if
you have no tolerance allowance.
If the number of items on the platform is within the two limits, the scale flashes the “Target”
soft and beeps.
To enable the weight or pcs mode:
1. Press the * key
2. Press the CONFIG soft key and the scale prompts for password. Enter 1111.
3. Press the MORE soft key
4. Press the SETPNT soft key.
5. Press the SP1 soft key.
6. Press either the weight or pcs soft key to enable the function.
7. Enter the upper and lower values. Press the ENT key to enter.
8. Press clear to step back one level.
9. Press the SP2 key and enter the jog time. Press ENT to enter.
10. Press clear to step back one level.
19
11. Press the SP3 key. Select enable or disable.
12. Press the CLEAR key to step back to the main menu.
To enter or change target values from the main menu:
1.
Press the FUNCTIONS key.
2.
Press the TARGET soft key. The scale prompts for the lower limit value.
3. Use the numeric keys to key-in the lower limit value then press the ENT key. The scale
prompts for the upper limit value.
4. Use the numeric keys to key-in the upper limit value then press the ENT key.
5. Place items on scale until the scale signals that the items are within the entered limits.
NOTE: To exit the target function, press the CLR key once.
Example: The following example shows a typical use of the TTL outputs from the TC- 2010.
1. Application is to fill a box of parts from a conveyor that.. The desired count is 1000 pcs
with tolerance of –5 pcs and + 5 pcs.
2. Set point 1 has a minimum value of 995 pcs and a maximum value of 1005 pcs.
th
3. Set point 2 has a jog time of 10 which is one second. (10 x 1/10 sec)
4. Set point 3 is enabled and controls a push arm.
5. A box is placed on the scale and the weight is tared off.
6. A piece count is created.
7. The operator presses start on a control box and the conveyor starts moving parts into
the box.
8. When the count reaches 995 pcs, the conveyor stops.
9. The conveyor jogs forward for one second and stops for one second and repeats until
1005 pcs are counted.
10. A control arm then pushes the box off the scale and down a gravity conveyor.
NOTES:
1. If the count/weight value is below the minimum value, set TTL 1 is active, TTL 2 and 3
are off.
2. If the count value is equal to or greater than the minimum value but less than the
maximum value, TTL2 is active, TTL 1 and 3 are off.
3. If the count/weight value is greater than or equal to the maximum value, TTL3 is active
and TTL 1 & 2 are off.
MIN VALUE
On if < Min value
MAX VAULE
On if >= Min value & < Max
On if >= Max value
Only one set point is active at a time. When a set point is active, the others are not.
20
4.5
CHARGING THE BATTERY
If your scale came equipped with the optional battery pack, follow this procedure to properly
charge your batteries.
NOTE: You should perform this procedure whenever the scale’s low battery annunciator
(BATT) turns on.
1. Push and hold the ON/OFF key for five seconds, then release or use the power switch to shut the
scale OFF.
2. Locate the battery charger switch on the rear panel of the scale.
NOTE: This may be hidden behind a metal plate held on by two drilled-head screws.
3. Position the switch as shown here:
4. Locate the AC adapter that shipped with the scale.
5. Connect the female end of the AC Adapter to the connector on the rear of scale, and then plug the
adapter into an AC outlet. Be sure to use the 24 VDC, 2A AC adapter that shipped with the
scale. Any other AC adapter may cause damage to the scale.
6. Allow at least three hours for the batteries to become fully charged. At the end of the charging
period, simply disconnect the AC adapter and resume normal use.
NOTE 1: The batteries will be charged regardless of the setting of the power switch (ON or OFF). You
may continue to use the scale while the batteries are charging if you wish.
NOTE 2: After charging the batteries, you may leave the battery charger switch in the position shown
above. If, however, you wish to store or ship the scale, you should position it the opposite way.
21
CHAPTER 5: SETUP
5.1
SETUP OVERVIEW
Press the * key offers you 6 soft key choices – CONFIG, SUPER, SERVIC, PRT
FM, DIAG, ITEM ID
5.2
CONFIG SUB-MENU
Table 5-1 lists the items which are contained in the Configuration sub-menu. The
CONFIG password is 1111.
To access the Configuration sub-menu, follow the instructions below.
1. Press the * button and scale prompts “Select a setup menu”.
2. Press the Config soft key. The prompts for “Input Password. Enter 1111. The
Configuration sub-menu items are listed above the six soft keys. Press the More
or Back soft keys to see more choices.
3. Press the soft key pertaining to the item you wish to modify. The scale shows the
current status or selection of that item in the form of a highlighted soft key text.
4. Press the soft key corresponding to the desired status then press the ENT key.
You may exit this screen without making changes by pressing the CLR key.
5. Repeat steps 3 and 4 above until the configuration is complete.
6. Press the CLR key twice to return to normal operating mode.
ITEM
SOFT
KEY
DESCRIPTION
Auto Sampling Enable/Disable
AUSMPL
Allows you to change the status of the auto
sampling feature. The default setting is disabled.
Auto Tare Enable/Disable
AUTARE
Auto Tare Clear Enable/Disable
TRCLR
Auto Tare APW Clear Enable/Disable
TRAWCL
Auto Switch Channel Enable/Disable
AUTOSW
Clock
Tare
CLOCK
TARE
Allows you to change the status of the auto tare
feature. The default setting is disabled.
Allows you to change the status of the auto tare
clear feature. The default setting is disabled.
Allows you to change the status of the auto tare
APW clear feature. The default setting is
disabled.
Allows you to change the status of the auto
switch channel feature. The default setting is
disabled
Time Format
Date Format
Setpoint
TIMEMT
DATEMT
SETPNT
Sets time and date
Sets basic menu soft key for tare entry or
keyboard tare entry
Selects 12 hour or 24 hour clock
Sets date format – standard or international
Enables or disables setpoints
TABLE 5-1: Configuration Sub-menu Items
22
5.3 SUPER SUB MENU
Table 5-2 lists the items which are contained in the Supervisor sub-menu. The
SUPER password is 2222.
To access the Supervisor sub-menu, follow the instructions below.
1. Press the * button and scale prompts “Select a setup menu”.
2. Press the SUPER soft key. The prompts for “Input Password. Enter 2222. The
Supervisor sub-menu items are listed above the soft keys.
3. Press the soft key pertaining to the item you wish to modify. The scale shows the
current status or selection of that item in the form of a highlighted soft key text.
4. Press the soft key corresponding to the desired status then press the ENT key.
You may exit this screen without making changes by pressing the CLR key.
5. Repeat steps 3 and 4 above until the Supervisor setup is complete.
6. Press the CLR key twice to return to normal operating mode.
ITEM
Accuracy Enable Disable
SOFT
KEY
ACCY
Minimum Sample
Local Scale Filter
MINSPL
LOCFLT
Remote Scale Filter
REMFLT
DESCRIPTION
Allows you to enable or disable the
controlled accuracy feature
Sets the minimum sample size value
Sets the amount of filtering on the TC2010
platform
Sets the amount of filtering on a remote
platform
TABLE 5-2: Supervisor Sub-menu Items
5.3.1 ACCURACY
1. Pressing the accuracy soft key will prompt for a password. Enter 1111. You will
then be prompted to enable or disable. If you select enable, the scale prompts for
“ Accuracy Setup” with soft keys showing percentage amounts. The higher the
selected percentage, the greater the sample weigh must be regardless of the
number of pieces. Table 5-3 illustrates the weight required in pounds for each
capacity 650 and percentage setting:
Capacity
12 lb
30 lb
60 lb
120 lb
NONE
0
0
0
0
94%
.012
.030
.060
.120
95%
.016
.039
.078
.156
96%
.024
.060
.120
.240
97%
.036
.090
.180
.360
98%
.048
.120
.240
.480
99%
.060
.150
.300
.600
99.6%
.072
.180
.360
.720
99.8%
.096
.240
.480
.960
99.9%
.120
.300
.600
1.20
TABLE 5-3: Sample weight required for controlled accuracy
2. The percentage accuracy does not guarantee an accurate piece count. It controls
the performance of the scale but cannot overcome variances in part weight. It is
one half of controlled accuracy.
3. If the number of samples used does not meet the minimum weight required, the
scale will prompt for more pieces until the minimum weight is reached.
23
5.3.2 MINIMUM SAMPLE
1. Pressing the minimum sample soft key will prompt for a password. Enter 2222.
You will then be prompted to enter the minimum sample size from 1 – 100 pieces.
This setting will require the scale operator to use your selected sample size
regardless of the size or weight of the sample pieces.
2. If a scale operator uses a sample size smaller than set here, the scale will prompt
for more pieces until the minimum number of samples is reached.
3. Used in conjunction with the accuracy feature, you can be assured that all scale
operators will use the same criteria for counting.
5.3.3 LOCAL FILTER & REMOTE FILTER
1. Pressing the local filter soft key allows access to soft keys for AUTO or numeric
levels of filtering. Auto filtering lets the scale set the required level of filtering
based on existing conditions. You can also set a fixed amount of filtering with
larger numbers offering more filtering. High filtering will cause the scale to react
more slowly. If large filtering values are required due to excessive air and or
vibration, consider taking steps to eliminate the source of air movement or
vibration.
2
Pressing the remote filter soft key allows the same adjustments for an optional
remote scale platform.
5.4 SERVICE SUB-MENU
Table 5-4 lists the items which are contained in the Service sub-menu. The
SERVICE password is 3333.
To access the Service sub-menu, follow the instructions below.
1. Press the * button and scale prompts “Select a setup menu”.
2. Press the SERVICE soft key. The prompts for “Input Password. Enter 3333.
The Service sub-menu items are listed above the six soft keys. Press the Other
or Back soft keys to see more choices.
7. Press the soft key pertaining to the item you wish to modify. The scale shows the
current status or selection of that item in the form of a highlighted soft key text.
8. Press the soft key corresponding to the desired status then press the ENT key.
You may exit this screen without making changes by pressing the CLR key.
9. Repeat steps 3 and 4 above until the configuration is complete.
10. Press the CLR key twice to return to normal operating mode.
24
ITEM
Calibration of 650 or remote platform
SOFT
KEY
CALIB
Zero Count Value/ re-entry
KCalZR
Full scale count value/ re-entry
KcalSP
Allows setting and changing of 650
parameters
LOCAL
Allows setting and changing of
remote platform parameters
Allows setting and changing of COM
port setups
Allows global scale reset to factory
defaults
Sets display backlight.
REMOTE
DESCRIPTION
Allows you to enable or disable the
controlled accuracy feature
Allows re-entry of zero point value without
going through calibration procedure
Sets the amount of filtering on the TC2010
platform
Sets scale operation parameters for
graduation size, creep tracking, zero
tracking, zero range, motion band, digital
filter, overload point, calibration unit,
displayed division size, decimal point
SETCOM
Sets serial protocol for COM ports
SETDEF
Resets all scale parameters to factory
defauts
Either always on or conservation mode to
save power for battery operation
LIGHT
TABLE 5-4: Service sub-menu items
5.4.1 CALIB – THREE POINT CALIBRATION
1.
2.
3.
4.
5.
6.
7.
8.
9.
10.
11.
12.
13.
Press the soft key CALIB
Scale prompts “Select local or remote for calibration”.
Press the local or remote soft key or exit soft key to exit calibration
The scale prompts “Remove all weights and press enter”.
Remove all weight from the scale platform and press the ENT key.
The scale prompts “please weight” and briefly displays the zero count value and then
displays “Zero Calibration Done”
After computing the zero point the scale prompts “Input test weight in pounds (CAL
Point 1)
Enter the test weight value. For CAL point one use a test weight of at least 10% of the
scale capacity and press ENT.
The scale prompts “Put test weight on the press enter”
Place the test weight on scale and press ENT.
The scale briefly displays the count value for CAL point one.
Follow the prompts for CAL point 2 and 3. Use approximately 50% of the scale capacity
for CAL 2 and close to 100% of scale capacity for CAL 3.
If the calibration was completed successfully, the scale briefly display “Calibration
Passed”
5.4.2 CALIB – SINGLE POINT CALIBRATION
1. Follow steps 1 – 11 in 5.4.1.
2. When the scale prompts “Input test weight in pounds (CAL Point 2) enter 0 the press
ENT
3. The scale prompts “Abort Point 2 CAL?”
4. Press the YES soft key.
5. The scale prompts “Multi point cal aborted” and returns to the service sub-menu.
25
5.4.3 KcalZR Allows re-entry of the zero counts from last calibration
1.
2.
3.
4.
Press the KcalZR soft key.
Scale prompts “Select local or remote for calibration”.
Press the local or remote soft key or exit soft key to exit calibration
Scale displays “Key in Zero Counts XXXXXX “ where XXXXXX is the existing value for
zero counts from the last calibration. The first digit is blinking and will accept new values
entered from the keyboard. Either enter a new value and press ENT or press ENT to
accept the displayed value.
5. Scale prompts “Zero count is:XXXXXX.
6. Press the Yes soft key to accept or No soft key to return to step 4.
5.4.4 KCalSP Allows re-entry of the full scale counts from last calibration
1.
2.
3.
4.
Press the KcalSP soft key
Scale prompts “Select local or remote for calibration”.
Press the local or remote soft key or exit soft key to exit calibration
Scale displays “Key in Full Scale Counts XXXXXX “ where XXXXXX is the existing
value for full scale counts from the last calibration. The first digit is blinking and will
accept new values entered from the keyboard. Either enter a new value and press ENT
or press ENT to accept the displayed value
5. Scale prompts “Full Scale counts is:XXXXXX.
6. Press the Yes soft key to accept or No soft key to return to step 4
5.4.5 LOCAL Sets scale operation parameters for graduation size, creep tracking,
zero tracking, zero range, motion band, digital filter, overload point, calibration unit,
displayed division size, decimal point See Table 5-4.
5.4.6 Remote Sets scale operation parameters for graduation size, creep tracking,
zero tracking, zero range, motion band, digital filter, overload point, calibration unit,
displayed division size, decimal point See Table 5-4
PARAMETER
(Soft Key Text)
DESCRIPTION
AVAILABLE
CHOICES
Graduations
(Grads)
Specifies number of full scale graduations. Value should be
consistent with legal requirements and environmental limits on
the useful system resolution.
Span
N/A
Creep Tracking
(CrpTrk)
Sets the range within which the scale will attempt to offset the
effects of load cell creep. Use a lower setting for lower capacity
load cells and vice-versa. Selections are in seconds.
Off
1, 3, 5, 10, 15,
20, 30, 50, 60,
120, 180, 240
Zero Track Band
(Ztrack)
Selects the range within which the scale will automatically zero.
Note that the scale must be in standstill to automatically zero.
Selections are in Display Divisions.
0 d, 0.5 d, 1 d
3d ,5d
26
1,000
1,500
2,000
2,500
3,000
4,000
5,000
6,000
7,500
8,000
10,000 12,000
15,000 20,000
24,000 30,000
40,000 50,000
100,000
Zero Range
(Zrange)
Selects the range within which the scale may be zeroed. Note
that the scale must be in standstill to zero the scale.
100%
1.9%
Motion Band
(MotBand)
Sets the level at which motion is detected by comparing the
present display update with the previous one. If motion is not
detected for two seconds or more, scale is in standstill and can
process a Print or Zero command. Maximum value varies
depending on local regulations.
0.25 d
1d
5d
Digital Filter
(DFltr)
Sets the scale’s digital filtering method. The auto setting is a
dynamic filtering algorithm which optimizes stability and response
time. The settings 8 to 128 employ an averaging algorithm and
the settings Full 8 to Full 32 employ a hybrid averaging/dynamic
filtering algorithm.
Auto
8, 16, 32, 64, 128
Full 8, Full 16,
Full 32
Overload Limit
(OverLd)
Selects the desired formula which determines the point at which
the scale shows overload. All selections are based on the
primary calibration unit.
"FS" = Full scale in primary units.
FS
FS + 2%
FS + 1d
FS + 9d
Calib. Unit
(CalUnt)
Selects the primary base unit to be used in the calibration
process. Also the default unit for normal operation.
lb
kg
Display Divisions
(DspDiv)
Determines the desired weight increments. Value should be
consistent with legal requirements.
1
Decimal Pt.
(DecPnt)
Determines location of the decimal point.
0, 0.0, 0.00, 0.000
0.0000, 0.00000
00
2
0.5 d
3d
10 d
5
TABLE 5-5: Local/Remote Scale Sub-menu Items
1. Press the soft key for each parameter listed in table 5-4. Each parameter will display
soft key choices for setup. Select the desired soft key and press ENT to select.
5.4.7 SETCOM Allows configuration and selection of COM ports
The configuration items for both serial ports (COM1 and COM2) are mostly identical in content. Table
5-5 lists the items which are available to be configured for each serial port.
1. From the service menu, press the SETCOM soft key.
2. Press the COM1 or COM2 soft key to configure the serial port of your choosing. The
sub-menu items are listed above the six soft keys.
3. Press the soft key pertaining to the parameter you wish to modify. The scale shows the
current status or selection of that item in the form of a highlighted soft key text.
4. Press the soft key corresponding to the desired status then press the ENT key. You may
exit this screen without making changes by pressing the CLR key.
5. Repeat steps 3 and 4 above until the configuration is complete.
6. Press the CLR key twice to return to normal operating mode.
27
PARAMETER
(Soft Key Text)
DESCRIPTION
AVAILABLE
CHOICES
Device (Device)
for COM1
Selects the device connected to the COM1 serial port. The
default setting is LP2742. DotPrt should be selected for a dot
matrix serial printer. BarPrt should be selected for bar code
printing.
DotPrt
MP20
TDP5
ET-LTP
Device (Device)
for COM2
Selects the device connected to the COM2 serial port. The
default setting is Scanner. Scanner should be selected for a
Symbol LS2401 or compatible bar code scanner. PC should be
selected for a full duplex connection to a PC or remote display.
See Appendix B for serial data format.
Scanner
PC
QWERTY
keyboard
TCS
Baud Rate (Baud)
Selects the baud rate for data transmission through the serial
port. The default setting for both ports is 9600.
600
1200
4800
Data Bits and
Parity (Bits)
Selects the number of data bits and parity of serial transmission.
The default setting is 8 None.
"8 None" = 8 data bits with no parity bit and 1 stop bit
"7 Odd" = 7 data bits with odd parity bit and 1 stop bit
"7 Even" = 7 data bits with even parity bit and 1 stop bit
8 None
7 Odd
7 Even
Mode of Serial
Transmission
(Mode) for COM2
Selects when data will be sent out of the COM2 serial port to a
computer or remote display. The default setting is Demand.
"Contiu" = Continuous mode; send data continuously
"Demand" = Demand mode; send data when a PRINT command
is issued from the computer.
Contiu
Demand
2400
9600
TABLE 5-6: Com port Sub-menu Items
5.4.8 RESTORE SYSTEM DEFAULTS SUB-MENU (SysDft)
The Restore System Defaults sub-menu allows you completely restore all configuration
settings throughout the scale to those programmed at the factory. This procedure will not
overwrite your item ID storage.
Use with extreme caution – this process cannot be undone!
To access the Restore System Defaults sub-menu, follow the instructions below.
1.
From the service menu, press the SYSDEF soft Key
2.
Scale prompts “Restore Factory Defaults?”
3.
Press the Yes soft key to restore factory settings or press the No soft key to exit.
4.
Press the CLR key twice to return to normal operating mode.
5.4.9 LIGHT
1. From the service menu, press the LIGHT soft Key
2. Scale prompts “Setup BKLight”
3. Select either the ON soft key for always on or the Consva soft key where the back light
turns off
28
after 10 minutes of no scale activity to conserve power for battery operation.
5.5
PRT FM Print format
1.
2.
3.
4.
From the main menu, press the * key
Press the PRTFM soft key
Scale prompts “Input Password”
Enter 4444
5.5.1 MARGIN
1.
2.
3.
4.
Press the MARGIN SOFT KEY
Scale prompts “Enter left margin spaces”
Enter a numeric value to set left margin. Default is 90.
Press ENT to accept
5.5.2 Header
1. There are three header fields used commonly for company name, address and
city/state. These three header fields print on the default label and can be changed.
There are also 10 user fields that contain text messages and may be selected for a
custom label when using the FIELDS soft key. Header fields are 25 characters
maximum.
2. Press the Header soft key and the scale prompts “Enter Message No:”
3. Enter a two digit value – 01, 02 or 03 for default label header or 04 to 13 for user fields.
4. Scale displays HEADER MESSAGE SETUP screen.
5. The contents of the selected header are displayed and may be edited with the displayed
soft keys.
6. Press the ENT key when editing is complete and scale prompts “Save Changes?”
7. Press the Yes soft key to accept or No soft key to exit without saving.
5.5.3 PrtMdl Printer model selection
1. Press the PrtMdl soft key.
2. The scale displays the model printers that have printer drivers preset in the scale.
3. Select the desired model and press the ENT key to accept or Exit soft key to exit
without change.
NOTE: if there is a printer that you would like to use that is not listed, call the factory for a
price on adding the print driver for your printer.
5.5.4
Fields
1. Press the Fields soft key.
2. The scale displays the fields for selection on the left side and the fields selected on the
right side. The fields are display four per screen. Use the PgUp or PgDn keys to see
more fields.
3. Use the arrow soft keys to move from side to side and up and down.
4. Use the Select soft key to add a field or the delete soft key to remove a field.
5. Some fields may print bar coded as well as human readable information. On the field
selected side, press the B code key to add bar code. The letter B will show on the right
side of the field selected screen. Press the B Code key again to remove.
6. Press the ENT key to accept and save the new label format.
7. The custom label is now set to print using the Print soft key from the main menu.
29
5.5.5
LABEL - Allows six label formats to be downloaded from WYSIWYG
software and also allows selection of the label.
5.5.5.1 – Download label format from PC
1.
2.
3.
4.
5.
6.
Press the DnLoad soft key
Scale prompts “ Select Index to Download.”
Press a soft key 1 – 6 to store the label format and press ENT
Scale prompts “Ready to Download Ent – Save CLR - cancel”
Use test print from PC to download a formatted label.
Press ENT to accept label. Scale prompts “FMT SIZE = xxx” where xxx is the file size.
A test label is automatically printed. Each of the six label registers is limited to a
maximum of 10K bytes for a file size.
7. See table 5.6 for a list of the scale fields available to print. Other data may be included
on the label as fixed text.
COMMAND
%GR
%NT
%APW
%TR
%PC
%DATE
%TIME
%IX
%ID
%PN
%CH
%LOT#
FUNCTION
Prints GR followed by Gross Weight
Prints NT followed by Net Weight
Prints APW followed by Average Piece Weight
Prints TR followed by Tare Weight
Prints PC followed by Number of Pieces
Prints the current date from the 650
Prints the current time from the 650
Prints IX followed by the Item ID (1 – 2000)
Before printing, the 650 will prompt for entry of a Product ID. IT then
prints ID followed by the Product ID entered
Before printing, the 650 will prompt for entry of a Product Name. It then
prints PN followed by the Product Name entered
Prints CH followed by the scale channel (1 or 2)
Before printing, the 650 will prompt for entry of a Lot #. It then prints
LOT# followed by the lot number entered.
TABLE 5-7: Print commands for formatting a label with WYSIWYG software
5.5.6
Deflt
1. Pressing the Deflt soft key changes the selected label format to the default label.
2. Use the clear key to move back to other menus. See appendix 2 figure B4 for label
example.
5.6 DIAGNOSTICS SUB-MENU (Diag)
The Diagnostics sub-menu allows you to test certain parts of the scale’s operation
for troubleshooting purposes. Available areas for testing include ADC (Analog-toDigital Converter) test, keyboard test and display test. This sub-menu also allows
you to key-in the scale’s calibration. Table 5-7 lists the items which are contained in
this sub-menu.
To access the Diagnostics sub-menu, follow the instructions below.
1. From the main menu. Press the * key.
2. Press the Diag soft key. Key-in the password (5555). The sub-menu items are
listed above the six soft keys.
30
3. Press the soft key pertaining to the diagnostic function you wish to access.
4. Press the CLR key twice to return to normal operating mode.
Item
Soft Key
Description
ADC (Analog-to-Digital Converter) Test
ADTst
Shows the selected scale’s internal counts. Useful for
troubleshooting calibration problems. Use the G?N soft key to
toggle between the original value and the zeroed value. Use the
Zero soft key to zero the internal counts. Use the L/R soft key to
toggle scales. Press the Exit soft key to exit this function.
Keyboard Test
KeyTst
Shows the key code for any key pressed. Useful for
troubleshooting keyboard problems. Consult Table 5-8 for a listing
of key codes. Press the CLR key to exit this function.
Display Test
DspTst
Displays a number of test screens for analysis of display
problems. Press any key to sequence through the test screens.
Automatically exits after displaying last screen.
TABLE 5-8: Diagnostic submenu
Key
SOFT KEY #1
SOFT KEY #2
SOFT KEY #3
SOFT KEY #4
SOFT KEY #5
SOFT KEY #6
STAR (*) KEY
ONE (1) KEY
TWO (2) KEY
THREE (3) KEY
FOUR (4) KEY
Code
16
17
18
19
20
21
13
01
02
03
04
Key
FIVE (5) KEY
SIX (6) KEY
SEVEN (7) KEY
EIGHT (8) KEY
NINE (9) KEY
ZERO (0) KEY
LOCAL/REMOTE KEY
FUNCTIONS KEY
DECIMAL (.) KEY
ENTER KEY
CLR KEY
TABLE 5-8: Display Test
31
Code
05
06
07
08
09
00
14
15
10
12
EXITS
5.6
ITEM ID SUB-MENU
This function is used to list, print or erase all items stored in the scale.
1.
From the main menu. Press the * key.
2.
Press the ItemID soft key. Scale prompts “Input Password”. Enter 6666. The
Configuration sub-menu items are listed above the six soft keys.
5.6.1 IntItem
INITIAL ITEM ID’s (Initial)
This function is used to erase all stored item ID’s.
Use with extreme caution – this process cannot be undone!
1.
Press the IntItem soft key. The scale asks you to confirm this action.
2.
Press the Yes soft key to proceed or press the No soft key to abort the operation.
5.6.2 EnSave
1. If Enable is selected with the soft key, any time the print command is used, the scale
will prompt “Save Item ID?” if the item being counted is not already in the database.
5.6.3 DnLoad & UpLoad
1. Dnload is used to send a database from a PC to the 650. UpLoad sends the 650
database to a PC.
5.6.4 PRINT
1. Prints the 650 database to a dot matrix printer.
5.6.5 LIST
1. Displays a list of items in the database. See 4.2.2.
32
CHAPTER 6: CALIBRATION
6.1
CALIBRATION OVERVIEW
Your 650 scale ships from the factory fully calibrated as a stand alone unit. If you are using
the 650 without a remote scale or the remote scale has been installed for you, then
calibration is not necessary. In general, there is no need to calibrate the scale unless you
feel that it has become inaccurate. It is a good idea to check the calibration of your scale
from time to time with a precision test weight. Salter Brecknell recommends that you
perform a new calibration on your digital scale at least once a year.
Note: If you wish to install the remote scale yourself - or you are a scale installer - then you
must configure and calibrate the remote scale before it can be used. The remote
scale’s installation and wiring instructions are found in Appendix D. The Service
Menu (Chapter 5) configures the scale to your remote weigh platform. Salter
Brecknell recommends letting a professional install the remote scale unless you
have previous experience in this field.
During calibration, up to four values are saved in the scale’s memory – the zero
value (deadweight) and up to three span values (test weights). If you are calibrating
the local scale, see Table 6-1 for a listing of minimum and recommend test weights.
In the unlikely event that either value is lost while in use, the Service menu makes
provisions for re-entering these values. See Chapter 5 for more information.
6.2
CALIBRATION MENU
6.2.1 CALIB – THREE POINT CALIBRATION
1.
2.
3.
4.
5.
6.
Press the soft key CALIB
Scale prompts “Select local or remote for calibration”.
Press the local or remote soft key or exit soft key to exit calibration
The scale prompts “Remove all weights and press enter”.
Remove all weight from the scale platform and press the ENT key.
The scale prompts “please weight” and briefly displays the zero count value and then
displays “Zero Calibration Done”
7. After computing the zero point the scale prompts “Input test weight in pounds (CAL
Point 1)
8. Enter the test weight value. For CAL point one use a test weight of at least 10% of the
scale capacity and press ENT.
9. The scale prompts “Put test weight on the press enter”
10. Place the test weight on scale and press ENT.
11. The scale briefly displays the count value for CAL point one.
12. Follow the prompts for CAL point 2 and 3. Use approximately 50% of the scale capacity
for CAL 2 and close to 100% of scale capacity for CAL 3.
13. If the calibration was completed successfully, the scale briefly display “Calibration
Passed”
6.2.2 CALIB – SINGLE POINT CALIBRATION
1. Follow steps 1 – 11 in 5.4.1.
6. When the scale prompts “Input test weight in pounds (CAL Point 2) enter 0 the press
ENT
7. The scale prompts “Abort Point 2 CAL?”
8. Press the YES soft key.
9. The scale prompts “Multi point cal aborted” and returns to the service sub-menu.
33
MODEL
Capacity / Graduation
Minimum Test Weight
Recommended Test Weight
650-12
12 x 0.001 lb
0.12 lb
8 lb to 12 lb
650-30
30 x 0.002 lb
0.3 lb
20 lb to 30 lb
650-60
60 x 0.005 lb
0.6 lb
40 lb to 60 lb
650-120
120 x 0.01 lb
1.2 lb
80 lb to 120 lb
650-6M
6 x 0.0005 kg (0.5 g)
60 g
4 kg to 6 kg
650-15M
15 x 0.001 kg (1 g)
150 g
10 kg to 15 kg
650-30M
30 x 0.002 kg (2 g)
300 g
20 kg to 30 kg
650-60M
60 x 0.005 kg (5 g)
600 g
40 kg to 60 kg
TABLE 6-1: Minimum / Recommended Calibration Test Weights for Local Scale
34
APPENDIX A: SPECIFICATIONS
CONSTRUCTION:
Housings: Gray ABS
Sub-Platform: Metal
Platter: Stainless Steel
Feet: Non-skid Hard Rubber
DISPLAY:
240 x 64 Graphic LCD,
EL Backlighting
KEYPAD:
22-key Tactile Keypad
OVER CAPACITY ANNUNCIATION:
103% of Full Scale Capacity
OPERATING TEMPERATURE RANGE:
32°F to 104°F
(0°C to 40°C)
POWER SOURCE:
AC Adapter, 12VDC, 800 mA,
included
COM1 SERIAL PORT:
Simplex RS-232, DSUB9M
COM2 SERIAL PORT:
Full Duplex RS-232, DSUB9F
WEIGHT:
Net Weight: 23.0 lb (10.4 kg)
Shipping Weight: 24.0 lb (10.8 kg)
PHYSICAL DIMENSIONS:
10.2" [258 mm]
13.2" [336 mm]
14.5" [368 mm]
13.5" [343 mm]
35
APPENDIX B: SERIAL PORT INFORMATION
B.1
COM1 SERIAL PORT
B.1.1
CONNECTING THE SERIAL PRINTER
The COM1 serial port is a simplex RS-232 port designed for connection to a serial printer.
Figure B-1 shows the serial port pinout. Figure B-2 shows a suggested cable
diagram for a dot matrix serial printer. Figure B-3 shows a suggested cable diagram
for a thermal serial printer. The cable shown in Figure B-3 is a standard Salter
Brecknell cable – Model NMC-1.
Note: The COM1 serial port contains a non-standard pin-out for a DSUB9 connector.
Earlier 650 models may contain a standard pin-out for a DSUB9 connector. In this
case, pin 3 is the Transmit Data (TXD) pin.
1. Plug the serial printer cable (not included) directly into the DSUB9 serial port
connector.
2
Pin No.
Pin Name
Signal Level
2
5
Transmit Data
Signal Ground
RS-232
RS-232
5
Front View
Figure B-1: Pin assignments for the COM1 serial port connector
SCALE
PRINTER
SCALE
3 RXD
3 RXD
TXD 2
S. GND
PRINTER
TXD 2
5
7 S. GND
DSUB9F
S. GND
DSUB25M
5
DSUB9F
FIGURE B-2: Cable Diagram for Scale to Dot Matrix
Printer
DSUB9M
FIGURE B-3: Cable Diagram for Scale to Thermal
Printer
5 SIG GND
6 TTL 1
7 TTL 2
8 TTL 3
DSUB9F
FIGURE B-2: Cable Diagram for Scale to external relays
36
5 S. GND
B.1.2
DEFAULT PRINT FORMAT
Figure B-4 shows the fixed format of the print format. The fields can be enabled or
disabled as described in Section 5.5.4.
FIGURE B-4: Default Print Format for Thermal Printer
B.1.3 CONNECTING TO MP-20
When connecting the MP20 to the 630, use an NMC-1 cable from COM 1. Connect the
other end of the NMC-1 cable to the printer cable supplied with the MP-20. Configure
section 5.5.3 to select the MP-20. Create a label using section 5.5.4. Select the fields to
print in human readable only. If a field has a bar code selected, it may not fit the entire bar
code across the two inch width of the label causing an incomplete, unreadable bar code.
B.2
COM2 SERIAL PORT
B.2.1
CONNECTING THE SCANNER, REMOTE DISPLAY, TC100 OR COMPUTER
The COM2 serial port is a full duplex RS-232 port designed for connection to a computer,
scanner or remote display. Figure B-5 shows the serial port pinout. Figure B-6
shows a suggested cable diagram for a PC-type computer. Figure B-7 shows a
suggested cable diagram for a scanner. The cable shown in Figure B-6 is a
standard Salter Brecknell cable – Model NMC-1.
Note: Earlier 650 models may not be equipped with a COM2 serial port.
1. Plug the scanner, remote display or computer communication cable (not
included) directly into the DSUB9 serial port connector.
5
Pin No.
Pin Name
Signal Level
2
3
5
Receive Data
Transmit Data
Signal Ground
RS-232
RS-232
RS-232
3
2
Front View
37
Figure B-5: Pin assignments for the COM2 serial port connector
SCALE
COMPUTER
SCALE
RXD 2
2 RXD
TXD 3
3 TXD
S. GND
5
SCANNER
2 TXD
RXD 2
5 S. GND
S. GND
5
5 S. GND
4 DTR
6 DSR
8 CTS
DSUB9M
DSUB9F
DSUB9M
FIGURE B-6: Cable Diagram for Scale to Computer
B.2.2
DSUB9M
FIGURE B-7: Cable Diagram for Scale to Scanner
FULL DUPLEX MODES FOR COM2
B.2.2.1
DEMAND MODE
The Demand mode allows control from a host device, usually a PC, and can be activated
by pressing the Print soft key. Figure B-8 shows the serial data format for the
Demand Mode. Table B-1 shows the recognized host commands.
<STX> <POL> xxxxx.xx
Start
Transmission
<SP> <LB/KG> <SP>
Weight Data Space
Polarity:
<SP> = Positive
"–" = Negative
<GR/NT> <CR> <LF>
Space
Units:
lb = pound
kg = kilogram
pc = pieces
Carriage
Return
Gross/Net:
GR = Gross
NT = Net
FIGURE B-8. Consolidated Controls Demand Mode
38
Line
Feed
“P” - This command is sent to the scale to print the indicated display. The
scale will not respond if the scale is in motion, positive overload or
negative overload.
“Z” - This command is sent to the scale to zero the scale. If the scale is in
motion, the scale will wait until a state of equilibrium is achieved. The
scale will not respond at all if the scale is in positive overload or
negative overload. The scale will also not respond if it is not in gross
mode or within the zero range specified in F4 of the Setup Menu.
“T” - This command is sent to the scale to tare the scale. If the scale is in
motion, the scale will wait until a state of equilibrium is achieved. The
scale will not respond at all if the scale is in positive overload or
negative overload. The scale will also not respond if it displaying a
negative gross value.
“G” - This command is sent to the scale to revert to gross mode. The scale
will not respond if the scale is in motion, positive overload or negative
overload. The scale will also not respond if it is not in net mode.
“N” - This command is sent to the scale to revert to net. The scale will not
respond if the scale is in motion, positive overload or negative
overload. The scale will also not respond if it is not in gross mode or a
tare has yet to be established.
“C” - This command is sent to the scale to toggle among the configured
units.
TABLE B-1. Recognized Host Commands
B.2.2.2
CONTINUOUS MODE
The Demand mode is used to interface to computers, scoreboards and other remote
devices requiring constant data updating. The transmission occurs at the end of
each display update. Figure B-9 shows the serial data format for the Continuous
Mode.
<STX>
<POL> xxxxx.xx
Start
Transmission
Polarity:
<SP> = Positive
"–" = Negative
<L/K> <G/N>
Weight Data
<STAT>
Gross/Net:
G = Gross
N = Net
<CR> <LF>
Carriage
Return
Line
Feed
Units:
L = pound
K = kilogram
P = pieces
Status:
<SP> = Valid
M = Motion
O = Over/under range
FIGURE B-9. Consolidated Controls Continuous Mode
39
B.2.3 CONNECTION TO A 610 OR 630
A 610 or 630 may be used for high precision calculations of average piece weights. The
610 or 630 can transmit the APW to the TC2010.
650 CONFIGURATION
1. Use COM 2 and set to scanner – see B.2.1
2. Use an NMC-2 male to male cable.
610 OR 630 CONFIGURATION
1. Set A 6 to APW transmit mode
2. Connect MNC-2 cable to COM 1
TO USE THE APW FROM THE 610
1. From the 650
2. Make sure the 610 is counting the pieces you want the average piece weight
from.
3. Press the SAMPLE soft key on the 650.
4. Press the APW soft key on the 650.
5. Press the TCS soft key on the 650.
6. The APW from the 610 is retrieved and the 650 begins counting
1. From the 610 OR 630
2. Use the 610 or 630 to count pieces you want the average piece weight from.
3. Press the PRINT key on the 610 to transmit the APW to the 650.
CAUTION: this will over-write any existing APW currently being used in the
650.
40
APPENDIX C: ERROR MESSAGES
C.1
ERROR MESSAGES
If the scale encounters an error condition, it will display a message alerting the operator. A
description of each display follows:
C.1.1
OPERATOR ERRORS
Message
Explanation
Maximum Scale Weight
Exceeded
Indicates that the weighing capacity of the selected scale has
been exceeded.
Not Enough Resolution
Indicates that there is not enough internal resolution to
calculate the unit weight of an item. This means that the
items you are counting are too light for the scale to
process at all.
Unit Weight too Light
Indicates that unit weight of the items you are sampling
or manually entering is too light for the scale to process
accurately.
Sample Weight too Light
Indicates that total weight of the items you are sampling
is too light for the scale to process accurately.
Invalid Tare Value Entered
Indicates that the tare weight value you are entering is
not rounded to the nearest scale division. For example,
you cannot enter 0.01 lb for a 0.05 lb increment scale.
Value Exceeds the Scale
Capacity
Indicates that the tare weight value or unit weight value
you are entering exceeds the capacity of the scale.
Remote Scale Error – Cannot
Switch
Indicates that there is a problem with the remote scale
or the remote scale has been disconnected.
Remote Scale Disabled
Indicates that the remote scale is disabled. Occurs
when you press the Local / Remote key.
No Such ID in System
Indicates that the ID number you have entered or
scanned does not exist in the scale.
No Pieces for Accumulating
Occurs when you press the M+ soft key with nothing on
the scale platform.
41
C.1.2
CALIBRATION ERRORS
Message
Explanation
Scale Not Ready
Scale is unstable or there is an internal error in the scale.
ERROR: Value Exceeds Scale
Capacity
Indicates that the test weight value you have chosen
exceeds the scale’s capacity.
ERROR: Value <1% of Scale
Capacity
Indicates that the test weight value you have chosen is
less than 1% of the scale’s capacity.
ERROR: Internal Resolution
Too Low
Occurs when you do not place the test weight on the
scale during calibration. Can also indicate that there is
an internal error in the scale.
Wrong Test Weight
During a multi-point calibration, the entered test weight
value did not match the test weight applied to the scale.
This error can also occur if the following relationship is
not true:
Cal Point 1 < Cal Point 2 < Cal Point 3
Invalid Data
Occurs when you enter a value of zero for the KcalZR
or KcalSP functions. See Chapter 5 for more
information.
42
APPENDIX D: REMOTE SCALE WIRING
D.1
REMOTE SCALE WIRING
The 650 ships with a 15 ft shielded load cell cable for connection to the remote platform’s
load cell(s) or junction box. The 650 supplies enough current to drive up to 4-350Ω load
cells.
1.
Plug the cable’s 14-pin Centronics-type connector into the load cell port on the
rear panel of the scale.
2. Wire the bare wires and shield to the remote platform’s load cell(s) or junction box using
the color codes shown in Figure D-1.
Color
RED
BLK
GRN
WHT
Wire Name
+Excitation
–Excitation
+Signal
–Signal
Figure D-1: Color Codes for Shielded Load Cell Cable
3.
If you do not wish to use the shielded load cell cable, you may use own, following
the pin assignments shown in Figure D-2. (A 14-pin Male Centronics-type connector is
required).
Pin Nos.
1/8
3/10
5/12
7/14
Pin Name
+Excitation
7
5
3
1
–Excitation
+Signal
–Signal
14
12
10
8
Figure D-2: Pin assignments for the Load Cell Port
43