1
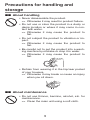
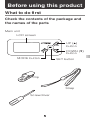
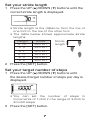
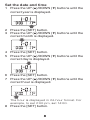
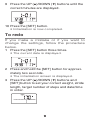
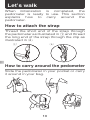
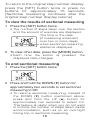
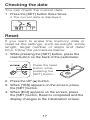
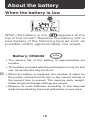
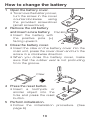
Instruction Manual
for
Digital Pedometer
Model TW610
Contents
Safety precautions
2
Features
4
Before using this product
5
Let’s walk
10
Method of operation
12
About the battery
18
Troubleshooting
20
What is an amount of exercise?
22
Specifications/Warranty
23
• Thank you for purchasing the digital pedometer TW610.
• Please read this Instruction Manual before using this
unit.
• Please keep this Instruction Manual for your future
reference.
Safety precautions
This instruction manual uses various illustrations to
explain how to use the product correctly and safely in
order to prevent any damage or injuries occurring to
you, other people or property.
The column bearing this mark describes
Warning the content related to a hazard that may
cause death or serious injuries.
The column bearing this mark describes
Caution the content related to a hazard that may
cause injuries or property damage.
This mark indicates prohibited actions.
This mark indicates items that are mandatory and the user is required to observe at
all times.
Warning
• Keep batteries, main unit and attached screwdriver away from babies.
>> Otherwise they may be accidentally
ingested or cause injuries.
• Never dispose of batteries in the fire.
>> Otherwise they may explode.
Caution
• If you are not accustomed to daily exercise,
consult your physician or trainer.
>> Sudden and strenuous exercise is dangerous.
• If you are receiving treatment for injuries or
diseases, consult your physician or trainer.
2
Precautions for handling and
storage
■■ About handling
• Never disassemble the product.
>> Otherwise it may result in product failure.
• Do not use or store the product in a dusty or
damp location or where it may come in contact with water.
>> Otherwise it may cause the product to
fail.
• Do not subject the product to vibration or impact.
>> Otherwise it may cause the product to
fail.
• Be careful not to put the product into a washing machine by mistake or drop it in water.
>> Otherwise it may cause the product to
fail.
• Refrain from wearing it in the hip/rear pocket
of your trousers.
>> Otherwise it may break or cause an injury
when you sit down.
■■ About maintenance
• Do not use thinner, benzine, alcohol, etc. for
maintenance.
>> Clean the main unit using a soft cloth.
3
Features
• The 3D (triaxial accelerometer) sensor enables
the pedometer to count the number of steps in
any direction when placed in a pocket or bag
• The pedometer measures calorie consumption,
amount of fat burned, walking distance, walking
time and average walking speed.
• It displays the level of attainment of a preset
daily target number of steps on a scale of nine.
• Data for the past 14 days is stored in the memory. You can view the accumulated data at any
time.
• You can measure the number of steps or distance for any selected section.
• If no buttons are pressed for a while, the screen
automatically returns to the standard display
(number of steps, time and amount of exercise).
• If no buttons are operated and no vibration is
generated by walking, power-saving mode is
automatically enabled to reduce battery consumption.
• Memory data is not erased when the battery is
replaced. (At most, data for the most recent onehour period will be erased.)
4
Before using this product
What to do first
Check the contents of the package and
the names of the parts
Main unit
LCD screen
UP (▲)
button
DOWN (▼)
button
MODE button
SET button
Clip
Strap
Screwdriver
5
Initializing the product
Turn on the power
1 Press and hold the [SET] button (for at least
three seconds).
• The entire display screen lights ready for
initialization.
Initialization
When you have finished setting your weight,
stride length, target number of steps and
date/time, the pedometer is ready to use.
Set your weight
1 Press the UP (▲)/DOWN (▼) buttons until the
correct weight is displayed.
• Pressing the UP (▲) button increases the
number and pressing the DOWN (▼) button
reduces the number.
2 Press the [SET] button.
6
Set your stride length
1 Press the UP (▲)/DOWN (▼) buttons until the
correct stride length is displayed.
• Stride length is the distance from the toe of
one foot to the toe of the other foot.
• The table below shows approximate stride
lengths.
Height
4’ 10”
5’ 3”
5’ 7”
5’ 11”
6’ 3”
6’ 6”
Stride
26 inch
28 inch
30 inch
32 inch
34 inch
35 inch
Stride
length
2 Press the [SET] button.
Set your target number of steps
1 Press the UP (▲)/DOWN (▼) buttons until
the desired target number of steps per day is
displayed.
• You can set the number of steps in
increments of 1,000 in the range of 3,000 to
30,000 steps.
2 Press the [SET] button.
7
Set the date and time
1 Press the UP (▲)/DOWN (▼) buttons until the
correct year is displayed.
2 Press the [SET] button.
3 Press the UP (▲)/DOWN (▼) buttons until the
correct month is displayed.
4 Press the [SET] button.
5 Press the UP (▲)/DOWN (▼) buttons until the
correct day is displayed.
6 Press the [SET] button.
7 Press the UP (▲)/DOWN (▼) buttons until the
correct hour is displayed.
The hour is displayed in 24-hour format. For
example, to set 2:00 pm, set 14:00.
8 Press the [SET] button.
8
9 Press the UP (▲)/DOWN (▼) buttons until the
correct minutes are displayed.
10 Press the [SET] button.
• Initialization is now completed.
To redo
If you make a mistake or if you want to
change the settings, follow the procedure
below.
1 Press the [SET] button three times.
• The current date is displayed.
2 Press and hold the [SET] button for approximately two seconds.
• The initialization screen is displayed.
3 Press the UP (▲)/DOWN (▼) buttons and
[SET] button to set your correct weight, stride
length, target number of steps and date/time
in order.
9
Let’s walk
When initialization is completed, the
pedometer is ready to use. This section
explains how to carry around the
pedometer.
How to attach the strap
Thread the short end of the strap through
the pedometer as illustrated in 1 and thread
the long end of the strap through the clip as
illustrated in 2.
1
2
How to carry around the pedometer
Slide the pedometer in your pocket or carry
it around in your bag.
10
Clip the strap to your pocket or
the side of your bag to prevent it
from falling out.
Take care not to pull too hard
on the strap while the clip is
attached to your clothes. Doing
so may damage the fabric.
For correct measuring
Do not swing the pedometer about or play a
sport while carrying it.
The pedometer may not measure correctly
in the following situations.
•
•
•
•
When you shuffle your feet
When you wear sandals, clogs or flip-flops
When you walk up or down a steep slope or stairs
When you walk at an irregular pace in a crowded
place
• When you walk repeatedly for short periods of less
than six seconds
• When you are riding a bicycle, motorcycle, in a car,
train or other means of transport
• When the pedometer is exposed to loud noise or
continuous vibration
11
Method of operation
Standard display
The following image illustrates the standard
display. When an alternate mode is selected.
the unit automatically returns to standard
display mode if it is not in active usage for
approximately 15 seconds.
Current time
Number of
steps walked
today
Target attainment level
This shows the level of
attainment in relation
to the preset target
number of steps
Amount of exercise
today
(For information on
amount of exercise,
see page 22)
• If the pedometer is not in active usage for over 30
seconds, the LCD blacks out and the device enters
power save mode. The device returns to normal mode
when the user begins walking or operates any of the
buttons.
• The number of steps taken on any one day is memorized
at 2:00 am and the counter returns to zero.
12
How to read the data
You can review your calorie consumption,
amount of fat burned, walking distance,
walking time, average walking speed and
target attainment level (on a scale of 9).
1 Press the [MODE] button.
• Each time the button is pressed, the display
changes as shown below.
Calorie
Standard screen
consumption
Average walking
speed
Amount of fat
burned
Walking time
Walking distance
13
How to read the memory data
You can view the data for the past 14 days
stored in the memory.
1 Press the UP (▲)/DOWN (▼) buttons to
change the displayed date.
• Pressing the UP (▲) button changes the
date away from the present and pressing
the DOWN (▼) button changes the date
closer to the present.
2 To view other data, press the [MODE] button.
• Each time the button is pressed, the
displayed data changes.
Number of steps
Amount of exercise
Date
How to read the accumulated data
You can view the accumulated data for the
past 7-day period (from 6 days ago to the
current day).
1 Press the [SET] button.
2 To view other data, press the [MODE] button.
14
• Each time the button is pressed, the
displayed data changes.
• The target attainment level shows the
accumulated number of steps for a 7-day
period in relation to the daily target x 7.
To return to the original step number display,
press the [SET] button three times or press
no buttons for approximately 15 seconds.
Sectional measuring
You can measure the number of steps taken
over a certain distance, such as from home to
the station, or the accumulated number of steps
over a 1-month period, or the number of steps
taken on an entire hiking route or excursion.
Start sectional measuring
1 Press the [SET] button twice.
• The word [trip] appears.
2 Press and hold the UP (▲) button for approximately two seconds to set sectional measuring to On.
On/Off indicator
3 Press and hold the [SET] button for approximately two seconds.
• The step number changes to zero and
sectional measuring starts.
15
To return to the original step number display,
press the [SET] button twice or press no
buttons for approximately 15 seconds.
(Sectional measuring continues after the
original step number display returns)
To view the results of sectional measuring
1 Press the [SET] button twice.
• The number of steps taken over the section
and the amount of exercise are displayed.
The time or the date
(if measuring extended
over two or more days)
when sectional measuring
started is displayed.
2 To view other data, press the [MODE] button.
• Each time the button is pressed, the
displayed data changes.
To end sectional measuring
1 Press the [SET] button twice.
2 Press and hold the DOWN (▼) button for
approximately two seconds to set sectional
measuring to Off.
• To resume sectional measuring, instead of
the DOWN (▼) button mentioned above,
press and hold the UP (▲) button for
approximately two seconds to select On.
This feature is useful when you do not want
to include the number of steps taken inside
accommodation, such as on an overnight
hiking trip, in sectional measuring.
16
Checking the date
You can check the current date.
1 Press the [SET] button three times.
• The current date is displayed.
Reset
If you want to erase the memory data or
reset all the settings, such as weight, stride
length, target number of steps and date/
time, follow the procedure below.
1. While pressing the [SET] button, press the
reset button on the back of the pedometer.
Press the reset
button while
pressing the
[SET] button
2. Press the UP (▲) button.
3. When [YES] appears on the screen, press
the [SET] button.
4. When [End] appears on the screen, press
the [SET] button. Reset is completed and the
display changes to the initialization screen.
17
About the battery
When the battery is low
When the battery is low,
appears at the
top of the screen. Replace the battery with a
new battery of the following type as soon as
possible (within approximately one week).
Battery: CR2032
• The service life of the battery is approximately six
months.
• The battery provided with the pedometer is only for trial
use. Its service life may be short.
• When the battery is replaced, the number of steps for
the portion of time from 00 min. to the current minute of
the current hour is erased. The memory data, weight,
stride length and target settings are saved.
• Dispose of used batteries according to the disposal
method specified by the local authorities in your area.
18
How to change the battery
1 Open the battery cover.
• To remove the battery cover,
turn the screw in the cover
counterclockwise
using
the provided screwdriver
(small screwdriver).
2 Remove the old battery
and insert a new battery. Packing
• Insert the battery with
the positive pole (+)
facing upward.
3 Close the battery cover.
• Insert the claw on the battery cover into the
main unit, press the cover down and turn the
screw in a clockwise direction.
• When you close the battery cover, make
sure that the rubber seal is not protruding
from the groove.
Claw
4 Press the reset button.
• Insert a toothpick or
similar object into the
hole and press the reset
button.
5 Perform initialization.
• Follow the initialization procedure. (See
page 6)
19
Troubleshooting
is displayed.
• The battery is low. Replace with a new
battery (CR2032). (See page 18)
Nothing is displayed at all.
• Nothing is displayed when the pedometer
is in power-saving mode. Press the [SET]
button or any other button.
• Check that a battery is inserted and that it
is correctly oriented. (See page 18)
• The battery may be exhausted. Replace
with a new battery. (See page 18)
• If you are using the pedometer for the first
time, press and hold the [SET] button (for
at least three seconds). (See page 6)
• Press the reset button on the back of the
pedometer. (See page 19)
The reading seems inaccurate.
• Check whether you are using the pedometer correctly. (See page 10)
Steps are not counted when I shake the
pedometer.
• To prevent measuring errors, ‘walking’ is
judged to be performed after at least six
seconds of walking and the relevant number of steps up to that point are added
on. Shaking the pedometer once or twice
doesn’t have an impact on the number of
steps counted.
20
No steps have been counted.
• If the initialization screen is flashing, your
steps will not be counted. (See page 6)
I don’t want the memory data to be erased
when I change the battery.
• The memory data, weight, stride length
and target settings are not erased when
you change the battery. (At most, the
data for the most recent one-hour period
will be erased.) So you can avoid any
interruption in the data by changing the
battery in the morning before you start
walking.
How do I erase the memory data?
• Follow the reset procedure. (See page 17)
The buttons don’t respond.
• Press the reset button on the back of the
pedometer. (See page 19)
21
What is an amount of exercise?
Amount of exercise (Ex) refers to the
unit indicating the amount of physical
activity. To prevent lifestyle diseases, you
are recommended to actively engage in
a minimum of 23 Ex physical activities
(exercise and daily activities) a week. It
is also recommended that you check with
the guideline by the health authority in your
area.
Amount of exercise (Ex) = Intensity of
physical activities (METs) x Time (hr).
Intensity of physical activities (METs)
multiplied by duration (hr) of physical activity
makes an amount of exercise (Ex).
METs = Metabolic Equivalents, the unit
of intensity of physical activities
The unit for expressing the “intensity of
physical activities” by the multiplication
equivalent to the counterpart during rest.
Normal walking is equivalent to 3 METs.
This product indicates the amount of
exercise (Ex) by the number of steps.
Reference)
Normal walking (3 METs) x 1 hour = 3 Ex
Fast walking (4 METs) x 1 hour = 4 Ex
22
Specifications
Detection system
Display method
Display contents
Date and time
3D acceleration sensor
LCD display
24-hour format (year/month/day/hour/
minutes)
Number of steps
999,999 steps
Calorie consumption
99,999.9 kcal
Amount of fat burned
9,999.9 g
Walking distance
999.99 miles
Walking time
99,999 minutes
Average walking speed 99.99 mile/hr
Exercise
99.9 Ex
Target attainment level 0 to 8 (on a scale of 9)
14-day memory, data
Number of steps, calorie consumption,
accumulated for 7 days amount of fat burned, walking distance,
walking time, walking speed, amount of
exercise, target attainment level
Setting range
Weight
40 to 450 lb
Stride length
8 to 60 in.
Daily target number
3,000 to 30,000 steps
of steps
Accuracy
Number of steps
+/- 5% (based on Citizen vibration tester)
Clock
Within +/- 30 seconds per month
(at 72°F, 22°C)
Drip-proof
Compliant with JIS C 0920:2003
(Drip-proof Type I)
Power supply
3 V DC (one CR2032 battery)
Battery service life
Approx. 6 months
(when walking approx. 10,000 steps on
average per day)
Service temperature range 32°F to104°F (0°C to 40°C)
Storage temperature range -4°F to 140°F (-20°C to 60°C)
Outside dimensions
Approx. 2 6/7” × 1 2/9” ×3/8”
(W x H x D)
(73 × 31 × 10 mm)
Dimensions of display
Approx. 1 2/7” × 5/7” (32.5 ×18.5 mm)
(W x H)
Weight
Approx. 8/9 oz (25 g)
Please note that the step number data,
etc. may be erased when the pedometer is
repaired or parts are replaced.
23
1-YEAR LIMITED WARRANTY
Congratulations on your purchase of a Digital Pedometer. Your Digital Pedometer,
excluding the battery, is covered by the following limited warranty commencing
upon the date of purchase, and subject to the following terms and conditions:
The Warrantor warrants that its Digital Pedometer will be free from defects in
materials and workmanship under normal consumer usage for a period of one year
for the original purchaser of the product.
Periodic maintenance, repair and replacement of parts due to normal wear and
tear are excluded from coverage. Defects or damage that result from: (a) improper
operation, storage, misuse or abuse, accident or neglect, such as physical
damage (cracks, scratches, etc.) to the surface of the product resulting from
misuse; (b) contact with liquid, water, rain, extreme humidity or heavy perspiration,
sand, dirt or the like, extreme heat, or food; (c) use of the Digital Pedometer for
commercial purposes or subjecting the Digital Pedometer to abnormal usage or
conditions; or (d) other acts which are not the fault of the Warrantor, are excluded
from coverage. This warranty does not cover batteries or other power sources that
may be provided with, or used with the Digital Pedometer.
If the Digital Pedometer fails to conform to this limited warranty, return the Digital
Pedometer postage prepaid along with $5.00 for return shipping, handling and
insurance to: Attn: CITIZEN SYSTEMS AMERICA CORPORATION 363 VAN NESS
WAY , SUITE 404 TORRANCE, CA 90501 USA. When returning a product, please
also include: (i) a copy of your receipt, bill of sale or other comparable proof of
purchase; (ii) a written description of the problem; and (iii) your name, address and
telephone number. Carefully package the product to avoid any damage that may
occur while in transit; shipping insurance with returned receipt is recommended.
At our option, the Warrantor will repair or replace the unit found to be defective
in materials or workmanship under normal consumer usage. The purchaser will
be notified of any additional repairs required prior to completing the repair, and
will be responsible for parts charges, if any, and repair charges not covered by
this limited warranty.
EXCEPT AS PROVIDED FOR IN THIS LIMITED WARRANTY, ALL EXPRESS AND
IMPLIED WARRANTIES AND CONDITIONS ARE DISCLAIMED, INCLUDING
WITHOUT LIMITATION THE IMPLIED WARRANTIES OF MERCHANTABILITY AND
FITNESS FOR A PARTICULAR PURPOSE. THE REPAIR OR REPLACEMENT AS
PROVIDED UNDER THIS LIMITED WARRANTY IS THE EXCLUSIVE REMEDY OF
THE CONSUMER, AND IS PROVIDED IN LIEU OF ALL OTHER WARRANTIES,
EXPRESS OR IMPLIED. IN NO EVENT SHALL THE WARRANTOR BE LIABLE,
WHETHER IN CONTRACT OR TORT (INCLUDING NEGLIGENCE) FOR DAMAGES
IN EXCESS OF THE PURCHASE PRICE OF THE PRODUCT, OR FOR ANY
INDIRECT, INCIDENTAL, SPECIAL OR CONSEQUENTIAL DAMAGES OF ANY
KIND, OR FOR DAMAGES TO, OR LOSS OF, OTHER PROPERTY OR EQUIPMENT
OR PERSONAL INJURIES TO THE FULL EXTENT THESE DAMAGES MAY BE
DISCLAIMED BY LAW.
Some states and jurisdictions do not allow the limitation or exclusion of incidental
or consequential damages, or limitation on the length of an implied warranty, so
the above limitations or exclusions may not apply to you. This warranty gives you
specific legal rights, and you may also have other rights that vary from state to state
or from one jurisdiction to another.
FOR CUSTOMER SERVICE
TOLL FREE / 800-421-6516
24
• CITIZEN is a registered trade mark of Citizen Holdings Co., Ltd., Japan.
CITIZEN es una marca registrada de Citizen Holdings Co., Ltd., Japón.
• Design and Specification are subject to change without notice.
363 Van Ness Way, Suite 404
Torrance, CA 90501
http://www.citizen-systems.com/
TOLL FREE / 800-421-6516
E-mail: [email protected]
Ver. 1101