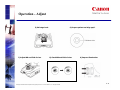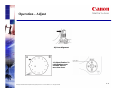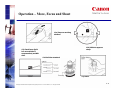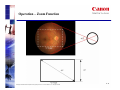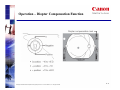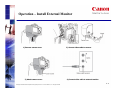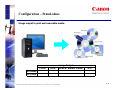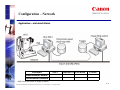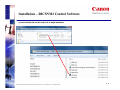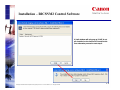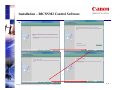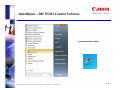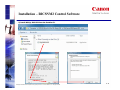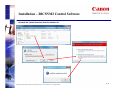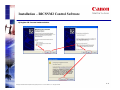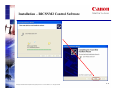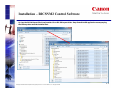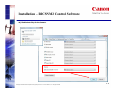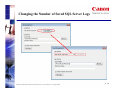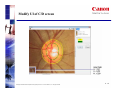
1
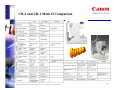
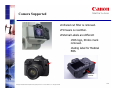
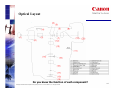
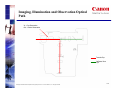
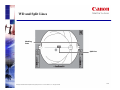
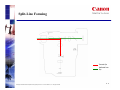
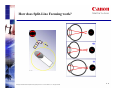
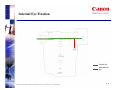
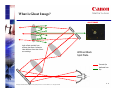
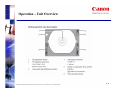
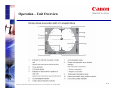
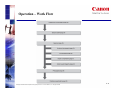
Canon Digital Retinal Camera – CR-2
Setting the benchmark for
the future.
Less is more:
Less space. More flexibility
All images embedded in this template are the property of Canon Inc. or Canon Sales Co., Inc. All rights reserved.
P. 1
Benefits and Features
1.
2.
3.
4.
Perfection image reproduction with 15.1 megapixels.
- A dedicate camera back for Medical with excellent EOS technology.
Small pupil mode.
- Pupil diameter as small as 3.3mm.
Compact and lightweight.
- Now it weighs only 15.0Kg.
Latest LED technology and low flash stereophotography.
- White LED replaces strobe tube.
5.
Digital filter technology for red-free and cobalt photography.
6.
Automatic flash settings.
7.
Anterior photography mode.
8.
Multifunctional joystick for reliable user control.
9.
Reduced Maintenance.
- Flash level is set automatically for every new examination.
- New mode makes anterior segment photography quick and easy.
All images embedded in this template are the property of Canon Inc. or Canon Sales Co., Inc. All rights reserved.
P. 2
CR-2 and CR-1 Mark II Comparison
All images embedded in this template are the property of Canon Inc. or Canon Sales Co., Inc. All rights reserved.
P. 3
Specifications
All images embedded in this template are the property of Canon Inc. or Canon Sales Co., Inc. All rights reserved.
P. 4
Camera Supported
Canon Medical EOS
All images embedded in this template are the property of Canon Inc. or Canon Sales Co., Inc. All rights reserved.
P. 5
Camera Supported
•Infrared cut filter is removed.
•Firmware is rewritten.
•External Labels are different
-EOS logo, Strobo mark
removed.
-Rating label for Medical
EOS.
Serial No.
Part No.
All images embedded in this template are the property of Canon Inc. or Canon Sales Co., Inc. All rights reserved.
P. 6
Optical Layout
Do you know the function of each component?
All images embedded in this template are the property of Canon Inc. or Canon Sales Co., Inc. All rights reserved.
P. 7
Imaging, Illumination and Observation Optical
Path
In – Eye Observation
Out – Retina Observation
Towards Eye
Reflected from
Eye
All images embedded in this template are the property of Canon Inc. or Canon Sales Co., Inc. All rights reserved.
P. 8
WD and Split Lines
Working
Dots
Split Line
All images embedded in this template are the property of Canon Inc. or Canon Sales Co., Inc. All rights reserved.
P. 9
WD Dots (Working Distance)
Towards Eye
Reflected from
Eye
All images embedded in this template are the property of Canon Inc. or Canon Sales Co., Inc. All rights reserved.
P. 10
Split-Line Focusing
Towards Eye
Reflected from
Eye
All images embedded in this template are the property of Canon Inc. or Canon Sales Co., Inc. All rights reserved.
P. 11
How does Split-Line Focusing work?
All images embedded in this template are the property of Canon Inc. or Canon Sales Co., Inc. All rights reserved.
P. 12
Internal Eye Fixation
Towards Eye
Reflected from
Eye
All images embedded in this template are the property of Canon Inc. or Canon Sales Co., Inc. All rights reserved.
P. 13
What is Ghost Image?
GHOST IMAGE
Points of difference in
refractive index on the
objective
lens.
Without Black
Spot Plate.
Towards Eye
Reflected from
Eye
All images embedded in this template are the property of Canon Inc. or Canon Sales Co., Inc. All rights reserved.
P. 14
What is Ghost Image?
GHOST IMAGE
Light reflects partially from
surfaces that have a refractive
index different from that of their
surroundings
Without Black
Spot Plate.
Towards Eye
Reflected from
Eye
All images embedded in this template are the property of Canon Inc. or Canon Sales Co., Inc. All rights reserved.
P. 15
How is Ghost Image Eliminated?
X-axis adjustment
Centering of Focus
Point.
With Black
Spot Plate.
Towards Eye
Y-axis adjustment
Focus distance.
All images embedded in this template are the property of Canon Inc. or Canon Sales Co., Inc. All rights reserved.
Reflected from
Eye
P. 16
Operation – Unit Overview
All images embedded in this template are the property of Canon Inc. or Canon Sales Co., Inc. All rights reserved.
P. 17
Operation – Unit Overview
All images embedded in this template are the property of Canon Inc. or Canon Sales Co., Inc. All rights reserved.
P. 18
Operation – Unit Overview
All images embedded in this template are the property of Canon Inc. or Canon Sales Co., Inc. All rights reserved.
P. 19
Operation – Unit Overview
All images embedded in this template are the property of Canon Inc. or Canon Sales Co., Inc. All rights reserved.
P. 20
Operation – Unit Overview
All images embedded in this template are the property of Canon Inc. or Canon Sales Co., Inc. All rights reserved.
P. 21
Operation – Work Flow
All images embedded in this template are the property of Canon Inc. or Canon Sales Co., Inc. All rights reserved.
P. 22
Operation - Prepare
1) Switch On CR-2 and Medical EOS.
3) Unlock stage.
All images embedded in this template are the property of Canon Inc. or Canon Sales Co., Inc. All rights reserved.
2) Select diopter compensation.
4) Adjust height.
P. 23
Operation - Adjust
5) Pull stage back.
7) Adjust WD and field of view.
6) Prepare patient and align pupil.
8) Check WD and field of view.
All images embedded in this template are the property of Canon Inc. or Canon Sales Co., Inc. All rights reserved.
9) Improve illumination.
P. 24
Operation - Adjust
10) Press Alignment.
11) Select Fixation. To
reset fixation, press
and hold ‘SET’ for
more than 2 sec.
All images embedded in this template are the property of Canon Inc. or Canon Sales Co., Inc. All rights reserved.
P. 25
Operation – Move, Focus and Shoot
12a) Improve working
distance.
12b) WD dots appears
sharp.
13) Check focus (Split
bar not available in
compensation) and WD
dots.
13a) Split bar standard.
14) Shoot.
All images embedded in this template are the property of Canon Inc. or Canon Sales Co., Inc. All rights reserved.
P. 26
Operation – Flash Intensity and Ready Lamp
All images embedded in this template are the property of Canon Inc. or Canon Sales Co., Inc. All rights reserved.
P. 27
Operation – SP Function
All images embedded in this template are the property of Canon Inc. or Canon Sales Co., Inc. All rights reserved.
P. 28
Operation – Zoom Function
All images embedded in this template are the property of Canon Inc. or Canon Sales Co., Inc. All rights reserved.
P. 29
Operation – Zoom Function
All images embedded in this template are the property of Canon Inc. or Canon Sales Co., Inc. All rights reserved.
P. 30
Operation – Diopter Compensation Function
All images embedded in this template are the property of Canon Inc. or Canon Sales Co., Inc. All rights reserved.
P. 31
Operation – Anterior Segment
Note: Press X2 to photograph inside eyelash.
All images embedded in this template are the property of Canon Inc. or Canon Sales Co., Inc. All rights reserved.
P. 32
Operation – Install External Monitor
1) Remove camera cover.
3) Attach camera cover.
All images embedded in this template are the property of Canon Inc. or Canon Sales Co., Inc. All rights reserved.
2) Connect video cable to camera.
4) Connect video cable to external monitor.
P. 33
Configuration - What Options?
All images embedded in this template are the property of Canon Inc. or Canon Sales Co., Inc. All rights reserved.
P. 34
Configuration – Stand-alone
Application – small clinics with private practitioners.
Option
A
B
C
CR-2
*
*
*
Control PC PPFocus
*
*
*
*
*
Printer
*
*
NOTE: Printer and control PC by dealers.
All images embedded in this template are the property of Canon Inc. or Canon Sales Co., Inc. All rights reserved.
P. 35
Configuration – Stand-alone
Image output to print and removable media.
RICSNM2
PPFocus
Prints
*
*
DCM
*
*
Image Output
DCM w/ Simple Viewer
All images embedded in this template are the property of Canon Inc. or Canon Sales Co., Inc. All rights reserved.
*
JPG
*
*
P. 36
Configuration – Network
Application – mid-sized clinics.
Location
Examination Room
Consultation Rooms
CR-1
*
Control PC PPFocus
*
*
*
Printer
*
NOTE: Printer and control PC supply by dealers.
All images embedded in this template are the property of Canon Inc. or Canon Sales Co., Inc. All rights reserved.
P. 37
Configuration – Network
Application – hospitals.
NOTE: Printer and control PC supply by dealers. PACS and RIS/HIS are hospital furnished equipments.
All images embedded in this template are the property of Canon Inc. or Canon Sales Co., Inc. All rights reserved.
P. 38
Installation – Control PC Requirements
The RICS NM2 runs under the following operating environment.
All images embedded in this template are the property of Canon Inc. or Canon Sales Co., Inc. All rights reserved.
P. 39
Installation – Camera Setting
All images embedded in this template are the property of Canon Inc. or Canon Sales Co., Inc. All rights reserved.
P. 40
Installation – Procedure
1) Turn off CR-2 and camera. Attach camera to CR-2
2) Attach DC coupler.
3) Attach cables to CR-2.
4) Attach camera cover.
All images embedded in this template are the property of Canon Inc. or Canon Sales Co., Inc. All rights reserved.
5) Depress to remove camera.
P. 41
Installation – Procedure
6) Layout cables as shown in the above diagram. Do not connect USB at Control PC’s end yet.
All images embedded in this template are the property of Canon Inc. or Canon Sales Co., Inc. All rights reserved.
P. 42
Installation – Procedure
7) Connect the power
cord and the USB cable.
All images embedded in this template are the property of Canon Inc. or Canon Sales Co., Inc. All rights reserved.
P. 43
Installation – RICSNM2 Control Software
The control software is installed by following the steps below. Refer to manual.
Steps [1] to [3] essential and mandatory.
Step [4] is optional.
NOTE: All installation (and un-installation) must be performed with administrator authority.
1)
Installing the Canon Retinal imaging control software NM2
-Install the control software as well as the run-time library required for the control
software.
2)
Installing Microsoft SQL Server 2005 Express Edition with SP3
-Install the database engine to be used by the control software.
3)
Installing the Canon Retinal camera VCP driver
-Install the USB driver and COM driver required for communication with the CR-1.
(The USB Cable to the CF-1 MUST BE connected at this point to detect the presence of
hardware).
4)
Installing the DICOM layout files for Canon Easy-Photo Print
-Install the DICOM layout files required for printing using the BJ printer and Easy-Photo
Print (EPP EX).
5)
Disable Auto Play for the Medical EOS when connected.
All images embedded in this template are the property of Canon Inc. or Canon Sales Co., Inc. All rights reserved.
P. 44
Installation – RICSNM2 Control Software
1) Insert Installer CD into the Control PC to begin installation.
All images embedded in this template are the property of Canon Inc. or Canon Sales Co., Inc. All rights reserved.
P. 45
Installation – RICSNM2 Control Software
2) Left window will only pop up if .NET is not
pre-installed on the Control PC. Install in this
case otherwise proceed to next step 3.
All images embedded in this template are the property of Canon Inc. or Canon Sales Co., Inc. All rights reserved.
P. 46
Installation – RICSNM2 Control Software
3)
All images embedded in this template are the property of Canon Inc. or Canon Sales Co., Inc. All rights reserved.
P. 47
Installation – RICSNM2 Control Software
4) Shortcut will be created.
All images embedded in this template are the property of Canon Inc. or Canon Sales Co., Inc. All rights reserved.
P. 48
Installation – RICSNM2 Control Software
5) Install MS SQL 2005 SP3 from the Installer CD.
All images embedded in this template are the property of Canon Inc. or Canon Sales Co., Inc. All rights reserved.
P. 49
Installation – RICSNM2 Control Software
All images embedded in this template are the property of Canon Inc. or Canon Sales Co., Inc. All rights reserved.
P. 50
Installation – RICSNM2 Control Software
All images embedded in this template are the property of Canon Inc. or Canon Sales Co., Inc. All rights reserved.
P. 51
Installation – RICSNM2 Control Software
All images embedded in this template are the property of Canon Inc. or Canon Sales Co., Inc. All rights reserved.
P. 52
Installation – RICSNM2 Control Software
6) Install VCP (Virtual Com Port) from the Installer CD.
All images embedded in this template are the property of Canon Inc. or Canon Sales Co., Inc. All rights reserved.
P. 53
Installation – RICSNM2 Control Software
7) Connect the USB cable to the Control PC now.
All images embedded in this template are the property of Canon Inc. or Canon Sales Co., Inc. All rights reserved.
P. 54
Installation – RICSNM2 Control Software
8) Register CR-2 as new hardware device.
All images embedded in this template are the property of Canon Inc. or Canon Sales Co., Inc. All rights reserved.
P. 55
Installation – RICSNM2 Control Software
All images embedded in this template are the property of Canon Inc. or Canon Sales Co., Inc. All rights reserved.
P. 56
Installation – RICSNM2 Control Software
9) Copy the DICOM layout files from Installer CD to EPP EX Layout folder. Easy PhotoPrint EX application accompanying
the Canon printer must be installed first.
All images embedded in this template are the property of Canon Inc. or Canon Sales Co., Inc. All rights reserved.
P. 57
Installation – RICSNM2 Control Software
10) Disable Auto Play for the Camera.
All images embedded in this template are the property of Canon Inc. or Canon Sales Co., Inc. All rights reserved.
P. 58
Introduction – RICSNM2 Control Software
All images embedded in this template are the property of Canon Inc. or Canon Sales Co., Inc. All rights reserved.
P. 59
Introduction – RICSNM2 Control Software
All images embedded in this template are the property of Canon Inc. or Canon Sales Co., Inc. All rights reserved.
P. 60
Introduction – RICSNM2 Control Software
All images embedded in this template are the property of Canon Inc. or Canon Sales Co., Inc. All rights reserved.
P. 61
Introduction – Note on Use
All images embedded in this template are the property of Canon Inc. or Canon Sales Co., Inc. All rights reserved.
P. 62
Introduction – Note on Use
All images embedded in this template are the property of Canon Inc. or Canon Sales Co., Inc. All rights reserved.
P. 63
Introduction – Note on Use
All images embedded in this template are the property of Canon Inc. or Canon Sales Co., Inc. All rights reserved.
P. 64
Introduction – Note on Use
All images embedded in this template are the property of Canon Inc. or Canon Sales Co., Inc. All rights reserved.
P. 65
Setup and Configuration – Login
User ID – canon
Password – canon
NOTE: LOGIN not possible if
essential setup is not completed.
All images embedded in this template are the property of Canon Inc. or Canon Sales Co., Inc. All rights reserved.
P. 66
Setup and Configuration – System
All images embedded in this template are the property of Canon Inc. or Canon Sales Co., Inc. All rights reserved.
P. 67
Setup and Configuration – Device
All images embedded in this template are the property of Canon Inc. or Canon Sales Co., Inc. All rights reserved.
P. 68
Setup and Configuration – Device
All images embedded in this template are the property of Canon Inc. or Canon Sales Co., Inc. All rights reserved.
P. 69
Setup and Configuration – Device
All images embedded in this template are the property of Canon Inc. or Canon Sales Co., Inc. All rights reserved.
P. 70
Setup and Configuration – Device
All images embedded in this template are the property of Canon Inc. or Canon Sales Co., Inc. All rights reserved.
P. 71
Setup and Configuration – Study Manager
All images embedded in this template are the property of Canon Inc. or Canon Sales Co., Inc. All rights reserved.
P. 72
Setup and Configuration – Study Manager
All images embedded in this template are the property of Canon Inc. or Canon Sales Co., Inc. All rights reserved.
P. 73
Setup and Configuration – Study Input
To select study input, Manual or Worklist, and enable MPPS
Tab selections available only when
modules are enable.
To select essential patient information during
registration of patient using manual input
instead of worklist.
All images embedded in this template are the property of Canon Inc. or Canon Sales Co., Inc. All rights reserved.
P. 74
Setup and Configuration – Worklist
To receive work list from worklist
SCP.
Provide:
-IP Addr / Hostname
-AET
-Port Number
-Search Conditions
-Search Interval
All images embedded in this template are the property of Canon Inc. or Canon Sales Co., Inc. All rights reserved.
P. 75
Setup and Configuration – MPPS
To send study status to MPPS SCP.
Provide:
-IP Addr / Hostname
-AET
-Port Number
All images embedded in this template are the property of Canon Inc. or Canon Sales Co., Inc. All rights reserved.
P. 76
Setup and Configuration – Storage
To send image to Storage SCP.
Provide:
-Storage name
-IP Addr / Hostname
-AET
-Port Number
-SOP Class
To export image – dcm or jpg format.
Provide:
-Storage name
-Storage directory
-SOP Class
All images embedded in this template are the property of Canon Inc. or Canon Sales Co., Inc. All rights reserved.
P. 77
Setup and Configuration – Simple Print
Un-check to use Printing Icon
for simple print.
All images embedded in this template are the property of Canon Inc. or Canon Sales Co., Inc. All rights reserved.
P. 78
Operation – Manual Patient Registration
At any time, click new study or
F1 to register a new patient and
suspend an existing examination.
All images embedded in this template are the property of Canon Inc. or Canon Sales Co., Inc. All rights reserved.
P. 79
Operation – Automatic Exposure (AE)
All images embedded in this template are the property of Canon Inc. or Canon Sales Co., Inc. All rights reserved.
P. 80
Operation – Image Adjustment
All images embedded in this template are the property of Canon Inc. or Canon Sales Co., Inc. All rights reserved.
P. 81
Operation – Image Adjustment
All images embedded in this template are the property of Canon Inc. or Canon Sales Co., Inc. All rights reserved.
P. 82
Operation – Image Adjustment
All images embedded in this template are the property of Canon Inc. or Canon Sales Co., Inc. All rights reserved.
P. 83
Operation – QA Setting
All images embedded in this template are the property of Canon Inc. or Canon Sales Co., Inc. All rights reserved.
P. 84
Operation – C/D Ratio Measurement
All images embedded in this template are the property of Canon Inc. or Canon Sales Co., Inc. All rights reserved.
P. 85
Operation – Stereo Photography
All images embedded in this template are the property of Canon Inc. or Canon Sales Co., Inc. All rights reserved.
P. 86
Operation – Stereo Photography Review
All images embedded in this template are the property of Canon Inc. or Canon Sales Co., Inc. All rights reserved.
P. 87
Operation – Study Log
All images embedded in this template are the property of Canon Inc. or Canon Sales Co., Inc. All rights reserved.
P. 88
Operation – Study Log
All images embedded in this template are the property of Canon Inc. or Canon Sales Co., Inc. All rights reserved.
P. 89
Operation – Study Log
All images embedded in this template are the property of Canon Inc. or Canon Sales Co., Inc. All rights reserved.
P. 90
Operation – Study Log
Select the the folder of the study log file to be deleted, and press the Delete key.
All images embedded in this template are the property of Canon Inc. or Canon Sales Co., Inc. All rights reserved.
P. 91
Operation – Study Log (Compare)
All images embedded in this template are the property of Canon Inc. or Canon Sales Co., Inc. All rights reserved.
P. 92
Operation – Easy PhotoPrint EX
All images embedded in this template are the property of Canon Inc. or Canon Sales Co., Inc. All rights reserved.
P. 93
Operation – Printers
PIXMA iP1880
PIXMA iP3300
PIXMA iP4500
PIXMA iP3500
PIXMA iP5280
PIXMA iP4200
All images embedded in this template are the property of Canon Inc. or Canon Sales Co., Inc. All rights reserved.
P. 94
Operation – Paper
All images embedded in this template are the property of Canon Inc. or Canon Sales Co., Inc. All rights reserved.
P. 95
Tool Mode – Functions
All images embedded in this template are the property of Canon Inc. or Canon Sales Co., Inc. All rights reserved.
P. 96
Tool Mode – Setup
All images embedded in this template are the property of Canon Inc. or Canon Sales Co., Inc. All rights reserved.
P. 97
Tool Software – Installation
1.
Tool software - CreaterTool.exe.
2.
The tool software can run from the local hard drive of the CR-2 Control PC installed at site
but it is recommended that the software is launched from a USB flash memory.
3.
If it is run from the local hard drive. Delete the tool software after use to prevent
unnecessary problems.
All images embedded in this template are the property of Canon Inc. or Canon Sales Co., Inc. All rights reserved.
P. 98
Tool Software – Startup Settings
[1]: Port
Check the number of the COM port on the PC used for serial communication with the CR-2
retinal camera.
[2]: Baud Rate
Check that the baud rate during serial communication is 38400 bps.
[3]: Mode
Select “CR-2 Adjustment” or “CR-2 Firmware Update”.
All images embedded in this template are the property of Canon Inc. or Canon Sales Co., Inc. All rights reserved.
P. 99
Tool Software – All Data Screen
All the fixed value for the CR-2 retinal camera written into the FRAM on the main board are
captured and displayed here. A fixed value file (txt) is generated concurrently. It is also
available to write the values of the fixed file (txt) into the FRAM on the main board here.
All images embedded in this template are the property of Canon Inc. or Canon Sales Co., Inc. All rights reserved.
P. 100
Tool Software – All Data Screen (Read)
*If the same file name already exists, the
file name for the new generated fixed
value file (txt) will have “_bak” at the end
of it.
File name:C R 2 _ 0 0 X X X X X X .txt
↑
↑
Product name (Fixed) Serial number(6-digit)
All images embedded in this template are the property of Canon Inc. or Canon Sales Co., Inc. All rights reserved.
P. 101
Tool Software – All Data Screen (Read)
All images embedded in this template are the property of Canon Inc. or Canon Sales Co., Inc. All rights reserved.
P. 102
Tool Software – All Data Screen (Write)
Check ‘From
File’ box.
All images embedded in this template are the property of Canon Inc. or Canon Sales Co., Inc. All rights reserved.
P. 103
Tool Software – Maintenance
In the Mainte tab, the CR-2 power-on time, operating status, error logs, and other service
information required for maintenance and inspection can be read, viewed, and reset.
1: Read Service Info - to read the service information from the connected CR-1 main unit and store in the SerialLog.txt file.
2: Reset Error Log - to clear the recorded log of the errors (up to 100).
3: Reset Age - to reset the recorded power-on time (in days: minutes format) to zero.
4: Reset Flash - to reset the number of times recorded for the firing of the xenon tubeto zero.
5: Reset RL - to reset the number of R/L switch ON/OFF times recorded to zero.
6: Reset Exp - to reset the number of times recorded for the pressing of the shutter release button to zero.
7: Reset Stage - to reset the number of times recorded for the pressing of the flash intensity switch (UP side) to zero.
8: YYYYMMDD - Replacement date which is recorded when item 9 is performed.
9: Reset Date - to update the replacement date of the xenon tube.
All images embedded in this template are the property of Canon Inc. or Canon Sales Co., Inc. All rights reserved.
P. 104
Tool Software – Maintenance
All images embedded in this template are the property of Canon Inc. or Canon Sales Co., Inc. All rights reserved.
P. 105
Tool Software – Maintenance
All images embedded in this template are the property of Canon Inc. or Canon Sales Co., Inc. All rights reserved.
P. 106
Tool Software – Firmware Upgrade
The filename of the version update file is defined as follows:
Update filename : CR-2 XXXX.vup
(CR-2; Version, in 4 digits.vup)
All images embedded in this template are the property of Canon Inc. or Canon Sales Co., Inc. All rights reserved.
P. 107
Tool Software – Up/Down Movement Adjustment
All images embedded in this template are the property of Canon Inc. or Canon Sales Co., Inc. All rights reserved.
P. 108
Tool Software – Initialise Screen
This function enables the product information to be
displayed and set.
[1]: Firmware Version
The firmware version of the CR-2 retinal camera (main
board) can be captured and checked by pressing the
[Firmware Version] button.
[2]: Hardware Version
The hardware version of the CR-2 retinal camera can be
captured and checked by pressing the [Hardware Version]
button.
[3]: Serial No.
The system number can be set and input here. (“000001”
appearing at startup is the default number.)
The system number which can be input is a fixed 6-digit
number, and the input of a number other than one
containing 6 digits will not be accepted.
(Example: 100001)
[4]: Model Name
The model name setting can be selected here.
[5]: YYYYMMDD
The date (year/month/day) of recording is displayed here.
(This cannot be changed since it is synchronized with the PC
date (year/month/day).)
[6]: By pressing the [Write] button, the settings of [3] and
[4] can be written into the FRAM on the main board of the
CR-2 retinal camera.
All images embedded in this template are the property of Canon Inc. or Canon Sales Co., Inc. All rights reserved.
P. 109
Others Technical Info – Error and Warning
Processes
The error and warning processes are executed based on the rules below.
1)
When an error or warning is detected, the status is recorded in an error log.
2)
After an error or warning has occurred, any series of operations that is required
is performed.
3)
After the required series of operations is completed, the error or warning is
displayed.
4)
The error or warning process is performed separately for each event based on
the order that it was recorded in the “Error/Warning List.”
5)
Any errors that occurred before connection communication with the Rics NM2
(when the CR-2 power is turned on) are not displayed on the Rics.
All images embedded in this template are the property of Canon Inc. or Canon Sales Co., Inc. All rights reserved.
P. 110
Others Technical Info – Error and Warning
Processes
Whenever a warning is recorded, a buzzer sound (beeping interval: 0.2 seconds (0.2 seconds) ×3,
identical to CF-1) is output. If an error status is recorded, the system changes to the SYS_ERROR
status, and a buzzer sound (quick beeping: 0.1 seconds (0.1 seconds) ×5, identical to CR-1) is
output.
All images embedded in this template are the property of Canon Inc. or Canon Sales Co., Inc. All rights reserved.
P. 111
Others Technical Info – Error and Warning
Processes
All images embedded in this template are the property of Canon Inc. or Canon Sales Co., Inc. All rights reserved.
P. 112
Others Technical Info – Error and Warning
Processes
All images embedded in this template are the property of Canon Inc. or Canon Sales Co., Inc. All rights reserved.
P. 113
Others Technical Info – Error and Warning
Processes
All images embedded in this template are the property of Canon Inc. or Canon Sales Co., Inc. All rights reserved.
P. 114
Others Technical Info – I/O Test
All images embedded in this template are the property of Canon Inc. or Canon Sales Co., Inc. All rights reserved.
P. 115
Others Technical Info – Error Log
The LogManagement tool is used for collecting setting file, log file, database table, SQL server log file and
Windows event log file pertinent to the RICS. In the event of unusual failure, collect and submit these information
for analysis and remedy.
Log storage directory is created to where it was pathed.
• A folder with the “Logmanagement_InstitutionName_Date” name format is created as the log storage directory
under the storage directory path that was entered at the main screen, and the various log types are copied under
this folder. The date format is “yyyyMMdd”.
• The institution name and date are added to the EventLog file name only to facilitate log analysis.
• If the institution name and date are already found in the same folder when acquiring the logs, overwriting of the
files is confirmed.
All images embedded in this template are the property of Canon Inc. or Canon Sales Co., Inc. All rights reserved.
P. 116
Electrical Schematic
All images embedded in this template are the property of Canon Inc. or Canon Sales Co., Inc. All rights reserved.
P. 117
Electrical Schematic
All images embedded in this template are the property of Canon Inc. or Canon Sales Co., Inc. All rights reserved.
P. 118
Introduction – New Functions
•
AE (Auto Exposure) function
•
Setting for return to external eye observation after capture (yes/no)
•
Added position reset for internal fixation lamp
•
Separate saving and transfer of RGB, RedFree, and Cobalt images (Digital
color filter)
•
Screen capture function
•
Function that imports the study log file data for re-editing and transferring
the data
•
Overlay of patient name on JPEG, TIFF, and DICOM images
•
Study Log screen can be set to remain open after transfer is completed
•
Direct editing of folder path in Storage Folder settings
•
Change to display of study dates in Compare Study screen
All images embedded in this template are the property of Canon Inc. or Canon Sales Co., Inc. All rights reserved.
P. 119
Introduction – New Functions
•
Change to number of acquired worklists
•
Change to SC modality
•
Saving in JPEG or Lossless format
•
Study delete log
•
Study import log
•
Log Management tool
•
Function for changing the number of saved logs in SQL server from 6 to 30
•
Function that uses the mouse wheel to enlarge or reduce the image centered
on the mouse position (pointer)
•
Support for installation on Windows 7
•
Modify UI of C/D screen
All images embedded in this template are the property of Canon Inc. or Canon Sales Co., Inc. All rights reserved.
P. 120
Auto Exposure (AE) Function
All images embedded in this template are the property of Canon Inc. or Canon Sales Co., Inc. All rights reserved.
P. 121
Setting for Return to External Eye Observation
After Capture
All images embedded in this template are the property of Canon Inc. or Canon Sales Co., Inc. All rights reserved.
P. 122
Added Position Reset for Internal Fixation Lamp
All images embedded in this template are the property of Canon Inc. or Canon Sales Co., Inc. All rights reserved.
P. 123
Separate Saving and Transfer of RGB, Digital RF
and DigitalCobalt Images
Select RGB, DRF or DCo
All images embedded in this template are the property of Canon Inc. or Canon Sales Co., Inc. All rights reserved.
Press to save
P. 124
Screen Capture Function
All images embedded in this template are the property of Canon Inc. or Canon Sales Co., Inc. All rights reserved.
P. 125
Function to Import Study Log File Data for Reediting and Transferring the Data
NOTE: A maximum number of 100 studies can be imported.
NOTE: This software enables importing and browsing only for external studies that were output by an NM (retinal)
type imaging cameras (such as the CR-1 or CR-1 Mark II).
All images embedded in this template are the property of Canon Inc. or Canon Sales Co., Inc. All rights reserved.
P. 126
Overlay of Patient Name on JPEG, TIFF, and
DICOM Images
All images embedded in this template are the property of Canon Inc. or Canon Sales Co., Inc. All rights reserved.
P. 127
Overlay of Patient Name on JPEG, TIFF, and
DICOM Images
Edit ini file,
ProgramFiles\Canon\RicsNM2\Settings\TransOverlayInfo.ini
to customise annotation.
String:
<Item>=<Group>.<Row>.<FontSizeType>.<FontSize>
Example: PatientID=LeftUp.0.Relative.400
PatientID will appear on,
Upper left corner,
Row 0,
Relative font,
Font size is 4% of Image.
NOTE: backup before editing.
All images embedded in this template are the property of Canon Inc. or Canon Sales Co., Inc. All rights reserved.
P. 128
Direct Editing of Folder Path in Storage Folder
Settings
All images embedded in this template are the property of Canon Inc. or Canon Sales Co., Inc. All rights reserved.
P. 129
Display of Study Dates in Compare Studies Screen
All images embedded in this template are the property of Canon Inc. or Canon Sales Co., Inc. All rights reserved.
P. 130
Change to Number of Acquired Worklists
All images embedded in this template are the property of Canon Inc. or Canon Sales Co., Inc. All rights reserved.
P. 131
Change to SC Modality
All images embedded in this template are the property of Canon Inc. or Canon Sales Co., Inc. All rights reserved.
P. 132
Saving in JPEG or Lossless Format
All images embedded in this template are the property of Canon Inc. or Canon Sales Co., Inc. All rights reserved.
P. 133
Study delete log and Study import log
A log of the deleted studies is saved for use in analysis when a problem occurs.
• Study delete log output location
The study delete log is saved to the folder (Installation folder)\Logs\DeleteStudy.
The file name is “yyyyMMdd.log”. yyyyMMdd is the date that the log was saved.
A log of the imported studies is saved for use in analysis when a problem occurs.
• Study delete log output location
The study delete log is saved to the folder (Installation folder)\Logs\ImportStudy.
The file name is “yyyyMMdd.log”. yyyyMMdd is the date that the log was saved.
All images embedded in this template are the property of Canon Inc. or Canon Sales Co., Inc. All rights reserved.
P. 134
Log Management Tool (LogManagement)
All images embedded in this template are the property of Canon Inc. or Canon Sales Co., Inc. All rights reserved.
P. 135
Changing the Number of Saved SQL Server Logs
All images embedded in this template are the property of Canon Inc. or Canon Sales Co., Inc. All rights reserved.
P. 136
Modify UI of C/D screen
All images embedded in this template are the property of Canon Inc. or Canon Sales Co., Inc. All rights reserved.
P. 137
Optical Adjustment, Assembly and Disassembly
Hands-on session
IMPORTANT!
Make x, y and z axes markings
before removing any optical
component.
All images embedded in this template are the property of Canon Inc. or Canon Sales Co., Inc. All rights reserved.
P. 138