1
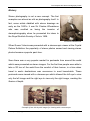
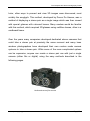
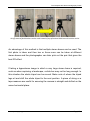
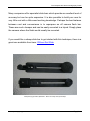
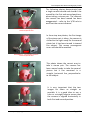
The Complete 3D Stereo Photography Guide Copyright Notice, Limit of Liability and Disclaimer of Warranty: © 2012 by Ashton Welch (www.stereophotographyguide.com). This publication is protected under international copyright laws. All Rights Reserved worldwide under the Berne Convention, including resale rights. No part of this document or related files may be reproduced, transmitted or resold in any form, by any means (electronic, photocopying, recording, or otherwise) without the prior written permission of the author. If you have this file (or a printout) and didn't pay for it, you are depriving the author and publisher of their rightful royalties. Please pay for your copy by purchasing it at http://www.3Dphotographyguide.com. Thank you. The publisher has used its best efforts in preparing this book, and the information provided herein is provided "as is." Ashton Welch and http://www.3Dphotographyguide.com makes no representation or warranties with respect to the accuracy or completeness of the contents of this book and specifically disclaims any implied warranties of merchantability or fitness for any particular purpose and shall in no event be liable for any loss of profit or any other commercial damage, including but not limited to special, incidental, consequential, or other damages. The information provided herein is for informational and entertainment purposes only. Although the author and publisher have made every reasonable attempt to achieve complete accuracy of the content in this Guide, they assume no responsibility for errors or omissions. Also, you should use this information as you see fit, and at your own risk. Your particular situation may not be exactly suited to the examples illustrated here; in fact, it's likely that they won't be the same, and you should adjust your use of the information and recommendations accordingly. This book identifies product names and services known to be trademarks, registered trademarks, or service marks of their respective holders. They are used throughout this book in an editorial fashion only. In addition, terms suspected of being trademarks, registered trademarks, or service marks have been appropriately capitalized, although the author and publisher cannot attest to the accuracy of this information. Use of a term in this book should not be regarded as affecting the validity of any trademark, registered trademark, or service mark. www.3dphotographyguide.com Page | 1 The Complete 3D Stereo Photography Guide Table of Contents Table of Contents ............................................................................................................................... 2 Chapter 1 - An Introduction To 3D Stereo Photography............................................................... 3 What is Stereo photography? ........................................................................................................... 3 History.............................................................................................................................................. 4 Chapter 2: Basic Terminology ......................................................................................................... 5 Chapter 3: Calculating Stereo Base Using The 1/30 Rule .............................................................. 8 1/30 Rule Quick Reference Table .................................................................................................... 9 Chapter 4: Taking a Stereo Pair Using a Single Camera ............................................................. 10 The Cha-Cha Method ..................................................................................................................... 10 The Slide Bar Method .................................................................................................................... 12 Tips When Using a Single Camera ................................................................................................ 14 Chapter 5: Using Two Cameras to Create a Stereo Pair ............................................................. 18 Using Two Disposable Cameras .................................................................................................... 18 Using Two Digital Cameras – The Simple Way............................................................................ 20 Chapter 6: Advanced Dual Camera Methods ............................................................................... 22 Cameras with wired remote port .................................................................................................... 22 Dual cameras with IR remotes ....................................................................................................... 24 Custom camera synchronisation products...................................................................................... 25 Dual cameras using Stereo Data Maker ......................................................................................... 26 Chapter 7: Custom and Specialist Equipment .............................................................................. 28 Stereo film cameras ........................................................................................................................ 28 Stereo Digital Cameras .................................................................................................................. 29 Beam-splitters and Mirror Lenses .................................................................................................. 35 Custom Dual Camera Rigs ............................................................................................................. 35 Chapter 8: Viewing and Presenting 3D Stereo Images ................................................................ 36 Parallel free viewing ...................................................................................................................... 39 Cross-eyed Free viewing ................................................................................................................ 40 Stereo Pairs Using a Stereo Viewer ............................................................................................... 43 Viewing Anaglyphs With 3D Glasses ........................................................................................... 47 Free 3D Anaglyph Glasses ............................................................................................................. 49 Very Quick DIY Anaglyph Glasses ............................................................................................... 49 Print and Make Your Own 3D Glasses .......................................................................................... 49 Popular free anaglyph software...................................................................................................... 50 Lenticular 3D Printing ................................................................................................................... 51 The Wiggle Technique ................................................................................................................... 53 3D LCD Shutter glasses ................................................................................................................. 54 Polarised Projection and Passive 3D .............................................................................................. 56 Chapter 9: Purchasing Equipment ................................................................................................. 58 Chapter 10: Conclusion ................................................................................................................... 59 www.3dphotographyguide.com Page | 2 The Complete 3D Stereo Photography Guide Chapter 1 - An Introduction To 3D Stereo Photography 3D or Stereo Photography is a way of presenting two images so that when viewed correctly, they create a sense of depth. It’s an exciting way to present images in a more life-like manner so that they appear to ‘jump out of the page’ or ‘disappear into the distance’. Anyone can create amazing 3D photographs as long as they have a camera - whether it’s a cheap disposable film camera or a top of the range digital SLR. What is Stereo photography? Because human eyes are spaced slightly apart, each eye sees a slightly different picture of the world. This is known as binocular vision and when the brain processes the two images, it provides depth perception. The basic premise of stereo photography is to mimic this and create two images, nearly identical but taken at roughly the same A Viewmaster brand stereo viewer distance apart as two human eyes. This is known as a stereo pair. Once a stereo pair has been photographed it can be displayed and viewed in a number of different ways to create a three dimensional effect. www.3dphotographyguide.com Page | 3 The Complete 3D Stereo Photography Guide History Stereo photography is not a new concept. The first examples are almost as old as photography itself. In fact, some artists dabbled with stereo drawings as early as the 1600’s. It was Sir Charles Wheatstone who was credited as being the inventor of stereophotography when he presented his ideas to the Royal Scottish Society of Arts in 1838. Sir Charles Wheatstone When Queen Victoria was presented with a stereoscopic viewer at the Crystal Palace Exhibition the popularity of stereo photos soared and viewing stereo photos became a popular past-time. Soon there was a very popular market for postcards from around the world which were presented as stereo images. For the first time people were able to take a 3D tour of the world from the comfort of their homes, in a time when travel to exotic destinations was uncommon to most households. These postcards were viewed with a stereoscope which allowed the left eye to view only the left image and the right eye to view only the right image, creating the illusion of depth. Example of two side by side images for viewing with a stereoscope www.3dphotographyguide.com Page | 4 The Complete 3D Stereo Photography Guide Later, other ways to present and view 3D images were discovered, most notably the anaglyph. This method, developed by Ducos Du Hauron, was a method of displaying a stereo pair as a single image which was then viewed with special glasses with coloured lenses. Many readers would be familiar with this method, which required 3D glasses using red/blue lenses, often in a cardboard frame. Over the years many companies developed dedicated stereo cameras that could take a stereo pair at precisely the same moment and many keen amateur photographers have developed their own custom made camera systems to take a stereo pair. While some of the more complicated options can be expensive, anyone can create a stereo pair can with just a single camera (either film or digital) using the easy methods described in the following pages. Dedicated stereo film camera www.3dphotographyguide.com Page | 5 The Complete 3D Stereo Photography Guide Chapter 2: Basic Terminology In order to understand 3D photography and the explanations within this book, it is important to understand the a few basic concepts and some terminology. All 3D photography requires the use of two images to create some sort of 3D effect. The two images are always almost identical except for the fact that they are photographed from slightly different angles. Just like a pair of stereo headphones use a left speaker and a right speaker to create stereo sound for your ears, stereo photography relies on a left image and a right image to create a 3D stereo effect for your eyes. We therefore call a pair of left and right images a stereo pair. The distance between the left and the right images of the stereo pair is called the stereo base and by adjusting the distance between where the two images are photographed, we can adjust how strong the 3D effect is when we present a 3D image. Sometimes this is also called camera shift. Generally the stereo base should be roughly the same distance apart as two human eyes, which is around 6.5cm (or 2.5 inches). This stereo base works for objects around 2m from the photographer. If the subject of the photo is further away than this, a wider stereo base is required and is referred to as hyperstereo. www.3dphotographyguide.com Page | 6 The Complete 3D Stereo Photography Guide If the subject is closer than 2m, a small stereo base is required, which is known as hypostereo. So how do you know what the correct stereo base is when it comes to take the two photos? A handy way to work out the required stereo base is to use the “1 in 30 rule” which will be discussed next. www.3dphotographyguide.com Page | 7 The Complete 3D Stereo Photography Guide Chapter 3: Calculating Stereo Base Using The 1/30 Rule The 1/30 rule is a rule of thumb for determining how small or large a stereo base is required (also known as camera shift). It states that the amount that the camera is shifted should be 1/30th of the distance to the nearest object (the closest object in the photo, not necessarily the main subject). For example, imagine you were taking a stereo pair of your desktop computer. The computer screen is 200cm away from the camera but the keyboard is 150cm away. To work out the stereo base simply divide the distance to the nearest object (the keyboard) by 30. 150cm ÷ 30 = 5cm. Another example would be of a cityscape photographed from a distance of 300m. However because there would likely be trees or roads in the foreground, probably within 10m, the stereo base should be calculated using the closest object in the photo (the trees). Therefore 10m ÷ 30 = 0.333m or 33.3cm. www.3dphotographyguide.com Page | 8 The Complete 3D Stereo Photography Guide 1/30 Rule Quick Reference Table Distance to Nearest Object 1.5 m 2.0 m 3.0 m 5.0 m 10. m 15 m 20 m 30 m Stereo Base (Camera Shift) 5.0 cm 6.6 cm 10.0 cm 16.6 cm 33.3 cm 50.0 cm 66.6 cm 100.0 cm Distance to Nearest Object Stereo Base (Camera Shift) 20 cm 30 cm 40 cm 50 cm 60 cm 70 cm 80 cm 90 cm 100 cm 6.60 mm 10.0 mm 13.3 mm 16.6 mm 20.0 mm 23.3 mm 26.6 mm 30.0 mm 33.3 mm www.3dphotographyguide.com Page | 9 The Complete 3D Stereo Photography Guide Chapter 4: Taking a Stereo Pair Using a Single Camera The Cha-Cha Method The simplest method to create a stereo pair is called the Cha Cha method and requires only a single camera and a steady hand. The photographer simply takes the first photo and then leans to the right or left to take the second photo. When leaning to take the second photo the camera must remain at the same height and distance from the subject but simply shift to the left or right horizontally. The distance the photographer needs to lean will be quite small. It should be roughly the same as the spacing between human eyes – so approximately 6.5cm (2.5 inches). If the subject of the photo is much closer or very far away, the stereo base should be estimated using the “1/30th rule” (use the 1/30th quick reference table). Keep in mind that the subjects of the photo should be stationary and appear the same in both photos. A person or vehicle that’s moved to a different location in the second photo will be very noticeable when viewing the 3D pair. This method has its drawbacks as it is quite difficult to keep the camera on the same horizontal plane and it is very easy to introduce a small amount of rotation to the second image, all of which will greatly degrade the final 3D effect. To overcome this and create much higher quality 3D images it is preferable to place the camera on a flat surface such as a table or railing to ensure that when the camera is moved to take the second photo, it remains flat. www.3dphotographyguide.com Page | 10 The Complete 3D Stereo Photography Guide For greater accuracy, ensure camera remains on the same horizontal plane. Try using a railing or table top Another way to overcome these drawbacks is to use a tripod and a special piece of equipment called a slide bar. This method is described in the next section. www.3dphotographyguide.com Page | 11 The Complete 3D Stereo Photography Guide The Slide Bar Method This method is similar to the previous method in that it involves shooting a photo, shifting the camera and shooting again. It creates a more accurate stereo pair than the Cha-Cha method. A slide bar is a bracket that can attach to both the camera and tripod and allows the camera to slide along the same horizontal plane without changing its height or distance from the subject. Once attached to the tripod, ensure that the slide bar and the tripod are perfectly horizontal, using a spirit level. These are also called macro focusing rails and come in 2-way and 4-way configurations. The above example is a 2-way focusing rail. Professional slide bar. GET ONE HERE If the tripod doesn’t have a level built in, a cheap bubble level from a hardware store is an excellent solution. Once the tripod and bracket are level, attach the camera and take the first photo. Then simply slide the camera to the left or the right approximately 6.5cm (or use the 1/30th Rule to calculate the stereo base) and take the second photo. www.3dphotographyguide.com Page | 12 The Complete 3D Stereo Photography Guide An off-camera flash bracket can be used instead of a professional slide bar with similar results An advantage of this method is that multiple stereo bases can be used. The first photo is taken and then two or three more can be taken at different stereo bases and the photographer can later pick out the pair that gives the best 3D effect. If taking a hyperstereo image in which a very large stereo base is required, such as when capturing a landscape, a slide bar may not be long enough. In this situation the whole tripod can be moved. Make note of where the tripod legs sit and shift the whole tripod to the next position. A piece of string or a tape measure are useful for ensuring the camera is straight and shifted on the same horizontal plane. www.3dphotographyguide.com Page | 13 The Complete 3D Stereo Photography Guide Many companies offer specialist slide bars which provide an excellent level of accuracy but can be quite expensive. It is also possible to build your own for very little cost with a little wood working knowledge. Perhaps the best balance between cost and convenience is to repurpose an off camera flash bar. These are much cheaper and can be easily mounted to a tripod. Simply place the camera where the flash would usually be mounted. If you would like a cheap slide bar to get started with this technique, there is a great one available from here: 200mm Rail Slide Examples of off-camera flash bars. These are cheap ones from Ebay! www.3dphotographyguide.com Page | 14 The Complete 3D Stereo Photography Guide Tips When Using a Single Camera Whichever method the photographer chooses to use, there’s a few other simple procedures that should be followed. 1. Choose Stationary Subjects A major difficulty to overcome is ensuring that nothing in the subject area changes between the first and second photo. Even one person in a different position may cause “retinal rivalry” in which the brain has difficulty processing the stereo image. However, with some care and perseverance this problem can be minimized. 2. Camera Settings Ensure that you don’t change the camera settings between the taking the two photos. They need to be as identical as possible. If you have a more advanced camera and a bit of know-how, focus the camera manually and set the aperture/shutter speed in manual mode if possible. This will ensure identical exposures. More advanced cameras also allow you to use exposure lock – refer to your camera’s user manual to see if this function is available. 3. Flash If using a flash, a twin-sun effect can spoil a great stereo pair. This is caused by the two different positions of the flash creating two different sets of shadows, particularly with close-up photography. This can be avoided by shooting without the flash, in bright sunlight or using a secondary light source such as an off-camera flash that remains stationary while both photos are taken. www.3dphotographyguide.com Page | 15 The Complete 3D Stereo Photography Guide 4. Convergence/Keystone Error This is a problem commonly encountered by those new to stereophotography, especially when shooting close-up images. When taking the stereo pair its common for the photographer to want to turn the camera in toward the subject. However, this causes a convergence error (also known as keystoning effect) that put simply, creates two images that are too different for the brain to resolve into a 3D image. The two images should be taken on exactly the same horizontal plane to avoid the convergence. This is demonstrated in the pictures on the following page. www.3dphotographyguide.com Page | 16 The Complete 3D Stereo Photography Guide The following photos demonstrate how a single camera should and shouldn’t be moved for the first and second positions, when taking a stereo pair. The distance the camera has been moved has been exaggerated – refer to the 1/30 rule to work out the correct distance INCORRECT - Converging cameras cause Keystone error In these top two photos, the first image of the stereo pair is taken, the camera is shifted to the right ready for the second photo but it has been turned in toward the subject. This causes convergence error and should be avoided. INCORRECT - Converging cameras cause Keystone error This photo shows the correct way to take a stereo pair. The camera has been moved ready to take the second picture but it has remained in a straight, horizontal line, perpendicular to the subject. CORRECT POSITIONING It is very important that the two images be taken as straight as possible. It is a good idea to use a ruler or a straight edge to ensure that the camera is aligned horizontally in both first and second position. CORRECT POSITIONING www.3dphotographyguide.com Page | 17 The Complete 3D Stereo Photography Guide Chapter 5: Using Two Cameras to Create a Stereo Pair Using Two Disposable Cameras One of the simplest ways to take a great stereo pair is by using two cheap disposable film cameras. These usually cost around $5 each and are a great way to begin experimenting with 3D photography. You will need: 2x cheap disposable cameras 1x 30cm ruler 4x rubber bands The two disposable cameras sit on top of the ruler and are held in place tightly using the rubber bands. The stereo-base can be adjusted by changing the placement of the cameras along the ruler. The scale on the ruler makes it very simple to measure the stereo-base while on the go. www.3dphotographyguide.com Page | 18 The Complete 3D Stereo Photography Guide To take the photograph, the user simply looks through the viewfinder of either of the cameras, composes the shot and then fires both the trigger buttons at the same time. While not completely synchronised, this does come fairly close and will allow the user to take a stereo photo of moving objects. Once the rolls of film in the camera have been used up, the photos are developed and can be scanned for manipulation using software. Alternately, the printed copies of the photos can be viewed together, side by side using some of the viewing and presentation methods described later in this book. Depending on the photos, they may require some careful trimming to present them side by side in an appropriate manner for use with a stereo viewer (see Chapter 8). www.3dphotographyguide.com Page | 19 The Complete 3D Stereo Photography Guide Using Two Digital Cameras – The Simple Way Almost identical to the above method, it is possible to use two digital cameras to create a stereo pair. It is preferable for the two cameras to be identical however if you have some experience using photo software to resize and crop photos, you can probably use any two digital cameras, however it will take considerably more effort in post-processing. You will need: 2x digital cameras (preferably the same model) 1x 30cm ruler 4x rubber bands The two digital cameras sit on top of the ruler* and are held in place tightly using the rubber bands. If using a twin flash bar, simply attach the cameras using the tripod screw mounts. The stereo-base can be adjusted by changing the placement of the cameras - either closer together or further apart. You can substitute the ruler and rubber bands for a twin camera bar or twin flash bracket that uses tripod mount screws. GET ONE HERE. www.3dphotographyguide.com Page | 20 The Complete 3D Stereo Photography Guide Make sure that the settings on the two cameras are as close to identical as possible. Auto mode will work but ideally use manual settings to ensure that the focus, zoom, aperture, exposure, and white balance are all the same. To take the photograph, the user simply composes the shot and then fires both the trigger buttons at the same time. While not completely synchronised, this can come close and will allow the user to take a stereo photo of moving objects. Preferably do not use the flash - if the flash fires at the same time it can result in over exposure and if they are out of sync you will have problems with an exposure difference between the two images. The photos can then be transferred from the memory cards for manipulation and viewing using the methods described later in the book. While this method is far from perfect, it does allow the user to capture a greater degree of action than when using a single camera on a slide bar. www.3dphotographyguide.com Page | 21 The Complete 3D Stereo Photography Guide Chapter 6: Advanced Dual Camera Methods One of the disadvantages of the previous two methods is that they rely on the user to press the camera triggers at the exact same moment. Combined with shutter lag this can result in two photos being taken out of sync - not an ideal situation for capturing a 3D image of a scene with fast moving action. There's a few ways to get around this however they either cost more or require some DIY solutions but do produce a superior stereo pair. Cameras with wired remote port There are a number of digital cameras on the market that enable the user to use a wired remote that plugs into the side of the camera. In some cases it’s a very simple task of buying (or making) two cheap wired remotes, cutting the wires and splicing the two input jacks to the one remote control. Pressing the wired remote trigger will then trigger both cameras at the same time. Most wired remotes use a very simple circuit that consists of nothing more than a headphone jack, two wires and a switch. Some also require a small watch battery to be part of the circuit. It is worth searching on the internet to see which cameras have wired remote input ports and to see if you can find a simple wiring diagram in order to make a custom switch. I have made my own homemade wired remote that has two jacks that I have successfully used with two Canon DSLR's, allowing both to be triggered at the same time. I used an old film canister, a momentary switch, two mono headphone jacks and some wire. www.3dphotographyguide.com Page | 22 The Complete 3D Stereo Photography Guide If your camera has a more complicated circuit or uses a custom plug other than headphone jacks, search on Ebay or similar sites to find two cheap wired remotes - you may simply be able to snip off the plug on one and then splice it into the other remote. An important point to note is that to get the highest possible synchronisation, you should use as close to the exact same length and gauge wire on both input leads to ensure that when the switch is pressed, the electrical signal meets the same electrical resistance and arrives at the camera at the same time. Custom Canon camera wired remote www.3dphotographyguide.com Page | 23 The Complete 3D Stereo Photography Guide Dual cameras with IR remotes Similar to the above method, many cameras allow the user to use an infrared wireless remote to fire the camera. If you have two identical digital cameras, they will use the same wireless remote signal and therefore can be triggered at very close to the same time with a cheap IR remote brought from online (from Ebay for example). I have not had as much success with this method as with using wired remotes as the cameras don't sync up quite as well. The main difficulty with this method is ensuring that both cameras detect the infrared signal at the same time - the remote needs to be fired the same distance from each sensor. One option is to fire the remote from in front and slightly above or below the camera so it’s out of frame. The second option is to mount it to the side and use a small mirror to bounce the signal to the cameras. This will obviously require some experimentation and some DIY skills to get it right. www.3dphotographyguide.com Page | 24 The Complete 3D Stereo Photography Guide Custom camera synchronisation products There are a number of custom products on the market that will sync up two cameras within milliseconds of each other. Prices, build quality and availability vary and usually this is the most expensive option. They also only work with specific camera models. This sort of equipment is used by the pros and is far too expensive for most users. I won't go into further detail but for those interested here are some such products: PocketWizard MultiMax (www.pocketwizard.com) SLR Shepherd (www.ledametrix.com) Lanc Sheperd for Sony cameras (www.ledametrix.com) Pokescope Lanc Controller (www.pokescope.com) Breeze Systems DSLR Remote Pro Multi-Camera system (www.breezesys.com) Please note that you can get the same or even better sync results at almost no cost by using two Canon digital cameras and the CHDK Stereo Data Maker camera hack discussed in the next section of this chapter. www.3dphotographyguide.com Page | 25 The Complete 3D Stereo Photography Guide Dual cameras using Stereo Data Maker If you know your way around a computer then it is worth researching a little piece of software called Stereo Data Maker, a custom build of CHDK (CanonHack Development Kit). The Stereo Data Maker (or SDM) is an amazing piece of FREE custom software that can be loaded onto a Canon camera’s memory card. When the camera boots up, it loads the custom software, unlocking a range of additional nifty features. The software is installed on the memory card, which has been formatted to be ‘bootable’. The procedure is completely reversible and doesn’t actually alter the camera’s firmware. Stereo Data Maker supports a whole range of Canon digital cameras – both old and new. You should be able to find a couple of supported and old 5 megapixel cameras online for well below $100 each. The setup procedure is basically: Read the SDM instructions from their website! Find two identical Canon cameras supported by SDM. Mount the two cameras next to each other – you could use the ‘ghetto’ ruler and rubber bands approach or purchase a dual camera/flash bracket (see example is Chapter 7). www.3dphotographyguide.com Page | 26 The Complete 3D Stereo Photography Guide Format two memory cards and make them ‘bootable’ as per the SDM instructions. Install SDM on each card. Make a DIY wired remote control with two camera inputs or splice an extra input onto a wired remote control purchased online. Once installed it is as simple as holding down the remote button until the cameras have synched and then releasing the remote to take the photograph! Follow SDM’s documentation. More information and the software are available from the following web pages: Homepage for SDM: http://stereo.jpn.org/eng/sdm/index.htm Supported cameras: http://stereo.jpn.org/eng/sdm/cams.htm SDM Documentation http://stereo.jpn.org/eng/sdm/docs.htm www.3dphotographyguide.com Page | 27 The Complete 3D Stereo Photography Guide Chapter 7: Custom and Specialist Equipment Stereo film cameras Over the years there have been many film cameras developed that are capable of taking stereo pairs at precisely the same time. They can still be found online or in specialist camera stores with vintage or second hand equipment. The Holga 3D camera is still being manufactured but if may be difficult to find working examples of the other cameras. Holga 3D Camera. GET ONE HERE FED Ctepeo Camera Stereo Realist Camera www.3dphotographyguide.com Nishika 8000 Camera. GET ONE HERE Kodak Stereo Camera Nimslo 3D Page | 28 The Complete 3D Stereo Photography Guide Stereo Digital Cameras Digital cameras with stereo capabilities are not as common as film cameras however there appears to have been a sudden resurgence of interest in stereophotography. The Fujifilm FinePix Real 3D W3 and the Minoru 3D Webcam are both examples of digital cameras that are capable of taking true stereo pairs. Some other point and shoot cameras, such as the Sony Cybershot WX5 have a 3D “sweep” mode that is very similar to the ‘sweep panorama’ mode you may be familiar with. It essentially performs the “cha cha” method for you while you pan the camera from left to right. Included in this section are just a few examples of the more common digital 3D cameras. The market has seen such a boom lately that I’m sure there will be many more coming out over the next 12 months with even better quality and greater features. Fujifilm Finepix Real 3D W3 (and W1) The Fujifilm Finepix Real 3D W3 is the successor to the W1. While it costs more than most of the other cameras mentioned in this section, it also performs the best and produces the highest quality 3D images which can be viewed instantly on the rear LCD screen using the built in lenticular viewing screen (similar to the 3D Nintentdo DS handheld gaming device). Of all the 3D cameras reviewed here, the W1 and W3 are by far the most competent at taking 3D images and the .MPO file type can be used with Fuji’s software to create side by side images, anaglyph and a range of other 3D www.3dphotographyguide.com Page | 29 The Complete 3D Stereo Photography Guide formats. It includes all the features you’d expect in a good point and shoot camera and can even record 3D movies. You can pick one up for between $250 - $300. More info. Fujifilm Finepix W1 3D and W3 3D DXG-018P 3D Camera At only 0.3 megapixels the DXG-018P 3D Camera has very average image quality compared to even older digital point and shoot cameras. It doesn’t have any fancy bells or whistles, it doesn’t have an optical or digital zoom. What it does have is the capability to capture 3D images directly out of the camera! The camera captures the images in side by side format, ready for free viewing or viewing with a stereoscope. DXG-018P 3D Camera The DXG-018P camera actually comes with its very own stereoscopic viewer so all you need to do is print the photos out at 4x6 at your local photo printing store (or at home) and you’ll be ready to go. Despite its shortcomings and lack of features other than 3D, this camera’s key selling point is that it’s incredibly cheap. They’re available online from websites such as Amazon and www.3dphotographyguide.com Page | 30 The Complete 3D Stereo Photography Guide Ebay for between $20-$40, making it easily afordable for most people. More info. Vivicam 3D T135 The Vivicam 3D T135 camera is another 3D camera available for under $100. It’s compact and has two camera lenses built into the one unit. It’s very much a no frills camera compared to the point and shoot cameras available today, but hey, it does take 3D photos straight out of the camera as well as 12.1 megapixel 2D photos. Unfortunately, the camera is only capable of taking 3D photos viewable as anaglyphs. There is no option for other 3D formats, such as side by side images. The camera comes with a pair of robust anaglyph glasses in plastic frames. Vivitar 3D T135 You can actually wear the glasses while composing your 3D image and view it ‘live’ on the camera’s LCD screen so you’ll know exactly how the 3D photo will turn out. On the downside, you’ll actually be seen in public wearing red/cyan lensed glasses which may get you some weird looks from passerbys. Expect to pay between $70-$100. More info. www.3dphotographyguide.com Page | 31 The Complete 3D Stereo Photography Guide Sony Bloggie 3D The Sony Bloggie 3D (not to be confused with its boring 2D counterpart) was designed to allow internet users to easily capture 3D video and photos on the go. You can easily switch between 2D and 3D modes at the touch of a button and the camera includes 8GB of internal storage. This equates to around 80 minutes of full 1080p 3D HD video or LOTS of 3D photos. Sony Bloggie3D Two great features are the 3D lenticular screen and the HDMI port. The lenticular screen, similar to that of the Fuji 3D W3, allows you to preview your 3D images and videos ‘live’ without the need for any extra glasses or viewers. The HDMI port also allows you to view images directly on your 3D TV through its HDMI port without the need for further formatting. There are a couple of very minor drawbacks with this camera – the tripod mount is on the vertical axis rather than the horizontal axis and the lenses are a little too close together to get a really great 3D image. More info. www.3dphotographyguide.com Page | 32 The Complete 3D Stereo Photography Guide Aiptek iS2 3D 12MP The Aiptek Di2J (or iS2) is actually not a bad 3D camera. While it doesn’t have quite the same number of features as the Fujifilm Finepix 3D W3, it does have quite a few features you would expect from a modern point and shoot camera. Aiptek Di2J 3D The camera features dual 5MP sensors and of course can do both still images and 3D 720p HD video. The camera feature exposure compensation, 4x digital zoom, HDMI output, 10 second self-timer and lots more. Expect to pay around $200 for this camera. More info. Minoru 3D Webcam When first released, the Minoru 3D Webcam was the world’s first consumer 3D webcam. However, many of the competitors have now caught up and have similar 3D webcams. Looking somewhat like a cute little robot, the camera simply sits on top of your monitor or stands up by itself. Like other webcams, it plugs in via a USB connector. Minoru 3D Webcam www.3dphotographyguide.com Page | 33 The Complete 3D Stereo Photography Guide The included software allows images and video to be captured and rendered straight into anaglyph format. The newer versions of the software also allow image and video capture in other formats including side-by-side. It comes with 5 pairs of cardboard anaglyph glasses. Of course it is also a great camera for shooting in 2D as well. More info. Tomy Tamara 3D Shot Cam The Tomy Tamara (or just Tomy as it’s called in the USA) 3D Shot Cam is a very basic 3D camera, more of a toy really. It has dual 0.3 megapixel lenses and saves the output files onto an SD card. Tomy Tamara 3D Shot Cam Photos are in side-by-side format and need to be printed and then cut to size to fit in the included cardboard 3D viewer. Because of the very low resolution the digital images are rather hard to manipulate into other formats, such as anaglyphs but it is still possible. At around $50-60 online this is a fun camera as long as you don’t take it too seriously. www.3dphotographyguide.com Page | 34 The Complete 3D Stereo Photography Guide Beam-splitters and Mirror Lenses These specialist pieces of equipment are mounted to the front of a camera and use a prism or mirrors to split the image and take a stereo pair. Often the quality isn’t the best and the stereo base cannot be adjusted but they still provide a great 3D image. A great example is the Loreo 3D Lens-in-a-cap (pictured) that comes in various mounts for digital SLR cameras including Canon, Sony, Nikon, and Pentax. This will allow your digital SLR to take side-by-side format 3D images straight out of your camera. More info. Custom Dual Camera Rigs Many fans of stereophotography have developed their own custom rigs that allow two side by side digital cameras to take a photo at precisely the same moment. This is often achieved by mounting two cameras next to each other and developing a way to release the shutters at the same moment. One common method is to open the cameras up and re-wire the shutter release button on one camera so that it sets off both cameras at the same time. For those interested, there are many sites on the internet that can give instructions on how to achieve this although there is always the risk that you’ll destroy two perfectly good cameras. www.3dphotographyguide.com Page | 35 The Complete 3D Stereo Photography Guide Another method is to use two digital cameras that allow you to use an infrared remote control to release the shutter. While this method may not always release the shutter at the same moment, it often comes very close and it is not as risky as modifying your camera. Some digital cameras also have an input for a corded shutter release. Cameras with this capability often have either small USB style plugs or headphone like plugs and it is possible to splice two of these cables so that the one shutter release can be plugged in to both cameras at the same time. This is also much less risky than rewiring your camera directly. For those readers who are a bit more advanced in their understanding of computer software and hardware it may be worth doing an online search for “CHDK and Stereo Data Maker”. The author has had great success creating a custom dual camera rig using this software installed on two Canon Powershot cameras with a spliced shutter release as discussed above. Many of the examples in this document were photographed using this type of setup. A corded remote shutter release like this one can be Rewired to work on two cameras at the same time www.3dphotographyguide.com Page | 36 The Complete 3D Stereo Photography Guide Chapter 8: Viewing and Presenting 3D Stereo Images There are many ways to view and present stereo photographs, ranging from the simple to the very complex. Each has their own distinct advantages and disadvantages and it is ultimately left to the creator of the image to determine the best method of presentation. The three most popular methods are relatively easy to accomplish and require only minor equipment and as such are discussed in depth. Other methods are possible but are more complicated or require expensive devices to view the images and therefore are discussed only briefly; however, this should not discourage the reader from researching further and conducting their own experiments using these alternative means. Method Cost of equipment Ease of viewing Requires practice Ease of preparation Full Colour Images Free viewing Nil Very easy Yes Stereoscope Low Easy Very easy Yes Anaglyph Very low Very easy Medium Partially LCD Shutter Glasses High Very easy Difficult Yes Polarized projection Very high Very easy Difficult Yes www.3dphotographyguide.com Page | 37 The Complete 3D Stereo Photography Guide The simplest way to view stereo pairs is known as free viewing and there are two methods. The first is known as parallel free viewing and the second is known as cross-eyed free viewing. Both methods take a little practice but most people shouldn’t have too much trouble. Parallel free viewing works best for relatively small images whereas cross-eyed free viewing can be used for both small and very large images. There are also a range of specialist viewers that make viewing stereo images easier but they will be explained in later chapters. To begin with, parallel free viewing is the simplest method and doesn’t require any extra equipment. www.3dphotographyguide.com Page | 38 The Complete 3D Stereo Photography Guide Parallel free viewing Parallel free viewing involves printing or placing the two images of the stereo pair side by side. Ensure that they are both lined up on the same horizontal plane. The left image should be on the left and the right image should be placed on the right. Free viewing digital images can be done on the computer screen, although the resolution is usually not as good as printed images due to pixelization. This method works when the combined width of the images is less than 5.5 inches or 14 centimetres. For larger images it is better to use the cross-eyed free viewing method. Below is an example stereo pair to practice this method (and to show you how to arrange the images). Example of image prepared for parallel free viewing www.3dphotographyguide.com Page | 39 The Complete 3D Stereo Photography Guide Begin by looking at the images and relax the focus of your eyes. Eventually your eyes will want to point straight ahead. While relaxing it will being to appear as if the images are moving toward each other and beginning to overlap. As the images overlap it will appear as if there are three side by side images. When this occurs, focus on the middle of the three images to view the stereo effect. A simple way to practice this is to place a piece of paper or cardboard perpendicular to the two images (where the white gap appears between the two images above) and then placing nose against the edge of the paper. This prevents the left eye seeing the right image and vice versa. Once the 3D image comes in to focus, carefully remove the piece of cardboard while concentrating on maintaining your focus. Cross-eyed Free viewing Cross-eyed free viewing tends to work better with larger pictures or when viewing images on a computer monitor. It is similar to the previous method, with both images of the stereo pair being placed side by side on the same horizontal plane. In this instance the images are to be reversed with the left image being place on the right side and the right image being placed on the left side. The trick to this method is getting your eyes to converge so that the left eye sees the right image and vice versa. www.3dphotographyguide.com Page | 40 The Complete 3D Stereo Photography Guide Start by sitting a comfortable distance from the images. The further you are away from the image, the less your eyes will need to converge. Place your finger in between the two images and focus on it. Maintain this focus as you slowly bring your finger closer to your nose. As you bring your finger closer to your face the stereo pair should appear to be moving apart. The images will begin to fuse and create a third image. When this occurs the third image is likely to be out of focus. Move your finger out of the way and wait patiently while remaining cross-eyed. Eventually your brain will resolve the out of focus image into a 3D image. It helps to concentrate on one particular object in the image. If you have bifocal or reading glasses these assist in converging the images and it may be as simple as moving your head forward or backwards until the image resolves into a 3D image. If the image appears ‘inside-out’ you are viewing it in the parallel format mentioned in the previous section. An image prepared for cross-eyed free viewing www.3dphotographyguide.com Page | 41 The Complete 3D Stereo Photography Guide Another simple way to practice this method is by creating an “Elliot Viewer” by cutting a small window in a piece of cardboard. Take the piece of cardboard and cut a square in it that is less than the distance between your eyes. Approximately 4cms is a good starting point to experiment with. Hold the cardboard half way between your eyes and the stereo pair. Close your left eye and adjust the cardboard so that your right eye can see only the left image. Now close your right eye and make small adjustments to the cardboard so that your left eye can see only see the right image as well. Repeat this process until each respective eye can only see the opposite image. www.3dphotographyguide.com Page | 42 The Complete 3D Stereo Photography Guide Now with both eyes open and without uncrossing your eyes, try to focus on the image you can see through the cardboard window. Your eyes should slowly converge and the as the image comes into focus it will be in 3D. It is easier to begin by practicing on smaller images, similar in size to the example on the previous page. Once you have mastered this technique try it again with larger stereo pairs. Stereo Pairs Using a Stereo Viewer There are many types of handheld stereo viewers available. The majority of these viewers use lenses to magnify and focus the stereo image and are usually a variation of the cross-eyed or parallel free viewing methods. One of the oldest types of viewers is known as the Holmes Viewer which was developed by Oliver Wendell Holmes in 1859. These were immensely popular and were used to view side by side images on a stereocard. Following the popularity of the Holmes viewer, many companies followed suit and produced their own similar models. Vintage stereo viewers can still be found in antique stores (or sometimes online). There are also a number of companies that sell reproduction models – some are fully assembled, while other DIY kits require some assembly. These types of viewers are great if you wish to print out your pictures onto photo paper or stiff card although it is not suited to viewing images on a computer screen. www.3dphotographyguide.com Page | 43 The Complete 3D Stereo Photography Guide Example of a Holmes style Stereo Viewer Lorgnette viewers are incredibly versatile and allow you to view side-by-side images on printed mediums and also on computer or television screens. The more expensive versions use optical quality glass lenses however the plastic viewers are incredibly cheap and provide a great way to view 3D images providing you try not to scratch the lenses. The author highly recommends this style of viewer due to its ease of use, low cost and convenient size. A typical lorgnette viewer and diagram showing how to use the viewer www.3dphotographyguide.com Page | 44 The Complete 3D Stereo Photography Guide One type of viewer that many readers may be familiar is the View-Master. View-Master viewers have been in production since the 1940’s and are still being made today. Pairs of transparent slides are printed on round discs that are inserted into the top of the View-Master. Viewmaster Stereo Viewer Pulling the lever on the side rotates the disc to display the next pair of stereo images. While these are commonly available in toy stores along with a range of image discs, it would be a very difficult process to create your own. The Tru-Vue system is similar to the View-Master system in that it uses specialised cards with transparent stereo slides printed on them. Invented in the 1930’s this system provided users with a range of images including travel photos, Hollywood movie stars, cartoons and fairy tales. Like the View-Master system, it would be a difficult process to develop your own images to use with this system. Tru-Vue Stereo Viewer from the 1960’s www.3dphotographyguide.com Page | 45 The Complete 3D Stereo Photography Guide Stereo Slide Viewers look somewhat like a pair of binoculars. Transparent slides are inserted for either the left or the right eye. The viewers are then held up to a light source to backlight the 3D image. More advanced versions of these viewers include better optical quality, magnification and inbuilt light sources. While it is still possible to have photographs printed as slides, it is becoming increasingly difficult to find camera stores with this capability. Example of stereo slide viewer Due to advancements in digital photography, slides (and film) are fast becoming a dead medium. For those wishing to experiment with these kinds of viewers, it may be possible to resize digital images to the same size as conventional slides and then print them onto overhead transparencies using an inkjet or laser printer. The transparencies would then need to be mounted in a similar fashion to regular slides. The author has not experienced this technique first hand and it may prove quite difficult. There are other kinds of viewers such as those that come with an array of mirrors to view either side-by-side or upper-and-lower configurations of stereo pairs however these sort of viewers are less common than the others discussed here. www.3dphotographyguide.com Page | 46 The Complete 3D Stereo Photography Guide Viewing Anaglyphs With 3D Glasses Anaglyphs require a little more preparation than free viewing but it is much easier for a person to view the image in 3D. Originally anaglyphs were only used for black and white images but recent advances have allowed 3D images to be displayed in full-colour using this technique. Instead of using two images side-by-side, the anaglyph is made up of the left and right images as two colored layers and superimposed on top of each other. This allows the image to be presented as a single frame rather than a pair. Each of the images in the stereo pair are coloured in a certain so that the two different coloured lenses prevent each eye from seeing certain colours thereby creating the 3D effect. Red/cyan 3D anaglyph www.3dphotographyguide.com Page | 47 The Complete 3D Stereo Photography Guide To view the anaglyph image, the viewer must wear a pair of 3D glasses which are commonly made of cardboard and have red/blue lenses or red/cyan lenses. Recent developments have seen other plastic frames with glass lenses. Cardboard Red/Blue anaglyph glasses The most common colour combinations used are red/cyan, red/blue, and red/green. Red/Cyan tends to be the standard as it creates the least amount of colour distortion and what is known as ghosting. Ghosting is the leaking of an image to one eye when it is intended exclusively for the other eye. Even when using red/cyan lenses, this problem is likely to always be present to some extent. To prepare the anaglyph image it is easiest to processes the stereo pair using computer software. There are many free programs available for download from the internet that appear to work as well, if not better, than expensive commercial software. Most of these programs allow you to simply input the right and left images, select what colour glasses you will be viewing the image with and then simply click a button to generate the image. I will discuss software options later in this chapter. If you’re planning on converting your stereo pairs into anaglyphs, you’ll need to view them with 3D glasses. You can buy them online, obtain them for free or easily make them yourself! www.3dphotographyguide.com Page | 48 The Complete 3D Stereo Photography Guide Free 3D Anaglyph Glasses Rainbow Symphony specialise in 3D glasses (and a range of other cool products). Best of all, they offer a free sample pair of 3D glasses through their website: http://www.rainbowsymphony.com/freestuff.html Very Quick DIY Anaglyph Glasses Anaglyph glasses are very simple to make - these are the kind of 3D glasses most of us are familiar with. They usually have red/blue lenses or red/cyan lenses. If you're in a huge hurry and need a pair of anaglyph glasses, you can easily find a clear plastic CD jewel case; flip the case open and use whiteboard or permanent markers to draw two boxes approximately the same distance apart as your eyes. Use a blue pen for the left eye and a red pen for the right eye. Simple, quick and easy! You can also use a pair of old reading glasses that you might having lying around - use whiteboard markers to colour in the lenses in red and blue. You can always clean the whiteboard marker ink off later using glasses cleaner and a soft cloth. Print and Make Your Own 3D Glasses Another option is to print your own 3D glasses onto card stock. Cut out the eye holes and tape red and blue cellophane gift wrapping squares over the eye holes. At the end of this book you’ll find a free template for 3D glasses you can print out at home! www.3dphotographyguide.com Page | 49 The Complete 3D Stereo Photography Guide Popular free anaglyph software The software programs that create anaglyphs also generally allow you to adjust the depth of the image by changing their alignment. This will allow you to adjust the ‘stereo window’ – which determines whether certain elements appear to pop out of the screen/off the page or whether they drop back from it. Whichever program you use, it is best to refer to the program’s documentation or FAQ’s to gain a better understanding of how to correctly align the images, although this is usually a very simple process. In most cases as simple as clicking on a + and – buttons until the image looks good. If you do wish to have any objects in the image to appear to pop out from the page/screen it is best practice to ensure that they are somewhere toward the middle of the image and do not intercept the image border otherwise they will appear discomforting and the object will seem unusually flat at the edges of the image. One of the best free pieces of software is the StereoPhoto Maker. It’s very basic but is certainly enough to get started with. It is available from http://www.stereomaker.net/eng/stphmkr/index.html. www.3dphotographyguide.com Page | 50 The Complete 3D Stereo Photography Guide Lenticular 3D Printing This is another great way to present and share 3D photos and doesn’t require the use of any glasses or special equipment. Many 3D cameras such as the Fujifilm Finepix 3D W3 use lenticular 3D screens on their display to allow users to preview 3D images straight out of the camera. Lenticular 3D printing is a little hard to explain. Essentially the two images of the stereo pair are combined in a process called ‘interlacing’. See the left hand picture below. Once interlaced, a thin plastic sheet of very small plastic cylinders is place over the top as per the image below right. When you tilt the printed image back and forth, the 3D effect becomes apparent. Here is an example of a lenticular card with a 3D pattern: http://www.youtube.com/watch?v=m5_lDoRSrco&feature=relmfu www.3dphotographyguide.com Page | 51 The Complete 3D Stereo Photography Guide While not exactly a cheap way to present images, they do certainly produce excellent results and are easily viewable by anyone without any equipment. I actually had them print a whole lot 3D photo cards so I could put together a portfolio that was easily viewable (and could be mailed to family and friends). One company I would recommend for 3D lenticular printing is Snapily. They can easily turn any stereo pair (or images straight from your 3D camera) into awesome 3D lenticular prints in a huge range of formats including photo cards, bookmarks, backpack tags, ornaments, business cards, notebook covers and stationary. Lenticular 3D is certainly a great way to make some fantastic 3D gifts and I found Snapily to be very professional, with a fast turnaround. www.3dphotographyguide.com Page | 52 The Complete 3D Stereo Photography Guide The Wiggle Technique The somewhat unusual ‘Wiggle’ technique does not require any special viewing equipment, however, the image created is not truly 3D but rather appears to have an element of depth to it. The Wiggle technique works by quickly alternating between the left and the right image. This can be through the use of an animated GIF image, a Flash or Java applet, or specialised software package and can be viewed on web pages or in Power Point Presentations. Rapidly alternating the pictures creates a crude sense of depth that most people can observe instantly. The drawback is that this can’t be displayed on printed material and will only work on displays that can ‘wiggle’. Many wiggle images use only two images which make the animation appear jerky. Using a series of photos (each with a differing stereo base) will achieve a smoother and more appealing motion. Using three or five images produce a much better wiggle effect than a simple transition between a left image and a right image. To create images using the wiggle technique you will need to use an image package that can create animated GIFS (such as Adobe Photoshop). www.3dphotographyguide.com Page | 53 The Complete 3D Stereo Photography Guide Free software that can be used to demonstrate and experiment with the ‘wiggle technique’ include: StereoPhoto Maker - http://www.stereomaker.net/sample/ani/ani_e.htm Wiggle Stereoscopic 3D Viewer – www.sourceforge.net/projects/wiggle Easy Wiggle Image Creator (for Android) http://tberk77.wordpress.com/ The New York Public Library has also created the Stereogranimator, which lets users search their collection of old early 20th century stereoscope cards and animate them into 3D images using the wiggle technique. Their website is http://stereo.nypl.org/ 3D LCD Shutter glasses 3D Liquid crystal shutter glasses are also known as field sequential glasses. These glasses are usually battery operated and can be either wired or wireless. These can be used to view images or movies on a computer screen or TV. Many of the early generation 3D television sets use this type of technology Shutter glasses have high-speed electronic shutters in each lens made from liquid crystal displays (LCD’s). They can be automatically turned on or off very rapidly (usually somewhere around 50 or 60 times per second!). When there is no electrical current running through it, the lens is see through. When a current is applied, the lens becomes opaque. www.3dphotographyguide.com Page | 54 The Complete 3D Stereo Photography Guide As the glasses shutter on and off, left and right images are shown on the screen or TV and are rapidly alternated. The flickering screen is synchronized with the lenses in the glasses thus each eye only sees the appropriate left or right image. The images must alternate very rapidly and the flickering is usually too fast for the human eye to detect. If a casual passer-by was to watch the TV screen or monitor without wearing the 3D shutter glasses the image would simply appear blurry, is if the person had double vision. LCD shutter glasses for use with 3D TV The shutter glasses are usually either sold with the TV or 3D monitor. It is also possible to buy kits with a controller and/or software that is able to synchronise the alternating left and right images and produce a video output signal so that it can be used with any normal TV or monitor. This video signal is then passed into your computer monitor or TV screen. It is possible to use this method with any of the stereo pairs you’ve already photographed however it is recommended that you refer to the specific documentation that comes with the brand of glasses that you have purchased. While this technology is a little more expensive than the methods previously discussed, it does provide an excellent way to view 3D images, watch 3D www.3dphotographyguide.com Page | 55 The Complete 3D Stereo Photography Guide movies and play 3D games. If you’re interested in fully exploring stereoscopy then these are definitely a superior method. While some brands are for dedicated 3D monitors or televisions there are others that will work with any TV or monitor including old CRT monitors and the newer flat screen LCD/LED or Plasmas. In fact, if you search online you can even find old versions that can decode certain 3D VHS and even Betamax movies to 3D ‘on the fly’. Polarised Projection and Passive 3D Polarised projection is capable of displaying incredible 3D imagery and is commonly used in cinemas when screening 3D movies. This method is more difficult to prepare and requires a larger budget to purchase the necessary hardware. The newer 3D TV models are beginning to employee this ‘passive 3D’ technology. To be able to display the images, two projectors are required (film, slide or digital video). Each projector has a polarising filter placed over their lenses. The left projector shines the left image or film onto the screen. The right projector shines the right image directly on top of the left image but the polarising filter is adjusted to be 90 degrees different. www.3dphotographyguide.com Page | 56 The Complete 3D Stereo Photography Guide The audience must wear 3D glasses with polarised lenses (usually cheap plastic). The left lens is polarised at 0 degrees and therefore only sees the left image. The right lens is polarised at 90 degrees and therefore only sees the right image, thus creating the 3D effect. The image suffers from minimal distortion and can be viewed in full colour, sharp focused 3D glory. To use this method you would require two projectors as well as the necessary polarising filters and glasses. The image should also be projected onto a silver backed screen so that the polarisation is not disrupted. Any stereo pair can be used however if attempting to use this method for film, special software may be necessary to ensure that the two film streams remain synchronised. Passive polarised 3D glasses www.3dphotographyguide.com Page | 57 The Complete 3D Stereo Photography Guide Chapter 9: Purchasing Equipment 3D photography can be as simple or as professional as you would like. While 3D images can be captured using any camera, there may be some readers who wish to take their photography to the next level or even delve into 3D movie making. My website is full of impartial and practical advice on a range of 3D related products. I have scoured the web to provide you with some great deals on a range of quality 3D products including: Professional slide bars 3D and regular digital cameras 3D Camera rigs Anaglyph glasses Stereoscopic Viewers LCD Shutter Glasses 3D Software for photography and film making 3D movies and films Further reading material Simply visit my website at www.stereophotographyguide.com www.3dphotographyguide.com Page | 58 The Complete 3D Stereo Photography Guide Chapter 10: Conclusion I trust that you have enjoyed this introduction to 3D stereo photography and I hope that you have now been inspired to experiment with some of the techniques explained in this book. Given the heightened interest in 3D movies in recent years, coupled with new forms of media and technology, it is certainly a fantastic time to explore this artistic medium. Thank you for your interest in my book. Photography is a passion of mine and I particularly love to experiment with it in all its forms. I always enjoy hearing from other photography and 3D enthusiasts and would be happy to try and answer any further questions you may have. Unfortunately I’m not always able to respond to each and every e-mail that floods my inbox, but I try my hardest. If you do have any questions, feedback or comments on this book or on photography in general, please feel free to contact me through my website at www.stereophotographyguide.com. www.3dphotographyguide.com Page | 59