1
User’s Manual/ 使用说明书
411867301
English
User’s Manual
No part of this publication may be reproduced, stored in a retrieval system, or transmitted in any form or by
any means, electronic, mechanical, photocopying, recording, or otherwise, without the prior written
permission of Seiko Epson Corporation. No patent liability is assumed with respect to the use of the
information contained herein. While every precaution has been taken in the preparation of this book, Seiko
Epson Corporation assumes no responsibility for errors or omissions. Neither is any liability assumed for
damages resulting from the use of the information contained herein.
Neither Seiko Epson Corporation nor its affiliates shall be liable to the purchaser of this product or third
parties for damages, losses, costs, or expenses incurred by purchaser or third parties as a result of: accident,
misuse, or abuse of this product or unauthorized modifications, repairs, or alterations to this product, or
(excluding the U.S.) failure to strictly comply with Seiko Epson Corporation’s operating and maintenance
instructions.
Seiko Epson Corporation shall not be liable against any damages or problems arising from the use of any
options or any consumable products other than those designated as Original Epson Products or Epson
Approved Products by Seiko Epson Corporation.
EPSON is a registered trademark of Seiko Epson Corporation in Japan and other countries/regions.
Microsoft, Windows, Windows Vista, and Windows Server are registered trademarks of Microsoft
Corporation in the United States and/or other countries.
The Ethernet interface model of this product includes software developed by the University of California,
Berkeley, and its contributors.
NOTICE: The contents of this manual are subject to change without notice.
Copyright © 2010 Seiko Epson Corporation. All rights reserved.
WARNING
This is a Class A product. In a domestic environment this product may cause radio interference in which case
the user may be required to take adequate measures.
English
Safety Precautions
This section presents important information intended to ensure safe
and effective use of this product. Please read this section carefully and
store it in an accessible location.
WARNING:
Shut down your equipment immediately if it produces smoke, a strange
odor, or unusual noise. Continued use may lead to fire. Immediately
unplug the equipment and contact your dealer or a Seiko Epson service
center for advice.
Never attempt to repair this product yourself. Improper repair work can
be dangerous.
Never disassemble or modify this product. Tampering with this product
may result in injury or fire.
Use the specified AC Adapter only. Connection to an improper power
source may cause fire.
Be sure your power cable meets the relevant safety standards and
includes a power-system ground terminal (PE terminal). Otherwise shock
may result.
Do not allow foreign matter to fall into the equipment. Penetration by
foreign objects may lead to fire.
If water or other liquid spills into this equipment, unplug the power cord
immediately, and then contact your dealer or a Seiko Epson service
center for advice. Continued usage may lead to fire.
Do not use aerosol sprayers containing flammable gas inside or around
this product. Doing so may cause fire.
CAUTION:
Do not connect cables in ways other than those mentioned in this
manual. Different connections may cause equipment damage and
burning.
Be sure to set this equipment on a firm, stable, horizontal surface. The
product may break or cause injury if it falls.
Do not use in locations subject to high humidity or dust levels. Excessive
humidity and dust may cause equipment damage or fire.
Do not place heavy objects on top of this product. Never stand or lean
on this product. Equipment may fall or collapse, causing breakage and
possible injury.
To ensure safety, unplug this product before leaving it unused for an
extended period.
Do not remove the ink cartridge from the product when you ship it.
2 TM-C610 User’s Manual
English
Restriction of Use
When this product is used for applications requiring high reliability/
safety, such as transportation devices related to aviation, rail, marine,
automotive, etc.; disaster prevention devices; various safety devices,
etc.; or functional/precision devices, etc.; you should use this product
only after giving consideration to including fail-safes and
redundancies into your design to maintain safety and total system
reliability. Because this product was not intended for use in
applications requiring extremely high reliability/safety, such as
aerospace equipment, main communication equipment, nuclear power
control equipment, or medical equipment related to direct medical
care, etc., please make your own judgment on this product’s suitability
after a full evaluation.
Unpacking
The following items should be included with the printer. If any items
are damaged, contact your dealer.
❏
❏
❏
❏
Roll paper
Ink cartridge (Model: SJIC15P)
AC adapter
User’s Manual (this manual)
TM-C610 User’s Manual 3
English
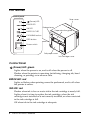
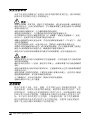
Part Names
Control panel
Rear cover
(Power) LED
ERROR LED
INK LED
PAPER OUT LED
Release lever
Paper ejection guide
CLEANING button
FEED button
Power switch
Roll paper cover
Ink cartridge cover
Control Panel
(Power) LED: green
Lights when the power is on, and is off when the power is off.
Flashes when the printer is operating (initializing, charging ink, head
cleaning, or printing) or in an error state.
ERROR LED: red
Lights or flashes when printing cannot be performed, and is off when
the printer is online.
INK LED: red
Flashes when ink is low or waste ink in the ink cartridge is nearly full.
Lights when it is time to replace the ink cartridge, when the ink
cartridge is not installed or is not correctly installed, or when waste ink
in the ink cartridge is full.
Off when ink in the ink cartridge is adequate.
4 TM-C610 User’s Manual
English
PAPER OUT LED: red
Flashes when the remaining roll paper is near the end.
Lights when the remaining roll paper is near the end (ERROR LED is
off), and when the roll paper is not installed or is not correctly installed
(ERROR LED is on).
Off when the roll paper is correctly installed.
CLEANING button
When the printout is faint or dots are missing, pressing this button for
3 seconds or more performs print head cleaning.
CAUTION:
To prevent ink waste, do not press the CLEANING button unless there is a
problem with print quality.
FEED button
Feeds the roll paper. After feeding paper, the roll paper is
automatically cut.
Power switch
Turns on/off the printer. To turn off, press this switch for 3 seconds or
more.
Caution:
Before you turn off the printer, wait more than 10 seconds after the printer
has finished its operation.
Setup
Follow in order the steps below to set up the printer.
1.
2.
3.
4.
5.
Installing the printer. (See page 6.)
Connecting and arranging the cables. (See page 7.)
Installing the roll paper. (See page 9.)
Installing the ink cartridge.(See page 10.)
Installing the printer driver. (See page 12.)
TM-C610 User’s Manual 5
English
Installing the Printer
❏
❏
❏
❏
❏
Do not place the printer in dusty locations.
The printer must be installed horizontally.
Leave enough space in front of the printer for the ink cartridge
cover and the roll paper cover to be fully opened, and be careful
not to place an obstacle in front of the printer, especially when you
install the printer on a mounting table.
If you install the printer in a location where it could fall during
operation, make sure to secure the printer with screws.
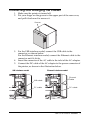
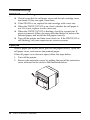
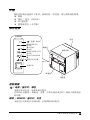
When installing the printer on a mounting table, secure the printer
with two screws (M4) or fix it with affixing tape. Use screws
between 7 and 10 mm long from the ground point of the rubber
foot on the printer.
7~10 mm
Printer
85 mm
Screw holes
❏
❏
Mounting table
Rubber foot
Do not allow cables to catch or foreign matter to accumulate under
the printer.
Do not subject the printer to impact during operation. Otherwise,
print problems may occur.
6 TM-C610 User’s Manual
English
Connecting and Arranging the Cables
1.
2.
Make sure the printer is turned off.
Put your finger on the groove in the upper part of the rear cover,
and pull it backward to remove it.
Groove
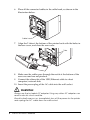
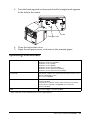
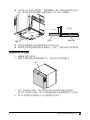
3.
4.
5.
For the USB interface model, connect the USB cable to the
connector, as shown below.
For the Ethernet interface model, connect the Ethernet cable to the
connector until it clicks.
Insert the connector of the AC cable to the inlet of the AC adapter.
Connect the DC cable of the AC adapter to the power connector of
the printer, as shown in the illustration below.
Ethernet interface model
USB interface model
USB cable
Ethernet
cable
DC cable
DC cable
TM-C610 User’s Manual 7
English
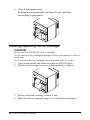
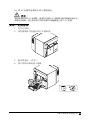
6.
Place all the connected cables in the cable hook, as shown in the
illustration below.
Cable hook
7.
Align the 2 tabs at the bottom of the printer back with the holes in
the rear cover, and close the rear cover.
Tabs
8.
Make sure the cables pass through the notch at the bottom of the
rear cover and are not pinched.
9. Connect the other side of the USB/Ethernet cable to a host
computer/network hub.
10. Insert the power plug of the AC cable into the wall socket.
WARNING:
Always use the included AC adapter. Using any other AC adapter can
result in electric shock and fire.
Should a fault ever occur, immediately turn off the power to the printer
and unplug the AC cable from the wall socket.
8 TM-C610 User’s Manual
English
Installing/Replacing the Roll Paper
1.
2.
Turn on the printer.
Press down the release lever, and pull it to the front to open the
roll paper cover.
3.
4.
Remove the paper core if there is one.
Load the roll paper in the orientation shown below.
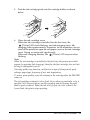
5.
Pull the paper end to the paper exit keeping it within the paper
ejection guide.
TM-C610 User’s Manual 9
English
6.
Close the roll paper cover.
Roll paper is automatically fed about 10 cm, and then
autocutting is performed.
Installing/Replacing the Ink Cartridge
CAUTION:
Always use the EPSON SJIC15P ink cartridge.
Do not open the ink cartridge package until you are ready to install it in
the printer.
Do not remove the ink cartridge from the printer when you ship it.
1.
2.
Turn on the printer and make sure that the INK LED lights.
Pull the ink cartridge cover out, as shown below, to open it.
3.
4.
Remove the used cartridge, if there is one.
Shake the ink cartridge package 4 or 5 times before opening it.
10 TM-C610 User’s Manual
English
5.
Push the ink cartridge gently into the cartridge holder, as shown
below.
6.
Close the ink cartridge cover.
When the ink cartridge is installed for the first time, the
(Power) LED starts flashing, and ink charging starts. Ink
charging takes approximately 4 minutes. In the meantime, do not
turn off the printer or open the roll paper cover or the ink cartridge
cover. Doing so wastes ink significantly.
When ink charging finishes, the
(Power) LED stays on after
flashing.
Note:
When the ink cartridge is installed for the first time, the printer uses ink to
prepare for printing (ink charging), therefore the first cartridge does not last
as long as subsequent ones do.
Cartridge yields vary based on such factors as type of item printed, print
settings, paper type, frequency of use, and temperature.
To insure print quality, some ink remains in the cartridge after the INK LED
comes on.
The ink cartridge contains 3 colors of ink. Even when one particular color is
specified, all 3 colors of ink are used for printing and for keeping the print
head in good condition. When the ink level of even one color comes to the
lowest limit, the printer stops printing.
TM-C610 User’s Manual 11
English
Installing the Printer Driver
CAUTION:
Be sure to confirm the operating environment (page 15) before
installing.
You are required to log on to the computer as a user with administrative
rights.
For the USB Interface Model
1.
2.
3.
Turn off the printer. (You will turn it on during installation by
following the instructions.)
For a 32bit OS, double-click on the icon “c61d32_XXXX.exe.”
For a 64bit OS, double-click on the icon “c61d64_XXXX.exe.”
Complete the installation by following the instructions displayed.
For Ethernet Interface Model
1.
2.
3.
4.
5.
6.
7.
Make sure the printer is turned on.
Set the IP address to the printer by using EPSON TMNet
WinConfig.
Click [Start] - [Control Panel] - [Printer] (or [Printers and Faxes]).
From the menu, click [File] - [Add Printer].
Click [Add a local printer].
Select [Create a new port:], select [Standard TCP/IP Port] in
“Type of port,” and click [Next].
Set each item as described below:
•
•
•
Device type: TCP/IP Device
Hostname or IP address: IP address set for the printer
Port name: The value set in [Hostname or IP address] is
•
Query the printer and automatically select the driver to use:
automatically input.
Uncheck the checkbox.
Select [Standard] in “Device Type,” select [Generic Network
Card], and click [Next].
9. Click the [Cancel] button to close the window.
10. For a 32bit OS, double-click on the icon “c61d32_XXXX.exe.”
For a 64bit OS, double-click on the icon “c61d64_XXXX.exe.”
11. Complete the installation by following the instructions displayed.
8.
12 TM-C610 User’s Manual
English
Displaying the Printer Driver
Follow the steps below to display the printer driver.
Click [Start] - [Control Panel] - [Printer] (or [Printers and Faxes]).
Right-click on [EPSON TM-C610] and click [Printing
Preferences].
For details on how to use the printer driver, see the printer driver help.
1.
2.
Cleaning
Cleaning the Printer Case
Be sure to turn off the printer, and wipe the dirt off the printer case
with a dry cloth or a damp cloth.
CAUTION:
Never clean the product with alcohol, benzine, thinner, or other such
solvents. Doing so may damage or break the parts made of plastic and
rubber.
Cleaning the Print Head
Perform head cleaning only when the printout is faint or dots are
missing.
CAUTION:
When ink is low, head cleaning may not start or may stop during
cleaning. In this case, head cleaning starts after a new ink cartridge is
installed.
Follow the steps below to perform head cleaning. (You can also use the
printer driver for head cleaning. For details, see the printer driver
help.)
1.
2.
Turn on the printer.
Press the CLEANING button for 3 seconds or more.
Head cleaning starts, and the
(Power) LED starts flashing.
When head cleaning finishes, the
(Power) LED stays on.
CAUTION:
Do not do not turn off the printer or open the roll paper cover or the
ink cartridge cover while the
(Power) LED is flashing.
TM-C610 User’s Manual 13
English
Troubleshooting
ERROR LED on or flashing
❏
❏
❏
❏
❏
Check to see that the roll paper cover and the ink cartridge cover
are closed. If they are open, close them.
If the INK LED is on, replace the ink cartridge with a new one.
When the PAPER OUT LED is on, check whether the roll paper is
out. If it is out, replace it with a new one.
When the PAPER OUT LED is flashing, check for a paper jam. If
paper is jammed, follow the steps described below to remove the
jammed paper, and install the roll paper correctly.
Turn off the printer and then turn it back on. If the ERROR LED is
still flashing, call your supervisor or a service person.
Paper jam
When a paper jam occurs, never pull out the paper forcibly. Open the
roll paper cover, and remove the jammed paper.
If the roll paper cover does not open, follow the steps below.
1.
2.
Turn off the printer.
Remove the autocutter cover by pulling the part of the autocutter
cover indicated in the circle in the illustration below.
14 TM-C610 User’s Manual
English
3.
Turn the knob upward or downward until a triangle mark appears
in the hole in the frame.
Knob
Triangle mark
4.
5.
Close the autocutter cover.
Open the roll paper cover, and remove the jammed paper.
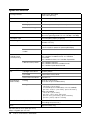
Operating Environment
OS
Windows 7 (32/64bit)
Windows Vista SP2 (32/64bit)
Windows XP SP3 (32bit)
Windows XP SP2 (64bit)
Windows Server 2008 R2 (64bit)
Windows Server 2008 SP2 (32/64bit)
Windows Server 2003 R2 SP2 (32/64bit)
Computers
The printer supports the following computers that run the
above operating system.
•PC/AT-compatible
CPU*
Computers with a processor of 1 GHz or better are
recommended.
Intel Pentium/Celeron series, AMD Athlon/Duron family,
or processors that are compatible with these are
recommended.
RAM*
512 MB or larger is recommended.
* : Must meet the system requirements for the supported OS.
TM-C610 User’s Manual 15
English
Specifications
Printing method
Serial ink jet, dot matrix
Three-color printing
Paper feed
Bidirectional printing by forward friction feed
Autocutter
Cutting method
By separated-blade scissors
Cutting type
Partial cut (one center point uncut)
Minimum cut length
16.1 mm
Print density
360 dpi × 180 dpi, 360 dpi × 360 dpi
Print speed
96 mm/s (printing width: 53 mm, 360 dpi × 180 dpi)
49.8 mm/s (printing width: 53 mm, 360 dpi × 360 dpi)
Roll paper type
Normal quality paper (single-ply)
Ink cartridge
3-color integrated dedicated ink cartridge
(Model: SJIC15P)
Interface
Barcode/
2-dimensional
symbol printing
USB interface model
Compliance: USB 2.0
Communication speed: Hi-speed (480 Mbps)
Ethernet interface
model
100 Base-TX/10 Base-T
Barcodes
UPC-A, UPC-E, JAN 8 (EAN 8), JAN 13 (EAN 13),
GS1 DataBar Omnidirectional, GS1 DataBar
Truncated,
GS1 DataBar Limited, GS1 DataBar Expanded
2-dimensional symbols
GS1 DataBar Stacked,
GS1 DataBar Stacked Omnidirectional,
GS1 DataBar Expanded Stacked
Power supply
Life
Temperature
and humidity
Dedicated AC adapter
Carriage mechanism
4 million passes
Print head
6,000 million shots/nozzle
Autocutter mechanism
500,000 cuts
Printing
10 to 35°C {50 to 95°F}
20 to 80% RH (No condensation)
Storage
When packed:
-20 to 60°C {-4 to 140°F},
5 to 85%RH (No condensation, ink not loaded)
(At -20°C or 60°C {-4 or 140°F}: up to 120 hours)
When ink loaded:
-20 to 40°C {-4 to 104°F}
(At -20°C {-4°F}: up to 120 hours)
(At 0 to 30°C {32 to 86°F}: up to 6 months)
(At 40°C {104°F}: up to 1 month)
Overall dimensions (H × W × D)
185 × 200× 195 mm
(Excluding the protrusion )
Mass
Approximately 4 kg
dpi: dots per 25.4 mm (dots per inch)
Mbps: megabits per second
16 TM-C610 User’s Manual
简体中文
使用说明书
没有精工爱普生公司的正式书面许可,本手册不得复制,不得保存在可再生系统内,或以任何形式任何手段进
行电子、机械转载、复印、录制等。使用本手册内的有关信息无须授权。在编辑本手册时我们考虑到了各项防
备措施,对于手册中的错误和遗漏,精工爱普生公司概不负责。同时,也不负责由于使用本手册中的信息内容
造成的损失。
本产品由于用户或第三方造成的事故、错误使用和乱用,以及擅自改装、修理或变更式样等,不严格遵守精工
爱普生公司的操作和维修要求 (美国除外),引起的危害、损失、费用和付出款项等,不论是精工爱普生公司
还是其它有关的集团公司,对于该顾客或第三方概不负有任何责任。
由于使用非正规爱普生产品或非精工爱普生公司指定许可的任何附件或任何消耗品,从而造成的损失和故障,
精工爱普生公司概不负责。
EPSON 是 Seiko Epson Corporation 在日本、中华人民共和国及其它国家或地区的注册商标。
Microsoft、Windows、Windows Vista 和 Windows Server 是 Microsoft Corporation 在美国和 / 或其他国家的注册商标。
本产品的以太网接口机型包含伯克利加利福尼亚大学及其捐献者开发的软件。
备注:本手册中的内容有可能发生更改,恕不事先通知。
Copyright © 2010 Seiko Epson Corporation. All rights reserved. 20101224
制造商 : 精工爱普生株式会社
地址 : 日本东京都新宿区西新宿 2-4-1
对于中国的用户
此为 A 级产品,在生活环境中,该产品可能会造成无线电干扰。在这种情况下,可能需要用户对其干扰采取切
实可行的措施。
ºÚÃÂ÷–Œƒ
安全注意事项
本章节介绍有关确保本产品的安全和有效使用的重要信息。 请仔细阅读
此部分并将其保存在便于拿到的地方。
警告 :
如果发生冒烟、异常气味、或者不正常的噪音时,请立即关闭机器。继续使用可
能会引起火灾。 应该立即拔掉插头,并与销售商或精工爱普生服务中心取得联
系询问处理办法。
请勿试图自行维修本机。不正确的维修是很危险的。
请勿自行拆卸或校正。不正确的动作会对本机造成伤害或火灾。
在中国使用本产品时只能使用规定的 AC 适配器 (爱普生电源插销 C,型号:
M235A)。连接到不适当的电源可能会导致火灾。
请确认电源线符合相关安全标准,并包含电源系统接地端子 (PE 端子)。 否则
可能会导致触电。
防止任何异物落入机内,以免引起火灾。异物进入机器可能会导致火灾。
如果有水或其他液体溅入机内,请立即拔掉电源线,并且与销售商或精工爱普生
服务中心取得联系询问处理办法。继续使用可能会导致火灾。
请勿在本产品的内部及周围使用可燃性气体的喷雾器。否则可能造成火灾。
注意 :
请勿使用未在本手册中没有提到的方法连接线缆。 不同的连接方式可能会导致
本机损坏或烧毁。
确认将本机安放在一个坚固、稳定的水平面上。 机器如果落下则可能会破裂或
损坏。
请勿在潮湿或灰尘较多的地方使用本机。 过度潮湿和灰尘过多可能使得机器损
坏或发生火灾。
请勿在机器上放置任何重物。 不要站在机器上或靠在机器上。 这些作法可能会
使装置摔落或毁坏,或可能导致破损和伤害。
为了确保安全,长时间不使用时,请拔出本机的电源插头。
运输时请勿从产品上拆下墨盒。
使用限制
将本产品用于飞机、列车、船舶、汽车等的与运行直接相关的装置、防
灾防盗装置、各种安全装置等要求机能、精度等具备高度可信性、安全
性的用途时,为维持这些系统整体的可信性与安全,请采取故障自动防
护设计及冗长设计等措施,在确保系统全体安全的基础上使用本公司产
品。 本产品并非以使用于太空机器、干线通信机器、原子力控制机器、
医疗机器等需具备高度可信性与安全性的用途。若使用于前述用途时,
请客户充分进行确认和判断本产品的适用性。
18 TM-C610 使用说明书
ºÚÃÂ÷–Œƒ
开箱
随同打印机应包括以下各项。如果任何一项受损,请与销售商店联系。
❏ 纸卷
❏ 墨盒 (型号:SJIC15P)
❏ AC 适配器
❏ 使用说明书 (本手册)
部件名称
控制面板
后盖
(电源)指示灯
错误(ERROR)
指示灯
解锁杆
墨水(INK)
指示灯
缺纸(PAPER OUT)
指示灯
清洁(CLEANING)
键
进纸(FEED)键
排纸导板
电源开关
纸卷盖
墨盒盖
控制面板
(电源)指示灯:绿色
电源打开时点亮,电源关闭时熄灭。
打印机正在操作 (初始化、充墨、打印头清洁或打印)或处于错误状态
时闪烁。
错误 (ERROR)指示灯:红色
无法进行打印时点亮或闪烁,打印机联机时熄灭。
TM-C610 使用说明书 19
ºÚÃÂ÷–Œƒ
墨水 (INK)指示灯:红色
墨盒中的墨水较少或废墨快满时闪烁。
到达墨盒更换时间时,墨盒未安装或未正确安装时以及墨盒中的废墨水
已满时点亮。
墨盒中的墨水充足时熄灭。
缺纸 (PAPER OUT)指示灯:红色
剩余卷纸接近尾部时闪烁。
剩余卷纸接近尾部 (ERROR 指示灯熄灭)时,未安装或未正确安装卷
纸 (ERROR 指示灯点亮)时点亮。
卷纸已正确安装时熄灭。
清洁 (CLEANING)键
打印字迹模糊或有漏点时,按下此键 3 秒或以上以清洁打印头。
注意 :
为防止墨水浪费,除非打印质量存在问题,否则不要按下清洁 (CLEANING)
键。
进纸 (FEED)键
进给纸卷。进纸后,自动裁切卷纸。
电源开关
打开 / 关闭打印机。要关闭打印机,请按下此开关 3 秒或以上。
注意 :
请在打印机完成操作后等待 10 秒以上,随后关闭打印机。
设置
按下述步骤设置打印机。
1. 安装打印机。(请参见第 20 页。)
2. 连接并排布电缆。(请参见第 21 页。)
3. 安装纸卷。(请参见第 23 页。)
4. 安装墨盒。(请参见第 24 页。)
5. 安装打印机驱动程序。(请参见第 26 页。)
安装打印机
❏
❏
❏
❏
请勿将打印机放在多尘环境中。
打印机必须水平安装。
在打印机前端留出足够的空间以完全打开墨盒盖和卷纸盖,且注意
不要在打印机前放置障碍物,尤其是在安装台上安装打印机时。
如果将打印机安装在操作期间可能使之掉落的位置,则务必用螺丝
固定打印机。
20 TM-C610 使用说明书
ºÚÃÂ÷–Œƒ
❏
在安装台上安装打印机时,用两颗螺丝 (M4) 或粘接胶带固定打印
机。所用距离打印机橡胶支脚着地点 7 至 10 mm 的螺丝。
7~10 mm
打印机
85 mm
安装台
螺丝孔
❏
❏
橡胶支脚
请勿使电缆被夹在或异物聚集在打印机下面。
请勿使打印机在操作期间受到撞击。否则,可能导致打印机故障。
连接并排布电缆
1.
2.
请确保关闭打印机。
请将手指伸到后盖顶部的槽口中,然后往后拉将其拆下。
槽口
3.
4.
对于 USB 接口机型,如下图所示将 USB 电缆连接至连接器。
对于以太网接口机型,将以太网电缆连接至连接器使其卡入到位。
将 AC 电缆的连接器插入 AC 适配器的入线口。
TM-C610 使用说明书 21
ºÚÃÂ÷–Œƒ
5.
将 AC 适配器的 DC 电缆连接至打印机的电源连接器,如下图所示。
以太网接口机型
USB 接口机型
以太网电缆
USB 电缆
DC 电缆
DC 电缆
6.
将所有连接电缆置于电缆挂钩中,如下图所示。
电缆挂钩
7.
将后盖孔对准打印机背后底部的 2 个凸耳,然后关闭后盖。
凸耳
8.
9.
请确保电缆穿过后盖底部的凹口而未被夹住。
将 USB/ 以太网电缆的另一端连接至主机 / 网络集线器。
22 TM-C610 使用说明书
ºÚÃÂ÷–Œƒ
10. 将 AC 电缆的电源插头插入墙壁插座。
警告 :
务必使用附带的 AC 适配器。使用任何其他 AC 适配器可能导致触电或火灾。
如果发生故障,请立即关闭打印机电源并从墙壁插座上拔下 AC 电缆。
安装 / 更换卷纸
1.
2.
打开打印机。
按住解锁杆并往前拉以打开卷纸盖。
3.
4.
取出纸卷芯 (若有)。
按下图所示取向装入卷纸。
TM-C610 使用说明书 23
ºÚÃÂ÷–Œƒ
5.
将卷纸末端拉至出纸口,使其保持在排纸导板以内。
6.
合上纸卷盖。
卷纸会自动进给约 10 cm,然后进行自动裁切。
安装 / 更换墨盒
注意 :
务必使用 EPSON SJIC15P 墨盒。
未准备将墨盒装入打印机前,请勿打开墨盒包装。
运输时请勿从打印机上拆下墨盒。
1. 打开打印机并确保墨水 (INK)指示灯点亮。
24 TM-C610 使用说明书
ºÚÃÂ÷–Œƒ
2.
如下图所示,拉出墨盒盖以将其打开。
3.
4.
5.
取出旧墨盒 (若有)。
请在打开墨盒包装前将其摇晃 4 或 5 次。
如下图所示将墨盒轻轻推入墨盒架。
6.
关闭墨盒盖。
首次安装墨盒时, (电源)指示灯开始闪烁,并开始充墨。 充墨
需要大约 4 分钟。在此期间,请勿关闭打印机,或打开纸卷盖或墨
盒盖。否则会浪费大量墨水。
充墨完成后, (电源)指示灯在闪烁后持续点亮。
注:
首次安装墨盒时,打印机将使用墨水准备打印 (充墨),因此首个墨盒
的使用寿命会比之后的短。
墨盒使用寿命会因打印项目类型、打印设置、纸张类型、使用频率和温
度等因素而异。
为了确保打印质量,墨水 (INK)指示灯点亮之后,墨盒中仍会剩有部
分墨水。
墨盒包含 3 种颜色的墨水。即使只指定一种颜色打印,为保持打印和打
印头处于良好状态,也会使用全部 3 种颜色。只要有一种颜色的墨水剩
余量达到最低限,打印机就会停止打印。
TM-C610 使用说明书 25
ºÚÃÂ÷–Œƒ
安装打印机驱动程序
注意:
请务必在安装前确认操作环境 (第 28 页)。
您需要作为一名具有管理权限的用户登录计算机。
对于 USB 接口机型
1.
2.
3.
关闭打印机。 (您将按指示在安装期间将其打开。)
对于 32 位操作系统,双击 “c61d32_XXXX.exe”图标。
对于 64 位操作系统,双击 “c61d64_XXXX.exe”图标。
按显示的指示完成安装。
对于以太网接口机型
1.
2.
3.
4.
5.
6.
请确保打开打印机。
使用 EPSON TMNet WinConfig 设置打印机的 IP 地址。
点击 [开始]- [控制面板]- [打印机](或 [打印机和传真])。
从菜单中点击 [文件]- [添加打印机]。
点击 [添加本地打印机]。
选择 [创建新端口],选择 “端口类型”中的 [Standard TCP/IP
Port]并点击 [下一步]。
7. 按如下所述设置各项目 :
• 设备类型 : TCP/IP Device
• 主机名或 IP 地址 : 设置打印机的 IP 地址
• 端口名 : 自动输入 [打印机名或 IP 地址]中所设的值。
• 查询打印机并自动选择要使用的打印机驱动程序 : 不勾选该复选框。
8. 在“设备类型”中选择[标准],选择[Generic Network Card],
并点击 [下一步]。
9. 点击 [取消]按钮以关闭窗口。
10. 对于 32 位操作系统,双击 “c61d32_XXXX.exe”图标。
对于 64 位操作系统,双击 “c61d64_XXXX.exe”图标。
11. 按显示的指示完成安装。
显示打印机驱动程序
按以下步骤显示打印机驱动程序。
1. 点击[开始]-[控制面板]- [打印机](或[打印机和传真])。
2. 右击 [EPSON TM-C610]并点击 [打印首选项]。
有关如何使用打印机驱动程序的详情,请参见打印机驱动程序帮助。
26 TM-C610 使用说明书
ºÚÃÂ÷–Œƒ
清洁
清洁打印机外壳
请务必关闭打印机,然后用干布或微湿的布擦去打印机外壳上的灰尘。
注意 :
切勿使用酒精、汽油、稀释剂或其他类似溶剂清洁本机。否则可能导致塑料和橡
胶部件损坏或断裂。
清洁打印头
请仅在打印字迹模糊或有漏点时清洁打印头。
注意:
墨水较少时,打印头清洁可能无法开始或在清洁期间停止。在这种情况下,安装
新的墨盒后会开始打印头清洁。
按以下步骤进行打印头清洁。 (您也可使用打印机驱动程序进行打印头
清洁。有关详情,请参见打印机驱动程序帮助。)
1. 打开打印机。
2. 按下清洁 (CLEANING)键 3 秒或以上。
打印头清洁开始且, (电源)指示灯开始闪烁。打印头清洁完
成时, (电源)指示灯持续点亮。
注意 :
(电源)指示灯闪烁时,请勿关闭打印机或者打印纸卷盖或墨
盒盖。
故障排除
错误 (ERROR)指示灯点亮或闪烁
❏
❏
❏
❏
❏
检查纸卷盖和墨盒盖是否均关闭。如果打开,则将其关闭。
如果墨水 (INK)指示灯点亮,则更换新墨盒。
当缺纸 (PAPER OUT)指示灯点亮时,请检查卷纸是否用完。如
果用完,则更换新卷纸。
当缺纸 (PAPER OUT)指示灯闪烁时,请检查是否发生卡纸。如
果发生卡纸,则按下述步骤取出卡住的卷纸,并正确安装卷纸。
关闭打印机,然后再将其打开。如果错误 (ERROR)指示灯仍然
闪烁,请联系您的上司或致电维修人员。
卡纸
发生卡纸故障时,切勿强行将纸拉出。打开纸卷盖并取出卡住的纸。
如果纸卷盖不能打开,请按以下步骤操作。
1. 关闭打印机。
TM-C610 使用说明书 27
ºÚÃÂ÷–Œƒ
2.
拉动自动裁纸器盖 (下图中圆圈所示部分)以将其拆下。
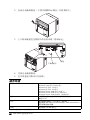
3.
上下转动旋钮直至图框中的孔内出现三角形标记。
旋钮
三角形标记
4.
5.
关闭自动裁纸器盖。
打开纸卷盖并取出卡住的纸。
操作环境
OS
Windows 7 (32/64 位)
Windows Vista SP2 (32/64 位)
Windows XP SP3 (32 位)
Windows XP SP2 (64 位)
Windows Server 2008 R2 (64 位)
Windows Server 2008 SP2 (32/64 位)
Windows Server 2003 R2 SP2 (32/64 位)
电脑
本打印机支持在上述操作系统运行的下述电脑。
兼容 PC/AT
CPU*
建议使用处理器为 1 GHz 或以上的电脑。
建议使用 Intel Pentium/Celeron 系列、AMD Athlon/Duron
系列或兼容的处理器。
RAM*
建议使用 512 MB 或以上。
* : 必须满足所支持 OS 的系统要求。
28 TM-C610 使用说明书
ºÚÃÂ÷–Œƒ
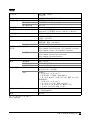
规格
打印方式
串行喷墨,点阵式
三色打印
进纸
自动裁纸器
通过正向摩擦进纸进行双向打印
裁切方法
利用独立刀片剪断
裁切类型
部分裁切 (一个中心点未切断)
最小裁切长度
16.1 mm
打印密度
360 dpi × 180 dpi、360 dpi × 360 dpi
打印速度
96 mm/s (打印宽度 : 53 mm,360 dpi × 180 dpi)
49.8 mm/s (打印宽度 : 53 mm,360 dpi × 360 dpi)
卷纸类型
普通纸 (单层)
墨盒
3 色集成专用墨盒
(型号 : SJIC15P)
接口
条形码 / 二维符
号打印
USB 接口机型
符合 : USB 2.0
通信速度 : 高速 (480 Mbps)
以太网接口机型
100 Base-TX/10 Base-T
条形码
UPC-A、UPC-E、JAN 8 (EAN 8)、JAN 13 (EAN 13)、
GS1 DataBar Omnidirectional、GS1 DataBar Truncated、
GS1 DataBar Limited、GS1 DataBar Expanded
二维符号
GS1 DataBar Stacked、
GS1 DataBar Stacked Omnidirectional、
GS1 DataBar Expanded Stacked
滑车机构
通行 4 百万次
电源
寿命
温度和湿度
专用 AC 适配器
打印头
60 亿次喷射 / 喷嘴
自动裁纸器机构
500,000 次裁切
打印
10 至 35°C {50 至 95°F}
20 至 80% RH (无冷凝)
存放
包装时:
-20 至 60°C {-4 至 140°F},
5 至 85%RH (无冷凝,未装入墨水)
(在 -20°C 或 60°C {-4 或 140°F} 时:最多 120 小时)
装有墨水时:
-20 至 40°C {-4 至 104°F}
(在 -20°C {-4°F} 时:最多 120 小时)
(在 0 至 30°C {32 至 86°F} 时 : 最多 6 个月)
(在 40°C {104°F} 时 : 最多 1 个月)
总尺寸 (H × W × D)
185 × 200 × 195 mm
(不包括突起部分)
重量
约 4 kg
dpi : 点/ 25.4 mm (点/英寸)
Mbps : 每秒兆位
TM-C610 使用说明书 29
Printed in China
中国印刷