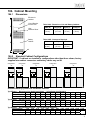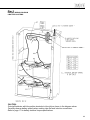
1
Installation Instructions
and
User Manual
For
Inverter
Power
Systems
1.0 - 17.5 KVA
READ AND FOLLOW ALL SAFETY
INSTRUCTIONS
IMPORTANT SAFEGUARDS
When using electrical equipment, you should always follow basic safety precautions,
including the following:
1. Read and follow all safety instructions.
2. Do not install the LSN (Life Safety Network) inverter system outdoors.
3. Do not install near gas or electric heaters or in other high-temperature locations.
4. Use caution when servicing batteries. Battery acid can cause burns to skin and
eyes. If acid is spilled on skin or in the eyes, flush with fresh water and contact a
physician immediately.
5. Equipment should be mounted in locations where it will not be readily subjected to tampering by unauthorized personnel.
6. The use of accessory equipment not recommended by the manufacturer may
cause an unsafe condition and may void the warranty.
7. Do not use this equipment for other than intended use.
8. All servicing of this equipment must be performed by qualified service personnel.
SAVE THESE INSTRUCTIONS
IMPORTANT SAFETY INSTRUCTIONS
The installation and use of this product must comply with all national, federal, state,
municipal, or local codes that apply.
Please read this manual thoroughly before operating the LSN Inverter System.
For technical assistance, contact Dual-Lite’s Systems Technical Support
Center at 1-800-848-6439.
Technicians are available during normal working hours (EST).
2
Table of Contents
Section 100 System Installation Instructions
Description
Page
101.
Unit Specifications............................................................................................................................................................ 4
102.
Receiving, Moving and Storing Systems and Batteries................................................................................................ 5
103.
Installation Requirements................................................................................................................................................. 6
104.
105.1
105.2
105.3
105.4
105.5
Tools....................................................................................................................................................................................11
Installation Considerations................................................................................................................................................. 12
Battery Installation Procedure....................................................................................................................................... 12-16
DC Fuse Installation........................................................................................................................................................... 17
Electronics Cabinet Voltage Check.................................................................................................................................... 17
AC Connections............................................................................................................................................................... 18
107.
108.
109.
110.
111.
104.1 Dimensions.......................................................................................................................................................................... 7
104.2 Standard Cabinet Configurations......................................................................................................................................... 7
104.3 Cabinet Installation........................................................................................................................................................... 8,9
Battery Installation and Connection.............................................................................................................................. 10
106.
103.1 Operating Environment........................................................................................................................................................ 6
103.2 High Altitude Operation........................................................................................................................................................ 6
Cabinet Mounting (Physical)............................................................................................................................................ 7
105.
102.1 Shipping Damage................................................................................................................................................................ 5
102.2 Moving Units and Batteries.................................................................................................................................................. 5
102.3 Temporary Storage of Units and Batteries........................................................................................................................... 5
106.1 AC Wiring Preparations...................................................................................................................................................... 18
106.2 AC Input and AC Output Connections................................................................................................................................ 19
RS-232 Communications Connections......................................................................................................................... 20
Final Installation Checklist............................................................................................................................................. 20
Maintenance Bypass Switch Phase Check................................................................................................................... 21
System Start-Up Procedure............................................................................................................................................ 22
System Verification......................................................................................................................................................... 22
Section 200 User Manual
Description
. ..........................................................................................................................................................................Page
201.
User Interface Panel........................................................................................................................................................ 23
202.
203.
User interface Panel Basics............................................................................................................................................... 23
Using The Interface Panel.................................................................................................................................................. 24
How To Display A Parameter.............................................................................................................................................. 24
How to Clear A User Password.......................................................................................................................................... 24
How o Change A Parameter Value..................................................................................................................................... 24
How to Change Operating Modes...................................................................................................................................... 25
Parameter "Hot Key" Listing By Function...................................................................................................................... 26,27
System Diagnostics........................................................................................................................................................ 28
System Auto Testing....................................................................................................................................................... 28
204.
205.
206.
207.
208.
201.1
201.2
201.3
201.4
201.5
201.6
201.7
203.1
203.2
203.3
203.4
203.5
Weekly Test........................................................................................................................................................................ 28
Monthly Test....................................................................................................................................................................... 28
Annual Test......................................................................................................................................................................... 28
Extended Power Outages.................................................................................................................................................. 28
Performing A Manual Test.................................................................................................................................................. 29
Stored Test Results (Logs)............................................................................................................................................. 29
Alarms.............................................................................................................................................................................. 31
Communications............................................................................................................................................................. 33
Unit Communication Options......................................................................................................................................... 33
Service Options............................................................................................................................................................... 34
Section 300 Maintenance, Warranty and Technical Support
300.
Maintenance..................................................................................................................................................................... 35
300.1
300.2
300.3
300.4
Safe Shut Down Procedure............................................................................................................................................... 35
Routine System Maintenance............................................................................................................................................ 36
Changing Air Filters............................................................................................................................................................ 36
Battery Maintenance and Replacement........................................................................................................................ 37-39
301.
302.
Warranty Information...................................................................................................................................................... 39
Technical Service and Support...................................................................................................................................... 39
Appendix 1....................................................................................................................................................................... 40
3
Section 100 System Installation Instructions
101Specifications
Input
• Input voltage: 120, 208, 240, 277or 347VAC +10-15%. Other voltages available on request
• Input frequency: 60Hz ±3%
• Synchronizing slew rate: 1 Hz per second nominal
• Input lightning protection: Meets ANSI 62.41, UL 924 and UL 1778 requirements
Output
• Output voltage: 120, 240, 277, 240/120, 277/120 or 347VAC. Other voltages available upon request
• Output regulation: (static) ±5% based on a 5% - 100% resistive load
• Minimum loading: none required
• Output distortion: Less than 5% THD linear load
• Load power factor: .75 lag to .8 lead
• Output frequency: Normally, synchronized to utility,
+.05 Hz during emergency
• Overload: 150% momentary, 120% for five minutes,
110% for ten minutes
• Time to transfer to inverter after a utility power failure: No break
Battery
• Battery charger: Fully automatic and temperature compensated with internal diagnostic indicators
• Recharge time: 24 hours
• Battery protection: Automatic low-battery voltage disconnect. Automatic restart upon utility return
• Battery switch: Also used as battery isolator
• Standard battery: "S" - Sealed lead-calcium: 10-year life
• Optional batteries: "G" - Sealed lead-calcium: 20-year life "N" - Wet nickel-cadmium: 25-year life
• Battery voltage: 96VDC or 144VDC (system dependent)
• Runtimes: 90 minutes standard. Other runtimes available on request
• Operating temperature: 0°C to 40°C (32°F to 104°F)
• Relative humidity: 95% non-condensing
Note: Battery performance rated at 25°C (77°F)
Table 1.
KVA/KW Rating
Power Factor Rating
1.0K 2.0K 2.7K 3.7K 4.8K 5.5K 6.6K 8.3K 10.0K 12.5K 15.0K 17.5K
.8 lead to .8 lead to .8 lead to .8 lead to .8 lead to.8 lead to .8 lead to .8 lead to .8 lead to .8 lead to .8 lead to .8 lead to
.75 lag .75 lag .75 lag .75 lag .75 lag .75 lag .75 lag .75 lag .75 lag .75 lag .75 lag .75 lag
Input VAC: 208, 240, 277, 347 (3)
Input/Output Input VAC: 120, 208, 240, 277, 347
Output VAC: 120, 240, 277, 347,
Voltage Combinations
Output VAC: 120, 240, 277, 347, 120/240(1), 120/277
120/240(1), 120/277
Available — Single Phase
Other voltages available; consult factory (2)
Other
voltages
available; consult factory (2)
AC Input Voltage/
120/20A 120/30A 120/40A 120/50A 120/70A 120/70A 120/80A
—
—
—
—
—
Input Circuit Breaker
208/15A 208/20A 208/25A 208/30A 208/40A 208/40A 208/50A 208/70A 208/80A 208/100A 208/125A —
Rating
240/15A 240/15A 240/20A 240/25A 240/35A 240/35A 240/45A 240/60A 240/70A 240/80A 240/100A —
277/15A 277/15A 277/20A 277/25A 277/30A 277/30A 277/40A 277/50A 277/60A 277/70A 277/90A 277/100A
347/15A 347/15A 347/20A 347/20A 347/25A 347/25A 347/30A 347/50A 347/50A 347/60A 347/80A 347/80A
Output Voltage and 120/8.3 120/16.6 120/22.5 120/30.8 120/40.0 120/45.8 120/55.0 120/69.1 120/83.3 120/104.1 120/125 120/146
Maximum Output Current 240/4.2 240/8.3 240/11.3 240/15.4 240/20.0 240/22.9 240/27.5 240/34.6 240/41.7 240/52.1 240/62.5 240/72.9
In Amperes
277/3.6 277/7.2 277/9.7 277/13.4 277/17.3 277/19.9 277/23.8 277/29.9 277/36.1 277/45.1 277/54.2 277/63.2
347/2.9 347/5.8 347/7.8 347/10.7 347/13.4 347/15.9 347/19.0 347/23.9 347/28.8 347/36.0 347/43.2 347/50.4
Standard Charger Size 5
5
5
5
10
10
10
10
10
15
15
15
(Amperes)
System DC Voltage
96
96
96
96
96
96
96
144
144
144
144
144
Heat Output (BTU/Hr.)
175
350
473
648
840
963
1,155
1,453
1,750
2,188
2,625
3,063
(1)
(2) (3) 4
On systems with 120/240VAC output, loading may not exceed 50% of the system's total KVA rating on any 120V leg. Loading beyond 50% on any 120V leg will cause an unsafe condition and transformer failure will occur. Call our Service Line at 800-848-6439 for alternate load connection configurations.
An external transformer may be required with certain input/output voltage configurations. Consult factory for details.
Input voltage on 17.5KVA model limited to 277 and 347VAC only.
102. Receiving, Moving and Storing Systems and Batteries
102.1 Shipping Damage
LSN inverter systems and batteries are normally shipped separately.
Carefully inspect all cartons upon receipt for evidence of shipping damage.
Notify carrier immediately of leaking or damaged cartons for possible concealed damage.
All LSN electronics cabinet cartons are shipped with tip and vibration indicators.
Refuse all shipments in which the tip or vibration indicators have been activated.
102.2 Moving Units and Batteries
CAUTION: Batteries and LSN Electronics cabinets are very heavy. Proper equipment should
always be used to move batteries and units to avoid damage and personal injury.
WARNINGS:
• ALWAYS WEAR PERSONAL EYE PROTECTION WHEN WORKING WITH BATTERIES - SEE PAGE 10
• Batteries contain liquid caustic or acid electrolytes which CAN CAUSE SEVERE BURNS.
Care must be taken when moving batteries to avoid tipping and spillage of electrolyte material.
In case of accidental spill.
ANTIDOTE:
• EYES: Flush immediately with flowing water for at least 15 minutes. Seek medical attention.
• EXTERNAL: Flush immediately with water. Seek medical attention.
102.3 Temporary Storage of Units and Batteries
For temporary storage of LSN inverter systems and batteries prior to installation, select a clean, cool, dry location with
normal ventilation for human habitation and level floors.
CAUTION: Batteries and LSN Electronics cabinets are very heavy. Check to assure that the floor in the
temporary storage area is capable of safely bearing the load.
IMPORTANT:
Lengthy storage of batteries will cause irreversible damage to the cells.
Failure to connect LSN inverter system batteries to an energized charging circuit within 90 days from the date
of shipment will void the battery warranty.
Storage Temperature:
Store all batteries at 0° to +40° C (32° to +104° F). Batteries will have a longer shelf life if stored at 25° C (77° F).
The LSN electronics and battery cabinets may be stored at -20° to +60° C (-4° to +140° F).
Ventilation: The air around the unit must be clean, dust-free, and free of corrosive chemicals or other contaminants. Do not place
the LSN inverter system or batteries in a sealed room or container.
DANGER: EXPLOSIVE - CAN CAUSE BLINDNESS OR OTHER SEVERE INJURIES.
Every type of battery can produce hydrogen gas, even sealed, maintenance-free batteries. The gas is vented through
the vent caps and into the air.
Do not allow smoking, sparks, or flames in battery storage location because hydrogen is concentrated under
the vent cap of each cell of the battery. Hydrogen is highly explosive, and is hard to detect because it is
colorless, odorless, and lighter than air.
5
103. Installation Requirements
103.1
Operating Environment
Install the LSN inverter system in a clean, cool, dry place with normal ventilation for human habitation and level floors.
CAUTION: Batteries and LSN Electronics cabinets are very heavy. Check to assure that the
floor is capable of safely bearing the load.
Operating Temperature: LSN inverter Systems are UL Listed for 20° to 30° C (+ 68° to +86° F) operation.
The LSN Inverter System has a designed operating range of 0° to +40° C (+32° to +104° F) at up to 95% relative
humidity. Installation in environments at the temperature extremes of the designed operating range may effect unit
performance or reduce service life.
Battery performance and service life is maximized if the operating temperature is maintained at 25° C (77° F) .
Ventilation: The air around the unit must be clean, dust-free, and free of corrosive chemicals or other contaminants. Do not place
the LSN inverter system or batteries in a sealed room or container.
Batteries:
The temperature should be near 25° C (77° F) for optimum battery performance.
Temperature Effect On Performance:
Batteries will be less efficient at temperatures below 18° C (65° F), and high temperatures will reduce battery life.
Typically, at 35° C (95° F), battery life will be half of what it would be at normal temperature of 25° C (77° F). At 45° C
(113° F), battery life will be one-fourth of normal.
WARNING: Every type of battery can produce hydrogen gas, even sealed, maintenance-free batteries. The gas is
vented through the vent caps and into the air, mainly when the unit is charging the batteries. The batteries produce the
most hydrogen when maximum voltage is present in fully charged batteries. The amount of current that the charger
supplies to the batteries (not the battery ampere-hour) determines how much hydrogen is produced.
Do not allow smoking, sparks, or flames in battery storage location because hydrogen is concentrated under
the vent cap of each cell of the battery. Hydrogen is highly explosive, and is hard to detect because it is
colorless, odorless, and lighter than air.
!
CAUTION
NEVER INSTALL BATTERIES IN A
SEALED ROOM OR ENCLOSURE
IMPORTANT:
Lengthy storage of batteries will cause irreversible damage to the cells.
Failure to connect LSN inverter system batteries to an energized charging circuit within 90
days from the date of shipment will void the battery warranty.
103.2
High Altitude Operation:
The maximum operating temperature drops 1° Celsius per 300 meters (2° F per 1000 feet) above sea level. Maximum
elevation is 3000 meters (10,000 feet).
6
104. Cabinet Mounting
104.1
Dimensions
Electronics
Cabinet
Circuit Breaker
Access Door
B
User
Interface Panel
Battery
Cabinet
B
Table 104A - Dimensions: Unit and Battery Cabinets
Width (A)
Height (B) Depth (C)
Footprint
30 in.
(76 cm)
46 in.
(117 cm)
18.65 in
(47 cm)
3.88 Ft2
(.36 m2)
Table 104B - Clearances Required:
Sides
Top
Front
0 in.
(0 mm)
12 in.
(31 cm)
30 in.
(76 cm)
C
A
104.2
Standard Cabinet Configurations
IMPORTANT: If cabinets are installed in configurations other than those shown, factory
supplied inter-cabinet connectors and battery cables may not fit.
Configuration
"A"
Configuration
"B"
Configuration
"C"
Configuration
"D"
Configuration
"E"
Standard Battery Systems for 90-Minute Runtime
Type S Battery – Maintenance-Free Sealed Lead-Calcium – 10-Year Design Life Expectancy
System Capacity 1.0K 2.0K 2.7K 3.7K 4.8K 5.5K 6.6K 8.3K 10.0K 12.5K 15.0K 17.5K
System Configuration A
A
A
A
A
B
B
B
B
B
C
C
Total Weight (lbs.) *
838 1,116 1,122 1,222 1,492 1,926 2,130 2,475 2,829 2,861 4,121 4,393
Type G Battery – Maintenance-Free Sealed Lead-Calcium – 20-Year Design Life Expectancy
System Capacity 1.0K 2.0K 2.7K 3.7K 4.8K 5.5K 6.6K 8.3K 10.0K 12.5K 15.0K 17.5K
System Configuration A
A
A
A
B
B
B
B
B
D
D
D
Total Weight (lbs.) * 1,365 1,384 1,390 1,472 1,684 2,062 2,630 2,679 3,589 3,657 4,885 5,491
Type N Battery – Wet-Cell Nickel-Cadmium – 25-Year Design Life Expectancy
System Capacity 1.0K 2.0K 2.7K 3.7K 4.8K 5.5K 6.6K 8.3K 10.0K 12.5K 15.0K 17.5K
System Configuration B
B
B
B
B
C
C
D
D
E
E Consult
Total Weight (lbs.) * 1,075 1,486 1,644 1,894 2,232 2,532 2,812 3,481 3,940 4,720 5,505 Factory
* Approximate system weights
7
104.3
Cabinet Installation
Based on the desired cabinet configuration for the application, remove the appropriate knockouts in the electronics
and battery cabinets. See Figures 1, 2, 3, or 4 for the knockout locations.
Follow the general sequence below to install the cabinets.
CAUTION: Batteries and LSN Electronics cabinets are very heavy. Check to assure that the floor in the
installation area is capable of safely bearing the load.
1. Locate all mounting hardware and chase/close nipples in the accessory box located inside the battery cabinet.
2. Arrange the lower cabinet(s) in their permanent location. If more than one cabinet is to be located on the lower
level (Configuration B or C), fasten them together using the supplied 5/16-18 x 3/4" bolts. Locate the three
mounting holes in the rear of the battery cabinet and use three bolts per cabinet to secure together. Install the
supplied chase nipple and plastic bushing in the knockouts to connect the lower cabinets together.
3. Secure the supplied wall mounting brackets to the electronics cabinet (Configurations A and B), or to the
outermost sides of the upper cabinets (Configuration C). Use three supplied 5/16-18 x 3/4" bolts per wall bracket.
Note: Only two wall mounting brackets are supplied with the system, normally intended to secure the upper cabinets to the wall. Consult the factory if additional brackets are needed to secure the lower cabinets to the wall.
4. Place the upper cabinets in position and secure them together using the supplied 5/16-18 x 3/4" bolts. Locate the
three mounting holes in the rear of the battery cabinet and use three bolts per cabinet to secure together.
5. Secure the upper cabinets to the lower cabinets using the supplied 5/16-18 x 1 1/2" bolts. Install from the floor of
the upper cabinets into the top of the lower cabinets. Install the supplied close nipple and plastic bushing in the
knockouts to connect the upper cabinets to the lower cabinets.
6. Secure the wall mounting brackets to the wall using an acceptable wall anchoring technique.
Fig. 1
Fig. 2
1.951 Diam.
Knockout
Typ. (2)
1.951 Diam.
Knockout
Typ. Both Sides
BATTERY
INVERTERSIDE
SIDE
0.875 Diam.
Knockout
Typ. (5)
INVERTER TOP
1.125 Diam.
Knockout
Typ. (2)
Fig. 3
Fig. 4
1.951 Diam.
Knockouts
Typ. Both Sides
BATTERY SIDE
BATTERY TOP
BATTERY BASE
INVERTER BASE
1.951 Diam.
Knockout
8
Configuration “B”
Three
Cabinet Systems
Configuration “A”
Two
Cabinet Systems
Install Wall
Mounting Brackets
To Top Cabinet On
Both Sides
Install Wall
Mounting Brackets
To Top Cabinet On
Both Sides
Configuration “C”
Four
Cabinet Systems
Install Wall Mounting
Brackets To Outermost
Surfaces Of Upper
Cabinets
9
105. Battery Installation and Connection
Installing the Batteries and DC Wiring
Important Safety Precautions
The installer must take these precautions:
1. Wear protective clothing, eye-wear, rubber gloves and boots. Batteries contain corrosive acids or
caustic alkalis and toxic materials and can rupture or leak if mistreated. Remove rings and metal
wristwatches or other metal objects and jewelry. Don’t carry metal objects in pockets where the
objects can fall onto the batteries or into the LSN inverter system or battery cabinet.
2. Tools must have insulated handles so that they will not short battery terminals. Do not allow a tool to
short a battery terminal to another battery terminal or to the cabinet at any time. Do not lay tools or
metal parts on top of the batteries, and do not lay any objects where they could fall onto the batteries
or into the cabinet.
3. Install the batteries as shown on the battery wiring diagram provided in this manual or with the
battery cable kit. When connecting cables, never allow a cable to short across a battery’s terminals,
the string of batteries, or to the cabinet.
4. Align the cables on the battery terminals so that the cable lug will not contact any part of the cabinet
even if the battery is moved. Keep the cable away from any sharp metal edges.
5. Install the battery cables so they cannot be pinched by the battery cabinet or the LSN inverter system
doors.
6. External battery cabinet chassis ground (or earth) must be connected to the LSN inverter system
unit’s chassis ground (or earth). The ground conductor must be insulated. If you use conduit, this
ground conductor must be routed in the same conduit as the battery conductors.
7. Where conductors may be exposed to physical damage, protect conductors in accordance with NEC
requirements.
8. Full voltage and current are always present at the battery terminals. The batteries used in this
system can produce dangerous voltages, extremely high currents, and possible risk of electric
shock. Batteries may cause severe injury if the terminals are shorted together or to ground (earth).
Be extremely careful to avoid electric shock and burns caused by contacting battery terminals or
shorting terminals during battery installation. Do not touch uninsulated battery terminals.
9. A qualified electrician who is familiar with battery systems and required precautions must install and
service the batteries. Any battery used with this unit shall comply with the applicable requirements
for batteries in the standard for emergency lighting and power equipment, UL 924. Cabinets are
designed to be used with, and batteries must be replaced by identical cells or a Dual-Lite approved
equivalent. If using substitute batteries not supplied by Dual-Lite, the unit’s UL listing will be void,
and the equipment may fail to perform properly. The installation must conform to national and local
codes as well. Keep unauthorized personnel away from batteries.
10
105.1
Tools
The following tools are required to install the system batteries. Other tools may be necessary if optional batteries have
been ordered.
CAUTION: Always use insulated tools for battery installation. Always torque to the manufacturer’s recommendations.
• Petroleum Jelly
• Slotted Screwdriver • 3-inch Socket Extension • Ratchet
• Electrical Tape
• Digital Volt-Ohm Meter
105.2
• 1/2-inch Insulated Socket Wrench
• Safety Equipment Required by Local Codes
• Torque Wrench Calibrated in Inch-pounds or Newton-meters
• Brush (for applying conductive grease or petroleum jelly to terminals)
• Safety Glasses with Side Shields - See Page 10
Installation Considerations
This section explains how to install the LSN system’s batteries, fuses, and cables. A qualified electrician who is
familiar with battery installations and applicable building and electrical codes should install the batteries.
1. Location
The system batteries install in separate battery cabinet(s). Before installing the batteries, install the LSN inverter
system and any battery cabinets in their permanent location. See Section 103 to choose a location and Section
104 for instructions on securing the LSN inverter system and battery cabinets to the wall.
CAUTION: Do not move the LSN inverter system or separate battery cabinet(s) after installing the batteries. The
unit, cabinet and/or batteries may be damaged.
2. Inter-Cabinet Connections
Wherever conductors may be exposed to physical damage, the conductors must be protected in accordance with
NEC requirements. This includes battery cables between the LSN inverter system and battery cabinet(s) and
cables between battery cabinets.
Dual-Lite recommends routing the battery cables through the chase nipples supplied with the unit. The battery
cables shipped with the unit are designed for an installation with the battery cabinet(s) installed in the standard
configurations shown in Section 104.1
IMPORTANT: If cabinets are installed in configurations other than those shown in
Section 104.1, factory supplied inter-cabinet connectors and battery cables may not fit.
11
105.3
Battery Installation Procedure
Battery Voltage: Select which wiring diagram to use from this table
KVA Rating
1.0K
System DC Voltage
96
Number of Batteries
8
Battery Fuse Rating (Amps) 100
Wiring Diagram Fig.
1
2.0K
96
8
100
1
2.7K
96
8
100
1
3.7K
96
8
100
1
4.8
96
8
125
1
5.5K
96
16
125
2
6.6K
96
16
125
2
8.3K
144
24
125
3
10.0K 12.5K 15.0K 17.5K
144
144
144
144
24
24
36
36
125
150
150
150
3
3
4
4
Installing Batteries
NOTE: The following procedure applies to standard Type “S” maintenance-free Lead-Calcium batteries. LSN systems specified
with long-life Lead-Calcium (Free-Standing Type “G”) or wet-cell Nickel-Cadmium (Type” N”) batteries are supplied with Wiring
Diagrams in the documentation package. Make sure all switches and circuit breakers are in the "OFF" position.
IMPORTANT: Insure all terminal block and cable connections are tightened according to the proper torque specifications listed on
pages 17 and 19 of this manual.
CAUTION: Verify that proper polarity is maintained in the wiring between the battery and electronics cabinets.
CAUTION: DO NOT INSTALL FUSE(S) IN BATTERY CABINET FUSE BLOCK(S) AT THIS TIME.
CAUTION: Orient all batteries with the positive terminals to the right as shown in the diagrams that follow.
Carefully observe battery polarity when making inter-cell and inter-tier connections.
Preliminary Wiring:
1. Install fuse block cable BC1 from left side of fuse block to left side of cabinet terminal block TB4 (POS. +) of each battery
cabinet.
2. Install cable BC5 from left side of cabinet terminal block TB2 (NEG. -) of each battery cabinet. Let cable hang to bottom of
battery cabinet.
3. Install inter-battery cabinet cables, BC6, to TB1 (NEG -) and TB3 (POS +) between each battery cabinet (if applicable).
4. Install battery cabinet to electronics cabinet cables, BC6, from last battery cabinet TB1 (NEG -) and TB3 (POS +) to electronics
cabinet DC Input NEG and POS terminal blocks.
5. Connect inter-cabinet ground wires between all battery cabinets and electronics cabinet.
6. Route gray thermistor wire, which is coiled up and tie wire wrapped next to the DC input fuse, from electronics cabinet to one
of the battery cabinets. Attach it to one of the battery cables making sure the end of the gray wire is not touching either the
cabinet or any battery terminal. The chosen battery cabinet should be the one expected to get the warmest. The sensor at the
end of the wires will vary the charger settings depending on battery temperature.
Bottom Level Battery Installation
1. Place four batteries in bottom of cabinet(s) with positive terminals on the right hand side.
2. Attach the three inter-cell connectors (BC3 in diagram) between cells as shown.
3. Connect BC5 from TB2 NEG. on terminal block(s) to negative terminal of battery at front left position.
Second Tier Battery Installation
1. Install second tier shelves in cabinet(s). Be careful to keep shelf from touching battery terminals.
2. Place four batteries on second tier shelf of cabinet(s) with positive terminals on the right hand side.
3. Attach the three inter-cell connectors (BC3) between cells as shown.
4. Connect inter-tier cable(s) (BC4) from positive terminal of bottom right front cell to the negative terminal of second tier left front
cell as shown.
5a. For 24 and 36 battery systems, skip to “Third Tier Battery Installation” below.
5b. For 8 and 16 battery systems, connect BC2 cable(s) between positive terminal on upper right front cell to the right side of Fuse
Block F1 as shown.
Third Tier Battery Installation (24 and 36 Battery Systems Only)
1. Install third tier shelves in cabinets. Be careful to keep shelf from touching battery terminals.
2. Place four batteries on third tier shelf with positive terminals on the right hand side.
3. Attach the three inter-cell connectors (BC3) between cells as shown.
4. Connect inter-tier cables (BC4) from positive terminal of second tier right front cell to the negative terminal of third tier left front
cell as shown.
5. Connect BC2 cables between positive terminal on third tier right front cell to the right side of Fuse Block F1 as shown.
12
Fig. 1
BATTERY WIRING DIAGRAM
8 BATTERY SYSTEMS
CAUTION:
Orient all batteries with the positive terminals to the right as shown in the diagram above.
Carefully observe battery polarity when making inter-cell and inter-tier connections.
Refer to page 17 for battery terminal torque specifications.
13
Fig. 2
BATTERY WIRING DIAGRAM
16 BATTERY SYSTEMS
CAUTION:
Orient all batteries with the positive terminals to the right as shown in the diagram above.
Carefully observe battery polarity when making inter-cell and inter-tier connections.
Refer to page 17 for battery terminal torque specifications.
14
Fig. 3
BATTERY WIRING DIAGRAM
24 BATTERY SYSTEMS
CAUTION:
Orient all batteries with the positive terminals to the right as shown in the diagram above.
Carefully observe battery polarity when making inter-cell and inter-tier connections.
Refer to page 17 for battery terminal torque specifications.
15
Fig. 4
BATTERY WIRING DIAGRAM
36 BATTERY SYSTEMS
1300736 Rev E
CAUTION:
Orient all batteries with the positive terminals to the right as shown in the diagram above.
Carefully observe battery polarity when making inter-cell and inter-tier connections.
Refer to page 17 for battery terminal torque specifications.
16
105.4
Battery Cabinet Voltage Check and DC Fuse Installation
Note: This procedure applies to a 36 battery system. Fewer steps may be required depending on the number of
batteries in the system.
Important: Always observe proper polarity when taking battery voltage measurements.
1. Using a digital volt-ohm meter (DVM), check for correct nominal battery voltage between right side of fuse block
F1 and left side of battery cabinet terminal block TB2 (NEG -). Check for correct voltage in each battery cabinet. 2. Identify the battery cabinet furthest from the inverter and install battery Fuse F1. Observing proper polarity, use
DVM to check for correct battery voltage between battery cabinet terminal block left side TB2 (NEG - ) and TB4
(POS +). In an eight battery system, proceed to Section 105.5.
3. Identify next battery cabinet in line. Observing proper polarity, use DVM to check for correct battery voltage between next battery cabinet terminal block left side TB1 (NEG - ) and TB3 (POS +). 4. Install battery Fuse F1. Observing proper polarity, use DVM to check for correct battery voltage between battery
cabinet terminal block left side TB2 (NEG - ) and TB4 (POS +). In a 16 or 24 battery system, proceed to Section
105.5
5. Identify last battery cabinet in line. Observing proper polarity, use DVM to check for correct battery voltage between last battery cabinet terminal block left side TB1 (NEG - ) and TB3 (POS +). 6. Install battery Fuse F1. Observing proper polarity, use DVM to check for correct battery voltage between battery
cabinet terminal block left side TB2 (NEG - ) and TB4 (POS +).
105.5
Electronics Cabinet Voltage Check
Using a digital volt-ohm meter, check for correct nominal battery voltage between electronics cabinet DC Input NEG
and POS terminal blocks. Refer to table in section 105.3 for proper system DC voltage.
Caution: Torque all connections in accordance with the following tables.
Failure to do so may create an unsafe condition or fire hazard.
Battery Terminal Torque Specifications
Type "S" Batteries
Battery Part No.
Torque
93012367
30 inch-lbs.
93012368
30 inch-lbs.
93012369
110 inch-lbs.
93012370
110 inch-lbs.
93012371
110 inch-lbs.
93012372
110 inch-lbs.
Battery Fuse Block
275 inch-lbs.
Battery Fuse
120 inch-lbs.
Type "G" Batteries
See battery label
Type "N" Batteries
Battery Part No.
Torque
0120881, 882
66 inch-lbs.
0120883, 884
177 inch-lbs.
0120885, 886,
265 inch-lbs.
887, 888
17
106. AC Connections
CAUTION
A. All LSN inverter system units contain hazardous AC and DC voltages. Because of these voltages, a qualified
electrician must install the LSN inverter system, AC line service, and batteries. The electrician must install the AC
line service according to local, state and NEC codes and must be familiar with batteries and battery installation.
B. Before installing, maintaining, or servicing the unit, always remove or shut off all sources of AC and DC power and
shut off the LSN inverter system. Disconnect AC line input at the service panel and turn off the Main DC Switch,
the Main AC Switch, and the Master Switch to make sure the unit will not supply output voltage.
C. Whenever AC and/or DC voltage is applied, there will be AC voltage inside the LSN inverter system unit; the
unit can supply power from AC line or from its batteries. To avoid equipment damage or personal injury, always
assume that there may be voltage inside the LSN inverter system.
D. Remove rings, watches, and other jewelry before installing the AC wiring. Always wear protective clothing and eye
protection and use insulated tools when working near batteries. Whenever servicing an energized unit with the
inside panel open, electric shock is possible; follow all local safety codes. TEST BEFORE TOUCHING!
E. Before installing an external bypass switch, make sure that both the bypass switch and the AC disconnect switch
are off.
F. To reduce the risk of fire or electric shock, install the LSN inverter system and the batteries in a temperaturecontrolled and humidity-controlled indoor area free of conductive contaminants. See Section 103 for operating
environment specifications.
Preparations
1. Open the circuit breaker access door. Make sure all breakers are in the off position.
2. Make sure the LSN inverter system input and output voltages are correct for the particular application. Remember
that the LSN system provides single-phase power only.
3. The input circuit breaker in the input service panel provides the means for disconnecting AC to the LSN inverter
system. If using a bypass switch, the bypass enclosure also includes a separate AC Disconnect switch. Only
authorized persons shall be able to disconnect AC to the unit. (See NEC 700-20 and 700-21.) Bypass switches
with AC Disconnect have handles that can accept a lock to restrict control to authorized persons. If using the input
circuit breaker to disconnect AC, make sure that only authorized persons have control of the circuit breaker panel
to meet the requirements of NEC 700-20.
4. If installing a bypass switch, use the installation and wiring instructions supplied with the bypass switch.
NOTE: Systems not using a bypass switch may have optional output circuit breakers and/or a normally off relay.
18
CAUTION
To prevent electrical shock or equipment damage, for all units, with and without a bypass switch, make sure the
Master Switch, the Main AC Switch, the Main DC Switch on the inverter and the bypass switch (if applicable), all
output circuit breakers, and the AC input at the service panel are all off before making AC connections to the LSN
inverter system.
5. If not previously done, remove knockouts for AC Input and AC Output in the top of the LSN inverter system (See
Figure 1 in Section 104.1).
CAUTION: Do not drill the cabinet; drill filings may damage the unit and prevent it from operating. If larger
knockouts are needed, use a chassis punch to enlarge the appropriate knockout. Do not add additional or
unnecessary knockouts.
If planning to connect a computer or terminal to the LSN inverter system unit’s RS232 port, remove one of the
knockouts in the top of the unit at this time (See Figure 1 in Section 104.1). If necessary, enlarge the knockout; it
should be able to accept at least 1.25-inch (32 mm) conduit.
6. Install the input and output conduit.
7. IMPORTANT: Run the AC Input service conductors and AC Output conductors through separate conduits.
Emergency output conductors and non-emergency output conductors must also be run through separate conduits.
LSN inverter system emergency output circuits shall be installed in dedicated conduit systems and not shared with
other electrical circuits as described in NEC 700-9(b).
106.2 AC Input and AC Output Connections
Make all AC input and output connections to the LSN inverter system as indicated on labels within the cabinet. If
system was supplied with internal output circuit breaker distribution option, remove circuit breaker distribution cover
and make wiring connections directly to the circuit breakers and re-install cover.
If the LSN system is to incorporate a bypass switch, it is recommended that the "Phase Check Procedure" as
described in Section 109 be performed - wiring instructions are supplied with the bypass switch.
IMPORTANT: To make sure phasing is correct, make all terminal strip connections exactly as they are labeled. Good
ground connections are necessary to reduce electrical noise and ensure safe operation of the LSN inverter system
unit and the loads.
Caution: Torque all connections in accordance with the following tables.
Failure to do so may create an unsafe condition or fire hazard.
Terminals
Terminal Width
Inches mm
31/64 12.2
19/32
15.2
25/32
20
!
Torque
inch-lbs.
16
32
64
"C" Breakers
Rating
amps
10-60
80
Torque
inch-lbs.
25
34
CAUTION:
• Before installing the bypass switch, turn off the unit's AC input power at the service panel and turn off the
bypass switch and AC disconnect switch to prevent electrical shock or equipment damage.
• Before operating the bypass switch after installation, perform the Phase Check in Section 109.
• DO NOT change the external bypass switch’s position from UPS to Line or Line to UPS when line is present
and: 1) the UPS output is shut off or
2) the UPS is running on battery power.
19
107. RS232 Connections
All LSN inverter systems are supplied with an RS232 communications port. This port may be used for remote
monitoring and control of the system.
Connecting the RS232 Port to a Computer or Terminal
Note: Connections to the RS232 port must be wired according to Class 1 wiring methods as described in NEC
Section 725, Part B.
The LSN inverter system is provided with an industry standard DB-9 molded female cable. This cable is
located within the LSN system inverter cabinet. Connections to the supplied DB-9 cable must be made inside
the LSN inverter cabinet. A user supplied, high quality DB-9 to DB-9 or DB-9 to DB-25 communications cable
must be used to make the connection between the LSN inverter system and the monitoring computer or
terminal.
108. Final Installation Checklist
Important: Before Proceeding to the System Start-up Procedure (Section 109) Complete the Final
Installation Checklist below.
1. Insure the LSN Inverter cabinet and all battery cabinets are securely fastened together and mechanically fastened
to a wall or other structure.
2. Insure that the input circuit breaker in the building service panel serving as the AC disconnect to the LSN system
is in the OFF position.
3. Check for proper ground connections in all battery cabinets, the LSN Inverter cabinet, the building service panel,
and the external load distribution panel.
4. Check for any loose wiring connections in all battery cabinets, the LSN Inverter cabinet, the building service
panel, and the external load distribution panel.
5. Insure that all correct fuses are properly installed in each battery cabinet (See Section 105.3).
6. Check that correct nominal battery voltage (96 or 144VDC) is present in the LSN Inverter cabinet between the DC
Input NEG and POS terminal blocks. Refer to Section 105.3 for proper system DC voltage.
7. On the LSN Inverter insure that the Master ON/OFF Switch, the Precharge Switch, the Main DC Switch, and the
Main AC Switch are all in the OFF position.
8. Insure that the Maintenance Bypass Switch (if applicable) and all output circuit breakers are in the off position.
9. Close and lock all Battery cabinet doors.
20
109. Maintenance Bypass Switch Phase Check
If you are not using a bypass switch with the LSN inverter system, the phase check is not necessary, so you can
skip this section and go directly to Section 110 to complete the system start-up. If the LSN unit does have a bypass
switch, complete the following phase check once you have made all of the terminal strip connections and installed the
batteries.
!
CAUTION: Before you switch the bypass switch from “UPS” to “AC Line,” make sure you follow the steps below to check for correct operation.
1. Make sure the main circuit breaker at the load service panel is off, or make sure the connected loads (protected
equipment) cannot receive power from the LSN inverter system. Turn the bypass switch to the “OFF” position. At the AC service panel, apply power to the LSN system and the bypass switch. Turn the LSN Master ON/OFF
Switch to the "ON" position. Turn the bypass switch to the "ON" position.
2. Press the precharge switch for ten seconds. Release the precharge switch and immediately turn the LSN Main
DC Switch to the "ON" position.
3. Turn the Main AC Switch inside the LSN system to the "ON" position. The loads (protected equipment) should still
be off at this time. After a short startup, the READY LED and AC-ON LED will illuminate. The LSN inverter system
is ready to supply output power.
4. Make sure the voltage from the LSN system to the connected loads is close to the voltage from AC line to the
bypass switch. (There may be slight differences.) To measure this, use an AC voltmeter check the voltage
between the following points on the bypass switch terminal strip. (See the terminal strip label). Record the
voltages below.
AC from LSN Output
AC Line Input
(60 Hz 208 or 240VAC only) 7 to 8_________VAC
11 to 12_________VAC
(60 Hz 208 or 240VAC only) 6 to 8_________VAC
10 to 12_________VAC
(All other voltages)
7 to 8_________VAC
11 to 12 _________VAC
The voltages recorded in the first column should be similar to the voltages in the second column. The voltages may
vary slightly. If the voltage readings vary more than a few volts, shut down AC line and the LSN system. Check
all connections at the terminal strip, and correct any wiring problems. If help is required, contact Dual-Lite’s
Technical Support Center at 1-800-848-6439.
Important: If the AC Input voltage is 208 volts, you will normally measure 88VAC between output terminals 6 and 8. Never connect any 120-volt load to the 88-volt terminals.
5. If a Break-Before-Make type bypass switch is being used, proceed to step 8.
If a Make-Before-Break bypass switch is being used, make sure the AC voltages from the LSN system output and
the AC line input are in phase. To do this, measure the AC voltage between the following points on the bypass
switch terminal strip. These measurements should not be more than 100VAC; if measurements exceed 100VAC,
contact Dual-Lite’s Technical Support Center at 1-800-848-6439.
(60 Hz 208 or 240 V only) 8 to 12_________VAC
(All other voltages) 7 to 11_________VAC
6. Measure the AC voltage between the following points on the bypass switch terminal strip. This reading should not
exceed 1VAC; if measurements exceed 1VAC, contact Dual-Lite’s Technical Support Center at 1-800-848-6439.
(60 Hz 208 V or 240 V)
(60 Hz 120 V or 50 Hz 220/230/240 VAC)
6 to 10_________VAC
8 to 12_________VAC
21
CAUTION: If a Make Before-Break type bypass switch is being used, equipment will be damaged if the switch position is changed while AC line voltage is applied and the LSN system is turned off
or operating in inverter (DC) mode. Make sure the LSN system is running on line (AC mode) and supplying
output voltage before changing the bypass switch position. See the instructions supplied with your bypass
switch.
7. Turn the bypass switch to the “LINE" position. Using an AC voltmeter, verify the voltage to your protected
equipment load is correct. Voltage can be verified at the Load Distribution Panel.
8. Turn the bypass switch to the “UPS” position and measure the voltage to your protected equipment load once
more (at the Load Distribution Panel). Verify the voltage is correct.
9. If all readings during the voltage and phase check are acceptable, reattach the bypass switch cover. Tighten the
retaining screws securely. Proceed to Section 110 to complete the system start-up.
!
110. Start-Up Procedure
FACTORY START UP: A Factory Start Up is provided standard with this unit. Please contact Dual-Lite's
Technical Support Center.
IMPORTANT: The LSN inverter system is a sophisticated electronic back-up power supply. Care must be
taken to follow the steps below in their exact sequence. Failure to do so will result in erroneous alarm messages and possible equipment failure.
CAUTION: Familiarize yourself with the shut down procedure in section 300.1 before proceeding with the
Start Up.
1. Turn on the input circuit breaker in the building service panel serving as the AC disconnect to the LSN
system and check for proper voltage and phasing on the AC Input terminal block.
2. Turn on all output circuit breakers in the external Load Distribution Panel.
3. Close and lock the main cabinet door to the LSN Inverter cabinet.
4. Open the LSN system Circuit Breaker access door.
5. Turn on the output circuit breakers (if any).
6. Turn on the LSN Master On/Off Switch. Caution: This is a locking toggle type switch. Pull it out towards
you to move it to the "ON" position.
7. Hold the Pre-charge Switch in the "ON" position for 10 seconds.
8. Release the Pre-charge Switch and immediately turn ON the Main DC Switch.
9. Turn on the Main AC switch.
10. After approximately five seconds, the system should turn on, the lighting loads should be energized,
the front panel "AC-ON" and "READY" LEDs should illuminate, and the system LCD display will begin to
scroll the system parameters.
11. Depending on the state of charge of the batteries, the front panel Charging LED may illuminate.
111. System Verification
At this point, the connected load should be energized, the "Ready" and "AC On" LEDs should be lit, and the display
is scrolling through 18 operating messages. Wait 2 minutes while the system completes its final set up, and then look
at the various messages and make sure they are within expected limits. If any alarms sound, go to section 205 for
further instructions. If you need assistance, call Dual-Lite's Technical Support Center at 800-848-6439.
If no alarms sound, perform the following inverter test to verify its operation:
Once the “Ready” LED is illuminated, simulate a power failure by opening the AC input circuit breaker. The inverter
and the cooling fans will begin operating. All connected loads should be energized and operational, HID fixtures
should not “wink-out”.
Allow the inverter to run for several minutes or until satisfied with its operation. Close the AC input breaker to end the
test and return the unit to standby mode.
Note: It will take a few seconds for the unit to re-synchronize with the input line. The inverter will turn off when
synchronization is achieved.
22
Section 200 User Manual
201. User Interface Panel Basics
LED Status Indicators
AC-On - AC is present at output terminals
Ready - Unit is ready for emergency operation
Emergency Power - Unit is operating on battery
power
Charging - Unit battery is being charged
Alarm - Operation outside of pre-programmed parameters detected
Display Readout
• Large, easy-to-read characters
• 2-line x 40-character LCD display
• Provides continuous scrolling of
20 metered functions
Control Keys
Enter Key (ENT)
Main Menu Key (MAN)
• Used to enter data
• Displays the main system menu
Clear Key (CLR)
Display Key (DSP)
• Clears the last entered character • Used to display system parameters
and cancels or resumes scrolling • Inserts decimal point when entering display feature
data
Program Key (PRG)
Previous Key (PRV)
• Used to change system
• Returns the display to the previous
programming
menu screen
• Inserts negative symbol when
entering data
Located on the inverter cabinet’s front door, the user interface panel allows the user to monitor and control the
LSN system. The microprocessor-controlled display includes an array of LED indicator lights, a
2-line x 40-character digital display and a coded keypad to display over 250 system parameters, operating modes,
alarms and stored logs.
Menu-Driven Display
The LSN user interface provides a menu-driven display that allows access to all system information through the following four primary sub-menus:
• Meters
• User Programming
• Logs
• Factory Programming
The menu-driven display provides users with a structured, intuitive method of accessing system information. The
display is a user-friendly interface allowing easy access to all system programming, operating parameters, meters and
logs. The interface design utilizes numeric “Hot Keys” for each parameter to access data.
Password Protection
To ensure that only authorized personnel operate the unit, every LSN system is password protected. No control functions can be accessed or operating parameter changes made without a valid six-digit password authentication.
LSN Inverter systems provide multi-level password protection. Each progressive level allows changes to increasingly
The User Password is factory set at 944944 and is user programmable.
See section 201.3 for procedure for clearing a User Password.
23
201.1
Using The Interface Panel
The User Interface Panel is used to display over 250 system parameters, operating modes, alarms and stored logs.
When the correct password is entered, the user can also change system modes and parameter values.
If the wrong key is pressed at any time, press (CLR) and then the correct key. The control panel will beep each time
you press a key.
Before changing parameter settings or system modes, a user password must be entered. User password consist of
six, user selected, numeric digits. The user password is stored in parameter 178 and can be user defined by following
the "How To Change A Parameter Value" in Section 200.2.3
201.2
How To Display A Parameter
1. Press [DSP]
2. Enter the desired parameter number
3. Press [ENT]
For example, to display parameter 7 (Battery Volts & Charging Current), follow these steps:
User Keypad Actions
[DSP]
Display Readout
Enter Display Code
setup value
7
Enter Display Code
setup value 7
[ENT]
More Battery Meter Functions (5)
Battery 108.2 V, BattIin 1.2 A
201.3
How To Clear A User Password
Once a password has been entered, it can be cleared in one of the two following ways:
1. If the User Interface Panel remains inactive for a period of 30 minutes, the password will be automatically cleared.
2. Press [PRG] 233 to display the password parameter menu. The display will present prompt "1" to cancel all
passwords. Press 1, [ENT] to clear password.
201.4
How To Change A Parameter Value
NOTE: Only certain parameters are user changeable. Refer to the complete parameter listings on the following
pages; user changeable parameters are shown in boldface.
1. Press [PRG]
2. Enter the desired parameter number
3. Enter the user password (if not already active)
4. Press [ENT]
5. Enter the new parameter value and press [ENT]
For example, to change parameter 0 (time) to 9:30 a.m., follow these steps:
24
User Keypad Actions
[PRG]
0
[ENT]
******
[ENT]
093000[ENT]
Display Readout
Enter Control Code
Setup Value
Enter Control Code
Setup Value 0
Password Required
Please enter 6-Digit user password
Enter Control Code
Setup Value 0
Time 14:00:00
Enter Time (HH:MM:SS) __:__:__
Time 14:00:00
Enter Time (HH:MM:SS) 09:30:00
IMPORTANT: The "TIME" (parameter 0) and "DATE" (parameter 10) must be set by user in order for system to operate properly.
201.5
How To Change Operating Modes
There are four available operating modes: 1. Off = System Off
2. Line = AC Pass-Through
3. Auto= Standby Operation
4. On = Inverter On (Emergency Battery Operation)
The LSN inverter system will select the appropriate operating mode automatically upon start-up.
NOTE: Changing the operating mode may prevent the LSN system from operating during a power failure.
To change the system operating mode to Inverter Mode, follow these steps:
1. Press [PRG]
2. Enter the parameter number “150”
3. Enter the user password (if not already active)
4. Press [ENT]
5. Enter the desired operating mode identifier and press [ENT]
User Keypad Actions
[PRG]
150
[ENT]
******
[ENT]
4 [ENT]
Display Readout
Enter Control Code
setup value
Enter Control Code
setup value150
Password Required
Please enter 6-digit user password
Enter Control Code
setup value150
User Inverter Mode Control Menu
Off(1) Line(2) AUTO(3) On(4)
Inverter Line Command Sent
Off(1) Line(2) AUTO(3) On(4)
25
201.6
Parameter “Hot Key” Listing By Function
User changeable parameters are shown in boldface.
Metered Parameters:
Time & Date
Input Voltage & Frequency
Output Voltage & Current
Volt-Amps, Watts and % of Full Load
Battery Volts & Charging Current
Input frequency
Run Time Remaining
Battery & Ambient Temperature
Transformer and Heatsink temperature
Output Power factor & Crest Factor
System Hours
Inverter time since startup
Output Frequency
Last Inverter Run Time
(0,10)
(1)
(2,4)
(5,16,17) (7)
(8)
(9)
(11)
(12,14)
(27)
(22)
(23)
(192)
(210)
System Parameters:
Unit ID string. Remote entry only (20 char)
Max allowed VA
System Hours Display/Reset
Minimum DC volts since startup
Maximum DC volts since startup
Minimum AC input volts
Maximum AC input volts
Minimum AC output volts
Maximum AC output volts
Minimum output VA
Maximum output VA
Factory Serial Number
Nominal Frequency
Nominal Input Voltage
Nominal Output Voltage
Rated VA
Rated Watts
Console Baud Rate
Nominal Battery Voltage
Nominal Run Time Minutes.
(15)
(19)
(22)
(30)
(31)
(32)
(33)
(34)
(35)
(36)
(37)
(40)
(42)
(43)
(44)
(45)
(46)
(95)
(219)
(236)
Charger Control:
Charger Type Selected
Batt Chg Lower on Volts
Battery Reduced Float Volts
Battery Chg Upper Off Volts
Charger Dropout Current Number
Charger Trickle Current Number
Nominal Battery Voltage
Batt Equalization Volts
(122)
(124)
(125)
(126)
(215)
(216)
(219)
(220)
Inverter Control:
Low Input Frequency switch point
High Input Frequency switch point
Inverter Off, Line, Auto, or On
(51)
(52)
(150)
Alarms:
High VA Overload alarm setpoint
Low Output Volts alarm setpoint
High Output Volts alarm setpoint
High Input Volts alarm setpoint
Low Input Volts alarm setpoint
Low Battery Volts alarm setpoint
Near Low Battery volts alarm setpoint
High Battery volts alarm setpoint
Low Run Time alarm setpoint
High Ambient Temp alarm setpoint
High Heatsink Temp alarm setpoint
Low input frequency alarm setpoint
Alarm Acknowledge and Silence
High Battery Temp Alarm setpoint
High Transformer Temp alarm setpoint
Alarm Query
(19)
(59)
(61)
(62)
(170)
(65)
(66)
(67)
(68)
(80)
(82)
(164)
(181)
(195)
(84)
(228)
Logs:
Inverter Log
Alarm Log
Test Results Log
Service Log
Battery Volts Log
Battery Discharge Volts Log
Power Log
Peak Values Log
Diagnostic Log
Shutdown:
(24)
(25)
(26)
(154)
(155)
(156)
(157)
(158)
(161)
Low Output Volts shutdown setpoint
High Ambient Temp shutdown setpoint
High Heatsink Temp Shutdown setpoint
High Transformer Temp Shutdown setpoint
High Output Volts shutdown setpoint
VA Overload Shutdown setpoint
(60)
(81)
(83)
(85)
(172)
(198)
NOTE: See “Appendix 1” in back of manual for numeric order listing of parameter hot keys along
with keyboard alpha alternates and password protection levels.
26
201.6
Parameter “Hot Key” Listing By Function
User changeable parameters are shown in boldface.
Monthly, Yearly Test & Equalize Time Setup:
Time of Day for Monthly test
Date for Monthly test
Monthly Test Time Duration
Annual Test Time Duration
System Test Fax Request Status
Monthly Reschedule Interval
Date for Annual test
Time of Day for Annual test
Annual Reschedule Interval
Start Monthly test
(73)
(127,128) (129)
(130)
(152)
(183)
(184)
(185)
(186)
(182)
Options, Relays:
Inverter Active Relay Delay
Alarm Active Relay Delay
Normally Open Relay 3 Off Delay
Normally Open Relay 4 Off Delay
(89)
(260)
(261)
(262)
Miscellaneous:
Software Version Change User Password
Cancel All Passwords
(137)
(178)
(233)
27
202. System Self-Diagnostics
Self-testing/self-diagnostic electronics perform continuous testing of subsystems, insuring performance to prescribed
operating parameters. Operation outside of prescribed limits or system malfunctions will result in an alarm indication
on the system’s user interface display panel. Depending on the type of alert, the panel alarm indication may be visual
or audiovisual.
User-programmable discharge tests are automatically performed on a monthly and annual basis. Date, time and
duration of these tests can be programmed to meet state, local authority and individual requirements. All testing events are automatically logged in memory and can be displayed on the user interface panel.
203. System Auto Testing
The LSN inverter system automatically performs three sophisticated, microprocessor-controlled system discharge
tests; a weekly test, a monthly test and an annual test. The following parameters affect these tests:
Weekly test
Monthly Test
Annual Test
• Schedule (264) • Time of day for monthly test (73) • Time of day for annual test (185)
• Date for monthly test (127)
• Date for annual test (184)
• Monthly test duration (129)
• Annual test duration (129)
• Monthly reschedule interval (183)
• Annual reschedule interval (186) 203.1
Weekly Test
203.2
Monthly Test
203.4
Annual Test
203.4
Extended Power Outages
Every week (at a time and date specified in parameter 264) the system will automatically operate the inverter for one
minute. During this test, the system will monitor inverter output and connected load. The unit automatically records
the results of the test in parameter 26, which can be displayed from the user interface panel.
Every month (or at the interval specified in parameter 183) the LSN Inverter System automatically performs a
discharge test to check battery capacity and emergency inverter operation. The duration of the monthly test cycle is
controlled by parameter 129, set at the factory for 5 minutes. The unit automatically records the results of the test in
parameter 26, which can be displayed from the user interface panel.
Once a year, the unit automatically performs a battery exercise cycle/discharge test by running the unit in emergency
mode for 90 minutes. It is recommended that it be scheduled at a time when the area protected by the LSN system
will be unoccupied for a full 48 hours to allow the batteries time to recover to full capacity. The date on which the
annual test takes place is stored in parameter 184 .
During extended power outages, the LSN inverter system will provide power to all connected loads for its full rated
discharge time.
NOTE: During emergency operation of the LSN system, parameter 9 allows the user to determine how many minutes
of runtime remain in the normal discharge period. At a set number of minutes prior to the end of the runtime (factory
default setting is 30 minutes), the unit will sound a “Low Runtime” alarm. The unit may also simultaneously sound a
“Near Low Battery” alarm. When either of these alarms occur, an orderly shutdown of any non-emergency equipment
that may be connected to the system should be conducted in order to allow the inverter to operate critical emergency
equipment for a longer period of time. Following the normal discharge period, the unit will continue to operate normally until battery capacity reaches a preset disconnect limit. At this point, the inverter will automatically disconnect inverter AC output power to the load. The
unit’s electronic controls will remain powered by the system batteries until the batteries reach a second pre-set low
imit at which point the unit will shut down completely to prevent deep discharge damage to the unit batteries.
28
203.5
Performing a Manual Test
Manual 5-minute tests may be performed at any time using the following procedure:
1 Press [PRG], 182, [ENT].
2. Display will read "Password Required"
3. Press "944944" (or current user defined password), [ENT].
4. Display will read "Start Immediate Monthly Systest Menu, Start (1)"
5. Press "1".
6. Display will read "Monthly Test Started"
The LSN system will operate in inverter mode for five minutes. The unit automatically records the results of the test in
parameter 26, which can be displayed from the user interface panel.
204. Stored Test Results (Logs)
Logs - What They Mean And How To Read Them
System logs may be accessed at any time by pressing [DSP] and the "Hot Key" designator for the Log you wish to
view. All logs are displayed in a scrolling fashion, starting with the most current event. Since each entry is displayed
for only 2 seconds, it may be necessary to pause the scrolling for a closer look. This can be done by pressing "0"
when the event you wish to stop at is displayed on the screen. To go the next entry press "1". To resume the scrolling
mode, press "0" again. To view another parameter, simply push [DSP] and the "Hot Key" designator at any time.
The following presents what each log looks like, and how to read them:
Service Log (Hot Key # 154)
Logs password levels entered or changed, system resets necessary due to alarmed shutdowns, and FAX messages
status (if so equipped). Retains the last 20 entries.
081200 09:55 Serv Pwd Entered
081200 09:18 User Pwd Entered
081200 09:05
FAX sent
First six digits are the date; the next four are the time in Military format. Next is the event.
Test Results Log (Hot Key # 26)
Logs start time and pass/fail status of all system tests. Retains the last 20 entries.
081200 11:20 MT Pass 0H 5M 0S
081200 11:16 MT Load: 654 VA
081200 11:15
MT Start
In interpreting this log, use the same procedure as the Service Log. The weekly test will be shown as WT, monthly
test as MT, the yearly test as YT. The digits following the pass/fail messages represent how long the test lasted in
hours, minutes and seconds.
Inverter Log (Hot Key # 24)
Logs the last 20 inverter events, including on/off times and run duration.
081200 13:47 INVOFF 1H 50M 6S
081200 11:56 INV ON 3
The date and time format in this log is the same as the others, but here we are keeping track of how many times the
inverter turns on by simply adding a counter after the "INV ON" message. Duration format is the same as in the "Test
Result Log". The above is telling us the inverter turned on for the 3rd time on 8/12/2000 at 11:56 AM and turned off 1
hour 50 minutes 6 seconds later at 1:47 PM (13:47 in Military time).
29
Battery Voltage Log (Hot Key # 155)
An hourly log of the systems total battery voltage and the charging current. Retains the last 48 entries.
081200 13:00 BatV 108.1 V ChgI 0.1 A
081200 12:00 BatV 108.1 V ChgI 0.1 A
081200 11:00 BatV 108.1 V ChgI 0.1 A
Battery Discharge Voltage Log (Hot Key # 156)
Logs the total battery voltage, at 5-minute intervals, while system is in inverter mode. Also displays the duration of the
power failure and the system's output VA. This type of information is very useful in determining battery performance.
Retains the last 40 entries.
081200 11:48 0H 9M 102.4V 231 VA
081200 11:43 0H 5M 101.5V 237 VA 081200 11:38 0H 0M 107.2V 225 VA
The above shows the power failure occurred at 11:38, initial battery voltage was 107.2 volts, the output load was 225
VA. The power failure lasted 9 minutes, a battery voltage was taken at the 5-minute mark, and ending voltage after
the 9 minutes was 102.4 volts.
Power Log (Hot Key # 157)
Continuously monitors the connected load total power consumption (in VA) and records a reading every minute.
Retains the last 30 entries.
081200 13:33:52 223 VA-min
081200 13:32:52 223 VA-min
081200 13:31:52 223 VA-min
Peak Value Report (Hot Key # 158)
Records peak system parameter readings for AC input voltage, AC output voltage, AC output current, battery voltage
and output VA.
ACVin observed max: 119 min: 115
ACVout observed max: 119 min: 115
ACIout observed max: 5 min: 5
VA observed max: 690.2 min: 646.4
BatteryV observed max: 114.5 min: 103.2
Diagnostic Status Report (Hot Key # 161)
Continuously monitors and logs internal microprocessor communication status. The information contained in this log
is to be used by factory trained technicians only.
Alarm Log (Hot Key # 25)
Logs the last 25 system alarms, the type of alarm, on/ off times and their duration. The system's alarms will be
covered in more depth in Section 205. At this point, we will simply show you what the log looks like and how to read it.
081200 15:29 CLR CktBrkr Trip ALM
081200 15:29 ALM Ckt Brkr Trip
062100 14:55 CLR ACVout Lo ALM
062100 14:55 ALM ACVout Lo 0 101
Each entry shows which alarm was activated and when. It also shows when the alarm cleared. In cases such as line
4, when the alarm activated because of a reading was either too low or too high, the log will show what the reading
was and where the trip point is set. In this example, the system detected a low AC output, it measured 0 volts - trip
point was set at 101 volts.
30
205. Alarms
What They Mean And How To Respond
When the LSN system detects a problem, it:
• Sounds an alarm
• Illuminates the red "ALARM" LED on the User Interface Panel, and
• Displays an error message
If the system was ordered with an optional e-mail device and the alarm condition lasts for more than five minutes, the
unit will automatically send an alarm e-mail to all programmed e-mail locations.
In The Event Of An Alarm Condition
1. Read the user interface panel display to determine the specific alarm condition.
2. Temporarily silence the alarm by pressing [MAN],3,2 on the user interface panel. The display should read "Alm
Silenced". This procedure silences the indicated alarm only. Should another failure be detected, the alarm for
that condition will sound.
3. Find the message or code in the following table. The table provides alarm information and appropriate response
procedures.
For illustration purposes, the model used is a 120-volt in, 240-volt out, 15 KVA unit operating with a nominal battery
bank of 144 volts DC. The first number in the alarm messages is the actual measured value, the second is the preset
limit. This table is offered as a guide only, other factors may cause the various alarms to activate.
NOTE - Whenever contacting the Dual Lite Technical Support Center, it is desirable to use a telephone as close to
the system as possible in order to help our technicians determine the cause of the alarm condition.
Alarm Message
What it means
ALM Lo ACVin 99 102
AC voltage fed to unit
fell below allowable
limits.
ALM Hi ACVin 140 134
AC voltage fed to unit is above allowable limits.
ALM Htsnkt Hi 150C 100C Heatsink temperature
rose above allowable
limit.
ALM BattT Hi 70C 60C
Battery cabinet
temperature rose above
allowable limit.
ALM Low Runtime 29 30
Unit is about to shut
down.
ALM Freq Lo 49 58
Output frequency is
below allowable limit.
ALM ACVout lo 200 204
System is still operating, but output voltage fell
below allowable limit.
ALM ACVout Hi 272 269
System is still operating,
but output voltage rose
above allowable limit.
ALM XfmrT Hi 102C 100C
Output transformer is
overheating and unit is
about to shut down.
What to do
Verify input AC is low with an external
voltmeter. If yes, call electrical contractor to
Troubleshoot and repair the service feeds. If no
contact Dual Lite’s Technical Support Center.
Verify input AC is high with an external
voltmeter. If yes, call electrical contractor to
troubleshoot and repair the service feeds. If no
contact Dual Lite’s Technical Support Center.
Contact Dual Lite’s Technical Support Center.
If batteries are installed in a hot environment
(above 50C), relocate them. If not, call
Dual Lite’s Technical Support Center.
Remove non-critical loads to extend runtime.
If alarm occurs in standby mode, problem is
with the incoming feed. If alarm occurs in
Inverter mode, contact Dual Lite’s Technical Support Center.
Contact Dual Lite’s Technical Support Center.
Make sure there is a minimum 5% load
connected to the unit. If not, make
arrangements to do so. If load is proper,
contact Dual Lite’s Technical Support Center.
Call Dual Lite’s Technical Support Center.
31
Alarm Message
What it means
ALM VA Hi 16218 15000
Unit has detected an
overload and is about to
shut down.
ALM I2C Comm
Microprocessor failure.
ALM BattV Hi 182 177
Battery voltage is too
high. ALM BattV Lo 125 127
Battery voltage is too low. If unit is in Inverter mode it is about to shut
down.
ALM BattV Nr Lo 130 132
Battery voltage is near
Low level.
ALM AmbT Hi 62C 60C
Ambient temperature
within the electronics
ALM CktBrkr Trip
One or more output
circuit breaker has
tripped.
LCL SHTDN XfmrT Hi
System has shut down
because output
transformer has overheated.
LCL SHTDN Htsnk Hi
System has shut down
because inverter
heatsink has overheated.
LCL SHTDN AC Out Over
System has shut down
Current
due to high output current.
SHTDN VA Ovrld 23110 System has shut down.
22500
Overload is greater than
50% of the rated of the unit.
SHTDN VA5 Ovrld 19111
System is overloaded by 18000
at least 20%. It has been
in this condition for 5
minutes and then shut down.
SHTDN VA10 Ovrld 17200 System is overloaded by
16500
at least 10%. It has been
in this condition for 10
minutes and then shut down.
SHTDN ACVout Lo 187 192 System has shut down
due to low AC output voltage.
SHTDN XfmrT Hi 122C 120C System has shut down
due to transformer overheating.
SHTDN AmbT Hi 82C 80C System has shut down
due to overheating in the
electronics cabinet.
SHTDN Htsnk Hi 123C 120C System has shut down
due to overheating if the
inverter heatsink.
ALM Battery Charger Failure Charger is not functioning.
ALM Annual Test Failed
System failed the 90-minute
annual test
ALM Monthly Test Failed
System failed the monthly
5-minute test
Weekly Test Failed
System failed the 1-minute test
32
What to do
Remove some of the load until alarm clears.
Contact Dual-Lite’s Technical Support Center.
Shut down the unit and contact Dual-Lite’s
Technical Support Center.
If charger light is on, allow condition to persist
for 24 hours. If alarm does not clear, contact
Dual-Lite’s Technical Support Center.
Same as above.
If unit is located is a hot environment, relocate
If not, contact Dual-Lite’s Technical Support Center.
Locate tripped breaker and reset. If it trips
again check load circuit for shorts.
Contact Dual-Lite’s Technical Support Center.
Contact Dual-Lite’s Technical Support Center.
Reduce load.
Reduce load.
Reduce load.
Reduce load.
Contact Dual-Lite’s Technical Support Center.
Contact Dual-Lite’s Technical Support Center.
Contact Dual-Lite’s Technical Support Center.
Contact Dual-Lite’s Technical Support Center.
Contact Dual-Lite’s Technical Support Center.
Some of the batteries may have failed.
Run a manual discharge and evaluate battery
performance. Call Dual-Lite's Technical
Support Center.
Some of the batteries may have failed.
Run a manual discharge and evaluate battery
performance. Call Dual-Lite's Technical
Support Center.
May have been caused by a decrease of more than 10% of the connected load. Load change message will appear at parameter #26. Check connected load and address any issues
accordingly.
206. Communications
Each LSN system is supplied with a DB-9/RS232 communication port enabling the user to communicate with
the equipment from a remote location. Owner must supply the connecting cable with a DB-9 Male end, and the
appropriate connector at the other for the COM port used on the PC. Follow instructions supplied with the PC to set
up communications through a terminal emulation program such as Hyper Terminal on Windows '95, '98. Settings for
the COM port should be set for 19200bps, 8 data bits, 1 stop bit, flow control - none.
Entering Commands:
Once connected, the PC monitor will mimic the same scrolling parameters that are displayed on the User Interface
Panel. To initiate commands from your keyboard, you must first hit the "Enter" key twice. The screen will display
"Communications Re-Enabled". Commands may now be entered.
Appendix 1 shows a list of commands available through the RS232 connection. There are three types of parameters,
Display, Program, and Both. Depending as to which type of parameter you are trying to access, one of the following
methods must be followed:
•
Display (Dsp) Parameters are "view only" parameters and can be accessed by typing d(space) and the Hot Key
number. Example; d 7 "Enter" will display the battery voltage
•
Program (Pr) Parameters are values that will change the operating specifications of the system. A password is
required to access any these, the more critical the function, the higher of a level password will be required. These
can be viewed by typing p(space) and the Hot Key number. Example: p 150 "Enter" will display the operating
mode of the unit, after you have entered your user password.
•
Both parameter types are accessible using either method above. Keep in mind that if you wish to change a setting
for a parameter of type "Both", you will first be required to enter your password.
Miscellaneous Commands:
"com","cmd" or "command" lists selected commands
"st", "sts" or "ststus" shows a formatted live update screen of selected metered data.
"stsf" shows the same screen but in a fixed status.
"pa", "par" or "param" lists all parameters that are type Dsp or Both.
207. Unit Communication Options
E-mail Device Option (EML)
The E-mail device is an option that automatically notifies the user(s) of system test results and alarm conditions. This
is accomplished by sending a detailed e-mail to up to six e-mail asddresses.
Purpose:
This option allows for remote monitoring via network connection, notification of alarm conditions by e-mail and
reporting all system tests to technical support and 5 additional addresses.
Description:
System is comprised of a single board computer with factory-installed software and a CAT5 Ethernet connection port.
Installation:
Entire system is factory installed and service technician activated.
• Requires CAT5 cable supplied by customer connected to the site's network server.
• E-mail Option Setup Checklist will need to be completed and sent to Dual-Lite by installer in order to
ensure that e-mail is setup by the time of startup. If the information is not available by the time of startup, a follow up
visit by an authorized service technician can be scheduled to setup the feature. 33
The e-mail device automatically sends an e-mail to the addresses programmed whenever:
• The unit performs a weekly, monthly or annual system test
• The unit sounds an alarm
NOTE: Communication option installation and wiring instructions are provided in the print package supplied
with the unit.
208. Service Options
Factory Start-Up
Factory Start-Up is provided standard.
Service Agreement (PMP)
Provides for an annual visit by a factory-authorized technician to test all system options and related accessories. Technician will perform a physical and mechanical inspection of all batteries and battery connections. Included will
be a test, calibration and recording of the system charger output, battery float voltages and all input/output settings. Technician will also perform a simulated power outage, discharging the batteries to 87.5% of nominal voltage and
record readings of individual battery voltages.
Monitoring Program (MP)
Requires Factory Start-Up (FS) and E-mail Device (EML) options. It provides for the continuous monitoring of the equipment by our Technical Support Group. All monthly and yearly
system tests will be reviewed and analyzed for early warning signs of system malfunctions. Any failures will be
automatically relayed to our Technical Support Center where corrective action can be taken. This Monitoring Program
is the only automated failure reporting system in the industry. It requires a CAT5 Ethernet cable to be connected to
the customer's network.
NOTE: Service Options may be purchased by contacting your Dual-Lite distributor or Authorized Service
Center.
34
300. Maintenance
300.1
Safe Shut Down Procedure
CAUTION
To avoid possible equipment damage or personal injury, assume that there is AC voltage present inside the LSN
inverter system unit any time AC input power or DC battery voltage is applied. The inverter is capable of providing
output voltage from the batteries even when there is no AC input line voltage. When AC input voltage is present, the
unit can provide output voltage even when the batteries are disconnected.
AC AND DC VOLTAGES WILL BE PRESENT INSIDE THE UNIT UNTIL LINE AC IS
DISCONNECTED AND ALL INTERNAL SWITCHES ARE TURNED OFF.
Do not touch components inside the unit. DC voltage is always present at the batteries and battery cables.
If an external bypass switch is not used, turn off all connected equipment (loads) at their source and proceed
to “Final Shut Down Procedure” below.
A. Bypass Switch Disconnect
If the unit utilizes a bypass switch, check the label to determine whether it is Break-Before-Make or Make-BeforeBreak.
Follow the instructions for the type of switch identified:
Break-Before-Make: If a Break-Before-Make (BBM) external bypass switch is used, the switch will temporarily
break input power as it switches from emergency inverter power to utility power (LINE) or back to CIS power. 1. Shut down all connected equipment (loads)
2. Turn the bypass switch to the LINE position.
3. If necessary, restart connected equipment.
Make-Before-Break: If a Make-Before-Break (MBB) bypass switch is used.
1. Make sure the AC Line light is on
2. Make sure the “Emergency Power” light on the user interface panel is off.
3. The LSN system must be providing utility AC pass-through to the connected equipment.
CAUTION:
If a Make-Before-Break bypass switch is used, equipment will be damaged if the switch position is changed when
line is applied and the LSN system is operating in the “Off” or “On” (Emergency Battery Operation) Mode. See the
instructions packed with the bypass switch.
4. Turn the bypass switch to the LINE position.
B. Final Shut Down Procedure
1. Open the unit’s front door.
2. Turn off the Master Switch, the Main DC Switch, the Main AC Switch and any Output Circuit Breakers.
CAUTION: HAZARDOUS ENERGY IS STORED IN CAPACITORS INSIDE THE LSN UNIT. AFTER TURNING OFF
SWITCHES, ALLOW 5 MINUTES FOR CAPACITORS TO DISCHARGE BEFORE ATTEMPTING ANY SERVICE
PROCEDURES.
3. If the service technician does not need to access the inside of the unit, close and lock the unit’s front door.
4. If the unit will be shut off for an extended period of time, recharge the batteries every 60 to 90 days.
CAUTION: The batteries will be damaged and the warranty voided if not routinely recharged.
NOTE: To turn power back on, follow the “System Startup Procedure” outlined in Section 110. Be sure to
complete all of the steps to assure the unit will operate properly.
35
300.2
Routine System Maintenance
The LSN inverter system unit is designed to provide years of trouble-free operation. Its self-testing/self-diagnostic
microprocessor will check the batteries and inverter regularly to ensure proper operation.
The unit does require some routine attention to assure peak performance. Dual-Lite recommends a Preventative
Maintenance check be performed by a qualified service technician at least every six months. The technician must
observe important safety precautions while performing the following recommended tasks: •
•
•
•
•
•
•
Inspect and clean the unit interiors;
Inspect and record any Alarm and Inverter Logs;
Inspect all batteries for leaks, case swelling or terminal corrosion;
Check the AC and DC meter functions and recalibrate if necessary;
Perform an emergency operation test to check operation of all critical connected loads;
Check the values of metered parameters and system logs,
Change air filters (see below).
NOTE: If the LSN unit is installed in an area where audible alarm signals may not be
heard, a weekly visual check is advised.
300.3
Changing Air Filters
CAUTION
This procedure must be done by a qualified service person ONLY! Based on the installation environment, LSN inverter system air filters should be changed at least every six months to
assure sufficient airflow to prevent overheating of unit electronics.
To change unit air filters, follow these steps:
1. Follow the steps in Section 207.1 to safely shut down the unit. Remember to leave the system door closed for at
least five minutes to allow capacitors to discharge. 2. After five minute period, open the system door.
2. Remove old filters which are held in place by double-sided adhesive tape.
3. Clean off any tape adhesive residue from back of door.
4. Replace filters using Dual-Lite Filter Kit
5. Close the system door.
6. Follow the “System Startup Procedure” outlined in Section 109. Be sure to complete all of the steps to assure the
unit will operate properly.
36
300.4
Battery Maintenance and Replacement
This section provides precautions for qualified service personnel working with unit batteries. No user serviceable
parts are within the system's cabinets
Important Safety Precautions
The service technician must take these precautions:
1. Wear protective clothing, eye-wear, rubber gloves and boots. Batteries contain corrosive acids or
caustic alkalis and toxic materials and can rupture or leak if mistreated. Remove rings and metal
wristwatches or other metal objects and jewelry. Don’t carry metal objects in pockets where the
objects can fall onto the batteries or into the LSN inverter system or battery cabinet.
2. Tools must have insulated handles so that they will not short battery terminals. Do not allow a tool to
short a battery terminal to another battery terminal or to the cabinet at any time. Do not lay tools or
metal parts on top of the batteries, and do not lay any objects where they could fall onto the batteries
or into the cabinet.
3. Install the batteries as shown on the battery wiring diagram provided in this manual or with the
battery cable kit. When connecting cables, never allow a cable to short across a battery’s terminals,
the string of batteries, or to the cabinet.
4. Align the cables on the battery terminals so that the cable lug will not contact any part of the cabinet
even if the battery is moved. Keep the cable away from any sharp metal edges.
5. Install the battery cables so they cannot be pinched by the battery cabinet or the LSN inverter
system doors.
6. External battery cabinet chassis ground (or earth) must be connected to the LSN inverter system
unit’s chassis ground (or earth). The ground conductor must be insulated. If you use conduit, this
ground conductor must be routed in the same conduit as the battery conductors.
7. Where conductors may be exposed to physical damage, protect conductors in accordance with NEC
requirements.
8. If replacing batteries or repairing battery connections, follow the procedure in this manual to shut
down the LSN inverter system and remove both AC and DC input power.
9. Full voltage and current are always present at the battery terminals. The batteries used in this
system can produce dangerous voltages, extremely high currents, and possible risk of electric
shock. Batteries may cause severe injury if the terminals are shorted together or to ground (earth).
Be extremely careful to avoid electric shock and burns caused by contacting battery terminals or
shorting terminals during battery installation. Do not touch uninsulated battery terminals.
10. A qualified electrician who is familiar with battery systems and required precautions must install and
service the batteries. Any battery used with this unit shall comply with the applicable requirements
for batteries in the standard for emergency lighting and power equipment, UL 924. Cabinets are
designed to be used with, and batteries must be replaced by identical cells or a Dual-Lite approved
equivalent. If using substitute batteries not supplied by Dual-Lite, the unit’s UL listing will be void,
and the equipment may fail to perform properly. The installation must conform to national and local
codes as well. Keep unauthorized personnel away from batteries.
37
CAUTION:
A battery can present a risk of electrical shock and high short circuit current. Battery replacement should only
be performed by qualified service personnel familiar with battery systems. All safety precautions outlined at the
beginning of this section must be observed when servicing, maintaining or replacing batteries
Routine Battery Inspection and Maintenance
Sealed Lead-Calcium Batteries (Includes Type S and Type G batteries)
Lead-Calcium cells are the most common type of battery used today in standby equipment. By design it is as
maintenance free as a battery can be. Coupled with the diagnostic and self-testing capabilities of the LSN system,
these batteries provide one of the most reliable and carefree inverter systems available today. It is recommended,
however, that some simple steps be taken to increase system life and maximize reliability:
•
If system is installed in a remote area where the system's alarms may not be heard, it is recommended that the
system be checked weekly for alarm conditions,
•
A quarterly visual check of the batteries should be conducted to look for deformities in the cases and terminal
corrosion. Any defective batteries should be replaced. All corroded terminals, regardless how slight, are to be
cleaned and retightened at once to prevent failure of the entire battery bank.
•
Once a year, all battery connections should be checked for tightness and re-torqued if necessary. Torque
specifications can be found on the battery label.
Nickel-Cadmium Batteries
Used in harsher environments, the wet nickel cadmium battery is designed for a 25-year life. When properly
maintained it will give years of reliable performance. Care must to be taken to maintain adequate electrolyte levels
and terminal cleanliness. Use only distilled water when necessary. Never use any kind of acid to refill the battery,
serious damage and injury may occur.
The same frequency and procedures as listed above for the lead-calcium batteries should be followed.
If you have any questions, contact Dual Lite's Technical Support Center at 1-800-848-6439.
Please dispose of all batteries properly.
Battery Replacement Procedure
WARNING: Always use the same quantity and type of battery as replacements.
Substituting batteries not supplied by Dual-Lite will void the UL listing of the system and may cause equipment failure.
To ensure the superior performance of your LSN inverter system and to maintain proper charger operation, replace
spent batteries only with Dual-Lite cells having the same part number, voltage and ampere-hour rating as the original
batteries.
1. Follow the proper shut down procedure as described in Section 300.1.
2. Remove battery cabinet fuses and test them for continuity. Faulty fuses will prevent batteries from charging and
render the battery bank useless during a power outage.
3. Break down the battery bank beginning with the intercell connectors. These cables tie the batteries installed on
the same shelf together.
4. Next remove the inter-tier cables. These cables connect the batteries located on different shelves together.
38
5. Remove the batteries from the cabinet. Batteries can be very heavy, use proper lifting methods when removing
battery.
6. Install new batteries following the instructions outlined in Section 105.3.
Battery Disposal
WARNINGS:
Do not dispose of batteries in a fire, the batteries could explode.
Do not open or mutilate batteries.
Released electrolyte is highly toxic and harmful to the skin and eyes.
CAUTION:
Batteries contain lead. Many state and local governments have regulations about used battery disposal. Please
dispose of the batteries properly. For help, contact the Dual-Lite Technical Support Center.
301. Warranty Information
WARRANTY
The system is guaranteed, under normal and proper use, against defects in
workmanship and materials for a period of two years from the date of shipment.
Batteries supplied as part of the system are covered under a separate pro-rata
warranty as described below:
Batteries - 1 year plus pro-rata period
Pro-Rata Periods - Lead-Calcium (Type S) - 9 years
Lead-Calcium (Type G) - 14 years
Nickel-Cadmium (Type N) - 14 years
IMPORTANT:
Lengthy storage of batteries will cause irreversible damage to the cells.
Failure to connect LSN inverter system batteries to an energized charging circuit within 90
days from the date of shipment will void the battery warranty.
302. Technical Service and Support
During or after installation, Dual-Lite’s Systems Technical Support Center is available to provide expert assistance. Our service representatives are available to answer customers’ questions or solve their problems.
Toll-Free Number
A toll-free phone has been set up for LSN technical assistance. The number is: 1-800-848-6439.
Service representatives are available during normal working hours (EST).
39
Appendix 1.
Parameter “Hot Key” Numerical Listing
Param.
Keyboard
No.
Type
Alpha
Password
Level
0
Both
t
User
1
Dsp
vi
N/A
2
Dsp
vo
N/A
4
Dsp
o
N/A
5
Dsp
va
N/A
6
Dsp
ib
N/A
7
Dsp
vb
N/A
8
Dsp
vi
N/A
9
Dsp
rt
N/A
10
Dsp
d
User
11
Dsp
at
N/A
12
Dsp
st
N/A
14
Dsp
xt
N/A
15
Both
id
User
16
Dsp
l
N/A
17
Dsp
w
N/A
18
Dsp
pf
N/A
19
Both
val
Serv
20
Dsp
po
N/A
21
Dsp
ol
N/A
22
Both
sh
Fact
23
Both
im
Fact
24
Dsp
il
N/A
25
Dsp
al
N/A
26
Dsp
tr
N/A
27
Dsp
cf
N/A
28
Both
bl
Serv
30
Both
mind
N/A
31
Both
maxd
N/A
32
Both
minvi
N/A
33
Both
maxvi
N/A
34
Both
minvo
N/A
35
Both
maxvo
N/A
36
Both
minva
N/A
37
Both
maxva
N/A
40
Both
sn
Fact
42
Dsp
nf
N/A
43
Both
nvi
Fact
44
Both
nvo
Fact
45
Both
rva
Fact
46
Both
rw
Fact
51
Both
lf
Serv
52
Both
hf
Serv
59
Both
lvoa
Serv
60
Both
lvos
Serv
61
Both
hvoa
Serv
62
Both
hvia
Serv
65
Both
lb
Serv
66
Both
nlb
Serv
67
Both
hb
Serv
40
Description
Time
Input Voltage Output Voltage
Output Current
Volt-Amps Out
Battery Supplied Current
Battery Volts & Charging Current
Input Frequency
Run Time Remaining
Date
Ambient Temperature
Heatsink Temperature
Transformer Temperature
Unit ID string.
Remote entry only (20 char)
Percent of Full Load
Watts Output
Output Power Factor
High VA Overload alarm setpoint
Power Outages
Overloads System Hours Display / Reset
Inverter Minutes since startup/Reset Inverter Log
Alarm Log
Test Results Log
Crest Factor
Brownout Level
Minimum DC volts since startup
Maximum DC volts since startup
Minimum AC input volts
Maximum AC input volts Minimum AC output volts
Maximum AC output volts
Minimum output VA
Maximum output VA
Factory Serial Number
Nominal Frequency
Nominal Input Voltage
Nominal Output Voltage
Rated VA
Rated Watts
Low Input Frequency switch point High Input Frequency switch point Low Output Volts alarm setpoint
Low Output Volts shutdown setpoint
High Output Volts alarm setpoint
High Input Volts alarm setpoint
Low Battery Volts alarm setpoint
Near Low Battery volts alarm setpoint
High Battery volts alarm setpoint
Param.
Keyboard
No.
Type
Alpha
Password
Level
68
Both
lr
Serv
73
Both
tt
User
78
Both
ae
Diag
80
Both
ats
Serv
81
Both
ats
Serv
82
Both
hta
Serv
83
Both
hts
Serv
84
Both
xta
Serv
85
Both
xts
Serv
89
Both
ird
User
95
Both
cb
Serv
110
Both
cvin
Fact
111
Both
cvid
Fact
112
Both
cvon
Fact
113
Both
cvod
Fact
114
Both
caon
Fact
115
Both
caod
Fact
116
Both
cdvn
Fact
117
Both
cdvd
Fact
118
Both
cdan
Fact
119
Both
cdad
Fact
120
Both
ccn
Fact
121
Both
ccd
Fact
122
Both
ct
Fact
123
Both
mc
Fact
124
Both
lcv
Fact
125
Both
fcv
Fact
126
Both
hcAv
Fact
127
Both
mtd
User
128
Both
mtd
User
129
Both
mtt
Fact
130
Both
att
Fact
137
Dsp
sv
N/A
150
Prg
inv
User
151
Both
lre
Serv
152
N/A
N/A
N/A
153
Dsp
op
N/A
154
Dsp
sl
N/A
155
Dsp
bvl
N/A
156
Dsp
bdl
N/A
157
Dsp
pl
N/A
158
Dsp
pvl
N/A
159
Prg
tled
Diag
160
Prg
clr
N/A
161
Dsp
drl
N/A
162
Both
ibe
N/A
163
Both
edw
User
164
Both
lfa
Serv
165
Both
lfe
Serv
166
Both
lvoe
Serv
167
Both
lvse
Serv
Description
Low Run Time alarm setpoint
Time of Day for Monthly test
Alarm Shutdown E/D
High Ambient Temp alarm setpoint
High Ambient Temp shutdown setpoint
High Heatsink Temp alarm setpoint
High Heatsink Temp Shutdown setpoint
High Transformer Temp alarm setpoint
High Transformer Temp Shutdown setpoint
Inverter Active Relay Delay
Console Baud Rate
AC V in Gain
AC V in Offset
AC V out Gain
AC V out Offset
AC Amps Out Gain
AC Amps Out Offset
DC Volts Gain
DC Volts Offset
Inverter Current Gain
Inverter Current Offset
Charger Current Gain
Charger Current Offset
Charger Type
Charge Current Setpoint Number
Batt Chg Lower On Volts
Battery Reduced Float Volts
Batt Chg Upper Off Volts
Date for Monthly test
Date for Monthly test
Monthly Test Time Duration
Annual Test Time Duration
Software Version
Inverter off, line, auto, on
E/D Low Run Time Alarm
Reserved For Factory Use
Compile Options
Service log
Battery volts log
Battery discharge volts log
Power log
Peak values log
LED relay diag test
Clr peak values
Diagnostic Report Log
Inverter beep On/Off
E/D Weekly Test
Low Input Freq Alarm setpoint
Enable/Disable Low Inp Freq Alm E/D Low Output Volts Alarm
E/D Low Output Volts Shutdown
Appendix 1.
Parameter “Hot Key” Numerical Listing
Param.
Keyboard Password
No.
Type
Alpha
Level
168
Both
hvoe
Serv
169
Both
hvie
Serv
170
Both
lvia
Serv
171
Both
lvie
Serv
172
Both
hvos
Serv
173
Both
hvse
Serv
174
Both
lbe
Serv
175
Both
nlbe
Serv
176
Both
hbe
Serv
177
Prg
csp
Serv
178
Prg
cup
User
179
Prg
cfp
Fact
180
Prg
cdp
Diag
181
Prg
ack
N/A
182
Prg
smt
User
183
Both
mta
User
184
Both
atd
User
185
Both
ath
User
186
Both
atr
User
187
Prg
res
N/A
188
Both
ate
Serv
189
Both
xte
Serv
190
Both
ase
Serv
191
Both
hte
Serv
192
Dsp
of
N/A
193
Both
hhe
Serv
194
Both
vae
Serv
195
Both
bta
Serv
196
Both
bte
Serv
197
Both
xse
Serv
198
Both
vas
Serv
199
Both
vse
Serv
200
Both
fx1
User
201
Both
fx2
User
202
Both
ff
User
203
Prg
eep
Serv
204
Both
eda
Serv
205
Both
edi
Serv
206
Both
edc
Serv
207
Both
ed
Serv
208
Both
et
Serv
209
Both
er
Serv
210
Dsp
it
N/A
211
Both
pim
Fact
212
Both
pib
Fact
213
Both
mtm
Fact
214
Both
atm
Fact
215
Both
cdc
Fact
216
Both
ctc
Fact
217
Both
edu
Fact
Description
E/D Hi Output Volts Alarm
E/D Hi Input Volts Alarm
Low Input Volts Alarm Setting
E/D Low Input Volts Alarm
(Default is Disabled)
Hi Output Volts Shutdown Setting
E/D Hi Output Volts Shutdown E/D Low Battery Volts Alarm
E/D Near Low Battery Alarm
E/D Battery Hi Volts Alarm
Change Service Password
Change User Password
Change Factory Password
Change Diagnostic Password
Acknowledge and Silence Alarms Start Monthly Test
Monthly Test AutoResched
Annual Test Date
Annual Test Time of Day
Annual Test AutoResched
Resume Scroll
E/D Hi Amb Temp Alarm E/D Hi Transformer Temp alarm
E/D Hi Amb Temp Shutdown
E/D Hi Heatsink Temp Shutdown
Output Frequency
E/D High Heatsink Temp alarm
E/D High VA Overload alarm
High Battery Temp alarm setpoint
E/D High Battery Temp alarm
E/D Transformer Hi Temp Shutdown VA Overload Shutdown setpoint
E/D VA Overload Shutdown
Destination Fax #1
Destination Fax #2
Fax From #
Copy System to/ Clear Eeprom/Step 2
E/D Audible Alarm
E/D I2C Alarm
E/D Circuit Breaker Trip Alarm
Equalize Date
Equalize Time of Day
Equalize Auto Reschedule
Months & Days
Last Inverter Run Time
ACI peak Gain
ACI peak Offset
Monthly Test Resched Max
Annual Test Resched Max
Charger Dropout Current
Charger Trickle Current
Equalize Duration Time
Param.
Keyboard
No.
Type
Alpha
218
Both
erm
219
Both
nbv
220
Both
ev
221
Both
bte
222
Both
bhe
223
Both
ivo
224
Both
ipo
225
Both
iv
226
Both
be
227
Prg
co
228
Dsp
aq
229
Both
ic
230
Both
fp1
231
Both
fp2
232
Both
N/A
233
Prg
cap
234
Prg
fng
235
Prg
fok
236
Both
nrt
237
Prg
vim
238
Prg
vib
239
Prg
vom
240
Prg
vob
241
Prg
aom 242
Prg
aob 243
Prg
bvm
244 Prg
bvo
245
Prg
icm
246
Prg
ico
247
Prg
ccm
248
Prg
cco
249
Prg
apm
250
Prg
apb
251
Prg
es
252
Both
fx3
253
Both
fx4
254
Both
fx5
255
Both
fx6
256
Both
fp3
257
Both
fp4
258
Both
fp5
259
Both
fp6
260
Both
ard
261
Both
no3
262
Both
no4
263
Both
edb
264
Dsp
wtd
265
N/A
N/A
266
Both
iam
267
Both
ipa
Password
Level
Fact
Fact
Fact
Serv
Serv
Serv
Serv
Serv
Serv
Diag
N/A
Diag
User
User
Serv
User
None
None
Serv
Fact Fact
Fact
Fact
Fact
Fact
Fact
Fact
Fact
Fact
Fact
Fact
Fact
Fact
Serv
User
User
User
User
User
User
User
User
User
User
User
Serv
N/A
N/A
User
User
Description
Equalize Resched Max Nominal Battery Voltage
Batt Equalization Volts
Inverter Boost Trip Point
(Brownout Level)
Inverter Boost Hysteresis
Inverter High Volts On Setpoint
Inverter Out Pot Setpoint Inverter Out Volts Setpoint Inverter Blank Adjust (Not Used )
Diag Charger On/Off
Alarm Query
Inverter Cycling On/Off
Fax #1 Prefix
Fax #2 Prefix
E/D Echo
Cancel All Passwords
Fax Failed. Serv Log entry from Fax OK. Serv Log entry from
Nominal Run Time Minutes.
AC V in Gain AutoCal
AC V in Offset AutoCal
AC V out Gain AutoCal
AC V out Offset AutoCal
AC Amps Out Gain AutoCal
AC Amps Out Offset AutoCal
Battery DC Volts Gain AutoCal
Battery DC Volts Offset AutoCal
Inverter Current Gain AutoCal
Inverter Current Offset AutoCal
Charger Current Gain AutoCal
Charger Current Offset AutoCal
ACI Peak Gain AutoCal
ACI Peak Offset AutoCal
Stop Equalize
Destination Fax #3
Destination Fax #4
Destination Fax #5
Destination Fax #6
Fax #3 Prefix
Fax #4 Prefix
Fax #5 Prefix
Fax #6 Prefix
Alarm Active Relay Delay
Normally Open Relay 3 Off Delay
Normally Open Relay 4 Off Delay
E/D Battery Charger fail Alarm
Weekly test Sched
Reserved For Factory Use
IP addressing mode
IP address
41
Appendix 1.
Parameter “Hot Key” Numerical Listing
Param.
Keyboard
No.
Type
Alpha
268
269
270
271
272
273
274
275
276
277
278
279
280
281
END
Notes:
42
Both
Both
Disp
Both
Both
Both
Both
Both
Both
Both
Both
Both
Both
Both
gwa
snm
em1
em2
em3
em4
em5
em5
tmz
mhd
epn
tls
usr
pwd
Password
Level
User
User
N/A
User
User
User
User
User
User
User
User
User
User
User
Description
Gateway address
Subnet mask
E-mail address 1
E-mail address 2
E-mail address 3
E-mail address 4
E-mail address 5
E-mail address 6
Time zone
Mail hub domain name
SMTP port number
TLS-secured message
Authorized user
Authorized user password
Notes:
43
1300736
A Hubbell Lighting, Inc. brand with representatives' offices in principal cities throughout North America.
Copyright © Hubbell Lighting, Inc.
44
Printed in U.S.A.
All Rights Reserved.
Content subject to change without notice.
0601681 J 10/09