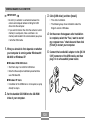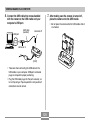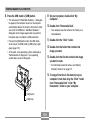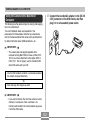
1
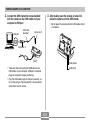
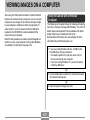
VIEWING IMAGES ON A COMPUTER
VIEWING IMAGES ON A COMPUTER
After using the USB cradle to establish a USB connection
between the camera and your computer, you can use your
computer to view images in file memory and copy images
to your computer’s hard disk or other storage media. In
order to do this, you first need to install the USB driver
located on the CD-ROM that comes bundled with the
camera onto your computer.
Note that the procedure you need to perform depends on
whether you are using computer running under Windows
(see below) or a Macintosh (see page 132).
Using the Camera with a Windows
Computer
The following are the general steps for viewing and copying
files from a computer running under Windows. You can find
details about each operation in the procedures that follow
below. Note that you should also refer to the
documentation that comes with your computer for other
information about USB connections, etc.
1. If you are running Windows 98, Me, or 2000, install
the USB driver onto your computer.
• You need to perform this step only once, the first
time you connect to your computer.
• If you are running Windows XP, you do not need to
install the USB driver.
2. Use the USB cradle to establish a connection between
the camera and computer.
3. View and copy the images you want.
127
VIEWING IMAGES ON A COMPUTER
3. Click [USB driver] and then [Install].
IMPORTANT!
• Do not try to establish a connection between the
camera and computer before installing the USB
driver onto the computer.
• If you want to transfer files from the camera’s built-in
memory to a computer, make sure there is no
memory card loaded in the camera before you place
it onto the USB cradle.
• This starts installation.
• The following steps show installation under the
English version of Windows.
4. On the screen that appears after installation
is complete, select the “Yes, I want to restart
my computer now.” check box and then click
[Finish] to restart your computer.
1. What you should do first depends on whether
5. Connect the bundled AC adaptor to the [DC IN
your computer is running under Windows 98/
Me/2000 or Windows XP.
5.3V] connector of the USB cradle, and then
plug it in to a household power outlet.
■ Windows 98/Me/2000 Users
• Start from step 2 to install the USB driver.
• Note that the example installation presented here
uses Windows 98.
■ Windows XP Users
• Installation of the USB driver is not required, so jump
directly to step 6.
2. Set the bundled CD-ROM into the CD-ROM
drive of your computer.
128
VIEWING IMAGES ON A COMPUTER
6. Connect the USB cable that comes bundled
7. After making sure the camera is turned off,
with the camera to the USB cradle and your
computer’s USB port.
USB port
USB cable
(bundled)
place the camera onto the USB cradle.
• Do not place the camera onto the USB cradle while it
is turned on.
Connector B
MENU
Connector A
DISP
[USB]
• Take care when connecting the USB cable to the
USB cradle or your computer. USB ports and cable
plugs are shaped for proper positioning.
• Plug the USB cable plugs into the ports securely, as
far as they will go. Proper operation is not possible if
connections are not correct.
129
VIEWING IMAGES ON A COMPUTER
8. Press the USB cradle’s [USB] button.
9. On your computer, double-click “My
Computer”.
• This will cause the “Add New Hardware...” dialog box
to appear on the computer screen as the computer
automatically detects the camera’s file memory. After
you install the USB driver, “Add New Hardware...”
dialog box will no longer appear when you perform
the above steps to establish a USB connection.
10. Double-click “Removable Disk”.
• Your computer sees the camera’s file memory as a
removable disk.
11. Double-click the “Dcim” folder.
• Pressing the [USB] button enters the USB mode,
which causes the USB cradle’s [USB] lamp to light
green (page 172).
12. Double-click the folder that contains the
image you want.
• At this point, some operating systems will display a
“Removable Disk” dialog box. If your operating
system does, close the dialog box.
13. Double-click the file that contains the image
you want to view.
• For information about file names, see “Memory
Directory Structure” on page 137.
14. To copy all the files in file memory to your
MENU
computer’s hard disk, drag the “Dcim” folder
from “Removable Disk” to the “My
Documents” folder on your computer.
DISP
[USB] button
[USB] lamp
130
VIEWING IMAGES ON A COMPUTER
IMPORTANT!
USB Connection Precautions
• Never use your computer to edit, delete, move, or
rename images stored in file memory. Doing so can
cause problems with the image management data
used by the camera, which may make it impossible
to display images on the camera or it may cause a
large error in the number of images value displayed
by the camera. Always copy images to your
computer memory before performing any edit, delete,
move, or rename operation.
• Be sure to read the documentation that comes with your
computer for other important information about USB
connections.
• Be sure to connect the AC adaptor to the USB cradle to
supply power to the camera.
• USB data communication is performed regardless of the
current setting of the camera’s mode selector.
• Do not leave the same image displayed on your computer
screen for a long time. Doing so can cause the image to
“burn in” on the screen.
• Never disconnect the USB cable, or perform any camera
or USB cradle operation while data communication is in
progress. Doing so can cause data to become corrupted.
15. Depending on the version of Windows you are
running, use one of the following procedures
to terminate the USB connection.
■ WindowsMe/98 Users
• After pressing the USB cradle [USB] button and
making sure that the [USB] lamp is not lit, remove
the camera from the USB cradle.
■ Windows2000/XP Users
• Click card services in the task tray on your computer
screen, and disable the drive number assigned to the
camera. After pressing the USB cradle [USB] button
and making sure that the [USB] lamp is not lit,
remove the camera from the USB cradle.
131
VIEWING IMAGES ON A COMPUTER
1. Connect the bundled AC adaptor to the [DC IN
Using the Camera with a Macintosh
Computer
5.3V] connector of the USB cradle, and then
plug it in to a household power outlet.
The following are the general steps for viewing and copying
files from a Macintosh.
You can find details about each operation in the
procedures that follow below. Note that you should also
refer to the documentation that comes with your Macintosh
for other information about USB connections, etc.
IMPORTANT!
• This camera does not support operation with a
computer running Mac OS 8.6 or lower, or Mac OS X
10.0. If you have a Macintosh running Mac OS 9 or
OS X (10.1, 10.2 or higher), use the standard USB
driver that comes with your OS.
1. Use the USB cradle to establish a connection between
the camera and your Macintosh.
2. View and copy the images you want.
IMPORTANT!
• If you want to transfer files from the camera’s built-in
memory to a computer, make sure there is no
memory card loaded in the camera before you place
it onto the USB cradle.
132
VIEWING IMAGES ON A COMPUTER
2. Connect the USB cable that comes bundled
3. After making sure the camera is turned off,
with the camera to the USB cradle and your
computer’s USB port.
USB port
USB cable
(bundled)
place the camera onto the USB cradle.
• Do not place the camera onto the USB cradle while it
is turned on.
Connector B
MENU
Connector A
DISP
[USB]
[USB] button
[USB] lamp
• Take care when connecting the USB cable to the
USB cradle or your computer. USB ports and cable
plugs are shaped for proper positioning.
• Plug the USB cable plugs into the ports securely, as
far as they will go. Proper operation is not possible if
connections are not correct.
133
VIEWING IMAGES ON A COMPUTER
4. Press the USB cradle’s [USB] button.
8. To copy all the files in file memory to your
Macintosh hard disk, drag the “DCIM” folder
to the folder to which you want to copy it.
• Pressing the [USB] button enters the USB mode,
which causes the USB cradle’s [USB] lamp to light
green (page 172).
IMPORTANT!
5. Your Macintosh will see the camera’s file
• Never use your computer to edit, delete, move, or
rename images stored in file memory. Doing so can
cause problems with the image management data
used by the camera, which may make it impossible
to display images on the camera or it may cause a
large error in the number of images value displayed
by the camera. Always copy images to your
computer memory before performing any edit, delete,
move, or rename operation.
memory as a drive.
• The appearance of the drive icon depends on the
Mac OS version you are using.
• After installing the USB driver, your Macintosh will
see the camera’s file memory as a drive whenever
you establish a USB connection between them.
6. Double-click the drive icon for the camera’s
9. To terminate the USB connection, drag the
file memory, the “DCIM” folder, and then the
folder that contains the image you want.
drive icon that represents the camera to
Trash. After pressing the USB cradle [USB]
button and making sure that the [USB] lamp is
not lit, remove the camera from the USB
cradle.
7. Double-click the file that contains the image
you want to view.
• For information about file names, see “Memory
Directory Structure” on page 137.
134
VIEWING IMAGES ON A COMPUTER
USB Connection Precautions
Operations You Can Perform from Your
Computer
• Be sure to read the documentation that comes with your
computer for other important information about USB
connections.
• Be sure to connect the AC adaptor to the USB cradle to
supply power to the camera.
• USB data communication is performed regardless of the
current setting of the camera’s mode selector.
• Do not leave the same image displayed on your computer
screen for a long time. Doing so can cause the image to
“burn in” on the screen.
• Never disconnect the USB cable, or perform any camera
or USB cradle operation while data communication is in
progress. Doing so can cause data to become corrupted.
The following are the operations you can perform while
there is a USB connection between your camera and
computer. See the referenced pages for more information
about each operation.
• View images in album format
.... See “Using the Album Feature” on page 140.
• Print images in album format
.... See “Using the Album Feature” on page 140.
• Automatically transfer images to your computer and
manage images
.... See “Installing the Software from the CD-ROM” on
page 147 for information about installing
Photo Loader.
• Retouch images
.... See “Installing the Software from the CD-ROM” on
page 147 for information about installing Photohands.
135
VIEWING IMAGES ON A COMPUTER
Using a Commercially Available SD Memory Card
Reader/Writer
See the user documentation that comes with the SD
memory card reader/writer for details about how to use it.
Using a Memory Card to Transfer Images
to a Computer
The procedures in this section describe how to transfer
images from the camera to your computer using a memory
card.
Using a Computer with a Built-in SD Memory Card Slot
Insert the SD memory card directly into the slot.
Using a Computer with a Built-in PC Card Slot
Use a commercially available PC card adapter (for an SD
memory card/MMC). For full details, see the user
documentation that comes with the PC card adapter and
your computer.
Using a Commercially Available PC Card Reader/Writer
and PC Card Adapter (for SD Memory Cards and
MMCs)
See the user documentation that comes with the PC card
reader/writer and PC card adapter (for an SD memory card/
MMC) for details about how to use them.
136
VIEWING IMAGES ON A COMPUTER
Memory Directory Structure
Memory Data
Images recorded with this camera and other data are
stored in memory using DCF (Design rule for Camera File
System) protocol. DCF protocol is designed to make it
easier to exchange image and other data between digital
cameras and other devices.
■ Directory Structure
<¥DCIM¥>
DCF Protocol
(DCIM Folder)
(Storage folder)
(Image file)
(Audio file)*1
(Audio snapshot image file)*1
(Audio snapshot audio file)*1
101CASIO
102CASIO
(Storage folder)
(Storage folder)
ALBUM
INDEX.HTM
(Album folder)
(Album HTML file)
...
100CASIO
CIMG0001.JPG
CIMG0002.WAV
CIMG0003.JPG
CIMG0003.WAV
...
DCF devices (digital cameras, printers, etc.) can exchange
images with each other. DCF protocol defines camera
format for image file data and the directory structure for file
memory, so images can be viewed using another
manufacturer’s DCF camera or printed on a DCF printer.
...
(FAVORITE folder)*2
<¥FAVORITE¥>
(Storage file)*2
(Storage file)*2
CIMG0001.JPG
CIMG0002.JPG
...
<¥MISC¥>
(DPOF file folder)
AUTPRINT.MRK
(DPOF file)
(BESTSHOT folder)*2
<¥SCENE¥>
3
UEM20001.JPE*
UEM20002.JPE*3
...
137
(User setup file)*2
(User setup file)*2
VIEWING IMAGES ON A COMPUTER
<¥AUDIO¥>
쏄쏄쏄쏄쏄쏄쏄쏄.MP3
LASTPLAY
(MP3 file folder)*1
• Audio snapshot audio file (EX-M20U only)
File that contains the audio part of an audio snapshot
(File Name Extension: WAV).
(MP3 file)*1
(LASTPLAY file)*1
• Album folder
Folder that contains files used by the album function
*1 These folders and files are for the EX-M20U only.
*2 These folders are created in built-in memory only.
*3 These file names are part of the EX-M20U file structure only.
With the EX-S20U, files are named UES20001.JPE,
UES20002.JPE, etc.
• Album HTML file
File used by the album function
(File Name Extension: HTM)
• FAVORITE folder (Built-in memory only)
Folder that contains Favorites image files
(Image Size: 320 x 240 pixels)
■ Folder and File Contents
• DCIM folder
Folder that stores all of the digital camera files
• DPOF file folder
Folder that contains DPOF files
• Storage folder
Folder for storing files created by the digital camera
• BESTSHOT folder (Built-in memory only)
Folder that contains BESTSHOT user setup files.
• Image file
File that contains an image recorded with the digital
camera (File Name Extension: JPG)
• User setup files (Built-in memory only)
Files that contain BESTSHOT user setups
• Audio file (EX-M20U only)
File that contains an audio recording (File Name
Extension: WAV).
• MP3 files folder (EX-M20U only)
Folder that contains MP3 files.
• LASTPLAY file (EX-M20U only)
File that contains information about the last played MP3
file.
• Audio snapshot image file (EX-M20U only)
File that contains the image part of an audio snapshot
(File Name Extension: JPG).
138
VIEWING IMAGES ON A COMPUTER
Image Files Supported by the Camera
Built-in Memory and Memory Card
Precautions
• Image files recorded with the CASIO EX-S20U/EX-M20U
Digital Camera
• DCF protocol image files
• Note that the folder named “DCIM” is the parent (top)
folder of all the files in memory. When transferring
memory contents to a hard disk, CD-R, MO disk, or other
external storage, treat all the contents inside a DCIM
folder as a set and always keep them together. You can
change the name of the DCIM folder on your computer.
Changing the name to a date is a good way to keep track
of multiple DCIM folders. However, if you even want to
copy the folders back to the camera’s file memory, be
sure you change the name of the DCIM folder back to
“DCIM” first. The camera does not recognize any folder
name other than DCIM.
• We also strongly recommend that after transferring data
from file memory to other external storage that you
reformat the camera’s file memory and delete its contents
before using it to store more files. Remember that
formatting memory deletes all of its contents. Check to
make sure that you no longer need any of the files in
memory before you format it.
Certain DCF functions may not be supported. When
displaying an image recorded on another camera model, it
may take a long time for the image to appear on the
display.
139
USING THE CAMERA WITH A COMPUTER
USING THE CAMERA WITH A COMPUTER
The album feature of the camera creates files that make it
possible for you to view images on your computer in a
photo album layout. You can also use the applications
contained on the CD-ROM that comes bundled with the
camera to automate image transfer and to retouch images.
• You can use the Web browser shown below to view or
print the contents of an album.
Microsoft Internet Explorer Ver 5.5 or later
Using the Album Feature
Creating an album
The album feature creates an HTML photo album layout
that displays your images. You can use the HTML layout to
post your images on a Web page, or for printing the
images.
1. In the PLAY mode, press [MENU].
2. Select the “PLAY” tab,
select “Create Album”,
and then press [].
Album
Sample layout
3. Use [] and [] to select “Create”, and then
press [SET].
• This starts creation of the album, and causes the
message “Busy.... Please wait...”. to appear on the
monitor screen.
Index
Info
140
USING THE CAMERA WITH A COMPUTER
• The PLAY mode screen reappears after creation of
the album is complete.
Selecting an Album Layout
You can select from among 10 different display layouts for
an album.
• Creating an album causes a file folder named
“ALBUM”, which contains a file named “INDEX.HTM”
plus other files to be created in camera memory or
on the memory card.
1. In the PLAY mode, press [MENU].
2. Select the “PLAY” tab, select “Create Album”,
IMPORTANT!
and then press [].
• Never open the battery cover or remove the memory
card from the camera while an album is being
created. Doing so not only runs the risk of certain
album files being skipped, it can also result in image
data and other data in memory being corrupted.
• If memory becomes full while an album is being
created, the message “Memory Full” appears on the
monitor screen and album creation is terminated.
• Album creation will not be performed properly if the
battery goes dead while album creation is in
progress.
• You can also configure the camera to create albums
automatically (page 143). However, performing the
above procedure creates an album regardless of
whether automatic album creation is turned on or off.
3. Use [] and [] to select “Layout”.
4. Use [] and [] to select the layout you want.
• Changing the layout causes the layout sample on the
right side of the screen to change.
IMPORTANT!
• The sample layout shows the arrangement of items
and the background color. It does not show whether
the layout uses a list view or detailed view, or the
current Image Type setting.
141
USING THE CAMERA WITH A COMPUTER
Configuring Detailed Album Settings
■ Background Color
1. In the PLAY mode, press [MENU].
You can specify white, black, or gray as the color of the
album background using the procedure under “Configuring
Detailed Album Settings”.
2. Select the “PLAY” tab, select “Create Album”,
and then press [].
■ Album Type
3. Use [] and [] to select “Set Up”, and then
There are two album types: Normal and Index/Info.
press [].
Normal Type
: This type of album displays images in
accordance with the currently selected
layout.
Index/Info Type : In addition to the normal album screen,
this type of album also includes
thumbnails of images and detailed
information about each image.
4. Use [] and [] to
select the item whose
setting you want to
change, and then press
[].
• Details about each of the
settings are provided in
the following sections.
5. Use [] and [] to change the setting, and
then press [SET].
142
USING THE CAMERA WITH A COMPUTER
■ Image Use
■ Auto Album Creation On/Off
This setting lets you select from among three different
image uses, as described below. Select the image use that
best suits the way you plan to use the image.
This setting controls whether an album is created
automatically whenever you turn off the camera.
For this purpose:
Smaller images for album browsing, Website
thumbnails, or archiving on a CD-R or other
media, with the full-size image displayed
when a thumbnail is clicked
• This setting can be used for browsing with
the thumbnails. Clicking a thumbnail
displays a larger version for viewing or
printing.
Small image files only for album browsing, or
uploading to a Website, etc.
• This option displays only the small-file
images (located in the camera’s “ALBUM”
folder). Smaller files upload to the Internet
faster.
• You cannot enlarge images by clicking a
thumbnail while this image is selected.
Printing (high resolution)
• High-resolution images take longer to
display on your computer screen.
• You cannot enlarge images by clicking a
thumbnail while this image is selected.
Select this
setting:
To do this:
Select this option:
Turn on auto album creation
On
Turn off auto album creation
Off
• When auto album creation is turned on, an album is
created automatically in built-in memory or on the
memory card whenever you turn off the camera.
View
IMPORTANT!
• When you turn off the camera while auto album
creation is turned on, the monitor screen turns off,
but the operation/flash charge lamp continues to
flash for a few seconds to indicate that the album
creation process is being performed. Never open the
battery cover or remove the memory card while the
operation/flash charge lamp is flashing green.
WEB
Print
143
USING THE CAMERA WITH A COMPUTER
NOTE
Viewing Album Files
• Depending on the number of images in memory, it
can take quite a bit of time to complete auto album
creation when you turn off the camera. If you do not
plan to use the album feature, we suggest that you
keep auto album creation turned off, which shortens
the amount of time the camera takes to power down
completely.
You can view and print album files using your computer’s
Web browser application.
1. Use your computer to access the data in builtin memory or on the memory card, or access
a memory card with your computer (pages
126, 136).
2. Open the built-in memory “ALBUM” folder or
the memory card “ALBUM” folder, which is
located inside the folder named “DCIM”.
3. Use your computer’s
Index/Info Album Type
Web browser to open
the file named
“INDEX.HTM”.
• This displays a list of
folders in built-in memory
or on the memory card.
Image
144
File Name
USING THE CAMERA WITH A COMPUTER
4. If you created the album after selecting
“Normal” type or “Index/Info” as the album
type under “Configuring Detailed Album
Settings” on page 142, you can click one of
the following display options.
Album : Displays an album created by the camera.
Index : Displays a list of images stored in a folder.
Info
: Displays information about each image.
Index
• If “View” is selected for “Use” (page 143), you can
double-click an image on your computer screen to
display the full-size version.
Info
Album
145
USING THE CAMERA WITH A COMPUTER
• The following describes the information that appears
on the Info Screen.
This Info Screen item:
File Size
Resolution
Quality
Drive mode
AE
Light metering
Shutter speed
Aperture stop
Exposure comp
Focusing mode
Flash mode
Sharpness
Saturation
Contrast
White balance
Sensitivity
Filter
Enhancement
Flash intensity
Digital zoom
World
Date
Model
NOTES
• When printing an album page, you should set up
your Web browser as described below.
— Select the browser frame where the images are
located.
— Set margins to the lowest possible values.
— Set the background color to a printable color.
• See the user documentation that came with your
Web browser application for details about printing
and configuring settings for printing.
Shows this:
Image file size
Resolution
Quality
Drive mode
Exposure mode
Metering mode
Shutter speed
Aperture stop
EV shift
Focusing mode
Flash mode
Sharpness
Saturation
Contrast
White balance
Sensitivity
Filter setting
Enhancement setting
Flash intensity
Digital zoom setting
Location
Recording date and time
Camera model name
5. After you are finished viewing the album, exit
your Web browser application.
146
USING THE CAMERA WITH A COMPUTER
Saving an Album
Installing the Software from the CD-ROM
• To save an album, copy the “DCIM” folder from camera
memory or the memory card to your computer’s hard disk,
a CD-R, an MO disk, or some other storage medium.
Note that copying only the “ALBUM” folder, does not copy
image data and other necessary files.
• After copying the “DCIM” folder, do not change or delete
any of the files inside of it. Adding new images or deleting
existing images may lead to abnormal album display.
• If you plan to use a memory card again after saving its
album, first delete all of its files or format it before loading
it into the camera.
• When you have “WEB” selected for the “Use” setting, the
album shows only the smaller image files stored in the
“ALBUM” folder. Such images can be uploaded to the
Internet more quickly.
About the bundled CD-ROM
The CD-ROM that comes bundled with the camera
contains the applications described below. Installation of
these applications is optional, and you should install only
the ones you want to use.
USB Driver for Mass Storage (for Windows)
This is the software that makes it possible for the camera
to “talk” to your personal computer over a USB connection.
If you are using Windows XP, do not install the USB driver
from the CD-ROM. With these operating systems, you will
be able to perform USB communication simply by
connecting the camera to your computer with the USB
cable.
Photo Loader (for Windows/Macintosh)
This application loads image data saved in JPEG format
from a digital camera to your computer.
With the EX-M20U, you can also load audio snapshot and
voice recording WAV files to your computer.
Photohands (for Windows)
This application is for retouching and printing image files.
147
USING THE CAMERA WITH A COMPUTER
Acrobat Reader (for Windows)
This is an application that lets you read PDF files. Use it to
read the user documentation for the camera, Photo Loader,
and Photohands, all of which is included on the bundled
CD-ROM.
Computer System Requirements
Computer system requirements depend on each of the
applications, as described below.
Windows
NOTE
See the “Readme” file on the bundled CD-ROM.
• See the user documentation files (PDF) on the
bundled CD-ROM for details about using Photo
Loader and Photohands. See “Viewing User
Documentation (PDF files)” on page 151 (Windows)
and page 152 (Macintosh) of this manual for more
information.
Macintosh
See the “readme” file on the bundled CD-ROM.
148
USING THE CAMERA WITH A COMPUTER
Getting Started
Installing Software from the CD-ROM in
Windows
Start up your computer and insert the CD-ROM into its CDROM drive. This will automatically launch the menu
application, which displays a menu screen on your
computer.
Use the procedures in this section to install the software
from the bundled CD-ROM to your computer.
NOTE
• The menu application may not start up automatically on
some computers. If this happens, navigate to the CDROM and double-click “menu.exe” to launch the menu
application.
• If you already have one of the bundled applications
installed on your computer, check its version. If the
bundled version is newer than the one you have, you
should install the newer version.
The CD-ROM includes the software and user
documentation for various languages. Check the CD-ROM
menu screen to see if applications and user documentation
are available for a particular language.
149
USING THE CAMERA WITH A COMPUTER
Viewing the Contents of the “Read me”
File
Installing an Application
1. Click the “Install” button for the application
You should always read the “Read me” file for any
application before installing it. The “Read me” file contains
information you need to know when installing the
application.
you want to install.
2. Follow the instructions that appear on your
computer screen.
1. Click the “Read me” button for the application
IMPORTANT!
you are going to install.
• Be sure to follow the instructions carefully and
completely. If you make a mistake when installing
Photo Loader, you may not be able to browse your
existing library information and HTML files that are
created automatically by Photo Loader. In some
cases, image files may be lost.
• When using an operating system other than
Windows XP, never connect the camera to your
computer without installing the USB driver from the
CD-ROM first.
IMPORTANT!
• Before upgrading or reinstalling Photo Loader, or
before installing it onto another computer, be sure to
read the “Read me” file for information about
retaining existing libraries.
150
USING THE CAMERA WITH A COMPUTER
Viewing User Documentation (PDF Files)
User Registration
1. In the “Manual” area, click the name of the
manual you want to read.
You can perform user registration over the Internet. To do
so, of course, you need to be able to connect to the
Internet with your computer.
IMPORTANT!
1. Click the “Register” button.
• You need to have Adobe Acrobat Reader installed
on your computer to read user documentation files. If
you do not already have Adobe Acrobat Reader
installed, you can install it from the bundled CDROM.
• This starts up your Web browser and accesses the
user registration website. Follow the instructions that
appear on your computer screen to register.
2. After registering, terminate your connection
to the Internet.
Exiting the Menu Application
1. On the menu screen, click “Exit” to exit the
menu.
151
USING THE CAMERA WITH A COMPUTER
■ To install Photo Loader
Installing Software from the CD-ROM on a
Macintosh
1. Open the folder named “Photo Loader”.
Use the procedures in this section to install the software
from the bundled CD-ROM to your computer.
2. Open the folder named “English”, and then
open the file named “Important”.
Installing Software
3. Open the folder named “Installer”, and then
Use the following procedures to install the software.
open the file named “readme”.
4. Follow the instructions in the “readme” file to
install Photo Loader.
IMPORTANT!
• If you are upgrading to the new version of Photo
Loader from a previous version and you want to use
library management data and HTML files created
using the old version of Photo Loader, be sure to
read the “Important” file in the “Photo Loader” folder.
Follow the instructions in the file to use your existing
library management files. Failure to follow this
procedure correctly can result in loss or corruption of
your existing files.
152
USING THE CAMERA WITH A COMPUTER
■ To read the Photo Loader user’s guide
Viewing User Documentation (PDF Files)
To perform the following procedures, you must have
Acrobat Reader installed on your Macintosh. You can
download the latest version of Adobe Acrobat Reader by
visiting the Adobe Systems website.
1. On the CD-ROM, open the “Manual” folder.
2. Open the “Photo Loader” folder and then
open the “English” folder.
■ To view the camera user’s guide
3. Open “PhotoLoader_english”.
1. On the CD-ROM, open the “Manual” folder.
■ To register as a user
2. Open the “Digital Camera” folder, and then
Internet registration only is supported. Visit the following
CASIO website to register:
http://world.casio.com/qv/register/
open the folder for the language whose user’s
guide you want to view.
3. Open the file named “camera_e.pdf”.
153
PLAYING AN AUDIO FILE (EX-M20U Only)
PLAYING AN AUDIO FILE (EX-M20U Only)
You can transfer MP3 music data files from your computer
to the camera and then use the camera as a portable audio
player.
Transferring Audio Files to the Camera
Use the following procedure to import an MP3 audio file
from your computer to the camera.
• MP3 stands for MPEG Audio Layer-3, which is the name
of audio compression technology.
1. Establish a USB connection between the
camera and your computer (page 127).
• Supported Files
An “MP3 file” is a Windows file whose name is followed
by the extension “.MP3”. The following describes the
types of MP3 files that are supported by this camera.
• If you plan to transfer MP3 audio files to a memory
card, load the card into the camera.
2. Perform one of the following operations to
• MPEG-1 Audio Layer-3
Bit Rate: 32 to 320 kbps, VBR-compatible
Sampling Frequencies: 32, 44.1, 48kHz
open camera memory or the memory card.
• Windows XP Users
Click “My Computer” and then “Removable Disk”.
• MPEG-2 Audio Layer-3
Bit Rate: 8 to 160 kbps, VBR-compatible
Sampling Frequencies: 16, 22.05, 24kHz
• Mac OS 9 Users
Click “untitled”.
• Maximum Number of Playback Files: 999
3. Open the “AUDIO” folder, and then transfer
the MP3 files you want to play into it.
IMPORTANT!
• If there is no “AUDIO” folder, create one at the
location indicated in “Memory Directory Structure” on
page 137.
• Depending on the MP3 file format, some music data
may not be playable.
• A bit rate of 128kbps and a sampling frequency of
44.1kHz are recommended for MP3 files.
• It is up to you to obtain software for creating MP3
files and to create the MP3 files you want to play.
4. This terminates the USB connection between
the camera and your computer (page 127).
154
PLAYING AN AUDIO FILE (EX-M20U Only)
NOTES
Preparing the Camera for Audio Player
Operation
• If you are using a “PLAYLIST.TXT” file (page 162),
you need to edit the contents of the file accordingly
whenever you add or delete an MP3 file.
• See the user documentation that comes with your
computer for information about moving, and copying
files.
Perform the following steps to prepare the camera for
operation as an audio player.
1. Turn off the camera.
2. Connect the LCD remote controller to the
camera’s connector, and then plug the stereo
headphones into the Headphones jack of the
LCD remote controller.
Headphones jack
LCD Remote Controller
Connector
Stereo Headphones
155
PLAYING AN AUDIO FILE (EX-M20U Only)
3. On the LCD remote controller, press the [
]
Using the Camera as an Audio Player
button.
• This turns on the camera, enters the AUDIO mode,
and starts playback.
General Guide
● LCD Remote Controller
IMPORTANT!
1
• Pressing the LCD remote controller’s [
] button
enters the AUDIO mode, regardless of the camera’s
mode selector setting.
• Entering the AUDIO mode causes the camera’s
monitor screen to turn off. Pressing [MENU] or
[DISP] on the camera while playback is stopped or
paused causes the monitor screen to turn on.
• Never try to connect any other type of remote
controller besides the one that comes with the
camera. Also, never try to use the supplied remote
controller with any other type of device.
• You cannot play MP3 file data through the camera’s
built-in speaker.
1[
2
3
4
6
5
A
7
8
9
0
156
] (Skip Back/Fast
Reverse)
2[
] (Skip Forward/Fast
Forward)
3 [ ] (Pause)
4[
] (Play/Stop)
5 Headphones jack (ø3.5mm
stereo mini jack)
6 Clip
7 Lock switch
8 Playback mode button
9 Volume buttons
0 LCD
A Camera connector
PLAYING AN AUDIO FILE (EX-M20U Only)
● Display
3 Playback status indicator
This icon indicates the current playback status.
1
2
3
4
5
1 Track number
This type of icon:
Indicates this:
Rotation clockwise while flashing
Playback is in progress.
Flashing
Playback is paused.
Steady and unmoving
Playback is stopped.
4 Playback mode indicator
Shows the track number of the current track.
This icon indicates the playback mode.
2 Track name, artist name, playback time, volume level,
BASS BOOST settings
• Shows the ID3 tag (ID3V1), which is the track name and
artist name (alphabetic characters only), contained in
the file.
• During fast forward and fast reverse, shows the elapsed
play time.
• During volume level adjustment, shows the current
volume level.
• When BASS BOOST is selected, shows the current
BASS BOOST setting (BASS 0, BASS 1, BASS 2).
This type of icon:
Indicates this:
None
Normal playback
All track repeat
1-track repeat
5 Battery level indicator
157
PLAYING AN AUDIO FILE (EX-M20U Only)
● To skip to the beginning of the next track
] button (remote controller beeps).
Press the [
To keep skipping forward, press the [
] button multiple
times (remote controller beeps). The current track
number is shown on the LCD.
Basic Remote Controller Operations
● To start playback
Press the [
] button. The remote controller beeps to
indicate that playback has started.
• Pressing the [
] button while the camera is off turns
on power and starts playback.
● To stop playback
] button (remote controller beeps).
Press the [
• Pressing the [
] button again will restart playback
from the beginning of the track where it was stopped.
● To pause playback
Press the [ ] button (remote controller beeps).
Pressing the [
] button or the [ ] button resumes
playback (remote controller beeps).
• If the Auto Power Off trigger time (about two minutes or
five minutes) is reached while playback is paused, the
camera will automatically turn off.
● To adjust volume
Press the [+] or [–] volume buttons to adjust volume to
the desired level. The LCD shows the current volume
level.
● To fast forward the playback
Hold down the [
] button for a few seconds until fast
forward starts.
● To turn off power
Press the camera’s power button.
• Camera power also turns off automatically if you do not
perform an operation for about 10 seconds after
playback is stopped.
● To fast reverse the playback
Hold down the [
] button for a few seconds until fast
reverse starts.
IMPORTANT!
• The button operation tone does not sound if the
camera’s button tone function is turned off (page
107).
• You cannot use fast forward, fast reverse, or skip
while the current volume level is shown on the LCD.
● To skip to the beginning of the current track
Press the [
] button (remote controller beeps).
To skip to the beginning of a previous track, press the
[
] button multiple times (remote controller beeps).
The current track number is shown on the LCD.
158
PLAYING AN AUDIO FILE (EX-M20U Only)
NOTE
Playing Back Audio Files
• The initial default mode is normal playback. The
camera remembers the last playback mode you
selected, even if you turn the camera off.
Specifying the Audio Playback Mode
You can use the following procedure to select one of three
playback modes: normal playback, all-track repeat, or onetrack repeat.
1. On the LCD remote controller, press [
Playing Back Tracks Randomly
Use the following procedure to configure audio playback for
random play of the audio files in file memory.
] to
start playback.
1. On the LCD remote controller, press the [
2. Press the LCD remote controller’s playback
button or the [
playback.
mode button to cycle through the playback
modes.
To do this:
Select this
mode:
Play all tracks in
order and then stop
Normal
Play all tracks in
order in an endless
loop
All-track repeat
Play the current
track in an endless
loop
1-track repeat
]
] button to stop or pause
• You could also enter the PLAY mode on the camera,
press [MENU], select the “PLAY” tab and then “Audio
Player”, and then press [왘].
Which is indicated
by this icon:
2. Use [왖] and [왔] to select “Random”, and then
None
press [왘].
159
PLAYING AN AUDIO FILE (EX-M20U Only)
3. Use [왖] and [왔] to select “On”, and then
Selecting a Specific Track for Playback
press [SET].
To do this:
Select this setting:
Turn on random play
On
Turn off random play
Off
You can use the following procedure to select the specific
track you want to play from a list of tracks on the camera’s
monitor screen.
1. On the LCD remote controller, press the [
button or the [
playback.
IMPORTANT!
• Random play is not performed if you have “1-track
repeat” selected as the playback mode (page 159).
] button to stop or pause
2. On the camera, press
the [DISP] button.
• This causes an MP3 file
list showing track
numbers, track names,
and play time to appear
on the camera’s monitor
screen.
3. Use [왖] and [왔] to move the highlighting to
the name of the MP3 file you want to play.
4. To start playback of the selected track, press
[
] on the LCD remote controller or the
[SET] button on the camera.
160
]
PLAYING AN AUDIO FILE (EX-M20U Only)
IMPORTANT!
Specifying the Track Playback Sequence
• The monitor screen turns off automatically if you do
not perform any operation for about 10 seconds.
Normally, audio files are played back in the sequence that
they are stored in file memory. You can also create a text
file that lists the MP3 files to be played and the sequence
for playing them. Then, simply name the file
“PLAYLIST.TXT” and place it into the camera’s “AUDIO”
folder. The camera will play back files accordingly.
1. Use your computer’s word processor or text
editor to create a text file like the one shown
below, and name it “PLAYLIST.TXT”.
2. Establish a USB connection between the
camera and your computer (page 127).
3. Open the folder in camera memory named
“AUDIO”, and place the “PLAYLIST.TXT” file
inside it.
4. Terminate the USB connection between the
camera and your computer (page 127).
• Now when you perform a playback operation, MP3
files will be played in the sequence you specified in
your play list.
161
PLAYING AN AUDIO FILE (EX-M20U Only)
■ Example Folder Structure
<¥AUDIO¥>
■ Example PLAYLIST.TXT File Contents
(Folder containing MP3 files)
AUDIO001.MP3
AUDIO002.MP3
AUDIO001.MP3
AUDIO002.MP3
POPS
ROCK\ROCK0002.MP3
(MP3 file)
(MP3 file)
...
PLAYLIST.TXT
LASTPLAY
1
2
3
(PLAYLIST.TXT file)
(LASTPLAY file)
4
POPS
POPS0001.MP3
POPS0002.MP3
(Folder containing MP3 files)
(MP3 file)
(MP3 file)
...
The above PLAYLIST.TXT file specifies the following
playback sequence.
ROCK
ROCK0001.MP3
ROCK0002.MP3
(Folder containing MP3 files)
(MP3 file)
(MP3 file)
1. Playback the MP3 file named AUDIO001.MP3.
...
2. Playback the MP3 file named AUDIO002.MP3.
3. Playback all the files in the folder named POPS.
IMPORTANT!
• Playback will include all the files in the “AUDIO”
folder and all the files in any folders inside the
“AUDIO” folder. Any files nested deeper will not be
played. If the “AUDIO” folder contains another folder
named “POPS”, and there is another folder named
“JAZZ” inside of the “POPS” folder, playback will
include all the files in the “AUDIO” folder and the
“POPS” folder, but not the files inside the “JAZZ”
folder.
4. Playback the MP3 file named ROCK0002.MP3, which is
located in folder named ROCK.
162
PLAYING AN AUDIO FILE (EX-M20U Only)
IMPORTANT!
Using BASS BOOST
• Any files and folders that are not included in the
“PLAYLIST.TXT” file are skipped during playback.
• If there is no file named “PLAYLIST.TXT” in the
camera’s “AUDIO” folder, all audio files are played in
the sequence they are stored.
• If you want to change the files that are played or their
sequence, simply edit the contents of the
“PLAYLIST.TXT” file.
• The contents of the “PLAYLIST.TXT” file are ignored
when random playback is turned on (page 159).
BASS BOOST enhances the low range of the audio for a
more powerful sound.
1. On the LCD remote controller, press the [
button or the [
playback.
]
] button to stop or pause
• You could also enter the PLAY mode on the camera,
press [MENU], select the “PLAY” tab and then “Audio
Player”, and then press [왘].
2. Use [왖] and [왔] to select “BASS BOOST”, and
then press [왘].
3. Use [왖] and [왔] to select the setting you
want, and then press [SET].
• Available settings are BASS 0, BASS 1, and BASS
2. A higher number provides more powerful sound.
163
PLAYING AN AUDIO FILE (EX-M20U Only)
IMPORTANT!
Deleting MP3 Files from File Memory
• When using BASS BOOST, playing at loud volume
can cause distortion. If this happens, lower the
volume level.
• During playback, you can change the BASS BOOST
setting using the camera’s [왖] and [왔] buttons.
You can delete a single MP3 file from camera memory or
on the memory card, or you can batch delete all the MP3
files.
IMPORTANT!
• Note that file deletion cannot be undone. Once you
delete a file it is gone. Make sure you really do not
need an MP3 file anymore before you delete it.
Especially when deleting all MP3 files, make sure
you check all the files you currently have in memory
before proceeding.
• If you are using a “PLAYLIST.TXT” file (page 161),
you need to edit the contents of the file accordingly
whenever you delete an MP3 file.
164
PLAYING AN AUDIO FILE (EX-M20U Only)
4. Use [왖] and [왔] to select “Delete”.
Deleting a Single MP3 File
• To exit the delete operation without deleting
anything, select “Cancel”.
Use the following procedure to delete a single MP3 file
from file memory or a memory card.
1. On the LCD remote controller, press the [
button or the [
playback.
5. Press the [SET] button to delete the file.
]
• Repeat steps 3 through 5 to delete other MP3 files, if
you want.
] button to stop or pause
6. Press [MENU] to exit the delete operation.
• You could also enter the PLAY mode on the camera,
press [MENU], select the “PLAY” tab and then “Audio
Player”, and then press [왘].
2. Use [왖] and [왔] to select “Delete”, and then
press [SET].
• This causes an MP3 file list showing track numbers,
track names, and play time to appear on the
camera’s monitor screen.
3. Use [왗] and [왘] to display the MP3 file you
want to delete.
165
PLAYING AN AUDIO FILE (EX-M20U Only)
Deleting All MP3 Files
Disabling Remote Controller Button Operations
The following procedure deletes all MP3 files currently in
file memory.
1. On the LCD remote controller, press the [
button or the [
playback.
The remote controller has a lock switch that you can use to
disable button operations to guard against accidental
operation. To disable all remote controller button
operations, slide the lock switch in the direction indicated
by the 왘 mark.
]
] button to stop or pause
• You could also enter the PLAY mode on the camera,
press [MENU], select the “PLAY” tab and then “Audio
Player”, and then press [왘].
2. Use [왖] and [왔] to select “All File Delete”, and
Lock switch
then press [SET].
3. Use [왖] and [왔] to select “Yes”.
• To re-enable remote controller button operations, slide
the lock switch back in the other direction.
• To exit the delete operation without deleting
anything, select “No”.
NOTE
4. Press [SET] to display all MP3 files in file
• The camera’s power button continues to be
operational, even while remote controller button
operations are disabled.
memory.
166
PLAYING AN AUDIO FILE (EX-M20U Only)
LCD Remote Control Error Messages
Audio Playback Precautions
The following describes the error messages that appear on
the LCD remote controller’s display.
Cause
NoData
Playback attempted
when there is no MP3
data in memory.
• Listening to audio at a high volume for long periods can
damage your hearing. Particular care is required when
first starting a playback operation.
• Never use the headphones, try to perform fine
adjustment, or look at the monitor screen while driving a
car, riding a motorcycle, or operating any other type of
motor vehicle. Doing so creates the risk of traffic accident.
When walking, take special care to remain aware of traffic
and road conditions around you.
Action
Transfer MP3 file data
to the “AUDIO” folder of
built-in memory or the
memory card.
NOTE
• The message “There are no files.” appears on the
camera monitor screen if there are no MP3 files in
memory.
167
APPENDIX
APPENDIX
ISO
Grid
Digital Zoom
Review
L/R Key
Menu Reference
The following shows lists of menus that appear in the REC
mode and PLAY mode, and their settings.
• The settings that are underlined in the following table are
initial defaults.
• Menu items marked with an asterisk (*) appear on the
EX-M20U only.
U/D Key
■ REC mode
● Memory tab menu
● REC tab menu
REC Mode
EX-S20U :
Snapshot /
REC Mode
Flash
White Balance
ISO
Digital Zoom
BESTSHOT
EX-M20U:
Self-timer
Flash
Size
Quality
EV Shift
White Balance
Auto / ISO 64 / ISO 125 / ISO 250 / ISO 500
On / Off
On / Off
On / Off
REC Mode / Flash / EV shift / White Balance
/ ISO / Off
REC Mode / Digital Zoom / Flash / White
Balance / Self-timer / Off
Snapshot /
BESTSHOT /
(
+
)/
Voice
10 sec / 2 sec / X3 / Off
Auto /
(Flash Off) /
(Flash On) /
(Red-eye reduction)
1600 x 1200 / 1600 x 1072 (3:2) /
1280 x 960 / 640 x 480
Fine / Normal / Economy
–2.0 / –1.7 / –1.3 / –1.0 / –0.7 / –0.3 / 0.0 /
+0.3 / +0.7 / +1.0 / +1.3 / +1.7 / +2.0
Auto /
(Sunlight) /
(Shade) /
(Light Bulb) /
(Fluorescent) / Manual
168
On / Off
On / Off
On / Off
On / Off
On / Off
APPENDIX
■ PLAY mode
● Set Up tab menu
Beep (EX-S20U)
Sounds (EX-M20U)
Startup
File No.
World Time
Date Style
Adjust
Language
Auto Power Off
Format
Reset
On / Off
Startup / Shutter / Operation / Volume
On (Selectable image) / Off
Continue / Reset
Home / World
Home Time setup (city, DST, etc.)
World Time setup (city, DST, etc.)
YY/MM/DD / DD/MM/YY / MM/DD/YY
Time setting
/ English / Français / Deutsch /
Español / Italiano / Português /
/
/
2 min / 5 min
Format / Cancel
Reset / Cancel
● PLAY tab menu
169
Slideshow
Calender
Start / Images / Time / Interval
–
Favorites
Create Album
DPOF
Protect
Rotation
Resize
Trimming
Dubbing*
Alarm
Copy
Audio Player*
Show / Save / Cancel
Create / Layout / Set Up / Cancel
Select images / All images / Cancel
On / All Files : On / Cancel
Rotate / Cancel
1280 x 960 / 640 x 480 / Cancel
–
–
Alarm setups
Built-in
Card / Card
Built-in / Cancel
Random / BASS BOOST / Delete
APPENDIX
● Set Up tab menu
Beep (EX-S20U)
Sounds (EX-M20U)
Startup
File No.
World Time
Date Style
Adjust
Language
Auto Power Off
Format
Reset
Indicator Lamp Reference
On / Off
Startup / Shutter / Operation / Volume
On (Selectable image) / Off
Continue / Reset
Home / World
Home Time setup (city, DST, etc.)
World Time setup (city, DST, etc.)
YY/MM/DD / DD/MM/YY / MM/DD/YY
Time setting
/ English / Français / Deutsch /
Español / Italiano / Português /
/
/
2 min / 5 min
Format / Cancel
Reset / Cancel
Camera Indicator Lamps
The camera has two indicator lamps: an operation/flash
charge lamp and a self-timer lamp. These lamps light and
flash to indicate the current operational status of the
camera.
Operation/Flash charge lamp
ME
NU
DIS
P
Self-timer lamp
* There are two lamp flash patterns.
Pattern 1 flashes once per second, while Pattern 2 flashes twice
per second. The table below explains what each flash pattern
indicates.
170
APPENDIX
■ REC Mode
Operation/Flash
Charge Lamp
■ PLAY Mode
Self-timer Lamp
Color
Status
Color
Green
Amber
Green
Green
Lit
Pattern 1
Lit
Pattern 2
Green
Pattern 1
Red
Green
Pattern 2
Red
Red
Red
Red
Red
Green
Lit
Lit
Pattern 1
Pattern 1
Pattern 2
Operation/Flash
Charge Lamp
Meaning
Status
Power on
Flash charging
Monitor screen off
Storing image
Self-timer countdown
Pattern 1
(10 to 3 seconds)
Self-timer countdown
Pattern 2
(3 to 1 seconds)
Memory error
Memory full
Low battery alert
Monitor screen disabled
Powering down
IMPORTANT!
• Never remove the memory card from the camera
while the operation/flash charge lamp is flashing.
Doing so will cause recorded images to be lost.
171
Color
Status
Green
Green
Red
Red
Green
Green
Lit
Pattern 2
Lit
Pattern 1
Pattern 2
Pattern 2
Self-timer Lamp
Color
Meaning
Status
Power on
Deleting image
Memory error
Low battery alert
Formatting
Powering down
APPENDIX
USB Cradle Indicator Lamps
The USB cradle has two indicator lamps: a [CHARGE]
lamp and a [USB] lamp. These lamps light and flash to
indicate the current operational status of the USB cradle
and camera.
[USB] lamp
[CHARGE] lamp
[CHARGE] lamp
Color
Red
Green
Amber
Red
Status
Lit
Lit
Lit
Flashing
[USB] lamp
Meaning
Color
Status
Green
Green
Charging
Charging complete
Charge standby
Charge error
Lit
USB connection
Flashing Accessing memory
172
APPENDIX
Troubleshooting Guide
Symptom
Possible Cause
Action
1) The battery is not oriented correctly.
2) The battery is dead.
1) Orient the battery correctly (page 26).
2) Charge the battery (page 28). If the battery
goes dead soon after being charged, it means
the battery has reached the end of its life and
needs to be replaced. Purchase a separately
available NP-20 rechargeable lithium ion
battery.
Camera suddenly powers
down.
1) Auto Power Off activated (page 36).
2) The battery is dead.
1) Turn power back on.
2) Charge the battery (page 28).
Image is not recorded
when the shutter release
button is pressed.
1) The mode selector is set to “
2) Flash unit is being charged.
3) Memory is full.
1) Align the mode selector with “
” (REC).
2) Wait until the flash unit finishes charging.
3) Transfer files you want to keep to your
computer and then delete files from image
memory, or use a different memory card.
Camera powers down
during self-timer
countdown.
The battery is dead.
Charge the battery (page 28).
Recorded images are not
saved in memory.
1) Camera powers down before the save
operation is complete.
2) Removing the memory card before the save
operation is complete.
1) When the battery indicator shows
, charge
the battery as soon as possible (page 28).
2) Do not remove the memory card before the
save operation is complete.
Image Recording
Power Supply
Power does not turn on.
” (PLAY).
173
APPENDIX
Possible Cause
Action
Sunlight or light from another source is shining
directly into the lens during recording.
Position the camera so sunlight does not shine
directly into the lens.
Images are not displayed.
A memory card with non-DCF images recorded
with another camera is loaded in the camera.
This camera cannot display non-DCF images
recorded onto a memory card using another digital
camera.
Cannot playback audio,
cannot hear audio, or
cannot control the audio
playback using the remote
controller.
1) There is no MP3 file data in memory. This is
indicated by the message “NoData” on the
remote controller LCD.
2) Stereo headphones are not connected
correctly.
3) Volume setting is too low.
4) The battery is dead.
5) The remote controller buttons are locked.
1) Transfer MP3 files to the camera’s AUDIO
folder.
Audio Playback
Playback
Symptom
Color of the playback
image is different from the
image on the monitor
screen during recording.
6) There are no playable files.
7) Improper PLAYLIST.TXT file contents
Playback time is short.
The battery is dead.
2) Correctly connect the headphones to the
headphones jack.
3) Adjust the volume to a higher level.
4) Charge the battery (page 28).
5) Slide the remote controller lock switch in the
opposite direction of the arrow marking to
unlock the controls.
6) Check the files you are trying to play (page 154).
7) Check to make sure the PLAYLIST.TXT file lists
the MP3 files you want to play.
Charge the battery (page 28).
* Note that audio player capabilities are available with the EX-M20U only.
174
APPENDIX
Symptom
Possible Cause
Action
Circuit problem caused by electrostatic charge,
impact, etc. while the camera was connected to
another device.
Remove the battery from the camera, reinsert it,
and then try again.
Monitor screen is off.
1) USB communication is in progress.
1) After the computer stops accessing camera file
memory, press the [USB] button on the USB
cradle. Check to make sure that the [USB] lamp
on the USB cradle is off, and then remove the
camera from the USB cradle.
2) Press [DISP] to turn on the monitor screen.
Other
All buttons and switches
are disabled.
2) The monitor screen is turned off (in the REC
mode).
Cannot transfer files over a
USB connection.
1) Camera is not set securely on the USB cradle.
2) USB cable is not connected securely.
3) USB driver is not installed.
4) Camera is turned off.
175
1) Check the connection between the camera and
USB cradle.
2) Check all connections.
3) Install the USB driver on your computer (page
127).
4) Press the [USB] button on the USB cradle.
APPENDIX
Display Messages
Alarm setting
complete.
This message appears after you change the alarm
setting.
Memory Full
Memory is full. If you want to record more files,
delete files you no longer need (page 93).
Battery is low.
The battery is dead.
No Favorites file!
There is no FAVORITE file.
Cannot register any
more files.
• You are attempting to register a BESTSHOT
setup when the “SCENE” folder already contains
999 setups.
• You are attempting to register a FAVORITE file
when the “FAVORITE” folder already contains
9999 files.
Printing Error
One of the following problems occurred during
printing.
• Printer power off
• Out of paper
• Out of ink
• Printer internal error
Card ERROR
Some problem occurred with the memory card.
Turn off the camera, and remove and then reinsert
the memory card. If the same message appears,
format the memory card (page 123).
Record Error
Image compression could not be performed during
image data storage for some reason. Record the
image again.
SYSTEM ERROR
Your camera system is corrupted. Contact your
retailer or a CASIO service center.
The card is locked.
The LOCK switch of the SD memory card is
locked. You cannot store images to or delete
images from a memory card that is locked.
This function is not
supported for this
file.
The function you are trying to perform is not
supported for the file on which you are trying to
perform it.
There are no files.
There are no files in built-in memory or on the
memory card.
IMPORTANT!
Formatting the memory card deletes all files on
the memory card. Before formatting, try
transferring recoverable files to a computer or
some other storage device.
File could not be
saved because
battery is low.
The battery is dead, so the recorded image could
not be saved.
Folder cannot be
created.
This message appears when you try to record an
image while there are 9,999 files stored in the
999th folder. If you want to record more files,
delete files you no longer need (page 93).
176
APPENDIX
There are no printing There are no DPOF settings specifying images and
images.
the number of copies of each for printing.
Set up DPOF.
Configure the required DPOF settings (page 97).
There is no file to
register.
You are trying to save an invalid file as a
BESTSHOT user setup, or as an original startup
image.
This card is not
formatted.
The memory card is not formatted. Format the
memory card (page 123).
This file cannot be
played.
The image file or audio file is corrupted, or is a
type that cannot be displayed by this camera.
Specifications
Main Specifications
Product ............................... Digital Camera
Model .................................. EX-S20U/EX-M20U
■ Camera Functions
This function cannot You attempted to copy files from built-in memory to
be used.
a memory card while there is no memory card
loaded in the camera (page 122).
Image Files Format
Snapshots: ...................... JPEG (Exif Version 2.2); DCF (Design
Rule for Camera File System)1.0
standard; DPOF compliant
Audio: .............................. WAV (EX-M20U only)
Recording Media: .............. 10MB built-in flash memory
SD Memory Card
MultiMediaCard
Image Size .......................... 1600 x 1200pixels
1600 x 1072 (3:2) pixels
1280 x 960pixels
640 x 480pixels
177
APPENDIX
Approximate Memory Capacity and File sizes
File Size
(pixels)
1600 x 1200
(UXGA)
1600 x 1072
(3:2)
1280 x 960
(SXGA)
640 x 480
(VGA)
Quality
Fine
Normal
Economy
Fine
Normal
Economy
Fine
Normal
Economy
Fine
Normal
Economy
Approximate
Image File Size
1050KB
710KB
370KB
910KB
610KB
300KB
680KB
460KB
250KB
190KB
140KB
90KB
Built-in flash
memory 10MB
8 shots
12 shots
24 shots
9 shots
14 shots
27 shots
12 shots
19 shots
34 shots
46 shots
60 shots
96 shots
Delete .................................. Single-file, all files (with protection)
SD Memory
Effective Pixels: ................. 2.0 million
Card* 64MB
57 shots
77 shots
151 shots
59 shots
89 shots
173 shots
81 shots
124 shots
217 shots
289 shots
379 shots
607 shots
Imaging Element: .............. 1/2.7-inch square pixel color CCD
(Total pixels: 2.11 million)
Lens/Focal Distance ......... F3.5/f = 5.6mm
(Equivalent to 37mm on a 35mm film
camera.)
Zoom ................................... 4X digital zoom
Focusing ............................. Fixed focus with macro mode
Focus Range ...................... Normal focus: Approximately 0.8m to ∞
(2.6´ to ∞)
Macro focus: Approximately 30cm
(11.8˝) (Optimum field
of view at A4-size.)
* Based on Matsushita Electric Industrial Co., Ltd. products. Capacity
depends on card manufacturer.
* To determine the number of images that can be stored on a memory card of
a different capacity, multiply the capacities in the table by the appropriate
value.
Exposure Control
Metering: ......................... Multi-pattern by imaging element
Exposure: ........................ Program AE
Exposure Compensation: ... –2EV to +2EV (in 1/3EV steps)
Shutter ................................ CCD shutter, mechanical shutter
1/8 to 1/8000 second
(Depends on REC mode and ISO
sensitivity setting being used.)
• Shutter speed is different for the
following BESTSHOT scenes.
Night Scene: 1 to 1/8000 second
Fireworks: 2 seconds (fixed)
Aperture: ............................ F3.5 fixed
White Balance .................... Automatic/fixed (4 modes) /Manual
178
APPENDIX
Self-timer ............................ 10 seconds, 2 seconds, Triple Selftimer
Input/Output Terminals .... Cradle connector
(EX-M20U connector is also used for
connection of remote controller.)
Built-in Flash
Flash Modes: ................... Auto, Off, On, Red-eye reduction
Approximate Flash Range: ... 0.8 meter to 1.5 meters (2.6´ to 4.9´)
(ISO Sensitivity: “Auto”)
Microphone ........................ Monaural (EX-M20U only)
Speaker ............................... 13mm round, monaural (EX-M20U
only)
Recording Functions ........ Snapshot (with audio for EX-M20U
only); Macro; self-timer; BESTSHOT;
voice recording (EX-M20U only)
■ Audio Player Function (EX-M20U Only)
* Audio is monaural
Data Compression/
Decompression ................. MP3 (MPEG-1 Audio Layer-3 /
MPEG-2 Audio Layer-3)
Audio Recording Time (EX-M20U only)
Audio Snapshot: .............. Approximately 30 seconds maximum
per image
Voice Recording: ............. Approximately 40 minutes with built-in
memory
After Recording: .............. Approximately 30 seconds maximum
per image
Sampling Frequencies ...... 32/44.1/48kHz
(MPEG-1 Audio Layer-3)
16/22.05/24kHz
(MPEG-2 Audio Layer-3)
Bit Rates ............................. 32 to 320kbps, VBR-compatible
(MPEG-1 Audio Layer-3)
8 to 160kbps, VBR-compatible
(MPEG-2 Audio Layer-3)
Monitor Screen .................. 1.6-inch TFT color LCD
84,960 pixels (354 x 240)
Viewfinder .......................... Monitor screen and optical viewfinder
Play Mode ........................... Normal, all track repeat, 1-track repeat,
random play
Timekeeping Functions .... Built-in quartz digital clock
Date and Time: ............... Recorded with image data
Auto Calendar: ................ To 2049
Practical Maximum
Headphone Output ............ 11mW + 11mW (16 Ω)
World Time: ........................ City; Date; Time; Summer time;
162 cities in 32 time zones
A bit rate of 128kbps and a sampling frequency of 44.1kHz are recommended
for MP3 files.
179
APPENDIX
■ Power Supply
*4 Voice recording times are based on continuous recording.
Power Requirements ........ Rechargeable lithium ion battery (NP20) x 1
*5 Audio playback times are based on continuous output (through
headphones).
• Voice recording and audio playback times apply to the EX-M20U only.
Approximate Battery Life:
Number of Shots,Continuous
Recording*1 (Recording Time)
Number of Shots,Normal
Recording*2 (Recording Time)
Continuous Playback*3
(Continuous Snapshot Recording)
Continuous Voice Recording*4
Continuous Audio Playback*5
Power Consumption ......... DC 3.7V Approximately 2.5W
720 shots (120 minutes)
190 shots (95 minutes)
■ Other
180 minutes
Dimensions
EX-S20U: ........................ 83(W) x 53(H) x 11.3(D) mm
(3.3˝(W) x 2.1˝(H) x 0.44˝(D))
(excluding projections)
170 minutes
450 minutes
The above values indicate the amount of time under the conditions defined
below, until power automatically turns off due to battery failure. They do not
guarantee that you will be able to achieve this level of operation. Low
temperatures shorten battery life.
EX-M20U: ........................ 83(W) x 53(H) x 12.4(D) mm
(3.3˝(W) x 2.1˝(H) x 0.49˝(D))
(excluding projections)
*1 Continuous Recording Conditions
• Temperature: 23°C (73°F)
• Monitor screen: On
• Flash: Off
• Image recorded about every 10 seconds
Weight
EX-S20U: ........................ Approximately 78 g (2.8 oz)
(excluding battery and accessories)
EX-M20U: ........................ Approximately 80 g (2.8 oz)
(excluding battery and accessories)
*2 Normal Recording Conditions
• Temperature: 23°C (73°F)
• Monitor screen: On
• Flash: On (one flash every two shots)
• Image recorded about every 30 seconds
• Power off/on every 10 shots
Bundled Accessories ........ Rechargeable lithium ion battery (NP20); USB Cradle (CA-23); Special AC
Adaptor (AD-C51J); Strap; USB cable;
LCD Remote Controller (bundled with
EX-M20U only); Stereo Headphones
(bundled with EX-M20U only); CDROM; Basic Reference
*3 Continuous Playback Conditions
• Temperature: 23°C (73°F)
• Scroll one image about every 10 seconds
180
APPENDIX
■ Rechargeable Lithium Ion Battery (NP-20)
■ Special AC Adaptor (AD-C51J)
Rated Voltage: ................... 3.7 V
Power Requirement .......... 100 to 240V AC, 50/60Hz, 83mA
Rated Capacitance: ........... 680 mAh
Output ................................. 5.3V DC, 650mA
Operating Temperature
Range: ................................. 0°C to 40°C (32°F to 104°F)
Dimensions ........................ 48(W) x 16(H) x 69(D) mm
(1.9"(W) x 0.63"(H) x 2.7"(D))
(excluding projections and cable)
Dimensions: ....................... 33 (W) x 50 (H) x 4.7 (D) mm
(1.3˝ (W) x 2.0˝ (H) x 0.19˝ (D))
Weight ................................. Approximately 95 g (3.4 oz)
Weight: ................................ Approximately 16 g (0.56 oz)
■ LCD Remote Controller (Bundled with EX-M20U Only)
■ USB Cradle (CA-23)
Input/Output Terminals .... Camera connector; headphones jack
(ø3.5mm stereo mini jack)
Input/Output Terminals .... Camera connector; USB port; AC
adaptor terminal (DC IN 5.3V)
Cord Length ....................... Approximately 0.8m (31.5˝)
Dimensions ........................ 74.5(W) x 16(H) x 11(D) mm
(2.9˝(W) x 0.63˝(H) x 0.43˝(D))
(excluding projections, excluding cradle)
Power Consumption ......... DC 5.3V Approximately 3.2W
Dimensions ........................ 101(W) x 32(H) x 58(D) mm
(4.0˝(W) x 1.3˝(H) x 2.3˝(D))
(excluding projections)
Weight ................................. Approximately 28 g (1.0 oz)
Weight ................................. Approximately 58 g (2.0 oz)
181
APPENDIX
Power Supply
• Use only the special NP-20 rechargeable lithium ion battery to power this
camera. Use of any other type of battery is not supported.
• This camera does not require a battery for the clock. The date and time
settings of the camera are cleared whenever power supplied by both the
battery and USB cradle is interrupted. Be sure to reconfigure these settings
after power is interrupted (page 39).
LCD Panel
• The LCD panel is a product of the latest LCD manufacturing technology that
provides a pixel yield of 99.99%. This means that less than 0.01% of the
total pixels are defective (they do not turn on or always remain turned on).
Lens
• You may sometimes notice some distortion in certain types of images, such
as a slight bend in lines that should be straight. This is due to the
characteristics of lens, and does not indicate malfunction of the camera.
182