1
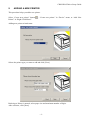
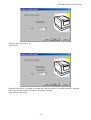
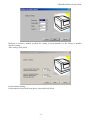
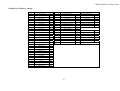
CBM OPOS Driver Setup Guide
CBM OPOS Driver
Setup Guide
November 26, 2004 Rev. 2.3
Japan CBM Corporation
5-68-10 Nakano, Nakano-Ku, Tokyo 169-0001 JAPAN
Tel 81-3-5345-7540
Fax 81-3-5345-7541
[email protected]
http://www.jcbm.co.jp/eng/printer/
CBM OPOS Driver Setup Guide
1.
INSTALLATION .........................................................................................................................2
2.
INSTALLATION CONFIGURATION........................................................................................6
3.
UNINSTALLATION....................................................................................................................7
4.
PRINTER SETTING TOOL.........................................................................................................8
5.
ADDING A NEW PRINTER .......................................................................................................9
6.
ADDING NEW DRAWER ........................................................................................................14
7.
ADDING LOGICAL DEVICE...................................................................................................15
8.
DELETING DEVICE .................................................................................................................15
9.
SETTING PRINTER ..................................................................................................................16
10. FIRMWARE VERSION OF PRINTER.....................................................................................18
-1-
CBM OPOS Driver Setup Guide
1.
INSTALLATION
The following explains the installation procedure required for using this product.
Description is made by taking the installation procedure of CBM1000 as an example.
procedure applies to other CBM POS printers.
Note: For the printer DIP switch, refer to the description in “Setting Printer”.
1.
Before installation, be sure to close all other open applications.
2.
Run Setup.exe on Setup Disk 1 supplied with the printer.
When the Setup.exe program is launched, the following message window appears.
Click the [Next] button.
-2-
This
CBM OPOS Driver Setup Guide
Carefully read the software license agreement and click [Yes].
Choose the directory where you wish to place the application program.
To change the destination folder, click the [Browse...] button.
-3-
CBM OPOS Driver Setup Guide
Choose the setup type you want.
Normally select “Typical”.
Click [Next] to start copying files.
When copying files is completed, the setting tool starts automatically.
Perform printer setting. (Refer to “Printer Setting Tool”.)
-4-
CBM OPOS Driver Setup Guide
Installation has finished.
Click [Finish].
Remarks:
If the parallel interface printer is used, when the PC is started, it is required to install printer driver
by driver install wizard. To stop the install wizard, it is necessary to install printer driver. Please
refer to the manual that comes with driver for the details of printer driver.
-5-
CBM OPOS Driver Setup Guide
2.
INSTALLATION CONFIGURATION
The following describes the files to be installed with the product.
:\Program Files\OPOS\CBM
Driver
(Folder you specified at installation)
(Folder to store device driver)
CBMDrvUnInstall.exe
CBMDrv.sys
Include
Opos.h
Opos.hi
OposPtr.h
OposPtr.hi
OposCash.h
OposCash.hi
OposCBM.h
OposAll.bas
OposCBM.bas
Manual
(Folder to store library header)
(Folder to store manual)
ApplicationDevelopmentGuide.pdf
SetupGuide.pdf
Sample
(Folder to store VB sample program)
OPOSsample.exe
Src
(Folder to store source file)
OPOSsampleDlg.frx
OPOSsampleDlg.frm
Module1.bas
OposAll.bas
OposCBM.bas
OPOSsample.vbp
Setbitmap.bmp
CBMconfig.exe
OPOS_CBM.dll
OPOSCashDrawer.ocx
OPOSPOSPrinter.ocx
(Setting tool)
(Service object)
(Drawer control object)
(Printer control object)
-6-
CBM OPOS Driver Setup Guide
3.
UNINSTALLATION
The following describes uninstallation of the product.
Delete registry
Delete printer and drawer using printer setting tool.
When you want to keep the printer setting, this step is not required.
(In the OPOS upgrading, keeping the printer setting is recommended.)
Delete OPOS
Choose CBM OPOS from “Adding and deleting application” of Control Panel and delete it.
-7-
CBM OPOS Driver Setup Guide
4.
PRINTER SETTING TOOL
The following describes the printer setting tool (CBMconfig.exe).
The setting tool can be started by “CBMOPOS” - “CBMConfig” from the start menu.
This is automatically installed at the time of installation.
Main Screen
Device View
Setting View
Device View
A list of added devices is shown.
It is displayed in tree structure of Physical device - Logical device.
Selects each device and changes the setting in the setting view.
Setting View
Displays and changes current setting of each device.
Change is effected immediately.
Right-Click Menu
In Device View, Right-Click Menu is displayed.
-8-
CBM OPOS Driver Setup Guide
5.
ADDING A NEW PRINTER
This procedure helps you add a new printer.
Select “Create new printer” button
Printer” in “Right-Click Menu”.
, “Create new printer” in “Device” menu, or “Add New
Adding new printer wizard starts.
Selects the printer type you want to add and click [Next].
Referring to Printer’s manual, select paper size and maximum number of digits.
After selection, click [Next].
-9-
CBM OPOS Driver Setup Guide
Select the port you want to use.
Click [Next].
If parallel connection is available, selecting either Serial interface or Parallel interface is required.
Follow the interface setting referring to the printer’s manual.
After setting, click [Next].
- 10 -
CBM OPOS Driver Setup Guide
Referring to Printer’s manual, perform the setting of serial interface or the setting of parallel
interface setting.
After setting, click [Next].
Perform details setting.
Unless otherwise specified, keep the set value and click [Next].
- 11 -
CBM OPOS Driver Setup Guide
Adding a drawer
If you have any drawer you want to connect, select the number of drawers.
If you have no drawer to be connected, the following step is omitted.
Setting 1st drawer
Referring to the manual, perform setting.
If you have two drawers to be connected, click [Next] and follow the same setting for 2nd drawer.
- 12 -
CBM OPOS Driver Setup Guide
Click [Finish] to add a printer and a drawer.
- 13 -
CBM OPOS Driver Setup Guide
6.
ADDING NEW DRAWER
This procedure helps you add a drawer to the printer.
Select “Create new drawer” button
Drawer” of “Right-Click Menu”.
, “Create new drawer” in “Device” menu, or “Add New
Adding new cash drawer wizard starts.
Select the printer to which the drawer is added and the number of drawers to be connected and click
[Next].
Perform the setting on the 1st drawer.
Referring to the manual, perform setting.
If you have two drawers to be connected, click [Next] and follow the same setting for 2nd drawer.
- 14 -
CBM OPOS Driver Setup Guide
Click [Finish] to add a drawer.
7.
ADDING LOGICAL DEVICE
This procedure helps you add a logical device to the printer and drawer.
Select the printer or drawer to which a logical device is added, select “Add device” button
“Add logical device” of “Device” menu, or “Add Device” of “Right-Click Menu”.
,
Enter a logical device name you want to add and click the [Add] button.
8.
DELETING DEVICE
This procedure helps you delete a logical device or physical device
Select the device you want to delete and select “Delete device” button
“Device” menu, or “Delete Device” of “Right-Click Menu”.
, “Delete device” of
If you deleted physical devices, all logical devices added to the devices are deleted.
- 15 -
CBM OPOS Driver Setup Guide
9.
SETTING PRINTER
Please check DIP switch setting and memory switch setting of the printer follows followings. Please refer to User’s manual for the details.
Setting List of DIP Switch
SW No.
CBM-1000-RF
CBM-1000II-RF
CBM-1000II-PF
1-1
Auto cutter
ON
Auto cutter
ON
Auto cutter
ON
1-2
1-3
1-4
1-5
Print mode
Paper width
Print columns
CR mode
—
—
—
OFF
Unused
Paper width
Print columns
CR mode
OFF
—
—
OFF
Unused
Paper width
Print columns
CR mode
OFF
—
—
OFF
1-6
1-7
1-8
2-1
2-2
2-3
2-4
2-5
Input buffer
OFF
—
—
ON
OFF
OFF
OFF
—
Input buffer
OFF
—
—
ON
OFF
OFF
OFF
OFF
Input buffer
OFF
—
—
ON
OFF
OFF
OFF
OFF
2-6
2-7
2-8
2-9
2-10
3-1
3-2
3-3
3-4
3-5
3-6
3-7
3-8
4-1
4-2
4-3
4-4
Print density
Character
code
JIS/Shift JIS
Condition for
BUSY to
Occur
Unused
Unused
Bit length
Parity
Odd/Even
Communicati
on mode
ON
OFF
OFF
—
—
—
OFF
Print density
Character
code
Unused
Condition for
BUSY to
Occur
Paper
Detection
Label Length
set
Unused
Bit length
Parity
Odd/Even
Communicati
on mode
Baud rate
DSR
INIT
Baud rate
DSR
INIT
ON
OFF
OFF
OFF
OFF
—
—
—
OFF
—
—
OFF
OFF
Print density
Character
code
Unused
Condition for
BUSY to
Occur
Paper
Detection
Label Length
set
Unused
Bit length
Parity
Odd/Even
Communicati
on mode
Baud rate
DSR
INIT
CT-S300-RF
Communicati
on condition
ON
setting
method
Hand shake
OFF
Bit length
—
Parity check
—
Parity
—
selection
Baud rate
—
selection
—
INIT
OFF
iDP-3240-RF
Auto cutter
ON
Cover open
Easy Loading
Print columns
CR mode
OFF
OFF
—
OFF
Input buffer
OFF
—
—
ON
OFF
OFF
OFF
—
Print density
Character
code
JIS/Shift JIS
Condition for
BUSY to
Occur
Unused
Unused
ON
OFF
OFF
OFF
OFF
—
—
—
Bit length
Parity
Odd/Even
Communicati
on mode
OFF
ON
OFF
OFF
—
—
—
OFF
—
—
OFF
OFF
—
—
OFF
OFF
Baud rate
DSR
INIT
-16-
—
—
OFF
OFF
CBM-262II-RF
Serial
Interface Data
Length
I/F Protocol
Parity
Baud Rate
Unused
—
CBM-262II-PF
Bidirection
ON
OFF
—
—
—
NOT USE
NOT USE
OFF
OFF
OFF
OFF
—
—
OFF
NOT USE
NOT USE
Unused
OFF
OFF
OFF
ACK
CBM OPOS Driver Setup Guide
Setting List of Memory Switch
SW No.
1-1
1-2
1-3
1-4
1-5
1-6
1-7
1-8
2-1
2-2
2-3
2-4
2-5
2-6
2-7
2-8
3-1
3-2
3-3
3-4
3-5
3-6
3-7
3-8
4-1
4-2
4-3
4-4
4-5
4-6
4-7
4-8
CT-S300-RF
Power ON Info
Buffer Size
Busy Condition
Receive Error
CR mode
Reserved
DSR Signal
Init Signal
Reserved
Auto Cutter
Spool Print
Full Col Printing
Resume aft PE
Paper width
Reserved
NPE Sensor
Resume Cttr Err
Resume Open Err
Parallel 31PIN
Paper Select
Column Number
No use
CBM1000 mode
Open w/Printing
Auto Length
BM Sensor
No use
No use
No use
No use
No use
Full Cut Cmd
OFF
OFF
OFF
OFF
OFF
OFF
OFF
OFF
ON
ON
OFF
ON
OFF
—
OFF
OFF
OFF
OFF
OFF
OFF
—
OFF
OFF
OFF
OFF
OFF
OFF
OFF
OFF
OFF
OFF
OFF
SW No.
1
2
3
4
5
6
7
8
9
10
11
12
13
14
15
16
17
18
CBM-262II-RF
Receipt print density
Journal print density
Cover Opoen Sensor
Auto Cutter
Auto Loading
Receipt Paper Near End
Journal Paper Near End
CR Control
Reset by INIT
Reset by DSR
Error Handshake
Input Buffer
High Quality Print
Country
Caracter Set
CBM262 Compatible
Power On Data Set
Stop Bit
-17-
—
—
Valid
Valid
—
—
—
Ignore
Invalid
Invalid
Invalid
8KB
—
U.S.A
—
Invalid
Valid
—
CBM-262II-PF
Receipt print density
Journal print density
Cover Opoen Sensor
Auto Cutter
Auto Loading
Receipt Paper Near End
Journal Paper Near End
CR Control
—
—
Valid
Valid
—
—
—
Ignore
Error Handshake
Input Buffer
High Quality Print
Country
Caracter Set
CBM262 Compatible
Power On Data Set
Invalid
8KB
—
U.S.A
—
Invalid
Invalid
CBM OPOS Driver Setup Guide
10.
FIRMWARE VERSION OF PRINTER
For CBM-1000II-PF(Parallel interface), please make sure the firwmare version is later than V3.16000.
The firmware before V3.16000, OPOS driver does not work.
-18-