1
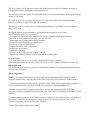
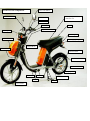
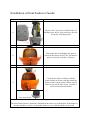
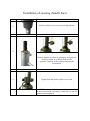
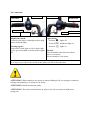
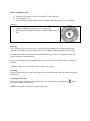
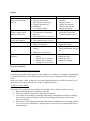
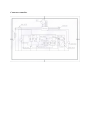
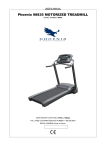
USER GUIDE
Version V1.0, Mai 2008
The 21st Century will be the one to resolve the problem between the development of means of
transportation and the downgrade of the quality of life.
The electric bicycles are means of transportations that are clean and contribute in the upgrade of the
quality of life for all.
The electric bicycle is a Product way ahead of its time in this Field, conceived with its strict
criteria’s of esthetics, ergonomics and transportation.
This bicycle is conceived for a driver, without the possibility of a passenger. It is conceived for
usage on the road.
Driving the electric bicycle demands a special effort on your part for safety issues.
Before assembly make sure to perform:
- An inspection of the bike before starting off to avoid accidents and damaging materials.
- Never let an inexperienced driver ride your electric bike.
- Wear bright color clothing while driving at night.
- Do not ride on the blind spot of other drivers.
- Do not cut or fish tail other drivers.
- Respect the vehicle code of your state.
- Respect the speed limits.
- Signal before turning.
- Be very careful at intersections, parking exits,etc….
- Always ride with both hands on the steering and feet on the pedals.
Protective gear
- For your safety, always wear a helmet, glasses and protective clothing.
- Do not wear clothing which is too loose with risk of getting it tangled on wheels, steering, etc.
Bike modification
All modification on the electric bicycle is completely forbidden .It could make riding the electric
bicycles very dangerous.
The strong points
Thanks to a drastic quality control, a severe selection of components and an assembly which
complies with the rules of the art, this electric bike is one of the best products in today’s market.
. A power assisted wheel equipped with a powerful motor which offers a high resolution ignition ,a
very low sound emission ,an easy hill climb and a capacity of prolonged battery life
. Braking system: Brakes of quality (drum brakes in front and expansion brakes in the back)
activation of brakes automatically turns the motor off, which causes a braking system which is more
efficient.
. Control system: protection against lack of tension, surcharge, motor being blocked, soft ignition to
lower noise resolution, electromagnetic brakes by lowering current, display of battery level
.Battery: Especially conceived for electric vehicles.
. Frame: High quality stainless steel frame
TECHNICAL CHARACTERISTIC
Dimensions (LxlxH)
Net weight (without battery)
Max loading weight
Maximum speed
Battery life
Battery capacity (48V)
Charge time
Rated Motor power
164.5*62*101cm
47.8KGS
125KGS
□20km/h
□>300 times
□14Ah lead-acid
□2-4 hours
□500W
□25km/h
□>500 times
□32km/h
□>1000 times
□42km/h
□12Ah lithium
□4-6hours
□800W
□14Ah lithium
□4-8hours
□20Ah lithium
□6-8hours
□10-12hours
Rear view Mirror
Location of the components
Handle bars
Battery compartment
under the seat
Commando
Dash board
Blinker
Seat
Ignition switch
Front light
Brake light
Front basket
Blinking signal light
Helmet Hook
Front fork
Electric Motor
Expansion brake
Protection cover
Foot peg
Frame
Crank
Shock absorber
Pedal
Stand
Front wheel
Pedals installation
step
1
Initial step
Piece
Crank
2
Bolt
Actions
Intermediary state or
final
ATTENTION
Align the wholes of the
crank with the fixation
support
Fasten the crank to its
support with the bolt that
is planned for this effect,
screw bolt very tightly
Place cap on top of bolt..
3
Cap
4
Pedal
Install pedal, proceed
with second one paying
attention to its direction
(see picture on the right).
View from above of a
correct installation, one
crank toward the front
and one crank toward
back.
Installation of front basket or facade
Step
Initial state
Actions
1
Unscrew the 2 top screws with the help of a
Phillips screw driver, keep screws on the side.
Locate the 4 fixation points.
2
Take basket out of packaging and open as
shown in the picture on left .you will then be
able to locate the 4 wholes of fixation.
3
Coincide the wholes of basket with the
fixation points on frame, and then fasten the
basket to the fixation points with the screws
that were put on the side in step 1 and the 2
screws from inside the basket.
View from inside
NOTE: The top case (basket) is mostly preassembled prior to delivery.
The front facade which is optional is installed in the same way as the basket. If the basket is
already installed, you have to dismantle basket so you could install the front facade.
Installation of steering (handle bars)
Step
1
Initial state
Actions
Remove plastic cover to access steering column.
2
Remove handle bars from its packaging and place on
steering column as is shown in the picture
opposite .Coincide all the wholes and insert the
fixation bolt.
3
Tighten bolt and put the plastic cover back.
NOTE: There is no need to carry out this operation .If
on these pictures the careening is removed, it is just for
a clearer demonstration.
Operation
Safety tips
1) We strongly recommend to attentively read this user guide before using your electric
bicycle so as to really understand the way it functions.
2) Please respect the codes of the road (laws) and ride on appropriate roads.
3) Your electric bicycles rides faster than a conventional bike, slow down on rainy days
and keep you distance from other vehicle. .
4) Do not ride in places where water emerges at the third of the wheels.
Dashboard
The control system is composed of a main
controller, a battery gage, a speedometer, a
handle throttle, and 2 handle brakes. This
display allows acceleration, deceleration,
stopping of motor when brakes are engaged and
protects the motor from over charging or not
being charged enough.
Speedometer
Battery gage
Left blinker
Right blinker
Headlights
Speedometer:Indicates speed in km/h
Battery gage: Indicates the level of battery charge.
Signal lights: Indicates that the blinkers (left or right) are on.
Head light: Turns on when head light is on.
The commands
High beam switch
Light switch
LEFT SIDE
RIGHT SIDE
Turning signal
Speed handle
Horn
Horn
High beam switch:
Controlee who allows switching between high
beams and head lights.
Turning signals :
Push on the switch right or left to signal right
or left, press on middle of switch to turn signal
off.
Light switch:
Position
lights off
Position
dashboard light on
Position
lights on
Throttle:
Turn the handle in the direction shown
above to accelerate.
Release throttle to slow down.
Horn switch :
Press anyway you like on the switch on the right or the left to blow the horn..
ATTENTION: When starting to accelerate on when climbing a hill, we strongly recommend
helping with pedaling so as to not tire the motor.
ATTENTION: Handle the throttle gently.
ATTENTION: The main controller heats up when in use, do not expose to high heat or
strong rain.
Before taking the road.
1) Check tire pressure (2.0 bars in front and 2.2 bars in back)
2) Check battery level.
3) Check braking system efficiency and if motor shuts off when brakes are applied.
Ignition:
1) Insert the key and turn it to the symbol on (
), the
dashboard lights up and the motor is ready to go
2) Pedaling before using the throttle will help saving battery
life.
Driving
The electric bicycle is easy to drive. On hills help by pedaling to save battery and motor.
Smooth ride could help considerably the life of the battery and the duration of its charge.
Release the throttle to slow down, and when throttle goes back to its original position, the
motor will shut off automatically.
In case of emergency press on both brakes front and back, this will shut off motor and stop
the bike.
Once the brakes are released the motor is ready to go again..
Parking
Put the electric bicycle on the stand, turn the key toward the left to the off position and pull
the key out.
Locking the steering.
Put the steering towards the left and turn the key to the position of parking/lock
steering column will be locked.
NOTE: To unlock perform the opposite operation.
and the
Use and Maintenance of the battery
Your electric biccycle is equipped with a high quality battery, which has these advantages:
1) Low self discharge
2) Leak proof Structure
Make sure to fully charge your battery before the first usage, or after long usage. In case of
prolonged non usage, make sure to retrieve it from the electric bicycle and store it in a dry
place and make sure to charge it at least once a month to avoid crystallization of lead sulfates.
The battery could be charged on the electric bicycle or while removed from it. The original
charger which was provided has to be used, as the use of a different charger could irreparably
damage the battery.
Battery indicator:
The level indicated is actual when the electric bicycle is in motion. If the level is weak, make
sure to pedal and charge the battery as soon as possible.
Attention: do not touch the battery terminals with wet hands. Do not provoke a short circuit
with metal .That would surely cause accidents.
Use of the battery charger:
How to charge the battery:
1. Lift open the seat to access the battery
2. Disconnect the main power cable
3. Connect the exit of the charger onto the battery to charge
4. Connect the plug of the charger to an regular electrical socket
5. The red light is on while charging
6. The light will become green when the battery becomes fully charged
7. Unplug the plug of the charger from the socket, the exit of the charger from the
battery and reconnect the main power cable
Attention: 1. As usual the processes of charging are completed on the electric bicycle.
2. Remove the key from the ignition while charging the battery.
State of charge:
The charge, automaticaly controlled, stops as soon as the battery is fully charged and the red
light of the charger turns off.
Note: In case of need, the charging process could be interrupted before it is complete.
ATTENTION: During the battery charge, place the battery and the charger out of the reach
of children.
While riding or in storage make sure that water or metal particles don’t come in
contact with the charger .That could result in a short circuit
During the charging, the charger blows out some heat. Do not cover or put it next to
flammable materials. The charging process has to be in a dry and aired out place in order to
dissipate the heat. If the charger doesn’t stop charging after 10 hours, stop charging and call
customer service.
Use only the original charger.
Don’t leave the charger in the electric bicycle; it could be damaged by the vibrations of the
bike.
ATTENTION: In case the charger overheats (≥65°C), stop immediately the charging.
The motor and the power assisted wheel
The electric motor supplies more power, even with a slow rotation speed, it has better
efficiency, a lower sound level and longer autonomy.
To preserve the life span of your motor, it is recommended that a complete check up of
the electric bicycle be done.
ATTENTION: On a steep hill carrying a heavy load the motor could overheat and get stuck.
In this case, make sure to pedal so the motor gets freed from whatever was blocking it.
Don’t ride on a road where the water submerges more than a third of the power assisted wheel,
because water could penetrate into the motor and cause a malfunction to the motor.
SPECIAL DECLARATION: Concerning Lithium battery
ATTENTION:
1.Do not connect the positive and negative terminals of this battery.
2.Do not expose thia battery to high temperature such as on or beside heating appliances or in
direct sunlight.
3.Do not submerge this battery in liquid of any kind.
4.Do not disassemble this battery unless you are a qualified electrician and then only after
reading the technical guide.Disassembly of this battery voids all guarantees unless opened by
an electrician authorised by Wisper Ltd.
5.Store in a cool,dry area out of direct sunlight.If this battery is to be stored for more than two
months please charge the battery for two hours every two months of storage.
6.Do not use any other charger except for the one supplied with this battery.
7.When this battery is no longer of use please dispose of properly by returning to a Wisper
retailer or battery collection point.Do not dispose of this battery with your household waste.
Brakes and chain adjusting
Back brake adjusting
Adjusting screw
Tighten the adjusting bolt until the leeway of the lever
of the back break is about 10 to 20 mm.
Attention: After the adjusting done, the back wheel
should be able to spin freely.
Front brake adjusting
Adjustment tool
Tighten the adjusting bolt to get a firmer response
from your brakes.
Attention: After the adjusting done, the front wheel
should be able to spin freely..
Adjusting screw
Chain adjusting
1) Unscrew the fixation bolt.
2) Adjust, with the adjusting bolt, the tension of the
chain.
3) Retighten the fixation bolt.
Attention: The chain has to be mostly extended the
leeway cannot exceed 0.6 inches.
The fixation bolt has to be tightened at 3,0 N.m . Or
more.
The wheels have to stay parallel between them.
Adjusting screw
Fixation screw
Maintenance
The following maintenances have to be done as regularly as possible, general rule, once a
week:
1) Clean the surface of the motor and of the entire electric bicycle.
2) Verify the motor and the pod of connection.
3) Check the fixation of each element, retighten the screws if necessary.
Regular maintenance:
Check up every 6 months:
- Check and adjust the braking system
- Check and tighten the fixation screws
- Check the wear and tear of tires
- The output of voltage from the charger
- The battery capacity
- Check and adjust the lights
- Check the control system
- Check the state of chains
Every 6 months:
Greasing the front and back axles, the stand, the chains crank and the brake cable.
Be aware of the state of usage of the brake lining. If the cables get stuck, you must
take apart, clean and grease and put back together.
Repair
Symptom
Ignition on ,and the
display board doesn’t
turn on
Ignition on, the motor
doesn’t engage when
throttle is activated
Throttle released and
motor still engaged
Lack of power
Speed unstable
The charger does not
function
Possible causes
1. Mischarge of the battery
2. The fuse has melted
3. The Niemen is defective
4. Wrong connection of
dashboard
5. Low battery charge
1. The motor is not activated
2. The throttle not connected
properly
3. The controller out of service
1. Defective throttle
2. The controller out of service
1. Low battery level
2. Brakes are applied
1. Bad connection with the
battery
2. Brake lever is defective
1. Short circuit in wall
socket
Charger fuse is burned
2. Battery fuse is burned
3. Charger is out of service
Solution
1. Clean the battery
terminal
2. change the fuse
3. Change the Neiman
4. Observe and remedy
5. Charge the battery
1. Check the connection
2. Check the connection
3. Contact customer service
Contact customer service
1.
2.
1.
2.
Charge the battery
adjust the brakes
Check the ignition
Check and change if need
be
1. Check and repair
2. Change the fuse
3. Change the fuse
4. Change the charger
In case of problem
The braking system becomes inefficient
A braking system that fails represents a grave danger of accident. It is strongly recommended
to check the efficiency of the brakes and to do the necessary adjustments before taking the
road.
In the case where, while on the road, you realize that the brakes are inefficient .make sure to
slow down and to stop immediately in order to adjust the brakes.
Temporary motor failure
The causes for a temporary motor failure are multiple, before calling customer services:
1. Dust and dirt build up on the battery terminal.
2. The main cable not connected to the battery terminal
3. The switch of the braking system that shuts motor off might be wet and is creating a
short circuit, dry the switch if needed. Avoid prolonged exposures of the electric
bicycle to the rain.
4. The switch of the braking system that shuts motor off should be at its original position,
if it is not or if it is blocked by a foreign object. Place back to its original and remove
blocking object
Connector controller.