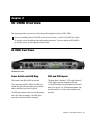
1
HD OMNI Guide Version 8.1 Legal Notices This guide is copyrighted ©2010 by Avid Technology, Inc., (hereafter “Avid”), with all rights reserved. Under copyright laws, this guide may not be duplicated in whole or in part without the written consent of Avid. 003, 96 I/O, 96i I/O, 192 Digital I/O, 192 I/O, 888|24 I/O, 882|20 I/O, 1622 I/O, 24-Bit ADAT Bridge I/O, AudioSuite, Avid, Avid DNA, Avid Mojo, Avid Unity, Avid Unity ISIS, Avid Xpress, AVoption, Axiom, Beat Detective, Bomb Factory, Bruno, C|24, Command|8, Control|24, D-Command, D-Control, D-Fi, D-fx, D-Show, D-Verb, DAE, Digi 002, DigiBase, DigiDelivery, Digidesign, Digidesign Audio Engine, Digidesign Intelligent Noise Reduction, Digidesign TDM Bus, DigiDrive, DigiRack, DigiTest, DigiTranslator, DINR, D-Show, DV Toolkit, EditPack, Eleven, HD Core, HD Process, Hybrid, Impact, Interplay, LoFi, M-Audio, MachineControl, Maxim, Mbox, MediaComposer, MIDI I/O, MIX, MultiShell, Nitris, OMF, OMF Interchange, PRE, ProControl, Pro Tools M-Powered, Pro Tools, Pro Tools|HD, Pro Tools LE, QuickPunch, Recti-Fi, Reel Tape, Reso, Reverb One, ReVibe, RTAS, Sibelius, Smack!, SoundReplacer, Sound Designer II, Strike, Structure, SYNC HD, SYNC I/O, Synchronic, TL Aggro, TL AutoPan, TL Drum Rehab, TL Everyphase, TL Fauxlder, TL In Tune, TL MasterMeter, TL Metro, TL Space, TL Utilities, Transfuser, Trillium Lane Labs, Vari-Fi Velvet, X-Form, and XMON are trademarks or registered trademarks of Avid Technology, Inc. Xpand! is Registered in the U.S. Patent and Trademark Office. All other trademarks are the property of their respective owners. Product features, specifications, system requirements, and availability are subject to change without notice. Guide Part Number 9320-62019-00 REV A 03/10 Documentation Feedback At Avid, we are always looking for ways to improve our documentation. If you have comments, corrections, or suggestions regarding our documentation, email us at [email protected]. contents Chapter 1. Introduction . . . . . . . . . . . . . . . . . . . . . . . . . . . . . . . . . . . . . . . . . . . . . . . . . . . . . . 1 HD OMNI Features. . . . . . . . . . . . . . . . . . . . . . . . . . . . . . . . . . . . . . . . . . . . . . . . . . . . . . . . 1 What’s Included . . . . . . . . . . . . . . . . . . . . . . . . . . . . . . . . . . . . . . . . . . . . . . . . . . . . . . . . . 2 System Requirements and Compatibility . . . . . . . . . . . . . . . . . . . . . . . . . . . . . . . . . . . . . . . . 2 Registration . . . . . . . . . . . . . . . . . . . . . . . . . . . . . . . . . . . . . . . . . . . . . . . . . . . . . . . . . . . . 2 About This Guide. . . . . . . . . . . . . . . . . . . . . . . . . . . . . . . . . . . . . . . . . . . . . . . . . . . . . . . . . 2 About www.avid.com . . . . . . . . . . . . . . . . . . . . . . . . . . . . . . . . . . . . . . . . . . . . . . . . . . . . . . 3 Chapter 2. HD OMNI Overview . . . . . . . . . . . . . . . . . . . . . . . . . . . . . . . . . . . . . . . . . . . . . . . . 5 HD OMNI Front Panel . . . . . . . . . . . . . . . . . . . . . . . . . . . . . . . . . . . . . . . . . . . . . . . . . . . . . 5 HD OMNI Back Panel. . . . . . . . . . . . . . . . . . . . . . . . . . . . . . . . . . . . . . . . . . . . . . . . . . . . . 11 Chapter 3. Connecting HD OMNI . . . . . . . . . . . . . . . . . . . . . . . . . . . . . . . . . . . . . . . . . . . . . 17 Pro Tools|HD Systems. . . . . . . . . . . . . . . . . . . . . . . . . . . . . . . . . . . . . . . . . . . . . . . . . . . . 17 Example Studio Connections . . . . . . . . . . . . . . . . . . . . . . . . . . . . . . . . . . . . . . . . . . . . . . . 20 Chapter 4. Configuring HD OMNI in Pro Tools . . . . . . . . . . . . . . . . . . . . . . . . . . . . . . . . . 23 Pro Tools Hardware Setup . . . . . . . . . . . . . . . . . . . . . . . . . . . . . . . . . . . . . . . . . . . . . . . . . 23 Pro Tools I/O Setup . . . . . . . . . . . . . . . . . . . . . . . . . . . . . . . . . . . . . . . . . . . . . . . . . . . . . . 36 Chapter 5. SETUP Mode . . . . . . . . . . . . . . . . . . . . . . . . . . . . . . . . . . . . . . . . . . . . . . . . . . . . . 41 SETUP Mode Options . . . . . . . . . . . . . . . . . . . . . . . . . . . . . . . . . . . . . . . . . . . . . . . . . . . . . 41 Analog Output (OUTLVL). . . . . . . . . . . . . . . . . . . . . . . . . . . . . . . . . . . . . . . . . . . . . . . . . . . 42 Analog Output Trim (OUTRIM). . . . . . . . . . . . . . . . . . . . . . . . . . . . . . . . . . . . . . . . . . . . . . . 42 TRS Output Mirrors (TRSOUT) . . . . . . . . . . . . . . . . . . . . . . . . . . . . . . . . . . . . . . . . . . . . . . . 43 Fold Down (FOLDWN) . . . . . . . . . . . . . . . . . . . . . . . . . . . . . . . . . . . . . . . . . . . . . . . . . . . . 43 Analog Line Input Reference Level (IN REF) . . . . . . . . . . . . . . . . . . . . . . . . . . . . . . . . . . . . . 44 Limiter (LIMITR) . . . . . . . . . . . . . . . . . . . . . . . . . . . . . . . . . . . . . . . . . . . . . . . . . . . . . . . . 44 Internal Sample Rate (SRATE) . . . . . . . . . . . . . . . . . . . . . . . . . . . . . . . . . . . . . . . . . . . . . . 45 Contents iii Clock Source (CLOCK) . . . . . . . . . . . . . . . . . . . . . . . . . . . . . . . . . . . . . . . . . . . . . . . . . . . . 45 Digital 1–2 Input Source (DIG1–2) . . . . . . . . . . . . . . . . . . . . . . . . . . . . . . . . . . . . . . . . . . . 46 Sample Rate Conversion (SRC1–2) . . . . . . . . . . . . . . . . . . . . . . . . . . . . . . . . . . . . . . . . . . 47 SPL Display Calibration (SPLCAL). . . . . . . . . . . . . . . . . . . . . . . . . . . . . . . . . . . . . . . . . . . . 47 Fan Control (FAN) . . . . . . . . . . . . . . . . . . . . . . . . . . . . . . . . . . . . . . . . . . . . . . . . . . . . . . . 49 Firmware Version (VER). . . . . . . . . . . . . . . . . . . . . . . . . . . . . . . . . . . . . . . . . . . . . . . . . . . 49 Factory Reset (RESET) . . . . . . . . . . . . . . . . . . . . . . . . . . . . . . . . . . . . . . . . . . . . . . . . . . . 50 Display Contrast (CNTRST). . . . . . . . . . . . . . . . . . . . . . . . . . . . . . . . . . . . . . . . . . . . . . . . . 50 Appendix A. Pinout Diagrams for the DB-25 Connectors . . . . . . . . . . . . . . . . . . . . . . . 51 Analog Output DB-25 . . . . . . . . . . . . . . . . . . . . . . . . . . . . . . . . . . . . . . . . . . . . . . . . . . . . 51 AES/EBU DB-25 . . . . . . . . . . . . . . . . . . . . . . . . . . . . . . . . . . . . . . . . . . . . . . . . . . . . . . . . 51 Appendix B. Sound Pressure Level Display Calibration . . . . . . . . . . . . . . . . . . . . . . . . . 53 Appendix C. Compliance Information . . . . . . . . . . . . . . . . . . . . . . . . . . . . . . . . . . . . . . . . . 55 Environmental Compliance . . . . . . . . . . . . . . . . . . . . . . . . . . . . . . . . . . . . . . . . . . . . . . . . 55 EMC (Electromagnetic Compliance) . . . . . . . . . . . . . . . . . . . . . . . . . . . . . . . . . . . . . . . . . . 56 Safety Compliance . . . . . . . . . . . . . . . . . . . . . . . . . . . . . . . . . . . . . . . . . . . . . . . . . . . . . . 56 Index . . . . . . . . . . . . . . . . . . . . . . . . . . . . . . . . . . . . . . . . . . . . . . . . . . . . . . . . . . . . . . . . . . . . . 59 iv HD OMNI Guide chapter 1 Introduction HD OMNI is a professional digital audio interface designed for use with Pro Tools|HD® systems. HD OMNI provides a compact preamp, input mixer, monitoring, and I/O solution for music production and recording, and post production studios. HD OMNI Features Analog I/O • 24-bit analog-to-digital (A/D) and digital-toanalog (D/A) converters, with support for sample rates up to 192 kHz • 2 high-quality Mic/DI preamps (Channels 1–2) • Soft Clip and Curv limiting circuits to protect against clipping on analog input. • 8 channels of analog back panel output using a DB-25 breakout cable (sold separately) with variable output gain • 2 channels of analog back panel output using TRS (Mirrors channels 1–2 or 7–8 on DB-25 connector) • Front panel stereo 1/4-inch headphone jack Digital I/O • 8 channels of AES/EBU output (up to 192 kHz Single Wire) using a DB-25 breakout cable (sold separately) • 2 channels of AES/EBU XLR input (up to 192 kHz Single Wire) • 2 combined XLR and 1/4-inch TRS front panel inputs for microphone and instrument level input • 2 channels of S/PDIF RCA input and output (up to 192 kHz) • 2 XLR back panel microphone inputs • 8 channels of ADAT TOSLINK input and output • 2 1/4-inch TRS Send and 2 1/4-inch TRS Return back panel jacks for hardware inserts on channels 1 and 2 • 4 analog TRS line level back panel inputs (Channels 1–4) HD OMNI provides multiple analog input connections, but only provides up to four channels of simultaneous analog input for Pro Tools. • Support for ADAT S/MUX Optical for sample rates of 88.2 kHz, 96 kHz, 176.4 kHz, and 192 kHz. • Support for two channels of S/PDIF Optical with sample rates of up to 96 kHz. • Real-time sample rate conversion (SRC) on Digital Inputs 1–2 of either AES/EBU, S/PDIF, or Optical (S/PDIF) SRC is not supported with ADAT S/MUX. Chapter 1: Introduction 1 Monitoring • An additional stereo “CUE” output path in Pro Tools for headphone monitoring from the front panel headphone jack System Requirements and Compatibility • Front panel Control Room (MAIN/ALT) and Headphone monitoring volume control HD OMNI requires a qualified Pro Tools|HD system. Pro Tools HD supports only one HD OMNI per system. • Flexible monitoring with fold-down from all stereo and surround formats (up to 7.1 surround) Avid can only assure compatibility and provide support for hardware and software it has tested and approved. • Input mixer for low latency direct monitoring of a variety of incoming signals (configured in the Pro Tools Hardware Setup) Synchronization • Loop Sync input and output for connecting additional Pro Tools|HD interfaces and peripherals • External Clock input and output for synchronizing HD OMNI with external Word Clock devices. For complete system requirements and a list of qualified computers, operating systems, hard drives, and third-party devices, visit: www.avid.com/compatibility Registration Review the enclosed Registration Information Card and follow the instructions on it to quickly register your purchase online. By registering, you become eligible to receive the following: • Technical support information What’s Included • HD OMNI audio interface • Software update and upgrade notices • Hardware warranty information • AC power cable • DigiLink to DigiLink Mini adapter cable • BNC cable (18 inches [0.46m]) • HD OMNI Guide • Health and Safety Guide • Registration Information Card About This Guide This guide provides a basic overview of the HD OMNI features and functionality. For complete instructions on connecting and configuring your Pro Tools|HD system, see the Pro Tools|HD User Guide. For additional information about using Pro Tools software, see the Pro Tools Reference Guide (in Pro Tools, choose Help > Pro Tools Reference Guide). 2 HD OMNI Guide Conventions Used in This Guide All of our guides use the following conventions to indicate menu choices and key commands: : Convention Action File > Save Choose Save from the File menu Control+N Hold down the Control key and press the N key Control-click Hold down the Control key and click the mouse button Right-click Click with the right mouse button The names of Commands, Options, and Settings that appear on-screen are in a different font. The following symbols are used to highlight important information: User Tips are helpful hints for getting the most from your system. Important Notices include information that could affect your data or the performance of your system. Shortcuts show you useful keyboard or mouse shortcuts. About www.avid.com The Avid website (www.avid.com) is your best online source for information to help you get the most out of your Pro Tools system. The following are just a few of the services and features available. Product Registration Register your purchase online. Support and Downloads Contact Avid Customer Success (technical support); download software updates and the latest online manuals; browse the Compatibility documents for system requirements; search the online Knowledge Base or join the worldwide Pro Tools community on the User Conference. Training and Education Study on your own using courses available online or find out how you can learn in a classroom setting at a certified Pro Tools training center. Products and Developers Learn about Avid products; download demo software or learn about our Development Partners and their plugins, applications, and hardware. News and Events Get the latest news from Avid or sign up for a Pro Tools demo. Cross References point to related sections in this guide and other Pro Tools guides. Chapter 1: Introduction 3 4 HD OMNI Guide chapter 2 HD OMNI Overview This chapter provides an overview of the front and back panel features of HD OMNI. If you are installing your Pro Tools|HD system for the first time, see the Pro Tools|HD User Guide for complete system installation and configuration instructions. If you are adding the HD OMNI to an existing system, see the Expanded Systems Guide. HD OMNI Front Panel HD OMNI Front Panel Power Switch and LED Ring CH1 and CH2 Inputs This button turns HD OMNI on and off. The front panel Channel 1 (CH1) and Channel 2 (CH2) Inputs provide combined XLR and 1/4-inch TRS inputs for microphone and instrument level input. Use XLR for microphone connections and use 1/4-inch for instrument connections. When powering on HD OMNI, the LED ring around the power button lights green, flashes amber, and then turns back to green. The LED ring is amber when the unit has power, unless Pro Tools is running. The LED lights green only when Pro Tools is running. Chapter 2: HD OMNI Overview 5 Preamp Controls The front panel Channel 1 and 2 inputs provide high-quality Microphone and Instrument level preamps. These two preamp channels can be linked so that changing any parameter on either channel causes an identical change to the other preamp channel (this is useful for stereo sources). When unlinked, the parameters for each preamp can be set independently. CH 1 and CH 2 MIC/LINE/DI Inputs, and Preamp controls Input Type Lets you select MIC, LINE, or INST for input on Channels 1 and 2. The corresponding LED lights to indicate which option is selected. When MIC is selected, the back panel MICROPHONE inputs are used for channel 1 and 2 input, unless an XLR cable is connected to the front panel CH1 or CH2 inputs, then the front panel connection is used. Remove the XLR cable from the front panel connector to regain use of the rear panel MIC connection. When LINE is selected, the back panel LINE IN 1 and 2 1/4-inch TRS inputs are used. When INST is selected, the front panel 1/4-inch TRS inputs are used. When Link 1 & 2 is disabled, the Input Type can be independently enabled (or disabled) on Channels 1 and 2 by pressing the PREAMP Encoder to select the desired channel. When the Input Type is set to LINE, the PREAMP is bypassed. Also, the preamps for the MIC/INST inputs do not change level when LINE is selected, so you can easily revert back to MIC or INST input. 6 HD OMNI Guide PAD Enables (or disables) a –20 dB pad for both Channel 1 and Channel 2 inputs. The PAD button LED lights when the pad is enabled. When Link 1 & 2 is disabled, PAD can be independently enabled (or disabled) on Channels 1 and 2 by pressing the PREAMP Encoder to select the desired channel. When using the INST input with some instruments (such as a guitar or bass), you may want to engage the Pad to avoid clipping on input. 48V Enables (or disables) 48V phantom power for the Channel 1 and Channel 2 XLR inputs. The 48V button LED lights when the phantom power is enabled. You can manually enable or disable the 48V option only when the Input Type is set to MIC. When switching to another Input Type (such as LINE), phantom power continues to be supplied to the MIC channel. When Link 1 & 2 is disabled, 48V can be independently enabled (or disabled) on Channels 1 and 2 by pressing the PREAMP Encoder to select the desired channel. Inserting or removing an XLR cable to or from the front panel inputs automatically disables phantom power (if it is on). High Pass Filter Enables (or disables) a 12 dB/octave high-pass filter with a roll-off starting at 85 Hz for the Channel 1 and Channel 2 inputs. The High Pass Filter button LED lights when the high-pass filter is enabled. This option is not available when the Input Type is set to LINE. When Link 1 & 2 is disabled, the High Pass Filter can be independently enabled (or disabled) on Channels 1 and 2 by pressing the PREAMP Encoder to select the desired channel. Phase Invert Inverts the phase for the Channel 1 and Channel 2 front panel inputs. The Phase Invert button LED lights when this option is enabled. INSERT Enables (or disables) the returns for any hardware inserts connected to the back panel Channel 1 and Channel 2 input and output pairs. Note that the sends are always active. When Link 1 & 2 is disabled, Phase Invert can be independently enabled (or disabled) on Channels 1 and 2 by pressing the PREAMP Encoder to select the desired channel. When Link 1 & 2 is disabled, INSERT can be independently enabled (or disabled) on Channels 1 and 2 by pressing the PREAMP Encoder to select the desired channel. PREAMP Display Shows the gain value (+10 to +65 dB). Preamp Signal Path When Link 1 & 2 is disabled, gain boost or attenuation for either Channel 1 (P1) or Channel 2 (P2) can be independently adjusted by pressing the PREAMP Encoder to select the desired channel. PREAMP Encoder Lets you adjust the input gain for MIC and INST inputs (by rotating the encoder), and toggle front panel controls between the two preamp channels (by pressing). Press the encoder to toggle between P1 and P2 (Channel and Channel 2). Turn the encoder clockwise to increase and counterclockwise to decrease the input gain for the selected channel (from +10 to +65 dB). Gain can be adjusted in 1 dB increments. The Channel 1 and Channel 2 front panel inputs use the following signal path: Input Signal > Pad > Preamp > HPF > Insert > Limiter > ADC > Phase Invert Synchronization and Sample Rate LEDs Synchronization and Sample Rate LEDs LINK 1 & 2 Links (or unlinks) controls for the Channel 1 and Channel 2 front panel inputs. The Link 1 & 2 button LED lights when this option is enabled. If the two channels are linked, when levels between channels 1 and 2 are different, the difference is maintained when changed the levels until an upper or lower limit (+10 or +65) is reached. When the upper or lower limit is reached by one of the channels, you can continue to adjust the level of the other channel until the limit is reached, but the difference between the two channels is no longer maintained. Sync Mode LEDs The SYNC MODE LEDs indicate the current Clock Source as set in the Pro Tools Hardware Setup (see “Pro Tools Hardware Setup” on page 23) or on HD OMNI in SETUP mode (see “Clock Source (CLOCK)” on page 45). INT (Internal) Indicates the HD OMNI sample clock is generated by its internal crystal oscillator, as determined by the session Sample Rate. EXT (External) Indicates that the HD OMNI is either using the EXT CLOCK IN port or a digital source for system synchronization. Chapter 2: HD OMNI Overview 7 When synchronized to Word Clock, External Clock input and output do not have to be at the Word clock rate. At 44.1 kHz and 48 kHz, EXT CLOCK IN synchronization will be 1x the current session sample rate. However, for sample rates higher than 48 kHz, HD OMNI generates a choice of 1x, 2x, or 4x of a base rate of 44.1 kHz or 48 kHz, as follows: MST (Loop Master) Indicates which Pro Tools audio interface is the master Pro Tools peripheral. The Loop Master LED will be continuously lit on the current Loop Master peripheral only, and unlit on all other peripherals. (Only one Pro Tools audio interface can be Loop Master at a time.) The Loop Master LED will always be lit with a single interface. Session Sample Rate Word Clock Support 44.1 kHz 44.1 kHz 48 kHz 48 kHz 88.2 kHz 88.2 kHz 44.1 kHz For Pro Tools|HD systems, Loop Master defaults to the first Pro Tools audio interface connected to the primary, or “core” Pro Tools|HD card. 96 kHz 96 kHz 48 kHz Sample Rate LEDs 176.4 kHz 176.4 kHz 44.1 kHz 192 kHz 192 kHz 48 kHz The Word Clock base rate can only be set in the Pro Tools Hardware Setup. If the EXT LED flashes on and off, HD OMNI does not have external sync. Check to make sure that HD OMNI is receiving synchronization from the correct clock source. 8 LOOP Indicates that the HD OMNI is slaving to another Pro Tools|HD audio interface using Loop Sync. HD OMNI Guide These LEDs display the current sample rate of the HD OMNI internal crystal oscillator: 44.1 kHz, 48 kHz, 88.2 kHz, 96 kHz, 176.4 kHz, or 192 kHz. The sample rate can be set in Pro Tools when you create a new session, or in the Hardware Setup (see “Pro Tools Hardware Setup” on page 23) or Playback Engine dialogs if no session is open. You can also set the Sample Rate in SETUP mode if Pro Tools is not running (see “Internal Sample Rate (SRATE)” on page 45). METERS MONITOR Controls These five-segment LEDs indicate signal level for either the input or output channels 1–8. These meters are calibrated at –42 dB, –18 dB, –12 dB, –6 dB, and 0 dB, respectively. The 0 dB LED segment lights red if clipping occurs at the Input or Output depending on whether IN or OUT is selected. HD OMNI provides onboard monitoring from mono up to 7.1 surround. Use the front panel MONITOR controls to select the monitoring path and adjust monitoring levels. You can configure the following monitoring options: • Control Room Outputs (MAIN and ALT as configured in Pro Tools) • MUTE, ALT, and CUE to Headphones • Headphone Output • SETUP Input/Output Meters The front panel METERS only display the eight analog/digital Input or Output channels assigned in the Pro Tools Hardware Setup. Unassigned channels are not displayed on the front panel METERS. The output METERS only show signal level from Pro Tools output channels. They do not display signal levels for direct monitoring. IN/OUT Button Toggles whether the Meters show the signal levels for either the Input or the Output channels. IN LED Indicates that the Meters are showing the the signal levels for the Input channels assigned in the Pro Tools Hardware Setup. OUT LED Indicates that the Meters are showing the signal levels for the Output channels assigned in the Pro Tools Hardware Setup. Monitor controls and Headphone jack For more information on configuring monitoring with HD OMNI in Pro Tools, see “Monitor” on page 26. SETUP Enables (or exits) Setup mode. The SETUP button LED is lit when in Setup mode (for more information about Setup mode, see Chapter 5, “SETUP Mode”). CUE Enables (or disables) a dedicated stereo Cue mix from Pro Tools that is sent to the headphones. The CUE button LED lights when enabled. When CUE is disabled, the headphones monitor the same mix as the Control Room outputs (see also “CUE 1–2” on page 39). A signal that meters at 0 on the HD OMNI will not necessarily clip; use the on-screen meters in Pro Tools to determine whether a signal is clipping. Chapter 2: HD OMNI Overview 9 ALT Toggles the Control Room output paths between MAIN and ALT. The LED is lit when the Control Room output is assigned to ALT, and it is off when the Control Room output is assigned to MAIN. You can also press and hold the ALT button to engage ALT Trim mode (see “Analog Output Trim (OUTRIM)” on page 42). MUTE Mutes (or unmutes) the MAIN or ALT Control Room outputs only, whichever is active. The LED lights when MUTE is enabled. When power cycling HD OMNI, MUTE is temporarily engaged automatically to protect the monitor outputs for the Control Room monitor paths declared in Pro Tools. The MUTE button does not affect the Headphone output. MONITOR Encoder Lets you select and adjust the output levels for the MAIN, ALT, and headphone outputs. You can also use the Monitor encoder to enter Trim values in ALT Trim mode and to navigate Setup mode. Press the encoder to switch between Control Room (CR) and Headphone mode (HP). In Setup mode, press the encoder to select and confirm settings. For more information on Setup mode, see Chapter 5, “SETUP Mode.” MONITOR Display Shows which output level is being controlled and the value for that parameter: • “CR” = Control Room level (either MAIN or ALT) • “HP” = Headphone level 10 HD OMNI Guide HEADPHONE Jack HD OMNI provides a single stereo 1/4-inch headphone jack on the front panel. The output to the headphone jack can either mirror the stereo channels of the selected Control Room monitoring path or the dedicated CUE 1–2 output from Pro Tools (see “CUE 1–2” on page 39). Use the MONITOR Encoder to control the Headphone level (see“MONITOR Controls” on page 9). The HD OMNI Headphone output also lets you monitor greater than stereo format sessions, in two different ways: passing the Left and Right channels only, or folding down from the greater-than-stereo format to stereo. For example, with a 5.1 monitor format, if fold down is not enabled, only the Left and Right channels will be heard in the headphones. However, with fold down enabled, all channels will be folded down to stereo for headphone monitoring. You can configure multichannel monitoring and enable (or disable) fold down or headphone monitoring in the Pro Tools Hardware Setup dialog (for more information, see “Monitor” on page 26). The HD OMNI Headphone output is set to power 600 Ohm headphones at +3 dBV. HD OMNI Back Panel The HD OMNI has the following back panel features: HD OMNI Back Panel Analog Inputs SEND and RTN 1 and 2 HD OMNI provides up to four channels of simultaneous analog inputs to Pro Tools using 24-bit A/D converters that support sample rates up to 192 kHz. Channels 1 and 2 can be from the front panel inputs (XLR microphone or 1/4-inch TRS Instrument), from the back panel MICROPHONE (XLR) 1 and 2 Inputs, or from the back panel LINE IN (1/4-inch TRS) 1 and 2 Inputs. Channels 3 and 4 are always from the back panel LINE IN 3 and 4 Inputs. HD OMNI provides two discrete hardware sends and returns. The selected inputs (MIC, LINE, or INST) on Channels 1 and 2 can be routed through the hardware sends and returns available on the back panel. This lets you use your favorite outboard gear (such as compressors or EQs) at the signal input stage, after the pad, preamp, and high-pass filter, but before the Soft Clip or Curv limiter circuits and the analog-todigital converter. Send and Return 1 inserts on Channel 1 and Send and Return 2 inserts on Channel 2. Select (or deselect) INSERT on the front panel to enable (or disable) the hardware inserts. Note that the sends are always active. Back panel analog inputs MICROPHONE 1 and 2 Inputs HD OMNI provides two microphone inputs (XLR) on the back panel. These two inputs are routed through the preamps, which can be controlled from the front panel. LINE IN 1–4 HD OMNI provides four line level 1/4-inch TRS inputs. LINE IN 1 and 2 can only be used for input when the Input Type is set to LINE on the front panel. MICROPHONE 1 and 2 can be used for input when the Input Type is set to MIC on the front panel. If the Input Type is set to MIC on the front panel, and a microphone connection is made on the front panel Channel 1 or 2 inputs, the corresponding back panel input is bypassed. Chapter 2: HD OMNI Overview 11 Analog Outputs Digital Inputs and Outputs Back panel analog TRS outputs, and analog and digital (AES/EBU) DB-25 outputs Back panel digital inputs and outputs AES EBU OUT 1–8 TRS OUT 1 and 2 HD OMNI provides two 1/4-inch TRS Outputs for monitoring either ANALOG OUT 1 and 2 or ANALOG OUT 7 and 8 (or neither). This can be set in Pro Tools on the Analog Out tab of the Hardware Setup dialog (see “Analog Out” on page 26) or on HD OMNI in SETUP mode (see “TRS Output Mirrors (TRSOUT)” on page 43) ANALOG OUT 1–8 HD OMNI provides a DB-25 connector for eight channels of analog audio output. These balanced outputs operate at +10 dBu (Speaker level) or at +24 dBu (Line level). You can set the output level in Pro Tools on the Analog Out page of the Hardware Setup dialog (see “Analog Out” on page 26). For a pinout diagram for the analog DB-25 connector, see Appendix A, “Pinout Diagrams for the DB-25 Connectors.” HD OMNI provides one DB–25 connector for eight channels of AES/EBU output. Each of the paired channels is a balanced three-conductor signal, and supports 192 kHz sample rates in Single Wire mode. For a pinout diagram for the AES/EBU DB25 connector, see Appendix A, “Pinout Diagrams for the DB-25 Connectors.” AES/EBU INPUT HD OMNI provides a single stereo AES/EBU (XLR) input. The AES/EBU Input supports sample rates up to 192 kHz using AES Single Wire. S/PDIF IN and OUT (Coaxial) HD OMNI provides RCA jacks for stereo S/PDIF digital data stream input and output. S/PDIF supports up to 24-bit audio, at sample rates up to 192 kHz. To maintain data integrity and minimize jitter, use only 75-ohm coaxial cable for S/PDIF connections. 12 HD OMNI Guide OPTICAL IN and OUT (1 and 2) HD OMNI provides two sets of eight-channel Optical (TOSLINK) input and output. The Optical I/O on HD OMNI supports up to 24-bit audio, at sample rates up to 192 kHz. The number of available Optical input and output channels varies with sample rate as described below: ADAT Optical At sample rates of 44.1 kHz and 48 kHz, Optical Port A provides eight channels of audio input and output. Optical Port B is unused for input, but on output it mirrors Optical Port A (channels 1–8). and 192kHz, but sample rate conversion (SRC) is automatically enabled for this feature. The Optical (S/PDIF) option can be selected in the Pro Tools Hardware Setup dialog. About Lightpipe-Compatible Devices Lightpipe is an industry standard, eight-channel optical digital audio connection created by Alesis. Lightpipe is found on many devices, including Optical (ADAT) decks, modular digital multitracks (MDMs), sound cards, A/D or D/A converters, and digital mixing consoles. DigiLink Mini Ports S/MUX 2 PRIMARY PORT At sample rates of 88.2 kHz and 96 kHz (S/MUX 2), each Optical port provides four channels of audio. Optical In and Out 1 send and receive channels 1–4, and Optical In and Out 2 send and receive channels 5–8. Use the PRIMARY PORT to connect HD OMNI to your Pro Tools|HD system using a DigiLink Mini to DigiLink adapter cable (included). S/MUX 4 At sample rates of 176.4 kHz and 192 kHz (S/MUX 4), each Optical port provides two channels of audio. Optical In and Out 1 send and receive channels 1 and 2, and Optical In and Out 2 send and receive channels 3 and 4. When using S/MUX, only the first optical port can be used to synchronize to external clock. Optical (S/PDIF) The PRIMARY PORT can send and receive up to 32 channels to and from a Pro Tools|HD card. Channels 17–32 (if active) are passed through to the EXPANSION PORT. However, note that HD OMNI only provides up to eight channels of input and output. When using HD OMNI in a system with multiple interfaces, it will provide eight channels of input and output on Pro Tools channels 1–8 or 17–24 depending on whether or not HD OMNI is connected directly to a Pro Tools|HD card, or whether it is connected to the Expansion port of another Pro Tools|HD peripheral (such as an HD I/O). Either set of Optical I/O ports can also be used for two-channel Optical S/PDIF input and output with support for sample rates up to 96 kHz. HD OMNI can receive two channels of Optical S/PDIF when operating at sample rates of 176.4 Chapter 2: HD OMNI Overview 13 DigiLink Mini Cable Length Specifications EXPANSION PORT There are six different lengths of DigiLink Mini cables: The EXPANSION PORT lets you connect an additional Pro Tools|HD audio interface to HD OMNI. The EXPANSION PORT passes channels 17–32 to and from the expansion (or secondary) audio interface. • 18” (0.46m), included with each interface • 12’ (3.6m) • 25’ (7.62m) • 50’ (15.25m), the maximum length supported for 192 kHz sessions (sold separately) • 100’ (30.5m), the maximum length supported for 96 kHz sessions (sold separately) • 200’ (61m), the maximum length supported for 48 kHz sessions (sold separately) DigiLink to DigiLink Mini Adapter Cables Use DigiLink to DigiLink Mini adapter cables to connect HD OMNI to Pro Tools|HD cards. You can also use DigiLink to DigiLink Mini adapter cables to connect older HD peripherals (such as 192 I/O) to the EXPANSION PORT of HD OMNI. There are two types of DigiLink to DigiLink Mini adapter cables: • 12” (0.3 m) DigiLink female to DigiLink Mini male, included with each interface • 12” (0.3 m) DigiLink Mini female to DigiLink male For more information about DigiLink Mini and DigiLink Mini to DigiLink cables, visit the Avid website (www.avid.com). 14 HD OMNI Guide This port is only available when HD OMNI is connected to a Pro Tools|HD card (it is not available when the HD OMNI is connected to the EXPANSION PORT on another audio interface). Pro Tools only supports a single HD OMNI per system. Any additional HD OMNI peripheral connected to your Pro Tools system will not be recognized. Clock and Synchronization Ports Back panel Word Clock and Loop Sync In and Out WD CLK IN and OUT The Word Clock I/O ports are standard BNC connectors that receive and output word clock signal. These ports can be used to synchronize HD OMNI with any word clock-capable device. Word Clock In can be selected as the Clock Source from the front panel or in the Hardware Setup dialog in Pro Tools. Word Clock Out can be configured in the Hardware Setup dialog using the External Clock Output selector. Because crucial timing data is passed through the Loop Sync and Word Clock ports, you should use high-quality, 75-ohm RG–59 cables for making connections. LOOP SYNC In and Out Loop Sync is a dedicated clock loop for synchronizing multiple Pro Tools|HD peripherals together (multiple audio interfaces, and/or a SYNC HD™ or SYNC I/O™ and one or more audio interfaces). Loop Sync uses a word clock signal based on sample rates of either 44.1 kHz or 48 kHz. As sample rate increases in the system, Loop Sync continues to operate at a base rate of 44.1 kHz or 48 kHz, depending upon the higher rate. The Loop Sync In and Out ports are standard BNC connectors that output a 1x Word clock signal. Loop Sync should only be used to chain multiple Pro Tools|HD peripherals together (audio interfaces and SYNC HD or SYNC I/O). AC Power This connector accepts a standard AC power cable (included). HD OMNI is auto power-selecting (100V to 240V) and will automatically work with a standard modular cable (IEC) to connect to AC power outlets in any country. Chapter 2: HD OMNI Overview 15 16 HD OMNI Guide chapter 3 Connecting HD OMNI Pro Tools|HD Systems HD OMNI provides up to eight channels of analog and digital I/O with Pro Tools when connected to a Pro Tools|HD card using a DigiLink Mini to DigiLink cable adapter or when connected to the expansion port of another Pro Tools|HD audio interface (such as HD I/O). You can add additional Pro Tools|HD audio interfaces to your Pro Tools|HD system using the Expansion port on the back of HD OMNI or using additional Pro Tools|HD cards. However, Pro Tools supports only one HD OMNI in a single Pro Tools|HD system. For more information about installing Pro Tools|HD cards, see the Pro Tools|HD User Guide. To connect HD OMNI to a Pro Tools|HD system, do one of the following: Connect HD OMNI Primary Port to the DigiLink Port on the Pro Tools|HD Accel Core card with a DigiLink Mini to DigiLink cable (included with your Pro Tools|HD system). – or – Connect HD OMNI Primary Port to the Expansion port on a primary Pro Tools|HD audio interface with a DigiLink Mini cable (HD I/O) or DigiLink Mini to DigiLink cable (192 I/O, 192 Digital I/O, or 96 I/O). Pro Tools|HD audio interfaces need room at their sides to maintain proper air flow for cooling. Do not block the sides of the unit or disconnect the internal fan. If the units are rack-mounted in a case, remove the case lids or doors before operating the system. Failure to do so can result in the units overheating very quickly, which can permanently damage sensitive components. If the fan stalls or fails on HD OMNI, the Monitor LCD displays “FANerr,” and the Monitor LCD backlighting turns red. If this happens, try power cycling HD OMNI to restart the fan. For more information, see “Fan Failure Mode” on page 49. Chapter 3: Connecting HD OMNI 17 Pro Tools|HD Accel Core card 12-foot DigiLink Mini to DigiLink cable, or a 12-foot DigiLink cable with a DigiLink to DigiLink Mini adapter Figure 1. HD OMNI connected to the DigiLink Port on a Pro Tools|HD Core card (8-channel system) To connect additional Pro Tools|HD Audio Interfaces to a Pro Tools|HD system: 3 Connect additional HD audio interfaces to ad- 1 Connect the Primary Port of the first HD au- 4 Make the necessary Loop Sync connections. dio interface to the DigiLink Port on the Pro Tools|HD Core card with a DigiLink Mini to DigiLink cable (included with your Pro Tools|HD system). 2 Do one of the following: • Connect the Primary Port of the second HD audio interface to the Expansion Port on the first HD audio interface with the included 18-inch DigiLink Mini cable. – or – • Connect the Primary Port of the second HD audio interface to a Pro Tools|HD Accel card with a DigiLink Mini to DigiLink cable (included with your Pro Tools|HD system). 18 HD OMNI Guide ditional Pro Tools|HD Accel cards. Pro Tools HD supports only one HD OMNI per system. Connecting Loop Sync To make Loop Sync connections: If you are using two (or more) Pro Tools audio interfaces or a SYNC peripheral, Loop Sync must be connected to maintain proper clock among the devices. For an example of connecting multiple Pro Tools|HD audio interfaces, see Figure 2 below. 1 Connect (daisy-chain) the Loop Sync Out of 12-foot DigiLink Mini to DigiLink cable each interface to the Loop Sync In of the next interface with the BNC cables included with your audio interface. 2 Connect the Loop Sync Out of the last inter- face to the Loop Sync In of the primary interface or SYNC peripheral. Pro Tools|HD Core card 18-inch DigiLink Mini cable Loop Sync cables Pro Tools|HD Accel card Figure 2. HD OMNI connected to the DigiLink Port on a Pro Tools|HD Core card and HD I/O connected to the DigiLink Mini Expansion port on HD OMNI. A second HD I/O is connected to the DigiLink Port on a Pro Tools|HD Accel card with a third HD I/O connected to the Expansion port on the second HD I/O. Loop Sync (BNC) cables connect the HD OMNI and all three HD I/Os. Chapter 3: Connecting HD OMNI 19 Example Studio Connections Figure 3 on page 20 and Figure 4 on page 21 illustrate possible studio setups without a mixer, where microphones, instruments, hardware inserts, and monitoring equipment are connected directly to HD OMNI. Note that the line level inputs are only available on the back panel. HD OMNI provides DB-25 breakout connectors for analog and AES/EBU output. Avid sells several different DigiSnake DB-25 cables for these purposes. For more information, contact your dealer or visit the Avid Store online at our website (www.avid.com). Figure 3. Example studio configuration using HD OMNI, front panel connections shown 20 HD OMNI Guide Optical in/out to ADAT Analog Output Digital Inputs/Outputs to DAT recorder Hardware Inserts Power Amp and Speakers Figure 4. Example studio configuration using HD OMNI, back panel connections shown Chapter 3: Connecting HD OMNI 21 22 HD OMNI Guide chapter 4 Configuring HD OMNI in Pro Tools Pro Tools Hardware Setup The Pro Tools Hardware Setup dialog lets you configure HD OMNI for use with Pro Tools. It also lets you configure some of the same settings as in Setup mode on HD OMNI (see Chapter 5, “SETUP Mode”). In addition to the standard Main, Analog In, and Analog Out tabs, the Hardware Setup dialog provides the Monitor and Mixer tabs that are unique to HD OMNI. Note that all HD OMNI specific hardware settings (except labels) are stored in HD OMNI itself. To configure HD OMNI in Pro Tools: 1 Choose Setup > Hardware. 2 From the Peripherals list, select the HD OMNI audio interface. 3 Click the Monitor tab and configure the options (see “Monitor” on page 26). 6 Click the Analog Out tab and configure the op- tions (see “Analog Out” on page 26). 7 Click the Mixer tab and configure the options (see “Mixer” on page 34). 8 Continue by configuring any other HD audio interfaces connected to your system. 9 When you are finished, click OK. Main The Main page of the Hardware Setup dialog is where you define which physical inputs and outputs on your audio interface are routed to available inputs and outputs in Pro Tools. You can think of this window as a patchbay that lets you route any of the inputs or outputs on your Pro Tools|HD audio interfaces to channel assignments in the Pro Tools mixer. Because the Monitor configuration affects the available Output paths, be sure to configure the Monitor page before configuring the other pages in the Hardware Setup and the I/O Setup. 4 Click the Main tab and configure the options (see “Main” on page 23). 5 Click the Analog In tab and configure the op- Hardware Setup, Main page tions (see “Analog In” on page 25). Chapter 4: Configuring HD OMNI in Pro Tools 23 Clock Source Selects the appropriate clock source for the system. In most cases, you can simply use Internal. The other options are for resolving Pro Tools to external clock sources. Depending on the selected Digital 1–2 Input Format, Clock Source options include: Internal, AES/EBU, S/PDIF, Optical (S/PDIF), ADAT 1–8 (at 44.1 kHz and 48 kHz), ADAT S/MUX 1–8 (at 88.2 kHz and 96 kHz), ADAT S/MUX 1–4 (at 176.4 kHz and 192 kHz), and Word Clock (multiple Word Clock rates are available when operating at higher sample rates). Sample Rate Determines the default sample rate when you create a new session. This setting is available only when there is no session open. Otherwise, the current session sample rate is displayed, but cannot be changed. Input Selects the physical inputs (such as Analog 1–2 or ADAT 1–2), that will be routed to the corresponding Pro Tools input channels (such as Ch 1–2 or Ch 3–4), listed on the left side of the Main page. Output Selects the physical outputs (such as Analog 1–2, Analog 3–4, AES/EBU 1–2, and so on), used for the corresponding Pro Tools output channels (listed on the left side of the Main page). The available Output options update to reflect the configuration of the Monitor page of the Hardware Setup (see “Monitor” on page 26). Mono and stereo Monitor paths are always automatically assigned to the first Output selector (Pro Tools channel outputs 1–2) and cannot be changed. Larger Monitor path formats similarly use subsequent Outputs as needed (depending on the channel width of the Monitor path). 24 HD OMNI Guide Physical outputs (such as “Analog 1–2”) are unavailable when they are assigned to Monitor (but Pro Tools output channels assigned to “Monitor” sound through the corresponding physical outputs). Physical outputs not assigned to Monitor output paths in Main tab of the Hardware Setup can cause speaker damage if you are not careful. Note that the front panel Mute button and the Monitor encoder (used for adjusting the Control Room monitoring path levels) only apply to assigned monitor paths, they do not have any effect on other outputs. Digital 1–2 Input Format Selects the digital input format for channels 1 and 2: • AES/EBU • S/PDIF • Optical (S/PDIF)—resets the Optical I/O port (which is, by default, eight channels of ADAT I/O) to two channels of S/PDIF Optical I/O Optical Output Format Selects the digital output format for the Optical output: • ADAT—Provides eight channels of ADAT optical output at 44.1 and 48 kHz. • ADAT S/MUX—Provides eight channels of ADAT S/MUX optical output at 88.2 and 96 kHz, and four channels of ADAT S/MUX optical output at 176.4 and 192 kHz. • Optical (S/PDIF)—Provides two channels of S/PDIF optical output at sample rates up to 96 kHz. Sample Rate Conversion Enables (or disables) real-time sample rate conversion for the selected Digital 1–2 Input Format. When enabled, if the sample rate of the digital input source differs from the Pro Tools session sample rate, HD OMNI converts the incoming sample rate to the session sample rate in real time. Analog In The Analog In page of the Hardware Setup dialog lets you set the Reference Level for the physical analog inputs on HD OMNI. You can also apply a limiter to each of the four analog inputs. If the session sample rate is higher than 96 kHz and Digital 1–2 Input Format is set to Optical (S/PDIF), the Sample Rate Conversion option is automatically enabled (since Optical S/PDIF only supports sample rates up to 96 kHz). Sample rate conversion increases latency by a variable amount depending on the difference between sample rates. S/PDIF Output Format For S/PDIF compatibility with Tascam DA-30 DAT recorders, select the Tascam option under S/PDIF Output Format. Ext. Clock Output Selects the appropriate output from the Ext. Clock Output pop-up menu to send clock output to other devices attached to HD OMNI. The available Ext. Clock Output options vary depending on the sample rate. Hardware Setup, Analog In page Reference Level Select the appropriate Reference Level for each of the four analog input channels. Input operating levels are switchable between +4 dBu and –10 dBV operation. Limiter HD OMNI provides options for limiting on each of the four input channels. Select an option from the corresponding Limiter pop-up menu: None Applies no limiting to the incoming analog signal. Soft Clip Attenuates the incoming analog signal, providing extra protection from temporary clipping transients that can cause digital distortion when they exceed the maximum input of the unit. With Soft Clip enabled, HD OMNI supports an additional 4 dB of headroom by rounding off the top 4 dB to the clip point. This is useful for eliminating stray transients or for emulating analog tape saturation. Chapter 4: Configuring HD OMNI in Pro Tools 25 Curv Attenuates the incoming analog signal using a soft knee limiter circuit. This guarantees super soft limiting without becoming hard, even with large overloads on input. Analog Out The Analog Out page of the Hardware Setup dialog lets you set the Output Level for the physical analog outputs on HD OMNI. You can also select which channels are mirrored on the back panel TRS Outputs. TRS Mirrors The TRS OUT 1 and 2 jacks on the back panel of HD OMNI can mirror the analog signal output of channels 1–2 or 7–8. Select the appropriate option depending on your monitoring configuration: Analog 1–2 Select this option if you want to monitor analog output channels 1–2 though TRS OUT 1 and 2. Analog 7–8 Select this option if you want to monitor analog output channels 7–8 through TRS OUT 1 and 2. None Select this option if you do not intend to use TRS OUT 1 and 2 for monitoring. Monitor Hardware Setup, Analog Out page Output Level Select the appropriate Output Level for each of the eight analog output channels. HD OMNI provides two options for output levels: The Monitor page of the Hardware Setup dialog is a virtual patchbay where you can define which physical outputs are used for the MAIN and ALT monitoring paths. You can assign dedicated monitoring paths to any of the available Analog 1–8, AES/EBU 1–8, or stereo digital outputs. Speaker (+10 dBu) Select this option for output channels connected directly to powered monitors. Line (+24 dBu) Select this option for output channels connected to line-level devices (such as an analog mixing console). Hardware Setup, Monitor page 26 HD OMNI Guide Changes to the Monitor page are reflected in the Output options on the Main page in the Hardware Setup dialog, the Output and Bus pages of the I/O Setup dialog, and in the Output path names for tracks in your Pro Tools session. Because of this, you should always configure the Monitor page first, before configuring the other pages of the Hardware Setup and the I/O Setup. With HD OMNI, Delay Compensation is not supported on assigned Monitor outputs. Delay Compensation is only supported on physical outputs not assigned to a Monitor path. To assign the MAIN and ALT Control Room paths: 1 In Pro Tools, open the Hardware Setup dialog (Setup > Hardware Setup) and select the Monitor tab. 2 Select the channel format from the Format se- lector for the Control Room Path you want to create. 3 Place the mouse cursor over the Channel Ma- trix (the cursor appears as a pencil), and click to assign Control Room Path monitoring channels to physical output channels on HD OMNI. These appear as Output channels for Pro Tools tracks. MAIN and ALT Control Room Paths HD OMNI provides two possible Control Room monitoring paths (CR Path): MAIN and ALT. Each of these monitoring paths can be set to None (not used), or to channel formats ranging from Mono to 7.1. When configuring MAIN and ALT Control Room monitoring paths, the path with the widest channel format determines the channel format of the “Monitor” Output path that appears both in the Output page of the I/O Setup and in the Main page of the Hardware Setup. All Output paths used by the Control Room monitoring path (MAIN and ALT) are otherwise unavailable. From Pro Tools, track outputs that are routed to “Monitor” will play out either the MAIN Control Room path or the ALT Control Room path depending on the state of the ALT button on the front panel of HD OMNI. The MAIN Control Room path is used for monitoring when the ALT button is disengaged on the front panel of HD OMNI (the LED is not lit). The ALT Control Room Path is used for monitoring when the ALT button is engaged on the front panel of HD OMNI (the LED is lit). Assigning Control Room Path monitoring channels to HD OMNI physical outputs 4 If desired, select the Fold Down channel for- mat from the Fold Down selector. 5 Enable or disable the Fold Down options (see “Fold Down Options” on page 32). 6 Click OK to save your changes and close the Hardware Setup dialog. The Monitor settings are saved on HD OMNI and apply regardless of whether or not Pro Tools is running. To reassign the MAIN and ALT Control Room paths: Click the current Control Room Path monitoring channel on the cross-point matrix and drag it to the new location for the physical output channel assignment you want. Chapter 4: Configuring HD OMNI in Pro Tools 27 Monitor Path Assignments Reserve Stereo Physical Output Pairs Regardless of the Monitor Format (channel width), the Monitor path always reserves stereo pairs of physical outputs even if the Monitor path is not using both channels of a given stereo pair. Additionally, the Monitor path is always labeled in consecutive pairs starting with 1–2 regardless of which physical outputs the different Monitor channels are assigned to. For example, if you assign a stereo Monitor path to Analog (DB25) outputs 1 and 5 (see 1. below), the physical outputs Analog 1–2 and 5–6 are reserved for the Monitor path, even though Output channels 2 and 6 are not being used. Additionally, in the Main page of the Hardware Setup, “Monitor 1–2” is automatically selected for the first Output. Analog 1–2 and Analog 5–6 appear in subsequent Output selectors as “Analog 1–2 (Monitor)” and “Analog 5–6 (Monitor)” and are greyed out and unavailable since the are reserved for the Monitor path (see 2. below). Similarly, in the Output page of the I/O Setup (see 3. below), “Monitor 1–2” is automatically selected for the first Output. Analog 1–2 and Analog 5–6 appear in subsequent Output selectors as “Analog 1–2 (Monitor)” and “Analog 5–6 (Monitor)” and are greyed out and unavailable since the are reserved for the Monitor path 1. 2. 3. Stereo Monitor path assigned to Analog 1 and 5 as it appears in the Hardware Setup (1 & 2) and in the I/O Setup (3) 28 HD OMNI Guide CR Path Channel Matrix Analog (DB-25) physical outputs MAIN channel assignments (5.1 monitor shown) AES/EBU (DB-25) physical outputs Digital Stereo physical outputs ALT channel assignments (2.1 monitor with shared LFE shown) Figure 5. CR Path MAIN and ALT channel assignments CR Path A Note About Odd Number Formats The Control Room Path (CR Path) channel matrix provides monitoring channel assignment rows for the MAIN and ALT CR Path. Since the Output channels for HD OMNI are in stereo pairs, any time you assign an odd numbered Format (such as mono, LCR, or 5.0), all stereo pairs carrying those channel assignments are used for the Monitor path and are unavailable as direct physical outputs in both the Hardware Setup and I/O Setup. For example, if you assign an LCR Monitoring path to Output channels 1–2 and 3 in the Monitor page of the Hardware Setup (see 1. below), channel 4 also becomes unavailable in the Main page of the Hardware Setup and in the Output page of the I/O Setup (see 2. below). Format The MAIN and ALT CR Path Format selectors let you select from the following channel formats: • None (the monitoring path is disabled) • Mono • Stereo • 2.1 (stereo plus an Lf channel) • LCR • LCRS • Quad 1. • 5.0 • 5.1 • 6.0 2. • 6.1 • 7.0 • 7.1 LCR Monitor path in Hardware Setup and I/O Setup Chapter 4: Configuring HD OMNI in Pro Tools 29 A Note About the 2.1 Format Fold Down When using the 2.1 monitoring format, Pro Tools sends only two output channels (stereo) to HD OMNI. The LFE channel, or .1 channel, is synthesized on the HD OMNI rather than being a separate Lf channel from Pro Tools. Consequently, when using a 2.1 monitoring format, one stereo pair of Output channels will be used for the Monitor path, and an additional stereo pair will be greyed out and unavailable as it is reserved for the Lf channel on HD OMNI. This is also reflected in the Output page of the I/O Setup. The MAIN and ALT monitoring path Fold Down selectors let you select any channel format that is narrower than the channel format selected for the corresponding CR Path. For example, if the MAIN CR Path Format is set to 5.1, it can fold down to 5.0 or lower channel formats. When folding down, all channels of the source are automatically, intelligently mixed down to the lower channel format so that all source channels are heard on the monitoring path. For example, if the 2.1 format is assigned to Analog output channels 1–3 in the Monitor Page of the Hardware Setup (see 1. below), in the Main Page of the Hardware Setup (see 2. below) and in the Output page of the I/O Setup (see 3. below), Analog 1–2 are assigned to “Monitor” and Analog 3–4 are made inactive since channel 3 is reserved for the Lf channel. 1. 2. 3. 2.1 Monitor path in Hardware Setup and I/O Setup 30 HD OMNI Guide When Fold Down is engaged for a CR Path, the CR Path Format is “folded down” to the selected Fold Down channel format. When Fold Down is not engaged for a CR Path, monitoring is maintained at the selected Format (channel format). When any Fold Down is set for a CR Path, the option to engage Fold Down for that CR Path becomes available. For more information, see “Fold Down Options” on page 32. Folding down loud mixes can cause clipping in certain circumstances. HD OMNI fold down algorithms follow common industry standards, such as summing to mono from larger formats. If you encounter clipping on fold down, you may want to reduce the overall gain of your mix. CR Path Channel Assignments to Physical Outputs The CR Path channel assignments are created and edited just like in the Pro Tools I/O Setup (for more information about I/O Setup, see the Pro Tools Reference Guide). The number of CR Path channels depends on the selected Format (channel format). For example, when the CR Path format is set to 5.1, the CR Path consists of 6 channels: L (front left), C (center), R (front right), Ls (left surround), Rs (right surround), and LFE (Low Frequency Effects). A 5.1 CR Path can be assigned to any 6 available physical outputs. In Figure 5 on page 29, the MAIN CR Path is 5.1 and each channel is assigned to the physical outputs of Analog (DB-25) channels 1–6. Uneven channel formats make the next even numbered channel unavailable. This is because output channel paths are always paired. For example, LCR occupies output channels 1–2 and 3–4 (with 4 unavailable), and 5.0 occupies output channels 1–2, 3–4, and 5–6 (with 6 unavailable). Once CR Path channels are assigned to physical outputs, the “Monitor” path is displayed in the Output selectors on the Main page of the Hardware Setup and in the I/O Setup. The individual physical outputs used by the MAIN and ALT Control Room monitor assignments are italicized in the I/O Setup, indicating they are in use and unavailable for other output assignments. LCR monitoring determines the available Hardware Setup Output assignments, and I/O Setup Output path assignments At sample rates higher than 96 kHz, the Optical S/PDIF Digital output is grayed out and unavailable as a monitoring path in the Hardware Setup. Note that any signal routed to the “Monitor” path from Pro Tools tracks plays out the corresponding assigned physical output according to the MAIN and ALT assignments. Chapter 4: Configuring HD OMNI in Pro Tools 31 Monitor Output Level Selector In addition to being able to set the Output Level for physical output in the Analog Out page, you can also set Output Levels without leaving the Monitor page. To set the Output Level for a physical output channel in the Monitor page: Click the output channel number at the top of the CR Path Channel Matrix and select the Output Level: • Speaker (+10dBu) – or – • Line (+24dBu) Option-click (Mac) or Alt-click (Windows) to set the Output Level for all channels. Selecting the Output Level for channel 3 of the Analog (DB-25) output in the Monitor page Fold Down Options Type 3 Fold down options for headphone monitoring. Fold down is a special type of submix from a multichannel source that keeps all channels audible with a monitoring path format of fewer channels. For example, when folding down from 5.1 to stereo, the Front Left and Surround Left channels fold down to the Left stereo channel, the Front Right and Surround Right channels fold down to the Right stereo channel, and the Center channel and the LFE channel are panned center between the Left and Right stereo channels. Note that some of the source channels will be automatically attenuated to balance correctly in the folded down mix. When not folding down from a multichannel format to a format of fewer channels, any channels from the source that do not directly match the channels available in the monitoring path are not heard. For example, with a MAIN 5.1 Control Room path routed to a stereo ALT monitoring path without folding down, only the Front Left and Right channels from the source are heard, while the Surround Left and Right, and LFE channels are not heard. HD OMNI provides several Fold Down options depending on the CR Path Format and Fold Down settings. HD OMNI provides intelligent fold down options for the MAIN and ALT Control Room, and headphone monitoring paths. HD OMNI provides three types of fold down options: Type 1 Fold down between formats of the same monitor path. For example, fold down the MAIN format to the specified Fold-Down format on the same monitor path. Type 2 Fold down between the MAIN and ALT Control Room paths. 32 HD OMNI Guide Monitor Fold Down options Engage Fold-Down for Main Enable the Engage Fold-Down for Main option (Type 1) to automatically fold down the MAIN CR Path from the selected Format (such as 5.1) to the selected Fold Down setting (such as Stereo). Engage Fold-Down for MAIN can also be enabled from the front panel in SETUP mode (see Chapter 5, “SETUP Mode”). Engage Fold-Down for ALT Enable the Engage Fold-Down for ALT option (Type 1) to automatically fold down the ALT CR Path from the selected Format (such as Stereo) to the selected Fold Down setting (such as Mono). Engage Fold-Down for ALT can also be enabled from the front panel in SETUP mode (see Chapter 5, “SETUP Mode”). Control Room Fold-Down The Control Room Fold-Down setting (Type 2) determines whether or not to fold-down between the MAIN and ALT CR Paths. For example, if the MAIN CR Path Format is set to 5.1 and ALT is set to Stereo, and the Control Room Fold-Down setting is set to Fold-Down Between CR Paths, enabling ALT on the front panel of HD OMNI folds down the 5.1 MAIN CR Path to the Stereo ALT CR Path. Fold Down Between CR Paths Select this option to fold-down from the CR Path with the larger Format setting (channel format) to the CR Path with the smaller Format setting, whether from MAIN to ALT or from ALT to MAIN. Do Not Fold Down Between CR Paths Select this option to disable fold down between the MAIN and ALT CR Paths. For example, if the MAIN Control Room monitor path is set to 5.1 and the ALT Control Room monitor path is set to Stereo, only the front Left and Right channels of the 5.1 source are heard in the ALT Stereo monitor output path and the other source channels are not. Headphone Fold Down The Headphone Fold-Down setting (Type 3) determines how the CR Path channels are folded down to stereo for headphone monitoring. Fold Down If Control Room Is Larger Than Stereo Select this option to fold down any greater-than-stereo CR Path to stereo for headphone monitoring. For example, if the MAIN CR Path Format is set to 5.1, those channels fold down to stereo for headphone monitoring. Fold Down Without LFE (If Present) Select this option to fold down any greater-than-stereo CR Path to stereo for headphone monitoring, but not passing the LFE channel if present (such as with 5.1). Do Not Fold Down (L/R Channels Only) Select this option to not fold down from a greaterthan-stereo CR Path and only pass the Left and Right channels for headphone monitoring. All other channels are not heard on the headphone monitoring path. For example, if MAIN is 5.1 and ALT is Stereo, MAIN will fold down to ALT. However, if MAIN is Mono and ALT is Stereo, ALT will fold down to MAIN. Chapter 4: Configuring HD OMNI in Pro Tools 33 Mixer Mixer Channel Strips The Mixer page of the Hardware Setup dialog lets you configure HD OMNI to mix the signals coming from HD OMNI physical inputs to the current active Monitor paths (direct monitoring). This way you monitor any incoming signal whether or not it is routed through the Pro Tools mixer. The Mixer channel strips are grouped in pairs of physical outputs: Analog 1–2, Analog 3–4, AES/EBU, ADAT 1–2, and so on. Each channel strip provides the same controls. For example, you can configure the Mixer so that you can listen to a connected CD player through your studio monitors, without having to route it through a Pro Tools session. Input Name Pan control Volume control Mute buttons Link button Monitor Assign Headphone Assign Label Hardware Setup, Mixer channel strip for Analog 1–2 Input Name Identifies the physical inputs. Any physical Inputs that are assigned to Input channels 1–8 on the Main page of the Hardware Setup appear bold. Inactive channels appear in italics. Hardware Setup, Mixer tab When you configure the Mixer settings in the Hardware Setup, the Mixer settings are stored on HD OMNI. This lets you use HD OMNI as a pre-configured standalone converter when Pro Tools is not running. Pan Control Pans the mono input signal in the stereo monitoring field. When the Monitor Path Channel format is greater-than-stereo (such as 5.1), the incoming signal is only panned between the Left and Right channels of the Monitor Path. When the Monitor Path Channel format is set to mono, stereo panning is automatically summed to mono. Option-click (Mac) or Alt-click (Windows) the Pan control to set it to the default center location. For linked stereo input pairs, Command-Option-Control-click (Mac) or Control-Alt-Start-click (Windows) to set the Pan controls hard left and hard right. 34 HD OMNI Guide Volume Control Adjust the volume of the mono signal sent to any of the selected output assignments. The volume control only attenuates the incoming signal from 0 dB (unity) to –INF. Option-click (Mac) or Alt-click (Windows) the Volume control to set it to the default unity setting. Mute Button Mutes (or unmutes) the input signal to all selected output assignments. Link Button Links (or unlinks) the Volume, Mute, and output assignments between the pair of inputs for the channel strip. The Pan control cannot be linked. Monitor Assign Selects (or deselects) the Monitor path as the output assignment. If no Monitor path is configured in the Monitor page of the Hardware Setup dialog, the Monitor output assignment is inactive. Headphone Assign Selects (or deselects) the Headphone output (on the front panel of HD OMNI) as the output assignment. Option-click (Mac) or Alt-click (Windows) any Mute, Link, Monitor Assign, or Headphone Assign button to select (or deselect) all buttons of the same type. Label Lets you enter a custom label for the physical input. This way you can create a descriptive label for the input to identify what is connected to it (such as “Mic 1,” “Guitar,” or “CD”). Note that labels are limited to six characters. Record/Input Monitor Enable The Record/Input Monitor Enable setting determines whether or not audio monitored through HD OMNI is muted when record or Input Monitor enabling a track in Pro Tools that shares the same physical input source. For example, if you have audio playing through Analog 1–2 using the HD OMNI Mixer, and you have a stereo track in Pro Tools that has Analog 1–2 set as the track input, when you record or Input Monitor enable the track, HD OMNI will either automatically mute the HD OMNI Mixer inputs or not. Depending on the recording or monitoring situation, you may want to manually mute record/Input Monitor enabled tracks to monitor incoming audio using the HD OMNI Mixer (direct input monitoring channels), or you may want to have Pro Tools automatically mute the HD OMNI Mixer to monitor incoming audio through the Pro Tools mixer (this will inherit any Pro Tools mixer latency). Any physical Inputs that are assigned to Input channels 1–8 on the Main page of the Hardware Setup appear bold. Inactive channels appear in italics. Mutes Mixer Input Select this option to automatically mute the inputs to the HD OMNI Mixer when record or Input Monitor enabling a Pro Tools track that uses the same physical input source (such as Analog 1–2). Other physical input sources will continue to sound through the HD OMNI Mixer. Ignore (Manually Manage Mutes) Select this option to never mute the physical inputs to the HD OMNI Mixer. You may want to select this option if you want to record into Pro Tools, but mute the record track and monitor the physical input source through the HD OMNI Mixer. Chapter 4: Configuring HD OMNI in Pro Tools 35 Pro Tools I/O Setup This section describes how to configure input, output, bus, monitoring, cue, and other signal paths for HD OMNI in the Pro Tools I/O Setup. For more information the I/O Setup dialog, see the Pro Tools Reference Guide. Opening the I/O Setup Dialog The I/O Setup dialog can be opened from the application window (with a session closed), or from within a session (when a session is open). Closing the I/O Setup Dialog To close the I/O Setup dialog and save changes: Click OK. When you click OK, Pro Tools checks several settings for routing validity (to prevent feedback loops). To close the I/O Setup dialog without saving changes: Click Cancel. Input To open the I/O Setup dialog: 1 Make sure HD OMNI is configured properly in the Hardware Setup dialog (see “Pro Tools Hardware Setup” on page 23). 2 Choose Setup > I/O. The Input page of the I/O Setup lets you configure input signal path names, formats, and source channel (analog or digital). Multichannel input paths (stereo or greater) can have any number of sub-paths. You can have overlapping Input signal paths. Input names, channel formats, and physical input mappings are saved with the system. I/O Setup dialog (Output page with HD OMNI shown) I/O Setup, Input page 36 HD OMNI Guide To assign HD OMNI physical inputs to Pro Tools Input paths, do one of the following: On the Input page of the I/O Setup dialog (Setup > I/O), select the physical inputs from the Input selector. The Output page of the I/O Setup displays the MAIN and ALT HD OMNI monitoring paths as “Monitor” and also provides a dedicated Cue output path (to the Headphone jack on the front panel of HD OMNI). Input selector Assigning Pro Tools Input channel paths to HD OMNI physical inputs in the I/O Setup – or – On the Main page of the Hardware Setup dialog (Setup > Hardware), select from the available physical inputs for each of the eight Input channels (see “Main” on page 23). Output The Output page of the I/O Setup for HD OMNI lets you configure output signal path names and formats. You can have overlapping Output paths. Output names, channel formats, and physical output mappings are saved with the system. I/O Setup, Output page Depending on whether or not monitoring paths are assigned in the Monitor page of the Hardware Setup dialog, not all physical outputs may be available from the Output selector in the Output page of the I/O setup. The selected physical output ports in the I/O Setup are linked to the eight channels of physical outputs selected for Output in the Main page of the Hardware Setup. If you change the setting on one dialog, it automatically updates in the other. Chapter 4: Configuring HD OMNI in Pro Tools 37 To assign HD OMNI physical outputs to Pro Tools Output paths, do one of the following: On the Output page of the I/O Setup dialog (Setup > I/O), select the physical outputs from the Output selector. 1–6 are automatically assigned to Monitor 1–2, Monitor 3–4, and Monitor 5–6. In the Output Channel Mapping grid, the Monitor Path spans the entire range of output assignments. HD OMNI 5.1 Monitoring path shown in the Output page of the I/O Setup Input selector Assigning Pro Tools Output channel paths to HD OMNI physical outputs in the I/O Setup – or – On the Main page of the Hardware Setup dialog (Setup > Hardware), select from the available physical outputs for each of the eight Output channels (see “Main” on page 23). Any of the remaining Output channels can be assigned to any of the remaining available physical outputs on HD OMNI. For example, with a 5.1 Main Monitor Path assigned to Analog Out 1–6 and a stereo ALT monitor path assigned to Analog Out 7–8, the Monitor Path in the Output page of the I/O Setup spans Output assignment 1–6. The remaining 7–8 Output can be assigned to any of the remaining available physical outputs, which in this case would be AES/EBU 1–8 (in pairs), ADAT 1–8 (in pairs), or S/PDIF. HD OMNI with Monitoring HD OMNI without Monitoring If you have configured a Monitoring path in the Monitor page of the Hardware Setup dialog, the physical outputs assigned to the MAIN and ALT Monitoring path are unavailable in the Main page of the Hardware Setup and in the I/O Setup. With no Monitor paths configured in the Monitor page of the Hardware Setup dialog, any unused physical output on HD OMNI can be selected for any the eight available Pro Tools output paths. The only exception is the additional CUE 1–2 output. The Monitoring path with the largest channel format is displayed in the I/O Setup. The Outputs are automatically assigned to the Monitor path in channel pairs from left to right. For example, for a 5.1 or a 5.0 monitor path, Outputs Pro Tools output paths assigned to physical outs on HD OMNI 38 HD OMNI Guide CUE 1–2 The CUE 1–2 Output is a “hard-wired” stereo output to the Headphone jack on the front panel of HD OMNI. You can assign Pro Tools Output channels (left and right) to CUE 1–2 in the Output page in the I/O Setup. Use these Output channels (such as A 9–10) from Pro Tools track outputs or sends for a separate headphone mix. However, any audio sent to the CUE 1–2 Output only plays through the headphones when the CUE button is enabled on the front panel of HD OMNI. Otherwise, the headphone jack mirrors the selected Control Room Monitoring Path (MAIN or ALT), with or without fold down (depending on the CR Path Format and selected Fold Down options). Output bus paths to output channel mappings are automatically generated depending on the defined session output bus paths and the available system output channel paths. Bus The Bus page lets you configure internal and output bus signal path names and formats, and map output busses to output paths (defined on the Output page). Multichannel busses (stereo or greater) can have any number of sub-paths. Output bus and internal mix bus names and channel formats are saved with the session. I/O Setup, Bus page Chapter 4: Configuring HD OMNI in Pro Tools 39 Insert Mic Preamps The Insert page of the I/O Setup lets you name Hardware Inserts that you may have connected to your Pro Tools audio interface. However, with HD OMNI, any channels that are used for monitoring are unavailable for hardware inserts. The Mic Preamps page of the I/O Setup is used for configuring hardware connections with a PRE (if present). H/W Insert Delays The H/W Insert Delays page of the I/O Setup is used for compensating for the delay (latency) of any Hardware Inserts. I/O Setup, Insert page 40 HD OMNI Guide chapter 5 SETUP Mode SETUP mode provides direct access to many of the same controls as in the Pro Tools Hardware Setup dialog right from the front panel of HD OMNI. SETUP mode also provides controls for calibrating your system, adjusting the Display contrast, setting the Fan mode, and several other HD OMNI-specific settings. SETUP Mode Options SETUP mode lets you configure the following options: • Analog Output Level (“OUTLVL”) • Analog Output Trim (“OUTTRIM”) • TRS Output Mirrors (“TRSOUT”) • Fold-Down (“FOLDWN”) • Analog Line Input Reference Level (“IN REF”) • Limiter (“LIMITR”) • Internal Sample Rate (“SRATE”) • Clock Source (“CLOCK”) Setup Mode and Monitor controls To enter SETUP mode: Press the SETUP button on the front panel of HD OMNI so that the SETUP button LED is lit. Also, while in SETUP mode, text in the Display lights amber. • Digital 1–2 Input Source (“DIG1–2”) • Sample Rate Conversion (“SRC1–2”) • SPL Display Calibration (“SPLCAL”) • Fan Control (“FAN”) • Firmware Version (“VER”) • Factory Reset (“RESET”) • Display Contrast (“CNTRST”) To exit SETUP mode: Press the SETUP button on the front panel of HD OMNI so that the SETUP button LED is not lit. Chapter 5: SETUP Mode 41 Analog Output (OUTLVL) Analog Output Trim (OUTRIM) In SETUP mode, the Analog Output Level (OUTLVL) control lets you set the Output Gain Level for each of the eight available analog outputs. In SETUP mode, the Analog Output Trim (OUTRIM) control lets you set the Analog Output Trim for each of the eight available analog outputs from –40 dB to +10 dB in 0.1 dB increments. The Analog Output Gain Level control is unavailable in SETUP mode when the Hardware Setup dialog is open. To adjust between the Low Gain and High Gain Analog Output Level: To adjust the Analog Output Trims: 1 Enter SETUP mode. The SETUP LED lights 1 Enter SETUP mode. The SETUP LED lights green. green. 2 If necessary, turn the MONITOR encoder until the display shows “OUTLVL” (OUTLVL is the default control when first entering SETUP mode). 2 Turn the MONITOR encoder until the display 3 Press the MONITOR encoder button to select OUTRIM. The SETUP LED blinks on and off. OUTLVL. The SETUP LED blinks on and off. 4 Turn MONITOR encoder until the display shows “OUT 1.” 5 Press the MONITOR encoder button to select OUT 1 (Analog Output channel 1). shows “OUTRIM.” 3 Press the MONITOR encoder button to select 4 Turn MONITOR encoder until the display shows “OUT 1.” 5 Press the MONITOR encoder button to select OUT 1 (Analog Output channel 1). “SPEAKR” (+10 dBu) or “LINE” (+24 dBu). 6 Turn the MONITOR encoder to adjust the Analog Output Trim (from –40.0 dB to +10.0 dB in 0.1 dB increments) for the selected Output. 7 Press the MONITOR encoder button to select 7 Press the MONITOR encoder button to select the displayed Output. The display shows “OUT 1.” the displayed setting. The display shows “OUT 1.” 8 Repeat preceding steps to set the Output Gain Level for Analog Outputs 2–8. 8 Repeat preceding steps to set the Analog Output Trim for Analog Outputs 2–8. 9 Press SETUP button to exit OUTLVL and re- 9 Press SETUP button to exit OUTRIM and re- turn to top level of SETUP Options menu. The SETUP LED stops blinking and lights solid green. turn to top level of SETUP Options menu. The SETUP LED stops blinking and lights solid green. 10 Exit SETUP mode. 10 Exit SETUP mode. 6 Turn the MONITOR encoder to display either 42 The Analog Output Trim control is unavailable in SETUP mode when the Hardware Setup dialog is open. HD OMNI Guide TRS Output Mirrors (TRSOUT) Fold Down (FOLDWN) In SETUP mode, the TRS Output Mirrors (TRSOUT) control lets you set whether the Analog TRS outputs on the back panel of HD OMNI mirror DB-25 Outputs 1–2 or DB-25 Outputs 7–8. This option can also be set to NONE, which results in no audio output from the Analog TRS Outputs. In SETUP mode, the Fold Down (FOLDWN) control lets you set whether Fold Down (as configured in the Hardware Setup in Pro Tools) is enabled or not for the MAIN and ALT Control Room paths. You can also set the Fold Down option for Headphone monitoring. The TRS Output Mirrors control is unavailable in SETUP mode when the Hardware Setup dialog is open. The Fold Down control is unavailable in SETUP mode when the Hardware Setup dialog is open. To select the TRS Output Mirrors option: To enable (or disable) Fold Down for a Monitor Path: 1 Enter SETUP mode. The SETUP LED lights 1 Enter SETUP mode. The SETUP LED lights green. green. 2 Turn the MONITOR encoder until the Moni- 2 Turn the MONITOR encoder until the Moni- tor display reads “TRSOUT.” tor display reads “FOLDWN.” 3 Press the MONITOR encoder button. The 3 Press the MONITOR encoder button to select SETUP LED blinks on and off, and the display shows the currently selected TRSOUT option. FOLDWN. The SETUP LED blinks on and off. 4 Turn the MONITOR encoder to display an option: 4 Turn MONITOR encoder until the display shows the Monitor Path you want: MAIN, ALT, or HP. • OUT1–2 5 Press the MONITOR encoder button to select • OUT7–8 the displayed Monitor Path. • NONE 5 Press the MONITOR encoder to select the dis- played option. The display shows “TRSOUT.” 6 Press SETUP button to exit TRSOUT and re- turn to top level of SETUP Options menu. The SETUP LED stops blinking and lights solid green. 7 Exit SETUP mode. 6 Turn the MONITOR encoder to display an option. The following options are available depending on which Monitor Path is selected: • for MAIN: NONE or ON. • for ALT: NONE or ON. • for HP: NONE (Do Not Fold Down), ON (Fold Down If Control Room Is Larger Than Stereo), or ON-LF (Fold Down Without LFE). 7 Press the MONITOR encoder to select the dis- played option. The display shows the selected Monitor Path. Chapter 5: SETUP Mode 43 8 Repeat the preceding steps to set the Fold 8 Repeat preceding steps to set the Input Refer- Down options for each of the other Monitor Paths. ence Level for Analog Input 2–4. 9 Press the SETUP button to exit FOLDDWN and return to the top level of the SETUP Options menu. The SETUP LED stops blinking and lights solid green. 9 Press SETUP button to exit IN REF and return to top level of SETUP Options menu. The SETUP LED stops blinking and lights solid green. 10 Exit SETUP mode. 10 Exit SETUP mode. Limiter (LIMITR) Analog Line Input Reference Level (IN REF) In SETUP mode, the Analog Line Input Reference Level (IN REF) control lets you set the Reference Level for each of the four analog input channels. The Analog Line Input Reference Level control is unavailable in SETUP mode when the Hardware Setup dialog is open. In SETUP mode, the Limiter (LIMITR) control lets you set the whether or not a limiter is enabled for each of the four available analog inputs. The Limiter control is unavailable in SETUP mode when the Hardware Setup dialog is open. To enable (or disable) limiter for each of the analog inputs: 1 Enter SETUP mode. The SETUP LED lights To set the Reference Level for each of the analog inputs: 1 Enter SETUP mode. The SETUP LED lights green. 2 Turn the MONITOR encoder until the display shows “IN REF.” 3 Press the MONITOR encoder button to select IN REF. The SETUP LED blinks on and off. 4 Turn MONITOR encoder until the display shows “IN 1.” 5 Press the MONITOR encoder button to select IN 1 (Analog Input channel 1). 6 Turn the MONITOR encoder to display either “–10dBV” or “+4dBu”. 7 Press the MONITOR encoder button to select and confirm the displayed Input Reference Level. The display shows “IN 1.” 44 HD OMNI Guide green. 2 Turn the MONITOR encoder until the display shows “LIMITR.” 3 Press the MONITOR encoder button to select LIMITR. The SETUP LED blinks on and off. 4 Turn MONITOR encoder until the display shows “IN1.” 5 Press the MONITOR encoder button to select IN 1 (Analog Input channel 1). 6 Turn the MONITOR encoder to display one of the following Limiter options: • NONE • SCLIP • CURV 7 Press the MONITOR encoder button to select the displayed Limiter option. The display shows “IN1.” 8 Repeat preceding steps to set the Limiter op- 5 Turn MONITOR encoder until the display tions for Analog Input 2–4. shows the sample rate: 9 Press SETUP button to exit LIMITR and return to top level of SETUP Options menu. The SETUP LED stops blinking and lights solid green. 10 Exit SETUP mode. • 44.1 kHz • 48 kHz • 88.2 kHz • 96 kHz • 176.4 kHz • 192 kHz Internal Sample Rate (SRATE) In SETUP mode, the Internal Sample Rate (SRATE) control lets you set the internal sample rate for HD OMNI (44.1 kHz to 192 kHz). The Internal Sample Rate control is unavailable in SETUP mode when the Hardware Setup dialog is open. At sample rates of 176.4 kHz and 192 kHz, Sample Rate Conversion is automatically enabled if the Digital 1–2 Input Format is set to Optical (S/PDIF). 6 Press the MONITOR encoder button to select and confirm the displayed sample rate. 7 Press SETUP button to exit SRATE and return to top level of SETUP Options menu. The SETUP LED stops blinking and lights solid green. 8 Exit SETUP mode. Clock Source (CLOCK) In SETUP mode, the Clock Source (CLOCK) control lets you set the digital clock source for HD OMNI. To set the Internal Sample Rate: 1 Ensure that the Hardware Setup dialog is not open and that no Pro Tools session is open. 2 Enter SETUP mode. The SETUP LED lights The Clock Source control is unavailable in SETUP mode when Pro Tools is running. To set the Internal Sample Rate: green. 1 Ensure that Pro Tools is not running. 3 Turn the MONITOR encoder until the display 2 Enter SETUP mode. The SETUP LED lights shows “SRATE.” green. 4 Press the MONITOR encoder button to select 3 Turn the MONITOR encoder until the display SRATE. The SETUP LED blinks on and off. shows “CLOCK.” 4 Press the MONITOR encoder button to select CLOCK. The SETUP LED blinks on and off. Chapter 5: SETUP Mode 45 5 Turn MONITOR encoder until the display shows the Clock Source: • INTRNL (Internal) • DIG IN • WORD (Word Clock) • ADAT At sample rates of 88.2 kHz and higher, the ability to select the base sample rate for Word Clock (44.1 kHz or 48 kHz) is not available in SETUP mode and must be done in the Pro Tools Hardware Setup (or Core Audio manager on Mac). 6 Press the MONITOR encoder button to select Digital 1–2 Input Source (DIG1–2) In SETUP mode, the Digital 1–2 Input Source (DIG IN) control lets you set the Digital 1–2 Input Format for HD OMNI. The Digital 1–2 Input Source control is unavailable in SETUP mode when the Hardware Setup dialog is open. At sample rates of 176.4 kHz and 192 kHz, Sample Rate Conversion is automatically enabled if the Digital 1–2 Input Format is set to Optical (S/PDIF). the displayed clock source. 7 Press SETUP button to exit CLOCK and return To set the Digital 1–2 Input Source: to top level of SETUP Options menu. The SETUP LED stops blinking and lights solid green. 1 Enter SETUP mode. The SETUP LED lights 8 Exit SETUP mode. 2 Turn the MONITOR encoder until the display green. shows “DIG1–2.” 3 Press the MONITOR encoder button to select DIG1–2. The SETUP LED blinks on and off. 4 Turn MONITOR encoder until the display shows the Digital 1–2 Input Source: • AES • S/PDIF • OPTICAL 5 Press the MONITOR encoder button to select the displayed Digital 1–2 Input Source. 6 Press SETUP button to exit DIG1–2 and return to top level of SETUP Options menu. The SETUP LED stops blinking and lights solid green. 7 Exit SETUP mode. 46 HD OMNI Guide Sample Rate Conversion (SRC1–2) SPL Display Calibration (SPLCAL) In SETUP mode, the Sample Rate Conversion (SRC1–2) control lets you enable (or disable) Sample Rate Conversion for the selected Digital 1–2 Input Source. In SETUP mode, the SPL Display Calibration (SPLCAL) control lets you change the Monitor display to read in SPL (Sound Pressure Level) instead of the factory default dB values. Calibrating for SPL requires an SPL meter and is common in post-production environments where monitoring standards are commonly observed for greater portability, repeatability, and predictability of mixed material. The Digital 1–2 Input Source control is unavailable in SETUP mode when the Hardware Setup dialog is open. At sample rates of 176.4 kHz and 192 kHz, Sample Rate Conversion is automatically enabled if the Digital 1–2 Input Format is set to Optical (S/PDIF). To enable (or disable) Sample Rate conversion for the selected Digital 1–2 Input Source: 1 Enter SETUP mode. The SETUP LED lights green. 2 Turn the MONITOR encoder until the display shows “SRC1–2.” 3 Press the MONITOR encoder button to select SRC1–2. The SETUP LED blinks on and off. HD OMNI lets you adjust the SPL Display Calibration both for the MAIN and ALT Monitor Paths. To properly calibrate the analog speaker outputs, you will need to first use OUTRIM mode and an SPL meter. After each speaker output has been properly trimmed and calibrated to an SPL value, use the SPL Display Calibration to set the SPL value to match the level that was calibrated in OUTRIM mode. For more information, see Appendix B, “Sound Pressure Level Display Calibration.” 4 Turn MONITOR encoder until the display shows ON (or OFF). 5 Press the MONITOR encoder button to enable (or disable) Sample Rate Conversion for the currently selected Digital 1–2 Input Source. 6 Press SETUP button to exit SRC1–2 and return to top level of SETUP Options menu. The SETUP LED stops blinking and lights solid green. 7 Exit SETUP mode. Chapter 5: SETUP Mode 47 To enter SPL Display Calibration mode: To cancel the SPL value: 1 Enter SETUP mode. The SETUP LED lights 1 Enter SETUP mode. The SETUP LED lights green. green. 2 Turn the MONITOR encoder until the display 2 Turn the MONITOR encoder until the display shows “SPLCAL.” shows “SPLCAL.” 3 Press the MONITOR encoder button to select 3 Press the MONITOR encoder button to select SPLCAL. The SETUP LED blinks on and off. SPLCAL. The SETUP LED blinks on and off. 4 Turn MONITOR encoder until the display 4 Turn MONITOR encoder until the display shows one of the following options: shows one of the following options: • CalMn (calibrate SPL for MAIN) • CalMn (calibrate SPL for MAIN) – or – – or – • CalAlt (calibrate SPL for ALT) • CalAlt (calibrate SPL for ALT) 5 Press the MONITOR encoder button to select 5 Press the MONITOR encoder button to select the displayed option. the displayed option. 6 For the selected Monitor Path option (MAIN 6 For the selected Monitor Path option (MAIN or ALT), turn the MONITOR encoder until the display shows SET. or ALT), turn the MONITOR encoder until the display shows NO SPL. 7 Press the MONITOR encoder button to select 7 Press the MONITOR encoder button to con- the SET. The display changes to show 85SPL. firm the setting. 8 Turn the MONITOR encoder to until the SPL 8 Press SETUP button to exit SPLCAL and return to top level of SETUP Options menu. The SETUP LED stops blinking and lights solid green. reading is displayed. 9 Press the MONITOR encoder button to con- firm the setting. 10 Press SETUP button to exit SPLCAL and re- turn to top level of SETUP Options menu. The SETUP LED stops blinking and lights solid green. 11 Exit SETUP mode. 48 HD OMNI Guide 9 Exit SETUP mode. Fan Control (FAN) In SETUP mode, the Fan Control (FAN) lets you set the HD OMNI cooling fan behavior. Fan Failure Mode If the fan stalls or fails completely, HD OMNI continues to operate normally, but the Monitor LCD displays “FANerr” and the backlighting changes to red. To set the Fan Control setting: 1 Enter SETUP mode. The SETUP LED lights green. 2 Turn the MONITOR encoder until the display shows “FAN.” If Fan Failure mode engages, do the following: Finish your production tasks as quickly as possible and then power cycle HD OMNI (quit Pro Tools, if Pro Tools is running) to reset the fan. 3 Press the MONITOR encoder button to select FAN. The SETUP LED blinks on and off. 4 Turn MONITOR encoder until the display If the fan still doesn’t start, try initiating a factory reset (see “Factory Reset (RESET)” on page 50). shows one of the following options: ON The fan is always on. Select this option if you are installing HD OMNI in a machine room or isobox. If the fan still doesn’t start, power off HD OMNI immediately and contact Avid or your Avid dealer for repair. – or – AUTO The fan runs at high or low speed automatically, depending on the internal temperature of HD OMNI. Select this option if HD OMNI is present in your listening environment. 5 Press the MONITOR encoder button to select Firmware Version (VER) In SETUP mode, the Firmware Version (FIRM) options let you see the current versions of the Firmware, FPGA, and Board revision for HD OMNI. the displayed FAN option. 6 Press SETUP button to exit FAN and return to top level of SETUP Options menu. The SETUP LED stops blinking and lights solid green. 7 Exit SETUP mode. To view the current version of the Firmware, FPGA, or Board revision: 1 Enter SETUP mode. The SETUP LED lights green. 2 Turn the MONITOR encoder until the display shows “VER.” 3 Press the MONITOR encoder button to select FIRM. The SETUP LED blinks on and off. 4 Turn MONITOR encoder until the display shows one of the following options: • FIRM • FPGA • BOARD Chapter 5: SETUP Mode 49 5 Press the MONITOR encoder button to select 4 Do one of the following: the displayed option. The version number for the selected option is shown in the display. • Press the MONITOR encoder button again to confirm RESET. 6 Press SETUP button to exit the current view – or – and return to VER. • Press the SETUP button to cancel the factory reset. 7 Repeat steps 4–6 to view the versions of the other options. 5 Exit SETUP mode. 8 Press SETUP button to exit VER and return to top level of SETUP Options menu. The SETUP LED stops blinking and lights solid green. Display Contrast (CNTRST) 9 Press SETUP again to exit SETUP mode. In SETUP mode, the Display Contrast (CNTRST) control lets you adjust the contrast for the HD OMNI display (0–62). Factory Reset (RESET) To adjust the contrast for the HD OMNI Display: In SETUP mode, the Factory Reset (RESET) command returns HD OMNI parameters to the factory default settings. Factory Reset is not available if Pro Tools is running. Quit Pro Tools before resetting HD OMNI to the factory settings. 1 Enter SETUP mode. The SETUP LED lights green. 2 Turn the MONITOR encoder until the display shows “CNTRST.” 3 Press the MONITOR encoder button to select CNTRST. The SETUP LED blinks on and off. To reset HD OMNI to the factory default settings: 1 Enter SETUP mode. The SETUP LED lights green. 2 Turn the MONITOR encoder until the display play Contrast (STEP 0–62). 5 Press the MONITOR encoder button to select 3 Press the MONITOR encoder button to select the displayed setting. The SETUP LED stops blinking and lights solid green, and the display shows CNTRST. RESET. 6 Exit SETUP mode. shows “RESET.” 50 4 Turn the MONITOR encoder to adjust the Dis- HD OMNI Guide appendix a Pinout Diagrams for the DB-25 Connectors Analog Output DB-25 AES/EBU DB-25 +4" Analog Outputs 1 2 3 4 5 6 7 8 CH1_HOT CH1_COLD CH1_GND CH2_HOT CH2_COLD CH2_GND CH3_HOT CH3_COLD CH3_GND CH4_HOT CH4_COLD CH4_GND CH5_HOT CH5_COLD CH5_GND CH6_HOT CH6_COLD CH6_GND CH7_HOT CH7_COLD CH7_GND CH8_HOT CH8_COLD CH8_GND NC_1 MH1 MH2 24 12 25 10 23 11 21 9 22 7 20 8 18 6 19 4 17 5 15 3 16 1 14 2 13 26 27 1-2 RCV 3-4 RCV 5-6 RCV 7-8 RCV 1-2 XMT 3-4 XMT 5-6 XMT 7-8 XMT CH12_RCV_HOT CH12_RCV_COLD CH12_RCV_GND CH34_RCV_HOT CH34_RCV_COLD CH34_RCV_GND CH56_RCV_HOT CH56_RCV_COLD CH56_RCV_GND CH78_RCV_HOT CH78_RCV_COLD CH78_RCV_GND CH12_XMT_HOT CH12_XMT_COLD CH12_XMT_GND CH34_XMT_HOT CH34_XMT_COLD CH34_XMT_GND CH56_XMT_HOT CH56_XMT_COLD CH56_XMT_GND CH78_XMT_HOT CH78_XMT_COLD CH78_XMT_GND NC_1 MH1 MH2 N/A N/A N/A N/A 24 12 25 10 23 11 21 9 22 7 20 8 18 6 19 4 17 5 15 3 16 1 14 2 13 26 27 Appendix A: Pinout Diagrams for the DB-25 Connectors 51 52 HD OMNI Guide appendix b Sound Pressure Level Display Calibration To properly calibrate the analog speaker outputs, the you will need to first use OUTRIM mode and an SPL meter. After each speaker output has been properly trimmed and calibrated to an SPL value, use the SPL Display Calibration to set the SPL value to match the level that was calibrated in OUTRIM mode. For example, to calibrate a 5.1 surround MAIN CR Monitor Path at 85 SPL: 1 Create a Pro Tools session with 7 Auxiliary Input tracks and do the following: • Bus the Output of the first Auxiliary Input track to the Inputs of the other 6 Auxiliary Input tracks (2–7). • Route each of the Outputs of Auxiliary Input tracks 2–7 to Monitor paths 1–6. • Lower your main output volume. • Insert Signal Generator on the first Auxiliary Input track and set it to generate pink noise at 0 dB, and set the track to Solo Safe mode. 5 Using an SPL Meter at the mix position, trim the output from the HD OMNI front panel until the SPL is reached (85 SPL). TRIM mode on HD OMNI reads in dB. The SPL meter should be set to Slow Response with a C-weighted scale. 6 Repeat steps 3–5 for all Outputs. 7 Exit OUTRIM mode. 8 Turn the MONITOR encoder until the display shows SPLCAL. 9 Press the MONITOR encoder button to select SPLCAL. 10 Turn MONITOR encoder until the display shows Cal MN. 11 Press the MONITOR encoder button to select Cal MN. 12 Turn the MONITOR encoder until the dis- • Be sure all tracks are set to Unity. play shows SET. • Slowly increase the main output volume to Unity. 13 Press the MONITOR encoder button to select the SET. The display changes to show 0SPL. 2 On HD OMNI, set the MAIN CR Path gain to 14 Turn the MONITOR encoder to until the display reads 85 SPL. 0 dB using the Monitor encoder. 3 Enter OUTRIM mode and select OUT 1. 4 Solo the Auxiliary Input track in Pro Tools that is routed to the first speaker. Appendix B: Sound Pressure Level Display Calibration 53 15 Press the MONITOR encoder button to con- firm the setting. In some cases the ALT CR Path might use the same outputs as the MAIN CR Path. In that case, do not re-trim the ALT speaker outputs, instead adjust the ALT Control Room level and calibrate it to match to the reference set for the MAIN CR Path (in our example 85 SPL). 54 HD OMNI Guide appendix c Compliance Information Environmental Compliance Disposal of Waste Equipment by Users in the European Union Proposition 65 Warning This product contains chemicals, including lead, known to the State of California to cause cancer and birth defects or other reproductive harm. Wash hands after handling. Perchlorate Notice This product may contain a lithium coin battery. The State of California requires the following disclosure statement: “Perchlorate Material – special handling may apply, See www.dtsc.ca.gov/hazardouswaste/perchlorate.” This symbol on the product or its packaging indicates that this product must not be disposed of with other waste. Instead, it is your responsibility to dispose of your waste equipment by handing it over to a designated collection point for the recycling of waste electrical and electronic equipment. The separate collection and recycling of your waste equipment at the time of disposal will help conserve natural resources and ensure that it is recycled in a manner that protects human health and the environment. For more information about where you can drop off your waste equipment for recycling, please contact your local city recycling office or the dealer from whom you purchased the product. Recycling Notice Appendix C: Compliance Information 55 EMC (Electromagnetic Compliance) Australian Compliance Avid declares that this product complies with the following standards regulating emissions and immunity: • FCC Part 15 Class A • EN55103-1 E4 • EN55103-2 E4 • AS/NZS 3548 Class A • CISPR 22 Class A Canadian Compliance FCC Compliance for United States This Class A digital apparatus complies with Canadian ICES-003 Radio and Television Interference This equipment has been tested and found to comply with the limits for a Class A digital device, pursuant to Part 15 of the FCC Rules. Avid Cet appareil numérique de la classe A est conforme à la norme NMB-003 du Canada CE Compliance (EMC and Safety) DECLARATION OF CONFORMITY We, Avid, 2001 Junipero Serra Boulevard Daly City, CA 94014-3886, USA 650-731-6300 declare under our sole responsibility that the product HD OMNI complies with Part 15 of FCC Rules. Operation is subject to the following two conditions: (1) this device may not cause harmful interference, and (2) this device must accept any interference received, including interference that may cause undesired operation. Communication Statement NOTE: This equipment has been tested and found to comply with the limits for a Class A digital device, pursuant to Part 15 of the FCC Rules. These limits are designed to provide reasonable protection against harmful interference in a residential installation. This equipment generates, uses, and can radiate radio frequency energy and, if not installed and used in accordance with the instructions, may cause harmful interference to radio communications. However, there is no guarantee that interference will not occur in a particular installation. If this equipment does cause harmful interference to radio or television reception, which can be determined by turning the equipment off and on, the user is encouraged to try and correct the interference by one or more of the following measures: • Reorient or locate the receiving antenna. • Increase the separation between the equipment and receiver. • Connect the equipment into an outlet on a circuit different from that to which the receiver is connected. • Consult the dealer or an experienced radio/TV technician for help. Any modifications to the unit, unless expressly approved by Avid, could void the user's authority to operate the equipment. 56 HD OMNI Guide Avid is authorized to apply the CE (Conformité Europénne) mark on this compliant equipment thereby declaring conformity to EMC Directive 89/336/EEC and Low Voltage Directive 2006/95/EEC. Safety Compliance Safety Statement This equipment has been tested to comply with USA and Canadian safety certification in accordance with the specifications of UL Standards: UL60065 7th /IEC 60065 7th and Canadian CAN/CSA C22.2 60065:03. Avid Inc., has been authorized to apply the appropriate UL & CUL mark on its compliant equipment. Warning Important Safety Instructions 1) Read these instructions. 12) For products that are not rack-mountable: Use only with a cart, stand, tripod, bracket, or table specified by the manufacturer, or sold with the equipment. When a cart is used, use caution when moving the cart/equipment combination to avoid injury from tip-over. 2) Keep these instructions. 3) Heed all warnings. 4) Follow all instructions. 5) Do not use this equipment near water. 6) Clean only with dry cloth. 7) Do not block any ventilation openings. Install in accordance with the manufacturer’s instructions. 8) Do not install near any heat sources such as radiators, heat registers, stoves, or other equipment (including amplifiers) that produce heat. 9) Do not defeat the safety purpose of the polarized or grounding-type plug. A polarized plug has two blades with one wider than the other. A grounding type plug has two blades and a third grounding prong. The wide blade or the third prong are provided for your safety. If the provided plug does not fit into your outlet, consult an electrician for replacement of the obsolete outlet. 10) Protect power cords from being walked on or pinched particularly at plugs, convenience receptacles, and the point where they exit from the equipment. 13) Unplug this equipment during lightning storms or when unused for long periods of time. 14) Refer all servicing to qualified service personnel. Servicing is required when the equipment has been damaged in any way, such as power-supply cord or plug is damaged, liquid has been spilled or objects have fallen into the equipment, the equipment has been exposed to rain or moisture, does not operate normally, or has been dropped. 15) For products that are a Mains powered device: The equipment shall not be exposed to dripping or splashing and no objects filled with liquids (such as vases) shall be placed on the equipment. Warning! To reduce the risk of fire or electric shock, do not expose this equipment to rain or moisture. 16) For products containing a lithium battery: CAUTION! Danger of explosion if battery is incorrectly replaced. Replace only with the same or equivalent type. 17) For products with a power switch: The main power switch is located on the front panel of the HD OMNI. It should remain accessible after installation. 18) The equipment shall be used at a maximum ambient temperature of 40° C. 11) Only use attachments/accessories specified by the manufacturer. Appendix C: Compliance Information 57 58 HD OMNI Guide index Numerics 2.1 monitoring format 30 –20 dB pad 6 48V phantom power 6 A AC Power connector 15 ADAT Optical 13 AES/EBU 12 Hardware Setup 24 AES/EBU (XLR) input 12 AES/EBU Output DB-25 Pinout Diagram 51 AES/EBU output (DB-25) 12 ALT Control Room monitoring path 27 Analog Line Input Reference Level (IN REF) control 44 Analog Output 12 DB-25 Pinout Diagram 51 analog output (DB-25) 12 Analog Output Level (OUTLVL) control 42 Analog Output Trim (OUTRIM) control 42 audio interfaces heat and ventilation 17 Avid customer success 3 Control Room monitoring paths 27 Control Room Path channel matrix 29 Control Room paths 27 CR Path 27 CR Path channel assignments 31 CUE 1–2 39 Curv 26 D DigiLink Cable Specifications 14 DigiLink Mini Cable Specifications 14 DigiLink Mini Ports 13 Digital 1–2 Input Source (DIG IN) control 46 Digital Format 24 Digital I/O connectors 12 direct monitoring 34 Do Not Fold Down (L/R Channels Only) 33 Do Not Fold Down Between CR Paths 33 E back panel features 11 Engage Fold-Down for ALT option 33 Engage Fold-Down for Main option 33 EXPANSION PORT (DigiLink Mini) 14 Ext. Clock Input 7 Ext. Clock Output 25 C F CH1 and CH2 Inputs 5 Clock Source (CLOCK) control 45 Clock Source pop-up menu 24 compatibility 2 Control Room Fold-Down setting 33 Fan 49 Fan Control (FAN) 49 Fold Down 30 Fold Down (FOLDWN) control 43 Fold Down Between CR Paths 33 B Index 59 Fold Down If Control Room Is Larger Than Stereo 33 Fold Down options 32 Fold Down Without LFE (If Present) 33 H Hardware Setup 23 Analog Out page 26 Clock Source 24 configuring 23 Digital Format 24 digital input format 24 Ext. Clock Output 25 Limiter pop-up menu 25 Mixer page 34 Monitor page 26 Output Level 26 physical inputs 24 physical outputs 24 Sample Rate 24 sample rate conversion 25 TRS Mirrors 26 HD OMNI Analog I/O 1 analog inputs 11 assigning physical outputs 38 back panel 11 connecting 17 connecting to a Pro Tools|HD system 17 Digital I/O 1 direct monitoring 34 features 1 front panel 5 hardware inserts 11 input limiting 25 line inputs 11 microphone inputs 11 Mixer channel strips 34 Monitor paths 27 Monitoring 2 Monitoring path in I/O Setup 38 Overview 5 Physical outputs in I/O Setup 38 Power Switch LED ring 5 synchronization 2 Headphone Fold-Down setting 33 High Pass Filter button 6 60 HD OMNI Guide I I/O Setup Bus page 39 dialog 36 H/W Insert Delays page 40 Input page 36 Insert page 40 Mic Preamps page 40 Output page 37 I/O Setup dialog 36 IN/OUT button 9 Input Type button 6 INSERT button 7 Internal clock (INT) mode 7 Internal clock mode 7 Internal Sample Rate (SRATE) control 45 L Lightpipe Optical port 13 Limiter (LIMITR) control 44 LINK button 7 Loop Master 8 Loop LED 8 Loop Master 8 Loop Sync connecting 19 ports 15 M MAIN Control Room monitoring path 27 METERS 9 Monitor Output Level selector 32 Monitor Path Assignments 28 Monitoring 2.1 format 30 ALT 27 CR Path channel assignments 31 CR Path Format selector (MAIN/ALT) 29 CR Path formats 29 Fold Down 30 Fold Down options 32 MAIN 27 odd format assignments 29 O Optical (ADAT) 24 about Lightpipe-compatible devices 13 Optical (S/PDIF) 13 Hardware Setup 24 Optical (TOSLINK) input and output 13 Optical Output Format 24 OUTRIM mode 53 SPL Display Calibration (SPLCAL) control 47 studio connections 20 Sync Mode LEDs 7 synchronization word clock ports 15 system requirements 2 T P PAD 6 PAD button 6 Phase Invert button 7 Pinout Diagrams 51 Power Switch 5 Preamp Controls 6 PREAMP Display 7 PREAMP Encoder 7 PRIMARY PORT (DigiLink Mini) 13 Pro Tools Hardware Setup 23 I/O Setup 36 Tascam DA30 25 technical support 3 TRS Mirrors 26 TRS Output Mirrors (TRSOUT) control 43 TRS Outputs 12 W website 3 Word Clock 8, 15, 24 Word Clock ports 15 R Record/Input Monitor Enable setting 35 Reference Level (Analog Input) 25 registration 2 S S/MUX 2 13 S/MUX 4 13 S/PDIF Hardware Setup 24 S/PDIF input and output 12 S/PDIF Output Format 25 Sample Rate 8 Sample Rate (Session) 8 Sample Rate Conversion (SRC) 25 Sample Rate Conversion (SRC1–2) control 47 Setup menu I/O Setup 36 SETUP mode 41 Soft Clip 25 SPL 47 SPL Display Calibration 53 Index 61 62 HD OMNI Guide Avid Technical Support (USA) Product Information 2001 Junipero Serra Boulevard Daly City, CA 94014-3886 USA Visit the Online Support Center at www.avid.com/support For company and product information, visit us on the web at www.avid.com