1
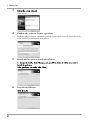
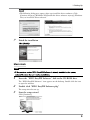
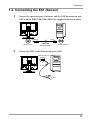
About This Manual
About This Manual
This manual describes the features, installation and usage of EIZO EasyPIX Software
(adjustment software for LCD monitor).
Copyright © 2008-2009 EIZO NANAO CORPORATION All rights reserved.
No part of this manual may be reproduced, stored in a retrieval system, or transmitted, in any
form or by any means, electric, mechanical, or otherwise, without the prior written permission
of EIZO NANAO CORPORATION.
EIZO NANAO CORPORATION is under no obligation to hold any submitted material or information confidential unless prior arrangements are made pursuant to EIZO NANAO CORPORATION's receipt of said information. Although every effort has been made to ensure that
this manual provides up-to-date information, please note that this products specifications are
subject to change without notice.
Windows and Windows Vista are registered trademarks of Microsoft Corporation.
Macintosh, iMac, iBook and MacOS are registered trademarks of Apple Inc.
PowerPC is registered trademark of International Business Machines Corporation.
Pentium is registered trademark of Intel Corporation.
EIZO EasyPIX and ColorNavigator are trademarks of EIZO NANAO CORPORATION.
EIZO, FlexScan and ScreenManager are registered trademarks of EIZO NANAO CORPORATION in Japan and other countries.
Table of Contents
Table of Contents
About This Manual - - 2
About EIZO EasyPIX Software - - 4
Features - - - - - - - - - - - - - - - - - - - - - - - - - - - - - - - - - - - - - - - - - - - - - - - 4
1. Setting Up - - 5
1-1. System Requirement - - - - - - - - - - - - - - - - - - - - - - - - - - - - - - - - - - - 5
1-2. Installing EasyPIX Software - - - - - - - - - - - - - - - - - - - - - - - - - - - - - - 6
1-3. Connecting the EX1 (Sensor)- - - - - - - - - - - - - - - - - - - - - - - - - - - - 11
2. How to Adjust the Monitor - - 12
2-1.Flow Diagram- - - - - - - - - - - - - - - - - - - - - - - - - - - - - - - - - - - - - - - - 12
2-2. Setup EIZO EasyPIX Software - - - - - - - - - - - - - - - - - - - - - - - - - - - 13
2-3. Starting EIZO EasyPIX Software- - - - - - - - - - - - - - - - - - - - - - - - - - 13
2-4.Adjusting the Monitor - - - - - - - - - - - - - - - - - - - - - - - - - - - - - - - - - - 15
2-5. Switching the Setting - - - - - - - - - - - - - - - - - - - - - - - - - - - - - - - - - - 19
3. Periodic Monitor Adjustment - - 20
4. Other Functions - - 20
4-1.Setting Preferences - - - - - - - - - - - - - - - - - - - - - - - - - - - - - - - - - - - 20
4-2. Exiting EIZO EasyPIX Software- - - - - - - - - - - - - - - - - - - - - - - - - - - 22
4-3. Uninstalling EIZO EasyPIX Software- - - - - - - - - - - - - - - - - - - - - - - 23
4-4. Monitor Display Area Setting Utility (Only for Windows)- - - - - - - - - - 24
5. Troubleshooting - - 26
About EIZO EasyPIX Software
About EIZO EasyPIX Software
EIZO EasyPIX Software enables you to easily adjust or switch the display settings of your
monitor, such as color and brightness, to the condition suitable for printing or viewing the
photo data captured by digital cameras.
Features
•Visual adjustment function
Enables you to adjust color and brightness by comparing the whiteness of your monitor
with that of the printing paper.
•Monitor status measurement and adjustment function
Enables you to measure and adjust the status of the monitor.
•Switching between settings
Enables you to store up to three sets of adjustment results. You can switch between the
monitor settings depending on the purpose with a single click on the buttons 1 to 3.
1. Setting Up
1. Setting Up
1-1. System Requirement
EIZO EasyPIX Software operates under the system shown below.
Windows
•Pentium-compatible Processor 1 GHz or more
- Physical RAM:
Windows XP Series: 128 MB or more
Windows Vista Series: 1 GB or more
- PC/AT compatible machine with built-in USB
- Operating System (OS):
Windows XP (32 bit/64 bit edition)
Windows Vista (32 bit/64 bit edition)
- Colors: 24 bit or more (recommended)
- Resolution: 1280 x 1024 or higher (recommended)
- USB ports (at least 2 free ports required)
•EIZO USB Cable (MD-C93)
•Sensor
- EX1
Note
•If your OS is Windows Vista, the following settings are required in a multiple monitor
environment.
1.Select [Control Panel] - [Appearance and Personalization] - [Personalization] [Adjust screen resolution].
2.[Display Settings] dialog appears.
3.Check the [Extend the desktop onto this monitor] check box for all monitors.
1. Setting Up
Macintosh
•Macintosh: satisfy the OS requirement (except iMac (Power PC), iBook, iBook G4)
(Built-in USB)
- Operating System (OS): Mac OS X 10.6
- 16.7 million or more colors (recommended)
- 1280 x 1024 or higher (recommended)
- USB ports (at least 2 free ports required)
•EIZO USB Cable (MD-C93)
•Sensor
- EX1
Note
•You cannot use EIZO EasyPIX software in the Classic environment in Mac OS X.
1-2. Installing EasyPIX Software
Note
•If your OS is Windows XP, the user account with "Administrator" privilege is required.
•Before starting the installation, exit all applications running on your PC.
Windows
1
Insert the "EIZO EasyPIX Software" disk to the CD-ROM drive
Menu opens automatically.
Click [Install EIZO EasyPIX Software] then the setup wizard starts.
1. Setting Up
Tips
•If the menu does not open automatically, select [Start] - [Run]. Click [Browse...]
and select "Launcher.exe" from the drive into which the "EIZO EasyPIX
Software" disk has been inserted. Click [OK] then the menu starts up.
•If your OS is Windows XP, the "Security Warning" dialog may appear. *1
Click [Run] to open the menu.
*1: The "Security Warning" dialog does not appear depending on the setting.
•If your OS is Windows Vista, the "User Account Control" dialog may appear.*2
Click [Continue] to open the menu.
*2: The "User Account Control" dialog does not appear depending on the setting.
Note
•If your OS does not meet the system requirements, the error message will appear
and the installation will not be executed.
2
Select the setup language
Select a language, and click [OK].
1. Setting Up
3
Start the setup wizard
Click [Next].
4
Confirm the software license agreement
Read the software license agreement carefully. If you agree, select [I accept the terms
in the license agreement] and click [Next].
5
Specify the location to install the software
To change the folder, click [Change], and specify the folder in which you want to
install the software.
After specifying the folder, click [Next].
6
Start the installation
Click [Install].
1. Setting Up
Tips
•The following dialog may appear when you install the driver software. Click
[Continue Anyway] (Windows XP)/[Install this driver software anyway] (Windows
Vista) to install the driver software.
7
Finish the installation
Click [Finish].
Macintosh
Note
•If the previous version EIZO EasyPIX Software is already installed to the system,
uninstall it before the new version installation.
1
2
3
Insert the "EIZO EasyPIX Software" disk to the CD-ROM drive
The "EIZO EasyPIX Software" icon appears on the desktop. Double click the icon
to open the window.
Double click "EIZO EasyPIX Software.pkg"
The setup wizard starts up.
Start the setup wizard
Click [Continue].
1. Setting Up
4
Confirm the software license agreement
Read the software license agreement carefully. If you agree, click [Continue].
Click [Agree] on the confirmation dialog.
5
Specify the location to install the software
Specify the location and click [Continue].
6
Start the installation
Click [Install].
7
Finish the installation
Click [Close].
10
1. Setting Up
1-3. Connecting the EX1 (Sensor)
1
Connect the upstream port of monitor and the USB downstream port
of PC with the EIZO USB Cable (MD-C93) supplied with your monitor
To PC
To Monitor
Upstream Port
2
MD-C93
EIZO USB Cable
Downstream Port
Connect the EX1 to the downstream port of PC
Downstream Port
To PC
EX1
11
2. How to Adjust the Monitor
2. How to Adjust the Monitor
Note
•When you perform the monitor adjustment with EIZO EasyPIX Software, the monitor
automatically switches the display mode to Custom. For details of the display modes and
selecting the mode, refer to the User’s Manual of the monitor.
2-1.Flow Diagram
㪪㫋㪸㫉㫋㩷㪘㪻㫁㫌㫊㫋㫄㪼㫅㫋
㪪㪼㫃㪼㪺㫋㩷㪸㩷㪧㫌㫉㫇㫆㫊㪼
㪤㪸㫋㪺㪿㫀㫅㪾
㪭㫀㪼㫎㫀㫅㪾㩷㪧㪿㫆㫋㫆㫊
㪞㪼㫅㪼㫉㪸㫃㩷㪬㫊㪼㩷㪪㫌㪺㪿㩷㪘㫊㩷㪮㪼㪹㩷㪙㫉㫆㫎㫊㫀㫅㪾
㪪㪼㫋㩷㪚㫆㫃㫆㫉㩷㪸㫅㪻㩷㪙㫉㫀㪾㪿㫋㫅㪼㫊㫊
㪪㪼㫋㩷㪙㫉㫀㪾㪿㫋㫅㪼㫊㫊
㪪㪼㫋㩷㪙㫉㫀㪾㪿㫋㫅㪼㫊㫊
㪪㫋㪸㫉㫋㩷㪤㪼㪸㫊㫌㫉㪼㫄㪼㫅㫋
㪪㫋㪸㫉㫋㩷㪤㪼㪸㫊㫌㫉㪼㫄㪼㫅㫋
㪪㫋㪸㫉㫋㩷㪤㪼㪸㫊㫌㫉㪼㫄㪼㫅㫋
㪥㪸㫄㪼㩷㪘㪻㫁㫌㫊㫋㫄㪼㫅㫋㩷㪩㪼㫊㫌㫃㫋
㪥㪸㫄㪼㩷㪘㪻㫁㫌㫊㫋㫄㪼㫅㫋㩷㪩㪼㫊㫌㫃㫋
㪥㪸㫄㪼㩷㪘㪻㫁㫌㫊㫋㫄㪼㫅㫋㩷㪩㪼㫊㫌㫃㫋
㪝㫀㫅㫀㫊㪿㩷㪘㪻㫁㫌㫊㫋㫄㪼㫅㫋
12
2. How to Adjust the Monitor
2-2. Setup EIZO EasyPIX Software
1
Turn on both the monitor and the PC 30 minutes before monitor adjustment (= warming up)
Disable the power management function of them so they will not be in the power
save mode.
For details of the power save mode of the monitor, refer to the User’s Manual of the
monitor. Exit other applications before starting up the EIZO EasyPIX Software.
Note
•To obtain precise monitor adjustment results, the monitor and PC must be
sufficiently warmed-up. Once the monitor goes into the power-save mode, it takes
a while for the brightness and color conditions to re-stabilize.
2
Set the display resolution and colors
Set the monitor color at 16.7 million (24 bit) or more.
It is recommended that the resolution is 1280 x 1024 or higher.
2-3. Starting EIZO EasyPIX Software
Windows
1
Click [Start] – [All Programs] – [EIZO] – [EIZO EasyPIX] – [EIZO
EasyPIX].
The EIZO EasyPIX Software icon is displayed on the notification area.
2
Double-click the EIZO EasyPIX Software icon on the notification area
to display the Main Control Panel
13
2. How to Adjust the Monitor
Macintosh
1
Double-click [EIZO EasyPIX] in the "Applications" folder
The EIZO EasyPIX Software icon is displayed in the Dock.
2
Click the EIZO EasyPIX Software icon in the Dock to display the
Main Control Panel
Tips
•EIZO EasyPIX Software starts automatically when you log on the PC. When it has
started up, the EIZO EasyPIX Software icon is displayed on the notification area
(in the Dock for Macintosh) indicating that the program is resident.
Windows
Macintosh
•The icons indicate the following:
The software is operating properly.
(Color)
Failed to detect applicable monitor. Refer to "5. Troubleshooting."
(Monochrome)
There is a message notified by the software.
Monitor adjustment software such as ColorNavigator is running. Exit
any monitor adjustment software.
14
2. How to Adjust the Monitor
2-4.Adjusting the Monitor
1
On the Main Control Panel, select a number under which the adjustment result is to be stored
Click the button 1, 2, or 3.
2
Start adjustment
Click [Adjust your monitor].
3
Select a purpose
Select a purpose from "Matching," "Viewing photos," and "General use such as
Web browsing."
•Matching
Matches the color of your monitor to the actual print. You can customize the
color and brightness.
•Viewing photos
Suits your monitor to viewing photos. You can customize the brightness.
•General use such as Web browsing
Suits your monitor to general use such as Web browsing. You can customize the
brightness.
After selecting the purpose, click [Next].
15
2. How to Adjust the Monitor
4
If you have selected "Matching," set the color and brightness. If you
have selected "Viewing photos" or "General use such as Web browsing," set the brightness.
Changes made to the color and brightness are immediately reflected on the monitor.
When "Matching" is selected
Adjust the color and brightness, comparing the whiteness of your monitor with the
printing paper. To prevent light from penetrating through the printing paper, use two
sheets, one placed on top of the other.
Reset button
Brightness adjustment slide bar
Brightness adjustment button
Color adjustment target
Color adjustment button
•Setting the color
Click inside the color adjustment target with the mouse. For fine adjustment,
click the color adjustment button, or press the arrow keys (↑↓→←) on the keyboard.
•Setting the brightness
Drag the slider of the brightness adjustment slide bar with the mouse. For fine
adjustment, click the brightness adjustment button, or press the Page Up or Page
Down key on the keyboard.
•Resetting the values
Click [Reset].
After setting the color and brightness, click [Next].
16
2. How to Adjust the Monitor
When "Viewing photos" is selected
Adjust the brightness to be suitable for displaying photographs.
Reset button
Brightness adjustment slide bar
Brightness adjustment button
•Setting the brightness
Drag the slider of the brightness adjustment slide bar with the mouse. For fine
adjustment, click the brightness adjustment button, or press the Page Up or Page
Down key on the keyboard.
•Resetting the values
Click [Reset].
After setting the brightness, click [Next].
When "General use such as Web browsing" is selected
Adjust the brightness to be suitable for web browsing, etc.
Reset button
Brightness adjustment slide bar
Brightness adjustment button
•Setting the brightness
Drag the slider of the brightness adjustment slide bar with the mouse. For fine
adjustment, click the brightness adjustment button, or press the Page Up or Page
Down key on the keyboard.
•Resetting the values
Click [Reset].
After setting the brightness, click [Next].
17
2. How to Adjust the Monitor
5
Start measurement
The software measures the current status of the screen. It takes approximately one
to three minutes.
Attach the EX1 as shown below, and click [Next]. During measurement, the progress indicator is displayed.
EX1
6
Specify the adjustment name
When measurement is finished, the "Name Adjustment Result" window is displayed.
Enter an adjustment name, and click [Apply and Exit].
18
2. How to Adjust the Monitor
7
The adjustment result is stored and reflected to the Main Control
Panel
Monitor adjustment is complete now.
Follow the procedure described above to store adjustment results for other purposes.
Use the monitor after selecting the adjustment results according to your purpose.
If you are using the monitor with multi-monitor setting, perform adjustment for
each monitor.
8
Click the Minimize button to close the Main Control Panel
Minimize button
2-5. Switching the Setting
1
Click the button 1, 2, or 3 on the Main Control Panel
The monitor display switches to the selected status.
19
3. Periodic Monitor Adjustment
4. Other Functions
3. Periodic Monitor Adjustment
The monitor brightness and color gradually alter. To compensate for changes, adjusting
once every 2-4 weeks is recommended.
The monitor should be readjusted if the system configuration changes as below.
•Changing the PC or graphics board
•Changing the connector on the monitor (ex. from SIGNAL1 to SIGNAL2) to the PC
or graphics board
•Changing the monitor resolution or color
•Changing the monitor location
•Replacing the room light
4. Other Functions
4-1.Setting Preferences
You can confirm and change the preferences for EIZO EasyPIX Software.
1
Open the Setting Panel
Windows
Right-click the EIZO EasyPIX Software icon on the notification area, and click [Open
Setting Panel] in the menu.
Macintosh
Click the EIZO EasyPIX menu bar, and click [Preferences] in the menu.
20
4. Other Functions
2
Confirm or change settings
Starting EIZO EasyPIX Software Automatically
You can set whether or not to start EIZO EasyPIX Software automatically when logging on the PC.
In the [General] tab, check or uncheck the box of "Start automatically when
you log on the PC"
Showing EIZO EasyPIX Software on the Taskbar (Only for Windows)
You can set whether or not to show EIZO EasyPIX Software on the taskbar.
In the [General] tab, check or uncheck the box of "Show minimized panel on
the taskbar."
Notifying when to Readjust the Monitor
Setting a timer displays messages on the screen a few hours after the monitor adjustment.
In the [Notification] tab, check or uncheck the box of “Notify the readjustment after.” If you check the box, enter the time for the timer
21
4. Other Functions
Displaying the Software Version
You can display the version of EIZO EasyPIX Software.
Click the [About…] tab (for Windows) or [About EIZO EasyPIX] tab (for Macintosh)
Tips
•All boxes in the Setting Panel are checked at the time of purchase. The timer for
readjustment notification is set to 100 hours (recommended).
4-2. Exiting EIZO EasyPIX Software
Windows
1
2
Right-click the EIZO EasyPIX Software icon on the notification area
to open the menu
Click [Exit]
Macintosh
1
2
22
Click the EIZO EasyPIX menu bar to display the menu
Click [Quit EIZO EasyPIX]
4. Other Functions
4-3. Uninstalling EIZO EasyPIX Software
Windows XP
1
2
Select [Control Panel] - [Add or Remove Programs]
Select "EIZO EasyPIX Software" from the list and click [Remove] to
remove the software
Windows Vista
1
2
Select [Control Panel] - [Programs and Features]
Select "EIZO EasyPIX Software" from the list and click [Uninstall]
Macintosh
1
Drag "EIZO EasyPIX" in the "Applications" folder to the Trash
23
4. Other Functions
4-4. Monitor Display Area Setting Utility (Only for Windows)
Monitor Display Area Setting Utility enables you to specify the display area of EIZO
monitor manually when it is not detected automatically. Use this utility software if the
Main Control Panel does not open when the monitor is connected to the PC.
1
Right-click the EIZO EasyPIX Software icon on the notification area
to open the menu
2
Click [Run Monitor Display Area Setting Utility]
3
Monitor Display Area Setting Utility starts
The list includes all of EIZO monitors connected to your PC, but supported software
of ours differ depending on the monitor.
4
Select the monitor for which you want to specify the display area
Select the monitor for which "Not specified" is displayed in the display area, and
click [Manual Settings].
5
Follow the instructions on the screen to specify the display area
Click [Next].
24
4. Other Functions
6
Specify the monitor for which you want to specify the display area
Drag the "Display Area Manual Setting" window to the screen where the "ScreenManager" main menu or "Information" is displayed, and click [Next].
7
Finish specifying the display area
When the window indicating that the display area setting is complete appears, click
[Finish].
Note
•Resetting of the display area may be necessary when the monitor configuration has been
changed in multiple monitor environment.
25
5. Troubleshooting
5. Troubleshooting
Symptom
"The display setting of your monitor has been
changed." is displayed although the display setting
has not been changed.
"Failed to detect applicable monitor." is displayed.
Main Control Panel does not open.
Nothing is displayed.
Possible cause and remedy
•Turn off the Auto FineContrast function of ScreenManager Pro for LCD. For details, refer to the User’
s Manual of ScreenManager Pro for LCD.
•Make sure that the USB cable is connected properly.
•When using Windows, specify the display area
using the Monitor Display Area Setting Utility. (see
page 24)
•Make sure that the USB cable is connected properly.
•When using Windows, specify the display area
using the Monitor Display Area Setting Utility. (see
page 24)
•Restart your PC.
•Refer to the User’s Manual of the monitor.
Display color has been changed.
•Readjust the monitor. (see page 15)
•Turn off the Auto EcoView (BrightRegulator) function and the ContrastEnhancer function of the
monitor. For details, refer to the User’s Manual of
the monitor.
Display color does not match the color on the paper.
•If other company’s monitor adjustment software is
running, exit the software.
•Be sure to use white paper. To prevent color or light
from penetrating through the printing paper, use
two sheets, one placed on top of the other.
•Adjust the brightness first, and then color.
•Use the light with high color rendering properties,
such as a fluorescent tube.
26