1
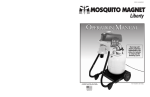
Mosquito Magnet DEFENDER / LIBERTY
Troubleshooting & Repair Steps©
NOTICE: With the exception of the reference to the Mosquito Web Site Information this guide and pictures are copyrighted. It shall not be copied and/or duplicated –
in whole or in part - without the owner’s [Frank Piccione] expressed written permission. Warning! "Be very careful when working with electrical connections and hot
parts (e.g. igniters, combustion chambers, etc.). We are not responsible for any damage to your unit or harm to yourself or others that may occur when following the
directions listed in our repair manual."
Mosquito Magnet© DEFENDER
The Mosquito Magnet (MM**) has a tendency to stop working after a few seasons.
IMPORTANT: Do your work outside because it can get a bit messy and you will not want any insects,
which have not died, flying around in your house!
Most problems are usually caused by a failed (or loose connection of the) thermocouple or igniter. Another
common failure cause is a clogged filter!
All Mosquito Magnets have the following in common: Power supply [Cord or Battery], liquid propane connector
consisting of a regulator, a propane mixing chamber, Schrader valve, LP solenoid valve, LP sprayer, igniter,
thermocouple, catalytic converter, fan, combustion chamber and a circuit board.
When you power on the unit, it turns on the fan and delivers airflow through the combustion chamber. Shortly
afterwards, the igniter is energized [it gets hot & ignites the propane], then the solenoid valve opens and allows
Liquid Propane to enter the combustion chamber through the sprayer. As soon as there is combustion, the
thermocouple sends feedback to the circuit board and the unit will continue to run. If there is no combustion the
Thermocouple will cause a shutdown of the unit. The propane is then converted in to CO2 via the catalytic
converter before exiting through the Plume Tube. The Schrader valve is the access point where you connect a
CO2 cartridge Quick Clear [blow out foreign matter from the tip of the sprayer] the unit via CO2 cartridge.
For troubleshooting, you may need a multi-meter, Phillips head screwdriver, a few wrenches, high-temperature
silicone adhesive, a 12-volt AC power supply, and Teflon tape [I suggest using Yellow - double density Teflon
tape which is often labeled as "Gas type" OR RectorSeal #5 pipe thread sealant].
Before you dive in opening the combustion chamber try the following:
1. Disconnect the gas line from the propane tank.
2. Using the reset tool, reset BOTH the tank and the regulator. Do this procedure twice. For
pictures & detailed instructions go to:
http://support.mosquitomagnet.com/help/common/opdrt.aspx
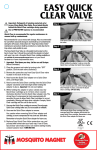
3. Use the Quick-Clear procedure. For additional info & pictures go to:
http://support.mosquitomagnet.com/help/common/qcv.aspx
a. Use up to FOUR CO2 cartridges, in a row, to clean out the Schrader valve. This is very
important.
b. Do not do it just once or twice.
4. Reconnect the Regulator to the propane tank.....with the unit turned OFF.
Now...SLOOOOOOOOWLY, very slowly open the propane tank valve... To the 3/4 open
position. I cannot emphasize how important it is to open the valve slowly. Otherwise, you can
lock up the regulator.
5. Now turn on the unit and let it run for five minutes, then check to see if you still have a fault
code**. If you do, you will have to take the combustion chamber apart to repair it.
If this does not do the trick, try the following:
1.
Disconnect the propane tank from the regulator and hook it up to your BBQ... Turn on the BBQ
and let it run for about 10 minutes... You could have air in the propane tank.
2. Reconnect the regulator to the tank with the unit off, then disconnect the regulator, then
reconnect it... Open the valve on the tank 3/4 of the way open. Now turn on your unit...
3. If this does not do the trick, disconnect the regulator from the propane tank and give it a shake…
If you hear rattling there is a very good possibility you have a bad regulator.
If the unit is up and running...always be sure to turn off the gas supply a minute or two before you turn
off the unit...Then run a Quick-Clear procedure... This should be done every time the propane tank is
changed.
What causes the problem? When liquid propane is pumped there is always a chance that oil from the
pump gets mixed in with the propane. It is the oil and/or dirt which plug the filter just behind the spray
head. [See Figure 6]
Page 1 of 13
Mosquito Magnet© DEFENDER / LIBERTY Troubleshooting & Repair Steps
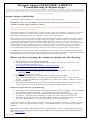
Troubleshooting steps:
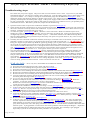
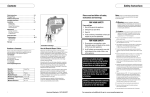
First check out your power supply! The power cord converts 120VAC into 12 VAC. If you turn on your MM
and nothing happens, you may have a faulty power supply line. Test the supply line by using a multi-meter to see
if you have 12VAC – or 2.5 amps is coming out of the end that plugs into the MM head. See Figure 1 If not,
unplug the supply and check for damage or breaks in the electric cord. If there are no tears or breaks in the line,
you may need to replace the whole power supply. If the power supply is OK but the unit does not run, then it may
be your circuit board. If the power supply is OK, lights are going on, but it still does not run, you probably need
to dismantle the head. ..But before you do this, inspect & test the following:
1. Open the head in order to expose the combustion chamber as pictured [See Figure 2].
2. Check all the electrical connections to see if any connections are loose. Sometimes a connection will come loose
due to the vibrations caused by the fan and combustion. If you find one or more, reconnect them and turn on your
machine. If this does not do the trick, go to step 3
3. To check the igniter. [See Figure 3] FIRST, check for a loose connection. Make sure that the nylon screw,
holding the igniter to the combustion chamber, has not come loose or broken off! If the screw has broken off,
use high temp silicon gasket compound to hold it in place… I found that Permatex Ultra Black Hi-temp RTV
Silicone Gasket Maker [can be purchased at just about any auto parts store] works best! Or, buy a new screw at
your local hardware store.
4. Carefully unscrew it from the combustion chamber, but keep it connected to the circuit board. Turn the unit on
and after a minute or so the igniter you should see the igniter get hot & turn bright red.<<< {WARNING}>>>
Keep your fingers away from the tip! Hold the igniter by putting a pair of pliers on the ceramic part… Be careful
not to crush it by applying too much force! If it does not than the igniter could be bad or you could have a bad
circuit board. In order to determine if it is a bad igniter disconnect it from the circuit board and connect it to a 12
volt. [See Figure 3A]. Be careful not to touch the two wires together when inserting them to the Igniter! If it is
good it will get hot within a minute or so. If the igniter doesn't, you need to replace it!
5. Now check the thermocouple. [See Figure 4] Unscrew the thermocouple from the combustion chamber, and
connect the terminals to a multi-meter. Apply heat to the thermocouple with a lighter and the ohms should
increase significantly. If the screw is broken you can use High Temperature Silicone Gasket Making Compound
OR you can buy them at your local hardware store. ACE Hardware carries them for sure. Now check out the
circuit board. [See Figure 5] See any burnt diodes and/or resisters? If so, the diode and/or resistor needs to be
replaced. Also, Check to make sure that the Low Voltage Regulator is not loose. [See Figure 5] Gently rock it.. If
it moves easily, you have a bad connection. In this case the fan will not run.
If all else fails…..Now, only now, disassemble the Combustion chamber.
A.
B.
C.
D.
E.
F.
G.
H.
I.
J.
K.
L.
M.
N.
O.
P.
Disconnect the head from the LP tank, stand, and power supply.
Remove the screws holding the LP gas line in place [See Figure 6].
Disconnect all electrical connections to the circuit board.
Remove the screws holding the combustion chamber attached to the bottom half of the head [See Figure 7].
Remove the Combustion chamber with the black plastic bracket from the lower half of the head.
Remove the three screws holding the fan housing attached to the combustion chamber [See Figure 8].
Turn the combustion chamber upside down and remove the two screws holding the combustion chamber to
the black plastic housing bracket [See Figure 9]. .
Use a 7/16 open end wrench to remove the LP hose from the 1-way valve. [See Figure 10].
Remove and Inspect the LP connector, 1-way valve, and hose for damage. [See Figure 11] Shake the
regulator. If you hear something loose you have a bad regulator.
Remove the circuit board [See Figure 5] from the combustion chamber by disconnecting all connections
except the power supply line. It is soldered in place!
Take apart the combustion chamber by unscrewing 5 screws [See Figure 12]
Using a heat gun, heat the seam to soften the high silicone adhesive holding the two halves together [See
Figure 13]. This is a very important step! If you do not heat the seam, you stand a good chance of breaking
the cast aluminum by trying to pry it apart without heating it first!
Once heated, gently insert a small screw driver into the seam use a thin screw driver
Clean out the interior of the combustion chamber [See Figure 14] , including the catalytic converter [See
Figure 15], with odorless mineral spirits NOTE: the catalytic converter is held in place by a small amount of
gasket compound [See Figure 16]
Remove the entire mixing chamber [See Figure 17]
Using 5/8” box wrench remove the Liquid Propane spray head [See Figure 18] – The, using an adjustable
wrench, separate the filter from the spray head [See Figure 19]. At this point you can either soak the spray
head and filter in low odor mineral spirits for approximately an hour (Be sure to let it dry thoroughly) OR
spray both components with a fast dying automobile brake cleaner. I found that this method works better than
mineral spirits. A plugged filter is what causes most of the problems with the Mosquito Magnet… Impurities
in the Liquid Propane are filtered out before the gas enters the chamber, but eventually it gets plugged…….
Especially if you do not use the Quick-Clean procedure on a regular basis!
Page 2 of 13
Mosquito Magnet© DEFENDER / LIBERTY Troubleshooting & Repair Steps
Q. Unscrew the valve stem from the Schrader valve with valve stem remove tool the valve stem [See Figure 20].
If the blue washer is frayed, buy a new one!
R. After you have cleaned the spray and filter reassemble it and reconnect it to the mixing valve. Put a piece of
Yellow - double density Teflon tape on the threads OR RectorSeal #5 pipe thread sealant and set aside.
S. You can test the solenoid valve by using a 12 volt battery – with thin wire connections- applying 12 volts DC
to the Solenoid valve connector. [See Figure 21] and listen for the valve to click. If there is not click, you
have a bad valve.
T. Once you've cleaned and tested everything, you can reassemble the combustion chamber by using Permatex
Ultra Black Hi-temp RTV Silicone Gasket Maker. First apply a dab to hold the catalytic converter. Then
apply the gasket compound only to the area previously coated with the adhesive [See Figure 22].
U. Now, reinstall the circuit board and make all the connections.. You will find that the connectors have different
end connecting points. So, do not be concerned that you connected a device to the wrong point on the circuit
board.
V. Test the fan. After assembly, power up the unit, you should see the fan turn on. If it doesn't run you may be
able to find one on eBay.
W. Now do a final Quick-Clean, reset the regulator and propane tank and you are ready to go!!!
Mosquito Magnet LIBERTY
1. The disassembly of the chamber and cleaning is basically the same as IT IS FOR THE DEFENDER. NOTE:
There are two small screws, on either side of the inside of Plume tube, which must be removed before you can
remove the top plastic cover. See Detailed Liberty Pictures beginning on page 8. Before diving into the repair…
Look at the pictures and read all the instructions!
Mosquito Magnet Liberty – Pro 1100MM
1. The same as the corded model, but is battery operated. Check your battery to make sure it has at least 5.4 volts
coming out of it. If not, the unit will not run.
2. If your system indicates either out of gas [Most times… Before you go to procedure a – i, see if it
would run normally by just installing a full propane tank] or has a low battery charge, the PC board
must be reset. [Just like your computer when you hit the restart button.] Otherwise the fault code will
stay on.
The standard resetting procedure is as follows:
Switch off unit off.
Disconnect the gas regulator from the Propane tank.
Disconnect the battery from the unit.
Disconnect the solar panel connector from the unit by removing the small pin attached to it from
the panel.
e) Now press the press the “On” button a number of times. The screen should then go Blank.
f) Reconnect the battery.
g) Reconnect solar power connector.
a)
b)
c)
d)
h) IMPORTANT: While the system is in the
i)
“OFF” position…Recharge the battery, using the
charger, for 24 hours.
After 24 hours, reconnect the Propane gas and restart the system using the normal start-up
procedure..
Please do not hesitate to contact us should you have any questions whatsoever: [email protected] If you find
that you are unable to repair the unit, you can send it to us for repair. We charge $75.00 (Total) for labor +
Parts if needed. If we determine that the unit cannot be repaired, there is no charge for labor. Customer pays
freight both ways.
Page 3 of 13
Mosquito Magnet© DEFENDER / LIBERTY Troubleshooting & Repair Steps
Figure 1. Power Supply Line Test> Showing
I meters which can be used
various
n
t
h
e
p
i
c
t
Page 4 of 13
Mosquito Magnet© DEFENDER / LIBERTY Troubleshooting & Repair Steps
Figure 2 – The combustion chamber
The combustion chamber removed
Figure 3 – Igniter
Igniter removed
Figure 3A – testing the Igniter using a 12 volt Battery
Figure 4 – The Thermocouple
Figure 4A Inside view of the thermocouple
Figure 5 - The circuit board with
disconnected Low Dropout Regulator. [The
part attached to the regulator is a heat sink.]
Circuit Board Connections:
Power connector
= J1
Thermocouple
= J2
Solenoid
=J3
Igniter
=J5
Fan
=J6
Page 5 of 13
Mosquito Magnet© DEFENDER / LIBERTY Troubleshooting & Repair Steps
Page 6 of 13
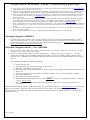
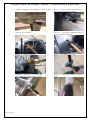
Figure 6 – Remove screws holding the LP line in place.
Figure 7 - remove all three screws holding
the combustion chamber in place.
Figure 8 – Fan housing
Figure 9 – Two screws holding the housing
to the Combustion Chamber.
Figure 10 – Remove the LP hose.
Figure 11 - Lp Hose and regulator
Figure 12 – Remove all 5 screws holding
the combustion chamber halves together.
Figure 13 – Heating the combustion chamber
seam.
Mosquito Magnet© DEFENDER / LIBERTY Troubleshooting & Repair Steps
Page 7 of 13
Figure 14 – Open combustion chamber Clean this area
w/ a small wire brush
Figure 15 – Clean catalytic converter w/Low
Odor Mineral spirits. Let it air-dry
throughly!
Figure 16 – High Temp gasket compund holding the
catalytic converter in place
Figure 17 – Clean off the gasket compound
Figure 18 – Spray Head.
Figure 19 – Spray head and filter separated
Figure 20 – Shrader valve
Figure 21 Solonoid valve
Figure 21A – Solenoid valve showing white
connector for testing.
Figure 22 – Apply gasket compound only
to the previously applied areas!
Mosquito Magnet© DEFENDER / LIBERTY Troubleshooting & Repair Steps
Glossary
1. MM-Mosquito Magnet
2. Fault Code **
a. Light solid on – Normal operation
b. Light blinking – MM initializing and turning on
c. Fast blink – Startup problem – catalytic converter not operating
Liberty Components
NOTE: A) First check the voltage from the [Liberty Plus] battery. If the voltage is below 5.2 the unit will not
start. B) Be sure to let the unit go through its cool down stage before turning off the electrical supply. C) If you
have left the unit off for a period of time you MUST recharge the battery for a full 24 hours. Otherwise, you
will get a low propane fault code. C) Liberty Corded unit= You must have 2.5 amps coming out of the
electrical supply cord. If not you may get a low propane fault code.
1.
2.
3.
4.
5.
Remove all the screws [Four] holding the mounting plate onto the bottom of the head.
Remove the two small screws holding the round flared funnel onto the head [See picture #2]
Remove all the screws holding the two halves of the head together.
Separate the two halves exposing the combustion chamber and all its components.
Please not that the igniter is attached to the circuit board via an electrical clip, but the Thermocouple is
attached directly to the circuit board via solder. Disconnect the igniter.
6. Remove the three screws holding the circuit board attached to the black plastic manifold [See picture
#3].
7. Disconnect the fan connector from the circuit board.
8. Remove the propane line running from the solenoid valve to the head of the combustion chamber [See
picture #4].
9. Remove the black plastic air tunnel by first removing the two screws holding it in place [See picture 5].
You will find that you will have to work at it in order to remove it. It just about snaps in place and it is a
very snug fit.
10. Now remove the any other black plastic housing you can remove by taking out the holding screws.
11. When this is all done you will see a total of four screws holding the combustion chamber in place…
There a two on either end of the combustion chamber. Remove them and now you can take out the
combustion chamber.
12. Remove the screws holding the two halves of the combustion chamber together.
13. Using a heat gun, apply heat to the area around the spray head [See picture #7]. Now take a putty knife
and gently separate the two halves. You will find that there is only [approximately] a three to four inch
area, on either side of the head where there is high temperature silicone gasket compound which has to
be softened before you can separate the two halves.
14. Remove the Thermocouple [Usually the screw holing it in place has disintegrated as is the usual case
with the igniter]
15. Remove the Igniter.
16. Now use the same cleaning procedure as outlined for the Defender.
Page 8 of 13
Mosquito Magnet© DEFENDER / LIBERTY Troubleshooting & Repair Steps
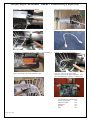
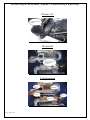
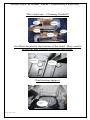
Picture #2
Picture #3
Picture #4
Page 9 of 13
Mosquito Magnet© DEFENDER / LIBERTY Troubleshooting & Repair Steps
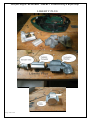
Picture #5
Picture#6
Components
Page 10 of 13
Mosquito Magnet© DEFENDER / LIBERTY Troubleshooting & Repair Steps
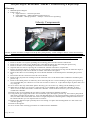
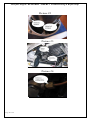
This a bad one…Cleaning Needed!!
Air filters located at the bottom of the head. They can be
taken out and washed with soap and water.
Fan housing support
Page 11 of 13
Mosquito Magnet© DEFENDER / LIBERTY Troubleshooting & Repair Steps
LIBERTY PLUS
Page 12 of 13
Mosquito Magnet© DEFENDER / LIBERTY Troubleshooting & Repair Steps
Page 13 of 13