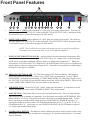
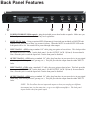
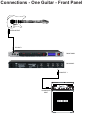
1
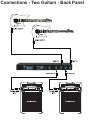
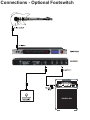
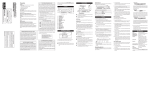
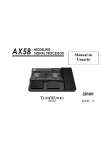
Your Rocktron VersaTune has been designed to comply with the following Standards and Directives as set forth by the European Union: Council Directive(s): 89/336/EEC, 73/23/EEC, 76/769/EC, 1994/62/EC, 2000/ 53/EC, 2002/95/EC Standard(s): EN55022, EN50082-1, EN60065 This means that this product has been designed to meet stringent guidelines on how much RF energy it can emit, and that it should be immune from other sources of interference when properly used. Improper use of this equipment could result in increased RF emissions, which may or may not interfere with other electronic products. To insure against this possibility, always use good shielded cables for all audio input and output connections. This will help insure compliance with the Directive(s). SPECIFICATIONS Inputs Two On Front Panel Two on Back Panel Outputs Two on Back Panel Front Panel Tuning Range +-50 Cents Calibration Range 436hz - 445hz Mute Switches Manual Switch Front Panel Optional Footswitch Jack on back panel (Momentary footswitch) Other Switches Input Selector Precision Mode Note Selector Tuning Window Up Tuning Window Down Size 482mm x 125mm x 45mm 19” x 5” x 1.75” Weight 2.25 kg 5lbs Input Impedance Output Impedance Power Consumption ≥1.5MΩ ≤1KΩ ≤1W Tunings List 126 Tuning Variations PRECAUTIONS NOTE: IT IS VERY IMPORTANT THAT YOU READ THIS SECTION TO PROVIDE YEARS OF TROUBLE FREE USE. THIS UNIT REQUIRES CAREFUL HANDLING. • All warnings on this equipment and in the operating instructions should be adhered to and all operating instructions should be followed. • Do not use this equipment near water. Care should be taken so that objects do not fall and liquids are not spilled into the unit through any openings. • The power cord/adapter should be unplugged from the outlet when left unused for a long period of time. • Do not block any ventilation openings (if applicable). Install in accordance with the manufacturer’s instructions. • Do not install near any heat sources such as radiators, heat registers, stoves or other apparatus (including amplifiers) that produce heat. • Only used attachments/accessories specified by the manufacturer. • Do not use this product with any case, stand, tripod, bracket or table that is not specified by the manufacturer. Insure that the case, stand, tripod, bracket etc. is properly adjusted and setup (follow all instructions). Extra care and caution should be taken to avoid tip over and injury. • Unplug this apparatus during lightning storms or when unused during long periods of time. Refer all service to qualified service personnel. Servicing is required when the apparatus has been damaged in any way, such as power supply or plug is damaged, liquid has been spilled or objects have fallen into the apparatus or if the apparatus has been exposed to rain or moisture, does not operate normally or has been dropped. DO NOT ATTEMPT TO SERVICE THIS EQUIPMENT. THIS EQUIPMENT SHOULD BE SERVICED BY QUALIFIED PERSONNEL ONLY. DO NOT MAKE ANY INTERNAL ADJUSTMENTS OR ADDITIONS TO THIS EQUIPMENT AT ANY TIME. DO NOT TAMPER WITH INTERNAL ELECTRONIC COMPONENTS AT ANY TIME. FAILURE TO FOLLOW THESE INSTRUCTIONS MAY VOID THE WARRANTY OF THIS EQUIPMENT, AS WELL AS CAUSING SHOCK HAZARD. OPERATING TEMPERATURE Do not expose this unit to excessive heat. This unit is designed to operate between 32° F and 104° F (0° C and 40° C). This unit may not function properly under extreme temperatures. Introduction Congratulations on your purchase of the Rocktron VersaTune Rack Tuner. The VersaTune Rack Tuner is a versatile true-bypass Guitar/Bass rack tuner for live and studio use. The large “NOTE” display and bright LEDs provide the perfect amount of light for on-stage tuning. Over a hundred different tunings can be viewed in the display window including standard guitar/bass tunings, alternate tunings, drop tunings and opening tunings. Additional features include two front & rear panel inputs, two rear panel outputs, input selector switch, +-60 Cents tuning LEDs, Precision Switch for ultra fine tuning, strobe, Mute Switch on front panel and MUTE jack on rear panel, Calibration switch and NOTE selection switch. Want to tune your guitar a half step down? Wanted to tune your guitar to DADGAD? Need to tune a Mandolin, Dobro, Pedal Steel Guitar or other types of instruments? Well, the VersaTune can help you to adjust to these tunings. The VersaTune tunings display window shows you how! Up () and down () arrows appear in the display window next to the note to show “how” to tune to a particular tuning from standard A440 tuning. For example, to tune a guitar down a half step from standard A440, the window will show a “down” () arrow next to the note you are tuning down to. Start by tuning the low E string down to D# or Eb as the window will show “down arrow” D#, (meaning to tune that string down to D# or Eb) . Continue with the same process for other strings. Use the Up/Down buttons to select different tunings from standard guitar and bass tunings to a wide range of alternate tunings and tunings for different types of instruments. Additional tunings for 7-String Guitar, 5-String and 6-String bass are included. Tunings for other instruments such as dobro, mandolin family, banjo, pedal steel, classical instruments and other string instruments (Bouzouki, Banduria, Dulcimer, Requinto, etc) are also included. Let your creative juices flow and try some of these different tunings! Front Panel Features 1 INPUT JACK 1 - (CH1) using a standard 1/4” cable, plug your guitar or bass in here. This Jack provides the output to OUTPUT JACK 1 on the back panel. See the OUTPUT JACK 1 description in the “Rear Panel Features” on the following pages for more details. 2 INPUT JACK 2- (CH2) using a standard 1/4” cable, plug your guitar or bass in here. This Jack provides the output to OUTPUT JACK 2 on the back panel. See the OUTPUT JACK 2 description in the “Rear Panel Features” on the following pages for more details. 3 NOTE: The VersaTune has two inputs and outputs so that you can plug two different instruments into it at the same time, yet go to two different amplifiers. INPUT SELECTOR BUTTON & LEDS - use this selector switch to determine which input will be “active.” Note that when you select Input 1 (CH1 LED will be “lit”) Output Jack 1 on the back panel will be active as well thus sending the signal to whatever is plugged into Output Jack 1. When you select Input 2 (CH2 LED will be “lit”) Output Jack 2 on the back panel will be active as well thus sending the signal to whatever is plugged into Output Jack 2. Note that it is not possible to send the Input 1 to Output 2 or the Input 2 to Output 1. 4&5 PRECISION BUTTON & LED - For Ultra Fine tuning use the Precision Button. This button increases the sensitivity of the tuner to allow you to “FINE” tune your instrument. To enter “PRECISION MODEL” press the Precision Button. In “PRECISION MODE” the LED colors change so now the “IN TUNE” or (0) LED will now be RED and the out of tune LEDs will be GREEN. Please see the section “USING THE VERSATUNE” for more details on this function. 6 STROBE BUTTON - To turn ON or OFF “strobe” tuning press this button. To learn how to use the “strobe” function, see section called “STROBE TUNING” later in this manual. 7 NOTE BUTTON - This button allows you to select a specific note to tune. This is an ideal function when using the tuner to intonate an instrument. Press the button once and the NOTE DISPLAY WINDOW will show “0” (Zero). This will show that the VersaTune is in standard tuning mode. To tune only a specific note press the NOTE button again, the NOTE DISPLAY WINDOW will show “A”. Pressing the button several more times will scroll through the notes A#, B, C, C#, D, D#, E, F, F#, G, G# and then back to “0”. At any time you can “PRESS AND HOLD” the NOTE Button to return to “0” which is the standard tuning mode. 8 CALIBRATION BUTTON - This button is used to calibrate the tuner to match a relative pitch of any instrument or audio source (like an old piano or tape player). For details on this function - see section titled “Calibration.” Front Panel Features...continued... 9 MUTE BUTTON - Use this button to MUTE the output for silent tuning. When MUTE is active, the MUTE LED (Point 4) will be “ON” or “LIT”. This button mutes both Output 1 and Output 2. MUTE LED - This LED works in conjunction with the MUTE BUTTON. When the input is MUTED, the MUTE LED will be Lit. No sound will be passed through either output. This LED also works in conjunction with the MUTE FTSW (footswitch) jack on the back panel. 10 UP BUTTON - This button is used in conjunction with the “TUNINGS WINDOW” - see point 14. Press this button to move UP through the lists of tunings. 11 DOWN BUTTON - This button is used in conjunction with the “TUNINGS WINDOW” - see point 14. Press this button to move DOWN through the lists of tunings. 12 NOTE DISPLAY - This window will show you the note that is being played. 13 SHARP INDICATOR - This indicator (#) will “light” if the note being played is “SHARP” 14 TUNINGS WINDOW - This window shows you over a hundred different types of tunings and is used as a guide to help you tune your instrument to the desired tuning. This window is used in conjunction with the UP Button (point 10) and the DOWN Button (Point 11) to select the desired tuning you would like displayed in the window. For more information see section called “TUNINGS WINDOW” later in this manual. 15 ON/OFF SWITCH - This is the power “ON/OFF” switch for the VersaTune. 16 TUNING LEDS SHARP/FLAT LEDS - When the note being played is IN TUNE the GREEN LED in the center of the LED panel will light. The RED LEDs show you if your note is Sharp or Flat. RED LEDs to the right of the GREEN LED are sharp and the string should be tuned down. The farther right the LED is away from the GREEN IN TUNE LED the more the note is SHARP. RED LEDs to the left of the GREEN LED are flat and the string should be tuned up. The farther left the LED is away from the GREEN IN TUNE LED the more the note is flat. In PRECISION MODE the LEDs are opposite. The IN TUNE LED will be RED and the out of tune LEDs are GREEN. The GREEN LEDs show you if your note is Sharp or Flat. GREEN LEDs to the right of the RED LED are sharp and the string should be tuned down. The farther right the LED is away from the RED IN TUNE LED the more the note is SHARP. GREEN LEDs to the left of the RED LED are flat and the string should be tuned up. The farther left the LED is away from the RED IN TUNE LED the more the note is flat. Back Panel Features 1 POWER CHORD/FUSE Receptacle - plug the included power chord to this receptacle. Make sure you follow all precautions in this manual and any local regulations. 2 MUTE FT SW Jack - Using an optional RTS (Momentary) footswitch (not included) will MUTE both Outputs of the VersaTune to allow you to tune in silence. When the MUTE is on the MUTE LED on the front panel will be Lit. No sound will be passed through either output. 3 INPUT JACK 1 - (CH1) using a standard 1/4” cable, plug your guitar or bass in here. This Jack provides the output to OUTPUT JACK 1 on the back panel. See the OUTPUT JACK 1 (Point 6) for more details. Note, when this jack is used the Input Jack 1 on the front panel is disabled. 4 OUTPUT JACK 1 - (CH1) using a standard 1/4” cable, plug from here in your next device in your signal chain (amp, rack effects processor, preamp, etc.). This jack provides the output from the either INPUT 1 Jacks. 5 INPUT JACK 2- (CH2) using a standard 1/4” cable, plug your guitar or bass in here. This Jack provides the output to OUTPUT JACK 2 on the back panel. See the OUTPUT JACK 2 (Point 4) for more details. Note, when this jack is used the Input Jack 2 on the front panel is disabled. 6 OUTPUT JACK 2 - (CH1) using a standard 1/4” cable, plug from here in your next device in your signal chain (amp, rack effects processor, preamp, etc.). This jack provides the output from the either INPUT 2 Jacks. NOTE: The VersaTune has two inputs and outputs so that you can plug two different instruments into it at the same time, yet go to two different amplifiers. The back panel inputs disables the front panel inputs. Connections - One Guitar - Front Panel GUITAR OUTPUT TO INPUT 1 FRONT PANEL BACK PANEL TO OUTPUT 1 TO AMPLIFIER INPUT Connections - One Guitar - Back Panel Connections - Two Guitars - Front Panel Connections - Two Guitars - Back Panel Connections - Optional Footswitch Connections - Rack Connection Using the VersaTune STANDARD TUNING MODE In Standard Tuning Mode (this is the default tuning mode when you turn on the VersaTune) the LEDs on the front panel will indicate the following: GREEN LED - Center LED with the (0 - zero) above the LED will indicate that the note being played is “IN TUNE” RED LEDs - To the left of the GREEN center LED will indicate that note being played is “FLAT”. The numbers shown on the front panel -10, -20, -30, - 40 indicate by how many “CENTS” the note being played is off from being IN TUNE. RED LEDs - To the right of the GREEN center LED will indicate that the note being played is “SHARP” from being IN TUNE. The numbers on the front panel +10, +20, +30, +40 indicate by how many “CENTS” the note being played is off from being IN TUNE. CENTS - The Cent is a logarithmic unit of measure used to musical intervals. Twelve-tone equal temperament divides an octave into 12 semi tones of 100 cents each. Cents are used to measure extremely small finite intervals or to compare the sizes of comparable intervals in different tuning systems. Usually the interval of once cent is to small to be heard between successive notes. Step 1 - plug the guitar/bass into Jack 1 or 2 of the Tuner and using the input select button select the appropriate jack (CH1 or CH2). Step 2 - play a note on your guitar. Pluck your E string, if needed, adjust your tuning machine on your instrument until the letter “E” appears in the NOTE Display window. Step 3 - if your note is flat - the “FLAT” LEDs to the left of the IN TUNE GREEN LED will light. The farther away the RED LED is from the GREEN IN TUNE LED the more flat the tuning is. If a Flat LED is lit, tune your string up. During this process the LEDs will begin to light and move closer to the GREEN IN TUNE LED. Step 4 - if your note is sharp - the “SHARP” LEDs to the right of the IN TUNE GREEN LEDs will light. The farther away the RED LED is from the GREEN IN TUNE LED the more sharp the tuning is. If a sharp LED is lit, tune your string down. During this process the LEDs will begin to light and move closer to the GREEN IN TUNE LED. Step 5 - Continue with step 3 or step 4 until the flat or sharp LEDs are not lit and the GREEN “IN TUNE” LED lights. At this point the string is IN TUNE. Step 6 - Continue steps 2-5 but using your other strings on your guitar or bass. Using the VersaTune PRECISION TUNING MODE Precision Tuning Mode allows you to “FINE” tune your instrument. This function increases the sensitivity of the VersaTune to allow for ultra fine tuning. In Precision Tuning Mode, the LEDs are reversed in color. Now the IN TUNE LED will be RED and the Flat and Sharp LEDs will be GREEN. This mode is quite sensitive and very slightly movements of the tuning machines on your instrument is necessary. RED LED - Center LED with the (0 - zero) above the LED will indicate that the note being played is “IN TUNE” GREEN LEDs - To the left of the RED center LED will indicate that note being played is “FLAT”. The numbers shown on the front panel -1, -2, -3, - 4 indicate by how many “CENTS” the note being played is off from being IN TUNE. GREEN LEDs - To the right of the RED center LED will indicate that the note being played is “SHARP” from being IN TUNE. The numbers on the front panel +1, +2, +3, +4 indicate by how many “CENTS” the note being played is off from being IN TUNE. These steps are similar to the Standard Tuning Mode steps, but require more slight adjustments to your tuning machines on your instrument. Step 1 - plug the guitar/bass into Jack 1 or 2 of the Tuner and using the input select button select the appropriate jack (CH1 or CH2). Step 2 - play a note on your guitar. Pluck your E string, if needed, adjust your tuning machine on your instrument until the letter “E” appears in the NOTE Display window. Step 3 - if your note is flat - the “FLAT” LEDs to the left of the IN TUNE RED LED will light. The farther away the GREEN LED is from the RED IN TUNE LED the more flat the tuning is. If a Flat LED is lit, tune your string up. During this process the LEDs will begin to light and move closer to the RED IN TUNE LED. Step 4 - if your note is sharp - the “SHARP” LEDs to the right of the IN TUNE RED LEDs will light. The farther away the GREEN LED is from the RED IN TUNE LED the more sharp the tuning is. If a sharp LED is lit, tune your string down. During this process the LEDs will begin to light and move closer to the RED IN TUNE LED. Step 5 - Continue with step 3 or step 4 until the flat or sharp LEDs are not lit and the RED “IN TUNE” LED lights. At this point the string is IN TUNE. Step 6 - Continue steps 2-5 but using your other strings on your guitar or bass. Using the VersaTune STROBE TUNING MODE The STROBE function of the VersaTune is very sensitive. Step 1 - plug the guitar/bass into the tuner and press the “STROBE” button. At this point the RED LEDs will appear to move from right to left. Step 2 - play a note on your guitar. Pluck your E string, if needed, adjust your tuning machine on your instrument until the letter “E” appears in the NOTE Display window. Step 3 - if your note is flat - the RED LEDs will appear to be moving from right to left, showing you that the note being played is flat. The faster the LEDs move right to left, the more flat the tuning is. Tune your string up. During this process the speed of the movement of the LEDs will appear to slow down as you approach being IN TUNE. When the LEDs don’t appear to be moving, then the note is IN TUNE. Step 4 - if your note is sharp - the RED LEDs will appear to be moving from left to right, showing you that the note being played is sharp. The faster the LEDs move from left to right, the more sharp the tuning is. Tune your string down. During this process the speed of the movement of the LEDs will appear to slow down as you approach being IN TUNE. When the LEDs don’t appear to be moving, then the note is IN TUNE. HINTS AND TIPS The VersaTune is sensitive, so it is not necessary to strike your string very hard. Standard string attack will work. Additionally, if you are in a loud environment try using harmonics to tune your instrument. Lightly touch the string over the 12th fret of your instrument and pick the string with normal pick attack. This will create a harmonic. It will work on all strings. The MUTED Output is ideal for tuning in live situations. This allows you to tune without everyone in the audience hearing you tune. Additionally, this will mute the signal going to your amplifier which will help you keep down noise generated if you are using a high gain amplifier. Using the VersaTune CALIBRATION A440Hz is the musical note A above middle C. It has a frequency of 440Hz and is the general tuning standard for musical pitch. It is sometimes referred to as Concert A. Occasionally there is a need to tune slightly off A440 pitch and this is where the CALIBRATION function comes in handy. You can adjust the VersaTune up and down slightly in the pitch that it reads so that the IN TUNE LED will light when you are IN TUNE with that change in pitch. You can calibrate the VersaTune to different pitches to help you tune to the pitch of instrument or audio source that may not be in tune to A440 pitch (like an old piano or tape player). When you press the CALIBRATION button, the NOTE display window will 0 - 9 numbers, the code list is as follows: NOTE DISPLAY WINDOW CALIBRATION 0 440Hz 1 441Hz 2 442Hz 3 443Hz 4 444Hz 5 445Hz 6 436Hz 7 437Hz 8 438Hz 9 439Hz Steps to Calibrate the VersaTune: Step 1 - press the “CALIBRATION” Button on the front panel. The “NOTE” display window will show “0” (Zero) in the window. This is the indication that the calibration of the VersaTune is set to standard A440 tuning. If you do nothing at this point, the “0” will flash after a few seconds and disappear. This means that the VersaTune is still set to A440 Tuning. Step 2 - Press the “CALIBRATION” Button a second time and you will see a “1” - (ONE) in the NOTE display window. The “1” will flash after a few seconds and disappear. This indicates that the VersaTune is now calibrated to A441Hz . To check this press the CALIBRATION button again and you will see a “1” in the note display window. Step 3 - Press the “CALIBRATION” Button a third time and you will see a “2” - (TWO) in the NOTE display window. The “2” will flash after a few seconds and disappear. This indicates that the VersaTune is now calibrated to A441Hz . To check this press the CALIBRATION button again and you will see a “2” in the note display window. This indicates that the VersaTune is now calibrated to A442Hz. Step 4 - To access other calibrations follow above steps to further adjust the VersaTune. NOTE: At any time you can return the VersaTune’s pitch to A440 by “PRESS AND HOLD” the CALIBRATION button and the calibration until the “0” (Zero) appears in the NOTE DISPLAY WINDOW. The “0” will flash and the VersaTune has returned to A440 calibration. TUNINGS WINDOW A unique feature on the VersaTune is the “TUNINGS WINDOW”. The TUNINGS WINDOW shows over a hundred different of tunings and how to tune to these tunings from the standard A440 Guitar Tuning. Additionally, we have included some other tunings for different instruments such as, mandolin, mandola, pedal steel, banjo and many others. Use the UP & DOWN buttons on the front panel to scroll through the different tunings. TUNINGS WINDOW LAYOUT The tunings of strings goes from left to right and are from Low String to High String. Thus in this window “1:Guitar Standard Tuning: E A D G B E your guitar should be tuned as follows: 6th string (lowest string) - tuned to “E” 5th string (next higher string) - tuned to “A” 4th string (next higher string) - tuned to “D” 3rd string (next higher string) - tuned to “G” 2nd string (next higher string) - tuned to “B” 1st string (next higher string) - tuned to “E” ALTERNATE TUNINGS Follow these steps to tune your guitar to most of these tunings: Step 1 - Tune your guitar to standard A440 tuning (it is 1:Guitar Standard) in the TUNINGS WINDOW. Step 2 - Us the “UP” button to select (2: Guitar Drop D) in the TUNINGS WINDOW. You will notice that the “D” in the window has a () - DOWN ARROW - next to it. This means you should tune your low E string DOWN to D. TUNINGS WINDOW....CONTINUED.... Here is a slightly more involved tuning. Use the UP & DOWN buttons on the front panel to select 1: Guitar Standard in the TUNINGS WINDOW. Step 1 - Tune your guitar to standard A440 tuning (it is 1:Guitar Standard) in the TUNINGS WINDOW. Step 2 - Us the “UP” button to select (3: Guitar 1/2 Step Down) in the TUNINGS WINDOW. You will notice that the all notes have a () - DOWN ARROW - next to it. This means you should tune all of your strings down to these notes. 6th string (lowest string) E down to D# 5th string (next higher string) A down to G# 4th string (next higher string) D down to C# 3rd string (next higher string) G down to F# 2nd string (next higher string) B down to A# 1st string (next higher string) E down to D# Note: Usually, when you tune a guitar down a 1/2 step it is often called “tuning a half step down” or “tuning to Eb”. However, as the industry standard tuners appear use the “SHARP” “#” indicator as the main way to determine the half steps between notes, the VersaTune in Standard mode also uses the “SHARP” “#” indicator. Thus, in the TUNINGS WINDOW, when tuning a guitar a half step down, instead of the note reading Eb, the note will read D#, which is the same note. CHROMATIC RACK TUNER WWW.ROCKTRON.COM Rocktron - A Division of GHS Corporation 2813 Wilber Ave Battle Creek MI 49037 USA www.rocktron.com [email protected] tel: 1-269-968-3351 Ver 1.00 - 1-15-12