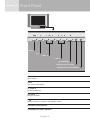
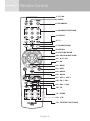
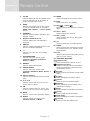
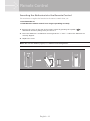
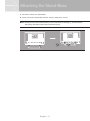
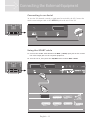
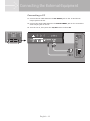
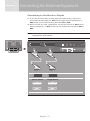
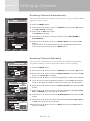
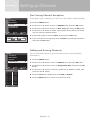
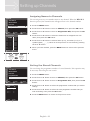
1
Safety Instructions To reduce the risk of electric shock, do not remove cover (or back). No user serviceable parts inside. Refer servicing to qualified service personnel. Indicates a situation which, if not avoided, could damage the equipment or other apparatus. This symbol indicates dangerous voltage inside the PDP-TV that presents a risk of electric shock or personal injury. Indicates a hazardous situation which, if not avoided, could result in serious injury. This symbol indicates important instructions accompanying the LCD-TV. Read this manual carefully and make sure you understand the instructions provided. For your safety, check what the result of each action will be. Throughout the whole manual, pay special attention to the following instructions that indicate hazardous situations. Indicates additional information to the user to make the user aware of possible problems and information of any importance to help the user to understand, to use and to maintain the installation. The information in this document is subject to change without notice. User Instructions A still image displayed too long may cause permanent damage to the LCD Panel. Watching the LCD TV in 4:3 format for a long period of time may leave traces of borders displayed on the left, right and center of the screen caused by the difference of light emission on the screen. Playing a DVD or a game console may cause similar effect to the screen. Damages caused by the above effect are not covered by the Warranty. Power Plug the power cord into the correct power outlet. An unstable connection may cause fire. Do not use damaged power cords or plugs, or use a loose wall outlet. This may cause electrical shock or fire. Do never touch the power cord with wet hands. This may cause electrical shock. Do not use multiple devices with one outlet. Overheating the outlet may cause fire. Do not bend or pull out the power cord using force, nor place heavy objects over it. This may cause electrical shock or fire. Make sure you pull out the power cord holding the plug itself. An internal disconnection may cause fire. When removing the product, turn off the power and pull out the plug from the power outlet. Also make sure other devices including the antenna or the connectors are removed from the outlets before relocating the product. Otherwise you may suffer electrical shock or fire due to a damaged power cord. English - 2 General Safety Precautions Installation Keep the product away from any heating devices. Placing it close to a heating device may cause fire. Keep the power cord away from any heating devices. A melted coating may cause fire or electrical shock. Place the antenna as far away as possible from any high-voltage cables. Touching the high voltage wiring may cause fire or electrical shock. Do not install the product in oily, smoky or humid (or exposed to rain/water) places or automobiles. This may cause fire. The connection between the external antenna and the internal wiring should be turned inside to avoid any inflow of rain. Exposing the PDP to water (rain) will cause electrical shock or fire. Do not use the product in humid places. Humidity will shorten the life of the product and may cause an electrical shortage or fire. Do not use the product in places with low temperatures (below 5°C). Avoid installing the product in poorly ventilated places. Internal overheating may cause an electrical shortage and fire. Be sure not to cover the ventilator (with a table-cloth or curtain, etc.). Internal overheating may cause an electrical shortage and fire. Do not install the product in an unstable place or on a small stand. The product may cause serious injury, if it falls on somebody (especially children). Install it on an even, stable place as it is front-heavy. Do not install the product on the floor. Someone (especially children) may trip over it. Cleaning Regular clean the product (at least once a year) according to the advice of the Customer Service. Leaving dust inside the product for an extended time may cause fire or malfunction. When not using the product for an extended time period, unplug the power cord. Dust over or inside the PDP may cause electrical shock, leakage or even fire from possible heat generation. When cleaning the product, unplug the power cord and use only a soft, dry cloth. Do not use chemicals like wax, benzene, alcohol, thinners, aroma, lubricator or cleanser. Do not wipe over the screen with your nails or any sharp-edged objects. This will scratch the surface. English - 3 Contents English - 4 Package Contents + Please check all package contents before using your TV. + Package Contents may be different according to the area. LCD - TV Remote Control AAA Batteries (X2) User’s Manual English - 5 Front Panel Menu 1 OK 2 ◄ VOL ► 3 ▼ CH ▲ 4 : STANDBY 5 Remote control sensor 6 Standby and timer indicator 7 1. MENU Menu display 2. OK Your choice confirmation 3. ◄ VOL ► Volume adjustment 4. ▼ CH ▲ Channel selection 5. : STANDBY Switches between operation and standby modes. 6. Remote control sensor 7. Standby and timer indicator English - 6 Rear Panel Red 8 Common Interface : R White : L Red : Pr Blue : Pb 7 Component Input Green : Y 1 Power 2 ANT.IN H/P 3 AV1/AV2 4 AV 3 5 AUDIO INPUT / PC INPUT 6 1. : POWER Power on/off 2. ANT.IN Connect to an antenna or a cable TV system. 3. H/P Connect the headphones. 4. AV1 / AV2 Connect to the SCART jack of a VCR, DVD player and similar devices. 5. AV3 Connect to the audio and video (or S-Video) jacks of a camcorder, video game and similar devices. 6. AUDIO INPUT / PC INPUT Connect to the audio and video output jacks of a PC. 7. COMPONENT INPUT Connect to the audio and video output jacks of a DVD player, DTV receiver and similar devices. 8. COMMON INTERFACE For one CA Module with a smart card. English - 7 Remote Control 1. TV/AV 2. MUTE 3. STANDBY 4. NUMERIC BUTTONS 5. PRE.CH 6. -/-7. SOUND MODE 8. RECALL 9. PICTURE MODE 10. COLOUR BUTTONS 11. ▲/▼/◄/► 12. OK 13. BACK 14. EXIT 15. MENU 16. ZOOM 17. VOL-/ VOL+ 18. CH-/ CH+ 19. AV1 / AV2 20. TV 21. SLEEP 22. I/II 23. TELETEXT BUTTONS English - 8 Remote Control 1. TV/AV Used to display all of the available input sources. Press the ▲ or ▼ button to select required input source. 2. MUTE Used to temporarily cut off the sound. To turn the sound back on, press the MUTE, VOL+(VOL►), or VOL-(◄VOL) button. 3. STANDBY Used to switch between operation and standby modes. 4. Numeric buttons (0~9) Used to display the corresponding channels. 5. PRE.CH Used to switch repeatedly between the last two channels displayed. 6. -/-Used to select the one or two-digit channel. 7. PICTURE MODE Used to select the picture mode (Custom, Dynamic, Standard, Movie, or Mild). 8. RECALL Used to display information. 9. SOUND MODE Used to select the sound mode (Custom, Standard, Music, Movie, or Speech). 10. Colour buttons Used to access directly teletext linked page. 11. ▲/▼/◄/► Used to control the cursor in the onscreen menu system. 12. OK Used to confirm (store or enter) your choice in the on-screen menu system. 13. BACK Used to return to the previous display. 14. ZOOM Used to change the picture size. (Normal, Zoom, or Wide) English - 9 15. MENU Used to display the on-screen menu. 16. EXIT Used to exit from any display. ) / CH+( ) 17. CH-( Used to change the channel or teletext page. 18. VOL-/ VOL+ Used to adjust the volume. 19. AV1 / AV2 Used to switch the AV1 or AV2 input mode directly. 20. TV Used to switch the TV mode directly. 21. SLEEP Used to select the preset time interval for switching the TV to standby mode automatically. 22. I/II Used to select the sound mode (stereo, dual, or mono sound). 23. TELETEXT BUTTONS (teletext off) Used to deactivate teletext service. (teletext on/mix) Used to view the teletext information. Used to overlap the teletext with the broadcasting screen. (mode) Used to select the teletext mode (LIST/ FLOF) (index) Used to display the teletext index. (store) Used to store the teletext pages. (cancel) Used to display the broadcast when searching for a page. (size) Used to display the double-size letters. (hold) Used to hold the teletext page. (sub-page) Used to display the teletext sub-page. (reveal) Used to reveal the hidden text. Remote Control Inserting the Batteries into the Remote Control You must insert or replace the batteries in the remote control when you: + Purchase the TV + Find that the remote control is no longer operating correctly 1. Remove the cover on the rear of the remote control by pressing the symbol ( downwards and then pulling firmly to remove it. ) 2. Insert two AAA size 1.5V batteries ensuring that the “+” and “-” ends of the batteries are correctly aligned. 3. Replace the cover. Note : Do not mix battery types, i.e. alkaline and manganese. English - 10 Attaching the Stand-Base 1. Attach the LCD to the stand-base. 2. Firmly secure the stand-base and the LCD by using the 4 screws. Note : Firmly secure the stand-base for the LCD before moving it, as the standbase may fall and could cause serious injury. English - 11 Mounting Device Installing on the Wall You can install the TV on the wall using a mounting bracket (sold separately). To reduce the risk of damage from falling, this TV should be secured at all times. Do not install on a weak surface such as plaster or foam board. Before you install the TV on the wall, separate the LCD and stand-base. Convenient Movement You can move the TV to other place conveniently. English - 12 Connecting the External Equipment Connecting to an Aerial To view the TV channels correctly, a signal must be received by the TV. Connect the aerial or network input cable to the ANT.IN jack on the rear of the TV. ▲ ANENNA IN Using the SCART cable 1. Connect the SCART cable between the AV1 (or AV2) input jack on the TV and the video output jack on the required equipment. 2. Turn the TV on, then press the TV/AV button to select AV1 or AV2. ▲ Video game divice English - 13 ▲ DVD player ▲ VCR ▲ Camcorder ▲ Video disc player ▲ Decoder ▲ Satellite receiver Connecting the External Equipment Using the Audio/Video cable 1. Connect the video cable between the VIDEO (AV3) input jack on the TV and the video output jack on the required equipment. Note : For the equipment with an S-VIDEO jack, connect the S-Video cable between the S-VIDEO (AV3) input jack on the TV and the S-Video output jack on the required equipment. 2. Connect the audio cable between the AUDIO-L/R (AV3) input jack on the TV and the audio output jack on the required equipment. 3. Turn the TV on, then press the TV/AV button to select AV3. Note : If you have connected the TV and the required equipment using an S-Video cable, select S-Video. ◄or► ▲ DVD player ▲ VCR ▲ Decoder ▲ Satellite receiver English - 14 ▲ Camcorder ▲ Video game divice ▲ Video disc player Connecting the External Equipment Connecting to the Component Input 1. Connect the video cable between the VIDEO-Y/Pb/Pr input jacks on the TV and the video output jacks on the required equipment. Note : Depending on the manufacturer, the Y/Pb/Pr jacks may be identified as Y/PB/PR, Y/B-Y/R-Y or Y/CB/CR. 2. Connect the audio cable between the AUDIO-L/R input jacks on the TV and the audio output jacks on the required equipment. 3. Turn the TV on, then press the TV/AV button to select Component. Red : R White : L Red : Pr Blue : Pb Green : Y ▲ DVD player ▲ VCR ▲ Decoder ▲ Satellite receiver English - 15 ▲ Camcorder ▲ Video game divice ▲ Video disc player Connecting the External Equipment Connecting a PC 1. Connect the PC cable between the PC INPUT jack on the TV and the PC output jack on the PC. 2. Connect the audio cable between the AUDIO INPUT jack on the TV and the audio output jack on the PC. 3. Turn the TV on, then press the TV/AV button to select PC. English - 16 Connecting the External Equipment Connecting to the Monitor Output 1. If you have a second VCR (or DVD player) and wish to copy, connect the source VCR (or DVD player) to AV1 and the target VCR (or DVD player) to AV2 so that you can redirect the signal from AV1 to AV2. 2. When you wish to record a programme, connect the receiver to AV1 and the VCR (or DVD player) to AV2 so that you can redirect the signal from AV1 to AV2. Note : For more details about how to record, refer to your required equipment’s instructions. Source Device Target Device ▲ DVD player ▲ DVD player ▲ VCR ▲ VCR English - 17 Watching TV Switching On and Off 1. Connect the power cord of the TV to a wall outlet. 2. Press the button on the rear of the TV. The standby indicator lights up. 3. Press the STANDBY button on the remote control (or TV) to switch the TV on. ▲ Rear or TV on the rear of the Note : To place the TV in standby mode, press the STANDBY button again on the remote control (or on the rear of the TV). It can be useful when you wish to interrupt viewing temporarily (during a meal, for example). 4. To switch the TV off, press the button on the rear of the TV. Note : Do not leave the TV in standby mode for too long (on holiday, for example). Turn the TV off by pressing the button on the rear of the TV. It is best to disconnect the power cord. Viewing the Input Source TV AV1 AV2 AV3 S-Video Component PC Once you have connected up your various audio and video systems, you can view different sources by selecting the appropriate input. 1. Press the TV/AV button. 2. Press the ▲ or ▼ button to select required input source as followings. TV – AV1 – AV2 – AV3 – S-Video – Component – PC 3. Press the OK button. It is switched to selected source. Note : You can select TV, AV1, or AV2 by simply pressing the TV, AV1, or AV2 button on the remote control. English - 18 Watching TV Changing Channels Using the CH- / CH+ buttons. The TV changes channels in sequence. You can select all channels that the TV has memorized. Note : You can not select channels that were either erased or not memorized. Using the numeric (0~9) buttons. Press the numeric buttons to quickly tune to any channel. Note : You can select all channels that were either erased or not memorized. For example, to select channel 27, press the 2, then 7. The TV will change channels when you press the second number. To change to single-digit channels (0~9) faster, press the 0 before the single digit. (For channel 4, press the 0, then 4.) Displaying Information You can display the channel information and setting status you selected by pressing the RECALL button. Press it again to exit. P 2 ABC NICAM Stereo Picture Sound Sound Effect Clock Sleep Dynamic Custom Ess 12:00 AM 117 Min Choosing Your Language Setup Language Time PC Setup English ► When you start using your TV for the first time, you must select the language which will be used for displaying menus and indications. 1. Press the MENU button. 2. Press the ▲ or ▼ button to move to Setup, then press the OK button. The Language is selected. Move OK Enter Back Return 3. Press the OK button again. 4. Press the ◄ or ► button to select required language. English - 19 Setting up Channels Scanning Channels Automatically Auto Search System Search Start PAL/SECAM ► You can automatically scan channels for the frequency ranges available (availability depends on your country). 1. Press the MENU button. 2. Press the ▲ or ▼ button to move to Channel, then press the OK button. The Auto Search is selected. Move OK Enter Auto Search System Searching... Back Return PAL/SECAM Pr 1 : 37 % Stop Move OK Enter Back 3. Press the ► or OK button again. The System is selected. 4. Press the ▲ or ▼ button to select required system (PAL/SECAM or PAL/SECAM-L). 5. Press the ▲ or ▼ button to move to Search Start, then press the OK button. The scan starts. The scanned channels are automatically stored in the order. If you want to stop, press the BACK button. Return Scanning Channels Manually Manual Search Prog. No. Colour System Sound System 1 ◄► Auto Auto VHF-L UHF Save ◄◄ Move Adjust Prog. No. Colour System Sound System VHF-L Adjust Save Enter Manual Search Prog. No. Colour System Sound System VHF-L ◄◄ Adjust Back Return 1. Press the MENU button. 2. Press the ▲ or ▼ button to move to Channel, then press the OK button. 3. Press the ▲ or ▼ button to move to Manual Search, then press the OK button. The Prog. No. is selected. 4. Press the ◄ or ► button to select the programme number to be assigned. Manual Search ◄◄ ►► You can choose whether or not to store each of the channels found and the programme number of each stored channel which you wish to identify. Save Enter 1 Auto Auto Auto PAL UHF SECAM ►► Back Return 1 Auto Auto Auto UHF BG I ►► DK Back 5. If you do not know the programme numbers, move to Save by pressing the ▲ or ▼ button and start the search by pressing the ◄ or ► button. 6. Press the ▲ or ▼ button to move to Colour System, then press the OK button. 7. Press the ▲ or ▼ button to select required broadcasting standard (Auto, PAL, or SECAM), then press the ◄ or ► button. 8. Press the ▲ or ▼ button to move to Sound System, then press the OK button. 9. Press the ▲ or ▼ button to select required sound standard (Auto, BG, I, or DK), then press the ◄ or ► button. 10. Press the ▲ or ▼ button to move to Save, then press the OK button to store your settings. Return English - 20 Setting up Channels Fine Tuning Channel Reception If the signal is weak or distorted, you may have to fine tune the channel manually. Channel Auto Search Manual Search Fine Tune Programme Edit Programme Sort Move OK Enter ► 2. Press the ▲ or ▼ button to move to Channel, then press the OK button. 3. Press the ▲ or ▼ button to move to Fine Tune, then press the OK button. Back Fine Tune Return 4. Press the ▲ or ▼ button to obtain a good quality of the picture and sound until you reach the optimal setting. 5. Press the ► button to move to Save, then press the OK button. 0 Reset 1. Press the MENU button. 6. If you reset the fine tuning to 0, move to Reset by pressing the ► button and press the OK button. Save Adding and Erasing Channels You can add channels that were not memorized or delete unwanted channels from memory. Channel Auto Search Manual Search Fine Tune Programme Edit Programme Sort Move OK Enter Programme Edit P 1 ----P 2 ----P 3 ----P 4 ----P 5 ----P 6 ----P 7 ----P 8 ----P 9 ----P 10 ----Move Add Erased Erased Erased Erased Erased Erased Erased Erased Erased OK ► Back Return 1. Press the MENU button. 2. Press the ▲ or ▼ button to move to Channel, then press the OK button. 3. Press the ▲ or ▼ button to move to Programme Edit, then press the OK button. 4. Press the ▲ or ▼ button to select the channel to be added or erased, then press the ◄ or ► button. 5. Press the OK button repeatedly to select Add or Erased. 6. Press the BACK button to return to the previous menu. Enter English - 21 Setting up Channels Assigning Names to Channels Channel You can assign an easy-to-remember name to any channel. When the RECALL button is pressed, the channel name will appear next to the channel number. Auto Search Manual Search Fine Tune Programme Edit Programme Sort Move OK Enter ► 2. Press the ▲ or ▼ button to move to Channel, then press the OK button. Back Return Programme Edit P 1 ABC-P 2 ----P 3 ----P 4 ----P 5 ----P 6 ----P 7 ----P 8 ----P 9 ----P 10 ----Adjust 3. Press the ▲ or ▼ button to move to Programme Edit, then press the OK button. 4. Press the ▲ or ▼ button to select the channel to be assigned to a new name, then press the OK button. Add Erased Erased Erased Erased Erased Erased Erased Erased Erased OK 1. Press the MENU button. 5. Press the ▲ or ▼ button to select a letter (A~Z), a number (0~9) or a symbol (space, _, -, *). Move on to the previous or next letter by pressing the ◄ or ► button. 6. When you have finished, press the BACK button to return to the previous menu. Return Sorting the Stored Channels Channel You can change the programme numbers of stored channels. This operation may be necessary after using the auto search. Auto Search Manual Search Fine Tune Programme Edit Programme Sort Move OK Enter Programme Sort FROM TO P 2----P 3----P 4----P 5----- P -P -P -P -- 1. Press the MENU button. ► Back Return 2. Press the ▲ or ▼ button to move to Channel, then press the OK button. 3. Press the ▲ or ▼ button to move to Programme Sort, then press the OK button. 4. Press the ▲ or ▼ button to select the programme number that you with to change. 5. Press the ▲ or ▼ button to select the new programme number that you wish to identify, then press the OK button. 6. Press the BACK button to return to the previous menu. Adjust OK Enter English - 22 Setting the Picture Selecting the Picture Mode Picture Picture Mode Custom Picture Colour Tone Size Standard ► Normal Normal You can select the picture mode which best corresponds to your viewing requirements. 1. Press the MENU button. 2. Press the ▲ or ▼ button to move to Picture, then press the OK button. The Picture Mode is selected. Move OK Enter Back 3. Press the OK button again. Return 4. Press the ▲ or ▼ button to select required picture mode as followings, then press the ▲ or ▼ button. Picture Picture Mode Custom Picture Colour Tone Size Adjust Enter Standard Custom – Dynamic – Standard – Movie – Mild Custom Normal Dynamic Standard Normal Movie Mild Back Note : You can select the modes by simply pressing the PICTURE MODE button on the remote control. Return Customizing the Picture Settings This TV has several setting options that allow you to control the picture quality. Picture Picture Mode Custom Picture Colour Tone Size Standard Normal Normal ► 1. Press the MENU button. 2. Press the ▲ or ▼ button to move to Picture, then press the OK button. 3. Press the ▲ or ▼ button to move to Custom Picture, then press the OK button. Move OK Enter Back 4. Press the ▲ or ▼ button to select required option as followings, then press the OK button. Return Custom Picture Contrast Brightness Colour Sharpness Tint Move Contrast OK Enter 80 50 50 50 50 Back Return 80 Contrast – Brightness – Colour – Sharpness – Tint (NTSC only) The horizontal bar is displayed. Press the ◄ or ► button until you reach the optimal setting. To select other options, press the ▲ or ▼ button. 5. Press the BACK button to return to the previous menu. Notes: If you make any changes to the options, the picture mode is automatically switched to Custom. Tint is not available in the PAL signal standard. English - 23 Setting the Picture Customizing the Picture Settings (PC mode) This TV has several setting options that allow you to control the picture quality. Picture Contrast Brightness Sharpness Colour Tone Colour Adjust Move OK Enter 80 50 50 Custom 1. Press the MENU button. 2. Press the ▲ or ▼ button to move to Picture, then press the OK button. 3. Press the ▲ or ▼ button to select required option as followings, then press the OK button. Back Contrast Contrast – Brightness – Sharpness Return The horizontal bar is displayed. Press the ◄ or ► button until you reach the optimal setting. To select other options, press the ▲ or ▼ button. 80 4. Press the BACK button to return to the previous menu. Changing the Colour Tone You can change the colour tone which best corresponds to your viewing requirements. Picture Picture Mode Custom Picture Colour Tone Size Adjust Enter Standard Normal Normal Cool 1 1. Press the MENU button. Cool 2 Normal Warm 1 Warm 2 Back 2. Press the ▲ or ▼ button to move to Picture, then press the OK button. 3. Press the ▲ or ▼ button to move to Colour Tone, then press the OK button. Return 4. Press the ▲ or ▼ button to select required colour tone as followings, then press the ◄ or ► button. ▼ PC mode Picture Contrast Brightness Sharpness Colour Tone Colour Adjust Adjust Enter Custom 80 50 50 Cool 1 – Cool 2 – Normal – Warm 1 – Warm 2 Custom – Mode 1 – Mode 2 – Mode 3 : PC mode Custom Mode 1 Mode 2 Mode 3 Back Return English - 24 Setting the Picture Adjusting the Colour (PC mode) You can adjust the RGB colour in PC mode. Picture Contrast Brightness Sharpness Colour Tone Colour Adjust Move OK Enter Custom Back 80 50 50 ► 2. Press the ▲ or ▼ button to move to Picture, then press the OK button. 3. Press the ▲ or ▼ button to move to Colour Adjust, then press the OK button. 4. Press the ▲ or ▼ button to select required colour as followings, then press the OK button. Return Colour Adjust Red Green Blue 1. Press the MENU button. 50 50 50 Red – Green – Blue The horizontal bar is displayed. Press the ▲ or ▼ button until you reach the optimal setting. To select other options, press the ▲ or ▼ button. 5. Press the BACK button to return to the previous menu. Move OK Enter Back Red Return 50 Changing the Picture Size Picture Picture Mode Custom Picture Colour Tone Size Adjust Enter Standard Back You can change the picture size which best corresponds to your viewing requirements. Normal Normal 1. Press the MENU button. Normal Zoom Wide 2. Press the ▲ or ▼ button to move to Picture, then press the OK button. Return 4. Press the ▲ or ▼ button to select required picture size as followings, then press the ▲ or ▼ button. 3. Press the ▲ or ▼ button to move to Size, then press the OK button. Normal – Zoom – Wide Note : You can select the picture sizes by simply pressing the ZOOM button on the remote control. English - 25 Setting the Sound Selecting the Sound Mode You can select the sound mode to be used when watching a given broadcast. Sound Sound Mode Custom Sound Sound Effect AVL Custom 1. Press the MENU button. Custom Standard DVB Music Off Movie Speech 2. Press the ▲ or ▼ button to move to Sound, then press the OK button. The Sound Mode is selected. 3. Press the OK button again. Enter Adjust Back 4. Press the ▲ or ▼ button to select required sound mode as followings, then press the ▲ or ▼ button. Return Custom – Standard – Music – Movie – Speech Note : You can select the modes by simply pressing the SOUND MODE button on the remote control. Customizing the Sound Settings This TV has several setting options that allow you to control the sound quality. ▼ Stereo mode Equalizer 100 500 1K R 3K 1. Press the MENU button. 10K 2. Press the ▲ or ▼ button to move to Sound, then press the OK button. 3. Press the ▲ or ▼ button to move to Custom Sound, then press the OK button. 4. Stereo mode : Press the ◄ or ► button to select required option, then press the ▲ or ▼ button until you reach the optimal setting. L Adjust Move Back Return ▼ Mono mode Custom Sound 50 50 50 Treble Bass Balance Move OK Enter Back Mono mode : Press the ▲ or ▼ button to select required option, then press the ◄ or ► button until you reach the optimal setting. 5. Press the BACK button to return to the previous menu. Return English - 26 Setting the Sound Changing the Sound Effect The sound effect can be changed to suit your personal preferences. Sound Sound Mode Custom Sound Sound Effect AVL Custom DVB Off Off DVB ESS Adjust Enter Back Return 1. Press the MENU button. 2. Press the ▲ or ▼ button to move to Sound, then press the OK button. 3. Press the ▲ or ▼ button to move to Sound Effect, then press the OK button. 4. Press the ▲ or ▼ button to select required sound effect as followings, then press the ◄ or ►button. Off – DVB (Dynamic Virtual Bass) – ESS (Extended Spatial Stereo) Adjusting the Volume Automatically Sound Sound Mode Custom Sound Sound Effect AVL Custom DVB Off Off On Adjust Enter Back Return Each broadcasting station has its own signal conditions, and so it is not easy to adjust the volume every time the channel is changed. This feature lets you automatically adjust the volume of the desired channel by lowering the sound output when the modulation signal is high or by raising the sound output when the modulation signal is low. 1. Press the MENU button. 2. Press the ▲ or ▼ button to move to Sound, then press the OK button. 3. Press the ▲ or ▼ button to move to AVL (Auto Volume Level), then press the OK button. 4. Press the ▲ or ▼ button to select required option (On or Off), then press the ◄ or ► button. English - 27 Setting the Time Setting the Current Time Clock Time Hour Minute 11 00 You can set the current time so that the current time is displayed when pressing the RECALL button to viewing information. AM 1. Press the MENU button. 2. Press the ▲ or ▼ button to move to Setup, then press the OK button. Move Adjust Back Return 3. Press the ▲ or ▼ button to move to Time, then press the OK button. The Clock is selected. 4. Press the OK button again. 5. Press the ◄ or ► button to move to Hour and Minute, then set them by pressing the ▲ or ▼ button. 6. Press the BACK button to return to the previous menu. Setting the TV On and Off Time On Time Time Hour Minute 7 00 You can set the on or off time so that the TV will switch on or off automatically at the time you select. AM Channel 2 2. Press the ▲ or ▼ button to move to Setup, then press the OK button. Volume 20 Setup 3. Press the ▲ or ▼ button to move to Time, then press the OK button. On Return Adjust Back Hour Minute Time 11 00 Setup On Move Off Time Move Adjust 1. Press the MENU button. Back PM Return 4. To set the time at which you wish the TV to be switched on automatically, move to On Time by pressing the ▲ or ▼, then press the OK button. 5. Press the ◄ or ► button to move to Hour, Minute, Channel, and Volume, then set them by pressing the ▲ or ▼ button. 6. Press the ◄ or ► button to move to Setup, then select On by pressing the ▲ or ▼ button. 7. When you have finished, press the BACK button to return to the previous menu. 8. To set the time at which you wish the TV to be switched off automatically, move to Off Time by pressing the ▲ or ▼, then press the OK button. 9. Repeat steps 5 to 7 for off time setting. English - 28 Setting the Time Setting the Sleep Time Time Clock On Time Off Time Sleep Time Power Save On On 30 ◄► Off You can select a time period of between 30 and 180 minutes after which the TV automatically switches to standby mode. 1. Press the MENU button. 2. Press the ▲ or ▼ button to move to Setup, then press the OK button. 3. Press the ▲ or ▼ button to move to Time, then press the OK button. Move Adjust Back Return 4. Press the ▲ or ▼ button to move to Sleep Time, then press the OK button. 5. Press the ◄ or ► button to select the preset time interval as followings, then press the BACK button. Off - 30 (minute) - 60 - 90 - 120 - 150 - 180 Note : You can select the sleep time by simply pressing the SLEEP button on the remote control. Switching the TV Off Automatically Time Clock On Time Off Time Sleep Time Power Save On On 30 On Off On Adjust Enter Back Return If no signal is received and no controls are operated for 1 hour, the TV will be automatically turned off. 1. Press the MENU button. 2. Press the ▲ or ▼ button to move to Setup, then press the OK button. 3. Press the ▲ or ▼ button to move to Time, then press the OK button. 4. Press the ▲ or ▼ button to move to Power Save, then press the OK button. 5. Press the ▲ or ▼ button to select required option (On or Off), then press the ◄ or ► button. English - 29 Setting up the PC Input Note : It is available in PC input mode. PC Setup Auto in Progress Frequency Phase PC Position Reset Move OK Enter ► 50 94 Back Tuning the PC Screen for Improved Quality Auto in Progress Frequency Phase PC Position Reset Enter 2. Press the ▲ or ▼ button to move to Setup, then press the OK button. 4. Press the OK button again. The message Auto Adjustment in Progress... is displayed. The picture quality and position are automatically adjusted, and the picture returns to original view about a few seconds later. Return PC Setup OK 1. Press the MENU button. 3. Press the ▲ or ▼ button to move to PC Setup, then press the OK button. The Auto in Progress is selected. Auto Adjustment in Progress... Move Adjusting the Status of PC Screen Automatically 50 94 Return Back Frequency 50 PC Position 5. Press the ▲ or ▼ button to select Frequency or Phase, then press the OK button. Press the ◄ or ► button until you reach the optimal setting, then press the BACK button. Selecting the Position of PC Screen 6. Press the ▲ or ▼ button to move to PC Position, then press the OK button. Select required position by pressing the ▲/▼/◄/▲ buttons, then press the BACK button. Resetting the PC Screen Settings 7. Press the ▲ or ▼ button to move to Reset, then press the OK button. The message for initializing is displayed. Adjust Back Return 8. Press the ◄ or ► button to select Yes, then press the OK button. All settings of PC screen are replaced with the factory initial values. Reset It will clear PC setup adjustment, and then return to factory initial value. Do you want to continue? Yes Move OK No Enter Back Return English - 30 Teletext Feature Most TV stations provide written information services via teletext. The index page of the teletext service gives you information on how to use the service. In addition, you can select various options to suit your requirements by using the remote control buttons. Note : For teletext information to be displayed correctly, channel reception must be stable. Otherwise, information may be missing or some pages may not be displayed. Using the Various Teletext Buttons (teletext off) Press to deactivate teletext service. (teletext on/mix) Press to activate teletext mode after selecting the channel providing the teletext service. Press it again to overlap the teletext with the current broadcasting screen. (mode) Press to select the teletext mode (LIST/FLOF). If you press it once again, it switches into the List save mode. In the List save mode, you can save teletext page into list using the (store) button. (index) Press to display the index (contents) page at any time while you are viewing teletext. (store) Press to store the teletext pages. (cancel) Press to view the broadcast when searching for a page. (size) Press to display the double-size letters in the upper half of the screen. For lower half of the screen, press it again. To display normal screen, press it once again. (hold) Press to hold the display on a given page if the selected page is linked with several secondary pages which follow on automatically. To resume, press it again. (sub-page) Press to display the available sub-page. (reveal) Press to display the hidden text (answers to quiz games, for example). To display normal screen, press it again. (page down) / (page up) Press to display the previous or next teletext page. 0~9 (numeric buttons) Press to enter the three-digit page number given in the content directly. Coloured buttons (red/green/yellow/blue) If the FASTEXT system is used by a broadcasting company, the different topics covered on a teletext page are colour-coded and can be selected by pressing the coloured buttons. Press one of them corresponding to the required. The page is displayed with other coloured information that can be selected in the same way. To display the previous or next page, press the corresponding coloured button. English - 31 Teletext Feature Displaying the Teletext Information 1. Using the CH- or CH+ button, select the channel providing the teletext service. 2. Press the (teletext on/mix) button to activate the teletext mode. The contents page is displayed. 3. To display the actual broadcast simultaneously with the teletext page, press the (teletext on/mix) button again. 4. To return the normal broadcasting mode, press the 5. Press the mode. (cancel) button. (teletext off) button to exit from the teletext display Note : If any broken character appears while teletext is being viewed, make sure that the teletext language is identical with the language in the Setup menu. If both languages are different, select the same language with the teletext language in the Setup menu. Selecting a Specific Teletext Page Press the number buttons on the remote control to enter the page number directly: 1. Enter the three-digit page number listed in the contents by pressing the corresponding numeric buttons. The current page counter is incremented and the page is displayed. 2. If the selected page is linked with several sub-pages, the sub-pages are displayed in sequence. (hold) button. Press To freeze the display on a given page, press the the (hold) button again to resume. Storing the Current Teletext Page into List 1. Press the (mode) button to display the listed pages. The list appears at the bottom of the page. 2. Press the (mode) button again to switch into the list save mode. The list is displayed with the coloured blocks. 3. Press the coloured button corresponding with the block to change into the current page. 4. To save the current teletext page completely, Press the button. English - 32 (store) Menu Map Picture PC mode Picture Picture Mode Custom Dynamic Standard Movie Mild Custom Picture Contrast Brightness Colour Sharpness Tint Colour Tone Cool 1 Cool 2 Normal Warm 1 Warm 2 Size Normal Zoom Wide Contrast Brightness Sharpness Sound Mono ► Colour Tone Custom Mode 1 Mode 2 Mode 3 Colour Adjust Red Green Blue Sound Mode Custom Standard Music Movie Speech Custom Sound Treble Bass Balance Stereo ► Custom Sound Equalizer Sound Effect Off DVB ESS AVL On Off English - 33 Menu Map Channel Auto Search System PAL/SECAM-L PAL/SECAM Search Start Manual Search Prog.No. Colour System Auto PAL SECAM Sound System Fine Tune Programme Edit Programme Sort Setup Language English Deutsch Français Italiano Español Time Clock On Time Off Time Sleep Time Power Save PC Setup Auto in Progress Frequency Phase PC Position Reset English - 34 Auto BG I DK Troubleshooting Before contacting after-sales service, perform the following simple solutions. If you cannot solve the problem using the following instructions, contact your local dealer. No picture or sound Check if the power cord is connected correctly. Check that you have pressed the control (or the rear of the TV). and the STANDBY button on the remote Select an input source channel appropriate for that particular source. Check the picture contrast and brightness settings. Check the volume. Normal picture but no sound Check the volume. Check whether the MUTE button on the remote control has been pressed. No picture or black and white picture Adjust the colour settings. Check that the broadcast system selected is correct. Sound and picture interference Try to identify the electrical appliance that is affecting the TV, then move it further away. Plug the TV into a different wall outlet. Blurred or snowy picture, distorted sound Check the direction, location and connections of your aerial. This interference often occurs due to the use of an indoor aerial. Remote control malfunctions Press the TV/AV button to select the TV or an external device. Replace the batteries in the remote control. Install batteries ensuring that the <+> and <-> ends of the batteries are inserted correctly. Check the angle and distance of the remote control to the TV. Make sure there are no obstacles between the remote control and the TV. Check that the correct function button has been pressed. Change the location of light sources or the direction of the TV to avoid glare. English - 35 Specifications Specifications Item LCD Panel PC Monitor Input/ Output TV Signal Regulation Others Specification +Type - Colour active matrix TFT-LCD +Display Area (active area) - 20.1” (408(H) x 306(V)mm) +Display Colour - 16.7 M +Pixel Pitch - 0.2125(H) x 0.6375(V) +Max. Resolution - 640 x 480 pixels +Interface - TTL Interface +Viewing Angle(CR≥10) - 160degrees Horizontal / 140degrees Vertical +Contrast Ratio - 500 : 1 (Type) +Brightness - 450 cd/m2 (Type) +Horizontal Frequency - 48.5 kHz +Vertical Frequency - 60 Hz +Dimension - 448.60(H) x 339.6(V) x 25.0(D) mm (Type) +Sync - Separate +Horizontal Frequency - 31~61 kHz +Vertical Frequency - 60 Hz +Max. Resolution - 1024 x 768 pixels @60Hz +Video Input - Analog Tuner(1), SCART(2), S-Video, RCA, RGB, Component +Audio Input - SCART(2), RCA(R/L), PC Audio, Component(R/L) +Audio Output - Speaker, Headphone +Area - EU +Antenna Input - IEC 169-2 Female +Tuning System - Programmable Frequency Synthesizer +Colour System - PAL, SECAM ( NTSC3.58 : AV mode) +Sound System - B/G, I, D/K +Stereo System - NICAM, A2 +VHF Low - 48.25 ~ 140.25 MHz ( E2 ~ S6 ) +VHF High - 147.25 ~ 423.25 MHz ( S7 ~ S36 ) +UHF - 431.25 ~ 855.25 MHz ( S37 ~ E69 ) +Teletext - Yes +Safety - CE +EMI - CE +Power - 55 Watt (Max) +Speaker Output - 3W x 2EA +Plug & Play Level - DDC 1/2 B +Weight - NET : 22.5 kg / Gross : 27.5kg +Power Supply - 90~260V English - 36 Service and Support You can get information such as a troubleshooting guide, software upgrades and product support guide from the web sites and call center (Hotline). Please try to contact to your local dealers first when you have any problem. Web site and e-mail Web site Global : http://www.humaxdigital.com Germany : http://www.humax-digital.de UK : http://www.humaxdigital.co.uk HCSA (HUMAX Customer Service Area) (Software Download, Information and Technical Q&A) English : http://www.humaxdigital.com/hcsa Deutsch : http://www.humaxdigital.com/deutsch/hcsa Technical Q&A Europe & North Africa : [email protected] Germany : [email protected] Call Center Technical Support To receive hardware repair service, contact your retail shop first. For more information, contact the call center. Technical hotlines (Germany) Tel. Hotline number for all our products except the BTCI Germany : 01805-778870 ( € 0,12/Minute) Other Countries : + 49 1805-778870 ( € 0,12/Minute + International Call Charge) Opening Time Local Time in Germany (GMT+1) 8:00 - 20:00 (Monday - Friday) / 8:00 - 18:00 (Saturday) Support Language Deutsch/English Technical hotlines for BTCI (Premiere Model) Tel. Hotline number for BTCI customer Germany : 01805-778900 ( € 0,12/Minute) Austria : 0820-400675 ( € 0,12/Minute) English - 37 Memo English - 38 Memo English - 39