1
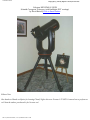
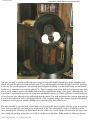
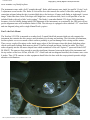
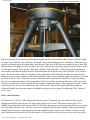
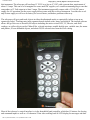
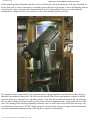
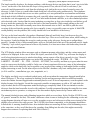
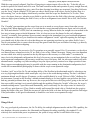
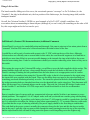
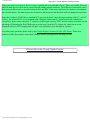
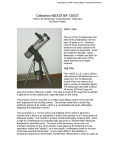
Untitled Document
Copyright (c) 2004 Cloudy Nights Telescope Reviews
www.cloudynights.com
All rights reserved. No part of this article may be reproduced or transmitted in any form by an means
without the prior written permission of the publisher.
file:///Users/asaint/cloudy/lab/copyright.htm3/13/2004 2:02:45 AM
Untitled Document
Copyright (c) Cloudy Nights Telescope Reviews
Celestron NEXSTAR 9.25GPS
Schmidt-Cassegrain Telescope (with StarBright XLT coatings)
by David Knisely Click to Email Author
Editors Note
Our thanks to Hands on Optics for loaning Cloudy Nights this new Nexstar 9.25 GPS. It turned out to perform so
well that the author purchased it for his own use!
file:///C|/web/nexstar.htm (1 of 14)3/28/2004 8:38:35 AM
Untitled Document
Copyright (c) Cloudy Nights Telescope Reviews
Suggested retail price: $3,000
With the popularity of Go-To telescope systems these days, the amateur has a great deal to choose from.
However, the old standard of the Schmidt-Cassegrain has in the past often been the work-horse, especially when
married to a mount which provides not only a drive but a system which will point the telescope to any target
desired. The pioneer of SCTs, Celestron, has now created an Go-To SCT with plenty to brag about: the NexStar
C9.25GPS.
Product Description
The NexStar 9.25GPS is a 9.25 inch (235mm) f/10 Schmidt-Cassegrain telescope on a heavy-duty 2-arm fork
mount with dual-axis drives and internal electronic control. The system can be configured for either Altazimuth
or Equatorial use, and features a Go-To slewing and tracking system with a large internal object database and
built-in GPS alignment capability.
Part 1: the Optical Tube Assembly
The optical tube assembly (OTA) uses a slightly longer f/ratio primary than is often found in many SCTs so the
OTA’s physical size seems slightly longer (about 21.5 inches long by 9.5 inches in width). The central
obstruction is about 3.37 inches, or about 36.4% of the linear aperture. The optics use the StarBright XLT
coatings to noticably improve the performance. The tube is made of Carbon fiber (lower expansion than
Aluminum), with a nice glossy surface and a sort of “herring-bone” black finish to it. The ends appear to be
made of aluminum with a cast aluminum back end housing and supporting the primary mirror and its focusing
mechanism. The lower portion of the back end has standard threads for the included 1.25” visual back.
The hole in the primary and central baffle appear to support the full visual field available in a wide-field 2 inch
eyepiece with about a 46mm field stop. At the nominal focal length of 2350mm, this would mean a maximum
true field of view on the sky of about 1.12 degrees with a 2 inch eyepiece and a maximum true field of about 0.67
degrees (40’ arc) with a 1.25 inch eyepiece (27mm field stop). As with most standard SCTs, the NexStar
9.25GPS does its focusing by moving the primary mirror slightly towards or away from the secondary, thereby
changing the focal point location as well as the true effective focal length of the instrument itself. This is done
via the rubber-coated focusing knob located to the right of the visual back of the telescope (ie: where the star
diagonal is placed). The back end of the optical tube assembly also has a large metal handle for assisting with
lifting and handling of the OTA.
file:///C|/web/nexstar.htm (2 of 14)3/28/2004 8:38:35 AM
Untitled Document
Copyright (c) Cloudy Nights Telescope Reviews
The tube assembly is attached to the fork arms using two long and slightly tapered open-frame aluminum rails
which bolt onto the tube at its front and back ends. These rails run nearly the entire length of the OTA, probably
to increase the overall mechanical strength and optical alignment stability over that found using just one bolted
location as is sometimes seen in a few other SCTs. There is enough room on the back end or front end ring of the
tube to easily mount a small reticle finder such as the Rigel Quickfinder using “sticky pads”, although there isn’t
a good place to permanently mount one using more permanent hardware (a Telrad could also be stuck to the side
of the telescope tube, although sticky pads might mar the finish). The front end houses the corrector plate and the
access to the collimation screws which adjust the tilt of the secondary mirror. One change from previous models
is that these screws are now standard Phillips screws instead of the older allen screws.
The tube assembly is provided with a metal dust cover to protect the corrector plate when the scope is not being
used. This cover has only one small piece of felt inside its lip. This was initially a source of difficulty, as the
cover tended to fall off unless you first slipped the side of the cover which had the felt piece over the edge of the
tube’s front end and then worked the rest of the cover down over the front. If that method is followed, the dust
file:///C|/web/nexstar.htm (3 of 14)3/28/2004 8:38:35 AM
Untitled Document
Copyright (c) Cloudy Nights Telescope Reviews
cover remains very firmly in place.
The instrument comes with a 9x50 “straight-through” finder which mounts on a single low profile “O-ring” style
3-adjustment screw bracket. The finder is a bit on the close side towards the surface of the tube, making its use
somewhat awkward when the tube is pointed high above the horizon. A longer stalk finder or right-angle “correct
image” finder like those Orion Telescopes sells might have served better here, but it is still possible to use the
included finder with only a little “neck craning”. The finder’s somewhat limited 5.25 degree field sometimes
becomes a bit of a liability during initial GPS alignment of the instrument, as occasionally, the GPS unit will not
put the alignment stars well-within the finder’s field. The telescope is equipped with a standard 1.25” visual back
and star diagonal, along with a single 40mm Plossl eyepiece.
Part 2: the Fork Mount
The NexStar 9.25 OTA is mounted on a rather beefy 2-armed black fork mount which not only supports the
instrument but contains the drive motors and electronics for slewing and tracking. The fork arms are aluminum,
but have plastic covers over much of their surfaces probably to prevent damage to the wiring and the motors.
There were a couple of locations on the inside upper edges of the fork arms where this plastic had sharp edges
which could catch clothing. Both arms are about 21 inches in length and about 6 inches in width. They flow
rather elegantly into the fat saucer-shaped base which reminds me of the old “Jupiter-2” spacecraft from LOST
IN SPACE. The arms are long enough to provide significant clearance between the back of the instrument and
the top surface of the base. In fact, with the 1.25” visual back and star diagonal installed, the clearance was a nice
4 inches. Thus, CCD cameras or other equipment should clear the base with the scope pointed upwards at high
altitudes or declinations.
file:///C|/web/nexstar.htm (4 of 14)3/28/2004 8:38:35 AM
Untitled Document
Copyright (c) Cloudy Nights Telescope Reviews
The entire mount and OTA are a hefty unit which weighs 58 lbs, but can be carried from either a handle on one
fork arm, or by both hands using that handle and a recessed handhold on the other arm (the preferred method).
One of the fork arms contains a recess for the NexStar hand controller, while the other arm has the altitude lock
lever near its top end.
The saucer-like base contains the electrical power connections (12V DC) and several jacks on its top side to
allow for things like two auxillary inputs, a PC interface port, an Autoguider port, and a 12V DC output for some
other device which might need power. The base also contains the mounting holes and central “pin” guide for the
attachment to a tripod or an equatorial wedge, as well as a locking lever for the azimuth motion. Unlike the first
NexStars, the NexStar 9.25GPS can be moved without having to supply any power to the scope by unlocking the
locks and moving the telescope by hand. However, to use the internal computerized electronics and display, both
altitude and azimuth locks must be engaged and the system must be properly aligned to the celestial sphere. The
motion with the locks completely off was very smooth, so it would be possible to use the scope manually without
power or with just the sidereal clock drive and an equatorial wedge if a person wanted to.
One problem was noted with the altitude lock. With the altitude lock activated, and the application of some slight
downward pressure to the tube’s front end (like that which sometimes occurs when setting the scope horizontally
on some surface prior to assembly or attaching a large CCD camera to the focuser), the altitude rocked over an
angle of about 2.4 degrees, as if the lock had a point where some internal play in the gears or motors was being
experienced. Under normal operation, this problem was not encountered, but when doing a lot of work with
putting heavy things on the OTA, this play should be kept in mind and the instrument balanced and re-aligned
after external equipment is installed. The manual states that the locks should only be fully engaged when the
scope is in its electronic operation, so when moving the scope, you should leave the locks slightly loose.
file:///C|/web/nexstar.htm (5 of 14)3/28/2004 8:38:35 AM
Untitled Document
Copyright (c) Cloudy Nights Telescope Reviews
The reviewed unit was mounted in an altazimuth fashion on the Celestron Heavy-Duty Tripod (#93499), which
was quite easy to lift and setup. However, the tripod’s tiny central guiding pin was sometimes a little hard to get
properly positioned under the central hole on the bottom of the base of the telescope without having to do a little
playing around. Struggling with the weight of the scope while trying to get things properly centered was a source
of frustration at times. Three special 3 inch long “shoulder” bolts with only 7/16ths of an inch of threading on
their smaller ends slide through holes in the tripod head and thread into the base of the NexStar 9.25 to fasten it
down. The heads of these bolts are enlarged, round, and knurled, and I found that I could secure these bolts by
hand and get satisfactory tightness in the altazimuth mode. However, for extended equatorial wedge use, it would
probably be better to use a large allen wrench on the allen insets in the head of each bolt to really snug things
down. It is recommended that no bolts longer than 3/8ths of an inch be inserted into the holes on the base of the
NexStar, as longer ones could be threaded in far enough to damage the motors. The tripod has a central 3-armed
center leg brace to push out and stabilize the legs of the tripod. Using it fully-tightened did help damp out
vibrations slightly faster than not using it, although the tripod was in no danger of collapsing if this “spreader”
wasn’t used.
Part 3: the Electronics
The NexSstar 9.25 GPS is a fully independent driven system. The motors have nine different slew speeds,
ranging from half the sidereal rate to as high as three degrees per second. This makes slewing on Go-To’s
slightly slower than that found in some of the LX-200 series instruments, but the instrument still gets to its target
in a reasonable amount of time. The slew rates can be changed from the hand controller, and are automatically
changed by the telescope’s internal software during alignment setup, which is a nice feature. Slewing is rather
quiet, much more so than in the LX200 telescopes, so you probably won’t wake anyone up at a star party with
file:///C|/web/nexstar.htm (6 of 14)3/28/2004 8:38:35 AM
Untitled Document
Copyright (c) Cloudy Nights Telescope Reviews
this instrument. The telescope will run from 15 V DC to as low as 9 V DC with a current draw requirement of
about 1.5 amps. This can be a bit marginal for some small DC supplies, so I would recommend going to one that
can produce a 12 Volt output at at least 2 amps. The instrument supposedly comes with a 12 Volt DC power
supply for AC operation, but the power supply did not come with the reviewed instrument. I ran this one on a 4
amp Astron supply as well as a car battery for several hours, and had no problems either way.
The telescope will go-to and track objects in either the altazimuth mode or equatorially (when set up on an
equatorial wedge). Tracking rates in the equatorial mode include solar, lunar, and sidereal. The internal software
allows full go-to access to about 40,000 objects including the entire revised NGC, IC, Messier, and Abell
catalogs, as well as objects on the Caldwell list, selected asterisms, notable double stars, variable stars, the moon
and planets, 50 user-definable objects, and about 29,500 selected stars from the SAO catalog.
Most of the telescope’s control interface is via the detachable hand controller, which has 19 buttons for slewing
and command inputs as well as a 16 character/2-line side-scrolling back-lit LCD display for messages and data.
file:///C|/web/nexstar.htm (7 of 14)3/28/2004 8:38:35 AM
Untitled Document
Copyright (c) Cloudy Nights Telescope Reviews
Under normal operation, the hand controller can be used from the stowed position in the fork arm, hand-held on
its two-foot cord, or can be connected to an auxillary port in the base of the mount. It can be left hanging from its
cord while the scope is slewing in the altazimuth mode (it won’t hit anything). However, in the equatorial
configuration, it might be best to just connect it to one of the auxillary ports on the base.
The internal software control and Go-To operation require a proper alignment, and with the NexStar, there are
basically four methods of doing this. The first uses the internal GPS receiver and magnetic compass to tell the
telescope where it is, what time it is, and where north is. Once this data is obtained automatically, the telescope
slews to what it thinks is the approximate location of two reference alignment stars. At this point, the user “fine
tunes” the pointing of the telescope manually so that the stars are at the center of the field of the telescope. The
second mode is known as the “AUTO” mode, where the telescope allows the user to input all the location/time/
orientation information manually when a GPS satellite reception is unobtainable.
file:///C|/web/nexstar.htm (8 of 14)3/28/2004 8:38:35 AM
Untitled Document
Copyright (c) Cloudy Nights Telescope Reviews
The third mode is the two-star alignment which only requires that you know the location of two prominant stars.
There is also the “Quick-Align” mode, which only requires that you level the OTA and point it north. It isn’t as
accurate as the other modes, but like the other methods, it can be “tweaked” to better alignment once an object is
located in the finder and then in the main telescope. The Quick-Align can also be used to do daytime alignment
using the sun as the alignment star, but THIS SHOULD ONLY BE DONE WITH THE SCOPE EQUIPPED
WITH A PROPER AND SAFE SOLAR FILTER! With this daytime alignment, some of the brightest planets
and a few stars can sometimes be viewed under good conditions when the sun is up. The instrument can also be
controlled from an external computer running various prominent skycharting programs (RS-232 to phone jack
plug cable for this is not supplied, but is available as an option).
Optical Performance
Overall, the NexStar 9.25GPS is a very good optical performer, with possibly one of the better sets of
commercial optics for an SCT that I have ever seen. The instrument arrived almost dead-on in collimation, and
after a small difficulty in getting one alignment screw to move, the collimation procedure was fairly typical for
an SCT, taking only a short time. The telescope retained its collimation pretty well no matter where it was
pointed. The instrument is well-baffled, with both a metal cylindrical baffle around the secondary and the usual
tubular center baffle extending up from the primary mirror. The star test revealed no glaringly-obvious defects,
although I could see the effects of a few very slow tube currents as the air flowed around the baffles. Once fully
cooled (and as the seeing began to stabilize), the views were impressive. Saturn showed this particularly well,
with the Cassini Divsion, several bands, and the darker polar region being easy to see.
What impressed me most however were the coatings and the contrast. There was a lot of very dark sky almost
right up the edges of the rings, and the faint inner moons Dione, Rhea, and Tethys stood out well. I even picked
up Enceladus at times, although it was quite marginal. Jupiter was equally good, with 7 or 8 belts visible and
fairly nice contrast in the finer detail. In fact, the most telling comment about the view from a fellow observer at
a local star party was, “It snaps!”, referring to the focusing not being as vague as is seen in some SCTs. Granted,
my 10 inch Newtonian with its larger custom-figured primary and smaller secondary mirror did yield just a tad
better view, but quite frankly, the NexStar 9.25 gave it a real run for its money. High power did reveal some
image shift during focusing of around 40 arc seconds which is fairly typical of many commercial SCTs, and is
probably one big reason people who do photography with these scopes lock the primary and put on external
focusers.
On Deep-sky, the NexStar 9.25GPS continued to shine. Star images were good across most of the field, with the
only obvious aberrations being in either the eyepiece or my own eyes. It resolved double stars and tight clusters
well, and made the companion to M35 (NGC 2158) look about as good as it did in my ten inch Newtonian. At
our star party, I was “doing requests” using the Go-To capability, and nailing object after object in rapid
succession. One of the requested objects was the “Eskimo” Nebula (NGC 2392), and I decided to kick things up
a bit using my 5-8mm Speers-Waler eyepiece. At its low power end (297x), the object showed its two-shell form
well, but just for fun, I pulled the slide out to go to 479x. The view of the Eskimo became even better, with more
detail visible at that extreme power, not only in the inner oval shell, but in the outer shell. Two people stated that
they had never seen this object look this good, so the NexStar was definitely performing well.
The field of view using the 1.25” visual back was somewhat limited (less than 0.67 degrees), so this was a slight
drawback for some deep-sky viewing, as well as for the overall success level of the Go-To function. The use of a
focal reducer may only provide a modest improvement in the field of view, since the main “bottleneck” is the
file:///C|/web/nexstar.htm (9 of 14)3/28/2004 8:38:35 AM
Untitled Document
Copyright (c) Cloudy Nights Telescope Reviews
somewhat restrictive diameter of the reducer’s lenses. For those who want more field with the NexStar 9.25GPS,
I might recommend the use of a 2 inch visual back and a longer focal length 2 inch wide-field eyepiece. A long
(and possibly heated) dewcap is also a must for observing under cool or moist nighttime conditions.
Mount and Electronic Drive Performance
The mechanical performance of the NexStar 9.25 was also fairly good. In the altazimuth mode, the instrument’s
mount damped out vibrations at between two and three seconds. This isn’t too bad, but isn’t exactly outstanding
either, so perhaps the tripod might be partially responsible for this. The tripod came with rubber feet, and I found
that for solid surface setup, it was best to remove those feet. The instrument’s slewing and tracking abilities
worked pretty much as advertised, although there were a few minor problems. In the altazimuth mode after doing
minor manual tweaks to the positioning of an object in the scope, there would be a little occasional azimuth “lag”
drift at low temperatures before the scope started tracking well again. Some of this effect can be taken out via the
“anti-backlash” option in the instrument’s setup.
Getting a GPS alignment was fairly easy (although it sometimes took several minutes to just access the
satellites), and the steps provided in both the manual and in the prompts in the display window got me up and
running fairly quickly. If I got impatient with the time needed for a satellite access, the proceedure allows
entering your local data by hand, so once in a while, I just did that. One potential headache which was missed by
the manual is that the GPS receiver in the NexStar is powered by its own internal battery which needs to be
recharged if the scope is not used for a long period of time. As such, after a person gets a new NexStar GPS, the
scope may need to be turned on and left sitting for as much as 20 hours to fully charge the GPS battery.
Once I selected the GPS option, the scope started moving while it downloaded the information from the
satellites. It got the time about an hour off at one point (it had been apparently set for Eastern Standard Time), so
I had to adjust it manually, but from then on, every GPS alignment got the time correctly, as well as the location
of my site. From that point, the scope did a slew to the first of its two alignment stars. During the first attempt,
the scope stopped about 10 degrees away from the target star, so I had a long slew to center it in the finder. Once
that was done, I hit the ENTER button and the scope “downshifted” to a slower slew rate, prompting me to
center the star in the eyepiece and then hit “ALIGN”. After this, the scope slewed to where it thought the second
alignment star should be, but again, it was about 7 degrees away from its true location. I repeated the “finetuning” of the alignment, and all was well, with the scope slewing to and tracking any object in its database
which was above the horizon. The scope has an internal compass to help determine where north is. This compass
can be “calibrated” to reflect magnetic deviation by pointing the scope to true north and hitting a button. Doing
this made future GPS alignment star slews much closer to where the stars really were, although the scope still
could not do a full and accurate alignment without some operator intervention.
There were a few “bugs” however, mostly due to “induced operator error”. The manual, as usual, falls short of
what it needed to emphasize when it comes to getting things to work properly. I had problems getting the scope
to track until I realized that the scope had to have both its locks fully engaged and the scope pointed downward
(ie: below the horizontal) at the start of the alignment proceedure. There was also a little missing or inadequatelyexplained information about what keys to press to get various things properly entered into the telescope’s
software from the hand controller. For example, the method for changing the sign of the declination input when
you want to slew to a specific set of coordinates is not mentioned any place in the manual, (you use the “up” or
“down” buttons) and it took me a little experimentation to find out how to do it.
file:///C|/web/nexstar.htm (10 of 14)3/28/2004 8:38:35 AM
Untitled Document
Copyright (c) Cloudy Nights Telescope Reviews
The hand controller also has a few design problems, with the most obvious one being that it won’t stay in its little
“recess” on the side of the fork when the scope is being carried. Thus, after it fell out several times, I just
removed it and disconnected its cord from the telephone-style jack in the recess when I wanted to move the
telescope. A little Velcro or a small rubber band would have solved this pesky problem nicely. The telephonetype jack for the cord inside this recess was also a problem, as it was positioned in an orientation and location
which made it fairly difficult to reconnect the cord, especially when wearing gloves. One other potential problem
was that the cord was apparently not “tied off” in a knot inside the hand controller, as is often standard procedure
with electrical cords. I noticed that the outer insulation covering three or four wires inside the cord did not go all
the way inside the opening for the cord on the back of the hand controller. With enough pulling on the cord
during routine use, this could eventually cause those thin internal wires to fail. I was able to push the outer
covering of the cord into the opening a bit, but eventually, it may very possibly come out again. A little RTB
would probably cure the problem, but it really should have been attended to at the factory.
The keys on the hand controller’s keypad are illuminated (dim red) and fairly large, but the arrow keys for
slewing the telescope are located a little close to the other keys. There were several times when, while looking in
the eyepiece, I ended up hitting the wrong key and screwing up the telescope, forcing me to realign things
properly. I wonder if any of these manufacturers will ever just pull their heads out of the sand and put in a simple
“Gameboy”-style rocker joypad instead of these silly buttons, or at least move them a bit farther away from the
other entry and control buttons.
The LCD display window allows messages such as alignment prompts, object data, and the various menus and
utilities to be displayed. In the case of about 200 objects, one touch of the “INFO” key will cause the display to
scroll a long description across its window describing various aspects of the object currently in view. I found it
amusing to hit the button while Jupiter was in the field, watching the words, “JUPITER ... IS ... THE ...
LARGEST ... PLANET ... IN ... THE ... SOLAR ... SYSTEM”, ect. scroll by and then try to guess what the next
word to come across the display would be. In the case of most experienced observers, some of the information
might be a little on the basic side, but for a public event, people in line waiting to look might find the scrolling
display interesting to read. For the other objects in the NexStar’s database, only basic catalog data is provided
(ie: R.A. and Dec., constellation, type, size, magnitude, ect.).
The display was fairly easy to read and worked pretty well except when the temperature dropped much below
about 29 degrees F. The scope continued to function, but the moving messages which scrolled horizontally
across the window became sluggish and occasionally hard to read. At lower temperatures, even the updates to the
display became a bit sluggish. I tested the scope and controller at temperatures as cold as -4F, and while the
scope worked, that level of temperature made the display go completely blank. If the user intends to run the
telescope from the hand controller in such cold conditions I would recommend keeping the controller in a warm
environment prior to operation, or using one of the after-market display heaters keep it warm while in use.
The manual also had pictures and collimating instructions which were not those for the NexStar 9.25GPS (a sort
of “generic” manual for the line). This made a difference when it came to looking for the collimating screws and
seeing diagrams showing a Fastar cover over the secondary screws and references to allen screws instead of the
phillips screws which were really present. The 9.25GPS is not Fastar compatable, so the diagrams should have
reflected this. A warning should also have been included about not removing all three of the collimating screws
at the same time, as they are all that keeps the secondary from falling into the tube (this might conceivably
happen when someone is replacing them with “Bob’s Knobs”).
file:///C|/web/nexstar.htm (11 of 14)3/28/2004 8:38:35 AM
Untitled Document
Copyright (c) Cloudy Nights Telescope Reviews
With the scope properly aligned, I had lots of fun going to various targets all over the sky. To do this, all you
needed to push a few buttons and off it went. The hand controller menus and operation is pretty straight forward,
and in this case, the manual does give a nice flow chart showing how things are structured. One thing I did miss
was the “beep” which a Meade LX-200 puts out when it finally stops at the object. On the NexStar, there is a
little rotating “bar” on the display which merely vanishes when the scope has finished its Go-To slew. There
were a few times, however, when the scope failed to get the object into the field of the telescope, mostly due to
either too high a power limiting the field of view, or due to an alignment issue which I like to call, “the NexStar
Gremlin”.
The “Gremlin” can sometimes put the scope from one to as much as seven degrees away from what you are
trying to find! When aligning the scope, it is vital that the correct time and location are input, and even with all
the “bells and whistles” of GPS, this can sometimes go wrong. When in doubt, the straight two-star method is the
best way to insure proper celestial alignment. Also, it is best not to use the planets for the early alignment
“tweaks”, as initially, their positions are not accurate enough in the instrument for a good consistent alignment.
Once alignment is achieved, you should not do another realignment “tweak” right after aquiring the first target
(you should only do this when it is clear that things are not appearing anywhere in your widest field of view).
Just do your manual slew to center what the scope has gone to and when you are finished viewing it, go directly
to the next object without realigning.
The pointing accuracy for successive Go-To operations was generally around 14 to 19 arc minutes, so the object
was almost always somewhere in the 38’ arc field of view of my 30mm Ultrascopic. Doing a two-star alignment
on stars which were widely separated on the sky did improve this accuracy to a little under 7 arc minutes at
times, but in the altazimuth configuration, this level of accuracy was not maintained after several slews. Perhaps
in the equatorial configuration, the accuracy would have been a bit better. Still, the telescope tracked well in the
altazimth mode, requiring very little tweaking to keep the object perfectly centered over longer periods of time.
Short exposure astrophotography may be possible with the scope running in the altazimuth configuration, but I
would still recommend that photography be done with the scope on an equatorial wedge.
I tried an “acid” test of the Go-To and tracking ability of the NexStar in the altazimuth mode by selecting a star
at a very high angular altitude which would pass very close to the zenith during tracking. The star’s calculated
maximum altitude was 89 degrees 50 minutes, so this would definitely be a real “Dobson’s Hole” challenge for
the instrument. I turned on the NexStar’s altitude/azimuth display to see how high the star got before the scope
had any potential problems show up. However, the scope passed this test with flying colors, going to the star and
then successfully tracking it as it passed right through the meridian. During the “height” of the pass, the scope’s
azimuth tracking motor’s speed increased dramatically, and I could easily see the scope rotate as it tracked (it
was still very quiet however). Thus, I had to actually walk around the tripod a bit as I looked into the eyepiece
during the height of the pass. While the star moved a bit in the field, at no time did it pass beyond the field edges.
If the performance is this good in altazimuth, it should be even better on an equatorial wedge.
Summary
Things I liked:
The very good optical performance, the Go-To ability, the multiple alignment modes and the GPS capability, the
nice database, the quiet operation, the Altazimuth and Equatorial tracking capability, the standard 12 volt
relatively-low current drain power requirements, the speed of setup, and the overall finish of the scope.
file:///C|/web/nexstar.htm (12 of 14)3/28/2004 8:38:35 AM
Untitled Document
Copyright (c) Cloudy Nights Telescope Reviews
Things I did not like:
The hand controller falling out of its recess, the occasional operator “screwups” or Go-To failures (ie: the
“Gremlin”), the play in the altitude axis, the low position of the finderscope, the focusing image shift, and the
inadequate manual.
Overall, the Celestron NexStar 9.25GPS is a good example of a Go-To SCT, which I would have few
reservations about recommending to almost anyone (although if you can’t easily lift something on the order of 60
lbs, this scope might not be the best one for you).
Jeff Richard's (Nexstar GPS forum moderator) Additional Comments
I found David’s review to be wonderfully adept and thorough. I do want to point out a few minor points from a
“seasoned” NexStar GPS owner who’s been around since the initial release of the line.
I would like to add a word of caution with respect to the 12 VDC outlet on the top of the base. Although
Celestron does not officially state a current limit for this outlet, the word from the engineers is to limit this to
probably no more than 500mA to prevent possible damage to the internal slip rings which deliver the power
from the non-rotating base. Under no circumstances should you consider connecting a dew heater of any sort to
this outlet.
When using the scope on the Celestron HD wedge, you will have to use the bolts supplied with the wedge. The
normal shoulder bolts will not have a long enough thread to reach the bolt holes on the base of the scope.
David’s warning of limiting the bolt penetration into the holes however is an appropriate word of caution.
Another thing to remember when using the Celestron HD wedge is that it is best mounted to the tripod using
the inserts that were supplied with the tripod. Those are the things that were taped to the tripod and had you
scratching your head wondering what they were for. The inserts are placed in the holes from underneath and
the wedge mounting bolts are threaded into them vice the threaded holes on the tripod top. This placement will
allow for the proper use of azimuth adjuster on the wedge. That said, the Celestron HD wedge is under sized
for the NexStar 11 and NexStar 9.25 GPS scopes and it would be advisable to look for an aftermarket
alternative.
Power is another item of concern with any computerized telescope and the NexStar is not immune to power
related problems. The supplied 1.5A AC adapter works well and you should not consider going with anything
with a smaller capacity. A good deep cycle battery of at least 17 A-H capacity would be a good choice for field
use. It’s advisable to not allow the voltage to drop below approximately 11.5 V as erratic behavior could result.
If you find that the scope is behaving erratically, the power supply should be the first thing to troubleshoot.
The weak link in the power system is actually the connector chosen for the base and this has been a trouble
spot in the past. I typically route my power cable through the small opening between the top of the tripod leg
and the tripod head as this will tend to help protect the power cord from pulling out at the slightest tug.
file:///C|/web/nexstar.htm (13 of 14)3/28/2004 8:38:35 AM
Untitled Document
Copyright (c) Cloudy Nights Telescope Reviews
I have one minor correction to David’s report regarding the user definable objects. There are actually 200 astro
and 200 land objects which can be entered into the hand controller database. The difference between the two is
that the astro objects data is recorded using the RA and DEC of the object and there fore point to a location on
the celestial sphere. The land objects are recorded as Alt/Az points and therefore will not change their position.
Since the NexStar 9.25 GPS has a standard SCT rear port (it doesn’t have the large opening of the 11” and 14”
OTA’s), the widest TFOV is best attained with a Panoptic 24mm and f6.3 reducer/corrector combination.
Using lower power more expensive 2” eyepieces will not gain you any TFOV and the reducer/corrector has the
advantage of flattening the field. Make sure you stay away from the f3.3 reducer for visual use as it was
designed solely for CCD imaging and will give very unpleasant views through an eyepiece.
If you have any questions, please stop by the Cloudy Nights Celestron NexStar GPS forum. There are a
number of folks there that are more than willing to answer your questions and help you out.
Discuss this in the Cloudy Nights Forums
file:///C|/web/nexstar.htm (14 of 14)3/28/2004 8:38:35 AM