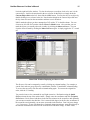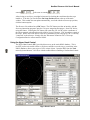
1
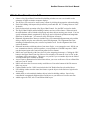
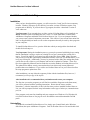
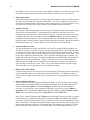
NexStar Observer List
by Mike Swanson
Version 2.6
User's Manual
Contents
Contents ........................................................................................................................................................ 1
Introduction................................................................................................................................................... 1
What's New Since Version 2.0?.................................................................................................................... 2
Installation and Uninstalling ......................................................................................................................... 3
Installation................................................................................................................................................. 3
Uninstalling............................................................................................................................................... 3
Basic Operation............................................................................................................................................. 5
Setup ......................................................................................................................................................... 5
Creating Observer Lists ............................................................................................................................ 7
Printing an Observer List ........................................................................................................................ 11
Alignment Star Chart .............................................................................................................................. 12
Red Screen Mode.................................................................................................................................... 13
Using NSOL with Your Telescope ............................................................................................................. 14
Using an Observer List to Control the Telescope ................................................................................... 14
Using the Hyper Hand Control ............................................................................................................... 16
PC to Scope Communication Problems .................................................................................................. 17
NexStar Observer List in Action................................................................................................................. 20
Using NSOL to Prepare for a Session..................................................................................................... 21
Using NSOL's HHC When You Haven't Prepared in Advance.............................................................. 23
Advanced Features...................................................................................................................................... 24
Exporting Observer Lists ........................................................................................................................ 24
Importing Data ........................................................................................................................................ 25
Technical Support ....................................................................................................................................... 27
Appendix A - Object Names in the Double Star List.................................................................................. 28
Appendix B - Constellation Names and Abbreviations .............................................................................. 30
Appendix C - Greek Alphabet and Abbreviations ...................................................................................... 31
Appendix D - Key to Dreyer's Descriptions in the NGC/IC....................................................................... 32
NexStar Observer List User's Manual
1
Introduction
NexStar Observer List (NSOL) allows you to create Observer Lists that are automatically saved
to the hard drive of your computer. You build the lists by choosing from tens of thousands of
deep-sky objects and stars. The NSOL database includes 47,844 objects:
• The entire Messier catalog (110 objects)
• The entire Caldwell catalog (109 objects)
• The entire NGC catalog (7,840 objects)
• The entire IC catalog (5,386 objects)
• The entire Abell galaxy cluster catalog (4,076 objects)
• All 15 magnitude or brighter galaxies from the UGC catalog (6,009 objects)
• 12,677 stars organized by SAO number and including HD numbers and common
names
• 11,637 double stars from the Saguaro Astronomy Club (www.saguaroastro.org)
database including supplemental names for Struve catalog stars contributed by
Thomas Kovacs ([email protected], www.haliburtonforest.com). See Appendix
A for a description of the names used in this list.
• And you can add as many additional objects as you wish!
NSOL allows you to more easily GoTo objects not in the NexStar database, such as objects you
learn about in magazine articles and books. You can create as many Observer Lists as you like,
highlighting objects of interest to you. For example, you might create a list of double stars and
globular clusters for the month of May to provide enjoyable viewing during a full moon. Or a list
of galaxies in Virgo and Coma Berenices for a dark-site trip in April. And you can exchange
your lists via email with other NSOL users or submit your favorite Observer Lists to the author
([email protected]) and they will be posted on the NexStar Resource Site
(www.NexStarSite.com) for others to download and enjoy. Visit the NexStar Observer List
section of the web site to download some of these pre-built Observer Lists such as the Herschel
400 organized by month.
NSOL works with all NexStar telescopes (including the reportedly non-functional GT hand
control shipped with the original NexStar GTs) as well as CGE, AS-GT (Advanced Series with
GoTo) and Ultima 2000 telescopes. NSOL also works with Tasco StarGuide telescopes. Your
computer must be running Windows 95/98/ME/NT/2000 or XP and have at least 30MB of free
hard drive space. Even an older, modest laptop will provide good performance with NSOL.
As with any Windows program, you will note that some menu items have shortcut keys listed,
such as Ctrl+N for creating a New List. Also, menus can be accessed with Alt and the underlined
letter in the menu name. The same goes for buttons in the various screens, Alt and the underlined
letter performs the same action as clicking the button with the mouse.
Clear Skies and Happy Computing!
Mike Swanson
2
NexStar Observer List User's Manual
What's New Since Version 2.0?
•
•
•
•
•
•
•
•
•
•
•
•
•
•
Observer List, Hyper Hand Control and list building windows are now user-sizeable to take
advantage of higher resolution computer displays.
The Observer List can now be sorted on any column by clicking the appropriate column heading.
Easier list building with improved keyboard-only search and add. See "Creating Observer Lists"
for details.
Easier keyboard-only operation of the Hyper Hand Control. See the HHC section for details.
The Hyper Hand Control and list building windows now have a filter feature. When activated,
the main database will be limited to displaying only those objects meeting your criteria. You can
specify minimum altitude, magnitude by object type and even desired separation and magnitude
difference of double stars. You can now easily find objects of interest.
Enhanced Alignment Star Chart now includes lists of recommended alignment star pairs and the
ability to display only the stars offered by Auto/GPS Alignment. The Alignment Star Chart,
including recommended star pairs, can now be printed as well. See the Alignment Star Chart
section for details.
Enhanced interaction with hcAnywhere (from Astro Geeks - www.astrogeeks.com) - NSOL can
now communicate directly with hcAnywhere, even on Windows 95/98/ME computers. NSOL
can also import/export tours from/to hcAnywhere (hcTour format).
NSOL now works directly with Cartes du Ciel (www.stargazing.net/astropc). Clicking the CDC
button in the Hyper Hand Control or Observer List windows will center the view in CDC on the
coordinates of the current object. This proves very useful if you see another object in the field of
view and would like to confirm its identity.
A new Export to Planetarium for Palm feature allows you to use an Observer List on a Palm Pilot
and leave your PC inside.
NSOL now shows the five most recently used Observer Lists at the bottom of the File menu to
allow easy access.
Updated double star list - NSOL now includes the SAC Double Star list as described above.
List building window now has Auto Sort feature to put the objects in the list into a logical order
for viewing.
Added ability to select multiple database objects in the list building window. Sort a list by
constellation or magnitude and then add several objects to your Observer List all at one time.
Added support for CGE, AS-GT and Ultima 2000 scopes.
NexStar Observer List User's Manual
3
Installation and Uninstalling
Installation
After you have downloaded the program, you will next need to "unzip" the file into a temporary
location. Windows XP opens zip files directly, but earlier versions of Windows require a zip
program such as WinZip. If you don't have a zip program, check the “downloads” section of
www.zdnet.com.
Very Important: If you currently have an older version of NexStar Observer List installed, you
MUST uninstall it prior to installing this new version. Go to the Start Menu, Control Panel,
Add/Remove Programs and double-click NexStar Observer List. If you are prompted whether
you want to remove shared components, answer no. This will leave your current observation lists
and User Supplied Objects intact as well as other components that may be used by other programs
in your computer.
To install NexStar Observer List, open the folder into which you unzipped the download and
double-click on Setup.exe.
Very Important: During the installation process, you may be presented with dialog boxes stating
that the installation is trying to replace an existing file on your system and the existing file is
newer. You will be asked if you want to keep the existing file: answer YES. Many programs
will present you with this option during installation and 99% of the time you should answer yes to
keep your existing file. Additionally, you may be presented with a dialog box stating that certain
system files are out-of-date on your computer and need to be updated to continue. These files
have been updated by Microsoft and are needed to access the database in NexStar Observer List.
The updated files address security concerns that have been discovered in many Microsoft
products that access databases. If you wish to use NexStar Observer List you will need to allow
the setup program to update these files.
After installation, you may delete the temporary folder with the installation files; however, I
recommend you keep a copy of the zip file.
After installation it is recommended that you shutdown and restart your computer.
The first time you run the program (you will find it was added to Programs on the Start menu),
you will be presented with the operating instructions. Please take the time to read the
instructions. After the instructions, if this is the first time you have installed NexStar Observer
List you will be prompted for basic setup information such as type of telescope, communications
port, etc.
If the program won't start after installing and your computer uses Windows 95 or Windows 98,
revisit the NexStar Observer List page on www.NexStarSite.com and download the DCOM
patch.
Uninstalling
If you decide to uninstall NexStar Observer List, simply open Control Panel on the Windows
Start Menu, then open Add/Remove Programs. Look for NexStar Observer List and double-click
4
NexStar Observer List User's Manual
to remove. Very, very important: when you are prompted about removing shared files, click the
button “Remove None”. This will leave components that might be in use by other programs in
place and it will also leave any Observer Lists and the file containing your User Supplied Objects
in your data folder (generally C:\Program Files\NSObserverList\Data).
NexStar Observer List User's Manual
5
Basic Operation
Setup
The Setup options presented when the program runs the first time can be found on the Tools,
Setup menu. Most of the items are self-explanatory, but some might require clarification.
•
Telescope Type
Selecting Telescope
Type is straightforward
unless you own a
NexStar 60/80/114/4
model. If you own a
NexStar 60/80/114/4
built prior to December
2001 and have not
received the updated
hand control from
Celestron, select OLD
NexStar 60/80/114/4 as
the telescope type. If
you are unsure of the
manufacture date, first
try the NexStar
60/80/114/4 selection
and if that doesn't work,
try the OLD NexStar
60/80/114/4 selection.
•
Communication
Settings
Generally you will be
communicating with
your telescope using the
Setup Options
RS-232 port on the
bottom of the hand control. In this case, select the Comm Port number you will connect to on
your PC/laptop. NSOL can also communicate with hcAnywhere (from Astro Geeks www.astrogeeks.com) either by using a Virtual Port or directly. When using the virtual port
method, select the Comm Port number just as you would when using the regular hand control.
To communicate directly with hcAnywhere, select hcAnywhere Direct instead. The direct
method is especially useful if your computer runs Windows 95/98/ME since hcAnywhere cannot
create a virtual port on those operating systems.
•
Use Windows Time Zone Setting?
This setting allows the program to calculate the correct universal time (UT) without you worrying
about whether your location is currently observing Daylight Savings Time or Standard Time. It
will only work if you have set the correct time and selected the correct time zone in Control
Panel, Date/Time (you can also set this by double-clicking the time in the lower right corner of
6
NexStar Observer List User's Manual
the Windows screen). If your time zone is not available in Windows, you will need to remove the
check mark on this option and manually enter the number of hours you are away from UT.
•
Observing Location
Observing Location is used with UT to calculate the current altitude of objects, to draw and print
sky charts, and to filter objects using the Altitude Filter. You do not need to be too precise; the
observing location settings have absolutely no effect on the accuracy of GoTo operations. If you
are within 100-150 miles of the correct settings, you will hardly notice the difference.
•
Altitude Controls
The Altitude Controls settings allow you to prevent GoTo operations below the minimum setting
and above the maximum setting. If you attempt a GoTo outside of your limits, you will be
prompted and can then choose to override and GoTo anyway. If you do not wish to receive these
warnings at all, remove the check mark next to Use Altitude Controls. Note that this feature is
especially useful when using the scope in equatorial mode since the altitude info on the GT and
original NexStar 5/8 hand control is not local altitude, but rather the object’s altitude in relation to
the tilted base of the scope. NexStar Observer List will always use the local altitude.
•
Location of Observer Lists
This option determines the folder your Observer Lists and User Supplied Objects database are
stored in. This can be convenient if you are currently making backups of a My Documents folder
(or similar) and want to include your NexStar Observer List data in the backup as well. You will
need to create a separate folder in the My Documents folder, perhaps named “NSOL Data”. Then
use the Browse button to select that folder. Then exit NSOL and using Windows Explorer, you
should copy all the files from the C:\Program Files\NSObserverList\Data folder (the default data
folder) into your newly created folder. Caution: if NexStar Observer List cannot find the file
NSObserverUserList.mdb (the User Supplied Objects database) in the folder you selected, you
will not be able to edit Observer Lists. Thus, if you are not familiar with moving and copying
files in Windows, it is recommended you do not change this setting.
•
Object Color in Sky Charts
Use this setting to choose the color of the oval representing the selected object in the small all-sky
charts found in the Observer List and Hyper Hand Control windows. The default is a dim red
color (to preserve night vision), but if you use a red filter over your laptop display, red will not be
visible.
•
Screen Settings in Windows
NSOL works best at screen resolutions of 800x600 or higher. You can configure this setting by
right-clicking on the Windows Desktop (the background behind all the program windows and
icons) and clicking Properties. Select the Settings tab and adjust the screen resolution if
necessary. If you must use a screen resolution of 640x480, you must also set the Taskbar to
Auto hide. Click on the Windows Start button, then select Settings and then Taskbar & Start
Menu. Put a checkmark in the box next to Auto hide and click the OK button.
Also, if your version of Windows has a Themes tab in the Display Properties window, you might
want to select the "Astronomy Friendly.Theme" found in the folder where NSOL was installed
(generally C:\Program Files\NSObserverList). In Windows 95/98, you will find Desktop Themes
in the Control Panel. The theme included with NSOL works well with the red-screen night-vision
mode in most astronomy programs. Note that this theme will change your "wallpaper" to "none"
and will also turn off any screen saver you may be using. You can manually reset these after
NexStar Observer List User's Manual
selecting the new theme if you wish.
Creating Observer Lists
The real power of NSOL is the ability to organize your observing session. Prior to stepping
outside, you can create an Observer List that will keep you on-track throughout the night. To
get started, use either the File, New List menu command (keyboard shortcut - Ctrl+N) or click
the first button on the toolbar. You will then be asked to name the list. Choose something
descriptive such as “Best objects for January”. After typing the name and clicking the Save
button, you will be presented with the Observer List window. The Observer List window
displays the current list and allows you to control your telescope (described in a later section).
The list will be empty at first, so you should begin by clicking the Edit List button.
Main NSOL Window Displaying Observer List
After clicking Edit List, you will be presented with a window that accesses the full NSOL
database. The pane to the left is the list you are building, while the right side of the window is
comprised of the eight separate lists of the full database. Click the tabs with the list names
(Messier, Caldwell, etc.) to pull that list to the front, or press Ctrl+Tab to cycle through the lists
front to back, Shift+Ctrl+Tab to cycle through the list back to front. For example, Ctrl+Tab
moves from Messier to Caldwell to NGC, while Shift+Ctrl+Tab moves from NGC to Caldwell
to Messier.
Each list has a section that lets you search by Object Number or Common/Alternate Name
7
8
NexStar Observer List User's Manual
(labeled simply “Name” in the lists). While you might not mind scrolling down the Messier or
Caldwell lists, most of the other lists are very long and the search feature will be a big time saver.
Note that additional catalog numbers (such as HD) for are found in the Common/Alternate
Name field while the SAO catalog numbers are in the Object Number column.
Searches in the Object Number field require an exact match in the Messier, Caldwell, NGC, IC,
and SAO Star lists. In other words, if you search for 10, NSOL will find only Messier 10, not
103, or 110. Searches in the Object Number field in the User Supplied and DSO lists, and
Common/Alternate Name in all lists, do not require an exact match. For example, searching
Messier for "cluster" in Common/Alternate Name will first locate M6, the Butterfly Cluster;
clicking the Find Next button will next locate M7, Ptolemy's Cluster, and so on. The Find Prev
button is useful when you go past your target.
Edit List Window
Searching in the Double Star list is a bit different than all the rest due to the wide variety of
catalogs used in the name field. You may only search on the name field but you have options for
"exact" or "close" matches. If you search for ADS 1 with Exact Match selected, you will only
find ADS 1. If you search for ADS 1 with Close Match selected, you will first find ADS 13230,
then clicking Find Next will find ADS 16556, and so on. Again, Find Prev is useful if you go
past your target.
NexStar Observer List User's Manual
9
The search feature was optimized to take advantage of the keyboard. In the above scenario, after
first typing "alpha" in the Search for box, press Enter to find the first occurrence, pressing Enter
successive times will find the next and then the next and so on.
Adding an item to your Observer List goes as follows. First you find an object you wish to add to
your Observer List and then you either click the Add button at the upper left corner of that list or
simply press Alt+A (notice the A on the add button is underlined). You will notice the typing
cursor automatically returns to the Search for box. Thus you can type 10 in the search box, press
Enter to locate Messier 10, and then press Alt+A to add M10 to your Observer List. Then you
can type 12 in the search box, press Enter to locate Messier 12, and then press Alt+A to add M12
to your Observer List. Alternately you can double-click the gray button at the left edge of the
row for that object (this button is also known as the row selector).
To select multiple objects scattered throughout the list, hold down Ctrl on the keyboard, then
click on each object. To select several objects listed contiguously (all together), click on the first
object, then hold down Shift on the keyboard and click on the last object. Note that Shift-click
does not work if you click the row selector on the left edge of the list - click anywhere else on the
row of the desired object. To add all the selected objects to your Observer List, click the Add
button. All of this might sound a little confusing, but it’s easier done than said!
The object lists on the right can be sorted on any column by simply clicking on the column
heading. Clicking the column heading a second time reverses the sort order. You may find the
Constellation sort order to be most useful as it allows you to easily cover many interesting objects
in a specific area of the sky. RA can be useful when trying to match an object whose name is
uncertain - especially true of double stars. Also, you can resize the width of any of the columns
by "clicking and dragging" the divider line between two column headings. For example, to make
the Number column narrower, point the mouse cursor at the divider line between "Number" and
"Name". Click and hold the left mouse button and drag left or right to adjust the width.
The sky chart on the left shows you the location of the object you have selected from your
Observer List, or the object you have selected from the tables in the NSOL database (notice the
difference in color). Note that it defaults not to current date and time (unless it is between 1 and 6
AM), but rather 10 PM of today's date. You can change the date and time of the sky chart with
the
button. This sky chart makes it easier to both organize the order of the items in
your Observer List as well as insuring you select objects that will actually be above the horizon at
your expected viewing time.
One of the eight lists is different from the rest - the User Supplied Objects. Using the Edit
button to the left of this list, you can add, edit and delete items in this list. You can also edit the
User Supplied Objects after starting NexStar Observer List (no need to open an Observer List) by
using the Tools, Edit User Supplied Objects menu command. Also, you can add a large number
of items all at once using the Import command as described in the Advanced Features section.
Note that when adding objects to the User Supplied list, coordinates cannot include
seconds/arcseconds. To enter coordinates with seconds/arcseconds, you must convert them to
decimal fractions of a minute/arcminute and include them in the minutes/arcminutes box. The
Seconds to Decimal conversion boxes help to simplify this process. For example, if you want to
enter 23m 34s, type 34 in the box under seconds and you will find this equates to 0.57. So, in the
arcminutes box you would enter 23.57.
At the bottom right of the window is the Filter button. When activated, the filter will prompt you
for several criteria and limit the lists of the full database to only those objects that meet the
10
NexStar Observer List User's Manual
criteria. Clicking the Filter button a second time deactivates the filter.
Use the Filter to find objects of interest to add to your Observer List. For example, the altitude
filter insures the database lists are limited to only those above the horizon (and your specified
altitude) during your expected observing session. Filter for globular clusters, planetary nebula
and open clusters with magnitudes of 0 to 8 to create a list of the brightest deep sky objects to
show to your visiting friends.
Filter Options
In the example shown here, only objects above an altitude of 20 degrees will be shown. The
altitude of the objects is calculated for the date and time shown below the sky chart on the left of
the Edit List window. The Altitude Filter requires correct time zone and location settings in the
Tools, Setup menu item. In the deep sky object lists (Messier, Caldwell, NGC, IC, Deep Sky
Objects), galaxies will not be shown and objects in the other categories (globular cluster, open
cluster, etc.) will only be shown if the magnitude is between 0 and 12. Only double stars with a
separation between 2 and 30, a magnitude between -2 and 10 and a difference in magnitude of 0
to 10 will be included. For example, Polaris (primary) has a magnitude of 2.1 while its
companion (secondary) has a magnitude of 9.1 for a difference of 7 - well within the limits
established. Castor's two components have a difference of 0.9 magnitude (2 and 2.9) - also within
the limits. Objects in the User Supplied Objects table will be limited to those with a magnitude
between -2 and 12.
Use the Save As... button to store the current settings in a named file. You can save many
different filter sets - for example, one for "Bright DSOs", another for "Faint Galaxies", another
for "Tight Double Stars". You can retrieve any of these sets using the Open... button. Even if
you don't save filter sets, NSOL will remember the last settings you used.
NexStar Observer List User's Manual
11
After clicking the OK button, filtering may take some time on a slower computer. On a 133Mhz
laptop, activating the filter takes almost 2 full minutes. On an 800Mhz laptop, the time is less
than 15 seconds. The filter remains active here and in the Hyper Hand Control (described later)
until you manually deactivate it or exit NSOL. Thus, if the filter is currently active, the next time
you open the Edit List window or the Hyper Hand Control, it may take several seconds before the
form appears.
Back in the Edit List window, below your object list in the bottom left corner, there are five
buttons:
• Close - Returns you to the main window.
• AutoSort - using the date and time shown below the sky chart, AutoSort will
reorder the objects to work around the sky starting with objects lower than 65
degrees in altitude, working from due south up through the west and on up to
north, then all the objects above 65 degrees altitude, then continuing again with
objects below 65 degrees, working from the north on down through the east and
back around to the south. AutoSort does not work well for lists that include
objects visible much later in the evening than the time listed below the sky chart,
so for an all-night session, you might want to create lists for each 2 or 3 hour
period.
• Move Up/Move Down - Use these to move objects up or down the list to finetune the order of the objects.
• Delete - Remove an object from the Observer List.
After you have added the items you want in the Observer List and placed them in the order for
best viewing (using AutoSort and Move Up/Down), click the Close button to return to the main
window. Now you can see that the Observer List window has three main sections. In the center
is the list itself. To the left is the full information for the currently selected object - Current
Object Info. To the right is an all-sky chart with the currently selected object shown as a small
oval. Notice the CDC button below the Current Object Info. The CDC button provides an
interface with the freeware planetarium program Cartes du Ciel (www.stargazing.net/astropc).
Start CDC before using this feature. Clicking the CDC button will center the view in CDC on the
coordinates of the object currently selected and provide a field of view of 5 degrees.
If you do not want to edit the list further and you do not wish to observe the objects with your
telescope at this time, you would close the Observer List. When you want to open one of the lists
you have created again later, use the File, Open Existing List menu command (keyboard
shortcut - Ctrl+O) or the button with the yellow folder. You will also notice that the most recent
lists you have used are listed at the bottom of the file menu - click on the name to directly open
that observer list. You can have up to eight lists open at the same time; the Window menu lets
you switch between all open lists. We will describe using these lists to control your telescope
later in the instructions.
Printing an Observer List
To print an Observer List, you must
first have the list open. Refer to the
directions above to open an existing list.
Use the File, Print menu command
(keyboard shortcut - Ctrl+P) or the
button with the printer. Then simply
12
NexStar Observer List User's Manual
choose whether you want a Compact List (prints the objects with a small amount of space
between each) or a List with Comment Area (prints the objects with room to write observing
notes after each). You can also print a Star Chart with all of your objects plotted either with or
without labels. If you have selected more than a few objects, be aware that the labels may
overlap. On a printed Star Chart, the first 180 objects plotted will be listed at the bottom of the
sheet.
Select the number of copies you would like and the correct printer if your system has multiple
printers available.
Alignment Star Chart
NSOL can also help you to locate your alignment stars. Use the Tools, Alignment Star Chart
menu command or the button with the star-studded black circle to display an all-sky chart with
the NexStar alignment stars designated. This feature is dependent upon the correct time zone in
Windows as described in the Setup section above. Note that it defaults not to current date and
time (unless it is between 1 and 6 AM), but rather 10 PM of today's date. You can change the
date and time of the sky chart with the
button. You can turn off and on the names of
the alignment stars with the Toggle Names button. The two dashed lines represent 20 and 70
degrees altitude - it is recommended you only select stars above 20 degrees and below 70 degrees
in altitude. You can also limit the alignment stars to just those presented by the Auto and GPS
Alignment routines. These are a subset of 21 of the full list of 40 alignment stars.
To the right of the chart you are presented with Best Alignment Pairs for both the Auto/GPS
Alignment routines and the Two Star Alignment routine. These are simply the pairs with the best
NexStar Observer List User's Manual
13
separation, one of the most important selection criteria for improved GoTo performance.
To print a copy of the Alignment Star Chart, click the Print button right on the chart window the File, Print menu command and the printer button on the tool bar will NOT print an
Alignment Star Chart. The chart will print based on the date and time shown on the Alignment
Star Chart window, so be sure to set this accordingly before clicking the Print button.
Red Screen Mode
When observing at night, the normal screen colors can ruin your night vision. To change the
screen colors to a scheme friendlier to dark-adapted eyes, use the Tools, Red Screen menu
command (keyboard shortcut - Ctrl+R) or click the button on the toolbar with the red-lens
glasses. To change back to a normal color scheme, repeat any of the above or, simply close the
program. In the event this program or any other astronomy program were to lock up or exit
abnormally leaving you with a red screen, you can restore normal colors by right-clicking on the
Desktop (the Windows screen background) and choosing Properties. Then go to the Appearance
sheet and choose the Scheme named Windows Standard.
14
NexStar Observer List User's Manual
Using NSOL with Your Telescope
When you are ready to use NexStar Observer List to control your telescope, setup and align your
telescope as you would normally. Remember the Alignment Star chart if you need help locating
two alignment stars. Connect the jack on the bottom of the hand control to the serial port of your
computer. For a diagram to build the correct cable, as well as a link to a source for pre-built
cables, visit the PC Control section of my web site (http://www.NexStarSite.com).
If your model of NexStar has an RS-232 mode in the hand control menu, you must enter that
mode for the telescope to communicate with NSOL. Test whether your PC can communicate
with your scope by clicking the Get Scope Position button in the NexStar Observer List main
window. An error or a response that doesn't match the position reported by the hand control
indicates problems; see PC to Scope Communication Problems below for assistance.
Caution: Whether you are using the hand control or a computer program for slewing
your telescope, it is possible the telescope might make contact with an immovable object
- generally the tripod or mount. For the N4, N5, N8 and GPS models, this is normally not
a problem, unless you are using an extra large diagonal or perhaps a camera. For some of
the reflector and refractor NexStars, it is easy for the telescope to make contact with the
tripod. For these reasons you should monitor your scope while in motion and be prepared
to cancel the slew. Generally you can cancel a slew with any of the direction buttons on
the hand control. Note that the Altitude Controls described in the Setup section above
can help to prevent this.
Note: The slew limit settings (minimum and maximum altitude) on the newer models of
NexStar scopes will prevent NSOL and other programs from slewing to an object outside
of the slew limits. If your scope does not move after sending a GoTo command, check
the slew limit settings in the hand control. To rely solely on the altitude controls in
NSOL, set the hand control's minimum Slew Limit to -90 and maximum Slew Limit to
+90.
Note: The original GT hand control for the NexStar 60/80/114/4 GT has a fault that
generally causes it to freeze when it receives two GoTo commands one after another via
the RS-232 port. This is not a problem with NSOL, but rather it happens regardless what
program you use. If the hand control locks up, you may be forced to turn off and restart
the scope, forcing you to repeat the scope’s alignment procedure. I have found you can
almost always prevent this by waiting until the GoTo is complete, then pressing any of
the direction buttons - for example, to center the object in the field of view. If this
doesn’t work for your scope, try pressing the Undo button on the hand control two or
three times after each GoTo. Also, the original GT hand control has a defect that
incorrectly reports the current coordinates when the telescope is pointed to a location
between 12 and 24 hours of right ascension and any negative declination.
Next, open the Hyper Hand Control to directly access items in the NSOL database or open the
Observer List(s) of objects you wish to view.
Using an Observer List to Control the Telescope
The Next and Previous buttons move through the list, or you can simply click on objects in the
NexStar Observer List User's Manual
15
list in the right half of the window. To slew the telescope to an object, check to be sure it is the
current object - look for the arrowhead in the row selector for that object or simply check the
Current Object Info on the left - then click the GoTo button. You can also slew to an object by
double-clicking its row selector in the list. Note that the altitude in the Current Object Info and
the sky chart are based on the current date and time as set in Windows.
NSOL marks the objects you have attempted to GoTo with a "Y" in the Go column. You can
clear one or all of the GoTo marks with the Clear Go Marks button. Also note that you can
mark the objects you actually observed (visually) by clicking the Observed button. You can
clear the observed mark by clicking the Observed button again - it simply toggles the "Y" on and
off.
Main NSOL Window Displaying an Observer List
The Observer List can be temporarily sorted by clicking any column heading. For example, to
sort the list in order to group objects by constellation, click the "Constellation" column heading.
To reverse the sort order, click the same column heading again. To return to the original list
order, click the "#" heading.
You can also issue a slew command for any Right Ascension - Declination using the Quick
GoTo section at the top of the main window. Simply enter the coordinates and click the Quick
GoTo button. RA is entered with hours in the first box, minutes in the second box and optionally
you can enter seconds in the third box. Dec is entered with degrees in the first box, arcminutes in
the second box and optionally you can enter arcseconds in the third box. Don’t forget to change
+ or - if necessary. If your coordinates have fractional minutes/arcminutes, enter them directly in
the minutes/arcminutes box and leave the seconds/arcseconds block empty. In other words,
16
NexStar Observer List User's Manual
entering
is the same as entering
.
After slewing to an object, you might be interested in checking the coordinates that the scope
landed at. To do this, you can click the Get Scope Position button at the top of the main
window. This readout does not update automatically; to refresh with the current scope position,
click the button anytime.
The Observer List window has a CDC button. The CDC button provides an interface with the
freeware planetarium program Cartes du Ciel (www.stargazing.net/astropc). Start CDC before
using this feature. Clicking the CDC button will center the view in CDC on the coordinates of
the object currently selected and provide a field of view of 5 degrees. CDC also allows control of
the scope. NSOL will not be able to send GoTo commands to your telescope if CDC is currently
"connected" to the telescope. Simply click the "Disconnect" button in CDC's Telescope
Configuration Panel to return control to NSOL.
Using the Hyper Hand Control
The Hyper Hand Control (HHC) provides direct access to the entire NSOL database. This is
useful if you haven't created a Observer List but would like to use the easy to search lists in the
NSOL database to direct your scope to GoTo various objects. Open the HHC from the Tools
menu (keyboard shortcut - Ctrl+H) or with the toolbar button resembling a NexStar hand control.
Hyper Hand Control
NexStar Observer List User's Manual
17
The HHC has four areas. The upper right portion of the window contains the eight lists of the
NSOL database. To access each list click the tabs along the top or press Ctrl+Tab to cycle
through the lists front to back, Shift+Ctrl+Tab to cycle through the list back to front. For
example, Ctrl+Tab moves from Messier to Caldwell to NGC, while Shift+Ctrl+Tab moves
from NGC to Caldwell to Messier. Use these lists to find the object you want to slew your
telescope towards. Each list also has a search section as described in Creating Observer Lists
earlier.
After finding an object in one of the eight lists, click the GoTo button or press Alt-G (notice the
underlined "G") and NSOL will direct your scope to slew to the object. The typing cursor returns
to the search box for easy, keyboard-only operation.
One of the eight lists is different from the rest - the User Supplied Objects. Click the Edit
button to the left of this list to add, edit and delete items in this list. Also, you can add a large
number of items all at once using the Import command as described later.
The object lists can be sorted on any column by simply clicking on the column heading. Clicking
the column heading a second time reverses the sort order. You may find the Constellation sort
order to be most useful as it allows you to easily cover all objects in a specific area of the sky.
RA can be useful when trying to match an object whose name is uncertain - especially true of
double stars. Also, you can resize the width of any of the columns by "clicking and dragging" the
divider line between two column headings. For example, to make the Number column narrower,
point the mouse cursor at the divider line between "Number" and "Name". Click and hold the left
mouse button and drag left or right to adjust the width.
At the bottom right of the window is the Filter button. Refer to the Creating Observer Lists
section earlier in the manual for details on the filter.
Below the object lists is a section for quickly slewing to any desired Right Ascension and
Declination. Simply enter the coordinates and click the Quick GoTo button as described in the
previous section. Get Scope Position also works as described earlier.
In the upper left of the HHC, you are presented with a simple all-sky chart. The object you
currently have selected from the lists to the right will be shown on the chart as a small oval, if it is
currently above the horizon. The sky chart is dependent upon the date, time and time zone
settings in Windows as described in the Setup section above.
At the bottom left of the HHC you will find full information for the item currently selected from
the lists on the right. The altitude is dependent upon the date, time and time zone settings in
Windows as well.
The CDC button provides an interface with the freeware planetarium program Cartes du Ciel as
described in the previous section.
PC to Scope Communication Problems
Laptops in particular can be a little tricky with the serial port. NSOL uses the most
straightforward method possible for communicating via the serial port, so if you are having
problems with NSOL, other programs will likely experience the same problem. Here are some
things to try to get your PC and scope communicating:
18
NexStar Observer List User's Manual
1. The telescope must be aligned before it will accept commands. To test indoors,
simply perform a Quick Align or an Auto Align, accepting the locations pointed
out for the two stars.
2. NSOL and almost all other astronomy programs can only communicate with the
telescope via the port on the bottom of the hand control - not the ports on the
base of the mount.
3. Perhaps you selected the wrong telescope type in the program; you will not harm
your telescope or computer testing other scope types.
4. Some combinations of computers and NexStar telescopes are sensitive to the
order of events when connecting the two. Try aligning the scope with the PC
disconnected from the hand control. Then connect the PC and start your
astronomy software.
5. For some models of NexStar (N5/8 and the new version of the N60/80/114/4),
you must enter 'RS-232' mode from the hand control menu before the scope will
accept commands.
6. Be sure there are no other programs using the serial port. For example, installing
Palm Pilot software on a computer is a sure way to disable the serial port for
access by other programs like NSOL. If there is a little icon for synchronizing in
the system tray (the section in the lower right corner of the screen with the
current time), then you can be pretty sure that a synchronizing program has taken
control of the serial port. You can generally close such programs by rightclicking the icon in the system tray and choosing exit. If you no longer use that
program, try removing it with Add/Remove Programs in the Control Panel.
7. Try other 'Comm Port' settings. In NSOL comm port settings are found in the
Tools, Setup menu.
8. Go to Control Panel (Start menu, Settings) and open the System icon. Click on
the Device Manager and look for 'Ports (COM & LPT)'. There should be a '+'
mark next to it and when you click the +, Device Manager will expand to show
the actual ports. At least one of the ports should be labeled 'Communications
Port (Com1)' or perhaps Com2 or other. If the little icon next to this entry has an
X through it, you must double-click the icon and try to determine why the comm
port is not operating.
9. Another potential conflict with a laptop computer is an infrared (or IrDA) port.
You can find that listed in the Device Manager as well. If you are not using the
infrared port, double-click the icon (not the one with the + mark, but rather the
one below it) and check the box to 'Disable in this hardware profile.'
10. A faulty cable might be the problem. One way to test the cable is to install
NSOL on a standard desktop PC and try controlling the scope from there
(remember the indoors alignment from number 1 above). Desktop PCs do not
generally have much problem with conflicting comm ports, EXCEPT in the case
of software to synchronize a PDA such as a Palm Pilot.
11. Take a good look at the connector on the bottom of the hand control - insure none
of the pins appear bent or misaligned.
12. There is a known problem with the serial port on many Dell laptop/notebook
computers. Sometimes they will communicate with the scope, sometimes they
just won't. If you have tried all of the above and get no communication or
intermittent communication, purchase a USB to serial port adapter and use that
rather than the built-in serial port. Belkin adapters are widely available and very
reliable. Also, check with Dell, reportedly a BIOS update that might fix the
problem on some computer models is now available.
13. Most other potential solutions require investigating and possibly changing
NexStar Observer List User's Manual
settings for serial and/or IrDA ports in the computer's setup (BIOS settings).
This requires reasonable experience in configuring computers and is not
recommended for those not already familiar with such procedures.
Hopefully one of these tips will resolve any issue you have. Email me at
[email protected] or check the PC Control section of my web site
(http://www.NexStarSite.com) if you need further assistance.
19
20
NexStar Observer List User's Manual
NexStar Observer List in Action
Regardless how you prepare for an evening of viewing, understanding what you can see with
your scope is a must. The faintest object you can see depends directly upon the aperture of your
telescope. The light gathering power of a telescope is a function of the area of the objective.
Relatively small increases in aperture result in fairly dramatic increases in image brightness.
Here is a table estimating limiting magnitude under good, dark sky conditions:
Instrument
Naked eye
Binoculars
Telescopes:
Aperture
about 7mm
50mm
Limiting Magnitude
6
9.5
60 mm (2.4 in.)
80 mm (3.1 in.)
4 in.
114 mm (4.5 in)
5 in.
8 in.
11 in.
14 in.
10.5
11.3
11.7
12
12.3
13.3
14
14.6
From this table, we should expect that a NexStar 4 would allow us to detect an object of about
11.7 magnitude when we are under dark skies. Unfortunately it is not quite that simple.
First, we must consider the seeing condition known as transparency. We need more than dark
skies to see the faintest objects; we also need clear skies. Particles in the air make faint objects
difficult to view. This is even more critical under light polluted skies or a sky with a bright
Moon. During a night with good transparency you might be able to easily see a faint globular
cluster or galaxy, but the next night moisture in the air could make it invisible.
Second, we must recall that magnitude for deep sky objects is generally derived by taking the
total luminosity of the object and reporting as if it were a single point. This is accurate for stars
as they are single point light sources. For most other deep sky objects, the magnitude reported is
potentially misleading. When choosing targets for a viewing session, we must consider both the
magnitude and the size of the object.
If a planetary nebula, M27 for example, is reported as magnitude 7.4 but it is 8 by 6 arcminutes in
size, the result is an object with a low surface brightness. In other words, it is actually very faint.
Larger galaxies and nebula are even more misleading. M81 is magnitude 6.9, nearly naked eye
limit - if it were a star. But, M81 is a galaxy with a size of 20 by 10 arcminutes, resulting in a
low surface brightness that makes it difficult to see without clear, dark skies.
Third, light pollution has a devastating effect on all but the brightest objects. Larger apertures
can help to overcome this problem, but there is no substitute for dark skies. If you live in a small
community, the background light pollution may not be too bad and you simply need to deal with
a few local lights from your closest neighbors. In a city, the situation is considerable worse. The
entire sky glows with the many thousands of lights flooding the city. Even if you can isolate
yourself from any local lights, the skyglow will make most deep sky objects impossible to see.
Planetary and lunar observations are not affected appreciably by light pollution, but for the deep
NexStar Observer List User's Manual
21
sky, you need to travel to a dark site. In light polluted skies you might be able to detect a faint
object, but under dark, clear skies details come into view.
Nature's version of light pollution, a bright Moon, will also make deep sky objects hard to
distinguish. Even at a dark site, a full Moon limits the objects you can see. To make matters
even more frustrating, the worst time to view the Moon is when it is full. The greatest detail to be
seen on the Moon is along the terminator, the line between the light and shadow. During a full
moon, most detail is washed out by the direct sunlight striking the surface. If there are no planets
in the sky, you might be limited to viewing double stars and the brightest deep sky objects.
Finally, remember good observation technique. Averted vision (looking to the side of an object
while concentrating on that object), wiggling the scope and varying the magnification will help
you to detect fainter objects. Careful observation of an object will bring out details not easily
seen at the first glance. Experience at the eyepiece pays off.
Using NSOL to Prepare for a Session
As discussed early in the manual, the real power of NSOL is preparing in advance for an
observing session. Create an Observer List to do this. Following are two examples of creating an
Observer List.
Observer List for Poor Conditions
Let's say you have a NexStar 114 and will be observing in the suburbs under mag 4 skies (the
brightest stars you can see with the naked eye are magnitude 4). Since the theoretical limiting
magnitude of the NexStar 114 is 12 (under great conditions), we could expect to be able to see
stars down to 10 or 11, which makes most open clusters visible. Only the brighter globular
clusters, planetary nebulae, galaxies and nebulae will be visible. For these more diffuse DSOs
(deep sky objects) let's say 8 is a good limit.
Start by creating a new Observer List - name it something like "Bright Objects for November".
Use the File, New List command or the corresponding toolbar button. Next, click the Edit List
button to add objects to the List.
The first thing to do when editing a list
is to insure the date and time shown
under the small sky chart corresponds
to date and time you intend to use the
list. Use the Change button if
necessary. Using an incorrect date and
time will not allow you to insure the
objects you add to the list will actually
be above the horizon - or your altitude
limit in the Filter Settings.
The next thing to do would be to
actually apply a filter useful for the
conditions noted above. Click the
Filter Options for Poor Sky Conditions
Filter button to display the Filter
Settings dialog box. Use settings as
shown to match the conditions we expect and the scope we are using. The settings for altitude
and magnitude are easy enough to understand, but the Double Star section might warrant
22
NexStar Observer List User's Manual
additional explanation.
On nights where conditions are not optimal, it is usually best not to push the limit on separation.
Separation of 1 to 3 arcseconds can be used on really clear and steady nights. Separation of 4 to
15 gives us a good variety of double stars to choose from while not requiring the most excellent
seeing conditions. Also, large differences in magnitude are best reserved for better conditions.
With a Mag. Difference between 0 and 2, this requires that both stars in the pair are closely
matched in magnitude - their greatest difference can only be a magnitude of 2.
Click the Save As... button and store these filter settings in a file named "Poor Seeing
Conditions". The next time you want to use the settings, simply use the Open... button to retrieve
them.
Click the OK button to apply the filter to the eight lists of the NSOL database. The remaining
objects meet your filter criteria. Select from the objects to add as many as you would like to your
Observer List. Review the Creating Observer Lists section for tips on adding multiple objects at
all at one time.
After you have added the objects you wish to view, click the AutoSort button to re-order the
objects so that you will not be wasting time jumping all around the sky while the scope is slewing
needlessly. Click the Close button and you are done.
You might then print a copy of the Observer List to use with the hand control (in the event you do
not intend to take your laptop out with your scope). You can also use the printed list as a log
sheet - recording your notes from the field. You might also find it useful to print a Star Chart this would include all the objects on your list.
To actually use the List with your computer to control your telescope, refer to the Using NSOL
with Your Telescope section of this manual.
Observer List for Great Conditions and a Night of Faint Fuzzies
Let's say this time you are planning for a dark site trip with your NexStar 11. Proceed as
described in the last example, except use filter settings as shown.
In this case, we are again filtering to remove any objects below 20 degrees altitude. The deep sky
lists will not display open clusters and we
will only be listing faint galaxies, globular
clusters, planetary nebulae and nebulae those with magnitudes between 8 and 13.
These filter settings will also limit the
double star list to those that are most
challenging. The separation between the
stars will be a very slight 1 to 6
arcseconds and the two stars in the pair
will vary greatly in magnitude - at least a
difference of 6.
Filter Options for Great Conditions
Again, you might want to save these filter
settings for future use by clicking the
Save As... button.
NexStar Observer List User's Manual
23
Using NSOL's HHC When You Haven't Prepared in Advance
There will be times when clear skies "sneak up on you" and you aren't really prepared. The
Hyper Hand Control was built for those occasions. After setting up your scope and connecting
your computer as described in the Using NSOL with Your Telescope section, click the HHC
button to open the Hyper Hand Control. As described earlier, the HHC gives you direct access to
the entire NSOL database - but then that could be too much of a good thing! Having access to
more than 40,000 objects is not necessarily very useful, unless of course you already know what
you want to view.
When you do know what you are looking for, the HHC makes it easy to access it. Just pull
forward the correct list (Messier, Caldwell, NGC, etc.), type the catalog number or name in the
Search for box, press Enter to locate the object and then Alt-G will direct the scope to GoTo that
object. See the Creating Observer List section for more tips on effective searching - sometimes it
is a bit more complicated than described here.
When you want to seek out new objects or if you don't really know what is visible just now, use
the Filter Settings to limit the database to just those objects that meet your criteria. The previous
section gave two examples of filter settings to get you started.
After applying the filter, click the constellation heading to sort the objects by constellation. In
that way, you won't be jumping all around the sky as you work through the filtered list.
24
NexStar Observer List User's Manual
Advanced Features
Exporting Observer Lists
The File menu includes an Export feature to allow Observer Lists to be used in other programs.
Note that to share your Observer Lists with other NSOL users you should simply send them the
Observer List (OLF) file - no export is required.
Export to hcAnywhere
Use Export to hcAnywhere to convert your Observer List into a tour for use with Astro Geeks'
(www.astrogeek.com) virtual NexStar hand control. The tour file will have same name as the
current Observer List file, but the extension will be .HCT. NSOL will attempt to find the
hcAnywhere Tours data folder and automatically place the file there and will inform you if
successful. If NSOL cannot find the Tours data folder, you will be notified and it is up to you to
find the folder and move the HCT file yourself. In this case, the HCT file will be placed in the
same location as the Observer List file (the default is C:\Program Files\NSObserverList\Data - as
found in Tools, Setup). Once the HCT file is properly located, you simply start hcAnywhere,
right-click over the hand control image and select the new tour. Tours in hcAnywhere are limited
to 200 objects (due to the design of the real hand control), so Observer Lists with more than 200
objects will simply be truncated.
Export to Planetarium for Palm
Use Export to Planetarium for Palm to create files that can be imported into Planetarium for
Palm (http://www.aho.ch/pilotplanets). Before starting, you must first open the Observer List you
wish to export, then simply follow the on-screen prompts. Due to a 4,000-character limitation on
Palm memo files, the export process may create more than one file. The file (or files) created will
be in the same location as the Observer List file, but the extension will be .TXT. If more than one
file is created, the first will end with 1.TXT, the second with 2.TXT and so on.
To import into Planetarium, first start the Palm Desktop program. Switch to the Memo Pad view,
then select Import... from the File menu. Change the Files of type selection to Comma
Separated and navigate to the folder where your NSOL data is stored (the default is C:\Program
Files\NSObserverList\Data - as found in Tools, Setup) and select the first of the files to import.
Repeat for the remaining files and then synchronize your Palm. Next, start Planetarium, pull
down the Options menu and select Objects. It is best to create and select a new category of
objects, for example "NSOL". Then select Import from Memo from the Database menu and
select each of the imported memos in turn. See the Planetarium manual for further details.
Export to CSV (Spreadsheet) File
Use Export to CSV (Spreadsheet) File to create files that can be opened in most spreadsheet
and database programs such as Microsoft Excel or Microsoft Access. This is a generic export
format that is suitable for use with a wide variety of programs. CSV is an acronym for "Comma
Separated Values". Before starting, you must first open the Observer List you wish export, then
simply follow the on-screen prompts. The file created will be in the same location (as found in
Tools, Setup - the default is C:\Program Files\NSObserverList\Data) as the Observer List file,
but the extension will be .CSV.
NexStar Observer List User's Manual
25
Importing Data
The File menu includes an Import feature to allow you to use data from other programs in
NSOL. NSOL recognizes two formats - Comma Separated Values (CSV) and hcTour
(hcAnywhere). We will discuss CSV files first.
Comma Separated Values
CSV files can be used to import data from a variety of sources. For example, you might find a
catalog of galaxy clusters on the Internet and rather than typing them into the User Supplied
Objects, you can use Import to add the catalog without typing. You can also use Export to
Comma Separated (discussed above) to export one Observer List to a CSV file and then you can
Import to another list to combine the two.
The files you import from must be of a very specific format. The generic name is known as a
Comma Separated Values file (CSV). Many programs that export data can create CSV files. For
example, AstroPlanner exports CSV files. For data that is not in CSV format, import to a
spreadsheet program like Microsoft Excel, put the columns in the correct order (and delete any
extra columns) and save as a CSV file.
The CSV file MUST have the following columns (fields) - no more and no less - and they MUST
be in this order:
• Category - general category or the name of the catalog the object is from (ex.
Messier)
• Object Number - a serial number in the category (ex. 31 for Messier 31)
• Name - a descriptive name (ex. Andromeda Galaxy)
• Type - the astronomical type of the object (ex. Galaxy)
• Magnitude - the visual magnitude of the object
• Constellation - self explanatory
• RA Hour - must be a whole number ranging from 0 to 23
• RA Minute - must be a number ranging from 0.00 to 59.99. If it is not possible
to produce fractional RA minutes, do not be too concerned, accepting the nearest
RA minute gets you within at least 14 arcminutes of the actual coordinates.
• Dec Sign - only "+", "-" or blank (implying "+") are acceptable
• Dec Degree - must be a whole number ranging from 0 to 90
• Dec Arcminute - must be a number ranging from 0.00 to 59.99. Often fractional
arcminutes are not available.
• Info - descriptive text about the object
Each row (line) in the file represents a single object (also known as a record). A comma
separates each of the fields and any field values that are non-numeric must be surrounded by
quotation marks. Also, note that you will not be able to import CSV files if they have a quotation
mark (as is commonly used for arcseconds) in a field entry. Prior to importing, such files can be
cleaned up in a spreadsheet program (such as MS Excel) and saved as CSV from the spreadsheet
program. Name, Type, Magnitude, Constellation and Info are optional, but an empty entry must
exist in the record as a placeholder. If all of this seems confusing... it is :-). Try exporting one of
your lists with Export to CSV (Spreadsheet) File and then open the CSV file using Notepad
(found on the Windows Start, Programs, Accessories menu) to study the format a bit.
As the name implies, use Import from CSV to User Supplied List to import objects to the User
Supplied List. Simply select the file with the desired objects (appropriate files will usually have a
file extension of .CSV or .TXT - the default - but you can change the "File of type" selection to
26
NexStar Observer List User's Manual
All Files if necessary), click the Open button and NSOL will process and import the data. If the
file is formatted incorrectly, an error will occur and the import will stop after the last good record.
Use Import from CSV to Current List to import objects to the current Observer List. Be sure
to open the correct list to receive the imported objects (or create a new Observer List) and then
select Import from CSV to Current List from the File menu. Select the file to import from and
NSOL will process and import the data. Again, if the file is formatted incorrectly, an error will
occur and the import will stop after the last good record. After you import to an Observer List,
you will likely want to click the Edit List button to use AutoSort or the Move Up/Down buttons
to set the order of the list.
hcTour (hcAnywhere)
hcTour is a program bundled with Astro Geeks' (www.astrogeeks.com) hcAnywhere application.
It is used to build custom tours for the hcAnywhere virtual hand control. NSOL can import tours
created in hcTour into the current Observer List. Be sure to open the correct list to receive the
imported objects (or create a new Observer List) and then select Import from hcTour
(hcAnywhere) File to Current List from the File menu. Select the file to import from and
NSOL will process and import the data. If the file is formatted incorrectly, an error will occur
and the import will stop after the last good record. After you import to an Observer List, you will
likely want to click the Edit List button to use AutoSort or the Move Up/Down buttons to set
the order of the list.
NexStar Observer List User's Manual
27
Technical Support
I provide support via email for any questions or problems you might have regarding NexStar
Observer List. To contact me, send email to [email protected]. If you received an error
message on the screen, please describe what you where doing when you got the error, provide
the full text of the error, and let me know if you can recreate the error. You may also visit the
NexStar Resource Site at www.NexStarSite.com and check the NexStar Observer List page for
program updates.
Also, I am always looking for suggestion for improving the program. Please email me with your
ideas!
28
NexStar Observer List User's Manual
Appendix A - Object Names in the Double Star List
The double star list in NSOL was created by the Saguaro Astronomy Club - SAC
(www.saguaroastro.org). Supplemental names for Struve catalog stars were contributed by Thomas
Kovacs ([email protected], www.haliburtonforest.com). For additional information regarding sources
used to compile their original lists please visit their respective web sites.
The object names in the double star list often include more than one entry. Combining information from
the SAC list, Mr. Kovacs' cross-references and other database available publicly, I have provided as many
names as possible for each object. Perhaps most useful are the widely used ADS numbers available on
the majority of the objects. SAO numbers are also included when there was a cross-reference available,
as well as common names. Hopefully if you are looking for a particular double star to add to an Observer
List, the name will be listed.
The original SAC list referenced several different catalogs in addition to ADS. To save space in the
database file the following abbreviations based on the discoverers were used. For example, STF 1 is the
first double in F.G.W. Struve's catalog while STT 10 is the tenth double in Otto Struve's catalog.
A
AC
AG
AGC
ALD
ALI
ARA
ARG
B
BAL
BAR
BET
BHA
BRD
BRT
BSO
BU
COO
COU
CPO
D
DA
DAW
DON
DOO
DOR
DUN
ES
FIL
FIN
FOX
GAL
GAN
GAU
GCB
Aitken R.G.
Clark Alvan
AG catalog
Clark A.G.
Alden H.L.
Ali A.
Aravamudan S.
Argelander F.
Bos W.H. van den
Baillaud R.
Barnard E.E.
Bertin B.
Bhaskaran T.P.
Bird F.
Barton S.G.
Brisbane Obs.
Burnham S.W.
Cordoba Obs.
Couteau P.
Cape Observatory
Dembowski E.
Dawes W.R.
Dawson B.H.
Donner H.F.
Doolittle E.
Dorpat Obs.
Dunlop J.
Espin T.E.
Filipov M.L.
Finsen W.S.
Fox P.
Gallo J.
Anderson G.
Gauchet P.L.
Giacobini M.
GLE
GLI
GLP
GRB
GYL
H
HDO
HEI
HJ
HLD
HLM
HO
HRG
HTG
HU
HWE
I
J
JC
JSP
KNT
KU
KUI
L
LAL
LAM
LDS
LEO
LPO
LV
MA
MA
MLB
MLF
MLL
Gale W.F.
Gilliss J.M.
Glasenapp S.
Groombridge S.
Goyal A.N.
Herschel W.
Harvard Obs.
Heintz W.D.
Herschel J.
Holden E.S.
Holmes E.
Hough G.W.
Hargrave L.
Hastings C.S.
Hussey W.L.
Howe H.A.
Innes R.T.A.
Jonckheere R.
Jacob W.S.
Jessup M.K.
Knott G.
Kustner F.
Kuiper G.P.
Lewis T.
Lalande F. de
Lamont J. von
Luyten p.m.
Leonard F.C.
La Plata Obs.
Leavenworth F.
Madler J.H.
Mason A.H.
Milburn W.
Muller F.
Mitchell S.A.
MLO
MLR
NZO
OL
PAN
PLQ
POL
POP
POU
PRO
PTT
PZ
R
RMK
ROE
RST
S
SCJ
SE
SEE
SEI
SHJ
SKI
SLR
STF
STG
STI
STN
STT
THE
UPT
VOU
WAK
WEI
WG
Melbourne Obs.
Muller P.
New Zealand Obs.
Olivier C.P.
Pannuzzio R.
Paloque E.
Pollock J.A.
Popovic G.
Pourteau A.
Perth Obs.
Pettitt E.
Piazzi G.
Russell H.C.
Rumker C.
Roe E.D.
Rossiter R.A.
South J.
Schjellerup H.
Secchi A.
See T.J.
Scheiner J.
South & Herschel
Skinner A.N.
Sellors R.P.
Struve F.G.W.
Struve G.
Stein J.
Stone O.
Struve O.
The P.S.
Voute J.G.
Walker R.L.
Weisse M.
Wrigley R.W.
NexStar Observer List User's Manual
WHC Wilson H.C.
WNC Winnecke A.
WNO Washington Obs.
WOR Worley C.E.
29
WRH Wilson
R.H.
When an object is not associated with one of the above discoverers, the Bayer (Greek letter) or Flamsteed
(decimal number) designation is used. The abbreviations used for constellation names are found in
Appendix B while the Greek alphabet is listed in Appendix C.
If you are unable to find what you are looking for using "Exact Match", change the search method to
"Close Match".
30
NexStar Observer List User's Manual
Appendix B - Constellation Names and Abbreviations
ANDROMEDA
ANTLIA
APUS
AQUARIUS
AQUILA
ARA
ARIES
AURIGA
BOOTES
CAELUM
CAMELOPARDALIS
CANCER
CANES VENATICI
CANIS MAJOR
CANIS MINOR
CAPRICORNUS
CARINA
CASSIOPEIA
CENTAURUS
CEPHEUS
CETUS
CHAMAELEON
CIRCINUS
COLUMBA
COMA BERENICES
CORONA AUSTRALIS
CORONA BOREALIS
CORVUS
CRATER
CRUX
CYGNUS
DELPHINUS
DORADO
DRACO
EQUULEUS
ERIDANUS
FORNAX
GEMINI
GRUS
HERCULES
HOROLOGIUM
HYDRA
HYDRUS
INDUS
AND
ANT
APS
AQR
AQL
ARA
ARI
AUR
BOO
CAE
CAM
CNC
CVN
CMA
CMI
CAP
CAR
CAS
CEN
CEP
CET
CHA
CIR
COL
COM
CRA
CRB
CRV
CRT
CRU
CYG
DEL
DOR
DRA
EQU
ERI
FOR
GEM
GRU
HER
HOR
HYA
HYI
IND
LACERTA
LEO
LEO MINOR
LEPUS
LIBRA
LUPUS
LYNX
LYRA
MENSA
MICROSCOPIUM
MONOCEROS
MUSCA
NORMA
OCTANS
OPHIUCHUS
ORION
PAVO
PEGASUS
PERSEUS
PHOENIX
PICTOR
PISCES
PISCES AUSTRINUS
PUPPIS
PYXIS
RETICULUM
SAGITTA
SAGITTARIUS
SCORPIUS
SCULPTOR
SCUTUM
SERPENS
SEXTANS
TAURUS
TELESCOPIUM
TRIANGULUM AUSTRALE
TRIANGULUM
TUCANA
URSA MAJOR
URSA MINOR
VELA
VIRGO
VOLANS
VULPECULA
LAC
LEO
LMI
LEP
LIB
LUP
LYN
LYR
MEN
MIC
MON
MUS
NOR
OCT
OPH
ORI
PAV
PEG
PER
PHE
PIC
PSC
PSA
PUP
PYX
RET
SGE
SGR
SCO
SCL
SCT
SER
SEX
TAU
TEL
TRA
TRI
TUC
UMA
UMI
VEL
VIR
VOL
VUL
NexStar Observer List User's Manual
31
Appendix C - Greek Alphabet and Abbreviations
Alpha - α
ALP
Beta - β
BET
Gamma - γ
GAM
Delta - δ
DEL
Epsilon - ε
EPS
Zeta - ζ
ZET
Eta - η
ETA
Theta - θ
THE
Iota - ι
IOT
Kappa - κ
KAP
Lambda - λ
LAM
Mu - µ
MU
Nu - ν
NU
Xi - ξ
XI
Omicron - ο
OMI
Pi - π
PI
Rho - ρ
RHO
Sigma - σ
SIG
Tau - τ
TAU
Upsilon - υ
UPS
Phi - φ
PHI
Chi - χ
CHI
Psi - ψ
PSI
Omega - ω
OMG
32
NexStar Observer List User's Manual
Appendix D - Key to Dreyer's Descriptions in the NGC/IC
When J. L. E. Dreyer edited his two main catalogs he included useful comments in a cryptic shorthand in
order to save space. Following is a key to Dreyer's shorthand descriptions.
*
*10
*7-8
**
***
!
!!
!!!
ab
alm
am
annul
att
b
bet
biN
bn
bs
bp
bf
B
c
chev
co
com
comp
conn
cont
C
Cl
d
def
dif
diffic
dist
D
e
ee
er
exc
E
f
F
g
glob.
gr
i
iF
inv
a single star
a star of 10th magnitude
star of magnitude 7 or 8
double star (same as D*)
triple star
remarkable
very much so
a magnificent or otherwise interesting object
about
almost
among
annular or ring nebula
attached
brighter
between
binuclear
brightest to north side
brightest to south side
brightest to preceding (westward) side
brightest to following (eastward) side
bright
considerably
chevelure ("a head of hair")
coarse, coarsely
cometic (cometary form)
companion
connected
in contact
compressed
cluster
diameter
defined
diffused
difficult
distance, or distant
double
extremely, excessively
most extremely
easily resolvable
eccentric
extended
following (eastward)
faint
gradually
globular
group
irregular
irregular figure
involved, involving
NexStar Observer List User's Manual
l
L
m
m
M
n
neb
nebs
neby
nf
np
ns
nr
N
p
pf
p
pg
pm
ps
plan
prob
P
PN
r
rr
rrr
R
RR
Ri
s
s
sf
sp
sc
sev
st
st 9...
st 9..13
stell
susp
S
S*
trap
triangle
triN
v
vv
var
little (adv.); long (adj.)
large
much
magnitude
middle, or in the middle
north
nebula
nebulous
nebulosity
north following
north preceding
north-south
near
nucleus, or to a nucleus
preceding (westward)
preceding-following
pretty (adv., before F. B. L, S)
pretty gradually
pretty much
pretty suddenly
planetary nebula (same as PN)
probably
poor (sparse) in stars
planetary nebula
resolvable (mottled, not resolved)
partially resolved, some stars seen
well resolved, clearly consisting of stars
round
exactly round
rich in stars
suddenly (abruptly)
south
south following
south preceding
scattered
several
stars (pl.)
stars of 9th magnitude and fainter
stars of magnitude 9 to 13
stellar, point-like
suspected
small in angular size
small (faint) star
trapezium
triangle, forms a triangle with
trinuclear
very
very (greater emphasis)
variable
33