1
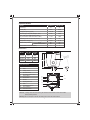
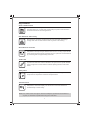
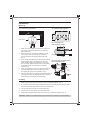
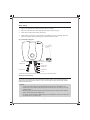
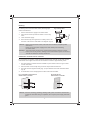
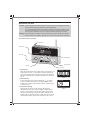
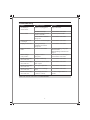
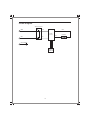
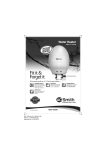
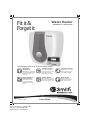
Fit it &
Forget it
Water Heater
HSE-SBS-015 / HSE-SBS-025
HEATIN
G
C
2kW
SET
kWh
ENERGY
METER
Why people prefer an A. O. Smith water heater...
ADVANCED
TECHNOLOGY
Blue Diamond® glass lined
tank. Maximum protection
against hard water and
corrosion.
MORE FEATURES &
USER CONTROLS
Wired remote control,
temperature settings,
power ON/OFF, energy
meter.
* Conditions Apply
Size: 210mm (H) x 148mm (W)
Part No.: 323238-000_R0
Approved on: 30-05-2012
SUPERIOR QUALITY
EXCELLENT SERVICE
Get the best quality that
ensures you have a water
heater that works in
Indian water conditions.
Guaranteed* A. O. Smith
Service within 12 hours.
Call: 1.800.103.2468
ENERGY SAVING
MADE BETTER
BEE 5 star rating. One of
the most energy efficient
water heater you can buy.
Made in India’s most
modern and advanced
water heater factory.
User Guide
Congratulations!
And welcome to the A. O. Smith family.
We would like to thank you for the trust you have shown in choosing an A. O. Smith water
heater. You can be sure it will live up to your expectations. Thousands of delighted users the
world over trust A. O. Smith water heaters for their families. This user guide will introduce you to
your water heater. Follow the instructions carefully and look forward to enjoying long years of
trouble-free service.
A. O. Smith is a company known for its innovative technologies and energy-efficient solutions.
Ours are the only water heaters with the Blue Diamond® Glass lining for the inner container of
the water heater. This cutting edge technology prevents sediment and scaling, fights corrosion
and extends the life of your water heater. We also offer you an exciting range of colour options
for the front panel of your water heater. Choose the one that matches your bathroom décor
best.
Our customer-centric approach manifests itself in many other ways too. A. O. Smith is the first
water heater company which gives you a dedicated Toll Free Customer Care Number. If you need
any information or assistance with your water heater, just call us from any phone, anywhere in
the country to our Toll Free Customer Care No. 1.800.103.2468.
Or
Factory Address:
A. O. Smith India Water Heating Private Limited
Plot No. 300, Phase-2, KIADB Industrial Area, Harohalli, Kanakapura Taluk,
Ramanagara District - 562 112, Karnataka, India.
About A. O. Smith
A. O. Smith India Water Heating Private Limited was established in 2006. Since this time, the
A. O. Smith team has conducted numerous focus group studies and spent an endless number
of research hours determining what India wanted in a water heater. Backed by 75 years of
proven technological advances, A. O. Smith India has created a stylish design with features
demanded by the Indian consumer.
The A. O. Smith plant with manufacturing facilities spread over 76,000 sq.ft. is located on
20 acres, just outside Bengaluru, in the KIADB Industrial Area, Harohalli. The India operations is
the 16th A. O. Smith manufacturing facility worldwide. A. O. Smith's India plant has extensive
engineering and technical resources and has the latest technologies incorporated. A. O. Smith is
the first and only manufacturer to invest in and produce glass lined water heaters in India.
Today, A. O. Smith Water Products Company is one of the largest water heater manufacturer in
the world, is a global leader in innovative technology and energy efficient solutions.
What's in the box?
Electric Water Heater
with Wired Remote
User Guide
Mounting
Accessories
Heater
Water-015 / HSE-SBS-025
HSE-SBS
&
Fit itge
For t it
Why people
prefer an
T SERVICE
EXCELLEN * A. O. Smith
..
water heater.
A. O. Smith SUPERIOR QUALITY
that
quality
best
water
Get the you have a
ensures that works in
heater
conditions.
water
Indian
D
ADVANCE OGY
TECHNOL ® glass lined
protection
Blue Diamond
and
tank. Maximum
hard water
against
corrosion.
&
SAVING
of
ENERGY rating. One
5 star
efficient
12 hours.
Guaranteed
within
2468
Service
Call: 1.800.103.
MADE
BETTER
most
India’s
Made in and advanced
factory.
modern
heater
water
BEE
energy can buy.
you
the most
heater
water
FEATURESS
MORE
USER CONTROL
control,
remote
Wired
e settings,
energy
temperatur
ON/OFF,
power
meter.
HEATING
C
2kW
SET
kWh
User Guide
ENERGY
METER
* Conditions
Apply
Contents
Specifications ......................................................................................... 1
Key Features ........................................................................................... 2
Installation.............................................................................................. 3
Directions for use ................................................................................... 6
A. O. Smith ColourMatch System® ........................................................ 8
Changing the Decorative Front Panel ................................................... 8
Troubleshooting ..................................................................................... 9
Circuit Diagram .....................................................................................10
Warranty ............................................................................................... 11
Jurisdiction ........................................................................................... 12
Warranty Card ...................................................................................... 13
Service and Maintenance..................................................................... 14
Drain Pipe
Specifications
Model
HSE-SBS-015
HSE-SBS-025
Volume [L]
15
25
Power [W]
2000
2000
~230/50
~230/50
0.560
0.690
1.138
1.386
25
41
Voltage/Frequency [V/Hz]
Actual Stdg. Loss [kWh/24h/45°C diff.]
o
Max. Stdg. Loss [kWh/24h/45 C diff.]
[as per IS 2082:1993 amended in 2002]
Reheating Time for 35°C rise [in min]
Temperature range [°C]
25-75
25-75
N/cm2
80
80
Water head (metres)
80
80
½
½
Rated water pressure
Inlet/Outlet connections [Inch]
Dimensions
Model
HSE-SBS
-015
HSE-SBS
-025
A [mm]
373
444
B1 [mm]
373
444
B2 [mm]
405
483
C [mm]
337
371
A
5
B2 B1
Part Descriptors
1
HE ATING
Outlet
3
2
Inlet
3
Safety Valve*
4
Wired Remote
5
Decorative Front Panel
6
Front Jacket
12
7
Back Jacket
8
Anode
11
10
9
Heating Element
10
Tank
8
11
Installation Bracket
7
12
PU Insulation
13
Thermal Cutout
1
C
2
4
6
13
9
Caution: *Safety valve has been factory fit with the water heater and set at 0.8 MPa
(8 Bar) rated pressure.
1
SET
kWh
ENERGY
METER
C
Warning: Do not tamper or detach the safety valve from the water heater.
2kW
ON/OFF
Key Features
Glass Coated Element
Scale and sediment build-up on the surface of the element can lead to
premature failure. A. O. Smith Glass Coating helps to prevent scale formation
and extends the life of the heating element.
Blue Diamond® Glass Lining
Blue Diamond® technology increases the life of the inner tank. The lining is
stronger and more corrosion resistant than any other in the industry.
Wired Remote Controller
HE ATING
C
2kW
SET
kWh
ENERGY
METER
ON/OFF
Displays the temperature and the total energy consumed by the water heater.
Temperature can be precisely set between 25°C to 75°C. It is easy to operate the
water heater with wired remote controller even if it is placed in an enclosed area
by connecting with an approximately 8 feet wire.
Anode Rod
The tank has an anode rod system with a stainless steel core that is designed
to protect the tank from corrosive elements. The system uses a special cathodic
action to fight the corrosive elements and thus prolongs the life of the water
heater.
Safety Valve
The safety valve is designed to automatically relieve and discharge water in case
the pressure or temperature overshoots the preset limits.
Thermal Cutout
In case a fault occurs and the water temperature exceeds the highest preset
temperature, the breaker rapidly cuts off the live line and the neutral line
simultaneously to assure safety.
Note: A. O. Smith reserves the right to amend or modify the specifications and features at
any time, as and when required without any prior notification.
2
Installation
Mounting
Fig. 1 Position for installation
Ceiling
Fig. 2 Wall mounting bracket
Wall
Water heater
Fig. 3 Installation of
wall mounting bracket
1.
Make sure that the wall can withstand at least twice
the weight of the water heater when completely
filled with water.
2.
Before locating the position for installation of the
water heater, make sure that there is sufficient
clearance between the ceiling and the side wall.
(Fig. 1)
3.
4.
5.
Use a drill bit with diameter of 10mm to drill 4 holes
at least 90mm deep in the wall (Fig. 3). The four
holes should be aligned horizontally and vertically.
The horizontal distance between the 2 holes should
be 120mm and the vertical distance should be
57mm. (Fig. 2)
Wall
Fig. 4 Inserting the water heater
into mounting bracket
2
Water
Heater
Insert the expansion anchors into the holes. Place the
wall mounting bracket over the expansion anchors
and tighten the screws on the bracket. (Fig. 3)
Place the water heater on wall mounting bracket (Fig. 4)
using hanger hooks. Tug downwards on the heater to
ensure that the water heater is fixed steadily.
1
Wall
3
Wall
Water
Heater
Water
Heater
Wall
Plumbing
1.
Make necessary plumbing with reference to the installation diagram. (Fig. 5)
2.
A. O. Smith recommends nylon braided hoses having a minimum pressure rating of 8 Bar
and hoses should be compatible for hot water applications.
3.
Connect the cold water pipe to the inlet [Blue Cap].
4.
Connect the hot water pipe to the outlet [Red Cap].
5.
Attach the discharge tube to safety valve as shown in installation diagram. (Fig. 5)
Attention: Make sure a suitable sealing tape is used for all connections to prevent leakage.
3
Water Filling
1.
Open a hot water faucet nearby to permit the air to escape.
2.
Open the cold water inlet valve fully, filling the heater and the piping.
3.
Close the hot water faucet when water flows.
4.
Check all the connections to see if there is any leakage. In case of a leakage, drain the
heater completely, repair the leaking joint and then refill the heater.
Fig. 5 Installation diagram
HE ATING
C
2kW
SET
kWh
ENERGY
METER
Red Cap
*Flexible Hose
Blue Cap
Safety Valve
Lever
Discharge Tube
*Flexible Hose
Hot Water Tap
Cold Water Tap
To Drain
*Flexible Hoses to be procured by the customer, not part of standard product.
Electrical Connections
The power cord and plug are connected with this water heater. Find a separate socket for
power plug and make sure the socket is in firm contact with the plug. Ensure that reliable
earthing has been done.
Caution:
• Connect the water heater using independent sockets, do not use adapters. Use
multimeter to check whether the live line and neutral line are not reverse, to ensure
complete safety.
• Before installing the water heater, confirm that the power of water heater matches
electric meter capacity and supply wire.
• The water heater should be earthed reliably. It is prohibited to connect the earth wire
to neutral wire or tap water pipe.
4
Draining
Fig. 6 Safety valve
For draining water from the water heater, following steps
needs to be followed:
1.
Switch off the electric supply to the water heater.
2.
Open the hot water taps until the water is not hot any
more.
3.
Close cold water supply.
4.
Drain the water by moving the lever of safety valve in the
direction of the arrow as indicated in the diagram. (Fig. 6)
Caution:
Before using the water heater, make sure that it should be completely filled
with water.
Please turn off the power supply to the water heater prior to draining
the water heater.
Warning: This water heater should not be operated with insufficient amount of water.
Failure to do so may result in damage to the water heater & injuries to the users.
This will also make the warranty null & void.
Installation of wired remote controller
For convenience of operation, please install the wired remote controller on the wall near the
water heater. The length of the wire for wired remote controller is approximately 8 feet.
1.
The wired remote controller must be installed at a place where it does not get in direct
contact with water.
2.
Drill two holes on the wall by using an electric impact drill with 5mm bit.
3.
The holes must be aligned vertically (Fig. 7). Space between two holes should be 24mm
(Fig. 8).
4.
Fix the bracket on the wall by expansion tubes and screws attached.
Fig. 8 Bracket for
wired remote controller
Fig. 7 Installation of Bracket for
wired remote controller
24mm
Wall
Caution: Once the mounting, plumbing, discharge tube, power connection wired remote
control box and water filling is completed, then only the power supply should be
given.
5
Directions for use
Caution: Before using the water heater, make sure the inner tank is completely filled with
water and the power plug has been connected properly.
It is recommended that the wired remote control box should be installed on the
remote bracket (Fig. 8). Ensure that the wired remote control box does not get in
direct contact with water. Do not use wet hands while operating the remote.
Warning: The wired remote controller works with the power of water heater (No separate
power connection or battery required). Do not open the wired remote controller.
Fig. 9 Wired remote controller
LED Indicators
Display LED
HEATING
C
ON / OFF
2kW
SET
kWh
LED Indicators
ENERGY
METER
Energy Meter
Increase
Decrease
1. Initial power
HE ATING
When the water heater power supply plug is connected, it is in
initial power on state, i.e. the heater is ready for heating the
water. The wired remote controller will perform the diagnosis
function and all indicators will glow and goes off as shown in
Fig. 10.
C
2kW
SET
kWh
Fig. 10
2. Power ON/OFF
To start heating the water, press ON/OFF key “ ” on wired
remote controller. While heating, the display shows actual
temperature of water inside the tank and the indicator glows
as shown in Fig. 11.
HE ATING
C
3. Temperature setting
Temperature can also be set by pressing “p
“(Increase),
“q
“(Decrease) keys once, the last 2 digits of display shows
change in value. Wait for few seconds without pressing any
keys, the value flashing in the display will be changed as set
temperature and stored in memory. It will return to its normal
mode and the heating of the water is based on the new set
6
2kW
Fig. 11
SET
kWh
temperature. While setting, the temperature indicators glow as
shown in Fig. 12.
HE ATING
SET
Note:
• Default set temperature (factory setting) is 70°C.
C
4. Energy meter
The “ENERGY METER” key is used to display the energy
consumed by water heater for 5 seconds in kWh. The new
value will be added to the consumed value and displays the
total consumed value. The energy meter value displayed is
cumulative. The display indicators glow as shown in Fig. 13.
Note:
• Energy Meter values are indicative only.
• Refer 6. Reset function to reset the Energy Meter.
2kW
kWh
Fig. 12
HE ATING
C
2kW
SET
kWh
5. Modes
Fig. 13
There are two types of modes depending on the actual water
temperature inside the inner tank of the water heater:
a. Heating mode
When the actual temperature of the water is less than the
set temperature, it enters into Heating mode. The indicator
glows as shown in Fig. 14.
b. Standby mode
After the water heater reaches set temperature, it will enter
into the Standby mode due the cut-off power and the
indicators will glow as shown in Fig. 15.
HE ATING
C
2kW
SET
kWh
Fig. 14
When the temperature of the water drops by 5°C from the set
temperature due to usage of water, it again cycles the modes.
HE ATING
6. Reset function
By pressing “ENERGY METER” and ”q
” keys continuously for
5 seconds, the changed set temperature and the energy meter
value will be restored to factory settings (set temperature value
is made 70°C and energy meter value resets to 0 kWh) and
water heater goes into initial power state. While resetting in
the display, all screen indicators will glow up for a while and
goes off as shown in Fig. 10.
7
C
2kW
Fig. 15
SET
kWh
A. O. Smith ColourMatch System®
Attention: The product of your choice comes with either white or ivory as a front panel of
the same colour. You have the option of changing this panel to match your
bathroom décor.
A. O. Smith ColourMatch System® allows you to match your water heater to the colour of
your bathroom.
Please visit www.aosmithindia.com and choose your Decorative Front Panel colour options.
Call A. O. Smith Customer Care Centre [1.800.103.2468] to order the Decorative Front Panel.
Changing the Decorative Front Panel
Please follow the instructions as shown in Fig. 16
Fig. 16 Removing front panel
Press and remove the cap
Unscrew
Remove the Decorative
Front Panel to change
Press to release
Warning:
• Please ensure to switch off the power supply while changing the Decorative Front
Panel and pull out the power plug from the socket.
• An insulation layer is provided below the front panel which should not be replaced.
• While changing the front panel ensure that, none of the internal components are
damaged or removed.
8
Troubleshooting
Problem
Possible Cause(s)
Solution
• No display on
wired remote
Heater is not plugged in
Plug in the heater
Thermal cutout trips
Call Customer Care Centre
No power supply in power
socket on the wall
Check the power socket
Control circuit or internal
wiring error
Call Customer Care Centre
• Water temperature
is too high
Electronics circuit damaged
Call Customer Care Centre
• Display, no hot water
Heating element(s)
breakdown or internal
wiring error
Call Customer Care Centre
• Piping connection
leaks
Connection not sealed
Re-connect piping, using tape
thread sealant.
Refer plumbing instructions on
page 3
• Water leakage
from product
Leakage in tank or
other parts
Shut off power immediately and
Call Customer Care Centre
• Wired remote display
error code “E0”
Leakage of electricity
Call Customer Care Centre
• Wired remote display
error code “E1”
Temperature sensor circuit
short or open
Call Customer Care Centre
• Wired remote display
error code “E3”
Extra high temperature
Call Customer Care Centre
• Wired remote display
error code “E4”
Malfunction of leakage
circuit
Call Customer Care Centre
• Wired remote display
error code “E5”
Low voltage protection
(>100 V & <275 V)
Use after voltage returns to
normal
• No hot water
Note: Call Customer Care Centre on 1.800.103.2468
9
Circuit Diagram
Thermal Cutout
Black
Black
Blue
Power
Board
Element
Red
Red
Red
Green/Yellow
Wired
Remote
10
Warranty
Product warranty
Your A. O. Smith water heater is warranted against defects
arising from faulty design, workmanship and materials for a
period of 24 months from the date of the invoice, subject to
the following conditions:
1.
The customer will notify the Company promptly about
defects noticed and give the Company or its authorised
service provider adequate opportunity to inspect, test
and remedy them, for which the customer will deposit
the goods, if necessary, with the Company's
Office/Service Centre along with the original invoice.
2.
Special warranty from the date of purchase is subject to
the following conditions:
•
Tank
- 7 Years
•
Glass Coated Heating Element
- 2 + 2 Years*
•
Rest of the parts
- 2 Years
7
Warranty
on tank
4
Extended
Warranty*
* Register your product with the
A. O. Smith Customer Care
Centre [1.800.103.2468] within
two months of purchase. You will
get an extended warranty on the
element [from 2 years to 4 years].
You can also get an additional
changeable Decorative Front
Panel in a colour of your choice,
without cost.
3.
Inspection and Test Report of the Company's
Office/Service Centre will be treated as final and
binding under the warranty for determining the
defects, repairs/alterations required or carried out, or
certifying working of the goods thereafter.
4.
The Company or its authorised service provider will be
entitled to retain any defective part replaced under the
warranty.
5.
The Company's liability under the warranty will be
limited only to defects which occur under conditions of proper installation, normal
operation and under proper use. It excludes defects occurring because of abuse, faulty
care or maintenance and repairs/alterations to product or the parts by others.
6.
Components subject to wear, such as anode, are not covered under this warranty.
7.
The customer will have no claim under this warranty in respect of any personal injury,
damage or property or consequential damages, or for utilisation of the goods not in
accordance with the user guide.
11
General Terms of Warranty
1.
The “goods” shall mean the goods described in the purchase agreement.
2.
“The customer” shall mean the original purchaser under the purchase agreement.
3.
“The Company” shall mean A. O. Smith India Water Heating Pvt. Ltd.
4.
The “Purchase Agreement” shall mean the General Terms and Conditions of Sale agreed
upon by the customer and the Company as printed on the Invoice.
5.
“Invoice” shall mean the Invoice issued for the Unit by the Company or Authorised Dealer
to the customer describing the goods and indicating, inter alia, the total purchase price
thereof, the name of the customer and the place where the goods are to be installed.
6.
“User Guide” shall mean the instructions for installation leaflet published by the Company
and delivered to the customer.
Note: For registration of the Extended Warranty, please call our dedicated Toll Free Call
Centre No. 1.800.103.2468 OR fill up the details in the Warranty Card and mail the same
to A. O. Smith India Water Heating Pvt. Ltd., factory address.
Post Warranty
1.
The customer may be offered a yearly Service Contract at the prevailing Company rates
and terms.
2.
In case the customer does not wish to enter the Service Contract, he has the option of
calling our Service Centre and having his A. O. Smith Water Heater unit serviced on actual
basis i.e. by paying the Labour Cost and Spares needed to attend to that Service or
Complaint Call at the prevailing Company rates. Such service will be rendered by the
Company in towns or places where the Company has its Service Centres.
3.
The Company will provide free servicing of the goods brought to its Service Centre by the
customer, provided that all expenses of transporting the goods to and from the Service
Centre shall be borne by the customer directly.
4.
If, during such service, it is necessary for the Company to replace or repair defective
components or parts, the customer shall be required to pay for the same as per the
Company's prevailing price list.
Jurisdiction
The courts of competent jurisdiction at Bengaluru, Karnataka shall have exclusive jurisdiction
over all matters arising out of any disputes in relation to the product.
12
Warranty Card
Warranty Card (Customer Copy)
(To be retained by the Customer)
Unit Serial Number:
Invoice Number:
Dated:
Customer's Name and Address:
Model:
Capacity:
Dealer’s Stamp and Signature
Warranty Card
Warranty Card (Company Copy)
(To be sent back to the Company)
Unit Serial Number:
Invoice Number:
Dated:
Customer's Name and Address:
Model:
Capacity:
Dealer’s Stamp and Signature
13
Service and Maintenance
For Service needs:
Please contact our A. O. Smith Toll Free Customer Care Centre Helpline at 1.800.103.2468
Registered Office
A. O. Smith India Water Heating Private Limited
Plot No. 300, Phase - 2, KIADB Industrial Area, Harohalli, Kanakapura Taluk,
Ramanagara District - 562 112, Karnataka, India.
¡
Toll Free No.: 1.800.103.2468 ¡
Website: www.aosmithindia.com
Regional Office
Delhi:
602, Laxmi Deep Building, Plot 9, Laxmi Nagar District Centre, Vikas Marg,
New Delhi – 110 092
Pune:
401 & 402, Citi Mall, Ganeshkhind Road, Near Pune University,
Pune – 411 007
14
Manufactured by A. O. Smith India Water Heating Private Limited
Plot No. 300, Phase - 2, KIADB Industrial Area, Harohalli, Kanakapura Taluk, Ramanagara District - 562 112, Karnataka, India.
Toll Free: 1.800.103.2468 n
Website: www.aosmithindia.com