1
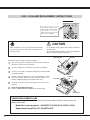
013-100237-02 Rev. 1 (02/07)
LX32 / LX34 LAMP REPLACEMENT: INSTRUCTIONS
TOP CONTROL
This indicator lights yellow
when the life of the projection
lamp draws to an end.
Replace the Projection Lamp
with a new one promptly.
ON-OFF
SELECT
CAUTION
Allow a projector to cool, for at least 45 minutes before
you open Lamp Cover. The inside of a projector can
become very hot.
For continued safety, replace with a lamp assembly of
the same type.
Do not drop a lamp assembly or touch a glass bulb! The
glass can shatter and may cause injury.
LAMP COVER
SCREW
Follow these steps to replace the lamp assembly.
1
Turn off the projector and disconnect the AC plug. Allow the
projector to cool for at least 45 minutes.
2
3
To remove Lamp Cover, remove the screw with a screwdriver.
4
Replace Lamp Assembly with a new one and tighten 2 screws
back into position. Make sure that Lamp Assembly is set
properly. Replace Lamp Cover and tighten the screw.
5
Connect AC Power Cord to the projector and turn on the
projector.
6
Reset the Lamp Replace Counter.
Refer to “LAMP REPLACE COUNTER” on the next page .
Loosen 2 screws with a screwdriver and pull out Lamp Assembly
by grasping Handle.
HANDLE
SCREWS
LAMP
ASSEMBLY
ORDER REPLACEMENT LAMP
Replacement Lamps can be ordered through your dealer. When ordering, please provide the
following information:
Model No. of your projector : 38-VIV207-01 (LX32) &103-002001 (LX34)
Replacement Lamp/Filter Kit : 03-000712-01P
1
013-100237-02 Rev. 1 (02/07)
RESET "LAMP REPLACE COUNTER"
Be sure to reset the Lamp Replace Counter after the Lamp Assembly is replaced. When the Lamp Replace Counter is reset,
the LAMP REPLACE Indicator stops lighting.
1
Turn projector on, press MENU button and ON-SCREEN
MENU will appear. Press POINT LEFT/RIGHT button(s) to
move a red frame pointer to SETTING Menu icon (refer to
page 36, 37).
2
Press POINT DOWN button to move a red frame pointer to
“Lamp counter reset” and then press SELECT button. The
message "Lamp replace counter reset?" is displayed. Move
the pointer to [Yes] and then press SELECT button.
3
Another confirmation dialog box appears and select [Yes] to
reset Lamp Replace Counter.
On
On
Code 1
Move the pointer to Lamp counter reset and then press
SELECT button. The message “Lamp replace counter
reset?” is displayed.
NOTE : Do not reset the Lamp Replace Counter until after the Projection Lamp is replaced.
LAMP HANDLING PRECAUTIONS
This projector uses a high-pressure lamp which must be handled carefully and properly. Improper
handling may result in accidents, injury, or create a fire hazard.
Lamp lifetime may differ from lamp to lamp and according to the environment of use. There is no
guarantee of the same lifetime for each lamp. Some lamps may fail or terminate their lifetime in a
shorter period of time than other similar lamps.
If the projector indicates that the lamp should be replaced, i.e., if the LAMP REPLACE INDICATOR
lights up, replace the lamp with a new one IMMEDIATELY after the projector has cooled down.
( Follow carefully the instructions in the LAMP REPLACEMENT section of this manual. ) Continuous
use of the lamp with the LAMP REPLACE INDICATOR lighted may increase the risk of lamp explosion.
A Lamp may explode as a result of vibration, shock or degradation as a result of hours of use as its
lifetime draws to an end. Risk of explosion may differ according to the environment or conditions in
which the projector and lamp are being used.
IF A LAMP EXPLODES, THE FOLLOWING SAFETY PRECAUTIONS SHOULD BE TAKEN.
If a lamp explodes, disconnect the projector ’s AC plug from the AC outlet immediately. Contact an
authorized service station for a checkup of the unit and replacement of the lamp. Additionally, check
carefully to ensure that there are no broken shards or pieces of glass around the projector or coming out
from the cooling air circulation holes. Any broken shards found should be cleaned up carefully. No one
should check the inside of the projector except those who are authorized trained technicians and who are
familiar with projector service. Inappropriate attempts to service the unit by anyone, especially those who
are not appropriately trained to do so, may result in an accident or injury caused by pieces of broken
glass.
2
013-100237-02 Rev. 1 (02/07)
WARNING TEMP. INDICATOR
WARNING TEMP. Indicator flashes red and projector is automatically turned off when an internal temperature of the
projector exceeds normal temperature. Wait at least 5 minutes before turning on projector again.
When WARNING TEMP. Indicator continues to flash, check the items listed below.
1
2
3
Ventilation Slots of the projector may be blocked. In such an event, reposition the projector so that Ventilation Slots
are not obstructed.
Air Filter may be clogged with dust particles. Clean Air Filter by following the section AIR FILTER CARE AND
CLEANING below.
If WARNING TEMP. Indicator remains on after performing the above checks, Cooling Fans or the Internal Circuits may
be malfunctioning. Contact service personnel from an authorized dealer or a service station.
AIR FILTER CARE AND CLEANING
Removable Air Filters prevent dust from accumulating on the surface of Projection Lens and Projection Mirror. Should Air
Filters become clogged with dust particles, it will reduce Cooling Fans’ effectiveness and may result in internal heat build up
and adversely affect the life of the projector. Clean Air Filters every 250 hours of operation, following the steps below:
1
Turn off the projector, and disconnect AC power cord from the
AC outlet.
2
Turn the projector upside down and remove Air Filters by
pulling the latches upward.
3
4
Clean Air Filters with a brush or wash out dust and particles, or install new.
AIR FILTERS
Pull up and remove for cleaning every 250 hours.
Air filters
Replace three Air Filters properly. Make sure that Air Filters are
fully inserted.
CAUTION
Do not operate the projector with Air Filter removed. Dust
may accumulate on LCD Panel and Projection Mirror
degrading picture quality.
Do not put small parts into Air Intake Vents. It may result in
malfunction of the projector.
RECOMMENDATION
This filter is on the
LX34 Model ONLY.
Aoid operation the projector in dusty/smoky environments. Operation in such environments
may cause poor image quality.
When using under dusty or smoky conditions, dust may accumulate on a lens, liquid crystal panels, or optical elements
inside the projector. This condition may degrade the quality of a projected image.
When the above symptoms are noticed, contact your authorized dealer or service station for proper cleaning.
New filters are included in the Lamp/Filter Kit (P/N 03-000712-01P). Single filters are also available separately:
> 003-000843-01 Base Filter A
> 10-A6103015095 Base Filter B
> 003-000844-01 Base Filter C (LX34 Only)
> 003-000842-01 Base Filter, Lamp
3
013-100237-02 Rev. 1 (02/07)