1
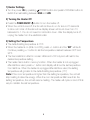
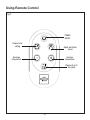
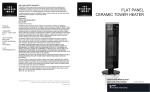
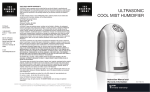
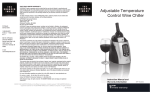
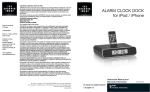
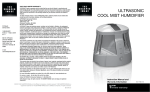
SI Products Service Center 1.888.856.6781 8:30a.m. – 7:00p.m. (EST) M–F Mail To: SI Products Consumer Relations Service Center Dept. 168 3000 Pontiac Trail Commerce Township, MI 48390 e-mail: [email protected] ONE YEAR LIMITED WARRANTY SI PRODUCTS sells its products with the intent that they are free of defects in manufacture and workmanship for a period of one year from the date of original purchase, except as noted below. SI PRODUCTS warrants that its products will be free of defects in material and workmanship under normal use and service. This warranty extends only to consumers and does not extend to Retailers. To obtain warranty service on your SI PRODUCTS product, mail the product and your dated sales receipt (as proof of purchase), postpaid, to the following address: SI PRODUCTS Consumer Relations Service Center Dept. 168 3000 Pontiac Trail Commerce Township, MI 48390 No COD's will be accepted. SI PRODUCTS does not authorize anyone, including, but not limited to, Retailers, the subsequent consumer purchaser of the product from a Retailer or remote purchasers, to obligate SI PRODUCTS in any way beyond the terms set forth herein. This warranty does not cover damage caused by misuse or abuse; accident; the attachment of any unauthorized accessory; alteration to the product; improper installation; unauthorized repairs or modifications; improper use of electrical/power supply; loss of power; dropped product; malfunction or damage of an operating part from failure to provide manufacturer’s recommended maintenance; transportation damage; theft; neglect; vandalism; or environmental conditions; loss of use during the period the product is at a repair facility or otherwise awaiting parts or repair; or any other conditions whatsoever that are beyond the control of SI PRODUCTS. This warranty is effective only if the product is purchased and operated in the country in which the product is purchased. A product that requires modifications or adoption to enable it to operate in any other country than the country for which it was designed, manufactured, approved and/or authorized, or repair of products damaged by these modifications is not covered under this warranty. THE WARRANTY PROVIDED HEREIN SHALL BE THE SOLE AND EXCLUSIVE WARRANTY. THERE SHALL BE NO OTHER WARRANTIES EXPRESS OR IMPLIED INCLUDING ANY IMPLIED WARRANTY OF MERCHANTABILITY OR FITNESS OR ANY OTHER OBLIGATION ON THE PART OF THE COMPANY WITH RESPECT TO PRODUCTS COVERED BY THIS WARRANTY. SI PRODUCTS SHALL HAVE NO LIABILITY FOR ANY INCIDENTAL, CONSEQUENTIAL OR SPECIAL DAMAGES. IN NO EVENT SHALL THIS WARRANTY REQUIRE MORE THAN THE REPAIR OR REPLACEMENT OF ANY PART OR PARTS WHICH ARE FOUND TO BE DEFECTIVE WITHIN THE EFFECTIVE PERIOD OF THE WARRANTY. NO REFUNDS WILL BE GIVEN. IF REPLACEMENT PARTS FOR DEFECTIVE MATERIALS ARE NOT AVAILABLE, SI PRODUCTS RESERVES THE RIGHT TO MAKE PRODUCT SUBSTITUTIONS IN LIEU OF REPAIR OR REPLACEMENT. This warranty does not extend to the purchase of opened, used, repaired, repackaged and/or resealed products, including but not limited to sale of such products on Internet auction sites and/or sales of such products by surplus or bulk resellers. Any and all warranties or guarantees shall immediately cease and terminate as to any products or parts thereof which are repaired, replaced, altered, or modified, without the prior express and written consent of SI PRODUCTS. This warranty provides you with specific legal rights. You may have additional rights which may vary from state to state. Because of individual regulations, some of the above limitations and exclusions may not apply to you. For more information regarding our product line in the USA, please visit: www.siproducts.com THE SHARPER IMAGE ® name and logo are registered trademarks. Marketed and distributed by SI products under license. ©The Sharper Image. All rights reserved. IB-EV-HT20 Oscillating Tower Ceramic Heater Instruction Manual and Warranty Information EV-HT20 Heat any room big or small. Thank you for purchasing The Sharper Image® Oscillating Tower Ceramic Heater. This product, along with the entire The Sharper Image collection, connects innovation with cutting-edge design to provide you with years of dependability and enjoyment. The oscillating tower heater from The Sharper Image heats any room from floor to ceiling evenly so you and your family can relax in a comfortable climate controlled setting when the weather outside turns colder. IMPORTANT SAFETY INFORMATION: WHEN USING ELECTRICAL PRODUCTS, ESPECIALLY WHEN CHILDREN ARE PRESENT, BASIC SAFETY PRECAUTIONS SHOULD ALWAYS BE FOLLOWED, INCLUDING THE FOLLOWING: READ ALL INSTRUCTIONS BEFORE USING DANGER-TO REDUCE THE RISK OF ELECTRIC SHOCK: • This heater is hot when in use. To avoid burns, do not let bare skin touch hot surface. If provided, always use handles when moving this heater. Keep combustible materials such as furniture, pillows, bedding, papers, clothes and curtains at least 3 feet from the front of the heater and keep them away from the sides and rear. • Extreme caution is necessary when any heater is used by or near children or invalids and whenever the heater is left operating and unattended. • Always unplug the heater when not in use. • Do not operate the heater with a damaged cord or plug, if the heater malfunctions, has been dropped or damaged in any manner. Return heater to authorized service facility for examination, electrical or mechanical adjustment, or repair. 2 Caution: All servicing of this product must be performed by authorized SI Products Service Personnel only. • This heater is not intended for use in bathroom, laundry areas and similar moist indoor locations. Never locate heater where it may fall into a bathtub or other water container. • Do not run cord under carpeting. Do not cover cord with throw rugs, runners or the like. Arrange cord away from traffic areas where it can be tripped over. CAUTION: This appliance has a polarized plug (one blade is wider than the other). To reduce the risk of shock, this plug is intended to fit only one way in a polarized outlet. If the plug does not fit fully in the outlet, reverse the plug. If it still does not fit, contact a qualified electrician. DO NOT attempt to defeat this safety feature. To do so could result in an electric shock hazard. • This heater draws 12.5 amps during operation. To prevent overloading a circuit, do not plug the heater into a circuit that already has other appliances working. • CAUTION: It is normal for the plug to feel warm to the touch; however, a loose fit between the AC outlet (receptacle) and plug may cause overheating and distortion of the plug. Contact a qualified electrician to replace loose or worn outlet. • To disconnect the heater, first turn controls to the OFF position, then remove plug from outlet. Never pull by the cord. • Do not insert or allow foreign objects to enter any ventilation or exhaust opening as this may cause an electric shock or fire, or damage the heater. • To prevent a possible fire, do not block air intakes or exhaust in any manner. Do not use on soft surface, like a bed, where openings may become blocked. • A heater has hot and arcing or sparking parts inside. Do not use it in the areas where gasoline, paint, or flammable liquids are used or stored. 3 • Use this heater only as described in this manual. Any other use not recommended by the manufacturer may cause fire, electric shock, or injury to persons. • Always plug heaters directly into a wall outlet/receptacle. Never use with an extension cord or relocate power tap (outlet/power strip). CAUTION: Avoid the use of an extension cord because the extension cord may overheat and cause a risk of fire. However, if you have to use an extension cord, the cord should be No.14 AWG minimum size and rated not less than 1875 watts. • The output of this heater may vary and its temperature may become intense enough to burn exposed skin. Use of this heater is not recommended for persons with reduced sensitivity to heat or an inability to react to avoid burns. • Always unplug the heater from the electrical outlet immediately after using and before cleaning. • DO NOT place the heater near a bed because objects such as pillows or blankets can fall off the bed and be ignited by the heater. • DO NOT reach for an appliance that has fallen into water. Unplug it immediately. • DO NOT use while bathing or in the shower. • DO NOT place or store appliance where it can fall or be pulled into a tub or sink. • DO NOT place in or drop into water or other liquid. • NEVER use pins or other metallic fasteners with this appliance. • Keep dry - DO NOT operate in a wet or moist condition. 4 WARNING – TO REDUCE THE RISK OF BURNS, ELECTRIC SHOCK, FIRE OR INJURY TO PERSONS: • An appliance should never be left unattended when plugged in. Unplug from outlet when not in use and before putting on or taking off parts or attachments. • Extreme caution is necessary when this appliance is used by or near children, invalids or disabled persons. • Use this appliance only for its intended use as described in this manual. Do not use attachments not recommended by The Sharper Image; specifically any attachments not provided with the unit. • NEVER operate this appliance if it has a damaged cord or plug, if it is not working properly, if it has been dropped or damaged, or dropped into water. Return it to SI Products Service Center for examination and repair. • Keep cord away from heated surfaces. • NEVER drop or insert any object into any opening. • DO NOT operate where aerosol (spray) products are being used or where oxygen is being administered. • DO NOT operate under a blanket or pillow. Excessive heating can occur and cause fire, electrocution or injury to persons. • DO NOT carry this appliance by the power cord or use cord as handle. • To disconnect, turn all controls to the “off” position, then remove plug from outlet. • This appliance is designed for personal, non-professional use only. • DO NOT use outdoors. • Check your heater cord and plug connections. a) Faulty wall outlet connections or loose plugs can cause the outlet or plug to overheat. Be sure the plug fits tight in the outlet. b) Heaters draw more current than small appliances, overheating of the outlet may occur even if it has not occurred with the use of other appliances. c) During use check frequency to determine if your plug outlet or faceplate is HOT! If so, discontinue use of the heater and have a qualified electrician check and/or replace the faulty outlet(s). SAVE THESE INSTRUCTIONS 5 Main Features on Oscillating Tower Ceramic Heater EV-HT20_Heater.ai 7/10/09 4:15:54 PM Fig. 1 Function control panel Temperature readout LCD screen Ceramic heating element Oscillation button Timer button POWER button Temperature adjustment Fig. 2 6 Specification of Main Unit: Input Voltage: 120V-60Hz Output Power: 1500W Current: 12.5A OPERATING INSTRUCTIONS Turning the Unit On • Check that neither the appliance nor the power cable has been damaged when first using. • Place the heater on a firm level surface, at least 3 ft. away from any wall and any other objects such as furniture, curtains, plants or combustible material. • With the POWER in the “OFF” position. Plug heater into a standard AC outlet. (See important safeguards regarding use of extension cords) • Press POWER ON/OFF button once to turn on the heater and the heater will heat at HIGH heating setting. The screen will display the room temperature and HIGH indicator will light. When the room temperature is displayed, the “ROOM” indicator will be lit. IMPORTANT: Your heater is equipped with a polarized alternating current line plug (a plug having one blade wider than the other). This plug will fit into the power outlet only one way. This is a safety feature. If you are unable to insert the plug fully into the outlet, try reversing the plug. If the plug should still fail to fit, contact your electrician to replace your outlet. DO NOT defeat the safety purpose of the polarized plug. 7 1) Heater Settings • Turn the power ON by pressing POWER button and press LOW/HIGH button to switch the heat setting between HIGH and LOW. 2) Turning the Heater Off • Press the POWER ON/OFF button to turn the heater off. • When the unit is turned off, the fan will continue to run for around 15 seconds to blow out hot air. At the same time display screen will count down from 15 backward to 1. You do not need to hold button down. After the display turns off, unplug the heater from the electrical outlet. 3) Setting the Temperature • The default setting temperature is 75°F. • When the heater is on (HIGH or LOW), press +/- button and the “SET” will be lit. Continue pressing +/- button to set the temperature desired between 60°F and 95°F. • The thermostat is in effect in modes: HIGH and LOW only and will heat to the desired temperature setting. • The heater has a built in memory function. When the heater is not unplugged after last time used, press +/- button and display will show the set temperature from last time. When the heater is unplugged after last time used, the setting temperature will go back to the default setting temperature. (75°) Note: If the room temperature is higher than the setting temperature, the unit will stop heating to save the energy. When the room temperature falls lower than the setting temperature, the unit will resume heating. The heater will cycle on and off this way to maintain the set temperature. 8 4) Setting the Timer This heater has a timer that will enable the heater to turn on and off automatically within 90 Minutes. • Plug the heater into an outlet, press the TIMER button to set the timer (0,15,30,…,90 Min) to automatically turn on the heater. • When the heater is on, press the TIMER button to set the timer (0,15,30,…,90 Minutes) to automatically turn off the heater. • When displaying the timer, the “MIN” will light • When the timer is set, the timer symbol will light. 5) Oscillation OSCILLATION button is used to start and stop the oscillation of the heater. When the unit is on, Press OSCILLATION button to start the Auto oscillation; press OSCILLATION button again to stop the oscillation. 6) “ºC” and “ºF” Conversion Press +/- button together more than 3 seconds, the display will convert between “°C” and “°F” When the temperature is on “°C” mode, the “°C” will light. When the temperature is on “°F” mode, the “°F” will light 7) Resetting Heater This heater is equipped with an internal high limit switch that causes the unit to stop operating in the event the internal temperature exceeds normal operating temperatures. IF THE UNIT SHUTS OFF: 1) PRESS POWER ON/OFF BUTTON TO TURN OFF THE HEATER 2) UNPLUG UNIT AND WAIT 10 MINUTES 3) PLUG IN AND PRESS POWER ON/OFF BUTTON AGAIN TO TURN IT ON 9 Using Remote Control Fig. 3 POWER ON/OFF Choose timer setting Adjust oscillation speed Decrease temperature Increase temperature Choose HI or LO fan speed 10 TROUBLESHOOTING If heater fails to operate • Be sure it is plugged in and that the electrical outlet is working. Check circuit breaker in case of blown circuit. • Check for any obstruction. If you find an obstruction press POWER ON/OFF button to turn the heater OFF. Unplug the heater and wait at least ten minutes for it to cool. Carefully remove the obstruction. Plug the heater back in and restart it as described under OPERATION. • If heater still does not operate, remove the plug from the socket and have the appliance serviced by authorized service personnel only. CLEANING AND STORAGE We recommend that the heater be cleaned at least once a month and before offseason storage. – Turn the heater OFF and unplug it. Allow it to cool. – Use a dry cloth to clean the external surfaces of the heater. DO NOT USE WATER, WAX, POLISH OR ANY CHEMICAL SOLUTION. – Clean your heater using the above-mentioned steps, then pack the heater in its original container and store it in a cool dry place. – This heater does not disassemble. – The motor is factory lubricated for life and will require no further lubrication. 11