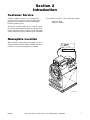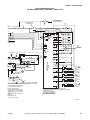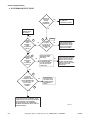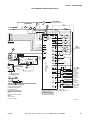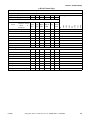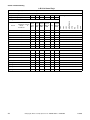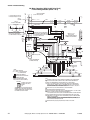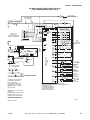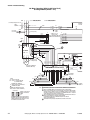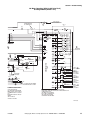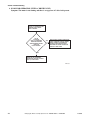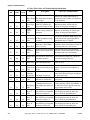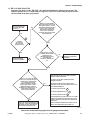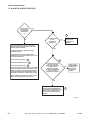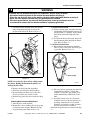
1
Service
Washer-Extractor
Pocket Hardmount
UWPV
Refer to Page 8 for Model Numbers
PHM1380C
www.comlaundry.com
Part No. F238006
April 2003
Table of Contents
Section 1 – Safety Information
General Safety Precautions .....................................3
Important Safety Instructions ..................................4
Locating an Authorized Servicer ............................6
Section 2 – Introduction
Customer Service ....................................................7
Nameplate Location ................................................7
Model Identification ................................................8
Section 3 – Installation
Electrical Installation ............................................10
Mechanical & Electrical Design ...........................11
Component Function....................................11
Section 4 – Troubleshooting
1. WE-6 Control Has No Visible Display — P and
N-Voltage Models ..........................................14
2. WE-6 Control Has No Visible Display — QVoltage Model ................................................18
3. No Fill Analysis .............................................22
4. Water Runs Continuously into the WasherExtractor .........................................................26
5. Door Lock Switch Analysis ...........................30
6. No Fuseboard Functions ................................34
7. No Motor Operation (With No AC
Drive Fault) ....................................................38
Preliminary Checks: .....................................38
Secondary Checks: .......................................38
A-B 160 Control Logic ................................38
A-B 1305 Control Logic ..............................39
A-B 1336 Control Logic ..............................40
8. No Motor Operation (With AC Drive Fault) .46
9. The Motor is Running, but at an
Abnormal Speed .............................................47
Preliminary Checks: .....................................47
Secondary Checks: .......................................47
AC Drive Fault Codes and Troubleshooting
Information...................................................48
10. No Spin ..........................................................50
11. Fill Alarm Analysis ........................................51
12. Empty Alarm Analysis ...................................54
13. Automatic Supply Dispenser Analysis ..........58
14. No Keypad Functions ....................................59
15. Door Unlocking Function ..............................60
16. Excessive Cycle Time ....................................64
17. Excessive Vibration and/or Noise
During Spin ....................................................65
18. Stop/Done Situation in Mid Cycle .................65
19. Power Wait Situation in Mid Cycle ...............65
20. Pumps Turning on in Mid Cycle Without Being
Programmed to Do So ....................................65
Section 5 – Service Procedures
21. Voltage Distribution ......................................67
22. Electrical Testing ...........................................69
23. Computer Test Procedure ..............................71
Test equipment required: .............................71
Computer Test Procedure.............................71
24. Test cycle .......................................................72
If the display indicates a “DOOR” alarm.....72
If the display indicates a “WATER” alarm..72
If the display indicates a “FILL” alarm .......72
If the display indicates an “EMTY”
(empty) alarm...............................................72
If there is no spin, but the rest of the
program is OK..............................................73
If the basket goes into spin with water left
in the basket .................................................73
If the display indicates “OVERHT”.............73
If the display indicates a “TEMP” alarm .....73
If the display indicates a “MEMR” alarm....73
25. Keypad Removal and Installation ..................73
26. Computer Board Removal and Installation ...76
27. Fuse Board Removal and Installation ............76
28. Interface Board Removal and Installation .....77
29. Keymode Switch ............................................78
30. Calibrating the WE-6 Temperature Circuit ...78
31. AC Drive Removal and Installation ...............80
32. Drive Motor ...................................................81
Service Tips..................................................81
Removal .......................................................81
Installation....................................................82
33. Drive Belt .......................................................82
Belt Replacement: ........................................82
Checking Belt Tension and Deflection: .......83
34. Water Level Pressure Switch .........................84
Service Tips..................................................84
Removal and Installation .............................85
35. Water Valve ...................................................85
36. Drain Valve ....................................................86
(continued)
© Copyright 2003, Alliance Laundry Systems LLC
All rights reserved. No part of the contents of this book may be reproduced or transmitted in any form or by any means without
the expressed written consent of the publisher.
F238006
© Copyright, Alliance Laundry Systems LLC – DO NOT COPY or TRANSMIT
1
37.
38.
39.
40.
Flange Relay Removal and Installation .........86
Vacuum Breaker ............................................87
Door Gasket Removal and Installation ..........87
Bearings and Cartridge Seal Replacement .....88
Mounting Instructions ..................................92
41. Bearing Alignment .........................................95
Bearing Troubleshooting Tips......................95
2
© Copyright, Alliance Laundry Systems LLC – DO NOT COPY or TRANSMIT
F238006
Section 1
Safety Information
Throughout this manual and on machine decals, you will find precautionary statements (“CAUTION,”
“WARNING,” and “DANGER”) followed by specific instructions. These precautions are intended for the personal
safety of the operator, user, servicer and those maintaining the machine.
a DANGER
Danger indicates the presence of a hazard that will cause severe personal injury, death or substantial property
damage if the danger is ignored.
a WARNING
Warning indicates the presence of a hazard that can cause severe personal injury, death or substantial property
damage if the warning is ignored.
a CAUTION
Caution indicates the presence of a hazard that will or can cause minor personal injury or property damage if the
caution is ignored.
Additional precautionary statements (“IMPORTANT” and “NOTE”) are followed by specific instructions.
IMPORTANT
The word “IMPORTANT” is used to inform the reader of specific procedures where minor machine damage will
occur if the procedure is not followed.
NOTE
The word “NOTE” is used to communicate installation, operation, maintenance or servicing information that is
important but not hazard related.
General Safety Precautions
In the interest of safety, some general precautions relating to the operation of this machine follow.
WARNING
• Failure to install, maintain and/or operate this product according to the manufacturer’s
instructions may result in conditions which can produce serious injury, death and/or property
damage.
• Do not repair or replace any part of the product or attempt any servicing unless specifically
recommended or published in this Service Manual and unless you understand and have the
skills to carry out the servicing.
• Whenever ground wires are removed during servicing, these ground wires must be
reconnected to ensure that the product is properly grounded and to reduce the risk of fire,
electric shock, serious injury or death.
W006R2
(continued)
F238006
© Copyright, Alliance Laundry Systems LLC – DO NOT COPY or TRANSMIT
3
Section 1 Safety Information
WARNING
To reduce the risk of electric shock, fire, explosion, serious injury or death:
• Disconnect electric power to the washer-extractor before servicing.
• Never start the washer-extractor with any guards/panels removed.
• Whenever ground wires are removed during servicing, these ground wires must be
reconnected to ensure that the washer-extractor is properly grounded.
W460
WARNING
Repairs that are made to your products by unqualified persons can result in hazards due to
improper assembly or adjustments subjecting you or the inexperienced person making such
repairs to the risk of serious injury, electrical shock or death.
W007
WARNING
If you or an unqualified person perform service on your product, you must assume the
responsibility for any personal injury or property damage which may result. The manufacturer
will not be responsible for any injury or property damage arising from improper service and/or
service procedures.
W008
Always contact your dealer, distributor, service agent or the manufacturer about any problems or conditions you do
not understand.
Important Safety Instructions
WARNING
To reduce the risk of fire, electric shock, serious injury or death to persons when using your
washer, follow these basic precautions:
W023E
1. Read all instructions before using the washer-extractor.
2. Refer to the GROUNDING INSTRUCTIONS in the INSTALLATION manual (supplied with your washerextractor) for the proper grounding of the washer-extractor.
3. Do not wash textiles that have been previously cleaned in, washed in, soaked in or spotted with gasoline, drycleaning solvents or other flammable or explosive substances. They give off vapors that could ignite or
explode.
4. Do not add gasoline, dry-cleaning solvents or other flammable or explosive substances to the wash water.
These substances give off vapors that could ignite or explode.
5. Under certain conditions, hydrogen gas may be produced in a hot water system that has not been used for two
weeks or more. HYDROGEN GAS IS EXPLOSIVE. If the hot water system has not been used for such a
period, before using a washer-extractor, turn on all hot water faucets and let the water flow from each for
several minutes. This will release any accumulated hydrogen gas. The gas is flammable. Do not smoke or use
an open flame during this time.
4
© Copyright, Alliance Laundry Systems LLC – DO NOT COPY or TRANSMIT
F238006
Section 1 Safety Information
6. Do not allow children to play on or in a washer-extractor. Close supervision of children is necessary when the
washer-extractor is used near children.
7. Before the washer-extractor is removed from service or discarded, remove the door to the washing
compartment.
8. Do not reach into the washer-extractor if the wash basket is moving.
9. Do not install or store the washer-extractor where it will be exposed to water and/or weather.
10. Do not tamper with the washer-extractor’s controls.
11. Do not repair or replace any part of the washer-extractor or attempt any servicing unless specifically
recommended in the user-maintenance instructions or in published user-repair instructions that the user
understands and has the skills to carry out.
12. To reduce the risk of an electrical shock or fire, DO NOT use an extension cord or an adapter to connect the
washer-extractor to an electrical power source.
13. Use the washer-extractor only for its intended purpose, washing clothes.
14. ALWAYS disconnect the washer-extractor from its electrical supply before attempting any service.
15. Install the washer-extractor according to the INSTALLATION INSTRUCTIONS. All connections for water,
drain, electrical power and grounding must comply with local codes and, when required, be made by licensed
personnel.
16. To reduce the risk of fire, textiles which have traces of any flammable substances such as vegetable oil,
cooking oil, machine oil, flammable chemicals, thinner, etc. or anything containing wax or chemicals such as
in mops or cleaning cloths, must not be put into the washer-extractor. These flammable substances may cause
the fabric to ignite.
17. Do not use fabric softeners or products to eliminate static unless recommended by the manufacturer of the
fabric softener or product.
18. Keep the washer-extractor in good condition. Bumping or dropping the washer-extractor can damage its safety
features. If this occurs, have the washer-extractor checked by a qualified service person.
19. Replace worn power cords and/or loose plugs.
20. Be sure that water connections have a shut-off valve and that fill hose connections are tight. CLOSE the shutoff valves at the end of each wash day.
21. The loading door MUST BE CLOSED any time the washer-extractor is to fill, tumble or spin. DO NOT bypass the loading door switch and permit the washer-extractor to operate with the loading door open.
22. Always read and follow the manufacturer’s instructions on packages of laundry and cleaning aids. Heed all
warnings and precautions. To reduce the risk of poisoning or chemical burns, keep them out of the reach of
children at all times (preferably in a locked cabinet).
23. Always follow the fabric care instructions supplied by the textile manufacturer.
24. Never operate the washer-extractor with any guards and/or panels removed.
25. DO NOT operate the washer-extractor with missing or broken parts.
26. DO NOT by-pass any safety devices.
27. Failure to install, maintain and/or operate this washer-extractor according to the manufacturer's instructions
may result in conditions that can produce bodily injury and/or property damage.
NOTE: The WARNING and IMPORTANT SAFETY INSTRUCTIONS appearing in this manual are not
meant to cover all possible conditions and situations that may occur. Common sense, caution and care must
be exercised when installing, maintaining and operating the washer-extractor.
Any problems or conditions not understood should be reported to the dealer, distributor, service agent or the
manufacturer.
F238006
© Copyright, Alliance Laundry Systems LLC – DO NOT COPY or TRANSMIT
5
Section 1 Safety Information
Locating an Authorized Servicer
Alliance Laundry Systems is not responsible for personal injury or property damage resulting from improper
service. Review all service information before beginning repairs.
Warranty service must be performed by an authorized technician, using authorized factory parts. If service is
required after the warranty expires, Alliance Laundry Systems also recommends contacting an authorized
technician and using authorized factory parts.
6
© Copyright, Alliance Laundry Systems LLC – DO NOT COPY or TRANSMIT
F238006
Section 2
Introduction
Customer Service
Alliance Laundry Systems is not responsible for
personal injury or property damage resulting from
improper service. Review all service information
before beginning repairs.
For technical assistance, call the following number:
(850) 718-1026
Marianna, Florida
If literature or replacement parts are required, contact
the source from whom the machine was purchased or
contact Alliance Laundry Systems at (920) 748-3950
for the name of the nearest authorized parts distributor.
Nameplate Location
When calling or writing about your product, be sure to
mention model and serial numbers. Model and serial
numbers are located on nameplate(s) as shown.
UW50PVQU20001
1195072314
Amps 19
200-240
Required Circuit Breaker Amps.
30
Hz 50 - 60 Wire 3
Phase 3
Max. Load 50 LB 23 KG Max. Speed 720
Model No.
Serial No.
Voltage
Elec. Heating
Product No.
KW Steam Press
520003
PSI
Date Code
RPM
BAR
1097
¨
P
U
S
H
PHM2049P
F238006
© Copyright, Alliance Laundry Systems LLC – DO NOT COPY or TRANSMIT
7
Section 2 Introduction
Model Identification
Information in this manual is applicable to these washer-extractors.
UW35PV
8
UW60PV
UW80PV
UW100PV
© Copyright, Alliance Laundry Systems LLC – DO NOT COPY or TRANSMIT
UW125PV
F238006
Section 3
Installation
WARNING
To reduce the risk of electrical shock, fire, explosion, serious injury or death:
• Disconnect electrical power to the washer-extractor before servicing it.
• Close the gas shut-off valve to the washer-extractor (when applicable) before servicing it.
• Never start the washer-extractor with any guards/panels removed.
• Whenever ground wires are removed during servicing, these ground wires must be
reconnected to ensure that the washer-extractor is properly grounded.
W461R1
Recirculation Inlet
Supply Valve Box
Supply Dispenser
Door Handle
Spray Rinse
Nozzle
Water Inlet Valves
Power Input Area
(inside)
Premium Wet
Clean Module
(optional)
Steam Connection
(optional)
Drain
Premium Wet
Clean Module
(optional)
PHM1950S
F238006
© Copyright, Alliance Laundry Systems LLC – DO NOT COPY or TRANSMIT
9
Section 3 Installation
WARNING
To reduce the risk of electrical shock, fire, explosion, serious injury or death:
• Disconnect electrical power to the washer-extractor before servicing it.
• Close the gas shut-off valve to the washer-extractor (when applicable) before servicing it.
• Never start the washer-extractor with any guards/panels removed.
• Whenever ground wires are removed during servicing, these ground wires must be
reconnected to ensure that the washer-extractor is properly grounded.
W461R1
UWPV Pocket Hardmount Water Supply Line Sizing
Model
35
60
80
100
125
Number of
Machines
1
2
3
4
1
2
3
4
1
2
3
4
1
2
3
4
1
2
3
4
Supply Line Size, in (mm)
Main
Hot/Cold
1 (25)
1-1/2 (38)
2 (50)
2 (50)
1-1/4 (32)
2 (50)
2 (50)
2-1/2 (64)
1-1/4 (32)
2 (50)
2 (50)
2-1/2 (64)
1-1/2 (38)
2 (50)
2 (50)
2-1/2 (64)
2 (50)
2-1/2 (64)
2-1/2 (64)
2-1/2 (64)
3/4 (19)
1 (25)
1-1/4 (32)
1-1/2 (38)
1 (25)
1-1/4 (32)
1-1/2 (38)
2 (50)
1 (25)
1-1/4 (32)
1-1/2 (38)
2 (50)
1 (25)
1-1/2 (38)
2-1/2 (64)
2 (50)
1-1/4 (32)
2 (50)
2 (50)
2-1/2 (64)
Electrical Installation
WARNING
This machine must be installed, adjusted
and serviced by qualified electrical
maintenance personnel familiar with the
construction and operation of this type of
machinery. They must also be familiar with
the potential hazards involved. Failure to
observe this warning may result in personal
injury and/or equipment damage and may
void the warranty.
10
WARNING
To reduce the risk of electrical shock,
disconnect the power from the machine
before removing the control box cover and
before attempting any service procedures.
Dangerous voltages are present in the
electrical control box(es) and at the motor
terminals. Only qualified personnel familiar
with electrical test procedures, test
equipment and safety precautions should
attempt adjustments and troubleshooting.
WARNING
Ensure that a ground wire from a proven
earth ground is connected to the ground lug
near the input power block on this machine.
Without proper grounding, personal injury
from electric shock and/or machine
malfunctions could occur.
Electrical connections are made at the rear of the
control module. The machine must be connected to the
proper electrical supply shown on the identification
plate attached to the side of the control module.
The AC drive requires a clean power supply, free from
voltage spikes and surges. A voltage monitor should be
used to check incoming power. Your local power
company may provide such a monitor.
If input voltage measures above 230 Volts for a 200
Volt drive or above 440 Volts for a 400 Volt drive, ask
the power company to lower the voltage. As an
alternative, a step-down transformer kit is available
from the distributor. Voltages above 250 Volts and 490
Volts require additional measures. Contact the
distributor or the manufacturer for assistance.
© Copyright, Alliance Laundry Systems LLC – DO NOT COPY or TRANSMIT
F238006
Section 3 Installation
WARNING
To reduce the risk of electrical shock, fire, explosion, serious injury or death:
• Disconnect electrical power to the washer-extractor before servicing it.
• Close the gas shut-off valve to the washer-extractor (when applicable) before servicing it.
• Never start the washer-extractor with any guards/panels removed.
• Whenever ground wires are removed during servicing, these ground wires must be
reconnected to ensure that the washer-extractor is properly grounded.
W461R1
WARNING
To reduce the risk of electrical shock, never
touch terminals or components of the AC
drive unless the power is disconnected and
the “CHARGE” indicator LED is off. The AC
drive retains potentially deadly voltage for
some time after the power is disconnected.
Tampering with the AC drive will void the
warranty. There are no user-serviceable
parts inside of the AC drive.
DANGER
To reduce the risk of serious injury, when
using a parameter unit to control the AC
drive, a large sign should be placed on the
front of the machine warning people of the
imminent danger. When controller the AC
drive with a parameter unit, the machine’s
computer and its safety features are
bypassed. This allows the basket to rotate
at high speeds with the door open.
The washer-extractor should be connected to an
individual branch circuit not shared with lighting or
other equipment.
The connection should be shielded in a liquid-tight or
approved flexible conduit with proper conductors of
correct size installed in accordance with the National
Electric Code or other applicable codes. The
connection must be made by a qualified electrician
using the wiring diagram provided with the washerextractor or according to accepted European standards
for equipment labeled with the CE mark.
For personal safety and for proper operation, the
washer-extractor must be grounded in accordance with
state and local codes. If such codes are not available,
grounding must conform with the National Electric
Code, article 250-95 or accepted European standards
for equipment labeled with the CE mark. The ground
connection must be made to a proven earth ground, not
to conduit or water pipes.
If a delta supply system is used, the high leg may be
connected to L3 on the UWPV models.
Mechanical & Electrical Design
Component Function
The AC drive provides thermal overload protection for
the drive motor. However, a separate three-phase circuit
breaker or electrical supply disconnecting device must
be installed for complete electrical overload protection.
This prevents damage to the motor by disconnecting all
legs if one should be lost accidentally. Check the data
plate on the back of the washer-extractor for circuit
breaker requirements.
NOTE: Do NOT use fuses in place of a circuit
breaker.
CAUTION
Do not use a phase adder on any variablespeed machine.
F238006
Keypad
The keypad consists of pressure-sensitive switches
enclosed within the control-module front decal. The
keypad executes all commands and programming
instructions to the computer.
Main Computer Board
The computer board is mounted on the inside front of
the control module and supports the LED display and
indicators. It also provides mounting and printed
circuitry for the ROM, RAM, battery and beeper.
Fuse Board
The fuse board provides mounting for the output fuses,
transformer and R.C. networks for the computer. It is
mounted on a support bracket inside of the control
module.
© Copyright, Alliance Laundry Systems LLC – DO NOT COPY or TRANSMIT
11
Section 3 Installation
WARNING
To reduce the risk of electrical shock, fire, explosion, serious injury or death:
• Disconnect electrical power to the washer-extractor before servicing it.
• Close the gas shut-off valve to the washer-extractor (when applicable) before servicing it.
• Never start the washer-extractor with any guards/panels removed.
• Whenever ground wires are removed during servicing, these ground wires must be
reconnected to ensure that the washer-extractor is properly grounded.
W461R1
Door
The door has an automatic door-locking mechanism
which remains locked throughout the complete wash
cycle.
Water Valves
Solenoid-operated valves control the washerextractor’s fill and operate the spray rinse. They are
controlled by the computer. The valve configuration is
shown below:
AC Drive Control
The AC drive control module provides seven
programmable motor speeds from a single motor. It
lowers inrush current and controls the rate of
acceleration and deceleration. A parameter unit is
available as a troubleshooting aid and to program
changes in the drive control. The AC drive is located
inside of the control module.
CAUTION
UW35PV – Four 1/2 inch valves
UW60PV – Two 3/4 inch, Two 1/2 inch valves
UW80PV – Four 3/4 inch valves
UW100PV – Four 3/4 inch valves
UW125PV (Designs 1-6) – Four 3/4 inch valves
UW125PV (Design 7) – Two 1 inch, Two 3/4 inch
valves
Never change the AC drive’s preset
parameters without consulting the factory.
Permanent damage could result to the AC
drive and/or to the drive motor.
Drain Valve
The UW35PV uses a motorized 2 inch ball valve, while
the UW60, UW80, UW100 and UW125 use 3 inch ball
valves.
AC Drive Interface Board
The AC drive interface board converts motor logic from
the WE-6 computer to the correct signals for the AC
drive. All logic inputs to the computer are routed
through this board.
Drain connection sizes are shown below:
Number of
drain valves
Drain connection
per machine size
UW35PV
1
2 3/8 inch (60 mm)
UW60PV
1
3 inch (76 mm)
UW80PV
2
3 inch (76 mm)
UW100PV
2
3 inch (76 mm)
UW125PV
2
3 inch (76 mm)
Door Box
The door box contains the door lock microswitch,
interlock magnetic switch and the door unlock
solenoid.
Control Module
All electrical controls (e.g., computer board, buzzer,
water level switches and the door lock switch) are
located in a stainless steel enclosure mounted on top of
the shell. It is provided with conduit connections for
safe and reliable connection to the drive motor. The
electrical power source is connected to the power input
terminal strip inside the back of the control module.
12
© Copyright, Alliance Laundry Systems LLC – DO NOT COPY or TRANSMIT
F238006
Section 4
Troubleshooting
WARNING
To reduce the risk of electrical shock, fire, explosion, serious injury or death:
• Disconnect electrical power to the washer-extractor before servicing it.
• Close the gas shut-off valve to the washer-extractor (when applicable) before servicing it.
• Never start the washer-extractor with any guards/panels removed.
• Whenever ground wires are removed during servicing, these ground wires must be
reconnected to ensure that the washer-extractor is properly grounded.
W461R1
F238006
© Copyright, Alliance Laundry Systems LLC – DO NOT COPY or TRANSMIT
13
Section 4 Troubleshooting
1. WE-6 CONTROL HAS NO VISIBLE DISPLAY — P AND N-VOLTAGE MODELS
THE WE-6 CONTROL HAS
NO VISIBLE DISPLAY.
IS
THE MAIN
POWER CIRCUIT
BREAKER
ON?
NO
TURN ON THE MAIN POWER
CIRCUIT BREAKER.
YES
1
IS THERE
VOLTAGE
(380-480 VOLTS)
INTO AND OUT OF
THE QF2 CIRCUIT
BREAKER?
NO
RESET THE QF2 CIRCUIT BREAKER. IF, AFTER
RESETTING, THERE IS STILL NO VOLTAGE,
REPLACE THE QF2 CIRCUIT BREAKER.
YES
2
NOTE: THE TCI TRANSFORMER IS
LOCATED ON THE LEFT SIDE OF THE
FRAME UNDERNEATH THE OUTER
PANELS.
IS THERE
VOLTAGE INTO
(380-480 VOLTS)
AND OUT OF (200-240
VOLTS) THE TC1
TRANSFORMER?
NO
REPLACE THE TC1 TRANSFORMER.
YES
3
NOTE: THE QF1 CIRCUIT BREAKERS
ARE ON THE FRONT LEFT SIDE OF
THE MACHINE BESIDE THE KEY
SWITCH.
IS THERE
VOLTAGE (120
VOLTS) INTO
AND OUT OF THE
2 QF1 CIRCUIT
BREAKERS?
RESET THE 2 QF1 CIRCUIT BREAKERS. IF,
AFTER RESETTING, THERE IS STILL NO
VOLTAGE, REPLACE THE QF1 CIRCUIT
BREAKERS.
NO
YES
IS THERE
VOLTAGE (120
VOLTS) INTO
AND OUT OF
THE E-STOP
SWITCH SB1?
4
RESET AND RETURN (EITHER BY PULLING OR BY
TWISTING AND PULLING) THE E-STOP SWITCH SB1.
IF, AFTER RESETTING AND RETURNING, THERE IS
STILL NO VOLTAGE, REPLACE THE E-STOP
SWITCH SB1.
NO
YES
IS THERE
VOLTAGE (220
VOLTS) ON THE J2
WHITE TRANSFORMER
PLUG ON THE FUSEBOARD
BETWEEN PINS 1
AND 4?
5
NO
RETURN TO THE TOP. CHECK EACH OF THE ABOVE
STEPS CAREFULLY.
ALSO, ON THE J2 WHITE TRANSFORMER PLUG ON
THE FUSEBOARD, MAKE SURE THAT THERE IS
VOLTAGE BETWEEN PIN 1 TO GROUND AND PIN 4 TO
GROUND.
7
YES
IS THERE 10VDC ON THE RIBBON CABLE LOCATED
BETWEEN THE FUSEBOARD AND THE WE-6 COMPUTER?
IF NOT, REPLACE IT.
IF THERE IS 10VDC ON THE RIBBON CABLE , DISCONNECT
ALL OF THE CABLES FROM THE WE-6 COMPUTER EXCEPT
THE GROUND WIRE AND THE RIBBON CABLE FROM THE
FUSEBOARD. IF THE WE-6 STILL DOESN'T SHOW A DISPLAY,
THE FUSEBOARD MAY NOT BE WORKING PROPERLY.
CONTACT THE FACTORY BEFORE REPLACING IT.
YES
IS THERE
10VDC BETWEEN
THE +10VDC MALE
SPADE AND THE
GROUND?
6
NO
CHECK THE FU4 (125MA) FUSE LOCATED
BEHIND THE TRANSFORMER. IF THE FUSE IS
BLOWN, REPLACE IT. IF THE FUSE ISN'T
BLOWN, REPLACE THE FUSEBOARD.
IF THE FUSEBOARD DOES SHOW A DISPLAY, RECONNECT
THE RIBBON CABLE.
PHM1924S
NOTE: IF THE J1 RIBBON CABLE IS INSTALLED
INCORRECTLY, THERE WILL BE NO DISPLAY.
14
© Copyright, Alliance Laundry Systems LLC – DO NOT COPY or TRANSMIT
F238006
Section 4 Troubleshooting
Please refer to the following 2 pages for wiring diagram information.
F238006
© Copyright, Alliance Laundry Systems LLC – DO NOT COPY or TRANSMIT
15
Section 4 Troubleshooting
WE-6 Control Has No Visible Display — P and N-Voltage Models (Sheet 1 of 2)
P.E.
GND
P: 380-415V/50-60HZ/3ø/3W 220V CTRL
L1
L2
L3
35-100LB:
1
15 AMP CIRCUIT BREAKER
14 AWG (2mm2) WIRE
2
4
3
N: 440-480V/50-60HZ/3ø/3W 220V CTRL
LIMIT OF
EQUIPMENT
XT2
QF2
18 AWG
XT1
DETAIL "B"
BUCK/BOOST TRANSFORMERS
L1
440-480V INPUT
L2
L1
L2
L2 QF2
QF2 H4
L1 QF2
QF2 H1
L3
150VA
250VA
6
X4
X1 H4
X3 X2
H3 H2
H1
H1
H4 X1
H2 H3
X2 X3
X2 QF1B
QF1B J2-1-1
X1 QF1A1
0.5 AMP
1.0 AMP
12 AWG (35-100LB)
L3
QF1
TC1
3
QF1A SB1
1.0 AMP
2.0 AMP
6
6
X4
C1
C2
L1C
L2C
L3C
5
400-437V OUTPUT
PART NUMBER 360116 OR EQUIVALENT.
OUTPUT VOLTAGE IS APPROXIMATELY
10% LOWER THAN INPUT VOLTAGE (BUCK).
C2-1 L1
BUCK-BOOST
TRANSFORMER
REQUIRED ONLY FOR 440-480V APPLICATIONS.
REFER TO BUCK/BOOST TRANSFORMER DETAIL
"B" FOR CONNECTION DETAILS. REFER TO NOTE 5
FOR 380-415 VOLT APPLICATIONS.
GRN/YEL
L1C L2C L3C
1
2
3
C2-2 L2
C2-3 L3
4
C2-5 GND
5
6
CHASSIS
KA4
RADIO
FILTER
7
7
R
S
6
8
T
1
2
CONNECTOR "C1 & C2"
3
UW60 & 100 ONLY!
REFER TO REUSE INTERCONNECTION
SCHEMATIC FOR FURTHER DETAILS
5
6
7
4
7
C2-6 TO XT3 COMMON
4
SEE REUSE
IN UPPER R
C2-7 A2
10
A2 TERMINAL ON FUSEBOARD
11
6
4
AC DRIVE
160 – C
1
5
SQ1
KA3
2
5
J3-2-2
J3-2-1
J3-2-3
J2-2-3
J3-2-12
J2-2-5
J2-2-4
14 AWG (35-100LB)
J2-2-6
1
J12-1-1
3
6
J2-2-1
SP1c
C8-B = CABLE #8, BLACK WIRE
P
J5-2
J4-2
SEE FUSEBOARD
POWER CIRCUIT
ST1
J12-1-5
3
J12-1-6
J11-1-1
SQ2
J12-1-7
31 32
SP1b
P
2 = TERMINAL STRIP, TERMINAL #2
J11-1-9 J11-1-3
J12-1-8 J11-1-7
21 22
P
SP1a
12 11
J11-1-5
J11-1-11
= TERMINAL STRIP JUMPER
CHASSIS
J12-1-10
J12-1-9
1
1
J7-2-14
J7-2-13
J7-2-12
J7-2-11
J7-2-9
J7-2-10
J7-2-7
J7-2-8
J7-2-6
J7-2-5
J7-2-4
J7-2-3
J7-2-1
SA1a
LEGEND:
J7-2-2
SQ3
FLAT RIBBON CABLE
J8
AP–3 AC DRIVE INTERFACE BOARD
(REFER TO MOTOR NAMEPLATE
FOR WIRING CONNECTIONS)
(TERMINAL STRIP JUMPERS MAY BE USED IN
VARIOUS PLACES NOT SHOWN ON SCHEMATIC)
J2
1
1
J1
R-C = RESISTOR/CAPACITOR FILTER NETWORK
WRITE INHIBIT
16 PIN
DIP SOCKET
1
M1
J7-2-1 = CONN. J7, 1 (ON FUSEBOARD), PIN#1
J7, 2 (ON INTERFACE BRD.)
7
FLAT RIBBON CABLE
W/ D I P CONNECTOR
J6-2
BLUE (2)
BROWN (3)
GRN/YEL
BLACK (1)
5
J3-2-13
W
J2-2-2
V
J3-2-9
J3-2-11 J12-1-2
2
U
SA1b
3
NOTES:
1
THE DRIVE MOTOR (M1) IS DUAL VOLTAGE CAPABLE. REFER TO NAMEPLATE OF MOTOR BEFORE WIRING.
IF MOTOR ROTATION IS INCORRECT, SWAP ANY 2 WIRES OF CABLE BETWEEN AC DRIVE AND MOTOR.
2
REFER TO PROGRAMMING MANUAL FOR DETAILED INSTRUCTIONS TO OPERATE SUPPLIES.
SUPPLY 5 OUTPUT PROVIDES POWER TO SWITCH RELAYS KA1 & KA2 IN ORDER TO ENABLE EXTERNAL
SUPPLIES 6 THROUGH 9. EXAMPLE: IF SUPPLY 1 IS PROGRAMMED, THE SUPPLY 1 OUTPUT PROVIDES A
220V SIGNAL TO EXTERNAL SUPPLY 1. WHEN SUPPLY 5 IS PROGRAMMED WITH SUPPLY 1, THE SUPPLY 1
OUTPUT THEN PROVIDES A 220V SIGNAL TO EXTERNAL SUPPLY 6.
3
REFER TO DWG. #635635 FOR CONNECTION DETAILS OF CONTROL TRANSFORMER.
TYPICAL RELAY
NORMALLY CLOSED CONTACTS
NORMALLY OPEN CONTACTS
COMMON
COIL
ODD NUMBERED CONTACTS ARE ISOLATED FROM EVEN
NUMBERED CONTACTS BUT OPERATE SIMULTANEOUSLY.
TERMINAL NUMBERS MAY VARY FROM RELAY TO RELAY
BUT TERMINAL POSITIONS ARE THE SAME.
16
4
AIR OPERATED DRAIN SYSTEM AVAILABLE AS AN OPTION
5
380-415V APPLICATIONS DO NOT REQUIRE BUCK-BOOST TRANSFORMERS. WIRES L1, L2 & L3 WILL CONNECT
DIRECTLY TO AC DRIVE FROM INPUT POWER DISTRIBUTION TERMINAL XT1.
FOR 440-480V APPLICATIONS, REFER TO BUCK-BOOST TRANSFORMER SCHEMATIC FOR CONNECTION DETAILS.
6
UW80-100 MACHINES WITH DUAL ELECTRICALLY OPERATED DRAIN VALVES REQUIRE A 250VA CONTROL
TRANSFORMER (TC1), TWO AMP 250VA CONTROL CIRCUIT BREAKERS (QF1) AND A 1.0 AMP TRANSFORMER
PRIMARY (QF2) CIRCUIT BREAKER.
ALL MACHINES WITH SINGLE ELECTRICALLY OPERATED DRAIN VALVE REQUIRE A 150VA XFMR, TWO 1 AMP
CONTROL CIRCUIT BREAKERS (QF1) AND A 0.5 AMP TRANSFORMER PRIMARY CIRCUIT BREAKER (QF2).
ALL AIR-OP DRAIN SYSTEMS REQUIRE 150VA XFMR.
7
AN ADDITIONAL FILTER (P/N 635654) IS REQUIRED ACROSS THE INPUT OF THE AC DRIVE.
© Copyright, Alliance Laundry Systems LLC – DO NOT COPY or TRANSMIT
F238006
Section 4 Troubleshooting
WE-6 Control Has No Visible Display — P and N-Voltage Models (Sheet 2 of 2)
4
3
UW60 & 100 ONLY!
CONNECT TO TERMINAL #4 OF
REUSE HARNESS CONNECTOR "C1"
M4
BOARD MOUNTED RELAY
"K3" ON INTERFACE PCB
7 KA4 8
QF1
TC1
X2 QF1B
QF1B J2-1-1
X1 QF1A1
QF1A SB1
0VA
0VA
1.0 AMP
2.0 AMP
J10-1-4
J10-1-3
5
SB1
J4
J5
M2
TO TERMINAL
S5 ON
FUSEBOARD
6
6
ACN
C1
5
J2-1-2
C1-2 ACN
C1-3 J4-1-2
J2-1-3
C1-7 J4-1-1
7
4
1/2 A
TO ELV
DEVICES
1/2 A
FU4
125mA
1/2 A
E1
E2
1/2 A
J4-1-2
C1-4 J10-1-4
J4-1-3
E3
J4-1-1
10VDC
J5-1-5
J15-1-4
YV4
J15-1-13
J5-1-4
J15-1-3
YV2
J15-1-12
J5-1-3
J15-1-2
YV3
J15-1-11
J5-1-2
J15-1-1
YV1
J15-1-10
J15-1-5
KM8
YV11 J15-1-14
6
CF
J4-1-4
SEE REUSE DRAIN "M4"
IN UPPER RIGHT CORNER
J5-1-1
1/2 A
HT
USEBOARD
220V
CONTROLS
J2-1-4
C1-5 J4-1-3
C1-6 J4-1-4
6
ACN
CS
3
UW60 & 100 ONLY!
REFER TO REUSE INTERCONNECTION
SCHEMATIC FOR FURTHER DETAILS
J15-1-6 YV10 J15-1-15
ACH
HF
CONNECTOR "C1 & C2"
R-C
HS
1
2
ACH
J2-1-1
C1-1 ACH
M3b
SQ1
T1 A
SB2
J1
7
WRITE INHIBIT
AP–2
WE–6 COMPUTER
BL
KEY PAD GND
BK
1/2 A
1
J8
J5-2
J6-2
J4-2
KA1
J6-1-3
1/2 A
KA2
7
2
KA1-2 S4
2
J6-1-4
1/2 A
2
SUPPLY 5
NO XT3 CONNECTION
8
KA1
KA1-4 S9
6
4
YV8
ST1
J12-1-5
KA1-1 S3
1
1/2 A
SQ2
J12-1-7
J6-1-5
KA1
S3
J12-1-6
8
YV9
S4
SEE FUSEBOARD
POWER CIRCUIT
KA3
J6-1-2
S5
RECEIVE
7
7
ACN
TRANSMIT
A2 C2-7
A1
1
AP–1
WE–6 FUSEBOARD
GY
CHASSIS
HA1
J3-1-1
1/2 A
1
BL
J12-1-4
J3-1-2
1/2 A
J3
ARD
YA1
6
J3-1-3
1
FLAT RIBBON CABLE
J12-1-3
5
A2
J2
1
1
A3
16 PIN
DIP SOCKET
FLAT RIBBON CABLE
W/ D I P CONNECTOR
FLAT
RIBBON
CABLE
J3-1-4
T1 A
DR
5
J10-1-2
M3
SA1b
J1-26
J1
J10-1-1
J3-1-5
DN
10VDC
6
DUAL DRAIN ON
UW80-100 ONLY
J12-1-8 J11-1-7
P
KA1-3 S8
5
3
YV7
SP1a
2
12 11
J6-1-6
1/2 A
KA2-2 S2
KA2
S2
J11-1-5
SP1 WATER LEVEL SWITCH TERMINAL
NUMBERS ARE SUBJECT TO CHANGE.
KA2-4 S7
6
4
YV6
1
CTIONS TO OPERATE SUPPLIES.
KA1 & KA2 IN ORDER TO ENABLE EXTERNAL
RAMMED, THE SUPPLY 1 OUTPUT PROVIDES A
PROGRAMMED WITH SUPPLY 1, THE SUPPLY 1
PPLY 6.
ONTROL TRANSFORMER.
1/2 A
J6-1-7
S1
R TO NAMEPLATE OF MOTOR BEFORE WIRING.
F CABLE BETWEEN AC DRIVE AND MOTOR.
KA2
KA2-1 S1
KA2-3 S6
5
3
SUPPLY 4
TO XT3 SUPPLY 4
SUPPLY 9
TO XT3 SUPPLY 9
TO XT3 COMMON
SUPPLY 3
TO XT3 SUPPLY 3
SUPPLY 8
TO XT3 SUPPLY 8
SUPPLY 2
TO XT3 SUPPLY 2
SUPPLY 7
TO XT3 SUPPLY 7
2
SUPPLY 1
TO XT3 SUPPLY 1
SUPPLY 6
TO XT3 SUPPLY 6
EXTERNAL SUPPLY TERMINAL STRIP (XT3) LOCATED ON REAR OF MODULE.
EXTERNAL SUPPLY 5 INTENTIONALLY OMITTED. SUPPLY 5 ENERGIZES RELAYS KA1 & KA2
TO ENABLE SUPPLIES 6 THRU 9.
THIS COMMON IS NOT A TRUE NEUTRAL.
DO NOT CONNECT LOAD BETWEEN LINE 1,
LINE 2 OR LINE 3 AND THIS COMMON.
220V BETWEEN ALL LINES AND COMMON.
RANSFORMERS. WIRES L1, L2 & L3 WILL CONNECT
N TERMINAL XT1.
NSFORMER SCHEMATIC FOR CONNECTION DETAILS.
PHM1925S
D DRAIN VALVES REQUIRE A 250VA CONTROL
BREAKERS (QF1) AND A 1.0 AMP TRANSFORMER
RAIN VALVE REQUIRE A 150VA XFMR, TWO 1 AMP
FORMER PRIMARY CIRCUIT BREAKER (QF2).
S THE INPUT OF THE AC DRIVE.
F238006
© Copyright, Alliance Laundry Systems LLC – DO NOT COPY or TRANSMIT
17
Section 4 Troubleshooting
2. WE-6 CONTROL HAS NO VISIBLE DISPLAY — Q-VOLTAGE MODEL
THE WE-6
CONTROL HAS NO
VISIBLE DISPLAY.
IS THE
MAIN POWER
CIRCUIT
BREAKER
ON?
TURN ON THE MAIN
POWER CIRCUIT
BREAKER.
NO
YES
1
IS THERE
VOLTAGE (120
VOLTS) INTO AND
OUT OF THE 2
QF1 CIRCUIT
BREAKERS?
NOTE: THE QF1 CIRCUIT
BREAKERS ARE ON THE
FRONT LEFT SIDE OF THE
MACHINE BESIDE THE KEY
SWITCH.
NO
RESET THE 2 QF1 CIRCUIT
BREAKERS. IF, AFTER RESETTING,
THERE IS STILL NO VOLTAGE,
REPLACE THE QF1 CIRCUIT
BREAKERS.
YES
2
IS THERE
VOLTAGE (120
VOLTS) INTO
AND OUT OF THE
E-STOP SWITCH
SB1?
RESET AND RETURN (EITHER BY
PULLING OR BY TWISTING AND
PULLING) THE E-STOP SWITCH SB1. IF,
AFTER RESETTING AND RETURNING,
THERE IS STILL NO VOLTAGE,
REPLACE THE E-STOP SWITCH SB1.
NO
YES
3
IS
THERE VOLTAGE
(220 VOLTS) ON THE
J2 WHITE
TRANSFORMER
PLUG ON THE
FUSEBOARD
BETWEEN PINS 1
AND 4?
5
RETURN TO THE TOP. CHECK EACH OF THE
ABOVE STEPS CAREFULLY.
NO
ALSO, ON THE J2 WHITE TRANSFORMER
PLUG ON THE FUSEBOARD, MAKE SURE
THAT THERE IS VOLTAGE BETWEEN PIN 1
TO GROUND AND PIN 4 TO GROUND.
YES
IS THERE 10VDC ON THE RIBBON CABLE
LOCATED BETWEEN THE FUSEBOARD AND
THE WE-6 COMPUTER? IF NOT, REPLACE IT.
IF THERE IS 10VDC ON THE RIBBON CABLE,
DISCONNECT ALL OF THE CABLES FROM THE
WE-6 COMPUTER EXCEPT THE GROUND WIRE
AND THE RIBBON CABLE FROM THE
FUSEBOARD. IF THE WE-6 STILL DOESN'T
SHOW A DISPLAY, THE FUSEBOARD MAY NOT
BE WORKING PROPERLY. CONTACT THE
FACTORY BEFORE REPLACING IT.
4
YES
IS THERE
10VDC BETWEEN
THE +10VDC
MALE SPADE
AND THE
GROUND?
NO
CHECK THE FU4 (125MA) FUSE
LOCATED BEHIND THE
TRANSFORMER. IF THE FUSE IS
BLOWN, REPLACE IT. IF THE FUSE
ISN'T BLOWN, REPLACE THE
FUSEBOARD.
IF THE FUSEBOARD DOES SHOW A DISPLAY,
RECONNECT THE RIBBON CABLE.
PHM1926S
NOTE: IF THE J1 RIBBON CABLE IS INSTALLED
INCORRECTLY, THERE WILL BE NO DISPLAY.
18
© Copyright, Alliance Laundry Systems LLC – DO NOT COPY or TRANSMIT
F238006
Section 4 Troubleshooting
Please refer to the following 2 pages for wiring diagram information.
F238006
© Copyright, Alliance Laundry Systems LLC – DO NOT COPY or TRANSMIT
19
Section 4 Troubleshooting
WE-6 Control Has No Visible Display — Q-Voltage Models (Sheet 1 of 2)
P.E.
GND
L2
L1
L3
35-60LB:
15 AMP CIRCUIT BREAKER
14 AWG (2mm2) WIRE
80-100LB:
25 AMP CIRCUIT BREAKER
10 AWG (6mm2) WIRE
2
1
Q: 200-240V/50-60HZ/3ø/3W 220V CTRL
BOARD MOU
"K3" ON INTE
LIMIT OF
EQUIPMENT
XT2
TO XT3- LINE 2
TO XT3- LINE 1
18 AWG
XT1
L1
L2
QF1
L3
L2 QF1B
QF1B J2-1-1
L1 QF1A
QF1A SB1
3 AMP
3
1.0 AMP
2.0 AMP
12 AWG (35-100LB)
3 AMP
C2
FU3
C2-1 L1
C2-2 L2
C2-3 L3
C2-5 GND
GRN/YEL
CHASSIS
7
R
S
6
8
T
1
2
3
4
5
5
6
6
7
4
C1-1 ACH
C1-2 ACN
C1-3 J4-1-2
C1-5 J4-1-3
C1-6 J4-1-4
C1-7 J4-1-1
C1-4 J10-1-4
SEE REUSE DRAIN "M4"
IN UPPER RIGHT CORNER
C2-7 A2
A2 TERMINAL ON FUSEBOARD
KA4
RADIO
FILTER
4
C1
CONNECTOR "C1 & C2"
1
UW60 & 100 ONLY!
2 REFER TO REUSE INTERCONNECTION
SCHEMATIC
FOR FURTHER DETAILS
3
7
C2-6 TO XT3 COMMON
SB1
4
10
11
6
4
AC DRIVE
160 – C
1
5
3
KA3
2
W
SQ1
3
6
2
SA1b
5
J12-1-1
7
WRITE INHIBIT
16 PIN
DIP SOCKET
FLAT RIBBON CABLE
W/ D I P CONNECTOR
J3-2-13
J3-2-2
J3-2-1
J3-2-3
J2-2-3
J3-2-12
J2-2-5
M1
J2-2-4
14 AWG (35-60LB)
12 AWG (80-100LB)
J3-2-9
J3-2-11 J12-1-2
1
J2-2-6
BLUE (2)
BROWN (3)
GRN/YEL
BLACK (1)
5
J2-2-1
V
J2-2-2
U
J2
1
A
WE–6 C
BL
BK
1
1
1
(REFER TO MOTOR NAMEPLATE
FOR WIRING CONNECTIONS)
J5-2
J6-2
J4-2
J7-2-14
J7-2-13
J7-2-12
J7-2-11
J7-2-9
J7-2-10
J7-2-7
J7-2-8
J7-2-5
J7-2-6
J7-2-4
J7-2-3
J7-2-2
J7-2-1
SP1c
J12-1-9
1
REC
CHASSIS
SEE FUSEBOARD
POWER CIRCUIT
J12-1-10
SA1a
P
BL
FLAT RIBBON CABLE
AP–3 AC DRIVE INTERFACE BOARD
SQ3
LEGEND:
C8-B = CABLE #8, BLACK WIRE
J8
J1
ST1
J12-1-5
3
J12-1-6
J11-1-1
SQ2
J12-1-7
31 32
J7-2-1 = CONN. J7, 1 (ON FUSEBOARD), PIN#1
J7, 2 (ON INTERFACE BRD.)
SP1b
2 = TERMINAL STRIP, TERMINAL #2
P
J11-1-9 J11-1-3
J12-1-8 J11-1-7
21 22
R-C = RESISTOR/CAPACITOR FILTER NETWORK
P
12 11
J11-1-5
J11-1-11
SP1a
SP1 WATER
NUMBERS A
= TERMINAL STRIP JUMPER
NOTES:
(TERMINAL STRIP JUMPERS MAY BE USED IN
VARIOUS PLACES NOT SHOWN ON SCHEMATIC)
1
THE DRIVE MOTOR (M1) IS DUAL VOLTAGE CAPABLE, REFER TO NAMEPLATE OF MOTOR BEFORE WIRING.
IF MOTOR ROTATION IS INCORRECT, SWAP ANY 2 WIRES OF CABLE BETWEEN AC DRIVE AND MOTOR.
2
REFER TO PROGRAMMING MANUAL FOR DETAILED INSTRUCTIONS TO OPERATE SUPPLIES.
SUPPLY 5 OUTPUT PROVIDES POWER TO ACTIVATE RELAYS KA1 & KA2 IN ORDER TO ENABLE EXTERNAL
SUPPLIES 6 THROUGH 9. EXAMPLE: IF SUPPLY 1 IS PROGRAMMED, THE SUPPLY 1 OUTPUT PROVIDES A
220V SIGNAL TO EXTERNAL SUPPLY 1. WHEN SUPPLY 5 IS PROGRAMMED WITH SUPPLY 1, THE SUPPLY 1
OUTPUT THEN PROVIDES A 220V SIGNAL TO EXTERNAL SUPPLY 6.
3
UW80-100 MACHINES WITH DUAL ELECTRICALLY OPERATED DRAIN VALVES REQUIRE TWO 2 AMP, 250V
CONTROL CIRCUIT BREAKERS (QF1). LIKEWISE FOR REUSE DRAIN M4.
ALL MACHINES WITH SINGLE ELECTRIC DRAIN VALVES REQUIRE TWO 1 AMP, 250V
CONTROL CIRCUIT BREAKERS (QF1).
4
AN ADDITIONAL FILTER (P/N 635654) IS REQUIRED ACROSS THE INPUT OF THE AC DRIVE.
TYPICAL RELAY
NORMALLY CLOSED CONTACTS
NORMALLY OPEN CONTACTS
COMMON
COIL
ODD NUMBERED CONTACTS ARE ISOLATED FROM EVEN
NUMBERED CONTACTS BUT OPERATE SIMULTANEOUSLY.
TERMINAL NUMBERS MAY VARY FROM RELAY TO RELAY
BUT TERMINAL POSITIONS ARE THE SAME.
20
© Copyright, Alliance Laundry Systems LLC – DO NOT COPY or TRANSMIT
F238006
Section 4 Troubleshooting
WE-6 Control Has No Visible Display — Q-Voltage Models (Sheet 2 of 2)
2
UW60 & 100 ONLY!
CONNECT TO TERMINAL #4 OF
REUSE HARNESS CONNECTOR "C1"
M4
2-1-1
J10-1-4
J10-1-3
BOARD MOUNTED RELAY
"K3" ON INTERFACE PCB
3
7 KA4 8
SB1
J4
B1
J5
M2
TO TERMINAL
SS ON
FUSEBOARD
C1
1
2
3
6
J2-1-1
C1-5 J4-1-3
J2-1-2
C1-6 J4-1-4
J2-1-3
C1-7 J4-1-1
J2-1-4
C1-4 J10-1-4
ACH
220V
CONTROLS
ACH
J5-1-5
J15-1-4
YV4
J15-1-13
1/2 A
J5-1-4
J15-1-3
YV2
J15-1-12
1/2 A
J5-1-3
J15-1-2
YV3
J15-1-11
J5-1-2
J15-1-1
YV1
J15-1-10
J15-1-5
KM8
YV11 J15-1-14
CS
3
ACN
1/2 A
TO ELV
DEVICES
FU4
125mA
E REUSE DRAIN "M4"
UPPER RIGHT CORNER
J15-1-7 YV10 J15-1-16
R-C
HF
7
4
ACN
C1-3 J4-1-2
HS
5
C1-1 ACH
C1-2 ACN
1/2 A
J4-1-2
J4-1-3
CF
E1
10VDC
4
HT
E3
J4-1-1
J5-1-1
1/2 A
E2
J4-1-4
M3b
J10-1-1
J3-1-5
T1 A
J10-1-2
M3
DN
10VDC
SA1b
J1-26
WRITE INHIBIT
16 PIN
DIP SOCKET
FLAT RIBBON CABLE
W/ D I P CONNECTOR
BL
KEY PAD GND
BK
J8
J5-2
J6-2
TRANSMIT
RECEIVE
CHASSIS
J3-1-1
5
7
KA3
KA1
J6-1-3
1/2 A
KA2
7
2
KA1-2 S4
2
KA1
KA1-4 S9
S4
6
4
YV8
KA1-1 S3
1
J6-1-5
KA1
S3
J12-1-6
1/2 A
ST1
KA1-3 S8
5
3
YV7
SQ2
J12-1-7
2
P
12 11
J11-1-5
J6-1-6
1/2 A
SP1a
ATED DRAIN VALVES REQUIRE TWO 2 AMP, 250V
USE DRAIN M4.
REQUIRE TWO 1 AMP, 250V
6
4
YV6
1
J6-1-7
S1
TRUCTIONS TO OPERATE SUPPLIES.
AYS KA1 & KA2 IN ORDER TO ENABLE EXTERNAL
OGRAMMED, THE SUPPLY 1 OUTPUT PROVIDES A
IS PROGRAMMED WITH SUPPLY 1, THE SUPPLY 1
SUPPLY 6.
KA2-4 S7
SP1 WATER LEVEL SWITCH TERMINAL
NUMBERS ARE SUBJECT TO CHANGE.
1/2 A
EFER TO NAMEPLATE OF MOTOR BEFORE WIRING.
S OF CABLE BETWEEN AC DRIVE AND MOTOR.
KA2-2 S2
KA2
S2
J12-1-8 J11-1-7
2
SUPPLY 5
NO XT3 CONNECTION
8
YV9
J6-1-4
1/2 A
SEE FUSEBOARD
POWER CIRCUIT
J12-1-5
8
J6-1-2
S5
J4-2
BOARD
A2 C2-7
ACN
BL
J3-1-2
1/2 A
1/2 A
J3
1
FLAT RIBBON CABLE
HA1
A1
GY
J3-1-3
1
1
1
1/2 A
J12-1-4
1
AP–1
WE–6 FUSEBOARD
J2
1
AP–2
WE–6 COMPUTER
FLAT
RIBBON
CABLE
YA1
6
A2
J12-1-1
J1
7
J12-1-3
5
A3
5
J1
SB2
J3-1-4
T1 A
DR
SQ1
3
DUAL DRAIN ON
UW80-100 ONLY
KA2
KA2-1 S1
KA2-3 S6
5
3
SUPPLY 4
TO XT3 SUPPLY 4
SUPPLY 9
TO XT3 SUPPLY 9
TO XT3 COMMON
SUPPLY 3
TO XT3 SUPPLY 3
SUPPLY 8
TO XT3 SUPPLY 8
SUPPLY 2
TO XT3 SUPPLY 2
SUPPLY 7
TO XT3 SUPPLY 7
2
SUPPLY 1
TO XT3 SUPPLY 1
SUPPLY 6
TO XT3 SUPPLY 6
EXTERNAL SUPPLY TERMINAL STRIP (XT3) LOCATED ON REAR OF MODULE.
EXTERNAL SUPPLY 5 INTENTIONALLY OMITTED. SUPPLY 5 ENERGIZES RELAYS KA1 & KA2
TO ENABLE SUPPLIES 6 THRU 9.
THIS COMMON IS NOT A TRUE NEUTRAL.
DO NOT CONNECT LOAD BETWEEN LINE 1,
LINE 2 OR LINE 3 AND THIS COMMON.
220V BETWEEN ALL LINES AND COMMON.
OSS THE INPUT OF THE AC DRIVE.
PHM1927S
F238006
© Copyright, Alliance Laundry Systems LLC – DO NOT COPY or TRANSMIT
21
Section 4 Troubleshooting
3. NO FILL ANALYSIS
IS THERE WATER
COMING IN
THROUGH THE
WATER SUPPLY
LINES?
CHECK THE MAIN WATER
VALVE SHUT-OFFS, INSIDE
OF THE WATER HOSES AND
IN-LINE STRAINERS.
NO
YES
REFER TO THE "NO
FUSEBOARD FUNCTIONS"
FLOWCHART AT POINT B.
NO
ARE ANY OF
THE LIGHTS ON
THE
FUSEBOARD
TURNED ON?
REPLACE THE
FUSES.
YES
NO
POINT A
ARE THE CORRECT LIGHTS ON
THE FUSEBOARD LIT THAT
CORRESPOND TO THAT WHICH
IS DISPLAYED ON THE CONTROL
MODULE DECAL (E.G., IF COLD
SPRAY AND COLD FILL ARE
DISPLAYED ON THE DECAL, CS
AND CF SHOULD BE LIT ON THE
FUSEBOARD)?
ARE THE FUSES ON
THE FUSEBOARD
(THAT
CORRESPOND TO
THE LIGHTS THAT
SHOULD BE LIT)
INTACT?
NO
REPLACE THE
VALVE'S SOLENOID.
YES
YES
REPLACE THE
RIBBON CABLE.
1
NO
NO
IS THERE
MAGNETISM
WITHIN THE
CENTER WALLS
OF THE
SOLENOID
VALVE?
YES
READ THE VOLTAGE AT
THE CORRESPONDING
WATER VALVE
BETWEEN THE TWO
WIRES. IS THERE
VOLTAGE (220 VOLTS)?
2
IS THE RIBBON
CABLE BETWEEN
THE
MICROPROCESSOR
AND THE
FUSEBOARD
INTACT?
YES
YES
NO
REPLACE OR REPAIR THE
MECHANICAL PARTS OF THE
VALVE.
CHECK THE WIRING
BETWEEN THE
FUSEBOARD AND J15.
CHECK THE WIRING
BETWEEN J15 AND THE
WATER VALVES.
3
THERE IS A
POSSIBILITY THAT
EITHER THE
FUSEBOARD OR
MICROCOMPUTER MAY
NEED REPLACING.
CONTACT THE
CUSTOMER SERVICE
DEPARTMENT.
PHM1922S
22
© Copyright, Alliance Laundry Systems LLC – DO NOT COPY or TRANSMIT
F238006
Section 4 Troubleshooting
Please refer to the following 2 pages for wiring diagram information.
F238006
© Copyright, Alliance Laundry Systems LLC – DO NOT COPY or TRANSMIT
23
Section 4 Troubleshooting
No Fill Analysis (Sheet 1 of 2)
P.E.
GND
L1
L2
L3
35-60LB:
15 AMP CIRCUIT BREAKER
14 AWG (2mm2) WIRE
80-100LB:
25 AMP CIRCUIT BREAKER
10 AWG (6mm2) WIRE
Q: 200-240V/50-60HZ/3ø/3W 220V CTRL
BOARD MOU
"K3" ON INT
LIMIT OF
EQUIPMENT
XT2
XT1
L1
TO XT3- LINE 2
TO XT3- LINE 1
L2
QF1
18 AWG
L3
L2 QF1B
QF1B J2-1-1
L1 QF1A
QF1A SB1
3 AMP
3
1.0 AMP
2.0 AMP
12 AWG (35-100LB)
3 AMP
C2
FU3
C2-1 L1
C2-2 L2
C2-3 L3
C2-5 GND
GRN/YEL
CHASSIS
7
R
S
6
8
T
1
2
3
4
5
5
6
6
7
4
C1-1 ACH
C1-2 ACN
C1-3 J4-1-2
C1-5 J4-1-3
C1-6 J4-1-4
C1-7 J4-1-1
C1-4 J10-1-4
SEE REUSE DRAIN "M4"
IN UPPER RIGHT CORNER
C2-7 A2
A2 TERMINAL ON FUSEBOARD
KA4
RADIO
FILTER
4
C1
CONNECTOR "C1 & C2"
1
UW60 & 100 ONLY!
2 REFER TO REUSE INTERCONNECTION
3 SCHEMATIC FOR FURTHER DETAILS
7
C2-6 TO XT3 COMMON
SB1
4
10
11
6
4
AC DRIVE
160 – C
1
5
3
KA3
2
W
SQ1
3
6
2
SA1b
5
J12-1-1
7
WRITE INHIBIT
16 PIN
DIP SOCKET
FLAT RIBBON CABLE
W/ D I P CONNECTOR
J3-2-13
J3-2-2
J3-2-1
J3-2-3
J2-2-3
J3-2-12
J2-2-5
M1
J2-2-4
14 AWG (35-60LB)
12 AWG (80-100LB)
J3-2-9
J3-2-11 J12-1-2
1
J2-2-6
BLUE (2)
BROWN (3)
GRN/YEL
BLACK (1)
5
J2-2-1
V
J2-2-2
U
J2
1
WE–6
BL
BK
1
1
1
(REFER TO MOTOR NAMEPLATE
FOR WIRING CONNECTIONS)
J5-2
J6-2
J4-2
J7-2-14
J7-2-13
J7-2-12
J7-2-11
J7-2-9
J7-2-10
J7-2-7
J7-2-8
J7-2-6
J7-2-5
J7-2-4
J7-2-3
J7-2-2
J7-2-1
P
J12-1-9
1
RE
CHASSIS
SEE FUSEBOARD
POWER CIRCUIT
J12-1-10
SA1a
SP1c
BL
FLAT RIBBON CABLE
AP–3 AC DRIVE INTERFACE BOARD
SQ3
LEGEND:
C8-B = CABLE #8, BLACK WIRE
J8
J1
ST1
J12-1-5
3
J12-1-6
J11-1-1
SQ2
J12-1-7
31 32
J7-2-1 = CONN. J7, 1 (ON FUSEBOARD), PIN#1
J7, 2 (ON INTERFACE BRD.)
SP1b
2 = TERMINAL STRIP, TERMINAL #2
P
J11-1-9 J11-1-3
J12-1-8 J11-1-7
21 22
R-C = RESISTOR/CAPACITOR FILTER NETWORK
P
12 11
J11-1-5
J11-1-11
SP1a
SP1 WATER
NUMBERS A
= TERMINAL STRIP JUMPER
NOTES:
(TERMINAL STRIP JUMPERS MAY BE USED IN
VARIOUS PLACES NOT SHOWN ON SCHEMATIC)
1
THE DRIVE MOTOR (M1) IS DUAL VOLTAGE CAPABLE, REFER TO NAMEPLATE OF MOTOR BEFORE WIRING.
IF MOTOR ROTATION IS INCORRECT, SWAP ANY 2 WIRES OF CABLE BETWEEN AC DRIVE AND MOTOR.
2
REFER TO PROGRAMMING MANUAL FOR DETAILED INSTRUCTIONS TO OPERATE SUPPLIES.
SUPPLY 5 OUTPUT PROVIDES POWER TO ACTIVATE RELAYS KA1 & KA2 IN ORDER TO ENABLE EXTERNAL
SUPPLIES 6 THROUGH 9. EXAMPLE: IF SUPPLY 1 IS PROGRAMMED, THE SUPPLY 1 OUTPUT PROVIDES A
220V SIGNAL TO EXTERNAL SUPPLY 1. WHEN SUPPLY 5 IS PROGRAMMED WITH SUPPLY 1, THE SUPPLY 1
OUTPUT THEN PROVIDES A 220V SIGNAL TO EXTERNAL SUPPLY 6.
3
UW80-100 MACHINES WITH DUAL ELECTRICALLY OPERATED DRAIN VALVES REQUIRE TWO 2 AMP, 250V
CONTROL CIRCUIT BREAKERS (QF1). LIKEWISE FOR REUSE DRAIN M4.
ALL MACHINES WITH SINGLE ELECTRIC DRAIN VALVES REQUIRE TWO 1 AMP, 250V
CONTROL CIRCUIT BREAKERS (QF1).
4
AN ADDITIONAL FILTER (P/N 635654) IS REQUIRED ACROSS THE INPUT OF THE AC DRIVE.
TYPICAL RELAY
NORMALLY CLOSED CONTACTS
NORMALLY OPEN CONTACTS
COMMON
COIL
ODD NUMBERED CONTACTS ARE ISOLATED FROM EVEN
NUMBERED CONTACTS BUT OPERATE SIMULTANEOUSLY.
TERMINAL NUMBERS MAY VARY FROM RELAY TO RELAY
BUT TERMINAL POSITIONS ARE THE SAME.
24
© Copyright, Alliance Laundry Systems LLC – DO NOT COPY or TRANSMIT
F238006
Section 4 Troubleshooting
No Fill Analysis (Sheet 2 of 2)
UW60 & 100 ONLY!
CONNECT TO TERMINAL #4 OF
REUSE HARNESS CONNECTOR "C1"
M4
BOARD MOUNTED RELAY
"K3" ON INTERFACE PCB
J2-1-1
J10-1-4
J10-1-3
3
7 KA4 8
SB1
J4
SB1
J5
M2
TO TERMINAL
SS ON
FUSEBOARD
C1
C1-1 ACH
C1-2 ACN
3
C1-3 J4-1-2
J2-1-1
C1-5 J4-1-3
J2-1-2
C1-6 J4-1-4
C1-7 J4-1-1
J2-1-3
5
6
ACH
220V
CONTROLS
J2-1-4
C1-4 J10-1-4
FU4
125mA
3
R-C
ACH
1/2 A
TO ELV
DEVICES
J15-1-7 YV10 J15-1-16
ACN
YV4
J15-1-13
J15-1-3
YV2
J15-1-12
J5-1-3
J15-1-2
YV3
J15-1-11
J5-1-2
J15-1-1
YV1
J15-1-10
J15-1-5
KM8
YV11 J15-1-14
J5-1-5
J15-1-4
J5-1-4
1/2 A
1/2 A
CS
EE REUSE DRAIN "M4"
UPPER RIGHT CORNER
1/2 A
J4-1-2
E2
J5-1-1
1/2 A
HT
J4-1-4
CF
E1
J4-1-3
E3
J4-1-1
10VDC
M3b
J10-1-1
J3-1-5
T1 A
J10-1-2
DR
J1-26
WRITE INHIBIT
BL
KEY PAD GND
BK
J3
J8
J5-2
J6-2
CHASSIS
1
KA1
J6-1-3
1/2 A
KA2
7
2
KA1-2 S4
KA1
KA1-4 S9
6
4
YV8
KA1-1 S3
1
J6-1-5
KA1
S3
J12-1-6
1/2 A
ST1
KA1-3 S8
5
3
YV7
SQ2
J12-1-7
2
P
12 11
J11-1-5
J6-1-6
1/2 A
SP1a
RATED DRAIN VALVES REQUIRE TWO 2 AMP, 250V
USE DRAIN M4.
REQUIRE TWO 1 AMP, 250V
6
4
YV6
1
J6-1-7
S1
TRUCTIONS TO OPERATE SUPPLIES.
LAYS KA1 & KA2 IN ORDER TO ENABLE EXTERNAL
OGRAMMED, THE SUPPLY 1 OUTPUT PROVIDES A
5 IS PROGRAMMED WITH SUPPLY 1, THE SUPPLY 1
SUPPLY 6.
KA2-4 S7
SP1 WATER LEVEL SWITCH TERMINAL
NUMBERS ARE SUBJECT TO CHANGE.
1/2 A
REFER TO NAMEPLATE OF MOTOR BEFORE WIRING.
ES OF CABLE BETWEEN AC DRIVE AND MOTOR.
KA2-2 S2
KA2
S2
J12-1-8 J11-1-7
2
SUPPLY 5
NO XT3 CONNECTION
8
2
J6-1-4
1/2 A
SEE FUSEBOARD
POWER CIRCUIT
J12-1-5
8
YV9
S4
J7 2 14
RECEIVE
KA3
J6-1-2
S5
J4-2
BOARD
TRANSMIT
7
ACN
BL
A2 C2-7
J3-1-1
1/2 A
1
FLAT RIBBON CABLE
J3-1-2
1/2 A
A1
1
HA1
J3-1-3
1
1
GY
J12-1-4
1
AP–1
WE–6 FUSEBOARD
J2
1
1/2 A
YA1
6
A2
16 PIN
DIP SOCKET
AP–2
WE–6 COMPUTER
FLAT
RIBBON
CABLE
J12-1-3
5
A3
J12-1-1
J1
7
FLAT RIBBON CABLE
W/ D I P CONNECTOR
J1
SB2
J3-1-4
T1 A
SA1b
5
3
DUAL DRAIN ON
UW80-100 ONLY
M3
DN
10VDC
SQ1
2
HF
7
4
ACN
HS
1
2
KA2
KA2-1 S1
KA2-3 S6
5
3
SUPPLY 4
TO XT3 SUPPLY 4
SUPPLY 9
TO XT3 SUPPLY 9
TO XT3 COMMON
SUPPLY 3
TO XT3 SUPPLY 3
SUPPLY 8
TO XT3 SUPPLY 8
SUPPLY 2
TO XT3 SUPPLY 2
SUPPLY 7
TO XT3 SUPPLY 7
2
SUPPLY 1
TO XT3 SUPPLY 1
SUPPLY 6
TO XT3 SUPPLY 6
EXTERNAL SUPPLY TERMINAL STRIP (XT3) LOCATED ON REAR OF MODULE.
EXTERNAL SUPPLY 5 INTENTIONALLY OMITTED. SUPPLY 5 ENERGIZES RELAYS KA1 & KA2
TO ENABLE SUPPLIES 6 THRU 9.
THIS COMMON IS NOT A TRUE NEUTRAL.
DO NOT CONNECT LOAD BETWEEN LINE 1,
LINE 2 OR LINE 3 AND THIS COMMON.
220V BETWEEN ALL LINES AND COMMON.
ROSS THE INPUT OF THE AC DRIVE.
PHM1923S
F238006
© Copyright, Alliance Laundry Systems LLC – DO NOT COPY or TRANSMIT
25
Section 4 Troubleshooting
4. WATER RUNS CONTINUOUSLY INTO THE WASHER-EXTRACTOR
(Either when the machine is in cycle or not)
Note: This information applies to the four main fill valves as well as the 4-way supply valves.
The first task in this process is to determine which valve is staying on. If it is one of the four
main valves (i.e., hot spray, hot fill, cold spray or cold fill), this may be done by individually
shutting off the water supply to each valve. If it is a supply valve that is staying open, find
the location in the dry supply box where the water is flushing into and follow the hose back
to the solenoid. Once the valve has been identified, proceed as follows:
TURN THE MAIN
POWER TO THE
MACHINE OFF.
DOES THE WATER
SHUT OFF?
THIS IS A MECHANICAL ISSUE.
REPLACE OR REPAIR THE
MECHANICAL PARTS OF THE
VALVE.
NO
YES
1
THIS IS AN ELECTRICAL ISSUE.
DOES THE CORRESPONDING
LIGHT ON THE FUSEBOARD STAY
ON CONTINUOUSLY AFTER THE
DOOR IS CLOSED AND THE ACH
HAS BEEN ENERGIZED (E.G., IF
THE COLD SPRAY VALVE IS IN
QUESTION, IS THE CS LIGHT
STAYING ON)?
YES
MAKE SURE THAT THE MAIN POWER
TO THE MACHINE HAS BEEN TURNED
OFF. REMOVE THE WIRES BETWEEN J4
AND J5 ON THE INTERFACE BOARD.
PLACE A JUMPER BETWEEN THE TWO
WIRES. DISCONNECT THE RIBBON
CABLE BETWEEN THE COMPUTER AND
THE FUSEBOARD. TURN ON THE
MACHINE'S MAIN POWER. DOES THE
RESPECTIVE LIGHT ON THE
FUSEBOARD COME ON IMMEDIATELY?
YES
2
NO
CHECK FOR MISWIRING AT THE
FUSEBOARD OR FOR A SHORT
ON THE WIRE THAT
ENERGIZES THE RESPECTIVE
VALVE (E.G., IF YV1 STAYS
ENERGIZED BUT THE COLD
FILL LIGHT ISN'T LIT ON THE
FUSEBOARD, CHECK THE
WIRING BETWEEN J5-1-2 AND
J15-1-1).
3
NO
CHECK THE RIBBON CABLE
BETWEEN THE COMPUTER AND
THE FUSEBOARD. REPLACE THE
RIBBON CABLE IF NEEDED. IF
THE RIBBON CABLE IS OKAY,
REPLACE THE COMPUTER.
THERE IS A POSSIBILITY THAT THE
FUSEBOARD IS CONTAMINATED. TRY
CLEANING IT. IF THE TEST MENTIONED
IN THE PREVIOUS STEP IS STILL
UNSUCCESSFUL, REPLACE THE
FUSEBOARD.
PHM1920S
26
© Copyright, Alliance Laundry Systems LLC – DO NOT COPY or TRANSMIT
F238006
Section 4 Troubleshooting
Please refer to the following 2 pages for wiring diagram information.
F238006
© Copyright, Alliance Laundry Systems LLC – DO NOT COPY or TRANSMIT
27
Section 4 Troubleshooting
Water Runs Continuously into the Washer-Extractor
(Either when the machine is in cycle or not) (Sheet 1 of 2)
P.E.
GND
L1
L2
L3
35-60LB:
15 AMP CIRCUIT BREAKER
14 AWG (2mm2) WIRE
80-100LB:
25 AMP CIRCUIT BREAKER
10 AWG (6mm2) WIRE
Q: 200-240V/50-60HZ/3ø/3W 220V CTRL
BOARD MOU
"K3" ON INT
LIMIT OF
EQUIPMENT
XT2
TO XT3- LINE 2
TO XT3- LINE 1
18 AWG
XT1
L1
L2
QF1
L3
L2 QF1B
QF1B J2-1-1
L1 QF1A
QF1A SB1
3 AMP
3
1.0 AMP
2.0 AMP
12 AWG (35-100LB)
3 AMP
C2
FU3
C2-1 L1
C2-2 L2
C2-3 L3
C2-5 GND
GRN/YEL
CHASSIS
7
R
S
6
8
T
1
2
C1-2 ACN
3
C1-3 J4-1-2
4
5
5
6
6
7
4
C1-1 ACH
C1-5 J4-1-3
C1-6 J4-1-4
C1-7 J4-1-1
C1-4 J10-1-4
SEE REUSE DRAIN "M4"
IN UPPER RIGHT CORNER
C2-7 A2
A2 TERMINAL ON FUSEBOARD
KA4
RADIO
FILTER
4
C1
CONNECTOR "C1 & C2"
1
UW60 & 100 ONLY!
2 REFER TO REUSE INTERCONNECTION
SCHEMATIC
FOR FURTHER DETAILS
3
7
C2-6 TO XT3 COMMON
SB1
4
10
11
6
4
AC DRIVE
160 – C
1
5
3
KA3
2
W
SQ1
3
6
2
SA1b
5
J12-1-1
7
WRITE INHIBIT
16 PIN
DIP SOCKET
FLAT RIBBON CABLE
W/ D I P CONNECTOR
J3-2-13
J3-2-2
J3-2-1
J3-2-3
J2-2-3
J3-2-12
J2-2-5
M1
J2-2-4
14 AWG (35-60LB)
12 AWG (80-100LB)
J3-2-9
J3-2-11 J12-1-2
1
J2-2-6
BLUE (2)
BROWN (3)
GRN/YEL
BLACK (1)
5
J2-2-1
V
J2-2-2
U
J2
1
WE–6
BL
BK
1
1
1
(REFER TO MOTOR NAMEPLATE
FOR WIRING CONNECTIONS)
J5-2
J6-2
J4-2
J7-2-14
J7-2-13
J7-2-12
J7-2-11
J7-2-9
J7-2-10
J7-2-7
J7-2-8
J7-2-6
J7-2-5
J7-2-4
J7-2-3
J7-2-2
J7-2-1
P
J12-1-9
1
RE
CHASSIS
SEE FUSEBOARD
POWER CIRCUIT
J12-1-10
SA1a
SP1c
BL
FLAT RIBBON CABLE
AP–3 AC DRIVE INTERFACE BOARD
SQ3
LEGEND:
C8-B = CABLE #8, BLACK WIRE
J8
J1
ST1
J12-1-5
3
J12-1-6
J11-1-1
SQ2
J12-1-7
31 32
J7-2-1 = CONN. J7, 1 (ON FUSEBOARD), PIN#1
J7, 2 (ON INTERFACE BRD.)
SP1b
2 = TERMINAL STRIP, TERMINAL #2
P
J11-1-9 J11-1-3
J12-1-8 J11-1-7
21 22
R-C = RESISTOR/CAPACITOR FILTER NETWORK
P
12 11
J11-1-5
J11-1-11
SP1a
SP1 WATER
NUMBERS A
= TERMINAL STRIP JUMPER
NOTES:
(TERMINAL STRIP JUMPERS MAY BE USED IN
VARIOUS PLACES NOT SHOWN ON SCHEMATIC)
1
THE DRIVE MOTOR (M1) IS DUAL VOLTAGE CAPABLE, REFER TO NAMEPLATE OF MOTOR BEFORE WIRING.
IF MOTOR ROTATION IS INCORRECT, SWAP ANY 2 WIRES OF CABLE BETWEEN AC DRIVE AND MOTOR.
2
REFER TO PROGRAMMING MANUAL FOR DETAILED INSTRUCTIONS TO OPERATE SUPPLIES.
SUPPLY 5 OUTPUT PROVIDES POWER TO ACTIVATE RELAYS KA1 & KA2 IN ORDER TO ENABLE EXTERNAL
SUPPLIES 6 THROUGH 9. EXAMPLE: IF SUPPLY 1 IS PROGRAMMED, THE SUPPLY 1 OUTPUT PROVIDES A
220V SIGNAL TO EXTERNAL SUPPLY 1. WHEN SUPPLY 5 IS PROGRAMMED WITH SUPPLY 1, THE SUPPLY 1
OUTPUT THEN PROVIDES A 220V SIGNAL TO EXTERNAL SUPPLY 6.
3
UW80-100 MACHINES WITH DUAL ELECTRICALLY OPERATED DRAIN VALVES REQUIRE TWO 2 AMP, 250V
CONTROL CIRCUIT BREAKERS (QF1). LIKEWISE FOR REUSE DRAIN M4.
ALL MACHINES WITH SINGLE ELECTRIC DRAIN VALVES REQUIRE TWO 1 AMP, 250V
CONTROL CIRCUIT BREAKERS (QF1).
4
AN ADDITIONAL FILTER (P/N 635654) IS REQUIRED ACROSS THE INPUT OF THE AC DRIVE.
TYPICAL RELAY
NORMALLY CLOSED CONTACTS
NORMALLY OPEN CONTACTS
COMMON
COIL
ODD NUMBERED CONTACTS ARE ISOLATED FROM EVEN
NUMBERED CONTACTS BUT OPERATE SIMULTANEOUSLY.
TERMINAL NUMBERS MAY VARY FROM RELAY TO RELAY
BUT TERMINAL POSITIONS ARE THE SAME.
28
© Copyright, Alliance Laundry Systems LLC – DO NOT COPY or TRANSMIT
F238006
Section 4 Troubleshooting
Water Runs Continuously into the Washer-Extractor
(Either when the machine is in cycle or not) (Sheet 2 of 2)
UW60 & 100 ONLY!
CONNECT TO TERMINAL #4 OF
REUSE HARNESS CONNECTOR "C1"
M4
2-1-1
J10-1-4
J10-1-3
BOARD MOUNTED RELAY
"K3" ON INTERFACE PCB
2
3
7 KA4 8
SB1
J4
B1
J5
M2
TO TERMINAL
SS ON
FUSEBOARD
C1
1
2
3
6
J2-1-1
C1-5 J4-1-3
J2-1-2
C1-6 J4-1-4
J2-1-3
C1-7 J4-1-1
J2-1-4
C1-4 J10-1-4
ACH
TO ELV
DEVICES
ACN
1/2 A
1/2 A
1/2 A
E2
J15-1-13
J5-1-4
J15-1-3
YV2
J15-1-12
J5-1-3
J15-1-2
YV3
J15-1-11
J5-1-2
J15-1-1
YV1
J15-1-10
J15-1-5
KM8
YV11 J15-1-14
J5-1-1
1/2 A
E3
J4-1-1
YV4
HT
J4-1-4
J15-1-4
CF
E1
J4-1-3
J5-1-5
CS
1
J4-1-2
ACH
1/2 A
220V
CONTROLS
FU4
125mA
E REUSE DRAIN "M4"
UPPER RIGHT CORNER
J15-1-7 YV10 J15-1-16
R-C
HF
7
4
ACN
C1-3 J4-1-2
HS
5
C1-1 ACH
C1-2 ACN
10VDC
M3b
T1 A
J10-1-1
J3-1-5
J10-1-2
M3
DN
10VDC
SA1b
J1-26
WRITE INHIBIT
16 PIN
DIP SOCKET
FLAT RIBBON CABLE
W/ D I P CONNECTOR
BL
KEY PAD GND
BK
J8
J5-2
J6-2
RECEIVE
CHASSIS
3
KA3
KA1
J6-1-3
1/2 A
KA2
7
2
KA1-2 S4
2
KA1
KA1-4 S9
S4
6
4
YV8
KA1-1 S3
1
J6-1-5
KA1
S3
J12-1-6
1/2 A
ST1
KA1-3 S8
5
3
YV7
SQ2
J12-1-7
2
P
12 11
J11-1-5
J6-1-6
1/2 A
SP1a
ATED DRAIN VALVES REQUIRE TWO 2 AMP, 250V
USE DRAIN M4.
REQUIRE TWO 1 AMP, 250V
6
4
YV6
1
J6-1-7
S1
TRUCTIONS TO OPERATE SUPPLIES.
AYS KA1 & KA2 IN ORDER TO ENABLE EXTERNAL
OGRAMMED, THE SUPPLY 1 OUTPUT PROVIDES A
IS PROGRAMMED WITH SUPPLY 1, THE SUPPLY 1
SUPPLY 6.
KA2-4 S7
SP1 WATER LEVEL SWITCH TERMINAL
NUMBERS ARE SUBJECT TO CHANGE.
1/2 A
EFER TO NAMEPLATE OF MOTOR BEFORE WIRING.
S OF CABLE BETWEEN AC DRIVE AND MOTOR.
KA2-2 S2
KA2
S2
J12-1-8 J11-1-7
2
SUPPLY 5
NO XT3 CONNECTION
8
YV9
J6-1-4
1/2 A
SEE FUSEBOARD
POWER CIRCUIT
J12-1-5
8
J6-1-2
S5
J4-2
BOARD
TRANSMIT
7
ACN
BL
A2 C2-7
J3-1-1
1/2 A
J3
1
FLAT RIBBON CABLE
J3-1-2
1/2 A
A1
GY
HA1
J3-1-3
1
1
1
1/2 A
J12-1-4
1
AP–1
WE–6 FUSEBOARD
J2
1
AP–2
WE–6 COMPUTER
FLAT
RIBBON
CABLE
YA1
6
A2
J12-1-1
J1
7
J12-1-3
5
A3
5
J1
SB2
J3-1-4
T1 A
DR
SQ1
3
DUAL DRAIN ON
UW80-100 ONLY
KA2
KA2-1 S1
KA2-3 S6
5
3
SUPPLY 4
TO XT3 SUPPLY 4
SUPPLY 9
TO XT3 SUPPLY 9
TO XT3 COMMON
SUPPLY 3
TO XT3 SUPPLY 3
SUPPLY 8
TO XT3 SUPPLY 8
SUPPLY 2
TO XT3 SUPPLY 2
SUPPLY 7
TO XT3 SUPPLY 7
2
SUPPLY 1
TO XT3 SUPPLY 1
SUPPLY 6
TO XT3 SUPPLY 6
EXTERNAL SUPPLY TERMINAL STRIP (XT3) LOCATED ON REAR OF MODULE.
EXTERNAL SUPPLY 5 INTENTIONALLY OMITTED. SUPPLY 5 ENERGIZES RELAYS KA1 & KA2
TO ENABLE SUPPLIES 6 THRU 9.
THIS COMMON IS NOT A TRUE NEUTRAL.
DO NOT CONNECT LOAD BETWEEN LINE 1,
LINE 2 OR LINE 3 AND THIS COMMON.
220V BETWEEN ALL LINES AND COMMON.
OSS THE INPUT OF THE AC DRIVE.
PHM1921S
F238006
© Copyright, Alliance Laundry Systems LLC – DO NOT COPY or TRANSMIT
29
Section 4 Troubleshooting
5. DOOR LOCK SWITCH ANALYSIS
Symptom: The WE-6 Display Reads “Close Door”
THE WE-6 DISPLAY READS
"CLOSE DOOR."
1
2
IS THE SQ3 SWITCH
CLOSING (I.E., IS
THERE A CLOSED
CIRCUIT AT J7-2-1
AND J7-2-2 ON THE
INTERFACE BOARD?
YES
CHECK THE RIBBON CABLE BETWEEN
THE COMPUTER AND THE INTERFACE
BOARD. IF THE RIBBON CABLE IS
INTACT, REPLACE THE INTERFACE
BOARD.
NO
CHECK THE WIRING BETWEEN THE
INTERFACE BOARD AND THE SQ3
SWITCH. IF THE WIRING IS INTACT,
REPLACE THE SQ3 SWITCH.
PHM1918S
30
© Copyright, Alliance Laundry Systems LLC – DO NOT COPY or TRANSMIT
F238006
Section 4 Troubleshooting
Please refer to the following 2 pages for wiring diagram information.
F238006
© Copyright, Alliance Laundry Systems LLC – DO NOT COPY or TRANSMIT
31
Section 4 Troubleshooting
Door Lock Switch Analysis
The WE-6 Display Reads “Close Door” (Sheet 1 of 2)
P.E.
GND
L1
L2
L3
35-60LB:
15 AMP CIRCUIT BREAKER
14 AWG (2mm2) WIRE
80-100LB:
25 AMP CIRCUIT BREAKER
10 AWG (6mm2) WIRE
Q: 200-240V/50-60HZ/3ø/3W 220V CTRL
BOARD MOU
"K3" ON INT
LIMIT OF
EQUIPMENT
XT2
TO XT3- LINE 2
TO XT3- LINE 1
18 AWG
XT1
L1
L2
QF1
L3
L2 QF1B
QF1B J2-1-1
L1 QF1A
QF1A SB1
3 AMP
3
1.0 AMP
2.0 AMP
12 AWG (35-100LB)
3 AMP
C2
FU3
C2-1 L1
C2-2 L2
C2-3 L3
C2-5 GND
GRN/YEL
CHASSIS
7
R
S
6
8
T
1
2
3
4
5
5
6
6
7
4
C1-1 ACH
C1-2 ACN
C1-3 J4-1-2
C1-5 J4-1-3
C1-6 J4-1-4
C1-7 J4-1-1
C1-4 J10-1-4
SEE REUSE DRAIN "M4"
IN UPPER RIGHT CORNER
C2-7 A2
A2 TERMINAL ON FUSEBOARD
KA4
RADIO
FILTER
4
C1
CONNECTOR "C1 & C2"
1
UW60 & 100 ONLY!
2 REFER TO REUSE INTERCONNECTION
SCHEMATIC
FOR FURTHER DETAILS
3
7
C2-6 TO XT3 COMMON
SB1
4
10
11
6
4
AC DRIVE
160 – C
1
5
3
KA3
2
W
SQ1
3
6
2
SA1b
5
J12-1-1
7
WRITE INHIBIT
16 PIN
DIP SOCKET
FLAT RIBBON CABLE
W/ D I P CONNECTOR
J3-2-13
J3-2-2
J3-2-1
J3-2-3
J2-2-3
J3-2-12
J2-2-5
M1
J2-2-4
14 AWG (35-60LB)
12 AWG (80-100LB)
J3-2-9
J3-2-11 J12-1-2
1
J2-2-6
BLUE (2)
BROWN (3)
GRN/YEL
BLACK (1)
5
J2-2-1
V
J2-2-2
U
J2
1
WE–6
BL
BK
1
1
1
(REFER TO MOTOR NAMEPLATE
FOR WIRING CONNECTIONS)
J5-2
J6-2
J4-2
J7-2-14
J7-2-13
J7-2-12
J7-2-11
J7-2-9
J7-2-10
J7-2-7
J7-2-8
J7-2-6
J7-2-5
J7-2-4
J7-2-3
J7-2-1
J12-1-9
1
RE
CHASSIS
2
SEE FUSEBOARD
POWER CIRCUIT
J12-1-10
SA1a
P
J7-2-2
SQ3
SP1c
BL
FLAT RIBBON CABLE
AP–3 AC DRIVE INTERFACE BOARD
1
LEGEND:
C8-B = CABLE #8, BLACK WIRE
J8
J1
ST1
J12-1-5
3
J12-1-6
J11-1-1
SQ2
J12-1-7
31 32
J7-2-1 = CONN. J7, 1 (ON FUSEBOARD), PIN#1
J7, 2 (ON INTERFACE BRD.)
SP1b
2 = TERMINAL STRIP, TERMINAL #2
P
J11-1-9 J11-1-3
J12-1-8 J11-1-7
21 22
R-C = RESISTOR/CAPACITOR FILTER NETWORK
P
12 11
J11-1-5
J11-1-11
SP1a
SP1 WATER
NUMBERS A
= TERMINAL STRIP JUMPER
NOTES:
(TERMINAL STRIP JUMPERS MAY BE USED IN
VARIOUS PLACES NOT SHOWN ON SCHEMATIC)
1
THE DRIVE MOTOR (M1) IS DUAL VOLTAGE CAPABLE, REFER TO NAMEPLATE OF MOTOR BEFORE WIRING.
IF MOTOR ROTATION IS INCORRECT, SWAP ANY 2 WIRES OF CABLE BETWEEN AC DRIVE AND MOTOR.
2
REFER TO PROGRAMMING MANUAL FOR DETAILED INSTRUCTIONS TO OPERATE SUPPLIES.
SUPPLY 5 OUTPUT PROVIDES POWER TO ACTIVATE RELAYS KA1 & KA2 IN ORDER TO ENABLE EXTERNAL
SUPPLIES 6 THROUGH 9. EXAMPLE: IF SUPPLY 1 IS PROGRAMMED, THE SUPPLY 1 OUTPUT PROVIDES A
220V SIGNAL TO EXTERNAL SUPPLY 1. WHEN SUPPLY 5 IS PROGRAMMED WITH SUPPLY 1, THE SUPPLY 1
OUTPUT THEN PROVIDES A 220V SIGNAL TO EXTERNAL SUPPLY 6.
3
UW80-100 MACHINES WITH DUAL ELECTRICALLY OPERATED DRAIN VALVES REQUIRE TWO 2 AMP, 250V
CONTROL CIRCUIT BREAKERS (QF1). LIKEWISE FOR REUSE DRAIN M4.
ALL MACHINES WITH SINGLE ELECTRIC DRAIN VALVES REQUIRE TWO 1 AMP, 250V
CONTROL CIRCUIT BREAKERS (QF1).
4
AN ADDITIONAL FILTER (P/N 635654) IS REQUIRED ACROSS THE INPUT OF THE AC DRIVE.
TYPICAL RELAY
NORMALLY CLOSED CONTACTS
NORMALLY OPEN CONTACTS
COMMON
COIL
ODD NUMBERED CONTACTS ARE ISOLATED FROM EVEN
NUMBERED CONTACTS BUT OPERATE SIMULTANEOUSLY.
TERMINAL NUMBERS MAY VARY FROM RELAY TO RELAY
BUT TERMINAL POSITIONS ARE THE SAME.
32
© Copyright, Alliance Laundry Systems LLC – DO NOT COPY or TRANSMIT
F238006
Section 4 Troubleshooting
Door Lock Switch Analysis
The WE-6 Display Reads “Close Door” (Sheet 2 of 2)
UW60 & 100 ONLY!
CONNECT TO TERMINAL #4 OF
REUSE HARNESS CONNECTOR "C1"
M4
2-1-1
J10-1-4
J10-1-3
BOARD MOUNTED RELAY
"K3" ON INTERFACE PCB
3
7 KA4 8
SB1
J4
B1
J5
M2
TO TERMINAL
SS ON
FUSEBOARD
C1
1
2
3
6
J2-1-1
C1-5 J4-1-3
J2-1-2
C1-6 J4-1-4
J2-1-3
C1-7 J4-1-1
J2-1-4
C1-4 J10-1-4
ACH
220V
CONTROLS
FU4
125mA
J15-1-7 YV10 J15-1-16
R-C
ACH
ACN
1/2 A
TO ELV
DEVICES
J5-1-5
J15-1-4
YV4
J15-1-13
1/2 A
J5-1-4
J15-1-3
YV2
J15-1-12
J5-1-3
J15-1-2
YV3
J15-1-11
J5-1-2
J15-1-1
YV1
J15-1-10
J15-1-5
KM8
YV11 J15-1-14
HF
7
4
ACN
C1-3 J4-1-2
HS
5
C1-1 ACH
C1-2 ACN
1/2 A
CS
E REUSE DRAIN "M4"
UPPER RIGHT CORNER
1/2 A
J4-1-2
J4-1-3
E2
J5-1-1
1/2 A
HT
J4-1-4
CF
E1
E3
J4-1-1
10VDC
M3b
J10-1-1
J3-1-5
T1 A
J10-1-2
M3
DN
10VDC
SA1b
J1-26
WRITE INHIBIT
16 PIN
DIP SOCKET
FLAT RIBBON CABLE
W/ D I P CONNECTOR
BL
KEY PAD GND
BK
J3
1
J8
J5-2
J6-2
TRANSMIT
RECEIVE
CHASSIS
KA3
KA1
J6-1-3
1/2 A
KA2
7
2
KA1-2 S4
2
KA1
KA1-4 S9
6
4
YV8
KA1-1 S3
1
J6-1-5
KA1
S3
J12-1-6
1/2 A
ST1
KA1-3 S8
5
3
YV7
SQ2
J12-1-7
2
P
12 11
J11-1-5
J6-1-6
1/2 A
SP1a
ATED DRAIN VALVES REQUIRE TWO 2 AMP, 250V
USE DRAIN M4.
REQUIRE TWO 1 AMP, 250V
6
4
YV6
1
J6-1-7
S1
TRUCTIONS TO OPERATE SUPPLIES.
AYS KA1 & KA2 IN ORDER TO ENABLE EXTERNAL
OGRAMMED, THE SUPPLY 1 OUTPUT PROVIDES A
IS PROGRAMMED WITH SUPPLY 1, THE SUPPLY 1
SUPPLY 6.
KA2-4 S7
SP1 WATER LEVEL SWITCH TERMINAL
NUMBERS ARE SUBJECT TO CHANGE.
1/2 A
EFER TO NAMEPLATE OF MOTOR BEFORE WIRING.
S OF CABLE BETWEEN AC DRIVE AND MOTOR.
KA2-2 S2
KA2
S2
J12-1-8 J11-1-7
2
SUPPLY 5
NO XT3 CONNECTION
8
YV9
J6-1-4
1/2 A
SEE FUSEBOARD
POWER CIRCUIT
J12-1-5
8
J6-1-2
S4
2
7
S5
J4-2
BOARD
A2 C2-7
J3-1-1
1/2 A
ACN
BL
FLAT RIBBON CABLE
J3-1-2
1/2 A
A1
GY
HA1
J3-1-3
1
1
1
1/2 A
J12-1-4
1
AP–1
WE–6 FUSEBOARD
J2
1
AP–2
WE–6 COMPUTER
FLAT
RIBBON
CABLE
YA1
6
A2
J12-1-1
J1
7
J12-1-3
5
A3
5
J1
SB2
J3-1-4
T1 A
DR
SQ1
3
DUAL DRAIN ON
UW80-100 ONLY
KA2
KA2-1 S1
KA2-3 S6
5
3
SUPPLY 4
TO XT3 SUPPLY 4
SUPPLY 9
TO XT3 SUPPLY 9
TO XT3 COMMON
SUPPLY 3
TO XT3 SUPPLY 3
SUPPLY 8
TO XT3 SUPPLY 8
SUPPLY 2
TO XT3 SUPPLY 2
SUPPLY 7
TO XT3 SUPPLY 7
2
SUPPLY 1
TO XT3 SUPPLY 1
SUPPLY 6
TO XT3 SUPPLY 6
EXTERNAL SUPPLY TERMINAL STRIP (XT3) LOCATED ON REAR OF MODULE.
EXTERNAL SUPPLY 5 INTENTIONALLY OMITTED. SUPPLY 5 ENERGIZES RELAYS KA1 & KA2
TO ENABLE SUPPLIES 6 THRU 9.
THIS COMMON IS NOT A TRUE NEUTRAL.
DO NOT CONNECT LOAD BETWEEN LINE 1,
LINE 2 OR LINE 3 AND THIS COMMON.
220V BETWEEN ALL LINES AND COMMON.
OSS THE INPUT OF THE AC DRIVE.
PHM1919S
F238006
© Copyright, Alliance Laundry Systems LLC – DO NOT COPY or TRANSMIT
33
Section 4 Troubleshooting
6. NO FUSEBOARD FUNCTIONS
ARE ANY OF
THE LIGHTS
ON THE
FUSEBOARD
TURNED ON?
YES
REFER TO THE "NO
FILL ANALYSIS"
FLOWCHART AT POINT A.
NO
CHECK THE WIRING
BETWEEN THE J5
AND THE ACH.
YES
1
2
READ
BETWEEN J5
AND A
GROUND. IS
THERE
VOLTAGE (120
VOLTS)?
NO
POINT B
IS THERE
VOLTAGE
(200-240 VOLTS)
BETWEEN THE
ACH AND THE
ACN?
YES
SOME OF THE LIGHTS ON
THE FUSEBOARD MUST
BE TURNED ON. PLEASE
DOUBLE-CHECK. REFER
TO THE "YES" PART OF
THE FIRST QUESTION.
NO
3
READ
BETWEEN J4
AND A
GROUND. IS
THERE
VOLTAGE (120
VOLTS)?
CHECK THE WIRING
BETWEEN THE SB1
AND THE J4.
NO
IF THE WIRING IS OKAY,
IS THERE VOLTAGE
(120 VOLTS) INTO AND
OUT OF THE E-STOP
SWITCH SB1?
NO
RESET AND RETURN (EITHER
BY PULLING OR BY TWISTING
AND PULLING) THE E-STOP
SWITCH SB1. IF, AFTER RESETTING AND RETURNING,
THERE IS STILL NO VOLTAGE,
REPLACE THE E-STOP
SWITCH SB1.
YES
4
IS THE SQ1
CLOSING (I.E.,
IS THERE A CLOSED
CIRCUIT BETWEEN PINS
J3-2-11 AND J3-2-13 ON
THE SQ1 WHEN
THE DOOR IS
CLOSED?
YES
DOUBLE-CHECK
THAT THE CIRCUIT
IS CLOSING. IF IT IS
CLOSING, REPLACE
THE INTERFACE
BOARD.
5
NO
MAKE SURE THAT THE DOOR MAGNET IS IN
PLACE. REPLACE IT IF IT IS MISSING. IF THE
MAGNET IS IN PLACE, CHECK THE MAGNETIC
SWITCH AND REPLACE IT IF NEEDED.
ALSO, CHECK THE PLUG CONNECTIONS
BETWEEN THE MAGNETIC SWITCH AND THE
INTERFACE BOARD.
34
© Copyright, Alliance Laundry Systems LLC – DO NOT COPY or TRANSMIT
PHM1916S
F238006
Section 4 Troubleshooting
Please refer to the following 2 pages for wiring diagram information.
F238006
© Copyright, Alliance Laundry Systems LLC – DO NOT COPY or TRANSMIT
35
Section 4 Troubleshooting
No Fuseboard Functions (Sheet 1 of 2)
P.E.
GND
L1
L2
L3
35-60LB:
15 AMP CIRCUIT BREAKER
14 AWG (2mm2) WIRE
80-100LB:
25 AMP CIRCUIT BREAKER
10 AWG (6mm2) WIRE
Q: 200-240V/50-60HZ/3ø/3W 220V CTRL
BOARD MOU
"K3" ON INT
LIMIT OF
EQUIPMENT
XT2
TO XT3- LINE 2
TO XT3- LINE 1
18 AWG
XT1
L1
L2
QF1
L3
L2 QF1B
QF1B J2-1-1
L1 QF1A
QF1A SB1
3 AMP
3
1.0 AMP
2.0 AMP
12 AWG (35-100LB)
3 AMP
C2
FU3
C2-1 L1
C2-2 L2
C2-3 L3
C2-5 GND
GRN/YEL
CHASSIS
7
R
S
6
8
T
1
2
4
5
5
6
6
7
4
3
C1-1 ACH
C1-2 ACN
C1-3 J4-1-2
C1-5 J4-1-3
C1-6 J4-1-4
C1-7 J4-1-1
C1-4 J10-1-4
SEE REUSE DRAIN "M4"
IN UPPER RIGHT CORNER
C2-7 A2
A2 TERMINAL ON FUSEBOARD
KA4
RADIO
FILTER
4
C1
CONNECTOR "C1 & C2"
1
UW60 & 100 ONLY!
2 REFER TO REUSE INTERCONNECTION
SCHEMATIC
FOR FURTHER DETAILS
3
7
C2-6 TO XT3 COMMON
3
SB1
4
10
11
4
6
4
AC DRIVE
160 – C
1
5
3
KA3
SQ1
6
2
SA1b
5
1
5
J3-2-2
J3-2-1
J3-2-3
J2-2-3
J3-2-12
J2-2-5
J2-2-4
M1
J2-2-6
14 AWG (35-60LB)
12 AWG (80-100LB)
J12-1-1
3
J2-2-1
BLUE (2)
BROWN (3)
GRN/YEL
BLACK (1)
5
7
WRITE INHIBIT
16 PIN
DIP SOCKET
FLAT RIBBON CABLE
W/ D I P CONNECTOR
J3-2-13
W
J2-2-2
V
J3-2-9
J3-2-11 J12-1-2
2
U
J2
1
WE–6
BL
BK
1
1
1
(REFER TO MOTOR NAMEPLATE
FOR WIRING CONNECTIONS)
J5-2
J6-2
J4-2
J7-2-14
J7-2-13
J7-2-12
J7-2-11
J7-2-9
J7-2-10
J7-2-7
J7-2-8
J7-2-6
J7-2-5
J7-2-4
J7-2-3
J7-2-2
J7-2-1
P
J12-1-9
1
RE
CHASSIS
SEE FUSEBOARD
POWER CIRCUIT
J12-1-10
SA1a
SP1c
BL
FLAT RIBBON CABLE
AP–3 AC DRIVE INTERFACE BOARD
SQ3
LEGEND:
C8-B = CABLE #8, BLACK WIRE
J8
J1
ST1
J12-1-5
3
J12-1-6
J11-1-1
SQ2
J12-1-7
31 32
J7-2-1 = CONN. J7, 1 (ON FUSEBOARD), PIN#1
J7, 2 (ON INTERFACE BRD.)
SP1b
2 = TERMINAL STRIP, TERMINAL #2
P
J11-1-9 J11-1-3
J12-1-8 J11-1-7
21 22
R-C = RESISTOR/CAPACITOR FILTER NETWORK
P
12 11
J11-1-5
J11-1-11
SP1a
SP1 WATER
NUMBERS A
= TERMINAL STRIP JUMPER
NOTES:
(TERMINAL STRIP JUMPERS MAY BE USED IN
VARIOUS PLACES NOT SHOWN ON SCHEMATIC)
1
THE DRIVE MOTOR (M1) IS DUAL VOLTAGE CAPABLE, REFER TO NAMEPLATE OF MOTOR BEFORE WIRING.
IF MOTOR ROTATION IS INCORRECT, SWAP ANY 2 WIRES OF CABLE BETWEEN AC DRIVE AND MOTOR.
2
REFER TO PROGRAMMING MANUAL FOR DETAILED INSTRUCTIONS TO OPERATE SUPPLIES.
SUPPLY 5 OUTPUT PROVIDES POWER TO ACTIVATE RELAYS KA1 & KA2 IN ORDER TO ENABLE EXTERNAL
SUPPLIES 6 THROUGH 9. EXAMPLE: IF SUPPLY 1 IS PROGRAMMED, THE SUPPLY 1 OUTPUT PROVIDES A
220V SIGNAL TO EXTERNAL SUPPLY 1. WHEN SUPPLY 5 IS PROGRAMMED WITH SUPPLY 1, THE SUPPLY 1
OUTPUT THEN PROVIDES A 220V SIGNAL TO EXTERNAL SUPPLY 6.
3
UW80-100 MACHINES WITH DUAL ELECTRICALLY OPERATED DRAIN VALVES REQUIRE TWO 2 AMP, 250V
CONTROL CIRCUIT BREAKERS (QF1). LIKEWISE FOR REUSE DRAIN M4.
ALL MACHINES WITH SINGLE ELECTRIC DRAIN VALVES REQUIRE TWO 1 AMP, 250V
CONTROL CIRCUIT BREAKERS (QF1).
4
AN ADDITIONAL FILTER (P/N 635654) IS REQUIRED ACROSS THE INPUT OF THE AC DRIVE.
TYPICAL RELAY
NORMALLY CLOSED CONTACTS
NORMALLY OPEN CONTACTS
COMMON
COIL
ODD NUMBERED CONTACTS ARE ISOLATED FROM EVEN
NUMBERED CONTACTS BUT OPERATE SIMULTANEOUSLY.
TERMINAL NUMBERS MAY VARY FROM RELAY TO RELAY
BUT TERMINAL POSITIONS ARE THE SAME.
36
© Copyright, Alliance Laundry Systems LLC – DO NOT COPY or TRANSMIT
F238006
Section 4 Troubleshooting
No Fuseboard Functions (Sheet 2 of 2)
UW60 & 100 ONLY!
CONNECT TO TERMINAL #4 OF
REUSE HARNESS CONNECTOR "C1"
M4
BOARD MOUNTED RELAY
"K3" ON INTERFACE PCB
2
J10-1-4
J10-1-3
3
7 KA4 8
1
3
SB1
J4
J5
M2
TO TERMINAL
SS ON
FUSEBOARD
C1-1 ACH
C1-2 ACN
ACN
C1-3 J4-1-2
J2-1-1
J2-1-2
J2-1-3
C1-7 J4-1-1
J2-1-4
FU4
125mA
ACH
ACN
1/2 A
TO ELV
DEVICES
J5-1-5
J15-1-4
YV4
J15-1-13
1/2 A
J5-1-4
J15-1-3
YV2
J15-1-12
J5-1-3
J15-1-2
YV3
J15-1-11
J5-1-2
J15-1-1
YV1
J15-1-10
J15-1-5
KM8
YV11 J15-1-14
HF
C1-4 J10-1-4
220V
CONTROLS
J15-1-7 YV10 J15-1-16
R-C
HS
C1-5 J4-1-3
C1-6 J4-1-4
ACH
1/2 A
CS
USE DRAIN "M4"
ER RIGHT CORNER
1/2 A
J4-1-2
J4-1-3
E2
4
J5-1-1
1/2 A
HT
J4-1-4
CF
E1
E3
J4-1-1
10VDC
M3b
J10-1-1
J3-1-5
T1 A
J10-1-2
M3
DN
10VDC
SA1b
J1-26
J1
7
WRITE INHIBIT
BL
BK
J3
1
J8
J5-2
J6-2
TRANSMIT
RECEIVE
CHASSIS
A2 C2-7
J3-1-1
1/2 A
7
KA3
KA1
J6-1-3
1/2 A
KA2
7
2
KA1-2 S4
2
KA1
KA1-4 S9
S4
6
4
YV8
KA1-1 S3
1
J6-1-5
KA1
S3
J12-1-6
1/2 A
ST1
KA1-3 S8
5
3
YV7
SQ2
J12-1-7
2
P
12 11
J11-1-5
J6-1-6
1/2 A
SP1a
D DRAIN VALVES REQUIRE TWO 2 AMP, 250V
DRAIN M4.
UIRE TWO 1 AMP, 250V
6
4
YV6
1
J6-1-7
S1
CTIONS TO OPERATE SUPPLIES.
KA1 & KA2 IN ORDER TO ENABLE EXTERNAL
AMMED, THE SUPPLY 1 OUTPUT PROVIDES A
ROGRAMMED WITH SUPPLY 1, THE SUPPLY 1
PLY 6.
KA2-4 S7
SP1 WATER LEVEL SWITCH TERMINAL
NUMBERS ARE SUBJECT TO CHANGE.
1/2 A
R TO NAMEPLATE OF MOTOR BEFORE WIRING.
F CABLE BETWEEN AC DRIVE AND MOTOR.
KA2-2 S2
KA2
S2
J12-1-8 J11-1-7
2
SUPPLY 5
NO XT3 CONNECTION
8
YV9
J6-1-4
1/2 A
SEE FUSEBOARD
POWER CIRCUIT
J12-1-5
8
J6-1-2
S5
J4-2
ARD
J3-1-2
1/2 A
ACN
BL
FLAT RIBBON CABLE
HA1
A1
GY
J3-1-3
1
1
1
J12-1-4
1
AP–1
WE–6 FUSEBOARD
J2
1
KEY PAD GND
1/2 A
YA1
6
A2
16 PIN
DIP SOCKET
FLAT RIBBON CABLE
W/ D I P CONNECTOR
AP–2
WE–6 COMPUTER
FLAT
RIBBON
CABLE
J12-1-3
5
A3
5
J1
SB2
J3-1-4
T1 A
DR
SQ1
3
DUAL DRAIN ON
UW80-100 ONLY
KA2
KA2-1 S1
KA2-3 S6
5
3
SUPPLY 4
TO XT3 SUPPLY 4
SUPPLY 9
TO XT3 SUPPLY 9
TO XT3 COMMON
SUPPLY 3
TO XT3 SUPPLY 3
SUPPLY 8
TO XT3 SUPPLY 8
SUPPLY 2
TO XT3 SUPPLY 2
SUPPLY 7
TO XT3 SUPPLY 7
2
SUPPLY 1
TO XT3 SUPPLY 1
SUPPLY 6
TO XT3 SUPPLY 6
EXTERNAL SUPPLY TERMINAL STRIP (XT3) LOCATED ON REAR OF MODULE.
EXTERNAL SUPPLY 5 INTENTIONALLY OMITTED. SUPPLY 5 ENERGIZES RELAYS KA1 & KA2
TO ENABLE SUPPLIES 6 THRU 9.
THIS COMMON IS NOT A TRUE NEUTRAL.
DO NOT CONNECT LOAD BETWEEN LINE 1,
LINE 2 OR LINE 3 AND THIS COMMON.
220V BETWEEN ALL LINES AND COMMON.
THE INPUT OF THE AC DRIVE.
PHM1917S
F238006
© Copyright, Alliance Laundry Systems LLC – DO NOT COPY or TRANSMIT
37
Section 4 Troubleshooting
7. NO MOTOR OPERATION (WITH NO AC DRIVE FAULT)
Symptom: The motor is not running and there is no apparent AC drive fault present.
Refer to reference point “1” on the following “No Motor Operation (With No AC Drive Fault)” schematics.
Preliminary Checks:
a. Check for any mechanical problems in the drive system (e.g., check the motor, motor bearings, pulleys and
belt).
b. Check all electrical connections between the interface board and the AC drive.
c. Check for proper control signal wiring.
Secondary Checks:
a. Check for incoming AC voltage into the AC drive.
b. Using a parameter unit, check the parameter set for your motor/AC drive combination.
NOTE: Contact the factory with your washer-extractor’s model and serial number to obtain the proper AC
drive illustration.
c. Check the control signals between the interface board and the AC drive with the voltage test shown on the
following charts.
A-B 160 Control Logic
H – Control Voltage High 12 Volts DC
Logic 0
L – Control Voltage Low <1 Volt DC
Logic 1
Voltage Reading Pos (+) Volts DC
4
2
1
6
8
5
Voltage Reading Neg (-) Volts DC
3
3
3
3
3
3
Input Status
Parameter 15
Parameter 12
V Computer & EDC
N/A
SW3
SW2
SW1
N/A
STF
Stop
STR
Action
A-B 160
Preset Preset Preset Forward
Reverse
Frequency Preset
Input/ Input/ Input/ Motion/ Stop Motion/
Preset
#
SW3 SW2 SW1
STF
STR
Parameter
Half Wash Fwd
62
1
H
H
L
L
L
H
0
0
0
1
0
1
1
0
Half Wash Rev
62
1
H
H
L
H
L
L
0
0
0
1
0
0
1
1
Wash Fwd
63
2
H
L
H
L
L
H
0
0
1
0
0
1
1
0
Wash Rev
63
2
H
L
H
H
L
L
0
0
1
0
0
0
1
1
Distribution
65
4
L
H
H
L
L
H
0
1
0
0
0
1
1
0
Spin 1
64
3
H
L
L
L
L
H
0
0
1
1
0
1
1
0
Spin 2
67
6
L
L
H
L
L
H
0
1
1
0
0
1
1
0
Spin 3
66
5
L
H
L
L
L
H
0
1
0
1
0
1
1
0
Half Wash Fwd
65
4
L
H
H
L
L
H
0
1
0
0
0
1
1
0
Half Wash Rev
65
4
L
H
H
H
L
L
0
1
0
0
0
0
1
1
Wash Fwd
63
2
H
L
H
L
L
H
0
0
1
0
0
1
1
0
Wash Rev
63
2
H
L
H
H
L
L
0
0
1
0
0
0
1
1
Distribution
62
1
H
H
L
L
L
H
0
0
0
0
0
1
1
0
Med. Spin
67
6
L
L
H
L
L
H
0
1
1
0
0
1
1
0
High Spin 1
66
5
L
H
L
L
L
H
0
1
0
1
0
1
1
0
High Spin 2
64
3
H
L
L
L
L
H
0
0
1
1
0
1
1
0
High Spin 3
68
7
L
L
L
L
L
H
0
1
1
1
0
1
1
0
WE-6 Computer
38
© Copyright, Alliance Laundry Systems LLC – DO NOT COPY or TRANSMIT
F238006
Section 4 Troubleshooting
A-B 1305 Control Logic
H – Control Voltage High 5 Volts DC
Logic 0
L – Control Voltage Low <1 Volt DC
Logic 1
Voltage Reading Pos (+) Volts DC
18
17
19
13
8
6
Voltage Reading Neg (-) Volts DC
7
7
7
7
7
7
Input Status Parameter 55
V Computer & EDC
X
SW3
SW2
SW1
N/A
STR
Stop
STF
Action
A-B 1305
Preset Preset Preset Reverse
Forward
Frequency Preset
Input/ Input/ Input/ Motion/ Stop Motion/
Preset
#
SW3 SW2 SW1
STR
STF
Parameter
Half Wash Fwd
27
1
H
H
L
H
L
L
x
0
0
1
0
0
1
1
Half Wash Rev
27
1
H
H
L
L
L
H
x
0
0
1
0
1
1
0
Wash Fwd
28
2
H
L
H
H
L
L
x
0
1
0
0
0
1
1
Wash Rev
28
2
H
L
H
L
L
H
x
0
1
0
0
1
1
0
Distribution
73
4
L
H
H
H
L
L
x
1
0
0
0
0
1
1
Spin 1
29
3
H
L
L
H
L
L
x
0
1
1
0
0
1
1
Spin 2
75
6
L
L
H
H
L
L
x
1
1
0
0
0
1
1
Spin 3
74
5
L
H
L
H
L
L
x
1
0
1
0
0
1
1
Half Wash Fwd
73
4
L
H
H
H
L
L
x
1
0
0
0
0
1
1
Half Wash Rev
73
4
L
H
H
L
L
H
x
1
0
0
0
1
1
0
Wash Fwd
28
2
H
L
H
H
L
L
x
0
1
0
0
0
1
1
WE-6 Computer
Wash Rev
28
2
H
L
H
L
L
H
x
0
1
0
0
1
1
0
Distribution
27
1
H
H
L
H
L
L
x
0
0
1
0
0
1
1
Med. Spin
75
6
L
L
H
H
L
L
x
1
1
0
0
0
1
1
High Spin 1
74
5
L
H
L
H
L
L
x
1
0
1
0
0
1
1
High Spin 2
29
3
H
L
L
H
L
L
x
0
1
1
0
0
1
1
High Spin 3
76
7
L
L
L
H
L
L
x
1
1
1
0
0
1
1
F238006
© Copyright, Alliance Laundry Systems LLC – DO NOT COPY or TRANSMIT
39
Section 4 Troubleshooting
A-B 1336 Control Logic
H – Control Voltage High 5 Volts DC
Logic 0
L – Control Voltage Low <1 Volt DC
Logic 1
Voltage Reading Pos (+) Volts DC
27
28
26
22
20
19
Voltage Reading Neg (-) Volts DC
29
29
29
29
29
29
Input Status Parameter #55
SW2
SW1
SW3
MTR TEMP
STR
N/A
STOP
STF
V Computer
Half Wash Fwd
73
4
H
H
L
H
L
L
0
0
1
1
0
0
1
1
Half Wash Rev
73
4
H
H
L
L
L
H
0
0
1
1
1
0
1
0
Wash Fwd
28
2
L
H
H
H
L
L
1
0
0
1
0
0
1
1
Action
A-B 1336
Preset Preset Preset Reverse
Forward
Frequency Preset
Input/ Input/ Input/ Motion/ Stop Motion/
Preset
#
SW2 SW1 SW3
STR
STF
Parameter
Wash Rev
28
2
L
H
H
L
L
H
1
0
0
1
1
0
1
0
Distribution
27
1
H
L
H
H
L
L
0
1
0
1
0
0
1
1
Spin 1
75
6
L
H
L
H
L
L
1
0
1
1
0
0
1
1
Spin 2
29
3
L
L
H
H
L
L
1
1
0
1
0
0
1
1
Spin 3
74
5
H
L
L
H
L
L
0
1
1
1
0
0
1
1
Half Wash Fwd
73
4
H
H
L
H
L
L
0
0
1
1
0
0
1
1
Half Wash Rev
73
4
H
H
L
L
L
H
0
0
1
1
1
0
1
0
Wash Fwd
28
2
L
H
H
H
L
L
1
0
0
1
0
0
1
1
Wash Rev
28
2
L
H
H
L
L
H
1
0
0
1
1
0
1
0
Distribution
27
1
H
L
H
H
L
L
0
1
0
1
0
0
1
1
Med. Spin
75
6
L
H
L
H
L
L
1
0
1
1
0
0
1
1
High Spin 1
74
5
H
L
L
H
L
L
0
1
1
1
0
0
1
1
High Spin 2
29
3
L
L
H
H
L
L
1
1
0
1
0
0
1
1
High Spin 3
76
7
L
L
L
H
L
L
1
1
1
1
0
0
1
1
WE-6 Controller
40
© Copyright, Alliance Laundry Systems LLC – DO NOT COPY or TRANSMIT
F238006
Section 4 Troubleshooting
Please refer to the following 4 pages for wiring diagram information.
F238006
© Copyright, Alliance Laundry Systems LLC – DO NOT COPY or TRANSMIT
41
Section 4 Troubleshooting
No Motor Operation (With No AC Drive Fault)
P and N-Voltage Models (Sheet 1 of 2)
P.E.
GND
P: 380-415V/50-60HZ/3ø/3W 220V CTRL
L1
L2
L3
35-100LB:
15 AMP CIRCUIT BREAKER
14 AWG (2mm2) WIRE
N: 440-480V/50-60HZ/3ø/3W 220V CTRL
B
"
LIMIT OF
EQUIPMENT
XT2
QF2
18 AWG
XT1
DETAIL "B"
BUCK/BOOST TRANSFORMERS
L1
440-480V INPUT
L2
L1
L2
L2 QF2
QF2 H4
L1 QF2
QF2 H1
L3
TC1
150VA
250VA
6
X4
X1 H4
X3 X2
H3 H2
H1
H1
H4 X1
H2 H3
X2 X3
X2 QF1B
QF1B J2-1-1
X1 QF1A1
0.5 AMP
1.0 AMP
12 AWG (35-100LB)
L3
QF1
3
QF1A SB1
1.0 AMP
2.0 AMP
6
6
X4
C1
C2
L1C
L2C
L3C
5
400-437V OUTPUT
PART NUMBER 360116 OR EQUIVALENT.
OUTPUT VOLTAGE IS APPROXIMATELY
10% LOWER THAN INPUT VOLTAGE (BUCK).
C2-1 L1
BUCK-BOOST
TRANSFORMER
REQUIRED ONLY FOR 440-480V APPLICATIONS.
REFER TO BUCK/BOOST TRANSFORMER DETAIL
"B" FOR CONNECTION DETAILS. REFER TO NOTE 5
FOR 380-415 VOLT APPLICATIONS.
GRN/YEL
L1C L2C L3C
1
2
3
C2-2 L2
C2-3 L3
4
C2-5 GND
5
6
CHASSIS
KA4
RADIO
FILTER
7
7
R
S
6
8
T
CONNECTOR "C1 & C2"
3
UW60 & 100 ONLY!
REFER TO REUSE INTERCONNECTION
SCHEMATIC FOR FURTHER DETAILS
5
4
C
C
C
7
4
C
SEE REUSE
IN UPPER R
C2-7 A2
10
C
C
6
7
C2-6 TO XT3 COMMON
C
1
2
A2 TERMINAL ON FUSEBOARD
11
1
6
4
AC DRIVE
160 – C
1
5
SQ1
KA3
2
5
J3-2-2
J3-2-1
J3-2-3
J2-2-3
J3-2-12
J2-2-5
J2-2-4
14 AWG (35-100LB)
J2-2-6
1
J12-1-1
3
6
J2-2-1
1
AP–3 AC DRIVE INTERFACE BOARD
SP1c
C8-B = CABLE #8, BLACK WIRE
P
J5-2
J4-2
SEE FUSEBOARD
POWER CIRCUIT
ST1
J12-1-5
3
J12-1-6
J11-1-1
SQ2
J12-1-7
31 32
SP1b
P
2 = TERMINAL STRIP, TERMINAL #2
J11-1-9 J11-1-3
J12-1-8 J11-1-7
21 22
P
SP1a
12 11
J11-1-5
J11-1-11
(TERMINAL STRIP JUMPERS MAY BE USED IN
VARIOUS PLACES NOT SHOWN ON SCHEMATIC)
CHASSIS
J12-1-10
J12-1-9
1
1
J7-2-14
J7-2-13
J7-2-12
J7-2-11
J7-2-9
J7-2-10
J7-2-7
J7-2-8
J7-2-6
J7-2-5
J7-2-4
J7-2-3
J7-2-1
SA1a
LEGEND:
J7-2-2
SQ3
FLAT RIBBON CABLE
J8
J1
= TERMINAL STRIP JUMPER
W
J2
1
(REFER TO MOTOR NAMEPLATE
FOR WIRING CONNECTIONS)
R-C = RESISTOR/CAPACITOR FILTER NETWORK
WRITE INHIBIT
16 PIN
DIP SOCKET
1
M1
J7-2-1 = CONN. J7, 1 (ON FUSEBOARD), PIN#1
J7, 2 (ON INTERFACE BRD.)
7
FLAT RIBBON CABLE
W/ D I P CONNECTOR
J6-2
BLUE (2)
BROWN (3)
GRN/YEL
BLACK (1)
5
J3-2-13
W
J2-2-2
V
J3-2-9
J3-2-11 J12-1-2
2
U
SA1b
3
NOTES:
1
THE DRIVE MOTOR (M1) IS DUAL VOLTAGE CAPABLE. REFER TO NAMEPLATE OF MOTOR BEFORE WIRING.
IF MOTOR ROTATION IS INCORRECT, SWAP ANY 2 WIRES OF CABLE BETWEEN AC DRIVE AND MOTOR.
2
REFER TO PROGRAMMING MANUAL FOR DETAILED INSTRUCTIONS TO OPERATE SUPPLIES.
SUPPLY 5 OUTPUT PROVIDES POWER TO SWITCH RELAYS KA1 & KA2 IN ORDER TO ENABLE EXTERNAL
SUPPLIES 6 THROUGH 9. EXAMPLE: IF SUPPLY 1 IS PROGRAMMED, THE SUPPLY 1 OUTPUT PROVIDES A
220V SIGNAL TO EXTERNAL SUPPLY 1. WHEN SUPPLY 5 IS PROGRAMMED WITH SUPPLY 1, THE SUPPLY 1
OUTPUT THEN PROVIDES A 220V SIGNAL TO EXTERNAL SUPPLY 6.
TYPICAL RELAY
NORMALLY CLOSED CONTACTS
NORMALLY OPEN CONTACTS
COMMON
COIL
ODD NUMBERED CONTACTS ARE ISOLATED FROM EVEN
NUMBERED CONTACTS BUT OPERATE SIMULTANEOUSLY.
TERMINAL NUMBERS MAY VARY FROM RELAY TO RELAY
BUT TERMINAL POSITIONS ARE THE SAME.
42
3
REFER TO DWG. #635635 FOR CONNECTION DETAILS OF CONTROL TRANSFORMER.
4
AIR OPERATED DRAIN SYSTEM AVAILABLE AS AN OPTION
5
380-415V APPLICATIONS DO NOT REQUIRE BUCK-BOOST TRANSFORMERS. WIRES L1, L2 & L3 WILL CONNECT
DIRECTLY TO AC DRIVE FROM INPUT POWER DISTRIBUTION TERMINAL XT1.
FOR 440-480V APPLICATIONS, REFER TO BUCK-BOOST TRANSFORMER SCHEMATIC FOR CONNECTION DETAILS.
6
UW80-100 MACHINES WITH DUAL ELECTRICALLY OPERATED DRAIN VALVES REQUIRE A 250VA CONTROL
TRANSFORMER (TC1), TWO AMP 250VA CONTROL CIRCUIT BREAKERS (QF1) AND A 1.0 AMP TRANSFORMER
PRIMARY (QF2) CIRCUIT BREAKER.
ALL MACHINES WITH SINGLE ELECTRICALLY OPERATED DRAIN VALVE REQUIRE A 150VA XFMR, TWO 1 AMP
CONTROL CIRCUIT BREAKERS (QF1) AND A 0.5 AMP TRANSFORMER PRIMARY CIRCUIT BREAKER (QF2).
ALL AIR-OP DRAIN SYSTEMS REQUIRE 150VA XFMR.
7
AN ADDITIONAL FILTER (P/N 635654) IS REQUIRED ACROSS THE INPUT OF THE AC DRIVE.
© Copyright, Alliance Laundry Systems LLC – DO NOT COPY or TRANSMIT
F238006
Section 4 Troubleshooting
No Motor Operation (With No AC Drive Fault)
P and N-Voltage Models (Sheet 2 of 2)
UW60 & 100 ONLY!
CONNECT TO TERMINAL #4 OF
REUSE HARNESS CONNECTOR "C1"
M4
J10-1-4
J10-1-3
BOARD MOUNTED RELAY
"K3" ON INTERFACE PCB
7 KA4 8
QF1
C1
X2 QF1B
QF1B J2-1-1
X1 QF1A1
0VA
0VA
SB1
J4
QF1A SB1
1.0 AMP
2.0 AMP
J5
M2
TO TERMINAL
S5 ON
FUSEBOARD
6
6
ACN
C1
CONNECTOR "C1 & C2"
J2-1-2
C1-2 ACN
C1-3 J4-1-2
J2-1-3
1/2 A
TO ELV
DEVICES
1/2 A
FU4
125mA
1/2 A
E1
E2
1/2 A
J4-1-2
C1-4 J10-1-4
J4-1-3
E3
J4-1-1
10VDC
J5-1-5
J15-1-4
YV4
J15-1-13
J5-1-4
J15-1-3
YV2
J15-1-12
J5-1-3
J15-1-2
YV3
J15-1-11
J5-1-2
J15-1-1
YV1
J15-1-10
J15-1-5
KM8
YV11 J15-1-14
CF
J4-1-4
SEE REUSE DRAIN "M4"
IN UPPER RIGHT CORNER
J5-1-1
1/2 A
HT
USEBOARD
ACN
CS
C1-7 J4-1-1
7
4
J15-1-6 YV10 J15-1-15
ACH
HF
C1-6 J4-1-4
6
220V
CONTROLS
J2-1-4
C1-5 J4-1-3
5
UW60 & 100 ONLY!
REFER TO REUSE INTERCONNECTION
SCHEMATIC FOR FURTHER DETAILS
R-C
HS
1
2
3
ACH
J2-1-1
C1-1 ACH
1
M3b
SQ1
SB2
J1
7
WRITE INHIBIT
AP–2
WE–6 COMPUTER
BL
KEY PAD GND
BK
1/2 A
1
J8
J5-2
J6-2
J4-2
KA1
J6-1-3
1/2 A
KA2
7
2
KA1-2 S4
2
J6-1-4
1/2 A
2
SUPPLY 5
NO XT3 CONNECTION
8
KA1
KA1-4 S9
6
4
YV8
ST1
J12-1-5
KA1-1 S3
1
1/2 A
SQ2
J12-1-7
J6-1-5
KA1
S3
J12-1-6
8
YV9
S4
SEE FUSEBOARD
POWER CIRCUIT
KA3
J6-1-2
S5
RECEIVE
7
ACN
TRANSMIT
A2 C2-7
A1
1
AP–1
WE–6 FUSEBOARD
GY
CHASSIS
HA1
J3-1-1
1/2 A
1
BL
J12-1-4
J3-1-2
1/2 A
J3
ARD
YA1
6
J3-1-3
1
FLAT RIBBON CABLE
J12-1-3
5
A2
J2
1
1
A3
16 PIN
DIP SOCKET
FLAT RIBBON CABLE
W/ D I P CONNECTOR
FLAT
RIBBON
CABLE
J3-1-4
T1 A
DR
5
J10-1-2
M3
SA1b
J1-26
J1
J10-1-1
J3-1-5
T1 A
DN
10VDC
6
DUAL DRAIN ON
UW80-100 ONLY
J12-1-8 J11-1-7
P
KA1-3 S8
5
3
YV7
SP1a
2
12 11
J6-1-6
1/2 A
KA2-2 S2
KA2
S2
J11-1-5
SP1 WATER LEVEL SWITCH TERMINAL
NUMBERS ARE SUBJECT TO CHANGE.
KA2-4 S7
6
4
YV6
1
CTIONS TO OPERATE SUPPLIES.
KA1 & KA2 IN ORDER TO ENABLE EXTERNAL
AMMED, THE SUPPLY 1 OUTPUT PROVIDES A
PROGRAMMED WITH SUPPLY 1, THE SUPPLY 1
PLY 6.
NTROL TRANSFORMER.
1/2 A
J6-1-7
S1
R TO NAMEPLATE OF MOTOR BEFORE WIRING.
F CABLE BETWEEN AC DRIVE AND MOTOR.
KA2
KA2-1 S1
KA2-3 S6
5
3
SUPPLY 4
TO XT3 SUPPLY 4
SUPPLY 9
TO XT3 SUPPLY 9
TO XT3 COMMON
SUPPLY 3
TO XT3 SUPPLY 3
SUPPLY 8
TO XT3 SUPPLY 8
SUPPLY 2
TO XT3 SUPPLY 2
SUPPLY 7
TO XT3 SUPPLY 7
2
SUPPLY 1
TO XT3 SUPPLY 1
SUPPLY 6
TO XT3 SUPPLY 6
EXTERNAL SUPPLY TERMINAL STRIP (XT3) LOCATED ON REAR OF MODULE.
EXTERNAL SUPPLY 5 INTENTIONALLY OMITTED. SUPPLY 5 ENERGIZES RELAYS KA1 & KA2
TO ENABLE SUPPLIES 6 THRU 9.
THIS COMMON IS NOT A TRUE NEUTRAL.
DO NOT CONNECT LOAD BETWEEN LINE 1,
LINE 2 OR LINE 3 AND THIS COMMON.
220V BETWEEN ALL LINES AND COMMON.
RANSFORMERS. WIRES L1, L2 & L3 WILL CONNECT
N TERMINAL XT1.
NSFORMER SCHEMATIC FOR CONNECTION DETAILS.
D DRAIN VALVES REQUIRE A 250VA CONTROL
BREAKERS (QF1) AND A 1.0 AMP TRANSFORMER
AIN VALVE REQUIRE A 150VA XFMR, TWO 1 AMP
FORMER PRIMARY CIRCUIT BREAKER (QF2).
PHM1937S
THE INPUT OF THE AC DRIVE.
F238006
© Copyright, Alliance Laundry Systems LLC – DO NOT COPY or TRANSMIT
43
Section 4 Troubleshooting
No Motor Operation (With No AC Drive Fault)
Q-Voltage Models (Sheet 1 of 2)
P.E.
GND
L1
L2
L3
35-60LB:
15 AMP CIRCUIT BREAKER
14 AWG (2mm2) WIRE
80-100LB:
25 AMP CIRCUIT BREAKER
10 AWG (6mm2) WIRE
Q: 200-240V/50-60HZ/3ø/3W 220V CTRL
BOARD MOU
"K3" ON INT
LIMIT OF
EQUIPMENT
XT2
XT1
L1
TO XT3- LINE 2
TO XT3- LINE 1
L2
QF1
18 AWG
L3
L2 QF1B
QF1B J2-1-1
L1 QF1A
QF1A SB1
3 AMP
3
1.0 AMP
2.0 AMP
12 AWG (35-100LB)
3 AMP
C2
FU3
C2-1 L1
C2-2 L2
C2-3 L3
C2-5 GND
GRN/YEL
7
R
S
6
8
T
1
2
4
5
5
6
6
7
4
C1-1 ACH
C1-2 ACN
C1-3 J4-1-2
3
C1-5 J4-1-3
C1-6 J4-1-4
C1-7 J4-1-1
C1-4 J10-1-4
SEE REUSE DRAIN "M4"
IN UPPER RIGHT CORNER
C2-7 A2
A2 TERMINAL ON FUSEBOARD
KA4
RADIO
FILTER
4
C1
CONNECTOR "C1 & C2"
1
UW60 & 100 ONLY!
2 REFER TO REUSE INTERCONNECTION
3 SCHEMATIC FOR FURTHER DETAILS
7
C2-6 TO XT3 COMMON
CHASSIS
SB1
4
1
10
11
6
4
AC DRIVE
160 – C
1
5
3
KA3
2
W
SQ1
6
2
SA1b
5
J12-1-1
7
WRITE INHIBIT
16 PIN
DIP SOCKET
FLAT RIBBON CABLE
W/ D I P CONNECTOR
J3-2-13
J3-2-2
J3-2-1
J3-2-3
J2-2-3
J3-2-12
J2-2-5
M1
J2-2-4
14 AWG (35-60LB)
12 AWG (80-100LB)
J3-2-9
J3-2-11 J12-1-2
1
J2-2-6
BLUE (2)
BROWN (3)
GRN/YEL
BLACK (1)
3
J2-2-1
V
J2-2-2
U
5
J2
1
WE–6
BL
BK
1
1
1
(REFER TO MOTOR NAMEPLATE
FOR WIRING CONNECTIONS)
J5-2
J6-2
J4-2
J7-2-14
J7-2-13
J7-2-12
J7-2-11
J7-2-9
J7-2-10
J7-2-7
J7-2-8
J7-2-6
J7-2-5
J7-2-4
J7-2-3
J7-2-2
J7-2-1
P
J12-1-9
1
RE
CHASSIS
SEE FUSEBOARD
POWER CIRCUIT
J12-1-10
SA1a
SP1c
BL
FLAT RIBBON CABLE
AP–3 AC DRIVE INTERFACE BOARD
SQ3
LEGEND:
C8-B = CABLE #8, BLACK WIRE
J8
J1
ST1
J12-1-5
3
J12-1-6
J11-1-1
SQ2
J12-1-7
31 32
J7-2-1 = CONN. J7, 1 (ON FUSEBOARD), PIN#1
J7, 2 (ON INTERFACE BRD.)
SP1b
2 = TERMINAL STRIP, TERMINAL #2
P
J11-1-9 J11-1-3
J12-1-8 J11-1-7
21 22
R-C = RESISTOR/CAPACITOR FILTER NETWORK
P
12 11
J11-1-5
J11-1-11
SP1a
SP1 WATER
NUMBERS A
= TERMINAL STRIP JUMPER
NOTES:
(TERMINAL STRIP JUMPERS MAY BE USED IN
VARIOUS PLACES NOT SHOWN ON SCHEMATIC)
1
THE DRIVE MOTOR (M1) IS DUAL VOLTAGE CAPABLE, REFER TO NAMEPLATE OF MOTOR BEFORE WIRING.
IF MOTOR ROTATION IS INCORRECT, SWAP ANY 2 WIRES OF CABLE BETWEEN AC DRIVE AND MOTOR.
2
REFER TO PROGRAMMING MANUAL FOR DETAILED INSTRUCTIONS TO OPERATE SUPPLIES.
SUPPLY 5 OUTPUT PROVIDES POWER TO ACTIVATE RELAYS KA1 & KA2 IN ORDER TO ENABLE EXTERNAL
SUPPLIES 6 THROUGH 9. EXAMPLE: IF SUPPLY 1 IS PROGRAMMED, THE SUPPLY 1 OUTPUT PROVIDES A
220V SIGNAL TO EXTERNAL SUPPLY 1. WHEN SUPPLY 5 IS PROGRAMMED WITH SUPPLY 1, THE SUPPLY 1
OUTPUT THEN PROVIDES A 220V SIGNAL TO EXTERNAL SUPPLY 6.
3
UW80-100 MACHINES WITH DUAL ELECTRICALLY OPERATED DRAIN VALVES REQUIRE TWO 2 AMP, 250V
CONTROL CIRCUIT BREAKERS (QF1). LIKEWISE FOR REUSE DRAIN M4.
ALL MACHINES WITH SINGLE ELECTRIC DRAIN VALVES REQUIRE TWO 1 AMP, 250V
CONTROL CIRCUIT BREAKERS (QF1).
4
AN ADDITIONAL FILTER (P/N 635654) IS REQUIRED ACROSS THE INPUT OF THE AC DRIVE.
TYPICAL RELAY
NORMALLY CLOSED CONTACTS
NORMALLY OPEN CONTACTS
COMMON
COIL
ODD NUMBERED CONTACTS ARE ISOLATED FROM EVEN
NUMBERED CONTACTS BUT OPERATE SIMULTANEOUSLY.
TERMINAL NUMBERS MAY VARY FROM RELAY TO RELAY
BUT TERMINAL POSITIONS ARE THE SAME.
44
© Copyright, Alliance Laundry Systems LLC – DO NOT COPY or TRANSMIT
F238006
Section 4 Troubleshooting
No Motor Operation (With No AC Drive Fault)
Q-Voltage Models (Sheet 2 of 2)
UW60 & 100 ONLY!
CONNECT TO TERMINAL #4 OF
REUSE HARNESS CONNECTOR "C1"
M4
J10-1-4
J10-1-3
BOARD MOUNTED RELAY
"K3" ON INTERFACE PCB
3
7 KA4 8
SB1
J4
J5
M2
TO TERMINAL
SS ON
FUSEBOARD
C1-1 ACH
C1-2 ACN
ACN
J2-1-1
C1-5 J4-1-3
J2-1-2
C1-6 J4-1-4
C1-7 J4-1-1
J2-1-3
ACH
220V
CONTROLS
J2-1-4
FU4
125mA
ACH
ACN
1/2 A
TO ELV
DEVICES
J5-1-5
J15-1-4
YV4
J15-1-13
1/2 A
J5-1-4
J15-1-3
YV2
J15-1-12
J5-1-3
J15-1-2
YV3
J15-1-11
J5-1-2
J15-1-1
YV1
J15-1-10
J15-1-5
KM8
YV11 J15-1-14
HF
C1-4 J10-1-4
J15-1-7 YV10 J15-1-16
R-C
HS
C1-3 J4-1-2
1/2 A
CS
USE DRAIN "M4"
ER RIGHT CORNER
1/2 A
J4-1-2
J4-1-3
E2
J4-1-4
J5-1-1
1/2 A
HT
1
CF
E1
E3
J4-1-1
10VDC
M3b
J10-1-1
J3-1-5
T1 A
J10-1-2
M3
DN
10VDC
SA1b
J1-26
J1
7
WRITE INHIBIT
BL
BK
J3
1
J8
J5-2
J6-2
TRANSMIT
RECEIVE
CHASSIS
A2 C2-7
J3-1-1
1/2 A
7
KA3
KA1
J6-1-3
1/2 A
KA2
7
2
KA1-2 S4
2
KA1
KA1-4 S9
S4
6
4
YV8
KA1-1 S3
1
J6-1-5
KA1
S3
J12-1-6
1/2 A
ST1
KA1-3 S8
5
3
YV7
SQ2
J12-1-7
2
P
12 11
J11-1-5
J6-1-6
1/2 A
SP1a
D DRAIN VALVES REQUIRE TWO 2 AMP, 250V
DRAIN M4.
UIRE TWO 1 AMP, 250V
6
4
YV6
1
J6-1-7
S1
CTIONS TO OPERATE SUPPLIES.
KA1 & KA2 IN ORDER TO ENABLE EXTERNAL
AMMED, THE SUPPLY 1 OUTPUT PROVIDES A
ROGRAMMED WITH SUPPLY 1, THE SUPPLY 1
PLY 6.
KA2-4 S7
SP1 WATER LEVEL SWITCH TERMINAL
NUMBERS ARE SUBJECT TO CHANGE.
1/2 A
R TO NAMEPLATE OF MOTOR BEFORE WIRING.
F CABLE BETWEEN AC DRIVE AND MOTOR.
KA2-2 S2
KA2
S2
J12-1-8 J11-1-7
2
SUPPLY 5
NO XT3 CONNECTION
8
YV9
J6-1-4
1/2 A
SEE FUSEBOARD
POWER CIRCUIT
J12-1-5
8
J6-1-2
S5
J4-2
ARD
J3-1-2
1/2 A
ACN
BL
FLAT RIBBON CABLE
HA1
A1
1
J3-1-3
1
1
GY
J12-1-4
1
AP–1
WE–6 FUSEBOARD
J2
1
KEY PAD GND
1/2 A
YA1
6
A2
16 PIN
DIP SOCKET
FLAT RIBBON CABLE
W/ D I P CONNECTOR
AP–2
WE–6 COMPUTER
FLAT
RIBBON
CABLE
J12-1-3
5
A3
5
J1
SB2
J3-1-4
T1 A
DR
SQ1
3
DUAL DRAIN ON
UW80-100 ONLY
KA2
KA2-1 S1
KA2-3 S6
5
3
SUPPLY 4
TO XT3 SUPPLY 4
SUPPLY 9
TO XT3 SUPPLY 9
TO XT3 COMMON
SUPPLY 3
TO XT3 SUPPLY 3
SUPPLY 8
TO XT3 SUPPLY 8
SUPPLY 2
TO XT3 SUPPLY 2
SUPPLY 7
TO XT3 SUPPLY 7
2
SUPPLY 1
TO XT3 SUPPLY 1
SUPPLY 6
TO XT3 SUPPLY 6
EXTERNAL SUPPLY TERMINAL STRIP (XT3) LOCATED ON REAR OF MODULE.
EXTERNAL SUPPLY 5 INTENTIONALLY OMITTED. SUPPLY 5 ENERGIZES RELAYS KA1 & KA2
TO ENABLE SUPPLIES 6 THRU 9.
THIS COMMON IS NOT A TRUE NEUTRAL.
DO NOT CONNECT LOAD BETWEEN LINE 1,
LINE 2 OR LINE 3 AND THIS COMMON.
220V BETWEEN ALL LINES AND COMMON.
THE INPUT OF THE AC DRIVE.
PHM1938S
F238006
© Copyright, Alliance Laundry Systems LLC – DO NOT COPY or TRANSMIT
45
Section 4 Troubleshooting
8. NO MOTOR OPERATION (WITH AC DRIVE FAULT)
Symptom: The motor is not running and there is an apparent AC drive fault present.
SYMPTOM: THE MOTOR IS NOT RUNNING AND THERE IS AN APPARENT AC DRIVE FAULT PRESENT.
INSTALL A PARAMETER UNIT
AND FIND THE AC DRIVE
FAULT PRESENT.
TRY TO
CLEAR THE
FAULT BY POWERING
DOWN THE MACHINE
AND RESTORING POWER.
DOES THE
FAULT RETURN?
YES
FIND THE FAULT CODE LISTED IN THE
CHART SHOWN ON THE FOLLOWING
PAGES. THERE IS A CORRECTIVE
ACTION LISTED FOR EACH FAULT.
PERFORM THE ACTION LISTED FOR
THE FAULT DISPLAYED.
NO
REFER TO THE "NO MOTOR
OPERATION (WITH NO AC DRIVE
FAULT)" FLOW CHART.
PHM1936S
46
© Copyright, Alliance Laundry Systems LLC – DO NOT COPY or TRANSMIT
F238006
Section 4 Troubleshooting
9. THE MOTOR IS RUNNING, BUT AT AN ABNORMAL SPEED
Preliminary Checks:
a. Check all electrical connections between the interface board and the AC drive. Refer to reference point “1”
on the “No Motor Operation (with No AC Drive Fault)” schematic.
Secondary Checks:
a. Using a parameter unit, check the parameter set for your motor/AC drive combination.
NOTE: Contact the factory with your washer-extractor’s model and serial number to obtain the proper AC
drive illustration.
b. Check the control signals between the interface board and the AC drive with the voltage test shown on the
charts included on the following pages.
F238006
© Copyright, Alliance Laundry Systems LLC – DO NOT COPY or TRANSMIT
47
Section 4 Troubleshooting
AC Drive Fault Codes and Troubleshooting Information
Bulletin Bulletin Bulletin
160
1305
1336
Description
03
03
03
04
04
04
Motor Temp The motor thermal switch
Fault
path is open.
DC Bus voltage remains
Power Loss below 85% nominal for
Fault
longer than 0.005 seconds.
Under
Voltage
DC Bus voltage fell below
Fault
minimum.
05
05
05
Over Voltage
Fault
06
06
06
07
07
07
08
08
08
Motor Stall
Motor
Overload
Fault
Over
Temperature
Fault
10
10
Serial Fault
12
12
12
Overcurrent
Fault
22
22
22
32
32
32
Controller
Reset Fault
EEPROM
Fault
33
33
33
Max Retries
Fault
38
38
38
Phase U
Fault
39
39
39
Phase V
Fault
40
40
40
Phase W
Fault
02
48
Fault
Corrective Action/Remarks
Motor temperature high. Check for:
ambient air, cooling fan blockage or
operation, break in switch wire path (not
on all machines).
Monitor incoming AC line for low
voltage or line power interruption.
Monitor AC incoming AC line for low
voltage or line power interruption.
Monitor the AC line for high line voltage
or transient conditions. High voltage can
DC Bus maximum voltage result from motor regeneration. Buck
exceeded.
transformer may be required.
Check motor wiring and connection
Motor has stalled. Motor
terminals. Check wash basket freedom of
load is excessive
movement and excess belt tension.
Internal electronic overload Check motor wiring and connection
trip. Excessive motor load terminals. Check wash basket freedom of
exists.
movement and excess belt tension.
Clear blocked or dirty heatsink fins.
Excessive heat detected by Check ambient temperature. Check for
heatsink transducer.
blocked or nonoperating fan.
Drive lost communication HIM removed while power applied, cycle
with controlling device.
power to clear.
Overcurrent detected in
Check short circuit at the controller
instantaneous hardware trip output or excessive load conditions at
circuit.
motor.
Check stop input into control terminal
board. Close door and ensure any jumpers
Stop input not present.
are placed correctly.
Consult the factory for further
EEProm has invalid data.
instructions.
Fault exists that must be corrected before
Controller failed to reset
further operation. Check “Fault Buffer 1”
fault within the number of on 1305 and 1336 for specific fault that
retries.
triggered max retries fault.
Phase-to-ground fault
detected between controller Check wiring between the drive and
and motor in Phase U.
motor. Check for grounded phase.
Phase to ground fault
detected between controller Check wiring between the drive and
and motor in Phase V.
motor. Check for grounded phase.
Phase to ground fault
detected between controller Check wiring between the drive and
and motor in Phase W.
motor. Check for grounded phase.
© Copyright, Alliance Laundry Systems LLC – DO NOT COPY or TRANSMIT
F238006
Section 4 Troubleshooting
AC Drive Fault Codes and Troubleshooting Information (continued)
Bulletin Bulletin Bulletin
160
1305
1336
41
41
41
43
43
43
44
45
57
F238006
Fault
Description
Corrective Action/Remarks
Check motor and external wiring to the
controller output terminals for shorted
condition.
Check motor and external wiring to the
VW Short
controller output terminals for shorted
Fault
condition.
Check for short circuit at the drive output
IPM Current Internal power module
or excessive load conditions at the motor,
Fault
overcurrent limit exceeded. specifically cable capacitance to ground.
IPM
Check for blocked or dirty heatsink fins.
Overtemp
Internal power module
Check ambient air. Check fan operation
Fault
thermal limit exceeded.
or filter blockage.
A current path to ground in
excess of 2A has been
Check motor and external wiring to drive
Ground
detected at one or more of output terminals for a grounded
Warning
the drive output terminals. condition.
UV Short
Fault
Excessive current has been
detected between two
controller output terminals.
Excessive current has been
detected between two
controller output terminals.
© Copyright, Alliance Laundry Systems LLC – DO NOT COPY or TRANSMIT
49
Section 4 Troubleshooting
10. NO SPIN
NOTE: While performing this check, make sure that the washer-extractor is running with a normal-size load.
NOTE: WHILE PERFORMING THIS CHECK, MAKE SURE THAT THE WASHER-EXTRACTOR IS RUNNING
WITH A NORMAL-SIZE LOAD.
WHEN THE WE-6
COMPUTER IS
ENGAGED IN A
HIGH-SPEED EXTRACT
(E.G., MS, H1, H2 OR H3),
IS THE BASKET
ROTATING?
NO
IS AN AC DRIVE
FAULT PRESENT?
YES
NO
REFER TO THE "NO MOTOR
OPERATION (WITH NO AC
DRIVE FAULT)" FLOWCHART.
YES
REFER TO THE "NO MOTOR
OPERATION (WITH AC DRIVE
FAULT)" FLOWCHART.
IS THE BASKET
ROTATING AT A
SLOW "WASH"
SPEED?
NO
REFER TO THE "THE MOTOR
IS RUNNING BUT AT AN
ABNORMAL SPEED"
FLOWCHART.
YES
CHECK THE A-FRAME HARD
LIMIT SWITCH BALANCE
CIRCUIT.
PHM1935S
50
© Copyright, Alliance Laundry Systems LLC – DO NOT COPY or TRANSMIT
F238006
Section 4 Troubleshooting
11. FILL ALARM ANALYSIS
Symptom: The display reads “FILLXX”, the signal light illuminates and the buzzer alarms. The
computer did not receive an input from the respective water level circuit telling it that the washerextractor filled in the time programmed.
CHECK THE DRAIN VALVE
FOR BLOCKAGE. IF THE
VALVE ISN'T BLOCKED,
REPLACE IT.
NO
YES
WHEN A FILL STEP BEGINS,
DOES THE WATER STAY IN THE
MACHINE AS THE FILL VALVES
OPEN AND THE DRAIN VALVE(S)
CLOSE? NOTE: THERE ARE
TWO DRAIN VALVES ON THE
UW80, UW100 AND UW125.
EITHER OF THE VALVES COULD
BE CAUSING THIS.
1
IS THERE
VOLTAGE (220
VOLTS) AT THE
DRAIN VALVE(S)?
YES
NO
CHECK THE 1 AMP DN FUSE
ON THE FUSEBOARD.
REPLACE IT IF NEEDED.
2
ARE THE FILL VALVES
OPENING AND ALLOWING
WATER INTO THE
WASHER-EXTRACTOR AS
THE COMPUTER
INSTRUCTS THEM TO DO
SO?
NO
REFER TO THE "NO FILL
ANALYSIS" FLOWCHART
AT POINT A.
YES
TEST THE WATER LEVEL SWITCH AS FOLLOWS.
REPLACE THE WATER LEVEL SWITCH, AIR TRAP
AND/OR TUBING AS NEEDED.
TEST ALL FILL STEPS TO HIGH
LEVEL (E.G., CHXXXX [COLD FILL
TO HIGH LEVEL], HHXXXX [HOT
FILL TO HIGH LEVEL] AND
WHXXXX [WARM FILL TO HIGH
LEVEL]). ARE THE FILL LEVELS
BEING REACHED IN A TIMELY
MANNER (I.E., 5 MINUTES)? ALL OF
THESE STEPS SHOULD FILL
EASILY WITHIN 5 MINUTES.
A. CHECK THE AIR TRAP TUBING FOR LEAKS
AND/OR BLOCKAGE.
YES
B. CHECK THE WATER LEVEL SWITCH WITH A
CONTINUITY TEST OR WITH AN OHMS TEST AT THE
FOLLOWING TERMINALS:
11 AND 12 (FOR LOW LEVEL)
3
21 AND 22 (FOR MEDIUM LEVEL)
31 AND 32 (FOR HIGH LEVEL)
NO
CHECK FOR ANY BLOCKAGES IN THE
LINES (E.G., THE FILTER SCREENS OR
THE WATER VALVES) THAT MAY BE
RESTRICTING THE WATER FLOW.
4
5
THIS SHOULD BE A CLOSED CIRCUIT AT ALL THREE
POINTS THAT OPENS WITH AIR PRESSURE TO THE
SWITCH. BLOW INTO THE SWITCH TO PROVIDE AIR
PRESSURE.
NOTE: OPENING THE SWITCH WILL LIGHT THE LED
INPUT LEVEL INDICATORS ON THE DISPLAY.
PHM1930S
Please refer to the following 2 pages for wiring diagram information.
F238006
© Copyright, Alliance Laundry Systems LLC – DO NOT COPY or TRANSMIT
51
Section 4 Troubleshooting
Fill Alarm Analysis (Sheet 1 of 2)
P.E.
GND
L2
L1
L3
35-60LB:
15 AMP CIRCUIT BREAKER
14 AWG (2mm2) WIRE
80-100LB:
25 AMP CIRCUIT BREAKER
10 AWG (6mm2) WIRE
Q: 200-240V/50-60HZ/3ø/3W 220V CTRL
BOARD MOUN
"K3" ON INTER
LIMIT OF
EQUIPMENT
XT2
TO XT3- LINE 2
TO XT3- LINE 1
18 AWG
XT1
L1
L2
QF1
L3
L2 QF1B
QF1B J2-1-1
L1 QF1A
QF1A SB1
3 AMP
3
1.0 AMP
2.0 AMP
12 AWG (35-100LB)
3 AMP
C2
FU3
C2-1 L1
C2-2 L2
C2-3 L3
C2-5 GND
GRN/YEL
CHASSIS
7
R
S
6
8
T
1
2
4
5
5
6
6
7
4
3
C1-1 ACH
C1-2 ACN
C1-3 J4-1-2
C1-5 J4-1-3
C1-6 J4-1-4
C1-7 J4-1-1
C1-4 J10-1-4
SEE REUSE DRAIN "M4"
IN UPPER RIGHT CORNER
C2-7 A2
A2 TERMINAL ON FUSEBOARD
KA4
RADIO
FILTER
4
C1
CONNECTOR "C1 & C2"
1
UW60 & 100 ONLY!
2 REFER TO REUSE INTERCONNECTION
SCHEMATIC
FOR FURTHER DETAILS
3
7
C2-6 TO XT3 COMMON
SB1
4
10
11
6
4
AC DRIVE
160 – C
1
5
3
KA3
2
W
SQ1
3
6
2
SA1b
5
J12-1-1
7
WRITE INHIBIT
16 PIN
DIP SOCKET
FLAT RIBBON CABLE
W/ D I P CONNECTOR
J3-2-13
J3-2-2
J3-2-1
J3-2-3
J2-2-3
J3-2-12
J2-2-5
M1
J2-2-4
14 AWG (35-60LB)
12 AWG (80-100LB)
J3-2-9
J3-2-11 J12-1-2
1
J2-2-6
BLUE (2)
BROWN (3)
GRN/YEL
BLACK (1)
5
J2-2-1
V
J2-2-2
U
A
WE–6 C
J2
1
BL
BK
1
G
1
1
(REFER TO MOTOR NAMEPLATE
FOR WIRING CONNECTIONS)
J5-2
J6-2
J7-2-14
J7-2-13
J7-2-12
J7-2-11
J7-2-9
J7-2-10
J7-2-7
J7-2-8
J7-2-6
J7-2-5
J7-2-4
J4-2
P
J7-2-3
J7-2-1
SP1c
REC
CHASSIS
SEE FUSEBOARD
POWER CIRCUIT
J12-1-10
J12-1-9
1
J7-2-2
SQ3
SA1a
LEGEND:
C8-B = CABLE #8, BLACK WIRE
BL
FLAT RIBBON CABLE
AP–3 AC DRIVE INTERFACE BOARD
5
4
J8
J1
ST1
J12-1-5
3
3
J12-1-6
J11-1-1
SQ2
J12-1-7
31 32
J7-2-1 = CONN. J7, 1 (ON FUSEBOARD), PIN#1
J7, 2 (ON INTERFACE BRD.)
SP1b
2 = TERMINAL STRIP, TERMINAL #2
P
J11-1-9 J11-1-3
J12-1-8 J11-1-7
21 22
R-C = RESISTOR/CAPACITOR FILTER NETWORK
P
12 11
J11-1-5
J11-1-11
SP1a
SP1 WATER
NUMBERS AR
= TERMINAL STRIP JUMPER
NOTES:
(TERMINAL STRIP JUMPERS MAY BE USED IN
VARIOUS PLACES NOT SHOWN ON SCHEMATIC)
1
THE DRIVE MOTOR (M1) IS DUAL VOLTAGE CAPABLE, REFER TO NAMEPLATE OF MOTOR BEFORE WIRING.
IF MOTOR ROTATION IS INCORRECT, SWAP ANY 2 WIRES OF CABLE BETWEEN AC DRIVE AND MOTOR.
2
REFER TO PROGRAMMING MANUAL FOR DETAILED INSTRUCTIONS TO OPERATE SUPPLIES.
SUPPLY 5 OUTPUT PROVIDES POWER TO ACTIVATE RELAYS KA1 & KA2 IN ORDER TO ENABLE EXTERNAL
SUPPLIES 6 THROUGH 9. EXAMPLE: IF SUPPLY 1 IS PROGRAMMED, THE SUPPLY 1 OUTPUT PROVIDES A
220V SIGNAL TO EXTERNAL SUPPLY 1. WHEN SUPPLY 5 IS PROGRAMMED WITH SUPPLY 1, THE SUPPLY 1
OUTPUT THEN PROVIDES A 220V SIGNAL TO EXTERNAL SUPPLY 6.
3
UW80-100 MACHINES WITH DUAL ELECTRICALLY OPERATED DRAIN VALVES REQUIRE TWO 2 AMP, 250V
CONTROL CIRCUIT BREAKERS (QF1). LIKEWISE FOR REUSE DRAIN M4.
ALL MACHINES WITH SINGLE ELECTRIC DRAIN VALVES REQUIRE TWO 1 AMP, 250V
CONTROL CIRCUIT BREAKERS (QF1).
4
AN ADDITIONAL FILTER (P/N 635654) IS REQUIRED ACROSS THE INPUT OF THE AC DRIVE.
TYPICAL RELAY
NORMALLY CLOSED CONTACTS
NORMALLY OPEN CONTACTS
COMMON
COIL
ODD NUMBERED CONTACTS ARE ISOLATED FROM EVEN
NUMBERED CONTACTS BUT OPERATE SIMULTANEOUSLY.
TERMINAL NUMBERS MAY VARY FROM RELAY TO RELAY
BUT TERMINAL POSITIONS ARE THE SAME.
52
© Copyright, Alliance Laundry Systems LLC – DO NOT COPY or TRANSMIT
F238006
Section 4 Troubleshooting
Fill Alarm Analysis (Sheet 2 of 2)
UW60 & 100 ONLY!
CONNECT TO TERMINAL #4 OF
REUSE HARNESS CONNECTOR "C1"
M4
-1
J10-1-4
J10-1-3
BOARD MOUNTED RELAY
"K3" ON INTERFACE PCB
3
7 KA4 8
SB1
J4
J5
M2
TO TERMINAL
SS ON
FUSEBOARD
C1
C1-1 ACH
C1-2 ACN
C1-3 J4-1-2
ACN
C1-6 J4-1-4
J2-1-3
C1-7 J4-1-1
J2-1-4
220V
CONTROLS
J15-1-7 YV10 J15-1-16
R-C
ACH
ACN
1/2 A
TO ELV
DEVICES
J5-1-5
J15-1-4
YV4
J15-1-13
1/2 A
J5-1-4
J15-1-3
YV2
J15-1-12
J5-1-3
J15-1-2
YV3
J15-1-11
J5-1-2
J15-1-1
YV1
J15-1-10
J15-1-5
KM8
YV11 J15-1-14
HF
C1-4 J10-1-4
ACH
HS
C1-5 J4-1-3
J2-1-1
J2-1-2
FU4
125mA
1/2 A
CS
REUSE DRAIN "M4"
PPER RIGHT CORNER
1/2 A
J4-1-2
J4-1-3
E2
J5-1-1
1/2 A
HT
J4-1-4
2
CF
E1
E3
J4-1-1
10VDC
M3b
J10-1-1
J3-1-5
T1 A
J10-1-2
DR
J1-26
J1
WRITE INHIBIT
BL
BK
J3
1
J8
J5-2
J6-2
TRANSMIT
RECEIVE
CHASSIS
A2 C2-7
J3-1-1
1/2 A
7
KA3
KA1
J6-1-3
1/2 A
KA2
7
2
KA1-2 S4
2
KA1
KA1-4 S9
S4
6
4
YV8
KA1-1 S3
1
ST1
1/2 A
J6-1-5
KA1
S3
J12-1-6
3
KA1-3 S8
5
3
YV7
SQ2
J12-1-7
2
P
12 11
J11-1-5
J6-1-6
1/2 A
SP1a
ED DRAIN VALVES REQUIRE TWO 2 AMP, 250V
E DRAIN M4.
QUIRE TWO 1 AMP, 250V
6
4
YV6
1
J6-1-7
S1
UCTIONS TO OPERATE SUPPLIES.
S KA1 & KA2 IN ORDER TO ENABLE EXTERNAL
RAMMED, THE SUPPLY 1 OUTPUT PROVIDES A
PROGRAMMED WITH SUPPLY 1, THE SUPPLY 1
PPLY 6.
KA2-4 S7
SP1 WATER LEVEL SWITCH TERMINAL
NUMBERS ARE SUBJECT TO CHANGE.
1/2 A
ER TO NAMEPLATE OF MOTOR BEFORE WIRING.
OF CABLE BETWEEN AC DRIVE AND MOTOR.
KA2-2 S2
KA2
S2
J12-1-8 J11-1-7
2
SUPPLY 5
NO XT3 CONNECTION
8
YV9
J6-1-4
1/2 A
SEE FUSEBOARD
POWER CIRCUIT
J12-1-5
8
J6-1-2
S5
J4-2
ARD
J3-1-2
1/2 A
ACN
BL
FLAT RIBBON CABLE
HA1
A1
GY
J3-1-3
1
1
1
J12-1-4
1
AP–1
WE–6 FUSEBOARD
J2
1
KEY PAD GND
1/2 A
YA1
6
A2
16 PIN
DIP SOCKET
AP–2
WE–6 COMPUTER
FLAT
RIBBON
CABLE
J12-1-3
5
A3
7
FLAT RIBBON CABLE
W/ D I P CONNECTOR
J1
SB2
J3-1-4
T1 A
SA1b
5
3
DUAL DRAIN ON
UW80-100 ONLY
M3
DN
10VDC
SQ1
1
KA2
KA2-1 S1
KA2-3 S6
5
3
SUPPLY 4
TO XT3 SUPPLY 4
SUPPLY 9
TO XT3 SUPPLY 9
TO XT3 COMMON
SUPPLY 3
TO XT3 SUPPLY 3
SUPPLY 8
TO XT3 SUPPLY 8
SUPPLY 2
TO XT3 SUPPLY 2
SUPPLY 7
TO XT3 SUPPLY 7
2
SUPPLY 1
TO XT3 SUPPLY 1
SUPPLY 6
TO XT3 SUPPLY 6
EXTERNAL SUPPLY TERMINAL STRIP (XT3) LOCATED ON REAR OF MODULE.
EXTERNAL SUPPLY 5 INTENTIONALLY OMITTED. SUPPLY 5 ENERGIZES RELAYS KA1 & KA2
TO ENABLE SUPPLIES 6 THRU 9.
THIS COMMON IS NOT A TRUE NEUTRAL.
DO NOT CONNECT LOAD BETWEEN LINE 1,
LINE 2 OR LINE 3 AND THIS COMMON.
220V BETWEEN ALL LINES AND COMMON.
S THE INPUT OF THE AC DRIVE.
PHM1931S
F238006
© Copyright, Alliance Laundry Systems LLC – DO NOT COPY or TRANSMIT
53
Section 4 Troubleshooting
12. EMPTY ALARM ANALYSIS
Symptom: The display reads “EMTYXX,” the buzzer sounds and the signal light is displayed. The
computer did not receive an input from the low side of the water level switch telling it that the washerextractor emptied in the time that had been programmed.
NOTE: If the empty alarm occurs in less than one minute from the point when the drain closed light goes out,
check the drain time that has been programmed into this step of the computer. The factory recommends that
at least one minute should be provided for each drain step.
WHEN THE COMPUTER GOES INTO A DRAIN
STEP (D1XXXX), AFTER SEVERAL SECONDS,
THE DRAIN CLOSED INDICATOR ON THE
FRONT OF THE COMPUTER WILL GO OUT. AT
THIS POINT, DOES THE WATER DRAIN FROM
THE WASHER-EXTRACTOR IN A TIMELY
MANNER (I.E., TOTAL DRAIN TIME SHOULD BE
BETWEEN 30 AND 40 SECONDS)?
TEST THE WATER LEVEL SWTCH
AS FOLLOWS. REPLACE THE
WATER LEVEL SWITCH, AIR TRAP
AND/OR TUBING AS NEEDED.
YES
A. CHECK THE AIR TRAP TUBING
FOR LEAKS AND/OR BLOCKAGE.
B. CHECK THE WATER LEVEL
SWITCH WITH A CONTINUITY
TEST OR WITH AN OHMS TEST
AT THE FOLLOWING TERMINALS:
NOTE: THERE ARE TWO DRAIN VALVES ON
THE UW80, UW100 AND THE UW125. CHECK
BOTH VALVES IN THESE CASES.
11 AND 12 (FOR LOW LEVEL)
1
21 AND 22 (FOR MEDIUM LEVEL)
2
31 AND 32 (FOR HIGH LEVEL)
3
NO
THIS SHOULD BE A CLOSED
CIRCUIT AT ALL THREE POINTS
THAT OPENS WITH AIR
PRESSURE TO THE SWITCH.
BLOW INTO THE SWITCH TO
PROVIDE AIR PRESSURE.
4
IS THERE
VOLTAGE (220
VOLTS) AT THE
DRAIN
VALVES?
NOTE: OPENING THE SWITCH
WILL LIGHT THE LED INPUT
INDICATORS ON THE DISPLAY.
NO
CHECK THE DRAIN(S) FOR STICKING
GATES AND CHECK THE ENTIRE DRAIN
LINE FOR BLOCKAGES. IF NO BLOCKAGES
OR STICKING GATES ARE FOUND,
REPLACE THE VALVE(S).
YES
5
DOES THE DN
LIGHT ON THE
FUSEBOARD
STAY ON
CONTINUOUSLY?
NO
CHECK FOR MISWIRING AT THE
FUSEBOARD OR FOR A SHORT ON THE
WIRE THAT ENERGIZES THE RESPECTIVE
DRAIN VALVE (E.G., IF M3 STAYS
ENERGIZED BUT THE DN LIGHT ISN'T LIT
ON THE FUSEBOARD, CHECK THE WIRING
BETWEEN J3-1-5 AND J10-1-1).
YES
CHECK THE RIBBON CABLE BETWEEN
THE COMPUTER AND THE FUSEBOARD.
REPLACE THE RIBBON CABLE IF NEEDED.
IF THE RIBBON CABLE IS OKAY, REPLACE
THE COMPUTER.
NO
MAKE SURE THAT THE
MAIN POWER TO THE MACHINE
HAS BEEN TURNED OFF. REMOVE
THE WIRES BETWEEN J4 AND J5 ON
THE INTERFACE BOARD. PLACE A
JUMPER BETWEEN THE TWO WIRES.
DISCONNECT THE RIBBON CABLE
BETWEEN THE COMPUTER AND THE
FUSEBOARD. TURN ON THE
MACHINE'S MAIN POWER. DOES THE
DN LIGHT ON THE FUSEBOARD COME
ON IMMEDIATELY?
YES
THERE IS A POSSIBILITY THAT THE
FUSEBOARD HAS BEEN CONTAMINATED.
TRY CLEANING IT. IF THE TEST MENTIONED
IN THE PREVIOUS STEP IS STILL
UNSUCCESSFUL, REPLACE THE
FUSEBOARD.
PHM1928S
54
© Copyright, Alliance Laundry Systems LLC – DO NOT COPY or TRANSMIT
F238006
Section 4 Troubleshooting
Please refer to the following 2 pages for wiring diagram information.
F238006
© Copyright, Alliance Laundry Systems LLC – DO NOT COPY or TRANSMIT
55
Section 4 Troubleshooting
Empty Alarm Analysis (Sheet 1 of 2)
P.E.
GND
L1
L2
L3
35-60LB:
15 AMP CIRCUIT BREAKER
14 AWG (2mm2) WIRE
80-100LB:
25 AMP CIRCUIT BREAKER
10 AWG (6mm2) WIRE
Q: 200-240V/50-60HZ/3ø/3W 220V CTRL
BOARD MOU
"K3" ON INT
LIMIT OF
EQUIPMENT
XT2
TO XT3- LINE 2
TO XT3- LINE 1
18 AWG
XT1
L1
L2
QF1
L3
L2 QF1B
QF1B J2-1-1
L1 QF1A
QF1A SB1
3 AMP
3
1.0 AMP
2.0 AMP
12 AWG (35-100LB)
3 AMP
C2
FU3
C2-1 L1
C2-2 L2
C2-3 L3
C2-5 GND
GRN/YEL
CHASSIS
7
R
S
6
8
T
1
2
4
5
5
6
6
7
4
3
C1-1 ACH
C1-2 ACN
C1-3 J4-1-2
C1-5 J4-1-3
C1-6 J4-1-4
C1-7 J4-1-1
C1-4 J10-1-4
SEE REUSE DRAIN "M4"
IN UPPER RIGHT CORNER
C2-7 A2
A2 TERMINAL ON FUSEBOARD
KA4
RADIO
FILTER
4
C1
CONNECTOR "C1 & C2"
1
UW60 & 100 ONLY!
2 REFER TO REUSE INTERCONNECTION
SCHEMATIC
FOR FURTHER DETAILS
3
7
C2-6 TO XT3 COMMON
SB1
4
10
11
6
4
AC DRIVE
160 – C
1
5
3
KA3
2
W
SQ1
3
6
2
SA1b
5
J12-1-1
7
WRITE INHIBIT
16 PIN
DIP SOCKET
FLAT RIBBON CABLE
W/ D I P CONNECTOR
J3-2-13
J3-2-2
J3-2-1
J3-2-3
J2-2-3
J3-2-12
J2-2-5
M1
J2-2-4
14 AWG (35-60LB)
12 AWG (80-100LB)
J3-2-9
J3-2-11 J12-1-2
1
J2-2-6
BLUE (2)
BROWN (3)
GRN/YEL
BLACK (1)
5
J2-2-1
V
J2-2-2
U
WE–6
J2
1
BL
BK
1
1
1
(REFER TO MOTOR NAMEPLATE
FOR WIRING CONNECTIONS)
J5-2
J6-2
J7-2-14
J7-2-13
J7-2-12
J7-2-11
J7-2-9
J7-2-10
J7-2-7
J7-2-8
J7-2-6
J7-2-5
J7-2-4
J4-2
P
J7-2-3
J7-2-1
SP1c
RE
CHASSIS
SEE FUSEBOARD
POWER CIRCUIT
J12-1-10
J12-1-9
1
J7-2-2
SQ3
SA1a
LEGEND:
C8-B = CABLE #8, BLACK WIRE
BL
FLAT RIBBON CABLE
AP–3 AC DRIVE INTERFACE BOARD
3
2
J8
J1
ST1
J12-1-5
1
3
J12-1-6
J11-1-1
SQ2
J12-1-7
31 32
J7-2-1 = CONN. J7, 1 (ON FUSEBOARD), PIN#1
J7, 2 (ON INTERFACE BRD.)
SP1b
2 = TERMINAL STRIP, TERMINAL #2
P
J11-1-9 J11-1-3
J12-1-8 J11-1-7
21 22
R-C = RESISTOR/CAPACITOR FILTER NETWORK
P
12 11
J11-1-5
J11-1-11
SP1a
SP1 WATER
NUMBERS A
= TERMINAL STRIP JUMPER
NOTES:
(TERMINAL STRIP JUMPERS MAY BE USED IN
VARIOUS PLACES NOT SHOWN ON SCHEMATIC)
1
THE DRIVE MOTOR (M1) IS DUAL VOLTAGE CAPABLE, REFER TO NAMEPLATE OF MOTOR BEFORE WIRING.
IF MOTOR ROTATION IS INCORRECT, SWAP ANY 2 WIRES OF CABLE BETWEEN AC DRIVE AND MOTOR.
2
REFER TO PROGRAMMING MANUAL FOR DETAILED INSTRUCTIONS TO OPERATE SUPPLIES.
SUPPLY 5 OUTPUT PROVIDES POWER TO ACTIVATE RELAYS KA1 & KA2 IN ORDER TO ENABLE EXTERNAL
SUPPLIES 6 THROUGH 9. EXAMPLE: IF SUPPLY 1 IS PROGRAMMED, THE SUPPLY 1 OUTPUT PROVIDES A
220V SIGNAL TO EXTERNAL SUPPLY 1. WHEN SUPPLY 5 IS PROGRAMMED WITH SUPPLY 1, THE SUPPLY 1
OUTPUT THEN PROVIDES A 220V SIGNAL TO EXTERNAL SUPPLY 6.
3
UW80-100 MACHINES WITH DUAL ELECTRICALLY OPERATED DRAIN VALVES REQUIRE TWO 2 AMP, 250V
CONTROL CIRCUIT BREAKERS (QF1). LIKEWISE FOR REUSE DRAIN M4.
ALL MACHINES WITH SINGLE ELECTRIC DRAIN VALVES REQUIRE TWO 1 AMP, 250V
CONTROL CIRCUIT BREAKERS (QF1).
4
AN ADDITIONAL FILTER (P/N 635654) IS REQUIRED ACROSS THE INPUT OF THE AC DRIVE.
TYPICAL RELAY
NORMALLY CLOSED CONTACTS
NORMALLY OPEN CONTACTS
COMMON
COIL
ODD NUMBERED CONTACTS ARE ISOLATED FROM EVEN
NUMBERED CONTACTS BUT OPERATE SIMULTANEOUSLY.
TERMINAL NUMBERS MAY VARY FROM RELAY TO RELAY
BUT TERMINAL POSITIONS ARE THE SAME.
56
© Copyright, Alliance Laundry Systems LLC – DO NOT COPY or TRANSMIT
F238006
Section 4 Troubleshooting
Empty Alarm Analysis (Sheet 2 of 2)
UW60 & 100 ONLY!
CONNECT TO TERMINAL #4 OF
REUSE HARNESS CONNECTOR "C1"
M4
1
J10-1-4
J10-1-3
BOARD MOUNTED RELAY
"K3" ON INTERFACE PCB
3
7 KA4 8
SB1
J4
J5
M2
TO TERMINAL
SS ON
FUSEBOARD
1
C1-1 ACH
C1-2 ACN
C1-3 J4-1-2
ACN
C1-6 J4-1-4
J2-1-3
C1-7 J4-1-1
J2-1-4
220V
CONTROLS
J15-1-7 YV10 J15-1-16
R-C
ACH
ACN
1/2 A
TO ELV
DEVICES
J5-1-5
J15-1-4
YV4
J15-1-13
1/2 A
J5-1-4
J15-1-3
YV2
J15-1-12
J5-1-3
J15-1-2
YV3
J15-1-11
J5-1-2
J15-1-1
YV1
J15-1-10
J15-1-5
KM8
YV11 J15-1-14
HF
C1-4 J10-1-4
ACH
HS
C1-5 J4-1-3
J2-1-1
J2-1-2
FU4
125mA
1/2 A
CS
EUSE DRAIN "M4"
PER RIGHT CORNER
1/2 A
J4-1-2
J4-1-3
E2
5
J5-1-1
1/2 A
E3
J4-1-1
10VDC
4
HT
J4-1-4
CF
E1
M3b
J10-1-1
J3-1-5
T1 A
J10-1-2
M3
DN
10VDC
SA1b
J1-26
J1
7
WRITE INHIBIT
BL
BK
J3
1
J8
J5-2
J6-2
TRANSMIT
RECEIVE
CHASSIS
A2 C2-7
J3-1-1
1/2 A
7
KA3
KA1
J6-1-3
1/2 A
KA2
7
2
KA1-2 S4
2
KA1
KA1-4 S9
S4
6
4
YV8
KA1-1 S3
1
ST1
1/2 A
J6-1-5
KA1
S3
J12-1-6
1
KA1-3 S8
5
3
YV7
SQ2
J12-1-7
2
P
12 11
J11-1-5
J6-1-6
1/2 A
SP1a
D DRAIN VALVES REQUIRE TWO 2 AMP, 250V
DRAIN M4.
QUIRE TWO 1 AMP, 250V
6
4
YV6
1
J6-1-7
S1
CTIONS TO OPERATE SUPPLIES.
S KA1 & KA2 IN ORDER TO ENABLE EXTERNAL
RAMMED, THE SUPPLY 1 OUTPUT PROVIDES A
PROGRAMMED WITH SUPPLY 1, THE SUPPLY 1
PPLY 6.
KA2-4 S7
SP1 WATER LEVEL SWITCH TERMINAL
NUMBERS ARE SUBJECT TO CHANGE.
1/2 A
R TO NAMEPLATE OF MOTOR BEFORE WIRING.
F CABLE BETWEEN AC DRIVE AND MOTOR.
KA2-2 S2
KA2
S2
J12-1-8 J11-1-7
2
SUPPLY 5
NO XT3 CONNECTION
8
YV9
J6-1-4
1/2 A
SEE FUSEBOARD
POWER CIRCUIT
J12-1-5
8
J6-1-2
S5
J4-2
ARD
J3-1-2
1/2 A
ACN
BL
FLAT RIBBON CABLE
HA1
A1
GY
J3-1-3
1
1
1
J12-1-4
1
AP–1
WE–6 FUSEBOARD
J2
1
KEY PAD GND
1/2 A
YA1
6
A2
16 PIN
DIP SOCKET
FLAT RIBBON CABLE
W/ D I P CONNECTOR
AP–2
WE–6 COMPUTER
FLAT
RIBBON
CABLE
J12-1-3
5
A3
5
J1
SB2
J3-1-4
T1 A
DR
SQ1
3
DUAL DRAIN ON
UW80-100 ONLY
KA2
KA2-1 S1
KA2-3 S6
5
3
SUPPLY 4
TO XT3 SUPPLY 4
SUPPLY 9
TO XT3 SUPPLY 9
TO XT3 COMMON
SUPPLY 3
TO XT3 SUPPLY 3
SUPPLY 8
TO XT3 SUPPLY 8
SUPPLY 2
TO XT3 SUPPLY 2
SUPPLY 7
TO XT3 SUPPLY 7
2
SUPPLY 1
TO XT3 SUPPLY 1
SUPPLY 6
TO XT3 SUPPLY 6
EXTERNAL SUPPLY TERMINAL STRIP (XT3) LOCATED ON REAR OF MODULE.
EXTERNAL SUPPLY 5 INTENTIONALLY OMITTED. SUPPLY 5 ENERGIZES RELAYS KA1 & KA2
TO ENABLE SUPPLIES 6 THRU 9.
THIS COMMON IS NOT A TRUE NEUTRAL.
DO NOT CONNECT LOAD BETWEEN LINE 1,
LINE 2 OR LINE 3 AND THIS COMMON.
220V BETWEEN ALL LINES AND COMMON.
S THE INPUT OF THE AC DRIVE.
PHM1929S
F238006
© Copyright, Alliance Laundry Systems LLC – DO NOT COPY or TRANSMIT
57
Section 4 Troubleshooting
13. AUTOMATIC SUPPLY DISPENSER ANALYSIS
Program and run the following steps into any available cycle to test the system.
NOTE: Pre-programmed cycle 39 already has a portion of this cycle pre-programmed into it.
Step
Description
Program
Min:sec
1
Warm Fill to Low Level
Warm Fill
5:00
2
Supply 1
Supply 1
2:00
3
Supply 2
Supply 2
2:00
4
Supply 3
Supply 3
2:00
5
Supply 4
Supply 4
2:00
6
Supply 6
Supply 5 and 1
2:00
7
Supply 7
Supply 5 and 2
2:00
8
Supply 8
Supply 5 and 3
2:00
9
Supply 9
Supply 5 and 4
2:00
10
Wash 1
Wash
:30
11
Drain 1
Drain
1:00
Run the cycle and, with the respective supply on the main display, refer to the following chart for the function
that should be occurring:
Supply
Function
1
Flushes Compartment 1
2
Flushes Compartment 2
3
Flushes Compartment 3
4
Flushes Compartments 4 and 5
6
Flushes Compartment 1
7
Flushes Compartment 2
8
Flushes Compartment 3
9
Flushes Compartments 4 and 5
During each step, test for voltage (220 Volts) between each respective supply terminal and the common
terminal on the XT3 terminal strip.
NOTE: The XT3 terminal strip is located toward the back of the control module, next to the power input
block.
58
© Copyright, Alliance Laundry Systems LLC – DO NOT COPY or TRANSMIT
F238006
Section 4 Troubleshooting
14. NO KEYPAD FUNCTIONS
WITH THE DISPLAY READING
"NEXT00," SELECT A
TWO-DIGIT CYCLE (E.G.,
ENTER "0" AND "9" FOR
CYCLE "09"). DOES THE
KEYPAD REACT WITH A
SINGLE BEEP AND BY
CHANGING THE DISPLAY TO
(E.G., "NEXT09")?
YES
NO
NO
IF YOU HEAR EITHER DOUBLE
BEEPS OR NO BEEPS AT ALL,
REPLACE THE KEYPAD.
PRESS THE
START BUTTON
ON THE KEYPAD.
DO YOU HEAR A
SINGLE BEEP?
YES
IF THE CYCLE STARTS ON THE
DISPLAY BUT NO FUNCTIONS
ARE TAKING PLACE, GO TO THE
"NO FUSEBOARD FUNCTION"
FLOWCHART, STEP 1.
YES
DOES THE DISPLAY
CHANGE, INDICATING
THAT THE COMPUTER
HAS GONE INTO THE
CYCLE THAT HAS BEEN
SELECTED (E.G., DOES
THE "NEXT09" DISPLAY
CHANGE TO "XX0109")?
NO
REPLACE THE KEYPAD. IF
THE PROBLEM PERSISTS,
CONTACT THE CUSTOMER
SERVICE DEPARTMENT.
PHM1932S
F238006
© Copyright, Alliance Laundry Systems LLC – DO NOT COPY or TRANSMIT
59
Section 4 Troubleshooting
15. DOOR UNLOCKING FUNCTION
IS THE UNLOCK
DOOR LED ON
THE COMPUTER
FRONT PANEL
LIT?
YES
4
IS THE DR LIGHT
ON THE
FUSEBOARD
BRIGHTLY LIT?
NO
CHECK THE 1 AMP
DR FUSE AND
REPLACE IT AS
NEEDED.
NO
TEST THE WATER LEVEL SWTCH AS FOLLOWS.
REPLACE THE WATER LEVEL SWITCH, AIR TRAP
AND/OR TUBING AS NEEDED.
YES
A. CHECK THE AIR TRAP TUBING FOR LEAKS
AND/OR BLOCKAGE.
B. CHECK THE WATER LEVEL SWITCH WITH A
CONTINUITY TEST OR WITH AN OHMS TEST AT THE
FOLLOWING TERMINALS:
11 AND 12 (FOR LOW LEVEL)
1
2
21 AND 22 (FOR MEDIUM LEVEL)
31 AND 32 (FOR HIGH LEVEL)
5
3
THIS SHOULD BE A CLOSED CIRCUIT AT ALL THREE
POINTS THAT OPENS WITH AIR PRESSURE TO THE
SWITCH. BLOW INTO THE SWITCH TO PROVIDE AIR
PRESSURE. RELEASE THE AIR FROM THE SWITCH
AND MAKE SURE THAT ALL THREE LEVELS CLOSE.
IS THERE VOLTAGE (220
VOLTS) AT THE TWO
WIRES THAT GO TO THE
YA1 DOOR UNLOCK
SOLENOID (LOCATED
INSIDE OF THE DOOR BOX
AT THE 3 O'CLOCK
POSITION OF THE DOOR)?
YES
CHECK THE YA1
FOR MECHANICAL
BINDINGS AND
REPLACE THE
SOLENOID AS
NEEDED.
NOTE: OPENING THE SWITCH WILL LIGHT THE LED
INPUT LEVEL INDICATORS ON THE DISPLAY.
NO
CHECK FOR A CLOSED CIRCUIT ON
THE SB2 (THE WHITE MOMENTARY
DOOR UNLOCK PUSHBUTTON) WHEN
THE BUTTON IS PRESSED. IF THE
CIRCUIT ISN'T CLOSING, REPLACE
THE SB2.
6
PHM1933S
60
© Copyright, Alliance Laundry Systems LLC – DO NOT COPY or TRANSMIT
F238006
Section 4 Troubleshooting
Please refer to the following 2 pages for wiring diagram information.
F238006
© Copyright, Alliance Laundry Systems LLC – DO NOT COPY or TRANSMIT
61
Section 4 Troubleshooting
Door Unlocking Function (Sheet 1 of 2)
P.E.
GND
L1
L2
L3
35-60LB:
15 AMP CIRCUIT BREAKER
14 AWG (2mm2) WIRE
80-100LB:
25 AMP CIRCUIT BREAKER
10 AWG (6mm2) WIRE
Q: 200-240V/50-60HZ/3ø/3W 220V CTRL
BOARD MOU
"K3" ON INTE
LIMIT OF
EQUIPMENT
XT2
TO XT3- LINE 2
TO XT3- LINE 1
18 AWG
XT1
L1
L2
QF1
L3
L2 QF1B
QF1B J2-1-1
L1 QF1A
QF1A SB1
3 AMP
3
1.0 AMP
2.0 AMP
12 AWG (35-100LB)
3 AMP
C2
FU3
C2-1 L1
C2-2 L2
C2-3 L3
C2-5 GND
GRN/YEL
CHASSIS
7
R
S
6
8
T
1
2
4
5
5
6
6
7
4
3
C1-1 ACH
C1-2 ACN
C1-3 J4-1-2
C1-5 J4-1-3
C1-6 J4-1-4
C1-7 J4-1-1
C1-4 J10-1-4
SEE REUSE DRAIN "M4"
IN UPPER RIGHT CORNER
C2-7 A2
A2 TERMINAL ON FUSEBOARD
KA4
RADIO
FILTER
4
C1
CONNECTOR "C1 & C2"
1
UW60 & 100 ONLY!
2 REFER TO REUSE INTERCONNECTION
SCHEMATIC
FOR FURTHER DETAILS
3
7
C2-6 TO XT3 COMMON
SB1
4
10
11
6
4
AC DRIVE
160 – C
1
5
3
KA3
2
W
SQ1
3
6
2
SA1b
5
J12-1-1
7
WRITE INHIBIT
16 PIN
DIP SOCKET
FLAT RIBBON CABLE
W/ D I P CONNECTOR
J3-2-13
J3-2-2
J3-2-1
J3-2-3
J2-2-3
J3-2-12
J2-2-5
M1
J2-2-4
14 AWG (35-60LB)
12 AWG (80-100LB)
J3-2-9
J3-2-11 J12-1-2
1
J2-2-6
BLUE (2)
BROWN (3)
GRN/YEL
BLACK (1)
5
J2-2-1
V
J2-2-2
U
A
WE–6 C
J2
1
BL
BK
1
1
1
(REFER TO MOTOR NAMEPLATE
FOR WIRING CONNECTIONS)
J5-2
J6-2
J7-2-14
J7-2-13
J7-2-12
J7-2-11
J7-2-9
J7-2-10
J7-2-7
J7-2-8
J7-2-5
J7-2-6
J7-2-4
J4-2
P
J7-2-3
J7-2-1
SP1c
REC
CHASSIS
SEE FUSEBOARD
POWER CIRCUIT
J12-1-10
J12-1-9
1
J7-2-2
SQ3
SA1a
LEGEND:
C8-B = CABLE #8, BLACK WIRE
BL
FLAT RIBBON CABLE
AP–3 AC DRIVE INTERFACE BOARD
3
2
J8
J1
ST1
J12-1-5
1
3
J12-1-6
J11-1-1
SQ2
J12-1-7
31 32
J7-2-1 = CONN. J7, 1 (ON FUSEBOARD), PIN#1
J7, 2 (ON INTERFACE BRD.)
SP1b
2 = TERMINAL STRIP, TERMINAL #2
P
J11-1-9 J11-1-3
J12-1-8 J11-1-7
21 22
R-C = RESISTOR/CAPACITOR FILTER NETWORK
P
12 11
J11-1-5
J11-1-11
SP1a
SP1 WATER
NUMBERS A
= TERMINAL STRIP JUMPER
NOTES:
(TERMINAL STRIP JUMPERS MAY BE USED IN
VARIOUS PLACES NOT SHOWN ON SCHEMATIC)
1
THE DRIVE MOTOR (M1) IS DUAL VOLTAGE CAPABLE, REFER TO NAMEPLATE OF MOTOR BEFORE WIRING.
IF MOTOR ROTATION IS INCORRECT, SWAP ANY 2 WIRES OF CABLE BETWEEN AC DRIVE AND MOTOR.
2
REFER TO PROGRAMMING MANUAL FOR DETAILED INSTRUCTIONS TO OPERATE SUPPLIES.
SUPPLY 5 OUTPUT PROVIDES POWER TO ACTIVATE RELAYS KA1 & KA2 IN ORDER TO ENABLE EXTERNAL
SUPPLIES 6 THROUGH 9. EXAMPLE: IF SUPPLY 1 IS PROGRAMMED, THE SUPPLY 1 OUTPUT PROVIDES A
220V SIGNAL TO EXTERNAL SUPPLY 1. WHEN SUPPLY 5 IS PROGRAMMED WITH SUPPLY 1, THE SUPPLY 1
OUTPUT THEN PROVIDES A 220V SIGNAL TO EXTERNAL SUPPLY 6.
3
UW80-100 MACHINES WITH DUAL ELECTRICALLY OPERATED DRAIN VALVES REQUIRE TWO 2 AMP, 250V
CONTROL CIRCUIT BREAKERS (QF1). LIKEWISE FOR REUSE DRAIN M4.
ALL MACHINES WITH SINGLE ELECTRIC DRAIN VALVES REQUIRE TWO 1 AMP, 250V
CONTROL CIRCUIT BREAKERS (QF1).
4
AN ADDITIONAL FILTER (P/N 635654) IS REQUIRED ACROSS THE INPUT OF THE AC DRIVE.
TYPICAL RELAY
NORMALLY CLOSED CONTACTS
NORMALLY OPEN CONTACTS
COMMON
COIL
ODD NUMBERED CONTACTS ARE ISOLATED FROM EVEN
NUMBERED CONTACTS BUT OPERATE SIMULTANEOUSLY.
TERMINAL NUMBERS MAY VARY FROM RELAY TO RELAY
BUT TERMINAL POSITIONS ARE THE SAME.
62
© Copyright, Alliance Laundry Systems LLC – DO NOT COPY or TRANSMIT
F238006
Section 4 Troubleshooting
Door Unlocking Function (Sheet 2 of 2)
UW60 & 100 ONLY!
CONNECT TO TERMINAL #4 OF
REUSE HARNESS CONNECTOR "C1"
M4
-1
J10-1-4
J10-1-3
BOARD MOUNTED RELAY
"K3" ON INTERFACE PCB
3
7 KA4 8
SB1
J4
J5
M2
TO TERMINAL
SS ON
FUSEBOARD
C1
C1-1 ACH
C1-2 ACN
C1-3 J4-1-2
ACN
C1-6 J4-1-4
J2-1-3
C1-7 J4-1-1
J2-1-4
220V
CONTROLS
1/2 A
1/2 A
YV4
J15-1-13
J5-1-4
J15-1-3
YV2
J15-1-12
J5-1-3
J15-1-2
YV3
J15-1-11
J5-1-2
J15-1-1
YV1
J15-1-10
J15-1-5
KM8
YV11 J15-1-14
CF
HT
10VDC
J3-1-5
T1 A
J1
WRITE INHIBIT
SB2
BL
BK
J3
1
ARD
TRANSMIT
J3-1-2
1/2 A
A2 C2-7
J3-1-1
1/2 A
7
KA3
KA1
J6-1-3
1/2 A
KA2
7
2
KA1-2 S4
2
KA1
KA1-4 S9
S4
6
4
YV8
KA1-1 S3
1
ST1
1/2 A
J6-1-5
KA1
S3
J12-1-6
1
KA1-3 S8
5
3
YV7
SQ2
J12-1-7
2
P
12 11
J11-1-5
J6-1-6
1/2 A
SP1a
ED DRAIN VALVES REQUIRE TWO 2 AMP, 250V
E DRAIN M4.
QUIRE TWO 1 AMP, 250V
6
4
YV6
1
J6-1-7
S1
UCTIONS TO OPERATE SUPPLIES.
S KA1 & KA2 IN ORDER TO ENABLE EXTERNAL
RAMMED, THE SUPPLY 1 OUTPUT PROVIDES A
PROGRAMMED WITH SUPPLY 1, THE SUPPLY 1
PPLY 6.
KA2-4 S7
SP1 WATER LEVEL SWITCH TERMINAL
NUMBERS ARE SUBJECT TO CHANGE.
1/2 A
ER TO NAMEPLATE OF MOTOR BEFORE WIRING.
OF CABLE BETWEEN AC DRIVE AND MOTOR.
KA2-2 S2
KA2
S2
J12-1-8 J11-1-7
2
SUPPLY 5
NO XT3 CONNECTION
8
YV9
J6-1-4
1/2 A
SEE FUSEBOARD
POWER CIRCUIT
J12-1-5
8
J6-1-2
S5
RECEIVE
CHASSIS
5
HA1
ACN
BL
FLAT RIBBON CABLE
J3-1-3
A1
GY
J12-1-4
1
1
1
1/2 A
YA1
6
1
AP–1
WE-6 FUSEBOARD
J2
1
KEY PAD GND
J12-1-3
5
A2
16 PIN
DIP SOCKET
FLAT RIBBON CABLE
W/ D I P CONNECTOR
AP–2
WE–6 COMPUTER
FLAT
RIBBON
CABLE
J10-1-2
M3
A3
7
3
DUAL DRAIN ON
UW80-100 ONLY
M3b
J10-1-1
J3-1-4
T1 A
DR
J1-26
5
6
DN
4
SA1b
J8
J15-1-4
CS
E3
10VDC
J6-2
J5-1-5
J5-1-1
1/2 A
E2
J4-1-1
J5-2
1/2 A
TO ELV
DEVICES
E1
J4-1-4
J4-2
ACN
1/2 A
J4-1-2
J4-1-3
J1
ACH
FU4
125mA
REUSE DRAIN "M4"
PPER RIGHT CORNER
SQ1
J15-1-7 YV10 J15-1-16
R-C
HF
C1-4 J10-1-4
ACH
HS
C1-5 J4-1-3
J2-1-1
J2-1-2
KA2
KA2-1 S1
KA2-3 S6
5
3
SUPPLY 4
TO XT3 SUPPLY 4
SUPPLY 9
TO XT3 SUPPLY 9
TO XT3 COMMON
SUPPLY 3
TO XT3 SUPPLY 3
SUPPLY 8
TO XT3 SUPPLY 8
SUPPLY 2
TO XT3 SUPPLY 2
SUPPLY 7
TO XT3 SUPPLY 7
2
SUPPLY 1
TO XT3 SUPPLY 1
SUPPLY 6
TO XT3 SUPPLY 6
EXTERNAL SUPPLY TERMINAL STRIP (XT3) LOCATED ON REAR OF MODULE.
EXTERNAL SUPPLY 5 INTENTIONALLY OMITTED. SUPPLY 5 ENERGIZES RELAYS KA1 & KA2
TO ENABLE SUPPLIES 6 THRU 9.
THIS COMMON IS NOT A TRUE NEUTRAL.
DO NOT CONNECT LOAD BETWEEN LINE 1,
LINE 2 OR LINE 3 AND THIS COMMON.
220V BETWEEN ALL LINES AND COMMON.
S THE INPUT OF THE AC DRIVE.
PHM1934S
F238006
© Copyright, Alliance Laundry Systems LLC – DO NOT COPY or TRANSMIT
63
Section 4 Troubleshooting
16. EXCESSIVE CYCLE TIME
When experiencing excessive cycle time, there are three main causes which are as follows:
a. Fill Time:
(1) Check for excessively long fill times. Refer to the “Fill Alarm Analysis” flowchart if any are found.
(2) Check for excessively long programmed fill times.
NOTE: All pre-programmed fill times are for 5 minutes. Any fill should easily complete during this time.
b. Drain Time:
(1) Look for excessively long programmed drain times (i.e., greater than one minute).
NOTE: Any drain step should not exceed 30-40 seconds.
c. Unnecessary Programming Steps:
(1) E.g., in the first fill of a cycle, if “S102XX” is programmed for 45 seconds and “S203XX” is
programmed for 45 seconds, the two steps can be accomplished together at the same time, saving 45
seconds. Refer to the “Programming Multiple Supply Steps” section of your washer-extractor’s
programming manual.
64
© Copyright, Alliance Laundry Systems LLC – DO NOT COPY or TRANSMIT
F238006
Section 4 Troubleshooting
17. EXCESSIVE VIBRATION AND/OR NOISE DURING SPIN
When experiencing excessive vibration and/or noise during a spin cycle, there are three main causes,
which are as follows:
a. Improper Loading:
(1) Always make sure that full loads are used. Never wash partial loads.
(2) Do not mix various laundry items together in the same wash (e.g., do not wash towels and sheets
together).
b. Improper Installation:
(1) Make sure that the washer-extractor is anchored to a flat, level surface with the proper depth of concrete.
(2) Tighten all anchor bolts and nuts. Make sure that they are of the correct size and grade.
(3) Make sure that the washer-extractor is grouted properly.
(4) Refer to your washer-extractor’s installation manual for exact installation specifications.
c. Faulty Front and/or Rear Bearings:
(1) Check the front and rear bearings’ noise factor.
(2) Lift up on the basket at the front of the tub. Check for any up and down play that would indicate bearing
wear.
(3) Replace the bearings as needed.
18. STOP/DONE SITUATION IN MID CYCLE
If the washer-extractor stops in mid-cycle, this indicates that the computer saw an open circuit at the door lock
microswitch.
Check the door lock microswitch for loose connections or broken wires. Repair the wires or replace the
microswitch as needed.
19. POWER WAIT SITUATION IN MID CYCLE
A power wait situation in mid cycle indicates that the machine’s computer lost power.
a. Check the computer’s battery back-up. Replace the battery as needed.
b. If the battery is okay, check for voltage at the white plug by the transformer on the output board. Voltage
present should either be 120 or 220 VAC, depending on the control voltage.
20. PUMPS TURNING ON IN MID CYCLE WITHOUT BEING PROGRAMMED TO DO SO
Pumps turning on in mid-cycle without being programmed to do so may be the result of resistors on the output
board allowing low voltage leaks (between 1 and 40 VAC).
Replace the resistors on the output board (that correspond to the pumps that are turning on in mid cycle) as
needed.
F238006
© Copyright, Alliance Laundry Systems LLC – DO NOT COPY or TRANSMIT
65
Section 5
Service Procedures
WARNING
To reduce the risk of electrical shock, fire, explosion, serious injury or death:
• Disconnect electrical power to the washer-extractor before servicing it.
• Close the gas shut-off valve to the washer-extractor (when applicable) before servicing it.
• Never start the washer-extractor with any guards/panels removed.
• Whenever ground wires are removed during servicing, these ground wires must be
reconnected to ensure that the washer-extractor is properly grounded.
W461R1
WARNING
To reduce the risk of serious injury,
disconnect power and water to the machine
before attempting any maintenance, repairs
or service or before removing any panels.
21. VOLTAGE DISTRIBUTION
Incoming electrical service is supplied to the machine
via a terminal strip mounted inside of the control
module. From the terminal strip, lines L1, L2 and L3
(on 3 phase models) or lines L1 and L2 (on single phase
models) are routed directly to the AC drive. The drive
is powered up when the machine receives power.
L1 and L2 also go to the primary side of the control
voltage transformer on P and N-voltage machines.
P voltage (380-415V/50-60 Hz/3ø/3W) and N-voltage
(440-480V/50-60 Hz/3ø/3W) machines have a 0.5
Amp circuit breaker for 150VA TX sizes (single-drain
versions) and 1 Amp circuit breaker for 250VA TX
sizes (dual-drain machines) on the primary side of the
TX. This protects the TX primary and the input wires
from overloads. The secondary side of the TX has 1
Amp (on single drain models) or 2 Amp (on dual-drain
models) circuit breakers to protect the control circuit
and TX from overloads on the secondary side of the
TX. An overload or improper TX connection can trip
both the primary and/or secondary breakers.
The control voltage transformer outputs are routed to
the circuit breakers (QFIA and QFIB). From QF1A, the
line goes to SB1 (E-Stop), to the AC Drive interface
board and then to the output board. From QFIB, the
common goes to the output board connector J2-1-1. All
of the neutral (common) wires in the control circuitry
are connected together electrically but are not
connected to ‘ground.’ The Q-voltage (200-240V/5060 Hz/3ø/ 3W) and T-voltage (200-240V/50-60
Hz/1ø/2W) machines will have the control voltage
F238006
taken directly off of L1 and L2 (R and S). The control
voltage will then route through a 1 Amp circuit breaker
(the same routing as the secondary from the control
transformer as described above), one per line, before
progressing to the actual controls. (If the machine is
equipped with dual drains, two 2 Amp circuit breakers
will be used in place of the 1 Amp version.)
Control transformers should be connected to deliver a
maximum of 240 Volt (60 Hertz) or 220 Volt (50 Hertz)
secondary voltage. Refer to Transformer Connection
Table below for all available connection terminals.
(E.g., for 415 Volt/50 Hertz input, connect to H1-H4
primary and X1-X2 secondary.)
Transformer Connection Table
Primary
Secondary
(Input)
(Output)
H2-H4
H1-H4
X1-X2
355 Volt
415 Volt
202 Volt
380 Volt
440 Volt
215 Volt
400 Volt
460 Volt
226 Volt
–
480 Volt
235 Volt
–
500 Volt
246 Volt
A ground lug is provided inside of the control module
where the electric service is connected. It should be
connected to a proven earth ground. This equipment
ground is important but does NOT carry normal
operating power.
The 220V AC (hot) is routed first through the 1 Amp
control circuit breakers. From the control circuit
breakers, it is connected through the emergency stop
switch and the board mounted relay “K3” (on the AC
drive board) before reaching ACH on the fuse board
and KA6 door lock safety relay coil that, when
energized, will close, allowing the drive to be enabled
to run.
© Copyright, Alliance Laundry Systems LLC – DO NOT COPY or TRANSMIT
67
Section 5 Service Procedures
WARNING
To reduce the risk of electrical shock, fire, explosion, serious injury or death:
• Disconnect electrical power to the washer-extractor before servicing it.
• Close the gas shut-off valve to the washer-extractor (when applicable) before servicing it.
• Never start the washer-extractor with any guards/panels removed.
• Whenever ground wires are removed during servicing, these ground wires must be
reconnected to ensure that the washer-extractor is properly grounded.
W461R1
While the door is open, there will be no AC voltage
available to ACH on the fuse board and no outputs will
operate.
NOTE: This is a safety circuit. Do not bypass it.
220 Volt AC for the computer is taken immediately
after the control circuit breaker and “K3” that is
connected to the 4-pin plug at the top center of the fuse
board. A 1/8 amp slo blo fuse is located next to the 4pin plug and protects the computer power supply that is
in the center of the fuse board. 12VDC is supplied to
the microcomputer board via a 26-conductor ribbon
cable.
Each of the 20 outputs on the fuse board is connected
to the ACH input through a solid-state current switch
that is controlled by a low-voltage signal from the
microcomputer.
The door unlock and the drain outputs are fused with a
1 Amp slo blo fuse. Each of the other 13 outputs are
fused with a 1/2 Amp fuse (500MA). All fuses on the
fuse board are 5 x 20 mm.
Next to the output tab (a push-on quick connect) for
each output is an LED. This LED will be lit whenever
the output is ON and the fuse is intact. A lit LED
indicates that output voltage is being applied to the
output tab. These LEDs will also glow, though at less
than normal brightness, if there is not a load (coil)
attached to the output or if the path through the load and
back to ACN is open. For this reason, fuses are
normally removed from any output which does not
have a load attached to it.
Bulletin 160
AC Drive
J5
J6
AC Drive
Interface
Board
Output
Fuse Board
QF2 Circuit Breaker
(Not Present On Q & T Voltages)
J6
KA4
Relay
J1
KA1
Relay
J2
KA2
Relay
KA3
Relay
J5
J4
J3
J7
J8
P001S
Buzzer
(HA1)
Figure 1
Display/Fuse Board, Interface Board
68
© Copyright, Alliance Laundry Systems LLC – DO NOT COPY or TRANSMIT
F238006
Section 5 Service Procedures
WARNING
To reduce the risk of electrical shock, fire, explosion, serious injury or death:
• Disconnect electrical power to the washer-extractor before servicing it.
• Close the gas shut-off valve to the washer-extractor (when applicable) before servicing it.
• Never start the washer-extractor with any guards/panels removed.
• Whenever ground wires are removed during servicing, these ground wires must be
reconnected to ensure that the washer-extractor is properly grounded.
W461R1
Program
Mode
Door
Lock
Switch
High Level
Fill Indicator
Medium Level
Fill Indicator
Balance
Sensing
Indicator
Low Level
Fill Indicator
Output Indicators
Supply 1
Heat
Supply 2
Forward
Supply 3
Reverse
Supply 4
Dist. Speed
Supply 5
Med. Speed
Cold Fill
High Speed
Hot Fill
Unlock Door
Spare
Drain Closed
Spare
Auxiliary 1
Signal
Auxiliary 2
U152RE3A
Figure 2
Sample Keypad with LED Indicators
22. ELECTRICAL TESTING
Required equipment for electrical testing includes
a digital or analog multimeter and an AC drive
parameter unit. The parameter unit is used for
troubleshooting, for diagnosing problems between
the motor/AC drive and to measure motor current.
It is available from Alliance Laundry Systems.
Order the specific unit referenced in the parameter
listing that came with the machine.
F238006
© Copyright, Alliance Laundry Systems LLC – DO NOT COPY or TRANSMIT
69
Section 5 Service Procedures
WARNING
To reduce the risk of electrical shock, fire, explosion, serious injury or death:
• Disconnect electrical power to the washer-extractor before servicing it.
• Close the gas shut-off valve to the washer-extractor (when applicable) before servicing it.
• Never start the washer-extractor with any guards/panels removed.
• Whenever ground wires are removed during servicing, these ground wires must be
reconnected to ensure that the washer-extractor is properly grounded.
W461R1
NOTE: Do not attempt to measure motor current
with a clip-on Amp meter on UWPV machines.
Incorrect readings will result.
The Amp meter can be used to detect excessive
electrical current draw that causes overloads on
breakers and fuses. The Amp meter clamps
around the current-carrying wire. Refer to the
instructions furnished with the meter.
The volt/ohm meter will measure volts when set
on “volt.” It will measure ohms (resistance) when
set on “ohm.” This setting can also be used for
continuity testing.
As mentioned in safety warnings, the power to the
machine must be disconnected before servicing.
Wires should be disconnected from the
component or components being checked. Using
the ohm meter, test leads are placed in contact
with the terminals being checked.
For example:
To check any switch, set the ohm meter to the
“ohm” scale as outlined in the meter’s operating
instructions. Place one lead on each terminal.
Refer to Figure 3. Depress the switch button. If
the switch is making contact, the needle on the
meter will move towards the “0” end of the ohm
scale. This indicates continuity through the
switch. When the switch button is released, the
needle will move back to its original position.
Continuity through wires can be tested in the same
manner.
WARNING
To reduce the risk of bodily injury and/or
property damage such as fire, electric
shock or equipment damage, washerextractors must be installed, adjusted and
serviced by qualified electrical maintenance
personnel familiar with the construction and
operation of the type of machinery. These
personnel must also be familiar with the
potential hazards involved. If this warning is
not observed, personal injury or equipment
damage (that may result in voiding the
warranty) can occur.
WARNING
To reduce the risk of electrical shock, be
sure that a ground wire from a proven earth
ground is connected to the chassis ground
lug in the electrical junction box on the
machine. Without proper grounding,
personal injury from electrical shock may
occur and machine malfunctions may be
evident.
NOTE: Computer controlled machines must have a
proper ground to prevent computer malfunctions.
WARNING
Y048I
To reduce the risk of injury, replace all
panels that have been removed to perform
service and maintenance procedures, do
not operate the machine with guards
removed or with parts missing or broken
and do not bypass any safety devices.
Y048I
Figure 3
Meter Lead Placement
70
© Copyright, Alliance Laundry Systems LLC – DO NOT COPY or TRANSMIT
F238006
Section 5 Service Procedures
WARNING
To reduce the risk of electrical shock, fire, explosion, serious injury or death:
• Disconnect electrical power to the washer-extractor before servicing it.
• Close the gas shut-off valve to the washer-extractor (when applicable) before servicing it.
• Never start the washer-extractor with any guards/panels removed.
• Whenever ground wires are removed during servicing, these ground wires must be
reconnected to ensure that the washer-extractor is properly grounded.
W461R1
DANGER
To reduce the risk of electrical shock, never
touch terminals or components of the AC
drive unless the power is disconnected and
the “CHARGE” indicator LED is off. The AC
drive retains potentially deadly voltage for
some time after the power is disconnected.
Tampering with the AC drive will void the
warranty. There are no user-serviceable
parts inside of the AC drive.
DANGER
To reduce the risk of injury, attempt no entry
until the basket has come to a complete
stop.
23. COMPUTER TEST PROCEDURE
WARNING
Serious shock may occur. Open the primary
disconnect switch before attempting any
repairs.
With its fuse board, the WE-6 programmable
computer is easier to maintain than other controls.
The following procedures should help eliminate
problems and determine if components are not
functioning properly. Refer to Figure 2.
Test equipment required:
• 20K OHM/Volt AC-DC voltmeter.
• Wiring diagram, WE-6 (supplied with the
washer-extractor).
F238006
Computer Test Procedure
a. Power up the washer-extractor:
(1) When AC power is turned on, the display
should flash “POWER”/“WAIT”
alternately. After 90 seconds, the display
should read “NEXT 00.”
(2) The door unlock solenoid should function if
the door unlock button is pressed.
(3) If tests 1 and 2 are positive, go to Step c.
b. If the computer does not read “NEXT” or does
not illuminate, refer to the “WE-6 Control Has
No Visible Display” flowchart.
c. If the computer reads “NEXT”:
NOTE: Press the center of the keys, applying only
enough pressure to activate them.
(1) Test the keyboard, first with the keymode
switch (located on the left side of the
control module) in the “RUN” position. A
beep tone should sound as each key is
pressed. Press each of the keys except the
“START” key and listen for the beep. After
pressing all of the keys (except “START”),
press “3” and “9,” then press “START.”
The display should flash “NCYC 39” for 3
seconds and then return to “NEXT00.”
(2) When “DISPLAY TEMP” is pressed and
held, the computer display should change to
show the temperature inside of the sump.
When the key is released, the display
should return to the previous read-out.
(3) Turn the keymode switch to “PROGRAM”
and press “EDIT/CYCLE.” The read-out
should display “DCYC--.”
(4) Press “CLEAR/STOP.” The display should
return to “-CYC 00.”
(5) Return the keymode switch to the “RUN”
position.
d. If the keyboard does not function as above:
(1) Check the plug (J-3) at the bottom center of
computer board for proper installation.
Refer to Figure 4.
(2) If the plug is intact and is installed
correctly, proceed to Paragraph 25.
© Copyright, Alliance Laundry Systems LLC – DO NOT COPY or TRANSMIT
71
Section 5 Service Procedures
WARNING
To reduce the risk of electrical shock, fire, explosion, serious injury or death:
• Disconnect electrical power to the washer-extractor before servicing it.
• Close the gas shut-off valve to the washer-extractor (when applicable) before servicing it.
• Never start the washer-extractor with any guards/panels removed.
• Whenever ground wires are removed during servicing, these ground wires must be
reconnected to ensure that the washer-extractor is properly grounded.
W461R1
24. TEST CYCLE
Cycle 01 is a pre-programmed test cycle used to
check all functions of the machine. Refer to
Figure 2.
a. Start this cycle by pressing “0,” then “1,” then
“START.”
b. The display should show “CL01” with the LED
for “COLD FILL” and “COLD SPRAY”
illuminated at the left of the module front,
indicating that these water valves have been
turned on.
c. The “DRAIN CLOSED” LED should be lit.
The “FORWARD” and “REVERSE” LEDs
should alternate on and off.
d. The programming manual indicates which
LEDs should be lit for each step.
e. If only one LED on the fuse board is not lit:
(1) Check the fuse on the fuse board associated
with that LED.
(2) If the fuse is OK, check the J-1 ribbon cable
between the computer and the fuse board.
(3) If the fuse is blown, check the related valve
or relay for a shorted condition before
replacing the fuse.
(4) Use a similar procedure for any individual
function that does not work.
IMPORTANT: For proper protection when
replacing fuses, use replacement fuses with the same
type and rating.
If the display indicates a “DOOR” alarm:
a. The computer has detected an unlocked door.
b. Check the switch activator on the door lock
extension arm.
c. Check the door lock switch.
d. Check the input plug, J-2, on the computer
board. Refer to Figure 1.
e. Check for loose wires or bad connections
associated with the door lock switch.
72
If the display indicates a “WATER” alarm:
a. This display will usually appear following a
final spin step. This indicates that the computer
has not received a signal indicating that the
machine is empty. This means that the machine
may still contain water. The door remains
locked and keyboard will not respond. Check
the drain and for a faulty low level switch.
If the display indicates a “FILL” alarm:
a. The water level was not reached in the allotted
time.
b. Push “START” to add more time to the cycle.
c. Check for leaks in the air system between the
level switches and the water level air chamber.
d. Check for obstructions in the water level air
chamber or tubing.
e. Check for obstructions or low pressure in the
water supply system.
f. Check for a failed drain valve motor. Check for
leaks in the drain valve.
g. Check for a defective water level switch.
If the display indicates an “EMTY” (empty)
alarm:
a. The water level has not reached empty in the
allotted time.
b. Check for a slow drain.
c. Check for a defective water level switch.
d. Check for obstructions between the air system
and the pressure switch.
e. Check for loose connections in the water level
circuit.
NOTE: Sufficient time for filling and draining must
be allowed when programming the computer. If a
“FILL” or “EMPTY” alarm occurs in only one
program, edit that program and re-enter it into the
computer, making sure that enough time has been
allowed for fill and/or drain.
© Copyright, Alliance Laundry Systems LLC – DO NOT COPY or TRANSMIT
F238006
Section 5 Service Procedures
WARNING
To reduce the risk of electrical shock, fire, explosion, serious injury or death:
• Disconnect electrical power to the washer-extractor before servicing it.
• Close the gas shut-off valve to the washer-extractor (when applicable) before servicing it.
• Never start the washer-extractor with any guards/panels removed.
• Whenever ground wires are removed during servicing, these ground wires must be
reconnected to ensure that the washer-extractor is properly grounded.
W461R1
If there is no spin, but the rest of the program
is OK:
a. When a medium or high-speed spin is
programmed, the computer looks for an out-ofbalance condition and an empty condition.
b. Check the input plug (J-2) on computer board.
Refer to Figure 5.
c. Check the balance switch that is located inside
of the frame.
d. Check the water pressure switch and the drain
line. Refer to Figure 1.
NOTE: When an “OUT-OF-BALANCE” condition
is detected, the computer will automatically reduce
the cylinder speed to the “WASH” forward speed to
allow the load to redistribute. The computer will
look for and attempt to correct the “OUT-OFBALANCE” three times in each spin step. If the
balance condition is still not corrected, the
computer will end the cycle.
If the basket goes into spin with water left in
the basket:
a. Check for leaks between the pressure system
and the water level switch.
If the display indicates “OVERHT”:
a. The temperature probe is short-circuited or has
an open circuit.
b. The machine will not perform a heat step until
this problem is resolved.
c. Replace the temperature probe in the sump and
recalibrate the temperature circuit. Refer to
Paragraph 30.
If the display indicates a “TEMP” alarm:
a. If this alarm is displayed, the temperature
sensor has recognized an over temperature limit
condition.
b. Adjust the water temperature as needed.
If the display indicates a “MEMR” alarm:
a. If this alarm is displayed, the computer has
detected a problem with the cycle information.
b. Review the cycle information and change it as
needed.
F238006
25. KEYPAD REMOVAL AND INSTALLATION
Removal
a. Turn off power to the machine.
b. Remove the two screws at the top rear edge of
the module top cover and slide the cover back
slightly until it can be removed. Remove the
module top cover.
c. Remove the nut that attaches the metal
computer board cover and remove the cover.
d. Follow the keypad ribbon cable from the
keypad to the computer board that is inside of
the control module.
e. Unplug the connector at J-3 (located on the
bottom center of the computer board). Refer to
Figure 4.
f. Remove the four nuts at the corners of the
computer board. Carefully move the computer
board away from the front while sliding the
keypad ribbon through the slot in the module
front.
g. Carefully remove the old keypad from the
control module front. The keypad is selfadhesive and separate from the control module
decal.
h. Remove any residual adhesive from the module
front.
NOTE: The module front surface must be clean and
smooth before a new keypad is applied. An uneven
surface will cause keypad malfunctions.
Installation
a. Insert the keypad’s plug and ribbon cable
through the slot in the module front.
b. Remove the backing paper from the new
keypad.
c. Align the keypad so that the cable is centered in
the slot. Press the keypad into place.
d. Carefully connect the ribbon cable plug to J-3 at
the bottom center of the computer board. Refer
to Figure 4. The cable must not be twisted and
the plug must be centered in the receptacle.
e. Reinstall the computer board and carefully
tighten the four nuts.
© Copyright, Alliance Laundry Systems LLC – DO NOT COPY or TRANSMIT
73
Section 5 Service Procedures
WARNING
To reduce the risk of electrical shock, fire, explosion, serious injury or death:
• Disconnect electrical power to the washer-extractor before servicing it.
• Close the gas shut-off valve to the washer-extractor (when applicable) before servicing it.
• Never start the washer-extractor with any guards/panels removed.
• Whenever ground wires are removed during servicing, these ground wires must be
reconnected to ensure that the washer-extractor is properly grounded.
W461R1
f. Reinstall the computer board cover with the
nut.
g. Turn the power on and test the keypad
operation. Refer to Paragraph 23.
NUTS (4)
PLUG AND
RIBBON CABLE
CONTROL MODULE
DECAL
UDN2981
U9 3
37
HC
74
U8
KEY PAD
74
U13373
HC
U5
ULN2803
U4 3
37
HC
U14
ULN2803
UDN2981
74
ULN2803
U3
U2
U1
J-1
B1
U7
U12 03
28
ULN
WE-6 COMPUTER BOARD
74
74
U11
C64
28
74
74
U17373
HC
U16373
HC
74
U19259
HC
U20373
HC
U2310
HC
74
U18259
HC
U10
C64
27
74HC273
U15
U24
C31
80
10
U26
5
55
U272
51
T1
U282
51
T1
J-2
J-3
P132D
Figure 4
Computer Board and Keypad
74
© Copyright, Alliance Laundry Systems LLC – DO NOT COPY or TRANSMIT
F238006
Section 5 Service Procedures
AC DRIVE
SP1
YV6
YV9
YV6 = SUPPLY 1
YV7 = SUPPLY 2
YV8 = SUPPLY 3
YV9 = SUPPLY 4
YV8
SP1 = WATER PRESSURE
SWITCH
(J11-1 CONNECTOR
CONNECTS TO THIS
SWITCH)
YV7
P002S
AC DRIVE
XT1 = POWER INPUT
BLOCK
FU3
XT3 = CONNECTION
EXTERNAL SUPPLY
FU3 = EXTERNAL SUPPLY
FUSES
PE
XT1
C1
XT3
POWER OUT
EMI FILTER FOR
CE OPTION
C2
ROUTING
FOR MAINS
POWER
INPUT
C2 = WATER REUSE/
WETCLEAN POWER
CONNECTION
PE = PROVEN EARTH
GROUND LUG
CUSTOMER
EXTERNAL
SUPPLY
ROUTING
RACEWAY
J10-1
C1 = WATER REUSE
CONTROL
CONNECTION
(COVERED RACEWAY IS
WHERE CONNECTORS
J10-1, J12-1 AND J15-1
CAN BE FOUND)
P003S
J15-1
J12-1
CE OPTION
SHIELDED MOTOR
CABLE CONNECTOR
Figure 5
Control Module Familiarization Guide
F238006
© Copyright, Alliance Laundry Systems LLC – DO NOT COPY or TRANSMIT
75
Section 5 Service Procedures
WARNING
To reduce the risk of electrical shock, fire, explosion, serious injury or death:
• Disconnect electrical power to the washer-extractor before servicing it.
• Close the gas shut-off valve to the washer-extractor (when applicable) before servicing it.
• Never start the washer-extractor with any guards/panels removed.
• Whenever ground wires are removed during servicing, these ground wires must be
reconnected to ensure that the washer-extractor is properly grounded.
W461R1
26. COMPUTER BOARD REMOVAL AND
INSTALLATION
6
U2
5
55
7
U2 2
51
T1
6
U2
5
55
7
U2 2
51
T1
8
U2 2
51
T1
TO INSERT AND REMOVE
FLAT RIBBON CABLE
P136D
Figure 6
Ribbon Cable Disconnect
Note how the wiring is routed before removing
any components and follow the original routing
during reinstallation.
a. Turn off power to the machine.
b. Remove the two screws at the top rear edge of
the module top cover and slide the cover back
slightly until it can be removed. Remove the
module top cover.
c. Remove the nut attaching the metal cover that
covers the computer board and remove the
cover.
d. Carefully disconnect the 16-conductor ribbon
cable plug near the battery at J3, refer to
Figure 4. Note the position of the red stripe to
properly reinstall the cable. Use care when
reconnecting this plug to avoid bending pins.
Make sure that the pins are aligned with the
sockets in the board before carefully seating the
plug into the socket.
e. Disconnect the 26-conductor ribbon cable
connector at J1 by pushing on the “ears,” refer
to Figure 6.
f. Disconnect the remaining 16-conductor ribbon
cable connector at J2 (refer to Figure 4) by
pushing on the “ears.” Refer to Figure 6.
g. Label and disconnect the two wires from the
keymode switch to the computer board at the
terminals marked “write inhibit.”
76
8
U2 2
51
T1
RIBBON CABLE PLUG MUST
BE ALIGNED WITH SOCKET
P137D
Figure 7
Aligning Plugs and Connecting
h. Label and disconnect the ground connection at
the terminal marked “GND.”
i. Remove the four nuts at the computer board
corners and move the board far enough away
from its mounting position to unplug and
remove the fiber optic cables at the bottom of
the board. Remove the board.
j. Board installation is the reverse of removal.
Carefully align the plugs with the receptacles
and push them gently into place. Refer to
Figure 7.
NOTE: Never force a plug into a receptacle. This
can result in damage to the controls.
27. FUSE BOARD REMOVAL AND
INSTALLATION
Note how the wiring is routed before removing
any components and follow the original routing
during reinstallation.
a. Turn off power to the machine.
b. Remove the two screws at the top rear edge of
the module cover and slide the cover back
slightly until it can be removed. Remove the
module top cover.
c. Remove the two clear covers from the board.
Refer to Figure 8.
© Copyright, Alliance Laundry Systems LLC – DO NOT COPY or TRANSMIT
F238006
Section 5 Service Procedures
WARNING
To reduce the risk of electrical shock, fire, explosion, serious injury or death:
• Disconnect electrical power to the washer-extractor before servicing it.
• Close the gas shut-off valve to the washer-extractor (when applicable) before servicing it.
• Never start the washer-extractor with any guards/panels removed.
• Whenever ground wires are removed during servicing, these ground wires must be
reconnected to ensure that the washer-extractor is properly grounded.
W461R1
h. Remove the output board from the nylon
standoffs (that fasten the board to the module)
and remove the board.
i. Board installation is the reverse of removal.
Carefully align the plugs with the receptacles
and push them gently into place. Refer to
Figure 7.
R.C.
NETWORK
NOTE: If the board is being replaced, remove the
R.C. network for installation of the new board.
Refer to Figure 8. Some R.C. networks are not
removable. In these cases, the replacement board
will include a new R.C. network.
P139D
Figure 8
Clear Covers and R.C. Network
d. Disconnect the 26-conductor ribbon cable at
the center of the board (adjacent to the
transformer) by pushing on the “ears.” Refer to
Figure 6.
P138D
Figure 9
Four-Pin Connector
e. Unplug the “ACH” and “ACN” connectors.
f. Unplug the four-pin connector by grasping and
squeezing the sides. Refer to Figure 9.
g. Label the wires and disconnect the headers J6
and J5 from the output board. Refer to Figure 1.
F238006
28. INTERFACE BOARD REMOVAL AND
INSTALLATION
Note how the wiring is routed before removing
any components and follow the original routing
during reinstallation.
a. Turn off power to the machine.
b. Remove the two screws at the top rear edge of
the module top cover and slide the cover back
slightly until it can be removed. Remove the
module top cover.
c. Label the headers and remove them from the
interface board, refer to Figure 10.
d. Disconnect the 16-conductor ribbon cable plug
at J8 (refer to Figure 10) by pushing on the
“ears.” Refer to Figure 6.
e. Label and disconnect the ground wire at J6.
Refer to Figure 10.
f. Carefully disconnect the 16-conductor ribbon
cable plug from J1. Refer to Figure 10. Note the
notch on the socket of the ribbon cable. During
installation use this notch as a reference to
connect this plug correctly.
NOTE: Extreme care must be used when
reconnecting this plug to avoid bending pins. Make
sure the pins are aligned with the sockets in the
board before carefully seating the plug into the
socket.
© Copyright, Alliance Laundry Systems LLC – DO NOT COPY or TRANSMIT
77
Section 5 Service Procedures
WARNING
To reduce the risk of electrical shock, fire, explosion, serious injury or death:
• Disconnect electrical power to the washer-extractor before servicing it.
• Close the gas shut-off valve to the washer-extractor (when applicable) before servicing it.
• Never start the washer-extractor with any guards/panels removed.
• Whenever ground wires are removed during servicing, these ground wires must be
reconnected to ensure that the washer-extractor is properly grounded.
W461R1
29. KEYMODE SWITCH
Symptoms of a damaged keymode switch may
include the following. If the following symptoms
occur, replace the keymode switch (refer to the
machine’s parts manual for keymode switch part
numbers).
J6
J1
Headers
J8
Headers
Standoff
PHM1973S
Figure 10
Interface Board
NOTE: In the event of an incorrect ribbon cable
connection (i.e., the plug is put on in reverse), the
display would be blank. Use care to ensure that the
ribbon cable is connected properly.
g. Remove the AC drive board from the nylon
standoffs that fasten the board to the module.
Refer to Figure 9, and remove the board.
h. Installation is the reverse of removal.
NOTE: The 16-conductor ribbon cable plug is not
polarized so it is possible to insert it backwards. Use
the procedure detailed in Step 6 to ensure a correct
connection.
NOTE: Never force a plug into a jack. This can
result in irreparable damage to the electronic
circuitry.
78
a. The computer display doesn’t change from
“NEXT” to CYC.”
b. The computer allows programming steps to be
entered, but the program isn’t saved when the
keymode switch is turned back to “RUN.”
30. CALIBRATING THE WE-6
TEMPERATURE CIRCUIT
a. Turn off power to the machine.
b. Remove the two screws at the top rear edge of
the module top cover and slide the cover back
slightly until it can be removed. Remove the
module top cover.
c. Remove the nut that attaches the computer
board cover and remove the cover.
d. Looking at the lower left of the computer board
from the rear of the washer-extractor, find the
1/2 inch x 1/2 inch (13 mm x 13 mm) square
blue component with a white plastic screw head
in its center. This is the temperature calibration
potentiometer. Turning the screw head adjusts
the temperature reading. Refer to Figure 11.
e. To allow time for calibration, program the
following sequence (refer to the machine’s
programming manual):
(1) Wash 3 for 10 seconds.
(2) Cold fill to high level.
(3) Wash 3 for 9 minutes, 99 seconds.
f. Place a thermocouple of the appropriate range
inside of the basket well below the high water
level.* (See boxed note below if a
thermocouple is not available.) Close the door.
© Copyright, Alliance Laundry Systems LLC – DO NOT COPY or TRANSMIT
F238006
Section 5 Service Procedures
WARNING
To reduce the risk of electrical shock, fire, explosion, serious injury or death:
• Disconnect electrical power to the washer-extractor before servicing it.
• Close the gas shut-off valve to the washer-extractor (when applicable) before servicing it.
• Never start the washer-extractor with any guards/panels removed.
• Whenever ground wires are removed during servicing, these ground wires must be
reconnected to ensure that the washer-extractor is properly grounded.
W461R1
* As an alternative, if you cannot put the external
sensor in the machine as described, take a sample
of the fill water entering the machine and record
the temperature using an accurate sensor. Then fill
the machine using the same fill source and follow
Step g.
DISPLAY
TEMPERATURE KEY
WE-6 COMPUTER
BOARD
UDN2981
UDN2981
74
U8
74
U7
F238006
U12 03
28
ULN
74
U9 3
37
HC
U11
C64
28
74
74
U13373
HC
U5
U14
U17373
HC
U16373
HC
74
74
U19259
HC
U20373
HC
U2310
HC
74
U18259
HC
U10
C64
27
U15
U24
C31
80
10
U26
5
55
NOTE: Turning the screw clockwise increases the
displayed WE-6 temperature. Turning the screw
counterclockwise decreases the displayed WE-6
temperature.
i. When the temperatures match, calibration is
completed. Close the control compartment and
remove the external temperature sensor.
j. The temperature probe leads and the
temperature circuit wires in the control module
must form twisted pairs to minimize
interference from the A.C. drive during motor
acceleration and deceleration. Twist the wire
pairs together if this has not been done.
k. Reinstall the computer board cover (refer to
Step c) and the module top cover (refer to Step
b).
U4 3
37
HC
B1
74HC273
h. While pressing the “Display Temperature” key,
use a screwdriver to turn the temperature
calibration screw until the WE-6 displays the
same temperature as the external temperature
meter.
74
ULN2803
U3
U2
U1
ULN2803
NOTE: Make sure that the external meter and the
WE-6 are both reading °F or °C. The WE-6 may be
prompted to display either °C or °F.
WE-6 KEY PAD
ULN2803
g. Start the cycle and, when the high water level is
reached (and the external temperature sensor is
submerged), press the “Display Temperature”
key on the WE-6 keypad. Refer to Figure 11.
The display will show a temperature.
U272
51
T1
U282
51
T1
4
U2 1
C3
80
6
U2
5
55
TEMPERATURE
CALIBRATION SCREW
P135D
Figure 11
Temperature Calibration
© Copyright, Alliance Laundry Systems LLC – DO NOT COPY or TRANSMIT
79
Section 5 Service Procedures
WARNING
To reduce the risk of electrical shock, fire, explosion, serious injury or death:
• Disconnect electrical power to the washer-extractor before servicing it.
• Close the gas shut-off valve to the washer-extractor (when applicable) before servicing it.
• Never start the washer-extractor with any guards/panels removed.
• Whenever ground wires are removed during servicing, these ground wires must be
reconnected to ensure that the washer-extractor is properly grounded.
W461R1
31. AC DRIVE REMOVAL AND
INSTALLATION
The AC drive contains no user serviceable
components. An optional parameter unit is
available as a troubleshooting aid and to program
factory authorized changes into the drive control.
IMPORTANT: Never change the preset parameters
without consulting your distributor. Serious
permanent damage could result to the AC drive
and/or drive motor.
NOTE: It is recommended that the wiring be
reinstalled into the AC drive before the AC drive is
reinstalled into the control module.
Power Wires
and
Ground Wire
AC Drive
Partition
Control
Signal
Wires
Removal and Installation
a. Turn off power to the machine.
b. Remove the two screws at the top rear edge of
the module top cover and slide the cover back
slightly until it can be removed. Remove the top
cover.
c. Loosen the screw that attaches the AC drive
partition to the control module. Remove the AC
drive partition. Refer to Figure 12.
d. Mark the control signal wires (the wires going
into the right side [facing the front of the
machine] of the AC drive). Loosen the screws
that connect the control signal wires to the AC
drive. Remove the control signal wires from the
AC drive. Refer to Figure 12.
e. Mark the power wires and the ground wire (the
wires going into the left side [facing the front of
the machine] of the AC drive). Loosen the
screws that connect the power wires and the
ground wire to the AC drive. Remove the
power wires and the ground wire from the AC
drive. Refer to Figure 12.
f. Remove the two screws on the left side of the
drive (facing the front of the machine) that
attach the AC drive to the control module.
g. Loosen the two screws on the right side of the
drive (facing the front of the machine) that
attach the AC drive to the control module.
h. Remove the AC drive.
i. Installation is the reverse of removal.
80
PHM1942S
Figure 12
© Copyright, Alliance Laundry Systems LLC – DO NOT COPY or TRANSMIT
F238006
Section 5 Service Procedures
WARNING
To reduce the risk of electrical shock, fire, explosion, serious injury or death:
• Disconnect electrical power to the washer-extractor before servicing it.
• Close the gas shut-off valve to the washer-extractor (when applicable) before servicing it.
• Never start the washer-extractor with any guards/panels removed.
• Whenever ground wires are removed during servicing, these ground wires must be
reconnected to ensure that the washer-extractor is properly grounded.
W461R1
32. DRIVE MOTOR
All motors for UWPV model machines are dualvoltage.
When using the 200 Volt AC drive, connect the
motor for low voltage. When using the 400 Volt
AC drive, connect motor for high voltage. Refer to
Figure 13.
LOW VOLTAGE
Removal and Installation
Removal
a. Turn off power to the machine.
b. Remove the screws attaching the cage wrap and
the back panel to the machine. Remove the cage
wrap and the back panel. Refer to Figure 14.
Cage
Wrap
HIGH VOLTAGE
4
5
6
7
8
9
7
8
9
4
5
6
1
2
3
1
2
3
L1
L2
L3
L1
L2
L3
U
V
W
U
V
W
P128D
Back
Panel
Figure 13
To change the direction of the motor rotation,
reverse any two leads between the AC drive and
the motor.
Service Tips
a. If the motor makes a high-pitched sound, check
the voltage. The rotor could also be out of
alignment with the stator.
b. If a motor has a reduced torque, check that the
current draw in each leg is the same. If it varies
more than 15%, either the motor winding or the
power to the machine is faulty.
c. If the motor does not receive power, check the
AC drive power.
d. If shorted or open windings are suspected,
check them with an ohmmeter. All three legs
must register the same amount of resistance
(ohms).
F238006
PHM1947S
Figure 14
c. Loosen the four bolts attaching the motor to the
frame to relieve the belt pressure. Remove the
belt. Refer to Figure 15.
d. Remove the motor junction box cover. Refer to
Figure 15.
e. Mark and remove the three power wires and the
ground wire.
f. Remove the bolts attaching the motor to the
frame. Remove the motor.
© Copyright, Alliance Laundry Systems LLC – DO NOT COPY or TRANSMIT
81
Section 5 Service Procedures
WARNING
To reduce the risk of electrical shock, fire, explosion, serious injury or death:
• Disconnect electrical power to the washer-extractor before servicing it.
• Close the gas shut-off valve to the washer-extractor (when applicable) before servicing it.
• Never start the washer-extractor with any guards/panels removed.
• Whenever ground wires are removed during servicing, these ground wires must be
reconnected to ensure that the washer-extractor is properly grounded.
W461R1
33. DRIVE BELT
If the drive belt is generating noise or if the AC
drive is generating faults because of excessive
hertz fluctuations, first inspect the belt for wear. If
the belt has uneven wear or frayed edges, replace
it. Refer to the Belt Replacement section, below. If
the drive belt isn’t noticeably worn, check the
belt’s tension and deflection. Refer to the
Checking Belt Tension and Deflection section,
below.
Belt
Motor
Junction
Box
Belt Replacement:
a. Turn off power to the machine.
b. Remove the screws attaching the cage wrap and
back panels to the machine. Remove the cage
wrap and back panel. Refer to Figure 16.
Cage
Wrap
PHM1946S
Motor
Figure 15
Installation
a. Re-strip the power wires and the ground wire.
b. Reconnect the power wires and the ground
wire.
c. Install the replacement motor with the four
bolts that were removed from the previous
motor.
Back
Panel
NOTE: Do not completely tighten the bolts. The
motor will need to be adjustable until the belt is
re-tensioned.
d. Reinstall the belt.
e. Reposition the motor until the belt reaches the
same tension as before the old motor was
removed. Completely tighten the motor bolts.
f. Reinstall the cage wrap and back panel.
PHM1947S
Figure 16
82
© Copyright, Alliance Laundry Systems LLC – DO NOT COPY or TRANSMIT
F238006
Section 5 Service Procedures
WARNING
To reduce the risk of electrical shock, fire, explosion, serious injury or death:
• Disconnect electrical power to the washer-extractor before servicing it.
• Close the gas shut-off valve to the washer-extractor (when applicable) before servicing it.
• Never start the washer-extractor with any guards/panels removed.
• Whenever ground wires are removed during servicing, these ground wires must be
reconnected to ensure that the washer-extractor is properly grounded.
W461R1
c. Loosen the motor mounting bolts and slide the
motor along the motor plate to relieve the
tension on the drive belt. Refer to Figure 17.
Drive
Belt
c. Check drive belt tension.
(1) Using a tension gauge, check the drive belt
tension. Belt tension should be between 70
and 90 pounds (± 5 pounds). Set the initial
belt tension toward the high end of the
range.
(2) To adjust the drive belt tension, loosen the
motor mounting bolts and slide the motor
plate. Refer to Figure 17.
d. Check the belt deflection.
(1) Belt deflection measurements should be
taken as close to the center of the belt span
as possible. Refer to Figure 18.
Deflection
Motor
PHM1946S
Span Length
PHM19
Figure 17
NOTE: Never install a drive belt by rolling it onto
the pulleys. Rolling the belt onto the pulleys can
damage the drive belt.
d. Remove the drive belt from the pulleys.
e. Install the new drive belt onto the pulleys.
f. Re-tension the belt. Refer to Checking Belt
Tension and Deflection section, below.
g. Reinstall any panels that were removed in Step
b.
Checking Belt Tension and Deflection:
a. Turn off power to the machine.
b. Remove the screws attaching the cage wrap and
back panels to the machine. Remove the cage
wrap and back panel. Refer to Figure 16.
F238006
P044IE3A
Figure 18
(2) For every inch of span length, the drive belt
should deflect 1/64 inch (.4 mm). For
example, a belt with a span length of 50
inches should deflect 50/64 inch (19.84
mm).
(3) An initial (run-in) force of 5.25 pounds
should be used to set the belt tension. An
operating (normal) force of 3.5 pounds
should be used after the washer-extractor
has been operated for a few hours.
e. Reinstall any panels that were removed in Step
b.
© Copyright, Alliance Laundry Systems LLC – DO NOT COPY or TRANSMIT
83
Section 5 Service Procedures
WARNING
To reduce the risk of electrical shock, fire, explosion, serious injury or death:
• Disconnect electrical power to the washer-extractor before servicing it.
• Close the gas shut-off valve to the washer-extractor (when applicable) before servicing it.
• Never start the washer-extractor with any guards/panels removed.
• Whenever ground wires are removed during servicing, these ground wires must be
reconnected to ensure that the washer-extractor is properly grounded.
W461R1
34. WATER LEVEL PRESSURE SWITCH
The pressure switch is set for predetermined water
levels at the factory and adjustment is not
recommended. The switches furnish inputs to the
microcomputer that engage the water inlet valves
until the programmed level (low, medium or high)
is reached.
3rd LEVEL
2nd LEVEL
The pressure switch is connected to a rubber air
trap that is attached to the shell sump. This air trap
acts as an air reservoir so that water does not rise
into the tube that connects the switch to the air
trap. A pressure differential is created in the air
trap as the machine fills with water. This results in
a deflection of the pressure switch diaphragm.
The pressure switch has pre-set trip points and
reset points. The low level reset point acts as a
safety for spin. The spin contactor cannot energize
until the low level reset point is reached. This
prevents the machine from going into spin
(extract) with water in the machine.
P134D
1st LEVEL
Figure 19
Level Switch
3rd LEVEL
2nd LEVEL
31
21
36
32
26
34
22
24
Service Tips
a. If the pressure switch does not turn off a water
fill (low, medium and high), check the air trap
and tubing for blockages or leaks. The system
must be air tight. Detergent residue may cause
blockages.
b. If the machine does not fill, check for
continuity at the pressure switch.
c. Connector J11-1 plugs onto the water level
switch and the wires connect to the AC drive
interface board. Refer to the wiring schematic
supplied with machine for details.
84
14
12
16
11
1st LEVEL
P130D
Figure 20
Water Level Pressure Switch Terminals
© Copyright, Alliance Laundry Systems LLC – DO NOT COPY or TRANSMIT
F238006
Section 5 Service Procedures
WARNING
To reduce the risk of electrical shock, fire, explosion, serious injury or death:
• Disconnect electrical power to the washer-extractor before servicing it.
• Close the gas shut-off valve to the washer-extractor (when applicable) before servicing it.
• Never start the washer-extractor with any guards/panels removed.
• Whenever ground wires are removed during servicing, these ground wires must be
reconnected to ensure that the washer-extractor is properly grounded.
W461R1
Removal and Installation
a. Turn off power to the machine.
b. Remove the two screws at the top rear edge of
the module top cover and slide the cover back
slightly until it can be removed. Remove the
module top cover.
c. Remove the header. Refer to Figure 21.
d. Depress the retaining clip on the back of the
pressure switch. Remove the pressure switch.
Refer to Figure 21.
e. Remove the tubing from the pressure switch.
Refer to Figure 21.
f. Installation is the reverse of removal.
Tubing
Pressure
Switch
35. WATER VALVE
If water continues to come into the machine when
no power is applied to the machine, there is a
mechanical problem with the valve. The valve
may also be worn or dirty.
Check the valve’s filter screen and flow restrictor
and clean them as needed. Inspect the valve for
cracks. If the valve is cracked, replace it.
If the valve isn’t cracked and the filter screen and
flow restrictor are clean, see the machine’s parts
manual for the valve repair kit part number. If the
valve repair kit doesn’t stop water from coming
into the machine without power being applied,
replace the valve.
Refer to Figure 22 for an exploded view of the
valve.
Header
PHM1941S
Figure 21
PHM1948S
Figure 22
F238006
© Copyright, Alliance Laundry Systems LLC – DO NOT COPY or TRANSMIT
85
Section 5 Service Procedures
WARNING
To reduce the risk of electrical shock, fire, explosion, serious injury or death:
• Disconnect electrical power to the washer-extractor before servicing it.
• Close the gas shut-off valve to the washer-extractor (when applicable) before servicing it.
• Never start the washer-extractor with any guards/panels removed.
• Whenever ground wires are removed during servicing, these ground wires must be
reconnected to ensure that the washer-extractor is properly grounded.
W461R1
36. DRAIN VALVE
If the washer-extractor doesn’t drain within 30
seconds, perform the following check. Refer to
Figure 23.
a. Turn off power to the machine.
b. Remove any panels necessary to access the
drain valve and drain plumbing.
c. Check for a clog in the drain line.
d. Verify that the drain valve is opening.
(1) The drain valve is normally open (i.e., it
requires voltage to close).
(2) When power is removed from the machine,
the drain valve should open.
e. If the drain is not opening, check for the
following:
(1) Check the motor winding for continuity, a
short circuit or an abnormal drop in voltage.
Replace the drain valve motor as needed
(consult the machine’s parts manual for
drain valve motor part numbers).
(2) Check that the shaft and rotor of the drain
motor turns freely.
(3) Check that the internal drain valve is
closing and does not bind. A clog within the
drain valve may be preventing the drain
valve from closing. Replace the drain valve
as needed (consult the machine’s parts
manual for drain valve part numbers).
f. Re-install any panels removed in Step 2.
37. FLANGE RELAY REMOVAL AND
INSTALLATION
a. Turn off power to the machine.
b. Remove the two screws at the top rear edge of
the module top cover and slide the cover back
slightly until it can be removed. Remove the
module top cover.
c. Remove the quick disconnect from the top of
the flange relay. Refer to Figure 24. All wires
remain in the same spot.
d. Remove one of the screws that attaches the
flange relay to the control module. Refer to
Figure 24.
86
Drain Valve
Motor
PHM1949S
Figure 23
Quick
Disconnect
Flange
Relay
PHM1943S
Figure 24
e. Loosen the other screw that attaches the flange
relay to the control module.
f. Remove the flange relay. Refer to Figure 24.
g. Installation is the reverse of removal.
© Copyright, Alliance Laundry Systems LLC – DO NOT COPY or TRANSMIT
F238006
Section 5 Service Procedures
WARNING
To reduce the risk of electrical shock, fire, explosion, serious injury or death:
• Disconnect electrical power to the washer-extractor before servicing it.
• Close the gas shut-off valve to the washer-extractor (when applicable) before servicing it.
• Never start the washer-extractor with any guards/panels removed.
• Whenever ground wires are removed during servicing, these ground wires must be
reconnected to ensure that the washer-extractor is properly grounded.
W461R1
38. VACUUM BREAKER
If the machine’s vacuum breaker is leaking, verify
that water pressure to the machine is between 30
and 85 psi. If the water pressure is between 30 and
85 psi, repair the vacuum breaker using a vacuum
breaker repair kit (refer to the machine’s parts
manual for vacuum breaker repair kit part
numbers).
Installation
Depress the door gasket and roll it toward the door
in a star-shaped pattern. Refer to Figure 26.
Door
Gasket
39. DOOR GASKET REMOVAL AND
INSTALLATION
Turn off power to the machine.
Removal
Depress the door gasket and roll it away from the
door. Refer to Figure 25.
PHM1945S
Figure 26
Door
Gasket
PHM1944S
Figure 25
F238006
© Copyright, Alliance Laundry Systems LLC – DO NOT COPY or TRANSMIT
87
Section 5 Service Procedures
WARNING
To reduce the risk of electrical shock, fire, explosion, serious injury or death:
• Disconnect electrical power to the washer-extractor before servicing it.
• Close the gas shut-off valve to the washer-extractor (when applicable) before servicing it.
• Never start the washer-extractor with any guards/panels removed.
• Whenever ground wires are removed during servicing, these ground wires must be
reconnected to ensure that the washer-extractor is properly grounded.
W461R1
40. BEARINGS AND CARTRIDGE SEAL
REPLACEMENT
a. Remove the three screws and the door lock
cover from the front of machine. Refer to
Figure 27.
b. Disconnect the spray rinse hose from the spray
tube assembly. Refer to Figure 27.
d. Using a permanent marker, make a mark on the
shell front and shell so that the shell front will
be reinstalled in the correct position.
¨
2
¨
P
U
S
H
P
U
S
H
1
PHM204K
Machine Panels
Figure 28
PHM206K
1
2
Door lock cover with 3 screws
Spray rinse hose
Figure 27
e. Remove the nut, bolt and shell band from
around the door. Refer to Figures 29 and 30.
f. Remove the rubber trim from around the
door/shell.
g. Pull the shell front off of the machine.
c. Remove the front, back, top and side panels.
Refer to Figure 28.
88
© Copyright, Alliance Laundry Systems LLC – DO NOT COPY or TRANSMIT
F238006
Section 5 Service Procedures
2
3
1
4
8
5
7
9
6
1
2
3
4
Shell band
Rubber Trim
Shell front
Basket
5
6
7
8
9
PHM196K
Shell
Stiffener plate
Rear bearing
Front and rear bearing detail
Cartridge seal assembly
Figure 29
UW35
F238006
© Copyright, Alliance Laundry Systems LLC – DO NOT COPY or TRANSMIT
89
Section 5 Service Procedures
4
3
2
1
8
6
7
5
PHM197K
1
2
3
4
Shell band
Rubber Trim
Shell front
Basket
5
6
7
8
Shell
Stiffener plate
Gasket
Cartridge seal assembly
Figure 30
UW60, UW80, UW100 and UW125
90
© Copyright, Alliance Laundry Systems LLC – DO NOT COPY or TRANSMIT
F238006
Section 5 Service Procedures
WARNING
To reduce the risk of electrical shock, fire, explosion, serious injury or death:
• Disconnect electrical power to the washer-extractor before servicing it.
• Close the gas shut-off valve to the washer-extractor (when applicable) before servicing it.
• Never start the washer-extractor with any guards/panels removed.
• Whenever ground wires are removed during servicing, these ground wires must be
reconnected to ensure that the washer-extractor is properly grounded.
W461R1
fails to free the bearing, Alliance Laundry has a
tool to assist in loosening and removing the
bearing.
1
2
4
3
2
1
PHM207K
1
2
Bearing (Old style)
Lock collar set screws
Figure 32
j. If the machine’s bearings are similar to
Figure 33 (new style SKF bearing), loosen the
front and the rear bearing’s set screws (until 3
threads are showing) using a short 3mm Allen
wrench.
PHM198K
1
2
3
4
Belt
Pulley
Rear bearing
Front bearing
1
2
Figure 31
h. Remove the belt from the pulley. Remove the
bolts from the pulley and place them in the hub
bushing. Tighten those bolts equally until the
bolts force the bushing from the hub. Remove
the pulley. Refer to Figure 31.
i. If the machine’s bearings are similar to
Figure 32 (old style bearing), loosen the lock
collar set screws until both of the collars can be
slid off of their bearing inner races. Grasp the
inner race of the bearing with a pipe wrench and
rotate the shaft by turning the basket. If this
F238006
PHM208K
1
2
SKF bearing
Set screws
Figure 33
© Copyright, Alliance Laundry Systems LLC – DO NOT COPY or TRANSMIT
91
Section 5 Service Procedures
WARNING
To reduce the risk of electrical shock, fire, explosion, serious injury or death:
• Disconnect electrical power to the washer-extractor before servicing it.
• Close the gas shut-off valve to the washer-extractor (when applicable) before servicing it.
• Never start the washer-extractor with any guards/panels removed.
• Whenever ground wires are removed during servicing, these ground wires must be
reconnected to ensure that the washer-extractor is properly grounded.
W461R1
k. Mark the shaft where it contacts the bearing
sleeve. This mark will be used to determine if
the procedure described below unseats the
bearing.
l. Drive the shaft through the bearings by
impacting the end of the shaft with a rubber
hammer. If this force is insufficient, a
sledgehammer can be used if care is taken to
protect the end of the shaft. If the force from a
rubber hammer or sledgehammer is
insufficient, use a puller to drive the shaft
through the bearings. A distinctive "pop" will
be heard once the bearings become unseated
from the shaft.
m. Verify that the shaft is loose from the bearings
by moving the basket forward. The shaft should
move freely though the bearing.
n. Remove the screws and the brass collar from
the basket.
o. Remove the basket from the machine.
p. Remove the nylon retainer and carbon seal
from the shell.
NOTE: If necessary, pull the shell back away from
the frame by removing the 6 nuts holding the
stiffener plate and shell to the frame.
q. Clean the shell (inside and out), removing all
dirt, oil and dried silicone.
Mounting Instructions
a. Using a micrometer, verify that shaft diameter
is within the +0.000/-0.004 inches in tolerance.
Refer to Table 1. Measure the location on the
shaft where the bearings will be mounted.
Check the end of the shaft for any burrs or lips
created from impact damage. If the shaft is not
within the listed tolerance, it should be
replaced.
Model
35, 60
80, 100
125
Shaft
Diameter
2.4375
2.9375
3.4375
Table 1
92
+/- Tolerance
(inches)
2.4375-2.4335
2.9357-2.9335
3.4375-3.4335
b. Clean and lubricate the entire shaft and apply
oil between the bearing inner race and the shaft.
c. Remove the plastic inserts from the bearing(s).
d. Slide the bearing(s) over the shaft to verify that
the shaft is the correct size and that the bearings
have not been damaged in shipment.
e. Torque the front bearing to the frame. Refer to
Table 2 for specifications.
Model UW Bearing Bolt size
35
35
60
60
80,100
125
Front
Rear
Front
Rear
All
All
5/8-18 x 2-3/4
9/16-18 x 2-1/2
5/8-18 x 2-3/4
9/16-18 x 2-1/2
3/4-16 x 2-3/4
7/8-14 x 3
Torque (ft.lbs. (N-M)
197 (267)
140 (190)
197 (267)
140 (190)
285 (386)
500 (678)
Table 2
f. Bolt the rear bearing to the frame. Leave the
bolts loose enough so that the rear bearing can
be moved against the frame.
NOTE: Do not put silicone in the seal area.
g. On all models except for UW35, install a gasket
between the stiffener plate and the shell back
and align the bolts. Refer to Figure 30.
NOTE: File the shell opening if the new cartridge
does not fit without interference.
NOTE: Remove any burrs from the key that is
located on the end of the basket shaft.
h. Install a new cartridge seal onto the machine
(without using RTV) with the gasket against
shell back, leaving the bolts loose, refer to
Figure 30.
NOTE: Make sure that the shell is tightened to the
frame and the stiffener plate.
i. Clean the alignment shaft and apply a light coat
of oil to it with a clean cloth to assist with the
insertion of it through the bearings.
© Copyright, Alliance Laundry Systems LLC – DO NOT COPY or TRANSMIT
F238006
Section 5 Service Procedures
WARNING
To reduce the risk of electrical shock, fire, explosion, serious injury or death:
• Disconnect electrical power to the washer-extractor before servicing it.
• Close the gas shut-off valve to the washer-extractor (when applicable) before servicing it.
• Never start the washer-extractor with any guards/panels removed.
• Whenever ground wires are removed during servicing, these ground wires must be
reconnected to ensure that the washer-extractor is properly grounded.
W461R1
Do not hit the inner sleeve of the rear bearing.
Insert the alignment shaft from the rear of the
machine through the back bearing, mating it
end first.
Do not hit the inner sleeve of the front bearing.
Slowly advance the shaft through the front
bearing.
j. Use the alignment shaft to align the cartridge
assembly with the two bearings.
k. Use a star pattern to tighten the cartridge to the
shell back. The bolts should stick through the
back of the stiffener plate on UW35 models.
l. On UW35 models, tighten the nuts to clamp the
stiffener plate to the back of the nylon retainer.
p. Torque the rear bearing. Refer to Table 2.
q. Set the basket front to the shell front gap. Refer
to Table 3.
Model
35
60
80,100
125
NOTE: Failure to follow the following procedures
will result in incorrectly installed bearings and
premature bearing failure.
r. Snug the Rear Bearing: Using a short 3mm
Allen wrench, tighten the mounting side set
screws on the rear bearing until only two
threads on each screw are visible. Alternate in
1/2 turn increments according to the pattern
shown in Figure 34. Ensure that the mounting
collar still rotates freely.
s. Snug the Front Bearing: Using a short 3mm
Allen wrench, tighten the mounting side set
screws on the front bearing until only two
threads on each screw are visible. Alternate in
1/2 turn increments according to the pattern
shown in Figure 34. Ensure that the mounting
collar still rotates freely.
m. With the basket at the proper height to mate
with the alignment shaft, advance the basket
shaft and mate it with the alignment shaft. One
person should be at the rear of the machine to
hold pressure against the alignment shaft and
another person should align the basket.
n. Once the alignment shaft and the basket shaft
are mated, hold pressure against the alignment
shaft to ensure that the two shafts are joined.
Guide the basket shaft through the two
bearings.
o. Once the basket shaft has cleared the rear
bearing, remove the alignment shaft.
UW35/60
UW80/100
3
1
2
4
UW125
4
3
+/- Tolerance
5/16-3/16
5/16-3/16
3/8-1/4
1/2-3/8
Table 3
NOTE: A minimum of two people are required to
complete the remaining steps.
1
Inches
3/16
3/16
1/4
3/8
7
2
1
3
4
5
5
Set Screw Pattern
6
2
PHM205K
Figure 34
F238006
© Copyright, Alliance Laundry Systems LLC – DO NOT COPY or TRANSMIT
93
Section 5 Service Procedures
WARNING
To reduce the risk of electrical shock, fire, explosion, serious injury or death:
• Disconnect electrical power to the washer-extractor before servicing it.
• Close the gas shut-off valve to the washer-extractor (when applicable) before servicing it.
• Never start the washer-extractor with any guards/panels removed.
• Whenever ground wires are removed during servicing, these ground wires must be
reconnected to ensure that the washer-extractor is properly grounded.
W461R1
t. Torque the Front Bearing: Make sure that the
short 3mm Allen wrench is secured in the head
of the set screw. Alternately tighten the
mounting set screws in 1/2 turn increments
until they are tightened to 80in-lbs of torque.
The Allen wrench is designed to flex
approximately 3/4 inches when 80 in-lbs is
achieved.
u. Torque the Rear Bearing: Make sure that the
short 3mm Allen wrench is secured in the head
of the set screw. Alternately tighten the
mounting set screws in 1/2 turn increments
until they are tightened to 80in-lbs of torque.
The Allen wrench is designed to flex
approximately 3/4 inches when 80 in-lbs is
achieved.
v. Recheck each set screw and retighten them as
needed. No threads should be visible.
w. Check the up and down play of the basket. The
bearings are not correctly mounted if play
exists.
x. Apply methoxy sealant at the split of the
bearing sleeve.
NOTE: Make sure that the new cartridge seal has
0.125 inches of axial (spring pressure) movement in
it.
y. After the bearings are set, check to see if the
metal ring on the seal is against the nylon
retainer. If needed, slide the brass collar
forward until the ring comes into contact with
the nylon. This will set the correct seal spring
compression. Refer to Figure 35.
94
z. Tighten the brass collar to the shaft using the
three set screws located in the brass collar.
aa. Remove the retaining ring from the cartridge
seal using a screwdriver. Refer to Figure 35.
Retaining
Ring
PHM277K
Figure 35
ab. Reinstall the pulley and the belt.
ac. Reinstall the door trim and shell band. Realign
them using the marks made in the previous step.
ad. Reinstall the door lock cover on the machine.
ae. Reconnect the spray rinse hose to the spray tube
assembly.
af. Reinstall all of the panels.
ag. Test the machine for leaks.
© Copyright, Alliance Laundry Systems LLC – DO NOT COPY or TRANSMIT
F238006
Section 5 Service Procedures
WARNING
To reduce the risk of electrical shock, fire, explosion, serious injury or death:
• Disconnect electrical power to the washer-extractor before servicing it.
• Close the gas shut-off valve to the washer-extractor (when applicable) before servicing it.
• Never start the washer-extractor with any guards/panels removed.
• Whenever ground wires are removed during servicing, these ground wires must be
reconnected to ensure that the washer-extractor is properly grounded.
W461R1
41. BEARING ALIGNMENT
NOTE: Severe out-of-balance loads can cause
misalignment of the flange-mounted bearings. Use
the following procedure to align and torque the
bearings.
a. Disconnect the power to the machine.
b. Tighten the rear bearing collar’s set screws to
hold the basket shaft in place. Do not torque
them at this time.
c. Loosen the front bearing collar’s set screws.
d. Connect power to the machine.
e. Start and run the machine in "medium" spin for
30 seconds to allow the bearing race to align.
f. Stop the machine and disconnect the power.
g. Apply loctite to the set screw threads.
h. Tighten the front bearing collar’s set screws
evenly by alternating between two of them until
they are snug. Finish tightening them with a
torque wrench until the correct torque is
achieved.
i. Loosen the rear bearing collar’s set screws.
j. Apply power to machine.
k. Start and run the machine in "medium" spin for
30 seconds to allow the bearing race to align.
l. Apply loctite to the set screw threads.
m. Tighten the rear bearing collar’s set screws
evenly by alternating between two of them until
they are snug. Finish tightening them with a
torque wrench until the correct torque is
achieved.
F238006
Bearing Troubleshooting Tips
a. "Knocking" sound during operation:
(1) Ensure that the mounting set screws are
adequately tightened and that the
dismounting set screws are in their original
position, protected by yellow plastic plugs.
(2) Ensure that the machine is secured to the
floor according to the manufacturer’s
instructions.
(3) If there is noticeable up and down play with
the basket, go to tip #3.
(4) If the noise persists, replace the bearing.
For warranty purposes, the old bearing
should be returned to the manufacturer for
a complete analysis.
b. Occasional slight noise during high speed spin:
(1) Pump a small amount of fresh grease into
the bearing unit.
(2) Check for basket play when the machine is
empty and not running. If there is basket
play, proceed to tip #3.
c. Basket play when the machine is empty and not
running:
(1) Further tighten each mounting set screw to
remove bearing clearance (up to 90 in-lbs is
allowable).
(2) If the basket play persists, dismount and
remount the bearings by following the steps
outlined in the instructions (without
unbolting the bearing housing from the
steel frame).
(3) If the basket play persists, replace the
bearing. For warranty purposes, the old
bearing should be returned to the
manufacturer for a complete analysis.
© Copyright, Alliance Laundry Systems LLC – DO NOT COPY or TRANSMIT
95