1
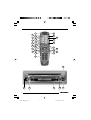
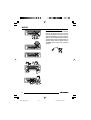
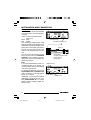
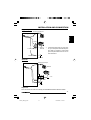
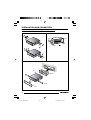
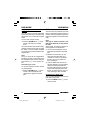
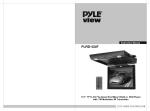
In Car Entertainment
DVD-Player ME4
7 607 004 523
Operating and installation instructions
http://www.blaupunkt.com
01DVD_ME4_de.pmd
1
23.05.2005, 13:47 Uhr
26
10
1
28
27
15
2
01DVD_ME4_de.pmd
2
10.08.2005, 9:21 Uhr
8
9
:
;
<
=
>
D
E
F
G
H
I
J
K
L
31
02DVD_ME4_gb.pdm
31
18.08.2005, 11:40 Uhr
ENGLISH
FRANÇAIS
C
ITALIANO
7
B
NEDERLANDS
6
A
SVENSKA
5
@
STOP/RETURN for stopping/interrupting playback.
Numerical keys and PREV./
GOTO button for directly selecting a chapter or a particular point
in time within the chapter.
BACKWARD for activating the
fast reverse function.
FORWARD for activating the fast
forward function.
ENTER/PLAY for selecting and
confirming menu entries and for
starting playback.
EQUALIZER for selecting an EQ
preset, defining your own EQs
and deactivating the EQs.
PAUSE/STEP button for pausing
playback (freeze frame).
MUTE for muting audio playback.
Volume + - for adjusting the volume.
DISPLAY for switching between
various display modes.
A-B button to specify the starting
and finishing point for the repeat
function.
For activating/deactivating the
repeat function. SAV/ERS is only
available in TV mode.
EJECT button for ejecting the CD/
DVD.
PLAY button on the device for
starting playback.
Infrared receiver for the remote
control.
ESPAÑOL
4
?
PORTUGUÊS
3
Button to switch the device on/off.
REP for activating/deactivating
the REPEAT function.
SCAN mode is only available in
TV mode.
DVD/TV/EXT for switching between DVD/CD/MP3 mode and
the external sources AUX1 and
AUX2.
T.MENU for accessing the DVD’s
title menu.
MENU for accessing the DVD’s
main menu (root menu).
ANGLE for adjusting the viewing
angle.
ZOOM for zooming into a section
of the picture during playback.
SUBTITLE for switching between
the subtitles that are available on
the DVD.
AUDIO for switching between the
audio tracks that are available on
the DVD.
SKIP buttons for accessing the
previous or next chapter (DVD) or
track (CD/MP3).
MON.SETUP has no function.
DVD SETUP for opening the setup menu to access the basic settings.
Arrow buttons for navigating in the
menus.
The CH+ and CH- buttons are
only available in TV mode.
SLOW for starting/stopping the
slow motion function.
DANSK
1
2
DEUTSCH
CONTROLS
CONTENTS
Notes ...................................... 33
Road safety ................................... 33
Safety notice ................................. 33
Recycling and disposal .................. 34
Installation and connection .... 35
Using for the first time ........... 39
Using the remote control for
the first time .................................. 39
Switching on/off .................... 39
Adjusting the volume ............. 40
Volume mute ................................. 40
DVD mode .............................. 40
Inserting/removing a DVD/CD ....... 41
Starting playback ........................... 41
On-screen display ......................... 42
Fast-forwarding ............................. 42
Slow motion .................................. 42
Pausing and resuming playback ..... 43
Freeze frame ................................. 43
Skipping chapters ......................... 43
Repeating a title/chapter on a DVD . 43
Selecting chapters directly ............ 44
Resuming playback from the
beginning of the first title on
the DVD ........................................ 44
Displaying subtitles ........................ 45
Selecting the playback language .... 45
Changing the camera angle ........... 45
Magnifying a screen section
(zoom) ........................................... 46
DVD menu .............................. 46
Displaying the DVD menu .............. 46
Selecting menu entries .................. 47
Closing the DVD menu .................. 47
Displaying the title menu ................ 47
External sources .................... 47
CD and MP3 mode ................. 48
Equalizer ................................ 49
Selecting sound presets ................ 49
Adjusting the user-defined
equalizer ........................................ 49
Help adjusting the equalizer ........... 50
Deactivating the equalizer .............. 50
DVD Setup ............................. 51
Opening the setup menu ............... 51
Changing settings in the
setup menu ................................... 51
Selecting the language for
the on-screen display ..................... 51
Selecting the playback language .... 51
Selecting the subtitle language ...... 51
Selecting the DVD menu language .. 51
Selecting the monitor settings ........ 51
DivX .............................................. 52
Parental lock ................................. 52
Setting the colour television
standard of the TV set ................... 53
Setting the picture mode ............... 54
Displaying the camera angle .......... 54
Switching the coaxial digital
output (SPDIF) on/off .................... 54
Configuring the audio output ......... 54
“Dual mono” setting ....................... 54
Setting the dynamic range
control (DRC) ................................ 55
Pro Logic setting ........................... 55
Downmixing Dolby Digital DVDs .... 55
Configuring PCM .......................... 55
Activating the screensaver ............. 55
Resetting the device ...................... 56
Specifications ........................ 56
32
02DVD_ME4_gb.pdm
32
18.08.2005, 11:40 Uhr
Safety notice
ENGLISH
FRANÇAIS
DANSK
PORTUGUÊS
ESPAÑOL
CAUTION:
The DVD player is a class I laser
product with an invisible laser beam
whose laser radiation can be dangerous for humans. The DVD player
must only be used in accordance
with the specified instructions. Never open the housing and never try
carrying out any repairs yourself.
Only allow maintenance to be carried out by trained personnel.
ITALIANO
Road safety has absolute priority. Only operate this device if the
road and traffic conditions allow you
to do so. Familiarise yourself with the
device before setting off on your journey.
You should always be able to hear
police, fire and ambulance sirens in
good time from inside your vehicle.
For this reason, listen to your car
sound system at a suitable volume
level during your journey.
NEDERLANDS
Road safety
Thank you for choosing a Blaupunkt
product. We hope you enjoy using this
new piece of equipment.
Please read these operating instructions before using the equipment for
the first time.
The Blaupunkt editors are constantly
working on making the operating instructions clearer and easier to understand. However, if you still have any
questions on how to operate the device,
please contact your dealer or the telephone hotline for your country. You will
find the telephone number printed at the
back of this booklet.
We provide a manufacturer guarantee
for our products bought within the European Union. You can view the guarantee conditions at www.blaupunkt.de
or ask for them directly at:
Blaupunkt GmbH
Hotline
Robert-Bosch-Str. 200
D-31139 Hildesheim
SVENSKA
Notes
DEUTSCH
NOTES
33
02DVD_ME4_gb.pdm
33
18.08.2005, 11:40 Uhr
NOTES
Recycling and disposal
DVD-ME4
DVD-CD-MP3 PLAYER
80mm
DVD-ME4
DVD-ME4
DVD-ME4
DVD-ME4
Our products are made from materials
that can be disposed of in an environmentally sensitive manner and are suitable for appropriate recycling. Products
that are to be scrapped must be collected separately from household waste. To
dispose of the product, please use the
available waste return and collection
systems.
DVD-CD-MP3 PLAYER
DVD-CD-MP3 PLAYER
DVD-CD-MP3 PLAYER
DVD-CD-MP3 PLAYER
34
02DVD_ME4_gb.pdm
34
18.08.2005, 11:40 Uhr
ENGLISH
FRANÇAIS
ITALIANO
DANSK
Before connecting your DVD Player
ME4, please read the following information carefully.
The battery’s negative terminal must
be disconnected for the entire time
it takes to install and connect the
device.
When doing so, you must observe the
vehicle manufacturer’s safety notices
(airbags, alarm systems, trip computers, immobilizers).
When installing the ME4, select a location in the vehicle that allows you to attach it firmly into place using screws.
The installation location should be such
that the ME4 does not get in the way of
the driver and cannot endanger the occupants in the event of the vehicle suddenly coming to a halt, for instance,
during an emergency stop.
Never place the remote control within
the inflation range of airbags and make
sure that the remote control is stored
securely so that it cannot injure the vehicle occupants in the event of an emergency stop.
NEDERLANDS
Installation and safety notices
SVENSKA
The supplied installation kit contains two
brackets, screws, a power supply cable and an IR receiver with a 3.5 mm
jack plug.
ESPAÑOL
Installation kit
You must take the following into account
when selecting the installation location:
- The vehicle tank must not be damaged by screws.
- There must be no wires or pipes
running beneath the surface on
which you want to install the device.
- The spare wheel, tools, etc. must
not be damaged by the screws.
Please also make sure that the device does not restrict access to the
spare wheel, tools, etc.
Do not install the device in any location
that is:
- subjected to direct sunlight.
- near warm air outlets (heating,
etc.).
- subjected to rain or moisture.
- subjected to dust or dirt.
- subjected to strong vibrations.
For installation in the dashboard (1 DIN
compartment), please use the supplied
mounting sleeve.
To ensure the device is installed securely, make sure you only use the supplied
mounting components (brackets,
screws).
PORTUGUÊS
Installation and connection
DEUTSCH
INSTALLATION AND CONNECTION
35
02DVD_ME4_gb.pdm
35
18.08.2005, 11:40 Uhr
INSTALLATION AND CONNECTION
Connections
AV1
Connect the free ends of the supplied
connection cable to your vehicle’s power supply.
Yellow: Continuous positive power
source 12V
Black: Earth
Red: Ignition
The continuous positive power cable
between the battery and the ME4 must
additionally be protected directly at the
battery with a fuse holder (5 amperes).
Plug the connector plug into the 4-pin
socket on the left-hand side of the device.
You can connect the infrared receiver
for the remote control to the REMOTE
SENSOR 3.5 mm jack plug. The infrared receiver can then be installed anywhere in the vehicle.
Note:
If you have not installed the ME4 in a
concealed location in the vehicle, you
can also point the remote control directly
at the front of the device.
For audio/video playback, connect the
AUDIO/VIDEO OUT and DIGITAL OUT
cable connections to the appropriate
inputs of your system.
Additionally, you can connect external
audio/video sources to this set of cables (AUDIO/VIDEO IN). For further
details, read the chapter entitled “External sources”.
AV2
VIDEO
VIDEO
L
L
AUDIO
AUDIO
DIGITAL
OUT
R
R
AUX IN
OUT
IN
Remote Sensor
Connection socket (4 pin)
BATT (+)
ACC (+)
GROUND (–)
Earth (black)
Continuous positive power
source (yellow)
Ignition (red)
VIDEO IN/OUT
VIDEO
L
AUDIO
R
IN
VIDEO
L
DIGITAL
OUT
OUT
AUDIO
R
AUX IN
Audio IN/OUT
DIGITAL OUT
36
02DVD_ME4_gb.pdm
36
18.08.2005, 11:40 Uhr
INSTALLATION AND CONNECTION
DEUTSCH
Supplied parts
Sicherung (FUSE) 5A
gelb/yellow
ENGLISH
12V
Batterie
*)
If connecting to terminal 15 of the vehicle, you must protect the switched positive cable by installing a fuse holder
(0.8 A fuse) at a distance of max. 30 cm
from terminal 15.
ITALIANO
ACC+B
I ==2A, 0,8A typ.*)
FRANÇAIS
rot/red
NEDERLANDS
schwarz/black
Ground
Optional
Sicherung (Fuse) 5A
Batterie
ESPAÑOL
12V
SVENSKA
gelb/yellow
rot/red ACC +B
PORTUGUÊS
+12V
Relais
schwarz/black
DANSK
Ground
Important:
This connection should be made by an authorised customer service centre.
37
02DVD_ME4_gb.pdm
37
18.08.2005, 11:40 Uhr
INSTALLATION AND CONNECTION
Installation positions and usage of the brackets
10cm
7cm
10cm
10cm
3.
2.
1.
4.
38
02DVD_ME4_gb.pdm
38
18.08.2005, 11:40 Uhr
Switching on/off
If you are using the ME4 for the first
time, you must insert the batteries into
the remote control.
The device is ready for operation when
the device’s CD compartment lights up
blue.
Using the remote control for the
first time
➮ To switch on the device, press the
➮ To switch off the device, press the
POWER button 1 on the remote control or the button 1 on
the device.
The device switches off.
ITALIANO
Inserting the batteries
1. Open the battery compartment by
detaching the lid.
2. Insert the new batteries. Battery
type: two AAA-type batteries. Make
sure the battery terminals are positioned as shown in the diagram in
the battery compartment.
3. Close the battery compartment.
POWER button 1 on the remote control or the button 1 on
the device.
The device switches on.
ENGLISH
Using for the first time
DEUTSCH
SWITCHING ON/OFF
FRANÇAIS
GETTING READY FOR USE
NEDERLANDS
Using the remote control
DANSK
PORTUGUÊS
ESPAÑOL
SVENSKA
Point the remote control at the separate infrared receiver or at the infrared
receiver on the front of the device.
Angle of operation: approximately 30˚
in all directions from the front of the IR
receiver.
39
02DVD_ME4_gb.pdm
39
18.08.2005, 11:40 Uhr
VOLUME
DVD MODE
Adjusting the volume
DVD mode
You can adjust the volume in steps from
0 (off) to 16 (maximum).
You can use the ME4 to play DVDs, video CDs (VCD), super video CDs
(SVCD), standard audio CDs and photo CDs (VCD 2.0, see page 48) as well
as MP3-CDs.
These operating instructions refer to
usage with DVDs. The button functions
for playing audio CDs are the same.
The ME4 is designed to play DVDs with
regional code 2. If the device is designed for use with other regional codes,
labels at the back of these instructions
and on the device will inform you of this.
CD-Rs and CD-RWs (CDs that you
have “burned” yourself) can generally
also be played. Due to the varying quality of CDs, Blaupunkt cannot guarantee that they will work properly.
To ensure the system functions properly, only use CDs labelled with the compact disc logo. Problems might be experienced when trying to play copy-protected CDs. Blaupunkt cannot guarantee the proper functioning of copy-protected CDs!
Media that you have burned yourself
(such as VCD/SVCD and DVD-R/RW,
DVD+R/RW) can generally be played.
Depending on the writable media
being used and the software used to
create and write data onto these
media, Blaupunkt cannot provide
any guarantee for complete compatibility or flawless playback.
➮ To increase the volume, press the
VOLUME + button G.
➮ To decrease the volume, press the
VOLUME - button G.
Volume mute
You can instantaneously reduce the
volume (mute).
➮ Press the MUTE button F.
“MUTE” appears on-screen.
Cancelling mute
➮ Press the MUTE button F again.
40
02DVD_ME4_gb.pdm
40
18.08.2005, 11:40 Uhr
• Photo CD (VCD 2.0, see page 48)
• Audio CD (CDs containing CD text
are not supported), CD-R and CDRW 12 cm
• MP3-CD containing MP3 files for
playing music. Only MP3-CDs
formatted using the “Joliet” or
“ISO 9660” formats are supported.
The player does not support the
following discs:
DVD-ROM
CDV
CD-G
DVDs with a different regional
code.
Removing a DVD/CD
➮ Press the EJECT button J on the
remote control or the EJECT button J on the device .
The DVD/CD is ejected.
➮ Carefully remove the DVD/CD.
ENGLISH
FRANÇAIS
ITALIANO
side uppermost into the DVD/CD
compartment at the front of the device until you feel a slight resistance.
The drive then draws in the DVD/CD.
You must not push or pull the DVD/CD
whilst it is being drawn in.
The DVD/CD is loaded. Either the DVD
menu appears or playback begins. This
depends on the DVD that is inserted.
Starting playback
Once you have loaded the DVD/CD that
you want into the device, the DVD menu
appears or playback begins. This depends on the DVD that is inserted.
➮ Press the ENTER/PLAY button C
on the remote control or the PLAY
button K on the device.
Playback begins.
DANSK
•
•
•
•
➮ Insert the DVD/CD with the printed
NEDERLANDS
DVD 12 cm
DVD-R / DVD-RW
DVD+R / DVD+RW
DVD DivX 3.11; 4.0; 5.0...x
Video CD (VCD), Super Video CD
(SVCD) 12 cm
Inserting a DVD/CD
SVENSKA
•
•
•
•
•
The ME4 has a slot-in drive without a
tray. It is only possible to achieve good
damping of the vibrations of the drive in
the device if slot-in drives are used.
ESPAÑOL
Disc formats supported by this
player:
Inserting/removing a DVD/CD
PORTUGUÊS
Risk of severe damage to the
DVD drive!
Contoured DVDs/CDs (shape CDs)
and DVDs/CDs with a diameter of
8 cm must not be used.
We accept no liability for any damage to the DVD drive that may occur
as a result of the use of unsuitable
DVDs/CDs.
DEUTSCH
DVD MODE
41
02DVD_ME4_gb.pdm
41
18.08.2005, 11:40 Uhr
DVD MODE
On-screen display
Fast-forwarding
You can display various details regarding the playing time on the screen that
is connected to the device. You can hide
the on-screen display.
The following on-screen displays are
available:
● TITLE 01/02 CHAPTER 33/45
01 : 26 : 14: The first of two titles
(main film sections) and chapter 33
of 45 from that title is being played.
Beneath it you will see the playing
time that has already elapsed.
● TITLE REMAIN
00 : 31 : 58: The remaining playing
time of the current title is displayed.
● CHAPTER ELAPSED
00 : 01 : 34: The elapsed playing
time of the current chapter is displayed.
● CHAPTER REMAIN
000 : 05 : 22: The remaining playing time of the current chapter is
displayed.
You can fast forward DVDs at double
speed, quadruple speed, 8-speed, 16speed, 32-speed and 64-speed (depending on the DVD - some DVDs can
only be played at up to 16 speed).
To fast forward or super-fast forward the
DVD,
Displaying/changing the on-screen
display
➮ Press the DISPLAY button H on
the remote control repeatedly until
the required information appears.
The on-screen display is shown at the
top edge of the screen.
Hiding the on-screen display
➮ Press the DISPLAY button H repeatedly until OFF appears briefly
and the on-screen display disappears.
➮ press the FORWARD button B on
the remote control repeatedly until
the speed that you want is displayed.
Stopping fast forwarding
To stop fast forwarding,
➮ press the ENTER/PLAY button C
on the remote control or the PLAY
button K on the device.
The DVD will then be played at normal
speed.
Slow motion
You can slow down playback of the DVD
in a forwards or backwards direction.
➮ To decrease the playback speed,
press the SLOW button > on the
remote control once or several
times.
If you press the SLOW button > once,
playback is switched to forwards play
at half-speed (SF 1/2x).
After every subsequent press, the
speed is further decreased (to one quarter, one sixth, one eighth). The screen
displays the speed and SF for “Slow
Forward”.
42
02DVD_ME4_gb.pdm
42
18.08.2005, 11:40 Uhr
Resuming playback
button : once
or several times on the remote
control or on the front of the device.
Playback will skip to the beginning of
the current or another previous chapter
accordingly.
➮ press the SKIP
on the remote control or the PLAY
button K on the device.
Playback is resumed.
Note:
If you play a DVD containing DivX footage, you can use the Skip buttons
: to skip forwards or backwards 3, 5
or 10 min. For settings, see page 52.
Freeze frame
➮ During playback, press the
Repeating a title/chapter on a
DVD
PAUSE/STEP button D on the remote control or the PLAY button
K on the device.
Playback is paused and is frozen as a
still image.
DVDs are divided into various chapters
and titles, which can be selected individually.
Resuming playback
➮ press the REP button 2 on the
To resume playback,
remote control.
“CHAPTER REPEAT ON” appears on
the display.
➮ Press the ENTER/PLAY button C
➮ press the ENTER/PLAY button C
on the remote control or the PLAY
button K on the device.
Repeating chapters or titles
To repeat the current chapter,
43
02DVD_ME4_gb.pdm
43
18.08.2005, 11:40 Uhr
ENGLISH
FRANÇAIS
ITALIANO
button ? on the remote control or on the front of the
device.
Playback is paused, and the device’s
starting screen and the text “PRESS
PLAY TO CONTINUE” are displayed.
➮ Press the
NEDERLANDS
Pausing playback
SVENSKA
Pausing and resuming playback
button : once
or several times on the remote
control or on the front of the device.
Playback will skip to the beginning of
the next or another subsequent chapter accordingly.
To skip to the beginning of the current
or a previous chapter,
➮ press the SKIP
ESPAÑOL
on the remote control or the PLAY
button K on the device.
A title on a DVD may be divided into
several smaller chapters.
To skip to the next or any other subsequent chapter,
PORTUGUÊS
➮ press the ENTER/PLAY button C
Skipping chapters
DANSK
Once the speed has reached the one
eighth setting, any subsequent press of
the button will cause the film to be
played backwards in slow motion. The
screen displays the speed and SR for
“Slow Rewind”.
To play the DVD at normal speed again,
DEUTSCH
DVD MODE
DVD MODE
To repeat the current title,
➮ press the REP button 2 on the
remote control a second time.
“TITLE REPEAT ON” appears on the
display.
Cancelling the repeat function
If you want to cancel the repeat function,
➮ press the REP button 2 on the
remote control repeatedly until
“REPEAT OFF” appears on the
display.
Selecting chapters directly
You can use the remote control to select a chapter directly or a particular
point in the playing time.
Selecting chapters
To select a chapter directly,
➮ press the PREV./GOTO button @
on the remote control.
The number of the current title and the
number of titles are displayed on-screen
after “TITLE”. After that you will see the
chapter number and the number of
chapters present. The chapter number
has a yellow background.
Selecting the playing time
You can directly select a particular position on the DVD by entering the playing time that corresponds with this position.
To skip to a particular position,
➮ press the PREV./GOTO button @
twice on the remote control.
The number of the current title and the
number of titles are displayed on-screen
after “TITLE”.
After this, you will see “TIME” and the
input field for the playing time. The input field has a yellow background.
➮ Use the numerical keys @ on the
remote control to enter the playing
time of the position that you want in
the format “hh.mm.ss” and press
the ENTER/PLAY button C.
Playback is resumed from the position
you selected.
Resuming playback from the
beginning of the first title on the
DVD
➮ Press the button ? twice on the
remote control or on the front of the
device.
➮ Use the numerical keys@ on the
➮ Press the PLAY button K on the
remote control to enter the number
of the chapter that you want and
press the ENTER/PLAY button C.
Playback is resumed from the position
you selected.
device or the ENTER/PLAY button
C on the remote control.
Playback will resume from the beginning of the title.
Note:
In the case of most DVDs, this is the
DVD’s root (main) menu.
44
02DVD_ME4_gb.pdm
44
18.08.2005, 11:40 Uhr
Note:
You can also use the DVD menu to
switch subtitles on/off or to select the
language in which they are displayed
(see DVD menu). Additionally, you can
set your preferred language for subtitles in the setup menu. For further information, read the section entitled “Presetting the language for subtitles” in the
“Setup” chapter.
Selecting the playback language
To select the playback language,
➮ press the AUDIO button 8 on the
remote control once or several
times.
The playback language changes. The
on-screen display appears. The current
language, the language number and the
number of available playback languages will be displayed.
➮ press the ANGLE button 7 on the
remote control.
The scene will be displayed from the
next camera angle. The on-screen display appears.
Note:
In the setup menu you can configure
the system to display a camera symbol
if additional camera angles are available. For further information, read the
section entitled “Displaying camera angles” in the “Setup” chapter.
45
02DVD_ME4_gb.pdm
45
ENGLISH
FRANÇAIS
ITALIANO
once or several times until subtitles
appear in the language that you
want.
Some DVDs provide two or more different camera angles for the same
scene.
The number of the current camera angle and the number of possible camera
angles is displayed next to the camera
symbol in the on-screen display.
To change the camera angle,
NEDERLANDS
➮ press the SUBTITLE button 9
Changing the camera angle
SVENSKA
the remote control.
Subtitles are displayed. The on-screen
display appears. The current language
and the number of available subtitle languages are displayed next to “SUBTITLE”.
To change the subtitle language,
ESPAÑOL
➮ press the SUBTITLE button 9 on
PORTUGUÊS
To display subtitles,
Note:
You can also use the DVD menu to
change the playback language (see
DVD menu). Additionally, you can set
your preferred playback language in the
setup menu. For further information,
read the section entitled “Presetting the
playback language” in the “Setup” chapter.
DANSK
Displaying subtitles
DEUTSCH
DVD MODE
18.08.2005, 11:40 Uhr
DVD MENU
DVD MODE
Magnifying a screen section
(zoom)
You can zoom into a freely selectable
section of the film that is currently being
played with up to 3 times the magnification.
To zoom into a screen section,
➮ press the ZOOM button 6 on the
remote control once or several
times.
The centre section of the screen is magnified by one step every time you press
the button. The zoom steps available
are 1.5 times, two times and three times
magnification.
Note:
Once you have set the magnification
level that you want, you can freely move
the magnified screen section using the
arrow buttons = on the remote control.
Deactivating the zoom
To continue watching the film without
any magnification,
➮ press the ZOOM button 6 on the
remote control repeatedly until
“ZOOM OFF” appears in the display.
DVD menu
The DVD menu is provided by the DVD
that you inserted in the player. After you
insert a DVD and playback begins, the
DVD menu appears on-screen automatically.
Note:
The type of options offered in the
DVD menu depends on the particular DVD.
A DVD might, for instance, offer the following options in the DVD menu:
● You can choose between various
languages for playback and subtitles.
● Besides the actual film, you can
also watch the trailer that ran in
cinemas or on the TV to promote
the film, and you can watch the
film’s “making of”.
● A film is divided into several consecutive chapters. You can select a
chapter and start playback from
that point without having to fast forward to that particular point in the
film as you would have to do if you
were watching a video cassette.
Displaying the DVD menu
You can stop playback and view the
DVD menu at any time.
➮ Press the MENU button 5 on the
remote control.
46
02DVD_ME4_gb.pdm
46
18.08.2005, 11:40 Uhr
/
= on the remote
control.
To confirm a menu item,
➮ press the ENTER/PLAY button C
on the remote control.
Closing the DVD menu
If you choose an appropriate menu item
in the DVD menu (e.g. the option to play
the film), the DVD menu will close automatically and playback will begin.
Displaying the title menu
You can also access the title menu directly thus allowing you to select individual titles/chapters conveniently:
➮ Press the T.MENU button 4 on
To switch between playback from the
internal DVD drive and playback from
the external sources,
➮ press the DVD/TV/EXT button 3
repeatedly on the remote control
until the source that you want is
displayed.
SVENSKA
➮ press one of the arrow buttons
ENGLISH
You can connect two external sources
to this device.
You could, for instance, connect a television tuner to the AUDIO/VIDEO IN
sockets and a games console to the
AUX IN sockets.
Note:
To avoid damaging the devices, make
sure when connecting external sources that the colours of the cables and of
the jacks on the external source and on
the ME4 match one another.
Sockets
VIDEO IN jack (yellow)
AUDIO IN jack (red/white)
FRANÇAIS
DVDs generally provide menus in which
you can select various options such as
“Start film”, “Select chapter”, etc.
To switch between the individual menu
items,
ITALIANO
External sources
NEDERLANDS
Selecting menu entries
DEUTSCH
EXTERNAL SOURCES
DVD MENU
DANSK
PORTUGUÊS
ESPAÑOL
the remote control.
The tile menu is displayed.
47
02DVD_ME4_gb.pdm
47
18.08.2005, 11:40 Uhr
CD/MP3 MODE
CD and MP3 mode
In addition to DVDs and video CDs, you
can also play audio CDs, photo CDs
(VCD 2.0) and MP3-CDs.
If you insert and play an audio CD, you
can use the play, search, pause and
repeat functions as described for DVD
mode.
If you insert a photo CD,
Note:
You cannot change directories during
playback.
The other functions (play, search, pause
and repeat) as described for DVD mode
can also be used in MP3 mode.
➮ after you see “Press play to continue” appear, press the PLAY button K.
➮ Press the T.MENU button 4 >
PBC on.
➮ Press the PLAY button K >
the CD’s start page appears.
➮ Press the PLAY button K >
the slideshow begins
If you want to play MP3-CDs, they must
be formatted in the “Joliet” or “ISO 9660”
format.
After you insert an MP3-CD, a menu
(Smart Navi) appears on-screen to help
you navigate through the CD’s contents.
You can use the Smart Navi menu to
switch conveniently between tracks and
directories using the
/
buttons = on the remote control.
➮ After you make your selection,
press the ENTER/PLAY button C
on the remote control or the PLAY
button K on the device.
48
02DVD_ME4_gb.pdm
48
18.08.2005, 11:40 Uhr
To make changes to the settings, we
recommend you use a CD that you are
familiar with.
➮ Listen to the CD.
➮ What kind of impression does the
scribed in the “Measures” column.
To adjust the user-defined equalizer,
➮ press the EQUALIZER button E
To select one of the five sound presets,
➮ press the EQUALIZER button E
➮ Press the ENTER/PLAY button C
on the remote control.
The current setting or the setting that
was used last is displayed.
➮ Use the arrow buttons (left/right)
➮ Press the ENTER/PLAY button C
repeatedly on the remote control
until the setting that you want appears.
After a few seconds, the equalizer display disappears from the screen but the
equalizer remains activated until you
deactivate it.
on the remote control repeatedly
until “PERSONAL” is displayed.
= on the remote control to move
the selection marker (yellow) to the
frequency that you want to adjust.
➮ Use the arrow buttons (up/down)
= on the remote control to boost
or reduce the output of the frequency to the value that you want.
49
02DVD_ME4_gb.pdm
49
18.08.2005, 11:40 Uhr
SVENSKA
➮ Adjust the equalizer values as de-
ESPAÑOL
sion” column in the table entitled
“Help adjusting the equalizer” on
the next page.
NEDERLANDS
ITALIANO
sound make?
➮ Now refer to the “Sound impres-
on the remote control.
The current setting or the setting that
was used last is displayed.
Selecting sound presets
ENGLISH
Notes on adjusting the settings
FRANÇAIS
You can adjust the equalizer to suit your
requirements by boosting or reducing
the output of the available frequencies.
PORTUGUÊS
The ME4 is equipped with a built-in 7band equalizer that you can use to optimise the music reproduction to suit your
vehicle or the style of music. You have
five sound presets and a user-defined
equalizer at your disposal.
Sound presets can be selected for the
following music styles:
• Classic
• Jazz
• Pop
• Ballad
• Dance
The user-defined equalizer allows you
to adjust the music reproduction to suit
your personal tastes by letting you boost
or reduce the output of the following frequencies: 60 Hz, 150 Hz, 400 Hz, 1 kHz,
2 kHz, 6 kHz and 15 kHz. The equalizer is displayed on-screen whilst you are
making your adjustments.
Adjusting the user-defined
equalizer
DANSK
Equalizer
DEUTSCH
EQUALIZER
EQUALIZER
Note:
When you make your adjustments to the
settings, the sound reproduction changes to reflect these changes.
A few seconds after you adjust the final
setting, the equalizer display disappears
from the screen but the equalizer remains activated until you deactivate it.
Deactivating the equalizer
To deactivate the equalizer,
➮ press the EQUALIZER button E
on the remote control.
“EQUALIZER OFF” appears briefly on
the display.
Help adjusting the equalizer
Start by adjusting the mid and treble levels and finish by setting the bass levels.
Sound Impression / problem
Measures
Bass sound is too weak
Boost the bass with
Frequency: 60 to 150 Hz
Gain: +4 to +6
Dirty bass
Booming sound
Unpleasant pressure
Reduce the lower mid level with
Frequency: 150 to 400 Hz
Gain: approx. -4
Sound very much in the foreground,
aggressive, no stereo effect.
Reduce the mid level with
Frequency: 1,000 to 2,000 Hz
Gain: -4 to -6
Dull sound
Little clarity
No brilliance to the instruments
Boost the treble level with
Frequency: 6,000 to 15,000 Hz
Gain: +2 to +4
50
02DVD_ME4_gb.pdm
50
18.08.2005, 11:40 Uhr
on the remote control.
Changing settings in the setup
menu
The settings in the setup menu are adjusted in similar way to that described
in the section entitled “Selecting the language for the on-screen display”.
The “PREFERENCES” settings can
only be changed whilst there is no DVD
present in the drive.
Selecting the language for the
on-screen display
➮ Open the setup menu.
➮ Use the
= buttons to select
the “GENERAL SETUP” menu
item.
➮ Confirm your choice by pressing
the ENTER/PLAY button C.
= buttons to select
the “OSD LANG” menu item.
➮ Use the
➮ Press the
button =.
The languages that are available for the
on-screen display will appear.
Selecting the playback language
You can set the playback language in
the “AUDIO” menu item in the
“PREFERENCES” menu.
Selecting the subtitle language
You can set the subtitles in the
“SUBTITLE” menu item in the
“PREFERENCES” menu.
Selecting the DVD menu
language
You can set the language for the DVD
menu in the “DISC MENU” menu item
in the “PREFERENCES” menu.
Selecting the monitor settings
You can set the monitor settings in the
“TV DISPLAY” menu item in the
“PREFERENCES” menu.
The following monitor settings are available:
● Normal/LB: The DVD player is connected to a 4:3 monitor. The widescreen picture covers the entire
width of the monitor and black bars
appear at the top and bottom edges of the screen.
buttons = to select
the menu item corresponding to
the language that you want.
ENGLISH
➮ press the DVD SETUP button ;
FRANÇAIS
To open the setup menu,
ITALIANO
Opening the setup menu
the DVD SETUP button ;.
The settings are saved and the setup
menu closes.
NEDERLANDS
➮ Close the setup menu by pressing
the ENTER/PLAY button C.
SVENSKA
The setup menu on the ME4 provides
you with many options for customising
the device to suit your needs.
ESPAÑOL
➮ Confirm your choice by pressing
PORTUGUÊS
DVD Setup
DEUTSCH
DVD SETUP – BASIC SETTINGS
DANSK
➮ Use the
51
02DVD_ME4_gb.pdm
51
18.08.2005, 11:40 Uhr
DVD SETUP – BASIC SETTINGS
●
●
Normal/PS: The DVD player is
connected to a 4:3 monitor. The widescreen picture is displayed using
the full height of the screen. The
left and right edges of the widescreen picture are cut off automatically.
WIDE: The DVD player is connected to a 16:9 monitor. The widescreen picture is displayed fully onscreen.
DivX
You can set the 3, 5 or 10 min. setting
in the “SOFT CHAP. ON” menu item in
the “PREFERENCES” menu.
Parental lock
You can password protect the device
against unauthorised use. You can also
specify a “rating level”. “Rating level”
means that certain DVDs are provided with a code that sets the minimum
age limit for persons viewing that
particular DVD. If you set a rating level
that lies below the rating level for the
DVD that is inserted in the drive, you
will only be able to play that DVD after
you have entered the password.
Note:
Not all DVDs support the rating level
function.
In the menu you can set which films are
allowed to be played. The levels are
based on the guidelines of the Moving
Picture Association of America (MPAA).
The following can be selected:
1 G: Approved for children
2: Approved for children
3 PG: Accompaniment by an adult is
recommended during playback.
4 PG 13: Accompaniment by an adult
is recommended, not suitable for children under the age of 13.
5: No evaluation of the DVD content is
available.
6 PG-R: Forbidden for children and
youths, content includes depiction of
violence, obscene language, etc.
7 NC 17: Content not suitable for young
persons under the age of 17.
8 ADULT: Content only for adults: violence, sex, etc.
NO PARENTAL: The parental lock is
disabled.
Note:
● You can unlock some locked DVDs
directly at the start with YES
(ENTER) and the password. Other
DVDs first require you to change
the rating level in the setup menu
before playing the DVD. This depends on the DVD.
Setting the parental lock
To set the parental lock,
➮ open the setup menu.
➮ Use the
buttons = to select
the “PREFERENCES” menu item.
➮ Confirm your choice by pressing
the ENTER/PLAY button C.
The preferences menu is displayed.
buttons = to select
the “PARENTAL” menu item.
➮ Use the
➮ Press the
button =.
52
02DVD_ME4_gb.pdm
52
18.08.2005, 11:40 Uhr
Note:
● If you have not set a password yet,
the default password is: 0000.
➮ Confirm your choice by pressing
the ENTER/PLAY button B.
➮ Close the setup menu by pressing
the DVD SETUP button ;.
The settings are saved and the setup
menu closes.
Changing the password
To change the password,
➮ open the setup menu.
➮ Use the
buttons = to select
the “PREFERENCES” menu item.
➮ Confirm your choice by pressing
the ENTER/PLAY button B.
The preferences menu is displayed.
buttons = to select
the “PASSWORD” menu item.
➮ Use the
➮ Press the button =.
➮ Confirm “CHANGE” with the
ENTER/PLAY button B.
➮ If you have not set a password yet,
ing the numerical keypad 0-9 ?.
➮ Confirm your choice by pressing
the ENTER/PLAY button B.
➮ Close the setup menu by pressing
the DVD SETUP button ;.
The settings are saved and the setup
menu closes.
Setting the colour television
standard of the TV set
To ensure an optimum picture quality,
set the colour television standard in the
DVD unit’s settings so that it matches
the standard used by the connected
monitor.
“PAL” is the colour television standard
that is valid in Europe, and “NTSC” is
the standard that is valid in America and
Asia.
If you select the “Multi” setting, the
DVD’s standard will be used for playback.
You can adjust the television standard
setting in the “TV TYPE” menu item in
the “PREFERENCES” menu.
DANSK
use the numerical keypad 0-9 ?
to enter the new password next to
“NEW PASSWORD”.
53
02DVD_ME4_gb.pdm
53
ENGLISH
➮ Enter the new password twice us-
FRANÇAIS
mote control to enter the password.
ITALIANO
➮ Use the 0-9 buttons ? on the re-
Note:
● If you have not set a password yet,
the default password is: 0000.
NEDERLANDS
the ENTER/PLAY button B.
SVENSKA
➮ Confirm your choice by pressing
word, first use the numerical keypad 0-9 ? to enter the old password next to “OLD PASSWORD”.
ESPAÑOL
buttons = to select
the required age limit.
➮ Use the
➮ If you have already set a pass-
PORTUGUÊS
The available age limits are displayed.
DEUTSCH
DVD SETUP – BASIC SETTINGS
18.08.2005, 11:40 Uhr
DVD SETUP – BASIC SETTINGS
Setting the picture mode
You can select the picture mode for optimum picture quality. Select the “AUTO”
option.
You can adjust the picture mode setting in the “PIC MODE” menu item in
the “GENERAL SETUP” menu.
Displaying the camera angle
You can set the system to display a “ ”
camera symbol whenever there is more
than one camera angle available on the
DVD. To do so, select the “ON” setting.
You can adjust the camera angle setting in the “ANGLE MARK” menu item
in the “GENERAL SETUP” menu.
Switching the coaxial digital
output (SPDIF) on/off
If you connect the ME4 to an amplifier
using the digital (SPDIF) input, you must
activate the SPDIF output on the ME4.
To do so, select the “ON” setting.
You can adjust the digital output setting
in the “SPDIF OUTPUT” menu item in
the “AUDIO SETUP” menu.
Configuring the audio output
If the device is installed in the vehicle,
you should connect it to the vehicle’s
system (amplifier, monitor) via the line
output. Alternatively, you can also connect headphones to the infrared receiver input (left-hand side of the device,
REMOTE SENSOR).
If you want to use headphones, select
the “RF REMOD” setting under “OP
MODE” in “AUDIO SETUP”.
Note:
Generally, the line output should be
used (“LINE OUT”).
“Dual mono” setting
For DVDs with 1+1 audio mode (two
mono channels), you can set how you
want the two channels to be outputted.
The following settings are available:
● Stereo:
Stereo playback of a 1+1 programme. Channel 1 is sent to the
left output and channel 2 to the
right output.
● CH1-Mono:
Channel 1 of the DVD is played on
both outputs (left and right).
● CH2-Mono:
Channel 2 of the DVD is played on
both outputs (left and right).
● Mix Mono:
Channel 1 and 2 of the DVD are
played on both outputs (left and
right).
➮ Open the setup menu.
➮ Use the
= buttons to select
the “AUDIO SETUP” menu item.
➮ Confirm your choice by pressing
the ENTER/PLAY button C.
= buttons to select
the “DUAL MONO” menu item.
➮ Use the
➮ Press the
➮ Use the
button =.
buttons = to select
the setting that you want.
➮ Confirm your choice by pressing
the ENTER/PLAY button C.
54
02DVD_ME4_gb.pdm
54
18.08.2005, 11:40 Uhr
➮ Confirm your choice by pressing
the ENTER/PLAY button C.
buttons = to select
the “COMPRESSION” menu item.
➮ Use the
➮ Press the
➮ Use the
button =.
buttons = to select
the setting that you want.
➮ Confirm your choice by pressing
the ENTER/PLAY button C.
➮ Close the setup menu by pressing
the DVD SETUP button ;.
The settings are saved and the setup
menu closes.
Pro Logic setting
If you are watching/listening to a DVD
containing an audio track in Dolby Surround Pro Logic, you can activate Pro
Logic in order to obtain a surroundsound signal at the digital output. The
Pro Logic decoder in the ME4 will then
compute a surround-sound signal that
If your amplifier system does not have
a digital input, you can simply connect
the ME4 to two free inputs. The ME4’s
downmix function computes a compatible stereo signal from the Dolby Digital
signal.
You can find the downmix settings under “SPEAKER SETUP” in the setup
menu.
Configuring PCM
You can make the ME4 output a linear
PCM signal (LPCM) with a sampling
rate of 48k or 96k.
Only change this setting if the system
in your vehicle only works with 48k PCM
signals. You can find the PCM settings
in “AUDIO SETUP” under “LPCM OUTPUT”.
Activating the screensaver
The ME4 is equipped with a screensaver that prevents pictures (e.g. menus)
from “burning into” liquid crystal displays.
55
02DVD_ME4_gb.pdm
55
18.08.2005, 11:41 Uhr
ENGLISH
FRANÇAIS
ITALIANO
the “AUDIO SETUP” menu item.
Downmixing Dolby Digital DVDs
NEDERLANDS
➮ Open the setup menu.
➮ Use the
= buttons to select
SVENSKA
You can use DRC to set the dynamics
of a Dolby programme in steps from
“OFF” to “Full”. Select the “Full” setting
for full dynamics.
ESPAÑOL
Setting the dynamic range
control (DRC)
comes close to the Dolby 5.1 listening
experience.
You can choose between the settings:
“ON”, “OFF” and “AUTO”. If the “AUTO”
setting is selected and a Dolby Surround
Pro Logic track is present on the disc,
the device will always use the Pro Logic decoder to output a signal at the digital output.
You can find the Pro Logic settings in
“AUDIO SETUP” under “PRO LOGIC”.
PORTUGUÊS
the DVD SETUP button ;.
The settings are saved and the setup
menu closes.
DANSK
➮ Close the setup menu by pressing
DEUTSCH
DVD SETUP – BASIC SETTINGS
DVD SETUP – BASIC SETTINGS
If the screensaver is activated, a Blaupunkt logo is displayed approximately
60 seconds after the last action taken
by the user in order to prevent individual pictures burning into the screen.
You can find the screensaver settings
under “SCREEN SAVER” in the “GENERAL SETUP” menu.
Resetting the device
You can reset the device thus clearing
all the settings you have changed.
Note:
● No DVD must be inserted.
➮ Open the setup menu.
➮ Use the
buttons = to select
the “PREFERENCES” menu item.
➮ Confirm your choice by pressing
the ENTER/PLAY button C.
The preferences menu is displayed.
buttons = to select
the “DEFAULTS” menu item.
SPECIFICATIONS
Specifications
Operating voltage:
Current consumption:
In operation:
less than 2.0 A
During standby:
approx. 3 mA
Operating temperature: 0˚C to +50˚C
Storing temperature:
-20˚C to
+70˚C
Air humidity:
10% to 75%
Laser:
650 nm
Colour standards:
PAL and
NTSC
Frequency range
Audio at 48 k:
Audio at 96 k:
➮ Use the
➮ Press the
button =.
The “RESET” menu item is highlighted.
If you are sure you want to reset the
device,
10.8 V to 23 V
4 Hz 22 kHz
4 Hz 44 kHz
Weight:
1.35 kg
Dimensions:
178 x 50 x
187 mm
➮ press the ENTER/PLAY button C.
The factory default settings are loaded.
Subject to changes.
56
02DVD_ME4_gb.pdm
56
18.08.2005, 11:41 Uhr
Service-Nummern / Service numbers / Numéros du service aprèsvente / Numeri del servizio di assistenza / Servicenummers /
Telefonnummer för service / Números de servicio / Número de
serviço / Servicenumre
Country:
Phone:
Fax:
Germany
(D)
0180-5000225
05121-49 4002
Austria
Belgium
Denmark
Finland
France
Great Britain
Greece
Ireland
Italy
Luxembourg
Netherlands
Norway
Portugal
Spain
Sweden
Switzerland
(A)
(B)
(DK)
(FIN)
(F)
(GB)
(GR)
(IRL)
(I)
(L)
(NL)
(N)
(P)
(E)
(S)
(CH)
01-610 39 0
02-525 5444
44 898 360
09-435 991
01-4010 7007
01-89583 8880
210 94 27 337
01-46 66 700
02-369 6331
40 4078
0800 400 1010
66-817 000
2185 00144
902 52 77 70
08-7501850
01-8471644
01-610 393 91
02-525 5263
44-898 644
09-435 99236
01-4010 7320
01-89583 8394
210 94 12 711
01-46 66 706
02-369 62464
40 2085
0800 400 1040
66-817 157
2185 00165
91 410 4078
08-7501810
01-8471650
Czech. Rep.
Hungary
Poland
(CZ)
(H)
(PL)
02-6130 0446
76 511 803
0800-118922
02-6130 0514
76 511 809
022-8771260
Turkey
(TR)
0212-335 06 71
0212-3460040
USA
(USA)
800-2662528
708-6817188
Brasil
(Mercosur)
(BR)
0800 7045446
+55-19 3745 2773
Malaysia
(Asia Pacific)
(MAL)
+604-6382 474
+604-6413 640
Blaupunkt GmbH
8622404637
08.05 CM/ASA
09DVD_ME4_dk.pmd
248
11.08.2005, 10:18 Uhr