1
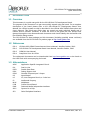
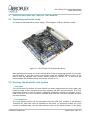
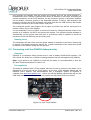
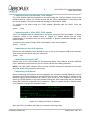
GR-LEON4-ITX
Development Board
Quick Start Guide
AEROFLEX GAISLER AB
Rev. 0.3, 2013-03-05
2
GR-LEON4-ITX Development Board
Quick Start Guide
Information furnished by Aeroflex Gaisler AB is believed to be accurate and reliable.
However, no responsibility is assumed by Aeroflex Gaisler AB for its use, nor for any infringements
of patents or other rights of third parties which may result from its use.
No license is granted by implication or otherwise under any patent or patent rights of Aeroflex
Gaisler AB.
Aeroflex Gaisler AB
tel +46 31 7758650
Kungsgatan 12
fax +46 31 421407
411 19 Göteborg
[email protected]
Sweden
www.aeroflex.com/gaisler
Copyright © 2013 Aeroflex Gaisler
All information is provided as is. There is no warranty that it is correct or suitable for any purpose,
neither implicit nor explicit.
© Aeroflex Gaisler AB
March 2013, Rev. 0.3
3
GR-LEON4-ITX Development Board
Quick Start Guide
TABLE OF CONTENTS
1
INTRODUCTION........................................................................................................ 6
1.1
1.2
1.3
2
UNPACKING AND SETTING UP THE BOARD.........................................................7
2.1
2.2
2.3
3
First steps......................................................................................................................15
Running an application..................................................................................................16
Initializing the DVI transmitter.......................................................................................17
Drawing images.............................................................................................................18
Interacting with the SPI boot PROM.............................................................................18
Interacting with I2C devices..........................................................................................20
Other interfaces and operations....................................................................................20
ADVANCED TOPICS............................................................................................... 21
5.1
5.2
6
Overview........................................................................................................................12
Debian Operating System.............................................................................................12
Logging in to the system...............................................................................................12
Shutting down the System.............................................................................................13
Graphical Interface (X Window System).......................................................................13
Network Interface..........................................................................................................13
System Time Keeping...................................................................................................14
Changing the Keyboard Layout....................................................................................14
GRMON AND THE GR-LEON4-ITX BOARD...........................................................15
4.1
4.2
4.3
4.4
4.5
4.6
4.7
5
Unpacking and initial setup.............................................................................................7
Running the bundled Linux system.................................................................................7
Overview..........................................................................................................................7
Pre-requisites...................................................................................................................7
Booting Linux...................................................................................................................8
Connecting with the GRMON debug monitor.................................................................8
Overview..........................................................................................................................8
Pre-requisites...................................................................................................................8
Connecting with the included JTAG adapter..................................................................9
Connecting with a Xilinx USB JTAG adapter..................................................................9
Connecting via the USB interface...................................................................................9
Connecting via serial UART............................................................................................9
Connecting via Ethernet..................................................................................................9
Using GRMON...............................................................................................................11
LINUX SYSTEM USER GUIDE............................................................................... 12
3.1
3.2
3.3
3.4
3.5
3.6
3.7
3.8
4
Overview..........................................................................................................................6
References.......................................................................................................................6
Abbreviations...................................................................................................................6
Building the Linux kernel...............................................................................................21
Overview........................................................................................................................21
Downloading an image with GRMON...........................................................................22
Creating a boot PROM..................................................................................................28
Overview........................................................................................................................28
MKPROM2....................................................................................................................28
U-boot............................................................................................................................30
TROUBLESHOOTING AND FREQUENCY ASKED QUESTIONS.........................32
© Aeroflex Gaisler AB
March 2013, Rev. 0.3
4
6.1
6.2
6.3
GR-LEON4-ITX Development Board
Quick Start Guide
General..........................................................................................................................32
The performance of the system is less compared to what is advertised for LEON4...32
I lost the contents of the USB Flash stick.....................................................................32
How do I restore the original PROM contents?............................................................32
GRMON reports a system frequency of 100 MHz, should it not be 200 MHz?...........32
Interfaces.......................................................................................................................32
Software freezes when initializing the Ethernet Interface.............................................32
I have problem X when using the USB Debug Communication Link...........................32
The system freezes when using it together with my PCI device..................................32
I2C communication does not work................................................................................33
My USB disk is not detected / does not work...............................................................33
How do I change the Ethernet Debug Link IP address in the delivered system?.......33
Additional support..........................................................................................................33
© Aeroflex Gaisler AB
March 2013, Rev. 0.3
5
GR-LEON4-ITX Development Board
Quick Start Guide
LIST OF TABLES
Table 3-1: System accounts..............................................................................................................13
Table 4-1: GRMON DVI transmitter initialization..............................................................................17
Table 5-1: SnapGear template configurations.................................................................................21
LIST OF FIGURES
Figure 2-1: GR-LEON4-ITX Development Board................................................................................7
Figure
Figure
Figure
Figure
2-2: User JTAG headers...........................................................................................................8
2-3: Setting the EDCL IP address............................................................................................9
2-4: GRMON after connect.....................................................................................................10
5-1: Selecting a SnapGear template configuration................................................................22
REVISION HISTORY
Revision
Date
Page
Description
0.1
2010-03-17
All
New document
0.2
2010-06-16
29, 30, 32
Fixed minor errors and omissions in U-boot image creation. Added information
on how to change the EDCL IP address used by U-boot.
2013-03-05
9, 12, 21,
28 - 30
Add note about lack of RS232 transceiver on DSU UART connector.
Add note stating that the SnapGear distribution is no longer maintained and
that new users can be better of with LinuxBuild.
Add information on Linux SMP booting with MKPROM2 and limitations of Uboot.
0.3
© Aeroflex Gaisler AB
March 2013, Rev. 0.3
6
1
GR-LEON4-ITX Development Board
Quick Start Guide
INTRODUCTION
1.1 Overview
This document is a quick start guide for the GR-LEON4-ITX Development Board.
The purpose of this document is to get users quickly started using the board. For a complete
description of the board please refer to the GR-LEON4-ITX Development Board User
Manual, the LEON4 system-on-chip is described in the LEON4-ASIC-DEMO Data sheet and
User's Manual. This quick start guide does not contain as much technical details and is
instead how-to oriented. However, to make the most of the guide the user should have
glanced through the two aforementioned documents and should ideally also be familiar with
the GRMON debug monitor.
The GR-LEON4-ITX data package and this document (including possibly newer revisions)
are available from the GR-LEON4-ITX product page at http://www.gaisler.com
1.2 References
RD-1
LEON4-ASIC-DEMO Data sheet and User's Manual, Aeroflex Gaisler, 2010
RD-2
GR-LEON4-ITX Development Board User Manual, Aeroflex Gaisler, 2010
RD-3
GRMON User Manual
RD-4
SnapGear Linux for LEON
The referenced documents can be downloaded from http://www.gaisler.com or be found on
the USB Flash stick accompanying the board.
1.3 Abbreviations
ASIC
DIL
DDR
DSU
GPIO
I/O
I2C
IP
MUX
PCB
RMII
SOC
SPI
Application Specific Integrated Circuit.
Dual In-Line
Double Data Rate
Debug Support Unit
General Purpose Input / Output
Input/Output
IIC, Inter integrated circuit, a 2 wire bus
Intellectual Property
Multiplexer
Printed Circuit Board
Reduced Media Independent Interface
System On a Chip
Serial Peripheral Interface
© Aeroflex Gaisler AB
March 2013, Rev. 0.3
7
2
GR-LEON4-ITX Development Board
Quick Start Guide
UNPACKING AND SETTING UP THE BOARD
2.1 Unpacking and initial setup
The board is delivered with a power supply, JTAG adapter, USB and Ethernet cables.
Figure 2-1: GR-LEON4-ITX Development Board
After unpacking the board, two routes can be taken. Either the preprogrammed Linux system
can be booted, or you can connect to the board using the GRMON debug monitor. If you
wish to start the bundled Linux system, please proceed to section 2.2 , to work with the
board through the GRMON debug monitor skip to section 2.3 .
2.2 Running the bundled Linux system
Overview
The GR-LEON4-ITX board's SPI boot PROM has been programmed with boot loader that
loads an image of the Linux kernel into main memory and then boots the kernel. The Linux
kernel then mounts its root file system, containing initialization scripts and software, from a
USB Flash stick. The Linux console is available both over the DVI video interface and over
the serial terminal.
Pre-requisites
The Linux kernel mounts the root filesystem from the USB stick included in the delivery.
Therefore the USB stick must be attached to the board. As previously stated, the Linux
console is available both over the video interface and over the serial terminal. As the board
© Aeroflex Gaisler AB
March 2013, Rev. 0.3
8
GR-LEON4-ITX Development Board
Quick Start Guide
only provides PIN headers with the receive and transmit lines for the serial terminal it is
recommended that a monitor, keyboard and mouse is attached to the board. According the
normal conventions for the PS/2 interface, the top connector (green) is the Mouse interface
and the bottom connector (purple) is the Keyboard interface. If using a USB keyboard and
mouse the devices should be connected via a USB hub and the USB memory stick should
be directly connected to one of the board's USB ports.
The connected monitor must support DVI-A output, the board can also be connected to a
monitor using a DVI-to-VGA adapter.
It is recommended, but not required, to connect the board to a Ethernet network where it can
receive an IP address via DHCP and access the Internet. This will allow system software to
automatically set the system date and time. If an Ethernet cable is attached it should be
connected to the first Ethernet port (the lower port).
Booting Linux
The bootloader will start Linux when the power adapter is attached to the board. Please skip
to section 3 for usage instructions. Section 5.1 contains transcripts of the output that should
be shown on the monitor during the boot process.
2.3 Connecting with the GRMON debug monitor
Overview
GRMON is a competent debug monitor that is used to debug GRLIB/LEON systems. The
GR-LEON4-ITX board has a number of debug interfaces that are all supported by GRMON.
Note: If you intend to use GRMON to work with the board it is recommended to clear the
SPI boot PROM as described in section 4.5 .
Pre-requisites
The board is delivered with a JTAG adapter that can be used to connect to the board. For a
description of how to set up the JTAG device, or for other JTAG adapters please see the
GRMON User's Manual. The documentation and a evaluation version of GRMON is
available from http://www.gaisler.com. Unless you will be loading software that will use the
USB Flash stick, it is recommended to not connect the USB Flash stick to the board.
Figure 2-2: User JTAG headers
© Aeroflex Gaisler AB
March 2013, Rev. 0.3
9
GR-LEON4-ITX Development Board
Quick Start Guide
Connecting with the included JTAG adapter
The JTAG adapter shall be connected to the board using the JTAG pin header shown in the
middle bottom of Figure 2-2. Please ensure that the JTAG cable/adapter is connected with
the correct polarity, to prevent unintended damage to the board or cable.
To connect to the board using the JTAG adapter delivered with the board, issue the
command:
grmon -jtag
Connecting with a Xilinx USB JTAG adapter
The JTAG adapter shall be connected to the board using the JTAG pin header, or ribbon
connector, shown in the middle bottom of Figure 2-2. Please ensure that the JTAG
cable/adapter is connected with the correct polarity, to prevent unintended damage to the
board or cable.
To connect to the board using a Xilinx USB adapter, issue the command:
grmon -xilusb
Connecting via the USB interface
Please see the GRMON User's Manual for how to set up the required USB driver software.
Then connect to the board using the command:
grmon -usb
Connecting via serial UART
Please refer to the GR-LEON4-ITX Development Board User Manual and the GRMON
User's Manual for instructions on how to connect via the serial debug interface.
NOTE: The DSU UART interface does not have a RS232 transceiver mounted on the board!
See user board user manual for instructions.
Connecting via Ethernet
Before connecting via Ethernet the host computer (the computer running GRMON) must be
connected to the same network as the GR-LEON4-ITX board. After that the IP address of the
Ethernet Debug Communication Link (EDCL) must be set up. This address can be set up
either by PROM software or by using another debug link. After connecting with an alternate
debug link, issue the command edcl <ip address>. Figure 2-3 below shows a session where
an IP address is set and the expected output:
Figure 2-3: Setting the EDCL IP address
After the EDCL IP address has been set, connect to the target with
© Aeroflex Gaisler AB
March 2013, Rev. 0.3
10
GR-LEON4-ITX Development Board
Quick Start Guide
grmon -eth -ip <ip address>
In the example above, the command would be: grmon -eth -ip 192.168.0.54
Figure 2-4: GRMON after connect
© Aeroflex Gaisler AB
March 2013, Rev. 0.3
11
GR-LEON4-ITX Development Board
Quick Start Guide
Using GRMON
The GRMON User's Manual describes the capabilities of GRMON. Section 4 of this
document describes some usage scenarios for GRMON on the GR-LEON4-ITX board.
© Aeroflex Gaisler AB
March 2013, Rev. 0.3
12
3
GR-LEON4-ITX Development Board
Quick Start Guide
LINUX SYSTEM USER GUIDE
3.1 Overview
When the system is powered on the processor will load the Linux kernel from flash into main
memory. The kernel will then mount a Debian root file system system from the USB Flash
stick.
The sections below describe the system and the available user interfaces. The reader is
encouraged to read the full documentation before using the system for the first time.
NOTE: The Linux image programmed into the board SPI Flash boot PROM and the source
code provided on the USB stick is for SnapGear Linux. This is an older Linux distribution that
is no longer actively maintained by Aeroflex Gaisler. For users that want to do Linux kernel
development, and for applications that require a newer user land, or are better off using
BusyBox, it is recommended to start from Aeroflex Gaisler's newer solution built around
Linux, named LinuxBuild. Packages are available from http://www.gaisler.com.
3.2 Debian Operating System
The USB Flash stick contains an installation of Debian 4.0 (Etch). Debian is a well-known
GNU/Linux distribution which comes with extensive documentation and a large set of
precompiled applications. A good starting point for Debian documentation is
http://www.debian.org/doc/
Precompiled applications can easily be added using Debian's package management system.
To search for an application the command apt-cache can be used. To search for the
application `less', issue the command:
apt-cache search less
The output will show a large amount of packages, in this case the package we searched for
is simply named less:
less - Pager program similar to more
To install this application we now issue (to install applications you must be logged in as the
super-user):
apt-get install less
This will fetch the application from a public repository specified in the file /etc/apt/sources.list,
which at delivery is specified to a public repository that can be accessed over the Internet.
More documentation about the package management system is available at the Debian
website mentioned above.
3.3 Logging in to the system
There are three ways of logging in to the system,
•
Serial terminal connected to the RS232 port (or GRMON with -u flag)
•
Keyboard, mouse and computer screen directly attached the system
The recommended interface for system interaction is to attach a keyboard, a mouse and a
computer monitor and use the command line interface. This setup will be no different from
working with a normal Linux desktop system.
The serial terminal provides an alternative way of access. To access the system via the
© Aeroflex Gaisler AB
March 2013, Rev. 0.3
13
GR-LEON4-ITX Development Board
Quick Start Guide
serial port the terminal emulator should be configured for 38400 8N1. The system boot
messages will be displayed on the frame buffer device. The serial terminal will display a
login prompt when the system has completed its boot process.
The system has two accounts for login:
Username
Password
Description
user
user
Normal user account.
root
root
Super-user account. Should only be used for system administration.
Table 3-1: System accounts
3.4 Shutting down the System
To protect the integrity of the file system, the system software should be properly shut down
before powering down the board. The correctly shut down the system, issue the command:
shutdown -h now
This command must be issued as the super-user (root). After the system has reported that is
going down for system halt there will be no more output on the serial terminal. The system
will report Halt on the frame buffer console when it is safe to power-off the board. If an
external screen is not connected, it can be assumed safe to power-off the system 90
seconds after the The system is going down for system halt NOW! message has been
displayed on the serial terminal.
3.5 Graphical Interface (X Window System)
The X window system graphical interface can be started from the command line by using the
command startx. This will launch a session using the BlackBox window manager, right-click
on the mouse will bring up the menu.
Other window managers can be started by editing the .xsession file in the home directory
(for the user account, /home/user/.xsession). If the file is changed to exec fvwm2, startx will
launch an X session using the FVWM window manager (http://www.fvwm.org).
The graphical interface has a menu option to shut down the system, but this is not supported
by the hardware. Instead, X should be exited back to the shell before the system is shut
down.
The X window system may show some instabilities, particularly when exiting the graphical
interface. If this leads to the system being inaccessible from the keyboard and mouse it is
typically still possible to connect to the system via another interface, such as the serial
terminal or network.
3.6 Network Interface
The network interface is configured during system start-up with the information contained in
the file /etc/network/interfaces. The default content of this file is:
# The loopback network interface
auto lo
iface lo inet loopback
# The primary network interface
auto eth0
iface eth0 inet dhcp
© Aeroflex Gaisler AB
March 2013, Rev. 0.3
14
GR-LEON4-ITX Development Board
Quick Start Guide
To assign a static IP address the file contents could be changed to, for instance:
# The loopback network interface
auto lo
iface lo inet loopback
# The primary network interface
auto eth0
iface eth0 inet static
address 192.168.0.58
netmask 255.255.255.0
network 192.168.0.0
broadcast 192.168.0.255
gateway 192.168.0.1
It is recommended that the system is attached to a network which allows access to the
Internet.
3.7 System Time Keeping
System software that is currently delivered with the board does have support for reading out
the board's real time clock and is therefore not able to keep the system time after the system
has been shut down. To avoid problems, such as irregularities caused by file time stamps
being in the future, it is strongly recommended that the system time is set at each boot. If the
system is connected to a network this can be automated by configuring the software to set
the time from a Network Time Protocol (NTP) server.
The delivered system is configured to set the time from the NTP server ntp1.chalmers.se.
Another NTP server can be selected by editing the file /etc/default/ntpdate.
If the board cannot be connected to a network with an NTP server, the time can be set
manually with the commands:
date --set 2008-10-10
date --set 14:00:00
The commands must be run as the super-user (root) and this must be done each time the
system has been restarted, unless the system has access to an NTP server.
3.8 Changing the Keyboard Layout
The system is configured to use a keyboard with a US American layout. If a keyboard with
another layout is to be used the keymap should be changed. For the console keyboard
layout issue the command below as the super-user (root):
dpkg-reconfigure console-data
In the package configuration, choose Select keymap from full list. The keymap that should
be chosen is likely prefixed with “pc /”. The system is delivered with the setting:
pc / qwerty / US american / Standard / Standard
The keymap for the graphical X Window system will also need to be changed if a keyboard
with a non-american layout is connected. This can be done by editing the /etc/X11/xorg.conf
file and modifying the line:
Option “XkbLayout”
“us”
To the layout choice corresponding to the new keyboard, for example by exchanging “us” to
“fr”.
© Aeroflex Gaisler AB
March 2013, Rev. 0.3
15
4
GR-LEON4-ITX Development Board
Quick Start Guide
GRMON AND THE GR-LEON4-ITX BOARD
4.1 First steps
The subsections below assume that GRMON, the host computer and the GR-LEON4-ITX
board have been set up so that GRMON can connect to the board. The transcripts with
courier font below are from a shell session invoking the command line version of GRMON.
The same commands can be used when the debugger is used with a GUI.
grmon -eth -ip 192.168.0.54
GRMON LEON debug monitor v1.1.39 professional version
Copyright (C) 2004-2008 Aeroflex Gaisler - all rights reserved.
For latest updates, go to http://www.gaisler.com/
Comments or bug-reports to [email protected]
ethernet startup. Found AHB 1 to AHB 0 bridge
Device ID: : 0x102
GRLIB build version: 3508
initialising ......................................
detected frequency: 100 MHz
Component
LEON4 SPARC V8 Processor
LEON4 SPARC V8 Processor
SVGA Controller
AHB-to-AHB Bridge
AHB Debug UART
AHB Debug JTAG TAP
GR Ethernet MAC
GR Ethernet MAC
USB EHCI controller
USB UHCI controller
GR USB 2.0 Device Controller
USB Debug Comm. Link
Gaisler CAN with DMA
Fast 32-bit PCI Bridge
PCI/AHB DMA controller
AHB-to-AHB Bridge
LEON4 Debug Support Unit
DDR2 Controller
AHB/APB Bridge
SPI Memory Controller
AHB/APB Bridge
AHB/APB Bridge
Multi-processor Interrupt Ctrl
Generic APB UART
Generic APB UART
Modular Timer Unit
PS/2 interface
PS/2 interface
I2C slave
AMBA Wrapper for OC I2C-master
AMBA Wrapper for OC I2C-master
AMBA Wrapper for OC I2C-master
SPI Controller
General purpose I/O port
General purpose I/O port
AHB status register
PCI Arbiter
PCI trace buffer
Vendor
Gaisler Research
Gaisler Research
Gaisler Research
Gaisler Research
Gaisler Research
Gaisler Research
Gaisler Research
Gaisler Research
Gaisler Research
Gaisler Research
Gaisler Research
Gaisler Research
Gaisler Research
Gaisler Research
Gaisler Research
Gaisler Research
Gaisler Research
Gaisler Research
Gaisler Research
Gaisler Research
Gaisler Research
Gaisler Research
Gaisler Research
Gaisler Research
Gaisler Research
Gaisler Research
Gaisler Research
Gaisler Research
Gaisler Research
Gaisler Research
Gaisler Research
Gaisler Research
Gaisler Research
Gaisler Research
Gaisler Research
Gaisler Research
European Space Agency
Gaisler Research
Use command 'info sys' to print a detailed report of attached cores
grlib>
At this point GRMON has successfully connected to the system. In this case we used the
© Aeroflex Gaisler AB
March 2013, Rev. 0.3
16
GR-LEON4-ITX Development Board
Quick Start Guide
Ethernet Debug Communications Link (EDCL). However any of the other debug links would
be fine. The first listing shows all cores available in the design. Giving the command info sys
prints a detailed report of the system. The output is too long to include here, however as a
sample with some most of the output cut out:
grlib> info sys
00.01:048
Gaisler Research
ahb master 0
LEON4 SPARC V8 Processor (ver 0x0)
… some output removed...
02.01:01d
Gaisler Research GR Ethernet MAC (ver 0x0)
ahb master 2, irq 12
apb: c0100100 – c0100200
edcl ip 192.168.0.54, buffer 2 kbyte
… some output removed...
01.01:02e
Gaisler Research DDR2 Controller (ver 0x0)
ahb: 40000000 – 80000000
ahb: ffe00100 – ffe00200
32-bit DDR2 : 1 * 256 Mbyte @ 0x40000000
200 MHz, col 10, ref 7.8 us, trfc 135 ns
… some output removed...
grlib>
The above shows a sample of the cores connected. In the sample we can see that the EDCL
IP address has been set and that the EDCL has 2 kbyte hardware buffer, we can also see
that GRMON has identified, and configured the DDR2 controller to use, 256 MiB of DDR2
SDRAM memory.
4.2 Running an application
In this example we will compile and run an application of our own. The procedure for
downloading other applications is the same as shown below.
In order to cross-compile a stand-alone C application the host computer must have the BCC
toolchain installed. The toolchain can be downloaded from http://www.gaisler.com and is
also included on the USB Flash stick (software/toolchains/BCC).
Below is a transcript of a terminal with comments inserted:
Show contents of file hello.c:
user@host:~$ cat hello.c
#include <stdio.h>
int main(void)
{
printf("Hello world\n");
return 0;
}
Compile and link application, place resulting machine code in file hello:
user@host:~$ sparc-elf-gcc -Wall hello.c -o hello
Connect with GRMON and load the application. Note that the flag -u is given to GRMON.
This flag places the first UART in debug mode which means that GRMON will echo the
characters written to the UART and the user does not need to attach a dedicated serial
terminal to the board. Without -u switch, no output would come from the program. Please
see the GRMON User's Manual for more information.
jan@jan:~$ grmon -eth -ip 192.168.0.54 -u
© Aeroflex Gaisler AB
March 2013, Rev. 0.3
17
GR-LEON4-ITX Development Board
Quick Start Guide
GRMON LEON debug monitor v1.1.39 professional version
… output removed ….
Use command 'info sys' to print a detailed report of attached cores
Download application to RAM:
grlib> load hello
section: .text at 0x40000000, size 39584 bytes
section: .data at 0x40009aa0, size 2764 bytes
total size: 42348 bytes (70.4 Mbit/s)
read 201 symbols
entry point: 0x40000000
Run the application that was just downloaded:
grlib> run
Hello world
Program exited normally.
grlib>
After this the application can be downloaded and run again. Please also try commands such
as inst or hist after running an application and refer to the GRMON User's Manual for their
meaning.
4.3 Initializing the DVI transmitter
The DVI transmitter on the board must be initialized before it can pass video data from the
LEON4-ASIC-DEMO device to a monitor. There are several GRMON commands tailored for
initializing the DVI transmitter with values suitable for the GR-LEON4-ITX board.
Command
Description
i2c 3 dvi init l4itx_dvi
Initialize the DVI transmitter for IDF 2 input data (16-bit color depth) and
monitor connected via digital DVI.
i2c 3 dvi init l4itx_vga
Initialize the DVI transmitter for IDF 2 input data (16-bit color depth) and
monitor connected via analog interface (or DVI-to-VGA adapter).
i2c 3 dvi init l4itx_dvi 0
Initialize the DVI transmitter for IDF 0 input data (24-bit color depth) and
monitor connected via digital DVI.
i2c 3 dvi init l4itx_vga 0
Initialize the DVI transmitter for IDF 0 input data (24-bit color depth) and
monitor connected via analog interface (or DVI-to-VGA adapter).
Table 4-1: GRMON DVI transmitter initialization
The transcript below shows the GRMON output:
grlib> i2c 3 dvi init_l4itx_dvi
Transmitter was not set to Chrontel CH7301C (AS=0), changing..
DVI transmitter set to Chrontel CH7301C (AS=0)
Initializing CH7301 for LEON/GRLIB design..
Initialization done..
grlib>
After initializing the transmitter, the command i2c 3 dvi showreg will show the values of the
DVI transmitter's registers.
© Aeroflex Gaisler AB
March 2013, Rev. 0.3
18
GR-LEON4-ITX Development Board
Quick Start Guide
4.4 Drawing images
GRMON has support for drawing both test screens and images in PPM ASCII format. The
transcript below show commands that draw the built-in test screen in different modes. Note
that the DVI transmitter must be initialized for the correct bit depth.
grlib> i2c 3 dvi init_l4itx_dvi
Transmitter was not set to Chrontel CH7301C (AS=0), changing..
DVI transmitter set to Chrontel CH7301C (AS=0)
Initializing CH7301 for LEON/GRLIB design..
Initialization done..
grlib> svga formats
Available SVGACTRL display formats:
Format
-----0
1
2
3
4
5
6
7
8
9
10
11
12
13
14
15
16
Resolution, refresh rate
-----------------------480x272,
480x240,
640x480, 60 Hz
640x480, 72 Hz
640x480, 75 Hz
640x480, 85 Hz
800x480,
800x600, 56 Hz
800x600, 60 Hz
800x600, 72 Hz
800x600, 75 Hz
800x600, 85 Hz
1024x768, 60 Hz
1024x768, 70 Hz
1024x768, 75 Hz
1024x768, 80 Hz
Custom format (undefined)
grlib> svga draw test_screen 2 16
Drawing picture = test_screen, Depth = 16 bits, Format = 640x480, 60 Hz
Framebuffer memory pos = 0x40200000
grlib> svga draw test_screen 8 16
Drawing picture = test_screen, Depth = 16 bits, Format = 800x600, 60 Hz
Framebuffer memory pos = 0x40200000
grlib> svga draw test_screen 12 16
Drawing picture = test_screen, Depth = 16 bits, Format = 1024x768, 60 Hz
Framebuffer memory pos = 0x40200000
grlib> i2c 3 dvi init_l4itx_dvi 0
Initializing CH7301 for LEON/GRLIB design..
Initialization done..
grlib> svga draw test_screen 8 32
Drawing picture = test_screen, Depth = 32 bits, Format = 800x600, 60 Hz
Framebuffer memory pos = 0x40200000
grlib>
The test screen consists of a framed white cross on black background.
4.5 Interacting with the SPI boot PROM
GRMON provides support for interacting with SPI memory devices via its SPI Flash layer.
SPI memory devices can be controlled both over SPICTRL and SPIMCTRL cores. In the
examples below we will use the SPI memory controller core (SPIMCTRL) since it is attached
© Aeroflex Gaisler AB
March 2013, Rev. 0.3
19
GR-LEON4-ITX Development Board
Quick Start Guide
to the SPI boot PROM on the GR-LEON4-ITX board. The first step in communicating with
the SPI memory device is to allow the SPI Flash layer to detect the device:
grlib> spim flash detect
Got manufacturer ID 0x20 and Device ID 0x2017
No device match for READ ID instruction, trying RES instruction..
Found matching device: ST/Numonyx M25P64
grlib>
Since the SPIMCTRL core maps the memory device into AMBA address space we can read
the memory device using GRMON's mem command:
grlib> mem 0
0
10
20
30
ffffffff
ffffffff
ffffffff
ffffffff
ffffffff
ffffffff
ffffffff
ffffffff
ffffffff
ffffffff
ffffffff
ffffffff
ffffffff
ffffffff
ffffffff
ffffffff
................
................
................
................
grlib>
In the read out above the device is empty. We can now try to load a file to the device. First
we give a shell command that lists the contents of the small S-REC file we will use for this
example (do not issue the shell cat command on large or non-text files)
grlib> shell cat ~/tests/test_seq4-small
S0030000FC
S315000000000000000004040404080808080C0C0C0C4A
S315000000101010101014141414181818181C1C1C1C3A
S315000000202020202024242424282828282C2C2C2C2A
S315000000303030303034343434383838383C3C3C3C1A
S315000000404040404044444444484848484C4C4C4C0A
S315000000505050505054545454585858585C5C5C5CFA
S315000000606060606064646464686868686C6C6C6CEA
S315000000707070707074747474787878787C7C7C7CDA
… and so on. We can now download this file to the memory device:
grlib> spim flash load ~/tests/test_seq4-small
section:
at 0x0, size 256 bytes
entry point: 0x0
After downloading the file we can see that the contents has been written to the flash device:
grlib> mem 0
0
10
20
30
00000000
10101010
20202020
30303030
04040404
14141414
24242424
34343434
08080808 0c0c0c0c
18181818 1c1c1c1c
28282828 2c2c2c2c
38383838 3c3c3c3c
................
................
$$$$((((,,,,
000044448888<<<<
grlib>
GRMON also has support for dumping the contents of the memory device into a S-REC file,
see the GRMON User's Manual for details.
Finally, we can erase the device, this should always be done before attempting to load data
into the memory. Erasing is quite slow and will take a little over sixty seconds:
grlib> spim flash erase
grlib> mem 0 4
0
ffffffff
ffffffff
ffffffff
ffffffff
................
grlib>
When the device is erased, all bits will be set to '1'.
© Aeroflex Gaisler AB
March 2013, Rev. 0.3
20
GR-LEON4-ITX Development Board
Quick Start Guide
4.6 Interacting with I2C devices
The LEON4 ASIC device provides three I2C interfaces, two master interfaces (I2CM0 &
I2CM1) and one slave interface (I2CS).
As a demonstration I2C circuit, an on-board DS1672 Real-Time Clock circuit is connected on
the board to the I2CM0 interface of the ASIC.
The I2CM1 and I2CS interfaces of the ASIC are connected to 4 pin 0.1” headers on the
board, to allow an external circuit to be hooked-up. If required, 10kOhm pull-up resistors on
the SCL and SDA signals can be installed if the appropriate jumpers JP9 and JP10 are
installed.
One way to interact with multiple I2C devices on the board is to connect one of the I2C
masters to the I2C slave. This can be done by attaching J18:1 to J17:1 and J18:3 to J17:3.
Pull-ups also need to be enabled (JP9:1-2,3-4 or JP10:1-2,3-4).
The following GRMON command will initialize the slave:
grlib> wmem 0xc0000600 0x50
grlib> wmem 0xc0000604 0x07
grlib> wmem 0xc0000614 0x99
The meaning of these write operations can be found by reading the I2C slave manual. The
connections made above connected I2CM1 to the slave. GRMON enumerates I2CM1 as I2C
core 2. To read data from the slave, issue:
grlib> i2c 2 read 0x50
Another way to interact with devices over I 2C is to communicate with the DS1672 real time
clock (RTC). The RTC is connected to the bus if I2C M0, this master is enumerated as I 2C
core 1 by GRMON. To detect any (7-bit addressable) devices on a bus the following
command can be used:
grlib> i2c 1 scan
Scanning 7-bit address space on I2C bus:
Detected I2C device at address 0x68
Scan of I2C bus completed. 1 device found
grlib>
The registers of the device can be read with:
grlib> i2c 1 read 0x68 0 5
00:
04:
ad
80
a9
29
b1
grlib>
The device can be written with:
grlib> i2c 1 write 0x68 0 0xab
grlib> i2c 1 read 0x68 0 5
00:
04:
ab
80
a9
29
b1
grlib>
Please see the GRMON User's Manual and the DS1672 data sheet for further details.
4.7 Other interfaces and operations
Please see the GRMON User's Manual for a description of the other debug drivers and
capabilities provided by GRMON.
© Aeroflex Gaisler AB
March 2013, Rev. 0.3
21
5
GR-LEON4-ITX Development Board
Quick Start Guide
ADVANCED TOPICS
5.1 Building the Linux kernel
Overview
NOTE: The Linux image programmed into the board SPI Flash boot PROM and the source
code provided on the USB stick is for SnapGear Linux. This is an older Linux distribution that
is no longer actively maintained by Aeroflex Gaisler. For users that want to do Linux kernel
development, and for applications that require a newer user land, or are better off using
BusyBox, it is recommended to start from Aeroflex Gaisler's newer solution built around
Linux, named LinuxBuild. Packages are available from http://www.gaisler.com. The
remained of the text below is applicable to the older SnapGear Linux distribution.
Aeroflex Gaisler provides a Linux distribution named SnapGear Linux. A release of
SnapGear Linux has been included on the first partition of the USB stick delivered with the
board (software/Linux contains the distribution and software/toolchains/Linux contains the
toolchain). SnapGear Linux can also be downloaded from http://www.gaisler.com
To be able to easily create a Linux configuration to run on the GR-LEON4-ITX board,
SnapGear Linux includes three template configurations that can be selected to quickly
compile a new Linux configuration:
Configuration name
Description
gr_l4itx_video
Main console is DVI video. Mounts root filesystem from second partition on
USB Flash stick.
gr_l4itx_serial
No video support, main console is serial terminal. Mounts root filesystem
from second partition on USB Flash stick.
gr_l4itx_busybox
No video support, main console is serial terminal. Root filesystem is a
memory image containing a Busybox system, does not mount USB Flash
stick.
Table 5-1: SnapGear template configurations
To be able to easily create a Linux configuration to run on the GR-LEON4-ITX board,
SnapGear Linux includes three template configurations that can be selected to quickly
compile a new Linux configuration.
First extract the SnapGear distribution:
jan@jan:~/Linux$ tar jxf snapgear-2.6-p41.tar.bz2
Enter the SnapGear directory and issue the command make xconfig. In the menu system
click Template Configurations and select the wanted configuration in the new window, also
check the box below the selection, as shown in Figure 5-1.
After the selection has been made, click the Main Menu button and in the remaining window
click Save and Exit.
The configuration of the SnapGear system and Linux kernel have now been updated to
predefined values. The system can now be compiled by issuing make at the system prompt.
© Aeroflex Gaisler AB
March 2013, Rev. 0.3
22
GR-LEON4-ITX Development Board
Quick Start Guide
The updated configuration can also be tailored as for normal SnapGear configurations. For
further information on SnapGear please see the SnapGear Linux for LEON manual.
Figure 5-1: Selecting a SnapGear template configuration
Downloading an image with GRMON
After the new image has been compiled it can be downloaded to the board using GRMON.
In the transcript below we connect to the board using the EDCL, the flag -nb must be given
to GRMON in order to not break on page faults, the -u flag is also given in order to see the
serial console in GRMON:
jan@jan:~/Linux/snapgear-2.6-p41$ grmon -eth -ip 192.168.0.54 -nb -u
GRMON LEON debug monitor v1.1.39 professional version
Copyright (C) 2004-2008 Aeroflex Gaisler - all rights reserved.
For latest updates, go to http://www.gaisler.com/
Comments or bug-reports to [email protected]
ethernet startup. Found AHB 1 to AHB 0 bridge
Device ID: : 0x102
GRLIB build version: 3508
initialising ......................................
detected frequency: 100 MHz
Component
LEON4 SPARC V8 Processor
LEON4 SPARC V8 Processor
Vendor
Gaisler Research
Gaisler Research
…if the Linux image will use video output we need to initialize the DVI transmitter:
grlib> i2c 3 dvi init_l4itx_dvi
Transmitter was not set to Chrontel CH7301C (AS=0), changing..
© Aeroflex Gaisler AB
March 2013, Rev. 0.3
23
GR-LEON4-ITX Development Board
Quick Start Guide
DVI transmitter set to Chrontel CH7301C (AS=0)
Initializing CH7301 for LEON/GRLIB design..
Initialization done..
grlib>
After this we can load the Linux image:
grlib> load images/image.dsu
section: .stage2 at 0x40000000, size 10240 bytes
section: .vmlinux at 0x40004000, size 2782144 bytes
total size: 2792384 bytes (79.0 Mbit/s)
read 6260 symbols
entry point: 0x40000000
grlib> run
Booting Linux
Booting Linux...
pkbase: 0xfc800000 pkend: 0xfcc00000 fixstart 0xfcfe4000
Debian GNU/Linux 4.0 gr-leon4-itx ttyS0
gr-leon4-itx login:
The above transcript loaded an image built from the the gr_l4itx_video configuration. In that
case the boot messages are passed to the graphical console. The Linux boot takes some
time and you may need to wait a minute before reaching the login prompt on the serial
console. The video output will show the boot messages as the system starts up.
If we instead load an image built from the gr_l4itx_serial configuration, all output will be
directed to the serial console:
grlib> load images/image.dsu
section: .stage2 at 0x40000000, size 10240 bytes
section: .vmlinux at 0x40004000, size 2642880 bytes
total size: 2653120 bytes (79.1 Mbit/s)
read 6159 symbols
entry point: 0x40000000
grlib> run
Booting Linux
Booting Linux...
PROMLIB: Sun Boot Prom Version 0 Revision 0
Linux version 2.6.21.1 (jan@jan) (gcc version 3.4.4) #17 SMP Tue Mar 16 15:28:21 CET
2010
ARCH: LEON
TYPE: Leon2/3 System-on-a-Chip
Ethernet address: 0:0:0:0:0:0
CACHE: 2-way associative cache, set size 4k
Boot time fixup v1.6. 4/Mar/98 Jakub Jelinek ([email protected]). Patching kernel
for srmmu[Leon2]/iommu
64MB HIGHMEM available.
Nocache: 0xfc000000-0xfc400000, 1024 pages [128-1280]
node 2: /cpu00 (type:cpu) (props:.node device_type mid mmu-nctx clock-frequency
uart1_baud uart2_baud )
node 3: /a: (type:serial) (props:.node device_type name )
node 4: /ambapp0 (type:ambapp) (props:.node device_type name )
node 5: /cpu01 (type:cpu) (props:.node device_type mid clock-frequency )
PROM: Built device tree from rootnode 1 with 1813 bytes of memory.
DEBUG: psr.impl = 0xf fsr.vers = 0x7
Built 1 zonelists. Total pages: 64338
Kernel command line: console=ttyS0,38400 root=8:2 rootdelay=10 init=/sbin/init
PID hash table entries: 1024 (order: 10, 4096 bytes)
Todo: init master_l10_counter
© Aeroflex Gaisler AB
March 2013, Rev. 0.3
24
GR-LEON4-ITX Development Board
Quick Start Guide
Attaching grlib apbuart serial drivers (clk:100hz):
Console: colour dummy device 80x25
Dentry cache hash table entries: 32768 (order: 5, 131072 bytes)
Inode-cache hash table entries: 16384 (order: 4, 65536 bytes)
pkbase: 0xfc800000 pkend: 0xfcc00000 fixstart 0xfcfe4000
Memory: 252864k/262144k available (2120k kernel code, 9116k reserved, 292k data,
160k init, 65536k highmem)
Mount-cache hash table entries: 512
Entering SMP Mode...
0:(2:2) cpus mpirq at 0xc0800110
Starting CPU 1 : (irqmp: 0xc0800110)
DEBUG: psr.impl = 0xf fsr.vers = 0x7
Started CPU 1
Brought up 2 CPUs
Total of 2 processors activated (399.76 BogoMIPS).
migration_cost=10000
NET: Registered protocol family 16
Found GRPCI controller - ahb mem,io: 0x80000000, 0xfff20000 - apb 0xc0100800 - irq:
25
Assigning PCI BARs.
SCSI subsystem initialized
usbcore: registered new interface driver usbfs
usbcore: registered new interface driver hub
usbcore: registered new device driver usb
NET: Registered protocol family 2
IP route cache hash table entries: 2048 (order: 1, 8192 bytes)
TCP established hash table entries: 8192 (order: 4, 98304 bytes)
TCP bind hash table entries: 8192 (order: 4, 65536 bytes)
TCP: Hash tables configured (established 8192 bind 8192)
TCP reno registered
leon: power management initialized
highmem bounce pool size: 64 pages
Installing knfsd (copyright (C) 1996 [email protected]).
io scheduler noop registered
io scheduler cfq registered (default)
grlib apbuart: 2 serial driver(s) at [0xc0000100(irq 2),0xc0000200(irq 3)]
grlib apbuart: system frequency: 100000 khz, baud rates: 38400 38400
ttyS0 at MMIO 0xc0000100 (irq = 2) is a Leon
Testing fifo size for UART port 0: got 8 bytes.
ttyS1 at MMIO 0xc0000200 (irq = 3) is a Leon
Testing fifo size for UART port 1: got 8 bytes.
RAMDISK driver initialized: 16 RAM disks of 4096K size 1024 blocksize
loop: loaded (max 8 devices)
Probing GRETH Ethernet Core at 0xc0100100
Detected National Semiconductor DP83848
Revision 0
10/100 GRETH Ethermac at [0xc0100100] irq 12. Running 100 Mbps full duplex
Probing GRETH Ethernet Core at 0xc0100200
Detected National Semiconductor DP83848 Revision 0
10/100 GRETH Ethermac at [0xc0100200] irq 13. Running 100 Mbps full duplex
usbmon: debugfs is not available
grusbhc-ehci grusbhc-ehci.0: Gaisler Research EHCI Host Controller
grusbhc-ehci grusbhc-ehci.0: new USB bus registered, assigned bus number 1
grusbhc-ehci grusbhc-ehci.0: irq 6, io base 0xc0100300
grusbhc-ehci grusbhc-ehci.0: USB 2.0 started, EHCI 1.00, driver 10 Dec 2004
usb usb1: configuration #1 chosen from 1 choice
hub 1-0:1.0: USB hub found
hub 1-0:1.0: 2 ports detected
USB Universal Host Controller Interface driver v3.0
grusbhc-uhci grusbhc-uhci.0: Gaisler Research UHCI Host Controller
grusbhc-uhci grusbhc-uhci.0: new USB bus registered, assigned bus number 2
grusbhc-uhci grusbhc-uhci.0: irq 7, io base 0xfff00200
usb usb2: configuration #1 chosen from 1 choice
© Aeroflex Gaisler AB
March 2013, Rev. 0.3
25
GR-LEON4-ITX Development Board
Quick Start Guide
hub 2-0:1.0: USB hub found
hub 2-0:1.0: 2 ports detected
Initializing USB Mass Storage driver...
usb 1-2: new high speed USB device using grusbhc-ehci and address 2
usb 1-2: configuration #1 chosen from 1 choice
scsi0 : SCSI emulation for USB Mass Storage devices
usbcore: registered new interface driver usb-storage
USB Mass Storage support registered.
usbcore: registered new interface driver usbhid
drivers/usb/input/hid-core.c: v2.6:USB HID core driver
i2c /dev entries driver
TCP cubic registered
NET: Registered protocol family 1
NET: Registered protocol family 17
drivers/rtc/hctosys.c: unable to open rtc device (rtc0)
Waiting 10sec before mounting root device...
scsi 0:0:0:0: Direct-Access
Kingston DataTraveler G2 PMAP PQ: 0 ANSI: 0 CCS
SCSI device sda: 15679488 512-byte hdwr sectors (8028 MB)
sda: Write Protect is off
sda: assuming drive cache: write through
SCSI device sda: 15679488 512-byte hdwr sectors (8028 MB)
sda: Write Protect is off
sda: assuming drive cache: write through
sda: sda1 sda2
sd 0:0:0:0: Attached scsi removable disk sda
sd 0:0:0:0: Attached scsi generic sg0 type 0
kjournald starting. Commit interval 5 seconds
EXT3-fs: mounted filesystem with ordered data mode.
VFS: Mounted root (ext3 filesystem) readonly.
Freeing unused kernel memory: 160k freed
INIT: version 2.86 booting
Activating swap...done.
EXT3 FS on sda2, internal journal
Setting the system clock..
Cannot access the Hardware Clock via any known method.
Use the --debug option to see the details of our search for an access method.
Cleaning up ifupdown....
Loading device-mapper support.
Checking file systems...fsck 1.40-WIP (14-Nov-2006)
done.
Setting kernel variables...done.
Mounting local filesystems...done.
Activating swapfile swap...done.
Setting up networking....
Configuring network interfaces...Internet Systems Consortium DHCP Client V3.0.4
Copyright 2004-2006 Internet Systems Consortium.
All rights reserved.
For info, please visit http://www.isc.org/sw/dhcp/
Listening on LPF/eth0/00:00:7a:cc:43:12
Sending on
LPF/eth0/00:00:7a:cc:43:12
Sending on
Socket/fallback
DHCPREQUEST on eth0 to 255.255.255.255 port 67
DHCPACK from 192.168.0.1
bound to 192.168.0.114 -- renewal in 299105 seconds.
done.
INIT: Entering runlevel: 2
Starting system log daemon: syslogd.
Starting kernel log daemon: klogd.
Starting system message bus: dbus.
Starting mouse interface server: gpm/etc/rc2.d/S20gpm: line 65: /dev/input/mice: No
such device
/etc/rc2.d/S20gpm: line 65: /dev/input/mice: No such device
© Aeroflex Gaisler AB
March 2013, Rev. 0.3
26
GR-LEON4-ITX Development Board
Quick Start Guide
/etc/rc2.d/S20gpm: line 65: /dev/input/mice: No such device
.
* Not starting internet superserver: no services enabled.
Starting periodic command scheduler: crond.
Debian GNU/Linux 4.0 gr-leon4-itx ttyS0
gr-leon4-itx login: user
Password:
Last login: Thu Jan 1 01:03:40 1970 on ttyS0
Linux gr-leon4-itx 2.6.21.1 #17 SMP Tue Mar 16 15:28:21 CET 2010 sparc
The programs included with the Debian GNU/Linux system are free software;
the exact distribution terms for each program are described in the
individual files in /usr/share/doc/*/copyright.
Debian GNU/Linux comes with ABSOLUTELY NO WARRANTY, to the extent
permitted by applicable law.
user@gr-leon4-itx:~$ echo "Linux input via GRMON"
Linux input via GRMON
user@gr-leon4-itx:~$
Finally, we load the gr_l4itx_busybox configuration:
grlib> run
Booting Linux
Booting Linux...
PROMLIB: Sun Boot Prom Version 0 Revision 0
Linux version 2.6.21.1 (jan@jan) (gcc version 3.4.4) #18 SMP Tue Mar 16 15:36:57 CET
2010
ARCH: LEON
TYPE: Leon2/3 System-on-a-Chip
Ethernet address: 0:0:0:0:0:0
CACHE: 2-way associative cache, set size 4k
Boot time fixup v1.6. 4/Mar/98 Jakub Jelinek ([email protected]). Patching kernel
for srmmu[Leon2]/iommu
64MB HIGHMEM available.
Nocache: 0xfc000000-0xfc400000, 1024 pages [128-1280]
node 2: /cpu00 (type:cpu) (props:.node device_type mid mmu-nctx clock-frequency
uart1_baud uart2_baud )
node 3: /a: (type:serial) (props:.node device_type name )
node 4: /ambapp0 (type:ambapp) (props:.node device_type name )
node 5: /cpu01 (type:cpu) (props:.node device_type mid clock-frequency )
PROM: Built device tree from rootnode 1 with 1813 bytes of memory.
DEBUG: psr.impl = 0xf fsr.vers = 0x7
Built 1 zonelists. Total pages: 63934
Kernel command line: console=ttyS0,38400 root=8:2 rootdelay=10 rdinit=/sbin/init
PID hash table entries: 1024 (order: 10, 4096 bytes)
Todo: init master_l10_counter
Attaching grlib apbuart serial drivers (clk:100hz):
Console: colour dummy device 80x25
Dentry cache hash table entries: 32768 (order: 5, 131072 bytes)
Inode-cache hash table entries: 16384 (order: 4, 65536 bytes)
pkbase: 0xfc800000 pkend: 0xfcc00000 fixstart 0xfcfe4000
Memory: 251328k/262144k available (2120k kernel code, 10728k reserved, 292k data,
1776k init, 65536k highmem)
Mount-cache hash table entries: 512
Entering SMP Mode...
0:(2:2) cpus mpirq at 0xc0800110
Starting CPU 1 : (irqmp: 0xc0800110)
DEBUG: psr.impl = 0xf fsr.vers = 0x7
Started CPU 1
© Aeroflex Gaisler AB
March 2013, Rev. 0.3
27
GR-LEON4-ITX Development Board
Quick Start Guide
Brought up 2 CPUs
Total of 2 processors activated (399.36 BogoMIPS).
migration_cost=10000
NET: Registered protocol family 16
Found GRPCI controller - ahb mem,io: 0x80000000, 0xfff20000 - apb 0xc0100800 - irq:
25
Assigning PCI BARs.
SCSI subsystem initialized
usbcore: registered new interface driver usbfs
usbcore: registered new interface driver hub
usbcore: registered new device driver usb
NET: Registered protocol family 2
IP route cache hash table entries: 2048 (order: 1, 8192 bytes)
TCP established hash table entries: 8192 (order: 4, 98304 bytes)
TCP bind hash table entries: 8192 (order: 4, 65536 bytes)
TCP: Hash tables configured (established 8192 bind 8192)
TCP reno registered
leon: power management initialized
highmem bounce pool size: 64 pages
Installing knfsd (copyright (C) 1996 [email protected]).
io scheduler noop registered
io scheduler cfq registered (default)
grlib apbuart: 2 serial driver(s) at [0xc0000100(irq 2),0xc0000200(irq 3)]
grlib apbuart: system frequency: 100000 khz, baud rates: 38400 38400
ttyS0 at MMIO 0xc0000100 (irq = 2) is a Leon
Testing fifo size for UART port 0: got 8 bytes.
ttyS1 at MMIO 0xc0000200 (irq = 3) is a Leon
Testing fifo size for UART port 1: got 8 bytes.
RAMDISK driver initialized: 16 RAM disks of 4096K size 1024 blocksize
loop: loaded (max 8 devices)
Probing GRETH Ethernet Core at 0xc0100100
Detected National Semiconductor DP83848 Revision 0
10/100 GRETH Ethermac at [0xc0100100] irq 12. Running 100 Mbps full duplex
Probing GRETH Ethernet Core at 0xc0100200
Detected National Semiconductor DP83848 Revision 0
10/100 GRETH Ethermac at [0xc0100200] irq 13. Running 100 Mbps full duplex
usbmon: debugfs is not available
grusbhc-ehci grusbhc-ehci.0: Gaisler Research EHCI Host Controller
grusbhc-ehci grusbhc-ehci.0: new USB bus registered, assigned bus number 1
grusbhc-ehci grusbhc-ehci.0: irq 6, io base 0xc0100300
grusbhc-ehci grusbhc-ehci.0: USB 2.0 started, EHCI 1.00, driver 10 Dec 2004
usb usb1: configuration #1 chosen from 1 choice
hub 1-0:1.0: USB hub found
hub 1-0:1.0: 2 ports detected
USB Universal Host Controller Interface driver v3.0
grusbhc-uhci grusbhc-uhci.0: Gaisler Research UHCI Host Controller
grusbhc-uhci grusbhc-uhci.0: new USB bus registered, assigned bus number 2
grusbhc-uhci grusbhc-uhci.0: irq 7, io base 0xfff00200
usb usb2: configuration #1 chosen from 1 choice
hub 2-0:1.0: USB hub found
hub 2-0:1.0: 2 ports detected
Initializing USB Mass Storage driver...
usbcore: registered new interface driver usb-storage
USB Mass Storage support registered.
usbcore: registered new interface driver usbhid
drivers/usb/input/hid-core.c: v2.6:USB HID core driver
i2c /dev entries driver
TCP cubic registered
NET: Registered protocol family 1
NET: Registered protocol family 17
drivers/rtc/hctosys.c: unable to open rtc device (rtc0)
Freeing unused kernel memory: 1776k freed
init started: BusyBox v1.8.2 (2010-03-16 15:33:25 CET)
© Aeroflex Gaisler AB
March 2013, Rev. 0.3
28
starting pid 22, tty '': '/etc/init.d/rcS'
starting pid 33, tty '': '/bin/sh'
/ # echo "hello world"
hello world
/ # ls
bin
etc
init
linuxrc proc
dev
home
lib
mnt
sbin
/ #
GR-LEON4-ITX Development Board
Quick Start Guide
sys
tmp
usr
var
Note that the last configuration does not mount the root filesystem from the USB stick.
5.2 Creating a boot PROM
Overview
Creating a boot PROM allows the system to boot software after power-up without the need to
connect with GRMON. There are several boot loaders available for LEON/GRLIB systems.
This document contains descriptions on how to use two of them, MKPROM2 and U-boot,
with the GR-LEON4-ITX board.
MKPROM2
Please see the MKPROM2 documentation for a general description of the application. This
sections deals with specifics of the GR-LEON4-ITX board. The MKPROM2 package is
included on the USB Flash stick in the directory software/bootloaders/mkprom2 but it is
preferable to download the latest version from http://www.gaisler.com.
MKPROM2 does not include support for initializing the DVI transmitter. In order to do this
MKPROM can be instructed to include software provided by the user. The data package
included with the board contains the file gr-l4itx-pack/mkprom2/bdinit.c that contains code for
initializing the DVI transmitter via I2C. To compile bdinit.c so that it can be included in the
boot ROM issue the command:
sparc-elf-gcc -Wall -c -g -O2 bdinit.c
Add the switch -DBPP24 if you will use 24-bit color and add -DDVI if you want to use digital
DVI output (to autodetect the type of screen connected via I 2C and select the correct
initialisation parameters is left as an exercise for the reader). The command line options for
MKPROM2 to be used with the GR-LEON4-ITX are:
MKPROM2 included on USB Flash stick:
Note: The MKPROM2 version included on the Flash stick does not support booting SMP
Linux. Please see text below on more recent MKPROM2 versions for SMP booting.
mkprom2 -v -freq 100 -stack 0x4ffffff0 -pnp 0xffeff800 -ddr2spa_cfg1 0x96a08616
-ddr2spa_cfg3 0x13650000 -ddr2spa_cfg4 0x0000017f -gpt 0xc0000300 -irqmp 0xc0800100
-uart 0xc0000100 -dsustart 0xd0000000 -dsutrace -bdinit -nomsg
However, at the time of writing MKPROM2 contains some hard coded values for addresses
in the system that makes it unsuitable for creating boot ROMs for the GR-LEON4-ITX board.
A workaround is to skip much of the built-in initialization provided by MKPROM and instead
perform the initialisation with the bdinit(..) calls. The file gr-l4itx-pack/mkprom2/bdinit2.c
contains initialisation code for the DDR2 memory controller, APBUART and timer unit.
In order to build a boot ROM for a system that will use video output, first compile bdinit2.c:
jan@jan:~/Linux$ sparc-elf-gcc -Wall -c -g -O2 -DDVI -o bdinit.o bdinit2.c
© Aeroflex Gaisler AB
March 2013, Rev. 0.3
29
GR-LEON4-ITX Development Board
Quick Start Guide
After this we can create an image using the SnapGear Linux kernel as input:
jan@jan:~/Linux$ /opt/mkprom2/mkprom2 -v -freq 100 -stack 0x4ffffff0 -pnp 0xffeff800
-irqmp 0xc0800100 -dsustart 0xd0000000 -dsutrace -bdinit -nomsg snapgear-2.6p41/images/image.dsu
LEON2/3/ERC32 MKPROM prom builder for BCC, ECOS, RTEMS and ThreadX v2.0.25
Copyright Gaisler Research 2004-2007, all rights reserved.
phead0: type: 1, off: 65536, vaddr: 40000000, paddr: 40000000, fsize: 2674944,
msize: 2833212
phead1: type: 6474e551, off: 0, vaddr: 0, paddr: 0, fsize: 0, msize: 0
section: .stage2 at 0x40000000, size 10240 bytes
Uncoded stream length: 10240 bytes
Coded stream length: 3374 bytes
Compression Ratio: 3.035
section: .vmlinux at 0x40004000, size 2658560 bytes
Uncoded stream length: 2658560 bytes
Coded stream length: 1562710 bytes
Compression Ratio: 1.701
creating LEON3 boot prom: prom.out
Searching for compiler to use (sparc-elf, sparc-rtems or sparc-linux):
sparc-elf-gcc (GCC) 3.4.4
Copyright (C) 2004 Free Software Foundation, Inc.
This is free software; see the source for copying conditions. There is NO
warranty; not even for MERCHANTABILITY or FITNESS FOR A PARTICULAR PURPOSE.
sparc-elf-gcc
-O2
-g
-N
-T/opt/mkprom2/linkprom
-Ttext=0x0
/opt/mkprom2/promcore.o
/opt/mkprom2/promcrt0.o
/opt/mkprom2/promload.o
/opt/mkprom2/promdecomp.o
-nostdlib
/opt/mkprom2/prominit.o
/opt/mkprom2/prominit_leon3.o /opt/mkprom2/prombdinit.o
dump.s bdinit.o
-o
prom.out
multidir:
jan@jan:~/Linux$
MKPROM2 available from gaisler.com:
Generate image with SMP Linux kernel as input:
mkprom2 -memc 0xFFE00100 -freq 100 -nopnp -ddr2spa_cfg1 0xf6a08616 -ddr2spa_cfg3
0x13650000 -ddr2spa_cfg4 0x0000017f -gpt 0xc0000300 -irqmp 0xc0800100 -uart
0xc0000100 -dsustart 0xd0000000 -dsutrace -baud 38400 -mp -mpentry 2 0x40000000
0x40000000 -mpstack 2 0x4ffffff0 0x4ffffff0 -nomsg -o output.prom <linux kernel
image name>.ram
Programming PROM image to SPI Flash:
The SPI Flash memory device can now be programmed with the PROM contents in the
prom.out file generated by MKPROM2 (it is recommended to use the Ethernet debug link
when programming the flash), start GRMON and issue the following commands:
grlib> spim flash detect
Got manufacturer ID 0x20 and Device ID 0x2017
No device match for READ ID instruction, trying RES instruction..
Found matching device: ST/Numonyx M25P64
grlib> spim flash load prom.out
section: .text at 0x0, size 1575824 bytes
section: .data at 0x180b90, size 32 bytes
total size: 1575856 bytes (119.3 kbit/s)
© Aeroflex Gaisler AB
March 2013, Rev. 0.3
30
GR-LEON4-ITX Development Board
Quick Start Guide
read 131 symbols
entry point: 0x00000000
The flash contents can now also be verified, either by spim flash verify prom.out or by the
faster verify prom.out:
grlib> verify prom.out
section: .text at 0x0, size 1575824 bytes
section: .data at 0x180b90, size 32 bytes
total size: 1575856 bytes (12.0 Mbit/s)
entry point: 0x00000000
grlib>
The PROM has now been successfully programmed. The software located in PROM can
now be booted by power cycling the board or by pushing the reset button.
U-boot
Note: U-boot currently only supports boot Linux images created with the SnapGear
distribution. If the more recent LinuxBuild Linux package is used then MKPROM2 must be
used to generate the PROM image.
U-Boot (Das Universal Boot loader) is boot loader for embedded systems developed by
http://www.denx.de and a port exists for SPARC/LEON. The LEON U-Boot can boot
RTEMS, VxWorks and Linux 2.6. Building the u-boot boot loader can be done with the
sparc-elf-gcc (BCC) crosscompiler.
The GR-LEON4-ITX data package contains a pre-built U-Boot image with a configuration
suitable for the board. The image is available in different formats in the directory gr-l4itxpack/u-boot/prebuilt this directory also contains a pre-built version of the mkimage tool. The
source for U-boot is on the USB Flash stick in the directory software/bootloaders/u-boot. To
re-build u-boot, enter the U-boot source directory and issue the command make
gr_leon4_itx_config followed by make.
To load the image onto the board, issue the following commands:
grlib> spim flash detect
Got manufacturer ID 0x20 and Device ID 0x2017
No device match for READ ID instruction, trying RES instruction..
Found matching device: ST/Numonyx M25P64
grlib> spim flash erase
grlib> spim flash load u-boot
section: .text at 0x0, size 208150 bytes
section: .u_boot_cmd at 0x32d18, size 1272 bytes
section: .data at 0x33210, size 34816 bytes
section: .got at 0x3ba10, size 4688 bytes
total size: 248926 bytes (116.9 kbit/s)
read 736 symbols
entry point: 0x00000000
grlib> verify u-boot
section: .text at 0x0, size 208150 bytes
section: .u_boot_cmd at 0x32d18, size 1272 bytes
section: .data at 0x33210, size 34816 bytes
section: .got at 0x3ba10, size 4688 bytes
total size: 248926 bytes (10.6 Mbit/s)
entry point: 0x00000000
grlib>
© Aeroflex Gaisler AB
March 2013, Rev. 0.3
31
GR-LEON4-ITX Development Board
Quick Start Guide
Next we need to build a Linux kernel image that U-boot can handle. U-Boot needs a header
to know how to interpret the binary images. The images support compression and CRC
verifying. To create an image, the mkimage tool must be in the system path. The Linux
kernel has a prepared build target for generating u-boot images (uImage):
jan@jan:~/Linux/snapgear-2.6-p41$ cd linux-2.6.21.1/
jan@jan:~/Linux/snapgear-2.6-p41/linux-2.6.21.1$ make ARCH=sparc \
CROSS_COMPILE=sparc-linux- uImage
CHK
include/linux/version.h
CHK
include/linux/utsrelease.h
… removed output ...
sparc-linux-ld
-Tdata
0x00040000
-r
-b
binary
arch/sparc/boot/uImage.o
Image arch/sparc/boot/uImage is ready
jan@jan:~/Linux/snapgear-2.6-p41/linux-2.6.21.1$
arch/sparc/boot/uImage
-o
In order to interact with the pre-built version of U-boot the board must be connected to a
monitor and a USB keyboard. The uImage created above should be placed in the root of a
TFTP sever and a Ethernet cable should be connected to the GR-LEON4-ITX board's
second (top) Ethernet port.
After the necessary preparations have been made reset the board and press a key on the
USB keyboard to stop the U-boot boot process. When presented with the U-boot prompt
issue the following commands (see the U-boot documentation for more commands and the
meaning of the commands below):
=>
=>
=>
=>
=>
=>
setenv severip <ip address of tftp server>
saveenv
run getkernel
sf probe
sf erase 400000 200000
sf write 40200000 400000 $(filesize)
To see information about the downloaded image issue the command:
=> iminfo
It is also possible to update the u-boot image using GRMON. First interact with U-boot and
issue the commands:
=> sf probe 0
=> sf erase 400000 200000
Then the Linux image can be built with:
make ARCH=sparc CROSS_COMPILE=sparc-linux- UIMAGE_FLASHADDR=0x00400000 uImage
and loaded in GRMON via (note the .o suffix):
grmon> spim flash load arch/sparc/boot/uImage.o
© Aeroflex Gaisler AB
March 2013, Rev. 0.3
32
6
GR-LEON4-ITX Development Board
Quick Start Guide
TROUBLESHOOTING AND FREQUENCY ASKED QUESTIONS
6.1 General
The performance of the system is less compared to what is advertised for LEON4
The advertised LEON4 performance figures typically come from systems that include a
Level-2 cache core. The GR-LEON4-ITX board and LEON4-ASIC-DEMO device were
constructed using a pre-release version of the LEON4 processor and the L2 cache core was
not available at this time. If you need to benchmark a system with a Level-2 cache, please
contact Aeroflex Gaisler.
I lost the contents of the USB Flash stick
Contact Aeroflex Gaisler for a possible download of the original stick contents, or a
replacement stick.
How do I restore the original PROM contents?
A copy of the original PROM contents is available in the GR-LEON4-ITX data package
under the directory gr-l4itx-pack/prom. The file l4itx_prom.srec can be written to the SPI boot
PROM using the GRMON commands: spim flash detect, spim flash erase, spim flash load
l4itx_prom.srec.
GRMON reports a system frequency of 100 MHz, should it not be 200 MHz?
The bus with most of the peripherals (AHB bus 1) runs at 100 MHz and the bus with the
LEON4 processors (AHB bus 0) runs at 200 MHz. GRMON connects bus 1 and also finds
the timer unit there, therefore GRMON reports the system frequency as 100 MHz, the
processor cores still run at 200 MHz.
6.2 Interfaces
Software freezes when initializing the Ethernet Interface
Software that relies on the MDIO interrupt for Ethernet PHY initialization may time out when
bringing up the Ethernet interface. This is an issue with some version of the Linux kernel
included in the SnapGear GNU/Linux distribution provided by Aeroflex Gaisler. A general
quick fix is to attach a network cable to each Ethernet port that is being initialized. The long
term fix is to contact the software vendor and ask for an update.
I have problem X when using the USB Debug Communication Link
The USB Debug Communication Link has a bug that leads to repeated accesses. This is a
problem when accessing register interfaces that are FIFOs, that is the interfaces are affected
by being read or written more than once with the same value. Therefore the USB Debug
communication link must not be used when interacting with a UART (for instance when using
the -u flag to GRMON) or using the SPIMCTRL or SPICTRL cores.
Also, jumper J10 17-18 (GPIO 43) must be installed at power-on for the USB DCL interface
to work.
The system freezes when using it together with my PCI device
The GRPCI core's PCI target interface included in the design has a bug that causes it to
perform bursts of infinite length if a PCI master performs a burst of eight or more words.
© Aeroflex Gaisler AB
March 2013, Rev. 0.3
33
GR-LEON4-ITX Development Board
Quick Start Guide
There is no known workaround for this issue and the LEON4-ASIC-DEMO device cannot be
used in a system where it will be accessed by a master performing bursts over eight words
in length.
I2C communication does not work
Please make sure that the bus has pull-ups (see the GR-LEON4-ITX Board User Manual for
how to enable pull-ups).
My USB disk is not detected / does not work
The board may not be able to provide enough power for drives connected via USB. Try
connecting the device via a USB hub that has a power source.
How do I change the Ethernet Debug Link IP address in the delivered system?
The system is delivered pre-programmed with the bootloader U-boot. After system reset, Uboot will initialize the system, which includes setting the Ethernet Debug Communication
Link's (EDCL) IP address. The address used by U-boot can be changed by attaching a USB
keyboard and pressing any key during the first seconds of system boot. U-boot will then
interrupt the boot process and show a prompt.
The IP address that U-boot will assign to the EDCL is stored in the variable greth_edcl_ip0.
To show the systems variables, issue the command:
=> printenv
To change the EDCL IP address to 172.16.0.24, issue the command:
=> setenv greth_edcl_ip0 172.16.0.24
To preserve the value after system reset the variable needs to be saved to SPI flash, this is
done with the command:
=> saveenv
It is also possible to change the EDCL IP address via GRMON, using the edcl command.
However, this will not affect the address used by U-boot after system reset.
6.3 Additional support
For customers with a support contract, or for issues where the board or device seem faulty,
please contact [email protected].
© Aeroflex Gaisler AB
March 2013, Rev. 0.3