1
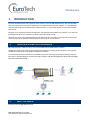
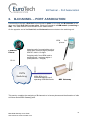
BRI ISDN GATEWAY User Guide CONTENTS CONTENTS 1. INTRODUCTION ...................................................................................................................3 1.1. The BRI ISDN Gateway Solution Overview ................................................................3 1.2. About this Manual .....................................................................................................3 1.3. Terminology ...............................................................................................................4 2. INSTALLATION AND SETUP ...................................................................................................5 2.1. Installation Overview (Getting Started).....................................................................5 2.2. Check the Package Items ...........................................................................................5 2.3. Hardware Installation ................................................................................................5 2.3.1. Hardware Overview ...................................................................................................5 2.3.2. Installing SIMs ............................................................................................................6 2.3.3. Connecting Cables .....................................................................................................6 2.4. Software Installation .................................................................................................7 3. BASIC SYSTEM SETUP (BASIC OPERATIONS) ..........................................................................9 3.1. Configurations with the BRI Management Application.............................................9 4. PORT AND SIM SETTINGS ........................................................................................... 11 4.1. Define Dial Settings for Each Port............................................................................11 4.2. Define Type of Dialed Numbers Dispatch Mode .....................................................12 4.3. Define Minimum Amount of Time between Outgoing Calls ...................................12 4.4. Define Registration Timer........................................................................................13 4.5. Define SIM Specifications ........................................................................................13 4.6. Define the SIM Operator .........................................................................................15 5. ISDN AND TIME SETTINGS........................................................................................... 16 5.1. ISDN Settings ...........................................................................................................16 5.2. Time and Date setting .............................................................................................18 6. B-CHANNEL – PORT ASSOCIATION ........................................................................... 19 6.1. B-Channel to In-House Phone Number Association ................................................20 6.2. In-House Phone Number and GSM Association ......................................................21 6.3. Network Prefixes Settings .......................................................................................21 6.4. Port Allocation Mode Settings.................................................................................22 6.5. Make Port Settings ..................................................................................................22 7. MONITORING CALLS AND REPORTS ......................................................................... 24 7.1. Monitoring Calls ......................................................................................................24 7.2. Call Reports..............................................................................................................26 7.3. Entering DELA ..........................................................................................................27 8. APPENDIX A: TCP/IP SETTING ............................................................................................. 29 8.1. TCP/IP settings task list:...........................................................................................29 ii BRI ISDN Gateway User Guide www.eurotech-communication.com Introduction 1. INTRODUCTION Eurotech Communication Ltd is glad you have chosen to use the BRI ISDN Gateway. We are confident due to the quality of our product, simplicity of use and excellent customer support, that the BRI ISDN Gateway will meet your communication needs and will help you saving money on your office/mobile phone calls. The goal of our experienced team of engineers, who develop and produce our products, is to meet the growing demands of our customers in today's communications world. We hope you enjoy using the BRI Gateway and appreciate any comments you may have as we always strive to improve our products and personal service for all of our customers. 1.1. THE BRI ISDN GATEWAY SOLUTION OVERVIEW BRI ISDN Gateway, or BRI for short, can connect ISDN calls to GSM cellular network The BRI is a device that connects your desk phones directly to cellular phone networks. This gateway completely bypasses the local landline telephone company. Two desk phones can be connected to each BRI via a phone switching unit (often a PBX type switch). Each port in the BRI Gateway contains four SIM. The port can be configured to direct calls through the most economical SIM. 1.2. ABOUT THIS MANUAL Exclusively for the BRI ISDN Gateway 3 BRI ISDN Gateway User Guide www.eurotech-communication.com Introduction 1.3. TERMINOLOGY The following is a list of important terms used in this guide and their definitions: Gateway – A n ISDN unit with 2 cellular ports. SIM – SIM card or chip Port (ch) – A port is single channel that can send call(s). Cellular Card (Slave card) – A card with cellular ports (modules). 4 BRI ISDN Gateway User Guide www.eurotech-communication.com Installation and Setup 2. INSTALLATION AND SETUP This section will guide you through the installation and setup process, including basic configuration and a system test to ensure that all components are working properly. These steps are MANDATORY to run the BRI ISDN unless otherwise indicated. After completing this section your Gateway is functional for basic operations. You may choose to make further configurations. 2.1. INSTALLATION OVERVIEW (GETTING STARTED) Perform the following steps to install and setup your system: 1) Check the items delivered in your package - see Check the Package Items on page 5. 2) Install SIMs. See Hardware Installation on page 5. 1) Connect cables, attenas and power supply. See Connecting Cables on page 7. 3) Install the PC management application using the CD provided - see Software Installation on page 7. 4) Power up the Gateway. 5) Perform basic setup - see Basic System Setup (Basic Operations) on page 9. 2.2. CHECK THE PACKAGE ITEMS Make sure that your package contains the following components before installation: Main Hardware Device - The BRI ISDN Gateway Quick Installation Guide – for brief installation explanations Software Installation CD - Gateway Manager CD for MS-Windows Management Application. Includes the User Manual file and additional auxiliary utilities. Cellular Antennas ISDN Connection Cable RS-232 Serial PC Comport (COM) connection cable (RJ-45 to RS-232 COM). This facilitates configuration and monitoring of the gateway. This is referred to as the ‘Com Cable’ in this manual Input: 110/240V 50-60Hz, Output:12v DC adapter 2.3. HARDWARE INSTALLATION This section describes the hardware installation. 2.3.1. HARDWARE OVERVIEW The BRI ISDN Gateway consists of three main parts: Chassis – Housing the gateway PCB. Master Card – Located at the left side of the unit. contains the ISDN,COM, Synchronization connections 5 BRI ISDN Gateway User Guide www.eurotech-communication.com Installation and Setup Cellular Card – Located on the right side of the unit. contains 2 cellular ports. Each port has four local SIM and one antenna. 2.3.2. INSTALLING SIMS The following sections describe how to install SIMs in the BRI ISDN Gateway. 2.3.2.1. INSTALLING SIMS On the back of the unit slide back the cover, there are 4 SIM chambers for each port to install SIM cards. To install a SIM in a cellular card: 1) Slide and lift the metal cover. 2) Position the SIM in the port SIM socket so that the SIM's metal contact is facing down and the snubbed edge is on the right hand side directed into the SIM socket. 3) Gently push the SIM card into the SIM socket. 4) Level and slide the metal cover. 5) The SIM is now installed. 6) Repeat for all sim chambers. 2.3.2.2. REMOVING SIMS To remove a local SIM 1) 2) 3) 4) Slide and lift the metal cover. Gently pull out the SIM card from the SIM socket. Level and slide the metal cover. Repeat for all sim chambers 2.3.3. CONNECTING CABLES On side panel (master card) connect the following: 6 BRI ISDN Gateway User Guide www.eurotech-communication.com Installation and Setup Power Supply COM PORT ISDN Synchronization ISDN cable - The ISDN cable is used to connect the system to the ISDN network. 2.4. Power Supply Cable - Connect the power supply cable from your 110-240V 50-60Hz power outlet to the BRI Gateway power connector/adapter. COM Cable RS323 – The RS-232 serial connection cable between the BRI and the PC is used for configuration with the BRI Management Application. Antennas – Connect antenna cable per port. Position the antennas at least 40 centimetres apart and more than 1.5 meters from the Gateway. SOFTWARE INSTALLATION Configuration is performed on an auxiliary computer by installing the BRI ISDN Management software CD for MS-Windows Application. To install the BRI ISDN Management Software on a MS-Windows PC 1) 2) 3) 4) 5) 6) Insert the BRI ISDN Management Installation CD into the CD drive of the PC. Navigate to the installation CD drive. Double-click setup.exe. Click Next. The Destination Folder appears. Select the destination folder by clicking Change and navigating to the destination. Click Next. 7 BRI ISDN Gateway User Guide www.eurotech-communication.com Installation and Setup 7) Click Install. The BRI ISDN Management application begins installation. You will be prompted when the installation is complete. 8) Click Finish and remove the CD. Note: If the BRI ISDN icon appears on the Desktop, the application was successfully installed. 8 BRI ISDN Gateway User Guide www.eurotech-communication.com Basic System Setup (Basic Operations) 3. BASIC SYSTEM SETUP (BASIC OPERATIONS) This section describes how to perform basic configurations and operations in the Gateway after you have installed the Management application. 3.1. CONFIGURATIONS WITH THE BRI MANAGEMENT APPLICATION After installing the BRI Management application, launch it and define the Type of Connection between the PC and the BRI Gateway as described below. To define the PC to BRI Gateway connection: 1) Launch the BRI Management by clicking on or by selecting: your PC desktop, Start > Programs > Eurotech-Communication > BRI Management v5.1. The BRI Management application window will open. 9 BRI ISDN Gateway User Guide www.eurotech-communication.com Basic System Setup (Basic Operations) 2) Click in the toolbar. The Selected Connection window will open. 3) Select the Com Port to which the Winner Series BRI Gateway is connected to. 4) Select in the Connection Mode Com Port and click the OK button. Note: TCP/IP Connection is avaiable only when ordered thus. see Appendix A. After installing the Manager and defining the port connection, define port and SIM settings as described in chapter 5. After establishing communication between the auxiliary computer and the Winner Series BRI Gateway, define groups of telephones in your office, as described in the following chapter. 10 BRI ISDN Gateway User Guide www.eurotech-communication.com Port and SIM Settings 4. PORT AND SIM SETTINGS This chapter describes port dial settings, as well as timetables and channel locks for SIM cards in use. 4.1. DEFINE DIAL SETTINGS FOR EACH PORT To define dial settings: 1) Click . The Port Setting window opens. 2) To define port dial settings, choose a port and proceed as described on the following pages. 11 BRI ISDN Gateway User Guide www.eurotech-communication.com Port and SIM Settings 4.2. DEFINE TYPE OF DIALED NUMBERS DISPATCH MODE You can define manual or automatic dispatch. Select the mode in which telephone numbers are dispatched to the GSM network. To dispatch phone numbers manually: 1) In the Send Complete list, select HASH. 2) In this mode, after you dialed all digits of a phone number, click number. to send the phone 3) To dispatch phone numbers automatically, in the send complete list, select OMIT. Then set three additional parameters: a) Define the length of phone numbers that will be dialed from the port (within a range). i) In the Min. Digits box, enter the number of digits of the shortest phone number that will be dialed from this port. ii) In the Max. Digits box, enter the number of digits of the longest phone number that will be dialed from this port b) Define the Inter Digit Pause. This parameter defines a waiting time, after a digit is clicked, before the number is automatically dispatched to the GSM network. i) If this parameter is set too low, then incomplete phone numbers may be dispatched if the user pauses briefly while dialing. ii) If this parameter is set too high, then users would have to wait a long time before a number is dispatched. The inter digit pause is activated after the minimum number of digits have been dialed. In many situations, two or three seconds may be appropriate for this parameter. Each unit of this parameter is 50 milliseconds. For example, to set an inter digit pause of 3 seconds, enter a value of 60 in this box (60 * 50 milliseconds = 3,000 milliseconds = 3 seconds). When a port is set to auto-dispatch phone numbers, the number is dispatched automatically after the user has dialed the maximum number of digits, or, when an inter digit pause has occurred. 4.3. DEFINE MINIMUM AMOUNT OF TIME BETWEEN OUTGOING CALLS Setup the minimum amount of time between outgoing calls in the Intercall Timer box. Set this parameter according to limitations of the GSM network. In many situations, two seconds may be an appropriate value for this parameter. 12 BRI ISDN Gateway User Guide www.eurotech-communication.com Port and SIM Settings 4.4. DEFINE REGISTRATION TIMER Setup the time the module will try registering a SIM card. At the end of this time he will move to the next available SIM. After making port settings, you MUST click Write Port Setting to send the settings to the Winner Series BRI Gateway unit. Then make settings for each SIM, as explained in the following section. 4.5. DEFINE SIM SPECIFICATIONS In order to define a specific SIM setting you need to choose the specific SIM in the Port SIMs Tree on the left side of the main screen. First we will define the activation time for the SIM. Select the [Time Table] Tab. The Time Table Tab with SIM Spec Definition window will appear. Now you can define the main SIM definitions, time range, and days that SIM will be enabled. To enter SIM specifications: 1) Enter the Predial number in the Predial number box. 2) Enter the PIN code of the SIM in the PIN CODE box. 3) Select a caller identification option in the Caller ID list: To enable the GSM network to set caller ID standards, select Network. To disable identification of the SIM, select CLIR Suppression. To enable identification of the SIM, select CLIR Invocation. 4) In the Time Table tab, define hours, and days, that the SIM is active. Days can be divided in up to four intervals. a. Select an interval. b. Enter the hours of the interval. 13 BRI ISDN Gateway User Guide www.eurotech-communication.com Port and SIM Settings c. Select days that this interval will be activated. Select days of deactivation in the row. 14 BRI ISDN Gateway User Guide www.eurotech-communication.com Port and SIM Settings 4.6. DEFINE THE SIM OPERATOR To assign the SIM to work with a specific GSM network: In the Operator ID, enter the GSM network operator ID, between 1–999999. Enter 0 to work with the SIM operator. 15 BRI ISDN Gateway User Guide www.eurotech-communication.com ISDN and Time Settings 5. ISDN AND TIME SETTINGS This section describes the required and optional ISDN settings as well as the related time setting. 5.1. ISDN SETTINGS Each Winner Series BRI Gateway has a master printed circuit board (PCB). The ISDN card is a small PCB mounted on the master PCB. The ISDN card is between ports in the Winner Series BRI Gateway and the external phones PBX switching unit. COM Port ISDN ISDN Synchronization To define ISDN settings: 1) Click: . The ISDN window opens. This window defines settings in the ISDN line, between the switching unit and the ISDN card. 2) Enter specifications as described on the following pages. Ensure that settings are in conformity with settings in the switching box. 4) Continue settings in the ISDN configuration window as follows: 16 BRI ISDN Gateway User Guide www.eurotech-communication.com ISDN and Time Settings System Version is the version of the master card software in the PCB. The ISDN module is a small PCB connected to the master PCB. The ISDN module has an EEPROM containing ISM software. ISM version - the version of the ISM software. Select NT or TE in the Network access box. Select Point to Point or Point Multipoint in the Connection mode box. In the Incoming Calls box, select the interface of incoming calls (from the switching unit to the ISDN card), Overlap (pulse) or In Block (packet), in conformity with the setting in the switching unit. Mode of Incoming calls processing is the mode of earring the ring back tone. In Real Processing you will ear it at the begging of the call from the GSM network, in Imitation Processing the ring back will begin automatically at the end of the alerting timer. 5) If you have more than one Winner Series BRI Gateway on site, enter the address of each Winner Series BRI Gateway unit in System Identification Number. This entry can accept number between 1 and 9 digits. 6) If you have sub-addresses of Winner Series BRI Gateway, enter the sub address of each Winner Series BRI Gateway unit in the second box, 1 digit. 17 BRI ISDN Gateway User Guide www.eurotech-communication.com ISDN and Time Settings 7) In the Type of Number box, select the Type of Number (TON) of calls, from the ISDN card to the switching unit, as defined in the switching unit. 8) The Numbering scheme protocol, from the ISDN card to the switching unit, is set at Number Plan Identification (NPI). Set this parameter as defined in the switching unit. 9) Click Write ISDN Setting to send the ISDN settings to the Dual Cell unit. Note: The following field boxes in this window are only displaying the existing settings: System version: this box displays the Version of the master card Firmware. ISM version: this box displays the version of the ISM Firmware. Country Code: this box displays the default country code setting – EuroISDN. ISDN version: this box displays the default ISDN version – EuroISDN. 5.2. TIME AND DATE SETTING At the bottom part of the ISDN window set the date and time. Then click Set System Time to send the settings to the Winner Series BRI Gateway. 18 BRI ISDN Gateway User Guide www.eurotech-communication.com B-Channel – Port Association 6. B-CHANNEL – PORT ASSOCIATION Communiction through a Dual Cell is performed via ports on one end, and B-channels on the other end: Each Dual Cell has two ports. Each port extends to a GSM module (containing a SIM). The GSM module communicates to the GSM network. On the opposite end of the Dual Cell, two B-channels communicate to the switching unit. GSM Cell phone Landline Phone Incoming calls, from switching unit to ISDN card: minimum digits (example 050-787-4444 = 10 digits Outgoing calls, from ISDN card to switching unit: maximum digits 4 (example 6001 = 4 digits) RJ-11 GSM Module PSTN Switching ISDN (BRI) 2 x BChannels Mapped into 2 operating GSM SIM Cards Winner Dual Cell BRI Gateway This section explains the assigning of B-channels to in-house phones and the allocation of calls to Winner Series BRI Gateway ports. 19 BRI ISDN Gateway User Guide www.eurotech-communication.com B-Channel – Port Association These settings are made in the B-channel/Port window. Click to open the B-Channel/Port setup window. This window is divided into four frames, as shown below. 6.1. B-CHANNEL TO IN-HOUSE PHONE NUMBER ASSOCIATION Assign office “in-house” phone number extensions to B-Channels In-house phone numbers are assigned in the lower left frame. 20 BRI ISDN Gateway User Guide www.eurotech-communication.com B-Channel – Port Association Outgoing number refers to internal telephone numbers (For example, 6001 and 6002). For each channel that extends to a phone simply mark the check box, as shown in the screen snapshot above. 6.2. IN-HOUSE PHONE NUMBER AND GSM ASSOCIATION This prefixes table is for associating prefix numbers (on the left of the table) of the different GSM operators to a specific SIM (1, 2, 3, and 4, on the top of the table). A port that associates with this SIM can generate calls only to GSM numbers having the defined prefixes. Each prefix has two priorities; the BRI will make the call using the SIM with the highest priority to that prefix. If the priority is the same for both ports, the BRI will use the port1, if busy then port2. 6.3. NETWORK PREFIXES SETTINGS The prefix table is on the right side of the B-channel/Port window. This table is used to direct calls (from the Winner Series BRI Gateway to GSM networks) through the appropriate SIM. For example: If the GSM network includes telephone numbers that start with 052, then this prefix could be listed in row 1 of this table, specifying the SIM and the port desired, and the priority. If the GSM network includes telephone numbers that start with 053 then this prefix could be listed in row 2 of this table, specifying the SIM and the port desired, and the priority. In this example a call to the GSM number 0525555555 will go out using SIM 1 and a call to 0535555555 will go out using SIM 2. 21 BRI ISDN Gateway User Guide www.eurotech-communication.com B-Channel – Port Association If the Prefix allocation mode is selected (as described below), then the Winner Series BRI Gateway checks the prefix of the outgoing numbers, and dispatches phone calls through the appropriate SIM. This helps ensure the lowest call rate possible for the user. 6.4. PORT ALLOCATION MODE SETTINGS The manner in which a phone call is directed to a port is determined in this frame. By Prefixes: if selected, then the Winner Series BRI Gateway directs a call through a port according to the defined prefixes table. Maximum prefix length is how many digits the prefix could be. Waiting time of free port is how many seconds the BRI will wait for the port when busy. If one GSM network is designated for both ports, then select the manner in which ports will be selected: Cyclic indicates that ports will be selected in a cyclic manner: for example, if the first call is via port 1, the following call will be directed through port 2, the third call will be directed through port 1, and so forth. Random indicates that ports will be selected at random, for example: port 2, port 2, port 1, port 2, port 2, port 1, port 1, and so forth. If Static is selected, each ISDN B channel (and its respective telephone) is linked permanently to a port as defined in the prefixes table frame. An ISDN B channel (and its respective telephone) can be switched as described below. 6.5. MAKE PORT SETTINGS Port/prefix settings are made in the upper left frame of this window and associates a port to a Bchannel. Check a port to activate it. If you want ports permanently linked to B channels, and you want to change the order of connections, proceed as follows: 22 BRI ISDN Gateway User Guide www.eurotech-communication.com B-Channel – Port Association 1. Click a cell in the B-channel column and drag the cell to the Stock column . 2. Click the remaining cell in the B-channel column and drag it to the row of the desired port. 3. Drag the cell in the Stock column to the desired position in the B-channel column 4. . After completing these steps, the Dual Cell is ready for operation. Calls can be monitored. 23 BRI ISDN Gateway User Guide www.eurotech-communication.com Monitoring Calls and Reports 7. MONITORING CALLS AND REPORTS This section explains how to monitor calls and review reports. 7.1. MONITORING CALLS To monitor calls: 1) Click: . The monitor screen opens. SIM Status GSM Network ID Broadcast Control Channel Network Network Connection Status SIM Connection Status B-Channel Number LED Setting: A red LED indicates there is no connection. A yellow LED indicates there is a connection, but no data transfer. A green LED indicates transfer of data. 2) Left click on the play button for the port options: 24 BRI ISDN Gateway User Guide www.eurotech-communication.com Monitoring Calls and Reports Disable port: disable or enable the port. Refresh port: reed the data from the port. DTMF Dialer: open DTMF dialer dialog box in it you can dial DTMF While Talking. Get Cell Information: display the cell information (see below). Reset Port 1, 2: reset the ports. Reset Statistics: reset the statistics of a specific SIM. Cell Information: View the antenna reception quality of surrounding antennas. Legend: LAC - Location Area Code. CI - Cell ID MCC - Mobile Country Code BSIC - Basic Station Identity Code BCCH - Broadcast Control Channel RSSI- Receiver Signal Strength 25 BRI ISDN Gateway User Guide www.eurotech-communication.com Monitoring Calls and Reports 7.2. CALL REPORTS To view call reports: 1) Click 3) Click Start to view the last calls that were made. 4) Click Access/CSV/XML to export the calls list to a file in that format. For Automatic exporting of the list to a file you need to define the Path of the file (above), the Format, the Check every timer and the Export every. The program will check if there is the amount of records in the memory (specified in Export every) every Check every minutes. If there is, the program will export the list to the file specified and will clear the memory. 26 BRI ISDN Gateway User Guide www.eurotech-communication.com Monitoring Calls and Reports 7.3. ENTERING DELA To enter DELA: 1) Click . DELA is a way to direct calls from a GSM number to specified extension. There are two options. Unlimited DELA Calls – Enter the GSM number in the OUT/IN number box, enter the extension number in the Extension box, Click Add button to list them. From now on, every call from this GSM number will be directed to this extension. Limited DELA Calls – Change the table to Enable, choose the time (in hours) you want each entry to remain in the table. A call from an extension to a GSM number will be entered the table. 27 BRI ISDN Gateway User Guide www.eurotech-communication.com Monitoring Calls and Reports From now on, until the timer will expire, whenever the specified GSM number will call, the call will be directed to the extension specified in the table. You can Export/Import the data to a file. 28 BRI ISDN Gateway User Guide www.eurotech-communication.com Appendix A: TCP/IP Setting 8. APPENDIX A: TCP/IP SETTING This section is only applicable to units that have been ordered with a TCP/IP connector. 8.1. TCP/IP SETTINGS TASK LIST: To define TCP/IP settings: 1) Connect the BRI Gateway to your LAN via the COM connector. 2) Install the software Network Enabler Administrator which is provided on the installation CD at the directory LAN Tools. 3) Launch the software Network Enabler and click the SEARCH icon (upper left side) to find the BRI Gateway IP. 4) The BRI Gateway IP should appear in the next screen: 29 BRI ISDN Gateway User Guide www.eurotech-communication.com Appendix A: TCP/IP Setting 5) Double click on the IP, then select the Network tab. The next screen will open: 6) Check the Modify check box above the IP Address and enter the desired IP, click the Modify below to change Netmask and other settings; after you made changes, click the OK button. 7) Close the Network Enabler. 8) Click Connect button in the BRI Management. 9) Select TCP/IP in the Connection Mode. 10) Enter the IP Address and the Port Number (the default is port 4001). 11) Click OK to connect to the BRI Gateway via the TCP/IP. 30 BRI ISDN Gateway User Guide www.eurotech-communication.com