1
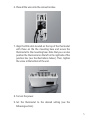
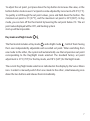
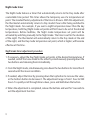
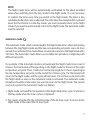
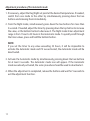
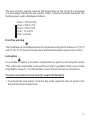
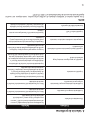
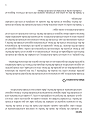
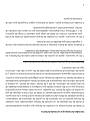
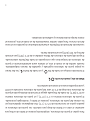
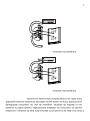
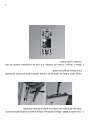
Line Voltage Non- Programmable Thermostat
Installation Instructions & User Guide
For BNP125, BNP150C, BNP125C, 1E65-140
Congratulations on the purchase of your
White-Rodgers™ thermostat!
Save these instructions for future use!
Questions? Contact White-RodgersTM
Customer Service at 1-877-654-9394
37-7460A
WARNING
WARNING
Before installing and operating this product, the owner and/or installer must read,
understand and follow these instructions and keep them handy for future reference.
If these instructions are not followed, the warranty will be considered null and void
and the manufacturer deems no further responsibility for this product. Moreover,
the following instructions must be adhered to in order to avoid personal injuries or
property damages, serious injuries and potentially fatal electric shocks. All electric
connections must be made by a qualified electrician, according to the electric and
building codes effective in your region. Do NOT connect this product to a supply
source other than 120 VAC or 240 VAC, and do not exceed the load limits specified.
Protect the heating system with the appropriate circuit breaker or fuse. You must
regularly clean dirt accumulations on the thermostat. Do NOT use fluid to clean
thermostat air vent. Do not install thermostat in a wet place. However, installing it
in isolated walls is allowed.
Note:
When a part of the product specification must be changed to improve operability or
other functions, priority is given to the product specification itself. In such instances,
the instruction manual may not entirely match all the functions of the actual product.
Therefore, the actual product and packaging, as well as the name and illustration,
may differ from the manual.
The screen/LCD display shown as an example in this manual may be different from the
actual screen/LCD display.
1. Description
This thermostat can be used to control electric heating units such as electric
baseboards, convectors, or aeroconvectors. It keeps the temperature of a room at
the requested set point with a high degree of accuracy. This product is designed for
installations with electrical current - with a resistive load - ranging from 1.25 A to 12.5
A (120/240 VAC). It possesses a user-friendly interface. Furthermore, it gives you the
possibility to control the temperature of a room with great precision.
This thermostat is not compatible with the following installations:
• electrical current higher than 12.5 A with a resistive load (3000 W @ 240 VAC and
1500 W @ 120 VAC);
• electrical current lower than 1.25 A with a resistive load (300 W @ 240 VAC and 150
W @ 120 VAC); and
• central heating system.
Parts supplied:
• one (1) thermostat;
• wall mounting plate located at the back of the thermostat;
• two (2) mounting screws;
• two (2) solderless connectors suitable for copper wires.
1
2. Installation
Selection of the thermostat location The thermostat must be mounted on a
connection box on a wall facing the heating unit, at around 1.5 m (5 feet) above the
floor level, on a section of the wall exempt from pipes or air ducts.
Do not install the thermostat in a location where temperature measurements could
be altered. For example:
• close to a window, on an external wall, or close to a doorleading outside;
• exposed directly to the light or heat of the Sun, a lamp, a fireplace or any other heat
source;
• close or in front of an air outlet;
• close to concealed ducts or a chimney; and
• in a location with poor air flow (e.g. behind a door), or with frequent air drafts
conditions (e.g. head of stairs).
Thermostat mounting and connection
1. Cut off power supply on lead wires at the electrical
panel in order to avoid any risk of electric shock.
2. Ensure that the air vents of the thermostat are clean and clear of any obstruction.
2
3.Using a screwdriver, loosen the screw retaining the mounting base of the
thermostat until you feel a loose (do not completely remove the screw).
Then, remove the mounting base at the back of the thermostat by tilting it
downward, then towards you.
4. Align and secure the mounting base to the connection box using the two screws
supplied.
3
5. Take the wires from the wall through the hole at the base of the mounting base
and connect them using the supplied solderless connectors. When making
the connection with aluminum wire, make sure that you are using connectors
identified CO/ALR. Please note that the thermostat wires do not have polarity.
Therefore, the way they are connected is not important.
2-wire installation
4-wire installation
4
6. Place all the wires into the connection box.
7. Align the little slots located on the top of the thermostat
with those on the the mounting base and secure the
thermostat to the mounting base. Note that you can also
position the thermostat on the left or the right side of the
junction box (see the illustrations below). Then, tighten
the screw at the bottom of the unit.
8. Turn on the power.
9. Set the thermostat to the desired setting (see the
following section).
5
3. Operation
ambient
temperature/
timer
heating power
used indicator
pictograms
frost-free warning
day mode
night mode
fan mode
automatic mode
lock mode
top button
bottom button
Powering on for the first time
When powering on for the first time, the thermostat is initially set to Day mode
The temperature is displayed in Celsius and is set at 21 degrees by default.
.
Temperature set points
The figures displayed above the pictogram indicate the temperature set point. It
can be displayed in degrees Celsius or Fahrenheit (see “Display in degrees Celsius/
Fahrenheit”).
6
To adjust the set point, just press down the top button to increase the value, or the
bottom button to decrease it. Set points can be adjusted by increments of 0.5°C (1°F).
To quickly scroll through the set point values, press and hold down the button. The
minimum set point is 3°C (37°F), and the maximum set point is 30°C (86°F). In Day
mode, you can turn off the thermostat by lowering the set point below 3°C. The set
point value displayed will be OFF, and heating system
start up will be impossible.
Day mode and Night mode
The thermostat includes a Day mode
and a Night mode , both of them having
their own independently adjustable and recorded set point. When switching from
one mode to the other, the system will automatically use the temperature set point
corresponding to the Day/Night mode selected. The standard factory set point
adjustment is 21°C (70°F) for the Day mode, and 18°C (64°F) for the Night mode.
The current Day/Night mode selection is indicated on the display by the Sun or Moon
icon. In order to manually switch from one mode to the other, simultaneously press
down the two buttons and release them immediately.
7
Night mode timer
The Night mode features a timer that automatically returns to the Day mode after
a selectable time period. This timer allows the temporary use of a temperature set
point. The standard factory adjustment of the timer is 8 hours. With this adjustment,
the thermostat automatically returns to Day mode 8 hours after being switched to
the Night mode. For example, if you want a night temperature lower than the day
temperature, both Day/Night mode set points will first have to be set at the desired
temperatures. Before bedtime, the Night mode temperature set point will be
activated by switching manually to the Night mode. The timer is set for the duration
of the night. The thermostat will automatically return to the Day mode at the end
of the night, and the Day mode temperature set point, which is higher, will become
effective at this time.
Night mode timer adjustment procedure
1. If necessary, adjust the Day/Night mode set points at the desired temperatures. If
needed, switch from one mode to the other by simultaneously pressing down the
two buttons and releasing them immediately.
2. From the Night mode, simultaneously press down the two buttons for more than 3
seconds until the moon icon blinks.
3. If needed, adjust the timer by pressing down the top button to increase the value,
or the bottom button to decrease it. The adjustment range is from 1 hour to 999
hours. To quickly scroll through timer values, press and hold down the button.
4. When the adjustment is completed, release the buttons and wait for 5 seconds to
exit the adjustment function.
8
NOTE:
The Night mode timer will be automatically reinitialized to the latest recorded
value when switching from the Day mode to the Night mode. It is not necessary
to readjust the timer every time you switch to the Night mode. The timer is also
reinitialized when this value is adjusted. Once the timer has completed its cycle and
when the thermostat is in the Day mode, you must manually return to the Night
mode. If you want to automatically return to the Night mode, the Automatic mode
must be selected.
Automatic mode
The Automatic mode, which is associated to the Night mode timer, allows alternating
between the Day/Night modes and the two corresponding set points over a 24-hour
period. Once activated, this mode allows an automatic return to the Night mode after
24 hours. The Automatic mode allows you to define two periods in a single day with
different set points.
For example, if the Automatic mode is activated and the Night mode timer is set at
8 hours, the thermostat will be operating in the Night mode for 8 hours at the night
temperature set point. Then, it will return to the Day mode for 16 hours operating at
the day temperature set point. At the end of the 24-hour cycle, the thermostat will
return to the Night mode, and the cycle will start over. The 24-hour cycle starts with
the Night mode as soon as the Automatic mode is activated. The Automatic mode
activation should be made when you want to return to the Night mode. The normal
course of a cycle in the Automatic mode is as follows:
1- Night mode: activated for the duration of the Night mode timer cycle. It returns to
the Day mode when the timer cycle is completed.
2- Day mode: activated for the remaining time of the 24-hour cycle. It returns to the
Night mode at the end of the 24- hour cycle.
9
Adjustment procedure of the Automatic mode
1. If necessary, adjust the Day/Night set point at the desired temperatures. If needed,
switch from one mode to the other by simultaneously pressing down the two
buttons and releasing them immediately.
2. From the Night mode, simultaneously press down the two buttons for more than
3 seconds. If needed, adjust the timer by pressing down the top button to increase
the value, or the bottom button to decrease it. The Night mode timer adjustment
range is from 1 hour to 23 hours in the Automatic mode. To quickly scroll through
the timer values, press and hold the bottom button.
NOTE:
If you set the timer to any value exceeding 23 hours, it will be impossible to
activate the Automatic mode and if it was activated, the Automatic mode will be
deactivated.
3. Activate the Automatic mode by simultaneously pressing down the two buttons
for at least 3 seconds. The Automatic mode icon will appear. If the Automatic
mode was already activated, the same procedure should be used to deactivate it.
4. When the adjustment is completed, release the buttons and wait for 5 seconds to
exit the adjustment function.
10
NOTE:
It is always possible to manually change the Day/ Night mode during a 24-hour
cycle. However, any manual return to the Night mode will re-initialize the Night
mode timer to the latest value recorded, which modifies the cycle in progress. In
all cases, at the end of the 24-hour cycle, the thermostat will return to the Night
mode and start a new cycle. It is thus not necessary to readjust the Automatic
mode when a manual change is made to the Day/Night mode.
When turning back on after being powered off (because of a power failure, for
example), the automatization of the Day/Night modes is deactivated, and, if
previously activated, the pictogram that corresponds to this mode will blink. The
blinking will stop as soon as you press down a button.
11
Display in degrees Celsius/Fahrenheit
The thermostat can display the ambient temperature and the set point in degrees
Celsius (standard factory setting) or Fahrenheit.
Selection procedure for degree Celsius/Fahrenheit display (for model with backlight)
1. From the Day mode, simultaneously press down the two buttons for 8 seconds
(note that the backlight will blink after 3 seconds, but you must hold down the
buttons). The Celcius/Fahrenheit symbol will blink after 8 seconds. Release the
buttons.
2. Press down the top button to switch from the degrees Celsius to the degrees
Fahrenheit, and conversely. The degree Celsius or Fahrenheit symbol will be
displayed.
3. When the adjustment is completed, release the buttons and wait for 5 seconds to
exit the adjustment function.
Selection procedure for degree Celsius/Fahrenheit display (for model without backlight)
1. From the Day mode, simultaneously press down the two buttons for 3 seconds.
The Celsius/Fahrenheit symbol will blink after 3 seconds. Release the buttons.
2.Press down the top button to switch from the degrees Celsius to the degrees
Fahrenheit, and conversely. The degree Celsius or Fahrenheit symbol will be
displayed.
3. When the adjustment is completed, release the buttons and wait for 5 seconds to
exit the adjustment function.
Heating Power Indicator
12
The level of power used to maintain the temperature at the set point is expressed
as a percentage indicated by the number of bars in the thermometer displayed. The
heating power used is displayed as follows:
4 bars = 75% to 100%
3 bars = 50% to 75%
2 bars = 25% to 50%
1 bar = 1% to 25%
0 bar = no heat
Frost-free warning
The Snowflake icon is displayed when the temperature set point is between 3°C (37°F)
and 5°C (41°F). A minimum temperature will be maintained to ensure frost control.
Lock option
It is possible to impose a maximum temperature set point by activating this mode.
Then, it becomes impossible to exceed this set point, regardless of the current mode
(Day/Night). However, it is still possible to lower the set point at your discretion.
Procedures to activate the Lock mode (for model with backlight)
1. To activate the Lock option, from the Day mode adjust the day set point to the
desired maximum temperature.
13
2. From the Day mode, simultaneously press down the two buttons for more than
13 seconds, until the Lock icon displays (note that the backlight will blink after 3
seconds and the °C or °F symbol will appear after 8 seconds, but continue to keep
both buttons pressed down).
3. Release the buttons. The thermostat is now locked.
Procedures to activate the Lock mode (for model without backlight)
1. To activate the Lock option, from the Day mode adjust the day set point to the
desired maximum temperature.
2. From the Day mode, simultaneously press down the two buttons for more than 13
seconds, until the Lock icon appears (note that the °C or °F symbol will blink after 3
seconds, but continue to keep both buttons pressed down).
3. Release the buttons. The thermostat is now locked.
Procedures to deactivate the Lock mode
1. To deactivate the Lock mode, start by cutting off the thermostat power at circuit
breaker and wait at least 20 seconds.
2. Turn the thermostat power back on and the Lock icon will blink for a maximum of
5 minutes.
3. Simultaneously press down both buttons for 13 seconds (note that the backlight
will blink after 3 seconds and the °C or °F symbol will appear after 8 seconds, but
continue to keep both buttons pressed down). After 13 seconds, the Lock icon will
disappear and the degrees symbol (C or F) will stop blinking, indicating that the
Lock mode is deactivated. Release the buttons.
14
Fan mode
The activation of the Fan mode is similar to the Celsius/ Fahrenheit adjustment.
Procedure to activate/deactivate the Fan mode (for model
with backlight)
To activate or deactivate the Fan mode, you must press down both buttons
simultaneously for 8 seconds while in Day mode.
Once the 8 seconds have passed, the Celsius/Fahrenheit symbol will blink. At this
point, release the buttons. You must then press down the bottom button to activate
or deactivate the Fan mode. The Fan symbol will turn on or off depending on the case.
Procedure to activate/deactivate the Fan mode (for model without backlight)
To activate or deactivate the Fan mode, you must press down both buttons
simultaneously for 3 seconds while in Day mode. Once the 3 seconds have passed,
the Celsius/ Fahrenheit symbol will blink. At this point, release the buttons.
You must then press down the bottom button to activate or deactivate the Fan mode.
The Fan pictogram will turn on or off depending on the case.
15
When the Fan mode is activated, the stop or minimum heating time (OFF/ON)
for a complete 10 minute cycle is established at 90 seconds (factory setting). You
can adjust it from 90 to 300 seconds. This is done to limit the amount of times the
thermostat will turn on or off. Also, if the thermostat reaches a differential superior
or inferior to the 2 degrees requested, it will shut off immediately. The deactivation
of the fan mode will cause the thermostat to go back to the heating cycle previously
programmed. Once the adjustment is finished, you can exit the adjustment mode by
not pressing any buttons for 5 seconds.
Ventilation intervals adjustment
You can adjust the minimum time between the fan startups and shutdowns. This
adjustment is similar to the fan activation procedure. First, you have to enter the fan
adjustment mode, as described in the previous section. Then, you must press down
the bottom button for 3 seconds, until the Fan icon blinks. A duration in seconds will
appear. You can adjust it from 90 (factory setting) to 300 seconds by increments of
30 seconds. Once the adjustment is done, you can exit the adjusment mode by not
pressing down any button during 5 seconds.
Parameters saving and power failures
The thermostat saves some parameters in a non-volatile memory to be able to
recover them after being shut off (a power failure, for example). These parameters
are the Day/ Night settings, the Automatic mode, the state of the Lock mode, the
maximum setting of the Lock mode, the Celsius/Fahrenheit mode, the Fan mode, the
number of minutes associated to a heating cycle, the number of hours of the night
time-switch, the number of hours remaining on the night time-switch and the current
Day/Night mode. These parameters are saved every minute if any changes are made,
except for the Day/Night mode and the remaining time left on the time-switch. These
are saved only if the automatization of the Day/Night mode had not been activated.
16
Please note that the automatization of the Day/Night modes is not automatically
reactivated when thermostat is turned on. The icon of the Automatic mode blinks
to warn the user that the mode was previously activated when thermostat was shut
off but is no longer active. Furthermore, when power is shut off, the existing Day/
Night mode is recovered only if the Automatic mode was previously deactivated. In
the opposite case, the Day mode is automatically reactivated. The Lock mode is also
reactivated if it was activated before being shut off. However, the icon will blink for
5 minutes, during which it is possible to deactivate the Lock mode by pressing down
both buttons simultaneously for 13 seconds. If this is not done, the Lock mode will
stay activated and the icon will stop blinking.
Night light (only for model with backlight)
You can activate the Night light option to permanently turn on the backlight. To
activate or deactivate this mode, the thermostat must first be set in Day mode. Then,
simultaneously press down both buttons for 3 seconds until the backlight blinks.
Release the buttons. The night light mode will be activated (or deactivated if it was
previously activated).
17
4. Troubleshooting
Problem
Solution
The thermostat is hot.
In normal operating conditions, the thermostat
housing can reach nearly 40°C at maximum load. That
is normal and will not affect the effective operation of
the thermostat.
Heating is always on.
Check if the thermostat is properly connected. Refer
to the installation section.
Heating does not run even if the thermostat indicates
it is on.
Check if the thermostat is properly connected. Refer
to the installation section.
The display does not turn on.
Check if the thermostat is properly connected. Refer
to the installation section. Check the power supply
at the electrical panel. Check if the heating unit has a
switch. If so, ensure that this switch is turned on.
The display turns off a few minutes and then turns
on again.
The thermal protection of the heating unit has
opened due to overheating. Check if the heating
unit is in good condition of operation and that
clearance around the appliance is according to the
manufacturer’s specifications.
The display has low contrast when heating is on.
The load is lower than the minimum load. Install
a heating unit that is within the load limits of the
thermostat.
The displayed ambient temperature is incorrect.
Check the presence of an air stream or a heat source
near the thermostat, and correct the situation.
The display indicates
E1 or E2.
Faulty thermal sensor. Contact the customer service.
Weak luminosity of
the display.
Possibility of a bad contact. Check thermostat wirings.
Refer to the installation section.
NOTE:
If you are unable to resolve the problem after having verified these points, please contact our customer
service department at 1-888-725-9797.
18
5. Technical Specifications
Supply voltage:
120/240 VAC, 50/60 Hz
Maximum electrical current with a resistive load:
12.5 A
3000 W @ 240 VAC
1500 W @ 120 VAC
Temperature display range:
3°C to 40°C (37°F to 99.5°F)
Temperature display resolution:
0.5°C (0.5°F)
Temperature set point range:
3°C to 30°C (37°F to 86°F)
Temperature set point increments:
0.5°C (1°F)
Storage temperature:
-40°C to 50°C (-104°F to 122°F)
19
Fo Installation Help
Fo
For
1-877-654-9394
1
-877-654-9394
877 654 9394
White-Rodgers.com
White-Rodgers
8100 West Florissant Avenue
St. Louis, MO 63136
© 2012 Printed in Canada
5. Especificaciones técnicas
Voltaje de alimentación:
120/240 VCA, 50/60 Hz
Corriente eléctrica máxima con una carga resistiva:
12.5 A
3000 W a 240 VCA
1500 W a 120 VCA
Temperatura de almacenamiento:
-40°C a 50°C (-104°F a 122°F)
Incrementos del punto de referencia de la temperatura:
0.5°C (1°F)
Rango del punto de referencia de la temperatura:
3°C a 30°C (37 °F a 86°F)
Resolución de la pantalla de temperatura:
0.5°C (0.5°F)
Rango de la pantalla de temperatura:
3°C a 40°C (37 °F a 99.5°F)
19
4. Solución de problemas
Problema
Solución
Posibilidad de un mal contacto. Revise el cableado
del termostato. Consulte la sección de instalación.
Luminosidad débil de la pantalla.
Sensor térmico con falla. Comuníquese con servicio
al cliente.
La pantalla indica E1 o E2.
Compruebe si hay presencia de una corriente de aire
o una fuente de calor cerca del termostato y corrija
la situación.
La temperatura ambiente mostrada es incorrecta.
La carga es menor que la carga mínima. Instale una
unidad de calefacción que quede dentro de los límites
de carga del termostato.
La pantalla tiene bajo contraste cuando la calefacción
está encendida.
La protección térmica de la unidad de calefacción se
abrió debido a un sobrecalentamiento. Revise si la
unidad de calefacción está en buenas condiciones de
operación y que la separación alrededor del aparato
sea de acuerdo con las especificaciones del fabricante.
La pantalla se apaga algunos minutos y luego
enciende de nuevo.
Revise si el termostato está bien conectado.
Consulte la sección de instalación. Revise la fuente
de alimentación en el panel eléctrico. Revise si la
unidad de calefacción tiene un interruptor. Si lo tiene,
asegúrese de que esté encendido.
La pantalla no enciende.
Revise si el termostato está bien conectado. Consulte la
sección de instalación.
La calefacción no funciona aunque el termostato
indique que está encendida.
Revise si el termostato está bien conectado. Consulte la
sección de instalación.
La calefacción siempre está encendida.
En condiciones normales de operación, la carcasa
del termostato puede alcanzar casi 40 °C con una
carga máxima. Esto es normal, y no afectará la
operación eficaz del termostato.
El termostato está caliente.
NOTA:
Si no puede resolver el problema después de verificar estos puntos, comuníquese con nuestro
departamento de servicio al cliente llamando al 1-888-725-9797.
18
Tome en cuenta que la automatización de los modos de Día/Noche no se reactiva
automáticamente cuando se enciende el termostato. El icono del modo Automático
destella para advertir al usuario que el modo ya estaba activado previamente cuando
el termostato estuvo apagado, pero ya no está activo. Además, cuando se interrumpe
la electricidad, se recupera el modo Día/Noche existente únicamente si se desactivó
previamente al modo Automático. En el caso opuesto, se reactiva automáticamente
el modo de Día. El moto de Bloqueo también se reactiva si estuvo activado antes de
que se apagara. Sin embargo, el icono destellará 5 minutos, durante los cuales es
posible desactivar el modo de Bloqueo presionando los dos botones al mismo tiempo
durante 13 segundos. Si esto no se hace, el modo de Bloqueo se mantendrá activado
y el icono dejará de destellar.
Luz de noche (solo para el modelo con luz de fondo)
Puede activar el modo de Luz nocturna para encender de manera permanente la
luz de fondo. Para activar o desactivar este modo, el termostato debe configurarse
primero en modo de Día. Después, presione al mismo tiempo los dos botones por
3 segundos, hasta que destelle la luz de fondo. Suelte los botones. El modo de Luz
nocturna quedará activado (o desactivado, si estaba activado previamente).
17
Cuando se active el modo de Ventilador, el tiempo de calefacción para apagarse
o mínimo (OFF/ON) por un ciclo completo de 10 minutos se establece a los
90 segundos (ajuste de fábrica). Lo puede ajustar de 90 a 300 segundos. Esto se
hace para limitar la cantidad de veces que el termostato se encenderá o apagará.
Asimismo, si el termostato llega a un diferencial solicitado mayor o menor de 2 grados,
se apagará de inmediato. La desactivación del modo de ventilador ocasionará que el
termostato regrese al ciclo de calefacción previamente programado. Una vez que se
termine el ajuste, puede salir del modo de ajuste si no presiona ningún botón por
5 segundos.
Ajuste a los intervalos de ventilación
Puede ajustar el tiempo mínimo entre los arranques y apagados del ventilador.
Este ajuste es parecido al procedimiento de activación del ventilador. Primero tiene
que entrar al modo de ajuste del ventilador, como se describe en la sección anterior.
Luego debe presionar el botón de abajo 3 segundos hasta que destelle el icono
del Ventilador. Aparecerá la duración en segundos. Puede ajustarla de 90 (ajuste de
fábrica) a 300 segundos en incrementos de 30 segundos. Una vez que se haga
el ajuste, puede salir del modo de ajuste si no presiona ningún botón por 5 segundos.
Almacenamiento de parámetros y fallas eléctricas
El termostato guarda algunos parámetros en una memoria no volátil para poderlos
recuperar después de que se apague (por ejemplo, por una falla eléctrica).
Estos parámetros son: los ajustes de Día/noche, el modo Automático, el estado del
modo de Bloqueo, el ajuste máximo del modo de Bloqueo, el modo de Centígrados/
Fahrenheit, el modo de Ventilador, el número de minutos relacionados con un ciclo
de calefacción, el número de horas del interruptor de noche, el número de horas que
le quedan al interruptor de noche y el modo de Día/Noche actual. Estos parámetros
se guardan cada minuto si se hace algún cambio, excepto por el modo de Día/Noche
y el tiempo restante en el interruptor de tiempo. Estos se guardan solamente si no se
ha activado la automatización del modo de Día/Noche.
16
Modo de Ventilador
La activación del modo de Ventilador es similar al ajuste de grados Centígrados/
Fahrenheit.
Procedimiento para activar/desactivar el modo de Ventilador (para el modelo con luz
de fondo)
Para activar o desactivar el modo de Ventilador, debe presionar los dos botones al
mismo tiempo durante 8 segundos al estar en modo de Día.
Una vez que transcurran los 8 segundos, el símbolo de Centígrados/Fahrenheit
va a destellar. En este punto, suelte los botones. Ahora debe presionar el botón de
abajo para activar o desactivar el modo de Ventilador. El símbolo de Ventilador se
encenderá o apagará, dependiendo del caso.
Procedimiento para activar/desactivar el modo de Ventilador (para el modelo sin luz
de fondo)
Para activar o desactivar el modo de Ventilador, debe presionar los dos botones al
mismo tiempo durante 3 segundos al estar en modo de Día. Una vez que transcurran
los 3 segundos, el símbolo de Centígrados/ Fahrenheit va a destellar. En este punto,
suelte los botones.
Ahora debe presionar el botón de abajo para activar o desactivar el modo de Ventilador.
El símbolo de Ventilador se encenderá o apagará, dependiendo del caso.
15
2. Desde el modo de Día, presione al mismo tiempo los dos botones por más de
13 segundos hasta que se muestre el icono de Bloqueo (tome en cuenta que la
luz de fondo destellará después de 3 segundos y que el símbolo °C o °F aparecerá
después de 8 segundos, pero siga presionando los dos botones).
3. Suelte los botones. El termostato ya está bloqueado.
Procedimientos para activar el modo de bloqueo (para el modelo sin luz de fondo)
1. Para activar la opción de Bloqueo, desde el modo de Día ajuste el punto de
referencia de día a la temperatura máxima deseada.
2. Desde el modo de Día, presione al mismo tiempo los dos botones por más de
13 segundos hasta que se muestre el icono de Bloqueo (tome en cuenta que
el símbolo °C o °F destellará después de 3 segundos, pero siga presionando los
dos botones).
3. Suelte los botones. El termostato ya está bloqueado.
Procedimientos para desactivar el modo de Bloqueo
1. Para desactivar el modo de Bloqueo, comience interrumpiendo la electricidad del
termostato en el disyuntor y espere por lo menos 20 segundos.
2. Reconecte la electricidad al termostato, y el icono de Bloqueo destellará un máximo
de 5 minutos.
3. Presione al mismo tiempo los dos botones por 13 segundos (tome en cuenta que
la luz de fondo destellará después de 3 segundos y que el símbolo °C o °F aparecerá
después de 8 segundos, pero siga presionando los dos botones). Después de
13 segundos, el icono de Bloqueo va a desaparecer y el símbolo de grados
(C o F) dejará de destellar, indicando que se desactivó el modo de Bloqueo.
Suelte los botones.
14
Indicador del poder de la calefacción
El nivel de poder utilizado para mantener la temperatura en el punto de referencia se
expresa como porcentaje, indicado por el número de barras en el termómetro mostrado.
El poder de calefacción utilizado se muestra como sigue:
4 barras = 75 a 100%
3 barras = 50 a 75%
2 barras = 25 a 50%
1 barra = 1 a 25%
0 barra = sin calefacción
Advertencia de ausencia de escarcha
Cuando el punto de referencia de temperatura se encuentra entre 3 °C (37 °F)
y 5 °C (41 °F) se muestra el icono del Copo de nieve. Se mantendrá una temperatura
mínima para asegurar el control de la escarcha.
Opción de bloqueo
Es posible imponer un punto de referencia de temperatura máxima activando
este modo. Posteriormente, se hace imposible exceder este punto de referencia,
sin importar el modo actual (Día/Noche). Sin embargo, todavía es posible bajar el
punto de referencia a su discreción.
Procedimientos para activar el modo de bloqueo (para el modelo con luz de fondo)
1. Para activar la opción de Bloqueo, desde el modo de Día ajuste el punto de referencia
de día a la temperatura máxima deseada.
13
Visualización en grados Centígrados / Fahrenheit
El termostato puede mostrar la temperatura ambiente y el punto de referencia en
grados Centígrados (ajuste de fábrica estándar) o Fahrenheit.
Procedimiento de selección para visualizar grados Centígrados/Fahrenheit (para el
modelo con luz de fondo)
1. Desde el modo de Día, presione al mismo tiempo los dos botones por 8 segundos
(tome en cuenta que la luz de fondo destellará después de 3 segundos, pero debe
mantener presionados los botones). El símbolo de Centígrados/Fahrenheit
destellará después de 8 segundos. Suelte los botones.
2. Presione el botón de arriba para cambiar de grados Centígrados a Fahrenheit
y viceversa. Se mostrará el símbolo de grados Centígrados o Fahrenheit.
3. Cuando se termine el ajuste, suelte los botones y espere 5 segundos para salir de
la función de ajuste.
Procedimiento de selección para visualizar grados Centígrados/Fahrenheit (para el
modelo sin luz de fondo)
1. Desde el modo de Día, presione al mismo tiempo los dos botones por 3 segundos.
El símbolo de Centígrados/Fahrenheit destellará después de 3 segundos. Suelte los
botones.
2.Presione el botón de arriba para cambiar de grados Centígrados a Fahrenheit
y viceversa. Se mostrará el símbolo de grados Centígrados o Fahrenheit.
3. Cuando se termine el ajuste, suelte los botones y espere 5 segundos para salir de
la función de ajuste.
12
NOTA:
Siempre es posible cambiar manualmente el modo de Día/Noche en un ciclo
de 24 horas. Sin embargo, todo retorno manual al modo de Noche reiniciará
el contador de tiempo del modo de noche al último valor registrado, el cual
modifica al ciclo en progreso. En todos los casos, al terminar el ciclo de 24 horas,
el termostato regresará al modo de Noche y comenzará un nuevo ciclo.
Por lo tanto, no es necesario reajustar el modo Automático cuando se realiza un
cambio manual al modo Día/Noche.
Cuando encienda otra vez después de estar apagado (por ejemplo, por una
falla eléctrica), se desactiva la automatización de los modos Día/Noche y, si estaba
activada previamente, destellará el pictograma que corresponde a este modo.
Los destellos se detendrán tan pronto como presione un botón.
11
Procedimiento de ajuste del modo Automático
1. De ser necesario, ajuste el punto de referencia del modo de Día/Noche a las
temperaturas deseadas. De ser necesario, cambie de un modo al otro presionando
al mismo tiempo los dos botones y soltándolos de inmediato.
2. Desde el modo de Noche, presione al mismo tiempo los dos botones por más
de 3 segundos. De ser necesario, ajuste el contador de tiempo presionando el
botón de arriba para aumentar el valor o el botón de abajo para reducirlo. El rango
de ajuste del contador de tiempo del modo de Noche es de 1 a 23 horas en el
modo Automático. Para desplazarse rápidamente por los valores del contador
de tiempo, presione el botón de abajo y manténgalo presionado.
NOTA:
Si configura el contador de tiempo con un valor mayor de 23 horas, será imposible
activar el modo Automático y, si estaba activado, se desactivará.
3. Active el modo Automático presionando al mismo tiempo los dos botones por lo
menos 3 segundos. Aparecerá el icono del modo Automático. Si ya estaba activado
el modo Automático, debe usarse el mismo procedimiento para desactivarlo.
4. Cuando se termine el ajuste, suelte los botones y espere 5 segundos para salir de
la función de ajuste.
10
NOTA:
El contador de tiempo de modo de Noche se reiniciará automáticamente al
último valor registrado cuando cambie del modo de Día al modo de Noche.
No es necesario reajustar el contador de tiempo cada vez que cambie al modo
de Noche. El contador también se reinicia cuando se ajusta este valor. Una vez
que el contador de tiempo ha completado su ciclo, y cuando el termostato está
en modo de Día, debe regresar manualmente al modo de Noche. Si desea regresar
automáticamente al modo de Noche, debe seleccionar el modo Automático.
Modo Automático
El modo Automático, que se relaciona con el contador de tiempo del modo de Noche,
permite alternar entre los modos de Día/Noche y los dos puntos de referencia
correspondientes en un periodo de 24 horas. Una vez activado, este modo permite
un regreso automático al modo de Noche después de 24 horas. El modo Automático
le permite definir dos periodos en un solo día con puntos de referencia diferentes.
Por ejemplo, si se activa el modo Automático y el contador de tiempo de modo de
Noche está configurado en 8 horas, el termostato va a operar en el modo de Noche
por 8 horas al punto de referencia de temperatura de noche. Luego regresará al
modo de Día durante 16 horas, operando al punto de referencia de temperatura
de día. Al terminar el ciclo de 24 horas, el termostato regresará al modo de Noche y
el ciclo comenzará otra vez. El ciclo de 24 horas comienza con el modo de Noche tan
pronto como se activa el modo Automático. La activación del modo automático debe
hacerse cuando desee regresar al modo de Noche. El curso normal de un ciclo en el
modo Automático es como sigue:
1- Modo de noche: se activa mientras dure el ciclo del contador de tiempo de modo
de Noche. Regresa al modo de Día cuando se completa el ciclo del contador
de tiempo.
2- Modo de día: se activa por el tiempo restante del ciclo de 24 horas. Regresa al
modo de noche al terminar el ciclo de 24 horas.
9
Contador de tiempo para el modo de Noche
El modo de Noche incluye un contador de tiempo que regresa automáticamente
al modo de Día después de un periodo de tiempo seleccionable. Este contador
de tiempo permite el uso temporal de un punto de referencia de temperatura.
El ajuste estándar de fábrica del contador de tiempo es de 8 horas. Con este ajuste,
el termostato regresa automáticamente al modo de Día 8 horas después de que
se cambie al modo de Noche. Por ejemplo, si en la noche desea una temperatura
más baja que en el día, primero tendrá que configurar la temperatura deseada de
los dos puntos de referencia, de Día y de Noche. Antes de dormir, se activará el
punto de referencia de temperatura del modo de Noche cambiando manualmente
al modo de Noche. El contador de tiempo está configurado mientras dure la noche.
El termostato regresará automáticamente al modo de Día al terminar la noche, y el
punto de referencia de temperatura del modo de Día, que es más alto, entrará en
vigor en este momento.
Procedimiento de ajuste del contador de tiempo de modo de noche
1. De ser necesario, ajuste los puntos de referencia del modo de Día/Noche a las
temperaturas deseadas. De ser necesario, cambie de un modo al otro presionando
al mismo tiempo los dos botones y soltándolos de inmediato.
2. Desde el modo de Noche, presione al mismo tiempo los dos botones por más de
3 segundos hasta que destelle el icono de la luna.
3. De ser necesario, ajuste el contador de tiempo presionando el botón de arriba
para aumentar el valor o el botón de abajo para reducirlo. El rango de ajuste es
de 1 a 999 horas. Para desplazarse rápidamente por los valores del contador de
tiempo, presione el botón y manténgalo presionado.
4. Cuando se termine el ajuste, suelte los botones y espere 5 segundos para salir de
la función de ajuste.
8
Para ajustar el punto de referencia, simplemente presione el botón de arriba para
aumentar el valor o el botón de abajo para reducirlo. Los puntos de referencia se
pueden ajustar en incrementos de 0.5 °C (1 °F). Para desplazarse rápidamente por
los valores del punto de referencia, presione el botón y manténgalo presionado.
El punto de referencia mínimo es 3 °C (37 °F), y el punto de referencia máximo
es 30 °C (86 °F). En modo de Día puede apagar el termostato disminuyendo el punto
de referencia más abajo de 3°C. El valor del punto de referencia mostrado será OFF
y será imposible arrancar el sistema de calefacción.
Modo de día y modo de noche
El termostato incluye un modo de Día
y un modo de Noche
; los dos tienen
su propio punto de referencia registrado y ajustable de manera independiente.
Cuando cambie de un modo al otro, el sistema usará automáticamente el punto
de referencia de temperatura que corresponda al modo Día/Noche seleccionado.
El ajuste del punto de referencia de fábrica estándar es de 21°C (70°F) para el modo
de Día y de 18°C (64°F) para el modo de Noche.
La selección del modo de Día/Noche actual está indicada en la pantalla con el icono
del sol o la luna. Para poder cambiar manualmente de un modo al otro, presione al
mismo tiempo los dos botones y suéltelos de inmediato.
7
3. Operación
temperatura
ambiente/contador
de tiempo
pictogramas
advertencia de ausencia
de escarcha
modo de día
modo de noche
indicador de poder
de calefacción
utilizado
modo de ventilador
modo automático
modo de bloqueo
botón de arriba
botón de abajo
Encendido por primera vez
Cuando lo enciende por primera vez, el termostato está configurado inicialmente
. La temperatura se muestra en grados Centígrados y está
en modo de Día
configurada en 21 grados de manera predeterminada.
Puntos de referencia de temperatura
Las cifras mostradas arriba del pictograma indican el punto de referencia de temperatura.
Puede mostrarse en grados Centígrados o Fahrenheit (vea "Visualización en grados
Centígrados / Fahrenheit").
6
6. Coloque todos los alambres en la caja de conexiones.
7. Alinee las pequeñas ranuras situadas en la parte superior
del termostato con las de la base de montaje y asegure el
termostato a la base de montaje. Tome en cuenta que también
puede colocar el termostato al lado izquierdo o derecho
de la caja de conexiones (vea las ilustraciones siguientes).
Luego apriete el tornillo en la parte inferior de la unidad.
8. Encienda la alimentación.
9. Configure el termostato en el ajuste deseado (consulte la
siguiente sección).
5
5. Tome los cables de la pared por la abertura de la base de montaje y conéctelos
usando los conectores sin soldadura suministrados. Cuando realice la conexión
con el alambre de aluminio, asegúrese de usar los conectores identificados
como CO/ALR. Tome en cuenta que los cables del termostato no tienen polaridad.
Por lo tanto, no es importante la manera como se conecten.
Instalación de 2 alambres
Instalación de 4 alambres
4
3.Con un destornillador, afloje el tornillo que retiene la base de montaje del termostato
hasta que sienta que esté suelto (no quite totalmente el tornillo).
Luego retire la base de montaje en la parte posterior del termostato inclinando
hacia abajo y luego hacia usted.
4. Alinee y asegure la base de montaje a la caja de conexiones usando los dos
tornillos suministrados.
3
2. Instalación
Selección de la ubicación del termostato. El termostato debe montarse sobre una caja
de conexiones en una pared de frente a la unidad de calefacción, aproximadamente
a 1.5 m (5 pies) por arriba del nivel del piso, en una sección de la pared que no tenga
tubos ni conductos de aire.
No instale el termostato en un sitio donde se podrían alterar las mediciones
de temperatura. Por ejemplo:
• cerca de una ventana, en una pared exterior o cerca de una puerta que conduzca
al exterior;
• expuesto directamente a la luz o al calor del sol, una lámpara, una chimenea o
alguna otra fuente de calor;
• cerca o frente de una salida de aire;
• cerca de conductos ocultos o una chimenea; y
• en un lugar con poco flujo de aire (por ejemplo, detrás de una puerta) o con
corrientes de aire frecuentes (por ejemplo, al inicio de las escaleras).
Montaje y conexión del termostato
1. Desconecte el suministro eléctrico en los cables principales del panel
eléctrico con el fin de evitar cualquier riesgo de descarga eléctrica.
2. Asegúrese de que las ventilaciones de aire del termostato estén limpias y libres de
cualquier obstrucción.
2
1. Descripción
Este termostato se puede usar para controlar unidades de calefacción eléctrica,
como zócalos eléctricos, convectores o aeroconvectores. Mantiene la temperatura
de una habitación al punto de referencia solicitado con un alto grado de precisión.
Este producto está diseñado para instalaciones con corriente eléctrica (con una
carga resistiva) que varía de 1.25 A a 12.5 A (120/240 VCA). Cuenta con una interfaz
fácil de usar. Además, le brinda la posibilidad de controlar la temperatura de una
habitación con gran precisión.
Este termostato no es compatible con las siguientes instalaciones:
• Corriente eléctrica mayor de 12.5 A con una carga resistiva (3000 W a 240 VCA
y 1500 W a 120 VCA)
• Corriente eléctrica menor de 1.25 A con una carga resistiva (300 W a 240 VCA
y 150 W a 120 VCA); y
• Sistema de calefacción central.
Piezas suministradas:
• un (1) termostato;
• placa de montaje en pared situada en la parte posterior del termostato;
• dos (2) tornillos de montaje;
• dos (2) conectores sin soldadura adecuados para alambres de cobre.
1
ADVERTENCIA
ADVERTENCIA
Antes de instalar y operar este producto, el propietario y/o instalador debe leer,
entender y seguir estas instrucciones, conservándolas a la mano para referencia futura.
De no seguir estas instrucciones, la garantía se considerará nula y el fabricante no se hará
responsable por este producto. Además, se deben cumplir las instrucciones siguientes
con el fin de evitar lesiones personales o daños a la propiedad, lesiones graves y
posibles descargas eléctricas fatales. Todas las conexiones eléctricas las debe hacer un
electricista calificado, de acuerdo con los códigos eléctricos y de construcción vigentes
en su región. NO conecte este producto a una fuente de alimentación que no sea de
120 VCA o 240 VCA, y no exceda los límites de carga especificados. Proteja el sistema
de calefacción con el interruptor automático de circuitos o fusible que sea adecuado.
Debe limpiar con regularidad las acumulaciones de suciedad en el termostato. NO use
fluidos para limpiar la ventilación de aire del termostato. No instale el termostato en
un lugar húmedo. Sin embargo, se permite instalarlo en paredes aisladas.
Nota:
Cuando se debe cambiar una parte de la especificación del producto para mejorar
la capacidad de operación u otras funciones, se da prioridad a la especificación
misma del producto. En dichos casos, el manual de instrucciones tal vez no coincida
plenamente con todas las funciones del producto real.
Por lo tanto, el producto y el empaque reales, así como el nombre y la ilustración,
podrían ser diferentes al manual.
La pantalla/monitor LCD mostrado como ejemplo en este manual podría ser diferente
de la pantalla/monitor LCD real.
Termostato no programable por voltaje de línea
Instrucciones de instalación y guía del usuario
Para BNP125, BNP150C, BNP125C, 1E65-140
¡Felicitaciones por comprar
su termostato White-Rodgers™!
¡Conserve estas instrucciones
para consultarlas en cualquier momento!
¿Alguna pregunta? Comuníquese con White-RodgersTM
Servicio al cliente: 1-877-654-9394
37-7460A