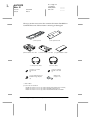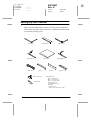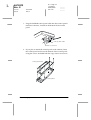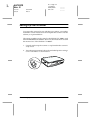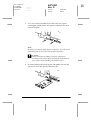
1
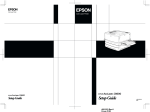
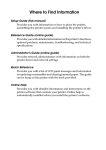
Color Copy Station
Color Copy Station
Setup Guide
Printed in Japan
00.XX-XX
Setup Guide
4012841-00
XXX
L
R4C3900
Rev. D
A5 size
4/6/01
COVER2.FM
Pass 3
Proof Sign-off:
T.Ichihashi
M.Miyazaki
K.Norum
_______
_______
_______
Where to Find Information
Before using the EPSON AcuLaser Color Copy Station 8500,
be sure to follow the instructions in the following manuals.
EPSON AcuLaser Color Copy Station 8500 Setup Guide
(this manual)
Explains how to assemble the copy station’s components and test
basic copying operation.
EPSON AcuLaser Color Copy Station 8500 Quick Reference
Gives you quick access to information needed for daily copying,
including explanations of control panel functions and touch panel
messages. This guide can be hung on the printer with the hook
provided.
EPSON AcuLaser Color Copy Station 8500 Reference Guide
(supplied on the CD-ROM accompanying the copy station)
Provides you with detailed information on the copy station,
from general maintenance and troubleshooting to technical
specifications.
For information on assembling the printer, the large capacity
paper unit, and the scanner, refer to the Unpacking Guide and
Setup Guide included with each device.
Proof Sign-off:
T.Ichihashi
M.Miyazaki
K.Norum
_______
_______
_______
R
R4C3900
Rev. D
A5 size
4/6/01
FRONT.FM
Pass 3
All rights reserved. No part of this publication may be reproduced, stored in a retrieval
system, or transmitted in any form or by any means, mechanical, photocopying, recording,
or otherwise, without the prior written permission of SEIKO EPSON CORPORATION. No
patent liability is assumed with respect to the use of the information contained herein. Neither
is any liability assumed for damages resulting from the use of the information contained
herein.
Neither SEIKO EPSON CORPORATION nor its affiliates shall be liable to the purchaser of
this product or third parties for damages, losses, costs, or expenses incurred by purchaser as
a result of: accident, misuse, or abuse of this product or unauthorized modifications, repairs,
or alterations to this product, or (excluding the U.S.) failure to strictly comply with SEIKO
EPSON corporation's operating and maintenance instructions.
SEIKO EPSON CORPORATION shall not be liable against any damages or problems arising
from the use of any options or any consumable products other than those designated as
Original EPSON Approved Products by SEIKO EPSON CORPORATION.
EPSON is a registered trademark of SEIKO EPSON CORPORATION.
General Notice: Other product names used herein are for identification purposes only and may be
trademarks of their respective owners. EPSON disclaims any and all rights in those marks.
Copyright © 2000 by SEIKO EPSON CORPORATION, Nagano, Japan
Setup Guide
L
R4C3900
Rev. D
A5 size
4/6/01
Proof Sign-off:
T.Ichihashi
M.Miyazaki
K.Norum
FRONT.FM
Pass 3
_______
_______
_______
DECLARATION of CONFORMITY
According to 47CFR, Part 2 and 15 for Class B Personal Computers and Peripherals;
and/or CPU Boards and Power Supplies used with Class B Personal Computers:
We:
Located at:
EPSON AMERICA, INC.
MS 6-43
3840 Kilroy Airport Way
Long Beach, CA 90806-2469
Telephone: (562)290-5254
Declare under sole responsibility that the product identified
herein, complies with 47CFR Part 2 and 15 of the FCC rules as a
Class B digital device. Each product marketed, is identical to the
representative unit tested and found to be compliant with the
standards. Records maintained continue to reflect the equipment
being produced can be expected to be within the variation
accepted, due to quantity production and testing on a statistical
basis as required by 47CFR §2.909 Operation is subject to the
following two conditions: (1) this device may not cause harmful
interference, and (2) this device must accept any interference
received, including interference that may cause undesired
operation.
ii
Trade Name:
EPSON
Type of Product:
Color Copy Station
Model:
EU-42
Proof Sign-off:
T.Ichihashi
M.Miyazaki
K.Norum
R
R4C3900
Rev. D
_______
_______
_______
A5 size
4/6/01
SETUPG.TOC
Pass 3
Contents
Safety Instructions . . . . . . . . . . . . . . . . . . . . . . . . . . . . . . . . . . . . . . . 1
Finding a Place for the Copy Station . . . . . . . . . . . . . . . . . . . . . . . 3
Checking the Copy Station Components . . . . . . . . . . . . . . . . . . . . 5
Setting Up the Cabinet . . . . . . . . . . . . . . . . . . . . . . . . . . . . . . . . . . . 7
Setting Up the Scanner . . . . . . . . . . . . . . . . . . . . . . . . . . . . . . . . . . . 14
Setting Up the Printer . . . . . . . . . . . . . . . . . . . . . . . . . . . . . . . . . . . . 17
Setting Up the Copy Station. . . . . . . . . . . . . . . . . . . . . . . . . . . . . . . 25
Testing the Copy Station . . . . . . . . . . . . . . . . . . . . . . . . . . . . . . . . . 30
Selecting a Language. . . . . . . . . . . . . . . . . . . . . . . . . . . . . . . . . . . . . 37
Appendix A
Installing EPSON Network Image Express . . . . . 39
Appendix B
Contacting Customer Support. . . . . . . . . . . . . . . . 47
iii
L
R4C3900
Rev. D
A5 size
4/6/01
SETUPG.TOC
Pass 3
iv
Proof Sign-off:
T.Ichihashi
M.Miyazaki
K.Norum
_______
_______
_______
Proof Sign-off:
T.Ichihashi
M.Miyazaki
K.Norum
_______
_______
_______
R
R4C3900
Rev. D
A5 size
4/6/01
SETUP.FM
Pass 3
Safety Instructions
Important Safety Instructions
Read all of these instructions and save them for later reference.
❏ Follow all warnings and instructions marked on the copy
station.
❏ Do not block or cover the openings in the printer or the scanner.
❏ Do not insert objects through the slots in the printer or the
scanner.
❏ Do not spill liquid on the copy station.
❏ Use only the type of power source indicated on the printer
and scanner labels.
❏ Connect all equipment to properly grounded power outlets.
Avoid using outlets on the same circuit as photocopiers or air
control systems that regularly switch on and off.
❏ Do not use a damaged or frayed power cord.
❏ Unless otherwise explained in this guide, do not attempt to
service this product yourself.
❏ Unplug the copy station and refer servicing to qualified
service personnel under the following conditions:
If a power cord or plug is damaged; if liquid has entered the
copy station; if any copy station component has been dropped
or the cabinet damaged; or if the copy station does not operate
normally or exhibits a distinct change in performance. Adjust
only those controls that are covered by the operating
instructions.
Safety Instructions
1
L
R4C3900
Rev. D
A5 size
4/6/01
SETUP.FM
Pass 3
Proof Sign-off:
T.Ichihashi
M.Miyazaki
K.Norum
_______
_______
_______
❏ If you plan to use the copy station in Germany, observe the
following:
To provide adequate short-circuit protection and overcurrent protection for this product, the building installation
must be protected by a 10 Amp or 16 Amp circuit breaker.
Note for German-speaking users:
Bei Anschluss des Druckers an die Stromversorgung muss
sichergestellt werden, dass die Gebäudeinstallation mit einer
10 A- oder 16 A-Sicherung abgesichert ist.
❏ Place the copy station near a wall outlet where you can easily
unplug the power cords.
Note for French-speaking users:
Placez le copy station près d'une prise de courant où les fiches
peuvent-être débranchées facilement.
Warnings, Cautions, and Notes
w
c
Warnings must be followed carefully to avoid bodily injury.
Cautions must be observed to avoid damage to your equipment.
Notes contain important information and useful tips on the operation
of your copy station.
2
Safety Instructions
Proof Sign-off:
T.Ichihashi
M.Miyazaki
K.Norum
R
R4C3900
Rev. D
_______
_______
_______
A5 size
4/6/01
SETUP.FM
Pass 3
Finding a Place for the Copy Station
Before assembling the copy station, find a place that meets the
following requirements.
❏ Leave adequate room for easy operation, maintenance, and
ventilation. The minimum space requirements are shown
below.
583 mm*
596 mm**
1348 to 1568 mm*
1381 to 1581 mm**
785 to 985 mm***
150 mm
780 mm
920 mm
620 mm
1332 mm (with tray extended)
656 mm (with tray folded)
835 mm
825 mm
* EPSON GT-10000+
** EPSON EXPRESSION 1640XL
***The cabinet height is adjustable to five positions.
Finding a Place for the Copy Station
3
L
R4C3900
Rev. D
A5 size
4/6/01
Proof Sign-off:
T.Ichihashi
M.Miyazaki
K.Norum
SETUP.FM
Pass 3
_______
_______
_______
❏ Place the copy station on a flat, stable surface.
❏ The copy station will operate properly under the following
conditions:
Temperature:
Humidity:
c
10 to 35°C
20 to 80%
Caution:
❏ Avoid locations that are subject to shock, direct sunlight,
extreme variation in temperature or humidity, excessive
heat, moisture, or dust.
❏ Do not place the copy station in locations where volatile
substances are used or stored.
4
Finding a Place for the Copy Station
Proof Sign-off:
T.Ichihashi
M.Miyazaki
K.Norum
R
R4C3900
Rev. D
_______
_______
_______
A5 size
4/6/01
SETUP.FM
Pass 3
Checking the Copy Station Components
The copy station consists of a cabinet and central control panel,
a scanner (EPSON GT-10000+ or EPSON EXPRESSION 1640XL),
a printer (EPSON AcuLaser C8500), and a large capacity paper
unit. Make sure you have the boxes for each of the copy station
components listed below.
❏ Color laser printer (EPSON AcuLaser C8500)
❏ Large capacity paper unit
❏ Color image scanner (EPSON GT-10000+ or EPSON
EXPRESSION 1640XL)
EPSON GT-10000+
EPSON EXPRESSION 1640XL
❏ Cabinet
❏ Copy station accessories
Checking the Copy Station Components
5
L
R4C3900
Rev. D
A5 size
4/6/01
Proof Sign-off:
T.Ichihashi
M.Miyazaki
K.Norum
SETUP.FM
Pass 3
_______
_______
_______
The copy station accessories box contains the items listed below.
Confirm that none of these items is missing or damaged.
control panel
printer interface board
control panel shelf
scanner interface board
control panel cable
screws for control
panel shelf
(5)
screws with washers for
EPSON Image Express
(2)
program ROM module
scanner cable
screw for printer
interface board
(1)
rubber feet
(2 types × 2)
caution label
product documentation
EPSON AcuLaser Color Copy Station 8500 Setup Guide (this manual)
EPSON AcuLaser Color Copy Station 8500 Quick Reference
EPSON AcuLaser Color Copy Station 8500 Online Guide CD-ROM
6
Checking the Copy Station Components
Proof Sign-off:
T.Ichihashi
M.Miyazaki
K.Norum
R
R4C3900
Rev. D
_______
_______
_______
A5 size
4/6/01
SETUP.FM
Pass 3
Setting Up the Cabinet
Make sure the cabinet box contains all of the parts listed below.
Then follow the steps in this section to assemble the cabinet and
to install the control panel.
left frame
front panel
left support
caster fixer
right frame
top panel
joint A
cable clips (8)
stoppers (2)
right support
joint B
panel cover
Miscellaneous
M8 × 35 bolts (8)
M6 × 12 screws (4)
M4 × 10 screws (29)
flat washers (8)
spring washers (8)
spanner
lock pins (2)*
* Not for use with this model.
Setting Up the Cabinet
7
L
R4C3900
Rev. D
A5 size
4/6/01
Proof Sign-off:
T.Ichihashi
M.Miyazaki
K.Norum
SETUP.FM
Pass 3
_______
_______
_______
Assembling the Cabinet
c
Caution:
The cabinet is bulky and requires two people for assembly or
handling.
1. Place flat washers and spring washers onto four M8 × 35 bolts
as shown below. Align the positioning marks on the right
support and the right frame, then fasten the support to the
frame with the bolts.
right support
M8 × 35 bolt
spring washer
flat washer
positioning
marks
right frame
2. Assemble the left support and left frame as explained in
step 1.
8
Setting Up the Cabinet
Proof Sign-off:
T.Ichihashi
M.Miyazaki
K.Norum
R
R4C3900
Rev. D
_______
_______
_______
A5 size
4/6/01
SETUP.FM
Pass 3
3. Use M4 × 10 screws to fasten joint A and the front panel to the
frame in the order shown below. Fasten the joint only loosely
in this step. It is to be fastened securely later in the assembly
procedure.
➂
➀
➂
➁
joint A
front panel
4. Fasten the caster fixer and the stoppers to the bottom of the
frame with four M4 × 10 screws.
caster fixer
stopper
Setting Up the Cabinet
9
R4C3900
Rev. D
A5 size
4/6/01
Proof Sign-off:
T.Ichihashi
M.Miyazaki
K.Norum
SETUP.FM
Pass 3
_______
_______
_______
5. Fasten the top panel onto the frame with seven M4 × 10
screws.
top panel
6. Fasten joint B to the frame with eight M4 × 10 screws. Then
securely fasten joint A, which was installed in step 2.
1
2
3
4
5
A
A
A
A
joint B
10
Setting Up the Cabinet
985 mm
L
The stand height is adjustable
to five positions. When the
stand is in position 3, 4, or 5,
use holes A to fasten joint B.
Proof Sign-off:
T.Ichihashi
M.Miyazaki
K.Norum
_______
_______
_______
R
R4C3900
Rev. D
A5 size
4/6/01
SETUP.FM
Pass 3
7. Attach cable clips to the cabinet as needed. Holes are provided
for this purpose in various positions around the cabinet.
w
c
Warning:
Do not climb onto the cabinet. Doing so may result in injury,
or may damage the cabinet.
Caution:
This cabinet is designed for use exclusively with the EPSON
AcuLaser Color Copy Station 8500, EPSON AcuLaser
C8500/GT-10000+ or EPSON EXPRESSION 1640XL copy
system. Do not use it with any other devices.
Installing the Control Panel
Follow the instructions below to install the control panel. As the
surface of the panel is easily damaged, prepare a soft cloth on
which to lay the panel during the installation procedure.
Note:
The control panel can be used independently from the cabinet. If you do
not plan to install the panel in the cabinet, attach the rubber feet to the
the bottom of the control panel as shown, then follow the instructions
below to connect the cable and to attach the panel cover.
Setting Up the Cabinet
11
L
R4C3900
Rev. D
A5 size
4/6/01
SETUP.FM
Pass 3
Proof Sign-off:
T.Ichihashi
M.Miyazaki
K.Norum
_______
_______
_______
1. Plug the shielded control panel cable into the control panel’s
interface connector, located on the bottom of the control
panel.
control panel cable
interface connector
2. If you plan to attach the control panel to the cabinet, fasten
the control panel shelf onto the bottom of the control panel
using the screws included with the copy station accessories.
control panel shelf
control panel
12
Setting Up the Cabinet
Proof Sign-off:
T.Ichihashi
M.Miyazaki
K.Norum
_______
_______
_______
R
R4C3900
Rev. D
A5 size
4/6/01
SETUP.FM
Pass 3
3. Insert the control panel shelf straight into the opening on the
front of the cabinet’s top panel.
Note:
If you do not plan to attach the control panel to the cabinet, attach
the panel cover included in the cabinet box to the opening on the
cabinet’s top panel.
4. Secure the control panel shelf with the screws included with
the cabinet.
Setting Up the Cabinet
13
L
R4C3900
Rev. D
A5 size
4/6/01
SETUP.FM
Pass 3
Proof Sign-off:
T.Ichihashi
M.Miyazaki
K.Norum
_______
_______
_______
Setting Up the Scanner
To prepare the scanner for use with the copy station, you need to
install the scanner interface board and place the scanner onto the
cabinet, as explained below.
The setup procedure is the same for the EPSON GT-10000+ and
EPSON EXPRESSION 1640XL. However, the illustrations used in
this manual are of the EPSON GT-10000+.
1. Unpack and set up the scanner as explained in the scanner’s
Setup Guide.
2. Turn the transportation lock to the unlocked position using a
coin or small disc as shown below.
14
Setting Up the Scanner
Proof Sign-off:
T.Ichihashi
M.Miyazaki
K.Norum
_______
_______
_______
R
R4C3900
Rev. D
A5 size
4/6/01
SETUP.FM
Pass 3
3. Use a cross-head screwdriver to remove the two screws
securing the shield plate to the optional interface slot; then
remove the plate.
Note:
Keep the screws and the shield plate in a safe place. You will need to
reattach the plate if you remove the interface board later.
c
Caution:
Static electricity can damage electronic components.
Discharge static electricity by touching the metal frame of
your scanner before handling the interface board.
4. Insert the interface board along the side guide rails into the
expansion slot in the optional interface slot.
Setting Up the Scanner
15
L
R4C3900
Rev. D
A5 size
4/6/01
SETUP.FM
Pass 3
Proof Sign-off:
T.Ichihashi
M.Miyazaki
K.Norum
_______
_______
_______
5. Secure the board with the retaining screws.
6. Place the scanner onto the cabinet in the direction shown
below.
16
Setting Up the Scanner
Proof Sign-off:
T.Ichihashi
M.Miyazaki
K.Norum
_______
_______
_______
R
R4C3900
Rev. D
A5 size
4/6/01
SETUP.FM
Pass 3
Setting Up the Printer
To prepare the printer for use with the copy station, you need to
install the interface board, ROM module, and large capacity paper
unit, then place the printer into the cabinet. Follow the steps in
this section.
w
c
Warning:
Be careful when working inside the printer as some components
are sharp and may cause injury.
Caution:
Before you install the modules, be sure to discharge any static
electricity by touching a grounded piece of metal. Otherwise, you
may damage static-sensitive components.
1. Unpack the printer as explained in the printer’s Unpacking
Guide, then follow the instructions in the printer’s Setup Guide
to carry out the following procedures.
❏ Installing the face-up tray
❏ Installing the toner cartridges
❏ Installing the photoconductor unit
2. Make sure that the printer is not plugged in.
Setting Up the Printer
17
L
R4C3900
Rev. D
A5 size
4/6/01
SETUP.FM
Pass 3
Proof Sign-off:
T.Ichihashi
M.Miyazaki
K.Norum
_______
_______
_______
3. Remove the two screws securing the shield plate on the rear
of the printer; then remove the plate.
Note:
❏ You will need the screws to secure the printer interface board
later in this procedure.
❏ Keep the shield plate in a safe place. You will need to reattach it
if you remove the interface board later.
4. Open the printer cover and pull out the paper path unit at
least 10 cm (4 inches).
18
Setting Up the Printer
Proof Sign-off:
T.Ichihashi
M.Miyazaki
K.Norum
_______
_______
_______
R
R4C3900
Rev. D
A5 size
4/6/01
SETUP.FM
Pass 3
5. Remove the screws on the right cover.
6. Slide the right cover backward and remove it as shown below.
Setting Up the Printer
19
L
R4C3900
Rev. D
A5 size
4/6/01
SETUP.FM
Pass 3
Proof Sign-off:
T.Ichihashi
M.Miyazaki
K.Norum
_______
_______
_______
7. Identify the socket for the printer interface board.
printer interface
board socket
c
Caution:
You should not remove any modules from the circuit board.
Otherwise, the printer will not work.
8. Insert the interface connectors through the slot at the back of
the printer, then press the interface board firmly onto the
socket.
c
20
Caution:
Do not touch the surface of the printer interface board. Be
sure to hold it at the edges.
Setting Up the Printer
Proof Sign-off:
T.Ichihashi
M.Miyazaki
K.Norum
_______
_______
_______
R
R4C3900
Rev. D
A5 size
4/6/01
SETUP.FM
Pass 3
9. Secure the interface board with the screw included with the
copy station accessories.
Note:
Use a magnetic cross-head screwdriver to prevent the screw from
dropping inside the printer.
10. Secure the printer interface board with the two screws which
you removed from the shield plate in step 6.
Setting Up the Printer
21
L
R4C3900
Rev. D
A5 size
4/6/01
SETUP.FM
Pass 3
Proof Sign-off:
T.Ichihashi
M.Miyazaki
K.Norum
_______
_______
_______
11. Identify the slots for the ROM module.
ROM module slot A
12. Insert the module all the way into slot A, making sure that the
gold contact side of the module faces up. The X tab on the left
of the slot will jut out when the module is inserted correctly.
c
22
Caution:
❏ Do not force the ROM module into the slot.
❏ Be sure to insert the module facing the correct way.
Setting Up the Printer
Proof Sign-off:
T.Ichihashi
M.Miyazaki
K.Norum
_______
_______
_______
R
R4C3900
Rev. D
A5 size
4/6/01
SETUP.FM
Pass 3
13. To reattach the right cover, align the bottom of the cover with
the right side of the printer, then fit the pins on the top of the
cover onto the holes on the printer.
14. Secure the right cover with the screws, then close the front
cover and push the paper path unit back into the printer.
15. Install the large capacity paper unit as explained in the
printer’s manual.
Setting Up the Printer
23
L
R4C3900
Rev. D
A5 size
4/6/01
SETUP.FM
Pass 3
Proof Sign-off:
T.Ichihashi
M.Miyazaki
K.Norum
_______
_______
_______
16. Roll the large capacity paper unit and the printer into the
cabinet.
17. Lock the four casters on the bottom of the large capacity paper
unit.
w
24
Warning:
Make sure the casters are securely locked. Otherwise, the
printer may move and cause an accident.
Setting Up the Printer
Proof Sign-off:
T.Ichihashi
M.Miyazaki
K.Norum
R
R4C3900
Rev. D
_______
_______
_______
A5 size
4/6/01
SETUP.FM
Pass 3
Setting Up the Copy Station
Once you’ve added each device to the cabinet, you are ready to
set up the copy station. This process involves connecting the
interface cables and power cords. Follow the steps in this section.
Connecting Interface Cables
The copy station devices are connected as shown below.
printer
scanner
control panel
scanner cable
control panel cable
Setting Up the Copy Station
25
L
R4C3900
Rev. D
A5 size
4/6/01
SETUP.FM
Pass 3
Proof Sign-off:
T.Ichihashi
M.Miyazaki
K.Norum
_______
_______
_______
Follow the steps in this section to connect the interface cables.
1. Make sure the printer and scanner are not plugged in.
2. Plug the control panel cable into the printer's serial interface
connector. Make sure the locks on both sides of the connector
snap into place.
3. Plug the scanner cable into the scanner’s interface connector.
26
Setting Up the Copy Station
Proof Sign-off:
T.Ichihashi
M.Miyazaki
K.Norum
_______
_______
_______
R
R4C3900
Rev. D
A5 size
4/6/01
SETUP.FM
Pass 3
4. Plug the other end of the cable into the connector on the
printer.
Plugging in the Printer and Scanner
The printer and scanner power is supplied through separate
power cords. Take note of the Warnings and Cautions below,
then follow the steps in this section to plug in the printer and the
scanner.
w
Warning:
❏ Use only the power cords that come with the printer and
scanner. Using other power cords could result in fire or
electric shock.
❏ Do not use multi-plug adapters or extension cords, or
auxiliary power from a computer. Using such power sources
could result in fire or electric shock.
❏ Do not allow dust to build up on the plug or the outlet. In a
damp environment, a tiny amount of current may develop,
which could result in fire or electric shock.
❏ Never touch a power plug with wet hands. Doing so could
result in electric shock.
Setting Up the Copy Station
27
L
R4C3900
Rev. D
A5 size
4/6/01
SETUP.FM
Pass 3
c
Proof Sign-off:
T.Ichihashi
M.Miyazaki
K.Norum
_______
_______
_______
Caution:
❏ Do not unplug a device when its power is on.
❏ When unplugging a power cord, grasp it by the plug—not
the cord.
Plugging in the printer
1. Check the label on the printer to make sure that the voltage
required by the printer matches that of the electrical outlet it
will be plugged into. Also, make sure that you have the correct
power cord for your power source.
2. Make sure that the printer is turned off. It is off when the
(N) side of the power switch on the left side of the printer is
pushed in.
3. Connect the power cord to the AC inlet on the left side of the
printer.
4. Plug the other end into a properly grounded electrical outlet.
28
Setting Up the Copy Station
Proof Sign-off:
T.Ichihashi
M.Miyazaki
K.Norum
_______
_______
_______
R
R4C3900
Rev. D
A5 size
4/6/01
SETUP.FM
Pass 3
Plugging in the scanner
1. Check the label on the back of the scanner to make sure
that the voltage required by the scanner matches that of the
electrical outlet it will be plugged into. Also, make sure that
you have the correct power cord for your power source.
2. Make sure the scanner is turned off. The power is off when
the P OPERATE button is raised.
3. Connect the power cord to the AC inlet on the back of the
scanner, and plug the other end into a properly-grounded
electrical outlet.
Setting Up the Copy Station
29
L
R4C3900
Rev. D
A5 size
4/6/01
SETUP.FM
Pass 3
Proof Sign-off:
T.Ichihashi
M.Miyazaki
K.Norum
_______
_______
_______
Testing the Copy Station
You can check the operation of the copy station by making a few
test copies. You will need to prepare a document to copy and a
stack of paper that is the same size as your document, then follow
the steps in this section to make your copies.
Getting Ready to Copy
To prepare to make your first copies, you need to load a stack of
paper into the printer, turn the printer and scanner on, and select
the paper source from the copy station’s control panel. Follow
these steps.
1. Pull the paper cassette out until it stops.
30
Testing the Copy Station
Proof Sign-off:
T.Ichihashi
M.Miyazaki
K.Norum
_______
_______
_______
R
R4C3900
Rev. D
A5 size
4/6/01
SETUP.FM
Pass 3
2. Press down on the metal plate in the cassette until it clicks into
place.
3. Press on the side and back paper guides, then slide them
outward until they are wide open enough to accommodate
the size of paper you want to load.
Testing the Copy Station
31
L
R4C3900
Rev. D
A5 size
4/6/01
SETUP.FM
Pass 3
Proof Sign-off:
T.Ichihashi
M.Miyazaki
K.Norum
_______
_______
_______
4. Fan a stack of plain paper and insert it into the cassette. Make
sure that all the paper is under the retaining clip on the right
side of the cassette.
Note:
Use paper with no creases or wrinkles.
5. Slide the paper guides until they just touch the edges of the
paper.
32
Testing the Copy Station
Proof Sign-off:
T.Ichihashi
M.Miyazaki
K.Norum
R
R4C3900
Rev. D
_______
_______
_______
A5 size
4/6/01
SETUP.FM
Pass 3
Note:
Make sure you adjust the side paper guide to the correct position,
because the copy station automatically senses the size of paper loaded
in the cassette from the position of this paper guide. If the paper guide
is not correctly aligned with the paper size indication (for example,
A4 or LT), the correct paper size will not be displayed on the control
panel and copying will be impossible.
6. Push the paper cassette all the way into the printer.
7. Turn on the scanner by pressing the P OPERATE button.
Note:
Always turn on the scanner before the printer.
8. Turn on the printer by pressing the (|) side of its power
switch.
The copy station checks the connections of the scanner and
the printer.
c
Caution:
Do not turn off the power while the copy station is checking
the scanner and printer connections, or while copying.
When the following screen appears, the copy station is ready
for copying.
Ready to Copy
A4
Plain
Reduce
Enlarge
LC1
Paper
Copy
Type: Magazine
Lighter
Adjust
Darker
1-Sided
1-Sided
Advanced
Testing the Copy Station
33
L
R4C3900
Rev. D
A5 size
4/6/01
SETUP.FM
Pass 3
Proof Sign-off:
T.Ichihashi
M.Miyazaki
K.Norum
_______
_______
_______
Copying
Once you’ve loaded paper and turned on the copy station, you’re
ready to make test copies. Follow these steps.
1. Make sure the scanner's READY light is on.
2. Open the document cover.
3. Place your document on the document table, with the side to
be scanned facing down. Make sure that the document is
carefully aligned.
corner of the
document
Use the document guide strip to align the horizontal edge of
the document.
34
Testing the Copy Station
Proof Sign-off:
T.Ichihashi
M.Miyazaki
K.Norum
R
R4C3900
Rev. D
_______
_______
_______
A5 size
4/6/01
SETUP.FM
Pass 3
Note:
An area 2 ± 1.5 mm in from both horizontal and vertical rulers will
not be scanned.
2 ± 1.5 mm
2 ± 1.5 mm
Document
4. Close the document cover gently so that the document does
not move.
Note:
Make sure the document is flat against the glass surface, otherwise
the image will appear fuzzy and out of focus. Also be sure to close
the document cover to prevent interference from external light.
5. Press the Paper button on the touch screen.
Ready to Copy
A4
Plain
Reduce
Enlarge
LC1
Paper
Copy
Type: Magazine
Lighter
Adjust
Darker
1-Sided
1-Sided
Advanced
Testing the Copy Station
35
L
R4C3900
Rev. D
A5 size
4/6/01
Proof Sign-off:
T.Ichihashi
M.Miyazaki
K.Norum
SETUP.FM
Pass 3
_______
_______
_______
6. Select the paper size and orientation that matches the size of
the document and the direction in which it is placed on the
document table.
Select Output Paper
A4
Plain
Magazine
Lower Cassette
MP Tray
1
A4
A4
Current
2
B5
B5
3
A3
A3W
Plain paper
Change
Cancel
7. Press the x start button on the copy station’s control panel.
The document is scanned and then printed.
start button
If the copy station does not work, or if the copy results are not
what you expected, check the connections between all devices,
and make sure the surface of the document table is clean and clear
of foreign objects. For more solutions to problems you may
encounter, see "Problem Solver" in the online Reference Guide.
36
Testing the Copy Station
Proof Sign-off:
T.Ichihashi
M.Miyazaki
K.Norum
R
R4C3900
Rev. D
_______
_______
_______
A5 size
4/6/01
SETUP.FM
Pass 3
Selecting a Language
The default language for the LCD touch screen is English.
However, German, Spanish, French, Italian, Portuguese, and
English (USA) are also available. If you want to change the
language, follow the steps below.
1. Press the Admin button on the control panel.
Admin button
2. Press the Admin. Set button on the touch screen.
Status Display
Admin Set
Print
Exit
Selecting a Language
37
L
R4C3900
Rev. D
A5 size
4/6/01
Proof Sign-off:
T.Ichihashi
M.Miyazaki
K.Norum
SETUP.FM
Pass 3
3. Press the Select Language button.
Select Administrator Items
Key Tone
ON
OFF
Set Default Copy Job
Standy
Control
ON
OFF
Color Calibration
Auto Feed
ON
OFF
Copy Unit
Select Language
Restore Defaults
Copy Unit
Restore Defaults
Exit
4. Choose a language and press Exit.
Select Language
English
French
German
Italian
Spanish
Portuguese
English (USA)
EXIT
38
Selecting a Language
_______
_______
_______
Proof Sign-off:
T.Ichihashi
M.Miyazaki
K.Norum
_______
_______
_______
R
R4C3900
Rev. D
A5 size
4/6/01
APPNDX.FM
Pass 3
Appendix A Installing EPSON Network
Image Express
EPSON Network Image Express allows the scanner to be shared
on a network without the need for a scanner server PC. This
appendix explains how to install EPSON Network Image Express
in the copy station.
See the manual that comes with this product for more
information.
EPSON Network Image Express
1. Make sure the printer and scanner are turned off and
unplugged.
2. Open the translucent cover on the control panel and remove
the inner tray.
Installing EPSON Network Image Express
39
L
R4C3900
Rev. D
A5 size
4/6/01
Proof Sign-off:
T.Ichihashi
M.Miyazaki
K.Norum
APPNDX.FM
Pass 3
_______
_______
_______
3. Remove the connector cover on the left side of the control
panel as shown below.
4. Identify the connectors and switch on the side panel of
Network Image Express.
network connector
DC inlet
10/100
SCSI connector
40
power supply mode switch
Installing EPSON Network Image Express
Proof Sign-off:
T.Ichihashi
M.Miyazaki
K.Norum
_______
_______
_______
R
R4C3900
Rev. D
A5 size
4/6/01
APPNDX.FM
Pass 3
5. Slide the power supply mode switch up, which is the off
position. The power to Network Image Express is turned
on automatically when the scanner power is turned on.
6. Pass one end of the SCSI cable included with Network Image
Express through the opening on the left side of the control
panel, then connect it to the SCSI connector on Network
Image Express. Make sure the locks on both sides of the
connector snap into place.
7. Connect the other end of the cable to an available SCSI
interface connector on the scanner. Usually, the scanner has
two SCSI interface connectors, either of which can be used.
See the scanner’s manual for more information.
Installing EPSON Network Image Express
41
L
R4C3900
Rev. D
A5 size
4/6/01
APPNDX.FM
Pass 3
Proof Sign-off:
T.Ichihashi
M.Miyazaki
K.Norum
_______
_______
_______
8. Pass the 10BaseT or 100BaseTX network cable through the
opening on the control panel, and connect it to the network
connector.
9. Pass the power cord through the opening on the control panel
and connect it to the DC inlet.
c
42
Caution:
Use only the AC adapter and the power cord included with
Network Image Express. Using other adapters may cause the
system to malfunction.
Installing EPSON Network Image Express
Proof Sign-off:
T.Ichihashi
M.Miyazaki
K.Norum
_______
_______
_______
R
R4C3900
Rev. D
A5 size
4/6/01
APPNDX.FM
Pass 3
10. Insert the left side of Network Image Express into the opening
on the control panel.
11. Push the right side of the Network Image Express gently into
place.
Installing EPSON Network Image Express
43
L
R4C3900
Rev. D
A5 size
4/6/01
APPNDX.FM
Pass 3
Proof Sign-off:
T.Ichihashi
M.Miyazaki
K.Norum
_______
_______
_______
12. Secure Network Image Express to the control panel with the
two screws included in the copy station accessories.
13. Close the translucent cover.
14. Attach a touch fastener strip to the AC adapter.
44
Installing EPSON Network Image Express
Proof Sign-off:
T.Ichihashi
M.Miyazaki
K.Norum
_______
_______
_______
R
R4C3900
Rev. D
A5 size
4/6/01
APPNDX.FM
Pass 3
15. Attach the other touch fastener strip to the cabinet, and then
attach the AC adapter to the cabinet by joining the two strips.
.
16. Install the cable clips at the following locations, then secure
the Network Image Express cables with the clips.
Installing EPSON Network Image Express
45
L
R4C3900
Rev. D
A5 size
4/6/01
APPNDX.FM
Pass 3
Proof Sign-off:
T.Ichihashi
M.Miyazaki
K.Norum
_______
_______
_______
17. Connect the power cord of the scanner and then turn on the
scanner.
18. Plug in the power cord of the AC adapter.
Note:
❏ Network Image Express has a built-in SCSI terminator.
❏ The fixed SCSI ID number for Network Image Express is 7. Use any
available number other than 7 for the scanner. See the scanner
manual to learn how to set the ID number.
❏ Make sure the scanner is terminated properly. See the scanner
manual to learn how to terminate the scanner.
c
46
Caution:
Do not connect or disconnect Network Image Express from the
scanner while the scanner is still turned on; otherwise, the
scanner or Network Image Express may be damaged.
Installing EPSON Network Image Express
Proof Sign-off:
T.Ichihashi
M.Miyazaki
K.Norum
_______
_______
_______
R
R4C3900
Rev. D
A5 size
4/6/01
APPNDX.FM
Pass 3
Appendix B Contacting Customer
Support
If your EPSON product is not operating properly and you cannot
solve the problem using the troubleshooting information in your
product documentation, contact customer support services for
assistance. If customer support for your area is not listed below,
contact the dealer where you purchased your product.
Customer support will be able to help you much more quickly if
you give them the following information.
❏ Product serial number
(The serial number label is usually on the back of the product.)
❏ Product model
❏ Product software version
(Click About, Version Info, or similar button in the product
software.)
❏ Brand and model of your computer
❏ Your computer operating system name and version
❏ Names and versions of the software applications you
normally use with your product
Contacting Customer Support
47
L
R4C3900
Rev. D
A5 size
4/6/01
Proof Sign-off:
T.Ichihashi
M.Miyazaki
K.Norum
APPNDX.FM
Pass 3
_______
_______
_______
For Users in North America
If you purchased your printer in the United States or Canada,
EPSON provides technical assistance 24 hours a day through the
electronic support services and automated telephone services
listed in the following table:
Service
Access
World Wide Web
From the Internet, you can reach EPSON
Support at http://support.epson.com. At this
site, you can download drivers and other
files, look at documentation such as product
brochures and user manuals, and access
troubleshooting information.
EPSON Internet FTP Site
If you have Internet FTP capability, use your
Web browser (or other software for FTP
downloading) to log onto ftp.epson.com
with the user name anonymous and your
e-mail address as the password.
EPSON E-MAIL
Technical Support
To receive technical advice through e-mail,
go to http://support.epson.com and
complete the form under the
troubleshooting tab, as requested.
Automated
Telephone Services
A variety of automated help services are
available 24 hours a day, seven days a week.
To use these services, you must have a touch
tone telephone and call (800) 922-8911.
To speak directly to a technical support representative, dial:
(562) 276-1300, (U.S.) or (905) 709-9475 (Canada), 6 am to 6 pM,
Pacific Time, Monday through Friday. Toll or long distance
charges may apply.
48
Contacting Customer Support
Proof Sign-off:
T.Ichihashi
M.Miyazaki
K.Norum
_______
_______
_______
R
R4C3900
Rev. D
A5 size
4/6/01
APPNDX.FM
Pass 3
Before you call, please have the following information ready:
❏ Product name
❏ Product serial number
❏ Proof of purchase (such as a store receipt) and date of
purchase
❏ Computer configuration
❏ Description of the problem
Note:
For help using any other software on your system, see the documentation
for that software for technical support information.
You can purchase ink cartridges, ribbon cartridges, paper,
manuals, and accessories from EPSON at (800) 873-7766 or visit
our web site at www.epsonsupplies.com (U.S. sales only). In
Canada, please call (800) 873-7766 for dealer referral.
For Users in the United Kingdom and the Republic
of Ireland
If you purchased your product in the UK or the Republic of
Ireland, EPSON (UK) LTD provides a range of customer services
and technical support.
Support via the World Wide Web
❏ For information on the latest EPSON products, software
drivers, online user guides, and answers to frequently asked
questions:
http://www.epson.co.uk
Contacting Customer Support
49
L
R4C3900
Rev. D
A5 size
4/6/01
APPNDX.FM
Pass 3
Proof Sign-off:
T.Ichihashi
M.Miyazaki
K.Norum
_______
_______
_______
❏ To E-mail EPSON Technical Support:
http://www.epson.co.uk/support/email/
❏ For a full list of EPSON Customer and Warranty Support
services:
http://www.epson.co.uk/support/
Support via telephone
Our Customer and Warranty Support teams can be contacted by
calling 0870 163 7766 in the UK or 0044 0870 163 7766 from the
Republic of Ireland. They can provide the following services:
❏ Technical information on installing, configuring, and
operating your EPSON products
❏ Arranging for faulty EPSON products to be repaired within
the warranty period
Pre-Sales Enquiry Desk
Our Enquiry Desk team can be contacted by calling 0800 220546
in the UK or 1 800 409132 from the Republic of Ireland, by faxing
01442 227271 in the UK or 0044 1442 227271 from the Republic of
Ireland, and via E-mail at [email protected]. They can provide the
following information:
❏ Pre-sales information and literature on new EPSON products
(also available via our world wide web site at
http://www.epson.co.uk)
❏ Where to purchase genuine EPSON consumables,
accessories, and options
50
Contacting Customer Support
Proof Sign-off:
T.Ichihashi
M.Miyazaki
K.Norum
_______
_______
_______
R
R4C3900
Rev. D
A5 size
4/6/01
APPNDX.FM
Pass 3
For Users in Australia
EPSON Australia wishes to provide you with a high level of
customer service. In addition to your product documentation,
we provide the following sources for obtaining information:
EPSON FAXBACK
EPSON FAXBACK will fax you the latest specifications and
pricing for most EPSON products offered in Australia. There is
also technical information including details of the latest software
and drivers available. Phone (02) 9903 9075 and the system will
guide you through a number of choices before faxing the
information to your fax machine.
EPSON Bulletin Board System
This is where you can download the latest software and drivers.
Visit the BBS to check out the latest versions. If you have a modem,
phone (02) 9417 5090.
Internet URL http://www.epson.com.au
Access the EPSON Australia World Wide Web pages. Worth
taking your modem here for the occasional surf! You can get the
same information as offered on the EPSON FAXBACK and the
EPSON Bulletin Board plus more.
Your dealer
Don’t forget that your dealer can often help identify and resolve
problems. The dealer should always be the first call for advice on
problems. They can often solve problems quickly and easily as
well as give you advice on the next step to take.
Contacting Customer Support
51
L
R4C3900
Rev. D
A5 size
4/6/01
Proof Sign-off:
T.Ichihashi
M.Miyazaki
K.Norum
APPNDX.FM
Pass 3
_______
_______
_______
EPSON Helpdesk
EPSON Helpdesk is provided as a final backup to make sure our
clients have access to advice. Operators on the Helpdesk can aid
you in diagnosing hardware and software problems. They can
also advise you on the latest EPSON products and where the
nearest dealer or service agent is located. Many types of queries
are answered here.
The Helpdesk numbers are:
Phone:
(02) 9903 9040
Fax:
(02) 9903 9189
We encourage you to have all the relevant information on hand
when you ring. The more information you prepare, the faster we
can help solve the problem. This information includes your
EPSON product documentation, type of computer, operating
system, application programs, and any other information you feel
is required.
For Users in India
Contacts for information, support, and services are:
World Wide Web (www.epson.co.in)
Information on product specifications, drivers for download,
Frequently Asked Questions (FAQ), Products Enquiry, and
Technical Query are available.
Epson India Bangalore Head Office:
52
Phone:
080 5095465
Fax:
080 5095474
Contacting Customer Support
Proof Sign-off:
T.Ichihashi
M.Miyazaki
K.Norum
R
R4C3900
Rev. D
_______
_______
_______
A5 size
4/6/01
APPNDX.FM
Pass 3
For Users in Malaysia
Contacts for information, support, and services are:
World Wide Web (www.epson.com.my)
Information on product specifications, drivers for download,
Frequently Asked Questions (FAQ), and Email Enquiries are
available.
Epson Trading Shah Alam Head Office
Phone:
03 5191366
Fax:
03 5191281
For Users in Singapore
Sources of information, support, and services available from
Epson Singapore are:
World Wide Web (www.epson.com.sg)
Information on product specifications, drivers for download,
Frequently Asked Questions (FAQ), Sales Enquiries, and
Technical Support via E-mail are available.
Epson HelpDesk (Phone: (065) 5863111)
Our HelpDesk team can help you with the following over the
phone:
❏ Sales enquiries and product information
❏ Product usage questions or problem
❏ Enquiries on repair service and warranty
Contacting Customer Support
53
L
R4C3900
Rev. D
A5 size
4/6/01
Proof Sign-off:
T.Ichihashi
M.Miyazaki
K.Norum
APPNDX.FM
Pass 3
_______
_______
_______
For Users in Hong Kong
To obtain technical support as well as other after-sales services,
users are welcome to contact EPSON Hong Kong Limited.
Internet home page
EPSON Hong Kong has established a local home page in both
Chinese and English on the Internet to provide users with the
following information:
❏ Product information
❏ Answers to Frequently Asked Questions (FAQs)
❏ Latest versions of EPSON product drivers
Users can access our World Wide Web home page at:
http://www.epson.com.hk
Electronic bulletin board system
An electronic bulletin board system (BBS) is also available to
obtain product information and the latest versions of product
drivers. You can log on to the following number for the BBS
service:
BBS:
(852) 2827-4244
Technical Support Hotline
You can also contact our technical staff at the following telephone
and fax numbers:
54
Phone:
(852) 2585-4399
Fax:
(852) 2827-4383
Contacting Customer Support
Proof Sign-off:
T.Ichihashi
M.Miyazaki
K.Norum
R
R4C3900
Rev. D
_______
_______
_______
A5 size
4/6/01
APPNDX.FM
Pass 3
For Users in the Philippines
To obtain technical support as well as other after sales services,
users are welcome to contact the EPSON Philippines
Representative Office at the telephone and fax numbers below:
Phone:
(632) 813-6552
Fax:
(632) 813-6545
BBS:
(632) 814-0595
Contacting Customer Support
55
EPSON OVERSEAS MARKETING LOCATIONS
EPSON AMERICA, INC.
EPSON UK LTD.
20770 Madrona Ave.
Campus 100, Maylands Avenue,
P.O. Box 2842
Hemel Hempstead, Herts,
Torrance, CA 90509-2842
HP2 7TJ, U.K.
Phone: (800) 922-8911
Phone: (+44) 01442 261144
Fax: (310) 782-5220
Fax: (+44) 01442 227227
EPSON DEUTSCHLAND GmbH
EPSON FRANCE S.A.
Zülpicher Straße 6,
68 bis, rue Marjolin
40549 Düsseldorf Germany
92300, Levallois-Perret, France
Phone: (0211) 56030
Phone: 33.1.40.87.37.37
Fax: (0211) 5047787
Telex: 610657
EPSON AUSTRALIA PTY. LTD.
EPSON SINGAPORE PTE. LTD.
70 GIBBES STREET, CHATSWOOD 2067 NSW.
No. 1 Temasek Avenue #36-00
Phone: 2-9903-9000
Millenia Tower, Singapore 039192
Fax: 2-9903-9177
Phone: (065) 33 77 911
Fax: (065) 33 41 185
EPSON HONG KONG LTD.
EPSON TAIWAN TECHNOLOGY &
Rooms 4706-10, 47/F,
TRADING LTD.
China Resources Bldg.,
10F, No. 287 Nanking E. Road, Sec. 3,
26 Harbour Road, Wanchai, Hong Kong
Taipei, Taiwan, R.O.C.
Phone: 2585-4300
Phone: (02) 717-7360
Fax: 2827-7083
Fax: (02) 712-9164
EPSON ITALIA S.p.A.
EPSON IBERICA S.A.
V.le F.lli Casiraghi 427
Av. de Roma, 18-26
20099 Sesto S.Giovanni
08290 Cerdanyola del Valles
MI, Italy
Barcelona, Spain
Phone: 2-262331
Phone: 582. 15.00
Fax: 2-2440750
Fax: 582. 15.55
SEIKO EPSON CORPORATION
EPSON PORTUGAL, S.A.
(Hirooka Office)
R. do Progresso, 471, 1° Perafita
80 Harashinden, Hirooka
4460 Matosinhos, Portugal
Shiojiri-shi, Nagano-ken
Phone: (02) 996 14 02
399-0785 Japan
Fax: (02) 996 14 11
1999 September
Color Copy Station
Color Copy Station
Setup Guide
Printed in Japan
00.XX-XX
Setup Guide
4012841-00
XXX